1
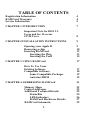
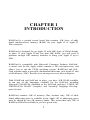
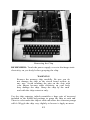
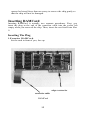
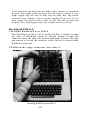
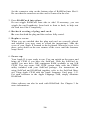
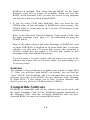
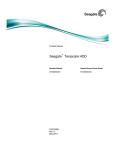
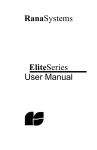
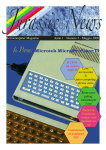
RAMCard™
A Peripheral for the Apple II®
Produced by Microsoft
Microsoft Consumer Products
A division of Microsoft, Inc.
10700 Northup Way
C-97200
Bellevue, WA 98004
Copyright Notice
This manual Copyrights Microsoft, 1980
All Rights Reserved
Printed in U.S.A.
If you have any questions about this copyright, please contact:
Microsoft Consumer Products
A division of Microsoft, Inc.
10700 Northup Way
C-97200
Bellevue, WA 98004
RAMCard is a trademark of Microsoft.
Apple is a registered trademark of Apple Computer Inc.
Z-80 is a registered trademark of Zilug, Inc.
Designer
RAMCard was designed for Microsoft Consumer Products by Don Burtis of
Burtronix, Villa Park, California. Microsoft Consumer Products is grateful to
Burtronix for its contribution to making RAMCard a reality.
2
TABLE OF CONTENTS
Registration Information
RAMCard Warranty
Service Information
4
4
5
CHAPTER 1 INTRODUCTION
7
Important Note for DOS 3.2
Users and for 13-sector
CP/M Users
CHAPTER 2 INSTALLATION INSTRUCTIONS
Opening your Apple II
Removing a chip
Inserting RAMCard
Inserting the Plug
Inserting the Card
CHAPTER 3 USING RAMCard
How To Use Your
Existing Software
Compatible Software
Some Compatible Packages
Autostart ROM
CHAPTER 4 ADDRESSING RAMCard
Memory Maps
Control Addresses
Additional Technical Details
Status Bits
LED Indicators
RAMCard Hardware Details
RAMCard Schematic
3
8
9
9
10
13
13
15
17
17
18
19
19
21
22
22
25
25
26
27
29
Registration Information
Please take a moment now to fill out the RAMCard registration
card that is enclosed and return it to us. We must have your
registration card on file in order to contact you regarding any changes
or updates to this product. Failure to return the registration card does
not void your warranty, hut will make it impossible for us to contact
you.
RAMCard Warranty
Microsoft Consumer Products (“MCP”) warrants to the original user
of this product that it shall be free of defects resulting from faulty
manufacture of the product or its components for a period of ninety
(90) days from the date of sale. Defects covered by this Warranty shall
be corrected either by repair or, at MCP’s election, by replacement. In
the event of replacement, the replacement unit will be warranted for
the remainder of the original ninety (90) day period or 30 days, whichever is longer.
If this product should require service, return it to Microsoft Consumer
Products, 400 108th Ave. NE, Suite 200, Bellevue, Washington 98004,
postage paid, along with an explanation of the suspected defect. MCP
will promptly handle all warranty claims.
THERE ARE NO WARRANTIES, EXPRESS OR IMPLIED, INCLUDING BUT NOT LIMITED TO THOSE OF MERCHANTABILITY OR FITNESS FOR A PARTICULAR PURPOSE, WHICH
EXTEND BEYOND THE DESCRIPTION AND DURATION SET
FORTH HEREIN.
MCPs SOLE OBLIGATION UNDER THIS WARRANTY IS
LIMITED TO THE REPAIR OR REPLACEMENT OF A DEFECTIVE PRODUCT AND MCP SHALL NOT, IN ANY EVENT, BE
LIABLE FOR ANY INCIDENTAL OR CONSEQUENTIAL DAMAGES OF ANY KIND RESULTING FROM USE OR POSSESSION
OF THIS PRODUCT.
Some states do not allow 1) limitations on how long an implied warranty lasts, or 2) the exclusion or limitation of incidental or consequential
damages, so the above limitations or exclusions may not apply to you.
This Warranty gives you specific legal rights, and you may also have
other rights which vary from state to state.
4
Service Information
If your RAMCard requires repair, please return it to the dealer from
whom it was purchased. If it is not possible to return the RAMCard to
your dealer, you may send it directly to Microsoft Consumer Products.
If the repair is required during the warranty period, please enclose
proof of purchase. During warranty, we will replace or repair your
RAMCard without charge. See previous section for more details regarding warranty coverage.
If the RAMCard requires service after the warranty period expires, it
will be repaired for a flat fee of $39.50. This service charge does not
cover damage due to negligence, misuse, or inadequate packaging on
return to MCP.
To return your RAMCard for service, please mail it post-paid to Microsoft Consumer Products. Package the card securely as we cannot be
responsible for damage due to shipping. BE SURE to enclose proof of
purchase for warranty work or a check or money order for $39.50 for
non-warranty repairs.
Mail post-paid to:
Microsoft Consumer Products
A division of Microsoft, Inc.
10700 Northup Way
C-97200
Bellevue, WA 98004
5
6
CHAPTER 1
INTRODUCTION
RAMCard is a printed circuit board that contains 16K bytes of additional random-access memory (RAM) for your Apple II or Apple II
Plus computer.
RAMCard is designed for an Apple II with 48K bytes of RAM already
in place. If your Apple II has less than 48K RAM, you will need to
purchase enough 16K memory modules to bring your Apple II up to
48K.
RAMCard is compatible with Microsoft Consumer Products SoftCard,
a circuit card for the Apple which contains a Z80 microprocessor, and
allows you to run the CP/M operating system. RAMCard and SoftCard together make a powerful combination that turns your Apple II into
a full memory (56K), flexible (two microprocessors) microcomputer.
With RAMCard and SoftCard in place, you have 56K RAM available
to run any of the languages available for the SoftCard, including
Microsoft’s BASIC-80 (included in the SoftCard package), COBOL-80,
FORTRAN-80, BASIC Compiler, and Assembly Language Development System.
RAMCard contains 16K of memory. But, because only 12K of additional addressing space is available in the Apple, 4K of addressing space
must be shared by two 4K memory banks. This means that only 12K of
RAMCard RAM is available to you at a given time.
7
IMPORTANT NOTE FOR DOS 3.2 USERS
AND FOR 13-SECTOR CP/M USERS
Apple II computers come standard with one of two BASICs: Applesoft
or Integer BASIC. Standard Apple II systems have Integer BASIC and
Apple II Plus systems have Applesoft.
If you are using an Apple Firmware Card installed in Slot 0 to make
available the other version of BASIC, you must remove it when RAMCard is installed. This means that the BASIC on the Apple Firmware
Card will no longer be available.
To use RAMCard with the Microsoft SoftCard and CP/M, you must
have a 16-sector system. This is because you must use the CPM56
program to update your CP/M system to 56K. The CPM56 utility is
included only on your 16-sector CP/M master disk. In addition, most of
the other software available for RAMCard also requires a 16-sector
disk system.
These problems can be solved with Apple Computer’s DOS 3.3 16sector update kit, available at your dealer. This package contains software that will allow you to load the other version of BASIC into
RAMCard, so that both versions of BASIC will be available for use by
Apple DOS programs. A disk is also supplied with the DOS 3.3 package
that will allow you to boot your old 13-sector disks.
8
CHAPTER 2
INSTALLATION
INSTRUCTIONS
This chapter gives step-by-step instructions for installing RAMCard.
We recommend that you read all the instructions first to acquaint
yourself with the overall procedure. Then, perform each step with care
exactly as described.
Opening Your Apple II
Since RAMCard is to be installed inside your Apple II, you must
remove the cover of your Apple before you start.
CAUTION
\
It is dangerous to open any electrical or electronic
device with the power turned on. Additionally, attempting to insert or remove peripheral cards while
your Apple’s power is on will probably destroy the
cards and other parts of your APple II. Be sure to
turn off the power to your Apple II before performing any of the steps in this procedure.
1.
Turn off the power.
The POWER light on the lower left corner of the keyboard should
not be illuminated.
9
2 . Remove the cover from your Apple II.
Pull up on the rear edge of the cover until the fasteners at the rear
corners pop apart. Do this only firmly enough to separate the fasteners, then stop. Do not pull up any further.
3 . Slide the cover backward.
Slide the cover away from the keyboard towards the rear of your
Apple II. The interior of your Apple II should now be exposed.
Removing A Chip
Before you can install RAMCard, you must remove one of the RAM
chips inside your Apple II. Later, you will insert the plug on the RAMCard connector cable into the space where the chip is now.
1 . Look into your Apple II.
Familiarize yourself with the inside.
power supply cover
memory chip to be removed
edge connector slot
RAM chips located
in this square
The Interior of an Apple II
10
You should see:
A big silver- or gold-colored box (the power supply cover) along
the left side.
Eight long, narrow slots (edge-connector receptacles), green or
black outside with gold-plated contacts inside, located perpendicular to and against the back wall of the Apple II enclosure.
The slots are numbered from left to right, from 0 to 7. The
numbers are located between the far end of the slots and the back
wall.
A 4 inch by 4 inch square outlined in white, located directly
behind the keyboard (RAM chips are located here).
2.
Touch the power supply cover.
Touch the cover to discharge any static electricity you may be
carrying.
3.
Find Slot 0.
Lean over your Apple II to see the numbers at the far end (back wall
side) of the eight slots. They are numbered from left to right, from 0
to 7. You want the number 0 slot, the leftmost.
4.
Remove card from sLot 0.
If there is a card in Slot 0, it must be removed since Slot 0 is the slot
you will use for RAMCard. If there is no card in Slot 0, disregard this
step and go on to step 5.
5.
Find the left rear memory chip.
Look inside the white square. There are three rows of eight memory
chips installed within the square. Locate the chip in the last row
(farthest from the keyboard) and the first column (farthest left,
closest to the power-supply cover). This is the chip you will need to
remove.
6.
Remove the left rear memory chip.
11
Removing the Chip
REMEMBER: Touch the power-supply cover to discharge static
electricity on your body before grasping the chip.
WARNING
Remove the memory chip carefully. Be sure you do
not damage the chip or the circuit board sockets in
any way. Avoid touching the pins on the chip with
your fingers because static electricity on your body
may damage the chip. Grasp the chip by the ends
and with the chip extractor only.
Use the chip extractor (which resembles a large pair of tweezers)
included in the RAMCard package to grasp the chip at each end.
There is a slot under the chip at each end where the extractor prongs
will fit. Wiggle the chip very slightly to loosen it. Apply no more
12
upward or lateral force than necessary to remove the chip gently so
that the chip will not be damaged.
Inserting RAMCard
Inserting RAMCard is actually two separate procedures. First, you
insert the plug at the end of the connector cable into the socket left
empty when you removed the chip. Then, insert the card itself into Slot
0
Inserting The Plug
1.Examine RAMCard.
Set the card in front of you, face up.
edge connector
connector cable
RAMCard
13
Notice the connector cable at the bottom left corner of this card. At
the end of the cable is a plug. Notice that RAMCard also has an I/O
connector strip along one edge. The cable plug will go into the
vacant memory chip space inside your Apple II. The edge-connector
will go into Slot 0.
2.Position the card and plug.
Hold the card on edge over the Apple II so that the cable end is
toward the keyboard, the side with the chips is facing to your right,
and the edge-connector is positioned over Slot 0.
3.Insert the plug.
Inserting the RAMCard Cable
Position the pins on the cable plug directly over the holes where the
memory chip was removed. Gently apply pressure to the top of the
plug. Apply only enough pressure to seat the plug completely.
14
If the plug does not slide into the holes easily, remove it, reposition
the pins, then app]y gentle pressure until the plug is seated. A very
slight wiggle may be used to help seat the plug. But, any lateral
movement may damage a pin so avoid wiggling if you can. If you
must wiggle the plug to seat it fully, be sure the pins are lined up
properly first, then wiggle only very slightly and very slowly.
Inserting RAMCard
1.Position RAMCard over Slot 0.
Hold RAMCard so that it can be inserted in Slot 0 without twisting
the cable. If RAMCard cannot be inserted without twisting the
connector cable, the plug was inserted backwards. Remove the plug
and reinsert it So that the connector cable will not be twisted when
RAMCard is inserted.
2.Position the edge-connector into Slot 0.
Inserting RAMCard into Slot 0
15
Set the connector strip on the bottom edge of RAMCard into Slot 0.
Be sure that the connector on the card is centered in the slot.
3. Press RAMCard into place.
Do not wiggle RAMCard from side to side! If necessary, you can
wiggle the card lengthwise, from back to front to back, to help seat
the card into Slot 0 completely.
4. Recheck seating of plug and card.
B e sure that both the plug and the card are fully seated.
5. R e p l a c e c o v e r .
When you are satisfied that the plug and card are correctly placed
and installed (you may want to reread the instructions), slide the
cover of your Apple II forward to the keyboard. When the cover is in
place, press down on the rear corners of the cover until the fasteners
snap closed.
6. Power up.
Your Apple II is now ready to run. You can switch on the power and
bring up CP/M if you have the SoftCard. With the SoftCard installed, you now have 56K contiguous RAM available to run 56K
CP/M. You can create 56K CP/M system disks with the CPM56
utility included with your SoftCard package. For instructions on
using SoftCard and RAMCard together, refer to the SoftCard Manual, Using Apple CP/M with the Apple Language Card, page 1-13.
For each reference to the Apple Language Card, simply substitute
RAMCard.
Other software can also be used with RAMCard. See Chapter 3 for
more information.
16
CHAPTER 3
USING RAMCard
For some Apple II configurations, installing RAMCard will change the
procedures you use to run your existing software.
This chapter outlines which configurations of the Apple II are affected
by installing RAMCard and what software procedures you need to
change. This chapter also Lists some of the software that is compatible
with RAMCard.
How To Use Your Existing Software
Installing RAMCard in your Apple II will affect the operation of your
existing software if:
1. You are using an Apple Firmware Card in Slot 0.
2. You are using 13-sector disks with SoftCard and CP/M
Let’s discuss these two topics in more detail.
1. Apple II computers come standard with one of the two BASICs:
Applesoft or Integer BASIC. Standard Apple II systems have Integer BASIC, and Apple II Plus systems have Applesoft.
If you are using an Apple Firmware Card installed in Slot 0 to make
available the other version of BASIC, you must remove it when
17
RAMCard is installed. This means that the BASIC on the Apple
Firmware Card will no longer be available. When you lose the
BASIC on the Firmware Card, you also lose access to any programs
you may have that are written in that BASIC.
2. If you are using CP/M (and SoftCard), then you must use the
CPM56 utility to take advantage of RAMCard’s extra memory. The
CPM56 utility is found only on the 16-sector CP/M master in the
SoftCard package.
Refer to the Microsoft SoftCard Manual, Using Apple CP/M with
the Apple Language Card,” page 1-13, for instructions for using the
CPM56 utility.
Most of the other software that takes advantage of RAMCard, such
as Apple FORTRAN, is supplied on 16-sector disks only. To run this
software, you will need a 16-sector disk system. One exception is
VisiCalc, which does not require a 16-sector disk system to take
advantage of the extra RAMCard memory.
If you are using a 13-sector system, and you want to use some of the
software that comes only on 16-sector disks, you must update to a
16-sector system.
Solution
The solution to these problems is to update your system to Apple DOS
3.3. Then, you will have both BASICs on diskette, you can load the
“other” BASIC into RAMCard, and you will again have access to the
programs you wrote in the BASIC on your Firmware Card. Updating
to Apple DOS 3.3 also allows you to boot 13-sector diskettes, and
allows you to use 16-sector CP/M (and hence CPM56).
Compatible Software
RAMCard is compatible with all the software that can be used with
the Apple Language Card. In fact, RAMCard operates identically to
the Language Card, with one exception: RAMCard does not have
Autostart ROM. See more on Autostart ROM below.
18
Some of the software packages that can be used with RAMCard are:
CP/M, which also allows you to use:
Microsoft’s COBOL-80
Microsoft’s FORTRAN-SO
Microsoft’s BASIC Compiler
Microsoft’s Assembly Language Development System
Applesoft BASIC
Integer BASIC
VisiCalc
Apple Pascal system Apple FORTRAN
Apple PILOT
Since RAMCard operates identically to the Apple Language Card, you
need only refer to the instructions in the software product documentation for using that software with the Apple Language Card; the operating instructions for use with RAMCard are exactly the same.
Autostart ROM
RAMCard does not include Autostart ROM. In a few cases, lack of
Autostart ROM may affect use of software designed to be used with the
Apple Language Card.
In addition, unless your Apple II has Autostart ROM installed onboard, the convenient auto-boot features of Autostart ROM are not
available. In order to behave exactly as if a Language Card is installed,
some software may require Autostart ROM.
If you have an Apple II Plus, your computer has Autostart ROM
installed on-board. If you have an Apple II, you may want to install
Autostart ROM to take advantage of the auto-boot features.
19
20
CHAPTER 4
ADDRESSING RAMCard
The information in this chapter is highly technical and is intended as
reference material only.
This chapter describes the addressing of RAMCard. Memory maps
showing the addresses used for RAMCard RAM and Apple on-board
ROM and a description of the control addresses and their functions
make up most of the information. At the end of the chapter, some
additional technical details relating to RAMCard and Apple II hardware are described.
RAMCard contains 16K of memory. But, because the memory
addresses $C000 through $CFFF are used for the Apple’s I/O, only the
12K of space from $D000 to $FFFF is available to address the 16K of
RAMCard. To address all of the 16K of memory on RAMCard, the
lower 4K of RAMCard address space is used twice. The programmer
can select either of two 4K memory banks to occupy the space from
$D000 to $DFFF at one time. This allows 8K of memory to be accessed
in only 4K of address space.
Also, RAMCard shares this memory space with the on-board Apple
ROMs. The programmer can, therefore, choose whether the memory
addresses between $D000 and $FFFF will be used to read ROM or read
RAMCard RAM, and whether these same addresses will be writeenabled or write-protected for RAMCard RAM. The selection of these
functions plus the selection of which 4K memory bank will be used are
performed by accesses to control addresses.
21
Because the address space $C000-$CFFF is used by the Apple,
22
Addressing information is divided into three sections in this chapter.
The first section shows memory maps. The maps show the memory
addresses for the functions called through control addresses. The second section describes these control addresses, which provide memory
mode selection, RAM write-enable/-protect, and bank switching. The
third section describes additional technical details about status bits,
about the LED indicators on RAMCard, and about RAMCard hardware details.
Memory Maps
The following diagrams illustrate the range of addresses used for the
memory functions of RAMCard and the Apple on-board ROM.
FFFF
RAMCard
RAM
Apple
on-board
ROM
E000
DFFF
BANK 2
BANK 1
D000
Control Addresses
The control addresses are special memory addresses that, when accessed, control simultaneously three unrelated functions:
1. Select write-protect or write-enable RAMCard’s RAM
2. Select RAMCard RAM read or Apple II on-board ROM
3. Select which 4K bank will be mapped into the $D000-$DFFF
addressing space.
Because the address space $C000-$CFFF is used by the Apple.
22
only 12K ($D000-$FFFF) of address space is available for 16K
RAM. Using the control addresses to switch between the two
4K banks allows you to address 8K RAM with only 4K of
address space.
The remainder of the RAMCard RAM ($E000-$FFFF) is directly addressable.
Control addresses are entered either in hexadecimal, for assembly language programs, or in decimal, for BASIC programs. Hexadecimal
addresses begin with the dollar sign ($).
All of the hexadecimal control addresses have the form $C08x. x is any
of the hexadecimal digits 0-3,8-9,A-B. The value of x determines the
bank and which functions are selected. When the value of x is converted to binary, then the functions associated with the bit positions can be
seen more clearly.
The hexadecimal digits 0-3,8-9,A-B convert to binary as follows:
HEX
BINARY
0
1
2
3
0
0
0
0
0
0
0
0
00
01
10
11
8
9
A
B
1
1
1
1
0
0
0
0
00
01
10
11
Bits 0 and 1 (the two right columns of each binary number) are read
together to select the functions. As you can see there are only four
selections — 00, 01, 10, 11. These selections are repeated.
Bits 0 and 1 together select the following functions:
00
Selects RAMCard RAM read and RAM write-protect.
01
Selects on-board ROM read. Two or more successive reads to the
address write-enables RAMCard RAM.
23
10
Selects on-board ROM read and write-protects RAM.
11
Selects RAMCard RAM read. Two or more successive reads
to the address write-enables RAM.
When ROM is selected, the Apple II on-board ROM is selected for the
address space $D000-$FFFF. Refer back to the memory maps in Section 3.1 for an illustration of these relationships.
Notice that it is possible to write to the RAMCard RAM and read from
on-board ROMs at the same time (01 above).
Bit 2 (the third column from the right) is ignored.
Bit 3 (the left column) selects which 4K bank will be accessible. If bit 3
is zero (x is between $t)-$3), then BANK 2 will be mapped into D000$DFFF. If bit 3 is one (x is between $8-$B), then BANK 1 will be
mapped into $D000-$DFFF. When one bank is selected, the other bank
is not available.
Power-on/RESET selects on-board ROM read (disables RAMCard
RAM read), write-enables RAMCard RAM, and selects mapping of
BANK 2 in the address space $D000-$DFFF. This is identical to two
consecutive accesses of $C081 The various selections are summarized in the chart below. Both the
hexadecimal and decimal control addresses are shown in the first
column.
Control
Address
$C080
—16256
Last Digit
(binary)
Functions/Bank
Selected
0000
Selects RAMCard RAM read, BANK 2, and
RAM write-protect
$C081
—16255
0001
Selects Apple on-board ROM read, BANK 2,
and write-enables RAMCard RAM if address
accessed twice consecutively
$C082
—16254
0010
Selects Apple on-board ROM read, BANK 2,
and RAMCard RAM write-protect
24
$C083
— 16253
0011
Selects RAMCard RAM read, BANK 2, and
write-enables RAMCard RAM if address ac
cessed twice consecutively
$C088
—16248
1000
Selects RAMCard RAM read, BANK 1, and
RAMCard RAM write-protect
$C089
—16247
1001
Selects Apple on-board ROM read, BANK 1,
and write-enables RAMCard RAM if address
accessed twice consecutively
$CO8A
-16246
1010
Selects Apple on-board ROM read, BANK 1,
and RAMCard RAM write-protect
$CO8B
—16245
1011
Selects RAMCard RAM read, BANK 1, and
write-enables RAMCard RAM if address accessed twice consecutively
NOTE: If RAMCard RAM was already in a write-enabled state, only a
angle access of a write-enable control address ($C081, $C083, $C089,
$C08B) is necessary to remain in a write-enable state until a writeprotect control address is accessed. (This state applies immediately
following power on.)
Additional Technical Details
The topics in these sections include status bits, the LED Indicators on
RAMCard, and RAMCard hardware details.
Status Bits
Whenever a read is performed to any of the control addresses which
alter RAMCard functions, the lower four bits of data returned show
the status JUST PRIOR to the read.
The four status hits (not to be confused with the bits of the control
address) indicate:
BANK SELECT — When BANK I is selected, status bit 0 will be
high. When BANK 2 is selected, status hit 0 will be low. This
state applies immediately following power on.
25
READ ENABLE — When RAMCard RAM is read-enabled, status bit 1 will be high. When Apple on-board ROM is enabled,
status bit I will be low. This state applies immediately following
power on. When RAMCard RAM is read-enabled, an INH signal
generated by the ICs in sockets U12 and U13 disable the ROMs
on the Apple motherboard.
WRITE ENABLE — When RAMCard RAM is write-enabled,
status bit 2 will be high. The state applies immediately following
power on. When RAMCard RAM is write-protected, status bit 2
will be low. NOTE: Write-enable remains on until a write-protect control address is accessed. Therefore, accesses to a writeenable control address subsequent to a write-enable will write to
RAMCard RAM unless a write-protect access intervenes. This
state applies immediately following power on.
NEXT — To protect RAMCard RAM from accidental writeenable, two consecutive accesses to a write-enable control address are required. When the first access has been done, the
NEXT flag is set, and status bit 3 is high. When the second access
has been done and RAMCard RAM is write-enabled, the NEXT
flag is turned off, and status bit 3 is low.
LED Indicators
Three LED indicators are attached to RAMCard along the top edge.
Next to each LED is a label which describes the functions that the LEDs
signal. The three labels are BANK 1, RAM READ ENA, and
RAM WRITE ENA. The LEDs indicate whether the bank or function
is on (selected) or off (deselected), but not whether an access is occurring or not. The LEDs indicate the following:
LED
BANK I
ON
OFF
4K BANK 1
selected
4K BANK 2
selected
RAM READ ENA
RAMCard RAM
read selected
Apple II ROM
selected
RAM WRITE ENA
RAMCard RAM
write-enabled
RAMCard RAM
write-protected
The LEDs may be on or off in any combination because the banks and
functions may be selected in any combination. At power-on/RESET,
RAM WRITE ENA LED is on; the other two LEDs are off.
26
RAMCard Hardware Details
This section describes how RAMCard handles its functions and indicates its States.
The connector cable provides the RAMCard memory chips access to
the multiplexed addresses and to a timing signal which is not available
through the 50 pin I/O edge-connector.
Addresses for RAMCard memory chips are provided by the Apple
motherboard address mux. Data in and out for the single displaced
chip (which is U9 on RAMCard) are routed through the connector cable.
Data in and out for the other eight chips on RAMCard (in sockets U1U8) are routed through the I/O edge-connector. The data out from the
chips in sockets U1-U8 are buffered on RAMCard (by the ICs in sockets U19 and U20) to ensure sufficient drive capability. Control addresses and status information are routed through the I/O edge-connector.
The decoding of the addresses and the storage of the state for each
function are performed by the ICs in sockets U14-U18. The IC in socket
U13 drives the LED indicators. Part of the IC in socket U19 buffers and
selects the status bits during function selection. Once the state of each
function is selected, the memory accesses on RAMCard are controlled
by the ICs in sockets U ll, U12, U l5, and U18.
27
28