1
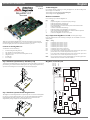
English
Quick Hardware Installation Guide
MAN-840-QH
02-24-04
MegaRAC G3
(Series 840)
Technical Support
If you need help installing, configuring, or running the MegaRAC G3, call American Megatrends
technical support at 770-246-8645.
Technical Support Web Site: http://www.ami.com/support/
Technical Support Email: [email protected]
Hardware Installation
Use the following steps to install the MegaRAC G3.
Step
1
2
3
4
5
6
7
8
9
10
Action
Unpack the MegaRAC G3 card (and check jumper settings)
Install the optional battery and battery clip
Install the optional modem daughterboard
Plug in the MegaRAC G3 card into the host system and attach internal cables
Connect external cables
Confirm the motherboard’s BIOS settings
Install the operating system and MegaRAC G3 card’s drivers
Install all American Megatrends MegaRAC G3 Windows Software Components
Setup your client system’s Internet browser
Connect to the MegaRAC G3 from a client system
Step 1 Unpack the MegaRAC G3 Card (and check jumper settings)
Inspect the cardboard carton for obvious damage. If damaged, call 770-246-8600. Leave it in its
original packing.
Only revision B1 and newer revisions of the MegaRAC G3 cards have jumpers JP13
and JP14. Revisions A and B do not have JP13 and JP14.
MegaRAC G3 Card Layout
JP12 Diagnostic &
Recovery Mode Jpr
JP11 Flash Write
Enable/Disable Jpr
JP13 PCI Bus
SMB Data Jpr
JP14 PCI Bus
SMB Clock Jpr
J9 MegaRAC
Feature Cable
Connector
J4 Jtag ICE
Connector
J10
External
Power
CR2032 3V
Coin Cell Battery
J8
VGA
Port
J7
Network
Jack
J6
Phone
Jack
JP2 Serial Port Connector
The MegaRAC G3 modem daughterboard is an optional component. Locate JP10 on the MegaRAC
G3 card. It has a series of pinholes that allow you to insert the modem daughterboard. Match the
modem daughterboard and the pin holes so that the pins align properly. Insert the modem
daughterboard by sliding it straight down into the MegaRAC G3 card.
JP10 Optional Modem Connector JP10
JP3 Service
Connector
Step 3 Install the Optional Modem Daughterboard
(C) 2004 Series 840 Rev-B1
J2 Battery
Connector
JP6 Reset
MegaRAC G3
J3 Service
Connector
To install the optional Battery Backup Unit, plug the battery cable into the J2 Battery connector and
place the battery pack in between the three mounting holes. Next, align and snap the plastic battery
clip into the three mounting holes over the battery pack. See the following diagram.
Note:
JP8 Chassis/
Motherboard
Reset Switch
Step 2 Install the Optional Battery and Battery Clip
JP14
JP7 Chassis/Motherboard
Reset Switch
J5 IPMB
an American Megatrends MegaRAC G3
This MegaRAC G3 Quick Installation Guide
a MegaRAC G3 User’s Guide (located on the MegaRAC G3 CD)
a MegaRAC G3 CD
one USB cable
an AC Adapter
JP10 Optional Modem Connector JP10
•
•
•
•
•
•
J1
USB
Port
You should have received the following:
Setting
Confirm that pins one and two are open.
Confirm that pins one and two are open.
Confirm that pins one and two are open.
Confirm that pins one and two are open.
Confirm that pins one and two are open.
Confirm that pins one and two are shorted.
Confirm that pins one, two and three are open.
If your hosts system’s motherboard has support for I2C on the PCI slots, place a short
pins one and two. If not, confirm that pins one and two are open.
If your hosts system’s motherboard has support for I2C on the PCI slots, place a short
pins one and two. If not, confirm that pins one and two are open.
JP5 Chassis/
Motherboard
Pwr Switch
Contents for the MegaRAC G3
Jumper
JP4
JP5
JP6
JP7
JP8
JP11
JP12
JP13
JP4 Chassis/
Motherboard
Pwr Switch
Thank you for purchasing the MegaRAC G3. Please take a few minutes to review this quick
guide before beginning the installation process. If you require a further explanation of any item
covered in this guide, please refer to the installation instructions on your CD.
English
Quick Hardware Installation Guide
Step 4 Plug in the MegaRAC G3 Card into the Host System and
Attach Internal Cables
Physically plug in the MegaRAC G3 card into any available PCI slot inside the host system.
Connector
J3 Service
Description
This jumper is used exclusively for servicing the MegaRAC G3 card. J3 is not
described in this document.
J4 JTAG ICE This header is used to debug and service the MegaRAC G3 card. J4 is not
described in this document.
J5 IPMB
If your motherboard has an IPMB connector, you can connect a cable from J5 on
the MegaRAC G3 card to the IPMB connector on your motherboard.
J9 FeatureCon This feature connector is primarily used for operating the host system’s
motherboard power and reset switch. It can also be used to gather I2C bus
information from the motherboard.
JP2 Serial Port You can connect an external 9 pin serial port connector to this header. This header
is primarily used to text redirect over the serial port.
JP3 Service
This jumper is used exclusively for servicing the MegaRAC G3 card. JP3 is not
described in this document.
JP4/JP5 Power JP4 and JP5 can be used in place of the MegaRAC Feature Cable to power on,
power off, and power cycle the motherboard. Connect a two pin cable from the
motherboard’s Power (Soft On/Off) header to JP4 on your MegaRAC G3 card.
Connect the chassis power switch to JP5 on your MegaRAC G3 card.
JP6 Reset
You can short this jumper to reset your MegaRAC G3 card.
JP7/JP8 Reset JP7 and JP8 can be used in place of the MegaRAC Feature Cable to reset the
motherboard. Connect a two pin cable from the motherboard’s Reset header to JP7
on your MegaRAC G3 card. Connect the chassis reset switch to JP8 on your
MegaRAC G3 card.
Note:
Note:
Note:
Note:
Note:
Note:
JP13 and JP14 can be used in place of the MegaRAC Feature Cable to gather I2C bus
information from the motherboard.
JP4 and JP5 can be used in place of the MegaRAC Feature Cable to power on, power
off, and power cycle the motherboard.
JP7 and JP8 can be used in place of the MegaRAC Feature Cable to reset the
motherboard.
Only the OEM version can utilize the hardware health monitoring capabilities of
MegaRAC G3 card. The hardware health monitoring function requires an OEM
specific cable and Sensor Definition Kit (SDK/SDR) file.
IPMI support is an OEM version feature.
The optional MegaRAC feature connector cable must be custom made for your specific
configuration.
Step 8 Install all American Megatrends MegaRAC G3 Windows
Software Components
Step 5 Connect External Cables
•
•
•
•
•
Connect the USB cable from the back of the MegaRAC G3 card to the motherboard’s USB
port.
Connect your VGA monitor to your MegaRAC G3 card.
Connect the RJ45 LAN cable from your local network to your MegaRAC G3 card.
Connect your phone cord from the back of the MegaRAC G3 card to the telephone wall
outlet. (Only if the optional modem daughterboard is installed.)
Connect your AC adapter. (The AC adapter is an optional component.)
Step 6 Confirm the Motherboard’s BIOS Settings
Power on the motherboard and enter the BIOS. Using the following table, confirm that your
motherboard’s BIOS settings are correct.
BIOS Section
Boot Options> Removable Devices
Boot Options> ATAPI CDROM
Advanced> PCIPnP> Configuration>
Legacy USB Support
Setting
AMI Virtual Floppy or USB Boot Device
AMI Virtual CDROM or USB Boot Device
Enable
Save the BIOS settings and restart the computer.
Note:
Note:
Make sure that your motherboard BIOS supports Legacy USB devices, USB Boot or
Boot to USB.
On some motherboards and server boards, depress the <CTRL>, <ALT>, and <ESC>
keys simultaneously to enter the BIOS. On others use the <F2> keys. See your server’s
documentation for more information on entering the BIOS setup.
Step 7 Install the Operating System and MegaRAC G3 Card’s
Drivers
Microsoft® Windows 2000/2003/XP operating systems need an .INF for the AMI Virtual Floppy
device exposed by the G3 card. Use the default .INF for the AMI Virtual CDROM.
Note:
Note:
The AMI Virtual Floppy installation procedure needs to be done one time only on the
host system. Once the AMI Virtual Floppy is properly loaded, you can perform floppy
redirection without going through any extra steps.
Do NOT use the default file that the Microsoft® Windows operating system presents
when it is searching for the AMI Virtual Floppy driver. Ensure that the Microsoft®
Windows operating system is asking for the AMI Virtual Floppy driver before allowing
the installation of the .INF file to continue.
Step 10 Connect to the MegaRAC G3 from a Client System
American Megatrends MegaRAC G3 Windows Software Components is a collection of MegaRAC
G3 host-side and remote access components. Insert your MegaRAC™ G3 CD into the host system.
The host system is the system that has the MegaRAC G3 card installed into it. Browse to the
following folder and file:
In order to connect to the MegaRAC G3 card, you must access the MegaRAC G3 from another
system on the same network. AMI refers to this other system as the client system. To do this, you
must know the MegaRAC G3 card’s IP address. If you have installed the MegaRAC G3 on a
network that uses DHCP, you can search the network for the MegaRAC G3 card. To locate and find
out its IP address, you must run RacTrendsSeek Locator.
CDROM\ServerAgents\Win32\Setup.exe
Note:
Double left click the Setup.exe icon to begin the installation of the American Megatrends
MegaRAC G3 Windows Host Component. Follow the instructions. After the installation is
complete, install the American Megatrends MegaRAC G3 Windows Software Components on a
local network computer that you want to use to access the host system.
Step 9 Setup your Client System’s Internet Browser
You must first setup your Internet browser on the client system before you can redirect the host
system’s console.
• Open Internet Options. To get there, open your Internet Explorer browser, left click Tools and
then Internet Options. The Internet Options window opens. Left click the Settings button.
• The Settings window opens. Left click the Every visit to the page button or Automatically
button. Left click the OK button to apply the change and to go back to the Internet Options
window.
• Next, you must setup Internet Explorer to allow the downloading of Signed ActiveX controls
and also allow it to run Signed ActiveX controls. To do this, left click the Security tab and then
the Custom Level button.
• The Security Settings window opens. Left click the Enable button under the Download signed
ActiveX controls section. Scroll down and left click the Enable button under the Run ActiveX
controls and plug-ins section. Left click the OK button. You are prompted with a Warning
window. Left click the Yes button to accept the changes to the Internet zone and to go back to
the Internet Options window. Left click the Apply button and then the OK button to make the
changes.
Note:
Note:
You must restart Internet Explorer before the changes take effect.
Remote Console cannot run with any other security settings in Internet Explorer.
AMI Corporate Headquarters
American Megatrends Inc.
6145-F Northbelt Parkway,
Norcross, Georgia 30071-2976
Sales (800)828-9264 [email protected]
Main (770)246-8600 Fax (770)246-8790
Germany:
Wardein Strasse 3A
D – 81825 Munchen, Germany
Tel [49]89-9699-9510 Fax [49]89-9699-9519
Make sure that you have already installed the MegaRAC G3 Windows Software
Components on the system that you want to use to locate the MegaRAC G3 card.
• Locate the RacTrendsSeek Locator program on your remote client system. Run the
RacTrendsSeek Locator program by double left clicking on it and left click on the Next button
after it opens.
• Type in your Network Name. For example, Corporate. Next, you must enter a range of IP
addresses that you want to search. Left click the Add>> button when finished.
• The name and IP range of the MegaRAC G3 will display in the right field. Place a check in the
box next to the range of IP addresses. Left click on the Next button.
• The name and IP range of the MegaRAC G3 will display in the Selected IP Range window.
Left click on the Next button.
• If the IP range is correct, RacTrendsSeek Locator will locate the MegaRAC G3 card. It will list
all MegaRAC cards it has discovered.
• Double left click on the IP address to start managing the MegaRAC G3 card and write down its
IP address. Left click on the Finish button after RacTrendsSeek Locator discovers all
MegaRAC cards.
• When prompted for the user name and password, enter the following (The default user name
and password are in lower-case characters):
Field
User Name
Password
Default
root
superuser
• Left click the OK button. After you successfully log into your MegaRAC G3 card, you are
greeted with the Welcome to MegaRAC G3 screen.
Note:
When you log in using the root user name and password, you have full administrative
powers. It is advised that once you log in, you change the root password.
India (www.amiindia.co.in):
S.No. 352/1 B, 1C, Kumaran Nagar, Semmechery Village
Off Old Mahabalipuram Road
Chennai – 600 119
Tel [91] 44-24500922 Fax [91] 44-24502142
Korea:
3 rd. Floor, 773-6
Ryucksam-Dong, Kangnam-Ku
Seoul, 135-928, Korea
Tel [82] 2-569-5689 Fax [82] 2-569-4689
Taiwan (www.ami.com.tw):
Suite A, Floor 6, No. 150
Tun Hwa N. Road
Taipei, Taiwan, R.O.C.
Tel [886] 2-2716-0036 Fax [886] 2-2718-1121
Japan (www.amij.com):
8F Mikuni Bldg.,
6-13-11 Sotokanda, Chiyoda-ku
Tokyo, 101-0021, Japan
Tel [81] 3-5812-0020 Fax [81] 3-5812-0022
www.ami.com
®
2004 American Megatrends Inc. All Rights Reserved. Printed in the U.S.A.