1
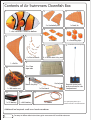
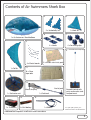
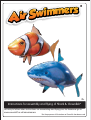
8+
Instructions for assembly and flying of Shark & Clownfish*
For easy to follow video instructions on assembling and flying your Air Swimmer go to
www.wowstuff.co.uk/airswimmers
*For the purposes of illustrations a Clownfish has been used
Contents of Air Swimmers Clownfish Box
2.
1.
3.
2 x Underbelly fins
1 x Back fin
6.
7.
1 x Air Swimmers Clownfish balloon
5.
4.
4 x Fastening clips
4 x Hooks
8.
4 x Elastic bands
9.
Controller colour may vary
12 x Double sided sticky pads
11.
1 x Tail fin
10.
B
C
18 x Clear
tape tabs
A
12.
End of pod
Mouth for putty
1 x Tail motor unit
13.
14.
1 x 9V battery
1 x AAA battery
1 x Pod track
Remote control with
putty enclosed in side
compartment.
15.
1 x Ribbon
For spare parts please go to
www.wowstuff.co.uk/airswimmers
Additional tool required: small cross head screwdriver
1.
For easy to follow video instructions go to www.wowstuff.co.uk/airswimmers
Contents of Air Swimmers Shark Box
2.
3.
2 x Underbelly fins
1 x Back fin
6.
7.
1 x Air Swimmers Shark balloon
5.
4 x Fastening clips
4 x Hooks
8.
4 x Elastic bands
9.
Controller colour may vary
12 x Double sided sticky pads
11.
1 x Tail fin
B
C
18 x Clear
tape tabs
A
12.
End of pod
Mouth for putty
1 x Tail motor unit
14.
1 x 9V battery
1 x AAA battery
1 x Pod track
Remote control with
putty enclosed in side
compartment.
15.
1 x Ribbon
For spare parts please go to
www.wowstuff.co.uk/airswimmers
Additional tool required: small cross head screwdriver
2.
IMPORTANT: PLEASE READ FULLY BEFORE ASSEMBLY
THIS PRODUCT IS ONLY TO BE USED INDOORS
Filling with helium
Fill your Air Swimmer at most party shops, flower shops and good retail
stockists. You may also buy your own helium tank that will allow you to
fill your Air Swimmer at home.
Note. Helium tanks should be used by adults only. Before using helium
tanks please consult any instruction manuals provided. It is recommended
two people carry out this assembly.
1. Tie the enclosed ribbon (15) to the loop indicated
at the bottom of the Air Swimmer and attach the
other end to the tag on the packaging. This will
stop the Air Swimmer floating off when inflated.
Tie ribbon here
2. To fill the Air Swimmer
with helium, lay the
Air Swimmer balloon
(1) out flat on the
ground and insert
the helium tank nozzle
into the valve at the
back of the balloon.
3. Release the helium slowly so that the balloon
starts to inflate and increase gradually until the
balloon is full and firm.
Warning: Do not over inflate the balloon.
The value is one way so does not require sealing
after inflating.
3.
For easy to follow video instructions go to www.wowstuff.co.uk/airswimmers
Note. After a few days you may find that the Air Swimmer may lose some of its buoyancy,
therefore you will need to top up the balloon on a regular basis. After several top ups the
helium inside the balloon may become mixed with air and need to be emptied fully and
then refilled.
To empty your Air Swimmer, insert a narrow drinking straw (maximum 6mm / 0.24 ins) into the
valve by at least 7 inches. Inserting a thicker diameter straw may damage the one way valve.
Warning: Do not inhale helium. Use only in a well ventilated area. Never use in closed spaces.
Helium reduces and can eliminate oxygen available for breathing. Inhaling helium can result in
serious personal injury or death.
Warning: DO NOT OVER INFLATE THE BALLOON.
Only inflate with helium. Do not use other type of gas.
Do not use any other inflations device such as a foot pump.
You can
store your
Air Swimmer
by attaching
the ribbon to
the box or
using the
hook on
the controller.
Controller colour may vary
Assembling your Air Swimmer
After filling the Air Swimmer balloon, you are ready for assembly. It is recommended two
people carry out this assembly.
Inserting the batteries
Please ensure that batteries are installed by
an adult.
Pod Track
The pod track (12) requires 1 x AAA battery (14).
1. Unscrew the battery cover using a cross
head screwdriver.
-
+
2. Insert the battery according to polarity
shown. Screw the battery cover back
into place.
4.
Attaching the Pod Track
1. Attach the pod track (12)
to the underside of the
Air Swimmer balloon
using double sided sticky
pads (8). It helps to have
another person hold the
balloon upside down.
Place the very back end
of the track, at the track
placement number
shown below.
Your altitude
0-1,000 feet
1,000-2,000 feet
2,000+ feet
1
2
3
Track placement
number
Track placement number
3
2
1
2. Place clear tape tabs (11B) over the front
and back track tabs to secure in place.
Use clear tape tabs (11C) for the middle
track tab, placing one either side to secure.
3. Loop the electric wire from the pod track
through the cable hoops, underneath the
Air Swimmer balloon.
5.
For easy to follow video instructions go to www.wowstuff.co.uk/airswimmers
Assembly of the Tail motor unit
1. Using double sided sticky pads (8),
stick the 4 hooks (6) onto the Air
Swimmer. Make sure the arrow
on the hook faces the towards
the head of the Air Swimmer.
2. Place clear tape tabs (11A) over the hooks
to secure.
3. Attach the tail fin (4) to the tail motor
unit (10) by slotting the rods into the
tail motor unit arms, as shown.
Clip 1
Clip 2
Clip 3
Clip 4
4. Attach the 4 fastening
clips (7) to the top and
bottom of the assembly
arms, securing the rods
in place.
6.
5. Place the tail motor unit on the back of the Air Swimmer balloon and attach to the 4
hooks using the elastic bands (5). Make sure the plug connection on the tail motor
unit, faces downwards.
Plug connection
6. Plug the electric wire into the tail motor
unit as shown.
Note: Ensure the electric wire has the
correct orientation to the tail motor unit,
as pins on tail motor unit can become
bent and damaged.
Attaching the fins
1. Remove the liner of the double sided sticky
pads (8) and attach each fin in place on
the Air Swimmer balloon (marked ‘place
fin here’), as shown.
Attention: On some early production runs there may be some printing errors. Therefore ignore letters A-F on the balloons
and fins, these are not required to assemble the Airswimmers. Simply follow this Instruction Manual. Due to a printing error
on Clown Fish balloon there are 2 fin positions printed on top edge of balloon. However there is only one Back Fin, which
should be placed on ‘Place Fin here’ mark towards the centre of the balloon. No fin should be placed on the rear ‘place fin
here’ position.
7.
For easy to follow video instructions go to www.wowstuff.co.uk/airswimmers
2. Place clear tape tabs (11A) over the fin tabs
to secure.
Remote Control
The remote control (9) requires 1 x 9V battery (13).
1. Unscrew the battery cover using a cross
head screwdriver.
Controller colour may vary
+
-
2. Insert the battery according to polarity
shown. Screw the battery cover back
into place.
Controller colour may vary
feet
6
5
4
3
2
1
0
Balancing the Air Swimmer
The Air Swimmer needs to float roughly at around 5 feet (1.5m). Untie the ribbon tether and
balance out the weight by placing putty in the pod mouth until the Air Swimmer neither rises
nor falls. If it starts to descend, remove some of the putty.
8.
Flying your Air Swimmer
Choose an environment which meets the following criteria:
1. An indoor environment with calm air conditioning, avoid air-conditioned rooms.
2. There should be no electric fans, air conditioners, lamps, candles or open fires or other items
that could effect flight or damage the Air Swimmer.
3. It is recommended to use a space larger than 10ft (3.4m) (W) x 16.5 ft (5m) (L) x 8ft (2.4m) (H).
4. Always turn off both the pod and the handset when finished playing.
5. Switch off any air conditioning before flight.
1. Turn the power switch to “ON” on the
pod track (12).
Dive
2. To activate the controller - press any button
on the unit.
Climb
Controller colour may vary
Controller colour may vary
3. To move the Air Swimmers tail
left, press left on the remote.
To move the tail right, press
right on the remote.
9.
For easy to follow video instructions go to www.wowstuff.co.uk/airswimmers
4. To get the Air Swimmer moving,
you need to move the tail from
left to right by pressing right, left,
right, left in a constant rhythm.
Experiment with faster and slower
rhythms to find the best speed.
5. To turn the Air Swimmer push the button once in the direction you wish to turn. This will give
you a tight turning circle, but the Air Swimmer will move slowly. To find out different ways of
turning your Air Swimmer visit www.wowstuff.co.uk/airswimmers.
Controller colour may vary
6. To make the Air Swimmer climb, the pod must move backwards on the track by
pressing the climb button so the nose points up. Then using the left/right button,
swim the Air Swimmer forward.
Controller colour may vary
7. To make the Air Swimmer dive, move the pod forward using the dive button so the
nose points down. Then using the left/right button, swim the Air Swimmer forward.
10.
Troubleshooting guide
Cause
Solution
Not enough helium or too much
putty in the pod mouth.
Refill with helium, remove putty so
Air Swimmer balances around
5 ft in height
High or low altitude
Check your altitude and adjust
the pod track accordingly.
(See page 5)
My Air Swimmer is too light and
sticks to the ceiling.
The Air Swimmer is too light and
needs to be weighted.
Try adding putty into the pod
mouth.
Tail or pod does not operate.
Weak batteries.
Remove and replace batteries in
the handset and pod track
The cable from the pod track
is not connected to the
tail sufficiently
Refit and ensure the plug
connection is fully
inserted correctly
Symptom
My Air Swimmer will not float.
Important Information
Please read and retain this information for future reference.
1. Radio-control Antenna
Radio-Control Antenna
Do not pull on this antenna as it may cause damage to the product.
11.
For easy to follow video instructions go to www.wowstuff.co.uk/airswimmers
Warnings Clownfish:
EU
Operates on 40 MHz frequency
Balloons represent a choking hazard. Keep uninflated balloons away from children. Discard broken balloons immediately.
Children under 8 years can choke or suffocate.
Warning! Never deliberately inhale balloon gas. Inhaling helium can result in serious lung injuries and/or suffocation. Do not
inhale helium from a balloon or helium tank under any circumstances.
Always use in a well-ventilated area.
Never allow children to handle the cylinder or to use the balloon filling equipment. Adult supervision is required.
Don’t play with the balloon near water.
This product is strictly for use INDOORS ONLY.
Do not use this product outside.
Do not fly near air conditioning ducts.
Small drafts or air flows may divert flying path.
Do not expose the balloon to extreme heat as this may cause the balloon to burst.
Warning: Do not over inflate the balloon.
This product may not work at high elevations depending on, altitude, temperature, humidity, helium/air dilution. If you use your
Air Swimmer at higher elevations, use non diluted helium and slightly over fill the balloon to increase its lift. Reduce weight by
not installing the rubber band hooks on the top and bottom of the balloon; only use the rubber band hooks and rubber bands
on the sides.
Battery Information
• 1 x 1.5V AAA for pod motor (Included)
• 1 x 9V Battery for remote controller (Included)
• Non-rechargeable batteries are not to be recharged;
• Rechargeable batteries are only to be charged under adult supervision;
• Rechargeable batteries are to be removed from the handset before being charged;
• Different types of batteries or new and used batteries are not to be mixed;
• Batteries are to be inserted with the correct polarity;
• Exhausted batteries are to be removed from the toy;
• The supply terminals are not to be short-circuited.
Never :
• Mix different types of batteries.
• Mix old and new batteries.
• Dispose of batteries in a fire.
• Attempt to recharge ordinary batteries.
Always :
• Make sure battery compartments are secure.
• Use batteries of the correct size and type.
• Fit batteries correctly observing the plus and minus marks on the battery and compartment.
• Replace a whole set of batteries at one time.
• Remove dead batteries from equipment.
• Remove batteries from appliance that will not be used again for a long time.
• Please remember that small button cells and all batteries should be kept away from young children as they could be easily
swallowed. Seek medical advice if you believe a cell has been swallowed.
Please ensure that batteries are installed by an adult prior to use.
Consumers have a significant role to play in reducing the impact of waste electrical and electronic equipment on the
environment, you can help by re-using or recycling such equipment.
The crossed out wheelie-bin symbol indicates that the product & batteries must not be disposed of in domestic waste as they
contain substances which can be damaging to the environment and human health. If you cannot re-use or recycle the product
or batteries, please use designated collection points, or civic recycling facilities to dispose of them.
Not suitable for children under 36 months due to small parts which may represent a choking
hazard. Not suitable for children under 36 months; strangulation hazard.
Please retain this packaging for future reference.
Recycle
BOX - CARD
widely recycled
12.
Warnings Shark:
EU
Operates on 27 MHz frequency
Balloons represent a choking hazard. Keep uninflated balloons away from children. Discard broken balloons immediately.
Children under 8 years can choke or suffocate.
Warning! Never deliberately inhale balloon gas. Inhaling helium can result in serious lung injuries and/or suffocation. Do
not inhale helium from a balloon or helium tank under any circumstances.
Always use in a well-ventilated area.
Never allow children to handle the cylinder or to use the balloon filling equipment. Adult supervision is required.
Don’t play with the balloon near water.
This product is strictly for use INDOORS ONLY.
Do not use this product outside.
Do not fly near air conditioning ducts.
Small drafts or air flows may divert flying path.
Do not expose the balloon to extreme heat as this may cause the balloon to burst.
Warning: Do not over inflate the balloon.
This product may not work at high elevations depending on, altitude, temperature, humidity, helium/air dilution. If you use
your Air Swimmer at higher elevations, use non diluted helium and slightly over fill the balloon to increase its lift. Reduce
weight by not installing the rubber band hooks on the top and bottom of the balloon; only use the rubber band hooks and
rubber bands on the sides.
Battery Information
• 1 x 1.5V AAA for pod motor (Included)
• 1 x 9V Battery for remote controller (Included)
• Non-rechargeable batteries are not to be recharged;
• Rechargeable batteries are only to be charged under adult supervision;
• Rechargeable batteries are to be removed from the handset before being charged;
• Different types of batteries or new and used batteries are not to be mixed;
• Batteries are to be inserted with the correct polarity;
• Exhausted batteries are to be removed from the toy;
• The supply terminals are not to be short-circuited.
Never :
• Mix different types of batteries.
• Mix old and new batteries.
• Dispose of batteries in a fire.
• Attempt to recharge ordinary batteries.
Always :
• Make sure battery compartments are secure.
• Use batteries of the correct size and type.
• Fit batteries correctly observing the plus and minus marks on the battery and compartment.
• Replace a whole set of batteries at one time.
• Remove dead batteries from equipment.
• Remove batteries from appliance that will not be used again for a long time.
• Please remember that small button cells and all batteries should be kept away from young children as they could be
easily swallowed. Seek medical advice if you believe a cell has been swallowed.
Please ensure that batteries are installed by an adult prior to use.
Consumers have a significant role to play in reducing the impact of waste electrical and electronic equipment on the
environment, you can help by re-using or recycling such equipment.
The crossed out wheelie-bin symbol indicates that the product & batteries must not be disposed of in domestic waste as
they contain substances which can be damaging to the environment and human health. If you cannot re-use or recycle the
product or batteries, please use designated collection points, or civic recycling facilities to dispose of them.
Not suitable for children under 36 months due to small parts which may represent a
choking hazard. Not suitable for children under 36 months; strangulation hazard.
Please retain this packaging for future reference.
13.
Recycle
BOX - CARD
widely recycled
For easy to follow video instructions go to www.wowstuff.co.uk/airswimmers
www.wowstuff.co.uk
Declaration of Conformity Shark
Manufacturer’s Name:
Manufacturer’s Address:
Type of Equipment:
Model Number:
Year of Manufacture:
China Industries Ltd. T/A Wow! Stuff!
Creative Industries Centre, Wolverhampton Science Park,
Wolverhampton, WV10 9TG, UK
Remote-Controlled Toy
AR-1001
2011
Application of Council Directive(s):
1999/5/EEC The Radio Equipment and Telecommunications
Terminal Equipment 2000 (and its amending directives)
Standard(s) to which Conformity is declared:
EN50371, EN62115, EN301 489-1/3, EN300 220-1/-2
I hereby declare that the equipment named above has been tested and found to comply with the relevant sections of
the above referenced specifications. The unit complies with all essential requirements of the Directives.
Place:
Date:
Wolverhampton, UK
30th June 2011
Graeme Taylor
Director
Made in China
www.wowstuff.co.uk
Declaration of Conformity Clownfish
Manufacturer’s Name:
Manufacturer’s Address:
Type of Equipment:
Model Number:
Year of Manufacture:
China Industries Ltd. T/A Wow! Stuff!
Creative Industries Centre, Wolverhampton Science Park,
Wolverhampton, WV10 9TG, UK
Remote-Controlled Toy
AR-1002
2011
Application of Council Directive(s):
1999/5/EEC The Radio Equipment and Telecommunications
Terminal Equipment 2000 (and its amending directives)
Standard(s) to which Conformity is declared:
EN50371, EN62115, EN301 489-1/3, EN300 220-1/-2
I hereby declare that the equipment named above has been tested and found to comply with the relevant sections of
the above referenced specifications. The unit complies with all essential requirements of the Directives.
Place:
Date:
Wolverhampton, UK
30th June 2011
Graeme Taylor
Director
Made in China
14.