1
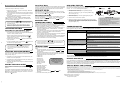
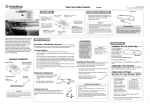
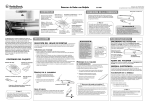
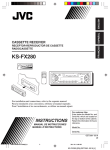
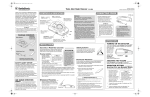
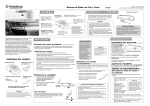
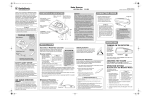
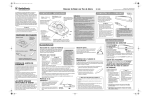
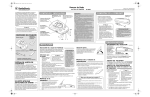
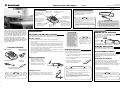
Radar Detector with Compass
www.radioshack.comSM
CONTROLS
360° Laser Eye — receives
incoming laser signals
directed at your vehicle from
all directions.
CONNECTING POWER
Mute — silences
the alert tone.
VOLUME/OFF — turns the
detector on and off and lets
you adjust the volume.
City (City/Highway) —
switches between city
and highway modes.
Dim — controls the
brightness of the
indicators
High Visibility
Alphanumeric Display —
Provides a good view of the
signal detected and signal
strength and indicates the
selected operating mode.
Radar Detector
Windshield Bracket
with Suction Cups
CAUTION SELECTING A MOUNTING LOCATION
For the best performance, select a location where the detector has a direct view of the
road. The detector’s radar antenna is at the opposite end of the indicators.
Mounting Guidelines
• Choose a location that does not block the driver’s view of the road.
• Mount the detector in a level position with a clear view of both the front and rear
of your vehicle.
• Some vehicles have InstaClear® or ElectriClear® defogging windshields, which
have metal coatings that block signals. Check your vehicle’s owner’s manual to
see if your vehicle has one of these features. A detector installed in a vehicle with
one of these features might not detect a signal.
• Since window tinting reduces the received strength of laser signals, you should
not mount the detector behind heavily-tinted glass.
WINDSHIELD MOUNTING
Hook and
Loop Tape
• If the detector does not operate when you turn it on,
remove the cigarette-lighter plug from your vehicle’s
socket and check the socket for debris. Also, check the
fuse in the detector’s plug and your vehicle’s cigarette
lighter fuse.
1. Clean the selected windshield area
and position the bracket on the
windshield. Press firmly on each
suction cup to secure the bracket.
Do not use the mounting
bracket in a vehicle that
has a plastic safety coating
on the inside of the
windshield designed to
protect passengers during
an accident. If you use the
bracket on this type of
windshield, you might
permanently mar the
windshield’s surface.
Mount the radar detector
on the dashboard instead.
Bracket Slot
Questions and Answers About
Vehicle Speed Detection
Before reading this Owner’s Manual, read the supplied
booklet Questions and Answers About Vehicle Speed
Detection to familiarize yourself with the terms and uses
associated with your detector.
• Before plugging the power cord’s cigarette-lighter plug
into your vehicle’s cigarette-lighter socket, make sure
the plug’s tip is screwed firmly onto the plug.
TURNING ON THE DETECTOR
Ô Note Ô
Though the detector has a
360° laser and radar
detection range, the radar
detection is most sensitive
in the front range.
DASHBOARD MOUNTING
In some vehicles, the dashboard may be the best location to
mount the detector. Use the supplied hook-and-loop tape to
mount your radar detector to the dash.
To turn on the detector, rotate VOLUME/OFF toward VOLUME
until it clicks. You hear a tone and the detector announces
“Welcome! Buckle your seat belt,”
and a test message of “WELCOME!”
appears.
After self-testing, HWY
appears.
To turn off the detector,
rotate VOLUME/OFF toward OFF until it clicks.
VOLUME/OFF
ADJUSTING THE VOLUME
Rotate VOLUME/OFF toward VOLUME to increase the detector’s
volume. Rotate it toward OFF to reduce the volume.
THE ELECTRONIC COMPASS
1. Use a damp cloth to clean the bottom of the detector and the
dashboard. Let both surfaces dry.
Your radar detector has an electronic compass that can display
eight different headings: North (N), South (S), East (E), West
(W), Northeast (NE), Northwest (NW), Southeast (SE),
Southwest (SW).
2. Remove the tape’s paper backing and stick the tape to the
bottom of the detector.
CALIBRATING THE COMPASS
3. Remove the backing from the other
side of the tape and firmly press your
detector onto the dashboard.
After installing your detector, you must calibrate the electronic
compass before using it. Calibration separates the earth’s
magnetic field from other magnetic fields so the electronic
compass provides accurate heading information. The calibration
is best performed on a level surface such as an empty parking
lot.
2. Slide the detector’s bracket slot onto
the bracket until it snaps into place.
Ô Note Ô
CAUTION • Use only the supplied 12V DC, positive (+) tip power
cord.
OPERATION
• Do not mount the detector where the driver or a passenger might hit it in a sudden
stop or accident.
Coiled Power Cord
Ô Note Ô
• To prevent the detector from draining your vehicle’s
battery if you leave the detector on when you turn off the
ignition, unplug the power cord from your vehicle’s
cigarette lighter socket.
INSTALLATION
• Choose a location that gives the detector a view unobstructed by metal objects.
PACKAGE CONTENTS
12V DC Jack
Plug the supplied power cord’s barrel plug into
the detector’s 12V DC jack. Then plug the cord’s
cigarette-lighter plug into your vehicle’s
cigarette-lighter socket.
12V DC Jack — The power
cord plugs in here.
Speaker — sounds a digital
voice alert. Tones let you
know the types of radar and
laser signals detected.
Thank you for purchasing the RadioShack Radar
Detector with Compass. Your radar detector can
alert you to many traffic radar and laser systems
with its distinct visual and audio alerts. It receives
X-, K-, and Ka-band radar signals, and detects
both the instant-on and laser systems many law
enforcement agencies use to measure vehicle
speed. Plus, your detector can give you advance
warning of potential road hazards by detecting signals
from transmitters that broadcast Safety Warning
System™ (SWS) alerts.
OWNER’S MANUAL
Please read before using this equipment.
22-1699
Ô Dashboard Mounting Notes Ô
• The tape’s adhesive might not stick to a surface treated with vinyl
cleaner or protectant.
Adjusting the Bracket
• Do not place the hook-and-loop tape over the detector’s serial
number.
If the mounted detector is not at the optimum viewing angle,
you can adjust the mounting bracket for better viewing.
Carefully bend the bracket in or out to adjust it to the desired
angle.
• On a curved dashboard, cut the supplied strip in half and use one
strip on each side of the bottom of the detector.
• Be sure to place the detector out of view when you leave the
vehicle. This keeps the detector out of sight of thieves and prevents
exposure to extremely high temperatures, which can temporarily
impair your detector’s performance.
You must calibrate the detector when:
• It is being used for the first time.
• It is being used in a different location.
Ô Note Ô
• The detector displays the compass heading information until it
picks up a signal. After the detector displays the signal, it returns to
the compass display.
• The compass should not be calibrated in an underground parking
garage or around a metal structure.
OPERATION (continued)
Follow these steps to calibrate your compass.
1. Hold down City until CAL... appears in the display. TURN and
TWICE flash alternately.
2. Turn the steering wheel all the way to the right or left and drive in
two complete circles. The circles must be completed in less than
two minutes.
3. Press City. The detector announces “Calibration complete.”
SUCCESS! appears in the display.
If the calibration is incomplete, PLEASE CALIBRATE AGAIN ..
PRESS CITY-KEY scrolls across the display. The detector also
announces “Please calibrate again.”
Ô
Note Ô
• If you do not drive in two complete circles, the radar detector will
not calibrate correctly.
• If you are in an area with a strong magnetic field, the compass
feature may not operate properly. If the unit still seems off after
calibration is complete, find a new area and redo the calibration.
OPERATION SETTINGS
SELECTING CITY AND HIGHWAY MODES
Your detector has two operating modes: City and Highway.
• City mode requires a stronger X-band signal before the detector
sounds, or visually indicates, an alert.
• Highway mode provides maximum sensitivity for open-road
driving. The detector is preset to Highway mode and HWY
appears when you turn it on.
1. To select City mode, press City. CTY appears and the detector
says “City Mode.”
2. To return to Highway mode, press City again. HWY appears and
the detector says “Highway Mode.”
Ô
Note Ô
• City mode helps prevent false alerts in tightly populated areas
where radar signals can bounce off surrounding structures.
• City mode has no effect on K/Ka-band alerts, laser alerts, or
instant-on radar.
SELECTING DISPLAY BRIGHTNESS
Your detector has three levels of display brightness: Bright, Dim, and
Dark. Once you set the display brightness, the detector retains the
setting until you change it.
1. Press Dim once to reduce brightness to Dim (50% darker). The
detector announces “Display Dim.”
2. Press Dim again to reduce brightness to Dark (10% darker). The
detector announces “Display Dark.”
3. Press Dim a third time to return to Bright. The detector announces
“Display Bright.”
MUTING THE AUDIO ALERT
While the detector sounds an alert signal, press Mute to temporarily
silence the detector. The detector announces “Mute On” and M
appears.
The detector automatically turns Mute off 20 seconds after the alert
signal stops. To return the detector to normal operation sooner, press
Mute while the alert indication is displayed. The detector announces
“Mute Off” and M disappears.
AUTO MUTE MODE
REPLACING THE FUSE
Your detector has Auto Mute Mode which automatically reduces the audio
volume of all alerts after 4 seconds for as long as the signal is detected. If
the same radar signal is encountered within 10 seconds, the detector
maintains a reduced audio-volume.
If the detector stops operating, follow these steps to check the fuse in
the power cord’s cigarette lighter plug and, if necessary, replace it with
a 2 amp, 11/4 × 1/4 -inch, fast-acting fuse (supplied).
Spring
1. Carefully turn the knurled ring on the cigarette lighter plug
counterclockwise to unscrew it.
AUTO MUTE ON/OFF
When the detector is on standby, press Mute when no alert is occurring.
Auto mute turns off and A disappears. If auto mute is set to off, press Mute
again. The auto mute turns on and A appears.
SELECTING VG-2 MODES
VG-2 mode is preset to on. To turn off VG-2, hold down Mute until the voice
alert says “VG-2 Off” and VG2-OFF appears. To turn VG-2 back on, hold
down Mute until the voice alert says “VG-2 On” and VG2-ON appears.
RECEIVING AND
IDENTIFYING SIGNALS
When your detector senses a radar signal, it responds with different
audible and visual alarms to indicate the signal type for X-, K-, and Kaband (newly included Ka-PoP) signals. The detector indicates the signal
strength by increasing the number you see on the display.
• If there is another detector in the vicinity, you may receive false signals.
• When the auto mute is on, if the same radar signal is detected within 10
seconds, reduced audio volume is maintained.
TUTORIAL MODE
Your detector has a tutorial mode to demonstrate all of its alphanumeric
display.
1. To enter Tutorial mode, turn on the detector while holding down Dim
and City. The detector sounds three beeps and TUTORIAL and MODE
flash alernately.
2. To select the demonstration for each alert, press Dim. The detector
displays each alert with its corresponding audio alert. The detector
demonstrates the alerts in the following order.
• X-Band Alert
• K-Band Alert
• Ka-Band Alert
See “Safety Warning System
• Pro-Laser Alert
(SWS) Categories and
• Pro-Laser3 Alert
Messages” for a listing of
• LTI2020 Laser Alert
SWS categories and
• Ultralyte Laser Alert
messages.
• VG-2 Alert
• Rock Slide Area Ahead
• School Zone Ahead
• Road Narrows Ahead
• Sharp Curve Ahead
• Pedestrian Crossing Ahead
When the demonstration finishes, TUTORIAL and MODE flash
alternately.
3. To exit the Tutorial mode, press City.
2. Remove the ring and tip from the cigarette lighter plug, then
remove the old fuse.
Tip
Fuse
Knurled Ring
CAUTION 3. Check the fuse. If it has blown, replace it.
4. Replace the metal tip inside the ring. Make sure the spring is intact.
Then place the fuse inside the cigarette lighter plug and screw the ring
back onto the plug. Make sure the tip is visible when you reassemble
the cigarette lighter plug.
• Using a fuse that does not meet the requirements listed
above can damage your detector, the power cable, or
the vehicle’s electrical system.
• If you must use pliers to loosen the ring, be careful not
to crush the ring or the metal tip inside the ring.
• Never use pliers or other tools to retighten the ring on
the cigarette lighter plug.
TROUBLESHOOTING
• If your detector senses a n X-band, K-band, Ka-band radar signal, it
announces “X-Band Detected,” “K-Band Detected,” or “Ka-Band
Detected” respectively.
• If your detector senses a laser signal, “PRO LASER.” PRO LASER 3,”
LTI-2020,” or ULTRALYTE LASER” scrolls and the detector
announces “Laser Detected.”
• If VG-2 is detected, VG-2 flashes and the detector sounds a distinctive
tone. The detector announces “VG-2 Detected.”
• If your detector senses a SWS signal, a message appears depending
on which SWS signal is detected, the detector sounds a distinctive
tone, and the detector announces the message.
Ô Note Ô
Take care not to lose the ring, tip, or the spring inside the plug
when removing the ring.
If you have problems operating your detector, the suggestions in this section might help. If you cannot solve the problem after trying
these suggestions, take your detector to your local RadioShack store for assistance.
Problem
Suggestion
The detector does not turn on
Be sure all power connections are secure.
The cigarette lighter socket might be dirty. Clean it with fine emery cloth to ensure a good, clean
connection.
Check the fuse in the power cord’s cigarette lighter plug. See “Replacing the Fuse”.
Check the fuse that controls power to your vehicle’s cigarette-lighter socket. See your vehicle’s owner’s
manual.
The detector gives a false alert when you use vehicle
accessories such as power windows, motorized mirror,
brakes, and so on
Check the vehicle’s electrical system for a loose connection, including the main battery cable and
alternator connections.
The detector performs the self-test, but does not
respond to radar signals when you see a police car.
A police car might not be equipped with radar (see the supplied booklet, “Questions and Answers
About Vehicle Speed Detection”).
Install a filter capacitor (1000 µF 35 volts) on the back of the cigarette lighter socket, across the power
connections.
Police might be using VASCAR type speed detection (see the supplied booklet, “Questions and
Answers About Vehicle Speed Detection”).
The detector has poor laser detection range
Be sure the laser detection lens is not blocked.
Be sure the detector is properly mounted.
Use lens cleaning solution to clean the laser detection lens.
CARE
Keep the radar detector dry; if it gets wet, wipe it dry immediately. Handle the radar detector carefully; do not drop it. Keep the radar
detector away from dust and dirt, and wipe it with a damp cloth occasionally to keep it looking new.
SERVICE AND REPAIR
If your radar detector is not performing as it should, take it to your local RadioShack store for assistance. To locate your nearest
RadioShack, use the store locator feature on RadioShack's website (www.radioshack.com), or call 1-800-The Shack (843-7422) and
follow the menu options. Modifying or tampering with the radar detector's internal components can cause a malfunction and might
invalidate its warranty and void your FCC authorization to operate it.
THE FCC WANTS YOU TO KNOW
This equipment has been tested and found to comply with the limits for a Class B digital device, pursuant to Part 15 of the FCC Rules. These limits are designed to provide reasonable protection against
harmful interference in a residential installation. This equipment generates, uses, and can radiate radio frequency energy and, if not installed and used in accordance with the instructions, may cause harmful
interference to radio communications.
However, there is no guarantee that interference will not occur in a particular installation. If this equipment does cause harmful interference to radio or television reception, which can be determined by
turning the equipment off and on, the user is encouraged to try to correct the interference by one or more of the following measures:
• Reorient or relocate the receiving antenna.
• Increase the separation between the equipment and receiver.
• Connect the equipment into an outlet on a circuit different from that to which the receiver is connected.
• Consult your local RadioShack store or an experienced radio/TV technician for help.
• If you cannot eliminate the interference, the FCC requires that you stop using your radar detector.
Changes or modifications not expressly approved by RadioShack may cause interference and void the user’s authority to operate the equipment.
©2003 RadioShack Corporation. All Rights Reserved.
RadioShack and RadioShack.com are trademarks
used by RadioShack Corporation.
06A03
Printed in China
www.radioshack.comSM
SAFETY WARNING SYSTEM (SWS) CATEGORIES AND MESSAGES
CATEGORY 1: HIGHWAY
CONSTRUCTION MAINTENANCE
SAFETY WARNING
SYSTEM
The Safety Warning System (SWS) employs
low-powered transmitters used by some
emergency services and road crews to alert
drivers to hazardous road conditions. The
SWS can indicate stationary, moving, or
railroad hazards.
The system has the potential to dramatically
decrease the occurrence of traffic accidents by
increasing drivers’ awareness of local road
hazards. Having this safety warning
compatible radar/laser detector will ensure that
you are ready to benefit from this system
wherever it is in use.
OWNER’S MANUAL
Please read before using this equipment.
CATEGORY 2: HIGHWAY HAZARD
ZONE ADVISORY I
CATEGORY 3: HIGHWAY HAZARD
ZONE ADVISORY II
1. WORK ZONE AHEAD
13. STATIONARY POLICE VEHICLE AHEAD
23. DEER/MOOSE CROSSING
2. ROAD CLOSED AHEAD/FOLLOW DETOUR
14. TRAIN APPROACHING/AT CROSSING
24. BLIND/DEAF CHILD AHEAD
3. BRIDGE CLOSED AHEAD/FOLLOW DETOUR
15. LOW OVERPASS AHEAD
4. HIGHWAY WORK CREW AHEAD
16. DRAW BRIDGE UP
25. STEEP GRADE AHEAD/TRUCK USE LOW
GEAR
5. UTILITY WORK CREW AHEAD
17. OBSERVE BRIDGE WEIGHT LIMIT
6. ALL TRAFFIC FOLLOW DETOUR AHEAD
18. ROCK SLIDE AHEAD
7. ALL TRUCKS FOLLOW DETOUR AHEAD
19. SCHOOL ZONE AHEAD
8. ALL TRAFFIC EXIT AHEAD
20. ROAD NARROWS AHEAD
9. RIGHT LANE CLOSED AHEAD
21. SHARP CURVE AHEAD
10. CENTER LANE CLOSED
26. ACCIDENT AHEAD
27. POOR ROAD SURFACE AHEAD
22. PEDESTRIAN CROSSING AHEAD
28. SCHOOL BUS LOADING/UNLOADING
29. NO PASSING ZONE
30. DANGEROUS INTERSECTION AHEAD
31. STATIONARY EMERGENCY VEHICLE AHEAD
32. For future use
11. LEFT LANE CLOSED AHEAD
12. For future use
CATEGORY 4: WEATHER RELATED
HAZARDS
CATEGORY 5: TRAVEL
INFORMATION/CONVENIENCE I
33. HIGH WIND AHEAD
43. REST AREA AHEAD
34. SEVERE WEATHER AHEAD
44. REST AREA WITH SERVICE AHEAD
35. HEAVY FOG AHEAD
45. 24 HOUR FUEL SERVICE AHEAD
36. HIGH WATER/FLOODING AHEAD
46. INSPECTION STATION OPEN
37. ICE ON BRIDGE AHEAD
47. INSPECTION STATION CLOSED
38. ICE ON ROAD AHEAD
48. REDUCE SPEED AREA AHEAD
39. BLOWING DUST AHEAD
49. SPEED LIMIT ENFORCED
40. BLOWING SAND AHEAD
50. HAZARDOUS MATERIALS/EXIT AHEAD
41. BLOWING SNOW WHITE OUT AHEAD
51. CONGESTION AHEAD/EXPECT DELAY
42. For future use
52. EXPECT 10 MINUTE DELAY
CATEGORY 6: TRAVEL
INFORMATION/CONVENIENCE II
53. EXPECT 20 MINUTE DELAY
54. EXPECT 30 MINUTE DELAY
55. EXPECT 1 HOUR DELAY
56. TRAFFIC ALERT/TURN AM RADIO
57. PAY TOLL AHEAD
58. TRUCKS EXIT RIGHT
59. TRUCKS EXIT LEFT
60. For future use
Fast/Slow Moving Vehicles
61. EMERGENCY VEHICLE IN TRANSIT
62. POLICE IN PURSUIT
63. OVERSIZED VEHICLE IN TRANSIT
64. SLOW MOVING VEHICLE
ARE RADAR DETECTORS LEGAL?
Federal law lets you install and use a radar detector in
automobiles and light trucks under 10,000 pounds in
the United States. Presently, Virginia and the District
of Columbia have some laws regulating or prohibiting
the use of radar detectors in all vehicles.
Limited One-Year Warranty
This product is warranted by RadioShack against manufacturing defects in material and workmanship under normal use for one (1) year from the date of purchase from RadioShack company-owned stores and authorized RadioShack franchisees and dealers. EXCEPT AS PROVIDED
HEREIN, RadioShack MAKES NO EXPRESS WARRANTIES AND ANY IMPLIED WARRANTIES, INCLUDING THOSE OF MERCHANTABILITY AND FITNESS FOR A PARTICULAR PURPOSE, ARE LIMITED IN DURATION TO THE DURATION OF THE WRITTEN LIMITED WARRANTIES CONTAINED HEREIN. EXCEPT AS PROVIDED HEREIN, RadioShack SHALL HAVE NO LIABILITY OR RESPONSIBILITY TO CUSTOMER OR ANY OTHER PERSON OR ENTITY WITH RESPECT TO ANY LIABILITY, LOSS OR DAMAGE CAUSED DIRECTLY OR INDIRECTLY BY USE OR PERFORMANCE OF THE PRODUCT OR ARISING OUT OF ANY BREACH OF THIS WARRANTY, INCLUDING, BUT NOT LIMITED TO, ANY DAMAGES RESULTING FROM INCONVENIENCE, LOSS OF TIME, DATA, PROPERTY, REVENUE, OR PROFIT OR
ANY INDIRECT, SPECIAL, INCIDENTAL, OR CONSEQUENTIAL DAMAGES, EVEN IF RadioShack HAS BEEN ADVISED OF THE POSSIBILITY OF SUCH DAMAGES.
Some states do not allow limitations on how long an implied warranty lasts or the exclusion or limitation of incidental or consequential damages, so the above limitations or exclusions may not apply to you.
In the event of a product defect during the warranty period, take the product and the RadioShack sales receipt as proof of purchase date to any RadioShack store. RadioShack will, at its option, unless otherwise provided by law: (a) correct the defect by product repair without charge for
parts and labor; (b) replace the product with one of the same or similar design; or (c) refund the purchase price. All replaced parts and products, and products on which a refund is made, become the property of RadioShack. New or reconditioned parts and products may be used in the
performance of warranty service. Repaired or replaced parts and products are warranted for the remainder of the original warranty period. You will be charged for repair or replacement of the product made after the expiration of the warranty period.
This warranty does not cover: (a) damage or failure caused by or attributable to acts of God, abuse, accident, misuse, improper or abnormal usage, failure to follow instructions, improper installation or maintenance, alteration, lightning or other incidence of excess voltage or current; (b)
any repairs other than those provided by a RadioShack Authorized Service Facility; (c) consumables such as fuses or batteries; (d) cosmetic damage; (e) transportation, shipping or insurance costs; or (f) costs of product removal, installation, set-up service adjustment or reinstallation.
This warranty gives you specific legal rights, and you may also have other rights which vary from state to state.
RadioShack Customer Relations, 200 Taylor Street, 6th Floor, Fort Worth, TX 76102
12/99
©2003 RadioShack Corporation. All Rights Reserved.
RadioShack and RadioShack.com are trademarks
used by RadioShack Corporation.
04A03
Printed in China