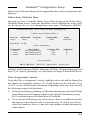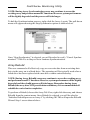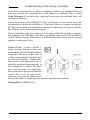
1
Ultra ATA/66 RAID Card User's Manual Copyright Copyright by PromiseTechnology, Inc. 1999. All rights reserved. No part of this manual may be reproduced or transmitted in any form without the expressed written permission of Promise Technology, Inc. Promise Technology is not liable for any errors contained herein or incidental or consequential damages in connection with furnishing this material. The published material in this manual is subject to change without notice. Promise reserves the right to make changes in the product design, layout, and driver revisions without notification to its users. Trademarks All trademarks are properties of their respective holders. RADIO FREQUENCYINTERFERENCE STATEMENT Each FastTrak66 Ultra ATA/66 RAID card is equipped with an FCC compliance label and shows an FCC identification number. The full text of the associated label is: CAUTION: Changes or modifications to the FastTrak66 not expressly approved by PROMISE TECHNOLOGY, INC. could void the user’s authority to operate this equipment. This equipment has been tested and found to comply with the limits for a Class B digital device, pursuant to Part 15 of the FCC Rules. These limits are designed to provide reasonable protection against harmful interference in a residential installation. This equipment generates, uses and can radiate radio frequency energy, and, if not installed and used in accordance with the instruction may cause harmful interference to radio communications. However, there is no guarantee that interference will not occur in a particular installation. If this equipment does cause harmful interference to radio or television reception, which can be determined by turning the equipment off and on, the user is encouraged to try to correct the interference by one or more of the following measures: - Reorient or relocate the receiving antenna. - Increase the separation between the equipment and receiver. - Connect the equipment into an outlet on a circuit different from that to which the receiver is connected. - Consult Promise Technology, Inc. or an experienced radio/TV technician for help. This device complies with Part 5 of the FCC Rules. Operation is subject to the following conditions: (1) This device may not cause harmful interference, and (2) this device must accept any interference received, including interference that may cause undesired operation. NOTE: Only digital device equipment CERTIFIED CLASS B should be attached to this equipment and that must have shielded cables. Table of Contents Introduction ....................................................................................... 1-1 What is the FastTrak/FastTrak66 RAID Card? ........................................... 1-1 Key Features and Benefits .......................................................................... 1-1 Getting Started ................................................................................... 2-1 Unpacking Your FastTrak66 ....................................................................... 2-1 Quick Installation ........................................................................................ 2-2 Hardware Installation ....................................................................... 3-1 Install the FastTrak66 Card ........................................................................ 3-1 Set IDE Drive Jumper Settinngs .................................................................. 3-1 Attaching Drives to Connectors ................................................................. 3-1 Drive Attachment Order by Connector ....................................................... 3-2 Installation Scenarios ................................................................................. 3-2 FastBuildTM Configuration Setup ..................................................... 4-1 BIOS Startup Screen ................................................................................... 4-1 FastBuildTM SetupMenu Navigation ........................................................... 4-1 Main Menu ................................................................................................. 4-2 Auto Setup ................................................................................................. 4-3 View Drive Assignments ............................................................................. 4-4 Define Array ............................................................................................... 4-5 Delete Array Menu ..................................................................................... 4-9 Rebuild Array ........................................................................................... 4-10 Controller Configuration ........................................................................... 4-12 FastCheckTM Win 95/98/NT Monitoring Utility ............................ 5-1 Installation .................................................................................................. 5-1 Running FastCheck .................................................................................... 5-2 FastCheck Monitoring Utility Main Screen ................................................ 5-3 Array Window ............................................................................................ 5-3 Array Synchronization ................................................................................ 5-6 Array Rebuild ............................................................................................. 5-7 Rebuild Wizard ............................................................................................ 5-8 Controller Window .................................................................................... 5-11 Options Window ....................................................................................... 5-13 i Table of Contents Understanding Disk Array Concepts ............................................. 6-1 Disk Array Adapter .................................................................................... 6-1 Adapter BIOS ............................................................................................. 6-1 FastBuildTM Auto Menu Setup ................................................................... 6-1 Reserved Sector .......................................................................................... 6-1 Disk Array Terms ........................................................................................ 6-2 Supported Disk Array Types ...................................................................... 6-3 Operating System Installation ......................................................... 7-1 DOS ............................................................................................................ 7-1 Microsoft Windows 3.1x ............................................................................. 7-2 Windows 95/98 Driver ................................................................................ 7-2 Windows NT 3.5x & NT 4.0 ........................................................................ 7-3 Installing Driver in Existing Windows NT System ...................................... 7-3 Removing Driver From Windows NT 3.5x ................................................... 7-4 Installing in Existing Windows NT 4.x System ........................................... 7-4 Removing Driver From Windows NT 4.x ..................................................... 7-5 Troubleshooting & Tips ................................................................... 8-1 Troubleshooting ......................................................................................... 8-1 Tips for Audio/Video Editing ...................................................................... 8-4 Appendices Frequently Asked Questions .......................................................... A-1 Pre-Installation (Speed, Device Types, Capacity, Cabling) ........................ A-1 Installation Issues (NT, I2O Drivers, Capacity, Booting, IRQ Settings) ..... A-4 Post-Installation (Power Up, BIOS , Memory, Caching, Booting) .............. A-5 Contacting Technical Support ......................................................... B-1 Warranty Information ....................................................................... C-1 Limited Warranty ............................................................................................. Disclaimer of Other Warranties ........................................................................ Returning a Product for Repair ...................................................... D-1 ii Chapter 1 Introduction Congratulations on choosing Promise Technology's innovative FastTrak66 Ultra ATA/66 RAID card for IBM PC compatible systems. This card is designed to boost sustained transfer rates and/or provide fault tolerance for the latest Ultra ATA/66 hard drives, while being backward-compatible with Ultra ATA/33, Enhanced IDE, and Fast ATA-2 high performance hard disk drives. What is the FastT rak66 RAID Card? Promise designed its FastTrak66 card to provide a cost-effective, high performance RAID card that adds performance and/or reliability to PC desktops and/or servers using Ultra ATA/66, Ultra ATA/33, or EIDE drives. FastTrak66 supports striping (RAID 0), mirroring (RAID 1), striping/mirroring (RAID 0+1), or spanning (JBOD) operation , respectively. With striping, identical drives can read and write data in parallel to increase performance. Mirroring increases read performance through load balancing and elevator sorting while creating a complete backup of your files. Striping with mirroring offers both high read/write performance and error tolerance. Spanning uses the full capacity of all attached drives without requiring identical drive size, but offers no other RAID functionality. A FastTrak66 striped array can double the sustained data transfer rate of Ultra ATA/66 drives. FastTrak66 fully supports Ultra ATA/66 specification of up to 66 MB/sec per drive, depending on individual drive specifications. FastTrak66 also offers fault tolerant, data redundancy for entry-level network file servers or simply for desktop PC users wanting to continually protect valuable data on their PC. FastTrak66 offers RAID 1 mirroring (for two drives) and RAID 0+1 mirroring and striping (for four drives) to protect data. Should a drive that is part of a mirrored array fail, FastTrak66 uses the mirrored drive (which contains identical data) to assume all data handling. When a new replacement drive is later installed, FastTrak66 rebuilds data to the new drive from the mirrored drive to restore fault tolerance. FastTrak66's bootable BIOS supports individual drives larger than 8.4GB. With FAT32 and NTFS partitioning, the array can be addressed as one large single volume. Key Features and Benefits The following information offers an overview of the major features of your new Promise FastTrak. It is divided into two areas: Advanced Hardware Design, and Compatibility. 1-1 Introduction Advanced Hardware Design Features Benefits Supports data striping (RAID 0), mirroring (RAID 1), and striping/ mirroring combination (RAID 0+1) Provides dramatic increase in drive performance and/or fault tolerant options. Offers performance customization and data rebuilds from the BIOS menu. Supports Ultra DMA 4/3/2/1/0, DMA 2/ 1/0 Burst data transfer rates up to 66MB/sec from Ultra ATA/66 drives to boost overall system performance. PCI Plug-n-Play, PCI Interrupt sharing and coexists with mainboard IDE controllers Easy to install; support four IDE drives on the FastTrak66 while still supporting 4 IDE devices on the mainboard IDE controllers. Supports concurrent dual IDE controller operation Drive workload is distributed in parallel between members of the array. Supports IDE bus master operation Allows multiasking during disk transfers which increase CPU efficiency. The CPU is free to process tasks during IDE data transfers through the PCI Bus to/from system memory. Utilizes FastBuildTM automenu from the FastTrak66 onboard BIOS Offers pre-set application specific settings which can be optimized for Desktop, Server, or A/V Editing. Has "Auto Setup" option for quick and easy array builds. Displays status and error checking messages during bootup Notifies user of possible errors and allows for recovery of mirrored drive arrays directly from FastBuildTM . Employs the latest Promise PCI Ultra ATA/66 ASIC technology. Fully supports Ultra ATA/66 specifications with 66MB/sec timing and CRC error-checking at high drive speeds. Mirroring supports automatic background rebuilds Fault tolerance can be restored automatically without rebooting 1-2 Introduction Compatibility Features Complies with PCI v2.1 Local Bus standard Benefits Provides highest level of hardware compatibility. Compliant with PCI IDE Bus Master standard. PCI IDE Bus Master support for Windows95, Windows NT 3.5x, 4.0 Provides 32-bit I/O, IDE Bus Master, and Ultra ATA performance for optimal system performance. Tested compatiblity to coexist with Mainboards that have integrated IDE controllers Improves system performance of new and existing installations including mainboards with Intel chipsets. Compatible with Ultra ATA/66, Ultra ATA/33, EIDE and Fast ATA-2 drives supporting multi-word DMA Works with newest and current IDE drive specifications. Promise engineers experienced with IDE devices perform verification testing with major drive manufacturers and development partners. Features LBA and Extended Interrupt13 drive translation in controller onboard BIOS Breaks capacity barriers for support of drives greater than 8.4GB in capacity. Offers flexible storage options for space demanding applications. 1-3 Introduction This Page Intentionally Left Blank Chapter 2 Getting Started This section is designed to get you started for installation of your FastTrak66. Unpacking Your FastT rak66 When you receive the FastTrak66, the package should contain the items listed below: w FastTrak66 Ultra ATA/66 RAID Card w FastTrak66 User’s Manual w Registration Card w FastTrak66 Driver floppy diskette w Two Internal 80-wire/40-pin Ultra ATA/66 hard drive cables (18” length) CAUTION IN HANDLINGAND INSTALLING! Before installing the adapter into an existing system, backup any necessary data. Failure to follow this accepted PC practice could result in data loss. Power off the system. Be careful when handling the controller. The FastTrak, like any valuable part of your computer system, is susceptible to static electricity. Be sure you are well grounded for the installation. If ANY of the contents are missing or appear to be damaged, please contact your dealer or distributor immediately. Board Layout IDE 2 Connectors IDE 1 First IDE channel IDE 1 Second IDE channel IDE 2 4-pin LED connector: Pin1PWR, Pin2 GND, Pin3 GND, Pin4 PWR LED 21-1-1 Quick Installation Quick Installation This section is designed to get you started for quick installation of your FastTrak66. Use drives that are preferably the same model and capacity. NOTE: If using older IDE drives (less than 300MBs), check with the manufacturer if it supports MultiDMA transfers. [1] Install FastTrak66 and Drives Power off the system and ground yourself by touching exposed metal of the PC chassis. Connect 18” 80-wire/40-pin cables to the FastTrak66 and hard disk drives. Make sure the blue plastic connector is used for the FastTrak66 slots. Attach the darker connectors to the drives. Note that the colored cable edge indicates Pin 1. Jumper and install the drives with proper master/slave jumper settings recommended by FastTrak66 Drive Setup the drive manufacturer. When 2 drives are IDE 1 IDE 2 attached, configure each drive as a master Total Drives (with no slave attached) and each drive on ---One M a separate channel. Check drive instrucM Two M tions for details on Master & Slave settings. Three M M&S Four M&S M&S Attach the case LED 2-pin or 4-pin cable to the FastTrak66 4-pin power/ground connector labeled LED. Be sure to align pin 1 of the LED cable to pin 1 of the connector. 1 LED Insert and secure the FastTrak66 into an open PCI slot. Re-check cabling for proper connection. 2-2 Quick Installation [2] Set Mainboard CMOS Setup No changes are necessary in the Mainboard CMOS Setup for resources or drive types. Since FastTrak66 is a PCI Plug-n-Play (PnP) device, the Interrupt and Port address resources are automatically assigned by the Mainboard’s PCI PnP BIOS. For the FastTrak66 to be the bootable IDE controller, confirm in the mainboard’s Standard CMOS Setup that the drive types (for hard disk drives) are set for “Not Installed” or “None”. Or use “Boot to SCSI” option, if this setting is available in the motherboard’s BIOS. No changes are needed for CD-ROM drives that are attached to the mainboard IDE controller. [3] Configuring FastBuild BIOS Setup Drives types are identified as “Not Installed” or “Boot to SCSI” (if available) Main Advanced System Date System Time Floppy Options Primary IDE Master Primary IDE Slave Secondary IDE Master Secondary IDE Slave Language Boot Options Video MOde Mouse Base Memory Extended Memory BIOS Version Security Exit Jan 1 1999 09:00:00 Press Enter Not Not Not Not Installed Installed Installed Installed English (US) Press Enter EGA / VGA Installed 640KB 31744KB 1.00.00.00 During bootup, the FastBuild BIOS appears on the screen and displays BIOS version information. 1) Press <Ctrl-F> to enter the FastBuild utility. 2) Press <1> for Auto Setup. • Under the “Optimize Array for” option, choose the “Performance”, “Fault Tolerance”, or “Capacity”. • For the “Typical Application Usage” option, select the appropriate setting with the <Space> key. See Chapter 4 for details on FastBuild Configuration Setup. 3) Press <Ctrl-Y> to save and “Yes” to save and reboot the system. NOTE: the disk array will be seen as one physical drive by the operating system. 2-3 Quick Installation [4] Starting the Operating System See the steps below for a new operating system installation. For other supported operating systems, see Chapter 7 for instructions. 1) Boot to Disk 1 of the DOS installation diskettes or manually partition and format new drives with standard DOS FDISK and FORMAT utilities. 2) Install DOS, Windows, and/or Windows95/98 using the “Setup.exe” utility found on the Microsoft installation diskettes. Driver Installation For DOS and Windows 3.1x: No drivers need to be installed. The FastTrak66 BIOS will provide enhanced operation. Windows95/98 setup will show a “New Hardware Found” dialog box. Under versions 4.00.950 and 4.00.950 an “Unknown PCI Device” will be detected. Under versions 4.00.950 B “PCI RAID Controller” will be displayed. NOTE: Obtain the Windows95/98 version number as follows: 1) Under the My Computer icon, click Control Panel; 2) click the System icon. Note the version number that appears here. 1) In the dialog box, choose “Driver from disk provided by hardware manufacturer” button. In the a: drive, insert the FastTrak66 utility diskette and type in “A:\” where prompted for the directory. 2) Select “Promise Technology, Inc. PCI FastTrak66 Driver” and click on Next. The FastTrak66 driver is now copied onto the system and entered into the Windows95/98 driver database. 3) When the "System Settings Change" dialog box appears, remove the floppy diskette and click on “Yes” to restart the system. Windows95/98 will then restart for the driver installation to take effect. Confirming Windows95/98 Installation From Windows95/98, open the Control Panel from My Computer followed by the System icon. Choose the “Device Manager” tab and click the “+” in front of the “SCSI Controllers” hardware type. The driver “Promise Technology, Inc. PCI FastTrak66 Driver” driver should be installed. 2-4 Chapter 3 Hardware Installation Install the FastT rak66 Card Insert and secure the FastTrak66 card into a PCI Bus Master slot. There are no hardware configurable jumpers or settings to change due to the adapter’s Plug-nplay (PnP) features. The FastTrak66 system resources including port address, interrupt, and BIOS address are automatically determined by the system PnP BIOS. To customize IRQ settings, enter the Mainboard BIOS’s Advanced PCI setup and follow the manufacturer’s procedures. When the system is limited by IRQ resources, the FastTrak66 card can be set for the same IRQ as other PCI cards that support PCI interrupt sharing. Set IDE Drive Jumper Settings Drives must be Ultra ATA/66, Ultra ATA/33, EIDE and/or Fast ATA-2 compatible to operate with the FastTrak66 RAID Adapter. For optimal performance, install all identical drives of the same model and capacity. The drives’ matched performance allows the array to function better as a single drive. Refer to the drive manufacturer documentation for proper Master / Slave settings. Note that sometimes the Master drive with no slave attached is called “Single.” The master slave setting differentiates two drives chained on the same connector. Attaching Drives to Connectors Attach drives with the supplied 18” 80-wire/40-pin Ultra ATA/66 cables. Only these cables will support data transfers up to 66MB/sec and must be used with Ultra ATA/66 drives. Use all available connectors before chaining a slave drive. This is recommended for better performance since data can be processed in parallel. For maximum IDE Fault tolerance, each mirrored pair should be installed on separate IDE connectors. Drives Attachment Order By Connector 3-1 Hardware Installation Drives Attachment Order By Connector The following table shows the order in which drives should be connected to the FastTrak66 card. Total Drives IDE 1 IDE 2 One Two Three Four M M M&S M&S — M M M&S M - Master, S - Slave Installation Scenarios Examine the following installation scenarios which may apply to your system. Then proceed to Chapter 4 which covers operation of the card’s BIOS utility and array creation. FastTrak66 coexisting with onboard ATAPI CD-ROM Do NOT attach ATAPI devices to FastTrak66. FastTrak66 is for hard drives only. ATAPI IDE CD-ROM drives or other devices can be installed on Mainboard or add-on IDE controllers. No configuration is necessary on the mainboard BIOS setup. 3-2 Hardware Installation FastTrak66 coexisting with hard drives on onboard IDE controller The FastTrak66 can coexist with onboard or add-on IDE controller(s) and hard drives installed. If the motherboard’s CMOS has a “boot to SCSI” option, it is possible to boot from the FastTrak66 and still recognize the onboard non-bootable drives. If the motherboard CMOS does not allow booting to SCSI, the boot drive must be attached on the onboard IDE controller FastTrak66 Coexists with SCSI controller The FastTrak66 is bootable with a SCSI controller in the system. The adapter with the lower BIOS address will be bootable. If it is necessary to change the boot sequence, swap the FastTrak66 PCI slot position with that of the SCSI card’s PCI slot. 3-3 Hardware Installation This Page Intentionally Left Blank Chapter 4 FastBuild TM Configuration Setup The FastBuildTM setup gives menu choices to create and manage disk arrays on the Promise FastTrak66 adapter. FastTrak (tm) / FastTrak66 (tm) BIOS Version 1.xx (Build xxxx) (c) 1995-99 Promise Technology, Inc. All Rights Reserved. ID MODE SIZE 1* 2 2+0 Stripe 1x2 Mirror 13044M 6522M TRACK-MAPPING STATUS 611/128/32 620/32/63 Functional Functional Press <Ctrl-F> to enter FastBuild (tm) Utility.... BIOS Startup Screen During the system startup, the Promise BIOS screen will appear as shown above.This displays the adapter BIOS version and array status. The array status consists of three possible conditions: Functional, Critical, Offline. Functional - The array is operational. Critical - A mirrored array contains a drive that has failed or disconnected. The remaining drive member in the array is functional. However, the array has temporarily lost its ability to provide fault tolerance. The user should identify the failed drive though the FastBuildTM Setup menu utility, and then replace the problem drive. Offline - A mirrored array has 2+ drives or a striped array has 1+ drives that have failed or have been disconnected. When the array condition is “offline,” the user must replace the failed drive(s), then restore data from a backup source. FastBuild TM Setup Menu Navigation When using the menus, these are some the basic navigation tips: Arrow keys highlights through choices; [Space] bar key allows to cycle through options; [Enter] key selects an option; [ESC] key is used to abort or exit the current menu. 4-1 FastBuild TM Configuration Setup Main Menu This is the first option screen when entering the FastBuildTM Setup. FastBuild (tm) Utility 1.xx (c) 1995-99 Promise Technology, Inc. [ Main Menu ] Auto Setup .............................................................. [ View Drive Assignments ....................................... [ Define Array .......................................................... [ Delete Array .......................................................... [ Rebuild Array ......................................................... [ Controller Configuration ...................................... [ 1 2 3 4 5 6 ] ] ] ] ] ] [ Keys Available ] Press 1...6 to Select Option [ESC] Exit To create a new array, follow the steps under the Auto Setup <1> selection or Define Array <3> selection. To repair an array, use the <5> Rebuild Array option. 4-2 FastBuild TM Configuration Setup Auto Setup <1> The <1> Auto Setup selection can intuitively help create your disk array. It will assign all available drives appropriate for the disk array you are creating. FastBuild (tm) Utility 1.xx (c) 1995-99 Promise Technology, Inc. [ Auto Setup Options Menu ] Optimize Array for: Typical Application usage: Performance General [ Auto Setup Configuration ] Mode ...................................................... Stripe Spare Drive Count ........................................ 1 Drive used in Array ...................................... 2 Array Disk Capacity ........................... 13044 [ Keys Available ] [] Up [] Down [, , Space] Change Option [ESC] Exit [Ctrl-Y] Save The “Optimize Array for:” setting has three choices - Performance (Striping), Fault Tolerance (Mirroring), and Capacity (Spanning). Striping (Performance) Supports the maximum performance where the capacity equals the number of drives times the capacity of the smallest drive in the disk array. Change the Stripe Block sectors that best optimizes system applications. Using a Stripe Block size of 8 KB is normally recommended for business applications and 64KB for server and Audio/ Video editing applications. Capacity (Spanning) Achieves the maximum amount of capacity by adding the sum of all the drives. The Stripe Block option does not apply. Mirr oring (Fault Tolerance) Allows creation of fault tolerant arrays for data security. Also provides a feature to add fault tolerance to one drive with existing data. The Stripe Block option does not apply. Typical Application usage Allows the user to choose the type of software to optimized for speed enhancement. The recommended stripe will then appear in the [ Auto Setup Configuration ]. 4-3 FastBuild TM Configuration Setup Spare Drive Count An extra drive that is not assigned to a disk array will be recognized as a Spare Drive for use with mirrored disk arrays. Such a drive is immediately used as a “standby” replacement. It is automatically added to an array once a disk member of the array has been detected as “failed.” To restore fault tolerance as quickly as possible, FastTrak66 begins to perform an automatic data rebuild on the “spare” drive in the background without the need to restart the system. At a later time, the failed drive can be physically removed from the FastTrak66 card and an extra drive added in its place to function as the “spare” drive. Creating Multiple Disk Arrays with Auto Setup If you plan to create multiple arrays, attach the drives necessary to create the first disk array and complete the <1> Auto Setup. Second, install the additional drives for the second array and again use the <1> Auto Setup. Repeat if more disk arrays need to be created. You can manually create disk arrays with the <3> Define Array option if necessary. View Drive Assignments <2> This option is to display whether drives are assigned to a disk arrays or are free. Under “Assignment” drives are labeled with their disk array or “Free.” Unassigned “free” drives can be used for a future array or used as a spare drive when a drive fails in a mirrored array. Unassigned drives are not accessible by the operating system. FastBuild (tm) Utility 1.xx (c) 1995-99 Promise Technology, Inc. [ View Drive Assignments ] Channel:ID 1 : Master 1 : Slave 2 : Master Drive Model MAXTOR87000A8 MAXTOR87000A8 MAXTOR87000A8 Capacity (MB) Assignment 6522 Array 1 6522 Free 6522 Array 1 [ Keys Available ] [] Up [] Down [ESC] Exit 4-4 FastBuild TM Configuration Setup Define Array <3> The Define Array screen allows users to begin the process of defining the drive elements and RAID levels for each disk array. Users will commonly create one or two drive arrays with FastTrak66, though the card will support a maximum of four arrays. [A user may use a single drive in either striping or spanning mode with FastTrak66. In this rare scenario, the card will create an individual array ID but will offer conventional controller performance, depending on the drive type. At a later time, a second drive can be added to the array and the array re-created to support RAID 1 mirroring]. FastBuild (tm) Utility 1.xx (c) 1995-99 Promise Technology, Inc. [Define Array Menu] Array No Array 1 Array 2 Array 3 Array 4 RAID Mode Stripe —— —— —— Total Drv 2 —— —— —— Capacity(MB) 13440 —— —— —— Status Functional —— —— —— [ Keys Available ] Note: * — Bootable Array [] Up [] Down [ESC] Exit [Enter] Select [Space] Change Boot Drive NOTE: For most installations, Promise recommends the <1> Auto Setup for easy disk array creation. To manually create an array from the Define Array Menu above, use the arrow keys to highlight an array number you wish to define, and press [Enter] to select. The 4-5 FastBuild TM Configuration Setup Define Array Definition Menu will next appear that allows drive assignments to the disk array. Define Array Definition Menu Selecting an Array # from the Define Array Menu brings up the Define Array Definition Menu screen. Under the Definition section, highlight the Array # and use the [Space] key to cycle through three array types: Performance (RAID 0 FastBuild (tm) Utility 1.xx (c) 1995-99 Promise Technology, Inc. [ Define Array Definition Menu ] Array No Array 1 RAID Mode Stripe Total Drv 2 Capacity(MB) 13044 Status Functional Stripe Block: 64 KB [ Drive Assignments ] Channel:ID 1 : Master 1 : Slave 2 : Master Drive Model MAXTOR87000A8 MAXTOR87000A8 MAXTOR87000A8 Capacity (MB) 6522 6522 6522 Assignment Y N Y [ Keys Available ] [] Up [] Down [ESC] Exit [Space] Select [Ctrl-Y] Save Striping), Fault Tolerance (RAID 1 Mirroring, RAID 0+1 Striping/Mirroring (for 4 drives ), or Capacity (Spanning). See Auto Setup or Chapter 5 about RAID levels. Drive Assignments Options Under the [ Drive Assignments ] section, highlight a drive and with the [Space] bar key change the Assignable option to “Y” to add the drive to the disk array. Press <Ctrl-Y> to save the disk array information. Depending on the array type selected, the following scenarios will take place: 1) If choosing a Striping, Spanning, or Mirroring/Striping array, the initial Define Array Menu screen will appear with the arrays defined. From there you may ESC to exit and return to the Main Menu of FastBuild. 2) If you selected a Mirroring array for two drives, there is an additional window that appears as described in order to create the array. To do this you will use either two brand new drives, or one drive that contains existing data that you wish to mirror. 4-6 FastBuild TM Configuration Setup Creating A Mirrored Array Using New Drives As described in the Drive Assignments Option section above, if you selected a mirroring array and wish to use two new assigned drives, follow the directions here. After assigning new drives to a Mirroring array and saving the information with <Ctrl-Y>, the window below will appear in order to create the array. Confirm “N” or “No” to the message that follows as shown to proceed: Do you want the disk image to be duplicated to another? (Yes/No) Y - Create and Duplicate N - Create Only Adding Fault Tolerance to an Existing Drive FastTrak66 will create a mirrored array using an existing system drive with data. You must assign the existing drive and another drive of same or larger capacity to the Mirroring array. The BIOS will send the existing data to the new blank drive. Create the array by confirming “Y” or “Yes” to the message that follows as shown below: Do you want the disk image to be duplicated to another? (Yes/No) Y - Create and Duplicate N - Create Only You will be prompted to select the Source drive from the two available drives. Arrow down to the drive that has existing data to be mirrored and press [Enter] to select. Channel:ID 1 :Master 2 :Master [Please Select A Source Disk] Drive Model MAXTOR87000A8 MAXTOR87000A8 Capacity (MB) 6522 6522 When prompted, press Y to confirm Yes to start duplicating the source image to the target drive. Note: all target drive data will be erased. Make sure you choose the correct drive. 4-7 FastBuild TM Configuration Setup Setting a Disk Array As Bootable Once you have returned to the Define Array Menu window, you may use it to select which defined array will be used as the bootable array. Highlight the desired array and press the [Space] bar key. The system will now recognize this as the first array and an * askerisk will appear next to the array number indicating it as bootable. Note: your PC or server must be configured to use the FastTrak66 as the bootable controller. The system will then use the bootable array as the (fixed) boot C: drive. Array No Array 1 * Array 2 [ Define Array Menu ] RAID Mode Total Drv Capacity(MB) Stripe 2 13044 Mirror 2 6522 Status Functional Functional * denotes bootable Disk Array Recognition Order During startup, the disk arrays on the FastTrak66 are recognized in this order: 1) The array set to bootable in the FastBuildTM Setup, and 2) the Array number (i.e. Array 0, Array 1…). This would be involved in determining which drive letters will be assigned to each disk array. Saved Disk Array Information All disk array data is saved into the reserved sector on each array member. Promise suggests that users record their disk array information for future reference. Another feature of the FastTrak66 disk array system is to recognize drive members even if drives are moved between different FastTrak66 card connectors. Since each drive’s array data identifies itself to the array, it is possible to move or swap drives without modifying the array setup. This is valuable when adding drives, or during a rebuild. 4-8 FastBuild TM Configuration Setup Delete Array Menu <4> This menu option allows for deletion of disk array assignments. Caution: Deletion of an existing disk array could result in its data loss. Record all array information including the array type, the disk members, and stripe block size in case you wish to undo a deletion. Arrays can normally be recovered after array deletion by defining array information identical to the deleted array. FastBuild (tm) Utility 1.xx (c) 1995-99 Promise Technology, Inc. [ Delete Array Menu ] Array No Array 1 Array 2 Array 3 Array 4 RAID Mode Stripe Mirror —— —— Total Drv 2 2 —— —— Capacity(MB) 13044 6522 —— —— Status Functional Functional —— —— [ Keys Available ] [] Up [] Down [ESC] Exit [Del] Delete To delete an array, highlight the Array you wish to delete and press the [Del] key. Confirm yes to the following warning message with the <Ctrl-Y> key to continue array deletion. Are you sure you want to delete this array? Press Ctrl-Y to Delete, others to Abort 4-9 FastBuild TM Configuration Setup Rebuild Array <5> The Rebuild option is necessary to recover from an error in a mirrored disk array. Note: Drives must be replaced if they contain any physical errors. Follow these steps before using the <5> Rebuild Array menu option: 1) 2) 3) 4) 5) From the FastTrak66 Startup BIOS error message, identify which array has failed. In the FastBuildTM Setup <3> Define Array, select the failed array and identify the Channel and ID of the failed drive Power off and physically remove the failed drive Replace the drive with an identical model Continue the restoration process with the <5> option With a failed drive in a disk array, Rebuild Menu will show the status as “Critical”. FastBuild (tm) Utility 1.xx (c) 1995-99 Promise Technology, Inc. [ Rebuild Array Menu ] Array No Array 1 Array 2 Array 3 Array 4 RAID Mode Stripe Mirror —— —— Total Drv 2 2 —— —— Capacity(MB) 13044 6522 —— —— Status Functional Critical —— —— [ Keys Available ] [] Up [] Down [ESC] Exit [Enter] Select 4-10 FastBuild TM Configuration Setup Highlight the Critical array and press [Enter]. The following screen will then appear: FastBuild (tm) Utility 1.xx (c) 1995-99 Promise Technology, Inc. [ Rebuild Array Menu ] Array No Array 2 RAID Mode Mirror Total Drv 2 Status Critical Stripe Block: Not Available [ Select Drive for Rebuild ] Channel:ID 1 : Slave Drive Model MAXTOR87000A8 Capacity (MB) 6522 [ Keys Available ] [] Up [] Down [ESC] Exit [Enter] Select Under [Select Drive for Rebuild], highlight the drive to replace the failed drive. Press enter and confirm that the data will be copied onto the selected drive. All data on the replacement drive will be written over with mirrored information from the array drive. NOTE: For automatic rebuilds of a mirrored array, attach an extra “spare” drive to the FastTrak66. Drives that are not assigned to an array and are the same size or larger than the original will be used for the automatic rebuild. This is performed in the background under all supported operating systems, except DOS. At a later time, the failed drive can be physically removed. 4-11 FastBuild TM Configuration Setup Controller Configuration <6> This menu allows you view and set the adapter options. FastBuild (tm) Utility 1.xx (c) 1995-99 Promise Technology, Inc. [ Adapter Configuration - Options ] Ultra ATA Mode: Halt On Error: Auto Enable [ System Resources Configuration ] Channel 1 (IDE1) Channel 2 (IDE2) Interrupt : A Interrupt : A I/O Port : FFF0 I/O Port : FFA8 [ Keys Available ] [] Up [] Selection [, , Space] Change Option [ESC] Exit [Adapter Configuration - Options] Ultra ATA Mode -- sets the disk DMA burst rate. “Auto” is the default setting to optimize system performance. “Turbo” forces the fastest data rate. The “Fast” setting operates for reliable mode. Halt On Error -- allows FastTrak66 to Halt operation at the BIOS startup screen should an error be detected. [ System Resources Configuration] This section displays the PCI slot interrupt and port address used by the FastTrak66. The resources used are determined by the Mainboard PCI PnP BIOS for the PCI slot in which the FastTrak66 resides. In the rare case that there is a resource conflict, refer to the Mainboard BIOS documentation on changes on resources allocated to the FastTrak66 PCI slot. 4-12 Chapter 5 FastCheck Win 95/98/NT Monitoring Utility Once FastTrak66 is installed and operational, the FastCheck Utility is used to monitor the operating status of all arrays and drives configured on the FastTrak66. Visual and audible messages are available to warn of possible problems with the disk array or controller. In addition, FastCheck visually identifies the physical location of attached drives on the FastTrak66 by IDE channel and identifies which drives are included as part of individual arrays. Finally, administrators can customize FastCheck to maintain operating logs and event notification, set Password access to the utility, and schedule maintenance on Mirrored (RAID 1) or a Striped/ Mirrored (RAID 0/1) arrays. Installation From the Start Button, choose the Run button. In the Run dialog box, type in “A:\” and click OK. A:\ Follow the directions from the setup program. Promise recommends to have FastCheck load during Startup. This insures you that it will be ready to post alerts on errors. During installation, click YES when prompted to run the utility on every startup. If NO is selected, FastCheck will not initialize during startup. You may manually execute the utility via the Start button. On the Windows 95/98/NT taskbar, the FastCheck icon appears as a stack of disks. To launch the utility double-click on the task bar icon. Windows NT 3.51 does not have a task bar. FastCheck will appear as a minimized icon on the desktop. 5-1 FastCheckTM Monitoring Utility Running FastCheck As described in the Installation section, the default option for FastCheck is to load during startup of Win95/98/NT . It appears minimized on the taskbar (below far right) as shown under Win 95/98/NT (4.0). Under Win NT 3.5x, it appears as a minimized icon on the desktop: Double-click the FastCheck icon (appears as 3 disk drives) on the taskbar or desktop. OR select FastCheck utility from the Win95/98/NT Start button shown below: 5-2 FastCheckTM Monitoring Utility FastCheck Monitoring Utility Main Screen Once FastCheck is selected, the FastCheck Monitoring Utility window will appear. The main pane has three information window tabs: Array, Controller, and Options. The Array tab is the default screen as shown below: Array Window The Array Window displays information about the arrays configured on your FastTrak66 through the FastBuild BIOS. From this window, you can also perform data Synchronization of mirrored arrays, or Rebuild data from one drive to a replacement drive within a mirrored array. While the Array Window does not allow you to change the array configurations directly, it clearly identifies which drives are associated with each array shown in the left pane. By left-clicking on the Array #, the right pane shows the following information categories for that array: RAID mode: (Striping, Mirroring, Mirroring & Striping, Spanning) Mapping: (similar to physical drive specifications) describing # of cylinders, heads, and sectors of the array’s “virtual” drive as seen by the system Size: Storage capacity of the array Status: (Functional, Critical, Offline) Functional: Means the array is providing full functionality Critical: Used only in reference to a Mirroring array (RAID 1 or RAID 0+1). A problem has been detected in one of the drives of the array and the drive has been taken “offline.” However, a “critical” array will continue to save and retrieve data from the remaining working 5-3 FastCheckTM Monitoring Utility drive(s). Promise recommends replacing the failed drive as soon as possible since a “Critical” array offers no data redundancy. Offline: This would appear most commonly within a RAID 0 or Spanning array. The “Offline” results from a drive having failed which has taken the entire array “offline.” In this case, you have likely lost data. Fix/ replace the drive that has failed, then restore data from a backup source. Array Drive Information By left-clicking on a drive member of an array in the left pane, the right pane shows the following information categories for that array: Status: (Okay, Bad, Offline, Rebuilding) Okay: Means the drive is working normally Bad: A problem has been detected in the drive and the drive taken offline. Mirrored arrays will continue to function without the drive. Striped and Spanning arrays will go offline when a drive fails. In this case, you have likely lost data. Fix/replace the drive that has failed, then restore data from a backup source. Offline: Drives that are NOT identified as “bad” may be taken offline if part of a Striping or Spanning array containing a “bad.” drive. These drives do NOT need to be replaced, however. Rebuilding: For drives in a mirroring array, this indicates the target drive in the rebuild process. 5-4 FastCheckTM Monitoring Utility Size: Indicates capacity of individual drive Location: Shows physical location of drive. Indicates on which IDE channel (1 or 2), and whether drive is Master or Slave on cable. This allows user to identify drives for removal/replacement. Mapping: Indicates physical parameters of drive (cylinders, heads, sectors) Timing: Shows selection of drive timing (directly related to burst speed) based on type of drive and cable used. Array Pull-down Menu At the bottom of the Array window, it indicates to right-click on an Array to perform synchronization or rebuild operations. Right-clicking displays the following pull-down menu: From this menu, users may choose to have the Window appear on top, Minimize, Synchronize mirrored drives, Rebuild a mirrored array, About check version #, or Exit. 5-5 FastCheckTM Monitoring Utility Array Synchronization Access array synchronization using the Array pull-down menu (see above section). Synchronization is a periodic maintenance procedure for Mirroring (RAID 1, RAID 0+1) arrays to maintain data consistency on all mirrored drives. In operation, array synchronization compares data on the mirrored drives for any differences. If there are differences detected, data from the primary drive(s) is automatically copied to the secondary drive(s). This assures that all mirrored drives will contain the exact information. To synchronize, choose the Array Tab View, right click the array, and choose “Synchronize” from the context menu. You can also “Schedule the array synchronization” under the Options Tab view. Once Synchronization is selected, you will be asked to “Initialize Synchronize process on Array #” by clicking OK.This will initiate the process. A progress bar will appear at the bottom of the FastCheck Monitoring window. 5-6 FastCheckTM Monitoring Utility NOTE: During Array Synchronization, users may continue to access the working array and perform normal PC functions. However, system performance will be slightly degraded and the process will take longer. To halt the Synchronization process, right-click the Array # again. The pull-down menu will appear showing the Stop Synchronize option as shown below. Once “Stop Synchronize” is selected, you will be asked to verify “Cancel Synchronization?” Click Yes to Stop or No to continue Synchronization. Array Rebuild This user command will effectively copy or overwrite data from an existing data drive in the array on to a blank drive. The operation will be typically used when a failed drive has been replaced with a new drive within a mirrored array. NOTE: During Array Rebuild, users may continue to access the working array and perform normal PC functions. However, system performance will be slightly degraded and the rebuild process will take longer. Remember during Array Rebuild, the array does NOT provide data redundancy. It is recommend that all rebuilds be carried out to completion. To perform a Rebuild, choose the Array Tab View, right click the array, and choose Rebuild from the context menu. Once Rebuild is selected, you will be asked to “Initialize Rebuild process on Array #” by clicking OK.This will open the Rebuild Wizard Step 1 screen shown below: 5-7 FastCheckTM Monitoring Utility Rebuild Wizard If there are multiple arrays defined, you must select the proper Array #. Press Next button to proceed to Step 2 of Rebuild Wizard or Cancel button to stop. 1 2 In Step 2 above, you must select the Target drive which will receive data. Make sure you select the blank new or replacement drive. The unselected drive will contain “good” data. It will be the remaining working drive of an array, or a system drive containing existing data that you wish to mirror. Make absolutely sure and double-check which drive is which. If data exists on the target drive, it will be over-written. Click the Next button to proceed to Step 3 or Cancel button to stop. 5-8 FastCheckTM Monitoring Utility Step 3 confirms the Target or “Rebuild” disk by Array # and drive ID. Click Finish button to initiate physical Rebuild, Back button to review Step 2, or Cancel button to Stop. Rebuild Progress Bar Once Array Rebuild is started, users are returned to the FastCheck Monitoring window. A progress bar will appear at the bottom of the FastCheck Monitoring window similar to below: NOTE: When a “spare” unassigned drive is present on the FastTrak66, a rebuild will automatically be performed from the remaining working drive. 5-9 FastCheckTM Monitoring Utility To halt the Rebuild process, right-click the Array # again. The pull-down menu will appear showing the Stop Rebuild option as shown below. Once “Stop Rebuild” is selected, you will be asked to verify “Cancel Rebuild?” Click Yes to Stop or No to continue Rebuild. 5-10 FastCheckTM Monitoring Utility Controller Window Clicking on the Controller tab, will reveal the Controller Window. This displays physical information about the location of FastTrak66, data channels on the card, and the attached drives. Controller Card Information By left-clicking on the FastTrak icon, the right pane shows the following information categories for that array: PCI Slot: Shows identification of PCI slot where FastTrak66 resides IRQ: Identifies interrupt request assigned to PCI slot Bus Master Base: Shows base address in hex numbering for board’s bus master function 5-11 FastCheckTM Monitoring Utility Controller Channel Information Left-clicking on a given Channel icon or # in the left pane, will show the Base IO addresses of the channel in the right pane: Controller Drive Information Left-clicking on a given Drive icon or ID in the left pane, will show similar information categories as the Array Window Drive Information in the right pane: Status: (Okay, Bad, Offline, Rebuilding) Okay: Means the drive is working normally Bad: A problem has been detected in the drive and the drive taken offline. Mirrored arrays will continue to function without the drive. Striped and Spanning arrays will go offline when a drive fails. In this case, you have likely lost data. Fix/replace the drive that has failed, then restore data from a backup source. Offline: Drives that are NOT identified as “bad” may be taken offline if part of a Striping or Spanning array containing a “bad” drive. These drives do NOT need to be replaced, however. 5-12 FastCheckTM Monitoring Utility Rebuilding: For drives that are part of a mirroring array, this indicates the target drive in the rebuild process. Size: Indicates capacity of individual drive Location: Shows physical location of drive. Indicates on which IDE channel (1 or 2), and whether drive is Master or Slave on cable. This allows user to identify drives for removal/replacement. Mapping: Indicates physical parameters of drive (cylinders, heads, sectors) Timing: Shows selection of drive timing (directly related to burst speed) based on type of drive and cable used. Options Window Clicking on the Options tab reveals the Options Window. Array administrators can customize the FastCheck Monitoring Utility in four major areas: Notification, Array Synchronization Scheduling, setting Password, Desktop Appearance. Most options relate to Mirroring arrays (RAID 1, RAID 0+1). Notification Enable audible prompt checkbox turns on/off the alarm of an event (typically a drive failure, or completion of rebuild or synchronization). Popup message box checkbox turns on/off the appearance of an event message box that would typically indicates a drive failure, or completion of rebuild or synchronization. 5-13 FastCheckTM Monitoring Utility Use log file checkbox allows writing operating event logs of the array activity (alerts and status reports) to a given file name and directory. If a file name is used but the path left blank, the default directory is the same as the FastCheck Utility (typically C:\Program Files\Promise\FastTrak66). Use NT system event log checkbox is greyed out under Win 95/98 automatically. Under Win NT it permits user to write array logging to NT’s own event log. To view FastCheck events under Windows NT, go to Start/Programs/ Adminstrative Tools/Event Viewer. In the Event Viewer, choose “Log” from the menu bar, then check “Application.” Any events generated by FastCheck will appear under the Source column as “FastCheck.” Schedule Array Synchronization (see page 5-6 for more information) Disable checkbox turns off scheduling of synchronization. If left unchecked, the Scheduling section is highlighted. Schedule event drop down box allows scheduling synchronization once per x minutes, daily, weekly, or monthly. This allows synchronization to take place during an off-hour when the system is either not in use or not in peak demand. Start time designates hr/min/ am/pm On the designates day of week or by ordinal (1st, 2nd, 3rd....) selection 5-14 FastCheckTM Monitoring Utility Password Enable checkbox turns on use of Password every time the FastCheck Monitoring Utility icon is selected or the program run from the Start menu. Once checked, a “Set Password” window appears: Once the password feature is enabled, the following menu will appear on each use of FastCheck: Change the Password: First use the original password to return to the FastCheck Monitoring Window. Click on Options tab, then click on the Change button in the Password section. Desktop Appearance Start minimized checkbox directs the Utility to remain minimized on the Windows toolbar Always on top checkbox tells the Utility to appear above all programs until closed or minimized manually. 5-15 FastCheckTM Monitoring Utility This Page Intentionally Left Blank Chapter 6 Understanding Disk Array Concepts Disk Array Adapter FastTrak66 is a high performance Ultra ATA/EIDE RAID controller card that features parallel data channel operation and an onboard BIOS. The two channels on the FastTrak66 support parallel operation that allows for overlapped I/O under multi-tasking operating systems and sharing the workload between multiple drives. Adapter BIOS The FastTrak66 card contains a BIOS code that extends the standard disk service routine provided through Int13. The BIOS is bootable for DOS and other operating systems that rely on the system BIOS for drive operation. FastTrak66 can support drives and disk arrays with capacities exceeding 8.4 GB using Extended Interrupt13 support. When the FastTrak66 BIOS appears during bootup, users can press <F2> to enter the FastBuildTM setup to select from menu settings. FastBuildTM Auto Menu Setup This setup utility is used to build and manage FastTrak66 disk arrays. The utility is menu driven and features the <1> Auto Setup option that uses a simple, interactive setup process. Once the array is built, all the array members store the configuration information in the drive’s reserved area. See Chapter 4 that provides descriptions of individual functions. Reserved Sector Array configuration data about the drive member and other members in the disk array are saved on a special location on the disk drives called the reserved sector. If any member of the array becomes corrupt or lost, the redundant configuration data on the other members can be used for rebuilds. Disk array members do not have a “memory” of their drive positions. This allows drives to be placed on different FastTrak66 connectors or cards within the system without reconfiguring or rebuilding. 6-1 Understanding Disk Array Concepts Disk Array T erms Disk Array Description A “disk array” is formed from a group of 2 or more disk drives which appear to the system as a single drive. The advantage of an array is to provide better throughput performance and/or data fault tolerance. Better performance is accomplished by sharing the workload in parallel among multiple physical drives. Fault tolerance is achieved through data redundant operation where if one (or more) drive fails or has a sector failure, a mirrored copy of the data can be found on another drive(s). For optimal results, select identical Ultra ATA/66 drives to install in disk arrays. The drives’ matched performance allows the array to function better as a single drive. Disk Array Member The individual disk drives in an array are called “members.” Each member of a specific disk array is coded in their “reserved sector” with configuration information that identifies the drive as a member. Disk Array Types For most installations, the FastBuildTM setup “<1> Auto Setup” option will configure your system. There are four disk array types in three categories that can be installed on the FastTrak66 card. Striping is in the Performance category while Mirroring, Striping/ Mirroring are in the Fault Tolerance category. Spanning (JBOD) is in the Capacity category. Disk arrays within the Performance and Fault Tolerance categories conform with the Redundant Array of Independent Disks technology, or RAID. The RAID levels supported are 0, 1, and 0/1. RAID Level Read/Write Performance Redundancy Capacity Number of Drives RAID 0 (Striping) RAID 1 (Mirroring) RAID 0+1 (Stripe/Mirror) Best/Best High /Normal Best/High --50% min 50% min 2 to 4 2 4 JBOD (Spanning) Normal/Normal - - - 2 to 4 All disk members in a formed disk array are recognized as a single physical drive to the system. 6-2 Understanding Disk Array Concepts Supported Disk Array T ypes Striping (RAID 0) Reads and writes sectors of data interleaved between multiple drives. When any disk member fails, it affects the entire array. Performance is better than a single drive since the workload is balanced between the array members. This array type is for high performance systems. Identical drives are recommended for performance as well as data storage efficiency. The disk array data capacity is equal to the number of drive members times the smallest member capacity. For example, one 1GB and three 1.2GB drives will form a 4GB (4 x 1GB) disk array. Stripe Size - a value can be set from 1KB to 1024KB sector size. The size can directly affect performance. In the FastBuild BIOS, the “Desktop” default is 8KB while “Server” and “A/V Editing” are 64KB. Mirroring (RAID 1) Writes duplicate data on to a pair of drives while reads are performed in parallel . IDE RAID 1 is fault tolerant because each drive of a mirrored pair is installed on separate connectors - follow the “Drive Setup By Connector” chart in Chapter 3. FastTrak66 performs reads using advanced data handling techniques that distribute the workload in a more efficient manner than using a single drive. When a read request is made, FastTrak66 selects the drive positioned closest to the requested data, then looks to the “idle” drive to perform the next read access. 6-3 Understanding Disk Array Concepts If one of the mirrored drives suffers a mechanical failure (e.g. spindle failure) or does not respond, the remaining drive will continue to function. This is called Fault Tolerance. If one drive has a physical sector error, the mirrored drive will continue to function. On the next reboot, the FastBuildTM utility will display an error in the array and recommend to replace the failed drive. Users may choose to continue using their PC, however Promise recommends replacing the failed drive as soon as possible. See Chapter 4 for a functional description. Due to redundancy, the drive capacity of the array is half the total drive capacity. For example, two 1GB drives that have a combined capacity of 2GB would have 1GB of usable storage. With drives of different capacities, there may be unused capacity on the larger drive. Spare Drive -- Under a RAID 1 setup, an extra “hot spare” drive can be attached to the FastTrak66 and not assigned to the array. In this case, it will be put on standby. This drive will be activated to replace a failed drive that is part of the mirrored array. A rebuild is performed automatically in the background to mirror the good drive onto the spare. At a later time, the system can be powered off and the failed drive can be physically removed and replaced. Spare drives must be the same or larger capacity than the smallest array member. Striping/Mirror (RAID 0+1) 6-4 Understanding Disk Array Concepts A combination of both above array types. It can increase performance by reading and writing data in parallel while protecting data with duplication. A minimum of four drives needs to be installed. With a four-drive disk array, two pairs of drives are striped. Each pair mirrors the data on the other pair of striped drives. The data capacity is similar to a standard Mirroring array with half of total capacity dedicated for redundancy. Dual Data Redundancy One unique (though rarely occurring) feature of RAID 0+1 is dual fault tolerance. This allows two drives to fail simultaneously and still maintain the integrity of data. There are six combinations in which two drives can fail; FastTrak66 protects the data array in four of them for most drives (some drives do not permit the Slave drive to continue to function if the Master drive fails). Assume the drives are configured as follows (M = Master, A/B indicates which striped pair the drive belongs to, # indicates which part of stripe data): M S IDE 1 IDE2 Drive A1 Drive B2 Drive B1 Drive A2 Under RAID 0+1, the array maintains data integrity if any 1&2 combination survives. Event Failed Drives Array Status Why? 1 2 3 4 5 6 A1/A2 B2/B1 A1/B2 B1/A2 A1/B1 B2/A2 Working Working Working Working Offline Offline B1/B2 retain array integrity A1/A2 retain array integrity B1/A2 retain array integrity A1/B2 retain array integrity B2/A2 contain only half of array data A1/B1 contain only half of array data Spanning (JBOD) 6-5 Understanding Disk Array Concepts A Spanning disk array (also aptly named as JBOD for “Just a Bunch of Drives”) is equal to the sum of all drives when the drives used are of different capacities. Spanning stores data on to a drive until it is full, then proceeds to store files onto the next drive in the array. There are no additional performance or fault tolerance array features in this array. When any disk member fails, the failure affects the entire array. Spanning may be considered for performance in certain instances. With striping, the performance is affected directly by the stripe block size. Block size should be tailored to the typical I/O on the drive — whether it is generally more random or sequential. However, what if there is no predictability of the type of I/O access? What if both random and sequential I/Os occur unpredictably? The performance of a striped array will fluctuate. In the end, this may result in no overall performance gain. With spanning, the performance factor simply reflects a single drive’s performance level, offers a more predictable transfer rate, and allows the use of mismatched drives. 6-6 Chapter 7 Operating System Installation The FastTrak66 card operates in various operating systems through either onboard BIOS or software drivers. These operating systems are fully supported by the FastTrak onboard BIOS driver: • • • DOS 5.x and above Windows 3.1x Windows for Workgroups 3.1x operation These operating systems have additional driver support provided on the Promise diskette. • Windows 95/98 • Windows NT 3.5x, 4.0 The following sections detail installation instructions for particular operating systems. DOS The DOS operating systems are supported by the FastTrak66 onboard BIOS. No additional drivers are required. For first time installation, follow the standard methods of installing the DOS operating system onto your hard disk: 1) Place “Disk 1” of your DOS installation diskettes into the A: drive 2) Type “A:\SETUP” at the A: prompt. 3) Follow the normal DOS installation procedures and refer to your DOS manual for additional details. OR 1) Place a DOS bootable diskette that contains both DOS FDISK.EXE and FORMAT.COM into the A: drive. 2) At the A: prompt, run your DOS FDISK utility program. 3) Create a Primary partition onto the hard disk. The utility program will continue until it asks you to put a DOS bootable floppy into the system and press a key to restart the system. 4) After rebooting to a DOS bootable floppy, run the DOS FORMAT command with the /S - type “FORMAT C: /S” from the A: prompt. Refer to the DOS Operating System manual for installation and partitioning/formatting additional hard disks. 7-1 Operating System Installation Microsoft Windows 3.1x The Windows 3.1x operating systems are supported by the FastTrak66 onboard BIOS. No additional drivers are required. Once the card is installed and the system rebooted, proceed with partitioning/formatting each FastTrak66 disk array as if it were a physical drive. Microsoft Windows95/98 driver Windows95/98 setup will show a “New Hardware Found” dialog box. Under versions Win95 4.00.950 and 4.00.950A an “Unknown PCI Device” will be detected. Under Win95 v. 4.00.950 B and Win98 “PCI RAID Controller” will be displayed. NOTE: To check the Windows95/98 version number, click the Control Panel from My Computer followed by the System icon. Under “System:” note the version number. 1) In the dialog box choose “Driver from disk provided by hardware manufacturer” button. 2) In the A: drive, insert the FastTrak66 utility diskette and type in “A:\WIN9x” when prompted for the directory. 3) Select “Promise Technology, Inc. PCI FastTrak66 Driver” and click on Next. The FastTrak66 driver is now copied onto the system and entered into the Windows95/98 driver database. 4) When the "System Settings Change" dialog box appears, remove the floppy diskette and click on “Yes” to restart the system. Windows95/98 will then restart for the driver installation to take effect. Confirming Windows95/98 Installation 1) From Windows95/98, open the Control Panel from My Computer followed by the System icon. 2) Choose the “Device Manager” tab and click the “+” in front of the “SCSI Controllers” hardware type. 3) The driver “Promise Technology, Inc. PCI FastTrak66 Driver” driver should be installed. 7-2 Operating System Installation Windows NT 3.5x and NT 4.0 FastTrak66 supports operation under Windows NT 3.5x and later versions. Driver Installation During Windows NT 3.5x and NT 4.0 Install 1a) Floppy Install: Boot the computer with the Windows NT installation diskettes. 1b) Floppyless Install: Boot from floppy and type “WINNT /B”. After files have been copied, the system will reboot. On the reboot, press <F6> when the message “Setup is inspecting your computer’s hardware configuration...” appears. 1c) CD-ROM Install: Boot from the CD-ROM and press <F6> when the message “Setup is inspecting your computer’s hardware configuration...”. 2) Press “S” to add a SCSI adapter. 3) Select “Other (requires disk provided by hardware manufacturer).” 4) Specify “a:\”, insert the Promise driver diskette into drive A: and press ENTER. 5) Select the “Promise Technology Inc. FastTrak66 RAID Controller” and click “OK”. Note: for CD installations, you must also specify the driver for your CD-ROM adapter (i.e. if using an ATAPI CD-ROM, specify the IDE 2.1 controller) 6) Follow the normal setup installation procedure. Installing Driver in an Existing Windows NT System If you will be attaching an existing drive to FastTrak66 that was already installed under a Windows NT installation, you must follow the steps to install the FastTrak66 NT Driver BEFORE you move the drive from your current IDE controller. Installing in Existing Win NT 3.5x Systems 1) In “Program Manager,” double-click on “Windows NT Setup” in “Main” group. 2) In “Windows NT Setup,” select “Options”, next choose “Add/Remove SCSI Adapters...” 3) In “SCSI Adapter Setup,” click on “Add...” 4) In “Select SCSI Adapter Option,” select “Other (Requires a disk from a hardware manufacturer)” in the “Adapter:” box. 7-3 Operating System Installation 5) One “Insert Diskette” box will appear. Insert the driver diskette into Drive A: and type “a:\” into dialogue box. 6) One “Select OEM Option” box will appear. Select “Promise Technology Inc. FastTrak66 RAID Controller”, click on “OK”. 7) One “Select SCSI Adapter Option” will appear. Click on “Install”. 8) After successful installation, the “SCSI Adapter Setup” box will show that “Promise Technology Inc. FastTrak66 RAID Controller” has been installed. 9) Reboot your computer to assure the proper working of the driver. Removing the Driver from Windows NT 3.5x 1) In “Program Manager,” double- click on “Windows NT Setup” in “Main” group. 2) In “Windows NT Setup”, select “Options”, next choose “Add/Remove SCSI Adapters...” 3) In “SCSI Adapter Setup,” select “Promise Technology Inc. FastTrak66 RAID Controller” and click on “Remove.” 4) After successful removing, the “SCSI Adapter Setup” box will show that “Promise Technology Inc. FastTrak66 RAID controller” has been removed. Installing in Existing Windows NT 4.x System 1) In “Start” Button choose “Control Panel” in “Setup” group. 2) In “Control Panel”, select “SCSI Adapter”, next choose “Drivers” Label 3) Choose “Add” button. 4) In “Install Driver” dialog, push “Have Disk...” button. 5) One “Install From Disk” box will appear. Insert the driver diskette intoDrive A: and type “a:\” into dialogue box. Choose “OK” 6) One “Install Driver” box will appear. Select “Promise Technology Inc. FastTrak66 RAID Controller” and click on “OK”. 7) One “Select SCSI Adapter Option” will appear. Click on “Install”. 8) After successful installation, the “SCSI Adapter Setup” box will show that “Promise Technology Inc. FastTrak66 RAID Controller” has been installed. 9) Reboot your computer for the driver to take effect. 7-4 Operating System Installation Removing the Driver from Windows NT 4.x 1) In “Start” Button choose “Control Panel” in “Setup” group. 2) In “Control Panel,” select “SCSI Adapter,” next choose “Drivers” label 3) Choose “Remove” button. 4) After successful removing, the “SCSI Adapter Setup” box will show that “Promise Technology Inc. FastTrak66 RAID Controller” has been removed. 7-5 Operating System Installation THIS PAGE LEFT INTENTIONALLY BLANK Chapter 8 Troubleshooting & T ips The following chapter is used to assist with troubleshooting conflicts and FastTrak66 installation problems. Also refer to the “README.TXT” file on the FastTrak66 driver and utility diskette for more recent information as well as the PromiseOnlineTM services listed in Appendix A. Eliminate Master/Slave combination problems Freeing additional IRQ resources Configuring PCI IRQ Assignment Set Mainboard CMOS Boot sequence Mainboard CMOS displays C: or D: drive failure during startup Coexist with IDE hard drives Drive cannot be formed into an array Critical Status Error during boot System locks up during bootup or when Windows starts Intermittent data problems Different drive lettering under Windows NT Promise Windows95/98 driver does not appear Device Manager Tips for Audio/Video Editing Eliminate Master/Slave combination problems Master/slave problems may exist between two IDE drives of different brands attached to a single cable. For both compatibility and better performance, choose drives of the same model/brand and install them on separate cables. Refer to the Drive Setup by Connector chart in Chapter 4 for more recommended drive placements. Freeing additional IRQ resources Since the Promise card supports PCI Interrupt sharing, it is possible to use IRQs already assigned to another PCI card. Interrupt Sharing is not supported with onboard IDE controllers. If the onboard IDE controller(s) are not used, you may disable the controllers to free IRQ 14 and/or 15. 8-1 TROUBLESHOOTING & TIPS Configuring PCI IRQ resources Setting the IRQ for a particular PCI slot will be different depending on the motherboard BIOS. This setting is usually made in the PCI Configuration and/or Plug and Play (PnP) section of the motherboard BIOS setup. There are three common methods that motherboard BIOS’s handle assignment of IRQs to PCI slots: 1) Specifically assigning an IRQ to a particular slot - You can tell the motherboard to use IRQ 10 for PCI slot 1, IRQ 11 for PCI slot 2, etc. 2) Listing which IRQs are available to be assigned to the PCI slots - This BIOS has an option where you specify “1st Available IRQ”, “2nd Available IRQ”, etc. The BIOS then scans the PCI slots for PCI cards and assigns these IRQs in the order that it finds the PCI cards. 3) Excluding an IRQ from being used by a PCI slot - If you have an ISA card that is using an IRQ, change the setting for this particular IRQ from “Available” to “used by ISA card” so that the motherboard will not assign this IRQ to a PCI slot. Consult your motherboard manual for information that is specific to your motherboard. Set Mainboard CMOS Boot sequence to boot to FastT rak66 On some Mainboard BIOS, it is necessary to set the Boot sequence to “SCSI, A:, C:” since the Promise card is identified as a SCSI card. Mainboard CMOS displays C: or D: drive failure during startup Do not reference C: or D: in the Mainboard Standard CMOS for drives attached to the FastTrak66 controller. Only enter drive information in the Mainboard CMOS if you have drives attached to a conventional add-on or onboard IDE controller. Coexist with IDE hard drives If an onboard IDE controller is installed with hard disks, enable support in the Mainboard Standard CMOS Setup for the drives. Note that the onboard IDE hard drives will then be the bootable hard disk unless the system BIOS has a boot sequence setting with a “SCSI, A:, C:” option. Drive cannot be formed into an array Drives must support Ultra DMA or Multi-word DMA and be free of media defects to be added into an array. Promise recommends to use new drives of the same model. Re-secure data and power cabling while checking for proper alignment. Typically, Pin 1 of the drive is closest to the power connector. 8-2 TROUBLESHOOTING & TIPS Critical Status Error during boot If a critical status error appears on the FastTrak66 BIOS startup screen for a mirrored array, there is a drive in the array which has failed or is not responding. The mirrored array has lost its fault tolerance but will still operate Before attempting a recovery, try powering the system off and on to reset the drive. Also confirm that cables are properly attached and the drive is receiving power. If the drive still appears to have failed, proceed to “Rebuild Array” option detailed in Chapter 4. System locks up during bootup or when Windows starts There may be a possible IRQ conflict with an ISA card. Identify what IRQs are used by ISA cards, enter the Mainboard PCI Setup, and reserve the IRQ for use with ISA. PCI slots cannot share IRQs with ISA cards. Intermittent data problems Do not exceed the 33Mhz PCI Bus speed. Pentiums set to higher than default settings or AMD K6 and Cyrix CPUs can exceed these limitations and cause intermittent boot and data problems. Different drive lettering under Windows NT This may happen when using a SCSI card in addition to the Promise card. Windows NT does not necessarily load the driver for the boot device controller first. This results in a drive that in MS-DOS is the C: drive being the D:, or E:, etc. in Windows NT. Use Windows NT’s Disk Administrator utility to reassign the letters which NT has assigned to the drives. See your Windows NT documentation for instructions on how to use Disk Administrator. Promise Windows95/98 driver does not appear Device Manager Windows may already be listing the controller under “Other Devices” instead of “Hard disk controllers” section. In Device Manager under “Other Devices” to see if it lists a “PCI Card”, or “RAID Controller”. If so, highlight this listing and click on the “Properties” button, and then click on the “Driver” tab. Depending on your version of Windows, choose either “Change Driver” or “Update Driver”. Then follow the on-screen prompts to complete installation of the driver. If Windows asks if you want to test if the device can be removed safely click on “CANCEL. Reboot the system to complete installation of the driver. 8-3 TROUBLESHOOTING & TIPS Tips for Audio/Video Editing Here are some tips that may optimize performance. We also recommend to review your editing card documentation for additional information. Use FastTrak66 as D: or other non-bootable drive in a Striped Array For A/V editing, keep the original system boot drive on the standard IDE controller as C: drive. Partitioning software such as FDISK will see the array as one physical drive, D: drive (or later). This will prevent file fragmentation and provide better accessibility to the array. Optimize Array for “Performance” The Promise FastBuild BIOS Utility autosetup menu allows optimizing the array for A/V Editing . The default Performance setting (Striping) selects a Stripe Block size of 64. This larger block size is recommended for the data streaming requirements of A/V editing. You may select an even larger block size in manual mode (see chapter 4). FastBuild (tm) Utility 1.xx (c) 1995-99 Promise Technology, Inc. [ Auto Setup Options Menu ] Optimize Array for: Typical Application usage: Performance A/V Editing [ Auto Setup Configuration ] Mode ...................................................... Stripe Stripe Block Size ......................................... 6 4 Drive used in Array ...................................... 2 Array Disk Capacity ........................... 13044 [ Keys Available ] [] Up [] Down [, , Space] Change Option [ESC] Exit [Ctrl-Y] Save Re-Configure PCI Latency Setting The PCI Latency setting appears in some Mainboard BIOS. The setting governs how much time is allocated to service each PCI slot. Promise recommends a valueof 64. An optimal value is neither too high nor too low and will vary from system to system. 8-4 A APPENDIX A Frequently Asked Questions This section lists frequently asked questions involving pre-installation, drive issues, installation, and post-installation. Pre-Installation (Speed, Device T ypes, Capacity , Cabling) Q: What kind of hard drives can I use for a FastTrak66 array? A: You can use any IDE/EIDE hard drive(s) to create arrays on the FastTrak66. You should use matching drives for multiple-drive arrays to maximize capacity usage as well as performance. Ultra ATA/66 drives are recommended for highest performance. Q: Will APM (Advanced Power Management) work with HDDs on the FastTrak/66? A: APM will not work with HDDs on the FastTrak/66. This is because the system sees the card as a SCSI card. Q: Can I use ATAPI devices on the FastT rak66 controller? A: No. There is no driver layer on the FastTrak66 controller which will support ATAPI packet messages. Q: Will the FastTrak/66 work with a 37Mhz or 41Mhz PCI bus speed? A: The current PCI 2.1 specification is for a 33Mhz PCI bus speed. The FastTrak/66 is designed around the specification. In most cases, a higher PCI bus speed will result in a variety of different errors. While some people have been able to get these higher speeds to work, since it is out of specification we cannot support it. Q: How can I change the e r sources that the FastTrak uses? A: The FastT rak/66 is fully PnP . This means all the resources that it uses are given to it by the PnP BIOS on the motherboard. The FastTrak/66 does support IRQ sharing, but this will not work unless ALL the concerned devices support the feature. If your motherboard allows you to control the assignment of these resources, you may be able to remedy the problem by “playing around” with them. You can also try resetting the configuration data in your CMOS. This is usually an option in the PnP section of your CMOS. Otherwise, the only way you A-1 A APPENDIX A might be able to affect these assignments is to switch the PCI slot that the card is in. Q: How does the FastT rak/66 RAID contr oller provide storage and/ or data protection with their arrays? A: FastTrak66 implements third different types of RAID levels as follows: RAID 0 (stripe) For capacity -- The FastTrak/66 array will be as big as the smallest HDD in the array times however many HDDs are in the array . Any larger HDDs will simply be truncated. The truncated space on the bigger HDDs will then be unusable. For sustained data transfers --Using FastTrak/66, a RAID 0 array consisting of two HDDs will transfer at about twice the speed of the slowest HDD in the array . A RAID 0 array consisting of four HDDs will transfer at about three times the speed of the slowest HDD in the array. RAID 1 (mirror) For capacity -- The FastTrak/66 array will be as big as the smallest HDD in the array . The larger HDD will simply be truncated.The truncated space on the bigger HDD will then be unusable. For sustained data transfers --The FastTrak/66 array will write data at the rate of the slowest HDD in the array . The FastT rak/66 array will read data at twice the rate of the slowest HDD in the .array JBOD (spanning) For capacity -- The FastTrak/66 array will combine the sizes of the HDDs in the array . As soon as one HDD is filled to capacity , the next HDD will automatically be used. For sustained data transfers --There is no performance increase with spanning (reading or writing). A-2 A APPENDIX A Drive Issues Q: Can I add a drive to a FastTrak66 RAID array via hot-swap and dynamically adjust the array size/configuration? A: No. The FastTrak66 system does not support dynamically adjustable RAID size/configurations. Q: Do the HDDs on the FastT rak/66 have to be the same size? A: The HDDs that you use with the FastTrak/66 do not have to be the same size. If the sizes fer, dif the FastT rak/66 will “adjust” the HDDs so that they are compatible. Basically , it will truncate the bigger HDD so the sizes match. Any unused space that results from this is unusable, so don’t use HDDs that differ too much. It’ll work, but it’s a waste. Q: Can I take a set of drives which make up an array created on one FastTrak66 server and move it to another FastTrak66 server? A: Yes. All FastTrak66 controllers read the arrays the same. way Once the drives are all connected, you must restart the system for it to recognize the newly-inserted array configuration. Q: Can I take a drive used in a FastT rak66 array and access it dir ectly with a different controller, such as the one integrated on the motherboard? A: Yes, but only under certain configurations. The following array configurations will allow the drive(s) to be accessed individually on another controller: mirror (RAID 0), single drive striped (RAID 1), or single drive spanned (JBOD). Multiple drives striped or spanned will not work. Also, the controller must address the drives as LBA, not CHS. Q: If I have a problem with one of the drives on the FastT rak66, how can I low level format it to correct the problem? A: Do NOT do this. Low-level formatting IDE drives is unnecessary and generally does not correct problems which might be experienced during use. Errors such as bad sectors or ECC/CRC failure are best remedied by completely replacing the drive. For this reason, drives attached to the FastTrak66 controller should NOT be low level formatted. A-3 A APPENDIX A Q: Do I have to install disk management software on my array in order to access the full storage capacity of drives? A: No! Disk management software would only complicate things. The array should be fully addressable by your O/S as it is. Remember that some operating systems have varying limits on the sizes of partitions and logical drives that can be defined. Consult your O/S documentation about partitioning larger drives. Q: What system BIOS CMOS settings do I use for the drives on the FastTrak66 controller? A: None. The drives on the FastTrak66 controller are supported by the FastTrak66 BIOS and/or an O/S drivers, not by your system BIOS. Q: How do I partition/format my FastTrak/66 RAID array? A: The FastTrak/66 “fools” the system into thinking that it’s dealing with a single HDD. Therefore, anything that you can do to a single HDD can also be done to a FastT rak/66 array . You can, and should, use the FDISK and FORMA T utilities to partition/format the array . You can partition the array however you see fit. You can format the array with whatever file system you wish. Installation Issues (NT, I2O Drivers, Drive Capacity , Booting, IRQ Settings) Q: Why are some drives recognized by the FastT rak66 Array Setup utilities with only partial capacity? A: Some hard drive models are shipped with a jumper that reduces the addressable capacity of the drive to prevent problems with older systems which won’t support larger drives. Consult the documentation accompanying the hard drive to set the jumper appropriately in order to utilize the full capacity of the drive. Q: How can I change the system boot sequence in order to boot from the FastT rak66 array? A: The boot sequence is controlled by the system BIOS. As far as the system BIOS is concerned, the FastTrak66 controller and defined arrays are categorized as a “SCSI” device (even though the BIOS will not attempt to access the FastTrak66 as any type of SCSI device). A-4 A APPENDIX A This allows you to set the boot sequence in your BIOS CMOS setup utility to boot from “SCSI” (an add-in controller like the FastTrak66) first, rather than “IDE” (an IDE controller built onto the motherboard or one which effectively replaces it). If there are multiple SCSI add-in controllers in the system, then the boot sequence among them will be determined exclusively by their PCI slot priority. PCI slot #1 will be first, slot #2 second, etc. Put the FastTrak66 controller in the PCI slot where it will be accessed ahead of other SCSI controllers if you want to boot from the array. Q: How can I change the boot sequence between a PCI SCSI card and the FastT rak66 RAID array? A: Since all PCI devices are all PnP, it is difficult to determine which device is addressed first. Some newer motherboard BIOSes may use advanced options that identify devices and allow you to select which device will be assigned resources first. Otherwise you may have to physically switch the device cards on the PCI slots so that the boot device is in the highest priority slot number (see previous question). If you do not require the FastTrak66 BIOS to boot from an array and it is only to be used through a driver under the O/S, one simpler solution would be to disable the FastTrak66 BIOS so that it does not affect the boot sequence at all. Post-Installation (Power Up, BIOS Initialization, Memory Managers, Caching, Booting) Q: Why does my system reboot after the QEMM driver loads from CONFIG.SYS? A: The problem lies in the QEMM “Stealth” feature. This feature places the drive information from the DOS System area into the upper reaches of RAM where Windows resides. This causes the FastTrak66 to lose track of its drives when asked to execute the next line in the CONFIG.SYS file. This forces the reboot that you see. Disable QEMM’s stealth feature to correct this problem. A-5 A APPENDIX A Q: Why can’t I see the drives on the FastT rak66 under FDISK? A: The FastTrak66 controller is dedicated to RAID array management and does not provide any means of addressing individual hard drives through the Int 13h interface used by FDISK. In order to access drives on the FastTrak66 from MSDOS at all, you must first create a RAID array. A-6 B APPENDIX B Contacting T echnical Support Promise Technical Support provides several support options for Promise users to access information and updates. We encourage using one of our electronic services which provide product information updates for the most efficient service and support. If you decide to contact us, please have the following information available before reaching a Promise Technical Support technician: 1. Product Model & Serial # 2. BIOS and Driver Version Numbers (check the controller BIOS banner and floppy label for version information) 3. Description of Problem 4. System Configuration ← Mainboard and CPU type ← Hard Drive Models ← Other Controllers These are the available Technical Support sources: Internet E-Mail Support [email protected] PromiseOnline TM World Wide Web e http://www .promise.com RecommendedTechnical Service Tech Support; Documents, Drivers, Utilities FAX Technical Support (408) 452-9163 FAXBack Document Service (408) 452-9160 Attention to Technical Support Retrieve Document #2150; Call from FAX phone handset Phone Technical Support (408) 452-1 180 8:30-5:00p.m. M-F Pacific Standard Time If you wish to write to us for support, address it to: Promise Technology, Inc. Attn: Technical Support 1460 Koll Circle, Suite A San Jose, CA 95112 USA B-1 This Page Intentionally Left Blank C APPENDIX C Warranty Information Limited W arranty Promise Technology, Inc. (“Promise”) warrants that for two (2) years from the time of the delivery to the original end user of the product, (a) the product will conform to Promise’s specifications, and (b) the product will be free from defects in material and workmanship under normal use and service. This warranty: (a) applies only to products that are new and in their original cartons on the date of purchase; (b) is not transferable; and (c) is valid only when accompanied by a copy of the original purchase receipt. This warranty shall not apply to defects resulting from the following causes: - improper or inadequate maintenance by the end user unauthorized modification operation outside the environmental specification for the product abuse, result of an accident, misuse, negligence, misapplication, natural or personal disaster maintenance other than by Promise or an authorized service center. Disclaimer of Other W arranties This Warranty covers only parts and labor and excludes any coverage on software items except as expressly set above. Except as expressly set forth above, Promise DISCLAIMS any warranties, express or implied, by statute or otherwise, regarding the product including, without limitation, any warranties for fitness for any purpose, quality, merchantability, non-infringement, or otherwise. Promise makes no warranty or representation concerning the suitability of any product for use with any C-1 C APPENDIX C other item. You assume full responsibility for selecting products and for ensuring that the products selected are compatible and appropriate for use with other goods with which they will be used. Promise DOES NOT WARRANT that any product is free from errors or that it will interface without any problems with your computer system. It is your responsibility to back up your computer or otherwise save important data before installing any product and to continue to back-up your important data regularly. Promise’s sole responsibility with respect to any product is, at Promise’s election, to (a) replace the product with a conforming unit of the same or a superior product; (b) repair the product; or (c) recover the product and refund the purchase price for the product, less the amount of any damage and compensation for any use of the product. Promise shall not be liable for the cost of procuring substitute goods, or services, lost profits, unrealized savings, equipment damage, costs of recovering, reprogramming, or reproducing any programs or data stored in or used with the products, or for any other general, special, consequential, indirect, incidental, or punitive damages, whether in contract, tort, or otherwise, notwithstanding the failure of the essential purpose of the foregoing remedy and regardless of whether Promise has been advised of the possibility of such damages. Promise is not an insurer. If you desire insurance against such damage, you must obtain such insurance from another party. Some states do not allow the exclusion or limitation of incidental or consequential damages for consumer product so the above limitation or exclusions may not apply to you. This warranty gives specific legal rights, and you may also have other rights which vary from state to state. This limited warranty is governed by the laws of the state of California. C-2 D APPENDIX D Returning a Product for Repair If you suspect the product is not working properly or if you have any questions about your product, Contact our Technical Support Staff through one of our Technical Services with the following: Product Model and Serial# (Required) Return Shipping Address Daytime Phone Number Description of the Problem Copy of original purchase invoice on hand The technician can assist in determining whether the Product requires repair. If the Product needs repair, our Technical Support Department representatives will issue a return merchandise authorization (“RMA”) number. Then return ONLY the specific defective part that is covered by the warranty (do not ship cables, manuals, diskettes, etc.) with a copy of your proof of purchase to: Promise Technology, Inc. Customer Service Department Attn: RMA# ______ 1460 Koll Circle San Jose, CA 95112 You must follow the following packaging guidelines for returning products: (a) Use the original shipping carton and packaging (b) Include a summary of the problem(s) with product, return address, and daytime phone number (c) Include a copy of proof of purchase (d) With the supplied RMA#, label “Attn: RMA#______” along with the Promise shipping address. You are responsible for the cost of insurance and shipment on the product to Promise. Damage caused due to improper transportation or packaging is not covered under the above warranty. D-1 D APPENDIX D In repairing the unit(s), Promise may elect to replace parts with new or reconditioned parts, or replace the entire unit with a new or reconditioned unit. In the event of a replacement, the replacement unit will be warranted for the remainder of the two (2) year period for the product or thirty days, whichever is longer. Promise will pay for only standard return shipping charges. You will be required to pay for any shipping options such as express shipment you require. Your Responsibilities You are responsible for determining whether the product is appropriate for your use and will interface with your equipment without dysfunction or damage. You are responsible for backing up your data before you install any product and for regularly backing up your data after you install the product. Promise is not liable for any damage to equipment or data resulting from use of any product. D-2