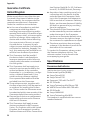
1
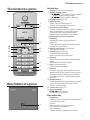
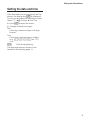
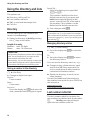
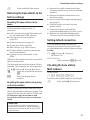
Dualphone Single Cordless Ope rating M a n u al DP 450 The handset at a glance Handset keys The handset at a glance 15 © £ 1 2 INT 1 10.06.06 FixedLine 09:45 SMS 3 14 13 12 4 5 11 6 10 7 9 8 Base Station at a glance 1 Display in idle status (example) 2 Battery charge status ¢ £ ¤ (1/3 charged to fully charged) ¡ flashes: battery nearly empty ¢ £ ¤ flashes: battery charging 3 Display keys (page 13) 4 Message key Opens calls and message lists Flashes: new message or new call 5 End call key, On/Off key End call, cancel function, go back one menu level (press briefly), back to idle status (press and hold), activate/deactivate handset (press and hold in idle status) 6 Connection socket for headset 7 Hash key Keypad lock on/off (press and hold, page 12) Switch between upper/lower case letters and digits for text entry 8 Call-by-call list key (not for VoIP) Open call-by-call list 9 Recall key (not for VoIP) Enter flash (press briefly) Insert a pause (press and hold) 10 Star key Ringer tones on/off (press and hold in idle status) Open special characters table 11 Key 1 (press and hold) Call the network mailbox 12 Talk key Accept a call, open last number redial list (press briefly in idle status), select connection type and start dialling (press briefly/ press and hold after entering the number, page 18) 13 Handsfree key Switch between earpiece/handsfree mode Lights up: handsfree talking activated Flashes: incoming call 14 Control key (page 12) 15 Signal strength ¦ § ¨ (low to high) ¥ flashes: no reception Base station key 1 1 Paging key Lights up: LAN connection active (phone is connected to router) Flashes: data transfer to LAN connection Press briefly: start paging Press and hold: set base station to registration mode 1 Contents Contents SMS (text messages) . . . . . . . . . . 16 Base station at a glance . . . . . . . . 1 Writing/sending/saving an SMS . . . . . . . 16 Receiving/reading an SMS . . . . . . . . . . . 17 Managing SMS lists . . . . . . . . . . . . . . . . 17 Notification by SMS . . . . . . . . . . . . . . . . 17 Safety precautions . . . . . . . . . . . . 3 E-mail notifications . . . . . . . . . . . 18 DP450 – More than just a telephone . . . . . 4 Entering access data for the incoming e-mail server . . . . . . . . . . . . . 18 Opening the incoming message list . . . 18 The handset at a glance . . . . . . . . 1 Setting the date and time . . . . . . . 5 No connection to the internet/ VoIP Server . . . . . . . . . . . . . . . . . . . 6 Menu tree . . . . . . . . . . . . . . . . . . . . 7 Making calls with VoIP and the fixed network . . . . . . . . . . . . 10 Making an external call . . . . . . . . . . . . . 10 Ending a call . . . . . . . . . . . . . . . . . . . . . 10 Accepting a call . . . . . . . . . . . . . . . . . . . 11 Switching between earpiece and handsfree mode . . . . . . . . . . . . . . . . . . 11 Setting and dialling emergency numbers . . . . . . . . . . . . . . . . . . . . . . . . 11 Operating the handset . . . . . . . . 12 Activating/deactivating the handset . . . . . . . . . . . . . . . . . . . . . . . . . 12 Activating/deactivating the keypad lock . . . . . . . . . . . . . . . . . . . . . . 12 Control key . . . . . . . . . . . . . . . . . . . . . . 12 Display keys . . . . . . . . . . . . . . . . . . . . . . 13 Reverting to idle status . . . . . . . . . . . . . 13 Using the directory and lists . . . . 14 Directory . . . . . . . . . . . . . . . . . . . . . . . . 14 Last number redial list . . . . . . . . . . . . . . 14 Opening lists with the message key . . . 15 Dialling from the directory/list. . . . . . . . 15 2 Handset/base station settings . . 19 Changing the handset display keys . . . . 19 Adjusting the loudspeaker volume . . . . 19 Setting ringer tones . . . . . . . . . . . . . . . . 19 Activating/deactivating advisory tones . . . . . . . . . . . . . . . . . . . . . . . . . . . 20 Setting the alarm clock . . . . . . . . . . . . . 20 Changing the system PIN on the base station . . . . . . . . . . . . . . . . . . . 20 Restoring factory settings . . . . . . . . . . . 20 Restoring the base station to the factory settings . . . . . . . . . . . . . . . . . . . 21 Setting default connection . . . . . . . . . . 21 Checking the base station MAC address . . . . . . . . . . . . . . . . . . . . . 21 Web configurator. . . . . . . . . . . . . 22 Connecting the PC to the Web configurator . . . . . . . . . . . . . . . . . . . . . 22 De-registering . . . . . . . . . . . . . . . . . . . . 22 Web configurator functions . . . . . . . . . 22 Appendix . . . . . . . . . . . . . . . . . . . 25 Care . . . . . . . . . . . . . . . . . . . . . . . . . . . . 25 Contact with liquid . . . . . . . . . . . . . . . . 25 Authorisation . . . . . . . . . . . . . . . . . . . . 25 Guarantee Certificate United Kingdom . . . . . . . . . . . . . . . . . . 26 Specifications . . . . . . . . . . . . . . . . . . . . 26 DP450 – Free software . . . . . . . . . . . . . 27 Safety precautions Safety precautions Warning: Read the safety precautions and the user guide before use. Explain their contents and the potential hazards associated with using the telephone to your children. Only use the mains adapter supplied, as indicated on the underside of the base station. Fit only the recommended rechargeable batteries (page 26) of the same type! This means that you must not use any other battery type or non-rechargeable batteries as this could result in significant health risks and personal injury. Insert rechargeable batteries with the correct polarity, and use them according to this user guide (symbols are attached to the inside or outside of the handset’s battery compartment). The operation of medical appliances may be affected. Be aware of the technical conditions in your particular environment, e.g. doctor’s surgery. Do not hold the rear of the handset to your ear when it is ringing or when the handsfree function is activated. Otherwise you risk serious and permanent damage to your hearing. The handset may cause an unpleasant humming noise in hearing aids. Do not install the base station in bathrooms or shower rooms. The handset and base station are not splashproof (page 25). Do not use your phone in environments with a potential explosion hazard, e.g. paint shops. If you give your DP450 to someone else, make sure you also give them the user guide. All electrical and electronic products should be disposed of separately from the municipal waste stream via designated collection facilities appointed by the government or the local authorities. This crossed-out wheeled bin symbol on the product means the product is covered by the European Directive 2002/96/EC. The correct disposal and separate collection of your old appliance will help prevent potential negative consequences for the environment and human health. It is a precondition for reuse and recycling of used electrical and electronic equipment. For more detailed information about disposal of your old appliance, please contact your local council refuse centre or the original supplier of the product. Please note: If the key block is switched on, even emergency numbers cannot be dialled! Not all of the functions described in this user guide are available in all countries. 3 DP450 – More than just a telephone DP450 – More than just a telephone Your phone lets you make calls both via the fixed network and (cost effectively) via the Internet (VoIP) without using a PC. And your phone can do much more besides: u Press a button each time you make a call to indicate whether you want to make a call via the fixed network or via the Internet (page 10). u Register up to six handsets to your base station. With your base station you can make two calls simultaneously via VoIP, or one call over the fixed network and one call via VoIP. u Configure the phone connection for VoIP without a PC. Your phone’s connection assistant downloads general data about your VoIP provider from the Internet and guides you through entering your personal data (VoIP/SIP account). This makes it easy for you to start using VoIP. u If necessary, make any further VoIP settings on a PC. The phone has a Web interface (Web configurator) that can be accessed via your PC’s Web browser (page 22). u Assign your own password (system PIN) to protect your device and the Web configurator from unauthorised access (page 20). u Send and receive SMS messages via the fixed network (page 16). u Use your phone to obtain information about new e-mail messages in your mailbox without a PC (page 18). u Save up to 150 numbers and names in your handset (page 14). u Download your Outlook contacts from a PC into your handset. Or back up the handset directory on your PC. 4 u You can programme the keys of your phone with important phone numbers. The phone number is then dialled by simply pressing the respective key (page 14). u Keep your hands free while making calls. Use the handsfree function on your handset or use a convenient headset (accessory, not included in the scope of delivery). u Use your handset as an alarm clock (page 20). You will find further information in the detailed user guide for your DP450 at www.tesco.com/ internetphoneinstallationguide/ Your DP450 has a protected operating system that offers increased security against viruses from the Internet. Have fun using your new telephone! Setting the date and time Setting the date and time If the date and time are not yet set on the phone, the display key §Time§ is displayed. You can set the date and time later via the menu v ¢Ð Settings ¢Date/Time. ¤ Press §Time§ or open the menu. ¤ Change multiple line input: Date: Enter day, month and year in 6-digit format. Time: Enter hours and minutes as 4 digits (e.g. 0 7 1 5 for 7:15 a.m. §Save§ Press the display key. The date and time are shown in the handset’s idle display (page 1). 5 No connection to the internet/VoIP server No connection to the Internet/VoIP server If one of the following messages is displayed instead of the internal name after the connection assistant is closed, then a fault has occurred: Server not accessible! The phone has no connection to the Internet. ¤ Check the cable connection between the base station and the router (the LED on the base station must light up) and the connection between the router and the Internet connection. ¤ Check whether the phone is connected to the LAN. It might not have been possible to assign an IP address to the phone or the IP address has already been assigned to another LAN subscriber and cannot be changed. ¤ Find the IP address using the handset menu: v ¢Ð Settings ¢ Base ¢ Local Network ¤ Start the Web configurator with the IP address. ¤ If no connection can be established, change the settings on the router (activate DHCP server) or the phone’s IP address. 6 Provider registration failed! u Your personal data for registering with the VoIP provider may have been entered incompletely or incorrectly. u Check your entries for , and . Particularly check your use of upper and lower case. To do this, open the following menu on your handset: v ¢Ð Settings ¢ Telephony ¢ VoIP ¢ Provider Registr. u The server address for the VoIP server has not yet been entered, or has been entered incorrectly. ¤ Start the Web configurator. ¤ Open Settings ¢ Telephony ¢ Connections Web page. ¤ Edit the server address where necessary. Please note: If port forwarding is activated on your router for the ports that have been registered as the SIP port (Standard 5600) and the RTP port (Standard 5004), then it makes sense to switch off DHCP and assign the phone a static IP address (otherwise you may not be able to hear the other party during VoIP calls): – Via the handset menu: v Ð Settings Base Local Network Or – Via the Web configurator: ¤ Open Settings IP Configuration Web page. ¤ Select IP address type. Please note that the IP address and subnet mask depend on the router’s address block. You must also specify the default gateway and DNS server. The IP address for the router is generally entered here. ¢ ¢ ¢ ¢ Menu tree Menu tree To open the main menu for your phone, with the habdset in idle status, press on the right of the control key: v There are two ways to select a function: Using the number combinations (“shortcut”) ¤ Enter the number combination that is in front of the function in the menu tree. Example: v 5 4 1 for “Set hanset language” Scrolling through the menus ¤ Scroll to the function with the control key q (press up and down) and press §OK§. 1 î Messaging 1-1 SMS An SMS mailbox (general or private) activated without a PIN 1-1-1 New SMS 1-1-2 Incoming (0) 1-1-3 Outgoing (0) An SMS mailbox with a PIN or 2-3 mailboxes activated 1-1-1 Mailbox 1-1-1-1 New SMS 1-1-1-2 Incoming (0) 1-1-1-3 Outgoing (0) 1-1-2 Mailbox 1 1-1-2-1 New SMS to to Mailbox 2 1-1-4 Mailbox 3 1-1-4-1 1-1-2-2 Incoming (0) to 1-1-4-2 1-1-2-3 Outgoing (0) to 1-1-4-3 1-1-6 Settings 1-1-6-1 Service Centres 1-1-6-2 SMS Mailboxes 1-1-6-3 Notify Number 1-1-6-4 Notify Type 1-1-6-6 Subscribe to SMS 7 Menu tree 1-2 E-mail 1-2-1 Inbox (0) 1-2-2 Settings 1-2-2-1 Incoming (POP3) 1-2-2-2 Registration 2 ê Sel. Services 2-1 VoIP 2-1-6 Call Divert 2-1-7 Call Waiting 2-2 Fixed Line 2-2-1 Withhold No. 2-2-6 Call Divert 2-2-7 Call Waiting 2-3 Ringback Off 3 ì Alarm Clock 4 í Add. Features 4-3 Room Monitor 5 Ð Settings 5-1 Date/Time 5-2 Audio Settings 5-2-1 Ringer Settings 5-2-1-1 Ext. Calls 5-2-1-2 Internal Calls 5-2-1-3 All 5-2-2 Advisory Tones 5-3 Display 5-3-1 Screen Picture 5-3-2 Colour Scheme 5-3-3 Contrast 5-3-4 Backlight 8 Menu tree 5-4 Handset 5-4-1 Language 5-4-2 Auto Answer 5-4-3 Register H/Set 5-4-4 Select Base 5-4-5 Reset Handset 5-5 Base 5-5-1 Calls List Type 5-5-1-1 Missed Calls 5-5-1-2 All Calls 5-5-2 Music on hold 5-5-3 System PIN 5-5-4 Base Reset 5-5-5 Add. Features 5-5-5-1 Repeater Mode 5-5-6 Local Network 5-5-8 Software Update 5-6 Voice Mail 5-6-1 Set Key 1 5-6-1-1 Network Mailb. 5-7 Telephony 5-7-1 Default Line 5-7-1-1 VoIP 5-7-1-2 Fixed Line 5-7-2 Connection Assist. 5-7-6 Fixed Line 5-7-6-1 Dialling Mode 5-7-6-2 Recall 5-7-7 VoIP 5-7-7-1 Show Stat. on HS 5-7-7-2 Select Provider 5-7-7-3 Provider Registr. Not all menu items are described in this quick guide. You will find the full description in the detailed user guide for your DP450 on the Internet at www.tesco.com/internetphoneinstallationguide/. 9 Making calls with VoIP and the fixed network Making calls with VoIP and the fixed network Making an external call External calls are those that are made via the public telephone network (fixed network) or the Internet (VoIP). You determine what type of connection you want to use when you dial. Please note: – You can make two parallel external calls on your base station (on two handsets): two calls via VoIP or one call each via VoIP and the fixed network. – If you use VoIP to make a call to the fixed network, you will also have to dial the area code for local calls (depending on the VoIP provider). To avoid always having to enter the area code for local calls, you can also enter the area code in the configuration (with the Web configurator, see page 22). It will then be inserted automatically for local calls. Selecting the type of connection via the talk key and making a call ~ c/d Enter number/IP address and briefly press/press and hold the talk key or handsfree key. A default connection is established on your phone (fixed network or VoIP, page 22). u Press the talk key c or handsfree key ¤ 10 d briefly if you want to make the call via the default connection. Press and hold the talk key c or handsfree key d if you want to make the call via the other type of connection. Please note: If you use a different GAP-compatible handset to the DP45, all calls will be made via the standard connection, even if you press and hold the talk key c. If you want to use the non-default connection to make a call, enter a star (*) at the end of the number. Selecting the type of connection via display keys and making a call Precondition: §FixedLine§ and/or §IP§ are assigned to the display keys on your handset (DP45 default settingis to call over IP). §Fixed Line§ / §IP§ Press the display key to select the type of connection. ~ /s Enter number or select number from the directory. c / d Press the talk or handsfree key. Entering an IP address Via VoIP you can dial an IP address instead of a phone number. ¤ Press the star key * to separate the parts of the IP address (e.g. 149*246*122*28). ¤ If necessary, press the hash key # to attach the SIP port number of the person you are calling to the IP address (e.g. 149*246*122*28#5060). Cancelling the dialling operation You can cancel the dialling operation with the end call key a. Ending a call a Press the end call key. Making calls with VoIP and the fixed network Accepting a call The handset indicates an incoming call by ringing and by the flashing handsfree key d. The display shows the caller’s number or name and the receive number the caller is calling (e.g. for Fixed Line, for IP1 etc.). Please note: The handset will only indicate calls to receive numbers assigned to the handset (page 14). If no specific receive numbers are assigned, all calls are signalled on all handsets. You can accept the call by: ¤ Pressing the talk key c. ¤ Pressing the display key §Accept§. ¤ Pressing the handsfree key d. If the handset is in the charging cradle and the function is activated (page 9), the handset will take a call automatically when you lift it out of the cradle. Switching between earpiece and handsfree mode ¤ Press handsfree key d to activate/ deactivate handsfree mode during a call. If you wish to place the handset in the charging cradle during a call in handsfree mode: ¤ Press and hold the handsfree key d while placing the handset in the charging cradle. If the handsfree key d does not light up, press the key again. Setting and dialling emergency numbers You can store up to five emergency numbers in your telephone. The default setting for the phone is that these emergency numbers are always dialled via Tesco Internet Phone – irrespective of which connection type you select. If the Tesco Internet Phone network is not working the emergency call can be forced to the fixed network by long pressing the Talk Key (see page 1). The fixed network always supports general emergency numbers (e.g. establishing a connection to the local police emergency number). You can enter or change emergency numbers on the Dialing Plans Web page in the Web configurator. ¤ Open the following Web page: Settings ¢ Telephony ¢ Dialing Plans. ¤ Enter your emergency numbers in the fields in the Emergency Numbers area. Change previously entered emergency numbers. ¤ Click on Set to save the settings. Please note: – You can use the Web configurator to display whether and which emergency numbers are saved on your phone. – If you have used the Web configurator to deactivate the Emergency calls always via fixed line function and have entered an automatic local area code for VoIP calls (Settings Telephony Dialing Plans), the local area code will also be prefixed to the emergency numbers when they are dialled using VoIP. £ £ 11 Operating the handset Operating the handset In lists and menus Activating/deactivating the handset u a Press and hold the end call key. You will hear the confirmation tone. Activating/deactivating the keypad lock # Press and hold the hash key. You will hear the confirmation tone. The ² icon appears in the display when the keypad lock is activated. Control key In this user guide, the side of the control key that you must press in the given operating situation is shown in black. Example: t for “press up on the control key”. The control key has the following functions: When the handset is in idle status s v u t 12 Open handset directory (press briefly/press and hold). Open main menu. Open list of handsets. Adjust the ringer volume of the handset (page 19). t/s v Scroll up/down line by line. Open submenu or confirm selection. Go back one menu level or cancel. In an input field You can use the control key to move the cursor up t, down s, right v or left u. During an external call s u t Open the directory. Initiate an internal consultation call. Adjust the loudspeaker volume for operation in earpiece/handsfree mode. Operating the handset Display keys The current display functions are shown in the bottom display line in reversed highlights. The function of the display keys changes depending on the particular operating situation. Example: FixedLine SMS 1 2 1 Current display key functions are shown in the bottom display line. 2 Display keys Reverting to idle status Reverting to idle status from anywhere in the menu: ¤ Press and hold the end call key a. Or: u Do not press any key: after 2 minutes the display will automatically revert to idle status. Changes that you have not confirmed or saved by pressing §OK§, §Yes§, §Save§, §Send§ or Save §OK§ will be lost. You will find more information about operating your DP450 in the detailed user guide on the Internet at www. tesco.com/ internetphoneinstallationguide/ 13 Using the directory and lists Using the directory and lists The options are: u Directory, call-by-call list u Last number redial list u SMS, e-mail and messenger lists u Calls list Directory You can save up to 150 numbers and names in the directory. ¤ Open the directory by briefly pressing the s key in idle status. Speed Dial : Select the digit keys for speed dial (2 to 9). The number is dialled via the nondefault connection if you press and hold the assigned digit key in idle status. Insert a hash (#) at the end of the number, if the number is to be dialled via the default connection ¤ Save changes with §Save§. Please note: If you add a star (*) to the end of the number, the number will be dialled via the non-default connection (page 21), even if you briefly press the talk key c. Length of an entry Managing directory entries Number: max. 32 digits Name: max. 16 characters s ¢s (Select entry) ¤ Press the display key §View§ to view the entry Or ¤ Press the display key §Options§ to open the directory menu. You can use the directory menu to, e.g.: u Change entries, delete entries, mark entries as a VIP (Very Important Person) or send them to other handsets connected to the base station u Delete the directory or send it to another handset You will find additional information in the detailed user guide for your DP450 on the Internet at www.tesco.com/ internetphoneinstallationguide Please note: Always enter the phone number with a dialling code. You will need this if you want to call a fixed network subscriber via VoIP. Alternatively, you can also specify an area code via the Web configurator that is placed before all numbers dialled without a dialling code. Saving a number in the directory s ¢ New Entry ¤ Change multiple line input: Number : Enter number. Name : Enter name. Annivers.: Press the display key §Edit§ and enter the date, reminder time and type of signal. Last number redial list The last number redial list contains the ten numbers last dialled with the handset. c Briefly press the talk key to open the last number redial list. 14 Using the directory and lists Opening lists with the message key You can open the following lists with the message key f: u SMS list If several mailboxes are set up, several lists are displayed where applicable. u Incoming e-mail list The list is only displayed if there are new messages in the mailbox on the incoming e-mail server. u Network mailbox If your network provider supports this function and the network mailbox is set up for fast access via key 1 (page 9). u Calls list You can configure your calls list to include all calls or just missed calls. v ¢Ð Settings ¢ Base ¢ Calls List Type Please note: Your calls list will only save calls made to the receiving numbers assigned to your handset (page 23). If you press the f key, the lists containing messages will be displayed (exception: network mailbox). Lists with new messages are displayed in bold. Opening a list f ¢If necessary, select the list q Select entry. You will find additional information about the lists in the detailed user guide for your DP450 on the Internet at www.tesco.com/ internetphoneinstallationguide/ Dialling from the directory/list ¤ Open the directory/list. ¤ Select entry via q. ¤ Press and hold/briefly press the talk key c (page 10). Please note: You can only dial IP addresses via VoIP An advisory tone sounds as soon as a new message arrives in a list. The f key flashes (it goes off when the key is pressed). In idle status, the display shows an icon for the new message. Icon à Á À New message... ... in network mailbox ... in calls list ... in SMS or e-mail list The number of new entries is shown beneath the corresponding icon. 15 SMS (text messages) SMS (text messages) Your unit is supplied ready for you to send SMS messages immediately. When an SMS is sent, the base station automatically establishes a connection via the fixed network. Preconditions: u Calling Line Identification is enabled for your fixed network connection. u Your network provider supports SMS in the fixed network (information on this can be obtained from your network provider). u You are registered with your service provider to send and receive SMS. Please note: When you call up the SMS menu for the first time, you are automatically registered with accessible SMS centres for which you have entered numbers. You can then receive SMS messages from these SMS centres. You can enter more SMS centres and use the registration wizard to register with these SMS centres. Please refer to the detailed user guide for your DP450 on the Internet at www.tesco.com/ internetphoneinstallationguide/ Writing/sending/saving an SMS v ¢î Messaging ¢ SMS ¢(mailbox, mailbox PIN) New SMS Select and press §OK§. ~ Write an SMS. §Options§ Press the display key. Save Select and press §OK§. The message is stored in the draft message list. You can edit and send it later. Open the draft message list: v ¢î Messaging ¢ SMS ¢(mailbox, mailbox PIN) ¢ Outgoing 16 Or Send SMS s/~ §Options§ Send Select and press §OK§. Select and press §OK§. Select number with area code (even if you are in that area) from the directory or enter directly. If necessary, add the mailbox ID to the end of the number. Press the display key. Select and press §OK§. Linking SMS messages If an SMS contains more than 160 characters or large image data, it is sent (up to eight messages) and received as a linked SMS. When writing an SMS you will see the following displayed in the top right of the header (example): 1 SMS 1170(2) 2 1 Maximum number of characters you may still write or add (assuming 8 linked SMS messages) 2 Number of SMS messages that have had to be linked for the text written so far. Please note that linking SMS messages generally results in higher charges. SMS (text messages) Receiving/reading an SMS Notification by SMS All received SMS messages are saved in the incoming message list. Linked SMS messages are displayed as one message. If this is too long or has not transferred completely, it will be split into individual messages. New SMS messages are signalled on all DP45 handsets by the À icon in the display, the flashing message key f and an advisory tone. When out and about, you can arrange to be notified about missed calls by SMS. Opening the incoming message list ¤ Press message key f and if neces- sary select mailbox and enter mailbox PIN. Or ¤ Open menu v ¢î ¢ Messaging ¢ SMS (mailbox, mailbox PIN) ¢ Incoming. Reading an SMS ¤ Press the display key §Read§. Managing SMS lists Via the options in the incoming/draft message list you can, for example: u Delete individual SMS messages or the entire list u Forward or reply to an SMS u Continue writing and send SMS messages stored in the draft message list. ¤ Select the SMS and press §Options§. Storing the notification number v ¢î Messaging ¢ SMS ¢ Settings ¢Notify Number ¤ Enter the number of a mobile phone or another device with SMS functionality to which the notification is to be sent. (Warning: Do not enter your own landline number!) Activating notification v ¢î Messaging ¢ SMS ¢ Settings ¢Notify Type ¤ Set if you want SMS notification. ¤ Save with §Save§. Please note that your network provider usually charges for SMS notifications. You will find further information in the detailed user guide for your DP450 on the Internet at www.tesco.com/ internetphoneinstallationguide/ 17 E-mail notifications E-mail notifications Entering the incoming e-mail server Your phone will inform you when new e-mail messages have arrived in your incoming e-mail server. Periodically (approx. every 15 min.) it establishes a connection to the e-mail server and checks whether new messages are present. New e-mail messages are indicated on all registered DP45 handsets by an advisory tone and by a flashing message key f. The À icon is shown in the idle display. Opening the incoming message list Preconditions: u You have established an e-mail account with an Internet provider. u The incoming e-mail server uses the POP3 protocol. u You have stored the name of the incoming e-mail server and your personal access data (account name, password) in the phone. Entering access data for the incoming e-mail server Entering access data v ¢î Messaging ¢ E-mail ¢ Settings ¢Registration ¤ Change multiple line input: Username: Enter user name (account name) (max. 32 characters). Authent. Password: Enter password (this is case sensitive). Press the display key §Save§. 18 v ¢î Messaging ¢ E-mail ¢ Settings ¢Incoming (POP3) ¤ Enter the name of the incoming e-mail server (POP3 server). ¤ Select §Options§ ¢ Save and press §OK§. v ¢î Messaging ¢ E-mail ¢ Inbox Or, if there are new e-mail messages (the message key f flashes): f ¢ E-mail: The phone establishes a connection to the incoming e-mail server. The list of e-mail messages stored there is displayed. The sender’s name and e-mail address (single line, abbreviated if necessary) are displayed as well as the date and time (the date and time only have correct values if the sender and recipient are located in the same time zone). Viewing the header of an e-mail q Select e-mail entry. §Subject§ Press display key. The subject of the e-mail message (max. 120 characters) is displayed. ” Now press the display key to return to the incoming message list. Viewing the sender’s address for an e-mail q Select e-mail entry. §From§ Press the display key. The sender’s e-mail address is displayed in full. ” Now press the display key to return to the incoming message list. Handset/base station settings Handset/base station settings The handset and base station are preconfigured, but you can change these settings to suit your individual requirements. You will find the relevant functions in the submenus v ¢ Settings and v ¢ Alarm Clock (page 7). The base station settings are carried out using a registered DP45 handset. Changing the handset display keys You can assign different functions to your handset’s display keys. The change is handset-specific. ¤ In idle status, press and hold the right or left display key (e.g. §FixedLine§). The list of possible key assignments is opened. q Select a function and press §OK§. The handset returns to idle status. The labelling for the display key has changed (e.g. §IP§ if IP Call is selected). Adjusting the loudspeaker volume You can set the loudspeaker volume for handsfree talking to five different levels and the earpiece volume to three different levels. You can only make these adjustments during a call. The handsfree talking volume can only be adjusted when this function is set. You are conducting an external call. t Open menu. r Select volume. §Save§ Press display key if necessary to save the setting permanently. If t is assigned with another function, e.g. toggling: §Options§ Open menu. Volume Select and press §OK§. Configure setting (see above). Setting ringer tones Set the volume and melody depending on the type of signalling required. v ¢Ð Settings ¢ Audio Settings ¢ Ringer Settings Ext. Calls / Internal Calls / All Select and press §OK§. ¤ Change multiple line input: r Set volume (1–6). s Scroll to the next line. r Select melody. §Save§ Press the display key to save the setting. In idle status, you can also open the Ringer Settings menu by pressing t briefly. Activating/deactivating the ringer tone You can deactivate the ringer tone on your handset before you accept a call or when the handset is in idle status; the ringer tone can be deactivated permanently or just for the current call. The ringer tone cannot be re-activated while an external call is in progress. Deactivating the ringer tone permanently * Press and hold the star key until the µ icon appears in the display. Re-activating the ringer tone * Press and hold the star key. 19 Handset/base station settings Deactivating the ringer tone for the current call When the alarm clock rings... §Silence§ Alarm repeat after 5 minutes Press the display key. Activating/deactivating advisory tones v ¢Ð Settings ¢ Audio Settings ¢ Advisory Tones ¤ Change multiple line input: Key Tones: / Confirm.: Select On or Off. Battery Select On, Off or In Call. The battery warning tone is only activated/deactivated and only sounds during a call. ¤ Save changes with §Save§. Setting the alarm clock Precondition: The date and time have already been set (page 5). Activating/deactivating the alarm clock and setting the wake-up time v ¢ì Alarm Clock ¤ Change multiple line input: Activation: Select On or Off. Time: Enter the wake-up time in 4-digit format. Melody: Select melody. Volume: Set the volume (1-6). ¤ Save changes with §Save§. You will see the ¸ icon. 20 §Snooze§ Press the display key or any key. After the second repetition the wake-up call is deactivated for 24 hours. Deactivating the alarm clock for 24 hours §OFF§ Press the display key. The wake-up call is deactivated. Changing the system PIN on the base station You can change the base station’s 4-digit default system PIN (“0000”) to a 4-digit system PIN known only to yourself. v ¢Ð Settings ¢ Base ¢ System PIN ~ Enter the current system PIN and press §OK§. ~ Enter the new system PIN. s Scroll to the Re-enter PIN: line. ~ Now re-enter the new system PIN and press §OK§. For security reasons, “****” is displayed instead of the system PIN. a Press and hold (idle status). Restoring factory settings Each individual handset setting is reset, in particular the language, display, volume, ringer tone, advisory tones and alarm clock settings (page 19). The last number redial list is cleared. Entries in the directory, the date and time and the handset’s registration to the base station will be retained. v ¢Ð Handset ¢ Reset handset §Yes§ Press the display key. You can cancel the factory reset by pressing a or the display key §No§. Handset/base station settings a Press and hold (idle status). ¤ Remove the cable connections from Restoring the base station to the factory settings ¤ Resetting the base station via the menu ¤ Each individual setting is reset, in particular: u VoIP settings such as VoIP provider and account data and DTMF settings u Settings for the local network (page 21) u Default connection (page 21) u The names of the handsets u SMS settings (e.g. SMS centres) u Answer machine settings (announcements are deleted) u Settings for the connection to the PABX. SMS lists, the answer machine list and the calls list are deleted. The date and time and the system PIN are retained. The handsets are still registered. v ¢Ð Settings ¢ Base ¢ Base Reset ~ Enter the system PIN and press §OK§. §Yes§ Press the display key to confirm. Resetting the base station using a key on the base station ¤ ¤ ¤ the base station to the router and fixed network. Remove the base station mains unit from the socket. Press and hold the registration/paging key (page 1). Plug the mains unit back into the power socket. Continue to press and hold the registration/paging key (at least 2 sec.). Release the registration/paging key. The base station has now been reset. Setting default connection You can make settings according to whether you want to make calls via VoIP or fixed network by default (press talk key briefly). v ¢Ð Settings ¢ Telephony ¢ Default Line VoIP / Fixed Line Select and press §OK§ (½ = on). Checking the base station MAC address In idle status: v55920 The base station MAC address is displayed. a Press and hold (idle status). As with resetting the base station via the menu, all individual settings are reset. The system PIN will also be reset to “0000” and all handsets registered above and beyond the delivery scope are deregistered. Please note: For information on how to reregister the handset after resetting it, where applicable, please see the full user guide for your DP450 on the Internet. 21 Web configurator Web configurator The Web configurator is the Web interface for your handset. It allows you to make the settings for your phone’s base station via your PC’s Web browser. Preconditions: u A standard Web browser is installed on the PC, e.g. Internet Explorer version 6.0 or higher, or Firefox version 1.0.4 or higher. u The phone and PC are connected to each other via a router. De-registering In the menu bar at the top right of every Web page in the Web configurator, you will see the command. Click on to de-register from the Web configurator. Web configurator functions Menu tree Home (Function overview) Settings IP Configuation Telephony Connecting the PC to the Web configurator Connections Number Assignment ¤ Launch the Web browser on your PC. Precondition: The settings of an available firewall on the PC allow the PC and telephone to communicate with each other. ¤ Enter the phone’s IP address into the address field of the Web browser, e.g. http://192.168.1.2. ¤ You can check the phone’s current IP address on the handset: v ¢Ð Settings ¢ Base ¢ Local Network ¤ Press the return key. A connection is established to the phone’s Web configurator. 22 Dialing Plans Telephone Directory Advanced Settings Messaging E-mail Miscellaneous Status (Information about the phone) Device Web configurator Settings With the Web configurator on your phone you have the following options: u IP Configuration Configure your phone access to the local network (IP address, gateway to the Internet). Especially if you assign your phone a static IP address, you must enter the gateway and DNS server via the Web configurator. That is usually your router. u Telephony ¢ Connections Configure your phone for VoIP. Download your VoIP provider’s general access data from the Internet onto your phone or enter the data yourself. Enter the personal access data of up to six VoIP accounts (VoIP phone numbers). Activate/deactivate these VoIP phone numbers as required. The phone registers with the VoIP server using the activated VoIP phone numbers and can be reached under these numbers. u Telephony ¢ Number Assignment Assign each registered handset its own VoIP phone numbers as send and receive numbers. State which handsets are to ring when calls are made to your fixed network number. ¢ Dialing Plans Save emergency numbers on your telephone. You can also activate or deactivate the following dialling rules: – For VoIP calls, an area code is automatically attached in front of all numbers that do not start with 0. Specify this dialling code. – Stored emergency numbers are always dialled via the fixed network. The stored emergency numbers are displayed. You can enter a phone number of your own. u Telephony ¢ Telephone Directory Store your outlook contacts in a tsv file on your PC and load this onto your handset. The contacts are copied to the handset directory. Back up the directories for your handsets on a PC. u Telephony ¢ Advanced Settings – Specify port numbers that the phone should use for VoIP telephony. – For VoIP, specify how DTMF signals are to be transferred and/or converted: either in voice packets or in SIP info packets. DTMF signalling is used, for example, to check and control some network mailboxes. Ask your VoIP provider which type of DTMF signalling is supported. u Messaging Enter the access data for your e-mail server. u Telephony 23 Web configurator u Miscellaneous State whether you wish to receive information about new firmware versions on the Internet. For the following firmware update you can specify the server/PC that is to make the update, and if required load new firmware onto the phone. View the VoIP status codes on the handset to diagnose problems with VoIP connections. You will find the description of the Web configurator in the detailed user guide for your DP450 on the Internet at www.tesco.com/ internetphoneinstallationguide/ 24 Appendix Appendix Care ¤ Wipe down the base station and handset with a damp cloth (no solvents) or an antistatic cloth. Never use a dry cloth. This can cause a build up of static. Contact with liquid If the handset has come into contact with liquid: ¤ Switch the handset off and remove the batteries immediately. ¤ Allow the liquid to drain from the handset. ¤ Pat all parts dry, then with the battery compartment open and the keypad facing down place the handset in a dry, warm place for at least 72 hours (not in a microwave, oven etc.). ¤ Do not switch on the handset again until it is completely dry. ¤ When it has fully dried out, you will normally be able to use it again. Authorisation This device is intended for analogue phone lines in the UK. Voice over IP telephony is possible via the LAN interface if an additonal modem has been connected. Country-specific requirements have been taken into consideration. We, Siemens Home and Office Communication Devices GmbH & Co. KG, declare that this device meets the essential requirements and other relevant regulations laid down in Directive 1999/5/EC. A copy of the 1999/5/EC Declaration of Conformity is available at this Internet address: http://www.siemens.com/gigasetdocs. 0682 25 Appendix Guarantee Certificate United Kingdom Without prejudice to any claim the user (customer) may have in relation to the dealer or retailer, the customer shall be granted a manufacturer’s Guarantee under the conditions set out below: u In the case of new devices and their components exhibiting defects resulting from manufacturing and/or material faults within 24 months of purchase, Siemens shall, at its own option and free of charge, either replace the device with another device reflecting the current state of the art, or repair the said device. In respect of parts subject to wear and tear (including but not limited to, batteries, keypads, casing), this warranty shall be valid for six months from the date of purchase. u This Guarantee shall be invalid if the device defect is attributable to improper treatment and/or failure to comply with information contained in the user guides. u This Guarantee shall not apply to or extend to services performed by the authorised dealer or the customer themselves (e. g. installation, configuration, software downloads). User guides and any software supplied on a separate data medium shall be excluded from the Guarantee. u The purchase receipt, together with the date of purchase, shall be required as evidence for invoking the Guarantee. Claims under the Guarantee must be submitted within two months of the Guarantee default becoming evident. u Ownership of devices or components replaced by and returned to Siemens shall vest in Siemens. u This Guarantee shall apply to new devices purchased in the European Union. For Products sold in the United Kingdom the Guarantee is issued by: Siemens Home and Office Communica26 tion Devices GmbH & Co. KG, Schlavenhorst 66, D-46395 Bocholt, Germany. u Any other claims resulting out of or in connection with the device shall be excluded from this Guarantee. Nothing in this Guarantee shall attempt to limit or exclude a Customers Statutory Rights, nor the manufacturer’s liability for death or personal injury resulting from its negligence. u The duration of the Guarantee shall not be extended by services rendered under the terms of the Guarantee. u Insofar as no Guarantee default exists, Siemens reserves the right to charge the customer for replacement or repair. u The above provisions does not imply a change in the burden of proof to the detriment of the customer. To invoke this Guarantee, please contact the Siemens telephone service. The relevant number is to be found in the accompanying user guide. Specifications Recommended batteries (Valid at the time of going to press) Nickel-metal-hydride (NiMH): u Sanyo Twicell 650 u Sanyo Twicell 700 u Panasonic 700 mAh “for DECT" u GP 700 mAh u Yuasa Technology AAA Phone 700 u VARTA Phone Power AAA 700 mAh u GP 850 mAh u Sanyo NiMH 800 u Yuasa Technology AAA 800 The handset is supplied with two recommended batteries. Appendix Handset operating times/charging times The following information relates to batteries with a capacity of 650 mAh. Standby time approx. 170 hours (7 days) Talktime approx. 13 hours Charging time approx. 6 hours The operating and charging times apply only when using the recommended batteries. Please note: When the display backlight is switched on, the standby time of the handset is reduced to approx. 30 hours. Base station power consumption Depending on current status, around 2.5 W. General specifications Interfaces Fixed network, Ethernet No. of channels 60 duplex channels Radio frequencyrange 1880–1900 MHz Duplex method Time multiplex, 10 ms frame length Channel grid 1728 kHz Bit rate 1152 kbit/s Modulation GFSK Language code 32 kbit/s Transmission power 10 mW, average power per channel Range up to 300 m outdoors, up to 50 m indoors Base station power 230 V ~/50 Hz supply Environmental conditions in operation +5 °C to +45 °C; 20% to 75% humidity Dialling mode DTMF (touch tone dialling)/DP (dial pulsing) Flashing time 250 ms Codecs G711, G726, G729AB with VAD/CNG Quality of Service TOS, DiffServ Protocols DECT, GAP, SIP, RTP, DHCP, NAT Traversal (STUN), HTTP DP450 – Free software Your DP450’s firmware contains, amongst other things, free software that is licensed under the GNU Lesser General Public License. This free software was developed by a third party and is protected by copyright. You will find the licence text in its original English version on the pages that follow. The software is provided free of charge. You are authorised to use this free software in accordance with the abovementioned licence conditions. In the event of contradictions between these licence conditions and the licence conditions that apply for the software according to Siemens Home and Office Communication Devices GmbH & Co. KG, the above-mentioned licence conditions shall take precedence for the free software. The GNU Lesser General Public License (LGPL) is supplied with this product. You can also download the licence conditions from the Internet: u The LGPL is available on the Internet at: http://www.gnu.org/copyleft/lesser.html u The source text, including copyright notices for free software, is currently available on the Internet at: http://www.siemens.com/developer/ c455ip For further information and Internet links to the source text of the free software, see the Online Support pages on the Internet at: www.siemens.com/gigasetcustomercare 27 Appendix If it is not already supplied with the product, you can request the source text, including copyright notices, from Siemens. There is a charge to cover the cost of copying and postage. Please submit this request by e-mail or fax to the following address or fax number within 3 years of purchasing this product. Please state the exact device type plus the version number of the installed device software. GNU LESSER GENERAL PUBLIC LICENSE E-mail: [email protected] Version 2.1, February 1999 Copyright (C) 1991, 1999 Free Software Foundation, Inc., 59 Temple Place, Suite 330, Boston, MA 02111-1307 USA Everyone is permitted to copy and distribute verbatim copies of this license document, but changing it is not allowed. [This is the first released version of the Lesser GPL. It also counts as the successor of the GNU Library Public License, version 2, hence the version number 2.1.] Fax: +49 2871 91302 Preamble Small Parts Dispatch Com Bocholt Use of the free software contained in this product extending beyond the program sequence intended by Siemens is at the user’s own risk – i.e. there shall be no claims for liability for defects against Siemens Home and Office Communication Devices GmbH & Co. KG. The GNU Lesser General Public License contains notes regarding the author’s liability for defects or that of other proprietors of the free software. You shall have no right to assert a claim against Siemens Home and Office Communication Devices GmbH & Co. KG based on liability for defects, if a defect in the product is or could be due to changes you have made to the programs or their configuration. Furthermore, you shall have no right to assert a claim against Siemens Home and Office Communication Devices GmbH & Co. KG based on liability for defects if the free software violates the copyright of third parties. Siemens shall not provide technical support for the software, including the free software included within it, if it has been changed. 28 The licenses for most software are designed to take away your freedom to share and change it. By contrast, the GNU General Public Licenses are intended to guarantee your freedom to share and change free software--to make sure the software is free for all its users. This license, the Lesser General Public License, applies to some specially designated software packages—typically libraries—of the Free Software Foundation and other authors who decide to use it. You can use it too, but we suggest you first think carefully about whether this license or the ordinary General Public License is the better strategy to use in any particular case, based on the explanations below. When we speak of free software, we are referring to freedom of use, not price. Our General Public Licenses are designed to make sure that you have the freedom to distribute copies of free software (and charge for this service if you wish); that you receive source code or can get it if you want it; that you can change the software and use pieces of it in new free programs; and that you are informed that you can do these things. To protect your rights, we need to make restrictions that forbid distributors to deny you these rights or to ask you to surrender these rights. These restrictions translate to certain responsibilities for you if you distribute copies of the library or if you modify it. For example, if you distribute copies of the library, whether gratis or for a fee, you must give the recipients all the rights that we gave you. You must make sure that they, too, receive or can get the source code. If you link other code with the library, you must provide complete object files to the recipients, so that they can relink them with the library after making changes to the library and recompiling it. And you must show them these terms so they know their rights. Appendix We protect your rights with a two-step method: (1) we copyright the library, and (2) we offer you this license, which gives you legal permission to copy, distribute and/or modify the library. To protect each distributor, we want to make it very clear that there is no warranty for the free library. Also, if the library is modified by someone else and passed on, the recipients should know that what they have is not the original version, so that the original author’s reputation will not be affected by problems that might be introduced by others. Finally, software patents pose a constant threat to the existence of any free program. We wish to make sure that a company cannot effectively restrict the users of a free program by obtaining a restrictive license from a patent holder. Therefore, we insist that any patent license obtained for a version of the library must be consistent with the full freedom of use specified in this license. Most GNU software, including some libraries, is covered by the ordinary GNU General Public License. This license, the GNU Lesser General Public License, applies to certain designated libraries, and is quite different from the ordinary General Public License. We use this license for certain libraries in order to permit linking those libraries into non-free programs. When a program is linked with a library, whether statically or using a shared library, the combination of the two is legally speaking a combined work, a derivative of the original library. The ordinary General Public License therefore permits such linking only if the entire combination fits its criteria of freedom. The Lesser General Public License permits more lax criteria for linking other code with the library. We call this license the “Lesser” General Public License because it does Less to protect the user’s freedom than the ordinary General Public License. It also provides other free software developers Less of an advantage over competing non-free programs. These disadvantages are the reason we use the ordinary General Public License for many libraries. However, the Lesser license provides advantages in certain special circumstances. For example, on rare occasions, there may be a special need to encourage the widest possible use of a certain library, so that it becomes a defacto standard. To achieve this, non-free programs must be allowed to use the library. A more frequent case is that a free library does the same job as widely used non-free libraries. In this case, there is little to gain by limiting the free library to free software only, so we use the Lesser General Public License. In other cases, permission to use a particular library in non-free programs enables a greater number of people to use a large body of free software. For example, permission to use the GNU C Library in non-free programs enables many more people to use the whole GNU operating system, as well as its variant, the GNU/Linux operating system. Although the Lesser General Public License is Less protective of the users’ freedom, it does ensure that the user of a program that is linked with the Library has the freedom and the wherewithal to run that program using a modified version of the Library. The precise terms and conditions for copying, distribution and modification follow. Pay close attention to the difference between a “work based on the library” and a “work that uses the library". The former contains code derived from the library, whereas the latter must be combined with the library in order to run. GNU LESSER GENERAL PUBLIC LICENSE TERMS AND CONDITIONS FOR COPYING, DISTRIBUTION AND MODIFICATION 0. This License Agreement applies to any software library or other program which contains a notice placed by the copyright holder or other authorized party saying it may be distributed under the terms of this Lesser General Public License (also called “this License"). Each licensee is addressed as “you". A “library” means a collection of software functions and/or data prepared so as to be conveniently linked with application programs (which use some of those functions and data) to form executables. The “Library", below, refers to any such software library or work which has been distributed under these terms. A “work based on the Library” means either the Library or any derivative work under copyright law: that is to say, a work containing the Library or a portion of it, either verbatim or with modifications and/ or translated straightforwardly into another language. (Hereinafter, translation is included without limitation in the term “modification".) "Source code” for a work means the preferred form of the work for making modifications to it. For a library, complete source code means all the source code for all modules it contains, plus any associated interface definition files, plus the scripts used to control compilation and installation of the library. 28 Appendix Activities other than copying, distribution and modification are not covered by this License; they are outside its scope. The act of running a program using the Library is not restricted, and output from such a program is covered only if its contents constitute a work based on the Library (independent of the use of the Library in a tool for writing it). Whether that is true depends on what the Library does and what the program that uses the Library does. 1. You may copy and distribute verbatim copies of the Library’s complete source code as you receive it, in any medium, provided that you conspicuously and appropriately publish on each copy an appropriate copyright notice and disclaimer of warranty; keep intact all the notices that refer to this License and to the absence of any warranty; and distribute a copy of this License along with the Library. You may charge a fee for the physical act of transferring a copy, and you may at your option offer warranty protection in exchange for a fee. 2. You may modify your copy or copies of the Library or any portion of it, thus forming a work based on the Library, and copy and distribute such modifications or work under the terms of Section 1 above, provided that you also meet all of these conditions: a) The modified work must itself be a software library. b) You must cause the files modified to carry prominent notices stating that you changed the files and the date of any change. c) You must cause the whole of the work to be licensed at no charge to all third parties under the terms of this License. d) If a facility in the modified Library refers to a function or a table of data to be supplied by an application program that uses the facility, other than as an argument passed when the facility is invoked, then you must make a good faith effort to ensure that, in the event an application does not supply such function or table, the facility still operates, and performs whatever part of its purpose remains meaningful. (For example, a function in a library to compute square roots has a purpose that is entirely welldefined independent of the application. Therefore, Subsection 2d requires that any application-supplied function or table used by this function must be optional: if the application does not supply it, the square root function must still compute square roots.) These requirements apply to the modified work as a whole. If identifiable sections of that work are not derived from the Library, and can be reasonably considered independent and 30 separate works in themselves, then this License, and its terms, do not apply to those sections when you distribute them as separate works. But when you distribute the same sections as part of a whole which is a work based on the Library, the distribution of the whole must be on the terms of this License, whose permissions for other licensees extend to the entire whole, and thus to each and every part regardless of who wrote it. Thus, it is not the intent of this section to claim rights or contest your rights to work written entirely by you; rather, the intent is to exercise the right to control the distribution of derivative or collective works based on the Library. In addition, mere aggregation of another work not based on the Library with the Library (or with a work based on the Library) on a volume of a storage or distribution medium does not bring the other work under the scope of this License. 3. You may opt to apply the terms of the ordinary GNU General Public License instead of this License to a given copy of the Library. To do this, you must alter all the notices that refer to this License, so that they refer to the ordinary GNU General Public License, version 2, instead of to this License. (If a newer version than version 2 of the ordinary GNU General Public License has appeared, then you can specify that version instead if you wish.) Do not make any other change in these notices. Once this change is made in a given copy, it is irreversible for that copy, so the ordinary GNU General Public License applies to all subsequent copies and derivative works made from that copy. This option is useful when you wish to copy part of the code of the Library into a program that is not a library. 4. You may copy and distribute the Library (or a portion or derivative of it, under Section 2) in object code or executable form under the terms of Sections 1 and 2 above provided that you accompany it with the complete corresponding machine-readable source code, which must be distributed under the terms of Sections 1 and 2 above on a medium customarily used for software interchange. If distribution of object code is made by offering access to copy from a designated place, then offering equivalent access to copy the source code from the same place satisfies the requirement to distribute the source code, even though third parties are not compelled to copy the source along with the object code. Appendix 5. A program that contains no derivative of any portion of the Library, but is designed to work with the Library by being compiled or linked with it, is called a “work that uses the Library". Such a work, in isolation, is not a derivative work of the Library, and therefore falls outside the scope of this License. However, linking a “work that uses the Library” with the Library creates an executable that is a derivative of the Library (because it contains portions of the Library), rather than a “work that uses the library". The executable is therefore covered by this License. Section 6 states terms for distribution of such executables. When a “work that uses the Library” uses material from a header file that is part of the Library, the object code for the work may be a derivative work of the Library even though the source code is not. Whether this is true is especially significant if the work can be linked without the Library, or if the work is itself a library. The threshold for this to be true is not precisely defined by law. If such an object file uses only numerical parameters, data structure layouts and accessories, and small macros and small inline functions (ten lines or less in length), then the use of the object file is unrestricted, regardless of whether it is legally a derivative work. (Executables containing this object code plus portions of the Library will still fall under Section 6.) Otherwise, if the work is a derivative of the Library, you may distribute the object code for the work under the terms of Section 6. Any executables containing that work also fall under Section 6, whether or not they are linked directly with the Library itself. 6. As an exception to the Sections above, you may also combine or link a “work that uses the Library” with the Library to produce a work containing portions of the Library, and distribute that work under terms of your choice, provided that the terms permit modification of the work for the customer’s own use and reverse engineering for debugging such modifications. You must give prominent notice with each copy of the work that the Library is used in it and that the Library and its use are covered by this License. You must supply a copy of this License. If the work during execution displays copyright notices, you must include the copyright notice for the Library among them, as well as a reference directing the user to the copy of this License. Also, you must do one of these things: a) Accompany the work with the complete corresponding machine-readable source code for the Library including whatever changes were used in the work (which must be distributed under Sections 1 and 2 above); and, if the work is an executable linked with the Library, with the complete machine-readable “work that uses the Library", as object code and/or source code, so that the user can modify the Library and then relink to produce a modified executable containing the modified Library. (It is understood that the user who changes the contents of definitions files in the Library will not necessarily be able to recompile the application to use the modified definitions.) b) Use a suitable shared library mechanism for linking with the Library. A suitable mechanism is one that (1) uses at run time a copy of the library already present on the user’s computer system, rather than copying library functions into the executable, and (2) will operate properly with a modified version of the library, if the user installs one, as long as the modified version is interface-compatible with the version that the work was made with. c) Accompany the work with a written offer, valid for at least three years, to give the same user the materials specified in Subsection 6a, above, for a charge no more than the cost of performing this distribution. d) If distribution of the work is made by offering access to copy from a designated place, offer equivalent access to copy the above specified materials from the same place. e) Verify that the user has already received a copy of these materials or that you have already sent this user a copy. For an executable, the required form of the “work that uses the Library” must include any data and utility programs needed for reproducing the executable from it. However, as a special exception, the materials to be distributed need not include anything that is normally distributed (in either source or binary form) with the major components (compiler, kernel, and so on) of the operating system on which the executable runs, unless that component itself accompanies the executable. It may happen that this requirement contradicts the license restrictions of other proprietary libraries that do not normally accompany the operating system. Such a contradiction means you cannot use both them and the Library together in an executable that you distribute. 7. You may place library facilities that are a work based on the Library side-by-side in a 31 Appendix single library together with other library facilities not covered by this License, and distribute such a combined library, provided that the separate distribution of the work based on the Library and of the other library facilities is otherwise permitted, and provided that you do these two things: a) Accompany the combined library with a copy of the same work based on the Library, uncombined with any other library facilities. This must be distributed under the terms of the Sections above. b) Give prominent notice with the combined library of the fact that part of it is a work based on the Library, and explaining where to find the accompanying uncombined form of the same work. 8. You may not copy, modify, sublicense, link with, or distribute the Library except as expressly provided under this License. Any attempt otherwise to copy, modify, sublicense, link with, or distribute the Library is void, and will automatically terminate your rights under this License. However, parties who have received copies, or rights, from you under this License will not have their licenses terminated so long as such parties remain in full compliance. 9. You are not required to accept this License, since you have not signed it. However, nothing else grants you permission to modify or distribute the Library or its derivative works. These actions are prohibited by law if you do not accept this License. Therefore, by modifying or distributing the Library (or any work based on the Library), you indicate your acceptance of this License to do so, and all its terms and conditions for copying, distributing or modifying the Library or works based on it. 10. Each time you redistribute the Library (or any work based on the Library), the recipient automatically receives a license from the original licensor to copy, distribute, link with or modify the Library subject to these terms and conditions. You may not impose any further restrictions on the recipients’ exercise of the rights granted herein. You are not responsible for enforcing compliance by third parties with this License. 11. If, as a consequence of a court judgment or allegation of patent infringement or for any other reason (not limited to patent issues), conditions are imposed on you (whether by court order, agreement or otherwise) that contradict the conditions of this License, they do not excuse you from the conditions of this License. If you cannot distribute so as to satisfy 32 simultaneously your obligations under this License and any other pertinent obligations, then as a consequence you may not distribute the Library at all. For example, if a patent license would not permit royalty-free redistribution of the Library by all those who receive copies directly or indirectly through you, then the only way you could satisfy both it and this License would be to refrain entirely from distribution of the Library. If any portion of this section is held invalid or unenforceable under any particular circumstance, the balance of the section is intended to apply, and the section as a whole is intended to apply in other circumstances. It is not the purpose of this section to induce you to infringe any patents or other property right claims or to contest validity of any such claims; this section has the sole purpose of protecting the integrity of the free software distribution system which is implemented by public license practices. Many people have made generous contributions to the wide range of software distributed through that system in reliance on consistent application of that system; it is up to the author/donor to decide if he or she is willing to distribute software through any other system and a licensee cannot impose that choice. This section is intended to make thoroughly clear what is believed to be a consequence of the rest of this License. 12. If the distribution and/or use of the Library is restricted in certain countries either by patents or by copyrighted interfaces, the original copyright holder who places the Library under this License may add an explicit geographical distribution limitation excluding those countries, so that distribution is permitted only in or among countries not thus excluded. In such case, this License incorporates the limitation as if written in the body of this License. 13. The Free Software Foundation may publish revised and/or new versions of the Lesser General Public License from time to time. Such new versions will be similar in spirit to the present version, but may differ in detail to address new problems or concerns. Each version is given a distinguishing version number. If the Library specifies a version number of this License which applies to it and “any later version", you have the option of following the terms and conditions either of that version or of any later version published by the Free Software Foundation. If the Library does not specify a license version number, you Appendix may choose any version ever published by the Free Software Foundation. 14. If you wish to incorporate parts of the Library into other free programs whose distribution conditions are incompatible with these, write to the author to ask for permission. For software which is copyrighted by the Free Software Foundation, write to the Free Software Foundation; we sometimes make exceptions for this. Our decision will be guided by the two goals of preserving the free status of all derivatives of our free software and of promoting the sharing and reuse of software generally. NO WARRANTY 15. BECAUSE THE LIBRARY IS LICENSED FREE OF CHARGE, THERE IS NO WARRANTY FOR THE LIBRARY, TO THE EXTENT PERMITTED BY APPLICABLE LAW. EXCEPT WHEN OTHERWISE STATED IN WRITING THE COPYRIGHT HOLDERS AND/OR OTHER PARTIES PROVIDE THE LIBRARY “AS IS” WITHOUT WARRANTY OF ANY KIND, EITHER EXPRESSED OR IMPLIED, INCLUDING, BUT NOT LIMITED TO, THE IMPLIED WARRANTIES OF MERCHANTABILITY AND FITNESS FOR A PARTICULAR PURPOSE. THE ENTIRE RISK AS TO THE QUALITY AND PERFORMANCE OF THE LIBRARY IS WITH YOU. SHOULD THE LIBRARY PROVE DEFECTIVE, YOU ASSUME THE COST OF ALL NECESSARY SERVICING, REPAIR OR CORRECTION. 16. IN NO EVENT UNLESS REQUIRED BY APPLICABLE LAW OR AGREED TO IN WRITING WILL ANY COPYRIGHT HOLDER, OR ANY OTHER PARTY WHO MAY MODIFY AND/OR REDISTRIBUTE THE LIBRARY AS PERMITTED ABOVE, BE LIABLE TO YOU FOR DAMAGES, INCLUDING ANY GENERAL, SPECIAL, INCIDENTAL OR CONSEQUENTIAL DAMAGES ARISING OUT OF THE USE OR INABILITY TO USE THE LIBRARY (INCLUDING BUT NOT LIMITED TO LOSS OF DATA OR DATA BEING RENDERED INACCURATE OR LOSSES SUSTAINED BY YOU OR THIRD PARTIES OR A FAILURE OF THE LIBRARY TO OPERATE WITH ANY OTHER SOFTWARE), EVEN IF SUCH HOLDER OR OTHER PARTY HAS BEEN ADVISED OF THE POSSIBILITY OF SUCH DAMAGES. END OF TERMS AND CONDITIONS How to Apply These Terms to Your New Libraries If you develop a new library, and you want it to be of the greatest possible use to the public, we recommend making it free software that everyone can redistribute and change. You can do so by permitting redistribution under these terms (or, alternatively, under the terms of the ordinary General Public License). To apply these terms, attach the following notices to the library. It is safest to attach them to the start of each source file to most effectively convey the exclusion of warranty; and each file should have at least the “copyright” line and a pointer to where the full notice is found. <one line to give the library’s name and a brief idea of what it does.> Copyright (C) <year> <name of author> This library is free software; you can redistribute it and/or modify it under the terms of the GNU Lesser General Public License as published by the Free Software Foundation; either version 2.1 of the License, or (at your option) any later version. This library is distributed in the hope that it will be useful, but WITHOUT ANY WARRANTY; without even the implied warranty of MERCHANTABILITY or FITNESS FOR A PARTICULAR PURPOSE. See the GNU Lesser General Public License for more details. You should have received a copy of the GNU Lesser General Public License along with this library; if not, write to the Free Software Foundation, Inc., 59 Temple Place, Suite 330, Boston, MA 02111-1307 USA Also add information on how to contact you by electronic and paper mail. You should also get your employer (if you work as a programmer) or your school, if any, to sign a “copyright disclaimer” for the library, if necessary. Here is a sample; alter the names: Yoyodyne, Inc., hereby disclaims all copyright interest in the library ‘Frob’ (a library for tweaking knobs) written by James Random Hacker. <signature of Ty Coon>, 1 April 1990 Ty Coon, President of Vice 33 34 Notes 35 Notes 36 Issued by Siemens Home and Office Communication Devices GmbH & Co. KG Schlavenhorst 66 D-46395 Bocholt © Siemens Home and Office Communication Devices GmbH & Co. KG 2005 All rights reserved. Subject to availability. Rights of modification reserved. www.siemens.com www.tesco.com