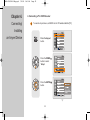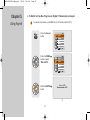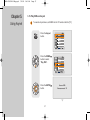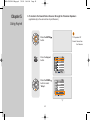
1
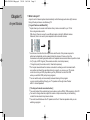
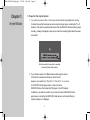
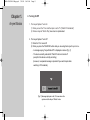
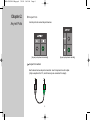
BN68-00653H-00Eng.cover.pdf
7/8/04 3:32 AM
Page 1
1-800-SAMSUNG(1-800-726-7864)
U.S.A
Samsung Electronics America
Service Division
400 Valley Road, Suite 201
Mount Arlington, NJ 07856
Anynet AV Owner’s lnstructions
www.samsungusa.com
Canada
Samsung Electronics Canada Inc.
Samsung Customer Care
7037 Financial Drive
Mississauga, Ontario
L5N 6R3
www.samsung.ca
BN68-00653H-00
© 2004 Samsung Electronics All rights reserved.
BN68-00653H-00Eng.qxd
7/8/04 3:42 AM
Page 1
Table of Contents
Chapter 1. Anynet Basics
1. What is Anynet? ..............................................................
2. Important Facts About Anynet...........................................
3. Electrical Power for the Anynet System ............................
4. Turning On/Off ................................................................
Chapter 2. Anynet Ports
Chapter 5. Using Anynet
1. To Watch TV Broadcasts on Anynet ............................... 34
2. To Watch Set-Top Box Programs (or Digital TV Broadcasts)
on Anynet ...................................................................... 35
3. To Play DVDs on Anynet................................................ 37
4. To Watch Video Tapes on Anynet .................................. 39
5.To Listen to the Sound from the TV Through a Receiver .. 41
6. To Listen to the Sound from a Receiver through the Television
Speakers....................................................................... 42
7. Bringing Up the TV Menu ............................................... 44
2
3
4
5
6
Chapter 3. Anynet Remote Control
1. Using the TV Remote Control in the Anynet System Mode.. 7
2. Using the “SOURCE” Button in the Anynet System Mode ... 7
3. Using the “MODE” Button in the Anynet System Mode ... ....8
4. Using the “Mute” Button in the Anynet System Mode ...........9
5. Using the “Volume +/-” Button in the Anynet System Mode
............................................................................................10
6. Using the “PIP Channel(
)” Buttons in the Anynet
System Mode...................................................................11
7. “Watch TV” Mode .............................................................12
8. “Play DVD” Mode .............................................................13
9. “Play VCR” Mode .............................................................14
Chapter 6. Anynet Q & A
1. Functioning....................................................................
2. Settings .........................................................................
3. Watch Menus ................................................................
4. Video.............................................................................
5. Audio.............................................................................
46
49
51
53
54
Chapter 7. Glossary ........................................................... 55
Chapter 4. Connecting/Installing an Anynet Device
1. How to Connect Anynet....................................................15
2. How to Connect the AV Signal Cables and Configure
the Anynet Connection Settings ........................................16
3. Connecting a TV + DVD/VCR Combo ...............................17
4. Connecting a TV + DVD Receiver.....................................21
5. Connecting a TV + DVD/VCR Combo + DVD Receiver......25
1
BN68-00653H-00Eng.qxd
7/8/04 3:42 AM
Chapter 1.
Anynet Basics
Page 2
1. What is Anynet?
Anynet is an AV network system to automatically control Samsung audio-video (AV) devices
through the Anynet menu via a Samsung TV.
[ Anynet Features and Benefits ]
• Aynet allows you to access most features of any device connected to your TV set
from a single remote control.
With Anynet, there is no need to use different remote controls for different devices.
Moreover, there is no need to press separate buttons to switch devices.
+
+
• Just choose a function from the Anynet menu and the rest of the process required is
performed automatically via the network linking the devices. It frees you from the
inconvenience of pressing separate buttons on separate devices several times to perform a task.
- Ex} To play a DVD: Regular (Three remote controls; nine button presses)
- Through Anynet (One remote control; t hree button presses)
• The Anynet network allows the devices connected to exchange control commands with
one another and check the operating status. As a result, you can use your TV remote
control to control your DVD player when you Play DVDs and to control the STB
when you watch the STB (set-top box) programs.
• You can switch easily and conveniently between listening to the program
you are currently watching through your TV speakers or through Home Theater
with 5.1 channel speakers.
[ The Anynet is most convenient when ]
• You watch content from external input source device such as DVDs, STB programs or the VCR
• You need to change channels, adjust the volume or skip scenes while you are watching
content from an external input source device
• You want to switch between the TV speakers and the 5.1 channel speakers while you are
watching a program
2
BN68-00653H-00Eng.qxd
7/8/04 3:42 AM
Chapter 1.
Anynet Basics
Page 3
2. Important Facts About Anynet
1. Anynet System is available only for Samsung Anynet-supported AV devices.
2. See below for Anynet-supported devices.
(All devices except for
and
are soon to be added)
DVD Player
DVD/VCR Combo
DVD Recorder
DVD Receiver or Home Theater
DVD Recorder Combo
DVD Recorder Combo Receiver
AV Receiver
Satellite Set-Top Box
Cable Set-Top Box
The Anynet does not support set-top
box models T165 and K165.
HDTV Set-Top Box
3.
4.
5.
6.
7.
All video cables are connected to the TV set.
Anynet System does not support more than one of the same type of devices.
One Anynet System menu can support up to two devices besides the TV.
Anynet System can support only one Home theater.
“Standard Connection” means a connection configuration in which no digital optical/coaxial
cables are connected.
8. “Advanced Connection” means a connection configuration in which digital optical/coaxial
cables are connected.
9. Anynet begins to operate when the Anynet-supported AV devices are plugged in and
enter Standby mode.
3
BN68-00653H-00Eng.qxd
7/8/04 3:42 AM
Chapter 1.
Anynet Basics
Page 4
3. Power for the Anynet System
1. If you press the power button on the remote control while the Anynet System is running,
It turns all devices that have been turned on using the Anynet menu, including the TV, off.
However, if the button is pushed while a device from the DVD/VCR Combo product group is
recording, a dialog is displayed to allow you to check the recording status before the power
is turned off.
All units except for the one that is recording
are turned off after three seconds.
2. If you choose to watch on a different device while using the Anynet
It turns all the video devices that are on at the time off.
However, if you switch from “Play DVD ” to “Play VCR ” ,or vice versa
on a DVD/VCR Combo group device, it does not turn the
DVD/VCR Combo off and stops the DVD player or the VCR instead.
In addition, if you switch to another Anynet menu item while a DVD/VCR Combo
group device is recording, the DVD/VCR Combo device is not turned off and no
separate dialog box is displayed.
4
BN68-00653H-00Eng.qxd
7/8/04 3:42 AM
Chapter 1.
Anynet Basics
Page 5
4. Turning On/Off
1. The Anynet System Turns On
1) When you turn the TV on and the Input is set to TV (“Watch TV Boradcast”)
2) When an Anynet “Watch /Play” menu item is implemented
2. The Anynet System Turns Off
1) When the TV is turned off
2) When you press the “SOURCE” button while you are using the Anynet Anynet menu.
- A message saying “Anynet Mode Off” is displayed on screen [Fig. 1]
- The device currently selected for “Watch” function is turned off
(except for the device currently recording)
(However, no separate message is provided if you switch inputs while
watching a TV broadcast.)
[Fig. 1] Message displayed on the TV screen when the
system exits the Anynet “Watch” mode.
5
BN68-00653H-00Eng.qxd
7/8/04 3:42 AM
Chapter 2.
Anynet Ports
Page 6
Anynet Ports
Use the ports to connect Anynet devices.
[Anynet ports placed horizontally]
[Anynet ports placed vertically]
Anynet Connectors
Each device has two Anynet connectors: one for input and one for output.
(Only exception is the TV, which has only one connector for output)
6
BN68-00653H-00Eng.qxd
7/8/04 3:42 AM
Chapter 3.
Anynet Remote
Control
Page 7
1. Using the TV Remote Control in the Anynet System Mode
1. When you select an Anynet menu item for an AV device, the TV remote control
switches to that AV device's mode.
2. You can have the AV device currently running on the Anynet System perform
basic functions from the TV remote control without pressing a separate button to
change modes.
2. Using the “SOURCE” Button in the Anynet System Mode
When you press the “SOURCE” button while you are using the Anynet “Watch” function.
- A message saying “Anynet Mode Off” is displayed on the screen [Fig. 1]
- The device currently selected in the Watch function is turned off.
(except for the device currently recording).
(However, no separate message is provided if you switch inputs while watching a
TV broadcast.)
[Fig. 1] Message displayed on the TV screen when the
system exits the Anynet “Watch” mode.
7
BN68-00653H-00Eng.qxd
7/8/04 3:42 AM
Chapter 3.
Anynet Remote
Page 8
3. Using the “MODE” Button in the Anynet System Mode
- When you press the “MODE” button on the remote control in the Anynet System mode
Note : Anynet Mode(TV, VCR, CATV, DVD, STB)
Control
- When you switch to a mode other than TV mode
by pressing the “MODE” button.
- Disappears after three seconds.
- When you switch to TV mode by pressing the
“MODE” button.
- Disappears after three seconds.
The Anynet System features are available only when you select “TV” mode
on the remote control.
8
BN68-00653H-00Eng.qxd
7/8/04 3:42 AM
Chapter 3.
Anynet Remote
Page 9
4. Using the “Mute” Button in the Anynet System Mode
- When you press the “Mute” button on the remote control with the DVD Receiver
selected as the audio device.
Control
- Disappears after three seconds.
9
BN68-00653H-00Eng.qxd
7/8/04 3:42 AM
Chapter 3.
Page 10
5. Using the “Volume +/-” Button in the Anynet System Mode
Anynet Remote
Control
[When you press the
Volume + button]
[When you press the
Volume - button]
Volume level of the receiver
connected to the Anynet
10
Volume level of the receiver
connected to the Anynet
BN68-00653H-00Eng.qxd
7/8/04 3:42 AM
Chapter 3.
Page 11
6. Using the “PIP Channel(
)” Buttons in the Anynet System Mode
Anynet Remote
Control
- If your AV device supports the channel(
) function (when operating a DVD/VCR
Combo), the PIP screen mode in the Anynet “Watch” modes also supports the function.
11
BN68-00653H-00Eng.qxd
7/8/04 3:42 AM
Chapter 3.
Page 12
7. “Watch TV” Mode
Only the Anynet-related buttons are specified.
Anynet Remote
Control
Source Button
Change Input
(Exit Anynet System)
Anynet Button
Exit Button
Anynet Watch Functions,
Used to access the Anynet
connection settings
Used to exit the Anynet Menu
PIP Channel (
) Button
Anynet in PIP Mode
Channel (
Menu On
12
) with the
BN68-00653H-00Eng.qxd
7/8/04 3:42 AM
Chapter 3.
Anynet Remote
Page 13
8. “Play DVD” Mode
DVD Player, DVD/VCR Combo (DVD), DVD Recorder, DVD Receiver,
DVD Recorder Combo (DVD), DVD Recorder Combo Theater (DVD)
Control
Numeric Buttons (0~9)
Used to enter numbers
+100 Button
Source List Button
Used to select a channel from
100 and onwards.
Change Input
(Exit Anynet System)
Mute Button
Info Display Button
Used to turn the sound from
the audio equipment off in
Anynet mode.
Used to view information
on the DVD title
Exit Button
Volume Control Buttons
Used to exit the Anynet Menu
Used to increase/decrease the
volume of the sound from the
audio equipment in Anynet
mode.
PIP Channel (
Anynet Button
) Button
Used to change channels
(
) in PIP mode while the
Anynet Watch menu is on
while using devices with the
tuner feature DVD Combo
(VCR), DVD Recorder, DVD
Receiver, DVD Recorder
Combo (VCR), DVD Recorder
Combo Theater(VCR)
Anynet Watch Functions,
Used to access the Anynet
connection settings
Menu Button
Used to access the menus of
each device
13
BN68-00653H-00Eng.qxd
7/8/04 3:42 AM
Chapter 3.
Anynet Remote
Page 14
9. “Play VCR” Mode
DVD/VCR Combo (VCR), DVD Recorder, DVD Receiver, DVD Recorder Combo (VCR),
DVD Recorder Combo Theater (VCR)
Control
Numeric Buttons (0~9)
Used to enter numbers
Channel Buttons
Used to change channels for
terrestrial TV broadcasting
+100 Button
Used to select a channel from
100 and onwards.
Source List Button
Change Input
(Exit Anynet System)
Mute Button
Info Display Button
Used to turn the sound from
the audio equipment off in
Anynet mode.
Used to view information
on the VCR title
Exit Button
Volume Control Buttons
Used to exit the Anynet Menu
Used to increase/decrease the
volume of the sound from the
audio equipment in Anynet
mode.
PIP Channel (
Anynet Button
) Button
Used to change channels
(
) in PIP mode while the
Anynet Watch menu is on
while using devices with the
tuner feature DVD Combo
(VCR), DVD Recorder, DVD
Receiver, DVD Recorder
Combo (VCR), DVD Recorder
Combo Theater(VCR)
Anynet Watch Functions,
Used to access the Anynet
connection settings
Menu Button
Used to access the menus of
each device
14
BN68-00653H-00Eng.qxd
7/8/04 3:42 AM
Chapter 4.
Connecting/
Installing
an Anynet Device
Page 15
1. How to Connect Anynet
If you have an Anynet TV, an Anynet DVD/VCR Combo, or an Anynet DVD Receiver
1. If you have one Anynet device,
Connect one end of the Anynet connector to the “Anynet” port on the back
of the TV set and the other to the input port on the back of the Anynet device.
2. If you have two or more Anynet devices [See Fig. 1],
1) Connect one end of the Anynet connector to the “Anynet” port on the back of the
TV set and the other to the “Anynet” Input port on the back of the first Anynet device.
2) Connect one end of the other Anynet connector to the “Anynet” Output port on the
back of the first Anynet device, and the other to the “Anynet” port on the back of the
second Anynet device.
3) If you have more than two Anynet devices, connect the remaining devices using the
same method.
[Fig. 1]
Anynet TV
Anynet DVD/VCR
Combo
Anynet DVD Receiver
15
BN68-00653H-00Eng.qxd
7/8/04 3:42 AM
Chapter 4.
Connecting/
Installing
an Anynet Device
Page 16
2. How to Connect the AV Signal Cables and Configure the Anynet Connection
Settings
1. Choose a connection diagram matching the type of your Anynet device.
(See Pages 17, 21 and 25)
For example, if you have a TV, a DVD/VCR Combo and a DVD Receiver, refer to the
diagram on Page 25.
2. Connect the devices in the order of the numbers shown in the diagram.
1) The connectors provided with the purchase of each product are shown in solid lines.
2) You can buy separate component cables or DVI cables for better picture quality.
In that case, you do not need to connect the connector in 1).
3. Go to “Set up” in the Anynet menu and select “Typical Setup” or “Customized
Setup” to complete the Anynet installation.
1) “Typical Setup”: Choose this menu item when you use the connectors
provided with the purchase of the products (RCA sound cable) to connect
the Anynet devices.
2) “Customized Setup”: Choose when you use optical connectors to connect
the Anynet devices.
4. You can enjoy better sound quality and 5.1 channel sound if you buy, and connect the
devices with, optical cables. Refer to the connection diagram for instructions for
connecting optical cables. To enjoy 5.1-channel sound on the Anynet, go to “Set up”
in the Anynet menu and select “Customized Setup”
If you used the S-Video cable for video signal transmission, connect the audio cable
from the device connected with the S-Video cable to Video Input 1 of the TV to enjoy
the audio and video from the device.
You hear audio from the device connected with the S-Video cable if you
connect the video cable from other devices to Video Input 1.
16
BN68-00653H-00Eng.qxd
7/8/04 3:42 AM
Chapter 4.
Page 17
3. Connecting a TV + DVD/VCR Combo
Connecting/
Installing
an Anynet Device
How to Connect the Cables
( Connect in the order of numbers shown in the diagram.)
Antenna Cable: Connect the external antenna cable to the
ANT Input port on the TV.
Anynet Connector: To use the Anynet, connect the Anynet
port on the TV and the Anynet Input port on the DVD/VCR
Combo using the Stereo-Stereo Anynet connector.
AV Connector: If you do not have a Component cable, connect the A/V output jacks on the DVD/VCR Combo to
the AV IN jacks on the TV.
Component Cable (Sold Separately): If you have the component connector cable,
connect Component Video Out jacks (DVD only) on the DVD/VCR Combo to the Component 1
Video Input jacks on the TV.
Audio Cable: After you complete step 4, connect the Component Audio Output jacks (DVD only) on the
DVD/VCR Combo and the Component Input 1 L-Audio-R jacks on the TV.
17
BN68-00653H-00Eng.qxd
7/8/04 3:42 AM
Chapter 4.
Connecting/
Page 18
3. Connecting a TV + DVD/VCR Combo
To view the Anynet menu, set MODE on the TV remote control to [TV].
Installing
an Anynet Device
Press the Anynet
button.
Press the DOWN
button to select
“Setup”.
Press the ENTER
button.
18
BN68-00653H-00Eng.qxd
7/8/04 3:42 AM
Chapter 4.
Page 19
3. Connecting a TV + DVD/VCR Combo
Connecting/
Installing
an Anynet Device
Press theDOWN
button to select
“Typical Setup”.
Press the
LEFT/RIGHT
button to select
“OK”.
Press the ENTER
button.
19
BN68-00653H-00Eng.qxd
7/8/04 3:49 AM
Chapter 4.
Page 20
3. Connecting a TV + DVD/VCR Combo
Connecting/
Installing
an Anynet Device
Press the ENTER
button.
20
BN68-00653H-00Eng.qxd
7/8/04 3:43 AM
Chapter 4.
Page 21
4. Connecting a TV + DVD Receiver
Connecting/
Installing
an Anynet Device
How to Connect the Cables
( Connect in the order of numbers shown in the diagram.)
Antenna Cable:Connect the external antenna cable to the
ANT Input port of the TV.
Anynet Connectors:To use Anynet,connect the Anynet
port on the TV and the Anynet Input port on the DVD Receiver
using the Stereo-Stereo Anynet connector.
Video Cable:If you do not have the component cable connect the Video output jack on the DVD Receiver
to the Video In jack on the TV.
Audio Cable:Connect the Left-Audio-Right AV jacks on the TV to the Analog Audio output jacks on
the DVD Receiver.
Component C able (Sold Separately):Connect Component Video Out jacks on the
DVD Receiver to the Component Input 1 “Y, PB, PR “ jacks on the TV.
21
BN68-00653H-00Eng.qxd
7/8/04 3:43 AM
Chapter 4.
Connecting/
Page 22
4. Connecting a TV + DVD Receiver
To view the Anynet menu, set MODE on the TV remote control to [TV].
Installing
an Anynet Device
Press the Anynet
button.
Press the DOWN
button to select
“Setup”.
Press the ENTER
button.
22
BN68-00653H-00Eng.qxd
7/8/04 3:43 AM
Chapter 4.
Page 23
4. Connecting a TV + DVD Receiver
Connecting/
Installing
an Anynet Device
Press theDOWN
button to select
“Typical Setup”.
Press the ENTER
button.
23
BN68-00653H-00Eng.qxd
7/8/04 3:43 AM
Chapter 4.
Page 24
4. Connecting a TV + DVD Receiver
Connecting/
Installing
an Anynet Device
Press the ENTER
button.
24
BN68-00653H-00Eng.qxd
7/8/04 3:43 AM
Chapter 4.
Page 25
5. Connecting a TV + DVD/VCR Combo + DVD Receiver
Connecting/
Installing
an Anynet Device
See next page for instructions on how to connect the devices.
25
BN68-00653H-00Eng.qxd
7/8/04 3:43 AM
Page 26
Chapter 4.
5. Connecting a TV + DVD/VCR Combo + DVD Receiver
Connecting/
How to Connect the Cables
( Connect in the order of numbers shown in the diagram on the previous page.)
Installing
an Anynet Device
Antenna Cable: Connect the external antenna cable to the ANT IN port of the TV.
Anynet Connectors: To use Anynet, connect the Anynet port on the TV and the
Anynet Input port on the DVD/VCR Combo using the Stereo-Stereo Anynet connector.
Anynet Connectors: To use Anynet, connect the Anynet Output port on the
DVD/VCR Combo and the Anynet Input port on the DVD Receiver using the Stereo-Stereo
Anynet connector.
AV Cable: If you do not have the COMPONENT connector, connect the Output
port of the AV output jacks on the DVD/VCR Combo to the AV IN jacks on the TV.
Component Cable (Sold Separately): If you have the component connector,
Connect the Component Video Output jacks (DVD only) on the DVD/VCR Combo and the
Component Input 1 “Y, PB , PR” jacks on the TV.
Audio Cable: Connect the L-Audio-R COMPONENT Audio In 1 jacks on the TV
to the Analog Audio Output jacks on the DVD/VCR Combo.
Component Cable (Sold Separately): Connect Component Video Out jacks on the DVD Receiver
to the COMPONENT Input 2 “Y, PB , PR” jacks on the TV.
Audio Connector:Connect the Left-Audio-Right port of Audio Output on the TV and the Audio
Input port on the DVD Receiver.
Optical Cable (Sold Separately): If you have an optical cable, connect the Digital
Audio Output Optical port on the DVD/VCR Combo to theDigital Input port on the DVD Receiver.
To enjoy 5.1-channel sound, go to “Set up” in the Anynet menu and select “Customized
Setup".
26
BN68-00653H-00Eng.qxd
7/8/04 3:43 AM
Chapter 4.
Connecting/
Page 27
5. Connecting a TV + DVD/VCR Combo + DVD Receiver
(When Not Connected With an Optical Cable)
To view the Anynet menu, set MODE Device on the TV remote control to [TV].
Installing
an Anynet Device
Press the Anynet
button.
Press the DOWN
button to select
“Setup”.
Press the ENTER
button.
27
BN68-00653H-00Eng.qxd
7/8/04 3:43 AM
Chapter 4.
Page 28
5. Connecting a TV + DVD/VCR Combo + DVD Receiver
(When Not Connected With an Optical Cable)
Connecting/
Installing
an Anynet Device
Press theDOWN
button to select
“Typical Setup”.
Press the ENTER
button.
28
BN68-00653H-00Eng.qxd
7/8/04 3:43 AM
Chapter 4.
Page 29
5. Connecting a TV + DVD/VCR Combo + DVD Receiver
(When Not Connected With an Optical Cable)
Connecting/
Installing
an Anynet Device
Press the ENTER
button.
29
BN68-00653H-00Eng.qxd
7/8/04 3:43 AM
Chapter 4.
Connecting/
Page 30
5. Connecting a TV + DVD/VCR Combo + DVD Receiver
(When Connected With an Optical Cable)
To view the Anynet menu, set MODE on the TV remote control to [TV].
Installing
an Anynet Device
Press the Anynet
button.
Press the DOWN
button to select
“Setup”.
Press the ENTER
button.
30
BN68-00653H-00Eng.qxd
7/8/04 3:43 AM
Chapter 4.
Page 31
5. Connecting a TV + DVD/VCR Combo + DVD Receiver
(When connected with an optical cable for sound)
Connecting/
Installing
an Anynet Device
Press the DOWN
button to select
“Customized
Setup”.
Press the ENTER
button.
31
BN68-00653H-00Eng.qxd
7/8/04 3:43 AM
Chapter 4.
Page 32
5. Connecting a TV + DVD/VCR Combo + DVD Receiver
(When connected with an optical cable for sound)
Connecting/
Installing
an Anynet Device
Press the
LEFT/RIGHT
button to select
“DVD Combo”
then press the
ENTER
button.
32
See if the device is
connected with an
optical cable.
If you press “Select ”
when the optical cable
is not connected,no
sound comes out from
the DVD/VCR Combo.
BN68-00653H-00Eng.qxd
7/8/04 3:43 AM
Chapter 4.
Page 33
5. Connecting a TV + DVD/VCR Combo + DVD Receiver
(When Connected With an Optical Cable)
Connecting/
Installing
an Anynet Device
Press the
LEFT/RIGHT
button to move
select “OK”
Press the ENTER
button.
Press the ENTER
button.
33
BN68-00653H-00Eng.qxd
7/8/04 3:43 AM
Chapter 5.
Using Anynet
Page 34
1. To Watch TV Broadcasts on Anynet
To view the Anynet menu, set MODE on the TV remote control to [TV].
Press the Anynet
button.
Press the ENTER
button .
Source : TV
Remocon mode : TV
•To exit Watch Anynet
TV Broadcasts
Press the SOURCE
button.
34
Source : Other source besides TV
Remocon mode : TV
BN68-00653H-00Eng.qxd
7/8/04 3:43 AM
Chapter 5.
Using Anynet
Page 35
2. To Watch Set-Top Box Programs (or Digital TV Broadcasts) on Anynet
To view the Anynet menu, set MODE on the TV remote control to [TV].
Press the Anynet
button.
Press the DOWN
button to select
“Watch STB”.
Press the ENTER
button.
35
Source : STB
Remocon mode : STB
BN68-00653H-00Eng.qxd
7/8/04 3:43 AM
Chapter 5.
Page 36
• To exit Watch Anynet Satellite Broadcasts
Using Anynet
Press the
36
button.
Source : Other source besides STB
Remocon mode : TV
BN68-00653H-00Eng.qxd
7/8/04 3:43 AM
Chapter 5.
Using Anynet
Page 37
3. To Play DVDs on Anynet
To view the Anynet menu, set MODE on the TV remote control to [TV].
Press the Anynet
button.
Press the DOWN
button to select
“Play DVD”.
Press the ENTER
button.
37
Source : DVD
Remocon mode : TV
BN68-00653H-00Eng.qxd
7/8/04 3:43 AM
Chapter 5.
• To exit
Page 38
Watch Anynet DVD
Using Anynet
Press the
38
button.
Source : Other source besides DVD
Remocon mode : TV
BN68-00653H-00Eng.qxd
7/8/04 3:43 AM
Chapter 5.
Using Anynet
Page 39
4. To Watch Video Tapes on Anynet
To view the Anynet menu, set MODE on the TV remote control to [TV].
Press the Anynet
button.
Press the DOWN
button to select
“Play VCR”
Press the ENTER
button.
39
BN68-00653H-00Eng.qxd
7/8/04 3:43 AM
Chapter 5.
Page 40
• To exit Watch Anynet VCR
Using Anynet
Press the
40
button.
BN68-00653H-00Eng.qxd
7/8/04 3:44 AM
Chapter 5.
Using Anynet
Page 41
5. To Listen to the Sound from the TV Through a Receiver
(applicable only to the users with an Anynet Receiver)
To view the Anynet menu, set MODE on the TV remote control to [TV].
Press the Anynet
button.
Press the DOWN
button to select
“Play VCR”.
Press the ENTER
button.
41
BN68-00653H-00Eng.qxd
7/8/04 3:44 AM
Chapter 5.
Page 42
6. To Listen to the Sound from a Receiver through the Television Speakers
(applicable only to the users with an Anynet Receiver)
Using Anynet
Press the ENTER
button.
TV Speakers: Off
Sound: Comes from
the Receiver
Press the Anynet
button.
Press the DOWN
button to select
“Setup”.
42
BN68-00653H-00Eng.qxd
7/8/04 3:44 AM
Page 43
Chapter 5.
Using Anynet
Press the ENTER
button.
Press the ENTER
button.
43
TV Speakers : On
RCV ->
sound : comes from
the TV
BN68-00653H-00Eng.qxd
7/8/04 3:44 AM
Chapter 5.
Using Anynet
Page 44
7. Brining Up the TV Menu
To view the Anynet menu, set MODE on the TV remote control to [TV].
Press the Anynet
button.
Press the DOWN
button to select
“Setup”.
Press the ENTER
button.
44
BN68-00653H-00Eng.qxd
7/8/04 3:44 AM
Page 45
Chapter 5.
Using Anynet
Press the DOWN
button to select
“TV menu”.
Press the ENTER
button.
45
BN68-00653H-00Eng.qxd
7/8/04 3:44 AM
Chapter 6.
Anynet Q & A
Page 46
1. Troubleshooting
Problem
Solution
The Anynet does not function.
Solution1:Check to see if the device is an Anynet device.
Solution2:The Anynet System supports only Anynet-enabled devices.
Solution3:Check to see if the Anynet devices are plugged in properly.
If remote control doesn’t work.
Solution1: Check to see if the angle and the distance between the remote
control and the device are appropriate and if there is any obstacle
in the path between the remote control and the device.
Solution2: Replace the remote control batteries.
Solution3: Check to see if you selected the correct device (TV, DVD, VCR,
cable or STB) to control using the [MODE] button.
Solution4: Check to see if the remote control mode matches the input mode.
Solution5: See if you pressed the correct function button.
Solution6: Be sure to note that there are buttons on the remote control that are
not available depending on the Watch mode.
For details, see “Chapter 3. Anynet Remote Control Functions.”
I would like to start the Anynet.
Solution1: See if the Anynet devices are connected to the TV according to the
connection diagram and make sure the proper Anynet Connection
Setting has been selected.
Press the [MODE]] button on the TV remote control to set the
mode to TV.
Then, press the [Anynet] button to bring up the Anynet menu and
choose a Watch function.
46
BN68-00653H-00Eng.qxd
7/8/04 3:44 AM
Chapter 6.
Anynet Q & A
Page 47
1. Troubleshooting
Problem
Solution
I would like to exit Anynet.
Solution1: Press [SOURCE] button on the TV remote control.
Solution2: Turn the TV off.
I would like to bring up the TV
menu while using the Anynet.
Solution1: If you press the [Menu] button while you are using the Anynet
Watch function, it will bring up the DVD menu, VCR menu or the
Set-Top Box menu.
To view the TV menu, go to Anynet “Settings” and select “TV Menu.”
Solution2: Press the Menu button on the front of the TV.
I would like to turn the Anynet
device off.
Solution1: Press the [Power] button on the TV remote control while using
the Anynet Watch function and the Anynet device that was
automatically turned on is the Anynet System is turned off.
(However, you cannot turn the device off in this manner if it
was turned on manually.)
Solution2: Press the SOURCE while using the Anynet Watch function
and all Anynet devices except for the TV are turned off.
Solution3: Select a different Watch menu item while using the Anyne t
Watch function and the Anynet device you have been
watching is turned off.
47
BN68-00653H-00Eng.qxd
7/8/04 3:44 AM
Chapter 6.
Anynet Q & A
Page 48
1. Troubleshooting
Problem
Solution
Can’t use Anynet.
Solution1 : To change the remote control to Anynet mode, be sure to
press the "MODE" button on the TV remote control to change
to TV mode first.
Can’t use (name of device).
Solution1 : Check to see if the power cord of the device is plugged in properly.
Solution2 : Check to see if the Anynet devices are connected properly
according to the instructions.
Can’t use in the current mode.
Solution1 : The key is not supported in the current mode.
For details, see “Chapter 3. Anynet Remote Control Functions.”
Anynet operating…
Solution1 : You cannot use the buttons on the remote control while the Anynet
settings are being adjusted or while switiching to another Watch
mode Try the buttons again after the application of the new Anynet
settings or the modes have been switched.
You cannot turn the device off
Solution1 : The device that is currently recording is not turned off when you
press the power button.
To turn a device that is currently recording off, use the device's
remote control or the button on the front of the device.
48
BN68-00653H-00Eng.qxd
7/8/04 3:44 AM
Chapter 6.
Anynet Q & A
Page 49
2. Settings
Problem
Solution
Solution1: See if there are Anynet devices connected.
The Anynet System supports only Anynet devices.
Solution2: Check to see if the Anynet devices connected are plugged in properly.
Solution3: Check to see if the Anynet devices are connected properly
according to the Anynet connection diagram. (Make sure that
the Output port of the TV is connected to the Input port of the
Anynet device and the Output port of the Anynet device is
connected to the Input port of the other Anynet device.)
Solution1: Connect the video cable of the device to the TV according to the
connection diagram. Then go to [Set up] in the Anynet menu and
select [Typical Setup] or [Customized Setup].
Solution2: Check to see if the video cable is damaged.
Then go to [Set up] in the Anynet menu and select
[Typical Setup] or [Customized Setup].
Solution3: If the video cables are connected properly, set the input source
to the Anynet device (Combo) using the Input button on the
remote control and see if the display works properly. If it does
not work properly, see Troubleshooting for such device (Combo).
Solution1: Check to see if the device is plugged in properly. Then go to [Set up]
in the Anynet menu and select [Typical Setup] or
[Customized Setup].
Solution2: Check to see if the cables are connected properly according to the
instructions. Then go to [Set up] in the Anynet menu and select
[Typical Setup] or [Customized Setup].
Solution3: If the device is connected properly, turn the TV off and go to
[Set up] in the Anynet menu and select [Typical Setup] or
[Customized Setup].
49
BN68-00653H-00Eng.qxd
7/8/04 3:44 AM
Chapter 6.
Anynet Q & A
Page 50
2. Settings
Problem
Solution
Solution1: Check to see if two or more of the same type of device are
connected and if so, remove all such devices but one.
The Anynet System does not function when more than one
of the same type of device is connected.
Solution1: Check the number of the Anynet devices connected and connect
the devices properly according to the connection diagram.
Then go to [Set up] in the Anynet menu and select
[Typical Setup] or [Customized Setup].
(The Anynet System supports up to one device from the
Receiver product group and two devices from the DVD product
group.)
Solution1: Make sure that the devices connected support the Anynet.
Remove devices from the new Anynet product groups that
are not supported by the Anynet version currently running on
your TV. Then go to [Set up] in the Anynet menu and select
[Typical Setup] or [Customized Setup].
50
BN68-00653H-00Eng.qxd
7/8/04 3:44 AM
Chapter 6.
Anynet Q & A
Page 51
3. Watch Menus
Problem
Solution
Solution1: Connect the video cable of the device to the TV according to the
connection diagram before use.
Solution2: Check to see if the video cable is connected to the same place
now as it was at the time you selected the Connection Setting.
To re-connect the video cable to a different location, re-select the
Connection Setting and choose a device to watch.
Solution3: If the TV is in VCR mode, see if the tape has any noise.
The device may not be able to detect the video signal if the noise
level is high.
Solution1: Connect the video cables of the VCR properly according to the
connection diagram. Then go to [Set up] in the Anynet
menu and select [Typical Setup] or [Customized Setup].
(After selecting the connection settings, make sure that the
Anynet device is selected for VCR viewing in the pop-up\
window.)
Solution2: If the cables are connected properly, see if the video cable of the
VCR is damaged.
Solution1: Check to see if the power cord of the device is plugged
in operly.
Solution2: Check to see if the Anynet devices are connected properly
according to the instructions.
51
BN68-00653H-00Eng.qxd
7/8/04 3:44 AM
Chapter 6.
Anynet Q & A
Page 52
3. Watch Menus
Problem
Solution
Solution1: See if there are Anynet devices connected.
The Anynet System supports only Anynet devices.
Solution2: If you have Anynet devices to connect, connect the devices
properly according to the connection diagram.
Then go to [Set up] in the Anynet menu and select
[Typical Setup] or [Customized Setup].
Solution1: You cannot use the “Play DVD ” or “Play VCR ” functions
while the device is recording. Stop the recording before you
use the “Play” functions.
52
BN68-00653H-00Eng.qxd
7/8/04 3:44 AM
Chapter 6.
Anynet Q & A
Page 53
4. Video
Problem
Solution
Solution1: See if the video cable from the Anynet device is properly connected
to the TV according to the connection diagram.
The screen appears blank.
The picture quality is poor and
the image shakes
Solution2: Check the DVD-only video output settings.
Solution3: Check to see if the video cable is damaged.
Solution4: If the TV is in the Play DVD mode, check the surface of the disc
for foreign objects and debris.
Wipe the surface clean with a soft cloth.
The screen blinks or blacks out
while the connection settings are
being selected.
Solution1: It is normal that the screen blinks or blacks out as if the TV is
turned off while the Anynet connection settings are being selected.
All I get is a blue screen.
Solution1: Check to see if the Anynet device for which the “Watch” function is
currently selected is plugged in properly.
Solution2: See if the video cable from the Anynet device currently selected
is properly connected to the TV according to
the connection diagram.
Solution3: Check to see if the video cable is damaged.
53
BN68-00653H-00Eng.qxd
7/8/04 3:44 AM
Chapter 6.
Anynet Q & A
Page 54
5. Audio
Problem
I get picture but no sound.
Solution
Solution1 : Check to see if the speakers are connected properly to the TV or the Receiver.
Solution2 : Check to see if the monitor output cable of the TV or the audio output cable of
the device is damaged.
Solution3 : See if the “Mute ”function has been activated.
Solution4 : If you are using a Receiver to listen,check to see if the Receiver is plugged in properly.
Solution5 : If you are using the Receiver to listen,check to see if the audio cables of the TV and the
device are connected properly according to theconnection diagram.
Audio cables must be connected according to the connection diagram to hear sound.
Solution6 : Check to see if the device and the Receiver are connected with an optical cable and
the Advanced Connection Setting has been selected.You won ’t get any sound if you
select the Advanced Connection Setting but do not use an optical cable to connect
the devices.
Solution7 : Check to see if the DVD player is in stop,slow playback,fast playback or fast reverse
playback mode.It is normal that you don ’t get sound when the device is in such a mode.
Solution8 : Check the DVD-only audio output settings.
Solution9 : In the “Play DVD ” mode,see if the disc is severely damaged.
Solution10 : If the device is connected to the TV with the S-Video signal cable,make sure that the
audio signal cable from the device connected with the S-Video cable is connected to the
Video Input 1 port on the TV.If the video/audio signal cable from another device is
connected to the Video Input 1 port,you will not hear sound from the device .
I get no sound from the
DVD Combo.
Solution1: Make sure the optical cable is connected properly. (See Page 20.)
I would like to hear the sound
through the TV speakers.
Solution1: Go to [Set up] in the Anynet menu and select “Listen Through TV.”
I would like to hear the
sound through the 5.1
channel speakers.
Solution1 : Go to [Set up] in the Anynet menu and select “Listen Through Receiver.”
(If the connection setting is not selected, connect the Anynet Receiver and the 5.1 channel
speakers and select the connection setting before use. See the instruction manual provided
with the Receiver to connect the 5.1 channel speakers.)
54
BN68-00653H-00Eng.qxd
7/8/04 3:44 AM
Chapter 7.
Glossary
Page 55
Glossary
Problem
Solution
The Anynet System
A system that enables you to control Samsung AV devices from the TV.
Watch TV
When selected, this Anynet menu item automatically executes the steps involved in
watching TV broadcasts on TV.
Play DVD
When selected, this Anynet menu item automatically executes the steps involved
in watching DVD titles on TV.
Play VCR
When selected, this Anynet menu item automatically executes the steps involved
in watching VCR titles on TV.
Watch Satellite
When selected, this Anynet menu item automatically executes the steps involved in
watching satellite programs on TV.
Switch to TV Remote
Control Mode
Select this menu item to switch the remote control to TV mode.
Switch to Anynet Remote
Control Mode
Select this menu item to switch the remote control to Anynet mode.
Typical Setup
A menu item to configure the system setting before using the Anynet System.
(In setting up the Anynet System,use the cables provided with the
purchase of the products or buy separate video cables to connect the devices.)
Customized Setup
A menu item to configure the system setting before using the Anynet System. (Choose
this menu item when you use optical connectors to connect the Anynet devices.)
Select Audio Port
Use this menu item to input on the TV or the Receiver to which you connected
the audio output of the device during the Anynet system configuration.
55