1
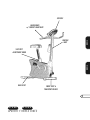
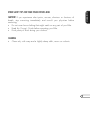
O w n e r’s
Guide
R1400, R1500,
E1400, AND E1500
FITNESS BIKES
C ongratulations on choosing a VISION FITNESS Bike. You’ve taken an
important step in developing and sustaining an exercise program! Your
Bike is a tremendously effective tool for achieving your personal fitness
goals. Regular use of your Bike can improve the quality of your life in so
many ways…
Here are just a few of the health benefits of aerobic exercise:
•
•
•
•
•
•
•
Weight Loss
A Healthier Heart
Improved Muscle Tone
Increased Daily Energy Levels
Reduced Stress
Help In Countering Anxiety and Depression
An Improved Self Image
The key to reaping these benefits is to develop the exercise habit. Your
new Bike will help you eliminate the obstacles that prevent you from
getting in your exercise time. Snow and rain and darkness won't interfere
with your workout when you have your Bike in the comfort of your home.
This Owner’s Guide provides you with basic information on starting an
exercise program. A more complete knowledge of your new Bike will
assist you in realizing your goal of a healthy lifestyle.
Some kinds of service to your Bike should only be performed by your
VISION FITNESS retailer. Please contact your authorized VISION FITNESS
retailer should service be required. If a question or problem arises which
cannot be handled by your VISION FITNESS retailer, please contact us:
VISION FITNESS
500 South CP Avenue
P.O. Box 280
Lake Mills, WI 53551
Ph: 1.800.335.4348
Fax: 1.920.648.3373
www.visionfitness.com
Table of Contents
E1500
R1400
CONSOLE
CONSOLE DISPLAY DESCRIPTIONS . . 12
USING THE R1500/E1500 CONSOLE . . 14
R1500/E1500 PROGRAMS . . . . . . 15
SERVICE AND TROUBLESHOOTING . . 20
HOME WARRANTY . . . . . . . . . . . . . 22
DEVELOPING FITNESS PROGRAM . . . 24
EXERCISE GUIDELINES . . . . . . . . . . 25
TARGET HEART RATE . . . . . . . . . . . . 26
RATE OF PERCEIVED EXERTION . . . . 27
BALANCED FITNESS . . . . . . . . . . . . 28
STRETCHING . . . . . . . . . . . . . . . . . 29
WEEKLY WORKOUT LOGS . . . . . . . . 32
MONTHLY WORKOUT LOGS . . . . . . 34
E1500
R1500
GENERAL
R1500
SAFETY INSTRUCTIONS . . . . . . . . . . 4
ASSEMBLY, MOVING, PLACEMENT . . . 6
STABILIZING, SEAT POSITIONING . . . . 7
SEAT ADJUSMENT . . . . . . . . . . . . . . 8
PEDAL STRAP ADJUSTMENT, POWER SUPPLY,
CONTACT HEART RATE . . . . . . . . . . . 9
CONSOLE HARDWARE DESCRIPTIONS . 10
ALL MODELS
ALL MODELS
R1400
E1400
E1400
CONSOLE
CONSOLE DISPLAY DESCRIPTIONS . . 16
USING THE R1500/E1500 CONSOLE . 18
R1500/E1500 PROGRAMS . . . . . . 19
GENERAL
1
R1500
CONSOLE
CONSOLE
MAST
SEAT HANDLEBARS
w/ CONTACT HEART RATE
R1400
SEAT ADJUSTMENT
HANDLE
REAR FOOT
FRAME SUPPORT TUBE
(R1500 ONLY)
2
R1400
R1500
SEMI-RECUMBENT FITNESS BIKES
FRONT FOOT &
TRANSPORT WHEELS
CONSOLE
HANDLEBARS
w/ CONTACT HEART RATE
E1500
CONSOLE
MAST
SEAT POST
ADJUSTMENT KNOB
E1400
REAR FOOT
FRONT FOOT &
TRANSPORT WHEELS
3
E1400
E1500
UPRIGHT FITNESS BIKES
ALL MODELS
IMPORTANT SAFETY INSTRUCTIONS
SAVE THESE INSTRUCTIONS
When using an electrical product, basic precautions should always be
followed, including the following:
Read all instructions before using this exercise product.
WARNING!
To reduce the risk of burns, fire, electrical shock or injury
to persons:
• Use this exercise product for its intended use as described in this
Owner’s Guide. Do not use attachments not recommended by the
manufacturer.
• Never drop or insert any object into any opening.
• Do not remove the Bike sidecovers. Service should be performed only by
an authorized VISION FITNESS retailer.
• Never operate this Bike if it has a damaged cord or plug, if
it is not working properly, if it has been damaged, or immersed in water.
Please contact your authorized VISION FITNESS retailer for service.
• Keep the cord away from heated surfaces.
• Do not use outdoors.
• To disconnect, turn the switch to the OFF position, then remove plug
from outlet.
• Only use the power cord provided with your VISION FITNESS Bike.
• Never place the power cord under carpeting or place any object on
top of the power cord, which may pinch and damage it.
• Unplug your Bike before moving it.
CHILDREN
•
•
4
Keep children off your Bike at all times.
When the Bike is in use, young children and pets should be kept at least
10 feet away.
ALL MODELS
OTHER SAFETY TIPS FOR YOUR VISION FITNESS BIKE
CAUTION! If you experience chest pains, nausea, dizziness or shortness of
breath, stop exercising immediately and consult your physician before
continuing.
• Do not wear loose clothing that might catch on any part of your Bike.
• Read this Owner’s Guide before operating your Bike.
• Drink plenty of fluids during your workout.
CLEANING
•
Clean only with soap and a slightly damp cloth; never use solvents.
5
ALL MODELS
ASSEMBLY
It is recommended, when possible, that an authorized VISION FITNESS
retailer assemble your Bike. If you have elected to assemble this product
yourself, for your safety, please read and follow each of the steps in the
enclosed assembly instructions. If you have any questions regarding any
component or function of your Bike, contact your retailer.
MOVING
Your VISION FITNESS Bike has transport wheels included for ease of
mobility. To move your semi-recumbent Bike, firmly grasp the rear of the
seat rail or the rear of the frame assembly. Carefully lift and roll on the
transport wheels. To move your upright Bike, firmly grasp the handlebars,
carefully tip toward you, and roll on the transport wheels.
CAUTION: Our Bikes are well-built and heavy, weighing up to 140 pounds!
Use care and additional help if necessary.
PLACEMENT IN YOUR HOME
6
Please follow the safety instructions to place your Bike in the location
where it will best be used. It is important that you place your Bike in a
comfortable and inviting room. Avoid putting your Bike in an unfinished
basement or undesirable setting. Exercise adherence will be achieved
only if you exercise in an attractive setting.
ALL MODELS
STABILIZING THE BIKE
After positioning your Bike in its
intended location, check its
stability by attempting to rock it
side to side. Rocking or wobbling
indicates that the Bike needs to be
leveled. Determine which leveler is
not resting completely on the floor.
Loosen the wing nut at the base of
the leveler to allow the leveler to
rotate. Now rotate the leveler to
the left or right until your Bike is
stable. Lock the adjustment by
tightening the wing nut against the
rear foot support.
SEAT POSITIONING
To determine proper seat position, sit on the seat and position the ball of
your foot on the center of the pedal. Your knee should bend slightly at the
furthest pedal position. You should be able to pedal without locking your
knees or shifting your weight from side to side.
7
ALL MODELS
UPRIGHT SEAT ADJUSTMENT
This Bike features a locking seat
adjustment pin to easily and safely
adjust the seat height. To adjust,
loosen the adjustment knob by
turning it two half turns counterclockwise. Pull out the knob to
unlock the post, and adjust the
post up or down to the desired
setting. Release the knob to lock in
place. Turn the knob clockwise
until tightened. Please check to be
sure seat post is locked in place
before each use.
SEMI-RECUMBENT SEAT ADJUSTMENT
While seated on the Bike, lift the
seat lever on the right side of the
seat to make adjustments. Slide
the seat forward or backward to
desired location. Push the seat
lever down to lock in place.
8
ALL MODELS
PEDAL STRAP ADJUSTMENT
The straps are designed to fit your
individual foot size and should be
adjusted tight enough to keep your
feet from slipping. The pedals
include spring-loaded clips for
easy adjustment. To tighten the
strap, pull down the open end of
the strap. To loosen the strap, push
down on the top of the clip and
pull the strap up. Release the clip
to lock in place.
POWER SUPPLY
Your Bike uses a wall mount external power supply. Use only the power supply
provided with your Bike. If you misplace this power supply, please contact
your authorized VISION FITNESS retailer for an original replacement. Use of
the wrong power supply may cause damage to your Bike.
CONTACT HEART RATE
The Contact Hand Pulse Sensors are included on each product to monitor
your heart rate. To use, grasp the sensors with a comfortable grip during
your workout. The console will display your heart rate. Although your
signal will be displayed immediately, it may take the system a few seconds
to zero in on your actual heart rate.
9
ALL MODELS
CONSOLE
DISPLAY CONSOLE OVERVIEW
The computerized display allows you to select a workout that helps you
achieve your fitness goals. It also allows you to monitor the progress and
feedback of each workout, so you can track improvements in fitness over
time.
A
B
C
D
F
10
G
E
ALL MODELS
CONSOLE HARDWARE DESCRIPTIONS
A. POWER SWITCH
Turn off power to your console if your Bike will not be used for an
extended period of time.
B. MILES/KILOMETER SWITCH
Changes your exercise feedback to the English or Metric system.
C. BIKE OR ELLIPTICAL TRAINER SWITCH
This console can be used on both products, so make sure the switch
is set to BIKE mode.
D. ENTER BUTTON
Use this button in setup mode to select your program, exercise time
and resistance level.
E. START BUTTON
Press the START button to immediately begin exercising in manual mode.
F.
PAUSE/HOLD TO RESET BUTTON
Use this button to STOP or PAUSE your program for up to five minutes.
Hold this button for three seconds to RESET your program.
G. UP ▲ OR DOWN ▼ ARROWS
Use these buttons to change program number, exercise time, and
resistance level in setup. During the workout use these buttons to
increase or decrease resistance.
11
R1500/E1500 CONSOLE
R1500
A
E1500
1
1
0
9:59 00.0
0
0
0
B
12
R1500/E1500 CONSOLE DISPLAY DESCRIPTIONS
A. PROFILE DISPLAY
R1500
This window provides an 8x12 block profile of your program profile.
Each horizontal row of blocks represents your segment time, which is
total workout time divided by twelve. Each vertical column of blocks
represents the resistance level, which is one block for every two levels.
B. FEEDBACK DISPLAY
E1500
During your workout these windows display exercise feedback about
your workout including:
- PROGRAM: A number that represents one of nine program profiles
that the console may be set to
- LEVEL: the current resistance level of your workout
- RPM: Revolutions Per Minute (RPM)
- TIME: the time elapsed or time remaining in your workout
- DISTANCE: the total distance traveled in miles or kilometers since
the start of the workout
- HEART RATE: displays your heart rate in beats per minute when
using the hand pulse grips
- CALORIES: an estimate of calories burned since the start of the workout
- WATTS: a measurement of workload. It is determined by
resistance level and stride rate
13
USING THE R1500/E1500 CONSOLE
R1500
E1500
EASY START
The quickest and easiest way to
begin exercising is to simply press
START. You will begin exercising in
manual mode for a default time at
the default resistance level. You can
change the resistance manually with
the arrow buttons.
CHOOSING A PROGRAM
The default program number will be
flashing in the PROGRAM window.
Press the UP ▲ or DOWN ▼ buttons
to scroll through the nine program
profile options. Push the ENTER
button to select a program.
0
The default exercise time will be
flashing in the TIME window. Use
0
the UP ▲ or DOWN ▼ buttons to
3
0
3
0
0
CHOOSING EXERCISE TIME
3
0
0
12:00
9:59 00.0
0
0
0
12:00 00.0
0
0
0
12:00 00.0
0
0
0
set your desired workout time. Press
ENTER to select.
CHOOSING RESISTANCE LEVEL
14
The default resistance level will be
flashing in the LEVEL window. Use
the UP ▲ or DOWN ▼ buttons to
set your desired workout resistance
level. Press ENTER to select.
3
3
0
3
3
0
12
R1500/E1500 PROGRAMS
PROGRAM 2 (INTERVAL)
PROGRAM 7 (DESCENT)
PROGRAM 3 (INCLINE)
PROGRAM 8 (FAT BURN)
PROGRAM 4 (WEIGHT LOSS)
PROGRAM 9 (MOUNTAIN)
E1500
PROGRAM 6 (VALLEY)
R1500
PROGRAM 1 (MANUAL)
PROGRAM 5 (ROLLING HILLS)
15
R1400/E1400 CONSOLE
A
E1400
R1400
B
16
R1400/E1400 CONSOLE DISPLAY DESCRIPTIONS
A. PROFILE DISPLAY
This window provides an 8x12 block profile of your program profile.
Each horizontal row of blocks represents your segment time, which is
total workout time divided by twelve. Each vertical column of blocks
represents the resistance level, which is one block per level.
B. FEEDBACK DISPLAY
During your workout these windows display exercise feedback about
your workout including:
- PROGRAM: A number that represents one of five program profiles
that the console may be set to
- LEVEL: the current resistance level of your workout
R1400
- RPM: Revolutions Per Minute (RPM)
- TIME: the time elapsed or time remaining in your workout
- DISTANCE: the total distance traveled in miles or kilometers since
E1400
the start of the workout
- HEART RATE: displays your heart rate in beats per minute when
using the hand pulse grips
- CALORIES: an estimate of calories burned since the start of the workout
17
USING THE R1400/E1400 CONSOLE
EASY START
The quickest and easiest way to
begin exercising is to simply press
START. You will begin exercising in
manual mode for a default time at
the default resistance level. You can
change the resistance manually with
the arrow buttons.
CHOOSING A PROGRAM
E1400
R1400
The default program number will be
flashing in the far left window. Press
the UP ▲ or DOWN ▼ buttons to
scroll through the nine program
profile options. Push the ENTER
button to select a program.
3 9:
3 9:59
0 00.0
0
2 9:
2 9:59
0 00.0
0
2 12:00
0 00.0
0
CHOOSING RESISTANCE LEVEL
The default level will be flashing in
the far left window. Use the UP ▲
or DOWN ▼ buttons to set your
desired workout resistance level.
Press ENTER to select.
CHOOSING EXERCISE TIME
18
The default exercise time will be
flashing in the TIME window. Use
the UP ▲ or DOWN ▼ buttons to
set your desired workout time. Press
ENTER to select.
2 12:00
R1400/E1400 PROGRAMS
PROGRAM 1 (MANUAL)
PROGRAM 2 (INTERVAL)
R1400
PROGRAM 3 (INCLINE)
E1400
PROGRAM 4 (WEIGHT LOSS)
PROGRAM 5 (ROLLING HILLS)
19
SERVICE AND TROUBLESHOOTING
PREVENTATIVE MAINTENANCE TIPS
•
•
•
•
Locate Bike in a cool, dry place.
Clean the top surface of the pedals regularly.
Make sure pedals are kept tight to crank arms.
Keep the display console free from fingerprints and salt build-up
caused by sweat.
• Use a cotton cloth with water and a mild cleaning product to clean
the bike. Other fabrics, including paper towels, may scratch the
surface. Do not use ammonia or acid-based cleaners.
• Clean the housing thoroughly on a regular basis.
PREVENTATIVE MAINTENANCE SCHEDULE
Follow the schedule below to ensure proper operation of the product.
ITEM
WEEKLY
MONTHLY
DISPLAY CONSOLE
CLEAN
INSPECT
GENERAL
20
ANNUALLY
INSPECT
CONSOLE MOUNTING BOLTS
FRAME
CLEAN
SEAT FRAME
CLEAN
INSPECT
HANDLEBARS
CLEAN
INSPECT
PLASTIC COVERS
CLEAN
INSPECT
PEDALS AND STRAPS
CLEAN
INSPECT
POWER CORD
BI-ANNUALLY
INSPECT
INSPECT
TROUBLESHOOTING
Our Bikes are designed to be reliable and easy to use. If, however, you
have a problem, these troubleshooting steps may reveal the cause.
PROBLEM: The console does not light up.
SOLUTION: Check to make sure the power switch located on the
backside of the console is turned on.
SOLUTION: Make sure the power adapter is plugged into the base of the Bike.
SOLUTION: Make sure the wire harness is plugged into the back of the
console.
PROBLEM: The Bike is making a
clicking noise.
SOLUTION: Using the pedal
wrench supplied with your Bike,
remove both the left and right
pedals, apply grease to the
threaded portion and reassemble
the pedals onto the Bike. Make
sure the pedals are tight.
SOLUTION: Make sure the pedal straps or your shoe laces are not hitting
the side cover.
SOLUTION: Assure seat adjustment is tight (See page 8)
GENERAL
PROBLEM: The Bike makes a squeaking or creaking noise.
SOLUTION: Check and tighten all hardware.
21
LIMITED HOME USE WARRANTY
VISION FITNESS extends the following exclusive, limited warranty, which shall
apply only to the use of the device in the home, for residential, non-commercial
purposes only. Any other use of the device shall void this warranty.
VISION FITNESS hereby extends the following limited warranties for the following
components of the device, for the time period indicated:
FRAME - LIFETIME VISION FITNESS warrants the Frame against defects in
workmanship and materials for the life of the product, as long as it remains in the
possession of the original owner.
ECB BRAKE - LIFETIME VISION FITNESS warrants the ECB Magnetic Brake against
defects in workmanship and materials for the life of the product, as long as it remains
in the possession of the original owner. Only the Brake and Magnet assembly, and
no other ancillary components or parts, are covered by this lifetime warranty.
ELECTRONICS & PARTS - TWO YEARS VISION FITNESS warrants the Electronic
components and all original Parts (other than the ECB Magnetic Brake) against
defects in workmanship and materials for a period of two years from the date of
original purchase, so long as the device remains in the possession of the original
owner.
GENERAL
LABOR - ONE YEAR VISION FITNESS shall cover the Labor cost for the repair of
the device for a period of one year from the date of original purchase, so long as
the device remains in the possession of the original owner.
22
LIMITED HOME USE WARRANTY (continued)
EXCLUSIVE REMEDY
The exclusive remedy for any of the above warranties shall be repair or
replacement of defective Parts, or the supply of Labor to cure any defect,
provided that Labor shall be limited to one year. All Labor shall be supplied by the
local Retailer who sold the Product, and the Product must be located within that
Retailer’s service area. Products located outside the Retailer’s service area will not
be covered by the Labor warranty.
EXCLUSIONS AND LIMITATIONS
This warranty applies only to the original owner and is not transferable. This
warranty is expressly limited to the repair or replacement of a defective Frame,
ECB Magnetic Brake, Electronic component, or defective Part and is the sole
remedy of the warranty. The warranty does not cover normal wear and tear,
improper assembly or maintenance, or installation of parts or accessories not
originally intended or compatible with the Fitness Product as sold. The warranty
does not apply to damage or failure due to accident, abuse, corrosion,
discoloration of paint or plastic, or neglect. VISION FITNESS shall not be
responsible for incidental or consequential damages. Parts and Electronic
components reconditioned to As New Condition by VISION FITNESS or its
vendors may sometimes be supplied as warranty replacement parts and constitute
fulfillment of warranty terms. Any warranty replacement parts shall be warranted
for the remainder of the original warranty term.
WARRANTY REGISTRATION
Your warranty card must be completed and sent to VISION FITNESS before a
warranty claim can be processed. You may also register via our website at
www.visionfitness.com. Inside the enclosed warranty card, you will find a
customer survey. Your care in completing the survey will be of value to us in
serving you in the future. Comments and suggestions are always welcome. We are
certain you will enjoy your new Bike. Thank you for selecting a VISION FITNESS product.
GENERAL
VISION FITNESS expressly disclaims all other warranties, express or implied,
including but not limited to all warranties of fitness for a particular purpose or of
merchantability. This warranty gives you specific legal rights, and your rights may
vary from state to state.
23
DEVELOPING A FITNESS PROGRAM
By purchasing this piece of VISION FITNESS exercise equipment, you
have made a commitment to exercise and now have the convenience of
exercising in your own home. Your new equipment offers the flexibility to
exercise at whatever time suits you best. It will be easier to maintain a
consistent exercise program that will help you achieve your fitness goals.
ACHIEVING YOUR FITNESS GOALS
GENERAL
An important step in developing a long-term fitness program is to
determine your goals. Is your primary goal to lose weight? Improve muscle
tone? Relieve stress? Prepare for the spring racing schedule? Knowing
what your goals are will help you develop a more successful exercise
program. If possible, try to define your personal goals in precise,
measurable terms over specific periods of time. Examples of these goals
might include:
• Decrease your waistline by two inches over the next two months.
• Run the local 5K race this summer.
• Get 30 minutes of cardiovascular exercise at least five days per week.
• Improve your race time by two minutes over the next year.
• Move from walking a mile to jogging a mile within the next three months.
The more specific the goal, the easier it will be to track your progress. If
your goals are long-term, divide them into monthly and weekly segments.
Long-term goals can lose some of the motivational benefits. Short-term
goals are easier to achieve and will allow you to see the progress you are
making. Every time you reach a goal, it is important to set a new goal.
This will lead to a healthier lifestyle and will provide the motivation that
you will need to move forward.
TRACK YOUR PROGRESS
24
Now that you have set your exercise goals, it is time to write them down
and make an exercise schedule that will help you achieve them. By
keeping a fitness diary, you will stay motivated and know where you are
in terms of reaching your goals. As time goes on, you will be able to look
back with pride to see how far you’ve come. For your convenience we
have included exercise log sheets at the end of this manual.
EXERCISE GUIDELINES
EXERCISE DURATION
A common question asked is, “how much exercise do I need?” We
recommend following the guidelines set up by the American College of
Sports Medicine (ACSM) for healthy aerobic activity.
• Exercise three to five days per week.
• Warm up for five to 10 minutes before aerobic activity.
• Maintain your exercise activity for 30 to 45 minutes.
• Gradually decrease the intensity of your workout, then stretch to
cool down during the last five to 10 minutes.
If weight loss is a major goal, participate in your aerobic activity at least
30 minutes for five days each week.
EXERCISE INTENSITY
The next question asked is, “how hard do I need to work out?” To reap
the most cardiovascular benefits from your workout, it is necessary to
exercise within a recommended intensity range. We recommend using
one of two methods to measure exercise intensity. These two methods are
performed by monitoring your exercise heart rate or by using the Rate of
Perceived Exertion (RPE).
GENERAL
25
TARGET HEART RATE
Target Heart Rate is a percentage of your maximum heart rate. Target
Heart Rate will vary for each individual depending on age, current level
of conditioning, and personal fitness goals. Exercise heart rate should
range from 55% to 85% of your maximum heart rate. As a point of
reference, we use the predicted maximum heart rate formula of
(220 minus age) to determine your heart rate training zone. Please use the
following chart to determine your predicted Target Heart Rate.
GENERAL
EXAMPLE:
If you are a 30-year-old, your predicted maximum heart rate is 190 based
on the (220 minus age) formula.
220 – 30 = 190
Based on the chart above, your heart rate training zone is 104 to 161,
which is 55%–85% of 190.
26
RATE OF PERCEIVED EXERTION
Rate of Perceived Exertion is one of the easiest ways to monitor exercise
intensity. By becoming familiar with the RPE scale, you can continually
assess your level of intensity and insure a level of exertion that is
comfortable. An increase in exercise intensity is directly related to
elevation in exercise heart rate. Consequently, RPE can be used alone or
together with heart rate when monitoring exercise intensity.
RPE SCALE
0
Nothing at all
.5
Very, very weak
1
Very weak
2
Weak
3
Moderate
4
Somewhat strong
5
Strong
6
7
Very strong
8
9
10
Very, very, strong
Maximal
GENERAL
The recommended RPE range during exercise for most people is between
3 (moderate) and 5 (strong). The RPE should be independent of your pace.
27
BALANCED FITNESS
While cardiovascular exercise has been the primary method of fitness for
many programs over the years, it should not be the only method. Strength
Training and Flexibility Training have become more popular as exercise
has developed. Incorporating strength and flexibility training into your
current exercise program will give you the balance you need to improve
your athletic performance, reduce susceptibility to injury, increase
metabolic rate, increase bone density, and reach your goals faster.
STRENGTH TRAINING
Strength training was once known as an activity performed by young
males only. That has changed with the advances in scientific research on
strength training over the last 20 years or so. Research has proven that,
after age 30, we begin to lose muscle mass if we do not incorporate
strength training into our exercise program. With this decrease in muscle
mass, our ability to burn calories decreases, our physical ability to do
work decreases and our susceptibility to injuries increases. The good news
is that, with a proper strength training program we can maintain or even
build muscle as we age. A proper strength training program will work the
muscle groups of the upper and lower body. There are now many options
available for strength training including: yoga, Pilates, selectorized
machines, free weights, stability balls or medicine balls, exercise tubing
and body weight exercises, just to name a few.
GENERAL
Recommendations for a minimum strength training program include:
FREQUENCY: Two to three days per week
VOLUME: One to three sets consisting of eight to 12 repetitions.
28
STRETCHING
Flexibility training is not associated with fitness as often as cardiovascular
exercise or strength training, even though it is just as important. A good
stretching program will help to maintain flexibility of the hips and lower
back. A flexible person will be less likely to injure themselves in common
activities, such as reaching, twisting and turning, or in uncommon activities
such as the annual softball tournament.
Before stretching, take a few minutes to warm up the muscles because
stretching a cold muscle can cause injury. Start your stretch slowly,
exhaling as you gently stretch the muscle. Try to hold each stretch 15 to
30 seconds. Don’t bounce when you stretch. Holding a stretch offers less
chance of injury. Don’t strain or push a muscle too far. If it hurts, ease up.
Here are a few stretches you can incorporate into your exercise program:
SEATED TOE TOUCH
GENERAL
Sit on the floor with your legs
together and straight out in front of
you. Do not lock your knees.
Extend your fingers toward your
toes, exhaling as you go. Hold for
15 to 30 seconds. Return to the
start position, and repeat as
necessary.
29
STANDING QUADRICEPS STRETCH
Using a wall to provide balance,
grasp your left ankle with your left
hand and hold to stretch. Your
knee should be pointing toward
the floor. Hold the stretch for 15 to
30 seconds. Repeat with your
right leg, and continue to alternate
as necessary.
STANDING CALF STRETCH
GENERAL
Standing about three to four feet
from the wall, take one step
forward with your right foot. Place
your hands on the wall in front of
you. Bend your right leg slowly,
using your movement to control the
amount of stretch in the left calf.
Your left heel should remain on the
ground. Slowly bring yourself
back to the starting position and
switch legs. Repeat as necessary.
30
GENERAL
31
32
GENERAL
GENERAL
33
34
GENERAL
GENERAL
35
it all
starts
with a
vision
500 South CP Avenue • P.O. Box 280
Lake Mills, WI 53551
toll free 800.335.4348 • phone 920.648.4090
fax 920.648.3373
www.visionfitness.com
©2006 Vision Fitness. All Rights Reserved.
HRT is a Trademark of Vision Fitness.
5.06
OM18.39PRD
REV1