1
y
POWER USER
Using the
PLG150-DR and PLG150-PC
Drum and Percussion
Plug-in Boards
for the
Modular Synthesis Plug-in System
Motif – S90
A Getting Started Guide
Phil Clendeninn
Product Support Group
©Yamaha Corporation of America
Special Version Note for Motif users…
If you are using the PLG150-DR or PLG150-PC in a Motif you should upgrade to v1.7 to take advantage of the new
operating system’s functionality. If you are using an earlier OS you must load the preset VOICE data into the PLG_USER
bank. This also is true for the S80, S30, CS6x and CS6R, which also can use these boards. Motif Version 1.7 places the
PLGPRE1 Voice data in memory so that when a PLG150DR and/or PC board is detected at power up the Motif will
automatically load the Preset Voice data. The S90 comes PLG150-DR/PC ready and will have the preset Voice data in
the PLGPRE1 bank.
PLG150-DR and PLG150-PC
The PLG150-DR and PLG150-PC are single part
boards based on AWM2 sample playback
technology. Sounds can be accessed in VOICE
mode, as a PART in multi-timbral setup
(Song/Pattern Mix) or as one of the Voice PARTS
of a Performance. There are some slight
differences on how these boards work depending
on which Modular Synthesis Plugin System
(MSPS) product it is placed in. The boards can be
used in the Motif 6/7/8 workstation synthesizers,
the S901, the S80, the S30, the CS6x, CS6R. As
with all PLG150 series boards it can be installed in
any available expansion slot2. Even if you are
familiar with one or more of the PLG series you
will want to pay close attention to how these
“Drum-kit Voice” boards work within the MSPS
products.
info. You should come up with a slot scheme if
you are planning on making and archiving your
own sounds. Both the Motif and S90 will
remember what slot your Voice data is intended
for when you save it. You will have to remember
what slot you used it in. Be consistent.
In the examples used for the screen shots in this
article the PLG150-DR board is in Plugin Slot 2
and the PLG150-PC board is in Plugin Slot 3. (A
PLG150-DX is in slot 1). *Note: PLG150 boards
can go in any slot, no restrictions.
KITS EXPLANATION: A key to understanding
and making use of the Drum kits (DR) and/or
Percussion kits (PC) is found in the Owner’s
Manual Voice List (page 26) – near the back of
the book. Spend a little time looking through this
part of the manual. You will find kits that are
composites of the main drum instruments. For
example, the kits on the PLG150-DR board have
been arranged by combining the kick, snare, hihat and toms of two principal kits. The Live Room
A and Live Room B are these two kits. If you are
new to drum Voices, then you need to understand
that the principal sounds of a drum kit appear in
the C1-B2 area of the keyboard. For example, the
main kick drum is at C1, the main snare is at D1,
a second snare is located at E1, the hi-hats
occupy the 3 black notes F#1, G#1, and A#1 and
the toms are located on the white keys between
F1-D1. Above C#2 through B2 are your main ride,
crash, china and other cymbals. Then mapped
above C3 you have either basic percussion or
some specific variety of drums. When looking at
the Instrument Map charts (pg. 27-52) in the
back of the booklet the columns are as follows:
Understanding how the board kits are configured
will help you in understanding how you can use
them most effectively. The different drum and
percussion sounds are assembled into KITS. This
is the first thing to understand. There are some
80 preset Kits and 8 User kits. You did not
purchase a bunch of loose samples that you have
to assemble into kits. This mapping procedure is
already done – you paid for this voicing already. It
is voiced so that when the board is placed in any
compatible product you can recall the sounds in
pre-assembled kits. There are 8 User kits that you
can edit via the provided Windows/Mac Plug-in
Board Editors. When you begin to appreciate how
the sounds are arranged, you will realize that you
need only find the kit that contains the sounds
you want to use. Some of the Drum kits on the
DR board are actually duplicates of internal S90
and Motif kits. This is so you can use them to
expand the polyphony. And some of the kits are
re-arrangements of the principal sounds in to
composite kits. Each board has its own 32-note
polyphony – when you assign a track to play the
board’s kit this saves you from using the internal
engine’s polyphony. Each board has its own onboard effects (Reverb and Insertion Effects) – that
allows you to use the on board effects of the host
for other purposes.
Checking Installation
Check to make sure your board is properly
installed. Here’s how:
A = Alternate group. Any two sounds in the same
alternate group will mute the other (as in open
and closed hi-hats).
K = Key off. This determines if the sound follows
an envelope or toggles off when you let go.
I = Insertion effect. Each note (instrument sound)
of a Kit can be connected to (or not) the kit’s
Insertion effect.
On the S90/Motif: Press UTILITY/ F6 PLG/ SF1
Status. The board should appear in slot “x” (x =
1, 2, or 3) see Owner’s Manual for installation
You can make these types of assignments in the
User kits only, using the provided Plug-in Board
Editor.
1
PLG series boards are also compatible with a host of
XG products and they have the protocol built in to
become a part of the open-ended XG system in addition
to their role in the Modular Synthesis Plugin System. You
can ignore the parts of the manual that refers to using
these boards in XG products.
2
There are slot restrictions for the PLG100 series
boards.
VOICE MODE
You can play the PLG150-DR/PC programs
normally from VOICE mode. The Voice mode
[PLGx] button will access the sounds via the
Memory A-H buttons and the 1-16 program
buttons, as normal.
2
How to use Kits in a MIX Step-by-Step:
•
MOTIF - From Song or Pattern Mode press
[MIXING] – LED lights up RED
•
S90 - To select a MIX press the SEQ PLAY
button followed by F6 MIX
•
Press [F3] Voice to view the Voice select
mixer.
•
Press [F6] repeatedly, as necessary, to select
a view of PARTS P1-P3 (the Plugin Slots). [F6]
will toggle among your available Part views
when you have PLG boards installed. The
other views will show internal Parts 01-16,
and Parts 17-32, if you have a PLG100-XG.
The Plug-in [P1-P3] Parts should be in the
screen.
You can also use the Voices as you would other
PLG150 sounds, i.e., as one Part in a USER
Performance. And, of course, you can access a
board in a MIX as PART P1, P2 or P3 depending on
the slot you have placed it. The host products own
internal AWM2 sounds occupy Parts 1-16. The
PLG150-DR/PC board occupies a single Part and
can be assigned a MIDI channel 1-16. But, hey, so
do the Internal AWM2 Parts. How do you not play
both simultaneously if there are only 16 MIDI
channels? Do I have to give up an internal Part for
a Plugin Part? That is the purpose of this
document.
•
Highlight the Bank MSB/LSB numbers and
select the appropriate Bank for Board you are
using.3
The possibilities are:
S90/Motif level Voices:
063/024 – this always refers to a PLG1USR Voice
063/025 – this always refers to a PLG2USR Voice
063/026 – this always refers to a PLG3USR Voice
063/070 – this is PLGPRE1 slot 1 preset bank
063/073 – this is PLGPRE1 slot 2 preset bank
063/076 – this is PLGPRE1 slot 3 preset bank
Drum Board direct:
047/000 – the PLG150-DR Custom bank (8)
079/000 – the 80 Preset Drum Board Kits
Percussion Board direct:
047/001 – the PLG150-PC Custom bank (8)
079/001 – the 80 Preset Percussion Board Kits
SPECIAL NOTE for MOTIF owners:
If you have a Motif with a version prior to 1.7 you will
have to assign the PLG150-DR/PC a MIDI channel when
you are using it in a multi-timbral MIX. If you have
version 1.7 or later (highly recommended) the PLG150
series boards will automatically be assigned a MIDI
channel. Therefore, you will want to master how to turn
OFF (un-assign) the internal sound on that MIDI channel
and how to select Voices for the PLG Part in which you
place your PLG board.
Using the PLG150-DR and PLG150-PC in a
multi-timbral Mix
First, let’s state something you already know.
Normally, internal Voices occupy the 16 available
Parts of a MIX. This, then, is your first skill in
working with the PLG boards – assigning/unassigning them to PARTS and MIDI channels.
•
In our example, we have the following 3 PLG
boards installed:
•
Of course, when you select a MIX an internal Part
already resides in each PART. And each Part is
assigned a MIDI channel, therefore you will have
to un-assign one of the internal Parts. For
example, if you decide to use the PLG150-DR on
MIDI channel 10, you would need to go to internal
Part number 10 and un-assign this PART, that is,
make Receive Channel = OFF for the internal Part
that defaults to Part 10.
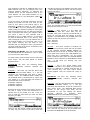
Highlight the Voice Number and use the
[INC/YES] buttons or the Data Wheel to select
Kits. The Kit number and name will read out in
the upper right-hand corner.
To see the MIDI Channel assignment for each
Part, press EDIT/ Touch the Part (track)
button 1-16/ F1 VOICE/ SF2 MODE.
3
MSB/LSB bank select numbers are used to define
specific banks in the tone generator and on the plug-in
board. The can be used in conjunction with a Program
Change message to recall Voices within a MIX remotely
from your sequencer.
3
•
Select a MIDI channel on which to
communicate with your boards (remember our
example has the DR board in PLG2 and the PC
board in PLG3; your setup may be different:
for our example, we’ll use 10 and 11
•
•
Press F6 [1-16] to return to internal Parts.
Un-assign the internal Parts for those MIDI
channels. Touch the corresponding PART 10
and PART 11 and set the MIDI Receive
Channel to OFF.
•
•
Motif: STORE the MIX
S90: PUT the MIX into a TEMPLATE
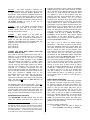
From the main Song (or Pattern) mode
screen press F3 OUTPUT.
The screen above shows the MIDI OUTPUT
CHANNEL for the 16 Tracks. If you were to change
track 1 to “OUT CH 10” then the information on
that track and the keyboard will transmit on MIDI
channel 10. And all PARTS, whether they are
internal, external or plug-in Part, that are set to
receive on Channel 10 will respond. If you leave
the track transmit channels set to the defaults,
then you must select the track assigned to the
Part you wish to play. You must select Track 10 in
the screen shot above in order to hear the
PLG150-DR that we just assigned there. And to
hear the PLG150-PC you would need to select
Track 11.
Using an External Sequencer - USB(MIDI)
The PLG150 series boards can be addressed using
the USB (MIDI) multi-Port connection from an
external computer sequencer. In this scenario you
can address the internal AWM2 sounds of the
Motif/S90 on PORT 1 (MIDI ch. 1-16) and the
PLG150 series boards on PORT 2.4 This takes
advantage of USB’s ability to have multiple 16channel MIDI connections on the same cable,
simultaneously. Each Port is addressed, separately
from an external sequencer – in your software
sequencer you can assign tracks to PORTS and
Channels on a track-by-track basis. This way you
can take advantage of the full 16 on-board
Motif/S90 Parts and address up to 3 of your
PLG150 boards on a separate port5.
By default the boards (in Motif v1.7 and the S90)
are assigned the MIDI channel that corresponds to
the slot, i.e., slot 1 - MIDI channel 1, slot 2 - MIDI
channel 2, etc. However, the initialized MIX will
return all PARTS, including the PLG PARTS to
MSB/LSB 63/0 Voice 1 (a SILENCE Voice for the
PLG boards). So although the PLG parts will now
be assigned a MIDI channel you will still need to
select a VOICE as you would for any PART, when
you want to hear them.
Learning curve: Get used to how this MIDI receive
channel assignment works. Depending on how you
have your system setup you may run into some
routing problems here. If you are using the Motif
or S90 alone you will need to select a MIDI
channel to transmit on. This is determined by the
selected TRACK – via the TRACK SELECT BUTTON.
The PLG board PARTS must be assigned a MIDI
channel and a track must be set to transmit on
that MIDI channel for you to hear the boards.
When you assign a PLUG-IN PART to a MIDI
channel you may not immediately hear it, at least
not until you return to the 1-16 Mixer view and
select a track. The [1-16] view corresponds to
tracks 1-16, initially. It is the track’s MIDI channel
assignment that determines what you hear. If the
track is assigned to send MIDI channel 10 that is
what determines which PART sounds from the
keyboard. For example if you set track 1 to
transmit on MIDI channel 10, the PART or PARTS
set to receive MIDI channel 10 will respond, no
matter if it is PART 1, PART 10 or a PLG PART.
This would allow you to break the 16-channel
limit. You can select the Port assignment for each
board in UTILITY/ F6 PLG/ SF2 MIDI. The host
(Motif or S90) remains fixed at PORT 1 – you
cannot change this assignment. Additionally,
when using the USB Port in this fashion you can
send an additional PORT out the MIDI OUT jack of
the Motif/S90. Under the MIDI IN/OUT parameter
where you select USB (UTILITY/ F5 MIDI/ SF4
Other) you will find the “ThruPort” parameter –
4
If you are not using the USB Port leave the PORT No.
set to OFF.
5
All three slots, if they contain PLG150 series boards,
can be addressed via a single Port (Port 2 in our
example above) because they are each a single PART
and occupy a single MIDI channel at a time.
4
This parameter controls an additional Port of 16
MIDI channels that you can address from your
external software sequencer. If, following the
example above, you set ThruPort to Port 3, you
could address 16 more MIDI channels to any
device connected to the Motif/S90’s MIDI OUT
jack.
.mid file provided on the CDROM. You’ll find 3 files
– choose the appropriate one for the slot you have
placed your board.
If you are using an external sequencer and are
hearing more than one Part at a time you will
want to turn either Local Control OFF in the
Motif/S90 or defeat the “Echo” or “Thru” function
in the software. If you are channelizing (directing
traffic) using your software’s ability to echo signal
back to the keyboard, then you will select the Part
that is sounding from within your software. When
you select a track in your software that is
assigned to Port 1 / MIDI channel 1 it will sound
an internal Motif/S90 Part, if you select a track
that is assigned to Port 2 you can address one of
the PLG150 boards (you would set each on its
own unique channel) and any track in your
software that you assigned to Port 3 would sound
the tone generator of the device connected to the
MIDI OUT of the Motif/S90.
This bank remains in memory even after power
down. The example above is in the PLUG-IN USER
bank and the board is in slot 2.
PLGPRE1 – With Version 1.7, the Motif will
automatically load this same data into the
PLGPRE1 bank when it detects the PLG150-DR on
power up. The S90 does this without a version
upgrade. The MSB/LSB of the PLGPRE bank will
depend on the slot you have you board in:
Slot 1 063/070
Slot 2 063/073
Slot 3 063/076
047/000 – this bank contains 8 locations for
custom user Drum Kits. These Kits can be edited
in the supplied PLUG-IN BOARD EDITOR for
PLG150-DR…more on this in moment. When you
power down they revert to the “LIVE ROOM A” kit,
which acts like a placeholder. You can reload
these 8 locations either from the PLUG-IN BOARD
EDITOR or from a bulk file on SmartMedia or SCSI
disk – if and when you develop your own
customized kits.
Navigating the Banks: There are several banks
on the PLG150-DR and PLG150-PC. Here is what
you need to know about them:
To select banks, press F2 Bank from the main PLG
Voice screen. Use the Data Wheel to choose
between banks.
PLG150-DR will have the following banks
available: PLGxUSR, 047/000, 079/000 and
PLGPRE1*.
079/000 – this is the preset Board Voice
bank…the “raw data” so to speak, on the PLG150
board. It is difficult to consider these 80 Kits as
“raw” because they can have native effects
already applied. They are voiced and “ready to
use”.
PLGxUSR – this bank can hold 64 Drum Kits
integrated with the Motif effects. “x” = the slot
containing the PLG150-DR. This bank is blank,
initially. *Note: The MSB/LSB bank number for
the PLGxUSR bank is determined by which slot
your board is in. The USR bank will always be
associated with a slot as follows:
PLG1USR= 063/024
PLG2USR= 063/025
PLG3USR= 063/026.
PLG150-PC will have the following banks
available: PLGxUSR, 047/001, 079/001 and
PLGPRE1.
PLGxUSR – this can hold 64 Drum Kits integrated
with the Motif/S90 effects. “x” = the slot
containing the PLG150-PC. These will remain even
after power down. The MSB/LSB Bank Select
number of the Plug-in User bank will be
determined by the slot holding the board:
063/024,
063/025
or
063/026.
Press
INFORMATION to view the MSB/LSB numbers.
Because the host product Voice data is stored in
the host it needs to find the PLG150-DR in a
specific slot. If your board is in slot 1 and you
wish to recall the Voice data you must use bank
63/24 in your MIX.
In the example above, the Percussion board is in
slot 3 and we are looking at the PLG3USR bank.
Therefore the MSB/LSB would be 063/026.
Those of you with earlier versions of the Motif OS
(or S80, CS) will need to load Voices from the
5
Insertion processors. Take a look at the PRESET
VOICE LIST for the PLG boards starting on page
26 in the back of the Owner’s Manual. This chart
will show you what Reverb and Insertion effect
are applied to each of the 079/000 (DR) and
079/001 (PC) Kits. These decisions were made in
programming the boards. You do not have
complete user discretion as to what effect is used
in a pre-programmed kit. That said, you do have
choices about how it reacts via OFFSETS to the
preset data. To get an idea of how this works: the
programmers of the original data for the boards
made some decisions about how the kits are
setup. For example in the PLG150-DR Preset Voice
List look at program number 28: KIT NAME –
FLANGER. This kit has a ROOM3 Reverb and
FLANGER1 as the Insertion. You cannot change
the selection of the effect algorithm. (That is
reserved for the 8 Custom user Kit created with
the PLUG-IN BOARD EDITOR).
047/001 – this bank contains 8 locations for
custom percussion kits. These ‘kits’ can be made
in the supplied PLUG-IN BOARD EDITOR for
PLG150-PC. These locations are Board locations to
which you can bulk custom kits. When you power
down they revert to the “AfroCuban” Kit, but you
can reload these 8 locations either from the PLUGIN BOARD EDITOR or from a bulk file on
SmartMedia or SCSI disk.
079/001 – this is the preset Percussion Board
Voice bank…the ‘raw data” so to speak, on the
PLG150 board. These 80 Kits use the board’s
Reverb and Insertion effects.
PLGPRE1 – With Version 1.7, the Motif will
automatically load this same data into the
PLGPRE1 bank when it detects the PLG150-PC on
power up. The S90 does this without a version
upgrade. The MSB/LSB of the PLGPRE bank will
depend on the slot you have you board in:
Slot 1 063/070
Slot 2 063/073
Slot 3 063/076
You have a set of what are called “Native”
parameters – this refers to Native to the board.
These are offsetting data to the preset data. You
can select a specific note (instrument sound) and
tune it, change its level, its pan position, work
with Insertion effect key assignment, its Reverb
send amount and you can work with various
parameters of the INSERTION effect. Remember
you cannot select the INSERTION effect but you
can edit it via the supplied offset controls.
They may have panned a particular Tom hard left
in a kit. You have control via an offset. You cannot
pan it further to the left but you can offset it by
moving it to the right. In other words, a setting
for pan in the Native parameter of +0 on this tom
is hard left – remember it is an offset. It will yield
no result if you set it to –40 (it is already hard
left) but a setting of +40 will start to move this
more toward the center – by adding a +40 value
to the stored value. A value of +127 will pan it
hard right.
Loading the Voice data (Motif (v1.6 and
earlier), S80/30, CS6)
You need to load the preset Voice data from a
MIDI file to the PLGxUSR bank in the following
products: Motif (if you do not have v1.7), S80,
S30, CS6x, and CS6R. Included on the CDROM
that accompanies the boards is a Folder called
“VOICES” – inside this folder you will find 3 files:
one for each slot that might contain your board.
The files are identical, only the slot they are
intended for is different. Remember the host
product remembers what slot the board is in. You
can use the FILE UTILITY to drag-and-drop the file
from your computer’s CDROM drive to the
SmartMedia card in the host’s slot. You can then
play this file from the Motif/S80/S30/CS
sequencer to load the Voice data to the PLGxUSR
bank. The S90 and Motif v1.7 does not need to
load the Voice data6.
Native Board Parameters
Take a look at the NATIVE parameters available
for the plug-in boards. These are found, normally,
by pressing UTILITY/ F6 PLUG/ SFx Native. The
“x” here will depend on what slot you have your
board in. But you will notice that there are no
Native parameters located here for these two
boards (no, the buttons are not broken). Here’s
why: When a board is a DRUM or PERCUSSION
board the NATIVE parameters are found within
the VOICE. This is because with a Kit type Voice
each note is autonomous, where with other PLGsynth boards the Native parameters were applied
globally to all board Voices.
An obligatory word on this Voice data… It is only
Voice parameters, and is meaningless without the
PLG150 Board (which contains the samples) firmly
secured in the proper slot for this Voice data. The
board contains the actually waveforms that you
hear. The Voice parameters alone make no sound.
Specification and Operation
The PLG150-DR and PC boards have 80 Kits
each. The boards have their own Reverb and
6
Being a new product paralleling the introduction of the
PLG150-DR and PC, the Voice data is burned in ROM of
the S90 and will be recalled when the proper board is
detected at power up. They will load into a bank in the
S90 called PLGPRE1 – on detection the S90 will load the
Voice data to the proper slot automatically.
To find the Native parameters:
•
Press EDIT/ touch the PART 1 button to
select ELEMENT level editing/ F4 NATIVE.
6
You will see the following parameters listed under
NATIVE – use the cursor arrows to see various
pages:
Use the PLUG-IN BOARD EDITOR for PLG150-DR
and the PLUG-IN BOARD EDITOR for PLG150-PC
to access the full complement of editing
parameters. Here is how it works:
•
Select a template kit for the 80 preset
board kits.7
•
Select an Insertion Effect and Reverb for
the kit
•
As you select a key its signal routing (flow
chart) and parameters are instantly
recalled. Note that when you select a key
for the INSERTION effect, by turning it
ON, its REVERB Send will disappear. The
signal is being routed through the
Insertion effect first then there is a send
to the reverb.
•
You can set the attributes of each note as
necessary. Including its note-on and noteoff response, assigning it to an alternate
group, etc.
•
You can edit each keys Pitch, Filter
(cutoff/resonance), Amplitude (Attack,
Decay 1, Decay 2), and MIX (level/pan).
Note Select – individual note number (you select 4
notes to edit via these Native offsets).
Note TUNE – offsets the pitch
Note LEVEL – offsets the volume
Note PAN – offsets the pan position
Note INSERT EFF – turn effect ON/OFF per key
Note Reverb Send – offset send amount
INS L.Freq – if available, low EQ frequency
INS L.Gain – if available, low gain
INS H.Freq – if available, high EQ frequency
INS H.Gain – if available, high gain
INS LFOFreq – if available, LFO frequency
INS LFODPT – if available, LFO Depth
INS DryWet – balance between Dry and effected
INS Drive – if available, Drive amount for insert
When you are looking at a Preset Board Voice
(079/000=DR and 079/001=PC), the Insertion
Effect and the Reverb algorithm are predetermined. If a parameter is unavailable, then
asterisks (****) will appear in the place of a
value. The reason it may be unavailable is that
only an effect with an EQ would have a LOW and
HIGH Gain control, only an effect algorithm with a
controllable LFO would require an offset for LFO
Frequency and LFO Depth, etc. If you happen to
select a Kit that has such a need, it will be
available. If, for example, you select a kit with
Reverb Room3 and a 2-band EQ, expect to find
the high and low gain but not the LFO parameters.
If on the other hand you select a kit with a Reverb
Hall and a Flanger expect to find the LFO
parameters but not the high and low gain.
The important difference between these custom
user Board Voices (047) and the preset Board
Voices (079) is that the user Board Voice kits
must be reloaded each time you power up. Of
course, this can be either from the computer
editor or a bulk file you can store on SmartMedia
card. You can make an autoloader file that will
automatically load your custom voice data on
power up. This requires a SmartMedia card/SCSI
drive. You store the data as a ‘PluginAllBulk’
type file for the slot that you place your PLG
board.
Saving a “PluginAllBulk” file to SmartMedia
card or SCSI removable drive
•
Press the [CARD] button (S90) or the [FILE]
button (Motif) to enter the Card File mode
•
F1 Configure/ SF1 select to read from
CARD/SCSI, as appropriate.
•
Press F2 SAVE
•
Set the TYPE to “PluginAllBulkX” x = slot #
•
Name your file (8 characters).
•
Press [ENTER]; and [YES] to execute
•
If you name your file (literally): AUTOLD1.S2B
for PLG1, or AUTOLD2.S2B for PLG2, or
AUTOLD3.S2B for PLG3, the synthesizer will
automatically load this file when you switch it
ON. See the Owner’s Manual for details. Of
course, you can name them anything you wish
if you just want to archive them.
CUSTOM USER KITS
On each board there is a User Board bank with 8
volatile locations for you to create a customized
drum or percussion kit. Your kit will be based on
one of the 80 template kits (these template kits
are actually each a special ELEMENT) – remember
the kits are actually different combinations of the
principal sounds. From there you can edit each
note (instrument), as necessary. In a Custom
User Kit you can select which Insertion Effect from
among the 35 algorithms, you can select which
Reverb effect from among the 12 algorithms and
you can edit each note, as necessary.
Supplied with your PLG Drum and/or Percussion
board is a Plug-in Board Editor and instructions on
how to use it within an OPT compatible sequencer
and how to use it as part of the Voice Editor for
Motif6/7/8. It also operates as a stand-alone
editor. The S90 comes with a copy of Yamaha’s
Windows sequencer SQ01 – the Plug-in Editors
can work within the SQ01 or within the Voice
Editor for S90, or as a stand-alone.
7
You do not start from scratch by selecting individual
drum/percussion instruments…you select a kit with the
samples you need already in it. Learning to read and
interpret the Voice List is essential.
7
F3 FILTER – HPF (high pass filter) – inactive on
these boards.
F4 NATIVE – here you access the board
parameters. {The UTILITY mode, F6 PLUG, SF
NATIVE buttons do not work when a board is a
DRUM or PERCUSSION board.} The NATIVE
parameters for these 2 boards are found with the
VOICE. This is because with a Kit type Voice each
note is autonomous, where with other synth
boards the Native parameters were applied
globally to all notes of the Voice.
F5 LFO – here you can apply a Low Frequency
Oscillator to control pitch.
F6 EQ – Equalizer – inactive on these boards.
Frequently Asked Questions
Motif: What is the difference between the
Board Preset banks 079/000 (DR), 079/001
(PC) and the data that I loaded into the Motif
PLGxUSR bank?
The 079/xxx bank contains the preset Board data
– 80 different Kits. All these sounds are accessed
directly from the PLG board itself. It has no
Motif/S90 integration as to additional effects or
controller setup. The data that is loaded into the
PLGxUSR bank are 64 Kits that have been setup
to respond to host effects and/or controllers. You
would only need to create PLGxUSR Voices if you
want to add host effects and control over those
effects to your kits. Otherwise you can use the
Preset (079) or your own kits (047) as necessary.
What is different about the PLG150-DR/PC
from other PLG150 series boards?
These boards, needless to say, are in kits. A kit is
a specialized Voice type where each note is
autonomous when it comes to certain parameters.
You can, for example, control the tuning of each
note individually, the envelope of each note, and
you even have a filter for each note, etc. Where a
normal voice treats samples as a group, the drum
voice treats samples as individuals. “There are
musicians…and then there are drummers!” True
individuals.
Can I route individual drums/percussion
sounds from these boards to individual
outputs on the AIEB2 or mLAN boards?
No. This would require an extremely complex
busing scheme. The PLG150 Series boards are
single Part boards and can be routed, as a whole,
to the main stereo outputs, the assignable L&R
outputs, or any of the assignable combination on
the AIEB2 or mLAN boards. But individual drums
cannot be routed to individual outputs
Does the PLUG-IN BOARD EDITOR for
PLG150-DR and PLUG-IN BOARD EDITOR for
PLG150-PC let me get at any parameters that
are unavailable from the host’s front panel?
Yes, they do. From the front panel of the Motif or
S90 you can select only 4 Notes (four instrument
sounds) by key, to edit via offsets to the stored
data. You can also edit the INS effect via offsets.
If you want to edit the kits, and select your own
Insertion effect you need to do so from the Editor.
Editing “from scratch” entails selecting one of 80
preset sample maps – from there you can select
effects and edit each note individually.
What is the difference between using the
board’s effects and using the host’s effects?
When the signal of the PLG150-DR/PC arrives in
the host you have the option of applying any of
the Insertion and System effects to that Voice as
with any of the PLG150 boards. These Voices get
stored to the PLGxUSR bank and remain resident
in the host even after power down. The only data
that disappears at power down is any Custom
drum kit data – this must be restored separately
via a bulk file or bulked from the Editor. When you
apply the Motif/S90 parameters to a kit and store
it to the PLGxUSR bank the parameters will be
applied globally to the Voice (this is true for all
PLG150 boards). For example, if you were to add
a host level effect to the Kit Voice it would apply
to all drums. In your Board User kit (047) you
have the ability to apply effects on a per note
basis. And, yes a Board User Kit can be accessed
via a PLGxUSR Voice.
How come the Insertion Bypass and System
Bypass buttons don’t work on the PLG150DR/PC?
The front panel BYPASS buttons bypass the
Motif/S90 effects (global), not the effects onboard
the PLG board (per note). You have a DRY/WET
balance offset control within the Kit’s NATIVE Edit
parameters. There is an important difference
between how the Motif/S90 effects are routed and
the way the effects onboard the PLG board are
routed. For example, you can set the effects per
note when you are addressing the effects of the
PLG board, however, when you add effects of the
Motif/S90 these are overall – applied to the entire
Kit Voice as a whole.
Some parameters are not effective on the
PLG150-DR/PC – which ones work and don’t
work?
When you are in PLG Voice EDIT mode and select
Element level parameters (touch track 1), you can
see:
F1 OSC – here you can assign kits to the HOST
Voice.
F1/SF5 OTHER – here you can coarse tune the kit
as a whole.
F2 PITCH – here you can apply an overall pitch
envelope to the kit.
Phil Clendeninn
Product Support Group
©Yamaha Corporation of America
8