1
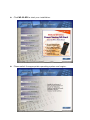
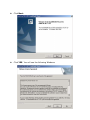
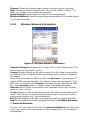
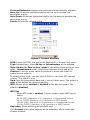
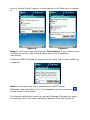
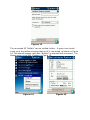
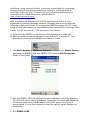
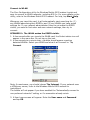
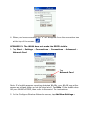
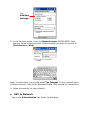
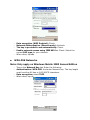
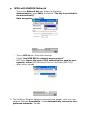
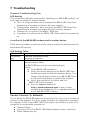
AmbiCom WL11-SD
Wireless LAN SD Card
User Manual
Version 3.0
October 15, 2004
Table of Contents
1 WL11-SD features ........................................................ 3
2 Package Contents & System Requirements .................. 3
2.1 Package Contents ................................................. 3
2.2 System Requirements ........................................... 3
2.2.1 Win-CE based PDAs (Pocket PC Device) ............. 3
3 Introducing WL11-SD Card .......................................... 3
3.1 WL11-SD client features and benefits ...................... 3
3.2 WL11-SD Wireless Network Scenarios...................... 4
3.2.1 Peer-to-Peer (Ad-Hoc) Workgroup .................... 4
3.2.2 Home Networking ........................................... 4
3.2.3 Enterprise Networking ..................................... 5
3.3 About the WL11-SD CD-ROM.................................. 5
4 Installing your WL11-SD Client Driver ......................... 5
4.1 Installation of the WL11-SD driver to the Pocket PC... 5
5 WL11-SD Configuration Utility ..................................... 8
5.1 Basic Setup.......................................................... 8
5.2 Advanced Setup ................................................... 9
5.2.1 Status..........................................................10
5.2.2 Wireless Network Information .........................11
5.2.3 Advance .......................................................13
5.2.4 About ..........................................................14
6 Connect Network with Microsoft Zero Configuration .. 14
6.1 Basic configuration...............................................14
6.2 WPA and 802.1x Authentication Configuration..........18
7 Troubleshooting ......................................................... 27
1 WL11-SD features
The AmbiCom Wireless SD Card conveniently connects your PDA to an
existing wireless network without cables or wires. In addition to the slim
and ultra light weight SD design, the Wireless SD Card also features
secure data transfer, full privacy exceptional range and data rate, as well
as meets Wi-Fi certification standards for total interoperability with other
802.11b or 802.11g equipment.
2 Package Contents & System Requirements
2.1 Package Contents
One AmbiCom WL11-SD
(Wireless LAN card)
One User Manual, Drivers and
Configuration utility CD-ROM
Quick Installation Guide
2.2 System Requirements
2.2.1
If you miss any of these items
please contact your reseller
Win-CE based PDAs (Pocket PC Device)
PDA with Windows Pocket PC 2002 and Windows Mobile 2003 with
at least 32 MB memory.
Secure Digital I/O (SDIO) capable slot, check with your PDA
manual or manufacturer. Go to www.ambicom.com for PDA
compatibility.
Microsoft Active Sync should be installed.
A standard 802.11b or 802.11g Wi- Fi approved Access Point
(AP)/Base station.
3 Introducing WL11-SD Card
3.1 WL11-SD client features and benefits
The WL11-SD Client is a wireless network card that complies with the IEEE
802.11b standard on wireless LANs.
Supports data rates up to 11 Mbps.
Compatible with wireless LAN system based on Direct Sequence
Spread Spectrum (DSSS) radio technology that complies with the
“IEEE 802.11b standard on wireless LANs”.
Support Ad hoc and Infrastructure modes for easy wireless
communication.
Automatic Transmit Rate Select mechanism in the transmit range
of 11, 5.5, 2 and 1 Mbps.
Supports Advanced Security 128 bit Wired Equivalent Privacy
(WEP) data encryption, 802.1X and WPA.
Note:
* WPA security is only support on Windows Mobile 2003
Second Edition
* 802.1x and WPA are not supported on CD V3.0 of
software on ETSI Domain.
Efficient Power Management.
Roaming over multiple channels.
Working range up to 400 meters in an open environment and 100
meters in a close environment.
3.2 WL11-SD Wireless Network Scenarios
The WL11-SD Client enables you to:
Connect your computer to a Peer- to- Peer workgroup of wireless
computing devices.
Connect your computer to a Small Office/Home Office (SOHO)
network or Wireless Hot Spot that has Wi- Fi Access Points.
Connect your computer to a Local Area Network (LAN)
Infrastructure.
3.2.1
Peer-to-Peer (Ad-Hoc) Workgroup
The Peer-to-Peer workgroup configuration enables you to quickly set up a
small wireless workgroup, where the workgroup participants can exchange
files using features like “Files and Printer Sharing” as supported by Microsoft
Networking.
You can use this option to setup a temporary or ad-hoc network in
environments where no access points are available (for example in Small
Office/Home Office (SOHO) environments). As long as the stations are within
range of one another, this is the easiest and least expensive way to set up a
wireless network.
3.2.2
Home Networking
With AmbiCom’s WL11-SD, wireless access to the Internet or other devices is
at your fingertips. All you need to do is connect the WL11-SD to an existing
Access Point or Router that may be connected to the broadband or dial-up
connection or Wireless Hot Spot and now you are ready to:
Share files and printers*
Access the Internet
Listen to internet radio
Watching online movie
Reading and replying email
And more
* Some application might require installing third party software; see your
PDA operating manual
3.2.3
Enterprise Networking
With the Wi-Fi certified Access Point in the corporate network system, you
can connect to a corporate Local Area Network (LAN) infrastructure to have
wireless access to all network facilities. LAN Infrastructures may either be
Stand- alone wireless LANs*
Wireless network infrastructures connected to an existing Ethernet
network.
* Some application might require installing third party software; see your
PDA operating manual
3.3 About the WL11-SD CD-ROM
The WL11-SD CD-ROM contains both software and documentation for the
WL11-SD card. If you wish to install the WL11-SD driver software, turn to
Section 4 "Installing your WL11-SD Client Driver" and follow the instruction.
4 Installing your WL11-SD Client Driver
4.1 Installation of the WL11-SD driver to the Pocket PC
Connect your PDA to your computer and make sure ActiveSync
has established for a connection between the two devices.
Insert the WL11-SD Setup CD into your CD-ROM. The following
Installation wizard will pop up to guide you through the process.
Unless you have deactivated the auto-run feature in Windows, the following
screen should appear automatically.
If this screen does not appear automatically, you can access the installation
program by clicking the Start button and selecting Run. In the drop down
box provided, type “D:\ Setup.exe” (“D” represents the CD-ROM drive).
Click WL11-SD to start your installation.
Please select the appropriate operating system and region.
Click Next.
Click YES. You will see the following Windows.
Click YES to accept the installation. Continue follow the installation
wizard.
Click Finish to complete the driver installation.
5 WL11-SD Configuration Utility
5.1 Basic Setup
When WL11-SD card is inserted, it should connect to the available Access
Point (AP) automatically. If more than one AP is available then the Wireless
SD should connect to the AP, which has stronger signal strength. When the
driver is loaded and if it is working normally an Icon
is displayed on the
lower right of the PDA screen. Once it is observed, now you are ready to
connect to the Internet. Other icons have different meaning and they are:
Icon indicates the network is not established.
Icon indicates that the card is scanning for the nearest AP.
5.2 Advanced Setup
If specific wireless network setup is required, tab the icon,
pop-up utility shown below.
Figures 1. Top Menu.
The menu options are:
● Radio on
● Radio off
● Status
● Wireless Network
● Advanced Options
● About
to access the
Radio on: Turns the wireless radio on. LED of the card will be flickering for
few seconds to establish the connection.
Radio off: Turns off the radio. A pop-up Windows will ask for your
confirmation. If confirmed, the Status Icon will be changed to look like this
Then WL11-SD card will stop functioning.
Status: Shows the current wireless network status like shown in figure 2.
The status screen also shows parameters about the wireless connection.
Wireless Network: Shows the currently available networks in Figure 3.
Note: Wireless Network is only shown on old version of software on ETSI
Domain.
Advanced Options: Show the advanced configuration such as WEP and
power save mode in Figure 6.
About: Shows the driver version and the setup utility software version in
Figure 7
5.2.1
Status
Figures 2. Status and Information
AP INFO: Shows the current access point relevant information.
SSID: Shows the current access point name (ESS ID).
Type: Shows the current connection mode.
WEP (Wired Equivalent Privacy): shows the current WEP used in the AP.
WEP can be enabled or disabled.
MAC: Shows the AP’s MAC address that this card is communicating.
CARD INFO: Shows the information about WL11-SD card inserted such as,
IP: IP address of the card,
MAC: MAC address of the card.
Release Button: Releases the Current IP address
Renew Button: Renews the IP address
LINK INFO: Shows the current wireless link information
Channel: Shows the wireless radio channel currently used by the card.
Rate: Shows the current transmit rate. This can be 1 Mbps, 2 Mbps, 5.5
Mbps, or 11 Mbps. Auto is automatic selection.
Signal Strength: Gives signal strength of the received signal.
Wireless Network: Shows wireless networks available in the neighborhood.
It is shown like below.
5.2.2
Wireless Network Information
Figures 3. Wireless Network Information
Available Networks: Displays all the active AP’s in the neighborhood. The
communicating AP currently is first.
Connect Button: Selects an AP and connect to the AP. Once the connection
is established the AP requires user’s information and the figure 4 Windows
will appear.
Users must input required WEP key and click Connect to communicate. If
multiple WEP keys are required, the index will show the requirement. If no
WEP input is required, click Connect to connect without inputting the WEP
key. Once Connect button is pressed, figure 5 Windows will popup.
Refresh Button: Starts a new search for all available APs or peer-to-peer
stations in the vicinity.
Create Button: Creates a new network and it will open the Windows shown
below. The user has to input all the information that is required to create
new wireless network (e.g. Ad-hoc Network).
Info Button: Selects an AP and its relevant information regarding the AP.
Add Button: Adds the currently selected AP from the Available Networks
to Preferred Networks.
The user can also select an AP from the preferred Networks list. Once this
is set, user can use the same name for quick connection or it is connected
automatically.
Preferred Networks: Displays the preferred wireless networks available.
Move Up: Moves the highlighted profile one line up to increase the
association priority.
Move Down: Moves the highlighted profile one line down to decrease the
association priority.
Delete: Deletes the selected profile.
Figures 4. Connect Windows
SSID: Enters the SSID, this can be the Network ID or Access Point name.
Type: Network type; either Ad-Hoc or Infrastructure will be selected.
Note: Ad-Hoc (or Peer-to-Peer) mode is connection between two or more
cards. Infrastructure mode is connection between clients and an AP.
Channel: In Ad-hoc mode, select the channel in which user wants to
create/join the network.
In infrastructure mode, user can leave it blank or can enter AP’s channel
number. The default is auto.
Rate: Sets the transmission data rate in the pull down menu. The default is
auto, which defines the rate automatically.
WEP: Selects either enabled or disabled of the data encryption. The
default is disabled.
WEP Key
When WEP mode is enabled, the user needs to enter WEP key as
shown.
64 bit (HEX) Maximum of 10 characters in Hexadecimal format
64 bit (ASCII) Maximum of 5 characters in ASCII format
128 bit (HEX) Maximum of 26 characters in Hexadecimal format
128 bit (ASCII) Maximum of 13 characters in ASCII format
Key Index: Allows selecting multiple WEP keys
Click Connect button after entering all the necessary info to create new
wireless network
Click on Info button will bring up the following Windows Figures 5.
Figures 5. Connected network information
5.2.3
Advance
Advanced Options: shows advanced configuration settings available for
WL11-SD card.
Figures 6. Advanced setup configuration
Operation Mode: Shows three different operational options depending on
applications.
Normal: This is the default mode and power level and performance level are
automatically selected.
Max Power Save: This option will give the best power savings but less
emphasis on the performance.
Max performance: This option will give the best performance.
User can change the settings by clicking Apply button.
5.2.4 About
About page content is shown in Figures 7.
Figures 7. WL11-SD card version information
Summary of Important Icons
Icon indicates the current AP is connected
Icon indicates the current AP is available for wireless connection
Icon indicates the current AP is not available for wireless connection
Icon indicates Ad-hoc mode is off with current wireless connection
Icon indicates Ad-hoc mode is on with current wireless connection
Icon indicates Ad-hoc mode is established with current wireless
connection
6 Connect Network with Microsoft Zero
Configuration
6.1 Basic configuration
The Wireless Zero Configuration utility for Windows Mobile 2003 makes it
easy to connect to WLAN networks, including WPA and 802.1x. To learn
about the utility, refer to your Windows Mobile 2003 manual. For help, tap
Start
Help.
Whenever you insert the AmbiCom WL11-SD card, the driver is loaded. The
driver starts with loading/initialization of the card type. After it is completed
show in Figures 8 and 9 appear. You can choose the AP they want to connect
to.
Figures 8
Figures 9
Note: In most cases, you should choose The Internet. If your network uses
a VPN/proxy server, refer to the Windows Mobile 2003 manual for
instructions.
A Network (WEP) Windows will appear that will allow you to enter a WEP key
if required.
Note: You can enter the key in hexadecimal or ASCII format.
When you have connected, the “x” will disappear from the connection
icon at the top of the screen.
The Network setting can be seen by going to Settings Connections, select
Connections icons, then select Advanced, Network Card, like Figures 10.
Figures 10
AP can be added by clicking “Add New” in Figure 10. A Windows popped up
as shown in Figure 13. Otherwise AP “Buffalo” can be selected by clicking on
it. Another set of menu popped up: General, Network Key, and 802.1x. They
are shown in Figures 11, and 12 respectively.
Figures 11
Figures 12
Figures 13
The connected AP “Buffalo” can be verified further. A green icon should
come up at the bottom showing that an AP is connected, as shown in Figure
14. This should happen right after “Buffalo” is selected and connected. The
Status menu in the GUI is shown in Figure 15.
Figures 14
Figures 15
6.2 WPA and 802.1x Authentication Configuration
This section explains how to use the SDIO WLAN Card with Windows Mobile
2003 to connect to WPA or 802.1x network. Before you try to connect, be
sure to install software and insert the card.
1. Prepare Network Information
Verify Card and Network Compatibility
WLAN SD card cannot connect to an 802.1x network unless the network
satisfies the four requirements below. Consult with your network
administrator.
- Windows Internet Information Service (IIS)
- Windows Internet Authentication Service (IAS)
- Windows Certification Authority (CA) with automatic approval and
correct Pocket PC certificate format (via MS certificate template)
- Access point configured only for 802.1x (i.e., no multi-mode support
or static 128-bit WEP keys)
Note: For more information, please refer to
http://www.microsoft.com/Windowsserver2003/technologies/default.mspx
Prepare Security Settings
If the network is compatible, ask the administrator for necessary security
settings:
- Wireless network name, known as ESSID or SSID (case sensitive)
- Authentication type, user name, password
- Use of either DHCP or Static IP to assign IP addresses
- Authentication permission restrictions (e.g., domain administrators
only)
Note: If your network only allows domain administrators to authenticate, ask
your network administrator to assign you this privilege.
Obtain 802.1x Certificate(s)
Ask the administrator for a copy of the root certificate from a Trusted Root
Authority (no intermediary authority).
EAP-TLS only: You also need to set up a cabled connection to the network to
install a personal certificate.
2. 802.1x Networks for Windows Mobile 2003
Here is the setup for the Wireless Network PC Card under Windows Mobile
2003.
2.1 Install 802.1x Certificates
If your network uses EAP-TLS authentication, you also need to install a user
(client) certificate. There are three primary methods for installing a user
certificate: using auto-enrollment, importing a certificate file, and using
Internet Explorer and web enrollment to request a certificate from a
Certificate Authority (CA). Consult with your network administrator for
instructions. For more information, please refer to
http://www.microsoft.com/.
Web enrollment on Windows 2000/2003 uses ActiveX, which is only
supported by desktop Windows versions. Microsoft has come up with the
following solution for Pocket PC: a separate ENROLL program for PPC which
sends a certificate request to the webserver and retrieves the certificate from
it after the CA has issued it. The procedure is as follows:
A. Download the ENROLL program form PDA manufacturer Web site.
B. Make an active connection between your Pocket PC and host PC. Use
ActiveSync and a serial/USB/Ethernet cable or cradle.
C. Use My Computer or Windows Explorer to access your Mobile Device
and copy the ENROLL.EXE and ENROLL.CFG into the MY Documents
folder of the Pocket PC.
D. Edit the ENROLL.CFG file: change the server address and enter Windows
2000/2003's server name/IP address. Also enter the name and password
of the user account on the Windows 2000/2003 server (will be sent
unencrypted (!) over the network so that the rightful owner obtains the
certificate).
E. Run ENROLL.EXE.
F. Enter the User, Password, and Server information as supplied by your
network administrator. Tap OK.
G. The program will generate a private key, stores it in its certificate store. It
also generates a CSR and submits it to the Windows 2000/2003 server.
H. The certificate gets issued. ENROLL.EXE should report "Cert Has Been
Added Successfully". If you go to Settings → System → Certificates, the
certificate should be listed. The root certificate should also be listed in the
Root store.
I. Disconnect the Pocket PC from the host PC.
Connect to WLAN
The Zero Configuration utility for Windows Mobile 2003 makes it quick and
easy to connect to WLAN networks, including 802.1x. For more details on the
utility, refer to the Windows Mobile 2003 manual. For help, tap Start Help.
Whenever you insert the card, it will automatically start searching for: (1)
any WLANs advertising their ESSIDs; and (2) any WLANs you have saved
settings for. If your network administrator chose to not make the ESSID
visible, you need to first enter and save network settings, then try to
connect.
SCENARIO 1: The WLAN makes the ESSID visible.
1. A few seconds after you inserts the WLAN card, the Socket status icon will
appear in the menu bar. Do not tap on the icon.
2. A few seconds to a minute later, a bubble should appear reporting
detected WLANs. Select your WLAN and what it will connect to. Tap
Connect.
Note: In most cases, you should choose The Internet. If your network uses
a VPN/proxy server, refer to the Windows Mobile 2003 manual for
instructions.
The bubble will not appear if you have enabled the “Automatically connect to
non-preferred networks” setting, or if a connection already exists.
3. A User Logon screen will appear. Enter the User name and Password
and tap OK.
4. When you have connected, the “x” will disappear from the connection icon
at the top of the screen.
SCENARIO 2: The WLAN does not make the ESSID visible.
1. Tap Start → Settings → Connections → Connections → Advanced →
Network Card.
Tap
Network Card
Note: If a bubble appears reporting detected WLANs, your WLAN may either
appear as a blank option or not be listed at all. Tap Hide. If the bubble does
list your WLAN’s ESSID, then refer to Scenario 1 for instructions.
2. In the Configure Wireless Networks screen, tap Add New Settings…
Tap
Add New
Settings…
3. In the General screen, enter the Network name (ESSID/SSID). Note
that this name is case-sensitive. Select whether you want to connect to
The Internet or Work.
Note: In most cases, you should select The Internet. If your network has a
VPN/proxy server, refer to the Windows Mobile 2003 manual for instructions.
4. Setup the security for your network.
■
802.1x Network
Tap on the Authentication tab. Enter the following:
-
■
Data encryption (WEP Enabled): Check.
Network Authentication (Shared mode): Uncheck.
The key is provided to me automatically: Check.
Enable network access using IEEE 802.1x. Check. Select the
correct EAP type for your network.
When done, tap ok.
WPA-PSK Networks
Note: Only apply on Windows Mobile 2003 Second Edition
-
Tap on the Network Key tab. Enter the following:
Authentication: WPA-PSK. And enter Network key. The key length
must be either 64 hex or 8-63 ASCII characters.
Data encryption: select TKIP.
When done, tap ok.
■
WPA with RADIUS Network
-
-
Tap on the Network Key tab. Enter the following:
Authentication: select WPA. And check “The key is provided for
me automatically”.
Data encryption: select TKIP.
Tap on 802.1x tab, Enter the following:
Check “Use IEEE 802.1x network access control”.
EAP Type: Select the type of EAP authentication used by your
network, either PEAP or Smart Card or Certificate (EAP-TLS).
When done, tap ok.
5. The Configure Wireless Networks screen should appear, with your new
network listed as Unavailable. Check Automatically connect to nonpreferred networks. Tap ok.
Tap
Automatically
connect to nonpreferred
networks
6. Remove and re-insert the WLAN card. Wait for the device to automatically
detect your WLAN. It may take between a few seconds to a minute.
7. When the bubble appears, select your WLAN. Tap Connect. When you
have connected, the “x” will vanish from the connection icon.
Note: If you encounter difficulties connecting to an 802.1x authentication
server, please check your settings and repeat steps above.
7 Troubleshooting
Common Troubleshooting Tips
LED Activity
If you encounter difficulty using and/or installing your WL11-SD product, the
error may be related to various causes:
● Out - of range situation, which prevents the WL11- SD Client from
establishing a wireless connection with the network.
● Configuration mismatch, which prevents the WL11- SD Client from
establishing a wireless connection with the (correct) network.
● Absence of, or conflict of the WL11- SD Driver.
● A problem or conflict with the WL11- SD Client socket from powering
on.
A conflict of the WL11-SD hardware with another device
Table below provides an overview of the various modes of operation and the
associated LED activity.
LED Activity Table
Power LED
Description/Action
Continuous
Standard operational mode
Red
No action is required
Off
WL11-SD Client power is not on, so it cannot
transmit/receive data.
The WL11-SD may not be connected properly.
Actions
Check WL11- SD connection.
Verify the device settings of the WL11- SD Client
to determine the conflict with another device. If so,
change the settings of either your WL11-SD Client
or the conflicting device to resolve the problem.
Verify the versions of the driver and the
WL11- SD Client firmware.
Visit our support website at
http://www.ambicom.com to see if newer
versions are available and if so, upgrade both the
driver and WL11-SD firmware.
Cannot Connect To Network
If your AmbiCom WL11-SD seems to be working fine, but you are not able to
connect to the network, this error might be due to a configuration mismatch.
For example if LED of your WL11-SD Client lights, the problem is likely to be
caused by a configuration mismatch of
Network Name
Encryption Key (The WL11- SD Network Name is case- sensitive).
Other causes may be:
No driver loaded.
Station not authorized to access network.
WL11- SD Client defect
The most common cause is simple mistake. First check whether the card is
inserted properly or not. If the card is inserted properly, the connection icon
(antenna) should be displayed. If you see the icon, click that icon and check
the status by clicking the status tab on the pop-up menu. Check whether any
APs are available or not. If you see many APs, select any of one those APs
and click connect. If you don’t see any APs click refresh button. If you still
don’t see AP list after refreshing it is possible that no active AP is nearby.
You may be in the dead zone. Move around or change the PDA orientations.
It may help.
Cannot Edit Configuration Profile
If you want to add/edit the Configuration Profile of your WL11-SD Client but
the Client Manager icon is not visible, you may do the following
Insert the WL11-SD card into the device. The Client Manager should pop-up.
If nothing happens, the driver is not installed. Install the driver and restart
the device. You should see the WL11-SD icon in the lower right side.
Cannot Find the AP
Check the available Access Point in the neighborhood by clicking the wireless
network tab in the utility. If the Access Point requires WEP key, input the
same WEP key the try to connect again. If you do not know the WEP key,
contact the system administrator to obtain the key.
For identifying the specific AP check the wireless networks available in the
neighborhood. If the AP shows ESSID, use the same ESSID to connect the
AP. ESSID is assigned to the specific AP for that purpose.
The System is Very Slow
Some devices with non-powerful CPU may suffer their performance
significantly. If the system is very slow, check
- If you are opening many Windows, close them
- Change the antenna orientation for better signal reception
- Check the signal strength if it is weak move toward the AP.
Removing the Driver B
1.
2.
3.
4.
5.
6.
7.
In your PDA, go to Start, then Settings.
Tab on System Tab.
Tab on Remove Programs Icon.
A new Windows will open and showing the Installed programs in your PDA
Tab on AmbiCom WL11-SD and then tab the Remove button.
Tab YES when prompted.
Do soft reset your PDA for the system updates.