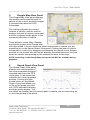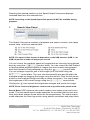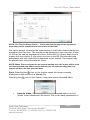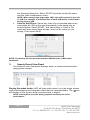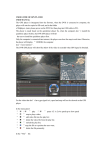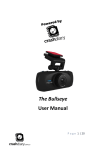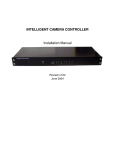
1
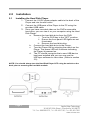
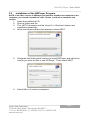
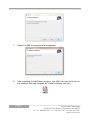
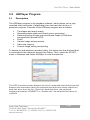
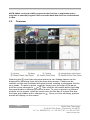
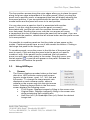
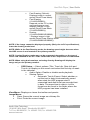
Hard Disk Player and HDPlayer Software Mobile Digital Video Systems User Guide and Instruction Manual, Version 1.0 www.avt-usa.com Table of Contents 1.0 Introduction ..............................................................................3 1.1 1.2 2.0 Product Components .............................................................3 Minimum System Requirements ............................................3 Installation ................................................................................4 2.1 2.2 3.0 Installing the Hard Disk Player ...............................................4 Installation of the HDPlayer Program.....................................5 HDPlayer Program ...................................................................7 3.1 3.2 3.3 A. B. C. D. E. F. G. Description .............................................................................7 Overview ................................................................................8 Using HDPlayer ......................................................................9 Screen ....................................................................................9 Menu ................................................................................... 10 Toolbar ................................................................................ 12 Google Map View Panel ..................................................... 13 Speed Graph View Panel .................................................... 13 Search View Panel .............................................................. 14 Search Event View Panel ................................................... 18 Page 2 Apollo Video Technology 14148 NE 190th Street – Woodinville, WA 98072 Toll Free: 888.288.8721; Tel: 425.483.7100; Fax: 425.483.7200 www.avt-usa.com Hard Disk Player | User Guide 1.0 Introduction The MR Hard Disk Player (Model No. RR-HDP) and Hard Disk Player (HDP) Software are used to easily locate and download video from the removable hard disk drive utilizing a personal computer (PC). This manual describes the procedures for installation and operating the Hard Disk Player and Hard Disk Player Software (hereinafter “HDPlayer Program”) designed for the RoadRunner Digital Video Recorder (DVR) system. 1.1 Product Components 1.2 Hard Disk Player USB Cable Power Cord and Adapter HDPlayer Software Installation CD User’s Manual (this document) Minimum System Requirements Operating System: Microsoft Windows XP, Windows Vista, or Windows 7 CPU: Intel Pentium III 500MHz or higher RAM: 128MB or higher (256MB recommended) VGA: AGP, Video RAM 8MB or higher (800x600, 24bpp or higher) USB 2.0 high speed only Internet access (Required for playback of mapping and speed data when DVR is equipped with GPS) NOTE: Intel Premium Dual Core 2.2GHz or higher CPU is required for the proper audio playback. Apollo Video Technology 14148 NE 190th Street – Woodinville, WA 98072 Toll Free: 888.288.8721; Tel: 425.483.7100; Fax: 425.483.7200 www.avt-usa.com Page 3 2.0 Installation 2.1 Installing the Hard Disk Player 1. Connect the 12VDC power adapter cable to the back of the Player and into the wall outlet 2. Connect the USB ports of the Player to the PC using the provided USB cable. 3. Once you have recorded video on the DVR’s removable hard drive, you can view it on your computer using the Hard Disk Player: a. Remove the hard disk drive from the DVR: i. Turn the DVR key to the “OFF” position. ii. Ensure the front panel LED lights are not illuminated. iii. Remove the hard disk drive. b. Connect the hard disk drive to the Player. c. Turn the Player ON by selecting the switch on the Player. The power LED will illuminate indicating the Player is powered on. d. The PC should recognize that a new USB device has been installed and you can now use the HDPlayer software to view video. (Refer to section 3.0). NOTE: You should always turn the Hard Disk Player OFF using the switch on the back prior to removing the hard disk module. Page 4 Apollo Video Technology 14148 NE 190th Street – Woodinville, WA 98072 Toll Free: 888.288.8721; Tel: 425.483.7100; Fax: 425.483.7200 www.avt-usa.com Hard Disk Player | User Guide 2.2 Installation of the HDPlayer Program NOTE: If an older version of HDPlayer program has already been installed on the computer, you should uninstall the older version, and then re-install the new version. 1. 2. 3. 4. Insert the installation CD. Run the Setup.exe file. The .NET Framework and the Visual C++ Runtime Libraries are installed automatically. When the following dialog box appears, select NEXT. 5. Designate the folder patch location to install HDPlayer and select the user(s) you want to able to use HPDlayer. Then select NEXT. 6. Select NEXT to confirm installation. Apollo Video Technology 14148 NE 190th Street – Woodinville, WA 98072 Toll Free: 888.288.8721; Tel: 425.483.7100; Fax: 425.483.7200 www.avt-usa.com Page 5 7. Select CLOSE to complete the installation. 8. After installing the HDPlayer program, the HDP icon can be found on the desktop. Run the program by “double-clicking” the icon. Page 6 Apollo Video Technology 14148 NE 190th Street – Woodinville, WA 98072 Toll Free: 888.288.8721; Tel: 425.483.7100; Fax: 425.483.7200 www.avt-usa.com Hard Disk Player | User Guide 3.0 HDPlayer Program 3.1 Description The HDPlayer program is the playback software, which allows you to play recorded video and audio (if applicable) from the hard disk drive on a personal computer. Features of the HDPlayer program are as follows: Time-lapse and event search Recording status table and Search event view panel Searching using Google map and Speed Graph (if DVR was equipped with optional GPS) Zoom Various image enhancements Video clip copying Current image saving and printing To search for and playback recorded video, first make sure that the hard disk is connected to the computer through the Player. Then, select the START menu in Windows and select HDPlayer to view the launcher. The HDP Launcher screen displays the list of connected hard disk drives and displays the information about the selected hard disk drive when selecting a hard disk drive from the list. Select the hard disk drive, the preferred language and select CONNECT or “double click” the selected hard drive to continue. Apollo Video Technology 14148 NE 190th Street – Woodinville, WA 98072 Toll Free: 888.288.8721; Tel: 425.483.7100; Fax: 425.483.7200 www.avt-usa.com Page 7 NOTE: When running the HDP program for the first time, it might take quite a long time to start the program if the connected hard disk drive has recorded textin data. 3.2 Overview Selecting the icon hides the panel without a tab. Hidden panels can be displayed by selecting them from the drop-down menus. Panels can be resized, moved and combined with other panels creating a workspace that fits your needs. To resize a panel, scroll the cursor over the edge of the panel until the cursor changes to or . Then click the left mouse button and drag the panel border to enlarge or reduce its size. To move a panel to a different position on the screen, scroll the cursor over the title bar of a panel that has not been auto-hidden until it changes to . Once you click and drag, position arrows will display on the screen. Page 8 Apollo Video Technology 14148 NE 190th Street – Woodinville, WA 98072 Toll Free: 888.288.8721; Tel: 425.483.7100; Fax: 425.483.7200 www.avt-usa.com Hard Disk Player | User Guide The four position arrows along the outer edges allow you to place the panel along the given edge independent of the other panels. When you drag the panel over a position arrow, a transparent blue box will display showing the new panel position. If you are satisfied with the position, release the left mouse button and the panel will move to its new position. You can also move a panel so that it is associated with another panel. To do this, drag the panel over the panel you want it associated with, and the icon with four position arrows will center over that panel. Scrolling the cursor over the icon arrows will cause a transparent blue box to display where the panel will be located. If you are satisfied with the position, release the left mouse button and the panel moves to its new position. It is possible to combine panels so that they take up less space on the screen. Combined panels have a row of tabs across the bottom. Clicking a tab brings that panel to the foreground. To combine panels, move the cursor to the title bar of the panel you want to move. Click and drag the panel onto the panel you want to combine it with. If the panels can be combined, the four-position arrow icon will have a tab symbol in the center. Drag the cursor over the tab symbol , a new tab will appear on the panel. Release the mouse button to combine the panels. 3.3 A. Using HDPlayer Screen The Screen displays recorded video on the hard disk drive. HDP provides various multi-screen layouts; single-screen, quad, 1+7, 3x3, 4x4 and full-screen. To change the image aspect ratio displayed on each camera screen, select a camera on the screen and click the right mouse button. Selecting Aspect Ratio in the text menu screen displays the following menu. Fit to Screen: Displays images by fitting to the screen size. Original Ratio: Displays images by fitting to the screen size while maintaining their original ratio. Half Size (x0.5) to Quadruple Size (x4): Select the desired image size. Apollo Video Technology 14148 NE 190th Street – Woodinville, WA 98072 Toll Free: 888.288.8721; Tel: 425.483.7100; Fax: 425.483.7200 www.avt-usa.com Page 9 NOTE: Half Size (x0.5) to Quadruple Size (x4) will be enabled when the selected camera screen can display images in those sizes. The user can enhance image display quality on the screen by eliminating “stair stepping” (aliasing) effects in the enlarged image. Click the right mouse button on the screen and select Anti-Aliasing Screen from the menu. NOTE: When using a low-end computer, the image drawing speed might decrease while the Anti-Aliasing Screen is activated. B. Menu Exit: Disconnect the current connection and closes the HDP program. Exit can also be performed by clicking the icon on the toolbar. Setup: Allows setting up the system operation. Date/Time Format: Set the date/time format. Display Option: o Drawing Mode Setup…: Select the draw mode level. Page 10 Normal Drawing: Depends on the PC’s CPU performance and displays images in low speed (DIB Draw Mode). Apollo Video Technology 14148 NE 190th Street – Woodinville, WA 98072 Toll Free: 888.288.8721; Tel: 425.483.7100; Fax: 425.483.7200 www.avt-usa.com Hard Disk Player | User Guide Fast Drawing (Default): Displays image in normal speed (Direct Draw Mode). Fast Drawing (YUV420/RGB32): Depends on the PC’s video card performance and displays images in high speed (Direct Draw Mode (YUV420/RGB32)). Overlay (YUV420/RGB32/RGB565) : Displays image in high speed (Direct Draw Overlay Mode (YUV420/RGB32/RGB565)). NOTE: If the image cannot be displayed properly (likely due to PC specifications), lower the drawing mode level. NOTE: While in the Fast Drawing mode, the drawing speed might decrease when the HDP screen is not located on the primary monitor. NOTE: Overlay Drawing mode may not be supported, depending on the type of video card installed in the PC. Video cards with an ATI chipset are recommended. NOTE: When using dual monitors, selecting Overlay Drawing will display the image only on the primary monitor. o OSD Setup…: Select options (Title, Time Info, Date Info and Text-In) to display on the screen and select the first day of week in the calendar. Audio Option: Enable or disable audio playback. Startup Option: Automatic Text-In Export: Select whether or not the text-in data is automatically saved when start the HDP program start if connected hard disk drive has recorded textin data. The saved text-in data in .txt file format can be found in the folder where the HDP program has been installed. View Menu: Displays or closes the toolbar and panels. Image Menu: Save: Saves the current image as a bitmap file. Print: Prints the current image. Apollo Video Technology 14148 NE 190th Street – Woodinville, WA 98072 Toll Free: 888.288.8721; Tel: 425.483.7100; Fax: 425.483.7200 www.avt-usa.com Page 11 NOTE: The Image menu can also be accessed using the toolbar controls. Layout Menu: Select the desired screen layout using the layout toolbar. When changing the screen layout, the selected camera on the current screen will be located in the first cell of the new layout. When in one of the multi-view formats, selecting Previous Layout or Next Layout will move to the previous or next page. In other words, when viewing Cameras 1 to 4 in the quad format, selecting Previous Layout will display Cameras 13 to 16 and selecting Next Layout will display Cameras 5 to 8. Selecting Full Screen enters the full-screen mode, and returns to the previous screen mode by pressing the Esc key on the keyboard or selecting Full Screen Close (x) from the popup menu displayed by clicking the right mouse button. NOTE: The Layout menu can also be accessed using the toolbar controls. Help Menu: Displays HDP version information. C. Toolbar The controls on the toolbar perform functions as described below Select the desired screen layout using the layout toolbar. When changing the screen layout, the selected camera on the current screen will be located in the first cell of the new layout. When viewing a multi-view format, selecting the or icon will move to the previous or next page. Page 12 Apollo Video Technology 14148 NE 190th Street – Woodinville, WA 98072 Toll Free: 888.288.8721; Tel: 425.483.7100; Fax: 425.483.7200 www.avt-usa.com Hard Disk Player | User Guide D. Google Map View Panel The Google Map View panel displays the location and movement path of vehicle of the current playback images if recorded data have the GPS information. The marker indicates the current location of vehicle, and the red line displays the path of vehicle movement, and the compass needle points to the movement direction of vehicle. Three different views (Map, Satellite and Hybrid modes) from Google Map will be provided. You can check the speed information of vehicle you are searching for on the Speed Graph View panel. Clicking the path of vehicle movement in a red line or dragging and dropping the marker in the desired position on the screen with the mouse displays recorded data from the time when the vehicle was passing by the selected location on the map. NOTE: Searching on the Google Map View panel will NOT be available during playback. E. Speed Graph View Panel The Speed Graph View panel displays the vehicle speed of the current playback images if recorded data have the GPS information. A red dotted line indicates the current playback position. Clicking the right mouse button on the Speed Graph View panel allows you to set up the graph type and unit, GPS information display, and high quality display. You can check the location and movement path of vehicle you are searching for on the Google Map View panel. Apollo Video Technology 14148 NE 190th Street – Woodinville, WA 98072 Toll Free: 888.288.8721; Tel: 425.483.7100; Fax: 425.483.7200 www.avt-usa.com Page 13 Selecting the desired position on the Speed Graph View panel displays recorded data from the selected time. NOTE: Searching on the Speed Graph View panel will NOT be available during playback. F. Search View Panel The Search View panel consists of playback and search controls, time-lapse search table, and event search table. NOTE: The speed of fast forward is dependent on the USB interface (USB 1.1 or USB 2.0) and the number of images per second. You can control the playback speed of images that are currently being played back by using the control slider. You can control the fast forward or fast backward playback speed of images that are currently being played back fast forward or fast backward by using the control slider. You can enlarge a specific part of the image up to five times using the control slider. The user can electronically pan and tilt within the enlarged image by dragging the image using the mouse. Click the left mouse button on the enlarged image and drag to move its position. You can change the brightness of the current image using the control slider. Clicking the icon cancels the brightness changes and resets the image. NOTE: Zoom in/out and brightness control work only while in the pause mode. Search Mode: HDP supports two search modes: time-lapse mode and event mode. The time-lapse search mode searches for recorded data by time and then plays back images found within the time parameters. The event search mode searches for event log entries using specific conditions and plays back Page 14 Apollo Video Technology 14148 NE 190th Street – Woodinville, WA 98072 Toll Free: 888.288.8721; Tel: 425.483.7100; Fax: 425.483.7200 www.avt-usa.com Hard Disk Player | User Guide the images associated with those event entries. These two modes have different panel configurations and search methods. Time-lapse Search: Click the icon on the Search View panel to enter the time-lapse search mode. Selecting a date from the calendar initiates the timelapse search. The dates for which recorded images are available are enabled. When first entering the time-lapse search, the latest date with recorded images will be selected (highlighted) in the calendar. Select the (Reload) icon to reload the date information. Recorded information available from the selected date will be displayed on the timetable. The recorded data are displayed by time and bar-shaped segments indicate there are recorded data during that time. Select a specific hour by clicking the mouse on the desired hour segment. NOTE: The timetable of the time-lapse search panel will differ depending on the DVR specifications. The recorded data of all camera channels are displayed by time in one-hour segments and a yellow highlighted segment indicates the selected time that will be played back. Select a specific hour by clicking the mouse on the desired hour segment, and video images will be played back starting with the first image captured within the one-hour segment. If the DVR’s time and date have been reset to a time that is earlier than some recorded video, it is possible for the DVR to have more than one video segment in the same time range. Select the (Segment) icon and select the video segment you want to search. The active segment will be highlighted with blue, and the inactive segment will be highlighted with gray on the timetable. Apollo Video Technology 14148 NE 190th Street – Woodinville, WA 98072 Toll Free: 888.288.8721; Tel: 425.483.7100; Fax: 425.483.7200 www.avt-usa.com Page 15 The recorded data will be displayed in one hour segments with a blue bar and a yellow bar indicating the current selected hour. If there is any data recorded within an hour the entire hour is highlighted blue. To view an image at a specific time, select the (Go To) icon. Event Search: Select the icon on the Search View panel to enter the event search mode. Select the icon, and set up the search condition in the following Event Search dialog box. Page 16 Apollo Video Technology 14148 NE 190th Street – Woodinville, WA 98072 Toll Free: 888.288.8721; Tel: 425.483.7100; Fax: 425.483.7200 www.avt-usa.com Hard Disk Player | User Guide NOTE: The Text-In (Event Search – Text-In tab) search may not be supported, depending on the specifications and version of the DVR. Set up the search criteria for the event search in the Event Search dialog box, and select the Find icon. The results will be displayed in the event list. A total of 100 results can be displayed at a time. Select the (Query Next) icon to display the next results. If you select an event in the list, the recorded data associated with that event will be displayed on the screen. The images may be played back using the playback icons. NOTE: When First is selected for the search starting time, the search will be from the first recorded data. When Last is selected for the search ending time, the search will be to the last recorded data. Save: Selecting the icon on the toolbar saves the image currently displayed on the screen as a bitmap file. Selecting the icon on the Search View panel saves recorded video. Save As Video: Saves any video clip of recorded data in an AVI (Audio Video Interleaved) file format. Set up the save parameters in Apollo Video Technology 14148 NE 190th Street – Woodinville, WA 98072 Toll Free: 888.288.8721; Tel: 425.483.7100; Fax: 425.483.7200 www.avt-usa.com Page 17 the following dialog box. Select START and then set the file name and the video compression codec. NOTE: When saving clips larger than 1GB, clips will be saved in the unit of 1GB. For example, 3 individual files of each 1GB will be created when saving clips of 3GB. Save As Self-Player: Saves any video clip of recorded data as an executable file. Set up the save parameters in the dialog box as pictured below. Select START, and select Save in. Enter a File name and then select Save as type (.exe) for the video you are saving. Then select SAVE. NOTE: The backup file size must be less than 2GB because of Microsoft limitations. G. Search Event View Panel The Search Event View panel displays alarm-in events searched while playing back images. Playing Recorded Audio: HDP will play audio when it is in the single-screen layout while playing back recorded video that has recorded audio. The icon will display on the screen while recorded audio is played. NOTE: Interruptions of audio during playback are likely due to PC performance. Page 18 Apollo Video Technology 14148 NE 190th Street – Woodinville, WA 98072 Toll Free: 888.288.8721; Tel: 425.483.7100; Fax: 425.483.7200 www.avt-usa.com Hard Disk Player | User Guide For assistance, contact technical support toll free at: 888.288.8721 (425.483.7100) or email: [email protected] Apollo Video Technology 14148 NE 190th Street – Woodinville, WA 98072 Toll Free: 888.288.8721; Tel: 425.483.7100; Fax: 425.483.7200 www.avt-usa.com Page 19