1
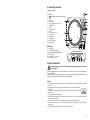
OperatorÕs manual
PROFESSIONAL USB TURNTABLE
ATT10U
Bedienungsanleitung
(D)
4-14
(GB) 48-58
These Operating Instructions accompany this product. They contain important information on
setting up and using the device. You should refer to these instructions, even if you are buying this
product for someone else.
Please retain these Operating Instructions for future use! A list of the contents can be found in the
Table of contents, with the corresponding page number, on page 49.
Dear customer,
Thank you for purchasing this product.
We kindly request the user to follow the operating instructions to preserve this condition and to ensure
safe operation!
Please read the operating instructions completely and observe the safety and operating
instructions before using the product.
All company names and product designations contained herein are trademarks of the
respectiveowners. All rights are reserved.
48
Table of contents
Introduction
1. Intended use
2. Delivery contents
3. Explanation of symbols
4. Safety instructions
5. Operating elements
A) Top side
B) Rear panel
6. Setup and connection
A) Setup
B) Connection
C) Connecting to mains
D) Replacing the cartridge
7. Operation
A) Balancing the counterweight
B) Setting anti-skate compenstaion
C) Playing records
8.
9.
10.
11.
49
D) Revolution speed fune tuning
Maintenance
Troubleshooting
Disposal
Technical data
Page
48
50
50
51
51
52
52
52
52
52
53
53
54
55
55
55
55
55
56
57
58
58
1. Intended Use
The turntable is intended to play garmophone records at 33 1/3, 45 or 78 rpm. It should be connected
to a sound amplifer or a mixing desk with appropriate phono inputs or to computer with USB connection.
After installing the included software, you can record or edit audio signals from the turntable to your
personal computer.
It utilises belt drive system, which improves motor and platter isolation and reduces low-frequency rumble
compared to direct drive system. The turntable includes a S-shaped tone arm reinforced with anti skating
mechanism.
It must be powered by 230V, 50Hz or 115V, 60Hz and is only authorised to used in dry indoor
environments.
Any usage other than described above is not permitted and can damage the product and lead to
associated risks such as short-circuit, fre, electirc shock, etc. No part of the product may be modifed or
rebuilt.
Please read the operating instructions thoroughly and keep them for further reference.
2. Delivery contents
•
•
•
•
•
•
•
•
•
•
•
•
•
Turntable
Turntable platter
Slip mat
45-rpm adapter
Counterweight
Headshell
Cartridge
LED needle light
USB cable
Phono cable
Mains cable
Software CD
Operating instructions
50
3. Explanation of symbols
9. Dépannage
The following symbols must be observed:
The lightning symbol with arrowhead within an equilateral triangle is intended to alert the user to the presence
of uninsulated voltage within the device’s enclosure that may be of sufficient magnitude to constitute a risk of
electrical shock to persons.
En achetant ce tourne-disque, vous avez fait l’acquisition d’un produit fiable, à la pointe de la technologie.
Cependant, des problèmes et un mauvais fonctionnement peuvent toujours se produire.
Pour cette raison, le tableau qui suit vous explique comment éliminer vous-même les éventuels mauvais fonctionnements.
An exclamation mark within an equilateral triangle indicates important information in the operating instructions.
Carefully read the whole operating instructions before operating the device, otherwise there is risk of danger.
The “hand” symbol indicates special information and advice on operation of the device.
The turntable is constructed in compliance with protection class 2 (double or extra insulation).
4. Safety instructions
•
•
•
•
•
•
•
•
•
•
•
•
•
We do not assume liability for resulting damages to property or personal injury if the product has been
abused in any way or damaged by improper use or failure to observe these operating instructions. The
warranty will then expire!
Unauthorised conversion and/or modification of the device are inadmissible because of safety and approval reasons (CE).
The operating instructions of connecting devices, such as power amplifier or mixing deck, must likewise be observed
before installation and operation of the product.
The turntable must not be subjected to heavy mechanical stress.
The turntable must not be exposed to extreme temperatures, direct sunlight, intense vibration or dampness.
No object should block the ventilation holes of the turntable. Sufficient air flow must be provided since the power adapter
is predominantly cooled by convection ventilation.
The housing of the turntable must not be opened. Capacitors in the device may still be charged even if the device has been
disconnected from voltage source. There is risk of mortal electric shock when touching electric components inside.
Before cleaning or connecting the turntable to other devices, the turntable must be disconnected from all electricity
sources.
The turntable is capable of producing loud music, after a longer period of time, sufficient to cause permanent hearing
damage. Make sure to set the volume of the amplifier to a comfortable level.
If there is reason to believe that safe operation is no longer possible, put the device out of operation and secure it against
unintended operation. Safe operation is no longer possible if:
- the device shows visible damages,
- the device no longer works,
- the mains cable or connecting cables become wore out or otherwise damaged,
- the device was stored under unfavourable conditions for a long period of time and
- the device was subject to considerable transport stress.
In commercial institutions, the accident prevention regulations of the Employer’s Liability Insurance Association for
Electrical Systems and Operating Materials are to be observed.
Electric devices are not toys and have no place in the hands of children and pets.
Servicing, adjustment or repair works must only be carried out by a specialist/ specialist workshop.
If any questions arise that are not answered in this operating instruction, please contact our Technical Advisory Service
or other experts.
51
5. Operating elements
(see fold-out, page 3)
A)
1.
2.
3.
4.
5.
6.
7.
8.
9.
10.
11.
12.
13.
14.
15.
Top side
“ ” buttons (both buttons have the same function)
Platter
Drive hub
LED needle light
Speed selection buttons (“33” and “45”)
“REVERSE” button
Headshell
Pitch control slider
Tone arm
Tone arm rest and clamp
Tone arm lift lever
Anti-skate knob
Counterweight
“MOTOR OFF” button
45 rpm adapter
B) Rear panel
16.
17.
18.
19.
20.
21.
Phono output
“PHONO/ LINE” selection switch
USB port (USB cable limit within 3M)
Power receptacle
Power button ( = on; = off)
Input voltage selector
6. Setup and connection
Before making connection, switch off the turntable and the connecting devices and then disconnect them
from mains sockets.
Take out the turntable and its accessories from the packaging. The accessories can be found in the protective polystyrene
parts of the packaging.
Position the turntable on a horizontal and stable surface and at a sufficient distance from the loudspeakers. When experiencing
feedback, direct the radiation field of your loudspeakers away from the turntable.
A) Setup
1. Place the platter (2) on the centre spindle. Make sure that the platter (2) can rotate uniformly and does not wobble
excessively.
2. Rotate the platter (2) until the drive hub (3) is visible through either one of the rectangular openings
on the platter.
3. Reach into the hole and pull the rubber drive belt over the drive hub (3). Be careful not to twist the
rubber drive belt.
4. Place the slip mat on top of the platter (2).
5. Attach the tone arm counterweight (13) to the rear end of the tone arm (9). The scale of the counterweight (13) should be
facing toward the headshell (7).
6. Secure the tone arm (9) to the tone arm rest with the clamp (10) before installing the headshell (7).
7. Insert the headshell (7) to the tone arm (9) and then turn the fastening collar anticlockwise. Do not over-tighten the
fastening collar.
8. Install the LED needle light (4) to the phono socket on the top of the turn table.
52
B) Connection
Connecting to other audio devices
Connect the phono outputs (16) of the turntable to the phono inputs of an ampliÞer or a mixing
desk through the provided phono cable (red = right channel; white = left channel).
Depending on the type of phono inputs of the connecting device, the “PHONO/ LINE” selection
switch (17).
- Set the switch to “PHONO” for plugging into magnetic-phono inputs of the connecting device.
- Set the switch to “LINE” for plugging into CD/ AUX/ TAPE (line level) inputs of the connecting device
The connecting device may be damaged, if the turntable was to be connected to a
magnetic-phono input while the switch is set to ÒLINEÓ.
Connecting to computer
Connect the USB port (18) of the turntable to a vacant USB port of a computer via USB cable.
A software CD is included with an open source software, Audacity, Licensed under the GNU General Public
License(GPL)which can record and edit audio signal from USB signal to computer.
For installation and operation instructions and details please visit http://audacity.sourceforge.net/.
C) Connecting to mains
Before connecting the turntable to the mains socket, make sure that the power button (20) is
in (OFF) position.
Ensure that the voltage selector (21) is set to the correct national voltage level
(230V or 115V).
The manufacturer is not liable for damage resulting from an incorrect setting of the voltage
selector.
1. Connect the mains cable to the power receptacle (19) of the turntable.
2. Make sure the input voltage selector (21) is set to Ò230VÓ.
3. Plug the mains cable to a mains socket.
53
D) Replacing the cartridge
1.
2.
3.
4.
5.
Couleur du fil
Canal et polarité
Blanc (L+)
Gauche, borne positive
Bleu (L–)
Gauche, borne négative
Rouge (R+)
Droite, borne positive
Vert (R–)
Droite, borne négative
6. Fixer la nouvelle cartouche avec les vis et les écrous. Les vis doivent être alignées perpendiculairement au cache de
protection (7).
7. Ajuster la distance entre la pointe de lecture et le moyeu central. La distance pour une lecture optimale est de 16mm.
8. Serrer les vis et les écrous.
Remplacement de la pointe de lecture
Il est possible de remplacer la pointe de lecture plutôt que toute la cartouche.
1. Eteindre le tourne-disque.
2. Bloquer le bras (9) sur son support au moyen de l’attache (10).
3. Tourner le collier de serrage dans le sens des aiguilles d’une montre puis détacher le cache de
protection (7).
4. Placer le protège pointe de lecture sur la cartouche.
5. Appuyer vers le bas et retirer la pointe de lecture.
6. Installer une nouvelle pointe de lecture compatible avec la cartouche.
7. Remettre la cartouche sur le bras de lecture (9).
8. Régler la force d’appui de la pointe de lecture.
Replace the cartridge after roughly 400 hours of use. The cartridge included in the product is AudioTechnica ® AT3600L.
1. Switch off the turntable.
2. Secure the tone arm (9) to the tone arm rest with the clamp (10).
3. Turn the fastening collar clockwise and then detach the headshell (7).
4. Unscrew the two screws on headshell (7) and then separate the cartridge from the headshell (7).
5. Connect a new cartridge to the headshell (7) while observing the pin assignment, which is shown
as below.
Wire Colour
Channel and polarity
White (L+)
Left, plus terminal
Blue (L–)
Left, negative terminal
Red (R+)
Right, plus terminal
Green (R–)
Right, negative terminal
6. Affix the new cartridge to with the screws and nuts. The screws should be aligned perpendicular to the
headshell (7).
7. Set the distance between the stylus and the centre spindle. The distance should be set to 16mm for
optimal playback.
8. Tighten the screws and nuts.
Replacing the stylus
Instead of replacing the whole cartridge, you can replace the stylus only.
1. Switch off the turntable.
2. Secure the tone arm (9) to the tone arm rest with the clamp (10).
3. Turn the fastening collar clockwise and then detach the headshell (7).
4. Put the stylus guard on the cartridge.
5. Press down and remove the stylus.
6. Insert a new stylus that is compatible with the cartridge.
7. Attach the cartridge to the tone arm (9).
AUDACITY SOFTWARE OVERVIEW
Audacity is free software, licensed under the GNU General Public License(GPL).
More information as well as open source code can be found on the web at
http://audacity.sourceforge.net/
* Please ensure you have installed the software before starting.
SET UP PROCEDURE
1. Connect an input source to the unit.
2. Connect the USB lead to your computer.
3. Install the Audacity recording software.
4. Open the Audacity program.
5. Go to EDIT then PREFERENCES.
6. Click AUDIO I/O tab.
7. Choose recording device USB AUDIO CODEC from the drop down menu.
8. Choose CHANNELS (2 STEREO)
9. Tick SOFTWARE PLAY THROUTH BOX
10. Click OK.
RECORDING & SAVING TRACKS
1. Play the track to be recorded.
2. Click the RED record button on the computer.
3. When you have finished the recording, click the YELLOW stop button.
4. You can now click FILE and choose to save your recording.
5. Click the GREEN play button to playback your finished recording.
54
7. Operation
A) Blancing the counterweight
1. Make sure the turntable is level.
2. Place the tone arm (9) between the platter (2) and the tone arm rest (10).
3. Remove the stylus guard.
4. Twist the counterweight (13) back and forth until the tone arm (9) hover perfectly horizontally
Carefully support the tone arm (9) with a finger to avoid it falling and thus damage the stylus.
5. Return the tone arm (9) to the rest (10) and secure it with the clamp.
6. Turn the number dial on the front of the counterweight (13) gently, while holding the counterweight (13), until “0” align with
the black broken line on the tone arm (9). Beware not to disturb the counterweight setting.
7. Set the stylus tracking force according to the dial with the manufacturers recommended one. Turn the counterweight (13)
in anticlockwise direction until the desired force is reached. The recommended setting for the supplied system is “3”.
B) Setting anti-skate compensation
Set the anti-skate knob (12) to match the tracking forces set previously. For example, if you set the tracking force at 3 grams,
set the anti-skate at “3” also.
If the turntable is experiencing excessive skipping during back-cueing and scratching while nearing the centre spindle, try to
spindle, try increasing the anti-skate in the increments indicated on the dial.
C) Playing records
1. Check through all connections and adjustments again.
2. Press the power button (20) to turn on/ off the turntable ( = on; = off).
3. Put a record on the turntable with the side you want to listen to face upward. Place the 45rpm adapter (15) on the centre
spindle if necessary.
4. Set the revolution speed selection buttons (5) according to the record playing speed.
- Press “33” button to play 33 1/3 rpm records
- Press “45” button to play 45 rpm records
- Press both buttons simultaneously to play 78 rpm records.
5. Press “REVERSE” button (6) to play the record in reverse. To deactivate the function, press “REVERSE” button (6) again.
6. Press “ ” button (1) to play the record. The turntable will start to rotate.
7. Release the clamp of the tone arm rest (10) and remove the stylus guard.
8. Lift the tone arm lift lever (11), so the tone arm will rest on the tone arm lift (11).
9. Move the tone arm (9) gently so the stylus is over the desired groove of the record.
10. Lower the tone arm lift (11), the stylus will slow engaged to the record.
11. Press “ ” button (1) again to stop playing immediately or press “MOTOR OFF” button (14) to stop playing slowly.
D) Revolution speed fine tuning
1. Use the pitch control slider (8) to set the revolution speed (± 10%).
2. Slide the slider (8) upward to reduces the playing speed, and downward to increase playing speed.
3. If the pitch is set to 0%, the red LED next to the slider (8) will be lit.
55
B) Raccordement
Raccordement à d’autres appareils audio
Connecter les bornes de sorties (16) du tourne-disque aux bornes d’entrées d’un amplificateur ou d’une table de mixage à
l’aide des câbles phonos fournies (rouge = canal droit : blanc = canal gauche).
En fonction du modèle de bornes d’entrées de l’appareil connecteur, le sélecteur « PHONO/LINE » (17) doit être correctement
ajusté.
Mettre le sélecteur sur « PHONO » pour brancher dans les entrées magnétiques phono de l’appareil connecteur.
Mettre le sélecteur sur « LINE » pour brancher dans les bornes d’entrées CD/AUX/TAPE (line level) de l’appareil
connecteur.
8. Maintenance
2.
3.
4.
5.
6.
7.
8.
9.
10.
11.
12.
13.
14.
15.
» (les deux boutons ont la même fonction)
Plateau
Moyeu entraîneur
Lumière DEL de l’aiguille
Sélecteurs de vitesse (« 33 » et « 45 »)
Bouton « REVERSE »
Cache de protection
Curseur de commande du pas
Bras de lecture
Repose-bras et attache du bras de lecture
Levier de levage du bras de lecture
Bouton antiskating
Contrepoids
Bouton « MOTOR OFF »
Adaptateur 45 tours
B) Panneau arrière
16.
17.
18.
19.
20.
21.
Sortie phono
Sélecteur « PHONO/ LINE »
Port USB
Alimentation en courant
Bouton marche/arrêt ( = on; = off)
Sélecteur de la tension d’entrée
6. Installation et connexion
Avant de brancher l’appareil, éteindre le tourne-disque et les appareils connectés et déconnectez-les du
secteur.
Clean the stylus tip frequently, using a soft brush with a back to front motion only.
The exterior of the turntable should be cleaned with a dry, clean and soft cloth only. Do not use carbon-containing cleaning
agents, petrol, alcohol or similar substances for cleaning purposes.
Before moving the turntable, unplug it from the mains socket and fasten the tone arm to the tone arm rest with the clamp.
Always use the slip mat during record playback.
Handling
• Never plug the power plug into a mains socket immediately after the appliance has been taken from a cold to a warm
environment. The condensation water that develops may lead to the appliance malfunctioning.
Allow the appliance to reach room temperature before connecting it to the power supply. Wait until the condensation water
has evaporated.
• Never connect or disconnect power plugs with wet hands.
• Never disconnect power plugs from the mains socket by pulling at the cable.
Always pull out the power plug, holding it at the contact surfaces provided for this purpose.
• Always pull the power plug out of the mains socket if the appliance is not going to be used for longer periods of time.
• To ensure an adequate ventilation, there must be an open area of 5cm around the housing. Apart from this, the air
circulation may not be obstructed by objects such as magazines, table cloths, curtains or similar.
• For safety reasons, always disconnect the power plug from the mains socket during thunderstorms.
Transportation
The following instructions should be followed before transportation:
• Disconnect the mains cable, pull out the phono cables.
• Secure the pick-up arm with the tone arm rest and the clamp.
• Put the protective plastic stylus guard.
• Remove the cartridge.
• Remove the tone arm counterweight.
• Remove the platter and slip mat.
• Pack the appliance back into its original packing.
Retirer le tourne-disque et ses accessoires de l’emballage. Les accessoires se trouvent dans les protections en polystyrène
de l’emballage.
Placer le tourne-disque sur une surface horizontale et stable à une distance suffisante des haut-parleurs. En cas de feedback, diriger le champ d’émission des haut-parleurs du côté opposé au tourne-disque.
A) Installation
1. Installer le plateau (2) sur l’axe central. Veiller à ce que le plateau (2) tourne de manière uniforme et n’oscille pas
excessivement.
2. Tourner le plateau jusqu’à ce que le moyeu d’entraînement (3) soit visible dans une des ouvertures
rectangulaires du plateau.
3. Aller dans l’ouverture et placer la courroie de transmission en caoutchouc sur le moyeu d’entraînement
(3). Veiller à ne pas tordre la courroie.
4. Placer le tapis antidérapant sur le plateau (2).
5. Attacher le contrepoids (13) à l’extrémité arrière du bras de lecture (9). L’échelle graduée du contrepoids (13) doit être
tournée du côté du cache de protection (7).
6. Bloquer le bras (9) sur son support au moyen du verrou (10) avant d’installer le cache de protection (7)
7. Insérer le cache de protection (7) sur le bras de lecture (9) puis tourner le collier de serrage dans le sens contraire des
aiguilles d’une montre. Veiller à ne pas trop serrer le collier.
8. Installer la lampe DEL de la pointe de lecture dans la fiche sono sur le dessus du tourne-disque.
56
9. Troubleshooting
3. Explication des symboles
In purchasing the wireless camera system, you have acquired a reliable, state-of-the-art product.
Problems and malfunctions may, however, still arise.
For this reason, the following is a description of how you can eliminate possible malfunctions yourself.
Always adhere to the safety instructions!
Error
The turntable does not work
The turntable is working,
but no sound can be heard
Reproduction is only through one channel
The tone of the playback sound
is too low or high
The playback is distorted
The pick-up arm can not be lowered
Possible cause
• Is the turntable switched on?
• Is the mains plug inserted into the mains socket?
• Check the mains socket. Does it have a regular supply of power?
• Is the audio source connected correctly to the input on the amplifier/
mixing desk?
• Is the stylus guard still in place?
• Is the tone arm lift lifted?
• Has the correct phono input been selected on the amplifier/mixing
desk?
• Has the volume control on the amplifier/mixing desk been set to its
minimum?
• Is the amplifier/mixing desk and the loudspeakers properly
connected?
• Is one of the cinch fittings incorrectly inserted?
• Is the balance control on the amplifier/mixing desk incorrectly set?
• Has the speed been correctly set?
•
•
•
•
•
•
Has the stylus force been set correctly?
Is the stylus defective or worn down?
Has the anti skating compensation been set correctly?
Is the record or stylus dirty?
Is the tone arm counterweight set correctly?
Is the tone arm counterweight set correctly?
Repairs other than those just described should only be performed by an authorised electrician.
57
Il convient de respecter les symboles suivants :
10. Disposal
The meaning of the symbol on the product, its accessory or packaging
indicates that this product shall not be treated as household waste.
Please, dispose of this equipment at your applicable collection point for
the recycling of electrical & electronic equipments waste.
In the European Union and Other European countries which there are separate
collection systems for used electrical andelectronic product. By ensuring the
correct disposal of this product, you will help prevent potentiallyhazardous to
the environment and to human health, which could otherwise be caused by
unsuitable wastehandling of this product. The recycling of materials will help
conserve natural resources. Please do nottherefore dispose of your old electrical
and electronic equipment with your household waste. For moredetailed information
about recycling of this product, please contact your local city office, your
householdwaste disposal service or the shop where you purchased the product.
11. Technical data
Operating voltage:
Power consumption:
Playback speed:
Pitch regulation:
Signal-to-Noise ratio:
Freuqency response:
Flutter:
Tracking error angle:
Start- and Stop-time:
Time for speed alteration:
Effective tone arm:
Cartridge weight:
Dimensions(LxWxH):
Weight:
230 V~ 50 Hz/ 115 V~ 60 Hz
5,5 W
33 1/3, 45 , 78 RPM
± 10%
>60 dB
20 Hz-20kHz
<0,2% WRMS (JIS WTD)
<1 s
<1 s
230.5 mm
6-10g
370 x 449 x 145 mm
3,8 kg
For more information and warranty conditions, please visit: www.akai.eu
58