1
Owner's Handbook
for Vehicle
Contents
A to Z
The Ultimate
Driving Machine
Online Edition for Part-No. 01 41 0 159 725 © 09/05 BMW AG
523i
525i
530i
540i
550i
525xi
530xi
530xd
520d
525d
530d
535d
Owner's Handbook
Congratulations on your choice of a BMW.
The better you are acquainted with your car, the easier you will
find it is to handle. We would therefore like to offer you the following advice:
Please read the Owner's Handbook before setting out in your
new BMW. It contains important notes on how to operate the car,
enabling you to derive maximum benefit from the technical
advantages of your BMW. It also contains useful information
which will help you to uphold both the operating safety and full
resale value of your BMW.
Supplementary information is provided in the other documents
of on-board literature.
We wish you many a safe and enjoyable journey,
BMW AG
Online Edition for Part-No. 01 41 0 159 725 © 09/05 BMW AG
© 2005 Bayerische Motoren Werke
Aktiengesellschaft
Munich, Germany
Not to be reproduced, wholly or in part, without
written permission from BMW AG, Munich.
Order No. 01 41 0 159 725
English VIII/05, 05 09 510
Printed in Germany
Printed on environmentally friendly paper,
bleached without chlorine, suitable for recycling.
Online Edition for Part-No. 01 41 0 159 725 © 09/05 BMW AG
Notes
Entertainment
Overview
8
14
20
160
164
169
175
Driving area
iDrive
Voice input system
Controls
122 Driving precautions
180
182
185
190
192
200
Refuelling
Wheels and tyres
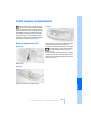
In the engine compartment
Maintenance
Replacing parts
Mutual aid
Reference
208 Technical data
223 Short commands for the voice input
system
228 From A-Z
Mobility
Driving hints
Mobility
Entertainment
Opening and closing
Adjusting
Child safety
Driving
Everything under control
Technical features for driving comfort and
safety
93 Lights
98 Climate
109 Practical interior equipment
On/off and settings
Radio
CD player and CD changer
TV
Reference
26
42
53
56
71
82
156 What to do if ...
Controls
4
132 Starting navigation system
134 Destination input
147 Route guidance
Driving hints
About this Owner's Handbook
Navigation
Navigation
The quickest access to a particular topic or item
is by consulting the detailed alphabetical index,
see page 228.
Overview
Contents
Online Edition for Part-No. 01 41 0 159 725 © 09/05 BMW AG
Notes
Notes
About this Owner's
Handbook
We have tried to make all the information in this
Owner's Handbook easy to find. The quickest
access to a specific topic or item is by consulting the detailed alphabetical index at the end.
Consult the first chapter for an overview of your
car.
When the time comes to sell your BMW, please
remember to hand over this Owner's Handbook; it is an important part of the car.
Additional sources of information
If you have any queries, BMW Service will be
glad to advise you.
Information on BMW, e.g. on technical aspects,
can also be found on the Internet at
www.bmw.com.
Symbols used
Indicates precautions that must be followed precisely in order to avoid the possibility of personal injury and serious damage to
the vehicle.
Indicates information that will assist you
in gaining the optimum benefit from your
vehicle and enable you to care more effectively
for your vehicle.
Refers to measures that can be taken to
help protect the environment.
< Marks the end of a specific item of information.
* Identifies optional extras or specific nationalmarket items of equipment, as well as equipment and functions not yet available at the time
of printing.
"..." Identifies texts on the control display for
selecting functions.
{...} Identifies commands for the voice input
system.
{{...}} Identifies replies by the voice input system.
Symbol for components and
assemblies
Recommends that you study the relevant
section of this Owner's Handbook in connection with a particular part or assembly.
4
Online Edition for Part-No. 01 41 0 159 725 © 09/05 BMW AG
In cars with right-hand drive, some of the
controls are arranged differently from
those shown in the illustrations of this Owner's
Handbook.<
Status at time of printing
BMW recommends using parts and
accessory products on this car that are
specifically approved for this purpose by BMW.
You are recommended to consult BMW Service
for advice on Genuine BMW parts and accessories, other BMW-approved products and competent advice on all related matters.
The safety and compatibility of these parts and
products in conjunction with BMW vehicles
have been checked by BMW. BMW accepts
product liability for them.
BMW cannot accept liability for parts or accessory products of any kind which it has not
approved.
BMW is unable to assess each individual product of outside origin as to its suitability for use
on BMW vehicles without safety risk. Nor can
suitability be assured if an official permit has
been issued for it in a specific country. Tests
performed for such permits cannot always
cover all operating conditions for BMW vehicles, and some of them therefore are insufficient.<
5
Online Edition for Part-No. 01 41 0 159 725 © 09/05 BMW AG
Reference
Mobility
The high safety and quality standards of BMW
vehicles are maintained by unceasing development work on designs, equipment and accessories. In rare instances, your car may therefore
differ from the information supplied in the
Owner's Handbook.
Parts and accessories
Controls
If your BMW contains equipment that is not
described in this Owner's Handbook, Supplementary Owner's Handbooks will be supplied
and you are requested to study and comply with
them.
The advanced technology behind this car,
for example the use of modern materials
and high-performance electronics, means that
specially adapted methods of maintenance and
repair are required. Always have the necessary
work on your BMW performed either by BMW
Service or by a workshop that operates to BMW
specifications and has suitably trained personnel. If such work is performed inexpertly, it could
result in consequential damage and thus constitute a safety risk.<
Driving hints
This explains why the Owner's Handbook may
also contain details of items which you have not
ordered. The differences can easily be identified by the asterisk * shown against optional
extras.
Maintenance and repair
Navigation
When you ordered your BMW, you chose various items of equipment.This Owner's Handbook describes all models and equipment
specifications which BMW offers within this
particular model line.
Overview
For your own safety
Entertainment
Your car
Online Edition for Part-No. 01 41 0 159 725 © 09/05 BMW AG
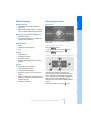
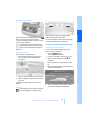
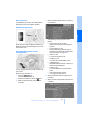
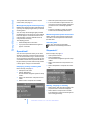
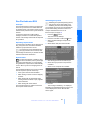
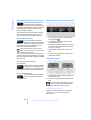
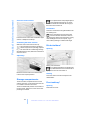
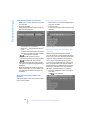
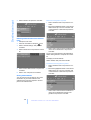
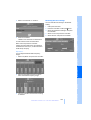
Overview
This summary of buttons, switches and
displays serves as an initial guide.
In addition, it gives you an insight into the
principles behind the various ways in which
functions can be performed.
Online Edition for Part-No. 01 41 0 159 725 © 09/05 BMW AG
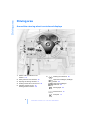
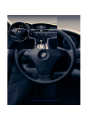
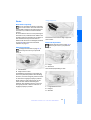
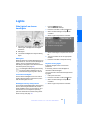
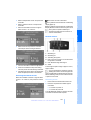
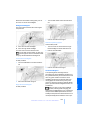
Driving area
Driving area
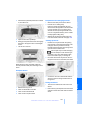
Around the steering wheel: controls and displays
1
Saloon: roller sun blind* for rear
window 110
2
Safety switch for rear windows 38
3
Opening and closing windows 37
4
Folding outside mirrors in and out* 49
5
Adjusting outside mirrors 49
Parking position function* 50
6
Flashing turn indicators 62
High-beam headlights, headlight
flasher 95
High-beam headlights
assistant* 95
Parking lights 95
Check Control 76
Computer 72
8
Online Edition for Part-No. 01 41 0 159 725 © 09/05 BMW AG
Telephone*:
> Press: receiving and ending a
call, dial starting* for a
selected phone number and
redialling if no phone number
has been selected
> Press and hold down:
redialling
12 Horn, entire surface
13
Heated steering wheel* 51
Steering wheel adjustment* 50
14
Overview
Buttons on the steering wheel
Cruise control* 64
Active Cruise Control* 66
Volume control
Controls
7
17
Headlight beam throw
adjustment 94
Head-Up Display* 91
Individually programmable* 51
Individually programmable 51
9
18
Instrument cluster 10
Low-beam headlights 93
Automatic driving lights
control* 94
Adaptive head light* 94
High-beam headlights
assistant* 95
Windscreen wipers 63
Rain sensor 63
Touring: rear window wiper 64
19
Switching the ignition on/off and
starting/stopping the engine 56
Instrument lighting 97
Front fog lights* 96
Mobility
10
Side lights 93
11 Ignition lock 56
9
Online Edition for Part-No. 01 41 0 159 725 © 09/05 BMW AG
Reference
8
Rear fog lights* 97
Navigation
Changing radio station
Selecting a music track
Changing TV station*
Scrolling in the telephone book
and in lists of stored numbers
Entertainment
Activating/deactivating voice input
system* 20
Driving hints
15 Releasing the engine compartment lid 185
16 Opening the luggage compartment lid/
tailgate 33
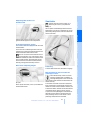
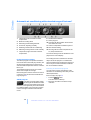
Driving area
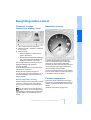
Instrument cluster
8
1
Flashing turn indicators
2
Speedometer
3
Indicator and warning lamps 11
> Distance recorder – odometer – and trip
distance recorder 71
4
Display for Active Cruise Control* 68
> Computer 72
5
Revolution counter 71
> Date and remaining distance to next
Service 74
6
Energy control 72
7
Display for
Display for
> Automatic transmission with
Steptronic* 61
> Time/date 71
> Sequential Manual Gearbox SMG* 59
> Outside temperature 71
> Hill Descent Control HDC* 85
> Indicator and warning lamps 76
> High-beam headlights assistant* 95
> Cruise control speed* 64
> Desired speed for Active Cruise
Control* 66
>
9
Current Check Control message 76
Fuel gauge 72
10 Resetting trip distance recorder 71
10
Online Edition for Part-No. 01 41 0 159 725 © 09/05 BMW AG
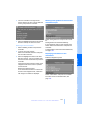
Principle
If action is required as a matter of urgency, this
information is flashed up as soon as the accompanying lamp comes on.
Indicator lamps not accompanied by
text messages
Overview
Indicator and warning lamps
Handbrake applied 58
Front fog lights* 96
Rear fog lights* 97
Lamp flashes:
DSC or DTC is regulating the propulsive and brake forces in order to maintain driving stability 84
Driving hints
Explanatory text messages
High-beam headlights/
headlight flasher 95
Navigation
Some lamps in the panel are checked for proper
functioning and thus come on briefly when the
engine starts or the ignition is switched on.
Dynamic Traction Control DTC 85
Entertainment
Indicator and warning lamps may light up in a
variety of colours and combinations both in the
panel 1 and in the display 2.
Controls
The following indicator lamps in display area 1
indicate that certain functions are active:
You can call up further information, e.g. on the
cause of a fault and on what action is required,
via the Check Control, see page 76.
11
Online Edition for Part-No. 01 41 0 159 725 © 09/05 BMW AG
Reference
Mobility
Text messages appearing along the lower edge
of the control display explain the meaning of the
indicator and warning lamps that have come on.
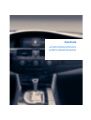
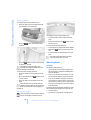
Driving area
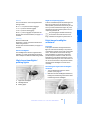
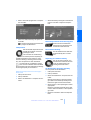
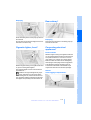
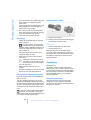
Around the centre console: controls and displays
12
Online Edition for Part-No. 01 41 0 159 725 © 09/05 BMW AG
4
Interior light 97
5
Glass roof, electric* 38
12 Eject button for
> Navigation DVD* 160
> Audio CD 160
Panorama glass roof* 39
13 Drive for navigation DVD for Professional*
navigation system 132
6
Indicator/warning light,
front passenger airbags* 54
14 Drive for
7
Control display 14
> Navigation DVD for Business* navigation system 132
8
Hazard warning flashers
> Audio CD 160
9
Central locking system 30
10 Automatic air conditioning 99
Automatic air conditioning with extended
range of features* 102
15 Switching entertainment audio output on/
off and adjusting volume 160
16
Seat heating* 48
Temperature adjustment, left/
right 99, 103
Active seat ventilation* 48
Air distribution 99, 103
Active backrest width
adjustment* 44
Automatic air distribution and
volume 99, 102
Active seat* 49
Cooling function 100, 104
Park Distance Control PDC* 82
Automatic Recirculated Air Control
AUC* 104
Recirculated-air mode 100, 104
Maximum cooling effect* 104
Residual heat utilisation* 104
Switching off automatic air
conditioning 100, 105
Overview
Making an emergency call* 200
Controls
3
> Tracks 160
Driving hints
Reading lights 97
> Radio stations 160
Navigation
2
11 Changing
Dynamic Traction Control DTC 85
17 Controller 14
Can be turned, pressed, or moved horizontally in four directions
18 Activating voice input system* 20
Entertainment
Microphone for hands-free operation of the
telephone*
and for the voice input system* 20
19 Calling up start menu on control display 15
20 Dynamic Driving Control* 60
Mobility
Air volume 99, 103
Defrosting windows and removing
mist 100, 103
Heated rear window 99, 102
13
Online Edition for Part-No. 01 41 0 159 725 © 09/05 BMW AG
Reference
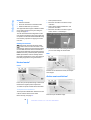
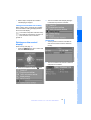
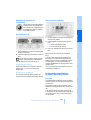
1
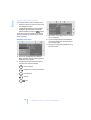
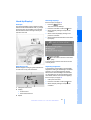
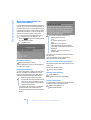
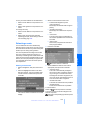
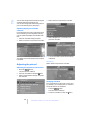
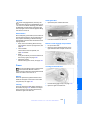
iDrive
iDrive
iDrive integrates the functions of a large
number of switches. These functions can now
be controlled from one central point. The basic
menu-guided operating principle is explained
below. Details of how to control individual functions are provided under the descriptions of the
items of equipment concerned.
Controls
1
Control display
2
button
To call up the start menu
3
Controller
You can select menu items and adjust settings with the controller:
Only make adjustments if the traffic conditions are sufficiently quiet or clear, so as
not to endanger the car's occupants and other
road users by being distracted.<
> Move it in four directions, arrow 4
> Turn it, arrow 5
> Press it, arrow 6
14
Online Edition for Part-No. 01 41 0 159 725 © 09/05 BMW AG
Operating principle
Communication
Start menu
Overview
Menu summary
> Telephone*, see separate Operating
Instructions
> Navigation system*
> On-board information, e.g. to display the
average fuel consumption
Entertainment
> Radio
> CD player and CD changer*
> TV*
All iDrive functions can be called up via five
menu items.
Calling up the start menu
Press the
button.
To call up the start menu from the menu:
Press the
Climate
> Air distribution
button twice.
Driving hints
Navigation or on-board information
Controls
> BMW Assist*, BMW Online* or TeleService*, see separate Operating Instructions
Calling up menu items in the start menu
> Seat climate control*
Navigation
> Automatic program
> Auxiliary heater/independent ventilation
system*
menu
> Settings for your car, e.g. for the central
locking
> Display of maintenance requirements and
dates of next statutory emissions test and
vehicle inspection
> Settings for telephone
Following radio readiness, see page 56:
You can call up the four menu items Communication, Navigation, Entertainment and Climate
via the start menu by moving the controller left,
right, forwards or back. Depending on the
selection, the menu previously called up will be
shown.
Press the controller to call up the menu.
15
Online Edition for Part-No. 01 41 0 159 725 © 09/05 BMW AG
Mobility
> Traffic information settings
Reference
> Tone and display settings
Entertainment
> Switching off control display
iDrive
Comfort menu item selection
The comfort selection feature enables you to:
> Call up a menu item in the start menu in the
last configuration used
> Toggle directly between Communication,
Navigation, Entertainment and Climate
without needing to press the
button
To do this, move the controller in the relevant
direction and hold it in position for more than
about 2 seconds.
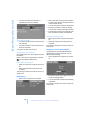
1
Menu items are usually grouped in horizontal or vertical lists.
Displays in the menu
2
Arrows indicate that there are additional
menu items within a list, but that they are
not currently visible.
3
Settings are represented graphically or as
numerical values.
1
Each menu is subdivided into different
fields. The field currently selected appears
highlighted in the display.
2
A symbol shows you which menu item of
the start menu was last selected:
Communication
Navigation or on-board information
Entertainment
Climate
menu
16
Online Edition for Part-No. 01 41 0 159 725 © 09/05 BMW AG
The individual steps are explained under Settings on the control display, Setting time, see
page 79.
1
4
> Menu items in white can be selected by
highlighting them
> Release the controller
> The active field becomes brighter in colour
To activate a menu item:
> New menu items are displayed or the
function is executed
Select a menu item: see 1
5
To perform adjustments:
> Turn the controller
> Graphic display, numerical value or text
displays can be changed
Mobility
> Slightly move the controller to the left,
right, forwards or backwards
> Press the controller
3
To switch between fields:
> Turn the controller; the highlighted
marker moves
> Confirm by changing the field
17
Online Edition for Part-No. 01 41 0 159 725 © 09/05 BMW AG
Reference
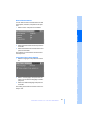
2
Select a menu item:
Entertainment
Navigation
Driving hints
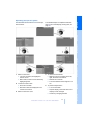
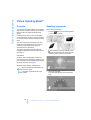
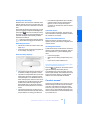
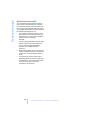
Controls
This illustration shows how the car can be operated via iDrive.
Overview
Operating principle at a glance
iDrive
Status information
3
Display for traffic information*:
> "TMC":
Traffic information for the navigation
system can be received and broadcasting is switched on
> "Ti+":
Traffic info + traffic information can be
received and broadcasting is switched
on
1
Display for:
4
Calls not accepted*
5
It is possible to use the telephone* if the
mobile phone is registered with the car
Mobile phone network reception
strength depends on the mobile phone
6
Time
> Entertainment:
Radio, CD, TV*
> Telephone*:
Name of network operator, no network,
or name of mobile phone registered with
the car
> "Car Phone"*:
Active voice connection for emergency
calls if BMW Assist is not initialised
> "BMW Assist"*:
Active voice connection with a
BMW Assist service
Other displays:
Status information is temporarily hidden during
Check Control message displays or inputs via
the voice input system*.
Assistance window*
> "Online" or "GPRS Online"*:
Active connection with BMW Online*
2
Entertainment sound output off or
display for traffic announcements*:
> "TP":
Traffic Programme switched on
> "T":
Traffic Programme is switched off but
the selected radio station does broadcast traffic reports
Additional information can be displayed in the
assistance window:
> No display:
The selected radio station does not
broadcast traffic reports
> The arrow or map view for cars with navigation system*
> The computer or journey computer*
> The car's position*
18
Online Edition for Part-No. 01 41 0 159 725 © 09/05 BMW AG
1. Move the controller to the right to switch to
the assistance window and press the controller.
Switching control display
on/off
1. Press the
button.
The start menu is called up.
2. Press the controller to call up the menu.
Overview
Selecting display
Controls
3. Select "Display off" and press the controller.
3. Press the controller.
Switching assistance window on/off
1. Move the controller to the right to switch to
the assistance window and press the controller.
Press the controller to switch on.
Driving hints
2. Select a menu item.
Entertainment
Navigation
2. Select "Exit assist. window" and press the
controller.
19
Online Edition for Part-No. 01 41 0 159 725 © 09/05 BMW AG
Reference
Mobility
To turn back on, switch to the assistance window and press the controller.
Voice input system
Voice input system*
Principle
Speaking commands
The voice input system enables you to operate
various items of equipment on your car without
having to take your hands off the steering
wheel.
Activating voice input
1. Press the
button on the steering wheel
or in the centre console.
Individual menu items on the control display
can be selected by means of short commands.
It is not necessary to use the controller to select
them.
The voice input system translates your commands into control signals for the system in
question, and prompts you by means of
announcements or questions.
The voice input system includes a special
microphone positioned near the interior mirror,
see page 12.
This symbol on the control display and an
acoustic signal indicate that the voice input
system is ready to pick up commands.
Condition
Via iDrive, select the language in which the
voice input system is operating, so that the spoken commands can be identified. Selecting the
language for iDrive, see page 81.
Symbol in the Owner's Handbook
{...} Say the commands marked with this
symbol word for word.
{{...}} Identifies the replies by the voice
input system.
2. Issue the command.
The command appears on the control display.
20
Online Edition for Part-No. 01 41 0 159 725 © 09/05 BMW AG
Calling up start menu
Ending or interrupting voice input
1. If necessary, switch on entertainment audio
output.
{Cancel}
Commands
An example: selecting a track
2. Press the
button on the steering wheel
or in the centre console.
3. {Entertainment}
The system says:
{{Entertainment}}
Controls
Press the
button on the steering wheel or in
the centre console
or
{Main menu}
Overview
This symbol appears on the control display if
further commands can be given.
If no further commands are possible, continue
by operating the item of equipment via iDrive.
Having possible commands read aloud
Driving hints
You can prompt the system to read out the
commands that are possible, depending on
which menu item is selected on the control display.
To have the possible commands read out to
you:
For instance, if you have selected "CD", the
commands available for operating the CD
player and CD changer* will be read out.
4. {CD}
The system says:
{{CD drive switched on}}
Requesting help
{Help}
Entertainment
Using alternative commands
Navigation
{Options}
There are often several different commands
available for performing the same function, e.g.:
{Settings menu} or {i menu}
Calling up functions immediately using
short commands
21
Online Edition for Part-No. 01 41 0 159 725 © 09/05 BMW AG
Reference
Mobility
Short commands enable you to perform certain
functions straight away, irrespective of which
menu item is selected, see page 223.
Voice input system
5. Press the
button on the steering wheel
or in the centre console.
6. Select a music track, e.g.:
{Track 1}
The system says:
{{Track 1}}
Notes
More information about voice control of
the telephone appears in the separate
Operating Instructions.<
When speaking commands, note the following:
> Say the commands and numbers fluently
and at normal volume; avoid unnatural
emphases and pauses between words. This
also applies to spelling a destination entry.
> Always speak the commands in the language of the voice input system.
> When selecting a radio station, use the
standard pronunciation of the station name.
> When making entries in the voice-activated
phone book, use only names in the language of the voice input system, and do not
use abbreviations.
> Keep the doors, windows and glass roof* or
panorama glass roof* closed in order to
avoid interference from outside noise.
> Avoid causing background noise in the car
while you are speaking.
22
Online Edition for Part-No. 01 41 0 159 725 © 09/05 BMW AG
Online Edition for Part-No. 01 41 0 159 725 © 09/05 BMW AG
Reference
23
Mobility
Entertainment
Navigation
Driving hints
Controls
Overview
Online Edition for Part-No. 01 41 0 159 725 © 09/05 BMW AG
Controls
This chapter enables you to operate your car
with greater ease. All equipment items that are
of relevance for driving and make your journey
safer and more comfortable are described here.
Online Edition for Part-No. 01 41 0 159 725 © 09/05 BMW AG
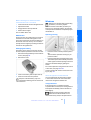
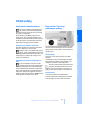
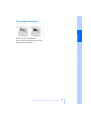
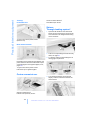
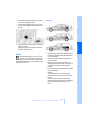
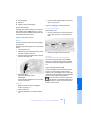
Opening and closing
Opening and closing
Key/Remote control
1
Remote control with integrated key
2
Spare key
3
Adapter for spare key, in glove box
Remote control with integrated key
Every remote control contains a rechargeable
battery that is automatically recharged when it
is in the ignition lock while the car is being
driven. Use the remote control at least twice a
year in order to keep the battery charged. If your
car is fitted with comfort access*, the remote
control will feature a replaceable battery, see
page 37.
On the basis of the remote control detected
when unlocking the car, various settings will be
called up in the car and applied, see Personal
Profile, page 27.
In addition, information about service requirements is stored in the remote control, see Service data in the remote control, page 190.
Integrated key
Press button 1 to release the key.
The integrated key fits the following locks:
> Key switch* for front passenger airbags,
see page 53
> Glove box, see page 111
> Touring: floor panel flap in load area, see
page 117
> Driver's door, see page 30
> Luggage compartment lid, see page 31
New remote controls
BMW Service can supply new remote controls
with integrated keys, as additional units or as
replacements in the event of loss.
Spare key
Spare key, to be kept in a safe place, for
instance in a purse or wallet. This key is not
intended for regular use.
The spare key and integrated key for the remote
control fit the same locks.
Adapter for spare key
You need the adapter to start the car with the
spare key or to switch on radio readiness.
26
Online Edition for Part-No. 01 41 0 159 725 © 09/05 BMW AG
> Brightness of the control display, see
page 80
> Units of measurement for fuel consumption, distance, temperature and pressure, see page 81
Overview
> Settings shown on the control display:
> Selection and brightness of Head-Up Display*, see page 91
Principle
> Air distribution, temperature to upper body
and intensity for automatic air conditioning
with extended range of features*, see
page 102
You can set many of your BMW's functions to
suit your personal needs and preferences.
Without any action on your part, Personal Profile ensures that most of these settings are
saved for the remote control currently in use.
When you unlock the car the remote control
used for the purpose is recognised and the settings saved for it are called up and implemented.
This means that your personal settings are
active when you return to your BMW, even if the
car was used in the interim by someone else
with a remote control of their own and the settings were changed accordingly. Individual settings are saved for up to four remote controls.
> Adjusting spoken instructions for route
guidance by navigation system*, see
page 150
The last settings of the following items of
equipment are in addition called up when the
car is unlocked:
> Position of driver's seat, door mirrors and
steering wheel*, see page 45
> The volume and tone settings for audio and
video sources, see page 161
> The display of memorised stations for the
radio, see page 164
Personal Profile settings
> When unlocking with the remote control,
either the driver's door only or the entire car
is unlocked, see page 28
> Locking the car after a short time or after
setting off, see page 30
> Assignment of the programmable buttons*
on the steering wheel, see page 51
Central locking
Driving hints
Personal Profile
Navigation
> Date format, see page 80
> Displaying optical warning for Park Distance Control PDC*, see page 83
Entertainment
> 12 hour/24 hour mode of clock, see
page 80
Principle
The central locking becomes active when the
driver's door is closed. The following are
unlocked or locked in combination:
> Doors
Mobility
Remove the adapter from the holder in the
glove box and insert the spare key into the
adapter.
Controls
> Language on the control display, see
page 81
> Luggage compartment lid/tailgate
27
Online Edition for Part-No. 01 41 0 159 725 © 09/05 BMW AG
Reference
> Fuel filler flap
Opening and closing
Operating from outside
4. Select "Door locks" and press the controller.
> via the remote control
> via the door lock
> with comfort access* via the door handles
The alarm system is also operated at the same
time. This prevents the doors being unlocked
either at the safety lock buttons or door handles. The alarm system* is also armed or disarmed. The interior light and the ground lights*
are also switched on or off with the remote control.
For more information about the alarm system*,
see page 34.
5. Select "Central locking" and press the controller.
Operating from inside
6. Select "Lock button" and press the controller.
Via the button for the central locking system,
see page 30. The fuel filler flap is not locked*.
In the event of an accident of sufficient severity,
the central locking is released automatically.
The hazard warning flashers and the interior
light are in addition switched on.
Opening and closing:
from the outside
7. Select a menu item:
> "All doors"
Press
button once to unlock the
entire car.
> "Driver's door only"
Press
button once to unlock only the
driver's door and the fuel filler flap.
Press it twice to unlock the entire car.
With the remote control
Persons remaining in the car or pets left
inside can lock the doors from the inside.
Take the remote control with you, so that the
car can be opened from the outside.<
Unlocking
You can unlock the car with the
depending on its settings.
button,
iDrive concept, see page 14.
1. Press the
button.
The start menu is called up.
2. Press the controller to call up the menu.
8. Press the controller.
The setting is saved for the remote control currently in use.
Comfort opening
Press and hold down the
button. The windows and the glass roof* are opened.
3. Select "Vehicle settings" and press the
controller.
28
Online Edition for Part-No. 01 41 0 159 725 © 09/05 BMW AG
Watch the closing movement to ensure
that no-one is trapped. The closing procedure is interrupted immediately if the button
is released.<
Switching on the interior light
With the car locked, press the
button.
This function enables you to locate the car, for
instance in a parking garage.
You can also activate the alarm system in the
event of danger:
button for at least three seconds.
To switch the alarm off: press any button.
Saloon: opening the luggage
compartment lid
You can also deactivate the optical acknowledgement signal for unlocking or locking.
3. Select "Vehicle settings" and press the
controller.
4. Select "Door locks" and press the controller.
5. Select "Confirmation" and press the controller.
button for about one second.
The luggage compartment lid opens, regardless of whether it was locked or unlocked.
The luggage compartment lid swings
rearwards and upwards when opened.
Make sure that there is sufficient clearance.
To avoid locking yourself out of the car inadvertently, do not leave the remote control in the
luggage compartment. If the luggage compartment lid was previously locked, it will be locked
again as soon as it is closed.<
6. Select the desired signal.
7. Press the controller.
The signals are switched on.
Touring: unlocking the tailgate
Press the
Overview
2. Press the controller to call up the menu.
button for about one second.
The tailgate opens a short way, regardless of
whether it was locked or unlocked.
29
Online Edition for Part-No. 01 41 0 159 725 © 09/05 BMW AG
Reference
Press the
Adjusting confirmation signals
1. Call up the start menu.
Panic mode*
Press the
Wrap protective material around any
sharp ends or edges of items of luggage
that could strike the rear window while the car is
moving, to prevent these damaging the heating
conductors in the rear window.<
Controls
Press and hold down the
button. The
windows and the glass roof* are closed.
Driving hints
Comfort closing
Navigation
button.
Do not lock the car from the outside when
there is someone inside it, as it cannot
then be unlocked from the inside in some
national-market versions.<
Entertainment
Press the
The tailgate swings rearwards and
upwards when opened. Make sure that
there is sufficient clearance.
To avoid locking yourself out of the car inadvertently, do not leave the remote control in the
luggage compartment. If the tailgate was previously locked, it will be locked again as soon as it
is closed.
The load area cover is raised when the tailgate
is opened. Before closing the tailgate, press the
cover down until it engages in position.<
Mobility
Locking
Opening and closing
Malfunctions
The remote control may malfunction as a result
of interference from localised radio signals.
If this occurs, unlock and lock the car by inserting the key into the door lock.
If the car can no longer be locked with a remote
control, the battery in the remote control is flat.
Use this remote control when driving a relatively
long distance to recharge its battery, see
page 26.
Via the door lock
Do not lock the car from the outside when
there is someone inside it, as it cannot
then be unlocked from the inside in some
national-market versions.<
In some national versions, the alarm system* is triggered when the door lock is
unlocked.
To switch off the alarm:
Unlock the car with the remote control, see
page 28, or insert the remote control fully into
the ignition lock.<
For further details of the alarm system*, see
page 34.
Comfort operation
The windows and the glass roof* can also be
operated via the door lock.
> Opening:
When the door is closed, turn the key in the
door lock to the unlocking position and hold
it there.
Watch the closing movement to ensure
that no-one is trapped. The movement is
stopped when the key is released.<
Manual operation
In the event of an electrical fault, you can lock
and unlock the driver's door by turning the key
to the limit positions in the door lock.
Opening and closing:
From the inside
This button unlocks or locks the doors and luggage compartment lid/tailgate when the front
doors are closed, but does not deadlock them.
The fuel filler flap remains unlocked*.
You can in addition select the following settings:
> The central locking is engaged automatically after a short while if no door has been
opened.
> The central locking is engaged as soon as
you drive off.
iDrive concept, see page 14.
1. Press the
button.
The start menu is called up.
2. Press the controller to call up the menu.
3. Select "Vehicle settings" and press the
controller.
4. Select "Door locks" and press the controller.
> Closing:
When the door is closed, turn the key to the
locking position and hold it there.
30
Online Edition for Part-No. 01 41 0 159 725 © 09/05 BMW AG
Luggage compartment lid/
tailgate
The luggage compartment lid/tailgate
swings rearwards and upwards when
opened. Make sure that there is sufficient clearance.<
Overview
5. Select "Central locking" and press the controller.
Controls
Saloon
Opening from inside
6. Select "Lock if no door opened"
or
"Lock after moving off".
Driving hints
7. Press the controller.
indicates that the setting is selected.
The setting is saved for the remote control currently in use.
> Either use the central locking button to
unlock all doors at once, then pull the door
handle above the armrest, or
Press the button: the luggage compartment lid
will open as long as it is not deadlocked.
Opening from outside
Navigation
Unlocking and opening
> Pull the handle on each individual door
twice: the first time to unlock the door, and
the second time to open it.
> Either lock all doors by pressing the central
locking button, or
Mobility
Persons remaining in the car or pets left
inside can lock the doors from the inside.
Take the remote control with you, so that the
car can be opened from the outside.<
Press the button on the luggage compartment
lid or press the
button on the remote control
for approx. 1 second: the luggage compartment
lid opens.
31
Online Edition for Part-No. 01 41 0 159 725 © 09/05 BMW AG
Reference
> Press down the safety lock button on the
door in question. To avoid being shut out of
the car accidentally, the driver's door cannot be locked with the safety lock button
when it is open.
Entertainment
Locking
Opening and closing
All keys, see page 26, fit the lock on the luggage
compartment lid.
Touring: opening and closing rear
window
Locking separately
The rear window can be opened separately for
ease of loading and unloading small items.
Turn a key in the luggage compartment lid
beyond a pressure point clockwise and remove
in the horizontal position.
This locks the luggage compartment lid and
disconnects it from the central locking system.
If you then give the remote control to a third
party with the integrated key, see page 26, it will
not be possible to access the luggage compartment. This is an advantage at hotels, for example.
The load area cover is raised when the
rear window is opened. Before closing the
rear window, press the cover down until it
engages in position.<
Releasing and opening manually
Turn the key as far as possible anti-clockwise:
The luggage compartment lid opens.
If you open the luggage compartment lid
via the lock when the alarm system* is
armed, the alarm will be triggered off. You
should therefore unlock the car first. If the alarm
has inadvertently been triggered off: switching
off the alarm, see page 35.<
Closing
Press the button: the rear window opens a short
way. It can now be swung upwards.
Press the window shut to close it.
Wrap protective material around any
sharp ends or edges of items of luggage
that could strike the rear window while the car is
moving, to prevent these damaging the heating
conductors in the rear window.<
To avoid injuries, make sure that the closing area of the luggage compartment lid is
unobstructed.<
Touring: tailgate
The recessed handles in the luggage compartment lid lining make it easier to pull the luggage
compartment lid down.
Press the button: the tailgate will open as long
as it is not deadlocked.
Opening from inside
32
Online Edition for Part-No. 01 41 0 159 725 © 09/05 BMW AG
Touring: automatic tailgate operation*
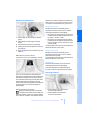
Adjusting limit of opening
You can set how far the tailgate is to open.
iDrive concept, see page 14.
Opening manually
In the event of an electrical fault:
1. From inside the load area, press out the
cover 1 attached to the tailgate with a
screwdriver.
Driving hints
To close the tailgate, press it down only lightly.
The actual closing action is automatic.
1. Press the
button.
The start menu is called up.
2. Press the controller to call up the menu.
3. Select "Vehicle settings" and press the
controller.
4. Select "Door locks" and press the controller.
5. Select "Luggage compartment lid opening"
and press the controller.
2. Press the bar 2 in the direction of the arrow.
Navigation
The load area cover is raised when the
tailgate is opened. Before closing the tailgate, press the cover down until it engages in
position.<
The recessed handles in the tailgate lining
make it easier to pull the lid down.
Entertainment
Press the button on the tailgate or press the
button on the remote control for approx.
1 second: the tailgate opens a short way. It can
now be swung upwards.
Controls
Overview
Opening from outside
Closing
6. Turn the controller. The setting is adopted;
you can now change to another field.
To avoid injuries, ensure that the closing
area of the tailgate is unobstructed.<
33
Online Edition for Part-No. 01 41 0 159 725 © 09/05 BMW AG
Reference
The tailgate is locked again as soon as it is
closed.
Mobility
3. Open the tailgate and press the cover back
into place.
Opening and closing
Opening tailgate
The tailgate opens automatically if you:
> Press the button on the outside of the tailgate when the car is unlocked.
The tailgate closes automatically if you:
> Press the button on the inside of the tailgate.
> Press the
footwell.
button in the driver's side
> Press and hold down the
remote control.
button on the
To interrupt the closing operation:
> Press the button on the inside of the tailgate
> Release the
trol
button on the remote con-
> Press the button on the outside of the tailgate
The closing operation will not be interrupted if you set off in the car.<
> Press the
button on the remote control
for approx. 1 second.
Alarm system*
The tailgate swings rearwards and
upwards when opened. Make sure that
there is sufficient clearance.<
Principle
To interrupt the opening operation:
> Press the button on the outside of the tailgate.
> Press and hold down the
remote control.
button on the
> Press the button on the inside of the tailgate.
The load area cover is raised when the
tailgate is opened. Before closing the tailgate, press the cover down until it engages in
position.<
The alarm system reacts if:
> Opening a door, the engine compartment
lid, the luggage compartment lid/tailgate or
the rear window*
> There is any movement inside the car: interior movement detector, see further below
> The car's inclination changes, for instance
if an attempt is made to jack it up and steal
the wheels or to raise it prior to towing away
> There is an interruption in the power supply
from the battery
The alarm will respond briefly as follows to indicate unauthorised attempts to access the car:
> Acoustic alarm
Closing the tailgate
To avoid injuries, ensure that the closing
area of the tailgate is unobstructed.<
> Activation* of the hazard warning system
34
Online Edition for Part-No. 01 41 0 159 725 © 09/05 BMW AG
> Unlock the car with the remote control, see
page 28, or
> Insert the remote control into the ignition as
far as it will go, see page 56.
Indicator lamp displays
Before the interior movement detector can
operate correctly, the windows and glass roof*
must be closed.
Avoiding false alarms
The tilt alarm sensor and the interior movement
detector can be switched off together. This prevents false alarms, e.g. in the following situations:
> If pets are to remain inside the car
Switching off the tilt alarm sensor and
interior movement detector
Press the
button on the remote control
again immediately after locking the car.
> The indicator lamp flashes after the car has
been locked: the doors, luggage compartment lid/tailgate or rear window* have not
been closed properly. Even if an item is not
closed fully, the remaining items are deadlocked and the indicator lamp begins to
flash steadily after 10 seconds. However,
the interior movement detector is not activated.
> The indicator lamp goes out after the car
has been unlocked: no attempt was made to
tamper with the car during your absence.
Overview
> In two-level garages
> When the car is being transported by autorail
> The indicator lamp beneath the inside mirror flashes steadily: the system is armed.
Controls
Interior movement detector
Driving hints
Switching off alarm
The car's angle is monitored. The alarm is set
off for instance if an attempt is made to steal the
car's wheels or tow it away.
The indicator lamp comes on briefly, then continues to flash steadily. The tilt alarm sensor and
interior movement detector are switched off
until the car is next unlocked and locked.
Navigation
Opening certain national-market versions
via the door lock triggers off the alarm.<
Tilt alarm sensor
Entertainment
Even when the alarm system is armed, you can
open the luggage compartment lid/tailgate by
pressing the
button on the remote control,
see page 31. When you close the luggage compartment lid/tailgate subsequently, it will be
locked and monitored.
Comfort access*
Comfort access enables you to access your car
without having to take the remote control into
your hand. It is sufficient to have the remote
control on your person, for example in a jacket
pocket. The car automatically recognises your
remote control when it is in the immediate vicinity or inside the car.
35
Online Edition for Part-No. 01 41 0 159 725 © 09/05 BMW AG
Mobility
Whenever the car is locked or unlocked, either
with the remote control or at the door lock, the
alarm system is armed or disarmed at the same
time.
> If the indicator light flashes after unlocking
until the remote control is inserted in the
ignition, but for no longer than approx.
5 minutes: an attempt was made to tamper
with the car.
Reference
Arming and disarming
Opening and closing
Comfort access supports the following functions:
> Unlocking/locking the car
> Starting the engine
> Comfort closing
Operating requirements
> The car can only be locked once it has
ascertained that the remote control on your
person is not inside the car.
> About two seconds have to elapse before
the car can again be unlocked and locked.
> The engine can be started only when the
car ascertains that the remote control on
your person is inside the car.
Special features in contrast to
conventional remote control
Generally speaking, it makes no difference
whether you control the functions outlined
above by using comfort access or by pressing
the buttons on the remote control. Consequently, you should begin by familiarising yourself with the instructions for opening and closing, starting on page 26.
The features specific to comfort access are
described below.
Releasing
Locking
Touch the area, arrow 2 on the driver's door
or 3 on the other doors, for approx. 1 second.
This corresponds to pressing the
button.
For comfort closing, press the area, arrow 2 or 3
with your finger.
If the car detects a remote control which
has been left in the luggage compartment/load area accidentally once the luggage
compartment lid/tailgate has been closed, the
lid will reopen. The hazard warning system
flashes and a signal* sounds.<
Switching on radio readiness
Lightly touching the start/stop button switches
on radio readiness, see page 56.
Do not depress the brake, otherwise the
engine will start immediately.<
Starting the engine
You can start the engine or switch on the ignition when a remote control is inside the car. It is
not necessary to insert the remote control in the
ignition lock, see page 56.
If you take the remote control with you when
you leave the car with the engine running, a
warning light will come on. In addition, a message will appear on the control display. As long
as the car does not detect a remote control,
once the engine has been switched off, you will
not be able to restart it for approx. 10 seconds.
Switching off the engine, automatic
transmission
Take a firm hold of one of the door handles,
arrow 1. This corresponds to pressing the
button.
The engine can be switched off only when the
selector lever is in position P, see page 58.
To switch off the engine with the selector lever
in position N, the remote control must be in the
ignition lock.
When a remote control is detected inside the
passenger compartment after the car has been
unlocked, the electric steering wheel lock disengages, see page 56.
36
Online Edition for Part-No. 01 41 0 159 725 © 09/05 BMW AG
The car will be able to roll.
Comfort access may malfunction as a result of
interference from local radio signals. In this
case, open or close the car using the buttons on
the remote control or the key. You can subsequently start the engine by inserting the remote
control into the ignition lock.
Changing the battery
The battery in the remote control for comfort
access requires replacement from time to time.
1. Remove the integrated key from the remote
control, see page 26.
2. Remove the cover.
> Press the switch until the pressure point is
felt:
The window is opened for as long as you
press the switch.
> Press the switch beyond the pressure point:
The window opens automatically. Press the
switch again to halt the opening movement.
Close the window similarly by pulling the
switch.
For comfort operation using the remote control
or door lock, see page 28 or 30.
Comfort closing with comfort access see Locking on page 36.
3. Insert a new battery with the plus side up.
After the ignition is switched off
4. Press the cover back into position.
You can still operate the windows for approx.
1 minute after the remote control has been
removed or the ignition switched off.
Dispose of the old battery only at an
authorised collecting point or hand it in to
BMW Service.<
Trap protection
If the closing force of a window exceeds
a specific value as it closes, the closing action is
interrupted immediately and the window reopens slightly.
Despite the trap protection function,
make sure that the windows are not
obstructed as they close; if this precaution is
37
Online Edition for Part-No. 01 41 0 159 725 © 09/05 BMW AG
Overview
Controls
Opening, closing
Malfunction
Driving hints
4. Switch off the engine.
Navigation
3. Engage selector lever position N.
Entertainment
2. Depress the brake.
Observe the windows during the closing
procedure, to avoid any injuries.
Take the remote control with you when you
leave the car, otherwise children, for example,
could operate the windows and possibly injure
themselves.<
Mobility
1. Insert the remote control in the ignition lock.
Windows
Reference
Before driving a car with automatic
transmission into a car wash
Opening and closing
not taken, the risk remains that thin objects, for
instance, could fail to interrupt the closing
movement.
To restrict the trap protection function, pull the
switch beyond its pressure point and hold it in
position. In this instance, if the closing force
exceeds a specific value the window is opened
only a short way.
If the switch is pulled beyond the pressure point
again within approx. 4 seconds and held in that
position, the trap protection function is overridden.<
Raising
Press the switch.
> If the glass roof is closed, it is raised and the
sliding trim opens slightly.
Safety switch
> If the glass roof is open, it automatically
moves to the raised position. The sliding
trim remains fully open.
Do not close the sliding trim forcibly with
the roof in the raised position, as this
could damage the mechanism.<
Opening, closing
This enables you to prevent the rear door windows being opened and closed at the switches
in the rear seat area, for instance by children.
When the safety function is switched on, the
LED comes on.
Press the safety switch when carrying
children on the rear seat, otherwise careless closing of the windows could result in
injury.<
Accessories near the windows
If you fit accessories within the window movement range, e.g. a clip-on aerial for your mobile
phone, the system must be initialised to teach it
the new conditions. BMW recommends that
you have this work performed by BMW Service.
> Push the switch back as far as the pressure
point.
The glass roof and sliding trim open in unison for as long as you hold the switch in
position.
> Push the switch back beyond the pressure
point.
The glass roof and sliding trim open automatically. Press the switch again briefly to
halt the opening movement.
The glass roof is closed in the same way by sliding the switch forwards. The sliding trim
remains open and can be closed manually.
For comfort operation using the remote control
or door lock, see page 28 or 30.
Comfort closing with comfort access see Locking on page 36.
Glass roof, electric*
After the ignition is switched off
Observe the glass roof during the closing
procedure, to avoid any injuries.
Take the remote control with you when you
leave the car, otherwise children could operate
the roof and possibly injure themselves.<
You can still operate the roof for approx.
1 minute after the remote control has been
removed or the ignition switched off.
38
Online Edition for Part-No. 01 41 0 159 725 © 09/05 BMW AG
Manual operation
Press the switch beyond the pressure point.
In the event of an electrical fault, you can move
the glass roof manually:
Further to this, the following movements are
automated:
> When the roof is open, press the switch in
the direction for raising: the roof moves to
the fully raised position.
1. Fold the cover down, possibly with the aid
of the screwdriver from the toolkit, see
page 192.
Controls
> When the roof is raised, press the switch in
the direction for opening: the roof moves to
the fully open position.
Overview
Automatic opening and closing
Pressing the switch again stops this movement.
Despite the trap protection function,
make sure that the roof is not obstructed
as it closes; if this precaution is not taken, the
risk remains that thin objects, for instance,
could fail to interrupt the closing movement.
The trap protection function is overridden by
pressing the switch beyond its pressure point
and holding it in position.<
2. Insert the Allen key from the toolkit, see
page 192, into the designated aperture.
Turn the glass roof in the desired direction.
To close, turn in the direction indicated by
the arrow.
Navigation
If the glass roof encounters an obstruction during closing from approximately the centre of the
roof aperture, or during closing from the raised
position, the closing movement is interrupted
and the glass roof is opened again slightly.
Driving hints
Trap protection
Observe the panorama glass roof during
the closing procedure, to avoid any injuries.
Take the remote control with you when you
leave the car, otherwise children could operate
the roof and possibly injure themselves.<
39
Online Edition for Part-No. 01 41 0 159 725 © 09/05 BMW AG
Mobility
Touring:
Panorama glass roof*
Reference
After a power failure, it is possible that the roof
will only move to the raised position. The system must be initialised. BMW recommends that
you have this work performed by BMW Service.
Entertainment
After a power failure
Opening and closing
Raising, opening, closing
Comfort position
Each time it is fully opened and subsequently
closed, the panorama glass roof halts in the
comfort position. If desired, the movement can
then be continued using the switch.
The comfort position minimises wind noise
inside the car.
Trap protection
Press the switch or push it in the required direction as far as the pressure point.
The sliding trim is opened:
> In unison with the roof
> A short distance when the roof is raised
When the roof is closed or in the raised position,
the sliding trim can be opened or closed independently.
For comfort operation using the remote control
or door lock, see page 28 or 30.
Comfort closing with comfort access see Locking on page 36.
Vent position
Press the switch:
The glass roof is raised and the sliding trim
opened a short distance.
After the ignition is switched off
If the panorama glass roof or sliding trim
encounters an obstruction during closing from
approximately one-third of the roof aperture, or
during closing from the raised position, the
closing movement is interrupted and the panorama glass roof and sliding trim are opened
again slightly.
Despite the trap protection function,
make sure that the roof is not obstructed
as it closes; if this precaution is not taken, the
risk remains that thin objects, for instance,
could fail to interrupt the closing movement.
The trap protection function is overridden by
pressing the switch beyond its pressure point
and holding it in position.<
After a power failure
After a power failure, it is possible that the roof
will only move to the raised position. The system must be initialised. BMW recommends that
you have this work performed by BMW Service.
You can still operate the roof for approx.
1 minute after the remote control has been
removed or the ignition switched off.
Manual operation
Automatic opening and closing
1. Fold the cover down, possibly applying the
screwdriver from the toolkit at the point
indicated, see page 192.
Press the switch beyond the pressure point.
Pressing the switch again stops this movement.
In the event of an electrical fault, you can move
the roof manually:
Opening and closing roof and sliding
trim together
Press the switch twice in rapid succession
beyond the pressure point.
Pressing the switch again stops this movement.
40
Online Edition for Part-No. 01 41 0 159 725 © 09/05 BMW AG
41
Online Edition for Part-No. 01 41 0 159 725 © 09/05 BMW AG
Reference
Mobility
Entertainment
Navigation
Driving hints
Controls
Overview
2. Take the Allen key from the holder next to
the toolkit and insert it into the designated
aperture. Turn the roof in the desired direction. To close, turn in the direction indicated
by the arrow.
Adjusting
Adjusting
Safe seated position
A seated position that suitably reflects your
requirements is a vital condition of relaxed driving with a minimum of fatigue. In conjunction
with the seat belts, the head restraints and the
airbags, the seated position has a major influence on your safety in the event of an accident.
You should therefore observe the following
notes in order to maintain the protective function of the car's safety systems.
For additional notes on carrying children in
safety, see page 53.
Airbags
Keep your distance from the airbags.
Always grip the steering wheel on the rim,
with your hands in the 3 o'clock and 9 o'clock
positions, to minimise the risk of injury to the
hands or arms in the event of the airbag being
triggered off.
No other persons, pets or objects should be
held or permitted to remain between the airbag
and yourself.
Do not use the front airbag cover on the front
passenger's side as a tray. Make sure that the
front passenger likewise adopts a correct
seated position and does not rest feet or legs on
the instrument panel, for example, otherwise
he/she could sustain leg injuries in the event of
the front airbag being triggered.
Make sure that passengers do not use the side
or head-level airbags as headrests, otherwise
they may sustain injuries in the event of the airbags triggering.<
Even if all these instructions are complied with,
certain injuries as a result of contact with the
airbag cannot be entirely ruled out, depending
on the circumstances in which an accident
occurs. Occupants with sensitive hearing may
be subject to brief and generally temporary
impaired hearing caused by the ignition and
inflation noise.
The locations of the airbags and additional
notes are given on page 90.
Head restraints
Head restraints adjusted to the correct height
reduce the risk of injuries to the neck in the
event of an accident.
Adjust the head restraint in such a way
that its centre is at approximately ear
level; otherwise, there is an increased risk of
injury should an accident occur.<
Seat belt
All occupants should always fasten their seat
belts before you set off. The airbags are a complementary safety feature and not a substitute
for the seat belts.
Never restrain more than one person with
each seat belt. Babies or small children
must not travel on the lap of another occupant.
Pregnant women should also wear the seat belt,
making sure that the strap in the pelvic area is
well down on the hips and does not press on the
abdominal region of the body. The seat belt
must not pass across the neck, become
trapped at any point or chafe against any sharp
edges. The seat belt should not be twisted and
must be positioned firmly over the pelvis and
shoulder, as close to the body as possible. It
should not pass over hard or fragile objects,
otherwise the belt in the pelvic area could slide
over the hips in the event of a head-on collision
and injure the lower abdomen. Avoid wearing
bulky clothing and regularly pull the belt in the
upper-body area taut, otherwise its restraining
effect could be impaired.
Touring: if the centre seat belt is used, the wider
backrest must be locked in position, see
page 116, otherwise the centre seat belt will not
have any restraining effect.<
Operating seat belts, see page 47.
42
Online Edition for Part-No. 01 41 0 159 725 © 09/05 BMW AG
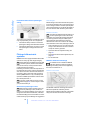
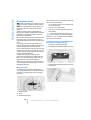
Seats
Note before adjusting
Comply with the notes on page 42, or
there may be a risk to your personal
safety.<
1
Forward/back
2
Angle of driver's seat
3
Height
4
Seat back
Navigation
Comply with the notes on page 42, or
there may be a risk to your personal
safety.<
Non-standard, depending on seat:
1
Longitudinal direction*
2
Height*
3
Seat tilt*
Mobility
Forward/back: pull the lever up and slide the
seat to the preferred position. After releasing
the lever, move the seat gently forward or back
to make sure it engages properly in position.
Angle of driver's seat: pull the lever up and
move the seat until the desired angle is
obtained. After releasing the lever, move the
seat gently forward or back to make sure it
engages properly in position.
43
Online Edition for Part-No. 01 41 0 159 725 © 09/05 BMW AG
Driving hints
Adjusting manually
Electrical adjustment
Entertainment
Observe also the notes on damaged seat belts
on page 48 and on the active front head
restraint* on page 47.
Pull the lever and move the thigh support forward or back.
Reference
Do not reposition the driver's seat while
the car is in motion. The seat could move
unexpectedly, leading to the driver losing control of the car, so that an accident could be
caused.
Do not recline the driver's or front passenger's
seat back too far, otherwise there will be a risk
of sliding under the seat belt in an accident, so
that the belt loses its protective effect.<
Controls
Overview
Thigh support*
Adjusting
The upper edge of the pelvis and the spinal column are supported, to encourage an upright but
relaxed seated position.
> To increase or reduce the curvature: press
switch at front or rear edge.
> To move the curved section up or down:
press switch at top or bottom.
Active backrest width adjustment*
4
Backrest*
Additional, depending on seat:
First adjust the width of the backrest to a comfortable position, see further above. Using the
selected backrest width as the basis, lateral
support is automatically adapted to the current
driving situation.
1
Backrest width*
2
Shoulder support*
3
Thigh support*
4
Lumbar support*, see further below
Shoulder support: the adjustable upper section
of the seat back supports the shoulder area of
the occupant's body. This results in a relaxed
seated position and reduces the load on the
shoulder muscles.
Adjusting lumbar support*
The extent to which the backrest is adjusted
and the speed with which this takes place
depend on the program. You can choose from
three programs, ranging from comfortable to
sporty.
Each press of the button switches between the
programs:
> "Comfort" program: one LED
> "Normal" program: two LEDs
> "Sport" program: three LEDs
To switch off: press and hold down button.
Easy entry/exit*
To facilitate entry and exit, the backrest width is
temporarily opened fully.
The seat back contour can be altered to provide
more support to the curved, lumbar section of
the spine.
44
Online Edition for Part-No. 01 41 0 159 725 © 09/05 BMW AG
Safety function
1. Close the driver's door and switch the ignition on or off.
2. Press memory button 1 or 2 as desired until
the adjusting procedure has been completed.
Overview
Seat, mirror and steering
wheel position memory*
Request with remote control
> Calling up when opening the driver's door
iDrive concept, see page 14.
1. Call up the start menu.
1. Switch on radio readiness or the ignition,
see page 56.
2. Select the desired seat, outside mirror and
steering wheel positions.
3. Press the
button:
The LED in the button comes on.
2. Press the controller to call up the menu.
3. Select "Vehicle settings" and press the
controller.
4. Select "Door locks" and press the controller.
4. Press the desired memory button 1 or 2:
The LED goes out.
Calling up
Do not call up the memory while the car is
in motion, otherwise an unexpected seat
or steering wheel movement may cause an
accident.<
1. Unlock and open the driver's door or switch
on radio readiness.
6. Select "Last seat pos." and press the controller.
Mobility
Convenience function
5. Select "Central locking" and press the controller.
2. Briefly press memory button 1 or 2 as
desired.
The positioning movement is interrupted
immediately if you briefly press a seat
adjustment switch or one of the memory
buttons.
45
Online Edition for Part-No. 01 41 0 159 725 © 09/05 BMW AG
Navigation
Memorising
Driving hints
> Calling up when unlocking the car
Entertainment
The lumbar support setting is not stored in the
position memory.
You can choose when the position is called up:
Reference
You can memorise and call up two different
positions for the driver's and front passenger's
seat*, the outside mirrors and the steering
wheel.
The last driver's seat, outside mirror and steering wheel position selected is memorised in the
remote control currently in use.
Controls
If the
button was pressed accidentally:
Press the button again; the LED will go out.
Adjusting
7. Select "After unlocking" or "After door
opens".
Adjusting manually
Up: pull.
8. Press the controller.
To switch off the calling-up procedure:
Select "Automatic off" and press the controller.
If this function is used, first make sure that
the footwell behind the driver's seat is
unobstructed. Otherwise persons could be
injured or objects damaged if the seat should
start to move towards the rear.<
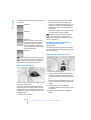
Down: press the button, arrow 1, and slide the
head restraint down.
To remove:
1. Pull the head restraint up as far as its limit of
travel.
2. Press the button, arrow 1, and pull the head
restraint fully out.
Adjusting electrically*
Head restraints
Head restraints adjusted to the correct height
reduce the risk of injuries to the neck in the
event of an accident.
Adjust the head restraint in such a way
that its centre is at approximately ear
level; otherwise, there is an increased risk of
injury should an accident occur.<
Front seats: adjusting height
You can adjust the height of the head restraints
manually or electrically, depending on the type
of seat.
Front seats: adjusting angle
Tilt the head restraint as required.
On the Comfort seat, you adjust the distance
between the head restraint and the back of your
head via the shoulder support.
46
Online Edition for Part-No. 01 41 0 159 725 © 09/05 BMW AG
Comply with the notes on page 42, or
there may be a risk to your personal
safety.<
Controls
All occupants should always fasten their seat
belts before you set off. The airbags are a complementary safety feature and not a substitute
for the seat belts.
Fold the side sections forward to provide
greater lateral support in the rest position.
Driving hints
Front head restraint, active*
The Comfort seats are equipped with an active
head restraint.
In the event of a sufficiently serious rear-end
collision, the active head restraint reduces the
distance between itself and the head.
Navigation
Do not use seat or head restraint covers
or hang objects, e.g. coat-hangers, from
the head restraints or attach accessories to the
seat or head restraint; this will impair the protective function of the active head restraints,
thereby putting personal safety at risk.<
The seat belt buckle must be heard to engage.
Belt reminder for driver's and front
passenger's seat*
The indicator lamp comes on and an
acoustic signal sounds. In addition, a
message will appear on the control display. Please check whether the seat belt is fastened correctly.
Up: pull.
Down: press the button, arrow 1, and slide the
head restraint down.
The 'Fasten seat belts' reminder is issued as
long as the driver's seat belt has not been fastened. On certain national-market versions, the
'Fasten seat belts' reminder is also activated at
road speeds above approx. 8 km/h, approx.
5 mph, if the front passenger's seat belt is not
fastened, if heavy objects are placed on the
front passenger seat, or if the driver or front
passenger unfasten their seat belts.
47
Online Edition for Part-No. 01 41 0 159 725 © 09/05 BMW AG
Entertainment
Fastening
Mobility
Rear seats: adjusting height
Overview
Seat belts
Reference
Adjusting side sections on
Comfort seat
Adjusting
Opening
1. Call up the start menu.
1. Hold onto the belt.
2. Move the controller to the left to call up
"Climate".
2. Press the red button on the belt buckle.
3. Guide the belt back up to the reel.
The upper belt anchorage is suitable for adults
of any stature as long as they are sitting correctly, see page 43.
3. Select "Seat-heating distribution" and
press the controller.
4. Move the controller to the left or right to
select "Driver" or "Passenger".
The two seat belt buckles integrated into the
rear seat are intended for the left and right seat
occupants. The buckle marked CENTER is only
to be used by a person occupying the centre
rear seat.
Damaged seat belts
Should the seat belts be placed under
strain in the event of an accident or sustain damage, replace the belt system including
the seat-belt tensioner and have the belt tensioner tested. Have this work performed only by
BMW Service or by a workshop that operates to
BMW specifications and has suitably trained
personnel, otherwise the correct functioning of
this safety equipment is not guaranteed.<
5. Turn the controller. The setting is adopted;
you can now change to another field.
Rear
Heated seats*
Front
Function as for heated front seats, two temperature stages.
Active seat ventilation*
Press once per temperature stage. Three LEDs
indicates the highest preset temperature.
To switch off: press and hold down the button.
Temperature distribution
The temperature distribution between the seat
cushion and seat back can be varied.
iDrive concept, see page 14.
Press once per ventilation stage.
48
Online Edition for Part-No. 01 41 0 159 725 © 09/05 BMW AG
To switch off: press and hold down the button.
Overview
The highest stage with three LEDs lit is
for a rapid cooling effect, e.g. if the car's
interior has become very hot. The system automatically switches down a stage after a short
time to avoid overcooling.<
Adjusting
2
Changing over to the mirror on the other
side or to the automatic parking function,
see Passenger-side mirror tilt-down on
page 50
3
Folding mirrors in and out*
To memorise mirror positions, see Seat, mirror
and steering wheel position memory on
page 45.
Door mirrors
At speeds up to approx. 30 km/h, approx.
20 mph, you can fold the mirrors in or out by
pressing button 3. This can be useful for example in car washes or narrow streets, or to fold
the mirrors back out into the correct position
after they have been folded in manually. If the
mirrors have been folded in, they automatically
fold out again when a speed of approx. 40 km/h,
approx. 25 mph, is reached.
The outer sections of the mirrors depict a larger
field of view* than the inner sections. In this
way, the view to the rear is extended and the
blind spot, as it is known, is reduced in size.
Before putting the car through a car wash,
fold the mirrors in either manually or by
pressing button 3, otherwise they could be
damaged on account of the car's width.<
When you switch off the active seat, it may take
up to 1 minute for the two halves of the base
cushion to return to their home positions.
Mirrors
The objects seen in the mirrors are closer
than they appear. Do not gauge your distance from following traffic based on what you
see in the mirrors; otherwise there is an
increased risk of accident.<
Automatic heating
Both outside mirrors are heated automatically
while the engine is running or the ignition
switched on.
49
Online Edition for Part-No. 01 41 0 159 725 © 09/05 BMW AG
Entertainment
Folding mirrors in and out*
Navigation
The mirrors can also be adjusted manually by
pressing the edge of the glass.
Mobility
To switch on, press the button; the LED lights
up.
Adjusting manually
Reference
The seat cushion is actively varied by the right
and left halves of the seat cushion being raised
and lowered alternately. This helps to avoid
muscular strain and signs of fatigue, and thus
guards against back pains in the lumbar region.
Driving hints
1
Controls
Active seat*
Adjusting
Passenger-side mirror tilt-down –
Automatic parking function*
Steering wheel
Adjusting
Activating
1. Push the switch to the position for the
driver-side mirror, arrow 1.
Do not adjust the steering wheel position
while the car is in motion, or an accident
may result from any unexpected movement.<
Adjusting manually
2. Engage reverse gear or move the selector
lever to position R.
The glass in the mirror on the passenger
side tilts slightly down. The road surface
close to the car, e.g. the kerb, is then
brought within the driver's field of view in
the mirror, for instance while parking the
car.
The parking position function is switched
off if you are towing a trailer.<
1. Fold the lever down.
2. Move the steering wheel to the preferred
height and angle to suit your seated position.
3. Fold the lever back up.
Adjusting electrically*
Deactivating
Push the switch to the position for the passenger-side mirror, arrow 2.
Inside mirror
The steering wheel can be adjusted in four
directions.
To memorise steering wheel position, see Seat,
mirror and steering wheel position memory,
page 45.
To reduce glare from following vehicles after
dark, turn the knob.
Automatic-dim mirrors* see page 123.
Electric steering-wheel lock
The steering wheel locks or unlocks automatically when the remote control is removed or
inserted, see page 56.
50
Online Edition for Part-No. 01 41 0 159 725 © 09/05 BMW AG
A list showing various functions is displayed:
Press the button with the ignition switched on.
When the steering wheel heating is on, the LED
in the button is lit.
Programmable buttons* on the
steering wheel
> "Voice output of nav. system"
Spoken instructions for the navigation
system*
> "Air circulation on / off"
Permanently shutting off the entry of
outside air, see Automatic Air Recirculation Control AUC on page 104
Overview
Heated steering wheel*
Controls
To facilitate entry and exit, the steering wheel
temporarily moves to its highest position.
4. Select "Steering wheel buttons" and press
the controller.
Driving hints
Easy entry/exit*
> "Telephone list"
Show/hide telephone book or last list of
saved numbers displayed
You can program the buttons with a function of
your choice.
iDrive concept, see page 14.
1. Press the
button.
The start menu is called up.
2. Press the controller to call up the menu.
> "Next entertainment source"
To change the audio source
5. Select the desired function and press the
controller.
6. Select a button if appropriate and press the
controller.
51
Online Edition for Part-No. 01 41 0 159 725 © 09/05 BMW AG
Reference
Mobility
3. Select "Vehicle settings" and press the
controller.
> "HDC on / off"
To switch Hill Descent Control HDC*
on/off
Entertainment
> "Display on / off"
To switch the control display on/off
Navigation
> "Mute on / off"
To mute the audio sources
Adjusting
The chosen function can be operated with the
appropriate key.
The setting is saved for the remote control currently in use.
Operating a function
Press the appropriate button on the steering
wheel.
If you have programmed "Voice output of nav.
system" for one of the buttons:
> Switching spoken instructions on/off:
Press and hold down the button.
> Repeating the last spoken instruction:
Press the button.
> With Business navigation system, interrupting spoken instructions during an
announcement:
Press the button.
52
Online Edition for Part-No. 01 41 0 159 725 © 09/05 BMW AG
Always carry children at the rear
Accident research has shown that the safest
place for children is in the rear seat.
Children under 12 or smaller than 150 cm,
approx. 5 feet, should always travel at the
rear using suitable child restraint systems, otherwise there is a greater risk of injury in the
event of an accident.<
Exception for the front passenger's
seat
If you nevertheless need to fit a child
restraint system on the front passenger's
seat, the passenger's front and side airbags
must be deactivated, otherwise a child travelling on that seat will be at considerable risk of
injury if the airbags are triggered, even if it is
wearing a child restraint system. BMW Service
will be pleased to advise you on this.<
Controls
You can deactivate and subsequently reactivate
the front and side airbags for the front passenger by means of a key switch. This is located in
the glove box.
Driving hints
All the seats in your BMW, except for the
driver's seat, are in principle suitable for the
installation of universal child restraint systems
for all age groups, provided these have been
approved for the age group in question.
Deactivating
Use a key to turn the key switch to the OFF
position.
The airbags for the front passenger are deactivated when the switch is in this position. The
airbags for the driver remain fully active.
Once the child restraint system has been
removed, immediately reactivate the airbags for the front passenger so that they can
deploy correctly in the event of an accident.<
Reactivating
Turn the key switch to the ON position.
53
Online Edition for Part-No. 01 41 0 159 725 © 09/05 BMW AG
Reference
Mobility
The front passenger's airbags are reactivated
and can deploy correctly if the need arises.
Navigation
Do not leave children unattended in the
car, as they could otherwise endanger
themselves and/or other persons by opening
the doors, for example.<
Key switch* for front
passenger airbag
Entertainment
Important considerations
Overview
Child safety
Child safety
Functional state of front passenger
airbag
Seat height
Before fitting a universal child restraint system
to the front passenger seat, move the seat up as
far as it will go in order to achieve optimal placement of the seat belt. Do not adjust the height of
the seat with the child restraint system fitted.
Backrest width*
The layout of the switches and indicator lamps
may vary depending on the car's equipment.
> The indicator lamp remains on if the front
passenger's airbags have been deactivated.
> The indicator lamp does not come on if the
front passenger's airbags have been activated.
Fitting child restraint
systems
BMW Service can supply suitable child restraint
systems for every age and weight category.
When selecting, installing and using child
restraint systems, observe the manufacturer's instructions, as the protective effect
could otherwise be impaired.
Following an accident, have all components of
the child restraint system and the seat belt that
was used to secure it checked and renewed if
necessary. Always have this work performed
either by BMW Service or by a workshop that
operates to BMW specifications and has suitably trained personnel.<
The backrest width adjustment feature of
the front passenger's seat must be fully
extended. Once the child seat has been fitted,
no memory positions may be called up and
active backrest width adjustment must be
deactivated in order not to restrict the stability
of the child seat on the front passenger's seat.<
1. After unlocking the car, sit on the front passenger's seat and close the door in order to
call up the memory position.
2. Open the backrest adjustment fully, see
page 44.
3. Deactivate active backrest adjustment, see
page 44.
4. Fit the child seat.
ISOFIX* child seat mountings
For details of how to install the ISOFIX
child seat, please consult the separate
operating and safety instructions supplied by
the seat's manufacturer.<
Saloon: rear seats
Touring: comply with the notes on seat
belts on page 42, or there may be a risk to
your personal safety.<
On the front passenger's seat
Before fitting a child restraint system on
the front passenger's seat, make sure
that the front and side airbags on the front passenger side have been deactivated, otherwise
the child travelling on that seat will be at considerable risk of injury if the airbags are triggered.<
The ISOFIX child seat mountings are located
behind the positions marked by arrows.
Before fitting the ISOFIX child seat, pull the belt
away from the area around the mountings.
54
Online Edition for Part-No. 01 41 0 159 725 © 09/05 BMW AG
The brackets for the ISOFIX child seat mountings are located behind the caps as shown.
Before fitting the ISOFIX child seat, remove the
caps and pull the belt away from the area
around the child seat mountings.
You can have the side airbags at the rear disabled. BMW Service will be pleased to advise
you on this.
Child safety catches in rear doors
Touring: rear seats
The brackets for the ISOFIX child seat mountings are located behind the caps as shown and
are covered again once the child seat has been
removed.
Before fitting the ISOFIX child seat, pull the belt
away from the area around the mountings.
Push down the locking lever on the rear doors:
The door in question can now only be opened
from the outside.
Safety switch for window lifts
Press the safety switch for the window lifts, see
page 38, if children are travelling on the rear
seat.
The ISOFIX child seat mountings are located
behind the points marked with arrows.
55
Online Edition for Part-No. 01 41 0 159 725 © 09/05 BMW AG
Overview
Reference
Mobility
Front passenger's seat
Controls
If your car has rear side airbags, do not
allow children travelling in child seats to
lean out towards the door trim, as serious injuries could occur if the side airbags were to be
triggered.<
Driving hints
When driving with children
Navigation
Before fitting the ISOFIX child seat, tilt the front
seat down fully* and make sure that the backrest is fully upright, see page 43.
Entertainment
Saloon: rear seats with through loading
system*
Driving
Driving
Ignition lock
Start/stop button
Insert the remote control fully into the ignition
lock.
Each time the start/stop button is pressed
briefly, radio readiness or the ignition are
switched on or off.
> Radio readiness switches on.
Individual electrical consumers can operate.
> The electric steering wheel lock disengages audibly.
Insert the remote control into the ignition
lock before starting off, otherwise the
electric steering wheel lock will not disengage
and you will not be able to steer the car.<
Removing the remote control from the
ignition lock
Press the remote control in briefly; it is ejected a
short way.
At the same time:
> The ignition switches off, if it was on beforehand.
> The electric steering wheel lock engages
audibly.
Automatic transmission
You cannot take out the remote control unless
the selector lever is in the P position: interlock.
Touching the start/stop button while the
brake or clutch is depressed starts the
engine.<
Radio readiness
Individual electrical consumers are ready for
operation. The time and the outside temperature are displayed in the instrument cluster.
Radio readiness is switched off automatically:
> Immediately when the remote control is
removed from the ignition lock
> When you touch the sensitive panel on the
door handle, if the car is fitted with comfort
access*, see Locking on page 36
Ignition on
Most of the indicator and warning lamps in
panel 1 of the instrument cluster, see page 11,
light up and remain on for different lengths of
time.
Radio readiness and ignition off
All indicator and warning lamps in the instrument cluster go out.
56
Online Edition for Part-No. 01 41 0 159 725 © 09/05 BMW AG
If the engine does not start, depress the
brake and push the selector lever to the
right; then engage position N. Watch the instrument cluster display.<
Exceptional starting conditions
In the following situations, press the accelerator
pedal halfway down when starting the engine.
> If the engine does not start at the first
attempt, for instance when it is extremely
hot or cold.
> If the engine is started at very low ambient
temperatures of below approx. –156 /57
or at high altitudes of more than about
1,000 m, approx. 3,300 ft, above sea level.
Manual gearbox
1. Apply the handbrake.
2. Depress the clutch and engage neutral
gear.
Avoid starting, stopping and restarting
the engine in rapid succession or
repeated attempts to start the engine if it does
not fire, otherwise unburned or only partially
combusted fuel could reach the catalytic converter, which could overheat and be damaged
as a result.<
3. Briefly press the start/stop button.
Diesel engine
Starting proceeds automatically for a certain
time, and ceases automatically as soon as the
engine has started.
When the engine is cold and the temperature is
below approx. 06/327, starting may be
delayed by automatic preheating. The preheating indicator lamp lights up on the instrument
cluster and a message appears on the Check
Control at the same time.
Automatic transmission with
Steptronic*
1. Depress the brake.
2. Briefly press the start/stop button.
Starting proceeds automatically for a certain
time, and ceases automatically as soon as the
engine has started.
57
Online Edition for Part-No. 01 41 0 159 725 © 09/05 BMW AG
Overview
Driving hints
Starting proceeds automatically for a certain
time, and ceases automatically as soon as the
engine has started.
Controls
3. Briefly press the start/stop button.
Navigation
Do not warm up the engine with the car at a
standstill; it is preferable to set off straight away,
driving at moderate engine speeds.
2. Select selector lever position N and make
sure that this position is also displayed on
the instrument cluster.
Entertainment
Do not press the accelerator pedal while starting the engine.
1. Depress the brake.
Mobility
Never run the engine in enclosed spaces,
as inhaling the harmful exhaust gas can
lead to loss of consciousness with fatal consequences. The exhaust gas contains carbon
monoxide, which is colourless and odourless,
but highly toxic. Do not leave the car unattended with the engine running, as this constitutes a hazard.
Before leaving the car with the engine running,
select neutral or selector lever position P and
apply the handbrake, otherwise the car could
roll away.<
Sequential Manual Gearbox SMG*
Reference
Starting the engine
Driving
Stopping engine
Releasing
Do not remove the remote control from
the ignition lock whilst the car is moving in
order to avoid the steering lock engaging during
steering.
Always take the remote control with you when
you leave the car. When parking on an incline,
apply the handbrake, otherwise the car could
roll away.<
Manual gearbox
1. With the car at a standstill, briefly press the
start/stop button.
2. Engage first gear or reverse.
3. Apply the handbrake.
Sequential Manual Gearbox SMG*
1. Apply the handbrake.
2. Engage a drive position.
3. Briefly press the start/stop button.
If N is engaged when the engine is switched
off, a visual and audible warning will be output to indicate this.
Raise slightly, press the knob and move the
lever down.
If exceptionally it is necessary to use the
handbrake while on the move, do not
apply it too firmly. Keep the knob on the lever
held in all the time. Too violent an application of
the handbrake could overbrake the rear wheels
and cause the rear of the car to skid.<
To prevent corrosion or an imbalance
between the brakes on the right and left
side, apply the handbrake lightly from time to
time when coasting to a standstill, provided that
it is safe to do so.
The brake lights do not come on when the
handbrake is applied.<
Automatic transmission*
1. With the car at a standstill, move the selector lever to position P.
Manual gearbox
2. Briefly press the start/stop button.
Handbrake
The handbrake is primarily intended for preventing a stationary car rolling away, and acts
on the rear wheels.
Indicator lamp
The indicator lamp lights up; a signal
will also sound when driving off. The
handbrake is applied.
When shifting in 5th/6th gear, press the
gearshift lever to the right. Otherwise the
engine could be damaged if you inadvertently
shift into 3rd or 4th gear.<
Applying
The lever engages automatically.
58
Online Edition for Part-No. 01 41 0 159 725 © 09/05 BMW AG
Principle
The Sequential M Gearbox SMG is an automated gearbox on which clutch operation and
gearshifts are performed by an electro-hydraulic system.
N is automatically engaged if the driver's
door is opened while the engine is running and neither the pedals nor the shift paddles or selector lever are being operated.
This is indicated by an acoustic signal and the
flashing N display in the instrument cluster.<
Gear indicator
You operate SMG via the selector lever in the
centre console and two shift paddles on the
steering wheel.
It offers you the following functions:
> The choice of manual or automated operation: Sequential mode or Drive mode
> A choice of two driving programs: Normal or
Sport, see Dynamic Driving Control
page 60
> Automatic downshifts and protection
against gearshifting errors, including in the
Sequential mode
> Acceleration assistant, see page 61
Selector lever positions
Overview
Controls
Sequential Manual Gearbox
SMG*
> D: activate/deactivate Drive mode
Driving hints
The reversing lights come on automatically
when the ignition is switched on.
R N 1 to 6
The current gear is displayed, preceded by a D
in the Drive mode.
Only the information on this display will
tell you whether the required selector
lever position has been engaged.<
Shiftlock
Before moving the lever away from N with the
car stationary, first depress the brake, otherwise the desired gearshift will not be performed.
R Reverse
Navigation
Engage this gear only when the car is standing
still. When the gearshift lever is pressed to the
left, a slight resistance has to be overcome.
> One-touch functions for the Sequential
mode:
+: manual upshifting
–: manual downshifting
Entertainment
Reverse
You will see the current selector lever position
in the centre console.
> R: reverse
> N: neutral
Every time the engine is started, the Sequential
mode is active when you press the selector
lever to the right with the brake depressed.
You shift up and down via the shift paddles or
the selector lever, without needing to take your
foot off the accelerator.
59
Online Edition for Part-No. 01 41 0 159 725 © 09/05 BMW AG
Reference
Sequential mode
Mobility
Engage this gear only when the car is standing
still.
Driving
It is also possible to move off in second gear,
e.g. on slippery roads.
Via the shift paddles on the steering
wheel
In the following situations, SMG will take control
on your behalf:
> Upshifts and downshifts are performed only
at a suitable engine or road speed; for
example, the gearbox cannot shift down if
the resulting engine speed would be too
high.
> When you bring the car to a halt, first gear is
selected automatically.
> Shortly before you reach the minimum
speed for the gear that is selected, the gearbox shifts down without any action required
on your part.
> To shift up, pull one of the shift paddles.
> To shift down, press one of the shift paddles.
Dynamic Driving Control
D Drive mode
In the Drive mode, all forward gears are
changed automatically.
Dynamic Driving Control allows you to call up an
enhanced sports response from your BMW at
the push of a button:
To change over from the Sequential to the Drive
mode: press the selector lever to the right,
towards D.
> The engine responds more spontaneously
to accelerator pedal movements.
Kick-down: to accelerate rapidly, e.g. for overtaking manoeuvres, press the accelerator down
fully. You achieve maximum acceleration.
> The engine's speed range is exploited to
the full in the Drive mode.
To change back to the Sequential mode: press
the selector lever to the right again in
direction D or change gear using the shift paddles or the selector lever.
Drive off quickly when moving off on an
uphill gradient. Do not use the accelerator
to prevent the car rolling back down a slope;
apply the handbrake, to avoid causing the gearbox to overheat.<
> Gear changes are performed more rapidly.
> 6th gear is not engaged in Drive mode.
> Cruise control*:
The memorised speed is established more
rapidly when called up.
Activating the system
Gear changes
Via the selector lever
> To shift up, pull the selector lever back.
> To shift down, push it forwards.
Press the SPORT button.
The LED in the button lights up and the SPORT
display appears in the instrument cluster.
60
Online Edition for Part-No. 01 41 0 159 725 © 09/05 BMW AG
> Engage reverse or
Moving the selector lever
The LED in the button and the SPORT display
in the instrument cluster go out.
Acceleration assistant
The acceleration assistant permits optimum
acceleration of the car from a standstill to motor
racing standards on high-grip surfaces.
Do not use the acceleration assistant too
frequently, otherwise various components could be subjected to premature wear.<
> Do not move the selector lever away from
position P until the engine is running: interlock.
> Before moving the lever away from P or N
with the car stationary, first depress the
brake, otherwise the selector lever will
refuse to move: shiftlock.
Apply the brake until you are ready to
move off; this will prevent the car
creeping when a gear is selected.<
Driving hints
> Switch off the engine.
Overview
> Press the SPORT button again or
The selector lever position is displayed, or the
current gear in the manual mode.
Controls
Deactivating the system
1. Activate Dynamic Driving Control.
2. Deactivate DSC, see page 84.
3. Fully depress the accelerator pedal quickly:
kick-down. The optimum engine speed for
pulling away is established.
In addition to the fully automatic mode, you can
perform manual gearshifts with the Steptronic,
see page 62.
Selector lever positions
A lock prevents the selector lever being inadvertently moved to the R or P position. To disengage the lock, press the button on the front of
the selector lever, see arrow.
P Park
Engage this gear only when the car is standing
still. The driven wheels are locked.
P R N D M/S + –
R Reverse
Displays in the instrument cluster
Engage this gear only when the car is standing
still.
Entertainment
Automatic transmission with
Steptronic*
Navigation
You should reactivate DSC subsequently
to maintain vehicle stability.<
D Drive, automatic position
Use this position for all normal driving. All forward gears are selected as necessary.
P R N D DS M1 to M6
61
Online Edition for Part-No. 01 41 0 159 725 © 09/05 BMW AG
Reference
You can select this in a car wash, for example.
The car will be able to roll.
Mobility
N Neutral
Driving
Kick-down
1. Unclip the gaiter of the selector lever.
Kick-down enables you to achieve maximum
performance: press the accelerator pedal down
beyond the regular full-throttle position;
increased resistance will be felt.
2. Pull the gaiter up over the selector lever
until the gaiter is inside out.
Sport program and M/S manual-shift
mode
3. Using the screwdriver from the toolkit, see
page 192, press the red section of the lever
while moving the selector lever to the
desired position at the same time.
Move selector lever to the left from position D,
into the M/S selection gate:
The Sport program is activated and DS appears
in the instrument cluster. This position is recommended for a performance-oriented driving
style.
Flashing turn indicators/
Headlight flasher
When you press the selector lever forwards or
back, the manual mode is activated and Steptronic changes gear. The instrument cluster
shows M1 to M6.
Upshifts and downshifts are performed only at a
suitable engine or road speed; for example, the
transmission will not shift down if the resulting
engine speed would be too high. The gear
selected appears briefly in the instrument cluster, followed by the gear actually in use.
To return to the automatic mode, move the
selector lever right into position D.
1
High-beam headlights
2
Headlight flasher
3
Flashing turn indicators
Indicating a turn
Overriding selector lever interlock
Press the lever beyond the pressure point.
Should the selector lever be stuck in position P
despite the button on the selector lever being
pressed, the selector-lever lock can be overridden:
To cancel it manually, press the lever as far as
the pressure point.
If the indicator lamp flashes more rapidly
than usual, a flashing turn indicator bulb
has failed; if towing a trailer, the failed bulb
could be on the trailer.<
62
Online Edition for Part-No. 01 41 0 159 725 © 09/05 BMW AG
Indicating a turn briefly
5
Press and hold the lever as far as the pressure
point for as long as you wish to indicate a turn.
Switching on wipers
Triple turn signal
The lever returns to the home position when
released.
Press the lever as far as the pressure point; the
flashing turn indicator flashes three times.
Normal wiper speed
1. Call up the start menu.
2. Press the controller to call up the menu.
Fast wiper speed
3. Select "Vehicle settings" and press the
controller.
Press twice or press beyond the pressure point.
The wipers switch to normal speed as the car
comes to a halt.
4. Select "Light" and press the controller.
Rain sensor
The speed of the wipers is regulated automatically according to how hard it is raining. The rain
sensor is located on the windscreen, directly in
front of the inside mirror.
Overview
Controls
iDrive concept, see page 14.
Press once.
The wipers switch to intermittent wipe as the
car comes to a halt.
Driving hints
You can activate or deactivate this function.
Adjusting rain sensor sensitivity
5. Select "Triple turn signal activation" and
press the controller.
The triple turn signal function is
switched on.
Wiper system
Press the button, arrow 3. The LED in the button comes on.
Entertainment
Navigation
Activating the rain sensor
Adjusting rain sensor sensitivity
Press the button again, arrow 3. The LED goes
out.
1
Switching on wipers
2
Switching off wipers or flick-wipe
3
Activating/deactivating the rain sensor
4
Cleaning windscreen and headlights
Deactivate the rain sensor in an automatic
car wash, to prevent the car's wipers
being activated inadvertently and damaged.<
63
Online Edition for Part-No. 01 41 0 159 725 © 09/05 BMW AG
Reference
Deactivating the rain sensor
Mobility
Turn the knurled wheel 5.
Driving
Cleaning windscreen and headlights*
Fluid from the washer fluid reservoir is sprayed
on to the windscreen and the wipers are operated briefly.
When the car's lights are switched on, the headlights are cleaned simultaneously at practical
intervals.
Only operate the washer systems and
cleaning equipment if you are certain that
the fluid will not freeze to the windscreen and
interfere with the view ahead. Screenwash
should therefore be added to the fluid, see
Washer fluid. Do not run the washer systems if
the washer fluid reservoir is empty, or the
washer pump will be damaged.<
Washer fluid
Screenwash for the washer fluid is highly
flammable. Keep it away from possible
ignition sources and store it only in the carefully
sealed original containers, out of reach of children. Comply with the instructions on the containers.<
Washer fluid reservoir
Windscreen washer jets
The windscreen washer jets are heated automatically while the engine is running or the ignition switched on.
Touring:
Rear window wiper
When filling with water, to which screenwash
has been added if required, always follow the
manufacturer's instructions.
Mix the water and screenwash additive
before filling the washer fluid reservoir, to
make sure the correct concentration is maintained.<
Capacity
Saloon:
Approx. 3 litres, approx. 5 pints, with headlamp
cleaning system* approx. 5 litres, approx.
9 pints.
1
Intermittent operation. It operates continuously when reverse gear is engaged
2
Rear window washer
Do not run the washer systems if the
washer fluid reservoir is empty, or the
washer pump will be damaged.<
Touring: approx. 5 litres, approx. 9 pints.
Cruise control*
Principle
You can activate cruise control once you reach
a speed of approx. 30 km/h or 20 mph. The car
then memorises and maintains the speed that
you specify using the lever on the steering column.
Do not use cruise control if adverse conditions prevent driving at constant speed,
e.g. winding roads, heavy traffic or poor surface
conditions such as snow, rain, ice or loose
64
Online Edition for Part-No. 01 41 0 159 725 © 09/05 BMW AG
Maintaining and memorising speed,
decelerating
One lever for all functions
Pull the lever, arrow 2:
Functions as 1, except that the car's speed is
reduced instead.
Overview
material. Otherwise you could lose control of
the car and cause an accident as a result.<
Interrupting cruise control
In addition, you interrupt the cruise control
function automatically:
> When braking
Interrupting cruise control
4
Recalling a speed
Maintaining and memorising speed,
accelerating
Press the lever as far as the pressure point,
arrow 1:
The car's current speed is maintained and
memorised. Display 1 in the speedometer
shows this controlled speed, see further below.
Each time the lever is pressed, the speed
increases by approx. 1 km/h or 1 mph.
Recalling a speed
Press button 4:
The memorised speed is recalled and maintained.
Deactivating the system
Whenever the ignition is switched off, the system is deactivated and the speed stored in the
memory is deleted.
Displays in the instrument cluster
Press the lever as far as the pressure point and
hold it there:
The car accelerates without the accelerator
pedal being pressed. As soon as you release
the lever, the speed the car has reached will be
maintained and memorised.
Press the lever beyond the pressure point:
Increase speed by 10 km/h or 5 mph.
If engine braking alone is insufficient on a downhill gradient, the set speed may be exceeded. It
may also prove impossible to maintain speed
with the available engine power on uphill gradients.
Driving hints
3
> When DSC has cut in
Navigation
Maintaining and memorising speed, decelerating
Entertainment
2
> When you operate the clutch or engage
automatic transmission/SMG position N
1
Memorised speed
2
Selected speed is displayed briefly
65
Online Edition for Part-No. 01 41 0 159 725 © 09/05 BMW AG
Mobility
Maintaining and memorising speed, accelerating
Reference
1
Controls
Press the lever upwards or downwards,
arrow 3.
Driving
Active Cruise Control*
Principle
Active Cruise Control enables you to select a
speed which the car will then maintain automatically, assuming your progress is not
obstructed.
Manual gearbox
You can shift gears while cruise control is activated. A shift notice is issued or the system is
deactivated when you drive for an extended
period at very high or very low engine speeds.
SMG
Subject to reasonable limits, the system automatically adjusts the speed of your car if you
come up behind a slower vehicle. You can vary
the distance to be maintained from the vehicle
in front. For safety reasons, this distance
depends on the speeds in question. To maintain sufficient distance, the system automatically closes down the throttle, applies the
brakes if necessary, and speeds up again if the
vehicle in front accelerates. As soon as the road
ahead becomes clear, it accelerates to your
desired speed again. The desired speed is also
maintained on downhill gradients.
In the Sequential mode, an instruction to shift
gear is issued or the system is deactivated if
you drive for an extended period at very high or
very low engine speeds.
Read and carefully comply with the information
on the system's limits starting on page 69 so
that you can understand the system's range of
applications and use the system appropriately.
Ideally, minimum speeds should not undershoot 30 km/h or 20 mph and maximum speeds
not exceed 180 km/h or 110 mph.
Professional navigation system*
If there is a navigation DVD in the drive, see
page 132, the system will adapt the way the car
is accelerated and slowed down to the road you
are currently driving along.
If the car's position is not known, e.g. because
you have left the area covered by the map, the
navigation system will cease to have an influence.
Braking sensation
The system's automatic brake operation results
in a braking sensation that is slightly different
from what you feel when you brake the car yourself in a similar situation. Unaccustomed noises
when the car is braked automatically are normal.
In the Drive mode, the SMG behaves in a similar
way to an automatic transmission in position D.
When to use it
The optimum road speed range on main roads
and motorways in good condition is approx.
80 to 140 km/h, approx. 50 to 85 mph. Make
sure that you observe the relevant maximum
legal speed limit.
Active Cruise Control does not release
you from your personal responsibility to
drive safely.
Consider road-surface, weather and visibility
conditions to decide whether and how the system should be used.
Use the system only when traffic is flowing
smoothly and not on roads with loose surfaces
or sharp bends, nor when there is road ice, fog,
snow or heavy rain.
Check the speed you are driving at as well as
your stopping distance, and remain in a position
to apply the brakes at all times. Otherwise operating conditions which violate the law or constitute an accident risk could result.<
66
Online Edition for Part-No. 01 41 0 159 725 © 09/05 BMW AG
2
Memorising and reducing the desired
speed
3
Deactivating the system, see page 68
4
Calling up memorised speed and distance,
see page 68
5
Selecting distance from vehicle in front, see
page 67
Maintaining current speed
Tap the lever, arrow 1, or pull briefly, arrow 2.
> Every time you press the lever beyond the
pressure point, the desired speed increases
to the next value of ten on the km/h or mph
speedo display.
The speed that is then shown is memorised and
will be achieved on a clear road.
Stepless increase
Briefly press the lever repeatedly up to or
beyond the pressure point, arrow 1, until the
desired speed is reached.
The speed that is then shown is memorised and
will be achieved on a clear road.
Decreasing
Pull the lever repeatedly, arrow 2, until the
desired speed appears on the display.
Functions analogous to stepwise/stepless
increase, except that the speed is decreased.
Selecting distance
The car's current speed is memorised and
maintained. It is displayed on the speedometer
and appears briefly on the instrument cluster.
The controlled speed may be undershot when
driving uphill if there is insufficient engine
power. If the engine braking effect is insufficient
on steep slopes, the system will apply the
brakes lightly.
Setting the desired speed
Adapt your desired speed to the traffic
conditions and remain ready to apply the
brakes at all times, or there is a risk of accidents.
The system is not able to compensate marked
> Knurled wheel turned downwards:
To increase the distance.
> Knurled wheel turned upwards:
To reduce the distance.
67
Online Edition for Part-No. 01 41 0 159 725 © 09/05 BMW AG
Overview
Controls
Memorising and increasing the desired
speed
Driving hints
1
> Every time you press the lever as far as the
pressure point, the desired speed increases
by approx. 1 km/h or 1 mph.
Navigation
Briefly press the lever repeatedly up to or
beyond the pressure point, arrow 1, until the
desired speed appears on the display.
Entertainment
Stepwise increase
Mobility
differences in speed in relation to vehicles travelling in front, e.g. if you get too close to a lorry
or if another vehicle swerves into your lane.<
Reference
One lever for all functions
Driving
The selected distance is displayed in the instrument cluster.
Distance 1
> When DSC is intervening or deactivated
> When the system does not detect any
objects for a lengthy period of time, e.g. on
infrequently driven roads without defined
boundaries or due to a dirty wheel sensor,
see page 69
> When your road speed is less than 30 km/h
or 20 mph due to a traffic situation
Distance 2
Distance 3
When you switch on the system
for the first time after starting the
engine, this distance is preset.
This corresponds to approx. half
the numerical value on the km/h or
mph speedo display.
Distance 4
When the system is deactivated, you
must brake the car yourself and/or
manoeuvre as necessary, otherwise there is a
risk of an accident.<
Recalling the memorised desired
speed and distance level
Press button 4.
The displays appear in the instrument cluster.
The memorised speed is deleted when the ignition is switched off.
Displays in the instrument cluster
Adapt the distance chosen from the vehicle in front to the traffic and weather conditions, otherwise you may risk committing a
traffic offence or causing an accident.<
Deactivating the system
1
Memorised desired speed
2
Lights up yellow: vehicle detected ahead
Flashes red, a signal sounds: system cannot maintain distance; driver must brake the
car
Press the lever up or down. The displays in the
instrument cluster go out.
The system is also deactivated whenever you
brake, shift gears very slowly, place the transmission in idle or move the gear selector lever to
position N. In addition, the system is automatically deactivated:
Flashes yellow: driving stability control systems are intervening; cruise control is deactivated
3
Selected distance to vehicle ahead
The display lights up as soon as the system
is activated
4
Memorised desired speed is displayed
briefly
> When DTC is activated
68
Online Edition for Part-No. 01 41 0 159 725 © 09/05 BMW AG
Radar sensor
The display 2 flashes red, a signal
sounds.
The system instructs you to intervene by braking and, if necessary,
taking evasive action. Active
Cruise Control is unable to restore the distance
between your car and the vehicle in front automatically.
However, this display does not relieve you of
the responsibility to adapt the desired speed
and driving style to the traffic conditions.
Display 2 flashes yellow.
The prerequisites for operating
Active Cruise Control are not met,
e.g. as a result of ABS or DSC
Controls
Warning lamps
Overview
interventions. The system intervenes by braking until you actively take over.
Heavy rain, dirt, snow and ice may impair the
system's ability to detect preceding vehicles. If
necessary, clean the radar sensor at the front of
the car, beneath the bumper. Take particular
care when removing snow and ice.
If the sensor is not correctly aligned, Active
Cruise Control cannot be activated.
The system does not respond to oncoming
vehicles.
Mobility
The system will not brake the car if you
approach a stationary obstruction on your
side of the road, e.g. a vehicle standing at red
traffic lights or the end of a tailback. You will
need to intervene to avoid the risk of an accident.<
Vehicles pulling out
If a vehicle pulls out in front of you, e.g. after
overtaking, the system will not identify the vehi-
69
Online Edition for Part-No. 01 41 0 159 725 © 09/05 BMW AG
Reference
The range of the wheel sensor and the system's
capacity for braking the car automatically are
limited. It is possible, for example, that twowheelers in front of you will be detected later
than cars.
Entertainment
Navigation
System limits
Driving hints
If --- km/h or --- mph appears briefly on
the instrument cluster, the system may
not be ready for operation. Calling up Check
Control messages, see page 76.<
Driving
cle until it has moved entirely into the same lane
as your car.
If a vehicle ahead suddenly swerves into
your lane, the system may not always be
able to maintain the selected distance automatically. The same applies to high differences
between your speed and that of preceding vehicles, e.g. when rapidly approaching a truck.
Once the system has established that a vehicle
is indeed in front of you, it will indicate that you
must brake and/or manoeuvre the car yourself.
You will need to intervene to avoid the risk of an
accident.<
decelerates in such a situation, the accelerator
can be used briefly to counteract this effect.
When the accelerator is released again, the system will resume control of the car's speed.
Your responsibility
Your actions have priority at all times. When you
press the accelerator pedal while driving with
Active Cruise Control, the automatic braking
function will be temporarily interrupted. When
the accelerator is released, the desired speed is
re-established or the selected distance from
the vehicle in front taken into account.
Do not leave your foot on the accelerator
pedal, and make sure that no objects
such as floor mats are resting on the accelerator
pedal, otherwise the system will not be able to
brake the car.<
Bends in the road
If the desired speed selected is excessive for a
bend, the system will reduce the speed while
the car is taking the bend. However, it is unable
to anticipate how sharp a bend in the road is.
You should therefore select an appropriate
speed before entering a bend.
Due to the wheel sensor's restricted range, the
situation may arise where a preceding vehicle
may not be detected on a bend in the road, or
detected very late.
When your car is approaching a bend, in view of
its curvature the system may respond temporarily to vehicles in the other lane. If your car
70
Online Edition for Part-No. 01 41 0 159 725 © 09/05 BMW AG
Revolution counter
1
Time, outside temperature and date
2
Distance recorder – odometer – and trip distance recorder
3
Press the knob:
Driving hints
Controls
Odometer, outside
temperature display, clock
Overview
Everything under control
Setting the time and date, see page 79.
You can alter the unit of measurement 6 or 7
on the control display, see Units of measurement on page 81.
Outside temperature warning
Once the display shows a temperature of below
+36/377, a signal sounds and a warning
lamp comes on. There is an increased risk of
ice.
Ice can still form even at temperatures
above +36/377. You should therefore
drive carefully over bridges and shaded roads;
otherwise there is an increased risk of accident.<
You must avoid engine speeds in the red warning zone, arrow 2. In this zone the fuel supply is
interrupted to protect the engine.
Coolant temperature
Should the coolant and therefore the engine
become too hot, a warning lamp will come on. In
addition, a message will appear on the control
display.
Checking coolant level, see page 188.
71
Online Edition for Part-No. 01 41 0 159 725 © 09/05 BMW AG
Entertainment
To call up the date:
Press the CHECK button on the flashing turn
indicator lever, see page 77.
Mobility
The outside temperature and time of day are
displayed following radio readiness.
The white striped advance warning zone,
arrow 1, changes depending on the engine
temperature. As the engine temperature
increases, the advance warning zone reduces in
size accordingly. Avoid engine speeds in the
advance warning zone if possible.
Reference
> With the ignition switched off, displaying
time, outside temperature display and
distance recorder for a short time
Navigation
> Reset trip distance recorder with the
ignition switched on
Everything under control
Energy control
Computer
Displays in the instrument cluster
Shows the momentary fuel consumption. This
enables you to check how economical and environmentally friendly your current driving style
is.
To access the information, press the BC button
on the flashing turn indicator lever following
radio readiness.
The following items of information are displayed in the order listed:
Fuel gauge
> Range
> Average speed
> Average fuel consumption
Range
Fuel tank capacity: approx. 70 litres, approx.
15.4 gal. Notes on refuelling, see page 180.
If the car is at an angle for some time, for example on a long mountain road, the value in the display may fluctuate to some extent.
This display indicates how far the car can probably be driven on the fuel remaining in the tank.
The distance is calculated on the basis of the
way the car has been driven over the past
30 km, approx. 20 miles.
If the range is below 50 km, approx.
30 miles, refuel the car, otherwise the
engine's functions are not assured and damage
may occur.<
Average speed
Reserve
Once the fuel level has fallen to the reserve
zone, a message appears on the control display
for a short time and the remaining operating
range is displayed on the computer. If the
remaining range is less than approx. 50 km,
approx. 30 miles, the message is displayed permanently on the control display.
The calculation of average speed ignores any
stationary periods where the engine was
switched off.
To reset the average speed: press the BC button on the flashing turn indicator lever for
approx. 2 seconds.
If the range is below 50 km, approx.
30 miles, refuel the car, otherwise the
engine's functions are not assured and damage
may occur.<
72
Online Edition for Part-No. 01 41 0 159 725 © 09/05 BMW AG
The average fuel consumption is calculated for
the period since the engine was last started.
> Enter a distance manually in the computer, see further below.
You can have the average fuel consumption for
two different distances displayed on the control
display, see Displays on the control display or
Journey computer* further below.
> Enter a destination in the navigation system*, see page 134.
1. Press the
button.
The start menu is called up.
> Enter a destination in the navigation system*, see page 134.
> Average speed
Controls
> Enter a distance manually in the computer, see further below.
> Average fuel consumption
Resetting values
2. Move the controller to the right to call up
"Navigation".
On cars without navigation system*:
Call up "OBC".
You can reset the values for average speed and
average consumption:
3. Select "On-board Info" and press the controller.
2. Press the controller again to confirm your
selection.
1. Select the respective menu item and press
the controller.
Entering distance manually
Entertainment
1. Select "Distance to dest." and press the
controller.
Driving hints
You can also call up the computer via iDrive,
principle see page 14.
> Distance from destination:
Navigation
Displays on the control display
> Range
4. Select "Computer" and press the controller.
2. Turn the controller to set the distance to the
destination. You may need to overcome a
slight resistance if you wish to enter a relatively high difference.
3. Press the controller to adopt the setting.
The distance is automatically preset during
route guidance by the navigation system*.
73
Online Edition for Part-No. 01 41 0 159 725 © 09/05 BMW AG
Mobility
To reset the average consumption: press the
BC button on the flashing turn indicator lever for
approx. 2 seconds.
Overview
> Estimated arrival time:
Reference
Average fuel consumption
Everything under control
Journey computer*
The journey computer is suitable e.g. for a holiday trip.
1. Move the controller to the right to switch to
the assistance window and press the controller.
1. Call up the start menu.
2. Call up "Navigation".
On cars without navigation system*: call up
"OBC".
3. Select "On-board Info" and press the controller.
4. Select "Journey computer" and press the
controller.
2. Select "Computer" or "Journey computer".
3. Press the controller.
> Departure time
> Journey time
> Distance covered
> Average speed
> Average fuel consumption
Service requirements
To start, stop or reset all values in the journey
computer:
1. Select "Set" and press the controller.
2. Select the desired menu item.
3. Press the controller.
Display options
You can have the computer or the journey computer displayed in the assistance window.
The distance remaining to the next service and
its date are displayed briefly when the ignition is
switched on.
The extent of service work required can
be read out from the remote control by
your BMW Service Advisor.<
74
Online Edition for Part-No. 01 41 0 159 725 © 09/05 BMW AG
2. Press the controller to call up the menu.
3. Select "Service" and press the controller.
4. Select "Service requirements" and press
the controller.
Servicing or an inspection required by law
is due soon. Please arrange a Service
appointment.
Servicing is overdue.
Entering dates of statutory emissions
tests and vehicle inspections*
Make sure that the date on the control display is
always set correctly, see page 80, otherwise
the Condition Based Service CBS cannot function correctly.
1. Call up the start menu.
2. Press the controller to call up the menu.
3. Select "Service" and press the controller.
5. Select "Status" and press the controller.
4. Select "Service requirements" and press
the controller.
Controls
1. Call up the start menu.
No servicing is currently needed.
Overview
Symbols
You can have further information on the scope
of maintenance displayed on the control display, see page 14.
Driving hints
Further information
A list of selected maintenance routines and
inspections required by law is displayed.
You can call up more information on each entry:
Select the entry and press the controller.
7. Select "Schedule date for service" and
press the controller. The month is selected.
Entertainment
6. Select "Stat. exhaust. insp." or "Stat. vehicle insp." and press the controller.
Navigation
5. Select "Status" and press the controller.
To exit the menu:
Select the
arrow and press the controller.
75
Online Edition for Part-No. 01 41 0 159 725 © 09/05 BMW AG
Reference
Mobility
8. Turn the controller to make the adjustment.
Everything under control
9. Press the controller to adopt the setting.
The year is selected.
10. Turn the controller to make the adjustment.
11. Press the controller to adopt the setting.
The date input is memorised.
after a short time. The warning lamp signals and
text messages are memorised and can be
called up again subsequently, see also page 77.
Explanatory text messages
To exit the menu:
Select the
arrow and press the controller.
Check Control
Principle
The Check Control monitors car functions and
alerts you to any faults in the systems monitored. The system alerts you by means of indicator or warning lamps in the instrument cluster, possibly accompanied by an acoustic
signal, and text messages at the bottom of the
control display.
Text messages appearing at the lower edge of
the control display explain the meaning of the
indicator and warning lamps that have come on.
Indicator and warning lamps
You can subsequently call up additional information for most Check Control messages, e.g.
the cause of a malfunction and what action is
required on your part, see below.
Indicator and warning lamps may light up in a
variety of colours and combinations both in the
panel 1 and in the display 2.
If action is required as a matter of urgency, this
information is flashed up as soon as the accompanying lamp comes on.
Exit the displayed information:
Select the
arrow and press the controller.
Order of importance of Check Control
messages
means that a Check Control message has
been issued. The symbol remains visible even if
the Check Control message disappears again
Important Check Control messages remain
until the faults in question have been rectified.
These messages cannot be deleted. If several
faults occur at the same time, they are displayed in succession.
Less important messages disappear after
approx. 20 seconds, but they remain memorised.
76
Online Edition for Part-No. 01 41 0 159 725 © 09/05 BMW AG
Displaying the urgency of malfunctions
Entertainment
2. Press the button:
Every time you press the button, another
message is displayed.
Displaying further information
subsequently
iDrive concept, see page 14.
1. Press the
button.
The start menu is called up.
2. Press the controller to call up the menu.
3. Select "Service" and press the controller.
Overview
Driving hints
To exit the display:
Select the
arrow and press the controller.
Navigation
1. Press and hold down the button:
The first message stored is displayed.
Depending on the equipment specification, the
following symbols are displayed alongside the
Check Control messages in the memory:
There are no malfunctions in the systems
monitored.
There are malfunctions in the systems
monitored. Supplementary information is
given on the control display for certain
malfunctions.
77
Online Edition for Part-No. 01 41 0 159 725 © 09/05 BMW AG
Mobility
Displaying memorised Check Control
messages
5. Select a text message and press the controller.
Reference
To hide these Check Control messages:
Press the CHECK button on the flashing turn
indicator lever.
Controls
4. Select "Check Control messages" and
press the controller.
Everything under control
The symbols also show the service requirements status, see page 74.
Messages displayed at end of a journey
Malfunctions which have been indicated during
a journey are displayed again when you switch
off the ignition.
You can call up the messages again provided
the display has not yet gone out. Press CHECK
button for approx. 2 seconds. If there are several messages, press the CHECK button as
many times as necessary.
5. Select the speed and press the controller.
6. Turn the controller to adjust the limit. You
may need to overcome a slight resistance if
you wish to enter a relatively high difference.
7. Press the controller to adopt the setting.
The limit is automatically switched on.
Memorising actual speed as limit value
Select "Accept current speed" and press the
controller. The actual speed is memorised as
the limit value.
The display goes out
> Automatically after a short time
Activating limit
> If you press the CHECK button again for
approx. 2 seconds
Select "On" and press the controller.
The limit is automatically switched on.
Speed limit*
Stopwatch*
You can enter a speed at which you are to be
alerted by means of a Check Control message.
You can use this feature e.g. to ensure that you
do not exceed the speed limit in a built-up area.
A renewed reminder of this speed limit will not
be given unless you have undercut it by at least
5 km/h, approx. 3 mph, in the meantime.
Displaying, setting or altering limit
iDrive concept, see page 14.
iDrive concept, see page 14.
1. Call up the start menu.
2. Call up "Navigation".
On cars without navigation system*: call up
"OBC".
3. Select "On-board Info" and press the controller.
4. Select "Stopwatch" and press the controller.
1. Call up the start menu.
2. Call up "Navigation".
On cars without navigation system*: call up
"OBC".
3. Select "On-board Info" and press the controller.
4. Select "Limit" and press the controller.
Starting, stopping or resetting
> Select "Start" and press the controller. The
stopwatch starts at the time displayed.
> Select "Reset" and press the controller.
The stopwatch is reset and starts again if it
was running previously.
78
Online Edition for Part-No. 01 41 0 159 725 © 09/05 BMW AG
Taking an intermediate time reading
Select "Interm. time" and press the controller.
The intermediate reading is displayed below
the current time display.
Setting time
Settings on the control
display
iDrive concept, see page 14.
1. You may need to move the controller forward once to switch to the first field from
the top.
1. Press the
button once or twice until
the start menu is displayed.
2. Turn the controller until "Clock" is selected
and press the controller.
79
Online Edition for Part-No. 01 41 0 159 725 © 09/05 BMW AG
Reference
Mobility
Entertainment
2. Press the controller to call up the menu.
Driving hints
Controls
You can also call up other functions at any
time while the stopwatch is running. The
stopwatch continues to run in the background.<
Overview
3. Turn the controller until "Display settings"
is selected and press the controller.
Navigation
> Select "Stop" and press the controller.
Timekeeping is stopped.
Everything under control
3. Turn the controller until "Set time" is
selected and press the controller.
2. Select "Set date" and press the controller.
The first part of the date setting is selected,
in this example the day.
3. Turn the controller to make the adjustment.
4. Press the controller to adopt the setting.
The next part of the time setting is selected.
5. Complete the setting. Once the setting has
been completed, the date is memorised.
Altering the date format
Adjusting settings
1. Select "Date format" and press the controller.
1. Turn the controller to set the hour and press
the controller.
2. Select the desired format and press the
controller.
2. Turn the controller to set the minutes and
press the controller.
The setting is saved for the remote control currently in use.
The system accepts the new time.
Switching on hour signal*
Shortly before the hour, three signal tones will
be emitted.
Select "Hour memo" and press the controller.
The hour signal is switched on.
Brightness of the control display
The brightness is automatically adjusted to
ambient light conditions. However, you can
adjust the basic setting.
1. Select "Brightness" and press the controller.
Setting the time format
1. Select "Time format" and press the controller.
2. Select the desired format and press the
controller.
The setting is saved for the remote control currently in use.
Setting date
1. Select "Date" and press the controller.
2. Move the controller to the right if necessary,
to call up "Display Offset".
3. Turn the controller until the desired setting
is obtained.
The setting is saved for the remote control currently in use.
80
Online Edition for Part-No. 01 41 0 159 725 © 09/05 BMW AG
Units of measurement
Overview
You can alter the units of measurement for fuel
consumption, distance, temperature and pressure.
Controls
1. Select "Units" and press the controller.
Driving hints
2. Select the desired menu item and press the
controller.
3. Select the desired unit of measurement and
press the controller.
The settings are saved for the remote control
currently in use.
Navigation
Language of the control display
Entertainment
1. Select "Languages" and press the controller.
2. Select "Text language" and press the controller. You can alter the language of the display texts.
The setting is saved for the remote control currently in use.
81
Online Edition for Part-No. 01 41 0 159 725 © 09/05 BMW AG
Reference
Mobility
3. Select the desired language and press the
controller.
Technical features for driving comfort and safety
Technical features for driving comfort and
safety
Park Distance Control PDC*
Switching on manually
Principle
PDC assists you when manoeuvring into
a parking space. Audible signals and a visual
display* indicate that you are approaching an
object in front of or behind your car. Four ultrasonic sensors in each bumper measure the distance from it. The sensors cover a range of
approx. 2 m or 7 ft. An acoustic warning does
not sound, however, until an object is approx.
60 cm or 2 ft or closer to the front sensors or
rear corner sensors, and approx. 1.5 m or 5 ft or
closer to the rear centre sensors.
PDC is a parking aid which is capable of
registering objects approached at low
speed, as is usually the case when the car is
being parked. Avoid approaching an object rapidly, otherwise the system may be unable to
alert you in sufficient time in view of the physical
principles involved.<
If the car is towing a trailer, the rear sensors will
be unable to supply meaningful signals. They
therefore do not come on.
Automatic activation
With the engine running or the ignition switched
on, the system is activated automatically after
approx. 1 second when you engage reverse
gear or move the selector lever to position R.
Wait briefly before starting to drive, to allow the
system to become active.
Press the button, the LED comes on.
Switching off manually
Press the button again; the LED goes out.
Once you have driven approx. 50 m, approx.
165 ft, or travelled at a speed of more than
approx. 30 km/h, approx. 20 mph, the system is
deactivated and the LED goes out. Switch the
system on again manually as necessary.
Audible warning signals
The fact that you are approaching an object is
indicated by an intermittent warning signal for
the part of the car in question. For instance, if an
object is identified to the rear left of the car, the
warning signal sounds at the rear left loudspeaker. The closer the car approaches the
obstruction, the more rapid the sequence of
signals. When the distance from a detected
object is less than approx. 30 cm, approx. 1 ft,
the signal becomes continuous.
An intermittent tone is interrupted after approx.
3 seconds:
> If you remain in front of an object that was
detected by only one of the corner sensors
> If you are driving parallel to a wall
82
Online Edition for Part-No. 01 41 0 159 725 © 09/05 BMW AG
iDrive concept, see page 14.
1. Call up the start menu.
2. Press the controller to call up the menu.
3. Select "Vehicle settings" and press the
controller.
4. Select "PDC" and press the controller.
Driving stability control
systems
Your BMW has a number of systems that help
to maintain the car's stability even in adverse
driving conditions.
Anti-lock Brake System ABS
ABS prevents the wheels locking when the
brakes are applied. The car can consequently
still be steered even when the brakes are
applied hard. This increases active driving
safety.
ABS is ready to operate each time the engine is
started. Safe braking see page 124.
Cornering Brake Control CBC
5. Select "Monitor on" and press the controller.
The PDC image is switched on.
When the brakes are applied while cornering
when changing lanes, the car's stability and
steering characteristics are further enhanced.
The display is shown on the control display as
soon as PDC is activated.
Electronic Brake Force Distribution
The setting is saved for the remote control currently in use.
The system regulates the braking pressure on
the rear wheels in order to stabilise the braking
behaviour.
83
Online Edition for Part-No. 01 41 0 159 725 © 09/05 BMW AG
Overview
Controls
You can have the fact that you are approaching
an object indicated on the control display.
Objects that are further away from the car will
appear on the control display before an audible
warning signal is given.
Driving hints
PDC with optical warning*
Navigation
As a precautionary measure, keep the sensors
clean and free from ice, so that they always
operate reliably. Do not spray for any length of
time with high-pressure cleaning equipment,
and keep cleaning jets at least 10 cm, approx.
4 in, away from the sensors.
Entertainment
PDC is no substitute for your personal
assessment of obstructions. The sensors
have certain dead areas in which objects cannot
always be detected. In addition, the identification of objects may not be possible if the physical limits of the ultrasonic measuring principle
are exceeded, for instance with trailer noses
and hitches, and thin or wedge-shaped objects.
Low objects already indicated, such as a kerb,
may enter the sensors' dead areas before a
continuous audible signal is given. Higher, protruding objects, such as ledges, may not be
detectable. Loud sound sources outside or
inside the car can drown out the PDC signal.<
Mobility
System limits
The LED in the button flashes and a message
appears on the control display. PDC has failed.
Have the system checked.
Reference
Malfunction
Technical features for driving comfort and safety
Dynamic Brake Control DBC
If the brake is pressed down rapidly, this system
automatically boosts the braking force to a
maximum and thus helps to keep the braking
distance as short as possible when a full brake
application is made. It also makes full use of the
advantages offered by ABS.
Maintain pressure on the brake during the
entire brake application. If the brake is released,
DBC will be switched off.
Dynamic Stability Control DSC
DSC prevents the driving wheels losing traction
when you pull away from rest or accelerate.
DSC also recognises unstable driving conditions, for example if the rear of the car is about
to swerve or if momentum is acting at an angle
past the front wheels. In such instances, DSC
helps to keep the car on a stable course, subject
to the limits imposed by the basic laws of
dynamics, by reducing the engine output and
applying the brakes to individual wheels.
DSC is ready to operate each time the engine is
started.
Not even DSC can overcome the laws of
physics. It is therefore the driver's
responsibility to adopt a suitable driving style in
every situation. Do not undermine the additional safety afforded by this system by taking
driving risks.<
enhancing intervention will now take place.
Intervention by the active steering*, which promotes stability, is likewise deactivated, see
page 88.
A message appears on the control display:
Please also observe the supplementary information given there.
In the interests of dynamic stability, activate
DSC again as soon as possible.
Activating DSC
Press the button; the indicator lamp in the
instrument cluster goes out.
Indicator lamps
If the indicator lamp is flashing:
DSC is regulating the propulsive and
braking forces.
If the indicator lamp is on:
DSC is deactivated.
Dynamic Traction Control DTC
DTC is a version of DSC that has been tractionoptimised for particular operating conditions,
e.g. driving on roads where the snow has not
been cleared. The system assures maximum
traction, but with reduced dynamic stability.
You should therefore drive with caution.
In the following exceptional situations it may be
best to activate DTC for a short time:
> When driving uphill on snow-covered roads,
in slush or on unploughed, snow-covered
roads
Deactivating DSC
> For rocking the car out of a hollow or starting in deep snow or on a loose surface
> When driving with snow chains*
Hold the button pressed until the DSC indicator
lamp in the instrument cluster remains on permanently, but for no longer than approx.10 seconds. Both Dynamic Traction Control DTC and
DSC are deactivated. No stabilising or traction84
Online Edition for Part-No. 01 41 0 159 725 © 09/05 BMW AG
Activating HDC
You can activate HDC:
> With the programmable buttons on the
steering wheel, see page 51
Press the button again; the DTC indicator lamp
in the instrument cluster goes out.
> Via iDrive
iDrive concept, see page 14.
1. Call up the start menu.
If the indicator lamp is flashing:
DTC is regulating the propulsive and
braking forces.
If the indicator lamp is on:
DTC is activated.
2. Press the controller to call up the menu.
3. Select "Vehicle settings" and press the
controller.
xDrive 525xi, 530xi, 530xd
xDrive is the four-wheel-drive system of your
BMW. The combined effect of xDrive and DSC
further optimises traction and driving dynamics.
The four-wheel-drive system xDrive distributes
the torque flow variably to the front and rear
wheels in accordance with the driving situation
and the condition of the road surface.
Hill Descent Control HDC 525xi, 530xi,
530xd
Principle
HDC reduces the car's speed when driving
down steep inclines and thus makes your BMW
even easier to control in such conditions. The
car will then move at about twice walking pace,
without your having to regulate its speed.
HDC can be activated at speeds of less than
approx. 35 km/h, approx. 22 mph. When the car
starts to travel downhill, its speed of below
Overview
4. Select "HDC" and press the controller.
Navigation
Indicator lamps
5. Select "HDC on" and press the controller.
The HDC display in the instrument cluster
appears.
Entertainment
Deactivating DTC
If the car is braked automatically, a message
appears on the control display for about 20 seconds.
Deactivating HDC
With the programmable buttons in the steering
wheel or via iDrive; the HDC display goes out.
At above approx. 60 km/h, approx. 37 mph,
HDC is deactivated immediately, and about
10 seconds after the ignition has been switched
off.
85
Online Edition for Part-No. 01 41 0 159 725 © 09/05 BMW AG
Mobility
Press the button; the DTC indicator lamp in the
instrument cluster comes on.
Controls
You can alter this speed within the range of
about 5 km/h and 25 km/h, approx. 3 mph and
16 mph, by accelerating or braking.
You can specify a target speed within the same
range by using the cruise control lever.
Driving hints
approx. 35 km/h, approx. 22 mph, is automatically reduced to about twice walking pace,
approx. 12 km/h, approx. 7 mph, and this speed
is then maintained.
Reference
Activating DTC
Technical features for driving comfort and safety
Using HDC
Malfunction
Manual transmission:
Use HDC in low gears and when reversing.
The warning lamp lights up and a message appears on the control display:
the system is faulty. Have the system
checked as soon as possible.
Automatic transmission:
HDC can be used in any transmission speed.
Displays in the instrument cluster
1
Display of target speed
2
HDC display
Malfunction
If the HDC display goes out while HDC is in
operation or does not come on:
HDC is temporarily unavailable due to the high
temperature of the brakes.
Dynamic Drive*
Principle
Dynamic Drive minimises side tilt of your car
and optimises dynamic stability when cornering
or taking evasive action.
Dynamic Drive is based on active stabilisers on
the front and rear axles. Depending on the driving situation, the suspension response is sporty
when cornering and relaxed when driving
straight ahead. The system constantly acts
within a fraction of a second while the car is on
the move.
The system is ready to operate each time the
engine is started.
If there is a malfunction, reduce your
speed accordingly, particularly on bends.
The car will lean over further when cornering
and under the influence of cross-winds, and the
suspension response will be noticeably softer
when cornering.
If a message instructing you to stop the car
appears on the control display, pull over as soon
as possible and switch off the engine. In this
instance, the oil level in the reservoir may have
fallen below the minimum level, possibly due to
a leak in the hydraulic system.
Do not drive the car any further; contact BMW
Service instead.<
Touring: self-levelling
suspension
Malfunction
If the warning lamp for self-levelling
suspension lights up yellow and a message appears on the control display:
the self-levelling suspension is faulty. Stop the
car and check it. If the body is distinctly lower at
the back than at the front, and possibly standing
at an angle, for instance lower at the left than at
the right, take the car to the nearest BMW Service or to a workshop that operates to BMW
specifications and has suitably trained personnel. Drive cautiously while the car is in this condition. The car's ground clearance is reduced
and its ride comfort below the usual standard.
Even if the car's suspension level is normal, take
it to the nearest BMW Service or to a workshop
that operates to BMW specifications and has
suitably trained personnel if a fault is indicated.
86
Online Edition for Part-No. 01 41 0 159 725 © 09/05 BMW AG
If a tyre loses pressure its rolling radius
changes, and this in turn alters the speed of
rotation. This change is detected and reported
as tyre failure.
Operating requirements
To ensure that tyre failure can be reported reliably, the system must have been initialised
while the tyre pressures are correct.
1. Press the
button.
The start menu is called up.
2. Press the controller to call up the menu.
3. Select "Vehicle settings" and press the
controller.
4. Select "RPA" and press the controller.
The system has to be reinitialised every
time tyre pressures are corrected, after
each change of a wheel or tyre, and after a trailer
has been attached or detached.<
System limits
5. Start the engine but do not drive off yet.
6. Select "Set tyre pressure" and press the
controller.
7. Select "Yes" and press the controller.
Entertainment
The Run Flat Indicator is unable to warn
the driver of sudden, severe tyre damage
caused by external factors, nor can it identify
the gradual loss of pressure that will inevitably
occur in all four tyres over a lengthy period of
time.<
Overview
iDrive concept, see page 14.
Controls
The Run Flat Indicator monitors the pressures
in the four tyres fitted to the wheels while the
car is being driven. The system reports any significant loss of pressure in one tyre in relation to
another.
Initialising is completed by driving the car;
this process can be interrupted at any
time. Initialising resumes automatically when
you continue your journey. Do not initialise the
system while driving with snow chains* or a
compact wheel* fitted to the car.<
Driving hints
Principle
Initialising the system
Navigation
Run Flat Indicator RPA
In the following situations, the system could be
slow to respond or operate incorrectly:
> If the system has not been initialised
> When driving on snow-covered or slippery
surfaces
The Run Flat Indicator is unable to function if
the compact wheel* is fitted.
8. Drive off.
The message "Initialising..." is displayed.
Initialising is completed during the journey. The
control display then shows "Status: RPA
active" again.
87
Online Edition for Part-No. 01 41 0 159 725 © 09/05 BMW AG
Reference
> When driving with snow chains*
Mobility
> When driving with an enthusiastic style,
causing the driven wheels to spin, high lateral acceleration
Technical features for driving comfort and safety
Indication of a flat tyre
The warning lamp shows red. A message appears on the control display. An
acoustic signal also sounds. There is a
flat tyre or substantial loss of tyre pressure.
1. Reduce your speed and stop the car carefully. Avoid violent or sudden braking and
steering manoeuvres.
2. Identify the damaged wheel.
If you are unable to identify where the
problem lies, contact BMW Service.<
3. Change the wheel with the damaged tyre,
see Changing a wheel, page 196.
Run-flat tyres*
1. Carefully reduce your speed to no more
than 80 km/h, approx. 50 mph. Avoid violent
or sudden braking and steering manoeuvres. Do not exceed a speed of 80 km/h,
approx. 50 mph, after this.
If the car is not fitted with run-flat
tyres, see page 183, do not continue
your journey, as driving on a flat tyre could
result in a serious accident.<
2. Check the pressure in all four tyres at the
next opportunity.
If all four tyres are inflated to the correct pressures, the Run Flat Indicator
might not have been initialised. Initialise the
system.<
3. If a tyre is completely deflated, you can estimate how far you will be able to drive using
the following guidelines:
> With low loads:
1 to 2 persons, without luggage:
approx. 250 km, approx. 155 miles
> With moderate loads:
2 persons, luggage compartment or load
area full, or 4 persons without luggage:
approx. 150 km, approx. 90 miles
> With full load:
4 persons or more, luggage compartment or load area full:
approx. 50 km, approx. 30 miles
Drive with caution and do not exceed
80 km/h, approx. 50 mph. If there is a loss
of tyre pressure, the car's handling properties
will change. These include reduced track stability during braking, longer braking distances and
altered self-steering properties.
If unusual vibration or loud noises occur during
the journey, this may be an indication that the
damaged tyre has finally failed. Reduce your
speed and pull over to a suitable location as
soon as possible. Otherwise, parts of the tyre
could come loose, which could result in an accident. Do not drive the car any further; contact
BMW Service instead.<
Active steering*
Principle
Active steering is a system which actively varies
the steering lock of the front wheels in relation
to steering wheel movements.
At low speeds, e.g. in built-up areas or when
parking, the steering lock is accentuated, i.e.
the steering response becomes very direct. At
higher speeds, on the other hand, the steering
lock is gradually reduced. This improves the
handling of your BMW across the entire speed
range.
In critical situations, the system can specifically
correct the angle through which the driver has
turned the wheels, and thus to stabilise the car
before the driver starts to take corrective action.
This stability-enhancing action is deactivated
when DSC is shut down, see page 84.
Malfunction
The warning lamp lights up and a message appears on the control display:
the active steering is faulty and deactivated. At low speeds, more pronounced movement of the steering wheel is required, whereas
the car will respond more sensitively to steering
wheel movements at higher speeds. The stabilising intervention may also be deactivated.
Drive cautiously and think well ahead. Have the
system checked.
88
Online Edition for Part-No. 01 41 0 159 725 © 09/05 BMW AG
Controls
Overview
Two-stage brake lights*
Picture on the left: normal braking.
89
Online Edition for Part-No. 01 41 0 159 725 © 09/05 BMW AG
Reference
Mobility
Entertainment
Navigation
Driving hints
Picture on the right: strong braking when rear
fog lights* are not switched on.
Technical features for driving comfort and safety
Airbags
There are the following airbags beneath the
covers indicated:
1
Front airbags
2
Head-level airbag
3
Side airbags at front and rear*
Protective effect
Comply with the notes on page 42, or
there may be a risk to your personal
safety.<
The front airbags protect the driver and front
passenger in the event of a head-on collision, if
the protective action of the seat belts alone
would be insufficient. The head-level and side
airbags provide protection in the event of a
side-on collision. The side airbag has the effect
of supporting the upper body from the side. The
head-level airbag supports the head of the
seat's occupant.
The airbags will purposely not be activated by
every collision, e.g. in more minor accidents,
certain roll-over situations and rear-end collisions.
Never attach any material to the airbag
covers with adhesive, place material over
them or modify them in any way. Do not dismantle the airbag occupant restraint system.
Do not modify the individual components of the
system or its wiring in any way. This includes
the upholstered covers on the steering wheel,
instrument panel, doors and roof posts as well
as the sides of the roof lining. Do not remove the
steering wheel. Avoid touching the system's
components immediately after it has been triggered off, as there is a risk of sustaining burns. If
the airbag occupant restraint system develops
a fault, is shut down out of use or has been activated, have it checked, repaired or dismantled
and the airbag generators scrapped only by
BMW Service or by a workshop that operates to
BMW specifications and has suitably trained
personnel and the necessary permits for handling explosive devices. Any careless or
unskilled interference with the system could
lead to its failure or to accidental triggering off
with the risk of injury.<
Operational status of airbag system
Following radio readiness, see page 56, the
warning lamp comes on for a short time to indicate that the entire airbag system and the belt
tensioners are operational.
Airbag system faulty
> Warning lamp does not come on following
radio readiness.
> Warning lamp remains permanently on.
In the event of a fault in the airbag system,
have it checked without delay, as there is
otherwise the risk that the system will not function as intended even if a sufficiently severe
accident occurs.<
90
Online Edition for Part-No. 01 41 0 159 725 © 09/05 BMW AG
Selecting displays
Principle
1. Press the
button.
The start menu is called up.
iDrive concept, see page 14.
2. Press the controller to call up the menu.
3. Select "Display settings" and press the
controller.
4. Select "Head-Up Display settings" and
press the controller.
The settings are saved for the remote control
currently in use.
Switching on/off
Adjusting brightness
With the engine running or ignition switched on:
The brightness of the display is automatically
adjusted according to ambient light conditions.
However, you can adjust the basic setting.
When the low-beam headlights are switched
on, the brightness can also be adjusted using
the knurled wheel for the instrument lighting.
To switch on or off, press the button.
Entertainment
6. Press the controller.
The information is shown on the HeadUp Display.
Navigation
Driving hints
5. Select the desired information for the HeadUp Display.
Controls
The Head-Up Display projects important information into the driver's field of view, e.g. navigation instructions. This enables you to register
this information without having to divert your
eyes from the road.
Overview
Head-Up Display*
iDrive concept, see page 14.
1. Call up the start menu.
3. Select "Display settings" and press the
controller.
1
Navigation instructions
2
Display
Mobility
2. Press the controller to call up the menu.
> Active Cruise Control
3
Speed
91
Online Edition for Part-No. 01 41 0 159 725 © 09/05 BMW AG
Reference
> Cruise control
Technical features for driving comfort and safety
4. Select "Brightness" and press the controller.
5. Move the controller to the left if necessary,
to call up "Head-Up Display Offset".
6. Turn the controller until the desired setting
is obtained.
The setting is saved for the remote control currently in use.
Care notes
For useful information on this subject, see the
booklet Looking after your car.
To avoid damage when cleaning the
Head-Up Display's cover, use only a soft,
non-scratching cloth or a cleaning cloth for display screens.<
Notes
The visibility of information in the Head-Up Display is influenced by:
> Sunglasses with certain polarisation filters
> Certain seated positions
> Objects resting on the Head-Up Display's
cover
> Wet roads and poor light conditions
If the image is shown distorted, have the basic
settings checked.
Special windscreen
The windscreen constitutes part of the system.
The windscreen is shaped in a way that satisfies
the requirements of the Head-Up Display and
permits the projection of precise images. A film
in the windscreen prevents double images
occurring.
Always have a windscreen replaced only either
by BMW Service or by a workshop that operates to BMW specifications and has suitably
trained personnel.
92
Online Edition for Part-No. 01 41 0 159 725 © 09/05 BMW AG
Side lights/Low-beam
headlights
1. Press the
button.
The start menu is called up.
Overview
Lights
2. Press the controller to call up the menu.
Low-beam headlights and daytime driving
lights
Side lights
5. Select "Home lights" and press the controller.
6. Turn the controller to set the appropriate
duration.
When the switch is in position 2 the lights are on
all round the car. You can use the side lights for
parking. There is the additional option of
switching on the lights on the side nearest the
road when parked, see page 95.
7. Press the controller to adopt the setting.
The side lights will discharge the battery.
Do not leave them switched on for too
long, otherwise the engine may fail to start.<
If necessary, switch on the side lights as
described under Side lights.
Low-beam headlights
The low-beam headlights come on in switch
position 3 if the ignition is switched on; otherwise the side lights come on.
Headlight courtesy delay feature
Daytime driving lights
If desired, the light switch can remain in
position 3.
You can activate or deactivate the daytime driving lights:
1. Call up the start menu.
Driving hints
Side lights
3
Navigation
2
2. Press the controller to call up the menu.
3. Select "Vehicle settings" and press the
controller.
4. Select "Light" and press the controller.
If you activate the headlight flasher after parking
the car, with the lights switched off, the lowbeam headlights come on and remain on for a
certain time. You can adjust the operating
period or deactivate the function using iDrive.
iDrive concept, see page 14.
93
Online Edition for Part-No. 01 41 0 159 725 © 09/05 BMW AG
Mobility
Automatic driving lights control*, Adaptive
Head Light* and High-beam headlights
assistant*
Reference
1
Entertainment
4. Select "Light" and press the controller.
Controls
3. Select "Vehicle settings" and press the
controller.
Lights
Adaptive Head Light*
Principle
Adaptive Head Light is a variable headlight control system that makes it possible to illuminate
the road surface more effectively. The light
cones from the headlights are directed to suit
the road ahead on the basis of steering angle
and other parameters.
5. Select "Daytime running light" and press
the controller.
Daytime driving lights are switched on.
Automatic driving lights control*
When the switch is in position 1, the low-beam
headlights are switched on and off automatically depending on ambient light conditions,
e.g. in a tunnel, twilight, and in precipitation.
Adaptive Head Light* is active. When the lowbeam headlights are on, the LED next to the
symbol is lit.
When driving into brightly illuminated tunnels,
there may be a delay before the headlights
switch on.
The headlights may also switch on when the
sun is sitting low on a blue sky.
The low-beam headlights remain
switched on irrespective of the ambient
light conditions if you switch on the fog lights*.
For daytime driving lights, the low-beam headlights always come on with the switch in this
position when the ignition is switched on.<
Activating Adaptive Head Light
In switch position 1, Adaptive Head Light is
active and automatic driving lights control is
switched on.
To avoid dazzling the drivers of oncoming vehicles, Adaptive Head Light is not active when the
car is reversing and directs the light to the front
passenger's side when the car is at a standstill.
Malfunction
The LED next to the symbol for automatic driving lights control flashes. Adaptive Head Light
is faulty or has failed. Have the system checked
as soon as possible.
Headlight beam throw
adjustment
Halogen lights
The driving lights control function is no
substitute for your individual judgement
of when it is necessary to switch on the lights.
The sensors are unable, for instance, to recognise fog or hazy weather. In such situations,
switch on the lights manually to avoid any safety
risk.<
The beam throw of the low-beam headlights
must be adjusted manually to suit the load carried in the car, otherwise the drivers of oncoming vehicles could be dazzled.
94
Online Edition for Part-No. 01 41 0 159 725 © 09/05 BMW AG
1 / 2 = 5 persons with luggage
2 / 2 = 1 person, luggage compartment full
Comply with rear axle load limit, see page 214
onwards.
Once you have switched the engine off, push
the lever beyond the pressure point in the corresponding direction 3.
The parking lights will drain the battery.
Do not leave them switched on for too
long, otherwise the engine may fail to start.<
Touring
All load conditions: 0.
Exception: 1 person, load area full and with a
trailer being towed: 1.
High-beam headlights
assistant*
Comply with rear axle load limit, see page 215
onwards.
Principle
Xenon headlights*
The headlight beam throw is regulated automatically, e.g. when accelerating and braking
and to adapt to the different loads being carried.
High-beam headlights/
parking lights
This system switches the high-beam headlights on and off automatically. The process is
controlled by a sensor on the front of the inside
mirror. The assistant ensures that the highbeam headlights are switched on whenever
permitted by the situation in which the car is
being driven. This relieves the load on you the
driver and optimises your view of the road. You
can of course intervene at any time and switch
the high-beam headlights on and off in the
usual way.
Activating the high-beam headlights
assistant
1. Turn the illumination switch to switch
position 1, see page 93.
High-beam headlights
2
Headlight flasher
3
Parking lights
95
Online Edition for Part-No. 01 41 0 159 725 © 09/05 BMW AG
Reference
1
Mobility
2. With the low-beam headlights switched on,
briefly press the flashing turn indicator lever
towards high-beam headlights.
Overview
1 / 1 = 5 persons without luggage
Controls
0 / 1 = 1 to 2 persons without luggage
Driving hints
There is an additional option of switching on the
lights on the side of the car facing the road
when parked, if permitted in the country of use:
Navigation
Right or left parking lights*
The second value in each case applies when
towing a trailer.
Entertainment
Saloon
Lights
The indicator lamp on the instrument
cluster comes on when the high-beam
headlights assistant is active. The
lights are turned up and down automatically as
the system responds to traffic travelling in front
and in the oncoming direction, and also when
ambient lighting is sufficient, e.g. in built-up
areas.
Turning up and down manually
You can intervene at any time as required or if
required by the situation:
> If the high-beam headlights assistant has
switched on the high-beam headlights but
you would prefer the low-beam headlights
to be switched on, simply use the flashing
turn indicator lever to turn the lights up and
down accordingly. This will deactivate the
high-beam headlights assistant.
To reactivate the system, press the flashing
turn indicator again briefly towards highbeam headlights.
> If the high-beam headlights assistant has
switched on the low-beam headlights but
you would prefer the high-beam headlights
to be switched, turn the lights up in the
usual way. This deactivates the system and
you will have to turn the lights down by
hand.
To reactivate the system, press the flashing
turn indicator again briefly towards highbeam headlights.
> In extremely unfavourable weather conditions such as dense fog or heavy rain
> In order to be able to perceive poorly-lit road
users such as pedestrians, cyclists, horses
and riders, carts, in situations where trains
or ships are travelling in the vicinity of the
road, deer passing
> On narrow bends, steep uphill or downhill
gradients, at traffic junctions or if your view
of oncoming traffic on a motorway is
obstructed
> In poorly lit towns and where there are very
reflective signs
> At low road speeds
> If the windscreen in the area in front of the
inside mirror has fogged over, is dirty or is
covered with stickers, labels, etc.
> If the sensor is dirty. Use a cloth soaked in
glass cleaner to clean the sensor on the
front of the inside mirror
Fog lights
> You can use the headlamp flasher in the
usual way when the headlights are dimmed.
To switch on/off, press the respective button.
System limits
1
Front fog lights*
You should always give priority to your
own judgement over that of the highbeam headlights assistant in respect of the use
of high-beam headlights. In such situations you
should turn the headlights down manually in
order not to create a safety hazard.<
2
Rear fog lights*
In the following example situations, the system
will not operate or its operation will be subject to
restrictions and your intervention may be
required:
Front fog lights*
The side lights or low-beam headlights
must be switched on. The green indicator lamp in the instrument cluster
comes on when the front fog lights are in use.
If automatic driving lights control has
been activated, the low-beam headlights
come on automatically when the front fog lights
are switched on.<
96
Online Edition for Part-No. 01 41 0 159 725 © 09/05 BMW AG
Rear fog lights*
Reading lights
Overview
The low-beam headlights or front fog
lights must be switched on. The yellow
indicator lamp in the instrument cluster
comes on when the rear fog lights are in use.
To save the battery, all the lights in the car
will be switched off approx. 15 minutes
after radio readiness has been switched off, see
Start/stop button on page 56.<
You can adjust the lighting intensity with the
knurled wheel.
Driving hints
There are reading lights at the front and rear,
next to the interior lights. To switch on/off,
press the button.
Controls
Instrument lighting
Navigation
Interior light
The interior light, the footwell lights, the door
entry lighting, the load area lights* and the
ground lights* are controlled automatically.
Entertainment
Switching interior light on/off manually
Press the button.
If you switch on the independent ventilation system* or auxiliary heater* with the
remote control, the interior light comes on for a
short time by way of confirmation.<
97
Online Edition for Part-No. 01 41 0 159 725 © 09/05 BMW AG
Reference
Mobility
To switch off the light permanently, hold the
button pressed for about 3 seconds.
Climate
Climate
Equipment versions
There are two versions of automatic air conditioning, depending on the equipment fitted to
your car.
1
Automatic air conditioning
2
Automatic air conditioning with extended
range of features*
Air vents
3
Air to windscreen and side windows
4
Air to the upper body area, see Ventilation
at front on page 100 and 105
5
Air to footwells
98
Online Edition for Part-No. 01 41 0 159 725 © 09/05 BMW AG
Switching off automatic air conditioning
7
Recirculated-air mode
3
Air volume, adjusting manually
8
LED for auxiliary heater*
4
Switching cooling function on/off manually
9
Rear window heating
5
Temperature control
10 Air inlet grille for interior temperature sensor, keep unobstructed
The following sections inform you in detail
about how to adjust the settings.
AUTO program
The AUTO program takes charge
of setting the air volume and air
distribution to the windscreen and
side windows, to the upper body and to the
footwell.
The cooling function is switched on automatically in the AUTO program.
Temperature
The scale values are guide figures
for the interior temperature.
The automatic air-conditioning
system attains this temperature as
quickly as possible regardless of the season by
using maximum cooling or heating power if necessary. The temperature is then maintained.
Adjusting air distribution manually
You can direct the air volume to the
windows
, towards the upper
body
and into the footwell
.
Any intermediate setting is possible. You can switch the automatic
function for air distribution back on with the
AUTO button.
The air volume continues to be regulated automatically when the air distribution is adjusted
manually.
Adjusting air volume manually
Turn to vary the air volume. You
can switch the automatic function
for the air volume back on by
pressing the AUTO button.
The higher the air volume, the more effective
the air conditioning will be.
99
Online Edition for Part-No. 01 41 0 159 725 © 09/05 BMW AG
Mobility
The AUTO program 2 can optimise air distribution and air volume in virtually any situation, see
AUTO program below. All you need to do is
select an inside temperature 5 which is comfortable for you.
The automatic air-conditioning system
does not have sufficient time to establish
the set temperature when temperature settings
are changed quickly in succession.<
Reference
Preferred interior climate
Driving hints
6
AUTO program
Navigation
Air distribution, adjusting manually
2
Entertainment
1
Controls
Overview
Automatic air conditioning
Climate
Switching cooling function on and off
Defrosting windows and removing mist
Air is cooled and dried when the
cooling function is switched on,
then reheated to suit the temperature setting. Depending on weather conditions,
the windscreen may fog over momentarily
when the engine is started.
The cooling function is switched on automatically in the AUTO program. The interior can
only be cooled when the engine is running.
Recirculated-air mode
If the air outside the car has an
unpleasant odour or contains pollutants, the supply to the interior of
the car can be shut off temporarily. The air
inside the car is then recirculated.
If the windows fog over in the recirculated-air mode, switch it off and, if necessary, increase the air volume.
The recirculated-air mode should not be used
continuously for lengthy periods, as the quality
of the air inside the car will otherwise gradually
deteriorate.<
1. Turn the rotary control for the air distribution to position
.
2. Turn the rotary control for the air volume
completely to the right.
3. Using the temperature rotary control, select
an interior temperature that you find pleasant, e.g. 226/72 7.
4. Close off the ventilation for the rear-seat
area.
5. To defrost the rear window, switch on the
heated rear window.
Ventilation at front
Switching off automatic air
conditioning
The air volume, the heating and the
cooling function are switched off.
The automatic air conditioning can
be switched on again by pressing any button.
Rear window heating
The rear window heater switches
off automatically after a certain
time.
1
Knurled wheels for continuous opening and
closing of the vents
2
Levers for adjusting the direction of the airflow
Do not drop any foreign objects into the
outlets, otherwise they could be blown
out with some force and cause injury.<
Ventilation for cooling
Adjust the outlets so that cool air is directed
towards you, e.g. if the car's interior has
become hot.
100
Online Edition for Part-No. 01 41 0 159 725 © 09/05 BMW AG
Micro-filter
Turn outlets so that the airflow passes the
occupants without striking their bodies directly.
The micro-filter traps dust and pollen in the
incoming air. This filter is changed by BMW
Service during routine maintenance work.
You can call up further information on the control display, see page 74.
Adjusting temperature for the upper
body area
Overview
Draught-free ventilation
Controls
With the ignition switched on, you can adjust
the settings of the automatic air conditioning
system via iDrive.
iDrive concept, see page 14.
1. Press the
button.
The start menu is called up.
2. Move the controller to the left to call up "Climate".
Driving hints
3. Select "Centre vent " and press the controller.
Navigation
4. Turn the controller. The setting is adopted;
you can now change to another field.
2
Levers for adjusting the direction of the airflow
Mobility
Knurled wheel for continuous opening and
closing of the outlets
101
Online Edition for Part-No. 01 41 0 159 725 © 09/05 BMW AG
Reference
1
Entertainment
Rear-seat area ventilation
Climate
Automatic air conditioning with extended range of features*
Temperature, left-hand side of interior
compartment
8
Residual heat utilisation
9
AUTO program
2
Maximum cooling effect
3
Defrosting and demisting windows
10 Automatic Air Recirculation Control AUC/
recirculated-air mode
4
Air volume, adjusting manually
11 LED for independent ventilation system*
5
Switching off automatic air conditioning
12 Rear window heating
6
Switching cooling function on/off manually
7
Temperature, right-hand side of interior
compartment
13 Air inlet grille for interior temperature sensor, keep unobstructed
1
Preferred interior climate
The AUTO program can optimise air distribution and air volume in virtually any situation, see
AUTO program below. All you need to do is
select an inside temperature which is comfortable for you.
The following sections inform you in detail
about how to adjust the settings.
Most settings are saved for the remote control
currently in use, see also Personal Profile settings on page 27.
The current setting for the air distribution is displayed on the control display.
The cooling function is switched on automatically in the AUTO program. A condensation
sensor simultaneously regulates the program in
such a way as to avoid or minimise condensation on the window surfaces.
Intensity of the AUTO program
You can reduce or boost the intensity of the
automatic air conditioning in line with your individual requirements.
iDrive concept, see page 14.
1. Press the
button.
The start menu is called up.
AUTO program
The AUTO program takes charge
of setting the air distribution and air
volume to the windscreen and side
windows, to the upper body and to the footwell.
It in addition adapts your temperature requirements in the light of ambient seasonal influences.
2. Move the controller to the left to call up
"Climate".
102
Online Edition for Part-No. 01 41 0 159 725 © 09/05 BMW AG
The automatic air-conditioning
system attains this temperature as quickly as
possible regardless of the season by using
maximum cooling or heating power if necessary. The temperature is then maintained.
The automatic air-conditioning system
does not have sufficient time to establish
the set temperature when temperature settings
are changed quickly in succession.<
Adjusting temperature for the upper
body area
1. Call up the start menu.
2. Call up "Climate".
3. Select "Air distribution " and press the controller.
Overview
Controls
Rear window heating
The rear window heater switches
off automatically after a certain
time.
Adjusting air volume manually
Turn to vary the air volume. You
can switch the automatic function
for the air volume back on by
pressing the AUTO button.
Air distribution adjusting manually
You can preset the air distribution.
1. Call up the start menu.
2. Call up "Climate".
3. Select "Air distribution " and press the controller.
Settings for the driver's and front passenger's side can be made separately via the
field on the right-hand or left-hand side.
4. Select driver's or front passenger's side as
appropriate.
Move the controller repeatedly to the right
or left to select the driver's or front passenger's side.
5. Move the controller to select the required
field.
103
Online Edition for Part-No. 01 41 0 159 725 © 09/05 BMW AG
Driving hints
Set the desired temperatures individually for the driver's and front
passenger's sides.
Remove ice and condensation
quickly from the windscreen and
from the front side windows.
Navigation
Temperature
Defrosting windows and removing mist
Entertainment
The selected intensity level of the automatic program is switched on.
Mobility
4. Select the desired intensity and press the
controller.
4. Select the field by moving the controller and
turn the controller to adjust the temperature.
Reference
3. Select "Automatic programmes " and press
the controller.
Climate
6. Turn the controller to adapt the air distribution.
Automatic Air Recirculation Control
AUC/recirculated-air mode
If the air outside the car has an
unpleasant odour or contains pollutants, the supply to the interior of
the car can be shut off. The air inside the car is
then recirculated. In the AUC mode, a sensor
detects pollutants in the outside air and shuts it
out automatically.
Three operating modes can be obtained in succession by pressing this button repeatedly:
Driver's side:
1
Air to windscreen and side windows
2
Air to the upper body area
3
Air to footwells
Front passenger's side:
4
Air to the upper body area
5
Air to footwells
Pressing the AUTO button cancels the air
distribution settings at the control display, and vice-versa.<
Switching cooling function on and off
Air is cooled and dried when the
cooling function is switched on,
then reheated to suit the temperature setting. Depending on weather conditions,
the windscreen may fog over momentarily
when the engine is started.
The cooling function is switched on automatically in the AUTO program. The interior can
only be cooled when the engine is running.
Maximum cooling effect
At outside temperatures above
0 6/327 and when the engine is
running, you obtain a maximum
cooling effect as soon as possible.
The automatic air-conditioning system
switches to the lowest temperature and operates in recirculated-air mode. Air flows at maximum rate only from the outlets for the upper
body area. You should therefore open these
outlets for maximum cooling.
> LED off: ambient air is constantly entering
the car.
> Right-hand LED on, AUC mode: the system
will identify pollutants in the ambient air and
shut off the ambient air supply if necessary.
> Left-hand LED on, recirculated-air mode:
the ambient air supply is permanently shut
off.
If the windows fog over in the recirculated-air mode, switch it off and, if necessary, increase the air volume.
The recirculated-air mode should not be used
continuously for lengthy periods, as the quality
of the air inside the car will otherwise gradually
deteriorate.<
Residual heat
Heat from the engine is stored and
used to heat the car's interior, for
instance when waiting at a level
crossing.
The function can be switched on whenever the
following conditions are met:
> Up to 15 minutes after the engine has been
switched off
> The engine is at operating temperature
> Battery voltage is sufficient
> The outside temperature is below 256/
777
The LED lights up when the function is
switched on.
Following radio readiness, you can adjust the
interior temperature, air flow rate and air distribution.
104
Online Edition for Part-No. 01 41 0 159 725 © 09/05 BMW AG
Rear-seat area ventilation
Overview
Switching off automatic air
conditioning
The air volume, the heating and the
cooling function are switched off.
The automatic air conditioning can
be switched on again by pressing
any button, except REST button.
Knurled wheel for continuous opening and
closing of the outlets
2
Knurled wheel for adjusting the temperature:
> Turned towards blue: cooler
> Turned towards red: warmer
3
2
Levers for adjusting the direction of the airflow
Do not drop any foreign objects into the
outlets, otherwise they could be blown
out with some force and cause injury.<
Ventilation for cooling
Adjust the outlets so that cool air is directed
towards you, e.g. if the car's interior has
become hot.
Draught-free ventilation
Turn outlets so that the airflow passes the
occupants without striking their bodies directly.
Micro-filter and activated charcoal
filter
The micro-filter traps dust and pollen in the
incoming air. The activated charcoal filter in
addition removes gaseous pollutants from the
air entering the car. This combined filter is
changed by BMW Service during routine maintenance work.
You can call up further information on the control display, see page 74.
Independent ventilation
system*/auxiliary heater*
Navigation
Knurled wheels for continuous opening and
closing of the vents
Entertainment
1
Levers for adjusting the direction of the airflow
Driving hints
1
Controls
Ventilation at front
Principle
Two different switch-on times can be preset.
The systems can also be switched on/off using
the remote control. They remain switched on
for 30 minutes.
105
Online Edition for Part-No. 01 41 0 159 725 © 09/05 BMW AG
Reference
The auxiliary heater heats the interior, and it
facilitates removing snow and ice from the exterior.
Mobility
The independent ventilation system ventilates
the interior of the car and lowers its temperature
as necessary.
Climate
Since their current consumption is high, you
should not run them twice in succession unless
there has in the meantime been an opportunity
to recharge the car's battery by driving the car.
Both systems are controlled via iDrive or using
the remote control, see page 107.
Independent ventilation system
The remote control and preselection of a
switch-on time can switch on the independent
ventilation system above outside temperatures
of approx. 156/597. In direct mode it is operational at any outside temperature, but not in
driving mode. If auxiliary heating is not fitted,
the independent ventilation system is operational at any temperature with a preselected
switch-on time.
Air emerges from the outlets for the upper body
zone in the instrument panel. The outlets must
therefore be open.
Auxiliary heater
The remote control and preselection of a
switch-on time can switch on the auxiliary
heater above outside temperatures of approx.
156/597. In direct mode it is operational at
any outside temperature, but not in driving
mode.
Never run the auxiliary heater in enclosed
spaces, as inhaling the harmful exhaust
gas from the engine can lead to loss of consciousness with fatal consequences. The
exhaust gas contains carbon monoxide, which
is colourless and odourless, but highly toxic.
Switch off the auxiliary heater before refuelling
the car.<
The auxiliary heater will not come on or
will switch itself off if there is not enough
fuel in the tank for less than approx. 50 km,
approx. 30 miles.<
Switching on and off directly
iDrive concept, see page 14.
1. Call up the start menu.
2. Move the controller to the left to call up "Climate".
3. Select "Independent mode " and press the
controller.
4. Select "Direct operation " and press the
controller.
5. Select "Independent heater" or "Independent ventilation" and press the controller.
If you have not used the auxiliary heater
for several months, you may need to
switch the system on again after a few minutes
in order for the auxiliary heater to start up.<
With the ignition switched off, the heated air is
automatically directed to the windscreen, side
windows and footwell.
Following radio readiness, you can adjust the
interior temperature, air flow rate and air distribution.
The auxiliary heater continues to run for a short
time after it has been switched off.
The symbol on the automatic air conditioning
display goes out.
The independent ventilation system/auxiliary heater is on.
The symbol on the automatic air conditioning
display flashes.
Preselecting switch-on times
iDrive concept, see page 14.
1. Call up the start menu.
2. Move the controller to the left to call up
"Climate".
106
Online Edition for Part-No. 01 41 0 159 725 © 09/05 BMW AG
Controls
The system in question will only be
switched on within the next 24 hours. It
must then be reactivated.<
Driving hints
Remote control*
6. Select the time and press the controller.
The first part of the setting is selected.
7. Turn the controller to make the adjustment.
8. Press the controller to adopt the setting.
The next part of the time setting is selected.
9. Complete the setting. Once the setting has
been completed, the time is memorised.
Activating the switch-on time
Move the controller to the left or right to select
"Timer 1" or "Timer 2", then press the controller.
Overview
The symbol on the automatic air conditioning
display flashes to indicate that the system is on.
1
Switching on
2
Switching off
3
Activating the system
4
LED: comes on for approx. 5 seconds when
the system is activated
5
LED: flashes during switching on
6
Aerial
The average reception range is approx. 150 m,
approx. 500 ft.
You can optimise the reception range by
holding the remote control as high in the
air as possible with the aerial pointing upwards.
When switching on/off, do not touch the aerial
or point it at the car.<
Navigation
5. Move the controller to the left or right to
select "Timer 1" or "Timer 2".
The symbol on the automatic air conditioning
display lights up.
Entertainment
4. Select "Switch-on times " and press the
controller.
The switch-on time is activated.
Switching on/off
1. Press button 3 until the LED 4 comes on.
2. Press the required button within approx.
5 seconds:
> To switch on, button 1
> To switch off, button 2
Mobility
3. Select "Independent mode " and press the
controller.
107
Online Edition for Part-No. 01 41 0 159 725 © 09/05 BMW AG
Reference
The LED 5 flashes rapidly for about 2 seconds
to confirm the switch-on/off request.
Climate
The symbol on the automatic air conditioning
display flashes.
If you switch on the independent ventilation system or auxiliary heater with the
remote control, the interior light comes on for a
short time by way of confirmation.<
Interference
The remote control handset may fail to function
properly if there is interference from other
equipment or devices which use the same radio
frequency.
Changing the battery
Change the battery if the LED no longer comes
on or flashes when the independent ventilation
system or auxiliary heater are switched on.
1. Press in the catch, arrow 1.
2. Remove the cover for the battery compartment, arrow 2.
3. Insert a new battery of the same type. The
battery's installed position is marked on the
base of the battery compartment.
4. Press the cover back into position.
Dispose of the old battery only at an
authorised collecting point or hand it in to
BMW Service.<
New remote control
If you would like to start using a new remote
control as a second remote control or if you
have lost your remote control, BMW Service will
gladly initialise it for you.
You can use two remote controls for your car.
108
Online Edition for Part-No. 01 41 0 159 725 © 09/05 BMW AG
If and when you decide to sell your car, in the
interests of security clear the programmed
functions first, see page 110.
During the programming operation and
before a programmed system is operated
with the integrated universal remote control,
make sure that no persons, animals or objects
are within the pivoting or movement range of
the system in question, otherwise there is a risk
of injury or damage. Comply also with the safety
instructions supplied with the original handheld transmitter.<
Checking compatibility
If this symbol appears on the pack or in
the instructions supplied with the original hand-held transmitter, you can
assume that the radio remote control device will
be compatible with the integrated universal
remote control.
A list of compatible hand-held transmitters is
available from the fax polling number
+49 (0)6838 907 283 3333. If you would like
more details, please call the freephone
Memory buttons
2
LED
Controls
Driving hints
1
Fixed-code hand-held transmitter
1. Switch on the ignition, see page 56.
2. When using for the first time: press the two
outer memory buttons 1 for approx. 20 seconds, until the LED 2 flashes. All memorised programs are deleted.
3. Point the original hand-held transmitter at
memory buttons 1 at a distance of approx.
5 to 20 cm, approx. 2 to 8 in.
The required distance between the
hand-held transmitter and memory
buttons 1 depends on the system according to which the original hand-held transmitter operates.<
4. Press the command button on the original
hand-held transmitter and the desired
memory button 1 on the integrated universal remote control at the same time. The
LED 2 initially flashes slowly. When the
LED 2 starts to flash rapidly, release both
buttons. If the LED 2 does not start to flash
rapidly after approx. 15 seconds, change
the distance.
109
Online Edition for Part-No. 01 41 0 159 725 © 09/05 BMW AG
Navigation
The signal from an original hand-held transmitter can be programmed to one of the three
memory buttons 1. The system in question can
then be operated with the memory button 1
programmed in this way with the ignition
switched on. Transmission of the signal is
shown by the LED 2.
Programming
Entertainment
The integrated universal remote control
replaces up to three different hand-held transmitters for various systems or devices that are
operated by radio remote control, for example a
gate opener and domestic alarm systems. The
integrated universal remote control identifies
and learns the signals transmitted by the original hand-held transmitters.
HomeLink is a registered trademark of Johnson
Controls, Inc.
Mobility
Principle
Homelink hotline at +49 (0)6838 907 277, or
0800 0466 35465 from within Germany.
Reference
Integrated universal remote
control*
Overview
Practical interior equipment
Practical interior equipment
5. To program additional original hand-held
transmitters, repeat steps 3 and 4.
The corresponding memory button 1 is now
programmed with the same signal as the original hand-held transmitter.
You can operate the system when the engine is
running or when the ignition is switched on.
If the system fails to function even after
repeated programming, check whether
the original hand-held transmitter uses an alternating-code system. To establish this, either
consult the operating instructions for the
original hand-held transmitter or press and hold
down the programmed memory button 1 on the
universal remote control. If the LED 2 on the
integrated universal remote control flashes rapidly for a short while and then remains lit for
about two seconds, the original hand-held
transmitter uses an alternating-code system. If
it uses an alternating-code system, program
the memory buttons 1 as described under
Alternating-code hand-held transmitter.<
4. Press the button on the receiver of the
device to be operated. Once step 4 has
been performed, step 5 must be completed
within about 30 seconds.
5. Press programmed memory button 1 on
the integrated universal remote control
three times.
The corresponding memory button 1 is now
programmed with the same signal as the original hand-held transmitter.
Deleting memorised programs
Press the two outer memory buttons 1 for
approx. 20 seconds, until the LED 2 flashes:
All memorised programs are deleted.
It is not possible to delete programs individually.
Roller sun blinds*
Roller sun blind for rear window
Alternating-code hand-held
transmitter
To program the integrated universal remote
control, consult the operating instructions for
the device to be operated. The instructions
should indicate what scope there is for synchronisation.
When programming an alternating-code handheld transmitter, the following points should in
addition be noted:
Programming will be easier if another person is available to assist you.<
1. Park your car within the range of the radio
remote control device.
Press the button in the driver's door.
Roller sun blinds for rear side windows
Pull the blind out at its loop and secure it to the
retainer.
2. Program the integrated universal remote
control as described above in Fixed-code
hand-held transmitter.
3. Establish the location of the button on the
receiver of the device to be operated, e.g.
on the drive system.
110
Online Edition for Part-No. 01 41 0 159 725 © 09/05 BMW AG
Make sure that the lamp is switched off
before inserting it in the holder in order to
avoid possible damage.<
Opening
Centre armrest front
Overview
Glove box
Pull the handle. The light in the glove box
comes on.
Closing
Swing the lid up.
Locking
Lock with a key.
If, for example, you hand over the remote
control to hotel staff without the integrated key, see page 26, the glove box cannot
be unlocked.<
Press the button. The lid opens slightly and can
be folded up.
Depending on the equipment, in the top section
you will find a compartment with a mat, which
can be removed for cleaning, or a telephone
cradle*.
Open the top section
Entertainment
After using the glove box while the car is
moving, close its lid without delay, so that
it cannot cause injury in the event of an accident.This also applies to the lid* of the compartment next to the steering column.<
Navigation
To open the lid
Driving hints
Controls
The compartment in the centre armrest has two
sections.
Rechargeable hand lamp*
This is inside the glove box, on the left.
The lamp can remain permanently plugged in.
Pull the lamp out of its holder whenever it is
needed.
111
Online Edition for Part-No. 01 41 0 159 725 © 09/05 BMW AG
Reference
Mobility
Press the button and fold the lid up.
Practical interior equipment
Access to lower section
Do not place hard or sharp-edged objects
in the elasticated pockets or net, otherwise there will be an increased risk of injury in
the event of an accident.<
Coat hooks
There are coat hooks on the grab handles in the
rear seating area.
Press the button on the front and fold the upper
section or telephone cradle up.
Items of clothing hung from the hooks
must not obstruct the driver's view. Do
not hang heavy objects from the hooks, as they
could endanger the car's occupants, e.g. in
case of heavy braking or sudden swerving.<
Ventilating the lower section*
Slide the cover in the lower section up.
The temperature inside the ventilated
section may become quite high, depending on the automatic air conditioning settings.
Should this be the case, slide the cover down to
close the vent.<
Drinks holders*
Opening
Adjusting*
Briefly press the button.
Do not place glassware in the drinks holders, otherwise there is an increased risk of
injury in the event of an accident.<
Move the section of the centre armrest illustrated to the required position.
Closing
Press the centre of the trim and push in the
drinks holder.
Storage compartments
There are further compartments next to the
steering column*, on the doors and in the centre console at the front* and rear*.
There are elasticated pockets on the backs of
the front seats, and there is a net* in the front
passenger's footwell.
Front ashtray*
Opening
Push back the cover.
112
Online Edition for Part-No. 01 41 0 159 725 © 09/05 BMW AG
Rear ashtray*
Press the ashtray at the front: it pops up and can
be removed.
Emptying
On cars with non-smoker package, the insert is
removed in the same way.
Press the entire lid down. The ashtray pops up
and can be removed.
Cigarette lighter, front*
Connecting electrical
appliances
With the engine running or the ignition switched
on, press in the cigarette lighter.
The cigarette lighter can be removed when it
pops back out.
Saloon:
In the luggage compartment*
113
Online Edition for Part-No. 01 41 0 159 725 © 09/05 BMW AG
Driving hints
Navigation
Reference
Mobility
Hold the hot cigarette lighter only by its
knob, otherwise you may suffer burns.
When leaving the car, remove the remote control, otherwise children could operate the cigarette lighter and possibly burn themselves.<
With the engine running or the ignition switched
on, the cigarette lighter socket can also be used
as a power socket for a 12 V torch or car vacuum cleaner, etc. rated at up to about 200 W.
Make sure that the socket is not damaged by
attempting to insert plugs of the wrong pattern.
This applies to all power sockets in the car.
The socket is fitted with a detachable cap in
conjunction with the non-smoker's package.
Entertainment
Power sockets
Controls
Overview
Emptying
Practical interior equipment
Access to drinks holders*:
Press 2 and open the lid.
Touring:
In the load area
Saloon:
Through-loading system*
1. Open the belt buckle for the central seat
belt at the rear and insert the tongue on the
end of the belt in the designated mounting
on the rear shelf.
To gain access to the power socket:
Open the cap.
Rear centre console*
2. Push the corresponding head restraint fully
down, see page 47.
3. To release, pull the corresponding lever in
the luggage compartment.
Depending on the equipment specification, the
power sockets at the rear are fitted with caps or
a cigarette lighter. See Cigarette lighter, front,
page 113.
To gain access to the power socket:
Pull off the cap or cigarette lighter.
Centre armrest at rear
4. The released seat back moves forward
slightly. Fold the seat back forward at the
head restraint.
Storage compartment*:
Pull the cover upwards, arrow 1.
114
Online Edition for Part-No. 01 41 0 159 725 © 09/05 BMW AG
There are lashing eyes in the luggage compartment to which a net* or retaining straps can be
attached when loads have to be secured, see
page 126.
Ski bag*
This enables up to four pairs of standard skis or
up to two snowboards to be carried safely and
kept clean.
You can stow skis up to a length of 2.10 m,
approx. 7 ft, with the aid of the ski bag. If skis of
this length are carried, however, the capacity of
the ski bag is lower in view of its tapered design.
Make sure that the skis are clean before they
are inserted into the bag. Wrap protective material around any sharp edges to avoid causing
damage.
Securing the load
Overview
Controls
4. Insert the tongue of the ski bag retaining
strap in the centre belt buckle marked
CENTER.
Driving hints
When folding back to the seating position, make sure that the catch engages
properly, otherwise even braking or swerving,
for example, could cause items of luggage to be
displaced forwards into the interior compartment, endangering the occupants.<
Loading
After loading the ski bag, secure the bag and its
contents by tightening the retaining strap at its
turnbuckle.
Removing ski bag
The ski bag can be removed completely, e.g. for
ease of drying or so that you can use other fittings in its place.
115
Online Edition for Part-No. 01 41 0 159 725 © 09/05 BMW AG
Mobility
3. Lay out the ski bag between the front seats
and fill it. The zip fastener provides better
access to the objects stowed in the bag and
facilitates drying the ski bag.
To stow away the ski bag, follow the opposite
procedure as for loading.
Reference
2. Press the button again; the cover in the luggage compartment opens. The cover in the
luggage compartment will also open if you
press the button hard enough the first time.
Secure the ski bag in the manner
described, otherwise even heavy braking
or sudden swerving could be sufficient to
endanger the car's occupants.<
Entertainment
Navigation
1. Fold down the centre armrest, press the
button and open the cover.
Practical interior equipment
Enlarging the load area
The rear seat back is split one-third/two-thirds.
You can fold down both sections individually as
a means of enlarging the load area.
1. Pull the handle forwards and lift out the ski
bag.
2. Close the lid in the luggage compartment.
For more information on the various fittings available, contact BMW Service.<
Touring: load area
Load area cover
Reach into the recess and pull forwards.
When folding back to the seating position, make sure that the catches engage
properly. The red warning zone in the recess
then disappears. If this is not done, even braking or swerving could be sufficient to displace
items of luggage to into the occupant compartment, endangering the occupants.<
Comply with the notes on seat belts on
page 42, or there may be a risk to your
personal safety.<
Partition net
Pull out the cover and locate it in the holders.
The cover can support the weight of light articles, e.g. clothing.
Do not place any heavy, hard objects on
the cover, as even heavy braking or sudden swerving could be sufficient to endanger
the car's occupants.
Do not allow the cover to be retracted in an
uncontrolled manner, as this could damage it.<
The load area cover is raised when the
rear window or tailgate is opened. Before
closing the rear window or tailgate, press the
cover down until it engages in position.<
Do not allow the partition net to be
retracted in an uncontrolled manner, as
this could result in injuries and cause damage to
the net.<
With normal load area
Pull the partition net out of the casing by the
loop. Hold the rail at both ends and insert in the
holders, see arrow 1. This is best done working
from the rear seat.
116
Online Edition for Part-No. 01 41 0 159 725 © 09/05 BMW AG
Compartment in floor
To open: reach into the recess and fold up the
handle.
With enlarged load area
Overview
If you no longer require the partition net, take
hold of the rail at both ends and remove it from
the holders, arrow 2. Allow the partition net to
slide slowly into the cassette.
1. Fold down both rear seat backs, see Enlarging the load area.
Controls
2. Release the casing at the buttons on either
side, arrow 1.
The partitions in the compartment can be rearranged.
Folding up spare wheel cover
Swing up the cover.
Disengage the hook from the holder and
engage it in the floor panel flap.
To restore the original arrangement, proceed in
the reverse order. Finish off by sliding the casing forwards in the holders on both sides until it
engages. The red warning zone in the recess
then disappears. Tug the casing to check that it
is properly locked in position.
Storage package*
Tensioning straps
You can disengage the right-hand tensioning
strap, e.g. to open the side panel. To disengage
it, pull it back at the rear end; to engage it, press
it into the opening. It can in addition be secured
in the middle. This allows you to secure objects
of varying sizes with it.
117
Online Edition for Part-No. 01 41 0 159 725 © 09/05 BMW AG
Mobility
5. Carefully pull out the partition net and insert
it in the front holders, see With normal load
area. This is best done working from the
front seat.
Before folding down, replace the hook in its
original position.
Reference
4. Push the casing into the guides on the
reverse of the seat backs.
Entertainment
Navigation
3. Pull out the casing to the rear, arrow 2, taking care not to tilt it.
Driving hints
The floor panel flap can be removed.
Practical interior equipment
Hook
Partitioning the rear compartment
There are two hooks for securing smaller
objects.
Fold out the partitions and press down.
Press at the base and fold out until engaged.
Floor compartments
Use the partition net, see page 116, otherwise objects could be dislodged merely
by heavy braking, sudden swerving or similar,
and endanger the occupants.<
Front compartment:
> To open, pull up the front floor panel flap by
the handle.
> To close, press down the front floor panel
flap until it engages.
Rear compartment: to open, reach into the
recess and fold up the handle.
The rear floor panel flap can be removed.
118
Online Edition for Part-No. 01 41 0 159 725 © 09/05 BMW AG
Online Edition for Part-No. 01 41 0 159 725 © 09/05 BMW AG
Reference
119
Mobility
Entertainment
Navigation
Driving hints
Controls
Overview
Online Edition for Part-No. 01 41 0 159 725 © 09/05 BMW AG
Driving hints
Here is a variety of information that you may
require in particular driving situations or
operating modes.
Online Edition for Part-No. 01 41 0 159 725 © 09/05 BMW AG
Driving precautions
Driving precautions
Running-in
Clutch
Moving parts need a certain time to achieve
maximum operating efficiency as a unit. Please
comply with the following instructions, which
are intended to ensure that your car achieves its
optimum operating life and economy.
Engine and final drive
Observe the national speed limits in the country
in which you are travelling.
The clutch needs to be run in for about 500 km,
approx. 300 miles, before it will operate with
maximum efficiency. Operate the clutch gently
while running it in.
After fitting new parts
The same running-in procedures should be
observed if any of the components mentioned
above have to be renewed in the course of the
car's operating life.
Up to 2000 km, approx. 1200 miles
Drive at varying road and engine speeds, but do
not exceed the following values:
General driving notes
> Petrol engine
4500 rpm, or 160 km/h or 100 mph
Closing the luggage compartment lid/
tailgate
> Diesel engine
3500 rpm, or 150 km/h or 90 mph
Drive only with the luggage compartment
lid/tailgate fully closed, otherwise exhaust
gases could enter the passenger compartment.<
Avoid full throttle and do not use the automatic
transmission kick-down.
From 2000 km, approx. 1200 miles,
onwards
Engine and road speeds can be gradually
increased.
However, should you need to drive with the luggage compartment lid/tailgate open:
1. Close all windows and the glass roof or panorama glass roof.
Sequential Manual Gearbox SMG
2. Increase the air volume from the automatic
air conditioning considerably, see page 99
or 103.
Do not use the acceleration assistant during
running-in, see page 61.
Hot exhaust system
Tyres
New tyres do not achieve their full road
grip immediately, for production reasons. You
should therefore drive in a restrained manner
for the first 300 km, approx. 200 miles.
Brake system
Brake pads and discs do not achieve a favourable wear and contact pattern until the car has
covered about 500 km, approx. 300 miles. Drive
with caution during this running-in period.
High temperatures occur in the exhaust
system of all vehicles. Never remove the
head shields protecting this area, nor apply
underseal to them. Make sure that when the car
is driven or parked and when the engine is
idling, no easily flammable material such as hay,
leaves, grass, etc. comes into contact with the
hot exhaust pipe. It could ignite and cause a fire,
with the risk of severe injuries or damage.<
122
Online Edition for Part-No. 01 41 0 159 725 © 09/05 BMW AG
Drive through water only to a max. depth
of 30 cm, approx. 1 ft, and no faster than
walking pace, otherwise the engine, electrical
system and transmission may be damaged.<
Never try to prevent the car rolling back
on an uphill gradient by slipping the
clutch; always apply the handbrake. The clutch
will otherwise wear rapidly.<
Sequential Manual Gearbox SMG
Drive off quickly when moving off on an
uphill gradient. Do not use the accelerator
to prevent the car rolling back down a slope;
apply the handbrake, to avoid causing the gearbox to overheat.<
Starting assistance
In order to ensure that the system functions
correctly, keep the photo-cells clean, do not
cover the area between the inside mirror and
windscreen, and do not affix adhesive labels or
stickers of any kind to the windscreen directly in
front of the mirror.
The starting assistance enables you to drive off
smoothly on uphill gradients. It is not necessary
to use the handbrake for this.
1. Hold the car in place by pressing the footbrake.
2. Release the footbrake and drive off without
delay.
The starting assistance holds the car for
about 2 seconds after the footbrake has
been released. Depending on the car's load or if
a trailer is being towed, it could roll back slightly
during this period. After releasing the footbrake,
move off swiftly straight away, as the starting
123
Online Edition for Part-No. 01 41 0 159 725 © 09/05 BMW AG
Mobility
There are two photo-cells in the inside mirror
for this purpose. One photo-cell is in the mirror
glass, the other slightly offset on the back of the
mirror.
Reference
Inside and outside mirrors,
automatic-dim*
Use of the handbrake on uphill
gradients
Overview
Wading
BMW advises against the use of mobile
communication equipment such as
mobile phones inside the car, unless they are
directly connected to an outside aerial. Mutual
interference between the car's electronics and
such equipment cannot be entirely ruled out.
There is moreover no guarantee that the radiation generated when such devices are transmitting will be dissipated out of the car's interior.<
Controls
Mobile communication equipment
The risk of aquaplaning increases along with
declining tread depth on the tyres, see also
Minimum tread depth on page 182.
Driving hints
When driving on wet or slushy surfaces,
reduce speed to prevent a wedge of water
forming between the tyre and the road. This situation, known as aquaplaning, means that the
tyre can actually lose contact completely with
the road surface, so that neither can the car be
steered nor the brakes be properly applied.<
Navigation
Aquaplaning
The diesel particle filter collects soot particles
and burns them periodically at high temperatures. This cleaning procedure takes several
minutes. Under some circumstances, you may
notice it by the fact that the engine temporarily
runs more roughly and requires a higher engine
speed for normal power development. In addition, the exhaust may cause some noise and
emit a small amount of smoke, even after the
engine has been switched off.
Entertainment
Diesel particle filter*
Driving precautions
assistance will no longer hold the car after
about 2 seconds and it will start to roll back.<
Safe braking
Your BMW is equipped with ABS as standard.
Where a situation requires you to apply the
brakes hard, you are advised to do so. Since the
car remains steerable, you can avoid obstacles
by turning the steering wheel as smoothly as
possible.
The pulsating sensation at the brake pedal,
combined with the sound of the hydraulic system operating, indicates that ABS is intervening.
Wet roads
In wet conditions or heavy rain, apply the brakes
briefly with slight pedal pressure every few kilometres or miles. When doing so, make sure that
no other road user is endangered. The resulting
heat dries the brake discs and pads. The braking force will then be available immediately if
needed.
Corrosion of brake discs
If the car is used only for short distances, is not
used for lengthy periods or is subjected to only
minor loads, the brake discs will be particularly
susceptible to corrosion and the brake pads will
collect dirt; this is because the necessary brake
pressure for a self-cleaning effect has not been
generated.
When the brakes are applied, corroded discs
tend to judder, and even lengthy brake applications usually fail to eliminate this effect entirely.
When car is parked
Moisture condensate forms in the automatic air
conditioning and is discharged underneath the
car. Traces of water on the ground are therefore
normal.
Before entering a car wash
Fold in the outside mirrors, see page 49, as they
could otherwise be damaged due to the car's
width.
With comfort access and automatic
transmission
Downhill gradients
To avoid impairing the efficiency of the
brake system as a result of overheating,
drive down long or steep descents in the gear
that allows you to keep brake applications to a
minimum. Otherwise even slight continuous
pressure on the brake pedal could cause overheating, brake pad wear or even brake system
failure.<
The engine braking effect can be enhanced by
selecting a lower gear in the automatic transmission's manual mode, right down to 1st gear
if necessary, see page 62. This avoids overburdening the brakes.
Never drive with the clutch held down,
with the transmission in neutral or with
the engine switched off; engine braking action
will not be present, or there will be no power
assistance to the brakes or steering.
Make sure that pedal functions are not impaired
by floor mats, carpets or other objects.<
Insert the remote control in the ignition lock.
The engine can be switched off with the selector lever in position N. See also page 37.
Rule of the road
When entering countries where the traffic
drives on the opposite side of the road to the
country in which your car is registered, certain
measures are necessary to avoid dazzling the
drivers of oncoming vehicles.
Halogen lights
BMW Service is able to supply masking film.
Note the instructions enclosed with the film
when applying.
Xenon headlights*
Do not make adjustments while the headlights are still hot, otherwise there is a risk
of burns.<
124
Online Edition for Part-No. 01 41 0 159 725 © 09/05 BMW AG
Loading
Overview
1. Switch off the light and remove the remote
control from the ignition lock.
Controls
2. In the engine compartment, turn the stoppers on the headlights anti-clockwise and
remove.
> Do not stack items higher than the top edge
of the seat backs.
> Touring:
Extend the partition net, see page 116,
making sure that no objects can penetrate
the net.
Place protective material around sharpedged or pointed objects which could strike
the rear window while the car is on the
move.
125
Online Edition for Part-No. 01 41 0 159 725 © 09/05 BMW AG
Navigation
> When carrying very heavy loads with no
passengers on the back seat, insert each of
the outer seat belts into their opposite
buckles.
Entertainment
> Wrap protective material round sharp corners and edges.
Mobility
Avoid overloading the car, as this could
cause the tyres' load capacity limit to be
exceeded. The tyres could then overheat and
sustain internal damage. This could lead to sudden pressure loss.<
> Position heavy objects low down and as far
forward as possible, ideally directly behind
the rear seat back.
Reference
Load
Driving hints
3. Driving on left: push each lever towards the
middle of the car.
Driving on right: push each lever towards
the outer edge of the car.
Driving precautions
Roof rack*
Securing the load
A special roof rack system is available as an
accessory for your BMW. If it is used, please
comply with the installation instructions supplied.
Mounting points
> Small and relatively light items can be
retained with the tensioning straps, a loadarea net* or other suitable straps.
The mounting points are in the door cutouts or
on the roof rails*.
Loading the roof rack
> BMW Service can supply suitable lashings*
for securing larger or heavier loads. To
secure these lashings, there are four eyes in
the luggage compartment or load area, see
picture.
> Please note the information supplied with
load securing equipment.
Always stow and secure the load as
described above, so that it cannot endanger the car's occupants, for example if sudden
braking or avoiding action is necessary.
Secure lashings only to the lashing eyes, see
illustration, otherwise the lashings could work
loose or the car could be damaged.
Do not exceed the car's permitted gross weight
or the axle load limits, see page 214, otherwise
the car's operating safety may be endangered
and the construction and use regulations
infringed.
Heavy or hard objects should not be carried
loose inside the car, since they could be dislodged, for example by heavy braking, sudden
avoiding action or similar, and endanger the
occupants.<
A loaded roof rack alters the car's road behaviour and steering response quite considerably,
by moving its centre of gravity.
When loading the roof rack, ensure that the
specified roof load limit, the car's gross weight
limit and the axle loads are not exceeded.
The relevant figures are shown under Weights
from page 214.
The roof load must be uniformly distributed and
should not be too large in area. Heavy items
should always be placed at the bottom. Make
sure that there is sufficient clearance for raising
the glass roof and that no objects extend back
far enough to be struck by the luggage compartment lid/tailgate when it is opened.
Correct, secure loading of the roof rack will prevent items shifting or falling off during the journey.
Drive smoothly and avoid violent acceleration,
braking or cornering.
126
Online Edition for Part-No. 01 41 0 159 725 © 09/05 BMW AG
Nose weight
The trailer's nose weight affects the towing
vehicle and thus increases its weight. The
weight of the trailer tow hitch and the nose
weight reduce the maximum payload of your
BMW. Please ensure that these do not cause
the gross weight limit of the towing vehicle to be
exceeded if a trailer is being towed.
Loads
Hold the cover flap against the trim from
beneath, push it in the guide and press on fully.
Trailer tow hitch*
Cars fitted with a trailer tow hitch prior to delivery are equipped with uprated suspension at
the rear axle and a more powerful engine cooling system, as appropriate for the model.
Look after a detachable ball end in accordance
with the manufacturer's operating instructions,
to ensure that it can be fitted and removed without difficulty.
Due to the body reinforcements at the rear end
of the car, the effect of the regenerable bumper
system is limited.
Fitting and removing
The ball hitch is in the luggage compartment or
load area, beneath the floor panel flap.
The procedure for fitting and removing the ball
hitch is described in the enclosed manufacturer's operating instructions.
Do not exceed either the trailer's permitted
gross weight or the specified permitted towing
load for the car. The smaller value is the limit
which should be adhered to.
Tyre pressures
Take great care to check the BMW's and the
trailer's tyre pressures. For the car, the tyre
inflation pressures for heavy loads apply, see
page 182. After each correction of the tyre
pressures, reinitialise the Run Flat Indicator,
see page 87.
For the trailer, comply with the manufacturer's
specifications.
Navigation
Fitting
A low centre of trailer gravity makes the outfit
much more stable and safe to drive.
Entertainment
Take hold of the cover flap for the trailer tow
hitch* by the cutout from beneath, and pull off
to the rear.
When loading the trailer, make sure that
the weight is kept as low as possible and
stowed if possible close to the axle.
Run Flat Indicator
Reinitialise the Run Flat Indicator after a trailer
has been attached or detached, see page 87.
Outside mirrors
Two outside mirrors which bring both rear corners of the trailer into your field of view are
required by law. Mirrors of this kind can be
obtained from BMW Service.
127
Online Edition for Part-No. 01 41 0 159 725 © 09/05 BMW AG
Mobility
Removing
Reference
Cover flap
It is important to ensure that the nose weight is
never less than a minimum of 25 kg, approx.
55 lb. Information about nose weight limits
appears on page 217 onwards. The nose
weight should be kept close to this limit.
Overview
Information about permissible trailer loads
appears on page 217 onwards. BMW Service
will provide information about ways to increase
these load ratings.
Controls
Before a journey
Driving hints
Towing a trailer
Driving precautions
Electrical consumers
Gradients
When towing a caravan, try to avoid operating
electrical equipment for too long at a time, in
order to limit the drain on the car's battery.
In the interest of safety and to avoid holding up
other traffic, do not attempt to climb gradients
steeper than 12Ξ when towing a trailer. If a
supplementary permit for heavier trailer loads
has been obtained, the limit is 8Ξ, see
page 217.
Before starting a journey, check that the
trailer's rear lights are operating correctly.
It is an offence to drive without functioning rear
lights, which would moreover put other road
users at risk.<
Towing a trailer
Observe the speed limit in the country in
which you are driving, but do not exceed
80 km/h, approx. 50 mph, when towing a trailer,
otherwise the outfit may become unstable.<
Counteracting snaking
If the trailer nevertheless begins to snake, the
outfit can only be stabilised by braking hard
immediately. Only attempt to steer out of the
situation if this is absolutely essential, and make
any steering movements as cautiously as possible and without endangering other road users.
Downhill gradients
Special care must be taken when descending
gradients, where a trailer is more susceptible to
snaking.
Before starting to descend, always change
down to the next lower gear, if necessary as far
as 1st gear, and drive down the hill slowly.
Climatic comfort
windscreen*
Trailer Stability Control*
The system helps you to neutralise a trailer's
tendency to swing from side to side. It detects
swinging and automatically brakes the car
promptly so that the car is no longer in a critical
road-speed range and the trailer is stabilised.
The system functions whenever the car is towing a trailer and the power socket for the trailer
is connected, starting at a speed of approx.
65 km/h, approx. 40 mph.
Use the area marked in the illustration for your
garage-door opener, electronic devices for toll
logging, or similar. This area does not have an
infrared-reflecting coating and is clearly distinguishable from inside the car.
If the power socket for the trailer is in use, but no
trailer is attached due to the use of a bicycle carrier with lights, for example, the system may still
be operational in extreme driving situations.
The system is unable to intervene if the trailer
jack-knifes, e.g. on roads that are slippery or
have a loose surface. Trailers with a high centre
of gravity can tip over before a swinging motion
is detected.
The system is not operational if DSC is deactivated or malfunctioning, see page 84.
128
Online Edition for Part-No. 01 41 0 159 725 © 09/05 BMW AG
Online Edition for Part-No. 01 41 0 159 725 © 09/05 BMW AG
Reference
129
Mobility
Entertainment
Navigation
Driving hints
Controls
Overview
Online Edition for Part-No. 01 41 0 159 725 © 09/05 BMW AG
Navigation
This chapter describes how you can enter
destinations and choose your route, so that
your navigation system guides you reliably to
your destination.
Online Edition for Part-No. 01 41 0 159 725 © 09/05 BMW AG
Starting navigation system
Starting navigation system*
Your navigation system can determine the precise position of your car by means of satellites
and guide you reliably to any specified destination.
guidance. A message appears on the control
display if new data from the navigation DVD is
required.
If you change the navigation DVD, a destination
that has not been saved will be deleted.
Navigation DVD
Inserting navigation DVD
A special navigation DVD is required for the
navigation system. This navigation DVD differs
for the Professional and Business navigation
systems. The latest version can be obtained
from BMW Service.
Professional navigation system*
1. Insert the navigation DVD with the label side
uppermost.
2. Wait for several seconds to allow the contents of the DVD to be read in.
Removing navigation DVD
1. Press button 1.
The DVD is ejected part way out of the
drive.
2. Remove the DVD.
If the DVD is not ejected from the drive, it is possible that the drive is blocked. A message
appears on the control display.
Use the lower drive for the navigation DVD.
Business navigation system*
Display in the assistance
window
Professional navigation system:
You can have the route or your car's position
displayed in the assistance window. This information remains displayed even if you change to
another application.
1. Move the controller to the right to change to
the assistance window.
Use the same drive for navigation DVDs and
audio CDs.
All the data required for each route guidance
procedure is held in the navigation system's
buffer memory. The navigation DVD can then
be removed during route guidance. This enables you to listen to audio CDs during route
132
Online Edition for Part-No. 01 41 0 159 725 © 09/05 BMW AG
Overview
2. Press the controller.
Further menu items are displayed.
Controls
3. Select the desired view of the route or
"Vehicle position".
4. Press the controller.
133
Online Edition for Part-No. 01 41 0 159 725 © 09/05 BMW AG
Reference
Mobility
Entertainment
Navigation
Driving hints
The assistance window is constantly updated
as you travel.
Destination input
Destination input
You can choose from the following options for
entering a destination:
3. Select "Navigation" and press the controller.
> Entering a destination manually, see below
> Entering a destination via voice commands*, see page 138
> Selecting the destination via Information,
see page 140
> Selecting a destination from a list, see Destinations list, page 140
> Selecting a destination from the address
book, see page 141
> Selecting home address, see page 144
Once you have selected a destination, you are
ready to start route guidance, see page 147.
Using navigation
Only enter data when the car is standing
still, and always obey the traffic regulations and road signs in the event of any contradiction between the traffic situation and the
instructions given by the navigation system.
Failure to do so may result in an infringement of
traffic laws and put the car's occupants and
other road users at risk.<
iDrive concept, see page 14.
Entering a destination
manually
The wordmatch principle makes the input of
place names and streets easier, see page 146.
This makes it possible to enter different spellings, and names are completed automatically
so that stored place names and streets can be
called up quickly.
1. If necessary, move the highlighted marker
to the uppermost field. Turn the controller
until "Navigation" is selected and press the
controller.
"New destination" is selected.
2. Press the controller.
1. Press the
button.
The start menu is called up.
2. Move the controller to the right to call up
"Navigation".
3. If necessary, move the highlighted marker
to the second field from the top. Turn the
controller until "Address input" is selected
and press the controller.
134
Online Edition for Part-No. 01 41 0 159 725 © 09/05 BMW AG
> If you do not enter a street name, you will be
guided to the centre of the town or city.
> You can skip input of the country, town or
city if you wish to retain previous inputs.
Selecting country
> To delete all numbers or letters:
Move the controller to the right to select
and hold down the controller.
4. Enter more letters if necessary.
The list is gradually narrowed down with
every subsequent letter that you enter.
> To enter spaces, if necessary:
Select the symbol and press the controller.
At least the town/city or its postcode must be
entered in order to start route guidance.
5. If necessary, move the highlighted marker
to the third field from the top. Turn the controller until the town or city name is selected
in the list and press the controller.
Mobility
Entering a destination by town or city
name
1. Select "City" or the town/city displayed and
press the controller.
2. Select the initial letter and press the controller.
A list of all places starting with that letter is
shown on the control display.
135
Online Edition for Part-No. 01 41 0 159 725 © 09/05 BMW AG
Reference
2. Select destination country and press the
controller.
With the Professional navigation system,
"Europa" can also be selected.
Entertainment
Navigation
1. Select "Country" or the country displayed
and press the controller.
The list of available countries is displayed.
> To delete individual numbers or letters:
Move the controller to the right to select
and press the controller.
Driving hints
The system in addition supports you with the
following special features:
Controls
Overview
3. To delete any letters, if necessary:
Destination input
Entering destination via postcode
Entering a street and junction
1. Select "City" or "City / Postcode" and press
the controller.
1. Select "Street" or the street displayed and
press the controller.
2. Entering postcode:
Select the individual characters and press
the controller each time.
2. Enter the street.
The street is entered in the same way as the
town/city.
> To enter spaces, if necessary:
Select the symbol and press the controller.
> To delete individual numbers or letters:
Move the controller to the right to select
and press the controller.
> To delete all numbers or letters:
Move the controller to the right to select
and hold down the controller.
3. Select postcode and press the controller.
The name of the appropriate destination is
displayed.
4. Move the highlighted marker to the third
field from the top. Turn the controller until
the destination is selected and press the
controller.
Enter the junction in the same way as the street.
Entering a street without indicating a
town/city
With the Professional navigation system:
You can also enter a street without indicating a
town or city. In this case, all streets are offered
within the country indicated. The respective
town or city is shown after the street name.
If a town or city has already been entered, this
entry can be cancelled. This may be useful in
instances where the desired street cannot be
found in the indicated town or city because it
belongs to a different suburb, for example.
1. Move the highlighted marker to the uppermost field.
The
arrow is selected.
Entering road, house number and
junction
After entering the street, you can add the junction or house number.
136
Online Edition for Part-No. 01 41 0 159 725 © 09/05 BMW AG
1. Select "Building number" and press the
controller.
2. To enter the house number:
Select the individual characters and press
the controller each time.
3. Move the highlighted marker to the third
field from the top. Turn the controller until
the house number is selected and press the
controller.
If route guidance does not start straight away:
Select "Add to destination list" and press the
controller.
The destination is stored in the destinations list,
see page 140.
Overview
Controls
Driving hints
Entering a house number
Select "Start guidance" and press the controller.
Route guidance is started immediately.
Displaying information on the
destination
Business navigation system:
Only house numbers that are stored on the
navigation DVD for the street in question
can be entered.
Business navigation system:
If not all the house numbers in a street are
stored on the navigation DVD, a selection
with ranges of numbers is displayed.
Select "Information" and press the controller.
137
Online Edition for Part-No. 01 41 0 159 725 © 09/05 BMW AG
Reference
Mobility
For further notes on the information, see
page 140.
Navigation
3. Move the highlighted marker to the second
field from the top and enter the street.
Starting route guidance from a manual
destination input
Entertainment
2. Turn the controller to the right until a
request appears to enter a street within the
country, and press the controller.
Destination input
Entering a destination via
voice commands*
In conjunction with the Professional navigation
system, you can enter a desired destination via
the voice input system. To enter a destination, it
is possible at any time to make entries via voice
commands or via iDrive. To do so, simply reactivate the voice input system, if necessary.
You can have the possible commands
read aloud to you via {Options}.<
1. Press the
button on the steering wheel
or in the centre console.
2. {Address input}
The system suggests a town or city.
2. Select place or country:
{Yes}
or to select another place:
{No}
Select entry, e.g. {Entry 3}.
The following options are available:
{next page}: other entries in the list are
displayed
{Repeat}: the town or city can be
spelled again.
The town or city can also be selected from the
list via iDrive:
Turn the controller until the destination is
selected and press the controller.
Selecting a country
Say the destination country.
Say the destination country in the language of
the voice input system.
Entering a destination
To enter a destination, spell it in the manner in
which it is spelled in the destination country.
Say the letters fluently and at normal volume,
and avoid unnatural emphases and pauses.
1. Spell the name of the town or city:
Say at least the first three letters of the
town or city. The more letters you say,
the more precisely the system will recognise the town or city.
The system can propose up to 20 destinations that match your entries. Up to 6
entries are displayed at a time on the control
display.
Entering a street and a house number
The street is entered in the same manner as the
town or city.
To enter the house number:
Say the house number.
Starting route guidance
{Start guidance}
Route guidance is started immediately.
Saving a destination
The destination is added to the destination list
or can be stored in the address book.
{Add to destination list} or
{Add to address book}.
138
Online Edition for Part-No. 01 41 0 159 725 © 09/05 BMW AG
Controls
1. Select "Navigation" and press the controller.
"New destination" is selected.
2. Press the controller.
4. Turn the controller to alter the scale.
Move the controller in the desired direction
to shift the map.
The controller can be moved left, right, forward, back and also diagonally.
3. Select "Destination input map" and press
the controller.
Overview
> Around the last destination entered if
route guidance is switched off
5. To transfer the destination for route guidance or save it, press the controller.
The selected destination and further menu
items are displayed.
6. Select the desired menu item:
> "Start route guidance" starts route guidance.
> "Show vehicle position" places your
car's position at the centre of the map.
> "Show destination position" places the
current destination at the centre of the
map.
> "Proceed" changes back to the "Destination input map".
to exit the menu.
139
Online Edition for Part-No. 01 41 0 159 725 © 09/05 BMW AG
Reference
Mobility
>
Driving hints
If you know only the position of a place or street,
you can enter the destination with the aid of a
map. You can narrow down the destination on
the map by means of cross-hairs and then
transfer it for route guidance.
> Around the current destination during
route guidance
Navigation
Professional navigation system:
A map section is displayed on the control
display:
Entertainment
Selecting a destination from a
map
Destination input
7. Press the controller.
The map for destination input can also be called
up in the map view:
Select the
symbol and press the controller.
6. Make your selection, e.g. "Hotels and restaurants", and press the controller.
The control display shows destinations
arranged by distance or in alphabetical
order.
Selecting the destination via
Information
You can call up selected destinations, e.g.
hotels, tourist attractions or hospitals, phone
them and transfer these destinations for route
guidance if you choose.
1. Select "Navigation" and press the controller.
"New destination" is selected.
2. Press the controller.
3. Select "Information" and press the controller.
7. Select a destination and press the controller.
8. Select a menu item:
> To transfer the address to the destinations list and start route guidance:
Select "Accept as destination" and
press the controller.
> To establish a telephone connection:
Select "Place call" and press the controller.
> Business navigation system:
To display the address and phone
number, select "Details" and press the
controller.
4. Select place:
To exit the menu:
Select the
arrow and press the controller.
> "On destination"
> "On location"
> "Other place"
> Business navigation system:
"On country"
Destinations list
The last 20 destinations entered into the system are shown in the destinations list. You can
call up these destinations and incorporate them
into route guidance.
If you are planning a longer journey, for example, you can save all the destinations you wish
to drive to in the destinations list in advance,
see Entering a destination manually on
page 134.
5. Press the controller.
140
Online Edition for Part-No. 01 41 0 159 725 © 09/05 BMW AG
> To save the entry:
Select "Add to address book".
> To display information on the destination:
Select "Info on destination".
The destination last entered is listed first in the
destinations list.
This symbol identifies the current destination.
To show other destinations in the destinations
list:
Turn controller.
Incorporating the destination into
route guidance
1. Select the desired destination from the destinations list and press the controller.
2. Select "Guidance" and press the controller.
> To delete the entry:
Select "Delete entry".
> To delete all entries:
Select "Delete list". Route guidance is
switched off.
> To change the entry:
Select "Change". For operation, see
Entering a destination by town or city
name, page 135.
3. Press the controller.
Address book
Calling up the address book
Entertainment
iDrive concept, see page 14.
Controls
2. The selected destination can be edited:
Driving hints
1. Select the desired destination in the destinations list and press the controller.
Overview
Editing the destination list
Navigation
Select "Navigation" and press the controller.
You can save approx. 100 destinations in the
address book.
141
Online Edition for Part-No. 01 41 0 159 725 © 09/05 BMW AG
Reference
Storing destinations in the address
book
Mobility
Select "Address book" and press the controller.
Destination input
Business and Professional navigation
systems
1. Entering a destination manually, see
page 134.
2. Select "Add to address book" and press the
controller.
You can also save a destination from the destinations list in the address book, see page 141.
Professional navigation system
Business navigation system
1. Select "Address book" and press the controller.
2. Move the highlighted marker to the second
field from the top. Turn the controller until
"Save location" is selected and press the
controller.
The name given can be modified. Operating
principle, see Entering a destination manually, page 134.
1. Select "Address book" and press the controller.
3. Select "Save address" and press the controller.
2. Select "New address" and press the controller.
You can transfer your current position to the
address book even if you have left the area digitised on the navigation DVD. To do this, you
have to enter a name.
Professional navigation system
1. Select "Address book" and press the controller.
3. Select "Enter address yourself" and press
the controller.
2. Move the highlighted marker to the second
field from the top. Turn the controller until
"New address" is selected and press the
controller.
4. Enter the name and address.
5. Select "Save address" and press the controller.
The entry is saved in the address book.
You can also save a destination from the destinations list in the address book, see page 140.
Saving the car's position*
The car's position can be transferred to the
address book.
3. Select "Use current location as address"
and press the controller.
The name given can be modified. Operating
142
Online Edition for Part-No. 01 41 0 159 725 © 09/05 BMW AG
4. Select "Save address" and press the controller.
1. Select "Address book" and press the controller.
You can transfer your current position to the
address book even if you have left the area digitised on the navigation DVD. To do this, you
have to enter a name.
2. Select an entry and press the controller.
Overview
Business navigation system
You can change the name of the entry.
3. Select "Edit" and press the controller.
Controls
Selecting destinations from the
address book
1. Select "Address book" and press the controller.
The stored entries are displayed on the
control display.
4. Change the name.
Operating principle, see Entering a destination manually, page 134.
Driving hints
principle, see Entering a destination manually, page 134.
1. Select "Address book" and press the controller.
2. Select an entry and press the controller.
2. Select an entry and press the controller.
3. Select "Edit" and press the controller.
Entertainment
To start route guidance:
Select "Start guidance" and press the controller.
Navigation
Professional navigation system
Changing destinations from address
book
Deleting destinations from address
book individually
1. Select "Address book" and press the controller.
Mobility
4. Change entry.
Operating principle, see Entering a destination manually, page 134.
143
Online Edition for Part-No. 01 41 0 159 725 © 09/05 BMW AG
Reference
2. Select an entry and press the controller.
Destination input
3. Select "Delete" and press the controller.
Business navigation system
1. Select "Address book" and press the controller.
2. Move the highlighted marker to the second
field from the top. Turn the controller until
"Home address" is selected and press the
controller.
Deleting all destinations from address
book
1. Call up the start menu.
2. Press the controller to call up the menu.
3. Select "Vehicle settings" and press the
controller.
4. Select "Delete data" and press the controller.
3. Select "Use current location as address" or
"Save current destination" and press the
controller.
To use your home address as the destination:
Select "Start guidance" and press the controller.
To display the home address:
Select "Details" and press the controller.
Professional navigation system
1. Select "Address book" and press the controller.
5. Select "Delete address book" and press the
controller.
6. Select "Yes" and press the controller.
2. Move the highlighted marker to the second
field from the top. Turn the controller until
"Home address" is selected and press the
controller.
Saving home address
You can save the car's position or the current
destination as your home address in the
address book. This entry appears in second
place in the address book.
3. Select "Use current location as address" or
"Save current destination" during route
guidance and press the controller.
144
Online Edition for Part-No. 01 41 0 159 725 © 09/05 BMW AG
1. Select "Home address" and press the controller.
2. Select "Edit" and press the controller.
Operating principle, see Entering a destination manually, page 134.
> "Fast route"
The fast route, being a combination of
the shortest possible route and the fastest roads
Selecting a route
> "Short route"
Short route, irrespective of how fast or
slow progress will be
You can influence the route calculated by
selecting various route criteria. You can change
the route criteria as often as you like during destination input or during route guidance.
4. Press the controller.
The route is planned according to fixed rules.
The type of road is taken into account, e.g.
motorways or winding roads. Details of the road
types are stored on the navigation DVD. For this
reason, the route proposed by the system will
not necessarily be the one the driver expects
from experience.
The route criterion is selected.
Altering route criteria
1. Select "Navigation" and press the controller.
2. Move the highlighted marker to the third
field from the top. Turn the controller until
"Route criteria" is selected and press the
controller.
Overview
> "Exclude motorways"
Motorways are avoided as far as possible.
5. Select additional criteria for the route as
appropriate, then press the controller:
> "Dynamic route"
The route is automatically changed in
the event of traffic congestion. Depending on the type of road and the nature
and length of the traffic congestion, the
route can also be calculated such that it
cuts across the traffic congestion.
Controls
To change the entry:
Driving hints
2. Select "Start guidance" and press the controller.
> Professional navigation system:
"Use motorways"
Motorways and arterial roads are given
priority.
Navigation
1. Select "Home address" and press the controller.
3. Select a route criterion for the route:
Entertainment
To use your home address as the destination:
To exit the menu:
Select the
arrow and press the controller.
The various criteria are listed on the control
display.
The route criteria can also be changed in the
arrow or map view:
Select the corresponding symbol and press
the controller.
145
Online Edition for Part-No. 01 41 0 159 725 © 09/05 BMW AG
Reference
> "Exclude ferries"
Ferries are avoided as far as possible.
Mobility
> "Exclude toll roads"
Toll roads are avoided as far as possible.
Destination input
Wordmatch principle
The wordmatch principle makes the input of
place names and streets easier. It compares
your destination inputs continuously with the
data stored on the navigation DVD, and reacts
even if slight discrepancies are found. This has
the following advantages for you:
> You can also input place names in a form
which differs from the official version, provided that you use a form that is familiar in
another country or language.
Example:
If you are using the German navigation DVD,
instead of the German name "München"
you can enter the English equivalent
"Munich" or the Italian equivalent
"Monaco".
> When entering place names or streets, the
system completes the name automatically
as soon as it has been identified beyond
doubt.
> The system only accepts name entries
beginning with letters that are stored on the
navigation DVD. This makes it impossible
for an incorrect name or unknown
addresses to be accepted.
146
Online Edition for Part-No. 01 41 0 159 725 © 09/05 BMW AG
1. If necessary, move the highlighted marker
to the uppermost field. Turn the controller
until "Navigation" is selected and press the
controller.
In the arrow or map view
Select the
symbol and press the controller.
Controls
iDrive concept, see page 14.
Ending/Resuming route
guidance
2. Turn the controller to select the destination
or destinations list and press the controller
or enter a new destination, see page 134.
In the destinations list
Driving hints
Starting route guidance
Overview
Route guidance
This symbol identifies the current destina-
2. Select "Guidance" and press the controller.
During route guidance, you can operate other
equipment items at any time via iDrive. If you
need to make a turn, you will be alerted in good
time by means of spoken instructions and
direction arrows in the display.
Mobility
Route guidance can also be started from the
arrow or the map view:
Select the
symbol and press the controller.
Entertainment
Once the route has been calculated, you are
guided by means of arrows on the control display.
With the Professional navigation system, an
optional map view is available.
1. Select the current destination and press the
controller.
If you did not reach your destination before the
end of your last journey, the following query will
147
Online Edition for Part-No. 01 41 0 159 725 © 09/05 BMW AG
Reference
3. Select "Guidance" and press the controller.
Navigation
tion.
Route guidance
appear at the start of the next journey:
"Continue guidance?".
3
Selecting route criteria
4
Starting/ending guidance
Route guidance starts automatically after a
short while.
5
Arrow to destination as the crow flies
To start route guidance immediately:
Select "Yes" and press the controller.
6
Distance to the next change of direction
7
Car's position
8
Direction of travel
> Outline of an arrow:
Route guidance on the calculated route
Displaying the route
> Solid arrow:
Arrow points to the calculated route as
the crow flies if the car is in an area not
recorded on the navigation DVD, e.g. in a
multi-storey car park.
Business navigation system:
Arrow points to the destination as the
crow flies if the navigation DVD has been
ejected and the route could not be calculated.
Various modes are available for displaying the
course of the route during route guidance,
depending on specification.
From another menu, you can switch
directly to the screen last shown, see
Comfort menu item selection, page 16.<
Displaying arrow view
1. Select "Navigation" and press the controller.
2. Move the highlighted marker to the fourth
field from the top. Turn the controller until
"Arrow view" is selected and press the controller.
Depending on your car's equipment version,
the expected time of arrival and the distance to
the destination will be displayed in the top or
bottom line of the control display.
The arrows appear in a different fashion before
a change of direction.
The arrow view is displayed.
1
Street name for change of direction
2
Distance to change of direction
3
Change of direction
To exit the menu:
Select the
arrow and press the controller.
1
Switching spoken instructions on/off
2
Calling up traffic information manually
148
Online Edition for Part-No. 01 41 0 159 725 © 09/05 BMW AG
Professional navigation system:
You can have the car's position shown on a
map. After starting route guidance, the planned
route is shown on the map.
8
Arrow to destination as the crow flies
1. Select "Navigation" and press the controller.
To exit the menu:
Select the
arrow and press the controller.
2. Move the highlighted marker to the fourth
field from the top. Turn the controller until
the desired map view is selected:
If the scale is smaller than 500 km or 250 miles,
you can choose whether to align the map pointing towards north, in the direction of travel, or
in perspective. At scales from 500 km or
250 miles upward, the map is always displayed
pointing towards north.
> "Map north-oriented"
> "Map, indicating dir. of travel"
> "Perspective"
The estimated time of arrival and the distance
from the destination are displayed on the bottom line of the control display.
Changing map view
Select the corresponding symbol and press the
controller.
The next map view is displayed.
Overview
Calling up traffic information manually
Controls
7
Driving hints
Displaying map view
Changing the scale
You can have the roads and towns along the
route displayed during route guidance.
The distances to be covered along each section
of the route are likewise displayed.
1. Select "Navigation" and press the controller.
Switching spoken instructions on/off
2
Starting/ending guidance
3
Selecting the destination via map
4
Displaying/hiding information last selected,
see Selecting the destination via Information, page 140
5
Changing map view
>
>
6
"Map north-oriented"
"Map, indicating dir. of travel"
"Perspective"
Altering route criteria
149
Online Edition for Part-No. 01 41 0 159 725 © 09/05 BMW AG
Reference
>
Mobility
1
2. Move the highlighted marker to the third
field from the top. Turn the controller until
"Route list" is selected and press the controller.
Entertainment
Displaying roads and places along the
route
3. Press the controller.
Navigation
Turn the controller to alter the scale.
Route guidance
Professional navigation system:
Direction arrows and congestion warnings are
also displayed.
until "Languages" is selected and press the
controller.
To exit the menu:
Select the
arrow and press the controller.
Route guidance by spoken
instructions
Switching spoken instructions on/off
During route guidance, voice messages can be
switched on or off in the arrow view or the map
view:
5. Turn the controller until "Voice output of
nav. system on" is selected and press the
controller.
1. In the map view:
Move the controller to the left to change
fields.
2. In the arrow and map view:
Turn the controller until the
symbol is
selected and press the controller.
Spoken instructions are switched on.
The setting is saved for the remote control currently in use*.
Repeating and cancelling spoken
instructions
To switch off the spoken instructions at any
time:
1. Call up the start menu.
2. Press the controller to call up the menu.
3. Turn the controller until "Display settings"
is selected and press the controller.
4. If necessary, move the highlighted marker
to the uppermost field. Turn the controller
You can also make the following adjustments
with the programmable buttons on the steering
wheel, see page 51:
> Having a spoken instruction repeated:
Press the button.
> Switching spoken instructions on/off:
Press and hold down the button.
> With the Business navigation system, to
switch off voice messages during an
announcement:
Press the button.
150
Online Edition for Part-No. 01 41 0 159 725 © 09/05 BMW AG
"Route via" is selected and press the controller.
The volume can be adjusted only while a spoken instruction is being issued.
1. Have the last spoken instruction repeated if
desired.
Overview
Adjusting the volume of the spoken
instructions
3. Select a point and press the controller.
Controls
2. Turn the knob during the spoken instruction
until the desired volume is obtained.
The setting is saved for the remote control currently in use.
Avoiding sections of route
You can also instruct the navigation system to
deviate from sections of the route during route
guidance. You do this by specifying after how
many kilometres of the original route you wish
to return to it.
Changing the route
1. Select "Navigation" and press the controller.
Changing the course of a route
2. Move the highlighted marker to the third
field from the top. Turn the controller until
"New route for" is selected and press the
controller.
Business navigation system:
During route guidance, you can specify up to
two points by which the route should pass, e.g.
places or motorway intersections. These points
are predetermined by the navigation system
and depend on the length of the route, among
other factors.
1. Select "Navigation" and press the controller.
Navigation
This volume is independent of the volume of the
audio and video sources.
Entertainment
To exit the menu:
Select the
arrow and press the controller.
Driving hints
4. Select "Calculate" and press the controller.
The new route is calculated.
> With the Professional navigation system, throughout the entire route
> With the Business navigation system, for
up to 50 km or 50 miles
151
Online Edition for Part-No. 01 41 0 159 725 © 09/05 BMW AG
Reference
A particular section of the route can be
avoided:
Mobility
2. Move the highlighted marker to the third
field from the top. Turn the controller until
Route guidance
3. Turn the controller to enter the desired
value, then press the controller.
4. Business navigation system:
Select "Calculate" and press the controller.
The route is recalculated.
To exit the menu without altering the route:
Select the
arrow and press the controller.
Traffic information*
At any time you can have traffic information displayed by radio stations that broadcast traffic
situation information: Traffic Message Channel
TMC. This traffic information is constantly
updated with the aid of measurements from
traffic control centres and information from
congestion detectors.
The traffic information relevant to the route you
are following is displayed automatically during
route guidance. It can also be called up manually via iDrive. With the Professional navigation
system, the traffic information is displayed in
the map view.
Switching traffic information
transmission on/off
iDrive concept, see page 14.
5. Turn the controller until "TMC" is selected
and press the controller.
Traffic information can be transmitted
and displayed.
Selecting TMC stations
Business navigation system
1. Call up the start menu.
2. Press the controller to call up the menu.
3. Select "Traffic information settings" and
press the controller.
4. Select "TMC" and press the controller.
5. Select a TMC station and press the controller.
"TMC AUTO": automatic selection of the
TMC station with the strongest received
signal.
1. Call up the start menu.
2. Press the controller to call up the menu.
Professional navigation system
3. Turn the controller until "Traffic information
settings" is selected and press the controller.
1. Call up the start menu.
4. Professional navigation system:
If necessary, move the highlighted marker
to the uppermost field. Turn the controller
until "Traffic information" is selected and
press the controller.
Business navigation system:
If necessary, move the highlighted marker
to the uppermost field. Turn the controller
until "TMC" is selected and press the controller.
2. Press the controller to call up the menu.
3. Select "Traffic information settings" and
press the controller.
4. Select "Traffic information" and press the
controller.
5. Select a TMC station and press the controller.
152
Online Edition for Part-No. 01 41 0 159 725 © 09/05 BMW AG
Professional navigation system:
During route guidance, traffic information
along the planned route will be marked by
means of a triangle with a red border.
Driving hints
During route guidance, traffic information can
be switched on or off in the arrow view or the
map view:
4. To display detailed traffic information:
Select an entry and press the controller.
This symbol will appear inside a red border if
traffic information is available for the planned
route.
symbol and press the controller.
To exit the menu:
Select the
arrow and press the controller.
Traffic information symbols
To call up the traffic information at any time:
1. Call up the start menu.
2. Move the controller to the right to call up
"Navigation".
3. Select "Traffic information" and press the
controller.
Traffic event at map scale larger than
10 km or 5 miles, arrow points in
affected direction of travel
Several traffic events are at the same
location on the map
Traffic light failure
Roadworks
Transport of hazardous load
Oncoming vehicle
Mobility
Undefined traffic obstruction
Height restriction
No parking
153
Online Edition for Part-No. 01 41 0 159 725 © 09/05 BMW AG
Reference
Select the
Navigation
Calling up traffic information manually
Overview
Business navigation system:
During route guidance, traffic information
concerning the planned route is shown at
the top of the list. It is indicated by a triangle
with red border.
Controls
The control display will show the current
traffic information, sorted by distance.
Entertainment
"AUTO": automatic selection of the TMC
station with the strongest received signal.
Route guidance
Along the planned route
Fog
Symbol with red border, together with the traffic
obstruction symbol.
Slippery road
Away from the planned route
Cross winds
> Map scale up to 10 km or 5 miles:
Symbol with grey border, together with the
traffic obstruction symbol
Smog
> Map scale from 20 km or 10 miles:
Symbol with grey border and an arrow
pointing in the appropriate direction
Road closed
Risk of hold-ups
Stop-and-go traffic
Traffic information during route
guidance
Congestion
If the navigation system receives traffic information and "Dynamic route" is not selected,
within approx. 100 km, approx. 50 miles of the
traffic obstruction, you are provided with specific information such as the length of the congestion.
The last possible turning to leave the route is
displayed to you shortly before you reach it.
Icy roads
Uneven surface
Accident
Narrow road
This information is still displayed if you have
called up another application on the control display.
Delay
Representation of traffic information in
the map view
Avoiding congestion
Professional navigation system:
The traffic information symbols are shown in
the map view up to a scale of 200 km or
100 miles.
At scales of up to 10 km or 5 miles, additional
information is displayed. The length, direction
and severity of traffic congestion are shown by
arrows along the route, e.g.:
Slow-moving traffic
Stop-and-go traffic
Congestion
Professional navigation system:
Select "Plan detour" and press the controller.
The navigation system calculates a new
route to avoid the congestion and then
takes you back onto the original route.
Congestion in both directions
154
Online Edition for Part-No. 01 41 0 159 725 © 09/05 BMW AG
Overview
Select "Dynamic route planning" and press
the controller.
The navigation system calculates a route
that depends on the road type and the
nature and length of the traffic congestion.
The route may lead through the traffic
obstruction or avoid the congestion and
then take you back onto the original route.
With the Professional navigation system, you
can also have the car's position shown on a
map, see page 149.
Controls
Business navigation system:
Displaying the car's position*
You can have the car's position displayed even
with route guidance switched off.
Driving hints
1. Select "Navigation" and press the controller.
Entertainment
Navigation
2. Move the highlighted marker to the fourth
field from the top. Turn the controller until
"Vehicle position" is selected and press the
controller.
If the navigation system is unable to identify a
name for your present position, it is displayed
as degrees longitude and latitude.
To exit the menu:
Select the
arrow and press the controller.
155
Online Edition for Part-No. 01 41 0 159 725 © 09/05 BMW AG
Reference
Mobility
The current position of your BMW is displayed.
What to do if ...
What to do if ...
What to do if ...
> a navigation DVD has been inserted but a
request to insert the DVD is displayed on
the control display?
The navigation DVD is possibly not the correct DVD for the navigation system. Check
the DVD's label.
posed route and the system requires a few
seconds to calculate a new route.
> the navigation system does not respond to
your inputs?
If the battery has been disconnected, up to
10 minutes may elapse before the system is
fully functional again.
> you call up your car's current position, but
the display is not accurate?
You are in a poor-reception area or in an
area not covered by the navigation DVD, or
the system is currently calculating your
position. Reception will normally be possible outdoors.
> a destination is not transferred to the route
guidance system?
The data for the destination is not available
on the navigation DVD currently in use.
Choose a destination as close as possible
to the original one.
> a destination without a street is not transferred to the route guidance system?
No city centre can be determined on the
navigation DVD for the place specified.
Enter any road, or a specific destination
such as the station, for the town or city in
question, then start route guidance.
> you wish to input a destination, but the correct letter of the alphabet cannot be
selected?
The data for the destination is not available
on the navigation DVD currently in use. In
this case the system will not let you choose
the letters of an address it cannot recognise. Choose a destination as close as possible to the original one.
> directions cease to be given immediately
before junctions during route guidance?
You are driving in an area for which full digital information is not yet available on the
navigation DVD. Instead of an arrow indicating a turn, you will see an arrow which indicates the general direction of your planned
route. Or you have deviated from the pro156
Online Edition for Part-No. 01 41 0 159 725 © 09/05 BMW AG
Online Edition for Part-No. 01 41 0 159 725 © 09/05 BMW AG
Reference
157
Mobility
Entertainment
Navigation
Driving hints
Controls
Overview
Online Edition for Part-No. 01 41 0 159 725 © 09/05 BMW AG
Entertainment
This chapter tells you how to operate the radio,
CD and TV and adjust the tone settings for
these systems.
Online Edition for Part-No. 01 41 0 159 725 © 09/05 BMW AG
On/off and settings
On/off and settings
The following audio and video sources share
the same controls and adjustment options:
1
> Professional radio* or
Business radio
Sound output for entertainment systems
on/off, volume
> Press: to switch on/off.
When switched on, the last radio station
tuned, CD track or TV channel is called
up.
> CD player
> CD changer*
> Turn: to adjust the volume.
> Television, TV*
2
3
Controls
4
Drive for audio CD
CD eject
Station/track search
> Changing radio stations.
The audio and video sources can be operated
via:
> Selecting tracks for CD player and CD
changer.
> Buttons next to CD player
> Changing TV channels.
> iDrive
> Buttons on the steering wheel, see page 9
Buttons near the CD player
The layout of the buttons may vary according to
specification.
Specification with one disc drive:
5
Drive for navigation DVD for Professional*
navigation system.
Operation via iDrive
iDrive concept, see page 14.
1. Press the
button.
The start menu is called up.
2. Move the controller to the rear to call up
"Entertainment".
Specification with two disc drives:
There is a choice of:
> "FM" and "AM": radio reception
> "CD": CD player or CD changer
> "TV": TV reception
> "Set": depending on the audio source in
question, further settings can be made, e.g.
for the radio: switch traffic reports* on/off,
update stations with the strongest received
160
Online Edition for Part-No. 01 41 0 159 725 © 09/05 BMW AG
1. Press the
button.
The start menu is called up.
This symbol on the control display indicates that the sound output has been switched
off.
3. Select "Entertainment settings" and press
the controller.
Adjusting volume
4. Select "Tone" and press the controller.
Entertainment
You can also adjust the volume with buttons on
the steering wheel, see page 9.
The setting is saved for the remote control currently in use.
Adjusting the volume of traffic reports*
Turn knob 1 during a traffic report until the
desired volume is obtained.
This volume is retained for subsequent traffic
reports. If other audio and video sources are set
louder than the traffic reports, the volume of an
announcement is raised correspondingly.
Overview
2. Press the controller to call up the menu.
In cars equipped with a single disc drive, sound
output remains available for approx. 20 minutes
after the ignition has been switched off.
All you have to do is switch sound output back
on.
Turn knob 1 next to the CD player until the
desired volume is obtained.
Controls
Altering tone settings
To switch the sound output for entertainment
systems on/off:
Press knob 1 next to the CD player.
Driving hints
Switching on/off
The settings are saved for the remote control
currently in use.
Navigation
The selected audio source is saved for the
remote control currently in use.
You can alter various tone settings, e.g. treble
and bass or the speed-dependent volume
increase.
The tone settings are applied to all audio
sources.
The tone settings can also be selected if you
have called up "Entertainment" in the start
menu:
Select "Set" and then "Tone", and press the
controller.
161
Online Edition for Part-No. 01 41 0 159 725 © 09/05 BMW AG
Mobility
From another menu, you can switch
directly to the screen last shown, see
Comfort menu item selection page 16.<
Tone control
Reference
signal, store stations, tone control, sample
stations.
On/off and settings
Treble and bass
1. Select "Treble / Bass" and press the controller.
2. Move the controller to the left or right to
select "Treble" or "Bass".
3. Turn the controller until the desired setting
is obtained.
1. Select "Speed dependent volume" and
press the controller.
2. Turn the controller:
The setting is adopted; you can now switch
to another field.
Professional LOGIC7 hifi system*
Balance and fader
You can select a room acoustics effect that
improves the room acoustics in all frequency
ranges.
You can adjust volume distribution in the same
way as "Treble / Bass".
1. Select "LOGIC7 room acoustics" and press
the controller.
> "Balance": left/right volume distribution
> "Fader": front/rear volume distribution
Speed-dependent volume control
The speed-dependent volume control automatically boosts the volume as the car's speed
increases. You can select various stages for the
increase in volume.
162
Online Edition for Part-No. 01 41 0 159 725 © 09/05 BMW AG
Resetting the tone settings
You can reset all tone settings to the default
setting.
1. Call up the start menu.
2. Press the controller to call up the menu.
Overview
2. Select "Concert hall" or "Theatre".
3. Select "Entertainment settings" and press
the controller.
5. Select "Reset" and press the controller.
3. Press the controller.
LOGIC7 room acoustics are switched on.
Controls
4. Select "Tone" and press the controller.
To switch off the room acoustics effect:
Select "Off" and press the controller.
Driving hints
LOGIC7 and the LOGIC7 logo are registered
trademarks of Lexicon, Inc., a Harman International Group company.
Equaliser*
You can adjust individual audio frequency
ranges.
Entertainment
Navigation
1. Select "Equalizer" and press the controller.
3. Turn the controller until the desired setting
is obtained.
163
Online Edition for Part-No. 01 41 0 159 725 © 09/05 BMW AG
Reference
Mobility
2. Move the controller to the left or right to
select the desired frequency range.
Radio
Radio
Your radio is designed for receiving the FM and
AM wavebands:
> FM: stations on the VHF waveband
> AM: stations on the LW*, MW and SW*
wavebands
If no station is displayed for "Autostore" or the
stations displayed can no longer be picked up,
update the stations with the strongest reception signal, see page 165.
Changing stations
Listening to the radio
Turn the controller.
Press the knob if sound output is switched off.
iDrive concept, see page 14.
1. Press the
button.
The start menu is called up.
2. Move the controller to the rear to call up
"Entertainment".
3. If necessary, move the highlighted marker
to the uppermost field. Turn the controller
to select "FM" or "AM".
In addition to the stations currently displayed,
you can have stations for a different selection
criterion displayed.
Professional radio*
You can choose between the following selection criteria:
> "All stations":
Stations that can currently be received on
the "FM" waveband.
> "Autostore":
The stations with the strongest reception
signal on the "AM" waveband.
> "Memorised stations":
Stations that you have previously memorised, see page 166.
Business radio
You can choose between the following selection criteria:
4. Press the controller.
Stations are shown on the control display
according to a variety of selection criteria, e.g.
for Professional* radio "All stations".
> "Autostore":
The stations with the strongest reception
signal, see page 165.
> "Memorised stations":
Stations that you have previously memorised, see page 166.
164
Online Edition for Part-No. 01 41 0 159 725 © 09/05 BMW AG
To stop Scan:
1. Move the highlighted marker to the second
field from the top.
1. Press the controller.
2. Turn the controller until the desired selection criterion is selected and press the controller.
Scan is interrupted and the selected station is
retained.
2. Select "Scan" and press the controller.
Overview
Changing selection criteria
To stop Scan, press the button again.
Frequency selection, manual
In "Manual frequency selection" you can select
stations that are received in addition to those
displayed.
Press
button for the corresponding direction.
The next station displayed will be called up.
You can also change the stations with buttons
on the steering wheel, see page 9.
1. Select "FM" or "AM" and press the controller.
2. Move the highlighted marker to the second
field from the top.
3. Select "Manual frequency selection" and
press the controller.
Navigation
Sampling stations, Scan
The stations on the current waveband are automatically sampled in succession.
1. Select "FM" or "AM" and press the controller.
"Set" is selected.
2. Press the controller.
Further menu items are displayed.
3. Select "Scan" and press the controller.
4. Turn the controller to select a particular
function.
Entertainment
Buttons next to CD player
Driving hints
Press and hold down the
button for longer
in the appropriate direction to start Scan.
Controls
Buttons next to CD player
Scan starts.
1. Select "FM" or "AM" and press the controller.
2. Move the highlighted marker to the second
field from the top.
165
Online Edition for Part-No. 01 41 0 159 725 © 09/05 BMW AG
Reference
If you move out of the reception range of the
stations originally received on a longer journey,
you can update the list of stations with the best
reception.
Mobility
Updating station with best reception
signal
Radio
3. Select "Autostore" and press the controller.
"Set" is selected.
3. Select the desired frequency or station.
"Set" is selected.
4. Press the controller.
Further menu items are displayed.
4. Press the controller.
Further menu items are displayed.
5. Select "Autostore" and press the controller.
5. Select "Save" and press the controller.
The display of stations with the best reception
is updated. The frequencies of the stations are
displayed.
"Memorised stations" is displayed.
Memorising stations
1. If necessary, move the highlighted marker
to the uppermost field. Turn the controller
to select "FM" or "AM" and press the controller.
"Set" is selected.
6. Turn the controller until the desired memory location is selected.
The number of the memory location is displayed next to the name or frequency of the
station.
7. Press the controller.
The station is now memorised.
2. Move the highlighted marker to the second
field from the top. Turn the controller until
the desired selection criterion is selected
and press the controller.
The stations for the last selection criterion are
displayed again after a short time.
The stations are saved for the remote control
currently in use.
166
Online Edition for Part-No. 01 41 0 159 725 © 09/05 BMW AG
Switching RDS on/off*
1. Select "Memorised stations" and press the
controller.
1. Select "FM" or "AM" and press the controller.
"Set" is selected.
2. Select the desired station.
"Set" is selected.
3. Press the controller.
Further menu items are displayed.
2. Press the controller.
Further menu items are displayed.
Overview
Changing memory location
3. Select "RDS" and press the controller.
RDS broadcasts additional information on the
VHF/FM waveband. RDS stations therefore
offer the following features:
> Where a radio station is broadcast on several frequencies, the set automatically
switches to whichever frequency offers the
best reception.
2. Select "Favourites" and press the controller.
> Where reception conditions are good, the
names of stations are displayed on the control display. Where reception is poor or in
the event of interference, it may take some
time before the station names will appear in
the display.
The most frequently used stations are displayed first.
167
Online Edition for Part-No. 01 41 0 159 725 © 09/05 BMW AG
Navigation
1. Select "All stations" and press the controller.
"Set" is selected.
Entertainment
Radio Data System RDS
For the selection criterion "All stations", you
can program whether the most frequently used
stations are displayed first.
Mobility
6. Press the controller.
The station is now memorised.
Automatically sorting
stations*
Reference
RDS is switched on.
5. Turn the controller until the desired memory location is selected.
The number of the memory location is displayed next to the name or frequency of the
station.
Driving hints
Controls
4. Select "Save" and press the controller.
Radio
Traffic reports*
The traffic reports are switched on.
You can receive traffic information announcements while you are listening to a CD or watching a TV program. In this case, the TP function,
Traffic Programme, must be switched on.
On cars with the Professional radio, your radio
will receive traffic information announcements
even if you are tuned to a station that does not
broadcast them. A second station that broadcasts traffic reports can be received in the background.
The following is displayed on the control display, see page 18:
Adjusting volume of traffic information
announcements, see page 161.
Selecting stations for traffic reports
On Professional radio*:
1. Call up the start menu.
2. Press the controller to call up the menu.
3. Select "Traffic information settings" and
press the controller.
4. Select "TP" and press the controller.
> "TP":
Traffic information is switched on.
> "T":
Traffic information is switched off, but the
selected station is broadcasting traffic
information announcements.
> No display:
The selected station does not broadcast
traffic reports.
The navigation system's spoken instructions
are not interrupted by traffic reports.
Switching traffic reports on/off
5. Select a station broadcasting traffic reports
and press the controller.
"TP AUTO": automatic selection of the traffic report station with the strongest
received signal.
iDrive concept, see page 14.
1. If necessary, move the highlighted marker
to the uppermost field. Turn the controller
to select "FM" or "AM" and press the controller.
"Set" is selected.
2. Press the controller.
Further menu items are displayed.
3. Turn the controller until "TP" is selected
and press the controller.
The traffic reports are switched on.
If you choose a traffic report station, broadcasting of traffic reports is automatically switched
on.
168
Online Edition for Part-No. 01 41 0 159 725 © 09/05 BMW AG
Listening to CDs
iDrive concept, see page 14.
1. Press the
button.
The start menu is called up.
Overview
CD player and CD changer*
3. If necessary, move the highlighted marker
to the uppermost field. Turn the controller
until "CD" is selected and press the controller.
Driving hints
Specification with two disc drives:
The upper disc drive is intended for audio CDs.
Controls
2. Move the controller to the rear to call up
"Entertainment".
Compressed audio files*
CDs with compressed audio files known as
MP3s can be played back on the CD player.
Entertainment
4. On cars with CD changers, you may need to
switch to the second field from the top and
turn the controller to select "CD", then
press the controller.
The CD-player starts playing.
Button next to CD player:
To eject the navigation DVD, press the button.
The navigation DVD is ejected part way out of
the drive.
Insert the CD into the drive with the label side
uppermost.
The CD starts to play automatically if sound
output is switched on. When playing CDs with
compressed audio files, it can take the CD
player approx. 1 minute to read in the data,
depending on the directory structure.
The CD starts to play if sound output is
switched on.
Press the button next to the CD player to
eject the CD.
The CD is ejected part way out of the drive.
To start to play a CD if there is already a CD in
the drive:
169
Online Edition for Part-No. 01 41 0 159 725 © 09/05 BMW AG
Mobility
CD player: starting CD
Reference
Specification with one disc drive:
The navigation DVD can be removed during
route guidance. All the data required for each
route guidance procedure is held in the navigation system's buffer memory. This enables you
to listen to audio CDs during route guidance. A
message appears on the control display if new
data from the navigation DVD is required.
Navigation
Removing navigation DVD
CD player and CD changer
CD changer: starting a CD
Via iDrive
1. Load and insert the CD magazine, see
page 173.
Turn the controller to select a track.
2. Press the
button.
The start menu is called up.
3. Move the controller to the rear to call up
"Entertainment".
4. If necessary, move the highlighted marker
to the uppermost field. Turn the controller
until "CD" is selected and press the controller.
5. If necessary, move the highlighted marker
to the second field from the top. Turn the
controller to select the required CD from
1...6 and press the controller.
At the end of the last track, the next CD is
selected and played.
Compressed audio files*
1. Select a directory, if appropriate, and press
the controller.
2. Select a track and press the controller.
If the CDs in the magazine have been changed,
the lowest CD starts to play, e.g. CD 1, track 1.
The control display indicates how many CDs
there are in the magazine.
Selecting a track
Buttons next to CD player
3. Select "Play" and press the controller.
Press the
button for the appropriate
direction as often as necessary until the desired
track on the current CD is reached.
The CD starts to play at the start of the track.
The track is displayed on the control display.
You can also change the track with buttons on
the steering wheel, see page 9.
170
Online Edition for Part-No. 01 41 0 159 725 © 09/05 BMW AG
All tracks on the current CD are automatically
sampled once in succession.
Controls
1. Select "Set" and press the controller.
Further menu items are displayed.
To exit the menu:
Select the
arrow and press the controller.
Displaying information on the track*
With compressed audio files, you can have any
saved information about the current track displayed, e.g. the name of the artist.
Overview
Sampling tracks, Scan
2. Select "Scan" and press the controller.
1. Press the controller.
Driving hints
To change the directory:
Select a directory and press the controller.
To stop Scan:
1. Press the controller.
2. Select "Scan" and press the controller.
The information is shown for the current track.
Scan is interrupted and the selected track is
retained.
171
Online Edition for Part-No. 01 41 0 159 725 © 09/05 BMW AG
Reference
Mobility
The setting is saved for the remote control currently in use.
Entertainment
Navigation
2. Select "Details" and press the controller.
CD player and CD changer
Compressed audio files*
2. Select "Repeat" and press the controller.
1. Select current track and press the controller.
2. Select the desired menu item:
> To sample all the tracks in the current
directory, select "Scan directory" and
press the controller.
> To sample all the tracks on the CD,
select "Scan all" and press the controller.
The current track on the CD is repeated.
To stop the repeat function:
1. Press the controller again.
2. Select "Repeat" and press the controller.
Compressed audio files*
1. Select current track and press the controller.
2. Select the desired menu item:
To stop sampling:
> To repeat the chosen track, select
"Repeat track" and press the controller.
1. Press the controller.
2. Select "Scan directory" or "Scan all" and
press the controller.
Sampling is interrupted and the selected track
is retained.
> To repeat all the tracks in the current
directory, select "Repeat directory" and
press the controller.
Repeating tracks
1. Select "Set" and press the controller.
Further menu items are displayed.
To stop the repeat function:
1. Press the controller.
2. Select "Repeat track" or "Repeat directory"
and press the controller.
172
Online Edition for Part-No. 01 41 0 159 725 © 09/05 BMW AG
Overview
Random play
The tracks on the current CD are played once
each in random order.
1. Select "Set" and press the controller.
Further menu items are displayed.
2. Select "Random" and press the controller.
2. Select "Random" and press the controller.
Press button 2,
the CD magazine 1 is ejected.
Compressed audio files*
Wait at least 2 seconds before pushing the
magazine back in so that the machine can read
in the CDs inserted again.
2. Select the desired menu item:
> To play the tracks in the current directory in random order, select "Random
directory" and press the controller.
Loading/emptying the CD magazine
When loading CDs into or removing them from
the CD magazine, hold them at the edge and do
not touch the reflective signal-sensing area.
> To play all the tracks on the CD in random order, select "Random all" and
press the controller.
Navigation
To stop random play:
1. Press the controller.
2. Select "Random directory" or "Random all"
and press the controller.
Fast forward/reverse
Buttons next to CD player:
Press and hold the
priate direction.
button for the appro-
To load:
Insert one CD into each slot with the label side
uppermost.
Entertainment
1. Select current track and press the controller.
Driving hints
1. Press the controller.
Controls
To stop random play:
CD magazine
To load or empty it, take the CD magazine 1 out
of the CD changer:
To empty:
Pull out the required slot and remove the CD it
contains.
173
Online Edition for Part-No. 01 41 0 159 725 © 09/05 BMW AG
Reference
Removing the CD magazine
Mobility
The BMW CD changer for six CDs is installed in
the glove box.
CD player and CD changer
Inserting the CD magazine
Humidity
A high level of humidity may cause the laser
beam focusing lens to fog over and temporarily
prevent the CD/DVD being played.
Malfunctions with individual CDs/DVDs
Should malfunctions occur only with individual
CDs/DVDs, one of the following factors may be
the cause.
Insert the CD magazine in fully in the direction
of the arrow.
The CD changer automatically reads in the CDs
in the changer and is then operational.
Self-recorded CDs/DVDs
With self-recorded CDs/DVDs, possible causes
for output malfunctions are, e.g., an inconsistent data-creation or burning process, or low
quality or high age of the CD/DVD blank.
Only write on the upper side of CDs/DVDs using
a special marker pen.
Notes
BMW CD/DVD players and changers are
officially designated Class 1 laser products. Never use them if the cover is damaged,
otherwise there is a risk of serious eye injuries.
Do not use CDs/DVDs with adhesive labels that
have been affixed subsequently, as these may
peel off while in the drive as a result of the temperatures to which these media are exposed
during playing, and could damage the system
irreparably.
Use only round CDs/DVDs with a standard
diameter of 12 cm, approx. 5 in, and do not use
CDs/DVDs in conjunction with adapters, e.g.
CD singles, otherwise the CDs or the adapter
could jam and be impossible to eject.
Do not use combined CD/DVDs, e.g. DVDPlus,
otherwise the CD/DVD could jam and be impossible to eject.<
General malfunctions
Damaged CDs/DVDs
Avoid causing fingerprints and protect against
dust, scratches and moisture.
Store CDs/DVDs in a case.
Do not expose CDs/DVDs to temperatures
above 506/122 7, high levels of humidity or
direct sunlight.
CDs/DVDs with copy protection
CDs/DVDs are often copy-protected by the
manufacturer. This could result in CDs/DVDs
being impossible to play, or only playable with
restrictions.
General care
Whenever necessary, use a commercially available cleaning cloth to wipe the reflective signal
side of CDs/DVDs in straight motions from the
centre outwards.
BMW CD/DVD players and changers have been
optimised for operation in cars. In some
instances, they may be more sensitive to faulty
CDs/DVDs than stationary devices would be.
If a CD/DVD cannot be played, first check if it
has been properly inserted.
174
Online Edition for Part-No. 01 41 0 159 725 © 09/05 BMW AG
Calling up
Channels
2. Move the controller to the rear to call up
"Entertainment".
The TV system is equipped with a digital
receiver*. In areas where both analogue and
digital television is broadcast, both analogue
and digital channels can be received. You can
change between these channels.
Changing channel
1. Press the controller.
The channels are displayed on the left-hand
side.
2. Select the desired channel and press the
controller.
The set calls up the channel last selected.
Mobility
For your safety, the TV picture is only
shown at a speed of up to 3 km/h, approx.
2 mph.
In certain national-market versions, the TV picture is only visible when the handbrake is
applied.
However, you can listen to the TV sound while
driving.<
175
Online Edition for Part-No. 01 41 0 159 725 © 09/05 BMW AG
Reference
3. Select "TV" and press the controller.
Navigation
iDrive concept, see page 14.
1. Press the
button.
The start menu is called up.
Entertainment
Press the knob if sound output is switched off.
Driving hints
Controls
To change to a different audio source:
Move the controller forward while a channel is
being received.
Overview
TV*
TV
You can also change the channel by turning the
controller while the programme is on.
You can also change the channel using the buttons on the steering wheel, see page 9.
4. Select "Picture" and press the controller.
?
Updating display of receivable
channels
If you have driven out of the transmission range
of the channels you were originally receiving,
you can update the display of receivable channels.
1. Press the controller during reception.
2. Select "Autostore" and press the controller.
The display of channels with the best reception
is updated.
5. Select "Brightness" or "Contrast" and
press the controller.
6. Turn the controller until the desired setting
is obtained.
Resetting
Adjusting the picture*
Select "Reset" and press the controller.
Adjusting the brightness and contrast
1. Press the
button.
The start menu is called up.
2. Press the controller to call up the menu.
3. Select "Entertainment settings" and press
the controller.
Changing standard
The TV standard is not the same in every country. However, you can adapt your TV receiver to
accept all common TV standards.
1. Press the
button.
The start menu is called up.
2. Press the controller to call up the menu.
176
Online Edition for Part-No. 01 41 0 159 725 © 09/05 BMW AG
Controls
Overview
3. Select "Entertainment settings" and press
the controller.
Driving hints
4. Select "Picture" and press the controller.
Navigation
To call up the TV standard, press the controller twice while a programme is on.
Entertainment
5. Select "TV standard" and press the controller.
177
Online Edition for Part-No. 01 41 0 159 725 © 09/05 BMW AG
Reference
Mobility
6. Select the country in which you are currently driving and press the controller.
The display of receivable channels is automatically updated.
Online Edition for Part-No. 01 41 0 159 725 © 09/05 BMW AG
Mobility
To assist you in preserving your car's mobility,
this section contains important information on
operating fluids, wheels and tyres, maintenance
routines and minor repairs.
Online Edition for Part-No. 01 41 0 159 725 © 09/05 BMW AG
Refuelling
Refuelling
Fuel filler flap
3. Pull the knob with the fuel pump symbol.
Briefly press the rear edge to open and close.
Note when refuelling
Manual release
When handling fuel, comply with
the safety regulations displayed by
garages and filling stations.<
In the event of an electrical fault, you can
release the fuel filler flap manually.
Saloon
1. Lift up the floor mat and the cover beneath it
in the luggage compartment.
2. Release the quick-release fasteners on the
right-hand side trim and take off the side
trim.
3. Pull the knob with the fuel pump symbol.
Place the tank cap in the holder on the flap.
When refuelling, insert the filler nozzle fully into
the filler neck. If the filler nozzle is raised during
refuelling
> the supply of fuel will be cut off prematurely
> fuel vapour and fumes will be fed back less
effectively
The fuel tank is full when the filler nozzle cuts
out for the first time.
Touring
1. Unhook the luggage strap*, see page 117.
2. Open the right-hand side trim in the load
area.
Fuel tank capacity
Approx. 70 litres, approx. 15.4 gal, including a
reserve of approx. 8 litres, approx. 1.8 gal.
If the range is below 50 km, approx.
30 miles, refuel the car, otherwise the
engine's functions are not assured and damage
may occur.<
180
Online Edition for Part-No. 01 41 0 159 725 © 09/05 BMW AG
Do not crush the tape attached to the cap.
A message will appear if the cap is loose
or missing.<
Contact BMW Service if the wrong type of fuel
has been added.
> Your BMW's engine is rated to run on:
Diesel oil to DIN EN 590 standard.
Fuel grade
Winter-grade diesel oil
Petrol engine
Never use fuel containing lead, otherwise
the catalytic converter will be permanently damaged.<
Ultra low sulphur petrol may also be used. Since
the engine has a knock control function, it can
run on different grades of fuel.
> The engine of your BMW is rated to run on:
To ensure that the diesel engine operates reliably during the cold season of the year, it must
be run on winter-grade diesel oil, which garages
usually sell during the period in question. Fuel
filter heating is installed as standard equipment
to prevent the fuel solidifying during operation.
Do not incorporate any additives, including petrol, as these could cause damage
to the engine.<
Navigation
Super Plus/premium plus fuel, octane
number 98 RON.
Fill up with fuel of this grade whenever possible, so that the nominal performance and
fuel consumption values are achieved.
> You can also run the engine on:
Entertainment
Premium-grade unleaded fuel, octane
number 95 RON.
This fuel is also sold under the following
designations:
DIN EN 228 or Eurosuper.
> The minimum permissible grade is:
Mobility
Regular-grade unleaded fuel, octane
number 91 RON.
If this grade of fuel is being used, the engine
may tend to make a knocking sound while
being started at high ambient temperatures. This has no influence on the engine's
operating life.
National-market versions supplied
to run on leaded fuel*
With this specification, in addition to the grades
listed above, you can run the engine on leaded
fuel. The minimum grade is likewise 91 RON.
181
Online Edition for Part-No. 01 41 0 159 725 © 09/05 BMW AG
Controls
Fit the tank cap and turn clockwise until it is
clearly heard to click into place.
Do not use rapeseed methyl ester RME,
biodiesel or petrol. If the wrong type of
fuel has been added, do not start the engine,
otherwise you risk causing damage to it.<
Driving hints
Fastening
Overview
Diesel engine
Reference
Tank cap
Wheels and tyres
Wheels and tyres
Tyre pressures
Condition of tyres
Information for your safety
The condition of the tyres and maintenance of
the correct tyre pressures not only influence
tyre life but are also decisive factors in road
safety and ride quality.
Checking pressures
Check and adjust the tyre pressures –
including the compact wheel* – on a regular basis, but at least twice a month and before
setting out on any long journey. Failure to do so
could cause incorrect tyre pressures to affect
driving stability or damage the tyres, therefore
leading to accidents.<
Inspect tyres frequently for damage, the presence of foreign bodies, unusual wear and sufficient tread depth.
Minimum tread depth
The tyre tread depth should not be allowed to
drop below 3 mm, approx. 1/8 in. Below a tread
depth of 3 mm, approx. 1/8 in, there is an
increased risk of aquaplaning when driving on
wet roads at fairly high speeds.
Below a tread depth of 4 mm, approx. 3/16 in,
winter tyres become noticeably less suitable for
winter driving conditions. New tyres should be
fitted in the interests of safety.
After correcting tyre pressures, reinitialise the Run Flat Indicator, see page 87.<
Tyre pressure values
The tyre pressures for your standard tyres are
visible on the driver's door post, with the
driver's door open.
Tyre pressures for heavy loads and
trailer towing
For trailer towing, the tyre pressures for the
higher load in the table apply.
Note tyre size
These tyre pressures apply to sizes of tyre
approved by BMW and makes of tyre recommended by BMW; details are available from
BMW Service.
Wear indicators in the base of the tread groove,
see arrow, are distributed around the tyre's circumference; the letters TWI – Tread Wear Indicator – on the tyre's flanks identify tyres that
incorporate these wear indicators. Once the
tyre tread has worn down to the wear indicators,
a tread depth of 1.6 mm, approx. 1/16 in, has
been reached.
Tyre damage
Unusual vibration while the car is being driven
could indicate a tyre fault or some other defect
on your car. This may have been caused e.g. by
driving over a kerb or similar. The same applies
to any other abnormal road behaviour, such as
pulling severely to the right or left.
182
Online Edition for Part-No. 01 41 0 159 725 © 09/05 BMW AG
BMW advises against the use of
retreaded tyres, as these could adversely
affect the car's safety. Their carcasses may differ in internal construction or have aged sufficiently to limit their durability.<
Run-flat tyres*
The right wheels and tyres
BMW recommends fitting only wheels
and tyres that it has approved for your
type of vehicle, otherwise the tyres may e.g.
make contact with the vehicle body due to
impermissible tolerances, even though they are
of an approved size; this could result in a serious
accident. BMW is unable to assess the suitability of wheels and tyres it has not approved and
cannot therefore guarantee their safety.<
Details of the correct wheel and tyre combinations can be obtained from BMW Service.
The correct wheel and tyre combination also
has an influence on various systems, which
could otherwise malfunction, e.g. ABS, DSC or
xDrive.
To maintain the car's good road behaviour,
always fit tyres of the same make and tread pattern to all wheels. After a tyre has been damaged, fit the original wheel and tyre combination
again as soon as possible.
Mobility
The symbol identifying run-flat tyres is a circle
with the letters RSC on the side wall.
Run-flat tyres comprise a tyre that is self-supporting within certain limitations, and a special
rim. The reinforcement in the side walls ensures
that the tyre can continue to be used subject to
certain restrictions, even if depressurised.
Continuing a journey with a damaged tyre, see
Indication of a flat tyre, page 88.
183
Online Edition for Part-No. 01 41 0 159 725 © 09/05 BMW AG
Reference
A tyre's date of manufacture is included in the
inscription on the tyre:
DOT ... 3705 means that the tyre was manufactured in week 37 of 2005.
Controls
For a variety of reasons, including the tendency
of tyres to become brittle along with increasing
age, BMW recommends that new tyres be fitted
after not more than 6 years, irrespective of the
actual level of wear. This also applies to the tyre
on the compact wheel*.
Driving hints
Retreaded tyres
Navigation
Age of tyres
Entertainment
Have new wheels and tyres fitted only by
BMW Service or by a specialist tyre dealer
that operates to BMW specifications and has
suitably trained personnel. If such work is performed inexpertly, it could result in consequential damage and thus constitute a safety risk.
Make sure that the new wheels are balanced.<
Overview
New wheels and tyres
In such cases, reduce speed immediately
and have the wheels and tyres checked
without delay. Proceed with caution to the nearest BMW Service or specialist tyre dealer that
operates to BMW specifications and has suitably trained personnel. Have the car towed there
if necessary. Tyre damage represents a risk of
serious injury to the car's occupants and to all
other road users.<
Wheels and tyres
Recommended makes of tyre
Note the speed limit applicable to these
tyres
Always comply with the speed limit for the
winter tyres fitted to your car; failure to do
so could result in tyre damage and accidents.<
Certain makes of tyre are recommended by
BMW for each tyre size. They are marked with a
clearly visible BMW designation on the side wall
of the tyre.
When properly used, these tyres meet the highest standards in terms of safety and handling
characteristics.
If the car is capable of speeds higher than that
permitted for the winter tyres, a label stating the
maximum permitted speed for the tyres fitted
must be displayed in your field of view. Specialist tyre dealers and BMW Service can supply
these labels.
Tyre storage
Store wheels and tyres in a cool, dry and preferably dark place when not in use. Protect tyres
against contamination from oil, grease and fuel.
Snow chains*
Run-flat tyres
When fitting new tyres or changing over from
summer to winter tyres and vice-versa, for your
own safety you should fit run-flat tyres. Also
bear in mind that there is no spare wheel available in the event of a puncture. BMW Service will
be pleased to advise you on this.
Only certain fine-link snow chains have been
tested by BMW, classified as safe for use and
recommended. BMW Service is able to provide
the details of these makes.
For safety reasons, BMW recommends
that damaged run-flat tyres be renewed
rather than repaired.<
When fitting, comply with the snow chain manufacturer's instructions. When snow chains are
in use, do not exceed 50 km/h, approx. 30 mph.
Special characteristics of winter tyres
Snow chains cannot be fitted on size
245/45 R 17 tyres.
BMW recommends you to fit winter tyres if the
car is used for driving in wintry conditions.
Although all-season tyres with an M+S marking
have better winter characteristics than summer
tyres, they do not normally match the performance of winter tyres.
Fit snow chains in pairs and only to the rear
wheels.
Do not initialise the Run Flat Indicator if
snow chains are fitted, as the instrument
might issue an incorrect reading.
When driving with snow chains, you may need
to activate DTC briefly, see page 84.<
184
Online Edition for Part-No. 01 41 0 159 725 © 09/05 BMW AG
Overview
In the engine compartment
Closing
Engine compartment lid
Close the engine compartment lid from a height
of about 40 cm, approx. 16 in, with some
momentum. It must be clearly heard to engage.
Pull the lever.
Driving hints
To avoid injuries, ensure that the closing
area of the engine compartment lid is
unobstructed.
If you notice during the journey that the engine
compartment lid has not been properly closed,
stop the car at the earliest possible moment and
close it correctly.<
Navigation
Releasing
Controls
Do not work on the car unless you possess the necessary technical knowledge.
If you are unfamiliar with the statutory guidelines, have any work on the car performed only
by BMW Service or by a workshop that operates to BMW specifications and has suitably
trained personnel. If such work is performed
inexpertly, it could result in consequential damage and thus constitute a safety risk.<
Entertainment
Opening
185
Online Edition for Part-No. 01 41 0 159 725 © 09/05 BMW AG
Reference
Mobility
Press the release lever and open the lid.
In the engine compartment
Important parts of the engine compartment
1
Filler neck for engine oil, see Adding engine
oil
2
Reservoir for brake fluid, under the microfilter housing
3
Jump-starting connection, see page 201
4
Diesel engines:
Dipstick for engine oil, see Checking the
engine oil level
5
Reservoir for washer fluid for headlight
cleaning system and windscreen washer,
see page 64
6
Coolant expansion tank, see page 188. On
the diesel engine, the coolant expansion
tank is on the opposite side
7
Vehicle identification number
Engine oil
Engine oil consumption depends on driving
style and the operating conditions.
Checking the engine oil level on diesel
engines
4. Carefully push the dipstick fully into its tube,
then pull it out again.
The oil level must be between the two
marks on the dipstick.
1. Park the car on a level surface with the
engine at operating temperature, in other
words after driving uninterrupted for at least
10 km, approx. 6 miles.
2. Switch off the engine.
3. After about 5 minutes pull out the dipstick 4
and wipe it dry with a non-linting cloth,
paper towel or similar.
186
Online Edition for Part-No. 01 41 0 159 725 © 09/05 BMW AG
In order for the oil level to be measured and displayed accurately, the engine must be at operating temperature, i.e. following uninterrupted
driving for at least 10 km, approx. 6 miles. You
can have the oil level displayed on the control
display while you are driving, or while the vehicle is at a standstill on a level surface and the
engine is running.
iDrive concept, see page 14.
1. Press the
button.
The start menu is called up.
2. Press the controller to call up the menu.
3. Select "Service" and press the controller.
> "Oil level at the minimum: Add 1 liter engine
oil.":
Top up with 1 litre, approx. 2 pints, of
engine oil at the next opportunity.
> "Engine oil level too high":
Have the car examined immediately,
otherwise too much oil could result in
engine damage.<
> "Please note: recalculated Service interval
for engine oil":
Do not add engine oil. You can continue
your journey. Note the newly calculated distance remaining to the next Oil Service, see
page 190. Have the system checked as
soon as possible.
Entertainment
Adding engine oil
4. Select "Service requirements" and press
the controller.
Petrol engines
Only add the amount of 1 litre, approx. 2 pints,
of oil when you are instructed to do so by a message on the control display.
Diesel engines
Do not add more oil until the level has dropped
almost to the lower dipstick mark. When this
187
Online Edition for Part-No. 01 41 0 159 725 © 09/05 BMW AG
Mobility
Your vehicle is equipped with an electronic oil
level monitoring device.
> "No measured value available: Update of
engine oil level in process":
Oil level is being measured. This can take
about 3 minutes if the car is at a standstill on
a level surface and the engine is running,
and about 5 minutes while the car is on the
move.
Reference
Checking the engine oil level on petrol
engines
> "Engine oil level OK"
Overview
Possible messages
Controls
Do not add oil beyond the upper dipstick
mark, otherwise the engine may be damaged by excess oil.<
Driving hints
5. Select "Engine oil level" and press the controller. The oil level is displayed.
Navigation
The quantity of oil between the mid-points of
the two dipstick marks is approx. 1.5 litres,
approx. 2.6 pints.
In the engine compartment
level is reached, a message also appears on the
control display.
Top up the oil level within the next
200 km, approx. 120 miles, otherwise the
engine may suffer damage.<
Keep all oils, greases etc. out of the reach
of children and read and comply with any
warning instructions on the containers, to avoid
any health risks.<
Oil change
Have oil changes performed either by BMW
Service or by a workshop that operates to BMW
specifications and has suitably trained personnel.
Approved engine oils
The quality of the engine oil is a decisive factor
for the correct operation and long life of your
car's engine. On the basis of extensive tests,
BMW regularly approves specific grades of
engine oil.
Coolant
Do not open up the cooling system while
the engine is hot, otherwise you may
scald yourself on the escaping coolant steam.<
Coolant is a mixture of water and an additive.
Not all commercially available additives are suitable for your BMW. BMW Service can provide
details of which additives are suitable.
Use only suitable additives, otherwise the
engine could incur damage. As these
additives are hazardous to health, observe the
notes on the containers.<
When disposing of coolant additives,
comply with the relevant environmental
protection regulations.<
Checking coolant level
1. The engine must be at ambient temperature.
BMW Service can provide details of the
oils approved by BMW for your car.<
2. Turn the cap on the expansion tank slightly
anti-clockwise until it starts to open, then
allow the pressure to escape before opening it fully.
Do not use any oil additives, as these
could in certain circumstances result in
engine damage.<
3. The coolant level is correct if it is between
the minimum and maximum marks, see also
diagram next to the filler neck.
Alternative oil grades
If exceptionally none of the approved grades of
oil is available, you can top up the oil level in
between oil changes with other grades of oil.
The oil specification on the container must be
one of the following:
Petrol engines
> Preferred: BMW Longlife-01,
BMW Longlife-01 FE or
BMW Longlife-04
> Alternatively: BMW Longlife-98 or
ACEA A3
4. If necessary, slowly top up to the correct
level; do not overfill.
5. Turn the cap to close until it is heard to click.
6. Have the cause of coolant loss rectified as
soon as possible.
Diesel engines
> Preferred: BMW Longlife-04
> Alternatively: BMW Longlife-01,
BMW Longlife-98 or ACEA A3/B4
188
Online Edition for Part-No. 01 41 0 159 725 © 09/05 BMW AG
Overview
Brake system
Malfunction
Brake fluid
Controls
If the warning lamp lights up red even
though the handbrake is released and a
message appears on the control display: stop as soon as possible.
The brake fluid level in the reservoir is too low.
You may simultaneously notice a marked
increase in brake pedal travel. Have the system
checked without delay.
Driving hints
If you continue to drive the car, increased
brake pedal movement may be necessary
and braking distances may be significantly
longer. Modify your driving style accordingly.<
Brake pads
Navigation
If the warning lamp lights up red even
though the handbrake is released and a
message appears on the control display: the brake pads have reached the safe limit
for pad wear. Have the brake pads changed
without delay.
189
Online Edition for Part-No. 01 41 0 159 725 © 09/05 BMW AG
Reference
Mobility
Entertainment
In the interests of your own safety, use
only brake pads that BMW has approved
for this particular model type. BMW is unable to
assess the suitability of brake pads it has not
approved and cannot therefore guarantee their
safety.<
Maintenance
Maintenance
BMW Maintenance System
> Spark plugs
> Vehicle check
> Statutory vehicle inspections, depending
on national requirements
Service data in the remote control
The BMW Maintenance System contributes
towards upholding the roadworthiness and
operating reliability of your BMW. It also covers
comfort and convenience aspects, such as
ensuring that filters for the air in the car's interior are renewed in good time. Its purpose is to
optimise maintenance measures with a view to
minimising the cost of looking after your car.
If and when you come to sell your BMW, a comprehensive record of servicing will prove a significant benefit.
Condition Based Service CBS
Sensors and advanced algorithms take account
of the varying conditions in which your BMW is
used. Condition Based Service uses these to
determine current and future servicing requirements. The system provides you with an opportunity to tailor the scope of maintenance work
to your personal standards, so that your BMW
will always be reliably operational.
Your car continuously stores such information
in the remote control as the car is being driven.
Your BMW Service Advisor can read out this
data from the remote control, and propose an
optimised maintenance approach. Whenever
you take your car in for servicing you should
therefore hand your BMW Service Advisor the
remote control unit that you last used.
Make sure that the date in the iDrive is
always set correctly, see page 80, otherwise the effectiveness of Condition Based
Service CBS is not assured.<
Service Booklet
Further information on the maintenance routines required is provided in the Service Booklet.
BMW recommends that you have maintenance and repair work carried out by
BMW Service.
Make sure that maintenance work is confirmed
in the Service Booklet after it has been carried
out. These entries are evidence that your BMW
has been serviced regularly and correctly.<
On the control display, you can have the
remaining distances and times for selected
maintenance tasks as well as any legally prescribed dates displayed to you individually, see
page 74:
> Engine oil
> Brakes, separately for front and rear
> Micro-filter/activated charcoal filter
> Particulate filter*
> Brake fluid
190
Online Edition for Part-No. 01 41 0 159 725 © 09/05 BMW AG
Controls
Overview
Socket for on-board
diagnosis OBD
Driving hints
Components which have a decisive effect on
exhaust emissions can be tested via the OBD
socket with a suitable device.
This on-board diagnosis socket is on the
driver's side, on the underside of the instrument
panel to the left, behind a cover.
Exhaust emissions
Navigation
If the warning lamp comes on: exhaust
emission values have deteriorated.
Have the car checked as soon as possible.
Recycling
Entertainment
The very design of your car incorporates a recycling-friendly concept that extends to both the
production methods used and the choice of
materials.
Mobility
BMW recommends that you hand in your car to
a salvaging operator approved by the BMW
Group at the end of its operating life. In doing
this, you will be making an active contribution
towards protecting resources and the environment. The regulations concerning the returning
of end-of-life vehicles may vary from country to
country. Further information is available on the
Internet on www.bmw.com or from BMW Service.
Useful hints on care of your BMW are provided
in the booklet Looking after your car.
191
Online Edition for Part-No. 01 41 0 159 725 © 09/05 BMW AG
Reference
General care
Replacing parts
Replacing parts
Toolkit
1. Fold out the wiper arm and hold it securely.
Saloon
2. Squeeze together the retaining tabs, simultaneously pushing the wiper blade forward
out of the holder.
3. Insert the new wiper blade and press it on
until you hear it engage.
Rear*
You will find the toolkit in the luggage compartment lid.
Unscrew the wing bolt to open.
Touring
1. Lift off the entire wiper arm and pull off the
wiper blade, see arrow.
2. Insert the new wiper blade and press it on
until it audibly engages.
Lights and bulbs
You will find the toolkit behind the left-hand side
trim in the load area.
Wiper blades, renewing
Front
Lights and bulbs are an important aspect of
driving safety. They should, therefore, be handled carefully. BMW recommends that any routines that you are not familiar with or that are not
described here be entrusted to BMW Service.
Do not touch the glass of a new bulb with
the fingers, because even slight amounts
of dirt or grease will then be burned into the bulb
and reduce its working life. Use a clean tissue,
cloth or similar, or hold the bulb by its base.<
A box containing spare bulbs is available from
BMW Service.
When working on electrical systems,
always begin by switching off the consumer in question, as otherwise short-circuits
could result. Observe any instructions supplied
by the bulb manufacturer, to avoid the risk of
injury or damage when changing bulbs.<
192
Online Edition for Part-No. 01 41 0 159 725 © 09/05 BMW AG
Halogen headlights
The picture shows the left side of the engine
compartment.
2. Pull out the bulb and change it.
Overview
1. Turn the bulb holder to the left and take it
off.
Controls
Please see the booklet Looking after your car
for notes on care of the headlights.
5 Watt bulbs, W 5 W
Cover for high-beam headlight
Turn the cover to the left and take it off.
1. Turn the cover for the low-beam or highbeam headlight to the left and take it off.
2. Pull out the bulb holder.
The H7 bulb is pressurised, so wear goggles and gloves. There is otherwise a risk
of injury if the bulb should be damaged.<
Navigation
Low-beam headlights
H7 bulb, 55 Watt
1. Turn the bulb holder to the left and take it
off.
3. Pull out the bulb and change it.
Xenon headlights*
2. Pull out the bulb and change it.
High-beam headlights
H7 bulb, 55 Watt
The operating life of these light units is
extremely long and the likelihood of failure very
low, provided that they are not switched on and
off a very great number of times.If a xenon
headlight should none the less fail, switch on
the fog lights and continue the journey with
great care, bearing in mind that visibility will be
poorer, provided that local legislation does not
prohibit this.
Have any work on the xenon headlight
system, including bulb-changing, performed only by BMW Service or by a workshop
that operates to BMW specifications and has
suitably trained personnel. Otherwise there is a
risk of potentially fatal accidents if work is per193
Online Edition for Part-No. 01 41 0 159 725 © 09/05 BMW AG
Entertainment
2
Mobility
Cover for low-beam headlight
Reference
1
Driving hints
Side and parking lights
Replacing parts
formed inexpertly, because of the high electrical voltages present.<
Rear lights
Saloon
Side and parking lights
In the event of a fault, please contact BMW
Service or a workshop that operates to BMW
specifications and has suitably trained personnel.
> Flashing turn indicators: 21 Watt bulb,
PY 21 W
> Reversing lights: 16 Watt bulb, W 16 W
> Other lights: 21 Watt bulb, P 21 W
Front flashing turn indicator
21 Watt bulb, PY 21 W
1. Turn the bulb holder to the left and take it
off.
2. Press the bulb in slightly and turn to the left,
take out and renew.
Side flashing turn indicators
5 Watt bulb, W 5 W
1. Push the light back at its front edge with the
fingertip and swing it out.
1
Flashing turn indicators
2
Rear light
3
Rear light and rear fog light
4
Reversing light
5
Reflector
6
Reflector
7
Parking, stop and brake lights
Touring
> Flashing turn indicators: 21 Watt bulb,
PY 21 W
> Reversing lights and rear fog light: 16 Watt
bulb, W 16 W
> Other lights: 21 Watt bulb, P 21 W
2. Turn the bulb holder to the left and take it
off.
3. Pull out the bulb and change it.
1
Flashing turn indicator
2
Rear light
3
Rear fog light
194
Online Edition for Part-No. 01 41 0 159 725 © 09/05 BMW AG
Centre brake light
This light uses LED technology. In the event of a
fault, please contact BMW Service or a workshop that operates to BMW specifications and
has suitably trained personnel.
Lights in luggage compartment lid
Licence plate lights
5 Watt bulb, C 5 W
1. Insert a screwdriver into the slot and press
to the right, see arrows. This releases the
light.
Lights in the side section
Saloon
The picture shows the left side of the luggage
compartment.
All bulbs are grouped together in a central bulb
holder.
1. Lift up the floor mat.
2. Release the quick-release fasteners on the
side trim and pull out the trim.
3. Squeeze together the bulb holder at the top
and base, and take it off.
2. Take out the light and renew the bulb.
Touring:
Rear fog light and reversing lights
In the event of a fault, please contact BMW
Service or a workshop that operates to BMW
specifications and has suitably trained personnel.
Light-emitting diodes LED
Touring
Controls, displays and other equipment items
inside your car have light-emitting diodes
behind a cover as their light source. These LED
resemble conventional lasers and are classified
by law as Class 1 light-emitting diodes.
Do not remove the covers or expose the
eyes directly to the unfiltered light source
for several hours at a time, as this could cause
irritation to the retina.<
Mobility
4. Reversing lights:
Pull out the bulb and renew it.
Other lights:
Press the bulb in slightly and turn to the left,
take out and renew.
Overview
Parking, stop and brake lights
Controls
Reflector
6
Driving hints
5
4. Press the bulb in slightly and turn to the left,
take out and renew.
Navigation
Reversing light
Entertainment
4
1. Right-hand side: unhook the luggage
strap*, see page 117.
2. Open the side trim.
195
Online Edition for Part-No. 01 41 0 159 725 © 09/05 BMW AG
Reference
3. Turn the bulb holder to the left and take it
out.
Replacing parts
Changing a wheel
Safety precautions in the event of a puncture or when changing a wheel: park the
car as far as possible from moving traffic, on a
firm surface. Switch on the hazard warning
flashers.
Allow the steering lock to engage with the
wheels in the straight-ahead position. Apply the
handbrake and engage first gear, reverse or
selector lever position P.
All occupants must leave the car and be led to a
point where they are not exposed to risk, for
example behind a crash barrier at the side of the
road.
If necessary, set up a warning triangle* or a
flashing warning lamp at a sufficient distance to
the rear. Comply with relevant local laws.
Only change wheels on a flat, firm and non-slip
surface. On a soft or low-grip surface, such as
snow, ice, tiles or similar, there is a risk of the car
or the jack sliding sideways.
Position the car's jack on a firm surface.
Never place wood blocks or similar under the
jack, or the maximum lifting capacity may be
exceeded due to the restricted height.
When the car is jacked up, do not lie under it or
start the engine, as this could lead to a potentially fatal accident.<
The tools are located in the holder beneath the
floor mat or floor panel flap.
1. Lift up the floor mat or floor panel flap and
the cover beneath it.
2. Take out the required tools.
3. After use, press the tools back down into
their holders.
If the car is fitted with run-flat tyres, no
tools for changing a wheel are supplied
with the car. You can obtain these from BMW
Service as accessories.<
Touring: removing and installing floor
panel flap of storage package
1. Fold up the rear floor panel flap.
2. Disengage both retaining straps at the top.
3. Disengage the gas-filled springs, see arrow,
and remove.
What you need
To avoid rattling noises later, please make a
note of the positions of the tools when they are
removed, and replace them in the same positions later.
1
Wheel chock*
2
Jack*
3
Wheel stud wrench*
196
Online Edition for Part-No. 01 41 0 159 725 © 09/05 BMW AG
5. Open the front floor panel flap.
6. Swing up the spare wheel cover and engage
the hook in the upper frame of the tailgate
cutout.
7. Lift out the cross-bar.
Jacking up the car
1. Position the car jack beneath the jacking
point closest to the wheel that needs to be
changed, with the jack base vertically
beneath the jacking point and resting on the
ground across its full surface.
Use the jack only for wheel changing.
Do not attempt to raise another type
of vehicle or any other load with this jack;
this could result in injury or damage.<
2. Introduce the head of the jack into the rectangular recess as it is extended, see detail.
When fitting the floor panel flap, follow the
reverse procedure and press the hinge covers
down.
Compact wheel*
3. Continue to turn the crank handle until the
wheel you wish to change is lifted clear of
the ground.
Controls
3. Slacken off the wheel studs by half a turn.
Cars with wheel stud lock* see page 198.
Driving hints
2. Prevent the car rolling away:
Place the wheel chock behind the front
wheel on the side opposite to the wheel that
is to be changed, or in front of that front
wheel if the car is pointing downhill. If the
car is on a significant incline, protect it additionally against rolling away.
Navigation
1. Observe the safety notes further above.
Overview
Preparations for changing a wheel
Entertainment
4. Fold the floor panel flap forwards to release
it, then take it out.
2. Take out washer 2 to one side.
3. Take out the tool holders 3.
2. Remove heavy dirt deposits from the wheel
and hub contact faces and clean the wheel
studs.
4. Take out the compact wheel.
197
Online Edition for Part-No. 01 41 0 159 725 © 09/05 BMW AG
Reference
1. Release the wing nut 1.
1. Take out the wheel studs and remove the
wheel.
Mobility
Fitting the wheel
Replacing parts
3. Fit the new wheel or the compact wheel and
insert at least two diagonally opposed
wheel studs.
If the car is not fitted with alloy wheels of the
Genuine BMW type, note that different
wheel studs may be needed.
Thiefproof wheel studs*
4. Insert and screw up the remaining wheel
studs, then tighten them all firmly, working
across the hub rather than round it.
5. Lower the car and remove the jack.
After fitting
1. Tighten the studs alternately on opposite
sides of the hub.
For safety reasons, have the wheel
stud tightening torque checked without delay, using a calibrated torque wrench.
The correct tightening torque is 120 Nm,
approx. 89 lb ft.<
2. Proceed in the reverse sequence when
storing the wheel and tools.
3. Correct the tyre pressure at the earliest
opportunity.
Prevent dirt entering the tyre valves
by attaching screw-on dust caps. Dirt
in the tyre valve can often lead to a gradual
loss of air pressure.<
4. Initialise the Run Flat Indicator, see
page 87.
1
Wheel stud for adapter
2
Adapter, in the recess beneath the luggage
compartment or load area floor
Removing
1. Insert the adapter 2 in the wheel stud.
2. Unscrew wheel stud 1.
After inserting, remove the adapter again.
The code number is embossed on the face of
the adapter. Please note this number and keep
the details in a safe place in the event of the
adapter being lost.
Car battery
Maintenance
Driving with the compact wheel fitted
The battery needs no routine maintenance
whatsoever, in other words the quantity of acid
it contains will normally last for the full operating
life of the battery in temperate climates. BMW
Service will gladly advise you on all matters
relating to batteries.
Drive with caution and do not exceed 80 km/h,
approx. 50 mph.
Recharging the battery
5. Renew the damaged tyre as soon as possible and have the new wheel balanced.
The car's handling properties, such as track
stability during braking, braking distances and
the self-steering properties at the limits of handling, may have changed. These effects will be
more pronounced in combination with winter
tyres.
Recharge the battery only with the engine
stopped, via the connections in the engine
compartment. Connections, see Starting with a
flat battery on page 201.
Only one compact wheel may be fitted at
one time. Fit a wheel/tyre combination
that matches that of the remaining wheels/tyres
at the earliest possible opportunity.<
198
Online Edition for Part-No. 01 41 0 159 725 © 09/05 BMW AG
In the glove box
After changing batteries, have any old
batteries disposed of by BMW Service or
take them to an official collecting point. Batteries filled with acid should be transported and
stored upright. Protect batteries against falling
over when in transit.<
1. Open both quick-release fasteners.
Overview
Disposal
> Seat, mirror and steering wheel memory
The positions must be reprogrammed, see
page 45.
> Time and date
These values must be updated, see
page 79 onwards.
2. Fold the lid forwards or take it off.
Saloon: in the luggage compartment
1. Lift up the floor mat.
2. Open the quick-release fasteners on the
right-hand side trim and pull out the trim.
Navigation
> Radio
It may be necessary to enter the stations in
the memory again, see page 166.
> Navigation system
Wait until the system starts, see page 156.
Fuses
Driving hints
After a temporary power failure, the functions of
certain equipment items may be restricted, as
they require reinitialising. Individual settings
may likewise have been lost and will have to be
reprogrammed:
Controls
Power failure
Touring: in the load area
Entertainment
Do not repair blown fuses or replace them
with fuses with different colours or
ampere ratings, otherwise overloaded electrical
wires can cause a fire in the car.<
Saloon
There are spare fuses and plastic tweezers in
the toolkit, see page 192. Details of the layout
of the fuses are to be found in the load area,
behind the right-hand side trim.
2. Open the right-hand side trim.
199
Online Edition for Part-No. 01 41 0 159 725 © 09/05 BMW AG
Reference
1. Unhook the luggage strap*, see page 117.
Touring
Mobility
There are spare fuses, plastic tweezers and
details of the layout of the fuses in the toolkit
compartment, see page 192.
Mutual aid
Mutual aid
Emergency call*
In order to make an emergency call:
> Business mobile phone preparation package.
> Radio readiness is switched on.
> The mobile phone network must be receivable.
> The emergency call system must be operational.
> BMW Assist has been activated. To activate
BMW Assist, see the separate Operating
Instructions.
Although the emergency number may differ
from country to country, it is still possible to initiate an emergency call within most GSM networks using the button.
Misuse of the emergency call system is a punishable offence.
If the situation allows, wait in the car until voice
contact has been established. You can then
provide more precise details of the situation.
On cars where BMW Assist has been enabled,
telephone contact is established with the BMW
Assist emergency call centre. If the car's current position can be determined, it is transferred to the emergency call centre.
If the LED is flashing but the emergency call
centre cannot be heard over the hands-free
system, the hands-free system may be malfunctioning. However, the emergency call centre may still be able to hear you speak.
In certain circumstances, an emergency call
may be placed automatically immediately after
a serious accident. Use of the button does not
interfere with an automatic emergency call.
For technical reasons, it may not be possible to make an emergency call in highly
adverse conditions.<
Making an emergency call
1. Briefly press the cover flap to open it.
The layout of the switches and indicator
lamps may vary depending on the car's
equipment.
Warning triangle*
The warning triangle is stored in the luggage
compartment lid/tailgate.
Saloon
2. Press the button for at least 2 seconds.
If a cancel query appears on the control display, you can interrupt the emergency call
within 5 seconds.
Unscrew the wing bolt to open.
The LED in the button comes on. As soon
as a telephone connection has been set up
with the general emergency call centre, the
LED flashes.
200
Online Edition for Part-No. 01 41 0 159 725 © 09/05 BMW AG
Touring
Release two quick-release fasteners and fold
down the trim.
You will find the first aid pouch behind the righthand side trim in the load area. On cars with a
tensioning strap*, pull back the rear end of the
tensioning trap and disengage it before opening the trim.
The telephone numbers for Mobile Service in
your home country are in the Contact booklet.
In cars equipped with BMW Assist or TeleService, you can establish contact with the BMW
Group's Mobile Service for breakdown assistance directly via iDrive, see separate Owner's
Handbook.
You will find the first aid pouch in the luggage
compartment lid.
Unscrew the wing bolt to open.
Starting with a flat battery
If your car's battery is flat, the engine of your
BMW can be started with the aid of two jump
leads from another vehicle's battery. In the
same way, you can help another car to start.
Use only leads with fully insulated terminal
clamps.
Do not touch any electrically live parts
when the engine is running, or a fatal accident may occur. Do not depart from the procedure described below, otherwise personal
injury could result or one or both vehicles be
damaged.<
201
Online Edition for Part-No. 01 41 0 159 725 © 09/05 BMW AG
Driving hints
Navigation
The BMW Group's Mobile Service – Emergency
Service – is there to assist you round the clock
in the event of a breakdown, including at weekends and on public holidays.
Entertainment
Saloon
Mobile Service*
Mobility
Certain items in the first aid pouch have a limited useful life. Check the expiry dates of the
contents regularly and replace any items that
have expired.
Reference
First aid pouch*
Controls
Overview
Touring
Mutual aid
Preparations
1. Check whether the battery of the other
vehicle has a voltage of 12 Volt and approx.
the same capacity in Amp/h. This should be
printed on the battery.
Your BMW has a special nut to act as the
body earth or negative terminal.
2. Switch off the engine of the donor vehicle.
3. Switch off all consumers in both vehicles.
The bodies of the two vehicles must not
make contact, otherwise there is the risk
of a short-circuit.<
Connecting the jump leads
Connect the jump leads in the correct
order, so that no sparks which could
cause injury occur at the battery.<
Your BMW has a jump-starting connection in
the engine compartment which acts as the battery's positive terminal, see also Engine compartment overview on page 186. The cap is
marked with +.
1. Fold open the cover on the BMW's jumpstarting connection by pulling the tab.
5. Connect the second terminal clamp to the
battery's negative terminal or to a ground/
earth connection on the engine or body of
the vehicle to be started.
Starting the engine
1. Start the engine of the donor vehicle and
allow it to run for a few minutes at a slightly
increased idle speed.
2. Start the engine of the other vehicle in the
customary way.
If an initial attempt to start the engine fails,
wait several minutes until the flat battery
has been recharged to a slightly greater
degree.
3. Allow the engines to run for a few minutes.
4. Disconnect the jump leads in the opposite
order from that in which they were originally
attached.
2. Connect a terminal clamp on the positive/+
lead to the battery's positive terminal or to a
jump-starting connection on the donor
vehicle.
3. Connect the other terminal clamp to the
battery's positive terminal or to a jumpstarting connection on the vehicle to be
started.
4. Connect a terminal clamp on the negative/–
lead to the battery's negative terminal or to
the engine or body earth connection on the
donor vehicle.
Check the battery if necessary and have it
recharged.
Do not use the spray products sold as
starting aids.<
Tow-starting, towing away
Using towing eye
The screw-in towing eye must always be carried on the car. It can be screwed into the front
or rear end of the BMW.
Saloon:
It is stored in the toolkit in the luggage compartment lid, see page 192.
202
Online Edition for Part-No. 01 41 0 159 725 © 09/05 BMW AG
Access to screw thread
Manual gearbox
Rectangular cover in bumper: press on the
arrow symbol on the cover.
Gearshift lever in neutral.
Front
Automatic transmission
Selector lever in position N.
Do not exceed a towing speed of 70 km/h,
approx. 45 mph, and a towing distance of
150 km, approx. 90 miles, otherwise the automatic transmission could be damaged.<
Overview
Switch on the hazard warning flashers, depending on local regulations. If the car's electrical
system has failed, the car to be towed must be
made identifiable to following vehicles, for
instance by placing a notice or the warning triangle in the rear window.
Controls
Use only the towing eye supplied with the
car, and make sure that it is screwed in
fully and is tight. Only use the towing eye for
towing on roads. Avoid lateral loads on the towing eye, e.g. do not raise the car at the towing
eye. Otherwise, the towing eye and the car
could be damaged.<
and brakes will require extra effort to operate.The active steering will not be active and
more pronounced steering wheel movements
will be necessary.<
Driving hints
Touring:
It is stored in the toolkit behind the left-hand
side trim in the load area, see page 192.
Towing methods
Do not raise the car at the towing eye or
by body or suspension components, otherwise it could be damaged.<
In some countries, it is prohibited to tow
another vehicle on public roads by means of a
towbar or towrope. Familiarise yourself with the
relevant legislation in the country in question.
With towbar
Make sure that the ignition is switched on,
see page 56, otherwise low-beam headlights, rear lights, turn indicators and windscreen wipers will not be available. If the electrical system fails, do not attempt to tow-start or
tow away the car. The electrical steering-wheel
lock cannot be disengaged and the car is not
steerable. Starting with a flat battery see
page 201. Servo assistance is not available
when the engine is not running. The steering
The towing vehicle must not be lighter
than the towed vehicle, otherwise it may
be impossible to maintain control.<
The towing eyes of both vehicles should be on
the same side. If it is impossible to avoid attaching the towbar at an angle, note the following:
> Towbar clearance may be restricted when
cornering.
> The towbar will generate lateral forces if it is
attached offset.
203
Online Edition for Part-No. 01 41 0 159 725 © 09/05 BMW AG
Mobility
Being towed
Reference
Rear
Entertainment
Switch on the ignition and engage selector
lever position N.
Navigation
Sequential Manual Gearbox SMG
Mutual aid
Only attach the towbar to the towing
eyes. Attaching the towbar to other parts
of the car can result in damage.<
With towrope
Ensure that the towrope is taut when the towing
vehicle moves off.
For towing, use nylon ropes or tapes, as
these will help to avoid sudden tensile
loads. Only attach the towrope to the towing
eyes. Attaching the towrope to other parts of
the car can result in damage.<
With breakdown truck
Tow-starting
If the electrical system fails, do not
attempt to tow-start or tow away the car.
The electrical steering-wheel lock cannot be
disengaged and the car is not steerable. Starting with a flat battery, see page 201.<
Do not tow-start cars with automatic
transmission. Cars equipped with a catalytic converter should only be tow-started if the
engine is cold. It is preferable to start the engine
using jump leads, see page 201.<
1. Switch on the hazard warning flashers,
complying with local regulations.
2. Switch on the ignition, see page 56.
3. Engage 3rd gear. Cars with SMG, see
below.
4. Keep the clutch depressed while tow-starting the car, then gradually release the
clutch. Press the clutch down fully again as
soon as the engine has started.
Have the BMW transported by a breakdown
truck with a hoisting frame or hoisted onto a
loading platform.
With breakdown truck 525xi, 530xi,
530xd
Do not tow away the BMW with just the
front or rear axle raised off the ground,
otherwise the wheels could lock and the transfer box be damaged.<
5. Halt in a suitable place, remove the towbar
or towrope and switch off the hazard warning flashers.
6. Have the car checked.
Cars with Sequential Manual Gearbox SMG:
1. Tow-start in selector lever position N.
2. Select the sequential mode. The correct
gear is engaged and the clutch operated
automatically.
Do not activate Hill Descent Control HDC
on the 525xi, 530xi, 530xd when towstarting, see page 85.<
Always have the BMW hoisted onto a loading
platform for transporting.
204
Online Edition for Part-No. 01 41 0 159 725 © 09/05 BMW AG
Online Edition for Part-No. 01 41 0 159 725 © 09/05 BMW AG
Reference
205
Mobility
Entertainment
Navigation
Driving hints
Controls
Overview
Online Edition for Part-No. 01 41 0 159 725 © 09/05 BMW AG
Reference
This chapter contains the technical data, the
short commands for the voice input system and
the index, which will help you find specific items
of information with ease.
Online Edition for Part-No. 01 41 0 159 725 © 09/05 BMW AG
Technical data
Technical data
Engine data
Displacement
cc
Number of cylinders
Maximum power output
kW/hp
at engine speed
rpm
Maximum torque
Nm/lb ft
at engine speed
rpm
Displacement
cc
523i
525i/xi
530i/xi
2497
2497
2996
6
6
6
130/175
160/215
190/255
5800
6500
6600
230/180
250/180
300/220
3500-5000
2750-4250
2500-4000
Number of cylinders
Maximum power output
kW/hp
at engine speed
rpm
Maximum torque
Nm/lb ft
at engine speed
rpm
Displacement
cc
Number of cylinders
Maximum power output
kW/hp
at engine speed
rpm
Maximum torque
Nm/lb ft
at engine speed
rpm
540i
550i
4000
4799
8
8
225/302
270/362
6300
6300
390/290
490/360
3500
3400
520d
525d
530d/xd
535d
1995
2497
2993
2993
4
6
6
6
120/161
130/175
170/227
200/268
4000
4000
4000
4000
340/250
400/300
500/370
560/410
2000-2750
2000-2750
1750-3000
2000
208
Online Edition for Part-No. 01 41 0 159 725 © 09/05 BMW AG
Manual
Automatic
Manual
Automatic
Urban
Litres/100 km
(mpg)
12.1/12.1
(23.3/23.3)
13.4/13.7
(21.1/20.6)
12.4/12.5
(22.8/22.6)
13.5/13.5
(20.9/20.9)
Extra-urban
Litres/100 km
(mpg)
6.4/6.7
(44.1/42.1)
6.9/7.1
(40.9/39.8)
6.5/6.8
(43.5/41.5)
7.0/7.2
(40.3/39.2)
Total
Litres/100 km
(mpg)
8.5/8.7
(33.2/32.4)
9.3/9.5
(30.4/29.7)
8.7/8.9
(32.4/31.7)
9.4/9.5
(30.1/29.7)
Ο emissions
Grams/km
(oz/mile)
205/210
(11.6/11.9)
224/230
(12.7/13.0)
210/215
(11.9/12.2)
227/229
(12.9/13.1)
530i/Touring
530i/Touring
540i
540i
Manual, SMG
Automatic
Manual, SMG
Automatic
Urban
Litres/100 km
(mpg)
12.6/13.1
(22.4/21.6)
13.6/13.3
(20.8/21.2)
16.2
(17.4)
15.5
(18.2)
Extra-urban
Litres/100 km
(mpg)
6.6/6.9
(42.8/40.9)
6.8/7.3
(41.5/38.7)
8.0
(35.3)
7.5
(37.7)
Total
Litres/100 km
(mpg)
8.8/9.2
(32.1/30.7)
9.3/9.5
(30.4/29.7)
11.0
(25.7)
10.4
(27.2)
Ο emissions
Grams/km
(oz/mile)
212/222
(11.9/12.6)
224/230
(12.7/13.1)
264
(15.0)
250
(14.5)
550i/Touring
550i/Touring
Manual, SMG
Automatic
Litres/100 km
(mpg)
16.4/17.0
(17.2/16.6)
15.9/16.6
(17.8/17.0)
Extra-urban
Litres/100 km
(mpg)
8.0/8.3
(35.3/34.0)
7.8/8.2
(36.2/34.4)
Total
Litres/100 km
(mpg)
11.1/11.5
(25.4/24.6)
10.8/11.3
(26.2/25.0)
Ο emissions
Grams/km
(oz/mile)
267/276
(15.2/16.0)
260/272
(14.8/15.4)
209
Online Edition for Part-No. 01 41 0 159 725 © 09/05 BMW AG
Reference
Mobility
Urban
Controls
525i/Touring
Driving hints
525i/Touring
Navigation
523i/Touring
Entertainment
523i/Touring
Overview
Fuel consumption, carbon dioxide/Θ emissions
Technical data
525xi/Touring 525xi/Touring 530xi/Touring 530xi/Touring
Manual
Automatic
Manual, SMG
Automatic
Urban
Litres/100 km
(mpg)
13.7/13.7
(20.6/20.6)
14.8/14.7
(19.1/19.2)
13.6/14.1
(20.8/20.0)
14.4/14.6
(19.6/19.3)
Extra-urban
Litres/100 km
(mpg)
7.2/7.7
(39.2/36.7)
7.7/7.9
(36.7/35.8)
7.4/7.8
(38.2/36.2)
7.9/8.1
(35.8/34.9)
Total
Litres/100 km
(mpg)
9.6/9.9
(29.4/28.5)
10.3/10.4
(27.4/27.2)
9.7/10.1
(29.1/28.0)
10.3/10.5
(27.4/26.9)
Ο emissions
Grams/km
(oz/mile)
232/239
(13.1/13.6)
249/251
(14.1/14.3)
234/244
(13.3/13.9)
249/253
(14.1/14.4)
530xd/Touring 530xd/Touring
Manual, SMG
Automatic
Urban
Litres/100 km
(mpg)
10.2/10.6
(27.7/26.6)
11.1/11.5
(25.4/24.6)
Extra-urban
Litres/100 km
(mpg)
6.1/6.3
(46.3/44.8)
6.5/6.8
(43.4/41.5)
Total
Litres/100 km
(mpg)
7.6/7.9
(37.2/35.8)
8.2/8.5
(34.4/33.2)
Ο emissions
Grams/km
(oz/mile)
203/211
(11.5/12.0)
219/227
(12.4/12.9)
520d/Touring 520d/Touring 525d/Touring 525d/Touring
Manual
Automatic
Manual
Automatic
Urban
Litres/100 km
(mpg)
8.0/8.3
(35.3/34.0)
9.3/9.6
(30.4/29.4)
9.3/9.7
(30.4/29.1)
10.6/10.9
(26.6/25.9)
Extra-urban
Litres/100 km
(mpg)
4.7/4.8
(60.1/58.8)
5.5/5.6
(51.4/50.4)
5.3/5.6
(53.3/50.4)
6.2/6.5
(45.6/43.5)
Total
Litres/100 km
(mpg)
5.9/6.1
(47.9/46.3)
6.9/7.1
(40.9/39.8)
6.7/7.0
(42.1/40.3)
7.8/8.0
(36.2/35.3)
Ο emissions
Grams/km
(oz/mile)
158/162
(9.0/9.2)
185/189
(10.5/10.7)
179/187
(10.1/10.6)
208/213
(11.8/12.1)
210
Online Edition for Part-No. 01 41 0 159 725 © 09/05 BMW AG
Automatic
Automatic
Urban
Litres/100 km
(mpg)
9.4/9.8
(30.0/28.8)
10.3/10.6
(27.4/26.6)
10.9/11.1
(25.9/25.4)
Extra-urban
Litres/100 km
(mpg)
5.2/5.4
(54.3/52.3)
5.9/6.0
(47.9/47.1)
6.3/6.5
(44.8/43.5)
Total
Litres/100 km
(mpg)
6.7/7.0
(42.2/40.4)
7.5/7.7
(37.7/36.7)
8.0/8.2
(35.3/34.4)
Ο emissions
Grams/km
(oz/mile)
179/187
(10.2/10.6)
200/205
(11.3/11.6)
211/216
(12.0/12.3)
Driving hints
Fuel consumption is determined according to a
standard test method, EU Directive
80/1268/EEC. It is not the same as the average
fuel consumption in practice, which depends on
a great many different factors such as driving
style, load, road condition, traffic density and
flow, weather, tyre pressures, etc.
Overview
Manual
Controls
530d/Touring 530d/Touring 535d/Touring
211
Online Edition for Part-No. 01 41 0 159 725 © 09/05 BMW AG
Reference
Mobility
Entertainment
Navigation
Engine power output and road performance
data are measured in the conditions laid down
by EU Directive 80/1269 EEC or DIN 70020,
with the car to standard specification. This
standard specifies the permitted tolerances.
Optional extras or special accessories may have
quite a significant influence on both performance and fuel consumption, as they often affect
the car's weight and χ value, drag coefficient,
for instance a roof rack, wider tyres, additional
mirrors.
Technical data
Dimensions
All dimensions in mm.
Car height with xDrive: 1482 mm, approx. 4 ft 10 in
Smallest turning circle ∆: 11.4 m, approx. 37 ft 6 in, with xDrive 11.9 m, approx. 39 ft 1 in
212
Online Edition for Part-No. 01 41 0 159 725 © 09/05 BMW AG
Overview
Controls
Driving hints
Entertainment
Navigation
213
Online Edition for Part-No. 01 41 0 159 725 © 09/05 BMW AG
Reference
Mobility
All dimensions in mm. Smallest turning circle ∆: 11.4 m, approx. 37 ft 6 in, with xDrive 11.9 m,
approx. 39 ft 1 in
Technical data
Weights
Saloon
523i
525i
530i
540i
550i
Kerb weight, ready for road, with 75 kg (165 lb) load, tank 90Ξ full, without optional extras
> Manual transmission, SMG
kg
(lb)
1545
(3405)
1550
(3410)
1565
(3450)
1725
(3800)
1735
(3825)
> Automatic transmission
kg
(lb)
1565
(3450)
1570
(3460)
1575
(3472)
1725
(3800)
1735
(3825)
> Manual transmission, SMG
kg
(lb)
2010
(4430)
2035
(4485)
2050
(4520)
2210
(4870)
2220
(4895)
> Automatic transmission
kg
(lb)
2030
(4475)
2055
(4530)
2060
(4540)
2210
(4870)
2220
(4895)
Front axle load limit
kg
(lb)
980
(2160)
980
(2160)
980
(2160)
1070
(2360)
1070
(2360)
Rear axle load limit
kg
(lb)
1150
(2535)
1150
(2535)
1150
(2535)
1235
(2720)
1235
(2720)
Permitted gross weight
Roof load
kg (lb)
100 (220)
Luggage compartment capacity acc.
to VDA test
Litres
(cu ft)
520
(18.4)
Saloon
525xi
530xi
530xd
Kerb weight, ready for road, with 75 kg (165 lb) load, tank 90Ξ full, without optional extras
> Manual transmission, SMG
kg
(lb)
1665
(3670)
1665
(3670)
1735
(3825)
> Automatic transmission
kg
(lb)
1680
(3700)
1680
(3700)
1750
(3855)
kg
(lb)
2150
(4740)
2150
(4740)
2220
(4890)
> Automatic transmission
kg
(lb)
2165
(4770)
2165
(4770)
2235
(4930)
Front axle load limit
kg
(lb)
1050
(2315)
1050
(2315)
1090
(2400)
Rear axle load limit
kg
(lb)
1190
(2620)
1190
(2620)
1200
(2640)
Permitted gross weight
> Manual transmission, SMG
Roof load
kg (lb)
100 (220)
Luggage compartment capacity acc.
to VDA test
Litres
(cu ft)
520
(18.4)
214
Online Edition for Part-No. 01 41 0 159 725 © 09/05 BMW AG
520d
525d
530d
535d
Kerb weight, ready for road, with 75 kg (165 lb) load, tank 90Ξ full, without optional extras
> Manual transmission, SMG
kg
(lb)
1585
(3490)
1660
(3660)
1665
(3670)
-
> Automatic transmission
kg
(lb)
1595
(3520)
1670
(3680)
1665
(3670)
1735
(3820)
> Manual transmission, SMG
kg
(lb)
2050
(4520)
2145
(4730)
2150
(4740)
-
> Automatic transmission
kg
(lb)
2060
(4540)
2155
(4750)
2150
(4740)
2220
(4890)
Front axle load limit
kg
(lb)
990
(2180)
1050
(2310)
1030
(2270)
1070
(2360)
Rear axle load limit
kg
(lb)
1170
(2580)
1180
(2600)
1200
(2640)
1215
(2680)
530i
550i
Overview
Saloon
Touring
523i
525i
Kerb weight, ready for road, with 75 kg (165 lb) load, tank 90Ξ full, without optional extras
> Manual transmission, SMG
kg
(lb)
1635
(3600)
1640
(3615)
1655
(3650)
1825
(4020)
> Automatic transmission
kg
(lb)
1655
(3650)
1660
(3660)
1665
(3670)
1825
(4023)
> Manual transmission, SMG
kg
(lb)
2160
(4760)
2165 2180 (4810)
(4770)
2310
(5090)
> Automatic transmission
kg
(lb)
2180
(4810)
2185
(4820)
2190
(4830)
2310
(5090)
Front axle load limit
kg
(lb)
980
(2160)
980
(2160)
980
(2160)
1070
(2359)
Rear axle load limit
kg
(lb)
1280
(2820)
1280
(2820)
1280
(2820)
1300
(2870)
Permitted gross weight
Roof load
kg (lb)
100 (220)
Load-area capacity acc. to VDA
Litres
(cu ft)
500-1650
(17.7-58.2)
215
Online Edition for Part-No. 01 41 0 159 725 © 09/05 BMW AG
Driving hints
Navigation
520
(18.4)
Entertainment
100 (220)
Litres
(cu ft)
Mobility
kg (lb)
Luggage compartment capacity acc.
to VDA test
Reference
Roof load
Controls
Permitted gross weight
Technical data
Touring
525xi
530xi
530xd
Kerb weight, ready for road, with 75 kg (165 lb) load, tank 90Ξ full, without optional extras
> Manual transmission, SMG
kg
(lb)
1760
(3880)
1760
(3880)
1830
(4030)
> Automatic transmission
kg
(lb)
1775
(3910)
1775
(3910)
1845
(4070)
> Manual transmission, SMG
kg
(lb)
2285
(5040)
2285
(5040)
2335
(5150)
> Automatic transmission
kg
(lb)
2300
(5070)
2300
(5070)
2350
(5180)
Front axle load limit
kg
(lb)
1050 (2315)
1050
(2315)
1090
(2400)
Rear axle load limit
kg
1300
(2870)
1300
(2870)
1300
(2870)
Permitted gross weight
(lb)
Roof load
kg (lb)
100 (220)
Load-area capacity acc. to VDA
Litres
(cu ft)
500-1650
(17.7-58.2)
Touring
520d
525d
530d
535d
Kerb weight, ready for road, with 75 kg (165 lb) load, tank 90Ξ full, without optional extras
> Manual transmission, SMG
kg
(lb)
1675
(3690)
1750
(3860)
1755
(3870)
-
> Automatic transmission
kg
(lb)
1685
(3710)
1760
(3880)
1755
(3870)
1830
(4030)
> Manual transmission, SMG
kg
(lb)
2200
(4850)
2275
(5020)
2280
(5030)
-
> Automatic transmission
kg
(lb)
2210
(4870)
2285
(5040)
2280
(5030)
2315
(5100)
Front axle load limit
kg
(lb)
980
(2160)
1050
(2310)
1030
(2270)
1070
(2360)
Rear axle load limit
kg
(lb)
1390
(3060)
1300
(2870)
1300
(2870)
1300
(2870)
Permitted gross weight
Roof load
kg (lb)
100 (220)
Load-area capacity acc. to VDA
Litres
(cu ft)
500-1650
(17.7-58.2)
216
Online Edition for Part-No. 01 41 0 159 725 © 09/05 BMW AG
550i
> Manual transmission, SMG
kg
(lb)
2010
(4430)
2035
(4490)
2050
(4519)
2270
(5000)
2280
(5030)
> Automatic transmission
kg
(lb)
2030
(4470)
2055
(4530)
2060
(4540)
2270
(5000)
2280
(5030)
Rear axle load limit
kg
(lb)
1195
(2630)
1215
(2680)
1215
(2680)
1340
(2950)
1340
(2950)
Towing loads according to EU operating permit. Note and comply with different values in certain
countries. BMW Service will have details of possible increases.
> Unbraked
kg
(lb)
750
(1650)
750
(1650)
750
(1650)
750
(1650)
750
(1650)
> braked on slopes of up to 12Ξ
kg
(lb)
1600
(3500)
1800
(4000)
2000
(4400)
2000
(4400)
2000
(4400)
> Automatic transmission
kg
(lb)
1800
(4000)
2000
(4400)
2000
(4400)
2000
(4400)
2000
(4400)
> braked on slopes of up to 8 Ξ
kg
(lb)
1800
(4000)
2000
(4400)
2000
(4400)
2000
(4400)
2000
(4400)
kg (lb)
Saloon
90 (200)
525xi
530xi
530xd
Permitted gross weight
> Manual transmission, SMG
kg
(lb)
2210
(4870)
2210
(4872)
2280
(5030)
> Automatic transmission
kg
(lb)
2225
(4900)
2225
(4900)
2295
(5060)
Rear axle load limit
kg
(lb)
1300
(2860)
1300
(2860)
1310
(2890)
Towing loads according to EU operating permit. Note and comply with different values in certain
countries. BMW Service will have details of possible increases.
> Unbraked
kg (lb)
750 (1650) 750 (1650) 750 (1650)
> braked on slopes of up to 12Ξ
kg
(lb)
1800
(4000)
2000
(4400)
2000
(4400)
> Automatic transmission
kg
(lb)
2000
(4400)
2000
(4400)
2000
(4400)
> braked on slopes of up to 8 Ξ
kg
(lb)
1800
(4000)
2000
(4400)
2000
(4400)
> Automatic transmission
kg
(lb)
2000
(4400)
2000
(4400)
2000
(4400)
Trailer nose weight
kg (lb)
90 (200)
217
Online Edition for Part-No. 01 41 0 159 725 © 09/05 BMW AG
Mobility
Trailer nose weight
Controls
540i
Driving hints
530i
Navigation
525i
Entertainment
523i
Permitted gross weight
Reference
Saloon
Overview
Towing a trailer
Technical data
Saloon
520d
525d
530d
535d
Permitted gross weight
> Manual transmission, SMG
kg
(lb)
2110
(4650)
2145
(4730)
2210
(4650)
-
> Automatic transmission
kg
(lb)
2120
(4670)
2155
(4750)
2210
(4870)
2220
(4890)
Rear axle load limit
kg
(lb)
1250
(2750)
1245
(2740)
1310
(2890)
1275
(2810)
Towing loads according to EU operating permit. Note and comply with different values in certain
countries. BMW Service will have details of possible increases.
> Unbraked
kg
(lb)
750
(1650)
750
(1650)
750
(1650)
750
(1650)
> braked on slopes of up to 12Ξ
kg
(lb)
1800
(4000)
2000
(4400)
2000
(4400)
2000
(4400)
> Automatic transmission
kg
(lb)
1800
(4000)
2000
(4400)
2000
(4400)
2000
(4400)
> braked on slopes of up to 8Ξ
kg
(lb)
1800
(4000)
2000
(4400)
2000
(4400)
2000
(4400)
Trailer nose weight
kg (lb)
Touring
90 (200)
523i
525i
530i
550i
Permitted gross weight
> Manual transmission, SMG
kg
(lb)
2220
(4890)
2225
(4910)
2240
(4900)
2370
(5220)
> Automatic transmission
kg
(lb)
2240
(4940)
2245
(4950)
2250
(4960)
2370
(5220)
Rear axle load limit
kg
(lb)
1380
(3040)
1400
(3090)
1400
(3090)
1400
(3090)
Towing loads according to EU operating permit. Note and comply with different values in certain
countries. BMW Service will have details of possible increases.
> Unbraked
kg
(lb)
750
(1650)
750
(1650)
750
(1650)
750
(1650)
> braked on slopes of up to 12Ξ
kg
(lb)
1600
(3500)
1800
(4000)
2000
(4400)
2000
(4400)
> Automatic transmission
kg
(lb)
1800
(4000)
2000
(4400)
2000
(4400)
2000
(4400)
> braked on slopes of up to 8Ξ
kg
(lb)
1800
(4000)
2000
(4400)
2000
(4400)
2000
(4400)
Trailer nose weight
kg (lb)
90 (200)
218
Online Edition for Part-No. 01 41 0 159 725 © 09/05 BMW AG
> Manual transmission, SMG
kg
(lb)
2325
(5130)
2325
(5130)
2375
(5240)
> Automatic transmission
kg
(lb)
2340
(5160)
2340
(5160)
2390
(5270)
Rear axle load limit
kg
(lb)
1400
(3090)
1400
(3090)
1400
(3090)
Towing loads according to EU operating permit. Note and comply with different values in certain
countries. BMW Service will have details of possible increases.
> Unbraked
kg
(lb)
750
(1650)
750
(1650)
750
(1650)
> braked on slopes of up to 12Ξ
kg
(lb)
1800
(4000)
2000
(4400)
2000
(4400)
> Automatic transmission
kg
(lb)
2000
(4400)
2000
(4400)
2000
(4400)
> braked on slopes of up to 8 Ξ
kg
(lb)
1800
(4000)
2000
(4400)
2000
(4400)
> Automatic transmission
kg
(lb)
2000
(4400)
2000
(4400)
2000
(4400)
Trailer nose weight
kg (lb)
Touring
90 (200)
520d
525d
530d
535d
Permitted gross weight
> Manual transmission, SMG
kg
(lb)
2260
(4980)
2335
(5150)
2340
(5160)
-
> Automatic transmission
kg
(lb)
2270
(5000)
2345
(5170)
2340
(5160)
2375
(5240)
Rear axle load limit
kg
(lb)
1390
(3060)
1400
(3090)
1420
(3130)
1400
(3090)
Overview
Permitted gross weight
Controls
530xd
Driving hints
530xi
Navigation
525xi
Entertainment
Touring
> Unbraked
kg
(lb)
750
(1650)
750
(1650)
750
(1650)
750
(1650)
> braked on slopes of up to 12Ξ
kg
(lb)
1800
(4000)
2000
(4400)
2000
(4400)
2000
(4400)
> braked on slopes of up to 8 Ξ
kg
(lb)
1800
(4000)
2000
(4400)
2000
(4400)
2000
(4400)
kg (lb)
90 (200)
219
Online Edition for Part-No. 01 41 0 159 725 © 09/05 BMW AG
Reference
Trailer nose weight
Mobility
Towing loads according to EU operating permit. Note and comply with different values in certain
countries. BMW Service will have details of possible increases.
Technical data
Performance
523i/Touring 525i/Touring 530i/Touring
Top speed
> Manual transmission, SMG
km/h
(mph)
235/227
(146/141)
245/240
(152/149)
250/250
(155/155)
> Automatic transmission
km/h
(mph)
232/224
(144/139)
242/237
(150/147)
250/250
(155/155)
Acceleration from
0 to 100 km/h
(0 to 62 mph)
> Manual transmission, SMG
s
8.5/8.8
7.5/7.8
6.5/6.6
> Automatic transmission
s
9.3/9.5
7.9/8.3
6.7/6.9
s
9.4/9.7
7.9/8.3
6.6/6.9
Acceleration from
80 to 120 km/h
(50 to 75 mph)
> Manual transmission, SMG
in 4th gear
540i 550i/Touring
Top speed
> Manual transmission, SMG
km/h
(mph)
250
(155)
250/250
(155/155)
> Automatic transmission
km/h
(mph)
250
(155)
250/250
(155/155)
s
6.2
5.5/5.6
s
6.3
5.6/5.7
s
6.3
5.2/5.4
Acceleration from
0 to 100 km/h
(0 to 62 mph)
> Manual transmission, SMG
> Automatic transmission
Acceleration from
80 to 120 km/h
(50 to 75 mph)
> Manual transmission, SMG
in 4th gear
220
Online Edition for Part-No. 01 41 0 159 725 © 09/05 BMW AG
Top speed
> Manual transmission,
SMG
km/h
(mph)
237/232
(147/144)
250/245
(155/152)
242/235
(150/146)
> Automatic transmission
km/h
(mph)
232/228
(144/141)
248/242
(154/150)
238/233
(148/145)
Acceleration from
0 to 100 km/h
(0 to 62 mph)
> Manual transmission,
SMG
s
8.3/8.5
6.8/7.0
6.6/6.8
> Automatic transmission
s
8.4/8.6
7.1/7.4
6.8/7.0
s
8.8/9.3
7.2/7.5
5.5/5.6
Acceleration from
80 to 120 km/h
(50 to 75 mph)
> Manual transmission,
SMG
in 4th gear
Overview
530xd/
Touring
Controls
530xi/
Touring
Driving hints
525xi/
Touring
520d/Touring 525d/Touring 530d/Touring
223/218
(139/135)
230/225
(143/140)
250/244
(155/152)
> Automatic transmission
km/h
(mph)
223/218
(139/135)
227/222
(141/138)
248/242
(154/150)
0 to 100 km/h
(0 to 62 mph)
> Manual gearbox
s
8.6/8.9
8.1/8.3
6.8/6.9
> Automatic transmission
s
8.7/8.9
8.3/8.5
6.8/7.0
s
7.0/7.5
6.5/6.9
5.1/5.1
Acceleration from
80 to 120 km/h
(50 to 75 mph)
> Manual transmission in
4th gear
535d/Touring
Top speed
Acceleration from
km/h
(mph)
0 to 100 km/h
(0 to 62 mph)
250/250
(155/155)
s
6.5/6.6
221
Online Edition for Part-No. 01 41 0 159 725 © 09/05 BMW AG
Reference
Acceleration from
Entertainment
km/h
(mph)
Mobility
> Manual gearbox
Navigation
Top speed
Technical data
Filling capacities
Fuel tank
including a reserve of
Litres (Imp. units)
Note
approx. 70 (15.4 gal)
Fuel grade: page 181
approx. 8 (1.8 gal)
Window washer system
Further details: page 64
> Saloon
approx. 3 (5 pints)
> incl. headlamp cleaning system
approx. 5 (9 pints)
> Touring
approx. 5 (9 pints)
Engine with oil filter renewal
> 523i, 525i/xi, 530i/xi
6.5 (11.4 pints)
> 540i, 550i
8.0 (14.1 pints)
> 520d
5.75 (10.1 pints)
> 525d
8.25 (14.5 pints)
> 530d/xd
7.75 (13.6 pints)
> 535d
8.5 (15.0 pints)
222
Online Edition for Part-No. 01 41 0 159 725 © 09/05 BMW AG
Long-life oil for petrol or
diesel engines.
Oil grades: page 188
Assistance window
Function
Command
Calling up assistance window 18
{Assistance window}
Selecting display in assistance window 19
{Assistance window map north orientated},
{Assistance window map direction of travel},
{Assistance window arrow view},
{Assistance window perspective},
{Assistance window vehicle position},
{Assistance window journey computer} or
{Assistance window computer}
Changing the scale in the assistance window 149 {Assistance window scale ... kilometres} or
{Assistance window scale ... metres}
Overview
item is selected. Important short commands for
the voice input system are listed below.
Controls
Short commands enable you to perform certain
functions directly irrespective of which menu
Driving hints
Short commands for the voice input
system*
{BMW Assist}
Calling up "BMW Service"
{BMW Service}
Calling up "BMW Contact"
{BMW Contact}
Calling up "BMW Contact Numbers"
{BMW Contact Numbers}
Calling up "Nearest BMW dealer"
{Nearest BMW dealer}
Calling up Information Plus
{Info Service}
Calling up My Info
{My Info}
Calling up BMW Online
{BMW Online}
Calling up telephone
{Telephone}
Entering PIN
{Enter PIN}
Dialling phone number
{Dial number}
Displaying phone book
{A to Z}
Dialling from the phone book
{Call ... } or
{Dial name}
Displaying "Top 8"
{Top 8}
Redialling
{Last number redial}
Mobility
Calling up BMW Assist
223
Online Edition for Part-No. 01 41 0 159 725 © 09/05 BMW AG
Entertainment
Command
Further information, see separate Operating Instructions:
Reference
Function
Navigation
Communication
Short commands for the voice input system
Function
Command
Displaying "Calls accepted"
{Calls accepted}
Displaying "Calls not accepted"
{Calls not accepted}
Displaying "Bluetooth"
{Bluetooth}
Navigation
Function
Command
Calling up navigation 134
{Navigation}
Calling up "Address input" 134
{Address input}
Calling up "New destination" 134
{New destination}
Displaying "Destination input map" 139
{Destination input map}
Displaying destination list 140
{Destination list}
Displaying address book 141
{Address book}
Displaying route criteria 145
{Route criteria}
Starting route guidance 147
{Start guidance}
Exit route guidance 147
{Guidance off}
Displaying arrow view 148
{Arrow view}
Displaying map view 149
{Map},
{Map north oriented},
{Map indicating direction of travel} or
{Perspective}
Changing the scale 149
{Scale ... kilometres} or
{Scale ... metres}
Displaying roads or places along the route 149
{Route list}
Switching on spoken instructions 150
{Navigation info on}
Switching off spoken instructions 150
{Navigation info off}
Repeating spoken instructions 150
{Repeat navigation info}
Calling up route 145, 151
{Route}
Calling up "New route for" 151
{New route for}
Calling up traffic information 152
{Traffic information}
Calling up "TMC" 152
{TMC}
Displaying the car's position 155
{Vehicle position}
224
Online Edition for Part-No. 01 41 0 159 725 © 09/05 BMW AG
Displaying journey computer 74
{Journey computer}
Calling up limit speed 78
{Limit}
Calling up stopwatch 78
{Stopwatch}
Controls
{Computer}
Function
Command
Tone control 161
{Tone}
Switching on radio 164
{Radio on}or
{FM on}
Calling up "FM" 164
{FM menu}
Calling up "AM" 164
{AM menu}
Driving hints
Entertainment
{FM all stations}
{Station...} or
{Select station}
Calling up "Memorised stations" 164
{FM memorised stations},
{SW memorised},
{MW memorised} or
{LW memorised}
Selecting a memorised radio station 164
{Memorised station}
Calling up "Manual frequency selection" 165
{FM manual frequency selection},
{SW manual},
{MW manual},
{LW manual},
{Select frequency} or
{Frequency ... Megahertz}
Calling up radio stations with best reception
signal 165
{SW autostore},
{MW autostore} or
{LW autostore}
Calling up "TP" 168
{TP}
Switching on Traffic Programme 168
{Traffic reports on}
Switching off Traffic Programme 168
{Traffic reports off}
Calling up CD player 169
{CD menu}
Switching on CD player 169
{CD}
Calling up CD changer 170
{CD changer menu}
Switching on CD changer 170
{CD changer}
Selecting CD 170
{CD 1...6}
Mobility
Calling up "All stations" 164
Selecting radio stations 164
225
Online Edition for Part-No. 01 41 0 159 725 © 09/05 BMW AG
Navigation
Displaying computer 73
Entertainment
Command
{On-board info}
Reference
Function
Calling up "On-board Info" 73
Overview
On-board information
Short commands for the voice input system
Function
Command
Selecting a music track 170
{CD track ...}
Selecting CD and music tracks 170
{CD 1...6 track...}
Calling up TV 175
{Television Menu}
Switching on TV 175
{Television}
Adjusting the picture 176
{Picture}
Climate
Function
Command
Adjusting temperature distribution for seat
heating 48
{Seat-heating distribution}
Calling up "Centre vent" 101
{Centre vent}
Calling up "Air distribution" 103
{Air distribution}
Calling up "Automatic programs" 102
{Automatic programmes}
Calling up "Independent ventilation" 106
{Independent mode}
Calling up "Direct operation" 106
{Direct operation}
Displaying switch-on times 106
{Switch-on times}
menu
Function
Command
Calling up "Door locks" 28, 30
{Door locks}
Calling up "Steering wheel buttons" 51
{Steering wheel buttons}
Calling up "Light" 63, 93
{Light}
Calling up "Communication interface"
{Communication interface}
Calling up "BMW Service settings"
{BMW Assist settings}
Calling up "BMW Service"
{BMW Service}
Calling up "Service requirements" 74
{Service requirements}
Calling up "Service" 74
{Service}
Displaying "Check Control messages" 76
{Check Control messages}
Calling up "Display settings" 79
{Display settings}
Calling up "Head-Up Display settings" 91
{HUD settings}
Activating speed limit 78
{Limit on}
Deactivating speed limit 78
{Limit off}
Adjusting brightness of control display 80
{Brightness}
Calling up "Units" 81
{Units}
Calling up "Languages" 81, 150
{Language}
Calling up "Clock" 79
{Clock}
226
Online Edition for Part-No. 01 41 0 159 725 © 09/05 BMW AG
Command
{Date}
Calling up "RPA" 87
{RPA}
Overview
Function
Calling up "Date" 80
{HDC}
{PDC}
Calling up "Traffic information settings" 152
{Traffic information settings}
Calling up "Entertainment settings" 161
{Entertainment settings}
227
Online Edition for Part-No. 01 41 0 159 725 © 09/05 BMW AG
Reference
Mobility
Entertainment
Navigation
Driving hints
Controls
Calling up "HDC" 85
Calling up "PDC" 83
From A-Z
From A-Z
Index
"..." Identifies texts on the
control display for selecting
functions and refers you to
the page where these texts
are to be found.
A
ABS Anti-lock Brake
System 83
ACC, see Active Cruise
Control 66
Acceleration 220
Acceleration assistant for
Sequential Manual Gearbox
SMG 61
"Accept as destination" 140
"Accept current speed" 78
Accessories 5
Accidents, reporting, see
Making an emergency
call 200
Acoustic signal, see Check
Control 76
Activated charcoal filter 105
Active backrest width
adjustment 44
Active Cruise Control 66
– indicator lamp 68
– selecting distance 67
– warning lamps 69
– wheel sensor 69
Active head restraint, front 47
Active seat 49
Active seat ventilation 48
Active steering 88
– warning lamp 88
Adapter for spare key 26
Adaptive brake light, see
Two-stage brake lights 89
Adaptive Head Light 94
"Address book" in
navigation 141
Address in
navigation 134, 138
– deleting 143
– entering 134, 138
– memorising 141
– memorising the car's
position 142
– selecting 143
"Address input" 134
"Add to address book" 141
"Add to destination
list" 137, 138
Adjusting the confirmation
signals for locking and
unlocking the car 29
Adjusting units of
measurement on the control
display 81
Adjustments
– on the control display 79
"After door opens" 46
"After unlocking" 46
Air, drying, see Cooling
function 100, 104
Airbags 90
– deactivating 53
– indicator lamp for front
passenger's airbags 54
– reactivating 53
– safe seated position 42
– warning lamp 90
Airbag switch 53
"Air circulation on / off" 51
"Air distribution" 103
Air distribution
– adjusting manually 99, 103
– automatic 99, 102
Air jets
– see Air vents 98
Air pressures, checking, see
Tyre pressures 182
Air recirculation, see Recirculated-air mode 100, 104
Air vents 98
– see Ventilation 100, 105
Air volume 99, 103
Alarm system 34
– avoiding false alarms 35
– interior movement
detector 35
– switching off alarm 35
– switching off tilt alarm
sensor and interior
movement detector 35
– tilt alarm sensor 35
"All doors" 28
Alloy wheels, care, see
booklet Looking after your
car
All-season tyres, see Winter
tyres 184
"All stations" calling up on
radio 164, 167
All-wheel-drive, see xDrive 85
Alternative route, see
Avoiding congestion 154
"AM", waveband 160, 164
Ambient air
– see Automatic Air Recirculation Control AUC 104
– see Recirculated-air
mode 100
Antifreeze
– coolant 188
– washer fluid 64
Anti-lock Brake System
ABS 83
Anti-theft alarm system, see
Alarm system 34
Anti-theft protection, see
Central locking 27
Approved engine oils 188
Approved oil grades, see
Approved engine oils 188
Aquaplaning 123
228
Online Edition for Part-No. 01 41 0 159 725 © 09/05 BMW AG
B
Backrest contour, see Lumbar
support 44
Backrests, see Seats 43
Backrest width adjustment 44
229
Online Edition for Part-No. 01 41 0 159 725 © 09/05 BMW AG
Overview
Controls
Driving hints
Navigation
Entertainment
"Balance", tone control 162
Balance, tone control 162
"Bass", tone control 162
Bass, tone control 161, 162
Battery, changing
– remote control for
independent ventilation
system/auxiliary heater 108
Battery, see Car battery 198
– starting with a flat
battery 201
Battery change
– remote control with comfort
access 37
Battery disposal
– car battery 199
– remote control with comfort
access 37
Being towed 203
Belts, see Seat belts 47
Belt tensioner
– see Airbags 90
– see Seat belts 47
Biodiesel, see Diesel
engine 181
Blind
– roller sun blinds 110
Blower, see Air
volume 99, 103
BMW Assist, see separate
Operating Instructions
BMW homepage 4
BMW Internet site 4
BMW Maintenance
System 190
BMW Online, see separate
Operating Instructions
Bottle holder, see Drinks
holders 112
Brake assist, see Dynamic
Brake Control DBC 84
Brake discs 124
Brake fluid 189
– warning lamp 189
Brake lights
– bulb changing 194
– two-stage brake lights 89
Brake pads 189
– running-in 122
Mobility
Automatic lights
– see Automatic driving lights
control 94
– see Daytime driving
lights 93
– see Headlight courtesy
delay feature 93
– see High-beam headlights
assistant 95
– see Interior light 97
"Automatic off" 46
"Automatic
programmes" 103
Automatic station search 165
Automatic transmission with
Steptronic 61
– interlock 61
– kick-down 62
– selector lever
interlock 61, 62
– shiftlock 61
– towing away 203
– tow-starting 204
– with comfort access 36
AUTO program for automatic
air conditioning
system 99, 102
"Autostore" for
radio 164, 166
"Autostore" for TV 176
Average fuel consumption 73
– setting unit of
measurement 81
Average speed, see
Computer 72
Avoiding false alarms 35
Axle load limits
– see Trailer towing 217
– see Weights 214
Axle loads
– see Trailer towing 217
– see Weights 214
Reference
Armrest, see Centre armrest
– front 111
– rear 114
Around the centre console 12
Around the steering wheel 8
Arrival time
– see Computer 73
– see Starting route
guidance 147
"Arrow view" in
navigation 148
Ashtrays
– front 112
– rear 113
Assistance systems, see
Driving stability control
systems 83
Assistance window 18
AUC, see Automatic Air Recirculation Control 104
Audio 160
– controls 160
– switching on/off 160
– tone control 161
– volume control 161
Automatic
– air distribution 99, 102
– air volume 102
– channel memory 176
– driving lights control 94
– memorising of stations 165
– steering wheel adjustment,
see Easy entry/exit 51
– tailgate operation 33
Automatic air conditioning 98
– automatic air
distribution 99, 102
– settings via iDrive 101
– switching off 100, 105
– with extended range of
features 102
Automatic Air Recirculation
Control AUC 104
Automatic anti-glare control,
see High-beam headlights
assistant 95
Automatic car washes 124
Automatic-dim mirrors 123
From A-Z
Brakes
– Anti-lock Brake System
ABS 83
– brake fluid 189
– brake fluid level 189
– brake pads 122, 189
– Cornering Brake Control
CBC 83
– disc brakes 124
– Dynamic Brake Control
DBC 84
– electronic brake force
distribution 83
– handbrake 58
– running-in 122
– see Safe braking 124
– two-stage brake lights 89
– warning lamp 11
Brake system 122, 189
– warning lamp 11, 189
Breakdown Service, see
Mobile Service 201
"Brightness" 80, 176
Brightness of the control
display 80
"Brightness" on TV 176
"Building number" in destination input 137
Bulb changing, see Lights and
bulbs 192
Button for starting engine 56
Buttons on the steering
wheel 9
Buttons on the steering
wheel, see Shift paddles 60
C
Can holder, see Drinks
holders 112
Capacity
– of load area 214
– of luggage
compartment 214
Car
– battery 198
– care, see booklet Looking
after your car
– dimensions 212
– general care 191
– laying up out of use, see
booklet Looking after your
car
– loads 125
– stopping 58
– trailer loads 217
– vehicle identification
number 186
– washing, see booklet
Looking after your car
– weight 214
Car's position
– displaying 155
– saving 142
Car's position, see Displaying
the car's position 155
Caravan-towing, see Towing
a trailer 127
Carbon dioxide 209
Car care, see booklet Looking
after your car
Care products, see booklet
Looking after your car
Car key, see Key/remote
control 26
Carpets, care, see booklet
Looking after your car
Car phone
– installed position, see
Centre armrest 111
Car radio, see Radio 164
Carrying children in safety 53
Car telephone
– see separate Operating
Instructions
Car wash 124
– see also booklet Looking
after your car
– see booklet Looking after
your car
– with comfort access 37
Catalytic converter, see Hot
exhaust system 122
CBC, see Cornering Brake
Control 83
CBS, see Condition Based
Service 190
"CD" 160, 169
CD changer 169
– controls 160
– fast forward, reverse 173
– installed position 173
– random play 173
– repeating track 172
– sampling tracks 171
– selecting CDs 170
– selecting tracks 170
– switching on/off 160
– tone control 161
– volume control 161
CD player 169
– controls 160
– fast forward, reverse 173
– random play 173
– repeating track 172
– sampling tracks 171
– selecting tracks 170
– switching on/off 160
– tone control 161
– volume control 161
"Central locking" 28
Central locking 27
– comfort access 35
– from inside 30
Centre armrest
– front 111
– rear 114
Centre brake light 195
Centre console 12
"Centre vent" 101
Changing a wheel 196
Changing bulbs, see Lights
and bulbs 192
Changing scale in
navigation 149
CHECK button 77
Check Control 76
"Check Control
messages" 77
Child restraint systems 53
Child safety catches 55
Child seats 53
230
Online Edition for Part-No. 01 41 0 159 725 © 09/05 BMW AG
Overview
Controls
Driving hints
Coolant 188
– checking level 188
– temperature 71
Cooling, maximum 104
Cornering Brake Control
CBC 83
Cornering lights, see Adaptive
Head Light 94
"Country" in destination
input 135
Cross-hairs in navigation 139
Cruise control 64, 66
– Active Cruise Control 66
Cup holder, see Drinks
holders 112
Current fuel consumption 72
Current position
– entering 142
Cylinders, see Engine
data 208
231
Online Edition for Part-No. 01 41 0 159 725 © 09/05 BMW AG
Entertainment
Data 208
– dimensions 212
– engine 208
– filling capacities 222
– fuel consumption 209
– performance 220
– technical data 208
– trailer loads 217
– weights 214
"Date" 80
Date 71
– calling up 71
– format 80
– setting 80
"Date format" 80
Daytime driving lights 93
"Daytime running light" 94
DBC, see Dynamic Brake
Control 84
Defrosting windows 100, 103
Defrosting windows and
removing mist 100, 103
Defrost setting 100, 103
"Delete address book" in
navigation 144
Navigation
D
Mobility
Compact Disc, see
– CD changer 169
– CD player 169
Compact wheel
– changing 197
– tyre pressure 182
Compartment for remote
control, see Ignition lock 56
Compartments
– in load area 118
Compressed audio files 169
"Computer" 73
Computer 72
– displays on the control
display 73
– hour signal 80
Computer, see iDrive 14
"Concert hall" 163
Condition Based Service
CBS 190
Condition of tyres 182
"Confirmation" 29
Congestion
– avoiding 154
– see Avoiding sections of
route 151
Connecting vacuum cleaner,
see Connecting electrical
appliances 113
Consumption, see Average
fuel consumption 73
Consumption display, see
Fuel gauge 72
Consumption indicator
– computer, average fuel
consumption 73
– energy control 72
Consumption statistics, see
Average fuel
consumption 73
Consumption values, see Fuel
consumption 209
"Continue guidance?" 147
"Contrast" on TV 176
Control centre, see iDrive 14
Control display, see iDrive 14
– brightness adjustment 80
Controller, see iDrive 14
Controls, see Driving area 8
Reference
Chrome parts, care, see
booklet Looking after your
car
Cigarette lighter 113
Cigarette lighter socket 113
"City / Postcode" 136
"City" in destination input 135
Cleaning, see booklet
Looking after your car
Clearance warning, see Park
Distance Control PDC 82
"Climate" 48, 101, 102
Climatic comfort
windscreen 128
Climbing assistance, see
Starting assistance 123
"Clock" 79
Clock 71
– 12 hour/24 hour mode 80
– setting time and date 79
Closing
– from inside 30
– from outside 28
Closing tank cap 181
Clutch, running-in 122
Ο emissions 209
Coat hooks 112
Cold start, see Starting the
engine 57
Combined instrument, see
Instrument cluster 10
Comfort/convenience, see
Around the centre
console 12
Comfort access 35
– changing the battery 37
– observing in a car wash 37
"Comfort" for active backrest
width adjustment 44
Comfort operation
– glass roof 28
– windows 28
– windows with comfort
access 36
– with comfort access 36
Comfort starting, see Starting
the engine 57
From A-Z
"Delete data" in
navigation 144
Demisting windows 100, 103
Destination address
– deleting 143
– entering 134, 138
Destination country in
navigation 135
Destination in navigation
– destinations list 140
– entering 134
– home address 144
– manual input 134, 138
– memorising 141
– selecting from address
book 143
– selecting from map 139
– selecting via
Information 140
"Destination input map" 139
Destinations list for
navigation 140
"Details" for audio mode 171
Diesel fuel 181
Diesel particle filter 123
Digital clock 71
Dimensions 212
Direction instructions, see
Spoken instructions 150
"Direct operation" 106
Displacement, see Engine
data 208
Display, see iDrive 14
Display lighting, see
Instrument lighting 97
"Display off" 19
"Display Offset" 80
"Display on / off" 51
Displays, see Instrument
cluster 10
"Display settings" 79
Displays in the windscreen,
see Head-Up Display 91
Disposal
– car battery 199
– remote control battery for
independent ventilation
system/auxiliary heater 108
– remote control battery with
comfort access 37
Distance, see Computer 73
Distance control, see Active
Cruise Control 66
Distance from destination,
see Computer 73
"Distance to dest." 73
Divided rear seat back, see
Through-loading
system 114
Door entry lighting 97
Door key, see Key/remote
control 26
Door locking, confirmation
signals 29
"Door locks" 28
Door locks 30
Door mirrors 49
– automatic-dim 123
Doors
– manual operation 30
– remote control 28
Downhill gradients 124
Draught-free
ventilation 101, 105
Drawbar load, see Trailer nose
weight 217
Drinks holders 112
Drive mode 60
"Driver's door only" 28
Driving area 8
Driving hints 122
Driving lights, see Side lights/
low-beam headlights 93
Driving lights control,
automatic 94
Driving on left 124
Driving stability control
systems 83
Dry air, see Cooling
function 100, 104
DSC, see Dynamic Stability
Control 84
DTC, see Dynamic Traction
Control 84
Dust caps on tyre valves, see
After fitting 198
DVD for navigation 132
Dynamic Brake Control
DBC 84
Dynamic Drive 86
Dynamic Driving Control 60
"Dynamic route" in
navigation 145
"Dynamic route planning" in
navigation 155
Dynamic Stability Control
DSC 84
– indicator lamp 11, 84
Dynamic Traction Control
DTC 84
– activating 85
– indicator lamp 11, 85
E
Easy entry/exit 51
– backrest width 44
Eject button, see Buttons on
CD player 160
Electrical fault
– door lock 30
– driver's door 30
– fuel filler flap 180
– glass roof, electric 39
– luggage compartment lid 32
– panorama glass roof 40
– tailgate 33
Electric seats 43
Electric steering wheel
adjustment 50
Electric windows, see
Windows 37
Electronic Brake Force
Distribution 83
Electronic oil level check 187
Electronic Stabilisation
Program ESP, see Dynamic
Stability Control DSC 84
Emergency call 200
232
Online Edition for Part-No. 01 41 0 159 725 © 09/05 BMW AG
"Fader" 162
Fader, tone control 162
Failure message, see Check
Control 76
False alarms, avoiding 35
Fasten seat belts, see Seat
belts 47
– warning lamp 47
Fastest route in
navigation 145
Fast forward
– CD player 173
"Fast route" in navigation 145
233
Online Edition for Part-No. 01 41 0 159 725 © 09/05 BMW AG
Overview
Controls
Driving hints
Navigation
Entertainment
F
Fault
– door lock 30
– fuel filler flap 180
– glass roof 39
– luggage compartment lid 32
– tailgate 33
Fault messages, see Check
Control 76
"Favourites", calling up on
radio 167
Filling capacities 222
Final drive, running-in 122
First aid pouch 201
Fixture for remote control, see
Ignition lock 56
Flashing on locking/
unlocking, see Adjusting
confirmation signals 29
Flashing turn indicators 62
– bulb changing 194
– indicator lamp 10
Flat tyre
– changing a wheel 196
– compact wheel 197
– run-flat tyres 88
Floods, see Wading 123
"FM" waveband 160, 164
Fog lights 96
– indicator lamp 11, 96
Folding rear seat
back 114, 116
Footbrake, see Safe
braking 124
Footwell lights 97
For your own safety 5
Four-wheel-drive system, see
xDrive 85
Frequency selection,
manual 165
Fresh air nozzles, see Air
vents 98
Front airbags 90
Front-passenger airbags
– deactivating 53
– deactivating, see Exception
for front passenger’s
seat 53
– reactivating 53
Front seat adjustment 43
Mobility
"Enter address yourself" 142
Entering a destination by
town or city name 135
Entering a destination in
navigation 135
Entering a postcode in
navigation 136
"Entertainment" 160
"Entertainment settings" 161
"Equalizer", tone control 163
Equalizer, tone control 163
ESP Electronic Stabilisation
Program, see Dynamic
Stability Control DSC 84
"Exclude ferries" in
navigation 145
"Exclude motorways" in
navigation 145
"Exclude toll roads" in
navigation 145
Excluding motorways in
navigation 145
Exhaust system, see Hot
exhaust system 122
"Exit assist. window" 19
Eye for tow-starting and
towing away, see Towing
eye 202
Eyes for lashing, see Securing
the load 126
Reference
Emergency operation, see
Manual operation
– door lock 30
– driver's door 30
– fuel filler flap 180
– glass roof 39
– luggage compartment lid 32
– panorama glass roof 40
– selector lever interlock,
automatic transmission 62
– tailgate 33
Emergency Service, see
Mobile Service 201
Energy-conscious driving,
see Energy control 72
Energy control 72
Engine
– data 208
– overheated, see Coolant
temperature 71
– running in 122
– speed 208
– starting 57
– starting, comfort access 35
– starting difficulties 57
– stopping 58
Engine compartment 186
Engine compartment lid 185
Engine coolant 188
Engine oil
– adding 187
– additives, see Approved
engine oils 188
– alternative oil grades 188
– approved engine oils 188
– checking oil level 186
– dipstick 186
– electronic oil level
check 187
– filling capacity 222
Engine oil dipstick 186
"Engine oil level" 187
Engine output, see Engine
data 208
Engine overheating, see
Coolant temperature 71
Engine speed 208
Engine starting, see Starting
the engine 57
From A-Z
Frost protection
– coolant 188
– washer fluid 64
Fuel 181
– additives 181
– consumption values, see
Fuel consumption 209
– fuel gauge 72
– grade 181
– see Average fuel
consumption 73
– see Fuel grade 181
– tank capacity 222
Fuel filler flap 180
– manual operation 180
Fuel level 72
Fuses 199
G
Garage door opener, see
Integrated universal remote
control 109
Gearbox
– manual gearbox 58
– overriding selector lever
interlock on automatic
transmission with
Steptronic 62
– Sequential Manual Gearbox
SMG 59
– starting assistance 123
Gear changes
– automatic transmission with
Steptronic 61, 62
– Sequential Manual Gearbox
SMG 60
Gear indicator
– automatic transmission with
Steptronic 61
– Sequential Manual Gearbox
SMG 59
Gear lever
– automatic transmission with
Steptronic 61
– manual gearbox 58
– Sequential Manual Gearbox
SMG 59
General care 191
General driving hints 122
Glass roof, electric 38
– comfort operation from
outside 30
– comfort operation with
comfort access 36
– manual adjustment 39
– remote control 28
Glove box 111
– light 111
– rechargeable hand lamp 111
Gong, see Check Control 76
GPS navigation, see
Navigation system 132
Grilles, see
Ventilation 100, 105
Gross weight
– see Trailer towing 217
– see Weights 214
Ground lights 97
"Guidance" 147
H
Halogen lights 193
Handbrake 58
– indicator lamp 11, 58
Hands-free unit, see
Microphone 12
Hazard warning flashers 13
"HDC" 85
HDC, see Hill Descent
Control 85
"HDC on" 85
"HDC on / off" 51
Head-level airbag 90
Headlight adjustment for
opposite rule of the
road 124
Headlight beam throw
adjustment
– dynamic for xenon
headlights 95
– for halogen headlights 94
Headlight courtesy delay
feature 93
Headlight flasher 62
Headlights 93
– bulb changing 193
– care, see booklet Looking
after your car
– cleaning, see Wiper
system 64
– setting, see Rule of the
road 124
Head restraint
– remove 46
Head restraints 46
– front head restraints,
active 47
– safe seated position 42
Head-Up Display 91
"Head-Up Display Offset" 92
"Head-Up Display
settings" 91
Heated
– mirror 49
– rear window 100, 103
– seats 48
– steering wheel 51
Heating 98
– interior 98
– outside mirrors 49
– rear window 100, 103
– residual heat 104
– seats 48
– steering wheel 51
Heating with the engine off,
see Residual heat 104
Heavy loads, see Securing the
load 126
Height, see Dimensions 212
Height adjustment
– seats 43
– steering wheel 50
High-beam headlights 95
– bulb changing 193
– headlight flasher 95
– indicator lamp 11
High-beam headlights
assistant 95
Hill Descent Control HDC 85
Hints for driving, see Driving
hints 122
Holder for drinks 112
234
Online Edition for Part-No. 01 41 0 159 725 © 09/05 BMW AG
235
Online Edition for Part-No. 01 41 0 159 725 © 09/05 BMW AG
Overview
Controls
Driving hints
Navigation
Entertainment
ID3 tag, see Information on
the track 171
iDrive 14
– assistance window 18
– automatic air-conditioning
system 101
– automatic air conditioning
with extended range of
features 102
– brightness adjustment 80
– changing date and time 79
– changing language 81
– changing settings 79
– changing units of
measurement and form of
expression 81
– confirming a selection or
input 17
– controller 14
– controls 14
– displays, menus 15
– selecting a menu item 17
– start menu 15
– status information 18
– switching menu pages 17
– symbols 16
Ignition 56
– switched off 56
– switched on 56
Ignition key, see Key/remote
control 26
Ignition key position 1, see
Radio readiness 56
Information
– about another place 140
– about the car's position 140
– about the destination 140
– on country 140
"Information" in
navigation 137, 140
Infrared-reflecting
windscreen, see Climatic
comfort windscreen 128
"Initialising..." 87
Initialising
– radio, see Memorising
stations 166
– Run Flat Indicator 87
– seat, mirror and steering
wheel position memory 45
– see Power failure 199
– see Setting time and
date 79
Input map for destination 139
Inside mirror 49, 50
– automatic-dim 123
Installed position
– CD changer 173
– mobile phone 111
– navigation disc drive 132
Instructions from navigation
system, see Spoken
instructions 150
Instrument cluster 10
Instrument lighting 97
Instrument panel, see Driving
area 8
Instrument panel lighting, see
Instrument lighting 97
Integrated key 26
Integrated universal remote
control 109
Interesting destination for
navigation 140
Interior light 97
– switching on with the
remote control 29
Interior movement
detector 35
– switching off 35
Interlock on automatic
transmission 61
Mobility
I
Ignition key position 2, see
Ignition on 56
Ignition lock 56
– starting the engine with
comfort access 36
Imitation leather, see booklet
Looking after your car
"Independent heater" 106
Independent heater, see
Auxiliary heater 106
"Independent mode" 106
"Independent ventilation" 106
Independent ventilation
system
– indicator lamp 102
– switching on and off
directly 106
Independent ventilation
system/auxiliary heater 105
– activating switch-on
times 107
– preselecting switch-on
times 106
– remote control 107
Indicator and warning
lamps 11
– active steering 88
– airbags 90
– brake fluid 189
– brake pads 189
– DSC 11, 84
– DTC 11, 85
– fasten seat belts 47
– fog lights 11, 96
– Run Flat Indicator 88
Indicators, see Flashing turn
indicators 62
Individual air
distribution 99, 103
Individually programmable
buttons on the steering
wheel 51
Individual settings, see
Personal Profile 27
Inflation pressures, see Tyre
pressures 182
"Info on destination" 141
Reference
Holder for telephone or
mobile phone 111
"Home address" in
navigation 144
"Home lights" 93
Homepage 4
Horn 8
Hot exhaust system 122
"Hour memo" 80
Hydraulic brake assist, see
Dynamic Brake Control
DBC 84
From A-Z
L
Intermittent wiper
operation 63
"Interm. time" 79
Internet site 4
ISOFIX child seat
mountings 54
J
Jack 196
– mounting points 197
Jacking points 197
"Journey computer" 74
Journey computer 74
Joystick, see iDrive 14
Jump-starting, see Starting
with a flat battery 201
Junction input 136
K
Kerb weight, see Weights 214
Key
– key-specific settings, see
Personal Profile 27
Keyless Go, see Comfort
access 35
Keyless locking and
unlocking, see Comfort
access 35
Key Memory, see Personal
Profile 27
Keys 26
Key switch for front
passenger airbags 53
Kick-down
– automatic transmission with
Steptronic 62
– Sequential Manual Gearbox
SMG 60
Knock control 181
Language, altering on the
control display 81
"Languages" 81
"Languages" in
navigation 150
Lashings, see Securing the
load 126
Last destinations, see Destinations list 140
"Last seat pos." 45
Laying up car out of use, see
booklet Looking after your
car
Leather care, see booklet
Looking after your car
LED light-emitting diodes 195
Length, see Dimensions 212
Licence plate lights, bulb
changing 195
"Light" 63, 93
Light
– see Side lights/low-beam
headlights 93
Light-emitting diodes
LED 195
Lighter 113
Lighting
– car, see Lights 93
– instruments 97
Lights
– see High-beam headlights
assistant 95
Lights and bulbs 192
Light switch 93
"Limit" 78
Limit, see Speed limit 78
List in navigation, see
Address book 141
Load
– securing in ski bag 115
Load area
– enlarging 116
– opening/closing, see
Tailgate 32
– opening from outside 33
– opening with remote
control 29
Load area cover, Touring 116
Load area lid, see Tailgate 32
Loads
– car 125
– loading 125
– securing 126
– see Loads 125
– trailer 127
Lockable wheel studs, see
Thiefproof wheel studs 198
"Lock button" 28
"Lock if no door opened" 31
Locking
– adjusting acknowledgement signals 29
– from inside 31
– from outside 29
– without a key, see Comfort
access 35
Locking without a key, see
Comfort access 35
"LOGIC7 room acoustics",
tone control 162
Long-life oils, see Alternative
oil grades 188
Low-beam headlights 93
– automatic 94
– bulb changing 193
Low fuel level, see Fuel
gauge 72
Low fuel level warning
lamp 72
Luggage compartment
– capacity 214
– emergency operation, see
Opening manually 33
– locking separately 32
– opening/closing, see
Luggage compartment lid/
tailgate 31
– opening from inside 31, 32
– opening from outside 31
– opening with remote
control 29
– remote control 29
– volume 214
Luggage compartment cover,
see Load area cover 116
236
Online Edition for Part-No. 01 41 0 159 725 © 09/05 BMW AG
N
"Navigation" 73, 134
Navigation announcements,
see Switching voice
messaging on/off 150
Navigation disc drive, installed
position 132
Navigation DVD 132
237
Online Edition for Part-No. 01 41 0 159 725 © 09/05 BMW AG
Overview
Controls
Driving hints
Navigation
Entertainment
M+S tyres, see Winter
tyres 184
Maintenance
– see Service Booklet
– see Service
requirements 74
Maintenance system 190
Manual air
distribution 99, 103
"Manual frequency selection"
for radio 165
Manual gearbox 58
Mobile phone
– installed position, see
Centre armrest 111
– see separate Operating
Instructions
– use inside the car, see
Mobile communication
equipment 123
Mobile Service 201
Modifications, technical, see
For your own safety 5
Monitor, see iDrive 14
"Monitor on" 83
Motorways, see Route
criteria 145
MP3, see Compressed audio
files 169
Multifunctional steering
wheel, see Buttons on
steering wheel 9
Multi-function lever
– see Flashing turn indicators/
headlight flasher 62
Multi-function switch
– see Wiper system 63
Music tracks
– random play 173
– sampling, scan 171
– searching 171
"Mute on / off" 51
Muting TV 160
MW, waveband 164
Mobility
M
Manual operation
– automatic transmission with
Steptronic 62
– door lock 30
– driver's door 30
– fuel filler flap 180
– glass roof 39
– luggage compartment lid 32
– panorama glass roof 40
– selector lever interlock,
automatic transmission 62
– Sequential Manual Gearbox
SMG 60
– tailgate 32
"Map, indicating dir. of
travel" 149
Map for navigation
– changing scale 149
– destination input 139
"Map north-oriented" 149
Map view 149
Master key, see Key/remote
control 26
Maximum cooling effect 104
Maximum speed
– for winter tyres 184
"Memorised stations" for
radio 164
Memorising radio
stations 166
Memory, see Seat, mirror and
steering wheel position
memory 45
Menus, see iDrive 14
Message list, traffic
information 153
Micro-filter 101, 105
Microphone
– for telephone 12
– for voice input system 12
Mirrors 49
– folding in and out 49
– heating 49
– memory, see Seat, mirror
and steering wheel position
memory 45
– parking position 50
Mobile communication
equipment 123
Reference
Luggage compartment lid 31
– deadlocking separately 32
– emergency operation, see
Manual operation 32
– opening from inside 31
– opening from outside 31
– unlocking and locking from
inside 30
– unlocking manually 32
Luggage compartment lid/
tailgate 31
– unlocking and locking from
inside 30
"Luggage compartment lid
opening" 33
Luggage net, see Partition
net 116
Luggage rack, see Roof
rack 126
Lumbar support 44
LW waveband 164
From A-Z
Navigation system 132
– address book 141
– adjusting volume 151
– avoiding sections of
route 151
– calling up 134
– destination input 134
– destinations list 140
– displaying route 148
– displaying the car's
position 155
– ending/resuming route
guidance 147
– entering a destination
address manually 134, 138
– last destinations 140
– route guidance in assistance
window 132
– route list 149
– searching for a special
destination 140
– selecting destination from
map 139
– selecting route criteria 145
– selecting the destination via
Information 140
– spoken instructions 150
– starting route guidance 147
– switching off 147
Neck restraints, see Head
restraints 46
"New address" in
navigation 142
"New destination" 134, 139
New remote control 26
– for auxiliary heater/
independent ventilation
system 108
"New route for" 151
New wheels and tyres 183
"Next entertainment
source" 51
"Normal" for active backrest
width adjustment 44
North, direction of, in map
view 149
Nose weight 127, 217
Nozzles, see
Ventilation 100, 105
Nylon rope, see Tow-starting
and towing away 202
O
OBD socket 191
Octane numbers, see Fuel
grade 181
Odometer – distance
recorder 71
Oil
– additives, see Approved
engine oils 188
– alternative oil grades 188
– approved engine oils 188
– consumption, see Checking
engine oil 186
– dipstick 186
– filling capacity 222
– level 186
– topping up, see Adding
engine oil 187
Oil change intervals
– see Service Booklet 190
– see Service
requirements 74
Old batteries
– see Changing the battery 37
– see Disposal 199
"On-board Info" 73
"On country" 140
"On destination" 140
"On location" 140
Opening, see Unlocking 35
Opening and closing
– comfort access 35
– from inside 30
– from outside 28
– panorama glass roof 40
– via the door lock 30
– via the remote control 28
Opening without a key, see
Comfort access 35
Orientation menu, see Start
menu 15
"Other place" in
navigation 140
Outlets for automatic air
conditioning system 98
Outlet slots, see Air vents 98
Output, see Engine data 208
Outside mirrors
– automatic heating 49
– folding in and out 49
– passenger-side mirror tiltdown 50
– towing a trailer 127
Outside temperature
display 71
– changing unit of
measurement 81
– in computer 81
Overriding selector lever
interlock 62
P
Paintwork care, see booklet
Looking after your car
Panic mode 29
Panorama glass roof 39
– manual operation 40
Park Distance Control
PDC 82
Parking aid, see Park Distance
Control PDC 82
Parking assistant, see Park
Distance Control PDC 82
Parking brake, see
Handbrake 58
Parking lights 95
– bulb changing 193
Parking position 50
Particle filter, see Diesel
particle filter 123
Partition net 116
Parts and accessories 5
Passenger-side mirror tiltdown 50
"PDC" 83
PDC, see Park Distance
Control 82
Performance 220
Personal Profile 27
"Perspective" 149
238
Online Edition for Part-No. 01 41 0 159 725 © 09/05 BMW AG
239
Online Edition for Part-No. 01 41 0 159 725 © 09/05 BMW AG
Overview
Controls
Driving hints
Navigation
Entertainment
Radio
– Autostore 165
– calling up stations 164
– controls 160
– memorising stations 166
– sampling stations 165
– selecting frequency
manually 165
– selecting
waveband 160, 164
– station search 165
– stations with best
reception 165
– switching on/off 160
– tone control 161
– traffic reports 168
– volume control 161
Radio-control key, see Key/
remote control 26
Radio position, see Radio
readiness 56
Radio readiness 56
– switched off 56
– switched on 56
– with comfort access 36
Rain sensor 63
Random
– CD changer 173
– CD player 173
"Random", random
generator 173
"Random all" for audio
mode 173
"Random directory" for audio
mode 173
Range 72
Rapeseed methyl ester
RME 181
"RDS" 167
Reading lights 97
Rear armrest, see Centre
armrest, rear 114
Rear fog lights 97
– bulb changing 194
– indicator lamp 11, 97
Rear lights 194
– bulb changing 194
Rear power socket 114
Rear seat back,
folding 114, 116
Rear seats
– folding over seat
backs 114, 116
– head restraint
adjustment 47
– heating 48
Rear window
– heater 100, 103
– opening and closing on the
Touring 32
– renewing wiper blade 192
– sun blind, see Roller sun
blinds 110
– window wiper on Touring 64
Recently used
destinations 140
Reception
– quality 167
– radio stations 167
– regional
programme 165, 176
– TV channels 176
Rechargeable hand lamp 111
Recirculated-air
mode 100, 104
– air recirculation 104
– Automatic Air Recirculation
Control AUC 104
Recirculation of air
– Automatic Air Recirculation
Control AUC 104
Reclining seat, see Seat
back 43
Recycling 191
Reflecting tail lights, see Rear
lights 194
Refuelling 180
Releasing
– engine compartment lid 185
Remote control 26
– changing the battery 37
– comfort access 35
– faults 30, 37
– garage door opener 109
– luggage compartment lid 29
– tailgate 29
Mobility
R
Reference
Petrol, see Fuel grade 181
Petrol consumption, see Fuel
consumption 209
"Picture" 176, 177
Pivoting headlights, see
Adaptive Head Light 94
Placing a call, see Telephone
Operating Instructions
"Plan detour" 154
Plasters, see First aid
pouch 201
Plastic, care, see booklet
Looking after your car
"Play" for audio mode 170
Pollen
– see Micro-filter 101
– see Micro-filter/Activated
charcoal filter 105
Position
– displaying 155
– saving 142
Power failure 199
Preheating, see Auxiliary
heater 106
Preheating, see Cars with
diesel engine 57
Preselecting switch-on times
for independent ventilation
system/auxiliary heater 106
Pressure, tyres 182
Pressure monitoring, see Run
Flat Indicator 87
Pressure monitoring for tyres,
see Run Flat Indicator 87
Programmable buttons on
steering wheel 51
Protective function, see Trap
protection
– glass roof, electric 39
– panorama glass roof 40
– windows 37
Punctures
– compact wheel 197
– Run Flat Indicator 87, 88
– run-flat tyres 183
From A-Z
Remote control for
independent ventilation
system/auxiliary heater 107
– battery, changing 108
– new remote control 108
Renewing tyres 183
"Repeat directory" for audio
mode 172
"Repeat" for audio mode 172
"Repeat track" for audio
mode 172
Replacement fuses 199
Replacement remote
control 26
Reservoir for cleaning
systems 64
Reset, see Resetting the tone
settings 163
"Reset" for stopwatch 78
"Reset" for tone settings 163
Residual distance, see
Range 72
Residual heat 104
Restraint systems
– for children 53
– see Seat belts 47
Retreaded tyres 183
Returning end-of-life
vehicles, see Recycling 191
Reverse
– automatic transmission with
Steptronic 61
– CD player 173
– manual gearbox 59
Reverse gear
– Sequential Manual Gearbox
SMG 59
Reversing light, see Reverse
gear
– bulb changing 194
Reversing lights, see Reverse
gear 59
Revolution counter 71
"Rhomb button" 51
RME, see Rapeseed methyl
ester 181
Road map 149
Roller cover
– load area cover 116
Roller cover, see Load area
cover, Touring 116
Roller sun blinds 110
RON, see Fuel grade 181
Roof load 214
Roof rack 126
Rope, see Tow-starting and
towing away 202
Rotary/pushbutton control,
see iDrive 14
Route 145
– altering 145, 151
– avoiding sections 151
– displaying 148
– displaying arrow view 148
– displaying map 149
– displaying places 149
– list 149
– selecting 145
– selecting criteria 145
Route, see Displaying
route 148
"Route criteria",
changing 145
Route guidance 147
– altering route
specifications 145
– avoiding sections of
route 151
– changing course of a
route 151
– displaying routes 148
– distance and arrival
time 147
– ending/resuming 147
– interrupting 147
– interrupting spoken
instructions 52
– spoken instructions 150
– starting 147
– volume of spoken
instructions 151
Route instructions, see
Spoken instructions 150
Route map, see Map view 149
Route selection 145
"Route via" 151
"RPA" 87
RPA, see Run Flat
Indicator 87
RSC, see Run-flat tyres 183
Run Flat Indicator 87
– false alarms 87
– initialising the system 87
– snow chains 184
– system limits 87
– warning lamp 88
Run-flat tyres 183
– flat tyre 88
– new tyres 183
– new wheels and tyres 183
– renewing tyres 184
– resuming a journey with a
damaged tyre 88
– tyre pressure 182
Running in 122
S
Safe braking 124
Safe seated position 42
– with airbags 42
– with head restraints 42
– with seat belt 42
Safety 5
Safety lock buttons on doors,
see Locking 31
Safety switch for rear
windows 38
Safety systems
– airbags 90
– Anti-lock Brake System
ABS 83
– Dynamic Stability Control
DSC 84
– seat belts 47
"Save address" in
navigation 142
240
Online Edition for Part-No. 01 41 0 159 725 © 09/05 BMW AG
241
Online Edition for Part-No. 01 41 0 159 725 © 09/05 BMW AG
Overview
Controls
Driving hints
Navigation
Entertainment
"Set date" 80
"Set" for audio mode 160
"Set" for journey computer 74
"Set time" 80
Settings
– clock,12h/24h mode 80
– configuring, see Personal
Profile 27
Setting speed limit 78
Setting time, see Preselecting
switch-on time 106
"Set tyre pressure" 87
Shiftlock
– automatic transmission with
Steptronic 61
– Sequential Manual Gearbox
SMG 59
Shift paddles 60
Short commands for the voice
input system 223
"Short route" in
navigation 145
Short route in navigation, see
Selecting route 145
Shoulder support 44
"Show destination
position" 139
"Show vehicle position" 139
Side airbags 90
Side flashing turn indicators,
changing bulb 194
Side lights 93
– bulb changing 193
Side lights/low-beam
headlights
– bulb changing 193
Side window blinds, see
Roller sun blinds 110
Signal horn, see Horn 8
Ski bag 115
Sliding/tilt sunroof
– see Panorama glass roof 39
Slippery roads, see Outside
temperature warning 71
SMG, see Sequential Manual
Gearbox 59
Smokers' package, see Front
ashtray 112
Snow chains 184
Mobility
Selecting distance with Active
Cruise Control 67
Selecting menu items 17
Selecting the route 145
Selection options in
navigation 145
Select "Lock after moving
off" 31
Selector lever
– automatic transmission with
Steptronic 61
– manual gearbox 58
– Sequential Manual Gearbox
SMG 59
Selector lever interlock, see
Shiftlock
– automatic transmission with
Steptronic 61
– Sequential Manual Gearbox
SMG 59
Selector lever positions
– automatic transmission with
Steptronic 61
– manual gearbox 58
– Sequential Manual Gearbox
SMG 59
Self-levelling suspension 86
Sequential Manual Gearbox
SMG 59
– acceleration assistant 61
– Dynamic Driving Control 60
– gear indicator 59
– kick-down 60
– running in 122
– towing away 203
– tow-starting 204
"Service" 75, 187
Service, see Mobile
Service 201
Service Booklet 190
Service car, see Mobile
Service 201
Service Interval indicator, see
Service requirements 74
"Service
requirements" 75, 187
Service requirements 74
– see also Condition Based
Service CBS 190
Reference
"Save current
destination" 144
"Save" for radio 166
Saving the car's position 142
"Scan"
– sampling stations 165
– sampling tracks 171
"Scan all" for audio mode 172
"Scan directory" for audio
mode 172
"Schedule date for
service" 75
Screen, see iDrive 14
Screw thread for towing
eye 203
Search
– CD changer 171
– CD player 171
– radio 165
Seat belts 47
– damage 48
– safe seated position 42
– warning lamp 47
"Seat-heating distribution" 48
Seats 43
– active backrest width
adjustment 44
– adjusting 43
– easy entry/exit 44
– electrical adjustment 43
– heating 48
– lumbar support 44
– manual adjustment 43
– memory, see Seat, mirror
and steering wheel position
memory 45
– position memory 45
– safe seated position 42
– thigh support 43, 44
– ventilation, see Active seat
ventilation 48
Sections of route, altering 151
Securing luggage
– in ski bag, see Securing the
load 115
– see Securing the load 126
Securing the load 126
Selecting audio sources, see
Operation via iDrive 160
From A-Z
Socket for On-Board
Diagnosis 191
Sockets, see Connecting
electrical appliances 113
Song search on CD, see
Sampling tracks 171
Soot particle filter, see Diesel
particle filter 123
SOS, see Making an
emergency call 200
Spare fuses 199
Spare key 26
– adapter 26
Spare wheel, see Changing a
wheel 196
Spare wheel, see Compact
wheel 197
Special oils, see Approved
engine oils 188
Speed
– when towing a trailer 128
– with compact wheel 198
"Speed dependent volume",
tone control 162
Speed-dependent volume
control 162
Speed limit
– when towing a trailer 128
– with winter tyres 184
Speedometer 10
Spoken instructions for
navigation system 150
– muting 52
– repeating 52, 150
– switching on/off 52, 150
– volume control 151
"Sport" for active backrest
width adjustment 44
Sport program
– automatic transmission with
Steptronic 62
– see Dynamic Driving
Control 60
Stability control, see Driving
stability control systems 83
"Star button" 51
Start/stop button 56
"Start" for stopwatch 78
"Start guidance" 137
Starting assistance 123
Starting difficulties
– see Exceptional starting
conditions 57
– starting with a flat
battery 201
Starting on uphill gradients,
see Starting assistance 123
Starting with a flat battery 201
Start menu, iDrive 15
"Start route guidance" 139
"Stat. exhaust. insp." 75
Station, see Radio 164
"Status" 75
Status at time of printing 5
"Stat. vehicle insp." 75
Steering wheel
– adjusting 50
– buttons on steering wheel 9
– easy entry/exit 51
– heating 51
– lock 56
– memory, see Seat, mirror,
and steering wheel position
memory 45
– programmable buttons 51
"Steering wheel buttons" 51
Steering with variable ratio,
see Active steering 88
Steptronic, see Automatic
transmission with
Steptronic 61
Sticking plasters, see First aid
pouch 201
"Stop" for stopwatch 79
Stop light, see Rear lights 194
– bulb changing 194
Stopping
– car 58
– engine 58
"Stopwatch" 78
Stopwatch 78
Storage compartments 112
Storage package 117
Storing tyres 184
Stowage
– see Storage
compartments 112
"Street" in destination
input 136
Summer tyres, see Wheels
and tyres 182
Sun roof
– see Glass roof, electric 38
Switches, see Driving area 8
Switch for front passenger
airbags 53
Switching cooling function on
and off 100, 104
Switching on/off
– audio 160
– CD changer 160
– CD player 160
– radio 160
– TV 175
Switching on hour signal 80
Switching sound output for
entertainment systems on/
off 161
"Switch-on times" 107
SW waveband 164
Symbols 4
– indicator and warning
lamps 11
– navigation system 153
– traffic info with navigation
system 152
T
Tachometer, see
Speedometer 10
Tailgate
– automatic operation 33
– opening from inside,
Touring 32
Tail lights, see Rear lights 194
Tank capacity, see Filling
capacities 222
Technical data 208
Technical modifications 5
Telephone, see separate
Operating Instructions
"Telephone list" 51
Telephone reception signal
level, see Status
information 18
242
Online Edition for Part-No. 01 41 0 159 725 © 09/05 BMW AG
243
Online Edition for Part-No. 01 41 0 159 725 © 09/05 BMW AG
Overview
Controls
Driving hints
Navigation
Entertainment
"TP AUTO" 168
TP function 168
Track width, see
Dimensions 212
Traction aid, see Dynamic
Stability Control DSC 84
"Traffic information" 152
Traffic information 152
– calling up 153
– during route guidance 154
– in the map view 154
– selecting 152
– switching on
announcements 168
"Traffic information
settings" 152, 168
Traffic jams
– switching on traffic information announcements 168
Traffic reports 168
– switching on/off 168
– TMC stations 152
– TP 168
– volume control 161
Trailer pulling, see Towing a
trailer 127
Trailer towing 127
– see Technical data 217
– towing loads and gross
weight 217
Transmission
– automatic transmission with
Steptronic 61
Transporting children 53
Transport securing
equipment, see Securing
the load 126
Trap protection
– electric windows 37
– glass roof, electric 39
– panorama glass roof 40
Tread depth, see Minimum
tread depth 182
"Treble", tone control 162
Treble, tone control 162
Trip distance recorder 71
"Triple turn signal
activation" 63, 94
Mobility
Tone for audio mode,
adjustment, see Tone
control 161
Toolkit 192
Tools, see Toolkit 192
Top speed
– performance 220
– with compact wheel 198
Torch, see Rechargeable
hand lamp 111
Torque
– engine 208
– wheel studs, see After
fitting 198
Touring
– automatic tailgate
operation 33
– compartments in load
area 117
– enlarging load area 116
– headlight beam throw
adjustment 95
– load area cover 116
– opening rear window 32
– opening tailgate 32
– panorama glass roof 39
– partition net 116
– power socket in load
area 114
– rear lights, bulb
changing 194
– rear window wiper 64
– rear wiper, renewing wiper
blade 192
– releasing fuel filler flap in the
event of an electrical
fault 180
– roller cover, see Load area
cover 116
– roller cover for load area, see
Load area cover 116
– self-levelling suspension 86
– storage package 117
Towing a trailer 127
Towing away 202
– towing eyes 202
Towing eye 202
Tow-starting 202, 204
"TP" 168
Reference
Television, see TV 175
Temperature
– adjustment for the
automatic air conditioning
system 99, 103
– adjustment for the upper
body area 101, 103
– of coolant, see Coolant
temperature 71
Temperature display
– outside temperature 71
– setting unit of
measurement 81
– temperature warning 71
Temperature warning 71
Tensioning straps, see
Storage package 117
"Text language" 81
"Theatre" 163
Theft protection for wheel
studs, see Thiefproof wheel
studs 198
Third brake light, see Centre
brake light 195
Through-loading system 114
Tightening torque of wheel
studs, see After fitting 198
Tilt alarm sensor, switching
off 35
"Time format" 80
Timekeeping, see
Stopwatch 78
Timer, see Preselecting
switch-on time 106
"Timer 1" for auxiliary heater/
independent ventilation
system 107
"Timer 2" for auxiliary heater/
independent ventilation
system 107
"TMC" 152
"TMC AUTO" 152
TMC stations, see Traffic
information 152
"Tone" 161
"Tone", tone control 161
Tone for audio mode
– adjusting 161
– central setting 163
From A-Z
Turning circle, see
Dimensions 212
Turning up and down
automatically, see Highbeam headlights
assistant 95
"TV" 160, 175
TV 175
– calling up 175
– changing channel 175
– changing standard 176
– controls 160
– receivable channels 176
– switching on/off 160
– tone control 161
– volume 160
TV contrast 176
"TV standard" 177
Two-stage brake lights 89
Tyre changing 183
– changing a wheel 196
– new wheels and tyres 183
Tyre pressure
– loss 88
Tyre pressure monitoring, see
Run Flat Indicator 87
Tyre pressures 182
– for heavy loads and trailer
towing 182
Tyres
– age 183
– air loss 88
– changing 196
– condition 182
– damage 182
– new wheels and tyres 183
– pressure monitoring 87
– pressures 182
– punctures, see Changing a
wheel 196
– renewing 183
– retreaded 183
– run-flat 183
– running-in 122
– size 182
– tread 182
– wear indicators 182
– wheel/tyre combination 183
– winter tyres 184
U
Underseal, see booklet
Looking after your car
"Units" 81
Units of measurement
– average fuel
consumption 81
– temperature 81
Universal garage door opener,
see Integrated universal
remote control 109
Universal remote control 109
Unlocking
– without a key, see Comfort
access 35
Unlocking and locking doors
– from inside 30, 31
– from outside 28
– setting confirmation
signals 29
"Use current location as
address" 142, 144
"Use motorways" in
navigation 145
V
Vehicle
– returning, see
Recycling 191
Vehicle battery, see Car
battery 198
Vehicle identification number,
see Engine
compartment 186
"Vehicle position" 155
Vehicle recycling, see
Recycling 191
"Vehicle settings", for
unlocking 28
Ventilation 100, 105
– draught-free 101, 105
– for rear 101, 105
– with engine off 105
Ventilation for rear 101, 105
Venting
– see Ventilation 100, 105
VHF waveband 164
Voice, see Route guidance by
spoken instructions 150
Voice input system 20
– short commands 223
"Voice output of nav.
system" 51
"Voice output of nav. system
on" 150
Volume
– audio sources 160
– TV 160
Volume control 160
– speed-dependent
adjustment 162
– spoken instructions 151
– traffic reports 161
Volume distribution for audio
mode
– front/rear 162
– right/left 162
W
Wading 123
Warning lamps, see Indicator
and warning lamps 11
Warning messages, see
Check Control 76
Warning triangle 200
Washer fluid 64
– reservoir capacity 64
Washer fluid reservoir 64
Washer jets, see Windscreen
washer jets 64
Washing the car, see booklet
Looking after your car
Water on roads, see
Wading 123
Waveband for radio 164
Wear indicators in the tyres,
see Minimum tread
depth 182
Weights 214
Wheel/tyre combination, see
New wheels and tyres 183
Wheel/tyre renewal, see New
wheels and tyres 183
Wheelbase, see
Dimensions 212
244
Online Edition for Part-No. 01 41 0 159 725 © 09/05 BMW AG
Overview
X
xDrive 85
Xenon headlights 95, 193
– bulb changing 193
– driving on left/right 124
– dynamic headlight beam
throw adjustment 95
Controls
Y
Mobility
Entertainment
Navigation
Driving hints
Your individual car 5
245
Online Edition for Part-No. 01 41 0 159 725 © 09/05 BMW AG
Reference
Wheel chock 196
Wheels and tyres 182
Wheelslip control, see
Dynamic Stability Control
DSC 84
Wheel studs 197
– keys 196
– thiefproof 198
– tightening torque, see After
fitting 198
Width, see Dimensions 212
Windows 37
– comfort operation 28
– comfort operation from
outside 30
– comfort operation with
comfort access 36
– rear window, Touring 32
– safety switch 38
Windscreen
– cleaning, see Wiper
system 64
– defrosting, see Defrosting
windows 100, 103
– infrared reflecting, see
Climatic comfort
windscreen 128
– with displays, see Head-Up
Display 91
Windscreen washer
– see Wiper system 63
– windscreen washer jets 64
Windscreen wipers, see
Wiper system
– renewing wiper blades 192
Winter tyres 184
– speed limit 78
– tyre storage 184
Wiper blades, renewing 192
Wiper system 63
– rain sensor 63
– washer fluid 64
– windscreen washer jets 64
Wordmatch principle for
navigation 146
Working in the engine
compartment 185
Wrench/screwdriver, see
Toolkit 192
Refuelling
So that you always have access to the data you
need when refuelling, you are recommended to
enter the relevant figures for your car in the table provided below. Use the index to find the information you need.
Fuel
Designation
Enter your preferred grade of fuel here.
Engine oil
Grade
Diesel engines:
The quantity of oil between the mid-points of
the two dipstick marks is approx. 1.5 litres, approx. 2.6 pints.
Tyre pressures
Summer tyres
front
rear
Winter tyres
front
Up to 4 persons
5 persons or 4 plus luggage
Online Edition for Part-No. 01 41 0 159 725 © 09/05 BMW AG
rear
More about BMW
The Ultimate
Driving Machine
01 41 0 159 725 en
www.bmw.com
*BL0159725009*
Online Edition for Part-No. 01 41 0 159 725 © 09/05 BMW AG