1
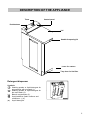
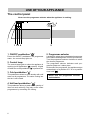
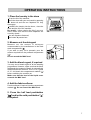
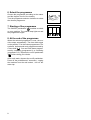
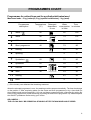
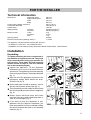
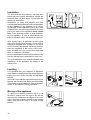
ZANUSSI
WASHING MACHINE
TL 553 C
129 6771 05
INSTRUCTIONS MANUAL
CONTENTS
For the user
Safety instructions
For the installer
4/5
Technical information
18
Description of the appliance
6
Use of your appliance
7
Unpacking
18
Operating instructions
8/9
Installation
19
Programme chart
10
Levelling
19
Moving of the appliance
19
Hints & Tips
Cleaning and maintenance
If something doesn't work
11-13
14
15/16
Guarantee
17
Service
17
Installation
Water connection
Electrical connection
Guide to use the instruction
The following symbols will be found in the text to guid you
throughout the instructions :
Safety instructions
Hints and tips
Environmental information
2
19/20
20
SAFETY INSTRUCTIONS
You must read the whole of this instruction book
before you use the appliance. Follow the advice
carefully. Keep the book for future reference. If
you sell or give away the appliance, make sure
that the book is passed to the new owner.
The following warnings are provided in the interest
of overall safety. You must read them before the
appliance is installed or used.
Use
This appliance is designed to be used by
adults. Children should not be allowed to touch
the controls or play with the product.
It is dangerous to modify the specifications of
this appliance in any way.
Always unplug the appliance and turn off the
water after use.
Only wash fabrics with are designed to be
machine washed. If in doubt, follow the instructions you find on the label of the item itself.
Place small metal rings or edged plastic rings
in a net or bag.
Make sure that all pockets are empty. Hard,
sharp objects such as coins, safety pins, nails,
screws or stones can cause extensive damage.
Do not machine wash fabrics which are
saturated with petroleum products. If volatile
cleaning fluids have been used, make sure
that they are thoroughly removed from the
fabrics before they are placed in the appliance.
Small and delicate objects (e.g. baby socks,
stockings) can be easily washed inside a small
pillowcase with a zip fastener or in larger
socks.
Use only the recommended quantities of fabric
conditioner.
Before cleaning, care and maintenance, ensure
that the machine is unplugged.
Installation
Any electrical work required to install this
appliance should be carried out by a qualified
electrician or competent person.
Any plumbing work required to install this
appliance should be cariied out by a qualified
plumber or competent person.
Make sure that the appliance does not stand
on its electrical supply cable.
This appliance is heavy. Care should be taken
when moving it.
All packaging and transit bolts must be removed
before the appliance is used. Serious damage
may occur if this is not done.
If your washing machine is in a room subject to
temperatures below freezing, the water must
be removed from the machine. So, the danger
of freezing should be expected.
Read all instructions before using
the appliance and save them for
future reference.
3
Safeties
Lid : your washing machine is equipped with
a safety avoiding the switching of the appliance
when the flapdoors of the drum are opened ;
the closure of the lid is so impossible. An
electromechanic safety prohibits the opening
of the lid when the washing machine works and
2 minutes after the end of the programme.
Washing motor : in case of mechanic
overloading, overvoltage, a thermic safety
protects automatically the motor.
Heating : the heating can only begin when
the water quantity necessary for the washing
is in the tub. This safety is useful when there is
a water break-up or if you forget to open the
water inlet hose.
Environmental information
All materials marked by the symbol
are
biodegradable. They can be disposed of without
danger or burnt in rubbish incinerators.
In order to realize water and energy savings and
to act in an environmentally conscious manner,
we advice to follow the below instructions :
- use if possible the appliance with full loads
instead of partial loads. Take care to do not
overload the drum.
- Use only the programmes with prewash for very
soiled laundry.
- Savings on detergent and for the environment
may also be achieved if with medium to hard
water you add sufficient detergent for soft water
and then add separately a softener. This relieves
our waters of a certain amount of chemicals.
4
When disposing of the machine in a proper
manner, destroy the door lock and cut off the
power supply cord.
DESCRIPTION OF THE APPLIANCE
Timer
Control panel
Pushbuttons
Lid
Handle for opening lid
Lever for castors
Trap door for lint filter
Detergent dispenser
Symbols
( ) Washing powder or liquid detergent for
programmes with pre-wash (1).
( ) Washing powder or liquid detergent for
the main wash (2).
( ) Bleach compartment (3).
( ) Liquid additives (fabric softener and
conditioner...) (4).
($) Liquid detergent.
1
2
34
5
USE OF YOUR APPLIANCE
The control panel
Never turn the programme selector when the appliance is working.
TL 553 C
1 234
1 ON/OFF pushbutton "
5
"
Press the ON/OFF pushbutton, the programme
starts : the control lamp lights on.
2 Control lamp
The control lamp lights on when the appliance is
working (on/off pushbutton " " pressed). It lights
off when the on/off pushbutton " " is pressed out.
3 Cold pushbutton " "
This pushbutton allows to wash laundry with cold
water on all programmes. The water coming into
the tub is not heated.
4 Half load pushbutton "
"
This pushbutton allows to wash small quantity of
linen not much soiled (2,5 kg) only on the cotton
programmes by cancelling one rinsing.
6
5 Programme selector
It enables to select the most adapted programme
to the nature and degreees of soil of your laundry.
Turn the programme selector clockwise to select
the chosen programme.
The programme selector indicates each programme phase as it takes place.
At the end of the programme, the appliance stops
automatically on a position off "I" or on a position
rinse hold " ".
Never turn the programme selector
anticlockwise.
OPERATING INSTRUCTIONS
1. Place the laundry in the drum
lift up the lid of the machine.
open the drum with your two hands by pressing
the button A and the two flapdoors till they
disengage.
introduce the laundry into the drum ; close the
drum and the lid of the machine.
Be careful : before closing the lid of your machine, make sure that the drum flapdoors are
correctly closed :
the two flapdoors fastened,
the button A pressed out.
A
2. Measure out the detergent
Measure out the amount of detergent
recommended by the manufacturer in the main
wash compartment ( )
If you wish to carry out a prewash, pour the
amount required into the prewash compartment
( ).
Do not exceed the MAX level.
3. Add the bleach agent, if required
You may use a bleach agent in all the washing
programmes. However, make sure that the fabric
withstands the treatment. Bleach is automatically
washed down into the drum. Pour 1/4 to 1 glass
of 12° chl bleach into compartment marked ( )
before switching the machine on.
Make sure that the level of the liquid never
exceeds the MAX level.
4. Add the fabric softener
Pour the softener, if required, into the compartment
marked ( ). Do not exceed the MAX level.
5. Press the half load pushbutton
" " and/or the cold pushbutton " "
if required.
7
6. Select the programme
Choose the programme according to the nature
and the degree of soil of the laundry.
Turn the programme selector clockwise to select
the chosen programme.
7. Starting of the programme
The ON/OFF pushbutton " " enables to switch
on your machine. The control lamp lights on and
the programme begins.
8. At the end of the programme
When the selected programme is over, the machine stops automatically. The timer knob stops
on the position "I" for the cotton programmes. The
synthetic, delicate and wool programmes end by
a rinse hold " ". You can finish these programmes by a spinning (programme 6) or a draining
(programme 12). Depress the on/off pushbutton
" " before doing your choice.
After each wash, depress the on/off pushbutton.
Press off the pushbuttons if necessary ; unplug
the machine from the wall socket ; turn off the
water tap.
8
PROGRAMMES CHART
Programmes for cotton/linen and for synthetics/delicates/wool
Maximum loads : 5 kg (cotton),2,5 kg (synthetics/delicates), 1 kg (wool).
Programmes
description
Temperatures Detergent
(°C)
dispensers
to use
1
White +
90
2
White
90
3
4
White
Short programme
5
Rinsing
6
Spinning
7
Synthetics +
8
Water
consumption
in liters
Time
in minutes
95
150
79
135
60
79
105
40
79
90
62
50
0
5
60
72
85
Synthetics
60
58
75
9
Delicate
40
58
55
10
Wool
30
63
45
11
Rinsing
42
20
12
Drain
0
5
*
*
(*) If the laundry can withstand the bleaching treatment.
When the selected programme is over, the washing machine stops automatically. The timer knob stops
on the position "I" after a spinning phase (for the cotton and linen programmes) or by a rinse hold (for
the synthetics and wool programmes). You can end these programmes with a spinning (by setting the
timer on the programme 6) or with a draining (by setting the timer on the programme 12). Please depress
the ON/OFF pushbutton before doing your choice.
BE CAREFUL :
THE LID CAN ONLY BE OPENED 90 SECONDS AFTER THE MACHINE HAS STOPPED.
9
HINTS AND TIPS
Washing hints
You are advised not to leave your laundry too
long, especially when damp. Damp laundry
produces moult and unpleasant smells.
Moult stains cannot be removed.
Sort your laundry.
Study carefully the chart in this booklet explaining
the symbols used on clothes labels (see page 13).
The following points are particularly important :
- a line under the bowl means that the garment
cannot be washed using programmes for resistant
fabrics such as cotton and linen;
- do not mix coloured garments with whites;
- anticrease materials like polyester/cotton should
be treated as synthetics;
- non-resistant fabrics like acrylic and most curtain
materials should be treated as delicate fabrics;
- the wool programme is designed specifically for
pure new wool. Other types of wool and wool
mixtures may shrink or felt if machine-washed.
Woollen garments should be spun briefly
immediately after washing.
Prewash
Prewash is not normally necessary. Your new
washing machine combined with modern
detergents will give perfect washing results without
prewash, thus saving energy, time, water and
detergent.
However, when the laundry is particularly dirty
(for example if you have to wash mechanics'
overalls or butchers' aprons), you are advised to
use prewash with a biological detergent.
Temperatures
We suggest that white cotton and linen, if it is not
excessively soiled, can be washed at 60° instead
of 90°C. There should be no reduction in performance, but there will be an energy saving of
approximately 30%.
The same applies to a lesser extent to fast
coloured garments.
They usually require a temperature of 60°C but if
they are not excessively dirty, you will have
satisfactory results at 40°C.
Garments with non-fast colours should not be
washed at temperatures above 40°C. If fast and
non-fast colours are washed together, they should
be treated as non-fast colours and therefore the
temperature should not exceed 40°C.
10
Resistant white and coloured synthetics can
normally be washed at 60°C but also in this case
40°C is sufficient if the laundry is not excessively
dirty.
Delicate synthetics, synthetics with non-fast
colours and woollen garments must never be
washed above 40°C.
As you already know, your washing machine can
also wash with cold water. However, it must be
remembered that the detergents currently on the
market have not been designed for cold washes
and that in winter, when the water is very cold,
they may not dissolve adequately.
We suggest the use of liquid detergents.
How much laundry can be washed in
one load?
Strictly speaking you should always weigh your
laundry.
The drum will take a maximum of 5 kg of cotton
and linen. For synthetics and delicate fabrics, the
maximum load is 2,5 kg and for wool, 1 kg.
As weighing can be complicated, we suggest you
estimate the weight according to how full the
drum is:
cotton and linen : drum full not too tighty packed
resistant synthetics : no more than 2/3 of the
drum
delicate fabrics and wool : no more than 1/2 of
the drum.
Before placing the laundry in the
machine:
- mend all tears, holes and ladders;
- secure loose buttons and close poppers and
zips;
- do not wash frayed garments - mend hems
before washing;
- remove all small objects from pockets. Nails,
pins, clips and similar objects can seriously
damage your washing machine and laundry;
- remove curtain hooks;
- wash coloured garments and in particular those
with non-fast colours separately when washing
for the first time. They are likely to lose colour the
first time they are washed.
- treat obstinate stains such as grass, rust, tar,
paint, ink etc. with a stain remover before washing.
To remove paint stains, for example, use a volatile substance such as turpentine: in this case,
you should wait for it to dry completely before
washing.
The manufacturer of your washing machine is not
responsible for any damage deriving from the use
of volatile, inflammable or toxic substances.
At the end of the washing
Damp laundry should be dried as soon as possible after finishing the wash.
Knitwear and woollens should be dried flat away
from direct sunlight.
Detergents and additives
Good washing results also depend on the choice
of detergent and use of the correct quantities to
avoid waste and protect the environment. Although
biodegradable, detergents contain substances
which in large quantities can damage the delicate
ecological balance of nature.
Always use good quality detergents suitable
for use in washing machines.
Follow the indications given by the detergent
manufacturer according to the weight of laundry,
the degree of soil and the hardness of the water
in your area; if you do not know how hard it is, ask
your local Water Authority.
Powder detergents.
The washing powder should be placed in the
appropriate compartments of the dispenser
drawer before starting the programme. Special
detergents are availaible for coloured and delicate
fabrics and for wool.
Liquid detergents
Using the new automatic dispenser for liquid
detergents, it is possible to use a liquid detergent
for main wash phases if you start the washing
machine immediately.
Liquid detergents can be used instead of powder
detergents particularly for lightly soiled laundry
and for medium or low temperature washing
programmes, while it is better to use a powder
detergent for high temperature washing
programmes.
Liquid additives
Any liquid additives for softening the laundry
must be poured into the compartment
of the
detergent dispenser drawer before starting the
programme.
The addition of water softener is particularly useful
when drying the clothes in a tumble dryer after
washing to avoid a static charge.
Make sure that the level of the liquid never
exceeds the MAX level.
Bleach
You may use a bleach agent in all the washing
programmes. However, make sure that the fabric
withstands the treatment. Bleach is automatically
washed down into the drum. Pour 1/4 to 1 glass
of 12° chl bleach into compartment " " before
switching the machine on.
Make sure that the level of the liquid never
exceeds the MAX level.
"Concentrated" powder detergents
Pour the concentrated powder detergent into the
main wash ( ) compartment.
Avoid selecting programmes including
prewash when concentrated detergents are
used.
Water hardness
Level
1
2
3
4
Characteristic
Soft
medium
hard
very hard
German degrees
°dH
m mol
0 - 7
8 - 14
15 - 21
> 21
0 - 1,3
1,4 - 2,5
2,6 - 3,8
> 3,8
French degrees
°T.H.
0 - 15
16 - 25
26 - 37
> 37
11
Wash code symbols
These symbols appear on fabric label, in order to help you choose the best way to treat your
laundry.
Strong wash
Max. wash
Max. wash
Max. wash
Max. wash
temperature 95°C temperature 60°C temperature 40°C temperature 30°C
WASH
Do not
wash
at all
Hand
wash
Delicate wash
BLEACHING
Do not bleach
Bleach in cold water
IRONING
Hot iron max. 200°C
DRY CLEANING
Dry cleaning
in all solvents
Warm iron max. 150°C
Lukewarm iron max. 110°C
Dry cleaning in
Dry cleaning in petrol, pure
perchlorethylene petrol,
alcohol, and R 113
pure alcohol, R 111 & R 113
Do not iron
Do not dry clean
high
temperature
low
DRYING
Flat
On clothes hanger
On the line
Tumble dry
Symbols identification on the panel of your washing machine :
: prewash detergent compartment
: wash detergent compartment
: soften detergent compartment
: spinning for cotton programmes (
: synthetics programmes
: rinse hold
: draining
: wool symbol
12
)
Do not tumble dry
CLEANING AND MAINTENANCE
Make sure that the machine is unplugged and
the water tap turned off before undertaking any kind of maintenance.
Bodywork
The outside or the machine can be cleaned with
warm water and a neutral non-abrasive household
detergent. Wipe with clean water and dry after
cleaning.
Important : do not use methylated spirit, diluents
or similar products.
It is advisable, from time to time, to carry out a
complete cycle without a washing load, adding a
decalcifying product.
fig.1
fig.2
The detergent dispenser
The detergent dispenser is very easy to remove.
Just turn the two screws 1/4 of a turn and slide the
box towards the top (fig.1 and fig.2).
fig.3
Clean the detergent dispenser under running
water with a brush or a piece of rag (fig.3).
Reposition the detergent dispenser into the lid
and refix the two screws (fig.4 and fig.5).
fig.5
fig.4
The drain filter
The machine has got a mecanic filter located on
the front part to collect lint and small objects
(toothpins, coins, pins, etc) inadvertently left in
the clothes. It is essential that this filter is cleaned
regularly.
Frequency of cleaning depends on the type of
articles washed (cleaning should be more frequent
if the articles have no hem and tend to fray).
Open the flapdoor covering the filter by pressing
the left side of the filter door (fig.1).
Place a container underneath to catch any
spillage. According ot the models, complete the
drain of the appliance by taking away the cap and
by extracting the little hose located on the left of
the filter (fig.2).
Turn the filter anticlockwise and clean it thoroughly
with running water (fig.3).
Refit the filter in the guides and turn it clockwise.
Refit the little hose ans the cap, then close the
flapdoor.
fig.1
fig.2
fig.3
13
IF SOMETHING DOESN'T WORK ?
Problems
Solutions
The wash results are not as usual
Check that :
was the wrong quantity or the wrong detergent
added ? Insufficient detergent leads to grey washes
and scale deposits in the machine. Check the
quantities more exactly.
were special stains pre-treated ?
were programme and temperature correctly
chosen ?
The washing cycle is very much too
long.
Check that :
the water pression is sufficient.
the pump filter is not obstructed.
there has not been a power breakdown.
The washing machine stops during a
washing cycle.
Check that :
the water pression is sufficient.
the pump filter is not obstructed.
the mains fuse is intact.
there is not a rinse hold ending a washing
programme for delicate laundry (see the
programmes chart page 10).
The machine does not start up
Check that :
the mains fuse is intact.
the appliance is plugged in,.
the lid is firmly shut.
the programme selector dial is correctly positioned.
the beginning of the programme has been ordered
(on/off pushbutton pushed on).
there has not been a power breakdown.
The machine does not drain and/or does
not spin
Check that :
the drain hose is not squashed or bent.
the drain filter is not clogged.
The machine does not fill
Check that :
the inlet water hose is opened and the water
pression is sufficent.
the lid of the appliance is closed.
there has not been a breakwater.
14
IF SOMETHING DOESN'T WORK (continue)
Problems
Solutions
The machine vibrates or is too noisy
Check that :
all the transit bolts and packing have been
removed.
all the feet resting firmly on the ground, the lock
nuts have been secrured.
the machine does not touch something.
the load is sufficent.
The machine empties as it fills
Check that :
the end of the drain hose is not too low.
There is water on the floor
Check that :
there is not too much detergent or unsuitable
detergent. The formation of foam can cause water
leaks.
one of the detergent dispenser is not obstructed.
the drain hose is well hanged.
if one of the joints or the tap leaking ? it is not
always easy to see as the leak often runs along the
hose.
is the drain filter cover properly closed ?
Softener detergent flows out the overflow
orifice
Check that :
you have respected the adviced quantities.
15
SERVICE
If you have unable to identify or solve the problem,
consult our servicing depar tment. Before
telephoning, make a note of the make, model and
date of purchase of your machine : the service
department will require this information.
Data plate
You will find these informations on the data plate
of the appliance. It is placed on the back of the
appliance.
16
FOR THE INSTALLER
Technical information
Dimensions
height with panel
height without panel
width
depth
Power supply voltage / frequency
Total power absorbed
Heater rating
Water pressure
minimum
maximum
Maximum load
cotton
synthetics
wool
Spinning speed
Electrical consumption (washing at 60°C)
895 mm
850 mm
397 mm
600 mm
230 V / 50 Hz
2300 W (10 A)
1950 W
50 kPa (0,5 kg/cm2)
800 kPa (8 kg/cm2)
5 kg
2,5 kg
1 kg
550 rpm
1,3 kWh
This appliance complies with the following EC Directive :
- 72/23/EEC of 19.02.1973 - Low-Voltage Directive
- 89/336/EEC of 03.05.1989 (including Amentment Directive 92/31/EEC) - EMV Directive.
Installation
Unpacking
The parts protecting the inner components of
the machine during transit are red. They must
all be removed before using your machine for
the first time. These parts and their securing
means should be kept in case the machine
has to be transported again.
Unpack the appliance. Tilt the appliance
backwards. Give to one of the back corners a
quarter turn. The appliance comes free naturally
out the polystyrene basis. Take away this basis
(fig. 1).
Fig. 1
Fig. 2
Open the lid of the appliance and remove the
polystyrene wedge which blocks the drum.
Close the lid (fig. 2).
On the back part and with a spanner, remove
the two red loosened spacers (A) (fig. 3).
The holes which are now visible must be closed
with the plugs (B) provided with the appliance
(fig. 4).
Fig 3
Fig 5
A
B
Fig 4
Fig 6
Please ensure that these parts have been
removed from the machine and keep them in
case of next transport (fig. 5).
If you want to keep the alignment of your
appliance with the adjacent cupboards, you
have the possibility to cut the crossbar holding
the hoses located at the back of your washing
machine (fig. 6).
17
Installation
The floor must be clean and dry, free from floor
polish and other greasy substances, so that the
machine does not slide about. Do not use any
grease as lubrification.
Installation on deep pile carpets and floor
coverings with foam backings is not recommended,
as the stability of the machine is no longer
guaranteed. If the installation must be done on a
carpeted floor, the openings located at the lower
part of the back of the appliance must remain
free. These openings ensure a good ventilation
of your appliance. In case of small format tiles,
place a standard rubber mat under the machine.
With sprung floors, in particular wooden plank
floors with yielding floor boards, screw down a
waterproof wooden base at least 15 mm thick,
across at least 2 floor boards. Wherever possible,
place the appliance in the corner of the room there wooden floors are most secure and least
liable to resonance vibrations.
Never compensate for small unevennesses in the
floor by placing wood, pasteboard or such like.
The front adjustable feet must be blocked after
installation of the appliance by means of the
locking nuts.
Levelling
It is essential that your machine is absolutely
level. Raise or lower the front feet of the machine;
tighten the nuts of the feet with an adjustable
wrench.
Also make sure that the machine does not touch
the wall, the furnitures etc. during the functioning.
This in order to avoid vibrations, noise or displacements of the appliance during operation.
Moving of the appliance
To move your washing machine, put it on its
wheels by turning from the right to the left the
special lever situated at the bottom of the machine. Once the machine placed at the chosen
place, bring back the lever to its initial original
position.
18
Water connection
Connect the water inlet hose to a cold water tap
with a 3/4" gas threaded orifice, after having
inserted the rugger sealing washer into the hose
collar. If the water connection is made onto new
pipes or onto pipes which have not been used for
a long time, it is advisable to run off a certain
amount of water before connecting the machine.
Place the curved end of the outled hose into a
drain pipe having a height between 70 and 100
cm from floor level or secure it to a sink or bath tub.
Make sure that the drain hose is firmly secured so
that it will not slip out or fall down from its position.
The water should drain freely and, consequently,
the drain hose should not be choked or placed in
such a way as to obstruct the normal water flow.
If an extension hose is required, remember that it
might cause a malfunction in the drain pump,
particularly if the extension has a length in excess
of 1 meter or if the diameter of the extension is
smaller than the diameter of the original drain
hose.
Electrical connection
Before you fit the plug into the wall socket, check
the following points :
1) The supply voltage of the domestic wiring
system does not fluctuate by more that 10%, plus
or minus, from 230 V.
2) The meter, the fuses, the supply line and the
wall socket are suitable to carry the maximum
load required by the machine (2,3 kW).
Very important :
The washing machine is provided with a
feeding wire with earth connection: it must be
connected to a plug like that is provided with
a good earth connection.
The replacing of the power cord must only be
realized by the After Sales Service.
The manufacturer declines any responsibility
where the previous recommendations are not
followed.
19
129 6771 05