1
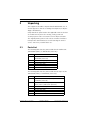
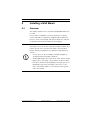
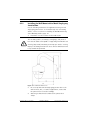
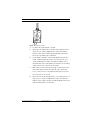
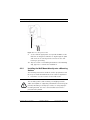
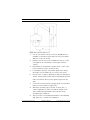
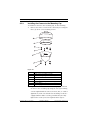
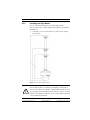
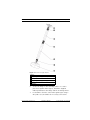
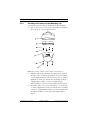
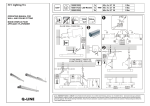
Mini PTZ Dome Accessories
VEZ-400
en
Installation Manual
Mini PTZ Dome Accessories
Table of Contents | en
3
Table of Contents
1
Safety
4
1.1
Safety precautions
4
1.2
Important safety instructions
5
1.3
Important notices
6
1.4
Bosch notices
6
2
Unpacking
8
2.1
Parts List
8
2.2
Additional Tools/Supplies Required
9
3
Installation Overview
10
4
Installing a Wall Mount
11
4.1
Overview
11
4.1.1
Installing the Wall Mount with a Metal Single-gang Junction Box
4.1.2
Installing the Wall Mount directly onto a Mounting Surface
14
4.1.3
Installing the Camera to the Mounting Cap
16
5
Installing a Pipe Mount
18
5.1
Overview
18
5.1.1
Installing the Pipe Mount
19
5.1.2
Installing the Camera to the Mounting Cap
22
6
Connection
23
12
Bosch Security Systems, Inc.
Installation Manual
F.01U.260.456 | 1.0 | 2011.10
4
en | Safety
1
Mini PTZ Dome Accessories
Safety
Before installing any of the accessories, please read this manual
carefully.
1.1
Safety precautions
WARNING!
Medium risk: Indicates a potentially hazardous situation.
If not avoided, this could result in minor or moderate bodily
injury.
CAUTION!
Low risk: Indicates a potentially hazardous situation.
If not avoided, this could result in property damage or risk of
damage to the unit.
NOTICE!
This symbol indicates information or a company policy that
relates directly or indirectly to the safety of personnel or
protection of property.
F.01U.260.456 | 1.0 | 2011.10
Installation Manual
Bosch Security Systems, Inc.
Mini PTZ Dome Accessories
1.2
Safety | en
5
Important safety instructions
Read, follow, and retain for future reference all of the following
safety instructions. Heed all warnings on the unit and in the
operating instructions before operating the unit.
1.
Cleaning - Unplug the unit from the outlet before cleaning.
Follow any instructions provided with the unit. Generally,
using a dry cloth for cleaning is sufficient but a moist, flufffree cloth or leather shammy may also be used. Do not use
liquid cleaners or aerosol cleaners.
2.
Object and liquid entry - Never push objects of any kind
into this unit through openings as they may touch
dangerous voltage points or short-out parts that could
result in a fire or electrical shock. Never spill liquid of any
kind on the unit. Do not place objects filled with liquids,
such as vases or cups, on the unit.
3.
Damage requiring service - Unplug the unit from the main
AC power source and refer servicing to qualified service
personnel when any damage to the equipment has
occurred, such as:
–
the power supply cord or plug is damaged;
–
exposure to moisture, water, and/or inclement
weather (rain, snow, etc.);
–
liquid has been spilled in or on the equipment;
–
an object has fallen into the unit;
–
unit has been dropped or the unit cabinet is damaged;
–
unit exhibits a distinct change in performance;
–
unit does not operate normally when the user
correctly follows the operating instructions.
4.
Replacement parts - Be sure the service technician uses
replacement parts specified by the manufacturer, or that
have the same characteristics as the original parts.
Unauthorized substitutions may cause fire, electrical
shock, or other hazards.
5.
Safety check - Safety checks should be performed upon
completion of service or repairs to the unit to ensure
proper operating condition.
Bosch Security Systems, Inc.
Installation Manual
F.01U.260.456 | 1.0 | 2011.10
6
en | Safety
6.
Mini PTZ Dome Accessories
Installation - Install in accordance with the manufacturer's
instructions and in accordance with applicable local codes.
1.3
Important notices
Accessories - Do not place this unit on an unstable stand,
tripod, bracket, or mount. The unit may fall, causing serious
injury and/or serious damage to the unit. Use only with the
cart, stand, tripod, bracket, or table specified by the
manufacturer. When a cart is used, use caution and care when
moving the cart/apparatus combination to avoid injury from
tip-over. Quick stops, excessive force, or uneven surfaces may
cause the cart/unit combination to overturn. Mount the unit
per the manufacturer's instructions.
Disposal - Your Bosch product was developed and
manufactured with high-quality material and components that
can be recycled and reused. This symbol means that electronic
and electrical appliances, which have reached the end of their
working life, must be collected and disposed of separately
from household waste material. Separate collecting systems
are usually in place for disused electronic and electrical
products. Please dispose of these units at an environmentally
compatible recycling facility, per European Directive 2002/96/
EC.
Environmental statement - Bosch has a strong commitment
towards the environment. This unit has been designed to
respect the environment as much as possible.
1.4
Bosch notices
Copyright
This manual is the intellectual property of Bosch Security
Systems and is protected by copyright. All rights reserved.
Trademarks
All hardware and software product names used in this
document are likely to be registered trademarks and must be
treated accordingly.
F.01U.260.456 | 1.0 | 2011.10
Installation Manual
Bosch Security Systems, Inc.
Mini PTZ Dome Accessories
Safety | en
7
Note:
This manual has been compiled with great care and the
information it contains has been thoroughly verified. The text
was complete and correct at the time of printing. The ongoing
development of the products may mean that the content of the
user guide can change without notice. Bosch Security Systems
accepts no liability for damage resulting directly or indirectly
from faults, incompleteness or discrepancies between the user
guide and the product described.
More information
For more information please contact the nearest Bosch Security
Systems location or visit www.boschsecurity.com
Bosch Security Systems, Inc.
Installation Manual
F.01U.260.456 | 1.0 | 2011.10
8
en | Unpacking
2
Mini PTZ Dome Accessories
Unpacking
This equipment should be unpacked and handled with care. If
an item appears to have been damaged in shipment, notify the
shipper immediately.
Verify that all the parts listed in the applicable Parts List below
are included. If any items are missing, notify your Bosch
Security Systems Sales or Customer Service Representative.
The original packing carton is the safest container in which to
transport the unit and must be used if returning the unit for
service. Save it for possible future use.
2.1
Parts List
The following table lists the parts included in the Wall mount
(VEZ-A4-WW (white) or VEZ-A4-WC (charcoal)):
Quantity Part
1
Wall mount: VEZ-A4-WW (white) or
1
1
1
1
1
VEZ-A4-WC (charcoal)
Dome mounting cap
Rubber pad
Roll of Teflon tape
Tube of Silicone grease
Installation manual (this booklet)
The following table lists the parts included in the Pipe mount
(VEZ-A4-PW (white) or VEZ-A4-PC (charcoal)):
Quantity Part
1
Pipe mount: VEZ-A4-PW (white) or
2
VEZ-A4-PC (charcoal)
Pipe mount extension poles,
1
1
1
1
1
20 cm (7.9 in.) and 30 cm (11.8 in.)
Pipe extension coupler
Ceiling flange
Roll of Teflon tape
Tube of Silicone grease
Installation manual (this booklet)
F.01U.260.456 | 1.0 | 2011.10
Installation Manual
Bosch Security Systems, Inc.
Mini PTZ Dome Accessories
2.2
Unpacking | en
9
Additional Tools/Supplies Required
–
Appropriate straight slot screwdrivers
–
No. 2 Phillips screwdriver
–
Appropriate tool for cutting a hole in drywall or ceiling tile
–
4 in. x 4 in. junction box (optional)
–
Ground lug (outdoor use only) [for pipe mounts]
–
VEZ-400 Mini PTZ Dome (includes screws to mount the
(if applicable)
camera)
–
Wire Puller tool
–
Suitable mounting screws/plugs to attach the wall/pipe
mount to the mounting surface
Bosch Security Systems, Inc.
Installation Manual
F.01U.260.456 | 1.0 | 2011.10
10
3
en | Installation Overview
Mini PTZ Dome Accessories
Installation Overview
The VEZ-400 Mini PTZ Dome camera comes with the hardware
and installation instructions necessary to mount the camera to
a concrete ceiling.
This following mounting accessories are available (and are
supplied with separate mounting instructions):
–
Wall mount, used in applications where the camera is
mounted to a vertical wall.
–
Pipe mount, used in applications where the camera is
mounted to a horizontal (high) ceiling.
The installation should be made by qualified installation
personnel and conform to the National Electrical Code and
applicable local codes.
F.01U.260.456 | 1.0 | 2011.10
Installation Manual
Bosch Security Systems, Inc.
Mini PTZ Dome Accessories
Installing a Wall Mount | en
4
Installing a Wall Mount
4.1
Overview
11
This chapter details how to mount the VEZ-400 Mini PTZ Dome
to a wall.
For an outdoor installation, you must obtain the mounting
screws with rubber sealing rings supplied with the Mini PTZ
Dome to ensure a water-tight environment inside the unit and
to maintain an IP Environmental Protection Rating.
NOTICE!
The image sensors in modern cameras are highly sensitive and
require special care for proper performance and extended
lifetime. Follow the guidelines for optimum results with your
camera:
–
Do not expose to direct sunlight or bright spotlights in
operating and nonoperating conditions.
–
Avoid bright lights in the field of view of the camera. Bright
lights cause a “smearing” effect, which is visible as white
lines above and below the highlight. Prolonged exposure to
bright lights may cause bleaching of the sensor's color
filters. This will be visible as colored spots in the picture
and is irreversible.
Bosch Security Systems, Inc.
Installation Manual
F.01U.260.456 | 1.0 | 2011.10
12
en | Installing a Wall Mount
4.1.1
Mini PTZ Dome Accessories
Installing the Wall Mount with a Metal Single-gang
Junction Box
Use the following instructions for applications using a metal
single-gang junction box. To mount directly onto a mounting
surface, refer to Section 4.1.2 Installing the Wall Mount directly
onto a Mounting Surface, page 14.
1.
Determine a secure location for the wall mount.
WARNING!
The mounting surface, mounting screws/plugs, and junction
box must be stable and capable of supporting a maximum load
of 15 kg (33 pounds). Mounting to an improper surface or using
improper mounting material can cause camera malfunction and
is a potential safety hazard.
Figure 4.1
2.
Wall Mount Dimensions
Fit a user-provided metal single-gang junction box to the
wall. In moist, wet, or outdoor applications, ensure that
the junction box is rated accordingly.
3.
Attach a grounded metal conduit to the junction box
clamp.
F.01U.260.456 | 1.0 | 2011.10
Installation Manual
Bosch Security Systems, Inc.
Mini PTZ Dome Accessories
Figure 4.2
Installing a Wall Mount | en
13
Metal Conduit
4.
Feed the wires through the conduit.
5.
Attach the mounting cap to the arm of the wall mount. In
moist, wet or outdoor applications, make sure that the
thread on the arm is sufficiently taped with Teflon tape
before the mounting cap is attached.
6.
Feed all wires from the camera through the arm into the
metal conduit using a wire puller tool. In moist, wet, or
outdoor applications, make sure that the rubber seal is
placed between the arm and the junction box or mounting
surface before the connections are made.
7.
Make all necessary connections inside of the junction box.
In moist locations, make sure that all connections and
loose connectors are sealed against water/moist (even if
the connection is not used).
8.
Fit the arm to the mounting surface or to a junction box. In
wet, moist, or outdoor applications, make sure that the
rubber seal is in place and pressed firmly between the arm
and mounting surface on all sides.
Bosch Security Systems, Inc.
Installation Manual
F.01U.260.456 | 1.0 | 2011.10
14
en | Installing a Wall Mount
Figure 4.3
9.
Mini PTZ Dome Accessories
Fit to Gang Junction Box
Secure with the appropriate user-provided SEMS screws
that have an integral lock washer to dig through the paint
and ensure an electrical ground connection to the arm
housing or ground lug.
10. Skip to Section 4.1.3 Installing the Camera to the Mounting
Cap, page 16, to continue the installation.
4.1.2
Installing the Wall Mount directly onto a Mounting
Surface
The following instructions detail the surface preparations and
the steps to install the Wall Mount for an outdoor application.
1.
Determine a secure location for the wall mount.
WARNING!
The mounting surface and mounting screws/plugs must be
stable and capable of supporting a maximum load of 15 kg (33
pounds). Mounting to an improper surface or using improper
mounting material can cause camera malfunction and is a
potential safety hazard.
F.01U.260.456 | 1.0 | 2011.10
Installation Manual
Bosch Security Systems, Inc.
Mini PTZ Dome Accessories
Figure 4.4
2.
Installing a Wall Mount | en
15
Wall Mount Dimensions
Use the four (4) holes at the end of the Wall Mount as a
template to mark the position where the holes should be
drilled to secure the mount.
3.
Drill the four (4) holes in the installation location, screws
not supplied. Use a minimum screw length of 10 mm
(.39 in.).
4.
Drill a fifth hole (maximum of 20 mm) in the center of the
four-hole pattern used to mount the arm.
5.
Feed all wires from the camera through the arm using a
wire puller tool, and make the necessary connections.
6.
In moist, wet, or outdoor applications, place the flat gasket
(item 1, below), between the surface and Wall Mount, and
make sure that the wires go through the gasket into the
wall.
7.
Secure the mount using four (4) appropriate user-provided
fasteners such as Moly or Toggle bolts.
8.
Attach the mounting cap to the arm. In moist, wet, or
outdoor applications, make sure that the thread on the
arm is sufficiently taped with Teflon tape before the
mounting cap is attached.
9.
Skip to Section 4.1.3 Installing the Camera to the Mounting
Cap, page 16, to continue the installation.
Bosch Security Systems, Inc.
Installation Manual
F.01U.260.456 | 1.0 | 2011.10
16
en | Installing a Wall Mount
4.1.3
Mini PTZ Dome Accessories
Installing the Camera to the Mounting Cap
To install the camera to the mounting cap, do the following:
1.
Remove the dome cover from the camera by loosening the
three (3) dome cover mounting screws.
Figure 4.5
Number
1
2
3
4
5
6
7
2.
Description
Dome cover mounting screws
Rubber sealing rings for mounting screws
Dome cover
Mounting screws
Rubber sealing rings for mounting screws
Camera base
Mounting cap
Align the camera base with the mounting cap, and mount
the base to the mounting cap using the four (4) mounting
screws supplied with the camera. In moist, wet, or outdoor
applications, make sure that all four mounting screws are
equipped with a rubber seal ring, and that they are fully
tightened to ensure protection against water ingress.
F.01U.260.456 | 1.0 | 2011.10
Installation Manual
Bosch Security Systems, Inc.
Mini PTZ Dome Accessories
3.
Installing a Wall Mount | en
17
Mount the dome cover to the camera base. In moist, wet,
or outdoor applications, make sure that all three mounting
screws are equipped with a rubber seal ring, and that they
are tightened fully to ensure protection against water
ingress.
Bosch Security Systems, Inc.
Installation Manual
F.01U.260.456 | 1.0 | 2011.10
18
en | Installing a Pipe Mount
Mini PTZ Dome Accessories
5
Installing a Pipe Mount
5.1
Overview
This chapter details how to mount the VEZ-400 Mini PTZ Dome
to a pipe.
For an outdoor installation, you must obtain the mounting
screws with rubber sealing rings supplied with the Mini PTZ
Dome to ensure a water-tight environment inside the unit and
to maintain an IP Environmental Protection Rating.
NOTICE!
The image sensors in modern cameras are highly sensitive and
require special care for proper performance and extended
lifetime. Follow the guidelines for optimum results with your
camera:
–
Do not expose to direct sunlight or bright spotlights in
operating and non-operating conditions.
–
Avoid bright lights in the field of view of the camera. Bright
lights cause a “smearing” effect, which is visible as white
lines above and below the highlight. Prolonged exposure to
bright lights may cause bleaching of the sensor's color
filters. This will be visible as colored spots in the picture
and is irreversible.
F.01U.260.456 | 1.0 | 2011.10
Installation Manual
Bosch Security Systems, Inc.
Mini PTZ Dome Accessories
5.1.1
Installing a Pipe Mount | en
19
Installing the Pipe Mount
Use the following instructions to install a pipe mount.
Note: Certain steps contain additional information for outdoor
installations.
1.
Determine a secure hard surface location for the ceiling
pipe mount.
Figure 5.1
Pipe Mount Dimensions
WARNING!
The mounting surface, mounting screws/plugs, and junction
box must be stable and capable of supporting a maximum load
of 15 kg (33 pounds). Mounting to an improper surface or using
improper mounting material can cause camera malfunction and
is a potential safety hazard.
Bosch Security Systems, Inc.
Installation Manual
F.01U.260.456 | 1.0 | 2011.10
20
en | Installing a Pipe Mount
2.
Mini PTZ Dome Accessories
Use the four (4) holes in the flange as a template to mark
the position where the holes should be drilled to secure
the mount.
3.
Drill the four (4) holes in the installation location. Use
screws (not supplied) with a minimum length of 10 mm
(.39 in.).
CAUTION!
All wires for installation applications must be routed through a
grounded conduit.
4.
Drill a fifth hole (maximum of 20 mm [.79 in.]) in the
center of the four-hole pattern used to mount the flange.
Use this hole to feed the wires through the mount.
5.
Fit the flange (supplied) to the pipe.
Note: Select the pipe length of 200 mm (7.9 in.), 300 mm
(11.8 in.), or combine the two (2) pipes with the integral
coupler for 505 mm (20 in.).
Apply the following couplings (supplied with the camera)
to the locations specified in the graphic below.
To ensure protection against water ingress, use the
supplied Teflon tape to seal the couplings.
F.01U.260.456 | 1.0 | 2011.10
Installation Manual
Bosch Security Systems, Inc.
Mini PTZ Dome Accessories
Figure 5.2
1
2
3
4
5
6
6.
Installing a Pipe Mount | en
21
Parts of a pipe mount
Base
Coupling, white pipe to 3/4 - 14 NPS
Pipe, 200 mm
Coupling, white pipe to pipe
Pipe, 300 mm
Adapter
Secure the flange to the mounting surface. To ensure
protection against water ingress, install the supplied
rubber pad between the flange and the mounting surface.
7.
Feed all wires from the camera through the pipe using a
wire puller tool, and make the necessary connections.
Bosch Security Systems, Inc.
Installation Manual
F.01U.260.456 | 1.0 | 2011.10
22
en | Installing a Pipe Mount
5.1.2
Mini PTZ Dome Accessories
Installing the Camera to the Mounting Cap
To install the camera to the mounting cap, do the following:
1.
Remove the dome cover from the camera by loosening the
three (3) dome cover mounting screws.
Figure 5.3
2.
Location of parts of camera dome and mounting cap
Align the camera base with the mounting cap, and mount
the base to the mounting cap using the four (4) mounting
screws supplied with the camera. In moist, wet, or outdoor
applications, make sure that all four mounting screws are
equipped with a rubber seal ring, and that they are
tightened fully to ensure protection against water ingress.
3.
Mount the dome cover to the camera base. In moist, wet,
or outdoor applications, make sure that all three mounting
screws are equipped with a rubber seal ring, and that they
are tightened fully to ensure protection against water
ingress.
F.01U.260.456 | 1.0 | 2011.10
Installation Manual
Bosch Security Systems, Inc.
Mini PTZ Dome Accessories
6
Connection | en
23
Connection
After the camera is mounted, connect the video, control, and
power cables.
CAUTION!
Do not connect power to the camera until all other connections
are made.
CAUTION!
Installation should only be performed by qualified service
personnel in accordance with the National Electrical Code or
applicable local codes.
CAUTION!
All wires for installation applications must be routed through a
grounded conduit.
CAUTION!
To prevent humidity problems, the camera must be installed in
dry conditions, and the cable leads should be sealed once
connected.
Please refer to the VEZ-400 User Manual for further instructions
on camera connections and configuration.
Bosch Security Systems, Inc.
Installation Manual
F.01U.260.456 | 1.0 | 2011.10
Bosch Security Systems, Inc.
850 Greenfield Road
Lancaster, PA 17601
U.S.A.
www.boschsecurity.com
© Bosch Security Systems, Inc., 2011