1
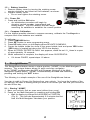
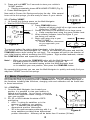
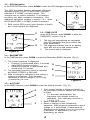
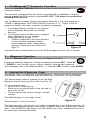
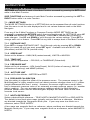
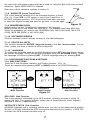
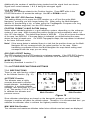
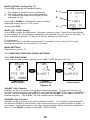
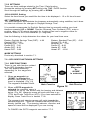
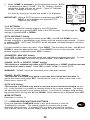
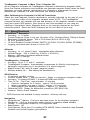
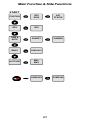
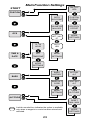
M u l t i - N a v i g a t o r TM
OWNER’S MANUAL
Copyright 2000, BRUNTON
Printed in U.S.A.
form 62-Multi-Nav rev 0214
i
M u l t i - N a v i g a t o r TM
OWNER’S MANUAL
TABLE OF CONTENTS
QUICK USE
Page(s) 1 -- 5
1 -- Getting Started ............................................. 1
1.1
1.2
1.3
1.4
-----
Buttons
Battery Insertion
Power On
Compass Calibration
2 -- StraightHomeTM............................................... 2
2.1 -- Storing *HOME*
2.2 -- Finding *HOME*
3 -- Main Functions ............................................ 3
3.1
3.2
3.3
3.4
-----
Position
GPS Navigation
Time / Date
Barometer
3.5 -- Altimeter
4 -- TrueMagneticTM Compass Function ......... 5
5 -- Waypoint Function ...................................... 5
6 -- Interactive Neoprene Case ......................... 5
INSTRUCTIONS
6 -- 22
7 -- Settings & Side Functions ........................ 6
7.1
7.2
7.3
7.4
7.5
7.6
7.7
--------
More Settings
Position Side Functions & Settings
Altitude Side Functions & Settings
Barometer Side Functions & Settings
Time / Date Side Functions & Settings
GPS Side Functions & Settings
Compass Side Functions & Settings
ii
OWNER’S MANUAL
TABLE OF CONTENTS
8 -- Waypoint Function ..................................... 14
8.1 -- Waypoint Menu
8.2 -- Route Menu
9 -- Maps & Reference Systems .................... 17
9.1 -- Latitude / Longitude
9.2 -- UTM System
10 -- Practical Navigation Example ................ 18
10.1 -- Fishing Trip to Ice Lake
11 -- Maintenance & Fault Finding ................. 20
11.1 -- Maintenance
11.2 -- Fault Finding
12 -- Specifications .............................................. 21
13 -- Important Information / Warnings .......... 22
APPENDICES
A1 -- D3
Glossary ................................................................ A1
Warranty Registration ....................................... B1
Operational Flow Chart ................................... C1
Index ...................................................................... D1
iii
QUICK USE
The Quick Use guide is intended as an introduction to the Multi-Navigator. Before
heading into an unfamiliar area read the entire manual to gain a full understanding of
the Multi-Navigator and its features. Pre-plan all trips. Always carry a map and compass
and know how to use them.
1 -- Getting Started
1.1 -- Buttons
The button layout is designed for one-handed operation, and
provides quick access to all functions.
When instructed to “press” a button, press the button for less
than 1 second. When instructed to “press & hold” a button,
press and hold for at least 2 seconds, unless instructed
otherwise.
ON / OFF & BACKLIGHT
Power Multi-Navigator on or off by pressing and holding the ON/OFF button.
BACKLIGHT -- Both the display and buttons can be backlit by pressing
the ON/OFF button, while Multi-Navigator power is on.
When using batteries, the backlight will stay on for 30 seconds, or until
turned off manually. When external power is used the backlight will remain
on until manually turned off.
UP / DOWN
Press UP or DOWN to scroll through the 5 main functions.
When in a setting mode, press UP or DOWN to change each value or
character.
LEFT / RIGHT
Press LEFT or RIGHT to see related side functions when available.
The LEFT/RIGHT buttons also move the cursor from side to side to allow for
the changing of values or characters when in a setting mode.
WAYPOINT (WPT)
Press WPT to activate the waypoint menu, from which you can record your
present position as a waypoint; create a new waypoint by entering its
coordinate; view waypoints; enter routes; or perform other waypoint settings.
To establish a *HOME* waypoint, press and hold the WPT button for
approximately 5 seconds, as illustrated in StraightHomeTM, section 2. The
display will show a countdown timer before the *HOME* position is
created.
COMPASS
When power is on, press the dedicated COMPASS button at any time for
direct access to the TrueMagneticTM electronic compass. Hold level for best
accuracy. To exit press UP or DOWN. For access to the TrueMagnetic
compass function when power is off, press and hold the COMPASS button.
SET (YES) / ESCAPE (NO)
SET (YES) In any of the main functions the SET or ESCAPE (ESC) buttons may be used to
view specific settings. These buttons are also used to set values or to escape
from specific functions. They often correspond to prompts displayed on the
screen.
ESC (NO)
1
1.2 -- Battery Insertion
1. Remove battery cover by turning the retaining screw
counter clockwise, and insert two AA batteries, as shown.
2. Replace battery cover.
! Do not over tighten the retaining screw.
1.3 -- Power ON
1. Press and hold the ON button
! An initialization procedure will begin by
showing version number, temperature and
battery status. The GPS receiver will then begin
searching for satellites to establish the current position.
BRUNTON
--
+
Figure 1
1.4 -- Compass Calibration
For the highest possible electronic compass accuracy, calibrate the TrueMagneticTM
compass each time batteries are installed.
To
1.
2.
3.
4.
calibrate:
Press COMPASS button.
Press SET button to enter programming menu.
Press UP button twice, or until display shows DEVIATE COMPASS.
Center the bubble inside the circle of the green bubble level and press YES button.
(YES button is located just above the YES in the display).
5. When AUTODEV ROTATE SLOWLY text appears, rotate the unit 11/4 times in a span
of approximately 10 seconds.
6. When calibration is complete, the display will show SUCCESSFUL.
! If it shows FAILED, repeat steps 1-6 above.
2 -- StraightHome TM
The StraightHome feature stores a unique position (*HOME*) in the Multi-Navigator’s
memory. This unique feature allows for quick and easy navigation
to the *HOME* position using the GPS and Compass functions of the MultiNavigation System (MNS). *HOME* is automatically recorded and named by
pressing and holding the WPT button.
The following is a simple example of the use of the StraightHome feature:
You plan to walk to Cavern Hot Springs from your vehicle. You know the location of the
hot springs, but after a relaxing soak you want to be certain you can find your vehicle at
the end of the day.
2.1 -- Storing * HOME *
1. Near your vehicle, find an open area (without tree cover).
2. Power on the Multi-Navigator by pressing and holding ON.
! Wait for display to change from ACQUIRE to POSITION
(Fig. 2). This will take approximately 2-3 minutes the first
time the Multi-Navigator calculates your position.
Figure 2
2
3. Press and hold WPT for 5 seconds to store your vehicle’s
*HOME* position.
! Display momentarily shows NEW HOME STORED (Fig. 3).
4. Power Multi-Navigator off.
Now walk to Cavern Hot Springs and enjoy the day. After several
hours at the hot springs, you are ready to return to your vehicle.
2.2 -- Finding *HOME*
1. At Cavern Hot Springs power on the Multi-Navigator.
Figure 3
2. Wait for POSITION to be acquired.
3. Press COMPASS button.
! Display will show a bold left or right arrow and the
distance to *HOME*. (Fig. 4)
Vehicle 4. Rotate your body in the direction of the large arrow.
! Keep compass level using the green bubble level.
*HOME*
5. When steering indicator looks like figure 5, you
are facing your vehicle.
6. Begin your return trip to your
Vehicle (HOME)
vehicle (*HOME*).
! Notice distance decreases
as you approach your
Figure 4
vehicle.
Figure 5
To preserve battery life, sight a distant landmark, in the direction of
your vehicle and turn Multi-Navigator off. Walk to the landmark and press and hold the
COMPASS button while holding the unit level. The compass will point in the direction of
your initial bearing without accessing the GPS system. Sight another landmark, release
the COMPASS button and repeat the process.
Note! -- When you press the COMPASS button with the Multi-Navigator off
the bearing used is based on the last position acquired. To
establish a more accurate bearing power the Multi-Navigator back
on to establish your new position, then press the COMPASS button.
By repeating this process you can use the Multi-Navigator to quickly and easily find your
way back *HOME* from the hot springs.
3 -- Main Functions
Scroll through the 5 main functions (POSITION, ALTITUDE, BAROMETER, TIME/DATE &
GPS NAVIGATION) by pressing the UP or DOWN buttons. A more detailed description of
the functions including side functions, changing units and calibration will be found later
in these instructions.
3.1 -- POSITION
1. Once the Multi-Navigator has located your
position, it is possible to view your location in
latitude and longitude. As you travel, notice the
latitude and longitude values change to indicate 1.
your new position.
2. 3D, 2D, or AQU indicate the status of GPS
positioning.
! AQU -- Looking for satellites, or in the
process of acquiring you position.
! 2D -- 3 satellites are providing two
dimensional position information.
2.
! 3D is the most accurate positioning with 4 or
Figure 6
more satellites providing three dimensional
position information. Accuracy will be better than 10 meters (33 feet).
3
3.2 -- GPS Navigation
In the POSITION function, press DOWN to enter the GPS Navigation function. (Fig. 7)
The GPS Navigation function will appear differently
depending upon if a GOTO WAYPOINT has been
selected or if *HOME* has been stored. This
example has no position selected. It is therefore
providing only basic navigation information. See
additional navigation screens in section 7.6-1, when
GOTO WAYPOINT or *HOME* position is selected.
1.
1. Both current GPS course (your direction of travel)
and current speed are displayed.
Figure 7
1.
3.3 -- TIME / DATE
In the GPS function, press DOWN to enter the
TIME/DATE function. (Fig. 8)
2.
1. The time will automatically be calculated
from GPS satellites after your position has
been determined.
2. The segments indicate time as an analog
clock dial with hour and minute hands.
3. The current date is displayed.
3.
Figure 8
3.4 -- BAROMETER
In the TIME function, press DOWN to enter the Barometer (BARO) function. (Fig. 9)
1. The current pressure is displayed.
! Pressure is recalculated every 2 seconds
while BARO function is active.
! Otherwise pressure is recalculated and
stored every 15 minutes.
2. The barometric pressure trend is indicated
by RISING, STEADY, or FALLING.
3. Rate of change is indicated by the raising or
lowering of segments. Each segment
represents a rate of change of 0.03 in Hg
(1 mbar/hPa) per hour.
3.
2.
1.
Figure 9
3.5 -- ALTITUDE
In the BARO function, press DOWN to enter the Altitude function. (Fig. 10)
3.
2.
1.
Figure 10
1. Your current altitude is displayed based on
the barometric pressure sensor with accuracy
to 3 feet..
! For accurate measurement, the
barometer and altitude should be
calibrated. See calibration sections in,
7.3-2 & 7.4-2.
2. Rate of change is listed.
3. Rates of change is also indicated by
segments. Each segment represents a rate of
change of 3 feet/second (1 meter/second).
Segments build upward if you are increasing
in elevation, or downward if you are
decreasing, as shown.
4
4 -- TrueMagneticTM Compass Function
Press the dedicated COMPASS button at any time to enter the electronic
Compass function.
The electronic compass detects the Earth’s magnetic field and displays a compass
bearing whether the GPS receiver is turned ON or OFF. This feature is not found on
standard GPS receivers.
The TrueMagnetic compass function can appear differently if you have assigned a
*HOME* or designated a GOTO WAYPOINT as in section 7.7-1. Figure 11 has no
waypoint selected, only basic compass navigation is displayed.
1. A compass bearing, accurate to two degrees
will be displayed along with the cardinal
direction.
2. The segment points at either true or magnetic
North, depending on your settings.
Described later in section 7.1-7.
! If MAG is displayed in the lower left-hand
corner indicates compass pointing
toward magnetic North, otherwise the
segment is pointing at true North, as in
figure 11.
2.
1.
Figure 11
Compass function automatically exits to the GPS Navigation function after 2 minutes.
5 -- Waypoint Function
Press the dedicated WPT button to enter the Waypoint function.
Everything related to waypoints is easily accessed by pressing WPT. Press UP
or DOWN to scroll through saving, viewing, deleting, entering new waypoints
and managing routes in the Waypoint Menu. To leave the WPT function, press NO/ESC.
6 -- Interactive Neoprene Case
A protective case is included with the Multi-Navigator. Although the unit is waterproof
and durable, using the neoprene case will further help protect the unit from damage.
The unique design makes it possible to use the MultiNavigator without removing it from this case (Fig. 12)
To use interactive case:
! Peal the front cover from top.
! Swing cover around the back of the unit and rehook over the top.
! This will expose the screen through a flexible
window.
The Multi-Navigator is now ready to use.
Figure 12
Reverse steps to cover the screen.
The following section should give you a basic understanding of the 5 Main functions, the
Compass and Waypoint functions and simple navigation using the StraightHome feature.
Now, in the INSTRUCTIONS section, you will explore how to set, calibrate and use all of
the previously mentioned functions.
5
INSTRUCTIONS
7 -- Settings & Side Functions
SETTINGS are options in each of the Main Function accessed by pressing the SET button
while in that Main Function.
SIDE FUNCTIONS are features of each Main Function accessed by pressing the LEFT or
RIGHT button while in a main Function.
7.1 -- MORE SETTINGS
The MORE SETTINGS function is a SETTING that can be accessed from all main functions.
Use this menu to set the units displayed and to set various features used on the MultiNavigator.
From any of the 5 Main Functions or Compass Function MORE SETTINGS can be
accessed by pressing the SET/YES button then scrolling through the SETTINGS using UP
or DOWN until MORE SETTINGS is displayed. Press YES to indicate that you want to
make changes. Use UP and DOWN to scroll through the various settings. Press SET to
change each unit or feature. Press ESC at any time to escape back to the Main Function.
7.1-1 DISTANCE UNIT
Press SET to change DISTANCE UNIT. Scroll through units by pressing UP or DOWN.
When you reach the unit you want, press SET again. Available units are MILES , KM
(kilometers) and NAUTIC M (nautical miles).
7.1-2 SPEED UNIT
Select unit for distance -- KM/H, M/S (meters/second), KNOTS or MILES/H.
7.1-3 TEMP UNIT
Select unit for temperature -- CELSIUS, or FAHRENHE (Fahrenheit).
7.1-4 PRESSURE UNIT
Select unit for air pressure -- HPA (hectoPascal), IN HG (inches of mercury), MM HG
(millimeters of mercury) and MBAR (millibar).
7.1-5 ALTITUDE UNIT
Select unit for the altitude -- METERS and FEET.
7.1-6 PRESSURE CALIBRATION
Use this setting to adjust the offset of the pressure sensor. The pressure sensor in the
Multi-Navigator is highly sensitive and can detect pressure changes down to 0.1 millibar
(height differences less than 1 meter). However, the sensor might have a small offset
from a barometric pressure value of an extremely accurate pressure sensor (i.e. weather
station reading). For very accurate pressure readings adjust the Multi-Navigator
pressure sensor offset until the Multi-Navigator displays the same value as the more
accurate local sensor.
7.1-7 NORTH REFERENCE
Select a desired North reference -- TRUE NORTH, MAGNETIC NORTH or GRID NORTH.
The default is true North since maps typically use true North as a reference. Meridians
are directed towards the Geographic North pole. If your map uses true North as a
reference, select TRUE NORTH.
A few maps use magnetic North as reference, where meridians are directed towards the
Magnetic North pole. If your map uses magnetic North as a reference, select MAGNETIC
NORTH.
6
On maps with grid systems there might be a need for using the grid north lines as North
reference. Select GRID NORTH if required.
WPT
Read more about reference systems in section 9.
7.1-8 SHOW XTE (Cross Track Error)
XTE is the distance traveled off of the intended direction of travel
(Fig. 13). Press YES, in XTE setting, to view Cross Track Error, in
the GPS navigation function. XTE is useful for times when you want
to leave the original course and need to get back on course again.
XT
E
You
START
Figure 13
7.1-9 DEGREES/MILS/GON
Default setting for the TrueMagnetic compass is 360 degrees.
Military forces, NATO and others use 6400 MILS. The Swedish army uses 6300 mils.
Select the graduation you wish to use, DEGREES (360), MILS 640 (6400), MILS 630
(6300), MILS 600 (6000) or 400 GON (400).
7.1-10 SOFTWARE VERSION
View the software version and the number of your Multi-Navigator.
7.1-11 DELETE ALL WPTS
This function deletes the ENTIRE waypoint memory, plus ALL stored routes! Do not
enter, unless you want to delete all stored waypoints!
7.1-12 LANGUAGE
To change the language used by the Multi-Navigator press SET, and the display shows
the current language. Scroll through the languages using the UP/DOWN button. Select
the language of choice by pressing SET. Exit the language setting by pressing ESC.
7.2 -- POSITION SIDE FUNCTIONS & SETTINGS
7.2-1 SIDE FUNCTIONS
There are 2 side functions related to the Position function. (Fig. 14)
These are reached while pressing LEFT or RIGHT while in the POSITION function.
POSITION
Main Function
GPS ELEV
Side Function
SATELLITE STATUS
Side Function
Figure 14
GPS ELEV Side Function
This is the elevation calculated by the GPS receiver, normally accurate to within 15
meters (49 feet). The graphic indicator shows rate of ascent/descent (each segment
indicates a rate of 1 meter/second).
SATELLITE STATUS Side Function
ACQUIRE indicates unit is collecting satellite data, but has not yet determined a position.
3D NAV or 2D NAV indicates the GPS receiver has determined your position. If GPS OFF
is shown, the GPS receiver has been shut off.
7
Additionally the number of satellites being tracked and the signal level are shown.
Signal level varies between 1 & 9, 9 being the strongest signal.
7.2-2 SETTINGS
There are four settings related to the Position function. Press SET while in the
POSITION function to access the settings. Use UP or DOWN to scroll.
TURN ON / OFF GPS Receiver Setting
This setting allows you to power the GPS receiver on or off (not the entire MultiNavigator), providing you with longer battery life. When using the Multi-Navigator
indoors for pre-planning a trip, or when using the TrueMagnetic Compass over long
distances between waypoints, turn the GPS receiver off.
POSITION FORMAT & MAP DATUM Setting
Select either latitude/longitude or a grid reference system, depending on the reference
system of your map. After choosing the position format you are prompted to select 1 of
over 107 map datums. The default map datum is WGS-84. If you do not know the datum
of the map, use WGS-84. If the map datum is indicated, you should select the same
datum the map is based upon. On USGS Topographic maps, the map datum is indicated
in the lower left-hand corner.
Note! If the wrong datum is selected there is a risk that the position shown on the MultiNavigator will not correspond with the actual position on the map. When
translating coordinates to/from the Multi-Navigator the map datum setting must
correspond with the map you are using.
GPS ELEV OFFSET Setting
The GPS elevation from the GPS system is not always accurate. If the GPS ELEV display
(Fig. 13) is deviating from a known altitude, correct the GPS elevation in this setting.
MORE SETTINGS
Previously described in section 7.1.
7.3 -- ALTITUDE SIDE FUNCTIONS & SETTINGS
7.3-1 SIDE FUNCTIONS
There is one side function related
to the Altitude function. (Fig. 15)
ALTITUDE Function
The altimeter uses a highly
accurate barometric pressure
based altimeter. Immediately after
calibration, it provides altitude
readings, with accuracies to 3 feet
(1 m). See section 7.3-2 & 7.4-2,
to calibrate the altimeter and
pressure sensor.
Altitude
Main Function
MIN / MAX
Side Function
Figure 15
Since altimeter calculations are based on the barometric pressure, you will find that
changes in weather will affect the altitude values. Therefore, it is recommended that you
calibrate the altimeter often to achieve the highest possible accuracy.
MIN / MAX Side Function
The minimum and maximum altitudes visited since altitude was last reset are displayed.
8
7.3-2 SETTINGS
Press SET while in the ALTITUDE function to enter the SETTINGS menu.
There are five settings related to the Altitude function.
SET REF ALT Setting
Press YES to set your current altitude as a base reference altitude. The altitude display
will show how many feet (meters) you have gained or lost relative to the reference
altitude. After a reference altitude is set, altitude is shown in the display with a small
triangle to the left. To reset back to an altitude display, you must EDIT REF ALT as
described below.
EDIT REF ALT Setting
Manually set a reference altitude. Set the REF ALT to zero if you want true altitude (sea
level) to be used as a reference altitude.
CALIB ALTITUDE Setting
To calibrate the altimeter press YES. Enter your known altitude above sea-level. Notice
the pressure value, below, changes as well.
If you don’t know your altitude, but know the local pressure from a reliable source adjust
altitude up or down until the pressure corresponds with their readings.
If you do not have access to a known altitude or known pressure use the GPS ELEVATION
side function as your calibration altitude, section 7.2-1 until you can find your known
altitude from a map or other means.
The altimeter needs to be calibrated periodically to achieve accurate readings.
RESET MIN/MAX Setting
This setting allows you to reset the minimum and maximum altitude values.
MORE SETTINGS
Described in section 7.1.
7.4 -- BAROMETER SIDE FUNCTIONS & SETTINGS
7.4-1 SIDE FUNCTIONS
There is one side function related
to the Barometer function (Fig. 16).
FORECAST Side Function
This function provides a weather
forecast for the next 12 hours with
five possible displays: SUNNY,
PARTLY CLOUDY, CLOUDY, RAIN
or STORM WARNING.
Note! -- The Multi-NavigatorTM
should be in the same location for
at least 6 hours to provide a more
accurate weather forecast.
Barometer
Main Function
Forecast
Side Function
Figure 16
7.4-2 SETTINGS
There are three settings related to the BARO function.
Access the settings by pressing SET while in the BARO function. Scroll through
the settings, by pressing UP or DOWN.
9
BARO HISTORY Setting (Fig. 17)
Press YES to display the pressure history.
1. The length of pressure history displayed.
2. The total change from the current pressure.
3. The pressure recorded at the length of time
indicated on top.
1.
2.
Press UP or DOWN to change the length of history
displayed ranging from 0 to 36 hours.
3.
To exit press ESC.
Figure 17
BARO ALT CORR Setting
Press YES to adjust the Barometer / Altimeter correction value. Enter the known altitude
at your location for the barometer readings to be adjusted as if you were at sea level. Or
enter a reference altitude of 0 feet for a true air pressure to be shown.
For reference:
8 meters (25 feet) in altitude corresponds to a change of one 1 mbar (0.03 in Hg).
Average air pressure at sea level is 1013 mbar.
MORE SETTINGS
Described in section 7.1.
7.5 -- TIME / DATE SIDE FUNCTIONS & SETTINGS
7.5-1 SIDE FUNCTIONS
There are two side functions related to the TIME / DATE function (Fig. 18).
TIME / DATE
Main Function
SUNSET
Side Function
SUNRISE
Side Function
Figure 18
SUNSET Side Function
Displays the time of sunset at the present received position. To check the sunset of a
previously stored waypoint press SET to open the SELECT WAYPOINT option and YES to
confirm. Scroll through stored waypoints using UP and DOWN. Press YES to select the
desired waypoint. The SUNSET at that location will be displayed.
SUNRISE Side Function
Displays the time of the sunrise at the selected location. If no waypoint was selected in
the previous SUNSET side function, the sunrise time at your present position is shown. If
you want to check the sunrise at ay other stored waypoint follow procedure mentioned
above. Press RIGHT to return to the TIME / DATE function.
10
7.5-2 SETTINGS
There are three settings related to the Time / Date function.
Access the settings by pressing SET while in the TIME / DATE function.
Scroll through the settings, by pressing UP or DOWN.
12/24 HOURS Setting
Select the time format you would like the time to be displayed -- 12 or 24 hour format.
SET TIMEZONE Setting
The Multi-Navigator will calculate the timezone automatically using satellites, but it does
not take into account for changes in Daylight Savings Time.
It is possible compensate for Daylight Savings time by manually setting your local
timezone pressing UP or DOWN. Use the Universal Time Constant (UTC), enter a
positive value (in 30 minute intervals) for locations East and a negative value for
locations West of the Prime Meridian (0o Longitude).
Use the following to help determine the values for your local time zone.
Eastern Daylight Savings Time (DST): -4.00
Central DST: -5.00
Mountain DST: -6.00
Pacific DST: -7.00
Alaska DST: -8.00
Hawaii DST: -9.00
Eastern Standard Time (ST): -5.00
Central ST: -6.00
Mountain ST: -7.00
Pacific ST: -8.00
Alaska ST: -9.00
Hawaii ST: -10.00
MORE SETTINGS
Previously described in section 7.1.
7.6 -- GPS SIDE FUNCTIONS & SETTINGS
7.6-1 SIDE FUNCTIONS
There is one side function related
to the GPS Navigation function.
This will appear differently
depending on the waypoints
selected.
1. When no waypoint or
*HOME* is selected the
direction and speed of your
travel is displayed. (Fig. 19)
The segment indicates North.
ONLY When
Waypoint
or
HOME
is selected
GPS
Main Function
Figure 19
Navigation
Side Function
2. When a GOTO waypoint is
selected the waypoint name is
indicated on top of the screen with the bearing and distance
below. (Fig. 20) Waypoint name will cycle with time to go
(TTG) and Cross Track Error (XTE), if you have selected to
display Cross Track Error in section 7.1-8.
The segment and steering arrows will point towards the
selected waypoint. Figure 20 indicates that MOUNTAIN is
directly behind you. The steering indicator, direction and
speed of travel will be displayed if you are moving.
To CANCEL the GOTO waypoint see section 7.7-2.
11
Figure 20
3. When *HOME* is selected in the StraightHome function, BACK
is displayed just above *HOME*. (Fig. 21) Bearing, distance,
course and speed will also be shown. Figure 21 indicates
*HOME* is straight in front of you.
You must be moving for course and speed to be displayed.
IMPORTANT! When a GOTO waypoint is selected press LEFT or
RIGHT to scroll between the selected GOTO
waypoint and *HOME*.
Figure 21
7.6-2 SETTINGS
There are six possible settings related to the GPS function.
Access the settings by pressing SET while in the GPS function. Scroll through the
settings, by pressing UP or DOWN.
GOTO WAYPOINT Setting
To select a waypoint to navigate towards press YES. Use UP and DOWN to scroll
through waypoints in alphabetical order starting with the waypoint last entered. Confirm
by pressing YES. GOTO NAV STARTED will be displayed, and Multi-Navigator will return
to GPS function.
It is also possible to search by name. Press RIGHT. The first letter will flash. Use UP and
DOWN to select the appropriate letter. Press RIGHT to move to the next letter. When
desired waypoint is displayed press YES to confirm.
ODOMETER / MAX SPD Setting
Press YES to display the maximum speed and total distance traveled recorded. To reset
these values press SET, and confirm by pressing YES. Press ESC / NO to exit.
CANCEL GOTO or DELETE *HOME* Setting
This function is available only when a GOTO waypoint or a *HOME* position has been
stored and no route is active. Press YES to delete *HOME* or cancel GOTO.
WARNING! *HOME* cannot be recovered once it has been deleted.
CANCEL ROUTE Setting
This function is available only when a route has been stored and activated. To
cancel the current route press SET. Reactivate the route or select a new route in the
Route menu, section 8.2.
GOTO LEG Setting
This function is available only when a route has been stored and activated, section
8.2. In this function it is possible to manually select a leg to travel towards. The display
will show the leg closest to your current position. If you wish to navigate using another
leg press scroll to the leg with UP and DOWN. When desired leg is displayed press SET.
MORE SETTINGS
Described in section 7.1.
7.7 -- COMPASS SIDE FUNCTIONS & SETTINGS
Press the dedicated COMPASS button in any other function to view the
TrueMagnetic compass. This internal electronic compass will provide
directions without moving. A standard GPS unit does not have this function,
and requires motion and excess battery usage for any directional navigation.
12
The Multi-Navigator also has the unique feature that allows access to the TrueMagnetic
COMPASS when the unit is off. Simply press and hold the COMPASS button.
7.7-1 SIDE FUNCTIONS
There is one side function related
to the compass function. This will
appear differently depending on
the waypoints selected. (Fig. 22)
1. When no waypoint or *HOME*
is selected there will be no
side function. The compass
main function works as a normal
magnetic compass. The
segment points North. The
bearing, distance and a
cardinal direction (SSW -- South
Southwest) are also displayed.
2. When a GOTO waypoint is
selected it is indicated at the
top of the Compass Navigation
screen with the bearing and
the cardinal direction below.
(Fig. 23). The segment points
towards the GOTO waypoint. In
Figure 23 the MOUNTAIN
waypoint is to the left at a
distance of 3.417 miles.
ONLY When
Waypoint
or
HOME
is selected
COMPASS
Main Function
Figure 22
Figure 23
Navigation
Side Function
Figure 24
A normal magnetic compass can be accessed as a side function
using LEFT or RIGHT.
3. When *HOME* is selected in the StraightHome function BACK is displayed just
above *HOME* (Fig. 24) Bearing, distance and cardinal direction will also be shown.
Figure 24 indicates HOME is straight in front of you.
It is possible to scroll between a selected GOTO waypoint and *HOME* by pressing
LEFT or RIGHT.
Note! The TrueMagnetic compass is accurate to +/- 2 degrees, provided it has been
calibrated and is held so that the bubble is centered.
7.7-2 SETTINGS
There are seven possible settings related to the TrueMagnetic compass function.
Access the settings by pressing SET while in the compass function.
Scroll through the settings, by pressing UP or DOWN.
GOTO WAYPOINT Setting
To select a waypoint to navigate towards press YES. Use UP and DOWN to scroll
through waypoints in alphabetical order starting with the waypoint last entered. Confirm
by pressing YES. GOTO NAV STARTED will be displayed, and Multi-Navigator will return
to the TrueMagnetic compass function.
It is also possible to search by name. Press RIGHT. The first letter will flash. Use UP and
DOWN to select the appropriate letter. Press RIGHT to move to the next letter. When
desired waypoint is displayed press YES to confirm.
13
MAGNETIC VAR Setting
Magnetic variation (declination) is the angle difference at your
location between true geographic North and magnetic North
(the direction all magnetic compasses point). It is important to
note magnetic declination at your position, since magnetic
declination varies and fluctuates slowly at different rates around
the world. Most maps use geographic North as a reference and
a magnetic compass points at magnetic North. It is therefore
Figure 25
necessary to adjust the compass so the bearings correspond
with the map. Figure 25 shows magnetic declination from a
USGS topographic map. Available settings are MAN (manual) and AUTO (automatic).
The Multi-Navigator has a built-in model to calculate the local magnetic declination
automatically from the GPS position. If you are at all are unsure of the value of the
magnetic variation we recommend you to select AUTO. If you select manual entry (MAN)
you must enter the amount of declination in degrees and select either East or West.
DEVIATE COMPASS Setting
Press YES to auto deviate (calibrate) the TrueMagnetic Compass. See section 1.4 for
instructions. It is recommended that the compass be calibrated after battery installation to
obtain accuracies to +/- 2 degrees.
CANCEL GOTO or DELETE *HOME* Setting
This function is available only when a GOTO waypoint or a *HOME* position has been
stored and no route is active. Press YES to delete *HOME* or cancel GOTO.
WARNING! *HOME* cannot be recovered once it has been deleted.
CANCEL ROUTE Setting
This function is available only when a route has been stored and activated. To
cancel the current route press SET. Reactivate the route or select a new route in the
Route menu, section 8.2.
GOTO LEG Setting
This function is available only when a route has been stored and activated, section
8.2. In this function it is possible to manually select a leg to travel towards. The display
will show the leg closest to your current position. If you wish to navigate using another
leg press scroll to the leg with UP and DOWN. When desired leg is displayed press SET.
MORE SETTINGS
Described in section 7.1.
8 -- WAYPOINT Function
Press the dedicated WPT button in any function to enter all the settings and
menus related to waypoints and routes.
8.1 WAYPOINT MENU
There are eight menu options in the WAYPOINT function.
STORE POSITION
Press YES to store your current position as a waypoint (Fig. 26).
Enter the desired name using UP and DOWN to scroll through
each character option. Press LEFT and RIGHT to change the
cursor position. Press SET when finished to store the new
waypoint into memory. Press ESC at any time to exit without
saving the waypoint.
14
Figure 26
GOTO WAYPOINT
To select a waypoint to navigate towards press YES. Use UP and DOWN to scroll
through waypoints in alphabetical order starting with the waypoint last entered. Confirm
by pressing YES. GOTO NAV STARTED will be displayed, and Multi-Navigator will return
to POSITION function.
It is also possible to search by name. Press RIGHT. The first letter will flash. Use UP and
DOWN to select the appropriate letter. Press RIGHT to move to the next letter. When
desired waypoint is displayed press YES to confirm.
MAGNIPOINTERTM
The MagniPointer enables you to create a waypoint using the built-in TrueMagnetic
compass.
1. Press YES to enter the setting. The current compass direction will be displayed.
2. Orient the Multi-Navigator to the direction or known bearing of the desired waypoint
and press SET to store the bearing.
3. Use UP and DOWN, LEFT and RIGHT to set the estimated distance to the waypoint.
Press SET to store the distance.
4. Enter the desired waypoint name and press SET when complete.
Note! Use The MagniPointer only when you do not have positioning information for
the waypoint you want to create. It is always preferable and more accurate to
enter a waypoint by its coordinates from a map.
NEW WAYPOINT
Manually enter a new waypoint into memory using this setting.
1. Press YES to enter. Your last position is displayed.
2. Adjust the coordinate using the UP and DOWN, LEFT and RIGHT buttons.
3. When desired coordinate is displayed press SET to store position.
4. Adjust the altitude and press SET.
5. Enter the desired waypoint name and press SET when complete.
EDIT WAYPOINT
Press YES to edit any aspect of previously stored waypoints.
1. Press UP or DOWN to scroll through the waypoints to the waypoint you want to edit.
Direction indications will be displayed for each waypoint.
2. Press YES when desired waypoint is displayed.
3. Adjust the coordinate using the UP and DOWN, LEFT and RIGHT buttons.
4. When desired coordinate is displayed press SET to store position.
5. Adjust the altitude and press SET.
6. Enter the desired waypoint name and press SET when complete.
! If you do not want to change any of the options press SET to move to next option.
VIEW WAYPOINT
View information on the waypoints in memory by pressing YES.
1. Use UP and DOWN to scroll through stored waypoints.
2. Press RIGHT or LEFT to view bearing and distance to the waypoint, time and date
of creation and its altitude.
3. Press ESC to exit viewing.
DELETE WAYPOINT
This setting is used to delete a waypoint from the memory. Scroll through the waypoints
using UP and DOWN. Press YES to delete.
WARNING! A waypoint cannot be recalled once it has been deleted.
15
ROUTE MENU Setting (See section 8-2)
The ROUTE MENU is the sub-menu used to store and manage routes in the MultiNavigator. A route is any number of legs connected together. A leg is any two waypoints
connected together. It is possible to store up to 10 routes with 100 waypoints each.
When navigating a route, the Multi-Navigator automatically shifts to the next leg in the
route when you are in line with the leg you were previously traveling. It is not necessary
to manually change to the next leg. It is also possible to reverse a route to return to the
starting point.
8.2 ROUTE MENU
Press YES to enter the ROUTE MENU (Fig. 27).
Use UP and DOWN to scroll through the five menu options.
NEW ROUTE
Note! Several waypoints must be stored before a route can be
created.
1. Press YES to create a route. The ADD WAYPOINT screen will
be displayed.
Figure 27
2. Press YES and scroll to the desired waypoint using UP and
DOWN , then press YES to select that waypoint.
! This is your start waypoint.
3. Repeat this procedure for each additional waypoint.
! The total distance of the route can be displayed by pressing RIGHT or LEFT.
Press button again to return.
4. When final destination waypoint is entered press NO at the ADD WAYPOINT screen.
The display will go back to NEW ROUTE.
ACTIVATE ROUTE
A route must be activated to begin route navigation.
Press YES to select the route you wish to activate.
1. Press UP and DOWN to scroll through the stored routes. Select by pressing YES.
2. Use UP and DOWN to select the direction to navigate the route.
! ACTIVATE FORWARD if you want to navigate the route the way it was stored
(from the start waypoint to the final destination).
! Or select ACTIVATE REVERSED if you want to navigate the route in the opposite
direction (from destination to start).
After activating a route the Multi-Navigator will detect your location on the route and
automatically place you into navigation on the closest leg from your current position.
EDIT ROUTE
Press YES to edit any part of a previously stored route, including adding a new final
destination waypoint, changing a start waypoint, or inserting a waypoint.
1. Search for a route using UP and DOWN. Select by pressing YES.
2. The first leg in the route appears. Scroll with UP and DOWN to find the leg you wish
to edit. Press YES to select.
3. Scroll through possible edit options with UP and DOWN.
! INSERT – inserts a waypoint in between the two waypoints in the leg.
! ADD – adds a new waypoint at the end of the route.
! REPLACE – replaces the target waypoint in the leg.
! REMOVE – removes the target waypoint in the leg.
4. Select the change you wish by pressing YES.
5. Press NO when all changes are complete to save and exit.
16
VIEW ROUTE
Use this function to view all waypoints and legs of a route.
1. Press YES to enter, scroll by pressing UP and DOWN.
2. Select desired route by pressing YES.
3. Leg one will be displayed with navigation information.
! To see the total route distance press RIGHT or LEFT.
4. Use UP and DOWN to scroll through each leg.
5. To exit press ESC.
DELETE ROUTE
Use this function to delete a desired route.
1. Press YES to use this function to delete a stored route.
2. Search for route by pressing UP or DOWN. Press
3. Press YES to delete displayed route.
Note! A route may not be deleted if activated. Use the GPS setting CANCEL ROUTE
(Section 7.72) to deactivate route before deleting. Also note that deletion of a
route does not include deleting the individual waypoints from the waypoint
memory.
9 -- Maps & Reference Systems
9.1 -- Latitude / Longitude
The most common way to describe a position
on Earth is to use the latitude & longitude (Lat/
Long) system. Lat/Long is a spherical
coordinate system measured from the Earth’s
center to locations on its surface. A position
on Earth is measured in degrees ( 0 ), minutes
( ‘ ) and seconds ( “ ). Latitude measurements
start at the Equator (00) and increase North &
South to the poles (900 N. & 900 S. Lat.).
Longitude measurements start at the Prime
Meridian (00) and increase East and West to
1800. (Fig. 28)
Figure 28
Lat/Long systems are displayed on most topographic maps, and are presented either in
degrees, minutes and hundreds of minutes, or in degrees, minutes and seconds.
9.2 -- UTM System
Another way to present a position on a map is by using a grid-system. The most common,
is the Universal Transverse Mercator (UTM) system. This system divides the Earth into
6-degree zones numbered from 01 to 60
(Fig. 29). Within every zone there is a gridsystem with coordinates, where Northings and
Eastings describe positions. Eastings always
increase right (East) & Northings always
increase up (North), on a map. When using
UTM coordinates to enter a waypoint into the
Multi-Navigator you must specify the zone of
the map since there are 60 places on Earth
with the same UTM coordinates. All USGS
topographic maps provide a zone number in
the margin. See how to use UTM grid
coordinate system in section 10.1-1.
Figure 29
Refer to Brunton’s Compass & Map Navigator book, 2nd edition, by Michael Hodgson for
further details on Latitude & Longitude and UTM coordinate systems.
17
9.3 -- Other Grid Systems
There are additional grid-systems available in different countries/areas. You will find
other systems including MGRS, UK grid, Finnish grid, Taiwan grid, New Zealand grid,
Swiss grid in section 7.2-2, POSITION FORMAT & MAP DATUM Setting.
10 -- Practical Navigation Example
10.1 -- Fishing Trip to Ice Lake
You are planning a trip to fish in Ice Lake. You have a topographic map of the area, and
will drive to the trailhead. Your plan is to store the vehicle as a *HOME* position and
navigate to the lake using your new Multi-Navigator. After fishing you would like to travel
back to the vehicle using the StraightHome feature.
10.1-1 Position of Ice Lake
Before you can use your Multi-Navigator to find Ice Lake you need to determine the
lake’s location. Since your map uses the UTM coordinate system, determine the position
of Ice Lake using the UTM tick marks on the map.
1. Connect like UTM markings with lines across the map. (Fig. 30)
2. Now, find the zone and map datum, in the map’s margin (zone 11 & NAD-27).
! Since the map is North of the Equator, label the zone -- N 11.
3. Next measuring the Eastings and Northings of your location.
! Start in the lower left-hand corner of the box surrounding the your location.
A. Measure in an Easterly direction until directly under your location.
! Approximately 600 meters to the right of 599000 mE.
! Therefore, the Easting coordinate is E599600.
B. Now, measure in a northerly direction.
! Your location is approximately 750 meters North of 4790000 mN.
! The Northing value is N4790750.
Figure 30
The position of Ice Lake is:
Zone N 11
Easting E599600
Northing N4790750
Map Datum NAD-27 (US)
Since, you do not need the GPS receiver on while planning your trip turn it off to save
battery life by pressing SET and then YES while in the POSITION function.
If you have not yet selected UTM / UPS as a Position Format follow the instruction below.
1. Press SET in the Position function to get to SETTINGS, and scroll to the POSITION
FORMAT setting using UP or DOWN.
2. Press SET and scroll until UTM / UPS is displayed and press SET.
3. Press YES again to select AUTO ZONE.
4. Now scroll through the map datums until your reach NAD-27 US and press SET.
All positions will now be shown in UTM / UPS format as on your map.
18
10.1-2 Recording Ice Lake as a Waypoint
Now that you know the location it is time to store it in your Multi-Navigator.
1. Press WPT and scroll UP until the display shows NEW WAYPOINT.
2. Press YES to set the coordinates of Ice Lake.
3. Adjust the zone number to N 11 and press SET.
4. Enter the Easting and Northing coordinates of Ice Lake using LEFT and RIGHT to
move the cursor and UP and DOWN to change each value.
! The digit adjacent to the E should always be 0.
! For Northing values continue pressing RIGHT until cursor is at the bottom row.
5. Press SET when complete.
6. Now enter the altitude of Ice Lake and press SET.
7. Enter the waypoint name as LAKE and press SET to complete.
8. LAKE is now stored as a waypoint and you are prompted to enter a new waypoint.
9. Press NO and the Multi-Navigator will return to the POSITION function.
10. Turn the unit off.
You are now ready to drive to the trailhead and head to Ice Lake.
10.1-3 Storing Your “HOME” Waypoint
After a the short drive to reach the trailhead, get out of your vehicle and power on your
Multi-Navigator. Once the Multi-Navigator has aquired your position you are
ready to store your *HOME* position at the vehicle.
1. Press and hold WPT until NEW HOME STORED appears.
10.1-4 Navigating to Lake
Now that *HOME* is recorded you are ready to activate the LAKE waypoint.
1. Scroll to the GPS function and press SET.
! GOTO WAYPOINT is displayed, press YES.
2. The first available waypoint is shown. Scroll until LAKE is displayed and press YES.
The bearing, distance, course and speed are now displayed in the GPS navigation
function. Since the GPS function will not work while standing still, it is preferable to use
the COMPASS function for checking the direction.
3. Press COMPASS and the Multi-Navigator points
you towards the LAKE waypoint (Fig. 31)
! Sight a landmark in the correct direction if you
cannot see Ice Lake.
! Remember, hold the Multi-Navigator level by centering the
bubble.
Now turn the Multi-Navigator off and get out thereTM.
10.1-5 Checking Direction to Ice Lake
When you reach the landmark you are ready to check the direction
again. With power still off press and hold the COMPASS button,
instantly activating the compass function. Using the pointers orient the
Multi-Navigator to the direction of Ice Lake. Sight another landmark in
that direction and release the COMPASS button. Continue your trip.
Figure 31
Note! When using the TrueMagnetic compass function with Multi-Navigator switched
off, the direction and distance to Ice Lake will be based on the last time the GPS
receiver was on. Remember, to get correct information based upon your current
position you need to switch GPS receiver on.
10.1-6 Correct Direction & Distance to Ice Lake
When you have walked for awhile and want an updated position using the GPS receiver
turn the Multi-Navigator on.
1. Once your position has been acquired press COMPASS.
! Distance and direction from your current position to Ice Lake is now updated.
2. Now sight another landmark along the updated course to Ice Lake.
19
3. Turn the Multi-Navigator off and repeat the procedures in 10.1-5 above until you
reach the lake.
10.1-7 At Ice Lake
You have arrived at Ice Lake. Easy, wasn’t it? Before you start fishing it is a good idea to
cancel the setting for navigating to the lake since you have already found the lake.
1. Press SET in either COMPASS or GPS functions to access SETTINGS.
2. Scroll until you reach CANCEL GOTO and Press YES. This will
3. Switch the Multi-Navigator off and start fishing!
10.1-8 Finding Your Way Back
When you have caught your limit and you want to start back for the
vehicle turn the Multi-Navigator on and wait for it to acquire your
position.
1. Press COMPASS and you will see BACK *HOME*
with the direction and distance. (Fig. 32)
2. Turn your body until you face the direction of your
vehicle, and start your trip back. Refer to sections
10.1-4 and 10.1-5 for navigation instructions.
10.1-9 Hints and Tips
Figure 32
The previous example is one way you can use the Multi-Navigator.
There are many other features you might want for use on your trips. You can, for
example:
! Check MIN / MAX altitude in the ALTITUDE function.
! Check barometric pressure and weather forecast in the BARO function.
! Store positions along your trip as waypoints, in the MARK WAYPOINT function.
! Check ODOMETER and MAX speed, to see how far and fast you have travelled.
! Connect a number of stored waypoints into a route in the ROUTE menu.
! Create new waypoints using the MagniPointer.
! Check your current position in the POSITION function.
! Check your current rate of ascent or descent in the ALTITUDE function.
As you see there are lots of possibilities, so use your imagination.
11 -- Maintenance & Fault Finding
11.1 -- Maintenance
Clean instrument with a mild soap solution.
DO NOT use detergents or high-pressure washing equipment.
11.2 -- Fault Finding
The Multi-Navigator Does Not Switch ON:
Check that you have inserted fresh batteries in the correct direction.
GPS Receiver Cannot Calculate Its Position:
Are you indoors? If so, go out on a fairly open spot and try again. If you are outdoors
check that you have a clear sky. This is especially important when starting the unit for the
first time, or if there has been a long period of time since last use.
Altimeter Displays Incorrect Values:
Calibrate your altimeter. The Altimeter is based on barometric pressure changes. Check
BARO function to monitor changes in barometric pressure.
Weather Forecast is Not Correct:
The weather forecast is based on the history and rate of change in air pressure. This
history is recorded even when the Multi-Navigator is off. It is advisable to have the MultiNavigator at a constant altitude for at least 6 hours before reading the weather forecast.
20
TrueMagnetic Compass is More Than 5 Degrees Off:
As any magnetic compass the TrueMagnetic compass is disturbed by magnetic fields.
Since the internal electronics and batteries can generate magnetic fields inside the MultiNavigator you must calibrate (autodeviate) the compass to compensate for these
disturbances. Calibrate it at least every time you change batteries.
After Calibrating the Compass it is Still off From North:
Check the local magnetic variation (declination) normally indicated on the map of your
area. If you are unsure of the magnetic variation select AUTO. The TrueMagnetic
compass function will calculate the size and direction of the magnetic variation needed
using the current GPS position. Also check to see if the meridians on your map are
referring to Geographic North, Magnetic North or the local grid system as the North
reference system. Select the North reference as the one used on your map.
12 -- Specifications
StormWatchTM Barometer
! Accuracy: +/- 1.5 mbar
! Current Pressure (Units: in Hg, mm Hg, mbar, hPa) - Displays Rising, Falling & Steady
! Barometric Pressure Range: 300 to 1100 mbar (9.00 to 33.00 in Hg)
! 36 hour pressure history
! 12 Hour Weather Forecast (SUNNY, PARTLY CLOUDY, CLOUDY, RAINY, STORMY)
! Logging performed when power is ON or OFF.
Altimeter
! Accuracy: to +/-1 meter (3 feet) - Immediately after calibration
! Altitude Range: -700 to +9200 m (-2,300 to + 30,000 ft.)
! Memory: Minimum & maximum altitude visited
! Displays rate of change
TrueMagneticTM Compass
! Accuracy: Up to +/- 2° with 1° resolution
! TrueMagnetic Compass: Automatically compensates for Earth’s local magnetic
declination and points you in the direction of a stored waypoint.
! MagniPointer Fast “point & press” waypoint creator.
! Extreme battery life -- See battery life specifications.
GPS Receiver
! 12-channel parallel receiver
! Position Update Rate: 1 time per second – When in continuous navigation mode.
! Accuracy: 15 meters 2D RMS. 1-5 meters 2D RMS with DGPS*
! Time To Fix: First Time - approximately 1-2 minutes
! Cold (no navigation for 4 hours) - approx. 30-45 seconds
! Warm (navigation the past 4 hours) - approx. 5-10 seconds
! Reacquisition (lost satellite reception) - approx. 0.1 seconds
! Differential GPS: Ready for differential corrections (RTCM-SC104)
! Antenna: Built-in Patch Antenna
* DGPS services are available in many countries. Accuracy will vary.
Navigation
! StraightHomeTM feature: Find your way back home, for the simplest navigation.
! Waypoints: 1,000 w/ 8-character name (stored w/ pressure based altitude)
! Routes: 10 Reversible Routes w/ 100 waypoints each
! Map Datums: 107
! Grid Systems: More than 10, including UTM, MGRS, Swiss, Australian, New Zealand,
Swedish and United Kingdom grid systems.
21
Data I/O
! NMEA 0183 - In / Out
! RTCM-SC104 (Differential GPS)
! Nexus PP
Battery Life
! Typical Compass Navigation: Up to 60 Days**
! Typical Compass & GPS Navigation: Up to 100 Hours***
! Continuous GPS Navigation: 10 Hours
** 15 seconds every 5th minute w/ continuous barometer logging.
*** GPS update every 30th minutes, compass use 15 seconds every 5th minute w/
continuous barometer logging.
Miscellaneous
! Optimum Operating Temperature Range: -25° to +70°C (-13° to +158°F)
! Waterproof: IP65 (submersible to 0.5 meters for 10 minutes)
! Display: 24 character, high-contrast, white, backlighted LCD.
! Keyboard: 9 Buttons - Backlit
! Internal Power: Qty. 2 AA batteries (LR6)
! External Power: 8 - 30 VDC
! Flash Memory: Upgrade Software with optional PC-Kit.
Dimensions
! 170 x 61 x 30 mm (6.7 x 2.4 x 1.2 inches)
! Display Size: 6.1 x 4.4 mm (2.4 x 1.7 inches)
! Weight (excluding batteries): 227 g (8.0 oz)
Optional Accessories
! PC-Kit: Including Global Map PlannerTM software and cable
! Adapter: 12 VDC Cigarette Lighter Adapter
! Mounting Bracket
13 -- Important Information / Warnings
Global Positioning System (GPS)
The Global Positioning System is owned and operated by the US Government, which is
responsible for its maintenance and functionality. The system is subject to changes that
can affect performance and accuracy of all GPS equipment. Currently the approximate
accuracy is better than 15 meters 2D RMS. The availability of GPS signals can be limited
in cities, deep valleys and other areas with obstacles blocking the sky.
Accuracy of Electronic Compass
The functionality of the electronic compass is dependent upon it being calibrated. The
electronic compass should be held level by centering the bubble. When calibrated and
level, accuracy of the compass will be up to +/- 2 degrees from true course.
Accuracy of Altimeter
The Altimeter function uses the built-in pressor sensor for calculations. Weather
changes detected by the barometer will effect the altitude calculated by the instrument.
The altimeter must be calibrated at least once a day to provide accurate readings.
Product Changes / Improvements
The Brunton Company reserves the right to change and improve the Multi-Navigator
without notice to any person or organization. Visit http://www.brunton.com, to find
supplementary information about this and other Brunton products.
22
APPENDICES
Glossary
Included below are words that are used quite frequently. Knowing the meaning of them
will make your navigation more fun, and the use of the Multi-Navigator even easier.
Global Positioning System (GPS) – GPS has more than 24 operating satellites around
the Earth. Each satellite provides the precise timing used by the GPS receiver in the
Multi-Navigator to calculate its position. At most your receiver can view twelve satellites at
any one time due to the location of the satellites relative to the Earth.
WAYPOINT – A position which is stored in memory. A waypoint is stored complete with
latitude, longitude, altitude (based an barometric pressure), time and date along with an
eight character name. Any waypoint can be used as a position to navigate towards.
LEG -- Any two waypoints connected together. Two or more legs can form a route.
ROUTE – A series of legs (up to 99) connected together.
ACQUISITION – When the GPS receiver is collecting satellite data, but has not yet
calculated a position.
TRACKING - When the GPS receiver collects satellite data, has calculated a position,
and is continuing to keep track of acquired satellites.
XTE (Cross Track Error) – The distance you have deviated from the original straight line
of travel when navigating to a waypoint. How far off course you are.
TTG (Time To Go) – The calculated time it will take you to reach the waypoint you are
navigating towards based on your current rate of travel.
BEARING – The direction to a selected waypoint from your current acquired position.
COURSE – The direction you are travelling.
DISCLAIMER
Common sense must be used at all times when navigating with any GPS receiver. The
manufacturer’s navigation equipment should only be considered as a navigational aide.
Please note that the manufacturers policy of continuous improvement may result in
changes to product specification without prior notice.
Appendix A1
BRUNTON, Limited FIVE Year Warranty
The Brunton Company warrants this product to be free of defects in materials
and workmanship, for a period of five years. This warranty extends to the
original purchaser for two years from the date of purchase.
This Warranty is void and a charge for repair will be made if:
1. The product has been damaged by negligence, accident or mishandling, or
has not been operated in accordance with standard operating procedures.
2. The product was altered or repaired by other than a Brunton repair facility, or
adaptations or accessories other than Brunton accessories have been
attached to this Brunton product.
This warranty gives you specific legal rights, and you also have rights which
vary from state to state. No other warranty, expressed or implied, applies to the
Brunton product, nor is any person or company authorized to assume any other
warranty for Brunton. Brunton does not assume any responsiblity for any
consequential damages occasioned by this product.
Should the product prove defective, contact the Brunton Company, and Brunton
will provide you with a Return Authorization Number. Send a copy of your
proof of purchase, the return authorization number, a short description of the
problem and the product to Brunton at the following address. Brunton suggests
insuring the product in case of damage or loss in shipment.
Warranty Repair
Brunton
620 East Monroe Avenue
Riverton, WY 82501-4997
(307) 856-6559
[email protected]
www.brunton.com
Detach and Return within 30 days of purchase
Multi-Navigator, 5 Year Warranty Registration
Name: ______________________________________________________________
Address: ___________________________________________________________
City: _______________________ State: ___________ Zip: ___________________
Phone: ______________________________________________________________
Date Purchased: _______________________ Store: ________________________
City: _______________________ State: ___________ Zip: ___________________
Amount Paid: ________________________________________________________
Do you own another Brunton Product?
( ) Yes. Product: _____________________________ ( ) No.
I decided to buy this product because of ...
( ) Recommendation
( ) Store Display
( ) Magazine
( ) Salesperson
( ) Catalog
( ) Newspaper
( ) Features
( ) Gift
This Multi-Navigator will be used for ...
( ) Geology
( ) Archelogy
( ) Mapping
( ) Forestry
( ) Hunting
( ) Backpacking
( ) Other: __________________
( ) Mining
( ) Camping
( ) Orienteering
Occupation: __________________________________________________________
B1
Main Function & Side Functions
START
POSITION
GPS
ELEV
GPS
GPS
TIME &
DATE
SUNSET
BARO
FORECAST
ALTITUDE
MIN /
MAX
SAT
STATUS
SUNRISE
COMPASS
COMPASS
C1
Dedicated Button Settings & Menus
GOTO
WAYPOINT
COMPASS
MAGNETIC
VAR
DEVIATE
COMPASS
STORE
POSITION
CANCEL
WPT / HM /
RT
GOTO
WAYPOINT
GOTO
LEG
MAGNIPOINTER
MORE
SETTINGS
NEW
WAYPOINT
NEW
ROUTE
EDIT
WAYPOINT
ACTIVATE
ROUTE
VIEW
WAYPOINT
EDIT
ROUTE
DELETE
WAYPOINT
POSITION
WHITE
VIEW
ROUTE
ROUTE
MENU
DELETE
ROUTE
A white rounded box indicates the option is available only
when a waypoint or route has been stored and activated.
C2
Main Function Settings
START
ON / OFF
GPS
POSITION
GPS
TIME &
DATE
GOTO
WAYPOINT
POSITON
FORMAT
ODOMETER
MAX SPD
GPS ELEV
OFFSET
CANCEL
WPT / HM /
RT
MORE
SETTINGS
12 / 24
HOUR
GOTO
LEG
SET
TIMEZONE
MORE
SETTINGS
MORE
SETTINGS
BARO
BARO
HISTORY
SET REF
ALT
BARO ALT
CORR
EDIT REF
ALT
MORE
SETTINGS
CALIB
ALTITUDE
ALTITUDE
RESET
MIN / MAX
WHITE
A white rounded box indicates the option is available
only when a waypoint or route has been stored and
activated.
C3
MORE
SETTINGS
Index
A
Activate Route - Waypoint 16
Altitude Function 4, 8
Altitude Unit Setting 6
B
Barometer Altitude Correction Setting - Barometer
Barometer Function 4
Barometer History Setting - Barometer 10
Battery Insertion 2
Buttons 1
On / Off 1
Compass 1
Up / Down 1
Left / Right 1
Waypoint (WPT) 1
Set / Esc (Yes / No) 1
C
Calibrate Altitude Setting - Altitude 9
Cancel Goto Setting - Compass 14
Cancel Goto Setting - GPS 12
Cancel Route Setting - Compass 14
Cancel Route Setting - GPS 12
Case - Interactive Neoprene 5
Compass Calibration 2
Compass Function (TrueMagnetic TM) 5
D
Degrees / Mils / Gon 7
Delete All Waypoints 7
Delete *Home* Setting - Compass 14
Delete *Home* Setting - GPS 12
Delete Route - Waypoint 17
Delete Waypoint - Waypoint 15
Deviate Compass Setting - Compass 14
Distance Unit Setting 6
E
Edit Reference Alttitude Setting - Altitude 9
Edit Route - Waypoint 16
Edit Waypoint - Waypoint 15
F
Fault Finding 20
Forecast Side Function - Barometer 9
G
Glossary Appendix A1
Goto Leg Setting - Compass 14
Goto Leg Setting - GPS 12
Goto Waypoint - Waypoint 15
Goto Waypoint Side Function - Compass 13
Goto Waypoint Side Function - GPS 11
D1
10
Index
G
Goto Waypoint Setting - Compass 13
Goto Waypoint Setting - GPS 12
GPS Elevation Offset Setting - Position
GPS Elevation Side Function 7
GPS Navigation Function 4
8
H-K Hints & Tips 20
*HOME*
Finding - Compass 3, 13, 20
Finding - GPS 12
Storing 2
Important Infomation / Warnings 22
L
Language Setting 7
Latitude / Longitude 17
M
Magnetic Variation (Declination) Setting - Compass 13
MagniPointer TM - Waypoint 15
Maintenance 20
Maps & Reference Systems 17
Min / Max Side Function - Altitude 8
More Settings 6
N
Navigation Example 18
New Route - Waypoint 16
New Waypoint - Waypoint 15
No Waypoint or *HOME* Side Function - Compass 13
North Reference Setting 6
O
Odometer Max Speed Setting - GPS 12
Operational Flow Chart Appendix C1 - C3
Other Grid Systems 17
P-Q Position Format & Map Datum Setting - Position 8
Position Function 3
Power On 2
Practical Navigation Example 18
At Ice Lake 20
Checking Direction to Ice Lake 19
Correct Distance & Direction to Ice Lake 19
Finding Your Way Back 20
Fishing Trip to Ice Lake 18
Hints and Tips 20
Navigating to Lake 19
Position of Ice Lake 18
Recording Ice Lake as a Waypoint 19
Storing Your *HOME* Position 19
Pressure Calibration Setting 6
Pressure Unit Setting 6
D2
Index
R
Reset Min / Max Setting - Altitude 9
Route Menu - Waypoint 16
S
Satellite Status Side Function 7
Set Reference Altitude Setting - Altitude 9
Software Version 7
Specifications 21
Speed Unit Setting 6
Store Position - Waypoint 14
StraightHome TM Function 2
Sunrise Side Function - Time / Date 10
Sunset Side Function - Time / Date 10
T
Temp Unit Setting 6
Time / Date Function 4
Time Zone Settings - Time / Date 11
Turn On / Off GPS Receiver Setting - Position 8
Time Format (12/24) Setting - Time / Date 11
U
UTM System 17
V
View Route - Waypoint 17
View Waypoint - Waypoint 15
W
Warranty Information Appendix B1
Waypoint Function 5, 14
Waypoint Menu 14
X-Z XTE (Cross Track Error) Setting
D3
7
Accessories
MNS-VEH
Allows attachment to most
vehicles using the basic RAM TM
mount, suction cups, or the
handle bar RAM mount.
MNS-DC
12 VDC External Power
Adapter. Attach to most
cigarette lighters.
MNS-CABLE
Cable with RS232, DB9
connector. Use to upload
the latest MNS firmware,
via www.brunton.com, or
use with compatible
mapping software.
Brunton Professional Instruments
Pocket Transits
Model
Needle / Graductions
5009
GEOQ, QUADS (4x90°
°)
5010
GEO, 0-360°
°
Model
Needle / Graductions
2001
Conventional, QUADS
2061
Conventional, 0-360°
°
5010GEO
5006LM
5 0 0 6 L M International, QUADS
5 0 0 5 L M International, 0-360°
°
Model
Needle / Graductions
5007
COM-PRO, International, QUADS
5008
COM-PRO, International, 0-360°
°
5008
SM 360LA
Sighting Compasses
Provides bearing, height, distance or
inclination to objects. Sturdy
anodized aluminum body. Available
with nylon or leather case.
SUM 360LA