1
Blue Chip User Guide
Last updated: October 2011
Health Communication Network
Blue
Guide
BlueChip
ChipTraining
Training
Guide
Page 2 of 193
Table of Contents
PATIENT RECORDS ............................................................................................................. 5
Opening an Existing Patient’s File ........................................................................................ 5
Other methods for searching for Existing Patients ............................................................ 7
File Numbers .................................................................................................................. 7
Medicare Number .......................................................................................................... 7
Date of Birth .................................................................................................................. 7
Invoice/Receipt .............................................................................................................. 7
Creating a New Patient File ................................................................................................... 8
The Patient Detail’s Screen .............................................................................................. 10
Residential/Postal Address........................................................................................... 11
Adding a New Suburb/Postcode .................................................................................. 11
Contact Numbers ......................................................................................................... 12
Comments .................................................................................................................... 12
First Visit Date ............................................................................................................. 12
Occupation & Email .................................................................................................... 12
Medicare/Veterans Affair Numbers ................................................................................. 12
To enter a Medicare number: ....................................................................................... 12
To enter a Veterans Affairs number: ........................................................................... 13
Online Patient Verification (OPV)................................................................................... 13
File Numbers .................................................................................................................... 13
Patient Notes ........................................................................................................................ 14
To view notes ............................................................................................................... 14
REFERRALS ......................................................................................................................... 15
Enter a New Referral ........................................................................................................... 17
MAKING AN APPOINTMENT .......................................................................................... 21
How to make an appointment for an existing patient with a current referral ...................... 21
How to make an appointment for an existing patient with an expired referral.................... 22
How to make an appointment for a new patient. ................................................................. 27
Double Book a Patient ..................................................................................................... 30
Appointment Comments .................................................................................................. 31
Recurring Appointments .................................................................................................. 33
Printing Appointment Reports (Lists) .................................................................................. 38
MODIFYING AN APPOINTMENT.................................................................................... 41
To Edit an Appointment using the Appointment Wizard .................................................... 41
Using the Appointment Book Button .............................................................................. 42
Using Find Slot Button .................................................................................................... 43
Changing the Appointment Date using the Calendar Control ......................................... 43
Changing the Appointment Time using the Time control ............................................... 44
Modifying the Appointment Type/Practitioner/Patient ................................................... 46
To Directly Edit an Appointment in the Appointment Book ............................................... 47
Moving an Appointment .................................................................................................. 47
Changing the Appointment Duration ............................................................................... 47
Finding an Appointment .................................................................................................. 48
Cancelling an Appointment ................................................................................................. 49
© 2011 Health Communication Network Limited.
Level 4, 201 Pacific Highway, St Leonards, NSW, 2065.
Customer Support: 1300 300 161 – Option 2
Blue
Guide
BlueChip
ChipTraining
Training
Guide
Page 3 of 193
Deleting an Appointment ..................................................................................................... 51
SETTING UP AUTOMATED SMS ..................................................................................... 53
CONFIGURING AUTOMATED SMS REMINDERS ...................................................... 57
CREATING ACCOUNTS..................................................................................................... 61
Creating a Private Patient Account ...................................................................................... 61
Entering Private Heath Fund Membership details ........................................................... 62
Creating Multiple Accounts for Single Patient ................................................................ 65
Creating a Third Party Account ....................................................................................... 69
Creating a new Medicare Australia Bulk Bill/DVA Account ......................................... 71
Entering a New Health Fund................................................................................................ 73
Parents Database .............................................................................................................. 74
Changing the Addressee for the Account ........................................................................ 76
Entering Account Contacts .............................................................................................. 77
Printing Labels ..................................................................................................................... 79
Deleting Accounts ................................................................................................................ 81
ESTIMATES .......................................................................................................................... 82
Create an Estimate for a Private Patient .............................................................................. 83
Create an Estimate for a Private Patient (known gap) ......................................................... 84
Create an Estimate for a Private Patient (standard gap) ...................................................... 85
INVOICING ........................................................................................................................... 87
Combined Invoice/Receipt................................................................................................... 87
Standalone Invoice ............................................................................................................... 92
Multiple Procedures – In rooms (outpatient) ....................................................................... 96
Hospital Services - Inpatient ................................................................................................ 97
RECEIPTS.............................................................................................................................. 99
Receipting a Pre-Existing Invoice ....................................................................................... 99
Receipting Multiple Patients .............................................................................................. 103
Part Payments..................................................................................................................... 107
Overpayments .................................................................................................................... 110
Alternatively .............................................................................................................. 112
Prepayments ....................................................................................................................... 113
Using a Prepayment ........................................................................................................... 114
Discounts............................................................................................................................ 116
ADJUSTMENTS .................................................................................................................. 119
Adjusting a Receipt ............................................................................................................ 119
Adjusting a Paid Invoice / Receipt..................................................................................... 122
Adjusting a standalone Invoice .......................................................................................... 128
REFUNDS & WRITE OFFS .............................................................................................. 131
Allocation Refund .............................................................................................................. 131
Credit Payment Refund ...................................................................................................... 137
Write Offs .......................................................................................................................... 140
MEDICARE AUSTRALIA / DVA ONLINE .................................................................... 142
Sending the Claim .............................................................................................................. 144
© 2011 Health Communication Network Limited.
Level 4, 201 Pacific Highway, St Leonards, NSW, 2065.
Customer Support: 1300 300 161 – Option 2
Blue
Guide
BlueChip
ChipTraining
Training
Guide
Page 4 of 193
Claim Status ................................................................................................................... 146
Receipting Claim Payments ............................................................................................... 147
ELECTRONIC PATIENT CLAIMING............................................................................ 151
Patient Claiming Scenarios ................................................................................................ 151
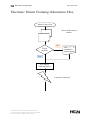
ELECTRONIC PATIENT CLAIMING INFORMATION FLOW................................ 153
Creating the Claim ............................................................................................................. 155
Receipting the Claim.......................................................................................................... 159
Handling Medicare Australia Rejections ........................................................................... 161
Medicare Australia Claim Status ....................................................................................... 166
RECALLS............................................................................................................................. 167
Creating recall templates: .................................................................................................. 167
Creating recall types: ......................................................................................................... 168
Assigning a patient to a recall from within the patient’s file ............................................. 169
Assigning a patient to a recall from the practice explorer ................................................. 171
Enacting a telephone based recall program ....................................................................... 174
Enacting a print based recall program ............................................................................... 175
CORRESPONDENCE ........................................................................................................ 178
Typing a Medical Report for a patient ............................................................................... 178
Select Deferred printing ............................................................................................. 179
Select Practitioner review .......................................................................................... 179
Saving Letters ................................................................................................................ 179
Printing Correspondence .................................................................................................... 179
To print directly from a Patient’s File............................................................................ 179
To print using Deferred Printing .................................................................................... 180
WP Review .................................................................................................................... 181
Click Print .................................................................................................................. 182
Click Cancel review ................................................................................................... 182
Click Defer print ........................................................................................................ 182
BANKING ............................................................................................................................ 183
EFTPOS ............................................................................................................................. 185
Account History ................................................................................................................. 186
View Receipt .............................................................................................................. 186
Print ............................................................................................................................ 186
Refunds .............................................................................................................................. 187
END OF DAY/SESSION PROCESS ................................................................................. 188
Day’s Appointment list (see Printing an Appointment List) ..................................... 188
Day Sheet ................................................................................................................... 189
What to do/Understand the Day Sheet ............................................................................... 189
Appointments ..................................................................................................................... 191
Printing an Appointment List......................................................................................... 191
© 2011 Health Communication Network Limited.
Level 4, 201 Pacific Highway, St Leonards, NSW, 2065.
Customer Support: 1300 300 161 – Option 2
Blue
Guide
BlueChip
ChipTraining
Training
Guide
Page 5 of 193
Patient Records
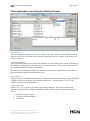
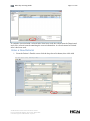
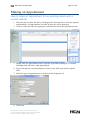
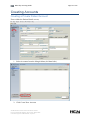
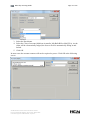
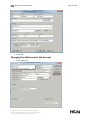
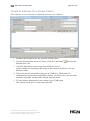
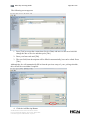
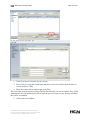
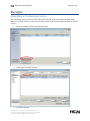
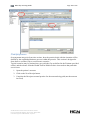
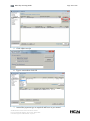
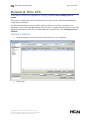
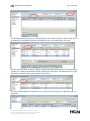
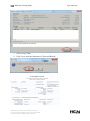
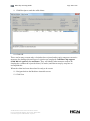
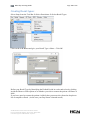
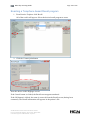
Opening an Existing Patient’s File
1. Select the Open Envelope Folder to Open
2. Type in the required surname in the Search For slot to check if the Patients’ details
have already been recorded. Alternatively, type a comma followed by the patient’s
given name (see over).
© 2011 Health Communication Network Limited.
Level 4, 201 Pacific Highway, St Leonards, NSW, 2065.
Customer Support: 1300 300 161 – Option 2
Blue
Guide
BlueChip
ChipTraining
Training
Guide
Page 6 of 193
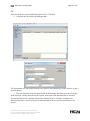
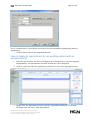
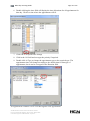
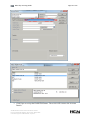
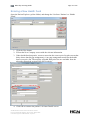
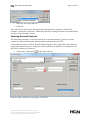
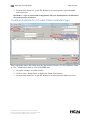
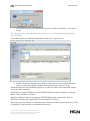
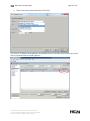
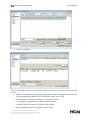
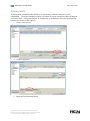
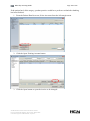
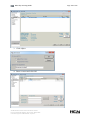
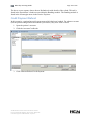
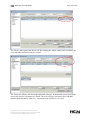
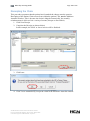
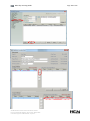
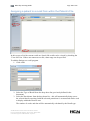
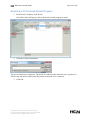
3. Left click to select the required patient (it will highlight blue). If a list of patients
results, click on the Open Button (see above) to open the patient’s file (see below).
© 2011 Health Communication Network Limited.
Level 4, 201 Pacific Highway, St Leonards, NSW, 2065.
Customer Support: 1300 300 161 – Option 2
Blue
Guide
BlueChip
ChipTraining
Training
Guide
Page 7 of 193
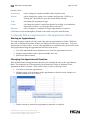
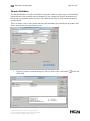
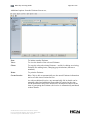
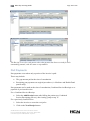
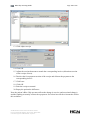
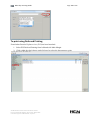
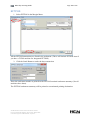
Other methods for searching for Existing Patients
File Numbers
You can search for a patient by File No. Click on the “By” and select the drop-down arrow
and select File No, click back in the search field and type the File number of the patient you
wish to search for.
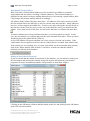
Medicare Number
Click on the drop-down arrow and select Medicare No, click back in the search field and type
the Medicare card number of the patient you wish to search for. You need to include spaces
to match the Medicare Number formatting.
This feature is particularly useful when you receive a Medicare cheque from someone who
has torn off the detailed information at the top.
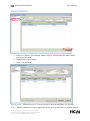
Date of Birth
You can search for a patient by their date of birth, select the drop down arrow and select Date
of Birth, click in the Search to enter the day/month/year. As an example, 3/3/1971 will
display all patients born on this date.
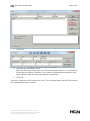
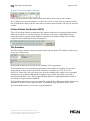
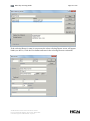
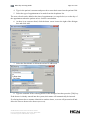
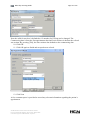
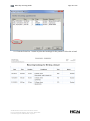
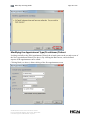
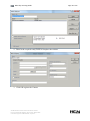
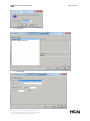
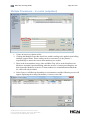
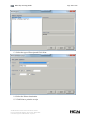
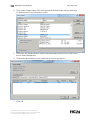
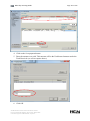
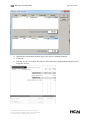
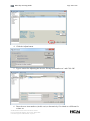
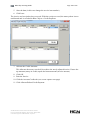
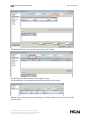
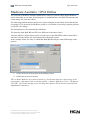
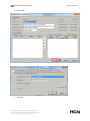
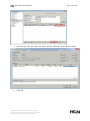
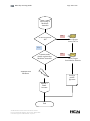
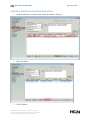
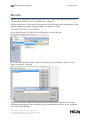
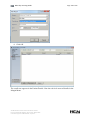
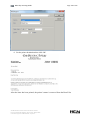
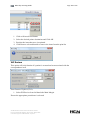
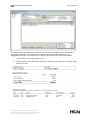
Invoice/Receipt
Hold [Ctrl] + [L] to bring up the following search dialog box. This can be useful when
insurance companies for example send cheques that quote the invoice but not the patient’s
name.
Click the required option
Type the reference number
Click Find
© 2011 Health Communication Network Limited.
Level 4, 201 Pacific Highway, St Leonards, NSW, 2065.
Customer Support: 1300 300 161 – Option 2
Blue
Guide
BlueChip
ChipTraining
Training
Guide
Page 8 of 193
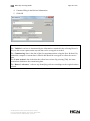
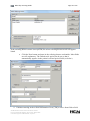
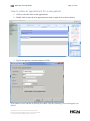
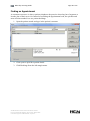
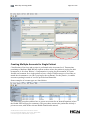
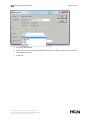
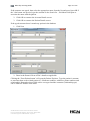
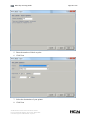
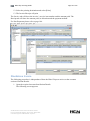
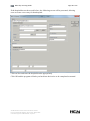
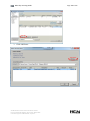
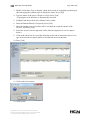
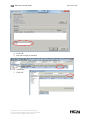
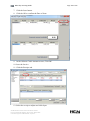
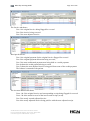
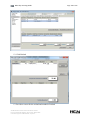
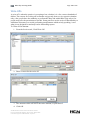
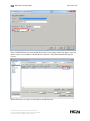
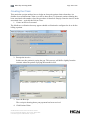
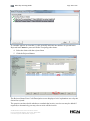
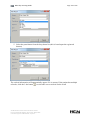
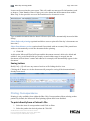
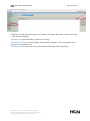
Creating a New Patient File
1. Click the Open Envelope folder
2. Type in the required surname to check if the Patients’ record already exits.
© 2011 Health Communication Network Limited.
Level 4, 201 Pacific Highway, St Leonards, NSW, 2065.
Customer Support: 1300 300 161 – Option 2
Blue
Guide
BlueChip
ChipTraining
Training
Guide
Page 9 of 193
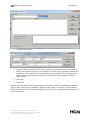
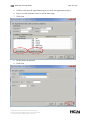
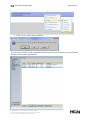
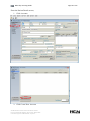
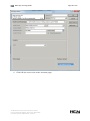
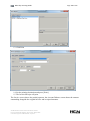
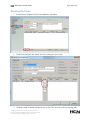
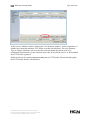
3. Click New
4. Complete the new patient screen.
Blue Chip will work with as little as a Given and Surname however it is advisable to
at least take the Patient’s Surname, Given Name and contact phone number(s) and
Date of Birth to help avoid creating duplicate patient files.
5. Click OK
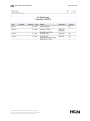
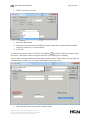
From this, a patient record is created (see over). The remaining details can be filled in when
the information becomes available.
© 2011 Health Communication Network Limited.
Level 4, 201 Pacific Highway, St Leonards, NSW, 2065.
Customer Support: 1300 300 161 – Option 2
Blue
Guide
BlueChip
ChipTraining
Training
Guide
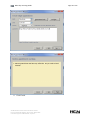
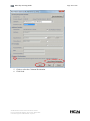
The Patient Detail’s Screen
© 2011 Health Communication Network Limited.
Level 4, 201 Pacific Highway, St Leonards, NSW, 2065.
Customer Support: 1300 300 161 – Option 2
Page 10 of 193
Blue
Guide
BlueChip
ChipTraining
Training
Guide
Page 11 of 193
Residential/Postal Address
Blue Chip allows for Residential addresses to be recorded as per Medicare Australia
requirements and also allows recording of Postal Addresses. The residential address is
defaulted as the patient’s primary mailing address however by entering a postal address, Blue
Chip changes the primary mailing address accordingly.
All Address fields in Blue Chip have three lines. All addresses will require an entry in both
the first and third lines (the third line is only for suburb, state and postcode). Many addresses
however, will not require the middle line – in these cases after entering the relevant details in
the first line, hit the [Tab] key twice to take you to the third line where you should enter the
suburb. If you look closely at this line, you will notice that there is a button with three dots.
A button with three dots always indicates that there is a list from which to choose. In this
case, the list contains every suburb and postcode in the Australia Post index. When you have
finished typing in the suburb hit the [Tab] key.
A list of all suburbs will appear and then one of two courses of action can be taken. If the
suburb name does not appear on the list, then it is likely that it is a suburb from another state.
If the suburb you are searching for is in a state from which you do not usually draw patients,
click in the “Show suburbs from all States” check box, to make sure that the suburb is
definitely not already in the database.
Adding a New Suburb/Postcode
If you are certain that the suburb is not already in the database, you can add it by clicking on
the New button and entering this suburb, along with its state and postcode (note that the
program will accept international suburbs with postcodes of more than 4 digits).
Clicking on the OK button will then add this suburb to the list, and clicking on the OK button
again will select this suburb.
© 2011 Health Communication Network Limited.
Level 4, 201 Pacific Highway, St Leonards, NSW, 2065.
Customer Support: 1300 300 161 – Option 2
Blue
Guide
BlueChip
ChipTraining
Training
Guide
Page 12 of 193
If the desired suburb does appear on the list, but you have not yet found a unique match, eg
you have typed Bondi, which finds multiple possible matches such Bondi, Bondi Beach, the
suburb dialog box will pop up with the first match (alphabetically) highlighted.
Simply use the down arrow on the keyboard or click on the scroll bar to find the suburb you
are after and click on the OK button once that suburb is highlighted. Again, this will move
your cursor to the Phone field.
The suburb postcode list can be updated for all states by downloading the file from the
Australia Post website in a .csv format. The Import button is used to import the file. Please
contact Support on 1300 300 161 Option 2 for help.
Contact Numbers
The phone numbers have probably already been entered for this patient, so you can tab
through to the next empty field and continue. If one or both phone number fields are empty
and you wish to fill those fields now, then type in the numbers and hit the [Tab] key to take
you to the next field. The Email field is optional and do not print on labels.
Comments
Next is the Comment field, designed as a quick reference field for any general information
regarding your patient. It is especially useful, as whatever comment is entered in this field
will appear in the Details Summary Box (patient information) displayed in the Open File
Dialog Box (Search screen).
First Visit Date
The First visit date field is used to record the date that the patient has/had their first
appointment with the practice.
Occupation & Email
These fields are optional. If the Email field appears on your screen, a patient’s email address
can be recorded there and used with correspondence. If the Occupation field appears on your
screen, you will notice it has a button with three dots on it (a list). This is a user defined list,
which is blank when used for the first time. After filling this field, hit the [Tab] key to move
your cursor to a radio button next to the word Medicare.
Medicare/Veterans Affair Numbers
To enter a Medicare number:
Press the [Tab] key and enter the number. A ‘Valid To’ date and Ref number will also need
to be entered. If a number is entered that does not fit the algorithm by which Medicare
numbers are created, then the number entered will disappear as you hit the [Tab] key to take
you to the next field.
© 2011 Health Communication Network Limited.
Level 4, 201 Pacific Highway, St Leonards, NSW, 2065.
Customer Support: 1300 300 161 – Option 2
Blue
Guide
BlueChip
ChipTraining
Training
Guide
Page 13 of 193
To enter a Veterans Affairs number:
Click with your mouse on the small, round, radio button next to the word Veterans
Press [Tab] key & enter the number, or when your cursor is in the form of a square around
the word Medicare button, hit the down arrow on the keyboard, hit the [Tab] key & enter the
number.
Online Patient Verification (OPV)
This will check the identity credentials of the patient at the practice against the data held by
Medicare Australia. To use this function, the practice will require a broadband internet
connection and be registered with Medicare Australia to do online billing; however Blue
Chip will work without this function being active.
File Numbers
The File numbers window appears just under the birth date panel. File number can be set up
in any one of three ways:
If file numbers have been turned off, File Number will be grayed out.
If file numbers are to be automatically generated, a file number will appear for each new
patient based on the criteria requested at setup time. Examples are 1234, EC1234 or
06031234. Blue Chip will not accept zeros as in the example 0001 whilst set for automatic
numbering. It is recommended that the length be kept as small as possible, especially if
interfacing with Blue Chip’s Day Surgery Module that has an eight alpha/numeric limit in
accordance with government standards.
If file numbers have been set up to be manually assigned, the field appears blank. Please note
that the File Number field is approximately 15 characters long and not the whole field.
Accounts and Referrals are covered in separate Modules.
© 2011 Health Communication Network Limited.
Level 4, 201 Pacific Highway, St Leonards, NSW, 2065.
Customer Support: 1300 300 161 – Option 2
Blue
Guide
BlueChip
ChipTraining
Training
Guide
Page 14 of 193
Patient Notes
The Notes module is a free-text area and is for secretaries to store general text information
related to a patient in their file. This module can be used to provide you with easily
accessible and current information, saving you the need to constantly refer to physical files.
The Notes module was designed with general information in mind, such as whether or not the
patient is/are a bad payer, or if they require an interpreter, or for information regarding test
results, etc.
To view notes
1. Click Notes in the Margin Menu of the desired patient’s file.
2. To add a note
3. Click Notes in the Margin Menu
4. Click Timestamp to enter the current date and time the note was entered (if
important).
5. Click in the Features Box and start typing.
6. Click on the Save button or [Ctrl] + [S]
You will notice that this action causes a red dot to appear next to the heading Notes, in the
Margin Menu. This is a visual cue for you to know that there is an entry in the patient’s
Notes module. Once you decide that this note is no longer relevant, use the mouse to select
the text you no longer need and delete it. If you delete some or all of the notes for a patient,
clicking on the Save tool button will prompt you to accept the changes (deletions).
© 2011 Health Communication Network Limited.
Level 4, 201 Pacific Highway, St Leonards, NSW, 2065.
Customer Support: 1300 300 161 – Option 2
Blue
Guide
BlueChip
ChipTraining
Training
Guide
Page 15 of 193
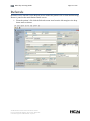
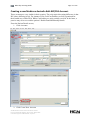
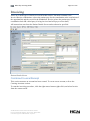
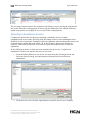
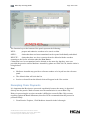
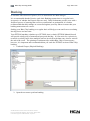
Referrals
Referrals can be entered via the Referrals screen within the patient’s file or from the Referring
Doctor’s panel on the main Patient Details screen.
1. From the patient’s file click the Referrals menu item from the left margin or the drop
down menu as shown.
© 2011 Health Communication Network Limited.
Level 4, 201 Pacific Highway, St Leonards, NSW, 2065.
Customer Support: 1300 300 161 – Option 2
Blue
Guide
BlueChip
ChipTraining
Training
Guide
Page 16 of 193
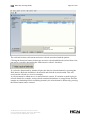
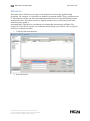
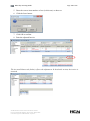
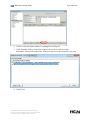
The referrals list shows all current and active referrals associated with the patient.
Clicking the deactivate button, deactivates an active referral and hides the referral from view,
but can be viewed by deselecting the ‘Hide inactive referral’ check box.
If a referral is deactivated by mistake, display the inactive referrals button (by ensuring the
Hide Inactive Referrals checkbox is deselected) and click the Activate button. This will
reactivate the referral (see over for example).
A referral cannot be edited once it is entered into the system. If a mistake is made keying in
referral details (for example, wrong referral commencement dates or wrong Doctor Provider
number in relationship to their consulting location), the referral must be Deleted (by pressing
the Delete button) and re-entered.
© 2011 Health Communication Network Limited.
Level 4, 201 Pacific Highway, St Leonards, NSW, 2065.
Customer Support: 1300 300 161 – Option 2
Blue
Guide
BlueChip
ChipTraining
Training
Guide
Page 17 of 193
If a mistake is noticed with a referral after it has been used, the referral must be Deactivated
and a New referral created containing the correct information. A referral cannot be Deleted
after it has been used.
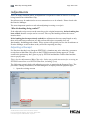
Enter a New Referral
1. From the Patient’s Details screen click the drop down list button, then click Add
© 2011 Health Communication Network Limited.
Level 4, 201 Pacific Highway, St Leonards, NSW, 2065.
Customer Support: 1300 300 161 – Option 2
Blue
Guide
BlueChip
ChipTraining
Training
Guide
Page 18 of 193
Or
From the Referrals screen within the Patient’s file, Click New
2. Complete the New Referral Dialogue Box
The Practitioner box allows the referral to be used for All practitioners in the practice or just a
specific Doctor.
3. Type the surname of the referring doctor in the dialogue box then press the [Tab] key.
If the doctor is already entered into the system, their name will automatically be inserted.
If referring Doctor has a surname identical to another Doctor, or Doctor consults from
different locations, a screen will present itself and allow the correct Doctor/location to be
chosen.
© 2011 Health Communication Network Limited.
Level 4, 201 Pacific Highway, St Leonards, NSW, 2065.
Customer Support: 1300 300 161 – Option 2
Blue
Guide
BlueChip
ChipTraining
Training
Guide
Page 19 of 193
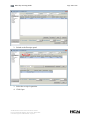
If the referring Doctor’s name is not present, the select referring Doctor screen will appear
blank (see above). Click the New button and enter in the referring Doctors credentials.
© 2011 Health Communication Network Limited.
Level 4, 201 Pacific Highway, St Leonards, NSW, 2065.
Customer Support: 1300 300 161 – Option 2
Blue
Guide
BlueChip
ChipTraining
Training
Guide
Page 20 of 193
4. Continue filling in the Referral information
5. Click OK
Note :
The ‘Valid for’ text box is determined by the information contained in the referring Doctor’s
file (see the screen capture under step 6b) but can be overtyped as needed.
The ‘Commencing’ date is the date of the first appointment date using the New Referral. By
default the computer s current date is filled in but should be overtyped to reflect the correct
data.
The ‘Letter written’ date is the date the referral was written. By pressing [Tab], the letter
written date defaults to the commencing date.
The ‘Doctor’s reference’ refers to any identifying reference markings on the original written
referral.
© 2011 Health Communication Network Limited.
Level 4, 201 Pacific Highway, St Leonards, NSW, 2065.
Customer Support: 1300 300 161 – Option 2
Blue
Guide
BlueChip
ChipTraining
Training
Guide
Page 21 of 193
Making an Appointment
How to make an appointment for an existing patient with a
current referral
1. Select the day and time. Do this by clicking on the Calendar tool to select the required
month and day. All appointments recorded for that day will be displayed.
2. Click in a time slot under the appropriate practitioner to select the Appointment time.
3. Double click the Appointment time to open the Appointment dialogue (or Wizard)
OR Right click and select ‘Add Appointment’.
4. Type in the patient’s surname and press [Tab] to enter their name into the patient
field.
5. Select the type of appointment to be made from the dropdown list.
6. Click Next
© 2011 Health Communication Network Limited.
Level 4, 201 Pacific Highway, St Leonards, NSW, 2065.
Customer Support: 1300 300 161 – Option 2
Blue
Guide
BlueChip
ChipTraining
Training
Guide
Page 22 of 193
A free comment space is provided to record any relevant information regarding the patient’s
appointment.
7. Click Finish to return to the Appointment book.
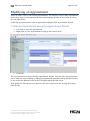
How to make an appointment for an existing patient with an
expired referral
1. Select the day and time. Do this by clicking on the Calendar tool to select the required
month and day. All appointments recorded for that day will be displayed.
2. Click in a time slot under the appropriate practitioner to select the Appointment time.
3. Double click the Appointment time to open the Appointment dialogue (or Wizard)
OR Right click and select ‘Add Appointment’.
© 2011 Health Communication Network Limited.
Level 4, 201 Pacific Highway, St Leonards, NSW, 2065.
Customer Support: 1300 300 161 – Option 2
Blue
Guide
BlueChip
ChipTraining
Training
Guide
Page 23 of 193
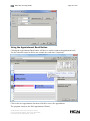
4. Type in the patient’s surname and press tab to enter their name into the patient field.
5. Select the type of appointment to be made from the dropdown list.
The new referral can be added at the time of appointment (see steps below) or on the day of
the appointment when the patient arrives for their consultation.
6. As there is no current referral, click the down arrow icon to the right of the dialogue
box and click Add
7. Select the Practitioner to whom the referral is addressed
8. Type the surname of the referring doctor in the dialogue box then press the [Tab] key.
If the doctor is already entered into the system, their name will automatically be inserted.
If referring doctor has a surname identical to another doctor, a screen will present itself and
allow the correct doctor to be chosen (see over).
© 2011 Health Communication Network Limited.
Level 4, 201 Pacific Highway, St Leonards, NSW, 2065.
Customer Support: 1300 300 161 – Option 2
Blue
Guide
BlueChip
ChipTraining
Training
Guide
Page 24 of 193
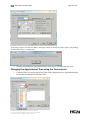
If the referring doctor’s name is not present, the select referring doctor screen will appear
blank.
a. Click the New button and enter in the referring doctors credentials. Most fields
are self explanatory. The Default refer period can be set so that it
automatically appears in the patient’s referral period field (see below)
9. Continue entering in the referral information. Press [Tab] to move from field to field.
© 2011 Health Communication Network Limited.
Level 4, 201 Pacific Highway, St Leonards, NSW, 2065.
Customer Support: 1300 300 161 – Option 2
Blue
Guide
BlueChip
ChipTraining
Training
Guide
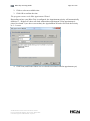
Page 25 of 193
Note the valid for text box is defaulted to 12 months (for GP) but can be changed. The
Commencing date is from the first appointment date and Letter Written is the date the referral
was written. By pressing [Tab], the letter written date defaults to the commencing date.
10. Click OK.
11. Click OK again to finish and accept the new referral.
12. Click Next
A free comment space is provided to record any relevant information regarding the patient’s
appointment.
© 2011 Health Communication Network Limited.
Level 4, 201 Pacific Highway, St Leonards, NSW, 2065.
Customer Support: 1300 300 161 – Option 2
Blue
Guide
BlueChip
ChipTraining
Training
Guide
13. Click Finish to return to the Appointment book.
© 2011 Health Communication Network Limited.
Level 4, 201 Pacific Highway, St Leonards, NSW, 2065.
Customer Support: 1300 300 161 – Option 2
Page 26 of 193
Blue
Guide
BlueChip
ChipTraining
Training
Guide
Page 27 of 193
How to make an appointment for a new patient.
1. Click to select the time for the appointment
2. Double click to start the new appointment wizard or right click (as shown below)
3. Type in the patient’s surname and press [Tab]
If the patient is new and has no patient file in Blue Chip the following screen will appear (see
below)
© 2011 Health Communication Network Limited.
Level 4, 201 Pacific Highway, St Leonards, NSW, 2065.
Customer Support: 1300 300 161 – Option 2
Blue
Guide
BlueChip
ChipTraining
Training
Guide
Page 28 of 193
4. Click the New button
5. Complete the New Patient screen. Note~ Only the given and surname fields must be
filled out to continue however it is essential to record a contact telephone number and
the patient’s date of birth (to avoid duplicate patient conflicts). The remaining fields
can be completed when the patient arrives at the practice and completes a Patient
Details form.
6. Click OK
7. Click Next
Record any relevant information regarding the appointment, such as reminding the patient to
bring in their referral and a reminder to staff to ask the patient to complete a patient details
form (either paper based or electronic in Blue Chip) by way of an Appointment comment (see
screen shot below).
© 2011 Health Communication Network Limited.
Level 4, 201 Pacific Highway, St Leonards, NSW, 2065.
Customer Support: 1300 300 161 – Option 2
Blue
Guide
BlueChip
ChipTraining
Training
Guide
8. Click Finish
© 2011 Health Communication Network Limited.
Level 4, 201 Pacific Highway, St Leonards, NSW, 2065.
Customer Support: 1300 300 161 – Option 2
Page 29 of 193
Blue
Guide
BlueChip
ChipTraining
Training
Guide
Page 30 of 193
Double Book a Patient
1. Navigate to the appointment time you wish to double book against
2. Double click at the end of the existing appointment (see where indicated in the screen
capture below)
3. Follow the appointment wizard for either a New patient or Existing patient as
described earlier. Just before finalising the appointment booking, this message may
appear (depending on how your version of Blue Chip is configured).
4. Click Back to amend the appointment priority (both appointments are trying to
occupy the same priority).
5. By clicking Finish, the New appointment will be given a lower priority than the
review being made here. To change this, click back and change this appointment’s
© 2011 Health Communication Network Limited.
Level 4, 201 Pacific Highway, St Leonards, NSW, 2065.
Customer Support: 1300 300 161 – Option 2
Blue
Guide
BlueChip
ChipTraining
Training
Guide
Page 31 of 193
priority to an unoccupied priority status (a number not marked with an asterix, see
next screen shot). To change the priority of an existing appointment, refer to
Modifying an Appointment.
6. Click Next
Appointment Comments
These are self explanatory; they allow information relevant to the patient and/or their
appointment to readily seen. Appointment comments can be recorded at the time of making
the appointment or added later (see Modifying an Appointment).
© 2011 Health Communication Network Limited.
Level 4, 201 Pacific Highway, St Leonards, NSW, 2065.
Customer Support: 1300 300 161 – Option 2
Blue
Guide
BlueChip
ChipTraining
Training
Guide
Page 32 of 193
When entering comments, the text will automatically wrap to the next line when typing. If
starting a new line is required, hold [Ctrl] and press [Enter] to force the cursor to start a new
line. Pressing Enter only at this point is the same as clicking the OK button and the
Appointment Wizard will exit.
The screen capture below shows an appointment with comment (the appointment is being
edited – see Modifying an Appointment). The term ‘blood work’ has been started on a new
line starting by present [Ctrl] + [Enter].
After entering in the comment, click Next and follow the appointment wizard to complete the
process to save the comment.
The space taken for each appointment type will determine how much of the comment will be
displayed on screen. To view the entire comment, hold the cursor over the appointment and
the appointment summary (see pop up box in the screen shot below) will display the entire
summary.
© 2011 Health Communication Network Limited.
Level 4, 201 Pacific Highway, St Leonards, NSW, 2065.
Customer Support: 1300 300 161 – Option 2
Blue
Guide
BlueChip
ChipTraining
Training
Guide
Page 33 of 193
Recurring Appointments
Should multiple appointments need to be made, start by ‘Making an Appointment’ for a new
or existing patient as described earlier.
1. Click to tick the Make multiple recurring appointments box (see above).
2. Click Next
3. Fill out the next screen as per required.
© 2011 Health Communication Network Limited.
Level 4, 201 Pacific Highway, St Leonards, NSW, 2065.
Customer Support: 1300 300 161 – Option 2
Blue
Guide
BlueChip
ChipTraining
Training
Guide
Page 34 of 193
The wizard will lock in the day (the day you are making the appointment in the appointment
book), but will allow modification of the appointment time. Remember that all appointments
will be initially set to the day and time of the first booking.
4. Click Next to confirm the appointments
The appointment spacing and times are set, however by clicking on the required cell, the date,
time, priority (col) and appointment type can be edited and comments can be recorded.
Double clicking the appointment date will allow the date to be varied. This will only affect
the select appointment not the group.
5. Click OK to accept the date change
© 2011 Health Communication Network Limited.
Level 4, 201 Pacific Highway, St Leonards, NSW, 2065.
Customer Support: 1300 300 161 – Option 2
Blue
Guide
BlueChip
ChipTraining
Training
Guide
Page 35 of 193
6. Double clicking the time field will display the time allocations for all appointment for
that day. Click in a time where the appointment will fit.
7. Click OK to accept the time change
8. Click in the Col field and overtype the priority if required.
9. Double click in Type to change the appointment type to the required type. The
appointment time will change according to the default time for that type of
appointment, but it can be overtyped in the Duration field.
An appointment comment can be recorded against each appointment.
© 2011 Health Communication Network Limited.
Level 4, 201 Pacific Highway, St Leonards, NSW, 2065.
Customer Support: 1300 300 161 – Option 2
Blue
Guide
BlueChip
ChipTraining
Training
Guide
Page 36 of 193
10. Click the Print List... button to print the bookings for the patient. Follow the wizard
© 2011 Health Communication Network Limited.
Level 4, 201 Pacific Highway, St Leonards, NSW, 2065.
Customer Support: 1300 300 161 – Option 2
Blue
Guide
BlueChip
ChipTraining
Training
Guide
The wizard returns to booking screen.
11. Click Finish to complete the wizard.
The patient’s appointments have been made.
© 2011 Health Communication Network Limited.
Level 4, 201 Pacific Highway, St Leonards, NSW, 2065.
Customer Support: 1300 300 161 – Option 2
Page 37 of 193
Blue
Guide
BlueChip
ChipTraining
Training
Guide
Printing Appointment Reports (Lists)
1. Forward to the required day using the Calendar control.
2. Click the printer icon, to bring up the reports screen.
3. Select the Appointment list for the required day.
4. Click to select an individual practitioner (or click All Practitioners).
© 2011 Health Communication Network Limited.
Level 4, 201 Pacific Highway, St Leonards, NSW, 2065.
Customer Support: 1300 300 161 – Option 2
Page 38 of 193
Blue
Guide
BlueChip
ChipTraining
Training
Guide
Page 39 of 193
5. Click to select specific appointment types (or click All Appointment types).
6. Type or use the calendar control to set the date range
7. Click Next
8. Set the printer destination
9. Click Next
© 2011 Health Communication Network Limited.
Level 4, 201 Pacific Highway, St Leonards, NSW, 2065.
Customer Support: 1300 300 161 – Option 2
Blue
Guide
BlueChip
ChipTraining
Training
Guide
© 2011 Health Communication Network Limited.
Level 4, 201 Pacific Highway, St Leonards, NSW, 2065.
Customer Support: 1300 300 161 – Option 2
Page 40 of 193
Blue
Guide
BlueChip
ChipTraining
Training
Guide
Page 41 of 193
Modifying an Appointment
There are many ways to edit existing appointments. The outlook version of the Appointment
book allows users to edit appointment times and durations directly on the screen as well as
the procedure below:
Following are instructions to edit an appointment using the Edit Appointment Wizard.
To Edit an Appointment using the Appointment Wizard
1. Left click to select the appointment
2. Right click over the appointment to bring up the context menu
3. Click Edit
The screen shot below shows the Edit Appointment Wizard. Here the date, time and priority
can be edited as well as adding or editing an appointment comment. Below will discuss how
to use each of the Buttons/Icons on the Edit Appointment Wizard screen.
If the details are already known in advance, the can be typed over the existing date and/or
time directly.
© 2011 Health Communication Network Limited.
Level 4, 201 Pacific Highway, St Leonards, NSW, 2065.
Customer Support: 1300 300 161 – Option 2
Blue
Guide
BlueChip
ChipTraining
Training
Guide
Page 42 of 193
Using the Appointment Book Button
Clicking the Appointment Book button will show a smaller windowed appointment book.
Use the calendar control to find a new suitable day (and time if required).
Click in the new appointment slot then click OK to move the appointment.
The program returns to the Edit Appointment Wizard.
© 2011 Health Communication Network Limited.
Level 4, 201 Pacific Highway, St Leonards, NSW, 2065.
Customer Support: 1300 300 161 – Option 2
Blue
Guide
BlueChip
ChipTraining
Training
Guide
Page 43 of 193
Using Find Slot Button
The Find Slot feature will only work if the practice has entered predetermined appointment
times into their plan. For example; a doctor may wish to see New patients on the hours and
Follow ups in the remaining time of the hour, post ops after lunch (see below)
1. Clicking the Find Slot button launches the Find Free Appointment Slot screen.
2. Click Search to display Available appointment times for that particular type of
appointment.
3. Clicking Next will display the next week of available appointments (dates depend on
the practitioner’s cycle)
4. Select your appointment slot by either clicking the dates and times on the left panel
and click OK or click on the time slot in the right hand panel and Click OK.
The program returns to the Edit Appointment Wizard
Changing the Appointment Date using the Calendar Control
1. Clicking the Calendar icon at the end of the date field will display a mini calendar.
This will show open sessions.
© 2011 Health Communication Network Limited.
Level 4, 201 Pacific Highway, St Leonards, NSW, 2065.
Customer Support: 1300 300 161 – Option 2
Blue
Guide
BlueChip
ChipTraining
Training
Guide
Page 44 of 193
If the time clashes with the new date a message similar to that below may appear (depending
on how Blue Chip is configured).
2. At this point change the appointment time (if the day is still required) See next
Changing the Appointment Time using the Time control
1. Click the Time icon at the end of the Time field to display the free appointment times
for the date as displayed in the date field.
© 2011 Health Communication Network Limited.
Level 4, 201 Pacific Highway, St Leonards, NSW, 2065.
Customer Support: 1300 300 161 – Option 2
Blue
Guide
BlueChip
ChipTraining
Training
Guide
Page 45 of 193
2. Click to select an available time
3. Click OK to confirm the time
The program returns to the Edit Appointment Wizard
Depending on how your Blue Chip is configured, the Appointment priority will automatically
default to 1 – Highest if it does not clash with another appointment. If the appointment is
placed in column 2 (see above screen shot), the Appointment Wizard will record the Priority
as 2 – Lowest.
4. Click Next (and Finish if there are no referrals associated with the appointment yet)
© 2011 Health Communication Network Limited.
Level 4, 201 Pacific Highway, St Leonards, NSW, 2065.
Customer Support: 1300 300 161 – Option 2
Blue
Guide
BlueChip
ChipTraining
Training
Guide
Page 46 of 193
Modifying the Appointment Type/Practitioner/Patient
Looking carefully at the Edit Appointment Wizard, the wizard opens on the second screen of
the New Appointment Wizard (see above). By clicking the Back arrow, earlier defined
aspects of the appointment can be edited.
Clicking Back (see above) allows editing of the first appointment screen
© 2011 Health Communication Network Limited.
Level 4, 201 Pacific Highway, St Leonards, NSW, 2065.
Customer Support: 1300 300 161 – Option 2
Blue
Guide
BlueChip
ChipTraining
Training
Guide
Page 47 of 193
On this screen:
Practitioner
can be changed to another available in the drop down list
Patient
can be changed by typing a new surname and press the {Tab] key or
clicking the 3 dot button to open the Search Patient facility.
Type
can change the Appointment type
Status
can change the patient’s status from booked to waiting, in consultation,
departed or no show (see Using the Diary in Session)
Duration
can be changed or extended if a longer appointment is required
Click Next to forward through the Wizard to the end to accept the modifications.
To Directly Edit an Appointment in the Appointment Book
Moving an Appointment
The drag and drop method will only work when moving appointments to either a different
time slot or different Practitioner if these are displayed on the screen at the time. (It is best
demonstrated via help video). To move the appointment to a different date, please refer to the
Edit Appointment using the Appointment Wizard section above).
1. Left click and hold the mouse button down to select the appointment to move.
2. Drag the Appointment to the required available time slot
3. Release the mouse button
Changing the Appointment Duration
This method allows the appointments duration to be changed directly on the Appointment
Book. The duration time is determined by the default unit of time as indicated on the
Appointment Book’s timeline. (This action is best viewed via the help video)
1. Left click to select the appointment
2. Hold the cursor over the bottom of the appointment so that the cursor changes to a
double-headed arrow (see below).
3. Drag to extend or contract the appointment’s duration as required.
© 2011 Health Communication Network Limited.
Level 4, 201 Pacific Highway, St Leonards, NSW, 2065.
Customer Support: 1300 300 161 – Option 2
Blue
Guide
BlueChip
ChipTraining
Training
Guide
Page 48 of 193
Finding an Appointment
A common occurrence is when a patient telephones the practice when they have forgotten or
lost the date of their next visit. Instead of searching the appointment book, the quickest and
most efficient method is to use patient bookings.
1. Open the patient search and type in the patient’s surname
2. Click open to open their patient details
3. Click Bookings from the left margin menu
© 2011 Health Communication Network Limited.
Level 4, 201 Pacific Highway, St Leonards, NSW, 2065.
Customer Support: 1300 300 161 – Option 2
Blue
Guide
BlueChip
ChipTraining
Training
Guide
Page 49 of 193
From this screen, the patient’s past and future appointments are listed, and they can be
printed but using the Print button on the bottom right of the screen.
Cancelling an Appointment
Below are the steps involved in cancelling an appointment. A line will be drawn through the
patient’s bookings and the appointment book will free up the previously occupied
appointment. It doesn’t take into account any legitimate reason the patient may have had for
cancelling. To accommodate this, before going to Status, click ‘Edit Appointment’ and add
the reason to the appointment comment. Then when the appointment is cancelled, the reason
appears in the patient’s bookings history.
To cancel an appointment directly from the Appointment book:
1. Left click to select the appointment
2. Right Click to display the context menu
3. Choose Status, then Cancelled
© 2011 Health Communication Network Limited.
Level 4, 201 Pacific Highway, St Leonards, NSW, 2065.
Customer Support: 1300 300 161 – Option 2
Blue
Guide
BlueChip
ChipTraining
Training
Guide
Page 50 of 193
4. Click Yes to confirm the cancellation
The time slot is freed up in the appointment book and the patient’s booking record will show
that they cancelled the appointment
© 2011 Health Communication Network Limited.
Level 4, 201 Pacific Highway, St Leonards, NSW, 2065.
Customer Support: 1300 300 161 – Option 2
Blue
Guide
BlueChip
ChipTraining
Training
Guide
Page 51 of 193
Alternatively
Navigate to the patient’s bookings in the Patient Details (follow the steps on Finding an
Appointment) and Click the Cancel booking button (see screen capture above).
Click Yes at the following prompt
Deleting an Appointment
Using the Delete Appointment functionality means that there is no record of the appointment
being made in the first instance and should only be used if there is a data entry error and the
practice does not wish to retain the record.
It is recommended that the Cancel Appointment feature be used predominantly, it is
especially beneficial to the practice when a patient has a reputation of cancelling their
appointment all the time. It allows the practice to perhaps be not so accommodating next
time.
To delete an appointment from the Appointment book
1. Left click to select the appointment
2. Right Click to display the context menu
3. Choose status, then Delete
Alternatively
Navigate to the patient’s bookings in the Patient Details (follow the steps in Finding an
Appointment) and Click the Delete booking button (see screen capture below).
© 2011 Health Communication Network Limited.
Level 4, 201 Pacific Highway, St Leonards, NSW, 2065.
Customer Support: 1300 300 161 – Option 2
Blue
Guide
BlueChip
ChipTraining
Training
Guide
Click Yes at the following prompt
© 2011 Health Communication Network Limited.
Level 4, 201 Pacific Highway, St Leonards, NSW, 2065.
Customer Support: 1300 300 161 – Option 2
Page 52 of 193
Blue
Guide
BlueChip
ChipTraining
Training
Guide
Page 53 of 193
Setting up Automated SMS
The following visual guide is to assist with setting up with the Blue Chip’s SMS reminder
service. By the end of this document, the SMS reminder system will be configured to be
fully automated. It will send SMS reminders to the patients at the designated interval without
any user intervention. Blue Chip will also generate a list of any patients who were unable to
be contacted.
Upon opening Blue Chip, a prompt appears to register for SMS reminders. Note this can be
turned off.
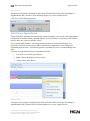
From the main Blue Chip screen,
1. Select SMS from the pull down menu
2. Select Setup SMS Reminders
3. At the registration screen, your Practice ID and Account name will automatically
appear in the Account Details section.
© 2011 Health Communication Network Limited.
Level 4, 201 Pacific Highway, St Leonards, NSW, 2065.
Customer Support: 1300 300 161 – Option 2
Blue
Guide
BlueChip
ChipTraining
Training
Guide
Page 54 of 193
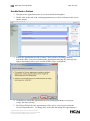
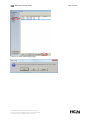
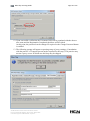
4. Click on the Register for SMS Button
5. Create an SMS password and type it into the New Password area
6. Retype the SMS password exactly as you did in the previous area
7. Click OK
8. The registration information entered will be validated immediately. If any part of the
information is found to be invalid, a prompt will appear to re- enter the information.
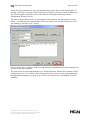
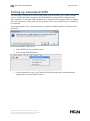
9. Otherwise, the default internet browser on your computer will open and attempt to
connect with the Blue Chip/Message Net web page for SMS registration. The
registration form will already have been populated with the Practice ID and Practice
Name.
© 2011 Health Communication Network Limited.
Level 4, 201 Pacific Highway, St Leonards, NSW, 2065.
Customer Support: 1300 300 161 – Option 2
Blue
Guide
BlueChip
ChipTraining
Training
Guide
Page 55 of 193
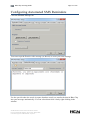
10. Complete the registration form and Click Submit.
A verification email will be sent to the email address specified in the registration
form.
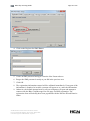
11. Once the verification email has been received, navigate back to Blue Chip and click
Verify Registration
© 2011 Health Communication Network Limited.
Level 4, 201 Pacific Highway, St Leonards, NSW, 2065.
Customer Support: 1300 300 161 – Option 2
Blue
Guide
BlueChip
ChipTraining
Training
Guide
Page 56 of 193
12. Upon successful verification, the Username field will be populated with the chosen
user name and the Registration Completed checkbox will be ticked.
At this point, the password can be changed if required as the Change Password button
is enabled.
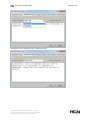
13. The following prompt will appear requesting setup of proxy settings. (Consultation
with the practice’s IT support person maybe required for this step). The practice may
not use a proxy server in which case this step may be skipped
© 2011 Health Communication Network Limited.
Level 4, 201 Pacific Highway, St Leonards, NSW, 2065.
Customer Support: 1300 300 161 – Option 2
Blue
Guide
BlueChip
ChipTraining
Training
Guide
Page 57 of 193
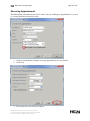
Configuring Automated SMS Reminders
Click the Standard Message tab
You can accept the Practice-wide message (as shown) or create your own message.
Use the special codes (the words in square brackets exactly) to transfer the data in Blue Chip
into your message automatically. You can select them from a list by right-clicking in the
window.
© 2011 Health Communication Network Limited.
Level 4, 201 Pacific Highway, St Leonards, NSW, 2065.
Customer Support: 1300 300 161 – Option 2
Blue
Guide
BlueChip
ChipTraining
Training
Guide
Messages can be customised for each practitioner.
© 2011 Health Communication Network Limited.
Level 4, 201 Pacific Highway, St Leonards, NSW, 2065.
Customer Support: 1300 300 161 – Option 2
Page 58 of 193
Blue
Guide
BlueChip
ChipTraining
Training
Guide
Page 59 of 193
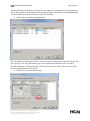
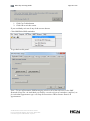
The Message Schedule determines when the reminders are sent
The interval between the reminder and appointment day can be changed along with the time
the reminders are sent (Remember Blue Chip can accommodate individual and bulk SMS
messages).
The Credit Status tab enables a means to check how many SMS credits the Practice has in its
account. To Get Credits, follow the steps listed over.
.
© 2011 Health Communication Network Limited.
Level 4, 201 Pacific Highway, St Leonards, NSW, 2065.
Customer Support: 1300 300 161 – Option 2
Blue
Guide
BlueChip
ChipTraining
Training
Guide
Page 60 of 193
1. Click Get Credits button
2. Click OK to exit the screen.
If you accidently exit out of any of the screens shown:
Click SMSSet SMS reminders
To get back to this panel:
Note ~ To turn off automatic SMS messaging, deselect all of the tick boxes in the SMS
Reminder Setup box. An individual practitioner can also opt-out of reminders completely or
for individual appointment types via Setup PractitionerPractitioner Details
Appointments.
© 2011 Health Communication Network Limited.
Level 4, 201 Pacific Highway, St Leonards, NSW, 2065.
Customer Support: 1300 300 161 – Option 2
Blue
Guide
BlueChip
ChipTraining
Training
Guide
Creating Accounts
Creating a Private Patient Account
From within the Patient Details screen,
1. Select Accounts from the Margin Menu (left hand side)
2. Click Create New Account
© 2011 Health Communication Network Limited.
Level 4, 201 Pacific Highway, St Leonards, NSW, 2065.
Customer Support: 1300 300 161 – Option 2
Page 61 of 193
Blue
Guide
BlueChip
ChipTraining
Training
Guide
Page 62 of 193
3. Select the Practitioner from the drop down options
4. Select the Class of account (Private) and to whom the account will be normally issued
to
5. Click OK
Entering Private Heath Fund Membership details
If the patient has Health Fund Membership, complete the following steps.
1. Select New from the drop down menu
2. Type the Health Fund’s name where indicated and press [Tab] or press the 3 dot
button
(list button) to select a name from the list
© 2011 Health Communication Network Limited.
Level 4, 201 Pacific Highway, St Leonards, NSW, 2065.
Customer Support: 1300 300 161 – Option 2
Blue
Guide
BlueChip
ChipTraining
Training
Guide
Page 63 of 193
3. Click Open to accept the Health Fund name. The screen will return to the Account
Details.
© 2011 Health Communication Network Limited.
Level 4, 201 Pacific Highway, St Leonards, NSW, 2065.
Customer Support: 1300 300 161 – Option 2
Blue
Guide
BlueChip
ChipTraining
Training
Guide
Page 64 of 193
If the required Health Fund’s name doesn’t appear in this list, refer to Entering a New
Health Fund.
4. Complete the remaining details into the Health Fund Membership section.
5. Click the Default Membership box, this will display the patient’s Health Fund
Membership summary on the Patient Detail’s screen.
6. Next of Kin account Contacts can be entered (see Parents database )
7. Click OK (the screen exits to the Accounts page)
8. Click Patient Details from the Margin menu to review the Health Fund Summary
© 2011 Health Communication Network Limited.
Level 4, 201 Pacific Highway, St Leonards, NSW, 2065.
Customer Support: 1300 300 161 – Option 2
Blue
Guide
BlueChip
ChipTraining
Training
Guide
Page 65 of 193
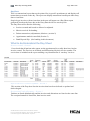
Creating Multiple Accounts for Single Patient
Classification of invoices and receipts is performed at the Accounts level. Transactions
pertaining to Medicare Bulk Bill are separate to those where the patient is paying for their
treatment as is for when Worker’s Compensation is paying for the treatment. It is quite
feasible and common for a single patient to have a range of different types of accounts to
match the circumstances (or who is paying for the treatment). For the practice, it enables
accurate reporting in terms of services provided and financials.
Some examples of account types are listed below:
The following procedure outlines how to create an account for an Insured Inpatient (where
the Health Fund will pay for treatment). This procedure assumes the patient has already a
private account, with all the relevant Health Fund details entered.
© 2011 Health Communication Network Limited.
Level 4, 201 Pacific Highway, St Leonards, NSW, 2065.
Customer Support: 1300 300 161 – Option 2
Blue
Guide
BlueChip
ChipTraining
Training
Guide
From the Patient Details screen,
1. Click Accounts
2. Click Create New Account
© 2011 Health Communication Network Limited.
Level 4, 201 Pacific Highway, St Leonards, NSW, 2065.
Customer Support: 1300 300 161 – Option 2
Page 66 of 193
Blue
Guide
BlueChip
ChipTraining
Training
Guide
Page 67 of 193
3. Select the Practitioner
4. Select the Class of account (Health Fund in this case) and to whom the account will
be normally issued to.
5. Click OK
© 2011 Health Communication Network Limited.
Level 4, 201 Pacific Highway, St Leonards, NSW, 2065.
Customer Support: 1300 300 161 – Option 2
Blue
Guide
BlueChip
ChipTraining
Training
Guide
6. Click OK (the screen exits to the Accounts page)
© 2011 Health Communication Network Limited.
Level 4, 201 Pacific Highway, St Leonards, NSW, 2065.
Customer Support: 1300 300 161 – Option 2
Page 68 of 193
Blue
Guide
BlueChip
ChipTraining
Training
Guide
Creating a Third Party Account
From the Patient Details screen,
1. Select Accounts
© 2011 Health Communication Network Limited.
Level 4, 201 Pacific Highway, St Leonards, NSW, 2065.
Customer Support: 1300 300 161 – Option 2
Page 69 of 193
Blue
Guide
BlueChip
ChipTraining
Training
Guide
Page 70 of 193
2. Click Create New Account
3. Select the Practitioner
4. Select the Class of account (Third Party) and to whom the account will be normally
issued to. In this case, it is the solicitor
5. Click OK
To enter the Account Contacts, Click the 3 dot button
and select an Insurer from the drop
down list. If the Insurer does not appear in the list, (see adding New Contacts)
Type in other relevant information in the Other details section. These fields will vary between
account classes. In this case, enter the Claim number and Injury dates.
6. Click OK (the screen exits to the Accounts page)
© 2011 Health Communication Network Limited.
Level 4, 201 Pacific Highway, St Leonards, NSW, 2065.
Customer Support: 1300 300 161 – Option 2
Blue
Guide
BlueChip
ChipTraining
Training
Guide
Page 71 of 193
Creating a new Medicare Australia Bulk Bill/DVA Account
These accounts are very similar in their creation. The only major discerning difference is that
DVA have differing levels. For instance DVA Gold Card holders are fully repatriated for
their health care, whilst DVA White Card holders are only partially covered. In the latter, a
practice may elect to record the patient’s Health Fund Membership details.
From the Patient Details screen,
1. Click Accounts
2. Click Create New Account
© 2011 Health Communication Network Limited.
Level 4, 201 Pacific Highway, St Leonards, NSW, 2065.
Customer Support: 1300 300 161 – Option 2
Blue
Guide
BlueChip
ChipTraining
Training
Guide
Page 72 of 193
3. Select the Practitioner
4. Select the Class of account (Medicare Australia, MA Bulk Bill or MA DVA). As the
claim will be electronically lodged, the Issue to field is automatically filling in and
locked.
5. Click OK
In most cases the account contacts will not be required or preset. Click OK at the following
screen
© 2011 Health Communication Network Limited.
Level 4, 201 Pacific Highway, St Leonards, NSW, 2065.
Customer Support: 1300 300 161 – Option 2
Blue
Guide
BlueChip
ChipTraining
Training
Guide
Page 73 of 193
Entering a New Health Fund
Open the Patient Explorer (yellow folder) and change the List from ‘Patients’ to ‘Health
Funds’
1. Click the New button
2. Fill out the New Company screen with the relevant information
3. Under health fund properties, ensure to associate the correct price list (the screen shot
below shows known-gap arrangement). A no-gap arrangement would list the health
fund’s own price list. The majority of health fund price lists are available from the
subscriber download section of the HCN website.
New Health Fund
4. Click OK to return to the patient’s Account Details screen.
© 2011 Health Communication Network Limited.
Level 4, 201 Pacific Highway, St Leonards, NSW, 2065.
Customer Support: 1300 300 161 – Option 2
Blue
Guide
BlueChip
ChipTraining
Training
Guide
Page 74 of 193
Parents Database
The Parents Database is used to hold details of people related (in some way) to an individual
patient but are not necessarily patients themselves (for example the child is the patient and
the parent is responsible for the account). The database can also be used to hold emergency
contact details.
There are many ways to enter details into the patient database, but initially the procedure will
follow on from the Accounts Detail screen.
1. Type the Contact’s surname and press [Tab] or click on the 3 dot button
of the field.
© 2011 Health Communication Network Limited.
Level 4, 201 Pacific Highway, St Leonards, NSW, 2065.
Customer Support: 1300 300 161 – Option 2
at the end
Blue
Guide
BlueChip
ChipTraining
Training
Guide
Page 75 of 193
If the surname was typed, then select the appropriate name from the list and press Open OR if
the 3 dot button was pressed, type the surname in the Search for…field then click Open to
associate the name with the patient.
2. Click OK to return to the Account Details screen
3. Click OK to return to the Patient Details screen
If the typed surname doesn’t match any patient in the database
1. Click New
2. Enter in the Parent’s/Next of Kin’s details as applicable.
Clicking the ‘From Patient button’ will open the Patient Explorer. Type the patient’s surname
to associate them to the related patient (i.e. Medicare numbers, addresses, phone numbers and
relationship). Remember these fields can be overtyped and the comment (relationship type)
can be edited to include extra detail.
© 2011 Health Communication Network Limited.
Level 4, 201 Pacific Highway, St Leonards, NSW, 2065.
Customer Support: 1300 300 161 – Option 2
Blue
Guide
BlueChip
ChipTraining
Training
Guide
3. Click OK
Changing the Addressee for the Account
1. Click Addressee
© 2011 Health Communication Network Limited.
Level 4, 201 Pacific Highway, St Leonards, NSW, 2065.
Customer Support: 1300 300 161 – Option 2
Page 76 of 193
Blue
Guide
BlueChip
ChipTraining
Training
Guide
Page 77 of 193
2. Select the Account Addressee
3. Click OK
This will result in the Invoice/Receipts being addressed to the person(s) selected (for
example, a parent for a child etc). Addressees can also be changed from the Account Details
screen (see screen capture below).
Entering Account Contacts
The following procedure is valid for entering new account contacts. Typically, account
contacts are specified during the initial program configuration (at HCN).
Contact data can also be entered from the Patient Explorer. By clicking the yellow folder to
bring up the Patient Explorer, change the List from Patient to Solicitors or Companies will
allow new contacts to be entered.
1. Click on the 3 dot button
at the end of the line
If the Account Contact does not appear, Click New
© 2011 Health Communication Network Limited.
Level 4, 201 Pacific Highway, St Leonards, NSW, 2065.
Customer Support: 1300 300 161 – Option 2
Blue
Guide
BlueChip
ChipTraining
Training
Guide
2. Enter in the required entity fields to complete the contact:
3. Click OK register the Contact
© 2011 Health Communication Network Limited.
Level 4, 201 Pacific Highway, St Leonards, NSW, 2065.
Customer Support: 1300 300 161 – Option 2
Page 78 of 193
Blue
Guide
BlueChip
ChipTraining
Training
Guide
Printing Labels
From the Accounts Details screen:
1. Select the account the labels are for (highlighted in blue)
2. Click the Print Labels button
3. Select the type of label normally used
4. Click Next
© 2011 Health Communication Network Limited.
Level 4, 201 Pacific Highway, St Leonards, NSW, 2065.
Customer Support: 1300 300 161 – Option 2
Page 79 of 193
Blue
Guide
BlueChip
ChipTraining
Training
Guide
5. Enter the number of labels to print
6. Click Next
7. Select the destination of your printer
8. Click Next
© 2011 Health Communication Network Limited.
Level 4, 201 Pacific Highway, St Leonards, NSW, 2065.
Customer Support: 1300 300 161 – Option 2
Page 80 of 193
Blue
Guide
BlueChip
ChipTraining
Training
Guide
Page 81 of 193
The program returns to the Account Details screen.
Deleting Accounts
If an account has been created in error (i.e. wrong practitioner, class or location), as long as
no transactions have been attributed to the class it may be deleted.
1. From within the account, click Account details.
2. At the Account Details screen, click Delete.
The Delete button is only available when no transactions have been recorded in the account.
© 2011 Health Communication Network Limited.
Level 4, 201 Pacific Highway, St Leonards, NSW, 2065.
Customer Support: 1300 300 161 – Option 2
Blue
Guide
BlueChip
ChipTraining
Training
Guide
Page 82 of 193
Estimates
Providing patients with a quote or estimate cost can be accessed from the left margin menu within the
Patient Details screen. Tip: Setup the account class for the invoice before setting up the estimate.
1. Click Estimates
2. Click NEW
© 2011 Health Communication Network Limited.
Level 4, 201 Pacific Highway, St Leonards, NSW, 2065.
Customer Support: 1300 300 161 – Option 2
Blue
Guide
BlueChip
ChipTraining
Training
Guide
Page 83 of 193
Create an Estimate for a Private Patient
(The Estimates screen is similar to completing an Invoice for a Patient.)
1. Nominate the Hospital where the operation will take place.
2. Type the hospital name and press [Tab] or Click the 3 dot button
hospital from a list
and select the
3. Check the Practitioner and Account class details are correct.
In this example, the amount payable (Gap) by the patient is the Doctor’s fee less
Medicare rebate.
4. Type in the service item number and press the [TAB] key. The details will
automatically feed into the corresponding columns. As with invoices, the fee can be
manually overridden, but the rebate and gap amounts cannot.
5. To enter another item number in the estimate, press [TAB] again
The estimate can be given a name and expiry date
© 2011 Health Communication Network Limited.
Level 4, 201 Pacific Highway, St Leonards, NSW, 2065.
Customer Support: 1300 300 161 – Option 2
Blue
Guide
BlueChip
ChipTraining
Training
Guide
Page 84 of 193
6. Press [OK] to complete the Estimate. This will then appear in the Patient Details file.
Create an Estimate for a Private Patient (known gap)
This is applicable where the patient pays the gap between a Doctor’s fee less (Medicare
rebate @ 75% + health fund’s published rate)
1. Set up the estimate as outlined ‘for a Private Patient’.
2. Click to select ‘Health Fund’ to display the Heath Fund column
© 2011 Health Communication Network Limited.
Level 4, 201 Pacific Highway, St Leonards, NSW, 2065.
Customer Support: 1300 300 161 – Option 2
Blue
Guide
BlueChip
ChipTraining
Training
Guide
Page 85 of 193
3. From the drop down list, set the H/F Rebate to be based upon the required health
fund’s price list.
Disclaimer ~ refer to contractual arrangements with your health fund as circumstances
vary from practice to practice.
Create an Estimate for a Private Patient (standard gap)
This is applicable where the patient pays the gap between, Doctor’s fee less (Medicare rebate
@ 75% + health fund rebate @ 25% of the MBS rate)
1. Set up the estimate as outlined earlier.
2. Click to select ‘Health Fund’ to display the Heath Fund column
3. From the drop down list, set the H/F Rebate to be based upon the Medicare rebate.
© 2011 Health Communication Network Limited.
Level 4, 201 Pacific Highway, St Leonards, NSW, 2065.
Customer Support: 1300 300 161 – Option 2
Blue
Guide
BlueChip
ChipTraining
Training
Guide
Page 86 of 193
Additional options from the Estimate Screen are;
New:
To initiate another Estimate
View:
To view the details of the selected Estimate
Clone:
To copy the selected existing Estimate – useful for editing an existing
Estimate like adding items, changing gap calculations (known to
standard)
Print:
To print the Estimate
Create Invoice:
Blue Chip is able to automatically use the stored Estimate information
and covert this into a Patient Invoice.
As with a traditional invoice, any automatically fed in details can be
manually edited and additional items added if required at the time.
As the Practitioner and Class details have already been entered at the
time of generating the Estimate, the invoice is automatically attributed
to those details.
© 2011 Health Communication Network Limited.
Level 4, 201 Pacific Highway, St Leonards, NSW, 2065.
Customer Support: 1300 300 161 – Option 2
Blue
Guide
BlueChip
ChipTraining
Training
Guide
Page 87 of 193
Invoicing
There are 2 main types of Invoices covered in this section. The most common is the
Invoice/Receipt combination, (where the patient pays for the consultation at the conclusion of
the appointment) and the second is the Standalone Invoice (where the patient pays for the
consultation later OR a third party is being invoiced and will pay at a later date).
All instructions start from the Patient Details Screen unless otherwise specified.
Patient Details Screen
Combined Invoice/Receipt
This section assumes an account has been created. To create a new account, refer to the
Creating Accounts section.
To start the invoicing procedure, click the right mouse button (right click) and select Invoice
from the context menu.
© 2011 Health Communication Network Limited.
Level 4, 201 Pacific Highway, St Leonards, NSW, 2065.
Customer Support: 1300 300 161 – Option 2
Blue
Guide
BlueChip
ChipTraining
Training
Guide
Page 88 of 193
The following screen appears:
1. Press [Tab] to accept the current date (Service Date) and move to the next field OR
change the date of service and then press [Tab]
2. Enter your Item code and [Tab]
3. The next field, item description will be filled in automatically, but can be edited. Press
[Tab]
Although the fee will automatically fill in from the previous setup of your pricing schedule,
this can still be overridden if required
4. Click the Add Receipt Button
© 2011 Health Communication Network Limited.
Level 4, 201 Pacific Highway, St Leonards, NSW, 2065.
Customer Support: 1300 300 161 – Option 2
Blue
Guide
BlueChip
ChipTraining
Training
Guide
Page 89 of 193
5. You will be asked if you wish to issue the invoice with an Issue Date. Click OK to
accept
Tip: Date of Issue can be different to Service Date (e.g. invoicing Operation Billing for
previous dates)
You will be taken to the Receipting Module to start your receipt process
6. Double Click in the Payment Type field or select from a list of available Payment
types or simply start typing the name of the payment type and press [Tab]
Payment options are self explanatory however Credit Card refers to the mercantile system
involving credit card slips.
EFTPOS covers both EFTPOS Auto and EFTPOS Manual using Visa/Master Cards and
Debit Cards (referred to as Other).
Debit/Visa/Master Cards are recorded as EFTPOS Manual type transactions. (If Tyro
EFTPOS is installed, the option EFTPOS Auto should be chosen).
Enter type payment (Cheque or Card) then Press [Tab] enter name of payer then Press [Tab]
(If paying by cash, the name is automatically inserted).
© 2011 Health Communication Network Limited.
Level 4, 201 Pacific Highway, St Leonards, NSW, 2065.
Customer Support: 1300 300 161 – Option 2
Blue
Guide
BlueChip
ChipTraining
Training
Guide
Page 90 of 193
If paying by card choose from Visa, MasterCard or Other. Bankcard is still listed however it
is now no longer used.
OTHER = Savings or Debits Cards).
Enter the Branch/Details (if required). Press [Tab]
It is recommended for Audit trails that cheque branch or cheque numbers are recorded.
EFTPOS or direct debit could reflect the transaction record number but not necessary.
TIP: Anything typed in here will be printed on the invoice – (therefore, please do not record
Credit Card Details as this can lead to Fraudulent activities)
7. Enter the required amount and Press [Tab]
8. Select the invoice item the payment will be allocated against
Click in the check box to record the allocation at the end of transaction line.
If a tyro transaction is declined, Blue Chip will not complete the receipt. The screen
will return the user to the new receipts screen. The first line will still contain the
original information except the amount (which will be zero). This line cannot be
edited. On the second line of the receipt, receipt using an alternative payment method.
If the patient does not want the decline information appearing on the receipt, the
receipt must be abandoned and started again.
9. Click Issue
© 2011 Health Communication Network Limited.
Level 4, 201 Pacific Highway, St Leonards, NSW, 2065.
Customer Support: 1300 300 161 – Option 2
Blue
Guide
BlueChip
ChipTraining
Training
Guide
10. Click OK
11. Click Print
© 2011 Health Communication Network Limited.
Level 4, 201 Pacific Highway, St Leonards, NSW, 2065.
Customer Support: 1300 300 161 – Option 2
Page 91 of 193
Blue
Guide
BlueChip
ChipTraining
Training
Guide
Page 92 of 193
12. Select the printing destination and select [Print]
13. The Invoice/Receipt will print
The Invoice tab will show the invoice’s service item number and the amount paid. The
Receipt tab will show the amount paid, its allocation and the payment method.
For Part Payments please refer to page 106 .
Standalone Invoice
The following procedure is independent of how the Blue Chip user arrives at the accounts
section of Patient Details.
1. Open the required account from Patient Details
The following screen appears:
© 2011 Health Communication Network Limited.
Level 4, 201 Pacific Highway, St Leonards, NSW, 2065.
Customer Support: 1300 300 161 – Option 2
Blue
Guide
BlueChip
ChipTraining
Training
Guide
Page 93 of 193
2. Click New Invoice from the Invoice screen
3. Press [Tab] to accept the current date and move to the next field or type the date of
service and press [Tab]
4. Enter the required Item number and press[Tab]
The next field, item description will be filled in automatically, but can be edited. Press [Tab].
Although the fee will automatically fill in from the previous setup of your pricing schedule,
this can be overridden
5. Click on the Issue Button
© 2011 Health Communication Network Limited.
Level 4, 201 Pacific Highway, St Leonards, NSW, 2065.
Customer Support: 1300 300 161 – Option 2
Blue
Guide
BlueChip
ChipTraining
Training
Guide
The next screen asks whether you wish to issue the invoice.
6. Click on OK
7. Click on Next at the following screen
© 2011 Health Communication Network Limited.
Level 4, 201 Pacific Highway, St Leonards, NSW, 2065.
Customer Support: 1300 300 161 – Option 2
Page 94 of 193
Blue
Guide
BlueChip
ChipTraining
Training
Guide
Page 95 of 193
8. Choose the printer destination then Click Next
The invoice will print. In the patient’s account the Invoice will show that it has been created
but no payment has been made against it.
© 2011 Health Communication Network Limited.
Level 4, 201 Pacific Highway, St Leonards, NSW, 2065.
Customer Support: 1300 300 161 – Option 2
Blue
Guide
BlueChip
ChipTraining
Training
Guide
Page 96 of 193
Multiple Procedures – In rooms (outpatient)
1. Create an invoice as shown earlier:
2. Clicking the Multiple Procedure check box enables scaling to be applied when billing
multiple surgical items. These scaling can be overwritten. It is the practice’s
responsibility to ensure the correct item number(s) are scaled.
3. Enter in the item numbers in any order and Blue Chip will re-order them based on
Medicare Australia Operation Ruling when the invoice is issued (providing they are
based upon the Medicare item list). If item numbers are consultation based then the
fee value will only be added.
4. Select Issue or Add Receipt depending on circumstances and the following screen will
appear displaying the scaling calculations, if correct select OK.
© 2011 Health Communication Network Limited.
Level 4, 201 Pacific Highway, St Leonards, NSW, 2065.
Customer Support: 1300 300 161 – Option 2
Blue
Guide
BlueChip
ChipTraining
Training
Guide
Page 97 of 193
1. Click OK and either issue the invoice or complete the receipt as described earlier.
Hospital Services - Inpatient
The Hospital Services box indicates that the services provided are performed in a hospital.
The rebate amount will reflect 75% of the schedule rate as required.
If Health Fund classes are used, then the Gap amount can change to reflect 100% as different
pricing rates may be used.
TIP: Tick the Hospital Services box first before adding any items numbers.
2. Click the Hospital Services box
3. Type in Hospital name or select from the associated drop down list (denoted by the
button with the 3 dots)
as to where the services was performed. Press [Tab]
4. Add in Service date (this may need to be backdated to the date of the surgery)
When the Invoice is printed, an * will appear after the item indicating it was an inpatient
procedure listing the Hospitals’ name on the invoice
TIP: If the hospital has already been entered in your system it will be displayed in the
database automatically.
© 2011 Health Communication Network Limited.
Level 4, 201 Pacific Highway, St Leonards, NSW, 2065.
Customer Support: 1300 300 161 – Option 2
Blue
Guide
BlueChip
ChipTraining
Training
Guide
Page 98 of 193
If the hospital has not been used before, the following screen will be presented, allowing
users to create a new entry for that hospital:
Click on New and enter the hospital details appropriately
Click OK and the program will take you back into the invoice to be completed as normal
© 2011 Health Communication Network Limited.
Level 4, 201 Pacific Highway, St Leonards, NSW, 2065.
Customer Support: 1300 300 161 – Option 2
Blue
Guide
BlueChip
ChipTraining
Training
Guide
Page 99 of 193
Receipts
Receipting a Pre-Existing Invoice
The following section covers invoices that have already been issued and are listed in the
Patient’s account. In this scenario, the receipt will be created from within the Patient Details
screen.
1. Select Accounts from the left margin menu
2. Click Open existing Account
3. Click Receipts tab
© 2011 Health Communication Network Limited.
Level 4, 201 Pacific Highway, St Leonards, NSW, 2065.
Customer Support: 1300 300 161 – Option 2
Blue
Guide
BlueChip
ChipTraining
Training
Guide
Page 100 of 193
4. Click New Receipt
TIP: for explanations of the various payment types, please refer to Combine Invoice/Receipt
process.
5. Double Click under Type to display a drop down menu of acceptable payment types
OR start typing the payment type to display the name. Press [Tab]
6. Type the name of the payer (Cheque or Card). Press [Tab]
(If paying by cash, the name is automatically inserted).
7. In Bank/Card select from Visa, MasterCard or Other
8. Enter the Branch/Details (if required). Press [Tab]
© 2011 Health Communication Network Limited.
Level 4, 201 Pacific Highway, St Leonards, NSW, 2065.
Customer Support: 1300 300 161 – Option 2
Blue
Guide
BlueChip
ChipTraining
Training
Guide
Page 101 of 193
9. Enter the required amount and Press [Tab]
10. Select the invoice item the payment will be allocated against and click in the check
box to record the allocation at the end of transaction line
11. Click Issue
12. Click OK
© 2011 Health Communication Network Limited.
Level 4, 201 Pacific Highway, St Leonards, NSW, 2065.
Customer Support: 1300 300 161 – Option 2
Blue
Guide
BlueChip
ChipTraining
Training
Guide
13. Select the type of Receipt and Click Print
14. Select the Printer destination
15. Click Print to print the receipt
© 2011 Health Communication Network Limited.
Level 4, 201 Pacific Highway, St Leonards, NSW, 2065.
Customer Support: 1300 300 161 – Option 2
Page 102 of 193
Blue
Guide
BlueChip
ChipTraining
Training
Guide
Page 103 of 193
Receipting Multiple Patients
Blue Chip allows you to receipt multiple patient invoices with one payment
It is not recommended that split receipts be performed for invoices that require claiming from
Medicare Australia.. This method is widely used when receipting third party statement
payments – i.e. the payment (direct debit, cheque) pays multiple patients and a receipt is not
required to be given to the patient.
Alternatively receipting two patients, (family members) on the one receipt
1. Invoice the first patient & issue the invoice (file do not print)
2. Invoice 2nd Patient and begin the receipt.
(after allocating the payment to the invoice do not print, goto step 3 )
© 2011 Health Communication Network Limited.
Level 4, 201 Pacific Highway, St Leonards, NSW, 2065.
Customer Support: 1300 300 161 – Option 2
Blue
Guide
BlueChip
ChipTraining
Training
Guide
3. Click Add Items
© 2011 Health Communication Network Limited.
Level 4, 201 Pacific Highway, St Leonards, NSW, 2065.
Customer Support: 1300 300 161 – Option 2
Page 104 of 193
Blue
Guide
BlueChip
ChipTraining
Training
Guide
Page 105 of 193
4. Click on the Change button (This will open up the Patient Search facility. Select the
1st Patient invoiced to perform the receipt)
5. Click Open the Patient and their details and outstanding amount will feed into Select
Invoice Items dialogue box
6. Click inside the checkbox to select which invoices your paying for
7. Click OK
© 2011 Health Communication Network Limited.
Level 4, 201 Pacific Highway, St Leonards, NSW, 2065.
Customer Support: 1300 300 161 – Option 2
Blue
Guide
BlueChip
ChipTraining
Training
Guide
Page 106 of 193
8. Click Issue and Print the Receipt as normal
In the example below the printed receipt shows details of the Payment and Invoices receipted
for the Andrews family.
© 2011 Health Communication Network Limited.
Level 4, 201 Pacific Highway, St Leonards, NSW, 2065.
Customer Support: 1300 300 161 – Option 2
Blue
Guide
BlueChip
ChipTraining
Training
Guide
Page 107 of 193
The Receipt screen for each patient show that payment has been received for each
outstanding amount, with the same receipt number.
Part Payments
Part payments occur when only a portion of the invoice is paid.
These may include:
The gap amount paid at the time of consultation
Receipting part payments on surgical procedures (i.e. Medicare and Health Fund
portion only)
Part payments can be made at the time of consultation (Combined Invoice/Receipt) or as
payment of pre-issued invoice
For a Combined Invoice/Receipt
Select the Add Receipt button after billing the patient (see Combined
Invoice/Receipting process), after issuing, jump to step 15
For a previously Issued Invoice
1. Select the invoice to create the receipt for.
2. Click on the New Receipt button
© 2011 Health Communication Network Limited.
Level 4, 201 Pacific Highway, St Leonards, NSW, 2065.
Customer Support: 1300 300 161 – Option 2
Blue
Guide
BlueChip
ChipTraining
Training
Guide
Page 108 of 193
3. Double Click under Type to display a drop down menu of acceptable payment types
OR start typing the payment type to display the name. Press [Tab]
4. Type the name of the payer (Cheque or Card). Press [Tab]
(If paying by cash, the name is automatically inserted).
5. In Bank/Card choose from Visa, MasterCard or Other
6. Enter the Branch/Details (if required). Press [Tab]
7. Enter the amount received (which will be less than the required amount of the
invoice), and Press [Tab]
8. Select the invoice item the payment will be allocated against (see screen capture
below)
9. Click in the check box to record the allocation at the end of transaction line or over
type in the amount receipted (which is less than the invoiced amount).
10. Press [Tab]
11. Click on the Issue button
12. Click on OK
© 2011 Health Communication Network Limited.
Level 4, 201 Pacific Highway, St Leonards, NSW, 2065.
Customer Support: 1300 300 161 – Option 2
Blue
Guide
BlueChip
ChipTraining
Training
Guide
Page 109 of 193
13. Click Print
14. Set the printing destination and press [Print].
15. The Invoice/Receipt will print.
The Invoice screen shows the partial payment, the Account Debtors screen shows the amount
outstanding alongside the original invoice and receipted amounts.
© 2011 Health Communication Network Limited.
Level 4, 201 Pacific Highway, St Leonards, NSW, 2065.
Customer Support: 1300 300 161 – Option 2
Blue
Guide
BlueChip
ChipTraining
Training
Guide
Page 110 of 193
Overpayments
Overpayments may arise from time to time, how the practice deals with the situation will be
defined by the established business process within the practice. This section is designed to
show how to use Blue Chip to record some scenarios.
Typical scenarios may be patients have pre-paid (the Gap as defined in the Estimate provided
earlier) and the rebates from the Health Fund or Medicare have increased on that particular
service item.
1. Open the patient’s account.
2. Click on the New Receipt button
3. Complete the Receipt as normal practice for the amount being paid (not the amount
invoiced)
© 2011 Health Communication Network Limited.
Level 4, 201 Pacific Highway, St Leonards, NSW, 2065.
Customer Support: 1300 300 161 – Option 2
Blue
Guide
BlueChip
ChipTraining
Training
Guide
Page 111 of 193
4. Click on the Overpayment button
5. Enter the amount over paid. This amount will be the Unallocated amount under the
Total Received (see screen capture above)
6. Click OK
© 2011 Health Communication Network Limited.
Level 4, 201 Pacific Highway, St Leonards, NSW, 2065.
Customer Support: 1300 300 161 – Option 2
Blue
Guide
BlueChip
ChipTraining
Training
Guide
Page 112 of 193
The allocations section (lower screen, see above) records the extra amount as an
overpayment, allowing the receipt to be issued
7. Click Issue and issue the receipt as per normal practice
The Account Credits screen will show (see below) the patient is in credit for the amount of
the overpayment. The printed receipt will also show this
In the event that the rebate has increased, the invoice can be adjusted so that the items reflect
the new fee value and the overpayment applied to the account.
Alternatively
A sundry invoice can be created for the amount overpaid and have the amount applied to the
sundry invoice.
N.B. An overpayment cannot be written off.
© 2011 Health Communication Network Limited.
Level 4, 201 Pacific Highway, St Leonards, NSW, 2065.
Customer Support: 1300 300 161 – Option 2
Blue
Guide
BlueChip
ChipTraining
Training
Guide
Page 113 of 193
Prepayments
A prepayment is defined as the ability to receipt money without issuing an invoice
outstanding. The most common scenario is a patient is paying for surgery that will happen
on a future date. A Prepayment may be a lump sum or a summary of several prepayments
(Obstetrics often uses this option).
1. Create a new receipt
2. Click Prepayment
3. Enter the Prepayment amount
© 2011 Health Communication Network Limited.
Level 4, 201 Pacific Highway, St Leonards, NSW, 2065.
Customer Support: 1300 300 161 – Option 2
Blue
Guide
BlueChip
ChipTraining
Training
Guide
Page 114 of 193
4. Click OK
5. Issue the receipt (as normal)
Note this receipt type does not contain the referral details and makes no mention of the
medical item involved. This receipt is not claimable from Medicare.
Using a Prepayment
1. Create a new invoice
2. Click Issue
3. Click OK
© 2011 Health Communication Network Limited.
Level 4, 201 Pacific Highway, St Leonards, NSW, 2065.
Customer Support: 1300 300 161 – Option 2
Blue
Guide
BlueChip
ChipTraining
Training
Guide
Page 115 of 193
4. Allocate the prepayment amount (top) to the invoice amount (bottom)
5. Click OK
6. Print the invoice as normal. The invoice will reflect the prepayment having been used
to pay the invoice.
© 2011 Health Communication Network Limited.
Level 4, 201 Pacific Highway, St Leonards, NSW, 2065.
Customer Support: 1300 300 161 – Option 2
Blue
Guide
BlueChip
ChipTraining
Training
Guide
Page 116 of 193
Discounts
Discounts can be offered as a message on the patient invoice but only applied during
receipting. For example, if a discount was granted for payment within 7 days; payment on the
8th day would be for the non discounted amount and the invoice/receipt and patient account
should reflect this. Discounts can also be applied outside of any set discount period at the
discretion of the practice.
Assuming Blue Chip has been configured to accommodate discounting (call Blue Chip
support on 1300 300 161 option 2 to enable the functionality if you wish to offer it); prepare
an invoice as discussed earlier
1. Click the Discount checkbox
2. Issue the invoice
© 2011 Health Communication Network Limited.
Level 4, 201 Pacific Highway, St Leonards, NSW, 2065.
Customer Support: 1300 300 161 – Option 2
Blue
Guide
BlueChip
ChipTraining
Training
Guide
3. When the patient returns to pay, open up their account
4. Click the Receipts tab
5. Click New Receipt
© 2011 Health Communication Network Limited.
Level 4, 201 Pacific Highway, St Leonards, NSW, 2065.
Customer Support: 1300 300 161 – Option 2
Page 117 of 193
Blue
Guide
BlueChip
ChipTraining
Training
Guide
Page 118 of 193
6. Enter receipt details as normal. In the Allocations portion of the screen, locate
discounts.
7. In discounts, enter in the cash amount to discount or a percentage with the percentage
symbol and press [tab] or [enter]. The discount will be deducted as shown.
8. Process the receipt as per normal.
© 2011 Health Communication Network Limited.
Level 4, 201 Pacific Highway, St Leonards, NSW, 2065.
Customer Support: 1300 300 161 – Option 2
Blue
Guide
BlueChip
ChipTraining
Training
Guide
Page 119 of 193
Adjustments
There are many situations where an adjustment is required for either an invoice or receipt
being issued from within Blue Chip.
Not all users may be authorised to reverse transactions or to do refunds. Please check with
the Practice Manager.
The most important question to ask when adjusting/reversing a receipt is
“Has the banking being settled?”
If the adjusted receipt occurs on the same day as the original transaction, before banking has
been settled, then the receipt can be reversed. This way the banking reflects the correct
monies taken.
If the banking has been previously settled then adjustments become complicated as only
those will sufficient permissions are able perform these due to monthly close off
functionality, backdating and refunds. These actions will typically involve the Practitioner or
Practice Manager to affect them as they will affect reporting accuracy.
Adjusting a Receipt
For Practices that don’t use Integrate EFPTPOS, a situation may arise when they generate a
receipt from within Blue Chip prior to the EFTPOS transaction being approved. In this
scenario the patient may have gone to pay by EFTPOS and had the card declined and has
now to pay by cash.
This is for the Adjustment of Blue Chip only: It does not provide instruction for reversing an
EFTPOS transaction on an EFTPOS machine (including Tyro).
The following scenario deals with adjusting a receipt, in particular the Payment Type. The
procedure is being documented, not instructing how to adjust particular payment types.
1. Open the existing account
© 2011 Health Communication Network Limited.
Level 4, 201 Pacific Highway, St Leonards, NSW, 2065.
Customer Support: 1300 300 161 – Option 2
Blue
Guide
BlueChip
ChipTraining
Training
Guide
2. Switch to the Receipts panel
3. Select the receipt in question
4. Click Open
© 2011 Health Communication Network Limited.
Level 4, 201 Pacific Highway, St Leonards, NSW, 2065.
Customer Support: 1300 300 161 – Option 2
Page 120 of 193
Blue
Guide
BlueChip
ChipTraining
Training
Guide
5. Click Adjust receipt
6. Type a reason then click OK
7. Amend the payment type as required and Issue as per normal
© 2011 Health Communication Network Limited.
Level 4, 201 Pacific Highway, St Leonards, NSW, 2065.
Customer Support: 1300 300 161 – Option 2
Page 121 of 193
Blue
Guide
BlueChip
ChipTraining
Training
Guide
Page 122 of 193
The receipt shows the adjustment.
Line 1 shows the receipt is flagged as having been reversed.
Line 2 shows the reversal shown in red beneath the flagged entry
Line 3 shows the receipt having been adjusted. The payment method (see above) now
reflects the change (cheque) as opposed to the original payment method (see screen
capture in step 2).
The Show Audit Trail check box can be enabled to provide detail as to who adjusted the
receipt, when it was adjusted and the reason for adjusting the receipt.
Adjusting a Paid Invoice / Receipt
Scenario – A patient has been invoiced for an initial consultation which should have been a
follow up (which is a lesser amount); the patient has paid the invoice and banking has not
been settled for the day.
The workflow is as follows: The invoice is adjusted to reflect the intended service item. The
receipt is adjusted to match the invoice’s adjusted amount. The difference is repaid to the
patient.
The above workflow should be used if the patient is still present. It does not describe how to
alter EFTPOS transactions on an EFTPOS terminal (including a Tyro terminal), it is only to
ensure Blue Chip correctly reflects the accuracy of the account.
© 2011 Health Communication Network Limited.
Level 4, 201 Pacific Highway, St Leonards, NSW, 2065.
Customer Support: 1300 300 161 – Option 2
Blue
Guide
BlueChip
ChipTraining
Training
Guide
Page 123 of 193
If the patient has left the surgery, prudent practice would be to perform a refund after banking
has been finalised.
1. From the Patient Details screen, Select Accounts from the left margin menu
2. Click the Open Existing Account button
3. Click the Open button to open the invoice to be changed.
© 2011 Health Communication Network Limited.
Level 4, 201 Pacific Highway, St Leonards, NSW, 2065.
Customer Support: 1300 300 161 – Option 2
Blue
Guide
BlueChip
ChipTraining
Training
Guide
Page 124 of 193
4. Click the Adjust button
5. Type a reason for Adjusting the invoice ‘Wrong item number etc’ and Click OK
6. Enter the new item numbers (in this case) or alternatively if it related to a different fee
or date etc
© 2011 Health Communication Network Limited.
Level 4, 201 Pacific Highway, St Leonards, NSW, 2065.
Customer Support: 1300 300 161 – Option 2
Blue
Guide
BlueChip
ChipTraining
Training
Guide
7. Click the Issue button
8. Click the OK to confirm the Date of Issue
9. At the Allocate Credit Amount screen, Click OK
10. Issue the Invoice
11. Click the Receipts tab
12. Select the receipt to adjust and click Open
© 2011 Health Communication Network Limited.
Level 4, 201 Pacific Highway, St Leonards, NSW, 2065.
Customer Support: 1300 300 161 – Option 2
Page 125 of 193
Blue
Guide
BlueChip
ChipTraining
Training
Guide
Page 126 of 193
13. Click Adjust receipt
14. Click OK
15. Adjust the receipted amount to match the corresponding invoice (allocations section
of the receipts screen).
16. Deselect the Overpayment section of the receipt and allocate the payment to the
corresponding invoice
17. Click Issue
18. Click OK
19. Print the receipt as normal.
20. Repay the patient the difference
Now the patient’s Blue Chip account reflects the change in service (and associated charges)
and the banking accurately reflects the repayment. See below how all the relevant tabs reflect
this workflow:
© 2011 Health Communication Network Limited.
Level 4, 201 Pacific Highway, St Leonards, NSW, 2065.
Customer Support: 1300 300 161 – Option 2
Blue
Guide
BlueChip
ChipTraining
Training
Guide
Page 127 of 193
The Invoice tab shows:
Line 1 the original invoice being flagged for reversal
Line 2 the invoice being reversed
Line 3 the new adjusted invoice.
Receipts tab shows:
Line 1 the original payment for the original invoice flagged for reversal
Line 2 the original payment allocation being reversed,
Line 3 the now unallocated payment now being held as a credit payment.
Line 4 shows the credit payment being reversed
Line 5 shows the new adjusted invoice being paid from some of the credit payment.
The balance is returned to the patient.
The Account Debtors tab shows
Lines 1 & 2 the original invoice and corresponding receipt being flagged for reversal
Lines 3 & 4 the actual reversal of the invoice and receipt (in red).
Line 5 the newly created adjusted invoice
Line 6 the newly adjusted invoice being paid for with the new adjusted receipt.
© 2011 Health Communication Network Limited.
Level 4, 201 Pacific Highway, St Leonards, NSW, 2065.
Customer Support: 1300 300 161 – Option 2
Blue
Guide
BlueChip
ChipTraining
Training
Guide
Page 128 of 193
The Account Credits tab shows the original receipt being reversed, placing the said amount
into credit. When the credit payment is used to pay the adjusted invoice and the difference
repaid to the patient, it is displayed as a reversal of the credit payment.
Adjusting a standalone Invoice
Compared to the Paid Invoice/Receipt, adjusting a standalone invoice is rather
straightforward. As no money has been paid, the timing (before or after banking has been
finalised) is not so important. Timing does become important when an adjustment needs to be
performed after a month has been closed off. In this instance, the practice manager or
someone with similar permissions may need to reopen the month in order to effect the
adjustment.
In the following scenario, an item has been omitted from the invoice. It requires an
adjustment in order to incorporate the extra service item.
1. From the Patient Details screen, Select Accounts from the left margin menu and
Select the Open Existing Account button as illustrated for Invoice/Receipt
adjustments
2. From the Invoice tab, click the Open button to open the invoice to be changed.
© 2011 Health Communication Network Limited.
Level 4, 201 Pacific Highway, St Leonards, NSW, 2065.
Customer Support: 1300 300 161 – Option 2
Blue
Guide
BlueChip
ChipTraining
Training
Guide
Page 129 of 193
3. Click the Adjust button
4. Type a reason for the Adjustment (i.e. ‘Wrong item number etc’) and Click OK
© 2011 Health Communication Network Limited.
Level 4, 201 Pacific Highway, St Leonards, NSW, 2065.
Customer Support: 1300 300 161 – Option 2
Blue
Guide
BlueChip
ChipTraining
Training
Guide
Page 130 of 193
5. Enter the correct item number or fees (in this case) or dates etc
6. Click the Issue button.
7. Click OK to confirm.
8. Print the adjusted Invoice
The Account Debtors tab (below) reflects the adjustment. In the details section, the invoice is
itemised.
© 2011 Health Communication Network Limited.
Level 4, 201 Pacific Highway, St Leonards, NSW, 2065.
Customer Support: 1300 300 161 – Option 2
Blue
Guide
BlueChip
ChipTraining
Training
Guide
Page 131 of 193
Refunds & Write Offs
In lay terms, a refund is an adjustment to a receipt performed after banking has been
settled.
The types of refunds that will be described in this section will be: Allocation Refund and a
Credit Payment Refund.
An Allocation Refund scenario would be when a paid invoice/receipt is required to be
adjusted to a lower amount after banking. This scenario is identical to the paid invoice/receipt
adjustment described earlier. The essential difference is that in this case, banking has been
finalised.
Allocation Refund
1. Open the patient’s account and locate the paid invoice to be adjusted
2. Click Open
© 2011 Health Communication Network Limited.
Level 4, 201 Pacific Highway, St Leonards, NSW, 2065.
Customer Support: 1300 300 161 – Option 2
Blue
Guide
BlueChip
ChipTraining
Training
Guide
3. Click Adjust
4. Enter a reason and click OK
© 2011 Health Communication Network Limited.
Level 4, 201 Pacific Highway, St Leonards, NSW, 2065.
Customer Support: 1300 300 161 – Option 2
Page 132 of 193
Blue
Guide
BlueChip
ChipTraining
Training
Guide
Page 133 of 193
5. Alter the data (in this case change the service item number)
6. Click Issue
The invoice and receipt has been reversed. With the receipt reversed, the money taken is now
unallocated and is recorded in Blue Chip as a Credit Payment.
7. Allocate the Credit Amounts.
This allocates the money now held in credit to the newly adjusted invoice. Ensure the
top amount (money in credit) equals the bottom amount (invoice amount).
8. Click OK
9. Print the Invoice
10. Click the Account Credits tab (see screen capture next page)
11. Click Allocate/Refund Credit Payment
© 2011 Health Communication Network Limited.
Level 4, 201 Pacific Highway, St Leonards, NSW, 2065.
Customer Support: 1300 300 161 – Option 2
Blue
Guide
BlueChip
ChipTraining
Training
Guide
12. Click Refund
13. Provide a reason for the refund and method of refund
© 2011 Health Communication Network Limited.
Level 4, 201 Pacific Highway, St Leonards, NSW, 2065.
Customer Support: 1300 300 161 – Option 2
Page 134 of 193
Blue
Guide
BlueChip
ChipTraining
Training
Guide
Page 135 of 193
14. Click OK
The Account Credits tab (above) shows the original receipted amount credited. It then shows
the allocation of $75 to pay the adjusted invoice. Finally it shows the amount refunded.
The Account Debtors tab (above) shows the original invoice and receipt (flagged) and their
subsequent reversals (in red). The tab then shows the adjusted invoice being paid by the
amount held in credit from the receipt reversal.
© 2011 Health Communication Network Limited.
Level 4, 201 Pacific Highway, St Leonards, NSW, 2065.
Customer Support: 1300 300 161 – Option 2
Blue
Guide
BlueChip
ChipTraining
Training
Guide
Page 136 of 193
The Refunds History tab (above) records details of the refund. Note the ‘Show Audit Trail’ is
permanently on and that if this was performed in error, the refund can be reversed.
The Receipts tab (above) shows original receipt and its allocation reversal. It also shows the
amount as a credit payment before finally showing $75 allocated. The Details of the Credit
Allocation is shown in the lower portion of the screen.
The Invoices tab shows the original invoice and its reversal. Lastly, the adjusted invoice is
displayed.
© 2011 Health Communication Network Limited.
Level 4, 201 Pacific Highway, St Leonards, NSW, 2065.
Customer Support: 1300 300 161 – Option 2
Blue
Guide
BlueChip
ChipTraining
Training
Guide
Page 137 of 193
The above screen capture shows the new Refunds tab with details of the refund. This tab is
found in the Practitioner’s bank account within the Banking module. The Banking module is
found in the left margin menu in the Practice Explorer.
Credit Payment Refund
In this scenario, a patient has paid a prepayment which has been banked. For whatever reason
(like the patient changed their mind about a procedure), they now wish a refund.
1. Open the patient’s account
2. Click the Account Credits tab
3. Click Allocate/Refund Credit Payment
© 2011 Health Communication Network Limited.
Level 4, 201 Pacific Highway, St Leonards, NSW, 2065.
Customer Support: 1300 300 161 – Option 2
Blue
Guide
BlueChip
ChipTraining
Training
Guide
4. Click Refund
5. Enter a reason and refund method
6. Click OK
© 2011 Health Communication Network Limited.
Level 4, 201 Pacific Highway, St Leonards, NSW, 2065.
Customer Support: 1300 300 161 – Option 2
Page 138 of 193
Blue
Guide
BlueChip
ChipTraining
Training
Guide
Page 139 of 193
The Refunds History tab will show the details of the refund
The Receipts tab shows details of the original receipt.
The Refunds tab in the Banking module shows details of the refund.
Details of past refunds can be listed using the ‘Refund Audit Trail’ reports found in the
reports section.
© 2011 Health Communication Network Limited.
Level 4, 201 Pacific Highway, St Leonards, NSW, 2065.
Customer Support: 1300 300 161 – Option 2
Blue
Guide
BlueChip
ChipTraining
Training
Guide
Page 140 of 193
Write Offs
A write off is when the practice is accepting a loss; whether it is a few cents or hundreds of
dollars. The reasons for writing off an amount vary greatly, however in a practice situation
only a few people have the authority to perform this duty and within Blue Chip only a few
people may have the permissions to do this. Some practices use the write off functionality to
administer discounts or to avoid performing an adjustment which strictly speaking, is not
what it was designed for and may lead to misleading reports.
To Write Off an amount
1. From the Invoices tab, Click Write Off
2. Enter a reason for the write off.
3. The amount written off can be the entire amount, or part thereof.
4. Click OK
© 2011 Health Communication Network Limited.
Level 4, 201 Pacific Highway, St Leonards, NSW, 2065.
Customer Support: 1300 300 161 – Option 2
Blue
Guide
BlueChip
ChipTraining
Training
Guide
Page 141 of 193
The Invoice tab registers the Write Off. By clicking the ‘Show Audit Trail’ checkbox, the
user, time/date and reason can be viewed.
The Write offs History tab shows the audit trail (always). In the details (lower) part of the
screen, the invoice it pertains to is listed. The write off type will always be a bad debt,
because basically that is what it is – an amount that will not be recovered.
© 2011 Health Communication Network Limited.
Level 4, 201 Pacific Highway, St Leonards, NSW, 2065.
Customer Support: 1300 300 161 – Option 2
Blue
Guide
BlueChip
ChipTraining
Training
Guide
Page 142 of 193
Medicare Australia / DVA Online
The recipient is Medicare Australia (Bulk Bill) or Dept of Veteran Affairs under Medicare
and is sent online in real time. Processing time is around 48 hours for Bulk Bill amounts and
a little longer for Veterans Affairs.
The following module outlines the process of processing the actual online claim (batch) and
receipting it. The invoicing for Medicare online is very similar to invoicing a patient privately
except for a few things.
The descriptions are not transmitted to Medicare.
The print out from Bulk Bill and DVA are different to the other classes.
Veterans Affairs is still in classic mode- a hard copy of each SIGNED voucher must still be
sent into Veterans Affairs for Assessment before the batch is paid.
In the example below, the class is called MA Bulk Bill but may be named differently at the
practice.
1. Create an invoice as described in the Billing section
2. Click Issue to issue to invoice
TIP: to advise Medicare of certain scenarios eg: Not Normal Aftercare. After keying in the
item number; right mouse click on the description. A button “Add Service Text” will appear.
Click OK. Type in the message or use the drop down option. This field can accept up to 30
alphanumeric characters.
© 2011 Health Communication Network Limited.
Level 4, 201 Pacific Highway, St Leonards, NSW, 2065.
Customer Support: 1300 300 161 – Option 2
Blue
Guide
BlueChip
ChipTraining
Training
Guide
Page 143 of 193
1
Since 2008 Medicare has advised that the practice is no longer required to print a copy for
their records. In accordance with Medicare’s directive, the patient should still sign for
service.
When the Invoice is issued, it looks like a standard invoice.
© 2011 Health Communication Network Limited.
Level 4, 201 Pacific Highway, St Leonards, NSW, 2065.
Customer Support: 1300 300 161 – Option 2
Blue
Guide
BlueChip
ChipTraining
Training
Guide
Page 144 of 193
Sending the Claim
1. From Practice Explorer [F12] select Medicare Australia
2. Click New to display the issued invoices waiting for processing
3. Click the single or double headed arrow to move the invoices to the processing side
© 2011 Health Communication Network Limited.
Level 4, 201 Pacific Highway, St Leonards, NSW, 2065.
Customer Support: 1300 300 161 – Option 2
Blue
Guide
BlueChip
ChipTraining
Training
Guide
4. Click Send
5. Click OK
© 2011 Health Communication Network Limited.
Level 4, 201 Pacific Highway, St Leonards, NSW, 2065.
Customer Support: 1300 300 161 – Option 2
Page 145 of 193
Blue
Guide
BlueChip
ChipTraining
Training
Guide
Page 146 of 193
Processing
Claim
When the claim has been sent without errors its status becomes ‘Awaiting Process Report’.
See Appendix A for the various stages the claim goes through.
Claim Status
How to read the panel:
To check on any claim, access the Medicare Australia Online Claims panel in Practice
Explorer (F12). This ‘user interface panel’ can be modified in several ways to make checking
easier.
By clicking on Status, the user can re-sort the information displayed so that all claims are in
Status Type.
The Refresh Button will appear bold. Clicking on this will reformat the report.
Clicking on Claim Type will sort entries by DVA and Bulk Bill (after hitting Refresh).
Claim ID – formerly known as Batch number – is called PMS Claim ID by Medicare
Australia when talking to them.
© 2011 Health Communication Network Limited.
Level 4, 201 Pacific Highway, St Leonards, NSW, 2065.
Customer Support: 1300 300 161 – Option 2
Blue
Guide
BlueChip
ChipTraining
Training
Guide
Page 147 of 193
The function keys at the bottom of the panel represent the following:
NEW –
prepare and authorise vouchers to be sent in a claim
OPEN –
claims that have not been transmitted can be opened individually and edited.
DELETE – claims that have not been transmitted can be deleted with the vouchers
returning to the list for selection under the New Button.
Claims that have been transmitted can be deleted on the same day that they were sent
provided the practice notifies Medicare Australia by phone on 1800 700 199, that the claim is
being deleted.
Note:
Medicare Australia may provide a reference number to be keyed in to the reference
panel.
The deleted claim will sit in the list.
Invoices released from the deleted claim will appear in the New section
Receipting Claim Payments
It is important that Receipts are processed expediently because the money is deposited
directly into the practice bank accounts once the transmission is sent to Blue Chip.
Delays in processing the receipts can make it difficult to reconcile Blue Chip revenue
reporting against the Bank Statements; therefore HCN recommends that this process be
performed daily.
1. From Practice Explorer, Click Medicare Australia in the left margin
© 2011 Health Communication Network Limited.
Level 4, 201 Pacific Highway, St Leonards, NSW, 2065.
Customer Support: 1300 300 161 – Option 2
Blue
Guide
BlueChip
ChipTraining
Training
Guide
Page 148 of 193
2. Click to select the claims marked ‘Awaiting Process Report’
3. Click Transmit. If the screen below appears, the batch is ready to receipt.
Remember, claims will usually take 24 hours to process from when they were sent.
4. Click Close
© 2011 Health Communication Network Limited.
Level 4, 201 Pacific Highway, St Leonards, NSW, 2065.
Customer Support: 1300 300 161 – Option 2
Blue
Guide
BlueChip
ChipTraining
Training
Guide
Page 149 of 193
5. Click Receipt when the claim now shows ‘Ready to Receipt’ in the Status column.
6. Click OK
© 2011 Health Communication Network Limited.
Level 4, 201 Pacific Highway, St Leonards, NSW, 2065.
Customer Support: 1300 300 161 – Option 2
Blue
Guide
BlueChip
ChipTraining
Training
Guide
Page 150 of 193
In the Patient’s file, the invoice indicates it has been paid, and the sundry invoice is listed
beneath it with a flag in the Sundry column.
The Receipt tab (below) shows the total receipted (invoice + sundry), and the payment
method displays that it has been directly debited.
The Account Debtors tab shows the original invoice, then the receipt for the benefit. The
sundry invoice is shown on the 3rd line which locks in the overpayment so it can’t be used by
the patient in future treatment as the money belongs to the practice.
© 2011 Health Communication Network Limited.
Level 4, 201 Pacific Highway, St Leonards, NSW, 2065.
Customer Support: 1300 300 161 – Option 2
Blue
Guide
BlueChip
ChipTraining
Training
Guide
Page 151 of 193
Electronic Patient Claiming
Patient Claiming Scenarios
Scenario 1: A gap payment, manually sent
Patient makes a part payment (gap payment) to the practice and the claim is manually sent to
Medicare Australia Patient Claiming.
Reimbursement:
A Medicare cheque with the doctor as the payee is sent to the patient. The patient then
forwards the cheque to the practice. If the cheque is not presented to the practice within 21
days, the practice should contact the patient initially. Depending on what has transpired, the
patient should then either present the cheque to the practice OR contact Medicare Australia to
have the original cheque cancelled and a new cheque redrawn. The cheque will then be sent
to the patient to be forwarded on to the practitioner.
There may be an alternative logic path; however this would differ for individual
circumstances.
Scenario 2: A gap payment, electronically sent
Patient makes a part payment (gap payment) to the practice and the claim is electronically
sent to Medicare Australia Online Patient Claiming.
Reimbursement:
A Medicare cheque with the doctor as the payee is sent to the patient. The patient then
forwards the cheque to the practice. If the cheque is not presented to the practice within 21
days, the practice should contact the patient initially. Depending on what has transpired, the
patient should then either present the cheque to the practice OR contact Medicare Australia to
have the original cheque cancelled and a new cheque redrawn. The cheque will then be sent
to the patient to be forwarded on to the practitioner.
If after 90 days a cheque has still not been presented to the practice, Medicare Australia runs
a search on cheques that have not been cashed. Medicare Australia will cancel non cashed
cheques and credit the practitioners’ account electronically.
Scenario 3: Full payment, electronically sent
Patient pays the invoice in full and the claim is sent electronically to Medicare Australia
Patient Claiming
Reimbursement:
After processing, the patient is electronically paid the claimable amount if they have first
registered their details with Medicare Australia.
Otherwise the patient will be reimbursed by Medicare cheque.
© 2011 Health Communication Network Limited.
Level 4, 201 Pacific Highway, St Leonards, NSW, 2065.
Customer Support: 1300 300 161 – Option 2
Blue
Guide
BlueChip
ChipTraining
Training
Guide
Page 152 of 193
Points to note:
The default setting for Patient Claiming in Blue Chip is reimbursement by cheque. The
practice should leave this setting even if the patient has registered their details. Medicare
Australia will override this setting on processing and reimburse electronically if applicable.
Patients can only be reimbursed electronically if they have paid the invoice in full and have
had their details registered with Medicare Australia.
If a patient has only made a part payment, a cheque (payee practitioner) is sent via the
patient. The patient forwards this to the practice.
© 2011 Health Communication Network Limited.
Level 4, 201 Pacific Highway, St Leonards, NSW, 2065.
Customer Support: 1300 300 161 – Option 2
Blue
Guide
BlueChip
ChipTraining
Training
Guide
Page 153 of 193
Electronic Patient Claiming Information Flow
Patient Claim Class
Invoice & Receipt as
normal
No
IF gap
payment
Then …is
recorded in
patient details
Yes
Press Patient
Claiming Button
Transmit to Medicare
© 2011 Health Communication Network Limited.
Level 4, 201 Pacific Highway, St Leonards, NSW, 2065.
Customer Support: 1300 300 161 – Option 2
Blue
Guide
BlueChip
ChipTraining
Training
Guide
Page 154 of 193
Processing at
Medicare
Australia
No
If invoice paid in
full
Then Cheque
sent to Dr via
patient
Yes
If details bank
details registered at
Medicare Australia
Transmit from
Medicare
Then Cheque
forwarded to Practice
Receipt
partial
payment
Patient’s
Bank
Account
End
© 2011 Health Communication Network Limited.
Level 4, 201 Pacific Highway, St Leonards, NSW, 2065.
Customer Support: 1300 300 161 – Option 2
No
Blue
Guide
BlueChip
ChipTraining
Training
Guide
Page 155 of 193
Creating the Claim
This particular section outlines how to lodge an electronic patient claim when there is a
distinct class called Patient Claim (or a title to that effect). If electronic patient claiming has
been associated with another class, the procedure is identical: Simply create the invoice in the
associated class – typically the Private Class.
1. Create an invoice as normal.
The Medicare verification box may appear should verification be configured to do so before
billing a patient.
2. Receipt the invoice.
In this case the patient is paying the gap. This process will differ slightly from the
scenario where the patient is paying the amount in full.
3. Issue the Receipt
The receipt is showing that a part payment has been received.
4. Click Patient Claim
© 2011 Health Communication Network Limited.
Level 4, 201 Pacific Highway, St Leonards, NSW, 2065.
Customer Support: 1300 300 161 – Option 2
Blue
Guide
BlueChip
ChipTraining
Training
Guide
Page 156 of 193
At this screen, Medicare advises clicking the ‘Use Medicare Address’ option. Regardless of
whether the patient has had their EFT details recorded with Medicare, leave the Payment
Type as Cheque. Medicare will override this selection should the patient need to be
reimbursed from Medicare (in the situation where they have paid the invoice in full) and had
their EFT details registered.
Medicare advises for practices not to record patient’s EFT details. Patients should register
their EFT details directly with Medicare.
© 2011 Health Communication Network Limited.
Level 4, 201 Pacific Highway, St Leonards, NSW, 2065.
Customer Support: 1300 300 161 – Option 2
Blue
Guide
BlueChip
ChipTraining
Training
Guide
5. Click to select the Claimant Declaration
6. Click Send
© 2011 Health Communication Network Limited.
Level 4, 201 Pacific Highway, St Leonards, NSW, 2065.
Customer Support: 1300 300 161 – Option 2
Page 157 of 193
Blue
Guide
BlueChip
ChipTraining
Training
Guide
7. Click Accept Claim
8. Click Yes to Print the Statement of Claim and Benefit.
© 2011 Health Communication Network Limited.
Level 4, 201 Pacific Highway, St Leonards, NSW, 2065.
Customer Support: 1300 300 161 – Option 2
Page 158 of 193
Blue
Guide
BlueChip
ChipTraining
Training
Guide
Page 159 of 193
Receipting the Claim
This procedure presumes that the patient has forwarded the cheque onto the practice.
Receipting of the Patient Claim occurs from within the patient’s file, not the Medicare
Australia window. This is because the claim is lodged electronically, the actually
reimbursement is delivered via a variety of means (cheque or direct debit).
1. Click New Receipt
2. Complete the Receipt (as shown below)
In this example, the 30061 or lower invoice will be finalised.
3. Click Issue
4. Click Yes to automatically receipt the claim in the Medicare Australia window.
© 2011 Health Communication Network Limited.
Level 4, 201 Pacific Highway, St Leonards, NSW, 2065.
Customer Support: 1300 300 161 – Option 2
Blue
Guide
BlueChip
ChipTraining
Training
Guide
5. The patient’s invoice is marked as paid.
© 2011 Health Communication Network Limited.
Level 4, 201 Pacific Highway, St Leonards, NSW, 2065.
Customer Support: 1300 300 161 – Option 2
Page 160 of 193
Blue
Guide
BlueChip
ChipTraining
Training
Guide
Handling Medicare Australia Rejections
1. Open the Medicare Australia option from the Practice Explorer
2. Select the claim
3. Click Transmit
© 2011 Health Communication Network Limited.
Level 4, 201 Pacific Highway, St Leonards, NSW, 2065.
Customer Support: 1300 300 161 – Option 2
Page 161 of 193
Blue
Guide
BlueChip
ChipTraining
Training
Guide
Page 162 of 193
If a number appears in a bracket (1), this generally indicates the number of rejected items.
Rejected items must be processed before receipting other items.
4. Select the claim with the rejected item
5. Click the Rejected button
The Rejected Items Error Code/Description screen displays a brief explanation as to why the
claim was rejected.
The practice can then decide whether to resubmit the invoice (service text may be added if
required) or alternatively you may elect to write off the invoice.
© 2011 Health Communication Network Limited.
Level 4, 201 Pacific Highway, St Leonards, NSW, 2065.
Customer Support: 1300 300 161 – Option 2
Blue
Guide
BlueChip
ChipTraining
Training
Guide
Page 163 of 193
6. Double click the Option column to change between Resubmit and Write Off for each
claim.
7. Click OK.
8. Click Yes to confirm processing of the rejected claims.
This will return to the main Medicare Australia screen.
© 2011 Health Communication Network Limited.
Level 4, 201 Pacific Highway, St Leonards, NSW, 2065.
Customer Support: 1300 300 161 – Option 2
Blue
Guide
BlueChip
ChipTraining
Training
Guide
Page 164 of 193
9. Click Receipt to settle the valid claims.
10. Click OK
There can be many reasons why a claim has been rejected and as such, numerous corrective
measures for dealing with each type of rejection are employed. Call Blue Chip support
(1300 300 161 option 2) for assistance. They will identify what measure needs to be
employed to validate the rejected claim (if it can be) and instruct step-by-step how to
accomplish this.
When the claim has been altered and is ready to be resent:
11. Navigate back to the Medicare Australia screen
12. Click New
© 2011 Health Communication Network Limited.
Level 4, 201 Pacific Highway, St Leonards, NSW, 2065.
Customer Support: 1300 300 161 – Option 2
Blue
Guide
BlueChip
ChipTraining
Training
Guide
© 2011 Health Communication Network Limited.
Level 4, 201 Pacific Highway, St Leonards, NSW, 2065.
Customer Support: 1300 300 161 – Option 2
Page 165 of 193
Blue
Guide
BlueChip
ChipTraining
Training
Guide
Page 166 of 193
13. Move the altered claims (which are coloured red) to the right panel by clicking the >
(singular) or >> (multiple) buttons
14. Click Send to resend the claims to Medicare.
Medicare Australia Claim Status
Claim Status
Description and Action(s) Required
Awaiting Authorisation
To authorise the claim, open it, and select either “Send” if you want to
immediately send the claim to the Medicare Australia, or “Store” to
authorise and store it for later submission. Authorised claims that are
stored will have a status of “Awaiting Submission”
Awaiting Submission
A claim with this status is waiting to be sent to the Medicare Australia.
Click on the “Transmit” button to submit the claim.
Awaiting Process Report
The processing report is available within 3 business days of the claim
being transmitted to Medicare Australia and details any exceptions
arising from the processing of the claim.
Information contained in this report can be used to allow resubmission
of items that have no payments made against them. This allows these
items to be reprocessed without waiting for the Payment Report to be
received. Click on the “Transmit” button to retrieve the Processing
Report.
Awaiting Payment
Report
A claim with this status has successfully retrieved the processing report
and is waiting for the payment report. The payment report is available
within 6 business days of the claim being transmitted to Medicare
Australia and details the deposit information for payments made to the
practitioner in respect of the claims. Once received, Blue Chip can then
create receipts and other entries (allocations, write-offs, sundry
invoices) to finalise the claim. Click on the “Transmit” button to retrieve
the Payment Report.
Ready To Receipt
Successful receipt of the payment report will allow receipting to be
completed for the claim.
All Rejected
All items in this claim have been rejected. Click on the “Rejected…”
button at Medicare Australia Online Claims window to process these
items
Finalised (Receipted)
The claim has been finalised. No further action is required.
Finalised (All rejected)
The claim has been finalised. No further action is required.
Same Day Delete
The claim has been deleted. No further action is required.
© 2011 Health Communication Network Limited.
Level 4, 201 Pacific Highway, St Leonards, NSW, 2065.
Customer Support: 1300 300 161 – Option 2
Blue
Guide
BlueChip
ChipTraining
Training
Guide
Page 167 of 193
Recalls
Patients can be assigned to a recall program in 2 ways, either from within the Patient’s file
via the Patient Details screen or through Practice Explorer.
Practices must however first create different types of Recalls and associated templates to help
identify whether the patients will be contacted via phone or via Mail.
Creating Recall Templates:
Select Setup from the Tool Bar Select Templates Select Recalls
To create a new Recall template, Click on New and give your template a name (i.e. Pap
Smear 24 months). Click OK
Add your letterhead, content of document and required Patient Fields that you would like
automatically brought into the document (for more information on how to create a template
see creating WP templates)
© 2011 Health Communication Network Limited.
Level 4, 201 Pacific Highway, St Leonards, NSW, 2065.
Customer Support: 1300 300 161 – Option 2
Blue
Guide
BlueChip
ChipTraining
Training
Guide
Page 168 of 193
Creating Recall types:
Select Setup from the Tool Bar Select Practitioner Select Recall Types
Click on the Add Button and give your Recall Type a Name. Click OK
Define your Recall Type by Identifying the Default Period in weeks and select by clicking
inside the Phone or Print options as to whether you wish to contact the patient via Phone or
Mail.
If you have opted to contact the patient via Mail, then you must select from the drop down
list of templates offered. (in this case your Pap Smear 24 month recall)
© 2011 Health Communication Network Limited.
Level 4, 201 Pacific Highway, St Leonards, NSW, 2065.
Customer Support: 1300 300 161 – Option 2
Blue
Guide
BlueChip
ChipTraining
Training
Guide
Page 169 of 193
Assigning a patient to a recall from within the Patient’s File
In this screen, all of the current recalls are listed. Old recalls can be viewed by checking the
‘View Old’ box. If there are numerous recalls, a date range can be specified.
To add the Patient to a recall program
1. Click ADD
2. Select the Type of Recall from the drop down list (previously defined in the
document)
3. Select the Practitioner from the drop down list – this will automatically bring across
the referral details associated with the selected practitioner’s accounts and can be used
to display within the Recall Letter
The number of weeks and date will be automatically calculated by the Recall type.
© 2011 Health Communication Network Limited.
Level 4, 201 Pacific Highway, St Leonards, NSW, 2065.
Customer Support: 1300 300 161 – Option 2
Blue
Guide
BlueChip
ChipTraining
Training
Guide
Page 170 of 193
4. Click OK
The recall now appears in the Patient Details. Note the red circle next to Recalls in the
Margin Menu.
© 2011 Health Communication Network Limited.
Level 4, 201 Pacific Highway, St Leonards, NSW, 2065.
Customer Support: 1300 300 161 – Option 2
Blue
Guide
BlueChip
ChipTraining
Training
Guide
Page 171 of 193
Assigning a patient to a recall from the Practice Explorer
1. From Practice Explorer, Click Recall
2. Click Add
3. Enter the patient (either type the Surname and press [Tab] or click the 3 dot button
and select the patient from the search facility)
4. Select the type of recall from the drop down list
© 2011 Health Communication Network Limited.
Level 4, 201 Pacific Highway, St Leonards, NSW, 2065.
Customer Support: 1300 300 161 – Option 2
Blue
Guide
BlueChip
ChipTraining
Training
Guide
Page 172 of 193
5. Select the practitioner from the drop down list (this is based upon the registered
doctors)
The referral information will automatically appear if it is current. If the patient has multiple
referrals, click the 3 dot button
to select the correct referral for the recall
© 2011 Health Communication Network Limited.
Level 4, 201 Pacific Highway, St Leonards, NSW, 2065.
Customer Support: 1300 300 161 – Option 2
Blue
Guide
BlueChip
ChipTraining
Training
Guide
Page 173 of 193
The date of the referral is displayed as with the letter date, effective date and expiry date.
The due xx weeks and date fields are linked. By changing the xx weeks will automatically
calculate the date field and vice-versa. Add a comment if one is required.
6. Press OK
© 2011 Health Communication Network Limited.
Level 4, 201 Pacific Highway, St Leonards, NSW, 2065.
Customer Support: 1300 300 161 – Option 2
Blue
Guide
BlueChip
ChipTraining
Training
Guide
Page 174 of 193
Enacting a Telephone based Recall program
1. From Practice Explorer click Recall.
All of the recalls will appear. Select the desired recall program to enact.
2. Click the Contact/print button
Note the advise on the diaglogue screen
If the Cancel button is clicked, the Recall screen appears unaltered.
If the OK button is clicked, the name is removed from the Recall screen (having been
contacted). The Recall information still appears in the patient’s file.
© 2011 Health Communication Network Limited.
Level 4, 201 Pacific Highway, St Leonards, NSW, 2065.
Customer Support: 1300 300 161 – Option 2
Blue
Guide
BlueChip
ChipTraining
Training
Guide
Page 175 of 193
Enacting a Print based Recall Program
1. From Practice Explorer click Recall.
All of the recalls will appear. Select the desired recall program to enact.
2. Click the Contact/print button
The screen allows for a comment. The check box indicates that once the letter is printed, it
will be sent and delivered therefore the patient is deemed to be contacted.
3. Click OK
© 2011 Health Communication Network Limited.
Level 4, 201 Pacific Highway, St Leonards, NSW, 2065.
Customer Support: 1300 300 161 – Option 2
Blue
Guide
BlueChip
ChipTraining
Training
Guide
Page 176 of 193
4. Set the printer destination then click OK
After the letter has been printed, the patient’s name is removed from the Recall list
© 2011 Health Communication Network Limited.
Level 4, 201 Pacific Highway, St Leonards, NSW, 2065.
Customer Support: 1300 300 161 – Option 2
Blue
Guide
BlueChip
ChipTraining
Training
Guide
Page 177 of 193
When the patient has been marked as Contacted, their name is removed from the Recall
screen in Patient Explorer AND the red circle is removed and details are placed in ‘old
recalls’ in the recalls section of Patient Details.
© 2011 Health Communication Network Limited.
Level 4, 201 Pacific Highway, St Leonards, NSW, 2065.
Customer Support: 1300 300 161 – Option 2
Blue
Guide
BlueChip
ChipTraining
Training
Guide
Page 178 of 193
Correspondence
Typing a Medical Report for a patient
1. Select Correspondence from the left hand side Main Margin
2. Click on New Letter
3. Select the template from which the letter will be based (this has already been
predefined within Blue Chip). Setup Templates WP
© 2011 Health Communication Network Limited.
Level 4, 201 Pacific Highway, St Leonards, NSW, 2065.
Customer Support: 1300 300 161 – Option 2
Blue
Guide
BlueChip
ChipTraining
Training
Guide
Page 179 of 193
Letters can be associated to an account. This will enable account specific information (such
as Insurer, Claim Number, Date of Injury etc) to be drawn into the document from within
Blue Chip. It also provides access to the Practitioner for electronic review.
Type a suitable document title for future reference (this can be automatically inserted within
Setup)
Select Deferred printing (optional and allows users to print all of the day’s documents at a
later time)
Select Practitioner review (optional and if associated with an account) if the practitioner
wishes to electronically review the document before printing.
4. Click OK
At this point, Microsoft Word will open and the document content is able to be edited and
added to. Any pre-defined fields (previously created within setup) is merged into the
document (referral doctor’s name and address for example) will automatically appear in the
document.
Saving Letters
Hold [Ctrl] + [S] will save any unsaved work as will clicking the disc icon.
Clicking the X button to exit the document will prompt for saving if the document hasn’t
already been saved.
Printing Correspondence
Printing is only available from within the Blue Chip Correspondence Menu relating to that
patient. By default, the Microsoft Word printing options have been disabled.
To print directly from a Patient’s File
1. Select the item of correspondence and Click on Print
2. Select the path to the desired printer & Click OK
© 2011 Health Communication Network Limited.
Level 4, 201 Pacific Highway, St Leonards, NSW, 2065.
Customer Support: 1300 300 161 – Option 2
Blue
Guide
BlueChip
ChipTraining
Training
Guide
Page 180 of 193
To print using Deferred Printing
Found when Practice Explorer view (F12) has been launched:
1. Select WP Deferred Printing from left hand side Main Margin.
2. Click within the check boxes under Selected to select the documents to print
© 2011 Health Communication Network Limited.
Level 4, 201 Pacific Highway, St Leonards, NSW, 2065.
Customer Support: 1300 300 161 – Option 2
Blue
Guide
BlueChip
ChipTraining
Training
Guide
Page 181 of 193
1. Click on Print selected button
2. Select the desired printer destination and Click OK
3. Reselect the items that were just printed
4. Click Remove selected button to remove the items from the print list
WP Review
This option will only function if a patient’s account has been associated with the
correspondence item.
From Practice Explorer (F12):
1. Select WP Review from left hand side Main Margin
Ensure the appropriate practitioner is selected
© 2011 Health Communication Network Limited.
Level 4, 201 Pacific Highway, St Leonards, NSW, 2065.
Customer Support: 1300 300 161 – Option 2
Blue
Guide
BlueChip
ChipTraining
Training
Guide
Page 182 of 193
Click Review will open the document for editing. Closing the document will move the item
to WP Deferred Printing.
Click Print to print immediately (without reviewing)
Click Cancel review to cancel printing the document altogether. The item remains in the
patient’s correspondence file.
Click Defer print to move the item to WP Deferred Printing without opening it.
© 2011 Health Communication Network Limited.
Level 4, 201 Pacific Highway, St Leonards, NSW, 2065.
Customer Support: 1300 300 161 – Option 2
Blue
Guide
BlueChip
ChipTraining
Training
Guide
Page 183 of 193
Banking
Is available when Practice Explorer (F12) is launched in the Menu Margin.
It is recommended that the Practice settle their Banking transactions on a regular basis
irrespective of whether the Deposit Slips are used. Daily Settlements provide users with a
foolproof process of ensuring that correct reconciliations are maintained, it is further
recommended that daily takings are reconciled against your Day Sheet to ensure that your
banking transactions are correct.
Settling your Blue Chip banking on a regular basis will help prevent small errors escalating
into big errors at a later time.
Your EFTPOS machine (whether tyro (EFTPOS Auto) or bank (EFTPOS Manual) based)
will provide a daily tally of transactions processed that day. It is far easier for a practice to
reconcile on a daily basis when multiple staff are involved in the data entry, then to wait till
the end of the week. The printing of settlement slips within Blue Chip is not necessary
however, it is important and recommended that you settle the EFTPOS section of Blue Chip
banking.
1. Cash and Cheque (Physical Banking)
2. Open the account to perform banking
© 2011 Health Communication Network Limited.
Level 4, 201 Pacific Highway, St Leonards, NSW, 2065.
Customer Support: 1300 300 161 – Option 2
Blue
Guide
BlueChip
ChipTraining
Training
Guide
Page 184 of 193
The amount represents the tactile (money you can touch including cheques) that will be
deposited at the bank. This defaults to Cash and shows the cash transactions. By
highlighting Cheque, the window below displays the associated Cheque transactions.
3. Click Draft to print a draft deposit slip
4. When satisfied, click Finalise to print the banking deposit slip and to reset the daily
balances to zero
© 2011 Health Communication Network Limited.
Level 4, 201 Pacific Highway, St Leonards, NSW, 2065.
Customer Support: 1300 300 161 – Option 2
Blue
Guide
BlueChip
ChipTraining
Training
Guide
Page 185 of 193
EFTPOS
1. Select EFTPOS in the Margin Menu.
All the EFTPOS transactions are listed in the settlement. (These will include EFTPOS Auto if
you have a TYRO machine for Integrated EFTPOS)
2. Click the Settle Button to settle the days transaction
Enter the settlement number as printed on the EFTPOS terminal settlement summary (Not all
machines have them).
The EFTPOS settlement summary will be printed to a nominated printing destination.
© 2011 Health Communication Network Limited.
Level 4, 201 Pacific Highway, St Leonards, NSW, 2065.
Customer Support: 1300 300 161 – Option 2
Blue
Guide
BlueChip
ChipTraining
Training
Guide
Page 186 of 193
Account History
1. Select Acct History from Margin Menu to display all bank deposits and EFTPOS
settlements recorded
2. Highlight the required entry
3. Click View Payment
View Receipt – Allows the user to view the receipt of the user and adjust it if required.
Print – Allows a duplicate receipt or bank deposit slip to be printed and it is marked as such.
© 2011 Health Communication Network Limited.
Level 4, 201 Pacific Highway, St Leonards, NSW, 2065.
Customer Support: 1300 300 161 – Option 2
Blue
Guide
BlueChip
ChipTraining
Training
Guide
Page 187 of 193
Refunds
Because a refund is performed after banking has been finalised, it does not change an issued
invoice or receipt, nor does it change a day’s takings. A refund is usually drawn from the
practice’s bank account, so this section has been included in the Banking Module. The
Refund screen displays all refunds given in the current month by default. Not shown in the
screen capture is the reason for the refund, who performed it, the date and time.
© 2011 Health Communication Network Limited.
Level 4, 201 Pacific Highway, St Leonards, NSW, 2065.
Customer Support: 1300 300 161 – Option 2
Blue
Guide
BlueChip
ChipTraining
Training
Guide
Page 188 of 193
End of Day/Session Process
Medicare Australia electronic claims should be transmitted and checked daily to ensure that
payments are processed promptly for reconciliation. Medicare Australia processes
transactions seven days a week therefore it is possible that transmissions on a Friday may be
paid by Monday. Not processing these transactions on a daily basis could make bank
statement reconciliation more difficult.
No Shows or Did Not Attend (DNA) type letters should also be considered in the End of Day
process to ensure the patients and referring doctors are kept informed, and to maintain the
patient/practice legal requirements.
The complete list of Blue Chip reports (except Banking) are located by clicking on the printer
icon
found in the Blue Chip toolbar
We recommend the following reports to be printed at the end of each day to ensure that any
discrepancies if they do arise can easily be identified and rectified.
Day’s Appointment list (see Printing an Appointment List)
The Appointment List reflects who is expected to attend the practice today.
Either use the existing sheet printed at the beginning of the session (tally sheet) OR Print a
fresh copy. Ensure that this new list reflects any ‘walk-ins’ or emergency appointments.
© 2011 Health Communication Network Limited.
Level 4, 201 Pacific Highway, St Leonards, NSW, 2065.
Customer Support: 1300 300 161 – Option 2
Blue
Guide
BlueChip
ChipTraining
Training
Guide
Page 189 of 193
Day Sheet
This is a transactional report that can be printed for (a) specific practitioner(s) and displays all
transactions processed on the day. The report can display transactions based upon either entry
date or issue date.
Surgical type invoices with an issue date in the past will appear on a Day Sheet report
generated, based on the Issue date or the Entry date the invoice was keyed in.
The Day Sheet will reflect the following;
Invoices created and issued or deferred or adjusted.
Monies received for banking.
Patient transactions, adjustments, deletions (section 2)
Appointments made & cancelled (Section 3)
Bank Deposit Slip: (See banking in this document)
What to do/Understand the Day Sheet
Invoices created – Section 1.
Cross check that all patients who appear on the appointment list or tally sheet have had an
invoice created. The invoices are itemised and differentiated by their invoice number. The
service date is included on the report enabling easy identification of ‘catch up’ invoices.
Deferred Invoices created or updated – Section 2.
This section of the Day sheet lists the invoices that have been deferred or updated and
deferred again.
Receipts and Credit Allocations – Section 3
Patients are listed alphabetically and the invoices and allocations are listed on the same line.
The receipted amount is listed first, then invoices total.
© 2011 Health Communication Network Limited.
Level 4, 201 Pacific Highway, St Leonards, NSW, 2065.
Customer Support: 1300 300 161 – Option 2
Blue
Guide
BlueChip
ChipTraining
Training
Guide
Page 190 of 193
Receipts by Payment Method – Section 4.
Receipts are listed in number order and itemised. The total in this section should equal the
physical count of cash, cheques and EFTPOS takings for the day. If the totals don’t balance,
refer back to Section 3 to check for discrepancies. Take special note of adjustments and cross
check that the final invoice/receipt is the correct outcome.
Write offs & Refunds – Section 5.
These 2 areas list the write offs and refunds performed in the day. A write off may
correspond to an invoice created that day. A refund will almost certainly correspond to a
transaction from a previous Banking period.
© 2011 Health Communication Network Limited.
Level 4, 201 Pacific Highway, St Leonards, NSW, 2065.
Customer Support: 1300 300 161 – Option 2
Blue
Guide
BlueChip
ChipTraining
Training
Guide
Page 191 of 193
If any errors have been made, correct them before banking has been settled. If required, print
off another day sheet after corrections have been made to ensure all figures add up; then settle
the banking.
The day’s appointments – Section 6
The last table on the day sheet lists the appointments made during the day (regardless of
when the appointment is actually for) and lists any cancellations received. There are
additional reports available under BC Reporter that can display statistical information on
appointments not found in the reporting module.
Appointments
Prior to ending the day, the next session’s appointment list can be printed off.
Printing an Appointment List
1. Forward to the required day using the Calendar control.
2. Click the printer
© 2011 Health Communication Network Limited.
Level 4, 201 Pacific Highway, St Leonards, NSW, 2065.
Customer Support: 1300 300 161 – Option 2
icon, to bring up the reports screen.
Blue
Guide
BlueChip
ChipTraining
Training
Guide
Page 192 of 193
3. Select the type of Appointment list for the required day.
4. Select the practitioner and appointment types (or choose select all). Set the date to the
required date (be sure to set the end date first-see below for the preferred format).
© 2011 Health Communication Network Limited.
Level 4, 201 Pacific Highway, St Leonards, NSW, 2065.
Customer Support: 1300 300 161 – Option 2
Blue
Guide
BlueChip
ChipTraining
Training
Guide
Page 193 of 193
5. Set the printer destination
6. The printout of the Appointment List can be used to remind patients of their
appointment.
© 2011 Health Communication Network Limited.
Level 4, 201 Pacific Highway, St Leonards, NSW, 2065.
Customer Support: 1300 300 161 – Option 2