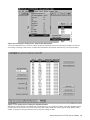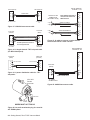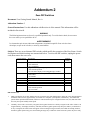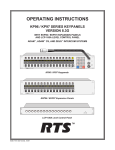
1
TM GETTING STARTED TM 1 8 16 24 PO W ER STA TU S RE S ET ™ 9330-7634-000 Rev C , 8/02 PROPRIETARY NOTICE CUSTOMER SUPPORT The RTS product information and design disclosed herein were originated by and are the property of Telex Communications, Inc. Telex reserves all patent, proprietary design, manufacturing, reproduction, use and sales rights thereto, and to any article disclosed therein, except to the extent rights are expressly granted to others. Technical questions should be directed to: PATENT NOTICE This equipment contains and uses a design embodied in United States Patent No. 5,483,528 for a "TDM Digital Matrix Intercom System". COPYRIGHT NOTICE Copyright 1997 by Telex Communications, Inc. All rights reserved. Reproduction in whole or in part without prior written permission from Telex is prohibited. UNPACKING AND INSPECTION Immediately upon receipt of the equipment, inspect the shipping container and the contents carefully for any discrepancies or damage. Should there be any, notify the freight company and the dealer at once. Customer Service Department RTS/Telex, 12000 Portland Avenue South Burnsville, MN 55337 U.S.A. Telephone: (952) 884-4051 Fax: (800) 323-0498 RETURN SHIPPING INSTRUCTIONS PROCEDURE FOR RETURNS If a repair is necessary, contact the dealer where this unit was purchased. If repair through the dealer is not possible, obtain a RETURN AUTHORIZATION from: Customer Service Department Telex Communications, Inc. Telephone: (877) 863-4169 Fax: (800) 323-0498 WARRANTY INFORMATION DO NOT RETURN ANY EQUIPMENT DIRECTLY TO THE FACTORY WITHOUT FIRST OBTAINING A RETURN AUTHORIZATION. RTS products are warranted by Telex Communications, Inc. to be free from defects in materials and workmanship for a period of three years from the date of sale. Be prepared to provide the company name, address, phone number, a person to contact regarding the repair, the type and quantity of equipment, a description of the problem and the serial number(s). The sole obligation of Telex during the warranty period is to provide, without charge, parts and labor necessary to remedy covered defects appearing in products returned prepaid to Telex. This warranty does not cover any defect, malfunction or failure caused beyond the control of Telex, including unreasonable or negligent operation, abuse, accident, failure to follow instructions in the manual, defective or improper associated equipment, attempts at modification and repair not authorized by Telex, and shipping damage. Products with their serial numbers removed or effaced are not covered by this warranty. SHIPPING TO MANUFACTURER FOR REPAIR OR ADJUSTMENT To obtain warranty service, follow the procedures entitled "Procedure For Returns" and "Shipping to Manufacturer for Repair or Adjustment". This warranty is the sole and exclusive express warranty given with respect to RTS products. It is the responsibility of the user to determine before purchase that this product is suitable for the user's intended purpose. ANY AND ALL IMPLIED WARRANTIES, INCLUDING THE IMPLIED WARRANTY OF MERCHANTABILITY ARE LIMITED TO THE DURATION OF THIS EXPRESS LIMITED WARRANTY. NEITHER TELEX NOR THE DEALER WHO SELLS RTS PRODUCTS IS LIABLE FOR INCIDENTAL OR CONSEQUENTIAL DAMAGES OF ANY KIND. 2 Getting Started, Zeus™ DSP Intercom Matrix All shipments of RTS products should be made via United Parcel Service or the best available shipper, prepaid. The equipment should be shipped in the original packing carton; if that is not available, use any suitable container that is rigid and of adequate size. If a substitute container is used, the equipment should be wrapped in paper and surrounded with at least four inches of excelsior or similar shock-absorbing material. All shipments must be sent to the following address and must include the Return Authorization. Factory Service Department Telex Communications, Incorporated West 1st Street Blue Earth, MN 56013 U.S.A. Upon completion of any repair the equipment will be returned via United Parcel Service or specified shipper collect. ATTENTION ZEUS II USERS The original Zeus manual ships with the Zeus II. This information sheet provides information that is relevant to Zeus II users only. If the front of the unit does not have the Zeus II logo, the unit is an original Zeus. The Zeus II has the following additional features: ! There are two power supplies and therefore two power cord connections on the rear of the unit. ! Simply plug in the power cords to turn the unit on. ! There are two additional LEDs (PS 1 & 2) on the front panel which indicate the status of the power supplies. ! There is an additional connector (J28) which is used along with an RS-232 to RS-485 converter (not supplied) for trunking. Below are figures that point out the Zeus II’s features. Located on the back of this sheet is a diagram providing specific information regarding the connection of the Zeus II in a trunked system, as well as, software configuration information regarding trunking. Front View Power Status Port and Matrix Status II TM 1 8 16 PS1 24 PS2 RESET POWER STATUS Reset CPU Status Rear View Accessory Port RS-232 Port for PC Connection ID 1 J25 ID 2 ID 3 ID 4 J1 TO PC ID 1 J4 ID 2 ID 3 Trunking Port ID 4 J9 ID 1 J12 ID 2 ID 3 ID 4 J17 J20 J26 Telex ID 5 UIO/PAP/LCP GPI J27 J5 ID 6 ID 7 ID 8 J28 TELEX COMMUNICATIONS, INC. Minneapolis, MN U.S.A. J8 GPI Port 8 In/8 Out Copyright © 2002 TelexCommunications, Inc. R J13 ID 5 ID 6 ID 7 ID 8 ID 5 J16 J21 24 Keypanel Ports ID 6 ID 7 ID 8 90-250 VAC 50/60 HZ J24 90-250 VAC Inputs Zeus II Info Sheet Rev. A, 8-2002 ICP-2000 To Other RTS Matrix Intercom System example: Adam CS (J901) TM ICP-2000 J1 J2 J3 J4 J5 J6 J7 J8 To TM-2000 TELEX COMMUNICATIONS, INC. MADE IN USA See TM-2000 Manual Telebyte Configuration See TM-2000 Manual See Diagram 2 Set to DTE To Zeus II (J28) DIP Swtich Settings Pos. 1 2 3 4 5 Telebyte RS-232 to RS-485 Converter Model 285M or Model 365M Setting Closed (on) Open (off) Open (off) Closed (on) Open (off) NOTE: Unit is set for RS-485 twowire mode via DIP switch. See Diagram 1 ID 1 J25 ID 2 Zeus II ID 3 ID 4 J1 TO PC ID 1 J4 ID 2 ID 3 ID 4 J9 ID 1 J12 ID 2 ID 3 ID 4 J17 J20 J26 Telex ID 5 UIO/PAP/LCP GPI Zeus II (J28) DE-9S (Female) J27 J5 ID 6 ID 7 ID 8 R J28 TELEX COMMUNICATIONS, INC. Minneapolis, MN U.S.A. J8 Telebyte 285M or 365M DB-25M (Female) ID 5 ID 6 ID 8 ID 7 J13 ID 5 J16 J21 ID 6 ID 7 ID 8 J24 ICP-2000 DE-9P (Male) Telebyte Model 285M or Model 365M Terminal Strip TX + 6 2 3 3 2 1 5 7 7 Diagram 1 To Setup the Zeus Edit software for trunking do the following: Step 1 1. Select Intercom Configurations located under the |Options| menu. 2. Click on the Options tab. 3. Make sure there is an X mark next to the “Allow for remote trunk master” entry. 4. Click on Apply. Step 2 1. Select Preferences located under the |Options| menu. 2. Click on the Advanced tab. 3. Make sure there is an X mark next to the “Enable trunking support” entry. 4. Click on OK. NOTE: The Zeus II communicates at 9600 baud with the Trunk Master (TM-2000). Be sure to configure the communications in the Trunk Edit software for 9600 baud. For further information on trunking consult the TM-2000 user manual. 90-250 VAC 50/60 HZ TX - Diagram 2 Telebyte Model 285M & 365M converters can be obtained from: Telebyte, Inc. 270 Pulaski Road Greenlawn, NY 11740 Main Ph. 631-423-3232 Order Ph. 800-835-3298 OR 631-423-3267 www.telebyteusa.com End-User License Agreement for Telex® Software IMPORTANT - Please read this document carefully before using this product. THIS DOCUMENT STATES THE TERMS AND CONDITIONS UPON WHICH TELEX COMMUNICATIONS, INC. (the COMPANY) OFFERS TO LICENSE THE INSTALLED SOFTWARE OR PROGRAM (the SOFTWARE) FOR USE WITH THE PRODUCT IN WHICH IT WAS INSTALLED. YOU ARE AGREEING TO BECOME BOUND BY THE TERMS OF THIS AGREEMENT. IF YOU DO NOT AGREE TO THE TERMS OF THIS AGREEMENT, DO NOT USE THIS PRODUCT. PROMPTLY RETURN THE PRODUCT TO THE PLACE WHERE YOU OBTAINED IT FOR A FULL REFUND. The installed software as supplied by the Company is licensed, not sold, to you for use only under the terms of this license, and the Company reserves all rights not expressly granted to you. You own the product or other media on or in which the Software is originally or subsequently recorded or fixed, but the Company retains ownership of all copies of the Software itself. 1. License: This license allows you to use the Software for internal purposes only on a single product in which it was installed. 2. Restrictions: (a) You may not market, distribute or transfer copies of the Software to others or electronically transfer or duplicate the Software. YOU MAY NOT REVERSE ENGINEER, DECOMPILE, DISASSEMBLE, MODIFY, ADAPT, TRANSLATE, RENT, LEASE OR LOAN THE SOFTWARE OR CREATE DERIVATIVE WORKS BASED ON THE SOFTWARE OR ANY ACCOMPANYING WRITTEN MATERIALS. (b) The Software and the accompanying written materials are copyrighted. Unauthorized copying of the Software, including portions thereof or the written materials, is expressly forbidden. (c) You understand that the Company may update or revise the Software and in so doing incurs no obligation to furnish such updates to you. 3. Limited Warranty: The Company does not warrant that the operation of the Software will meet your requirements or operate free from error. The Company DISCLAIMS ALL OTHER WARRANTIES AND CONDITIONS EITHER EXPRESS OR IMPLIED, INCLUDING THE WARRANTIES OF MERCHANTABILITY, FITNESS FOR A PARTICULAR PURPOSE AND NON-INFRINGEMENT OF THIRD PARTY RIGHTS. 4. Limited Liability: The liability of the Company for any claims arising out of this License based upon the Software, regardless of the form of action, shall not exceed the greater of the license fee for the Software or $50. 38109-709 Rev A 10/97 Getting Started, Zeus™ DSP Intercom Matrix 3 This page intentionally left blank. 4 Getting Started, Zeus™ DSP Intercom Matrix Table of Contents Read Me First! · · · · · · · · · · · · · · · · · · · · · · · · · · · · · · · · · · · · · · · · · · · · · · · · · · · · · · · · · · · · · · · · · 7 Introduction · · · · · · · · · · · · · · · · · · · · · · · · · · · · · · · · · · · · · · · · · · · · · · · · · · · · · · · · · · · · · · · · · · · 7 Zeus General Description · · · · · · · · · · · · · · · · · · · · · · · · · · · · · · · · · · · · · · · · · · · · · · · · · · · · · · · · · · · · 9 Specifications · · · · · · · · · · · · · · · · · · · · · · · · · · · · · · · · · · · · · · · · · · · · · · · · · · · · · · · · · · · · · · · · · 10 Zeus . . . . . . . . . . . . . . . . . . . . . . . . . . . . . . . . . . . . . . . . . . . . . . . . . . . . . . . . . . . . . . . . . . . . 10 ZEUSedit . . . . . . . . . . . . . . . . . . . . . . . . . . . . . . . . . . . . . . . . . . . . . . . . . . . . . . . . . . . . . . . . . 10 About the Sample Configuration Files, 1studio.zus and 2studio.zus · · · · · · · · · · · · · · · · · · · · · · · · · · · · · · · · · · · · · 13 Introduction . . . . . . . . . . . . . . . . . . . . . . . . . . . . . . . . . . . . . . . . . . . . . . . . . . . . . . . . . . . . . . . . 13 1studio.zus Description . . . . . . . . . . . . . . . . . . . . . . . . . . . . . . . . . . . . . . . . . . . . . . . . . . . . . . . . . . 13 Cables and Connectors· · · · · · · · · · · · · · · · · · · · · · · · · · · · · · · · · · · · · · · · · · · · · · · · · · · · · · · · · · · · · 22 Introduction . . . . . . . . . . . . . . . . . . . . . . . . . . . . . . . . . . . . . . . . . . . . . . . . . . . . . . . . . . . . . . . . 22 Connectors. . . . . . . . . . . . . . . . . . . . . . . . . . . . . . . . . . . . . . . . . . . . . . . . . . . . . . . . . . . . . . . . . 22 Types, Solder vs Solderless . . . . . . . . . . . . . . . . . . . . . . . . . . . . . . . . . . . . . . . . . . . . . . . . . . . . . . 22 Pin Numbers. . . . . . . . . . . . . . . . . . . . . . . . . . . . . . . . . . . . . . . . . . . . . . . . . . . . . . . . . . . . . . 22 Cable Requirements . . . . . . . . . . . . . . . . . . . . . . . . . . . . . . . . . . . . . . . . . . . . . . . . . . . . . . . . . . . . 22 Cable Diagrams . . . . . . . . . . . . . . . . . . . . . . . . . . . . . . . . . . . . . . . . . . . . . . . . . . . . . . . . . . . . . . 23 Installation Notes · · · · · · · · · · · · · · · · · · · · · · · · · · · · · · · · · · · · · · · · · · · · · · · · · · · · · · · · · · · · · · · 25 General Installation Procedure . . . . . . . . . . . . . . . . . . . . . . . . . . . . . . . . . . . . . . . . . . . . . . . . . . . . . . 25 Unpacking the Equipment . . . . . . . . . . . . . . . . . . . . . . . . . . . . . . . . . . . . . . . . . . . . . . . . . . . . . . . . . 25 Zeus Mounting Precautions . . . . . . . . . . . . . . . . . . . . . . . . . . . . . . . . . . . . . . . . . . . . . . . . . . . . . . . . 25 AC Power Connection. . . . . . . . . . . . . . . . . . . . . . . . . . . . . . . . . . . . . . . . . . . . . . . . . . . . . . . . . . . 25 Computer Connection . . . . . . . . . . . . . . . . . . . . . . . . . . . . . . . . . . . . . . . . . . . . . . . . . . . . . . . . . . . 25 Power-Up and Indications . . . . . . . . . . . . . . . . . . . . . . . . . . . . . . . . . . . . . . . . . . . . . . . . . . . . . . . . . 26 ZEUSedit Software Installation . . . . . . . . . . . . . . . . . . . . . . . . . . . . . . . . . . . . . . . . . . . . . . . . . . . . . . 26 Starting ZEUSedit . . . . . . . . . . . . . . . . . . . . . . . . . . . . . . . . . . . . . . . . . . . . . . . . . . . . . . . . . . . . . 26 Troubleshooting the Computer Connection . . . . . . . . . . . . . . . . . . . . . . . . . . . . . . . . . . . . . . . . . . . . . . . . 26 Keypanel Installation Notes . . . . . . . . . . . . . . . . . . . . . . . . . . . . . . . . . . . . . . . . . . . . . . . . . . . . . . . . 27 TIF-951 Telephone Interface Installation Notes . . . . . . . . . . . . . . . . . . . . . . . . . . . . . . . . . . . . . . . . . . . . . 27 Single Audio Inputs . . . . . . . . . . . . . . . . . . . . . . . . . . . . . . . . . . . . . . . . . . . . . . . . . . . . . . . . . . . . 27 General Purpose Interface (GPI) Connector (J27) . . . . . . . . . . . . . . . . . . . . . . . . . . . . . . . . . . . . . . . . . . . . 28 General Description . . . . . . . . . . . . . . . . . . . . . . . . . . . . . . . . . . . . . . . . . . . . . . . . . . . . . . . . . . 28 Connections . . . . . . . . . . . . . . . . . . . . . . . . . . . . . . . . . . . . . . . . . . . . . . . . . . . . . . . . . . . . . . 28 Programming GPI Outputs . . . . . . . . . . . . . . . . . . . . . . . . . . . . . . . . . . . . . . . . . . . . . . . . . . . . . . 28 Programming GPI Inputs . . . . . . . . . . . . . . . . . . . . . . . . . . . . . . . . . . . . . . . . . . . . . . . . . . . . . . . 30 UIO-256 Input/Output Frame . . . . . . . . . . . . . . . . . . . . . . . . . . . . . . . . . . . . . . . . . . . . . . . . . . . . . . . 30 LCP-102 Level Control Panel . . . . . . . . . . . . . . . . . . . . . . . . . . . . . . . . . . . . . . . . . . . . . . . . . . . . . . . 30 Using RTS TW Intercom Belt Packs with Zeus. . . . . . . . . . . . . . . . . . . . . . . . . . . . . . . . . . . . . . . . . . . . . . 30 Getting Started, Zeus™ DSP Intercom Matrix 5 List of Figures Figure 1. Reference view for Zeus DSP Intercom Matrix · · · · · · · · · · · · · · · · · · · · · · · · · · · · · · · · · · · · · · · · · · · 8 Figure 2. Zeus and Accessory Dimensions · · · · · · · · · · · · · · · · · · · · · · · · · · · · · · · · · · · · · · · · · · · · · · · · · · 11 Figure 3. A possible intercom system layout for the sample configuration file named 1studio.zus. · · · · · · · · · · · · · · · · · · · · · 12 Figure 4. The keypanel setup screen for the director’s keypanel in the example file 1studio.zus · · · · · · · · · · · · · · · · · · · · · · · 17 Figure 5. A partial view of the control room dim table for the example intercom system 1studio.zus.· · · · · · · · · · · · · · · · · · · · 18 Figure 6. Accessing the Analog Input / Output Gain Adjustment. · · · · · · · · · · · · · · · · · · · · · · · · · · · · · · · · · · · · · · 19 Figure 7. The analog input / output gain adjustment table. · · · · · · · · · · · · · · · · · · · · · · · · · · · · · · · · · · · · · · · · · · 19 Figure 8. A possible intercom system layout for the sample configuration file named 2studio.zus. · · · · · · · · · · · · · · · · · · · · · 21 Figure 9. Connector Numbering. · · · · · · · · · · · · · · · · · · · · · · · · · · · · · · · · · · · · · · · · · · · · · · · · · · · · · · · 22 Figure 10. Cable requirements. · · · · · · · · · · · · · · · · · · · · · · · · · · · · · · · · · · · · · · · · · · · · · · · · · · · · · · · · 22 Figure 11. Keypanel and TIF-951 Intercom cable wiring diagram. · · · · · · · · · · · · · · · · · · · · · · · · · · · · · · · · · · · · · · 23 Figure 12. A cable to connect a 4-wire intercom station other than a keypanel. · · · · · · · · · · · · · · · · · · · · · · · · · · · · · · · 23 Figure 13. An audio output cable from Zeus to an external device. · · · · · · · · · · · · · · · · · · · · · · · · · · · · · · · · · · · · · · 23 Figure 14. An audio input cable to connect an external audio source. · · · · · · · · · · · · · · · · · · · · · · · · · · · · · · · · · · · · 23 Figure 15. Configuration computer cable. · · · · · · · · · · · · · · · · · · · · · · · · · · · · · · · · · · · · · · · · · · · · · · · · · · · 23 Figure 16. LCP-102 interconnect cable. · · · · · · · · · · · · · · · · · · · · · · · · · · · · · · · · · · · · · · · · · · · · · · · · · · · · 23 Figure 17. UIO-256 interconnect cable. · · · · · · · · · · · · · · · · · · · · · · · · · · · · · · · · · · · · · · · · · · · · · · · · · · · · 24 Figure 18. A single-channel “TW” belt pack cable (for BP-318 belt pack). · · · · · · · · · · · · · · · · · · · · · · · · · · · · · · · · · 24 Figure 19. A power distribution cable for “TW” belt packs. · · · · · · · · · · · · · · · · · · · · · · · · · · · · · · · · · · · · · · · · · 24 Figure 20. An audio termination plug for use with the TW5W splitter.· · · · · · · · · · · · · · · · · · · · · · · · · · · · · · · · · · · · 24 Figure 21. A cable to connect a 4-wire channel from an SSA-324 to a Zeus channel. · · · · · · · · · · · · · · · · · · · · · · · · · · · · 24 Figure 22. 4020M interconnect cable. · · · · · · · · · · · · · · · · · · · · · · · · · · · · · · · · · · · · · · · · · · · · · · · · · · · · · 24 Figure 23. Typical GPI input connection. · · · · · · · · · · · · · · · · · · · · · · · · · · · · · · · · · · · · · · · · · · · · · · · · · · · 28 Figure 24. Typical GPI output connection. · · · · · · · · · · · · · · · · · · · · · · · · · · · · · · · · · · · · · · · · · · · · · · · · · · 28 Figure 25. An example of a stacked talk key. · · · · · · · · · · · · · · · · · · · · · · · · · · · · · · · · · · · · · · · · · · · · · · · · · 29 Figure 26. Setting up a GPI output to activate whenever anyone talks to a particular output port. · · · · · · · · · · · · · · · · · · · · · · 29 Figure 27. Interfacing TW Belt Packs to Zeus · · · · · · · · · · · · · · · · · · · · · · · · · · · · · · · · · · · · · · · · · · · · · · · · 31 List of Tables Table 1. The types of communication that are possible with Zeus. · · · · · · · · · · · · · · · · · · · · · · · · · · · · · · · · · · · · · · · 9 Table 2. GPI Connector Pinout Specifications· · · · · · · · · · · · · · · · · · · · · · · · · · · · · · · · · · · · · · · · · · · · · · · · · 10 Table 3. A printout of the Port Alpha list for the sample intercom setup file 1studio.zus· · · · · · · · · · · · · · · · · · · · · · · · · · · 14 Table 4. A printout of the IFB list for the sample intercom setup file 1studio.zus · · · · · · · · · · · · · · · · · · · · · · · · · · · · · · 15 Table 5. A partial printout of the IFB configuration list for the sample intercom setup file 1studio.zus · · · · · · · · · · · · · · · · · · · 16 Table 6. A summary of the toolbar buttons that are used to configure resources. · · · · · · · · · · · · · · · · · · · · · · · · · · · · · · · 16 Table 7. ID DIP Switch Settings for the TIF-951 · · · · · · · · · · · · · · · · · · · · · · · · · · · · · · · · · · · · · · · · · · · · · · · 27 6 Getting Started, Zeus™ DSP Intercom Matrix 1 Read Me First! If you don’t read anything else in this manual, at least read these important notes: • Make sure that the Zeus frame has adequate ventilation. Allow at least 1 rack unit (1.75 inches, or 45 mm) of open space above and below Zeus at all times during operation. Also, do not obstruct the vents at both sides. • The help file for ZEUSedit is intended to be your primary document when learning how to use the software. When viewing any main editing screen in ZEUSedit press the F1 key on the computer keyboard to get procedural information about how to use that screen. 2 Introduction This manual is divided into four main parts. There is a general description and specification for Zeus starting on page 9. Starting on page 13, are examples of how a Zeus intercom system might be set up. We highly recommend that you look through the example setup 1studio.zus that starts on that page. It contains useful information about component connections, and it also shows the most commonly used features of ZEUSedit. Cable wiring information can be found starting on page 22. Finally, there are general installation notes starting on page 25. A Few Terms For those users new to matrix intercom systems, or those more familiar with TW (also called two-wire, party-line or conference) intercom systems, it will be helpful to define a few terms. In TW intercom systems, the most normal configuration is that of a single party-line, or conference, where all the intercom users are interconnected on a single channel . The users all hear one another at all times, and private conversations between 2 individuals are possible only by hardware changes (either manually or under system control). Thus, in TW or party-line intercom systems, the conventional usage of the term “channel” means a single connection between multiple intercom stations. In Matrix intercom systems, the most normal configuration is a point to point (P-P) connection, similar to a telephone call: one user is connected to a single other user and has a private two way conversation. Like the telephone system, this is accomplished by having a dedicated connection between each user (intercom station or keypanel) and the matrix. In Zeus, this dedicated connection is referred to as a channel or port. A Zeus channel (or port) electrically consists of three pairs of wires, one pair taking audio from the keypanel, one pair taking audio to the keypanel, and one pair carrying 2-way control data between the matrix and keypanel. The important concept is that EACH user or keypanel has its own dedicated channel back to the Zeus intercom matrix. As will be shown later, through operating software, the Zeus Intercom System can be programmed to create party-lines or conferences, but even under those conditions, each member of a conference has a unique channel or port connection to the matrix. Getting Started, Zeus™ DSP Intercom Matrix 7 8 Getting Started, Zeus™ DSP Intercom Matrix Status Indicators: 2 rows of 24 LED's each Top Row: Green "keypanel connected" indicators. One for each intercom port. On only when a keypanel or TIF-951 is connected and operating on the port. Bottom Row: Red "frame activiity" indicators. LED 1 On = System Ok. LED 2 On = Audio Ok. LED 3 On = ZEUSedit on-line. LED 4 = UIO-256 connected LED 5 = LCP-102 connected. LED's 6-24 for service only TM 1 8 16 24 RESET POWER STATUS Recessed Diagnostic Pushbuttons Green Power Indicator (Service only) Configuration Computer Connector: 2-color Status Indicator: Green = Normal, Red = Fault 9-pin female D-sub. Connects to a computer running ZEUSedit. Uses a standard RS232 serial cable. Intercom Port Connectors: Connectors are 9-pin male D-sub. J1-J24 indicate ports 1-24. ID1-ID8 indicate the ID numbers to use when setting keypanel addresses. ID 1 J25 ID 2 ID 3 ID 4 J1 TO PC ID 1 J4 ID 2 ID 3 ID 4 J9 ID 1 J12 ID 2 Recessed Reset Pushbutton ID 3 ID 4 J17 J20 J26 Telex ID 5 UIO/PAP/LCP GPI J27 J5 ID 6 ID 7 ID 8 R TELEX COMMUNICATIONS, INC. Minneapolis, MN U.S.A. J8 ID 5 ID 6 J13 ID 7 ID 8 ID 5 J16 J21 ID 6 ID 7 CAUTION TO REDUCE RISK OF FIRE REPLACE WITH SAME TYPE FUSE 1A 240V SB ID 8 J24 90-250 VAC 50/60 HZ General Purpose Interface Connector: 25-pin female D-sub Multi-purpose accessory connector: 9-pin female D-sub. Connects to UIO-256, LCP-102, and Program Assign Panels (PAP). Figure 1. Reference view for Zeus DSP Intercom Matrix Universal AC Power Connector with Fuse and Power Switch: Automatically accepts 90-250 VAC, 50/60 Hz. 3 Zeus General Description Zeus is a versatile, 24-channel intercom signal router and controller which you configure from an IBM compatible PC. You use it to create sophisticated, small- to mid-size intercom systems. Using ZEUSedit configuration software for Windows®, you configure the channels to meet the unique communication needs of each user of the system. In the simplest application, for example, you can create a two-way communication channel between a user on channel 1 and a user on channel 2. This is called pointto-point communication. Or, you can configure several channels to talk and listen to each other in a conference. That’s called a party line. There are other, more sophisticated types of communication that you can set up as well. See Table 1. Zeus interfaces to all types of real-world audio devices. Yet, at the same time, it is extremely compact. That’s because it interfaces to external devices using common analog audio connections, while internally all signals are routed as digital information using a technique known as Time Division Multiplexing (TDM). The process is similar to what is used to create normal audio compact disks (CD’s) except that the technology used by Zeus conveys a significantly higher quality signal. You can route professional audio signals through Zeus without fear of signal degradation. For each intercom channel, the analog input and output gains are independently adjustable over a wide operating range. As a result, many common devices can be directly connected to channels: program audio signals from an audio mixing console; audio output from a user to a powered paging speaker or public address system; twoway radios; 4-wire television camera intercoms etc. This manual will also show you how to use RTS “TW” intercom equipment with Zeus. Zeus provides additional level controls which let you fine-tune the mix for individual users. If a user wants to monitor one or more sources at reduced levels, while monitoring all others at normal level, this can be accomplished using a separate level adjustment for each source (called crosspoint level). If a user wants to monitor one or more party lines at reduced levels while monitoring point-to-point communications at a normal level, there is a party line listen level adjustment for each party line. Zeus is compatible with the complete line of RTS intelligent keypanels and the TIF-951 Telephone Interface. Keypanels give users the ability to independently talk and listen to other channels, to party lines, or any of the other types of communication. Some keypanels are also equipped with a programming keypad, which allows the user to change key assignments or dial-out through the TIF-951 Telephone Interface. The TIF-951 can also let a user call in over a phone line and use a touch-tone phone to access any of the types of communication. The Zeus GPI (General Purpose Interface) provides eight control inputs and eight control outputs. You can use the Table 1. The types of communication that are possible with Zeus. Point-to-point (P-P) Communication between two channels. Each channel can communicate independently with every other channel. Party Line (PL) Communication between several users in a conference. Zeus lets you set each user as talker only, listener only, or both talker and listener. 24 separate party lines can be set up. Isolate (ISO) A means for one user to isolate another user for private communication. (Frequently used to temporarily isolate members of party lines.) 24 separate ISO circuits can be set up. Interrupt Foldback A means for one user to dim (re(IFB) with Adjustable duce the level of) an audio source Dimming that a second user is listening to and then talk over that source to the second user. The amount of dimming is adjustable from none to full mute. 24 separate IFB circuits can be set up. Special List (SL) A means for one user to talk and/or listen to several other unrelated users at once. (Useful for group call or zone paging.) 24 separate special lists can be set up. inputs to activate Zeus communications from external devices such as paging systems or two-way radios. You can use the outputs to control external devices from keypanels, such as two-way radios, paging systems, lighting systems, etc. You can connect popular RTS digital matrix accessories to Zeus via the accessory connector. The LCP-102 Level Control Panel gives you direct inward access to many ZEUSedit features from any convenient location in the intercom system. It lets you access Zeus’ analog input and output gain adjustments. And, it lets you select program input sources for IFB’s and set the program levels. You can also use it to set up party lines and adjust the listen levels for individual party line members. The UIO-256 Universal I/O frame lets you expand the quantity of GPI inputs and outputs. Zeus is also compatible with the traditional digital matrix program assign panels (PAP’s). Together, Zeus and ZEUSedit provide many communications and diagnostic tools which let you get the most out of your intercom system. To get an idea of the real-world possibilities of Zeus, we suggest that you take a look at the sample intercom systems and descriptions on the following pages. Getting Started, Zeus™ DSP Intercom Matrix 9 4 Specifications 4.1 Zeus Description A 24-channel, software configurable, audio signal router and controller for complex, small- to mid-size intercommunication systems. Power Input IEEC power connector with fuse and power switch. Internal switching power supply accepts 90-250 VAC, 50/60 Hz, 60 Watts max. Controls and Indicators Power On / Off toggle switch, located on back panel Reset pushbutton switch, recessed in front panel Diagnostic pushbutton switches (2), recessed in front panel Power On indicator General Status Indicator Keypanel Status indicators (24) Zeus controller status indicator Zeus audio status indicator ZEUSedit status indicator UIO-256 status indicator LCP-102 status indicator Miscellaneous diagnostic indicators (19, for service only) Configuration Computer (J25) General: RS232 Serial port Connector type: 9-pin female D-sub (DE-9S) Pin 2: RX Pin 3: TX Pin 5: Ground Accessory Connector (J26) General: An RS485 data port for LCP-102 / PAP / UIO-256 connection. Connector type: 9-pin female D-sub (DE-9S) Pin 1: LCP-102 / PAP / UIO-256 RS485 data Pin 2: ground Pin 3: N/C Pin 4: N/C Pin 5: N/C Pin 6: LCP-102 / PAP / UIO-256 RS485 data + Pin 7: ground Pin 8: N/C Pin 9: N/C GPI (General Purpose Interface) Connector (J27) General: Provides 8 control inputs which can simulate keypanel keys, and 8 control outputs which can be assigned to keys and used to activate external devices. Connector type: 25-pin female D-sub (See Table 2 for pinout). Table 2. GPI Connector Pinout Specifications Note: all indicators located on front panel Pin No. Function Analog Audio Specifications: 1 GPI Input #1 + Signal Type: Fully differential (balanced) Nominal Level: 8 dBu Maximum Level: 20 dBu Input Impedance: High (22 kΩ) Output Impedance: Low (600 Ω) 2 GPI Input #2 + 3 GPI Input #3 + 4 GPI Input #4 + 5 GPI Input #5 + 6 GPI Input #6 + A/D and D/A Specifications: 7 GPI Input #7 + Sampling Rate: 44.1 kHz Resolution: 20 Bits Converter Architecture: 128x Oversampling ∆−Σ Modulator 8 GPI Input #8 + 9 Common 10 Common Audio Performance: 11 Common SNR at 20 dBu: (A-weighted): > 90 dB THD+N at 20 dBu, 1 kHz (Unweighted): < 0.007% Frequency Response at 20 dBu: within +/- 1 dB from 50 Hz - 20 kHz Crosstalk at 20 dBu: < -80 dB CMRR: > 85 dB All measurements performed using an Audio Precision System 1 Dual Domain System. Measurements were performed using a sine wave at: f = 1 kHz and Level = 20 dBu. Measurement bandwidth = 20 Hz to 20 kHz. 12 Common 13 Common 14 GPI Out #1 + 15 GPI Out #2 + 16 GPI Out #3 + 17 GPI Out #4 + 18 GPI Out #5 + 19 GPI Out #6 + 20 GPI Out #7 + 21 GPI Out #8 + 22 Common 23 Common 24 Common Connections Intercom Channels (J1 to J24) General: 4-wire, balanced audio; RS485 data for optional intelligent keypanels Connector type: 9-pin male D-sub (DE-9P) Pin 1: Keypanel data + Pin 2: Keypanel data Pin 3: Audio out shield Pin 4: Audio in + (high) Pin 5: Audio in - (low) Pin 6: Keypanel data shield Pin 7: Audio out - (low) Pin 8: Audio out + (high) Pin 9: Audio in shield 10 Getting Started, Zeus™ DSP Intercom Matrix 4.2 ZEUSedit Description A Windows® based configuration utility for Zeus. Operating Systems Windows® 95/NT 6 17 .9 5 in m m 43 in .3 m 17 9 m 44217.4 mm in in 17 2 mm 43 KP96/KP97 Keypanel 2R Us 3 99 .9 i m n m 2R Us Zeus DSP Intercom Matrix in m 17 m 2 43 7 in mm 178 42916.9 mm in EKP96/EKP97 Expansion Keypanel for KP96/KP97 7 17 .0 8 in m m 2R Us in .3 m 17 9 m 43 LCP-102 Level Control Panel 6 17 .8 3 in m m 2R Us in .0 m 17 2 m 43 LCP-100A Level Control Panel 8. 21 5 6 in m m 1R U in .0 m 17 2 m 43 UIO-256 Universal Input/Output Frame 1R U 1R U 4 12 .9 4 in m m in m 17 m 2 43 38 15 1 in m m KP95-0 Keypanel in .5 m 17 5 m 44 1R U TIF-951 Telephone Interface EKPD-95 Expansion Keypanel for KP95-0 1R U Figure 2. Zeus and Accessory Dimensions ☞ Front panel rack mounts fit industry standard 19” (483 mm) racks and consoles. Dimensions exclude connectors. Allow at least 2 inches (51 mm) for cables and connections. Getting Started, Zeus™ DSP Intercom Matrix 11 Po Pa we ge red (P Sp St AG e ud E) ake io r STUDIO Talent 1 (TAL1) Talent 2 (TAL2) Talent 3 (TAL3) 4020M 4020M 4020M 22 22 22 Floor Manager 2 (FM-2) 13 Camera 1 (CAM1) 4-Wire Internal 12 Floor Manager 1 (FM-1) BP-318 Camera 3 (CAM3) 4-Wire Internal Camera 2 (CAM2) 4-Wire Internal 18 12 12 Lighting Director (LTG) BP-318 18 BP-318 18 19 19 20 20 20 19 Spare 20 19 TW5W #1 AUDIO Audio Operator (AUD) (PGM1) (PGM2)(PGM3) KP96-7 Mixing Console 16-Key Panel 11 PS-15 PC TW5W #2 2A 2B SSA-324 1A 1B SSA-324 21 15 TW5W #4 TW5W #3 21 21 21 14 14 11 14 Telephone Interface (TEL1) TIF-951 Zeus CHYRON To Phone Line Chyron Operator (CHYR) 11 KP95-0 16-Key Panel 11 MAINTENANCE CONTROL ROOM GRAPHICS Graphics (GPX) Assistant Director (AD) Director (DIR) Technical Director (TD) KP95-0 KP95-0 KP96-7 KP96-7 16-Key Panel 16-Key Panel 16-Key Panel 16-Key Panel 11 VIDEO KP95-0 11 KP95-0 KP95-0 KP95-0 16-Key Panel 16-Key Panel 16-Key Panel 11 16-Key Panel MASTER CONTROL ROOM 11 Video Video Tape Video Tape Operator (VID) Operator 1 (VTR1) Operator 2 (VTR2) Tape Library (LIB) 16-Key Panel KP96-7 11 11 11 TAPE LIBRARY Maintenance (MTCE) Master Control Room (MCR) KP96-7 16-Key Panel 11 4-Wire (CORD) 12 Satellite circuit, etc 11 Figure 3. A possible intercom system layout for the sample configuration file named 1studio.zus. To view this file, run ZEUSedit, select File Open, then browse to c:\Telex\Zeusedit\Setups and open 1studio.zus. Note: The numbered callouts above are the figure numbers for the cable wiring diagrams that start on page 22. See the facing page for a description of this figure. 12 Getting Started, Zeus™ DSP Intercom Matrix 5 About the Sample Configuration Files, 1studio.zus and 2studio.zus 5.1 Introduction Included on the ZEUSedit installation disk are two sample intercom system configuration files. We’ve also prepared sample system diagrams to go along with the sample files. We’ll provide a detailed explanation for the first sample file. The second sample file does not include anything that can’t be found in the first example. Rather, it is included just to give you an idea of an alternate configuration. To view the sample files, you will first need to install the software if you have not done so already. Insert the ZEUSedit disk into your computer and run the setup.exe program on the disk. Once the installation is completed, go ahead and run ZEUSedit. Your computer does not have to be connected to the intercom system yet. If you get the message saying that ZEUSedit is unable to contact an intercom, just click on OK. Let’s take a brief look at the system diagram before examining the sample files. 5.2 1studio.zus Description Figure 3 shows a plan for a television news broadcast studio based on the sample configuration file 1studio.zus. Note that the numbered callouts in the figure refer to cable diagrams which can be found starting on page 22. We’ll take a few moments for a general discussion of this system plan, and then we’ll look at the ZEUSedit configuration file to see how it can be accomplished. The system plan in Figure 3 actually requires several sophisticated communication techniques, all of which can be accomplished by Zeus with a minimum of extra support equipment. First, there are the standard keypanels used by the control and support personnel. The KP95-0 keypanels provide 15 talk keys, each of which can be assigned (using ZEUSedit) to talk to anyone in the intercom system. There is also a call waiting key for incoming messages. Since the KP95-0 does not have displays for incoming caller identification, there is a designation strip holder above the talk keys, and there is a print feature in ZEUSedit to print out designation strips. The KP96-7 keypanels used by some personnel have all the features of the KP95-0 keypanels, and also include 4character, alphanumeric key assignment displays which automatically update whenever the key assignments change. There is also a separate row of keys for independent listen activation. Additionally, the KP96-7 keypanels have programming keypads which can be used to change key assignments, to dial out on a telephone line through the TIF-951 Telephone Interface, and to access certain diagnostic features. connected to a channel output and can be accessed from any keypanel that has a key assigned to it. There are three RTS Model 4020M earset circuits for the on-the-air news talent (news anchors, weather person etc.). The earsets permit the talent to monitor the broadcast via program signals provided from the audio mixing console. For each talent earset, the broadcast audio can be set to dim (reduce in level) by a preset amount whenever that talent is receiving directions from the control room, and there are three levels of priority for director keypanels to assure that the proper personnel can communicate with the talent as needed. There is a telephone interface which can interface two phone lines to the intercom system and which permits both incoming and outgoing call routing. The personnel with the KP96-7 keypanels can dial out through the TIF951 Telephone Interface as previously mentioned. The 4-wire internal intercoms in the studio cameras can be directly connected to intercom channels, and there are programmable analog input and output gain adjusters within Zeus to compensate for nonstandard levels. These gains can be adjusted using ZEUSedit. Or, an LCP-102 Level Control Panel (not shown) can be connected to provide direct access to this gain adjustment feature from any convenient location. Figure 3 also shows the use of RTS “TW” intercom system components: The 2-wire, singlechannel, BP-318 belt packs used by some studio personnel interface to Zeus through SSA-324 converters. The PS-15 power supply and TW5W splitters distribute operating power to the belt packs on the same wires that conduct the audio. ZEUSedit can place the cameras and belt packs on a common party line, while also allowing keypanel operators to isolate any member of the party line to convey instructions without being interrupted by any background chatter on the party line. ZEUSedit can also be programmed so that the person directing is not bothered by callers while communicating instructions. In any studio environment, there is always the possibility of feedback when multiple intercom stations with speakers are located in close proximity to one another. This potential exists, for example, between the three keypanels in the control room, and also between the three keypanels in the Video Room. ZEUSedit has a special feature called “Dim Tables” which lets you eliminate this problem should it arise. Let’s now take a look at the ZEUSedit configuration file for 1studio.zus. Zeus can easily accommodate a variety of external devices. In the example, a powered studio-paging speaker is Getting Started, Zeus™ DSP Intercom Matrix 13 ☞ We’re going to make a suggestion now, which we 3. Now click on the Port Alpha button. 4. You should now be looking at the list of names for intercom ports. A printout of this list is shown in Table 3. This printout was obtained using the File, Print command in ZEUSedit. You’ll notice that most of the “Alpha” names in the list are the same as names in parenthesis in the studio illustration. There isn’t a lot of space on the keypanels to display long names, so these Alpha abbreviations will be used instead. ZEUSedit also lets you enter a longer description for reference purposes. When you set up your own intercom system, you’ll create a similar list of names for intercom ports by selecting ports and entering names. (For help on how to do this, press the F1 key while viewing the port alpha list.) After you have entered your names, you can print out a listing and distribute it to keypanel operators. think is important when you are starting out with ZEUSedit: put the help file on top and make use of it while you are learning the system. Here’s how to put the help file on top: 1. Press the F1 key on the computer keyboard. The help file will open. 2. In the help file, click on the Options menu and point to “Keep Help On Top”, then select “On Top”. 3. Now you can refer to step-by-step instructions in the help file while performing the steps in ZEUSedit. If the help file gets in the way, just re-size it, or move it around, or minimize it when you are not using it. ☞ By the way, whenever you press the F1 key, you’ll usually get help for the main screen that you are viewing in the background. Now, let’s get on with the example help file. 1. Select File, Open, then browse to c:\Telex\Zeusedit\Setups and open filename 1studio.zus. 2. The first thing that displays is a list of available intercom resources. Skip past this now: click OK. Table 3. A printout of the Port Alpha list for the sample intercom setup file 1studio.zus Port 001 002 003 004 005 006 007 008 009 010 011 012 013 014 015 016 017 018 019 020 021 022 023 024 5. 14 Getting Started, Zeus™ DSP Intercom Matrix Alpha DIR TD AD AUD VID CAM1 CAM2 CAM3 VTR1 VTR2 MCR TEL1 CHYR LIB GFX MTCE FM-1 FM-2 LTG PAGE PGM1 PGM2 PGM3 CORD Description Program Director Technical Director Assistant Dir. / Script Audio Operator Video Operator / CCU Camera 1 Camera 2 Camera 3 VTR operator 1 VTR operator 2 Master Control Room Telephone 1 555-1212 Chyron Operator Tape Library Graphics Maintenance Floor Manager 1 Floor Manager 2 Lighting Director Studio Paging speaker Pgm sound 1 / IFB 1 Pgm sound 2 / IFB 2 Pgm sound 3 / IFB 3 4 wire Coord Now you’ve seen where names for intercom ports are entered. You can use these names when it’s time to assign keys on keypanels. However, the studio plan also calls for some names which aren’t in the list: for example, TAL1, the talent 1 earset. That’s because TAL1 is not an intercom port, it’s an Interrupt Foldback (IFB). By the way, if you aren’t familiar with this term, you could always get a description of it from the help file. Click on the Search button, then follow the instructions to search for IFB. 6. Let’s assume that you are familiar with the term, and just move on to entering a name. Click the Other Alpha button. 7. As you can see, there are several other types of intercom resources, in addition to intercom ports, that can be named. Table 4. A printout of the IFB list for the sample intercom setup file 1studio.zus IFB 001 002 003 004 005 006 007 008 009 010 011 012 013 014 015 016 017 018 019 020 021 022 023 024 Alpha TAL1 TAL2 TAL3 IF04 IF05 IF06 IF07 IF08 IF09 IF10 IF11 IF12 IF13 IF14 IF15 IF16 IF17 IF18 IF19 IF20 IF21 IF22 IF23 IF24 Description Talent 1 IFB Talent 2 IFB Talent 3 IFB 10. The only other type of Alpha that needs to be entered is one for the studio production party line, which will include the cameras, the floor manager, and the lighting director. If you want to view the party line alphas, just click the Other Alpha button again and select the Party Line Alphas radio button. 11. Now you’ve seen where names are entered. The next step in configuring an intercom system is to set up any of the special communication types that are needed. For example, the talent IFB’s have to be configured so that they will operate correctly after being assigned to intercom keys. To configure an IFB, click on the IFB button. 8. To name an IFB, click on the IFB Alphas radio button, then click OK to view the list of IFB’s. 9. Using the File, Print option, the IFB list has been printed and is shown in Table 4. The sample printout shows that there are 24 IFB’s available, as was also indicated in the resource list that was presented when you first opened the sample file, but only 3 of these IFB’s are being used: one for each of the talent earsets. Note: To see how to enter IFB names, press the F1 key. When you are finished, move on to the next step. 12. You should now be viewing the IFB configuration list. A partial printout of it is shown in Table 5. Note that only the first three IFB’s have been configured: one for each talent position. The list only provides a summary of how the IFB’s are configured. If you want to modify an IFB’s setup, you’ll have to select it from the list and open the Edit IFB dialogue. While viewing the IFB configuration list, you can get help with setup by pressing the F1 key. Getting Started, Zeus™ DSP Intercom Matrix 15 Table 5. A partial printout of the IFB configuration list for the sample intercom setup file 1studio.zus IFB Alpha Dim? Scroll Enable Input Port Input Alpha Output Port Output Alpha 001 TAL1 -9.0 dB YES 021 PGM1 021 PGM1 002 TAL2 -9.0 dB YES 022 PGM2 022 PGM2 003 TAL3 -9.0 dB YES 023 PGM3 023 PGM3 004 IF04 NO YES ---- ---- 005 IF05 NO YES ---- ---- 006 IF06 NO YES ---- ---- 007 IF07 NO YES ---- ---- 008 IF08 NO YES ---- ---- The IFB configuration list shows you at a glance all the information about an IFB. The IFB’s are numbered 001 through 024. These numbers will never change. The names that you enter using the Other Alpha button, as previously described, appear in the Alpha column. Recall how an IFB operates: The talent (news anchor, weather person etc.) can hear the broadcast program in his or her earset. For talent 1 (TAL1) this is the PGM1 program that is coming into Zeus on the intercom channel 21 input and is going out on the channel 21 output to the talent earset. Now suppose the director wants to tell the talent near the end of a commercial break that he or she is back on in 10 seconds. The director could press a key assigned to PGM1 to do this, but then his voice would be mixed with the commercial audio and fed to the talent. It would be difficult for the talent to understand what is being said. That’s where the IFB comes in. Instead of pressing a key assigned to PGM1, the director presses a key assigned to the IFB TAL1. This causes the program audio level to be dimmed (reduced) by the amount indicated in the Dim? column. Now the director can be clearly heard. The normal program level will be restored when the director releases the IFB key. 13. You should now have a good idea of how to name things and also how to set up any special types of communication that will be needed. Recall that the 1studio.zus example calls for a party line for the studio production personnel (the cameras, lighting director and floor manager). As with IFB setup, which you start by pressing the IFB button on the toolbar, you can start party line setup by pressing the PL button. Table 6 summarizes the types of communication that you access with toolbar buttons. Remember, you can get help setting up each of these types of communication by clicking its toolbar button and then pressing the F1 key on the computer keyboard. 14. After you have named things and set up any additional types of communication that you will need, you can begin to assign keypanel keys to talk and listen to the things that you have named. Let’s show how this looks for the director keypanel in the example setup file 1studio.zus. Press the KP button on the toolbar. 16 Getting Started, Zeus™ DSP Intercom Matrix Table 6. A summary of the toolbar buttons that are used to configure resources. PL button Configures party lines. IFB button Configures IFB’s. SL button Configures special lists. GPI IN and GPI OUT Configures GPI inputs and outbuttons puts. ISO button Configures isolates. Dim button Configures dim tables. ☞ To get a description of what each of these buttons does: 1) click on the button; 2) press F1 for help; 3) click on the description link which appears at the top of the help screen. 15. The director’s keypanel is set up on intercom port number 1, and this is the intercom port that appears when you first click the KP button. See Figure 4. Figure 4. The keypanel setup screen for the director’s keypanel in the example file 1studio.zus ☞ Note: To get on-line help with keypanel setup, as well as some of the terms used below, press the F1 key while viewing any keypanel’s setup screen in ZEUSedit. Notice that all listen keys are assigned as “AF”. This is the auto-follow special function. This means that each listen key will automatically follow, or have the same assignment as, the talk key directly beneath it. You’ll also notice that the “R” boxes are checked above all key assignments. This means that the key assignments are restricted and cannot be changed by the keypanel operator. It is fairly common in many intercom systems for these two features to be set up on all intercom channels right from the start. The quick way to do this is to set it up on one keypanel and then copy and paste the settings to the keypanel setup screens for the remaining channels. You use Paste Special to do this. Paste Special is discussed in the on-line help for keypanel setup. There are a few other things to note about the key assignments. You’ll notice that the first key, PROD, does not appear in the illustration for 1studio.zus (Figure 3). That’s because this is the production party line and not an actual intercom station. You can look at the production party line by clicking the PL button on the toolbar. If you do, you will note that the camera operators, the lighting director, and both floor managers are assigned as members of the production party line. The director can talk to all of them by pressing the PROD talk key. You may also note that the names for the keys that are assigned to camera operators (1CAM, 2CAM, 3CAM) are spelled differently than they appear in the 1studio.zus illustration. That’s because these keys are ISO keys and not point-to-point keys. When the director presses the 1CAM key, for example, this will cause CAM1 to drop out of the production party line (PROD). The director can then privately direct the camera operator. You can view the ISO setups by pressing the ISO button on the toolbar. ☞ Typically in a television broadcast environment, it is the video operator who will use the camera isolates (if you look at the keypanel setup for VID, you will see that the 1CAM, 2CAM and 3CAM keys are assigned) but the director can also access them. Whenever one of these ISO’s is in-use by the video operator, the display above that key on the director’s keypanel will flash slowly and continuously. This is a cue to the director that pressing the key may break in on a conversation that is in progress. Getting Started, Zeus™ DSP Intercom Matrix 17 16. Using the 1studio.zus example, we’ve now taken you through virtually all the steps that are typically required to set up an intercom system. First, you name the intercom ports and any other types of communication (IFB’s, ISO’s etc.) that you will need. Then you configure any special types of communication that you have named. Then you assign the things you’ve named and configured to intercom keys on keypanels. There are still one or two more things that might be required: you may need to set up one or more dim tables, and you may need to adjust the input or output gains for some intercom channels. We’ll finish with a brief discussion of these two topics. 17. In the 1studio.zus example, the director, the assistant director, and the technical director are all located in the same room. Their keypanels are fairly close together, and the keypanels all have some common key assignments. For example, they all have a key assigned to talk to PROD, the production party line. (You could check this by clicking the KP button on the toolbar, and then selecting each of the three intercom ports in turn to view the key assignments.) Now suppose that both the director and the technical director have their PROD talk and listen keys activated, and the director is speaking. This will be heard at the technical director’s keypanel speaker. And, if the director’s microphone picks up the speaker audio (which is actually his own voice) and reamplifies it, this could cause feedback. To prevent this potential problem, a dim table has been set up. To view this dim table, click the Dim button on the toolbar. 18. Figure 5 shows the dim table that has been set up for the control room keypanels. While viewing this screen, press the F1 key to get help with dim table setup. 19. To finish, we’ll discuss the analog gain adjustment. In the 1studio.zus example, one possible use of this adjustment might be to adjust the audio output levels to the camera intercoms. These devices may be operating at a different audio level than the intercom system. As a result, any communications to the camera operators from any keypanel might sound too loud or soft. You adjust audio input and output gain from the System menu (Figure 6). As with most of the setup tables, you can get help with analog input and output gain adjustment by pressing the F1 key while viewing the table. Figure 5. A partial view of the control room dim table for the example intercom system 1studio.zus. All keypanels that are located in the control room have been assigned as members of the dim table, and the amount of dimming has been set at -1dB; a fairly small amount. Whenever one of these keypanel operators activates a key assignment, the volume will be reduced by 1 dB at any of the other keypanels that are listening to the same destination. Note: The name “Control Room Dim” was assigned using the Other Alpha button on the toolbar. 18 Getting Started, Zeus™ DSP Intercom Matrix Figure 6. Accessing the Analog Input / Output Gain Adjustment. You use this adjustment when you want to change the level for a particular channel, and the change will affect all channels when talking or listening to that channel. (To adjust the level between two particular channels only, use Crosspoint Gain.) Figure 7. The analog input / output gain adjustment table. Note that all channels are set to the default level of 0 dB. However, in the 1studio.zus example, some likely candidates for adjustment might be the outputs to the camera intercoms (CAM1, CAM2, CAM3) and also the program inputs (PGM1, PGM2, PGM3). To get help on using this table, press the F1 key while viewing the table. Getting Started, Zeus™ DSP Intercom Matrix 19 20. An intercom configuration file such as the 1studio.zus example can be created either off-line or on-line. Whichever method is used, the configuration changes must be downloaded to Zeus in order to take effect. Downloading changes while working on-line If the computer is communicating with Zeus while you are making changes, ONLINE will be indicated in the lower-right corner of the ZEUSedit screen. Online indication (lower-right corner of ZEUSedit screen) To send your changes while on-line, click the Send All button. You can also save a copy of your changes to disk using the Save command on the File menu. Or, to save an existing file with a new name, use the Save As command. Working Off-line and then downloading changes If you are creating or changing an intercom configuration file while off-line, FILE will be indicated in the lowerright corner of the ZEUSedit screen. You must first save your changes before you can send them to the intercom system. Use the Save command on the File menu if you are creating a new file or editing a file that you want to re-save with the same name. Use the Save As command if you want to create a new file from an existing file. Once you have saved the file, log on to Zeus by clicking the Go Online button. To send the file, open it using the File, Ovelay command. Then send the file to the intercom system using the Send All button. 20 Getting Started, Zeus™ DSP Intercom Matrix STUDIO 1 AUDIO 1 Audio Operator (AUD1) (PGM1) (PGM2) KP95-0 Mixing Console Talent 1 (IFB1) Talent 2 (IFB2) 4020M 4020M 22 22 14 14 11 Camera 1 (S1C1) 4-Wire Internal VIDEO 1 Video Video Tape Operator (VID1) Operator 1 (VTR1) KP95-0 12 Floor Manager (S1FM) KP95-0 Camera 3 (S1C3) 4-Wire Internal Camera 2 (S1C2) 4-Wire Internal 12 12 Lighting Director (LTG1) BP-318 11 11 18 BP-318 18 CONTROL ROOM 1 Technical Director (DIR1) Director (TD-1) KP95-0 KP95-0 PC 11 11 19 20 15 TW5W #1 Zeus 21 KP95-0 KP95-0 Technical Director (TD-2) TW5W #2 TW5W #3 20 TW5W #4 2A 2B SSA-324 1A 1B SSA-324 11 Director (DIR2) 19 20 19 PS-15 11 19 20 21 21 21 CONTROL ROOM 2 11 11 KP95-0 KP95-0 Video Video Tape Operator (VID2) Operator 1 (VTR2) VIDEO 2 18 BP-318 18 Floor Manager (S2FM) BP-318 Lighting Director (LTG2) 12 11 14 14 KP95-0 Mixing Console Audio Operator (AUD2) (PGM3) (PGM4) AUDIO 2 4-Wire Internal 12 12 4-Wire Internal Camera 2 (S2C2) Camera 1 (S2C1) 22 4-Wire Internal Camera 3 (S2C3) 22 4020M 4020M Talent 3 (IFB3) Talent 4 (IFB4) STUDIO 2 Figure 8. A possible intercom system layout for the sample configuration file named 2studio.zus. To view this file, run ZEUSedit, select File Open, then browse to c:\Telex\Zeusedit\Setups and open 2studio.zus. Note: The numbered callouts above are the Figure numbers for the cable wiring diagrams that start on page 22. Getting Started, Zeus™ DSP Intercom Matrix 21 6 Cables and Connectors 6.1 Introduction XLR CONNECTORS 9-Pin Male 3-Pin Male G Each Zeus intercom system will have unique requirements for cables, so it is not practical to supply these with Zeus. A computer interconnect cable has been provided, but even this may not be long enough for your system layout requirements. Most cables will need to be custom built. Following is some useful general information for those who are not familiar with cable construction. Connection diagrams are also included for all of the common types of connections to Zeus. 2 5 9 1 9 Pin Female G 3 Connectors G Types, Solder vs Solderless Connectors for cables are of two general types: solder and solderless. Solder connectors are the least expensive, and the connections are repairable. However, there is more labor involved when using these connectors, and some soldering skill is required to make good connections. Solderless connectors are generally much more expensive and require special tools, which can also be expensive. Also, the connections are not generally repairable (except that you could probably perform solder repairs if needed). On the other hand, cable construction is quicker with solderless connectors. Ask your intercom dealer about recommended sources for connectors. 6.2.2 4 6 3 1 25 Pin Male 13 25 1 14 2 6-Pin Female 25 Pin Female G 1 2 6 3 5 4 1 14 13 25 Figure 9. Connector Numbering. ☞ IMPORTANT! These are views of the connectors from the side where you connect the wires. Pin Numbers Pin numbers are generally stamped on the connectors, but the numbers are very small. It helps if you know that the connectors you will be using generally follow a standard numbering sequence, with the male and female connectors having mirror-image numbering. See Figure 9. 6.3 5 9 1 6 2 1 5 6.2.1 1 6 3 3-Pin Female 6-Pin Male 6.2 D-SUB CONNECTORS Cable Requirements We recommend 22AWG, stranded, twisted pair cable for your connections. For most applications you can use unshielded cable. Shielded cable is only required when some condition in the environment is inducing noise into the intercom system. For keypanels and the TIF-951, the cables should have three twisted pairs. To connect 4-wire audio devices, you’ll need two twisted pairs. To connect single audio inputs or outputs, such as program inputs or paging speaker outputs, you’ll need one twisted pair. The LCP-102 and the UIO-256 require a single twisted pair. Ask your intercom dealer about recommended sources for cabling. UNSHIELDED CABLES 3-Twisted Pairs 2-Twisted Pairs 1-Twisted Pair SHIELDED CABLES (OPTIONAL) 3-Twisted Pairs 2-Twisted Pairs 1-Twisted Pair Figure 10. Cable requirements. 22 Getting Started, Zeus™ DSP Intercom Matrix 6.4 Cable Diagrams DE-9P (MALE) TO KEYPANEL OR TIF-951 +1 -2 + - DATA 6 9 7 8 3 AUDIO TO ZEUS 1 1 2 6 2 6 + - Note: Shields optional. If used, do not connect at keypanel end! FROM AN EXTERNAL AUDIO SOURCE + - 4 5 9 + - +4 -5 DE-9S (FEMALE) TO ZEUS J1-J24 DE-9S (FEMALE) TO ZEUS J1-J24 AUDIO TO ZEUS + - Note: Shields optional. If used, do not connect at external device end! 7 + - Figure 11. Keypanel and TIF-951 Intercom cable wiring diagram. 5 9 7 8 3 8 3 AUDIO FROM ZEUS 4 Figure 14. An audio input cable to connect an external audio source. DE-9S (FEMALE) TO ZEUS J1-J24 1 2 6 TO EXTERNAL 4-WIRE AUDIO DEVICE AUDIO TO ZEUS + - Note: Shields optional. If used, do not connect at external device end! + - + + - AUDIO FROM ZEUS 4 5 9 DE-9P (MALE) 2 DE-9S (FEMALE) Note pin number switch 3 2 3 5 5 7 8 3 Figure 12. A cable to connect a 4-wire intercom station other than a keypanel. TO COMPUTER COM PORT TO ZEUS J25 Figure 15. Configuration computer cable. ☞ IMPORTANT! Note that pins 2 and 3 are switched between the two connectors! DE-9S (FEMALE) TO ZEUS J1-J24 1 2 6 4 + - AUDIO FROM ZEUS + - TO AN EXTERNAL Note: Shields optional. If AUDIO INPUT used, do not connect at external device end! 5 9 DE-9P (MALE) +6 -1 DE-9S (FEMALE) RS485 DATA 2 7+ 2 - 1 7 8 3 Figure 13. An audio output cable from Zeus to an external device. TO ZEUS J26 TO LCP-102 DATA Figure 16. LCP-102 interconnect cable. Getting Started, Zeus™ DSP Intercom Matrix 23 DE-9P (MALE) DE-9S (FEMALE) TO ZEUS J1-J24 DE-9P (MALE) 1+ 2 TO ZEUS J26 TO UIO-256 J2 1 TO SSA-324 TB1 CONNECTOR SYSTEM A OR (B) 3 (7) 4 (8) Figure 17. UIO-256 interconnect cable. 3-PIN XLR (Male) 3-PIN XLR (Female) 2 2 1 1 3 G 3 G To SSA-324 “Y” Cable Shields optional. Connect to Ground (G) Terminal. 2 (6) 1 (5) + Note: Shields optional. If used, do not connect at SSA-324 end! AUDIO TO ZEUS AUDIO FROM ZEUS + - 2 - RS485 DATA 2 6 + - 4 + - +6 -1 7 5 9 8 3 Figure 21. A cable to connect a 4-wire channel from an SSA-324 to a Zeus channel. To BP-318 Belt Pack DE-9S (FEMALE) TO ZEUS J1-J24 Figure 18. A single-channel “TW” belt pack cable (for BP-318 belt pack). 1 3 2 1 1 G G Figure 19. A power distribution cable for “TW” belt packs. 3-Pin XLR Female Connector 1 3 + 200 ohm 22 µF 50 Vdc WIRES MUST NOT TOUCH! Figure 20. An audio termination plug for use with the TW5W splitter. 24 Getting Started, Zeus™ DSP Intercom Matrix 4 3-PIN XLR (MALE) 5 9 1 7 2 8 3 + No Connection - No Connection 2 3 AUDIO FROM ZEUS TO 4020M IFB BELT PACK Figure 22. 4020M interconnect cable. + - 3 2 6 3-PIN XLR (Female) 3-PIN XLR (Male) 7 Installation Notes 7.1 General Installation Procedure These are the steps that you should generally use to get your Zeus intercom system up and running. 1. Unpack and inspect the equipment. 2. Organize a set of equipment manuals. (You may have several copies of some types, keypanel manuals, for example.) 3. Mount the Zeus frame and connect it to the configuration computer. 4. Install ZEUSedit on the configuration computer. 5. Log on to Zeus from ZEUSedit. 7.2 As soon as possible after receipt, inspect the container(s) and contents for physical damage that may have occurred in shipping. If damage has occurred, immediately (within 24 hours of receipt of equipment) contact the carrier involved and file a claim. Save all packing materials, and request an immediate inspection by the carrier’s insurance claims agent. Refer to the equipment manuals for each item for any information about items packed with that equipment. ☞ For information about returns to RTS, refer to the front of this manual. 7.3 ☞ You may wish to run the 1studio.zus example and take a few minutes to familiarize yourself with the software (recommended). Unpacking the Equipment Zeus Mounting Precautions ☞ Important! Leave at least 1 rack unit of space above and below Zeus and do not obstruct the cooling vents at the sides. Also, do not mount Zeus near any other component that generates an unusual amount of heat. 6. Begin connecting keypanels and other components. Verify operation of components as they are connected. 7. Configure the intercom system using ZEUSedit. Perform periodic downloads to check progress. 7.4 8. When you finish naming things, you can print out the name lists and distribute them if desired. KP95-0 Keypanels: When you finish assigning keys, you can print out designation strips, cut them to size, and insert them into the holders on the KP95-0 keypanels. 1. Place the AC switch on the back panel in the off (O) position. 2. Connect the AC power cord. 9. Perform any input and/or output gain adjustments for any audio devices that are operating at non-standard levels. (Use this adjustment when the level for a particular device needs to be adjusted throughout the intercom system.) 10. Adjust any crosspoint and party line gains as needed. (Use these adjustments when you want to adjust the mix for individual users.) 11. Set up dim tables as required if there are any feedback problems between intercom stations operating in close proximity to one-another. 12. This completes the general installation procedure. You may also wish to make use of the Logging and Partial Save features of ZEUSedit. Logging is available on the Logging menu. Logging basically keeps track of key activations, which can sometimes be useful for diagnostic purposes. Partial Save is available on the File menu. Partial Save lets you set up configuration files to make routine changes to portions of your intercom system setup. 7.5 AC Power Connection Computer Connection 1. Turn the computer off. 2. Connect the computer cable to J25 on the back of Zeus. 3. Connect the other end of the cable to any available COM port on the computer. The COM ports may be labeled COM 1, COM 2 etc. and may also be identified by any of the following symbols. COM port symbols ☞ If you need a longer computer cable, you can construct one using Figure 15, page 23. Getting Started, Zeus™ DSP Intercom Matrix 25 7.6 ☞ The ZEUSedit status indicator (third from left) will Power-Up and Indications 1. Turn on the Zeus power switch on the back panel. 2. Boot the computer and start Windows. 3. Zeus will take a few moments to power up, during which, the STATUS indicator will be red. After a few moments, the STATUS and POWER indicators should be green to indicate normal operation. 1 RESET POWER be lit whenever Zeus is communicating with ZEUSedit. be lit to indicate normal operation. 1 8 16 24 System (leftmost) and Audio Status Indicators. Red = OK 7.7 7.9 Insert the ZEUSedit installation disk in the computer’s floppy drive. 2. Run the setup.exe program on the disk. Follow the on-screen instructions to install the software. 3. When the installation is finished, remove the installation disk and store it in a safe place. 7.8 Starting ZEUSedit 1. Run the ZEUSedit program. 2. During startup, ZEUSedit will immediately attempt to contact the intercom system. This may take up to 10 seconds. 3. If ZEUSedit cannot contact the intercom system, you will see the message “Unable to contact an intercom, entering file mode.” In this case, refer to “Troubleshooting the Computer Connection”. 4. If ZEUSedit does connect, you will see the message “ONLINE” in the lower-right corner of the screen. You will also see the message “Uploading alphas” in the lower-left corner of the screen. This means that ZEUSedit is uploading the intercom system configuration information from Zeus. This may take a few moments. 26 Getting Started, Zeus™ DSP Intercom Matrix 24 Troubleshooting the Computer Connection If ZEUSedit cannot connect to Zeus, the most likely cause is that the COM port setting of ZEUSedit needs to be changed. (We’ll assume that your cable is properly connected and that the Zeus power is on and the front panel STATUS indicator is green.) It’s not always easy to determine exactly how the COM ports are numbered on your computer, so just try them all as follows: 1. In the Options menu, select Communications. 2. ZEUSedit should currently be set to COM1. Select COM2, then click OK. ZEUSedit Software Installation 1. 16 ZEUSedit Status Indicator (Third from left). Red = ONLINE STATUS ☞ The System and Audio status indicators should also 8 ☞ Leave the baud rate set at 9600. 3. Now click the Go online button to try and connect. 4. If ZEUSedit still cannot connect, repeat the above steps, using the setting COM3. If that doesn’t work, try COM4. 5. If none of the above settings work (and you are sure the cable connections are correct and that Zeus is powered on) you may have to make some changes in your computer setup. Some possible causes are that you are using multiple modems or have other serial port devices connected which are using all of the COM1 to COM4 settings. In this case, the solution may involve removing one of these devices and/or relocating it to some other COM port. For example, if you have an external modem connected to the computer, you could power down your computer and try removing it temporarily. Then connect the Zeus cable in its place and see if you can connect. Note that it is beyond the scope of this manual to isolate the problem in your particular computer, and if you are not sure how to proceed yourself, you should consult a computer specialist. 7.10 • Keypanel Installation Notes 2. A second modular jack labeled "INST" is also provided for each phone line. This may be used to connect a telephone or other instrument along with the TIF-951. 3. For each connected phone line, connect from the DE-9S connector (labeled "INTCM FRAME") on the back of the TIF-951 to a Zeus intercom channel. Use a 9-pin intercom cable (Figure 11, page 23). 4. For each intercom port used by the TIF-951, set DIP switches 4 to 7 on the back of the TIF-951 as summarized in Table 7. For all other TIF-951 DIP switch settings, refer to the TIF-951 User Manual. KP95/96/97 Keypanels: Refer to your keypanel installation manual for installation information. • DKP-8, DKP-12, KP-12: Refer to the User Manual for all installation and operation information. When connecting to the intercom system, use the 9-pin FRAME connector on the back of the unit. KP-12 only: There are two optional back panel modules: the Rear Connector Module and the GPI Module. Refer to the separate installation instructions supplied with each of these modules. Table 7. ID DIP Switch Settings for the TIF-951 • All Keypanels: When constructing keypanel cables, use the 9-pin intercom cable diagram in this manual (Figure 11, page 23). • ID Number SW 4 Zeus provides a keypanel status indicator for every intercom channel. If there is a keypanel connected and exchanging data with Zeus, the status indicator will be lit. You can also use the status indicator to check that you have correctly set the keypanel’s ID number. For example if you know you just connected a keypanel to port 8, but the port 7 LED turned on, the keypanel’s ID setting is not correct. 1 8 16 24 Address DIP Switch Settings* SW 5 SW 6 SW 7 1 Down Up Up Up 2 Up Down Up Up 3 Down Down Up Up 4 Up Up Down Up 5 Down Up Down Up 6 Up Down Down Up 7 Down Down Down Up 8 Up Up Up Down * Down=Closed; Up=Open ☞ Important!: Always reset the TIF-951 after changing any of the rear panel DIP switch settings. Do this by momentarily turning off the AC power to the TIF-951. The keypanel status indicators (top row). Green indicators will be lit for every channel where a keypanel or TIF-951 is connected and exchanging data with the intercom system. ☞ • Important! KP95 / 96 / 97 series keypanels: Always reset the keypanel after changing any of the rear panel DIP switch settings. Do this by momentarily turning off the AC power to the keypanel. The keypanel status indicators on the Zeus front panel also work with the TIF-951. If there is a TIF-951 connected to a channel and exchanging data with Zeus, the status indicator for that channel will be lit. 7.12 7.11 TIF-951 Telephone Interface Installation Notes The TIF-951 has two separate phone line interfaces, and each of these interfaces to a separate intercom port. You can connect one or both as follows: 1. Connect phone lines to the modular phone jacks labeled "LINE" on the back of the TIF-951. Single Audio Inputs External audio sources, such as program feeds, can be connected to the input pins of an intercom port. Use a cable as shown in Figure 14, page 23. The program source should be balanced and must be DC isolated. Nominal input level is +8 dBu; however, you can adjust the analog input gain, if necessary, to compensate for nonstandard levels. In ZEUSedit, open the System menu and point to Gains, Analog Input / Output Gains. After you have selected this item, you can press the F1 key to get setup help. Getting Started, Zeus™ DSP Intercom Matrix 27 Audio sources can be utilized in several ways within the intercom system: • An audio source can be assigned to a keypanel listen key. This permits the keypanel operator to listen to the source by activating the listen key. To assign an audio source to a key, click the KP button on the toolbar, then press the F1 key for help with keypanel setup. • The audio input to which an audio source is connected can be forced to the output of an intercom port (forced crosspoint). This forces the audio to always be heard at the output. This might be useful, for example when a belt pack or similar device needs to hear an audio source, but does not have listen keys. To force a crosspoint, click the XPT button on the toolbar, then press the F1 key to get help on this feature. • A program source can be used with interrupt foldback (IFB). Using IFB, the program source will normally be heard at some specified intercom output port. Then, when someone presses an intercom key to talk to that output port, the program audio will be cut off to permit conversation. The program audio will be restored when the intercom key is released. To setup an IFB, click the IFB button on the toolbar, then press the F1 key on the computer keyboard to get help. 7.13.2 Connections Pin-outs for the GPI inputs and outputs are summarized in Table 2, page 10. The GPI inputs require +5 to +12 VDC for activation. Figure 23 shows a typical connection. The GPI outputs are open collector outputs and require an external voltage to operate. These outputs pull to common when activated. Figure 24 shows a typical connection. GPI Input + 5-12 VDC Common EXTERNAL CIRCUIT Figure 23. Typical GPI input connection. 12 VDC GPI OUT + 7.13 General Purpose Interface (GPI) Connector (J27) 22 K 7.13.1 General Description J27 provides 8 general purpose control inputs and 8 general purpose control outputs. The control inputs can be assigned, using ZEUSedit, to activate intercom ports, party lines, etc. The control outputs can also be assigned, using ZEUSedit, to be activated by keypanel keys. The control outputs can be used to control lighting, to key a remote transmitter, to activate a paging system etc. 10 K Common ☞ You may see the GPI outputs referred to as relays, and the default names for GPI outputs are RY01, RY02 etc. Although the actual GPI outputs from Zeus are not relays, they are generally used in the same way that relays would be used. If you connect a UIO-256 Universal I/O Frame to Zeus, this device has actual relays which are assigned using the GPI output feature of ZEUSedit. 28 Getting Started, Zeus™ DSP Intercom Matrix Figure 24. Typical GPI output connection. 7.13.3 Programming GPI Outputs You name GPI outputs using the Other Alpha button. You can assign GPI outputs to keypanel keys by clicking the KP button and then following the steps you would nor- mally use to assign any port, party line etc. to a keypanel key. There is also another unique way that you can use GPI outputs: you can set them to activate whenever anyone talks to a particular intercom port. This is convenient because it saves you from having to make individual key assignments. The following example compares the two methods of using a GPI output. Example: Suppose you want to be able to talk over a public address system from a keypanel. Many paging amplifiers have both an audio input and a control input to activate (key) the amplifier output. You connect audio output from some Zeus channel to the audio input of the paging amplifier. You connect a Zeus GPI output to the control input of the paging amplifier. (In some cases, an external relay circuit may need to be constructed, such as the one shown in Figure 24. If you are using a UIO-256 instead of the GPI outputs of Zeus, the UIO-256 uses actual relay contacts for the outputs, and no external circuitry is required.) There are now two ways to use the paging amplifier connection. 1) Create a “stacked” talk key at a specific keypanel. Figure 25 shows an example of a stacked talk key. The advantage of this approach is that you can control access to the paging output on a keypanel-by-keypanel basis. The disadvantage is that you must set both talk level 1 and 2 on every keypanel that needs to access the paging amplifier. 2) Set up the GPI output so that it will activate whenever anyone talks to the intercom port where the paging amplifier is connected. Figure 26 shows an example of this. The advantage to this approach is that once you have setup the Talk level 1 assigned to port PAGE Talk level 2 assigned to GPI output PAGE Figure 25. An example of a stacked talk key. Talk level 1 connects the keypanel’s mic signal to an intercom output port that has been named “PAGE”. This output is connected to the paging amplifier audio input. Talk level 2 activates a GPI output that has also been named “PAGE”. This output keys the paging amplifier’s control input. GPI output, you don’t have to think about it anymore. Just assign any number of keypanel keys to talk to the paging audio output, and the GPI output will automatically activate to key the paging amplifier whenever any of these keys are pressed. To get help on GPI Output setup, click the GPI Out button, then press the F1 key for help. Figure 26. Setting up a GPI output to activate whenever anyone talks to a particular output port. ☞ In this example, GPI output number 001 was named “PAGE” using the Other Alpha button. The audio port that the paging amplifier is connected to was also named “PAGE” using the Port Alpha button. Getting Started, Zeus™ DSP Intercom Matrix 29 7.13.4 Programming GPI Inputs ☞ When an LCP-102 is connected and communicating Using a GPI input is a 2-step process. First you define a particular “key” at a particular intercom port that will be activated by the GPI input. You do this using the GPI IN button on the ZEUSedit toolbar. It is important to note that there does not actually have to be a keypanel connected at the port you select. In fact, there usually is no keypanel connected. The main purpose of the GPI inputs is to create a virtual key for an intercom channel that needs to control some device, but does not have a keypanel to do it. Once you have defined the key assignment that will be activated, you must assign the key itself. You do this like any other key assignment, by clicking the KP button, selecting the port where you want to assign a key, and then assigning the key. To get help with GPI Inputs, click the GPI In button, then press the F1 key for help. To get help with keypanel key assignment, click the KP button, then press the F1 key for help. 7.14 UIO-256 Input/Output Frame The UIO-256 provides 16 control inputs and 16 control outputs. These can be used exactly like the Zeus GPI inputs and outputs that were discussed previously, except that the UIO-256 outputs are actual relay contacts. The UIO-256 connects to the Zeus multi-purpose accessory connector, J26. Use a cable as shown in Figure 17. For further information on the UIO-256, refer to your UIO256 User Manual. ☞ When a UIO-256 is connected and communicating with Zeus, the UIO-256 status indicator will be lit on the Zeus front panel. 1 8 16 24 UIO-256 Status 7.15 LCP-102 Level Control Panel The LCP-102 Level Control Panel lets you access Zeus’ analog input and output gain adjustments. And, it lets you select program input sources for IFB’s and set the program levels. You can also use it to set up party lines and adjust the listen levels for individual party line members. The LCP-102 connects to the Zeus multi-purpose accessory connector, J26. Use a cable as shown in Figure 16. For further information on the LCP-102, refer to your LCP-102 User Manual. 30 Getting Started, Zeus™ DSP Intercom Matrix with Zeus, the LCP-102 status indicator will be lit on the Zeus front panel. 1 8 16 24 LCP-102 Status 7.16 Using RTS TW Intercom Belt Packs with Zeus The use of RTS Model BP-318 TW Belt Packs with Zeus was shown in the example intercom systems (Figure 3, page 12 and Figure 8, page 21). A detailed connection diagram is shown in Figure 27. In a TW intercom system, belt packs are usually operated on a party line, with audio and power being distributed on a common circuit between all of the belt packs. The power supply in a TW intercom system establishes what is called the “terminating impedance”. This terminating impedance assures that the system levels will not shift as belt packs are added to or removed from the party line. Without any terminating impedance, the belt pack audio would be very distorted. One characteristic of TW party lines, is that it is not possible to isolate specific members of the party line, unless special isolate control panel hardware is used. On the other hand, isolate capability is a standard feature in Zeus, but it requires that each belt pack be connected to a separate Zeus intercom channel. Party lines are created electronically within Zeus using ZEUSedit. Then, to isolate a specific belt pack, it is a simple matter to electronically isolate it from the party line using the ISO feature. In the example diagrams, an RTS Model PS-15 TW Power Supply supplies power to the belt packs. Other TW power supply models can be substituted. SSA-324 System-to-System Adapters are used to make the belt pack audio compatible with Zeus. Each SSA-324 can interface 2 belt packs to Zeus, with each belt pack on a separate channel. In order to prevent audio coupling between the belt packs, the power distribution cables are constructed without connecting any wire to pin 3 (see Figure 19, page 24). Since the pin 3 connection from the power supply is also what normally sets the terminating impedance, it is necessary to create a special terminating plug as a substitute (see Figure 20, page 24). The TW5W splitters are used as a convenient and inexpensive way to combine the audio, power and termination connections for each belt pack. A belt pack may then be connected to each TW5W using a standard TW intercom cable (Figure 18, page 24). MODEL PS15 POWER SUPPLY O/N 9000678600 PS15 NORM 200 Ω TW5W RTS SYSTEMS, BURBANK, CALIFORNIA MADE IN U.S.A. J1, J2 CONNECT TO TW INTERCOM SYSTEM COMPONENTS REFER TO OPERATION MANUAL FUSE 0.5A SB / 120VAC TIP-CH1 0.25A SB / 240VAC RING-CH2 SLEEVE-COM OUTPUTS IMPEDANCE SELECT DUAL 400 Ω AUDIO COUPLING CH1-CH2 CAUTION FOR CONTINUED PROTECTION AGAINST FIRE, REPLACE ONLY WITH SAME TYPE FUSE. 19 TW5W PUSH PUSH 19 19 20 1 20 3 + System B PUSH System A PUSH J102 J104 Power Input J101 1 - Earth 2 - AC 3 - AC 4 - NC TB 1 Connections System A System B 1 - 4-Wire in Hi 5 - 4-Wire in Hi 2 - 4-Wire in Lo 6 - 4-Wire in Lo 3 - 4-Wire Out Hi 7 - 4-Wire Out Hi 4 - 4-Wire Out Lo 8 - 4-Wire Out Lo 1 3 + To Another TW5W F1 Fuse 1A SB TB 1 S102 2-Wire In / Out 2-Wire In / Out S101 Sys B Unbal BAL Sys A Unbal BAL 8 J103 7 6 5 4 3 2 1 I/O In = Bal TELEX COMMUNICATONS, INC. Made in the U.S.A. TW Intercom System Mode SSA324 System Interface SSA-324 18 18 21 21 BP-318 HEADSET BP-318 el LINES n an s eu To a Z To Ch a s eu el HEADSET LINES n an Ch Z Figure 27. Interfacing TW Belt Packs to Zeus The numbered callouts are the Figure numbers for cable wiring diagrams starting on page 22. On the PS15: the position of the Impedance Select switch does not matter. On the SSA-324: set switches S101 and S102 to the Unbal position; set the front panel System A and System B switches to CH2. Since the PS15’s internal termination is not used in this application, the position of the Impedance Select switch on the back panel does not matter. On the SSA-324, switches S101 and S102 on the back panel should be set to the Unbal position. The System A and System B switches on the front panel should be set to CH2. For each Zeus channel, you can start with the default analog input / output settings. Adjust the level going from Zeus to each belt pack using the Level to RTS trimmer on the front of the SSA-324. Adjust the level from the belt pack to Zeus with the Level from RTS trimmer. In this application, you will probably leave the SSA-324 Duck trimmers in the full clockwise position. The Null Low, Med and Hi trimmers can be adjusted to minimize the belt pack users own voice in the belt pack headphones. Getting Started, Zeus™ DSP Intercom Matrix 31 Addendum Using Low-current Devices with the Zeus GPI Outputs Document: Zeus Getting Started Manual, Rev A Addendum Number: 1 General Instructions: Use this addendum with Revision A of the manual. This information will be included in Revision B. Subject: This addendum includes additional information about the use of the GPI outputs. It can be used together with the GPI connector pin-out information in the Specifications section, page 10, and the GPI connector information starting on page 28. A ULN2803 device driver IC is used for the GPI outputs of the Zeus frame. This IC has 8 outputs, each of which is capable of sinking up to 500 mA at 5 VDC. However, the Zeus internal power supply cannot provide enough power to simultaneously drive all 8 outputs at their maximum rating. The total drive current for all outputs should be limited to 400 mA. That is why the Zeus manual shows the use of an external power source and switching transistor (Figure 24, page 28 of the manual). On the other hand, some relays (such as the Takamisawa AS5W-K) only require about 50 mA. If eight of these relays are used, all 8 GPI outputs can be driven at the same time. In this case, the external drive transistor can be omitted, and relays can be connected as shown in Figure 1, below. GPI OUT + Common Figure 1. Direct connection of a low-current relay to a Zeus GPI output. Also connect a switching diode to protect the output from back EMF. (Diode is included with the Takamisawa relay and may be included with others.) Addendum 2 Zeus DIP Switches Document: Zeus Getting Started Manual, Rev A Addendum Number: 2 General Instructions: Use this addendum with Revision A of the manual. This information will be included in Revision B. WARNING The following instructions are for use by qualified personnel only. To avoid electric shock, do not remove the cover unless you are qualified to do so. AVERTISSEMENT Les instructions qui suivent s'adressent uniquement a un technicien qualifie. Pour evite des chocs electriques, ne pas ouvrir le boitier, a moins d'y entre habilite. Subject: There are several internal DIP switches which modify the operation of the Zeus Frame. Switch descriptions and default settings are summarized below. To access the DIP switches, unplug the power cord, then remove the case cover. Switch Number 1 2 3 4 5 6 7 8 Description Baud rate select1 Off: 9600 baud On: 38.4 Kbaud Keypanel Incoming message option2 Off: Normal operation On: All callers display in Incoming Messages window Keypanel "in-use" and "busy" flash3 Off: Enable On: Disable Not used (set to off) Not used (set to off) Not used (set to off) Not used (set to on) Test on/off Off: Normal operation On: Test mode Default Setting Off Off Off Off Off Off On Off DIP Switch Notes 1. Make sure that the rate set here matches the rate set in Zeus-edit. 9600 baud permits a longer PC cable, but uploads and downloads will be slower (approximately 30 seconds for a complete system update). Alternatively, 38.4 kbaud will provide faster uploads and downloads, but the PC cable should be kept to a length less than 10 ft (3m), and some older PC's may not operate reliably at this speed. 2. Normally, when a call is received by a keypanel, the keypanel checks for a talk key assigned to the caller. If there is an assigned talk key, the display for that key will flash, and the keypanel operator may then press that key to talk back. If no key is assigned, the caller's name will appear in the incoming messages window (also called call waiting window), and the keypanel operator may press the incoming messages key to talk back. Some intercom systems may have many keypanels that do not have alphanumeric talk key displays, such as the KP95-0 Keypanel. In this case, it may be preferable to have all caller's names appear in the Incoming Messages window, since it will not be possible to identify which talk key to press for talk back. 3. The in-use flash is indicated by a slow and continuous flashing display above a talk key (for keypanels equipped with displays). The in-use flash is provided for IFB's and ISO's. It is also provided for trunk lines (ADAM systems only). The in-use flash occurs, for example, on all keypanels that have keys assigned to a particular IFB when that IFB is inuse by any keypanel. The displays for these IFB keys will continue to flash until the IFB is no longer in-use. Any user could activate their IFB talk key while the display is flashing, but they may break in on a conversation that is in progress. The busy flash is indicated by an alphanumeric display that alternates between the normal key assignment and a double asterisk (**) when the talk key for that display is pressed. This indication occurs for keys assigned to IFB’s. It also occurs for keys assigned to trunk lines (ADAM systems only). A "busy" flash occurs, for example, when a keypanel operator tries to talk to an IFB which is currently in-use by another keypanel operator who’s keypanel has a higher IFB priority. When a busy flash is indicated, the lower priority operator cannot talk to the destination. While some people may find the in-use and busy indications helpful, the option to disable them is provided because some may object to the alternating display. Errata Zeus GPI Output External Transistor Connection Document: Zeus Getting Started Manual, Rev A Errata Number: 1 The following instructions correct errors in Revision A of the manual. This information will be included in Revision B of the manual. General Instructions: Figure 24, page 28: Replace Figure 24 in the manual with the one shown below. + 12 VDC Zeus External Circuit GPI OUT + 22 K 10 K Common Figure 24 Replacement Errata #1, 2/11/98