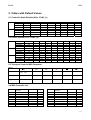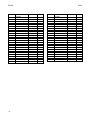
1
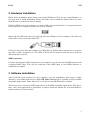
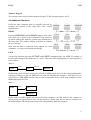
Expandable Controller Keyboard
User’s Guide
ESI - Copyright © 2007
Revision 1, November 2007
www.esi-audio.com
K.ON
ESI
INDEX
1. Introduction.................................................................................................................................. 4
1.1 Main Features....................................................................................................................................................... 4
2. Hardware Installation ................................................................................................................. 5
3. Software Installation.................................................................................................................... 5
4. Features & Functions................................................................................................................... 6
4.1 Function Buttons.................................................................................................................................................. 6
4.2 Additional Functions............................................................................................................................................ 9
4.3 Pitch and Modulation Wheels ............................................................................................................................ 10
4.4 Pedal Connectors ............................................................................................................................................... 11
4.5 Controller Knobs & Faders ................................................................................................................................ 11
4.6 Transport Controls ............................................................................................................................................. 12
4.7 Controller Assignment ....................................................................................................................................... 12
4.8 Save & Load Functions...................................................................................................................................... 13
5. Tables with Default Values ....................................................................................................... 15
5.1 Controller Knob Defaults (KNx - FUNC_A)..................................................................................................... 15
5.2 Faders Default (CSx - FUNC_B)....................................................................................................................... 15
5.3 Transport Controls MIDI Parameter .................................................................................................................. 15
5.4 MIDI Controller List.......................................................................................................................................... 15
6. General Information .................................................................................................................. 17
3
K.ON
ESI
1. Introduction
Thank you for purchasing K.ON.
K.ON is an expandable USB controller keyboard. Equipped with a stable aluminium cabinet, K.ON
is not only stylish, but perfectly optimized for professional usage live on stage or in any studio
environment. Various faders and dials as controllers are provided, allowing remote control of
software and hardware synthesizers. K.ON has a total of 4 expansion slots, compatible with existing
synthesizer modules from other vendors.
Please note that this document covers the basics of the K.ON installation as well as the usage of the
various built-in functions. However, this manual is not intended to explain the basics about MIDI,
MIDI controller messages, MIDI programs, MIDI channels or anything about typical audio-/MIDI
sequencing software. If you need to get more information about MIDI (i.e. you don’t know what a
MIDI controller actually is for example), a good start is usually the manual of your notation or
sequencing software (i.e. the included Cubase LE 4.0). In addition there are a lot of details about
MIDI on the Internet. A good technical resource and great starting point is www.midi.org, some
details are typically also provided in various forums about audio / MIDI and home recording.
1.1 Main Features
·
·
·
·
·
·
·
·
·
·
·
·
·
4
88 keys professional hammer action keyboard, with channel after touch function
8 assignable controller knobs, with presets for Cutoff, Resonance, Attack, Release, Pan, Reverb,
Chorus, and Tempo
9 assignable controller faders, with presets including control of volume of channel 1-16 and the
master volume
6 remote control buttons for audio and sequencer software, providing real-time remote control of
Record, Play, Stop, Fast Forward, Skip Backward and Return
Pitch and Modulation wheels
possibility to able to save/load 10 user parameter groups
various function buttons
LED data display, displaying the current state
one MIDI output
USB port, support USB 1.1, directly powered via USB bus
3 available expansion slots
bundled with Cubase LE 4.0 DVD-ROM
compatible with various Windows versions and Mac OS X
K.ON
ESI
2. Hardware Installation
Before driver installation, please locate your original Windows CD (if you are using Windows), as
you may need it during installation. Please also make sure to install the chipset drivers for your
motherboard if you have not done so already.
Find the USB port on your computer. A sample USB port is pictured below. It is typically located
next to the PS/2 or serial ports on the back of your computer.
Plug the K.ON USB cable (Series A plug type) into the USB port of your computer. The other end
of the cable will be connected with K.ON.
K.ON gets the power from the computer via USB cable by default when connected to a computer
and after you have switched it on. The LEDs of K.ON will be turned on once the unit is powered
and connected to your PC.
MIDI connection
If you are not using the USB connection to your computer, you can also use the MIDI out port with
a standard MIDI cable. This will be connected to the MIDI input of your MIDI interface or
soundcard for example.
3. Software Installation
After K.ON has been connected to your computer, you can immediately start using it. Under
Windows, a new MIDI input device called USB Audio Device will be available in all your MIDI
compatible applications. Under Mac OS X, a new device called K.ON will be available.
This device can be selected as MIDI input source in all MIDI compatible applications. How this is
done, varies from application to application, so please consult the manual for your audio/MIDI or
notation software for more details.
5
K.ON
ESI
4. Features & Functions
4.1 Function Buttons
K.ON has various function buttons on the control surface. This section explains each of them.
PROGRAM
You can change the MIDI program (instrument) with the PROGRAM button. After pressing it, the
LED above the button is on and the numeric display shows the currently selected program. You can
change it with the selection master knob under the numeric display, by entering numbers via the
numeric keypad or with the + / - buttons. All 128 standard MIDI voices are available in the range
from 0 ~ 127.
CHANNEL
Via the CHANNEL button the MIDI channel (1 ~ 16) can be selected. After pressing it, the LED
above the button is on and the numeric display shows the currently selected channel. You can
change it with the selection master knob under the numeric display, by entering numbers via the
numeric keypad or with the +/- buttons.
TRANSPOSE
The TRANSPOSE button allows you to transpose the key range of K.ON in the +/- 12 semitone
(+/- 1 octave) range. After pressing it, the LED above the button is on and the numeric display
shows the current value. The default value is 00. You can change it with the selection master knob
under the numeric display or via the +/- buttons.
OCTAVE
The OCTAVE adjusting button allows you to change the main octave pitch of K.ON over a range
of +/-3 semitones. After pressing it, the LED above the button is on and the numeric display shows
the current value. You can change it with the selection master knob under the numeric display or via
the +/- buttons.
CURVE
The CURVE button allows you to adjust the velocity curve. K.ON provides 5 different velocity
curves (0 ~ 4). After pressing it, the LED above the button is on and the numeric display shows the
current value. You can change it with the selection master knob under the numeric display or via the
+/- buttons.
6
K.ON
ESI
DUAL
K.ON provides a special function to allow you to play two simultaneous instruments / MIDI
programs.
Before you press the DUAL button, select the first MIDI program via PROGRAM as described
above. Now press DUAL and select the second voice. After pressing it, the LED above the button is
on. You can change the value on the numeric display it with the selection master knob, by entering
numbers via the numeric keypad or via the +/- buttons. K.ON will then transmit the MIDI
information on two channels simultaneously.
By default, the two voice or DUAL mode plays the second instrument on the next MIDI channel
(i.e. if the current MIDI channel is 1, the second instrument will be played on channel 2). As long as
DUAL mode is enabled (as indicated by the LED above the button), the CHANNEL button will
change the MIDI channel for the second instrument. Please note that the DUAL mode and SPLIT
mode cannot be used simultaneously.
To disable DUAL mode, press the DUAL button again. The LED above the button will be off.
SPLIT
K.ON also provides a keyboard split function that allows you to divide K.ON into two different
split zones with different MIDI instruments – the SPLIT mode.
First make sure to setup all parameters for the low tone. Then press SPLIT to start the split function
– the indicator LED will be turned on. Now you can start and edit the parameters for the high tone.
The default split point is central C (MIDI value 3C).
If you want to change the split point, you need to do this before enabling SPLIT mode (i.e. the LED
above the button is off). Press and hold the SPLIT button and then touch the key you want to assign
as split point. Release the SPLIT button and press it again to enable SPLIT mode (the LED will be
turned on) with the new split point.
If you want to modify the split point, can press SPLIT constantly, then press a key to select the split
point. After that, release the SPLIT.
By default, the SPLIT mode plays the second instrument on the next MIDI channel (i.e. if the
current MIDI channel is 1, the higher instrument will be played on channel 2). As long as SPLIT
mode is enabled (as indicated by the LED above the button), the CHANNEL button will change the
MIDI channel for the higher instrument. Please note that the SPLIT mode and DUAL mode cannot
be used simultaneously.
TOUCH
The TOUCH button allows you to turn on/ off channel after touch.
CONFIGURE
With the CONFIGURE button, you can assign different MIDI controller functions to the various
faders & control knobs of K.ON. How this is done is explained in section 4.7.
7
K.ON
ESI
SELECT
With the SELECT button, you can select the controller knob and fader and then control its value
via the master knob under the numeric display. The usage is further explained in section 4.7.
FUNC_A
The FUNC_A button allows you to select between the predefined and user controlled MIDI
controller values for the controller knobs. The LED next to the button shows the current selection.
The top LED indicates usage of Cutoff, Resonance, Attack, Release, Pan, Reverb, Chorus and
Tempo while the lower LED indicates the usage of the user defined values (KNx). Check the table
in section 5.1 for more information.
FUNC_B
The FUNC_B button allows you to select between the predefined and user controlled MIDI
controller values for the controller knobs. The LED next to the button shows the current selection.
The top LED indicates usage of Volume for channel 1 ~ 8, the mid LED indicates volume for
channel 9 ~ 16 and the lower LED indicates the usage of the user defined values (CSx). Check the
table in section 5.2 for more information.
+, - button
The + and – buttons of K.ON are used to enter values by increasing or decreasing values when
changing or entering them.
Master Knob
The master knob is positioned under the main numeric display. It is used to adjust values when
changing or entering them.
8
K.ON
ESI
Numeric Keypad
You can also enter values with the numeric keypad. To fill out empty spaces, use 0.
4.2 Additional Functions
K.ON has more functions that are typically accessed by
pressing two buttons at the same time. This section
explains these.
RESET
Pressing PROGRAM and CHANNEL buttons at the same
time sends out a system reset command. K.ON returns to
its initial settings and sends the system reset information at
the same time. The numeric display will blink to indicate
the reset process.
Note that the device connected must support the reset
command – or it may not respond accordingly.
LINK
Via the link function (pressing OCTAVE and CURVE simultaneously), the MIDI I/O routing of
K.ON can be changed. The modes are 0, 1 and 2. Check the following diagrams for a description of
each of them:
Mode 0
USB in
K.ON
USB out
PC
MIDI out
In this mode, the K.ON port needs to be selected as MIDI output device in the corresponding audio
sequencer software, so that the MIDI port can send out data from the computer. This allows you to
use K.ON as a USB MIDI interface and you can control other devices from your computer via the
MIDI output port of K.ON.
Mode 1
USB in
K.ON
PC
MIDI out
In this mode, no MIDI signals can sent out from the computer via USB, however the computer is
still receiving all signals from K.ON. Use this mode to control other devices that are connected to
the MIDI output of K.ON directly from K.ON, independently from the computer.
9
K.ON
ESI
Mode 2
USB out
PC
MIDI out
K.ON
In this mode, the computer receives no signals from K.ON via USB. The signals are sent directly to
the MIDI output port instead. Also signals sent by the PC are sent directly out to the MIDI output
port. This allows you to use K.ON and the computer simultaneously to control an external device
connected to the MIDI output port of K.ON.
ALL NOTE OFF
When pressing the buttons SPLIT and TOUCH simultaneously, K.ON will send out the all notes
off MIDI command (controller #123). Use this function when you have problems with hanging
notes on your system or sound module.
Please note that not all devices support this MIDI command, so in some cases it might simply not
work.
GM ON
Pressing CHANNEL and TRANSPOSE at the same time will send GM initialization information
(MIDI values F0 7E 7F 09 01 F7).
XG ON
Pressing CURVE and DUAL buttons at the same time will send XG initialization information
(MIDI values F0 43 10 4C 00 00 7E 00 F7)
GS ON
Pressing TOUCH and CONFIGURE buttons at the same time will send XG initialization
information (MIDI values F0 41 10 42 12 40 00 7F 00 41 F7)
Please note that the GM/GS/XG initialization functions only have an effect if the connected device
supports these commands.
4.3 Pitch and Modulation Wheels
Rotating the PITCH wheel during performance can change the pitch of the current performance
(typically one tone above or below). However, the PITCH wheel can be reconfigured to send out
another MIDI controller. Rotating the MODULATION wheel during performance typically adds a
tremolo effect to the sound. The MODULATION wheel can also be reconfigured to send out
another MIDI controller. This is described in section 4.7.
10
K.ON
ESI
4.4 Pedal Connectors
The two pedals are by default defined as sustain (PEDAL_A LED on top and
SUSTAIN connector on backside) and soft / damper (PEDAL_B LED on top and
DAMPER connector on the backside) pedal. They can be reconfigured for other
functions however. This is described in section 4.7.
Pedal Polarity
K.ON can recognize / change the pedal polarity by default. If you want to send ‘Pedal On’ while
stamping on the pedal and ‘Pedal Off’ while releasing the pedal, no operation needs to be done; If
you want to send ‘Pedal Off’ while stamping on the pedal and ‘Pedal On’ while releasing, you need
to stamp on the pedal before the keyboard is switched on, and release the pedal until you can see the
keyboard is powered on and displays something on the LED display.
4.5 Controller Knobs & Faders
Controller Knobs
8 controller knobs can send out MIDI controller values. The controllers are divided into 2 groups.
When the first indicator LED next to the FUNC_A button is on, it means the that the first group
with preset MIDI controllers will be used. When the second indicator is on, it means that the user
defined KNx MIDI controllers will be sent out instead. You can switch between the two groups
with the FUNC_A button. When adjusting different controller knobs, the LED displays current
adjusting values, the corresponding indicator is on, also, the value can be adjusted by knobs or +, buttons. Besides, the desired controller knobs can be selected by the SELECT button, and the
values can be adjusted by knobs, number buttons, or +, - buttons.
Faders
11
K.ON
ESI
9 faders can send out MIDI controller values. They are divided into 3 groups. When the first
indicator LED next to the FUNC_B button is on, the faders are adjusting volume of channel 1 ~ 8;
when the second indicator is on, they adjust volume of channel 9 ~ 16. When the third indicator is
on, the user defined CSx MIDI controllers will be sent out instead. These 3 modes can be switched
by FUNC_B. Like the 8 controller knobs, the faders can be used together with knobs, number
buttons or +, - buttons after selecting them with the SELECT button. M.VOLUME on the lower left
adjusts the main volume.
4.6 Transport Controls
The transport control buttons can be used to remote
control your sequencing software.
Please consult the manual of your audio / MIDI
sequencing or notation software on how to control
the transport functions remotely via MIDI.
The table in section 5.3 shows the MIDI controller
values K.ON is sending out. Depending on your
software, there might be a preset that matches these
values or there might be a learn function that detects the signals from K.ON and allows you to
assign them to functions of the software.
To start playback, you push the PLAY button. The LED above the button indicates the PLAY
mode. To start recording, you push the RECORD button. A red LED indicates the RECORD mode.
Please note that the PLAY and RECORD buttons can only be used after pushing STOP first as
PLAY and RECORD modes are exclusive, i.e. they cannot be used simultaneously.
Tempo
When in PLAY or RECORD mode, K.ON sends out MIDI sync clock information. The
tempo can be changed with the TEMPO controller knob (make sure to select the top row
of controllers via FUNC_A button first as described in section 4.5. The tempo can be
changed during playback and software or devices supporting MIDI clock information
will then automatically synchronize to K.ON. If the tempo value is changed when not in
PLAY or RECORD mode, it will be used the next time you push PLAY or RECORD.
4.7 Controller Assignment
The 8 controller knobs, 8 faders (the first, M.VOLUME, has a fixed function and cannot be
reassigned), Pitch & Modulation and the 2 pedal connectors can be used to send out different MIDI
controllers by reassigning different controller values to them. Typically you need to select the fader
/ knob, etc. for which you want to change the assignment first and then enter into the edit mode.
You can select the fader / knob via the SELECT button.
Assigning to Controller Knobs
Select the controller you want to assign via the SELECT button by pushing it several times and
browsing through the knobs. Press the CONFIGURE button and the system enters into edit mode
for the selected controller. The numeric display now displays the currently assigned MIDI controller
12
K.ON
ESI
number. Now you can adjust the MIDI controller value by entering the desired controller number
via the numeric keypad or with the + / - buttons.
Assigning to Faders
Select the fader you want to assign via the SELECT button by pushing it several times and
browsing through the knobs. Press the CONFIGURE button and the system enters into edit mode
for the selected controller. The numeric display now displays the currently assigned MIDI controller
number. Now you can adjust the MIDI controller value by entering the desired controller number
via the numeric keypad or with the + / - buttons.
Assigning to Pedals
Enter into edit mode (start via CONFIGURE) first. Then stamp on (or release) the pedal to select
the pedal. The numeric display now displays the currently assigned MIDI controller number. Now
you can adjust the MIDI controller value by entering the desired controller number via the numeric
keypad or with the + / - buttons.
Assigning to Pitch & Modulation wheels
Enter into edit mode (start via CONFIGURE) first. Then turn the Pitch or Modulation wheel. The
numeric display now displays the currently assigned MIDI controller number. Now you can adjust
the MIDI controller value by entering the desired controller number via the numeric keypad or with
the + / - buttons.
Note: As Pitch is not defined to be any standard MIDI controller in the 0 ~ 127 range, K.ON
defines Pitch as 128. This means that you can always enter numbers from 0 ~ 128 for the Pitch
wheel where 128 means Pitch.
Finishing the Reassignment
When the controller reassignment is done (i.e. you have entered the number of the required MIDI
controller), press any function button to confirm the configuration and exit the edit mode.
Please note that the controller knob and the fader controller should be assigned with MIDI
controllers with successive variation while the pedals should be assigned with MIDI controllers
with on / off variation.
4.8 Save & Load Functions
K.ON can store up to 10 groups with user parameters. This allows you to make different
configurations and load depending on the situation.
Save
Press the
and
buttons at the same time to enter into save mode. The 10 groups of us user
parameters are saved under number 0 ~ 9. The numeric display shows “S-”, the number can be
selected by entering it via the numeric keypad. For instance, if you enter 0, the LEDs display “S0”.
The user parameters will be saved in group 0 then. If you are not entering a number within 2
seconds, the system returns to the state prior to the saving.
13
K.ON
ESI
Load
and
at the same time to enter into load mode. The 10 groups of us user parameters can
Press
be loaded via their number (0 ~ 9 ). The numeric display shows “L-”, the corresponding user
parameter group that is saved can be loaded by inputting number 0-9. For instance, if you enter, the
LEDs display “L0”, which means that the parameters of group 0 will be loaded. If you are not
entering a number within 2 seconds, the system returns to the state prior to the loading.
14
K.ON
ESI
5. Tables with Default Values
5.1 Controller Knob Defaults (KNx - FUNC_A)
Grp #1
Grp #2
Name
Settings
Controller
Defaultvalue
Name
Setting
Controller
Defaultvalue
CUTOFF
Cutoff
74
64
KN1
RESONANCE
Resonance
71
64
KN2
ATTACK
Attack
73
64
KN3
RELEASE
Release
72
64
KN4
PAN
Pan
10
64
KN5
REVERB
Reverb
91
40
KN6
CHORUS
Chorus
93
0
KN7
TEMPO
Tempo
14
0
15
0
16
0
17
0
18
0
19
0
20
0
21
0
KN8
5.2 Faders Default (CSx - FUNC_B)
Group #1
Group #2
Group #3
Name
Channel
Controller
Defaultvalue
Name
Setting
Controller
Defaultvalue
Name
Setting
Controller
Defaultvalue
M.VOLUME
ALL(1)
113
100
M.VOLUME
113
100
M.VOLUME
VOL1
1
7
100
VOL9
9
7
100
CS1
VOL2
2
7
100
VOL10
10
7
100
CS2
VOL3
3
7
100
VOL11
11
7
100
CS3
VOL4
4
7
100
VOL12
12
7
100
CS4
VOL5
5
7
100
VOL13
13
7
100
CS5
VOL6
6
7
100
VOL14
14
7
100
CS6
VOL7
7
7
100
VOL15
15
7
100
CS7
VOL8
8
7
100
VOL16
16
7
100
CS8
113
100
22
0
23
0
24
0
25
0
26
0
27
0
28
0
29
0
5.3 Transport Controls MIDI Parameter
Name
Controller
114,118
115
116
117
118
119
Channel
1
1
1
1
1
1
Trigger
127
127
127
127
127
127
5.4 MIDI Controller List
Controller
0
1
2
3
4
5
6
7
Parameter
Function
Bank Select MSB
Modulation MSB
Breath MSB
Controller
Foot Cntrl MSB
Portam. time MSB
Data Entry MSB
Channel Vol. MSB
Defaultvalue
Range
Controller
0
0
127
0
127
0
2
100
0-127
0-127
0-127
0-127
0-127
0-127
0-127
0-127
8
9
10
11
12
13
14-31
32
Parameter
Function
Balance MSB
Controller
Pan MSB
Expression MSB
Effect Control MSB
Effect Control MSB
Controller
Bank Select LSB
Defaultvalue
Range
64
0
64
127
0
0
0
0
0-127
0-127
0-127
0-127
0-127
0-127
0-127
0-127
15
K.ON
Controller
33
34
35
36
37
38
39
40
41
42
43
44-63
64
65
66
67
68
69
70
71
72
73
74
75
76
77
16
ESI
Parameter
Function
Modulation LSB
Breath LSB
Controller
Foot Cntrl LSB
Portam. time LSB
Data Entry LSB
Chnnl Volume LSB
Balance LSB
Controller
Panpot LSB
Expression LSB
Controller
Sunstain
Portamento
Sostenuto
Soft Pedal
Legato FootSwitch
Hold 2
Sound Controller
Resonance
Release Time
Attack Time
Cutoff
Decay Time
Vibrato Depth
Vibrato Depth
Defaultvalue
Range
Controller
0
127
0
127
0
0
127
64
0
64
127
0
0
0
0
0
0
0
64
64
64
64
64
0
64
64
0-127
0-127
0-127
0-127
0-127
0-127
0-127
0-127
0-127
0-127
0-127
0-127
0-127
0-127
0-127
0-127
0-127
0-127
0-127
0-127
0-127
0-127
0-127
0-127
0-127
0-127
78
79
80-83
84
85-90
91
92
93
94
95
96
97
98
99
100
101
102-119
120
121
122
123
124
125
126
127
Parameter
Function
Vibrato Depth
Sound Controller
Controller
Portamento Control
Controller`
Reverb
Effects
Chorus
Effects
Effects
RPN Increment
RPN Decrement
NRPN LSB
NRPN MSB
RPN LSB
RPN MSB
Controller
All Sound Off
Reset All Contrll
Local Control
All Notes Off
OMNI Off
OMNI On
Mono
Poly
Defaultvalue
Range
64
64
0
0
0
40
0
0
0
0
0
0
0
0
0
0
0
0
0
0
0
0
0
0
0
0-127
0-127
0-127
0-127
0-127
0-127
0-127
0-127
0-127
0-127
0-127
0-127
0-127
0-127
0-127
0-127
0-127
0-127
0-127
0-127
0-127
0-127
0-127
0-127
0-127
K.ON
ESI
6. General Information
Trademarks
ESI and K.ON are trademarks of Ego Systems Inc. and ESI Audiotechnik GmbH. Windows is a
trademark of Microsoft Corporation. Other product and brand names are trademarks or registered
trademarks of their respective companies.
The FCC and CE Regulation Warning
This device complies with Part 15 of the FCC Rules. Operation is subject to the following two
conditions: (1) this device may not cause harmful interference, and (2) this device must accept any
interference received, including interference that may cause undesired operation. Caution : Any
changes or modifications in construction of this device with are not expressly approved by the party
responsible for compliance, could void the user's authority to operate equipment.
Note: This equipment has been tested and found to comply with the limits for a Class A digital
device, pursuant to Part 15 of the FCC Rules. These limits are designed to provide reasonable
protection against harmful interference when the equipment is operated in a commercial
environment. This equipment generates, uses, and can radiate radio frequency energy and, if not
installed and used in accordance with the instruction manual, may cause harmful interference to
radio communications. Operation of this equipment in a residential area is likely to cause harmful
interference in which case the user will be required to correct the interference at his own expense. If
necessary, consult an experienced radio/television technician for additional suggestions.
Correspondence
For technical support inquiries, contact ESI support online at www.esi-audio.com.
Disclaimer
All features and specifications subject to change without notice.
Parts of this manual are continually being updated. Please check our web site www.esi-audio.com
occasionally for the most recent update information.
17