1
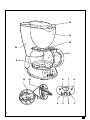
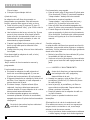
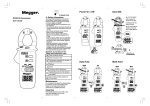
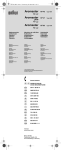
www.blackanddecker.com DCM310 1 English 4 Italiano 8 Español 12 EÏÏËÓÈη 16 Copyright Black & Decker 2 12 11 10 13 9 8 15 14 4 5 7 6 3 2 1 A 3 ENGLISH COFFEE MAKER DCM310 Thank you for choosing Black & Decker. We hope that you will enjoy using this product for many years. OVERVIEW 1. On/off button 2. Prog button 3. Minute button 4. Hour button 5. Auto light 6. Run light 7. Display 8. Hotplate 9. Carafe 10. Carafe lid 11. Bowl 12. Bowl lid 13. Water reservoir 14. Filter holder 15. Filter INTENDED USE Your Black & Decker coffee maker has been designed for making coffee.This product is intended for household use only. WARNING SYMBOLS The following symbols are used in this manual: Denotes risk of personal injury or damage to the product in case of non-observance of the instructions in this manual. Denotes risk of electric shock. ◆ EC DECLARATION OF CONFORMITY ◆ DCM310 Black & Decker declares that these products conform to: 89/336/EEC, 73/23/EEC, EN 55014, EN 60335, EN 61000 ◆ ◆ Kevin Hewitt Director of Consumer Engineering Spennymoor, County Durham DL16 6JG, United Kingdom 4 IMPORTANT SAFEGUARDS Warning! When using mains-powered appliances, basic safety precautions, including the following, should always be followed to reduce the risk of fire, electric shock and personal injury. Read this entire manual carefully before using the appliance. The intended use is described in this manual. The use of any accessory or attachment or the performance of any operation with this appliance other than those recommended in this instruction manual may present a risk of personal injury. Retain this manual for future reference. Using your appliance ◆ Make sure that the appliance is switched off before connecting to or disconnecting from the power supply. ◆ Always take care when using the appliance. ◆ Never pull the power supply cord to disconnect the plug from the socket. Keep the power supply cord away from heat, oil and sharp edges. Do not allow the power supply cord to hang over the edge of your work top or table. ◆ Do not place the appliance on or near heat sources or in a heated oven. ENGLISH ◆ ◆ ◆ ◆ ◆ ◆ ◆ ◆ ◆ Do not use the appliance near flammable or explosive materials. Do not use the appliance outdoors. Operate the appliance only with dry hands. If the power supply cord is damaged during use, disconnect the appliance from the power supply immediately. Do not touch the power supply cord before disconnecting from the power supply. Disconnect the appliance from the power supply when not in use, before fitting or removing parts and before cleaning. Always place the appliance on a level surface with adequate free space on all sides. Allow the appliance to cool before fitting or removing any parts and before cleaning. During use, the carafe and the hotplate can get very hot. Do not use the appliance if the carafe shows any sign of cracks. Safety of others ◆ Do not allow children or any person unfamiliar with these instructions to use the appliance. ◆ Do not allow children or animals to come near the work area or to touch the appliance or power supply cord. Close supervision is necessary when the appliance is used near children. After use ◆ Switch the appliance off and remove the plug from the socket before leaving it unattended and before changing, cleaning or inspecting any parts of the appliance. ◆ When not in use, the appliance should be stored in a dry place. Children should not have access to stored appliances. Inspection and repairs ◆ Before use, check the appliance for damaged or defective parts. Check for breakage of parts and any other conditions that may affect its operation. ◆ Do not use the appliance if any part is damaged or defective. ◆ Have any damaged or defective parts repaired or replaced by an authorised repair agent. ◆ ◆ ◆ ◆ ◆ ◆ Before use, check the power supply cord for signs of damage, ageing and wear. Do not use the appliance if the power supply cord or mains plug is damaged or defective. If the power supply cord or mains plug is damaged or defective it must be repaired by an authorised repair agent in order to avoid a hazard. Do not cut the power supply cord and do not attempt to repair it yourself. Never attempt to remove or replace any parts other than those specified in this manual. ELECTRICAL SAFETY Before use, check that the mains voltage corresponds to the voltage on the rating plate. Do not immerse the appliance, power supply cord or plug in water or other liquid. This product must be earthed. USE Never use the appliance without water in the reservoir. Before first use ◆ Wash the carafe, the filter holder and the filter in hot, soapy water. ◆ Rinse and dry all parts. Adding coffee and water ◆ Place the filter (15) in the filter holder (14). Fill the filter with the desired amount of coffee. ◆ Open the lid (12) and place the filter holder in the bowl (11). Make sure the pins on the filter holder fit securely into the bayonet holes in the bowl. ◆ Using the carafe (9), fill the water reservoir (13) with the desired amount of water. Close the lid. ◆ Place the carafe under the bowl. Setting the clock The appliance is fitted with a built-in programmable clock timer. To allow you to use this feature, the clock must first be set to the current time. 5 ENGLISH Press the prog button (2) once. The display (7) will show the word clock and 12:00 as the current time. ◆ Use the hour and minute buttons (4 & 3) to set the correct time. A single push on the button will increase the value in steps of one. By keeping the button depressed, the value will be increased in running mode. ◆ When the correct time is set, press the prog button until the figures on the display disappear. ◆ Release the prog button. The display will now show the set time. If the appliance is unplugged, the clock wil be reset to 12:00. ◆ Making coffee There are 2 modes of operation: manual and programmed. Manual operation ◆ Switch the appliance on by pressing the on/off button (1) once. The run light (6) will illuminate. ◆ The water in the reservoir will be heated and will flow into the filter bowl. After a short while, coffee will start to drip into the carafe. ◆ At the same time, the hotplate (8) will be heated. The hotplate will remain to be heated for 2 hours, after which it will be shut off automatically. ◆ The appliance can be shut off at any time by pressing the on/off button twice. The run light will extinguish. Do not let the carafe stand on the hotplate if the carafe is empty or almost empty. Programmed operation ◆ Press the prog button (2) twice. The auto light (5) will illuminate. The display (7) will show the word timer underneath the current time. ◆ While the word timer is shown, use the hour and minute buttons (4 & 3) to set the start time. ◆ Press the on/off button twice. The auto light will remain illuminated. ◆ When the start time is reached, the auto light will extinguish and the run light (6) will illuminate. The appliance will start making coffee as for manual operation. 6 Anti-drip function The appliance is fitted with an anti-drip function, allowing you to remove the carafe at any time, even when cofffee is still dripping from the filter bowl. ◆ Take the the carafe (9) from the hotplate (8) and pour the desired amount of coffee. ◆ Replace the carafe on the hotplate and allow the remainder of the coffee to drip into the carafe. CLEANING AND MAINTENANCE Before cleaning and maintenance, switch the appliance off and remove the plug from the socket. ◆ Using the handles, remove the filter (15) and the filter holder (14) from the bowl (11). Remove the used coffee grounds from the filter. ◆ Wash the carafe (9), the filter holder and the filter in hot, soapy water. Dry all parts and refit them. ◆ Wipe the outside of the appliance with a damp cloth. Note: The carafe is not dishwasher proof. Descaling the appliance If the appliance is used in an area with hard water, it is advised to descale the appliance when from time to time. ◆ Use a commercial descaling agent for coffee makers, or use water and vinegar as follows: ◆ Fill the water reservoir (13) and add 3 teaspoons of vinegar. Operate the appliance as for making coffee until the reservoir is empty. ◆ Discard the used water and repeat the procedure 2 or 3 times with fresh water. PROTECTING THE ENVIRONMENT Black & Decker provides a facility for recycling Black & Decker products once they have reached the end of their working life. This service is provided free of charge. ENGLISH To take advantage of this service please return your product to any authorised repair agent who will collect them on our behalf. You can check the location of your nearest authorised repair agent by contacting your local Black & Decker office at the address indicated in this manual. Alternatively, a list of authorised Black & Decker repair agents and full details of our after-sales service and contacts are available on the Internet at: www.2helpU.com. GUARANTEE Black & Decker is confident of the quality of its products and offers an outstanding guarantee. This guarantee statement is in addition to and in no way prejudices your statutory rights. The guarantee is valid within the territories of the Member States of the European Union and the European Free Trade Area. If a Black & Decker product becomes defective due to faulty materials, workmanship or lack of conformity, within 24 months from the date of purchase, Black & Decker guarantees to replace defective parts, repair products subjected to fair wear and tear or replace such products to ensure minimum inconvenience to the customer unless: ◆ The product has been used for trade, professional or hire purposes; ◆ The product has been subjected to misuse or neglect; ◆ The product has sustained damage through foreign objects, substances or accidents; ◆ Repairs have been attempted by persons other than authorised repair agents or Black & Decker service staff. To claim on the guarantee, you will need to submit proof of purchase to the seller or an authorised repair agent. You can check the location of your nearest authorised repair agent by contacting your local Black & Decker office at the address indicated in this manual. Alternatively, a list of authorised Black & Decker repair agents and full details of our after-sales service and contacts are available on the Internet at: www.2helpU.com. 7 ITALIANO MACCHINA PER CAFFÈ DCM310 Grazie per aver scelto Black & Decker. Ci auguriamo che usi questo prodotto per molti anni. PROSPETTO GENERALE 1. Pulsante ON/OFF 2. Pulsante di programmazione (PROG) 3. Pulsante dei minuti (MIN) 4. Pulsante delle ore (HOUR) 5. Spia di funzionamento automatico (AUTO) 6. Spia di funzionamento (RUN) 7. Display 8. Piastra riscaldante 9. Caraffa 10. Coperchio della caraffa 11. Contenitore del filtro 12. Coperchio del contenitore del filtro 13. Serbatoio dell’acqua 14. Portafiltro 15. Filtro USO PREVISTO La caffettiera Black & Decker è stata progettata specificamente per la preparazione di caffè. Questo prodotto é destinato esclusivamente all’uso domestico. SIMBOLI DI SICUREZZA Nel presente manuale si fa uso dei seguenti simboli: Indica il rischio d’infortuni alle persone o danni all’apparecchio in caso di mancata osservazione delle istruzioni contenute nel manuale. Indica il pericolo di scossa elettrica. ◆ DICHIARAZIONE CEE DI CONFORMITÀ DCM310 Black & Decker dichiara che questi prodotti sono stati costruiti in conformità a: 89/336/CEE, 73/23/CEE, EN 55014, EN 60335, EN 61000 ◆ ◆ ◆ Kevin Hewitt Direttore di Ricerca e Sviluppo Spennymoor, County Durham DL16 6JG, United Kingdom 8 IMPORTANTI NORME DI SICUREZZA Attenzione! Quando si impiegano apparecchi alimentati elettricamente, per ridurre il rischio di incendio, di scosse elettriche e infortuni occorre seguire sempre delle precauzioni di sicurezza di base, fra cui le seguenti: Prima di adoperare l’elettrodomestico, leggere attentamente le istruzioni del presente manuale. L’utilizzo previsto è quello descritto in questo manuale. L’uso di accessori o attrezzature diversi o l’uso di questo apparecchio per scopi diversi da quelli indicati nel presente manuale d’uso comportano il rischio di infortuni. Conservare questo manuale di istruzioni per successive consultazioni. Uso dell’elettrodomestico ◆ Accertare che l’elettrodomestico sia spento prima di collegarlo o scollegarlo dall’alimentazione. ◆ Fare sempre attenzione quando si usa l’elettrodomestico. ◆ Non tirare mai il cavo di alimentazione per disinserire la spina dalla presa. ITALIANO ◆ ◆ ◆ ◆ ◆ ◆ ◆ ◆ ◆ ◆ Mantenere il cavo lontano da fonti di calore, da olio e bordi taglienti. Non lasciare che il cavo di alimentazione penda dal bordo del piano di lavoro o della tavola. Non collocare l’elettrodomestico in prossimità di fonti di calore o in un forno caldo. Non utilizzare l’elettrodomestico in prossimità di materiali infiammabili o esplosivi. Evitare di utilizzare l’elettrodomestico all’esterno. L’elettrodomestico va adoperato con le mani asciutte. Se il cavo di alimentazione si danneggia durante l’uso, disinserire immediatamente la spina dell’apparecchio dalla presa di corrente. Non toccare il cavo di alimentazione se non dopo aver disinserito la spina dalla presa di corrente. Scollegare l’elettrodomestico dall’alimentazione quando non è in uso, prima di installare o rimuovere dei componenti e prima di pulirlo. Mettere sempre l’elettrodomestico su un piano orizzontale, lasciando spazio sufficiente su entrambi i lati. Lasciare raffreddare l’elettrodomestico prima di smontarne o sostituirne gli accessori e prima di pulirlo. Durante l’uso, la caraffa e la piastra riscaldante possono diventare bollenti. Non usare a macchina se la caraffa reca segni di spaccature. Sicurezza altrui ◆ Vietare l’uso dell’apparecchio a bambini e ad adulti che non abbiano letto il presente manuale d’istruzioni. ◆ Vietare a bambini o ad animali di avvicinarsi all’area di lavoro, di toccare l’apparecchio o il cavo di alimentazione. Fare estrema attenzione quando si usa l’apparecchio in presenza di bambini. ◆ Quando non è in funzione, l’apparecchio deve essere conservato in un luogo asciutto e non accessibile ai bambini. Ispezione e riparazioni ◆ Prima dell’uso, verificare che non vi siano componenti danneggiati o difettosi. Verificare anche che non vi siano parti rotte e che nulla comprometta il funzionamento dell’apparecchio. ◆ Non usare l’elettrodomestico se alcuni elementi sono danneggiati o difettosi. ◆ Eventuali elementi difettosi o danneggiati devono essere sostituiti o riparati da un tecnico autorizzato. ◆ Prima dell’uso, controllare che il cavo di alimentazione non presenti segni di danni, invecchiamento e usura. ◆ Non usare l’elettrodomestico se il cavo di alimentazione o la spina sono danneggiati o difettosi. ◆ Se il cavo di alimentazione o la spina sono danneggiati o difettosi devono essere riparati da un tecnico autorizzato, onde evitare situazioni pericolose. Non tagliare il cavo di alimentazione e non tentare di ripararlo personalmente. ◆ Non tentare mai di smontare o sostituire componenti diversi da quelli indicati nel presente manuale. ◆ ◆ NORME DI SICUREZZA ELETTRICA Prima dell’uso, controllare che la tensione di alimentazione corrisponda a quella indicata sulla targhetta con i dati caratteristici. Non immergere l’elettrodomestico, la spina o il cavo di alimentazione in acqua o altri liquidi. L’apparecchio deve essere collegato a massa. USO Dopo l’uso ◆ Prima di lasciare incustodito l’elettrodomestico, e prima di cambiarne, pulirne o ispezionarne qualsiasi parte, spegnerlo ed estrarre la spina dalla presa. Non usare mai l’elettrodomestico se il serbatoio dell’acqua è vuoto. 9 ITALIANO Prima di usare l’elettrodomestico per la prima volta ◆ Lavare la caraffa, il portafiltro e il filtro con acqua saponata bollente. ◆ Sciacquare ed asciugare tutti i pezzi. Introduzione di caffè ed acqua ◆ Collocare il filtro (15) nel portafiltro (14). Riempire il filtro con la quantità di caffè desiderata. ◆ Aprire il coperchio (12) e mettere il portafiltro nel contenitore (11). Controllare che le sporgenze del portafiltro si blocchino saldamente nei fori a baionetta del contenitore. ◆ Usando la caraffa (9), riempire il serbatoio (13) con la quantità di acqua desiderata. Chiudere il coperchio. ◆ Introdurre la caraffa sotto il contenitore. Regolazione dell’orologio L’elettrodomestico è provvisto di orologio con timer programmabile incorporato. Per utilizzare questa funzione, è necessario regolare l’orologio sull’orario corrente. ◆ Premere una volta il pulsante (2). Il display (7) visualizza la parola orologio e 12:00 come orario corrente. ◆ Utilizzare i pulsanti per le ore e i minuti (4 e 3) per impostare l’orario esatto. Una singola pressione sul pulsante fa aumentare il valore di un’unità. Se si mantiene premuto il pulsante, il valore aumenta rapidamente. ◆ Una volta impostato l’orario corretto, premere il pulsante di programmazione finché le cifre non scompaiono dal display. ◆ Rilasciare il pulsante di programmazione. Ora sul display è visualizzato l’orario impostato. Se l’elettrodomestico viene staccato dall’alimentazione, l’orologio viene reimpostato sull’ora 12:00. Preparazione del caffè Sono disponibili due modalità di funzionamento: manuale e programmata. 10 Funzionamento manuale ◆ Accendere l’elettrodomestico premendo una volta il pulsante on / off (1). La spia di funzionamento (6) s’illumina. ◆ L’acqua nel serbatoio viene riscaldata e immessa nel contenitore del filtro. Dopo poco, il caffè inizia a gocciolare nella caraffa. ◆ Contemporaneamente si riscalda la piastra riscaldante (8). La piastra riscaldante rimane calda per due ore, trascorse le quali si spegne automaticamente. ◆ L’elettrodomestico può essere spento in qualsiasi momento premendo due volte il tasto on / off. La spia di funzionamento si spegne. Non lasciare sulla piastra riscaldante la caraffa vuota o quasi vuota. Funzionamento programmato ◆ Premere due volte il pulsante di programmazione (2). La spia di funzionamento automatico (5) si illumina. Il display (7) visualizza la parola orologio sotto all’orario corrente. ◆ Mentre è visibile la parola timer, utilizzare i pulsanti dell’ora e i minuti (4 e 3) per impostare l’orario d’inizio. ◆ Premere due volte l’interruttore on / off. La spia di funzionamento automatico resta illuminata. ◆ Quando scatta l’orario d’inizio, la spia di funzionamento automatico si spegne e s’illumina la spia di funzionamento (6). L’elettrodomestico inizia a fare il caffè, come avviene per il funzionamento manuale. Funzione antigocciolamento L’elettrodomestico è provvisto di funzione antigocciolamento che consente di estrarre la caraffa in qualsiasi momento, anche mentre il caffè sta gocciolando dal contenitore del filtro. ◆ Prendere la caraffa (9), dalla piastra riscaldante (8) e versare la quantità di caffè desiderata. ◆ Rimettere la caraffa sulla piastra riscaldante e attendere che goccioli il resto del caffè. I TI A N L IOA N O ITAL PULIZIA E MANUTENZIONE Prima di eseguire qualsiasi procedura di pulizia o manutenzione, spegnere l’elettrodomestico e disinserirne la spina dalla presa. ◆ Utilizzando le impugnature, estrarre dal contenitore (11) il filtro (15) e il portafiltro (14). Togliere dal filtro i fondi di caffè. ◆ Lavare la caraffa (9), il portafiltro e il filtro con acqua saponata bollente. Asciugare tutti i pezzi e reinstallarli. ◆ Pulire l’esterno della macchina con un panno umido. Nota: la caraffa non può essere lavata in lavastoviglie. Decalcificazione dell’elettrodomestico Se l’elettrodomestico viene adoperato in un’area in cui l’acqua è particolarmente ricca di calcare, si suggerisce di decalcificarlo di tanto in tanto. ◆ Impiegare un decalcificante per macchine da caffè in commercio oppure usare acqua e aceto, come segue: ◆ Riempire il serbatoio dell’acqua (13) e aggiungere tre cucchiaini di aceto. Utilizzare la macchina come per preparare il caffè, sino a vuotare il serbatoio. ◆ Buttare l’acqua usata e ripetere questa procedura per due o tre volte con acqua pulita. PROTEZIONE DELL’AMBIENTE Black & Decker offre ai suoi clienti la possibilità di riciclare i prodotti Black & Decker che hanno esaurito la loro vita di servizio. Il servizio viene offerto gratuitamente. Per utilizzarlo, è sufficiente restituire il prodotto a qualsiasi tecnico autorizzato, incaricato della raccolta per conto dell’azienda. GARANZIA Certa della qualità dei suoi prodotti, Black & Decker offre una garanzia eccezionale. Il presente certificato di garanzia è complementare ai diritti statutari e non li pregiudica in alcun modo. La garanzia è valida entro il territorio degli Stati membri dell’Unione Europea e dell’EFTA (European Free Trade Area). Se un prodotto Black & Decker risulta difettoso per qualità del materiale, della costruzione o per mancata conformità entro 24 mesi dalla data di acquisto, Black & Decker garantisce la sostituzione delle parti difettose, provvede alla riparazione dei prodotti se ragionevolmente usurati oppure alla loro sostituzione, in modo da ridurre al minimo il disagio del cliente a meno che: ◆ Il prodotto non sia stato destinato ad usi commerciali, professionali o al noleggio; ◆ Il prodotto non sia stato usato in modo improprio o scorretto; ◆ Il prodotto non abbia subito danni causati da oggetti o sostanze estranee oppure incidenti; ◆ Il prodotto non abbia subito tentativi di riparazione non effettuati da tecnici autorizzati né dall’assistenza Black & Decker. Per attivare la garanzia è necessario esibire la prova comprovante l’acquisto al venditore o al tecnico autorizzato. Per individuare il tecnico autorizzato più vicino, rivolgersi alla sede Black & Decker locale, presso il recapito indicato nel presente manuale. Altrimenti un elenco completo di tutti i tecnici autorizzati Black & Decker e i dettagli completi sui contatti e i servizi post-vendita sono disponibili su Internet presso: www.2helpU.com. Per individuare il tecnico autorizzato più vicino, rivolgersi alla sede Black & Decker locale, presso il recapito indicato nel presente manuale. Altrimenti un elenco completo di tutti i tecnici autorizzati Black & Decker e i dettagli completi sui contatti e i servizi post-vendita sono disponibili su Internet presso: www.2helpU.com. 11 ESPAÑOL CAFETERIA DE GOTEO DCM310 Le damos las gracias por haber elegido Black & Decker. Esperamos que disfrute utilizando este producto durante muchos años. DESCRIPCIÓN GENERAL 1. Botón de encendido/apagado (ON/OFF) 2. Botón de programación (PROG) 3. Botón de minuto (MIN) 4. Botón de hora (HOUR) 5. Piloto automático (AUTO) 6. Piloto de funcionamiento (RUN) 7. Visor 8. Placa caliente 9. Jarra 10. Tapa de la jarra 11. Bol 12. Tapa del bol 13. Depósito de agua 14. Portafiltros 15. Filtro FINALIDAD La máquina de café Black & Decker ha sido diseñada para hacer café.Este producto está pensado para consumo doméstico únicamente. SÍMBOLOS DE ADVERTENCIA En este manual se utilizan los símbolos siguientes: Indica riesgo de lesiones a las personas, o daños al aparato en el caso de no atenerse a las instrucciones dadas en este manual. Indica riesgo de electrocución. ◆ DECLARACIÓN CE DE CONFORMIDAD ◆ DCM310 Black & Decker certifica que estos aparatos eléctricos han sido construidos de acuerdo a las normas siguientes: 89/336/CEE, 73/23/CEE, EN 55014, EN 60335, EN 61000 ◆ ◆ Kevin Hewitt Director de Ingeniería Spennymoor, County Durham DL16 6JG, United Kingdom 12 MEDIDAS PREVENTIVAS DE SEGURIDAD IMPORTANTES ¡Atención! Cuando use aparatos eléctricos, debe seguir siempre las precauciones de seguridad básicas, incluidas las siguientes, a fin de reducir el riesgo de incendios, electrocución y lesiones personales. Lea completamente este manual antes de utilizar el aparato. En este manual se explica el uso previsto para este aparato. El uso de otros accesorios, adaptadores, o la propia utilización de este aparato en cualquier forma diferente de las recomendadas en este manual de instrucciones puede constituir un riesgo de lesiones a las personas. Mantenga a mano este manual para consultas posteriores. Utilización del aparato ◆ Asegúrese de que el aparato está apagado antes de conectarlo o desconectarlo de la corriente. ◆ Tenga siempre cuidado cuando utilice este aparato. ◆ Nunca tire del cable para desconectarlo del enchufe. Proteja el cable del calor, del aceite y de las aristas vivas. Evite que el cable de corriente cuelgue por encima del borde de la superficie de la mesa. ESPAÑOL ◆ ◆ ◆ ◆ ◆ ◆ ◆ ◆ ◆ ◆ No coloque el aparato cerca de fuentes de calor o de un horno caliente. No utilice este aparato cerca de materiales inflamables o explosivos. No utilice este aparato en el exterior. Haga funcionar el aparato únicamente con las manos secas. Si el cable de corriente estuviera dañado por el uso, desenchufe inmediatamente el aparato de la corriente. No toque el cable antes de desenchufar el aparato de la corriente. Desenchufe el aparato de la corriente si no lo está utilizando, o antes de montar o desmontar piezas o de limpiarlo. Coloque siempre el aparato sobre superficies niveladas con espacio libre suficiente en todos sus lados. Deje enfriar el aparato antes de montar o desmontar piezas y antes de limpiarlo. Durante el uso, la jarra y la placa caliente pueden calentarse mucho. No use la máquina de café si la jarra presenta grietas o está rajada. Seguridad de otras personas ◆ No deje que el aparato sea utilizado por niños o por personas que no estén familiarizadas con su uso. ◆ Mantenga a los niños y animales domésticos alejados de la zona de trabajo y no permita que entren en contacto con el aparato o el cable de corriente. Es necesario estar muy atento cuando se utiliza el aparato cerca de los niños. Cuando acabe de utilizar el aparato ◆ Apague el aparato y desenchúfelo de la red si va a dejarlo desatendido y antes de cambiar, limpiar o inspeccionar alguna pieza del aparato. ◆ Cuando no se esté utilizando, el aparato debe guardarse en lugar seco. Los niños no deben tener acceso a estos aparatos guardados. Inspección y reparaciones ◆ Antes de utilizarlo, revise el aparato para ver si está dañado o tiene piezas defectuosas. Compruebe si hay alguna pieza rota o cualquier situación que pudiera afectar a su funcionamiento. ◆ ◆ ◆ ◆ ◆ ◆ ◆ ◆ No use el aparato si hay alguna pieza dañada o defectuosa. Encargue al servicio técnico autorizado que repare o sustituya las piezas defectuosas o averiadas. Antes de utilizar el aparato, revise el cable de alimentación de corriente para ver si presenta indicios de daños, envejecimiento o desgaste. No utilice el aparato si el cable de corriente o el enchufe estuvieran dañados o defectuosos. Si el cable eléctrico o el enchufe estuvieran estropeados o defectuosos, hay que sustituirlos en un servicio oficial de reparaciones con el fin de evitar cualquier peligro. No corte el cable de corriente y no trate de repararlo usted mismo. No intente nunca extraer o sustituir ninguna de las piezas que no sean las especificadas en este manual. SEGURIDAD ELÉCTRICA Antes de usarlo, compruebe que el voltaje de la red corresponde al valor indicado en la placa de características. No sumerja el aparato, el cable de corriente o la clavija en agua u otro tipo de líquido. Se requiere conexión a tierra. USO No use nunca el aparato sin agua en el depósito. Antes de usarlo por primera vez ◆ Lave la jarra, el portafiltros y el filtro en agua caliente enjabonada. ◆ Enjuague y seque todas las piezas. Añadir café y agua ◆ Coloque el filtro (15) en el portafiltros (14). Llene el filtro con la cantidad de café deseada. ◆ Abra la tapa (12) y coloque el portafiltros en el bol (11). Compruebe que los pasadores del portafiltros encajan en los agujeros de bayoneta del bol (11). ◆ Utilizando la jarra (9), llene el depósito de agua (13) con la cantidad de agua deseada. 13 ESPAÑOL ◆ Cierre la tapa. Coloque la jarra debajo del bol. Ajuste del reloj La máquina de café lleva incorporado un temporizador programable. Para utilizar esta función, primero debe poner el reloj en hora. ◆ Pulse el botón prog (2) una vez. El visor (7) mostrará la palabra “reloj” y las 12:00 como la hora actual. ◆ Use los botones de hora y minuto (4 y 3) para poner la hora correcta. Una simple presión sobre el botón incrementará el valor en uno. Manteniendo el botón pulsado, el valor irá aumentando progresivamente. ◆ Cuando haya fijado la hora correcta, pulse el botón prog hasta que las cifras del visor desaparezcan. ◆ Suelte el botón prog. Ahora el visor indicará la hora fijada. Si se desenchufa la máquina de café, el reloj volverá a las 12:00. Preparar café Hay 2 modos de funcionamiento: manual y programado. Funcionamiento programado ◆ Pulse el botón prog (2) dos veces. El piloto auto (5) se iluminará. El visor (7) mostrará la palabra “temporizador” debajo de la hora actual. ◆ Mientras se muestra la palabra “temporizador”, use los botones de hora y minuto (4 y 3) para fijar la hora de inicio. ◆ Pulse el botón de encendido/apagado dos veces. El piloto auto permanecerá encendido. ◆ Cuando llegue a la hora de inicio, el piloto auto se apagará y el piloto de funcionamiento (6) se iluminará. La máquina de café empezará a hacer café igual que en el funcionamiento manual. Función antigoteo La máquina de café lleva incorporada una función antigoteo, que permite retirar la jarra en cualquier momento, incluso mientras el café sigue goteando desde el bol del filtro. ◆ Retire la jarra (9) de la placa caliente (8) y sirva la cantidad de café que desee. ◆ Vuelva a colocar la jarra sobre la placa caliente y deje que el resto del café siga goteando a la jarra. LIMPIEZA Y MANTENIMIENTO Funcionamiento manual ◆ Encienda la máquina de café pulsando el botón de encendido/apagado (1) una vez. El piloto de funcionamiento (6) se iluminará. ◆ El agua del depósito se calentará y fluirá al bol del filtro. Poco después, el café empezará a gotear dentro de la jarra. ◆ Al mismo tiempo, la placa caliente (8) se calentará. La placa caliente permanecerá caliente durante 2 horas, después de lo cual se desconectará automáticamente. ◆ La cafetera puede apagarse en cualquier momento pulsando el botón de encendido/ apagado dos veces. El piloto de funcionamiento se apagará. No deje la jarra sobre la placa caliente si está vacía o casi vacía. 14 Antes de la limpieza y el mantenimiento de la máquina de café, apáguela y desenchúfela de la red. ◆ Usando los mangos, quite el filtro (15) y el portafiltros (14) del bol (11). Retire los posos de café del filtro. ◆ Lave la jarra (9), el portafiltros y el filtro en agua caliente enjabonada. Seque todas las piezas y vuelva a colocarlas. ◆ Limpie el exterior de la máquina de café con un paño húmedo. Nota: La jarra no puede introducirse en el lavavajillas. Eliminación de la cal de la máquina de café Si la cafetera se usa en una zona con aguas que tengan mucho contenido en cal, se aconseja eliminar la cal de vez en cuando. ◆ Use un producto desincrustante para cafeteras o utilice agua y vinagre de la forma siguiente: ESPAÑOL ◆ ◆ Llene el depósito de agua (13) y añada 3 cucharillas de vinagre. Haga funcionar la máquina de café como si estuviera haciendo un café exprés hasta que el depósito se vacíe. Deseche el agua utilizada y repita el procedimiento 2 o 3 veces con agua fresca. ◆ ◆ ◆ ◆ PROTECCIÓN DEL MEDIO AMBIENTE Black & Decker proporciona facilidades para el reciclado de los productos Black & Decker que hayan llegado al final de su vida útil. Este servicio se proporciona de forma gratuita. Para poderlo utilizar, le rogamos entregue el producto en cualquier servicio técnico autorizado quien se hará carga del mismo en nuestro nombre. Pueden consultar la dirección de su servicio técnico más cercano poniéndose en contacto con la oficina local de Black & Decker en la dirección que se indica en este manual. Como alternativa, se puede consultar en Internet, en la dirección siguiente, la lista de servicios técnico autorizados e información completa de nuestros servicios de postventa y contactos: www.2helpU.com. El producto haya sido utilizado con propósitos comerciales, profesionales o de alquiler; El producto haya sido sometido a un uso inadecuado o negligente; El producto haya sufrido daños causados por objetos o sustancias extrañas o accidentes; Se hayan realizado reparaciones por parte de personas que no sean los servicios de reparación autorizados o personal de servicios de Black & Decker; Para reclamar en garantía, será necesario que presente la prueba de compra al vendedor o al servicio técnico de reparaciones autorizado. Pueden consultar la dirección de su servicio técnico más cercano poniéndose en contacto con la oficina local de Black & Decker en la dirección que se indica en este manual. Como alternativa, se puede consultar en Internet, en la dirección siguiente, la lista de servicios técnico autorizados e información completa de nuestros servicios de postventa y contactos: www.2helpU.com. GARANTÍA Black & Decker confía plenamente en la calidad de sus productos y ofrece una garantía extraordinaria. Esta declaración de garantía es una añadido, y en ningún caso un perjuicio para sus derechos estatutarios. La garantía es válida dentro de los territorios de los Estados Miembros de la Unión Europea y de los de la Zona Europea de Libre Comercio. Si un producto Black & Decker resultara defectuoso debido a materiales o mano de obra defectuosos o a la falta de conformidad, Black & Decker garantiza, dentro de los 24 meses de la fecha de compra, la sustitución de las piezas defectuosas, la reparación de los productos sujetos a un desgaste y rotura razonables o la sustitución de tales productos para garantizar al cliente el mínimo de inconvenientes, a menos que: 15 ∂§§∏¡π∫∞ ∫∞ºE∆πEƒ∞ DCM310 E˘¯·ÚÈÛÙԇ̠ÁÈ· ÙËÓ ÂÌÈÛÙÔÛ‡ÓË Û·˜ ÛÙËÓ Black & Decker. EÏ›˙Ô˘Ì ӷ ·ÔÏ·‡ÛÂÙ ÙË ¯Ú‹ÛË ·˘ÙÔ‡ ÙÔ˘ ÚÔ˚fiÓÙÔ˜ ÁÈ· ÔÏÏ¿ ¯ÚfiÓÈ·. µ∞™π∫∞ ™∆√πÃEπ∞ 1. ¢È·ÎfiÙ˘ ON/OFF 2. ∫Ô˘Ì› ¶ÚÔÁÚ¿ÌÌ·ÙÔ˜ (PROG) 3. ∫Ô˘Ì› §ÂÙÒÓ (MIN) 4. ∫Ô˘Ì› ÒÚ·˜ (HOUR) 5. ºˆÙÂÈÓ‹ ¤Ó‰ÂÈÍË (AUTO) 6. ºˆÙÂÈÓ‹ EÓ‰ÂÈÍË §ÂÈÙÔ˘ÚÁ›·˜ (RUN) 7. √ıfiÓË 8. £ÂÚÌ·ÈÓfiÌÂÓË ‚¿ÛË 9. °˘¿ÏÈÓÔ ‰Ô¯Â›Ô 10. ∫·¿ÎÈ Á˘¿ÏÈÓÔ˘ ‰Ô¯Â›Ô˘ 11. ¶Ï·ÛÙÈÎfi ÂÚ›‚ÏËÌ· ˘Ô‰Ô¯‹˜ Ê›ÏÙÚÔ˘ 12. ∫·¿ÎÈ Ï·ÛÙÈÎÔ‡ ÂÚÈ‚Ï‹Ì·ÙÔ˜ ˘Ô‰Ô¯‹˜ Ê›ÏÙÚÔ˘ 13. ¢Ô¯Â›Ô ÓÂÚÔ‡ 14. ÀÔ‰Ô¯‹ Ê›ÏÙÚÔ˘ 15. º›ÏÙÚÔ E¡¢E¢Eπ°ªE¡∏ Ã∏™∏ ∏ ηÊÂÙȤڷ Black & Decker ¤¯ÂÈ Û¯Â‰È·ÛÙ› ÁÈ· Ó· ÊÙÈ¿¯ÓÂÙ ηʤ. ∞˘Ùfi ÙÔ ÚÔ˚fiÓ ÚÔÔÚ›˙ÂÙ·È ÁÈ· ÔÈÎȷ΋ ¯Ú‹ÛË ÌfiÓÔ. ¶ƒ√Eπ¢√¶√π∏∆π∫∞ ™Àªµ√§∞ ™Â ·˘Ùfi ÙÔ ÂÁ¯ÂÈÚ›‰ÈÔ ¯ÚËÛÈÌÔÔÈÔ‡ÓÙ·È Ù· ۇ̂ÔÏ· Ô˘ ·ÎÔÏÔ˘ıÔ‡Ó: EÈÛËÌ·›ÓÂÈ Î›Ó‰˘ÓÔ ÛˆÌ·ÙÈ΋˜ ‚Ï¿‚˘ ‹ ‚Ï¿‚˘ ÙÔ˘ ÚÔ˚fiÓÙÔ˜, Û ÂÚ›ÙˆÛË ÌË Ù‹ÚËÛ˘ ÙˆÓ Ô‰ËÁÈÒÓ ÙÔ˘ ÂÁ¯ÂÈÚȉ›Ô˘. EÈÛËÌ·›ÓÂÈ Î›Ó‰˘ÓÔ ËÏÂÎÙÚÔÏËÍ›·˜. ◆ ¢∏§ø™∏ ™Àªª√ƒºø™∏™ E∫ ◆ DCM310 Black & Decker ‰ËÏÒÓÂÈ fiÙÈ ·˘Ù¿ Ù· ÚÔ˚fiÓÙ· ۯ‰ȿÛÙËÎ·Ó Û‡Ìʈӷ ÌÂ: 89/336/E√∫, 73/23/E√∫, EN 55014, EN 60335, EN 61000 ◆ ◆ Kevin Hewitt ¢È¢ı˘ÓÙ‹˜ Ì˯·ÓÔÏÔÁ›·˜ Spennymoor, County Durham DL16 6JG, United Kingdom 16 ™∏ª∞¡∆π∫∞ ªE∆ƒ∞ ¶ƒ√™∆∞™π∞™ ¶ÚÔÛÔ¯‹! ∫·Ù¿ ÙË ¯Ú‹ÛË Û˘Û΢ÒÓ Ô˘ ÙÚÔÊÔ‰ÔÙÔ‡ÓÙ·È Ì ËÏÂÎÙÚÈÎfi Ú‡̷, ı· Ú¤ÂÈ ¿ÓÙ· Ó· Ï·Ì‚¿ÓÔÓÙ·È ÔÈ ‚·ÛÈΤ˜ ÚÔÊ˘Ï¿ÍÂȘ ·ÛÊ·Ï›·˜, ÁÈ· ÙÔÓ ÂÚÈÔÚÈÛÌfi ÙÔ˘ ÎÈÓ‰‡ÓÔ˘ ˘ÚηÁÈ¿˜, ËÏÂÎÙÚÔÏËÍ›·˜ Î·È ÛˆÌ·ÙÈÎÒÓ ‚Ï·‚ÒÓ. ¶ÚÈÓ ¯ÚËÛÈÌÔÔÈ‹ÛÂÙ ÙË Û˘Û΢‹ ‰È·‚¿ÛÙ ÚÔÛ¯ÙÈο ÔÏfiÎÏËÚÔ ÙÔ ÂÁ¯ÂÈÚ›‰ÈÔ. ∏ ÂӉ‰ÂÈÁ̤ÓË ¯Ú‹ÛË ·Ó·Ê¤ÚÂÙ·È Û ·˘Ùfi ÙÔ ÂÁ¯ÂÈÚ›‰ÈÔ. ∆fiÛÔ Ë ¯Ú‹ÛË ÂÍ·ÚÙËÌ¿ÙˆÓ ‹ ÚÔÛıËÎÒÓ fiÛÔ Î·È Ë Ú·ÁÌ·ÙÔÔ›ËÛË ÂÚÁ·ÛÈÒÓ Ì ÙË Û˘Û΢‹ Ô˘ ‰ÂÓ Û˘ÓÈÛÙÒÓÙ·È Û ·˘Ùfi ÙÔ ÂÁ¯ÂÈÚ›‰ÈÔ Ô‰ËÁÈÒÓ ÂÁ΢ÌÔÓ› ΛӉ˘ÓÔ ÙÚ·˘Ì·ÙÈÛÌÔ‡. º˘Ï¿ÍÙ ÙÔ ÂÁ¯ÂÈÚ›‰ÈÔ ·˘Ùfi ÁÈ· ÌÂÏÏÔÓÙÈ΋ ·Ó·ÊÔÚ¿. ÃÚ‹ÛË Ù˘ Û˘Û΢‹˜ Û·˜ ◆ µÂ‚·Èˆı›Ù fiÙÈ Ë Û˘Û΢‹ ¤¯ÂÈ ÙÂı› ÂÎÙfi˜ ÏÂÈÙÔ˘ÚÁ›·˜ ÚÈÓ ÙË Û˘Ó‰¤ÛÂÙ ‹ ÙËÓ ·ÔÛ˘Ó‰¤ÛÂÙ ·fi ÙËÓ Ú›˙·. ◆ ¶ÚÔÛ¤¯ÂÙ ¿ÓÙ· fiÙ·Ó ¯ÚËÛÈÌÔÔț٠ÙË Û˘Û΢‹. ◆ ¶ÔÙ¤ ÌËÓ ·ÔÛ˘Ó‰¤ÂÙ ÙË Û˘Û΢‹ ·fi ÙËÓ Ú›˙· ÙÚ·‚ÒÓÙ·˜ ÙÔ Î·ÏÒ‰Èfi Ù˘. ¢È·ÙËÚ›Ù ÙÔ Î·ÏÒ‰ÈÔ ÙÚÔÊÔ‰ÔÛ›·˜ Û ·fiÛÙ·ÛË ·fi ËÁ¤˜ ıÂÚÌfiÙËÙ·˜, Ï¿‰È· Î·È ·fi ·È¯ÌËÚ¤˜ ·Î̤˜. ∂§§∏¡π∫∞ ◆ ◆ ◆ ◆ ◆ ◆ ◆ ◆ ◆ ◆ ªËÓ ÂÈÙÚ¤ÂÙ ÙÔ Î·ÏÒ‰ÈÔ ÙÚÔÊÔ‰ÔÛ›·˜ Ó· ÎÚ¤ÌÂÙ·È ·fi ÙËÓ ¿ÎÚË Ù˘ ÂÈÊ¿ÓÂÈ·˜ ÂÚÁ·Û›·˜ ‹ ÙÔ˘ ÙÚ·Â˙ÈÔ‡. ªËÓ ÙÔÔıÂÙ›Ù ÙË Û˘Û΢‹ ¿Óˆ ‹ ÎÔÓÙ¿ Û ËÁ¤˜ ıÂÚÌfiÙËÙ·˜ ‹ Û ˙ÂÛÙfi ÊÔ‡ÚÓÔ. ªËÓ ¯ÚËÛÈÌÔÔț٠ÙË Û˘Û΢‹ ÎÔÓÙ¿ Û ‡ÊÏÂÎÙ· ‹ ÂÎÚËÎÙÈο ˘ÏÈο. ªËÓ ¯ÚËÛÈÌÔÔț٠ÙË Û˘Û΢‹ ÛÙÔ ‡·ÈıÚÔ. ¡· ı¤ÙÂÙ ÙË Û˘Û΢‹ Û ÏÂÈÙÔ˘ÚÁ›· ÌfiÓÔ Ì ÛÙÂÁÓ¿ ¯¤ÚÈ·. E¿Ó ÙÔ Î·ÏÒ‰ÈÔ ÙÚÔÊÔ‰ÔÛ›·˜ ηٷÛÙÚ·Ê› ηٿ ÙË ¯Ú‹ÛË, ·ÔÛ˘Ó‰¤ÛÙ ÙË Û˘Û΢‹ ·Ì¤Ûˆ˜ ·fi ÙËÓ Ú›˙·. ªËÓ ·ÁÁ›˙ÂÙ ÙÔ Î·ÏÒ‰ÈÔ ÙÚÔÊÔ‰ÔÛ›·˜ ÚÈÓ ·Ê·ÈÚ¤ÛÂÙ ÙÔ ÊȘ ·fi ÙËÓ Ú›˙·. ¡· ·ÔÛ˘Ó‰¤ÂÙ ÙË Û˘Û΢‹ ·fi ÙËÓ Ú›˙· fiÙ·Ó ‰ÂÓ ¯ÚËÛÈÌÔÔÈ›ٷÈ, ÚÈÓ ÙÔÔıÂÙ‹ÛÂÙ ‹ ·Ê·ÈÚ¤ÛÂÙ ÂÍ·ÚÙ‹Ì·Ù· Î·È ÚÈÓ ÙËÓ Î·ı·Ú›ÛÂÙÂ. ¡· ÙÔÔıÂÙ›Ù ÙËÓ Û˘Û΢‹ ¿ÓÙ· ÛÂ Â›Â‰Ë ÂÈÊ¿ÓÂÈ· Ì ·Ú΋ ÂχıÂÚÔ ¯ÒÚÔ ·fi fiϘ ÙȘ Ï¢ڤ˜. ∞Ê‹ÛÙ ÙË Û˘Û΢‹ Ó· ÎÚ˘ÒÛÂÈ ÚÈÓ ÙÔÔıÂÙ‹ÛÂÙ ‹ ·Ê·ÈÚ¤ÛÂÙ ÔÔÈ·‰‹ÔÙ ̤ÚË Ù˘ Û˘Û΢‹˜ ÚÈÓ ÙËÓ Î·ı·Ú›ÛÂÙÂ. ∫·Ù¿ ÙË ¯Ú‹ÛË, ÙÔ Á˘¿ÏÈÓÔ ‰Ô¯Â›Ô Î·È Ë ıÂÚÌ·ÈÓfiÌÂÓË ‚¿ÛË ÌÔÚ› Ó· ˙ÂÛÙ·ıÔ‡Ó Ôχ. ªË ¯ÚËÛÈÌÔÔț٠ÙË Û˘Û΢‹ Â¿Ó ÙÔ Á˘¿ÏÈÓÔ ‰Ô¯Â›Ô ·ÚÔ˘ÛÈ¿˙ÂÈ ÔÔÈ·‰‹ÔÙ ڈÁÌ‹. ∞ÛÊ¿ÏÂÈ· ÙÚ›ÙˆÓ ◆ ªËÓ ÂÈÙÚ¤ÂÙ Û ÌÈÎÚ¿ ·È‰È¿ ‹ Û ¿ÙÔÌ· Ô˘ ‰ÂÓ ¤¯Ô˘Ó ‰È·‚¿ÛÂÈ ÙÔ ÂÁ¯ÂÈÚ›‰ÈÔ Ô‰ËÁÈÒÓ ‹ Ô˘ ‰ÂÓ ¤¯Ô˘Ó ÂÍÔÈÎÂȈı› Ì ÙË Û˘Û΢‹ Ó· ÙË ¯ÚËÛÈÌÔÔÈ‹ÛÔ˘Ó. ◆ ªËÓ ÂÈÙÚ¤ÂÙ Û ·È‰È¿ ‹ ˙Ò· Ó· ÏËÛÈ¿˙Ô˘Ó ÛÙÔ ¯ÒÚÔ ÂÚÁ·Û›·˜ ‹ Ó· ·ÁÁ›˙Ô˘Ó ÙË Û˘Û΢‹ ‹ ÙÔ Î·ÏÒ‰ÈÔ ÙÚÔÊÔ‰ÔÛ›·˜ Ù˘. √Ù·Ó Ë Û˘Û΢‹ ¯ÚËÛÈÌÔÔÈÂ›Ù·È ÎÔÓÙ¿ Û ·È‰È¿ Â›Ó·È ··Ú·›ÙËÙË Ë ÛÙÂÓ‹ ÂÈÙ‹ÚËÛË. ªÂÙ¿ ÙË ¯Ú‹ÛË ◆ £¤ÛÙ ÙË Û˘Û΢‹ ÂÎÙfi˜ ÏÂÈÙÔ˘ÚÁ›·˜ Î·È ·Ê·ÈÚ¤ÛÙ ÙÔ ÊȘ ·fi ÙËÓ Ú›˙· ÚÈÓ ÙËÓ ·Ê‹ÛÂÙ ¯ˆÚ›˜ ÂÈÙ‹ÚËÛË Î·È ÚÈÓ ·ÏÏ¿ÍÂÙÂ, ηı·Ú›ÛÂÙ ‹ ÂÈıˆڋÛÂÙ ÔÔÈ·‰‹ÔÙ ÙÌ‹Ì·Ù¿ Ù˘. ◆ √Ù·Ó ‰ÂÓ ¯ÚËÛÈÌÔÔÈ›ٷÈ, Ë Û˘Û΢‹ Ú¤ÂÈ Ó· Ê˘Ï¿ÛÛÂÙ·È Û ÍËÚfi ¯ÒÚÔ. ∆· ·È‰È¿ ‰ÂÓ Ú¤ÂÈ Ó· ¤¯Ô˘Ó ÚfiÛ‚·ÛË Û ·ÔıËÎÂ˘Ì¤Ó˜ Û˘Û΢¤˜. EÈıÂÒÚËÛË Î·È ÂÈÛ΢¤˜ ◆ ¶ÚÈÓ ·fi ÙË ¯Ú‹ÛË, ÂϤÁÍÙ ÚÔÛÂÎÙÈο ÙË Û˘Û΢‹ ÁÈ· ηÙÂÛÙÚ·Ì̤ӷ ‹ ÂÏ·Ùو̷ÙÈο ̤ÚË. EϤÁÍÙ ÁÈ· ̤ÚË Ô˘ ¤¯Ô˘Ó Û¿ÛÂÈ Î·È ÁÈ· οı ›‰Ô˘˜ Û˘Óı‹Î˜ ÔÈ Ôԛ˜ ÂÓ‰¤¯ÂÙ·È Ó· ÂËÚ¿ÛÔ˘Ó ÙË ÏÂÈÙÔ˘ÚÁ›· Ù˘. ◆ ªË ¯ÚËÛÈÌÔÔț٠ÙË Û˘Û΢‹ ·Ó οÔÈÔ ÂÍ¿ÚÙËÌ¿ Ù˘ ·ÚÔ˘ÛÈ¿˙ÂÈ ÂÏ¿Ùو̷. ◆ ºÚÔÓÙ›ÛÙ ӷ Á›ÓÂÈ Ë ÂÈÛ΢‹ ‹ Ë ·ÓÙÈηٿÛÙ·ÛË ÙˆÓ Ù˘¯fiÓ ÂÏ·Ùو̷ÙÈÎÒÓ ÂÍ·ÚÙËÌ¿ÙˆÓ ·fi ÂÍÔ˘ÛÈÔ‰ÔÙË̤ÓÔ Î¤ÓÙÚÔ ÂÈÛ΢ÒÓ. ◆ ¶ÚÈÓ ·fi ÙË ¯Ú‹ÛË, ÂϤÁÍÙ ÚÔÛÂÎÙÈο ÙÔ Î·ÏÒ‰ÈÔ ÙÚÔÊÔ‰ÔÛ›·˜ ÁÈ· ÛËÌ¿‰È· ˙ËÌÈ¿˜, ·Ï·›ˆÛ˘ Î·È ÊıÔÚ¿˜. ◆ ªË ¯ÚËÛÈÌÔÔț٠ÙË Û˘Û΢‹ ·Ó ÙÔ Î·ÏÒ‰ÈÔ ÙÚÔÊÔ‰ÔÛ›·˜ Ù˘ ‹ ÙÔ ÊȘ ¤¯ÂÈ ¿ıÂÈ ˙ËÌÈ¿ ‹ ·ÚÔ˘ÛÈ¿˙ÂÈ ÂÏ¿Ùو̷. ◆ E¿Ó ÙÔ Î·ÏÒ‰ÈÔ ÙÚÔÊÔ‰ÔÛ›·˜ ‹ ÙÔ ÊȘ Â›Ó·È Î·ÙÂÛÙÚ·Ì̤ÓÔ ‹ ÂÏ·Ùو̷ÙÈÎfi, Ú¤ÂÈ Ó· ÂÈÛ΢·ÛÙ› ·fi ÂÍÔ˘ÛÈÔ‰ÔÙË̤ÓÔ ·ÓÙÈÚfiÛˆÔ ÂÈÛ΢‹˜, ÒÛÙ ӷ ÌËÓ ÚÔ·„ÂÈ Î›Ó‰˘ÓÔ˜. ªËÓ Îfi‚ÂÙ ÙÔ Î·ÏÒ‰ÈÔ ÙÚÔÊÔ‰ÔÛ›·˜ Î·È ÌËÓ ÚÔÛ·ı›Ù ӷ ÙÔ ÂÈÛ΢¿ÛÂÙ ÌfiÓÔÈ Û·˜. ◆ ¶ÔÙ¤ ÌËÓ ÂȯÂÈÚ›Ù ӷ ·Ê·ÈÚ¤ÛÂÙ ‹ Ó· ·ÓÙÈηٷÛÙ‹ÛÂÙ ÂÍ·ÚÙ‹Ì·Ù· ¿ÏÏ· ·fi ·˘Ù¿ Ô˘ ÚÔÛ‰ÈÔÚ›˙ÔÓÙ·È Û ·˘Ùfi ÙÔ ÂÁ¯ÂÈÚ›‰ÈÔ. ◆ ◆ ∏§E∫∆ƒπ∫∏ ∞™º∞§Eπ∞ ¶ÚÈÓ ·fi ÙË ¯Ú‹ÛË, ÂϤÁÍÙ ·Ó Ë Ù¿ÛË ÙÚÔÊÔ‰ÔÛ›·˜ ·ÓÙÈÛÙÔȯ› Û ·˘Ù‹Ó Ô˘ ·Ó·ÁÚ¿ÊÂÙ·È ÛÙËÓ ÈӷΛ‰· ¯·Ú·ÎÙËÚÈÛÙÈÎÒÓ. ªËÓ ‚˘ı›˙ÂÙ ÙËÓ Û˘Û΢‹, ÙÔ Î·ÏÒ‰ÈÔ ÙÚÔÊÔ‰ÔÛ›·˜ ‹ ÙÔ ÊȘ Û ÓÂÚfi ‹ ¿ÏÏÔ ˘ÁÚfi. ∞˘Ùfi ÙÔ ÚÔ˚fiÓ Ú¤ÂÈ Ó· Û˘Ó‰¤ÂÙ·È Û ÙÚÔÊÔ‰ÔÛ›· Ì Á›ˆÛË. 17 ∂§§∏¡π∫∞ Ã∏™∏ ¶ÔÙ¤ ÌË ¯ÚËÛÈÌÔÔț٠ÙË Û˘Û΢‹ ¯ˆÚ›˜ Ù· Ê›ÏÙÚ·. ¶ƒπ¡ ∞¶√ ∆∏¡ ¶ƒø∆∏ Ã∏™∏ ◆ ¶Ï‡ÓÂÙ ÙÔ Á˘¿ÏÈÓÔ ‰Ô¯Â›Ô, ÙË ı‹ÎË ÙÔ˘ Ê›ÏÙÚÔ˘ Î·È ÙÔ Ê›ÏÙÚÔ Ì ˙ÂÛÙfi ÓÂÚfi Ì ۷ԇÓÈ. ◆ •ÂχÓÂÙÂ Î·È ÛÙÂÁÓÒÛÙ fiÏ· Ù· ̤ÚË Ù˘ Û˘Û΢‹˜. ¶ÚÔÛı‹ÎË Î·Ê¤ Î·È ÓÂÚÔ‡ ◆ ∆ÔÔıÂÙ‹ÛÙ ÙÔ Ê›ÏÙÚÔ (15) ÛÙË ı‹ÎË ÁÈ· Ê›ÏÙÚÔ (14). °ÂÌ›ÛÙ ÙÔ Ê›ÏÙÚÔ Ì ÙËÓ ÂÈı˘ÌËÙ‹ ÔÛfiÙËÙ· ηʤ. ◆ ∞ÓÔ›ÍÙ ÙÔ Î·¿ÎÈ (12) Î·È ÙÔÔıÂÙ‹ÛÙ ÙËÓ ˘Ô‰Ô¯‹ Ê›ÏÙÚÔ˘ ÛÙÔ Ï·ÛÙÈÎfi ÂÚ›‚ÏËÌ· ˘Ô‰Ô¯‹˜ Ê›ÏÙÚÔ˘ (11). µÂ‚·Èˆı›Ù fiÙÈ ÔÈ ÚÔÂÍÔ¯¤˜ ÛÙ‹ÚÈ͢ Ù˘ ı‹Î˘ Ê›ÏÙÚÔ˘ ¤¯Ô˘Ó ÂÊ·ÚÌfiÛÂÈ Î·Ï¿ ÛÙȘ ÂÁÎÔ¤˜ ÙÔ˘ ÌÔÏ. ◆ ÃÚËÛÈÌÔÔÈÒÓÙ·˜ ÙÔ Á˘¿ÏÈÓÔ ‰Ô¯Â›Ô (9), ÁÂÌ›ÛÙ ÙÔ ‰Ô¯Â›Ô ÓÂÚÔ‡ (13) Ì ÙËÓ ÂÈı˘ÌËÙ‹ ÔÛfiÙËÙ· ÓÂÚÔ‡. ∫Ï›ÛÙ ÙÔ Î·¿ÎÈ ◆ ∆ÔÔıÂÙ‹ÛÙ ÙÔ Á˘¿ÏÈÓÔ ‰Ô¯Â›Ô οو ·fi ÙÔ Ï·ÛÙÈÎfi ÂÚ›‚ÏËÌ·. ƒ‡ıÌÈÛË ÚÔÏÔÁÈÔ‡ ∏ Û˘Û΢‹ ‰È·ı¤ÙÂÈ ÂÓۈ̷و̤ÓÔ ¯ÚÔÓfiÌÂÙÚÔ Ô˘ ÌÔÚ› Ó· ÚÔÁÚ·ÌÌ·ÙÈÛÙ›. °È· Ó· ÌÔÚ¤ÛÂÙ ӷ ¯ÚËÛÈÌÔÔÈ‹ÛÂÙ ·˘Ù‹ ÙË ÏÂÈÙÔ˘ÚÁ›·, Ú¤ÂÈ ÚÔËÁÔ˘Ì¤Óˆ˜ ÙÔ ÚÔÏfiÈ Ó· ¤¯ÂÈ Ú˘ıÌÈÛÙ› ÛÙË ÛˆÛÙ‹ ÒÚ· ÙË ÛÙÈÁÌ‹ Ô˘ ı¤ÙÂÙ ÙË Û˘Û΢‹ Û ÏÂÈÙÔ˘ÚÁ›·. ◆ ¶·Ù‹ÛÙ ̛· ÊÔÚ¿ ÙÔ ÎÔ˘Ì› ÚÔÁÚ·ÌÌ·ÙÈÛÌÔ‡ PROG (2). ™ÙËÓ ÔıfiÓË ı· ÂÌÊ·ÓÈÛÙ› Ë ¤Ó‰ÂÈÍË «ÚÔÏfiÈ» Î·È Ë ÒÚ· 12:00. ◆ ÃÚËÛÈÌÔÔÈ‹ÛÙ ٷ ÎÔ˘ÌÈ¿ ÒÚ·˜ Î·È ÏÂÙÒÓ (4 & 3) ÁÈ· Ó· Ú˘ıÌ›ÛÂÙ ÙËÓ ÒÚ·. ¶·ÙÒÓÙ·˜ Ì›· ÊÔÚ¿ ÙÔ ÎÔ˘Ì› ·˘Í¿ÓÂÙ ÙËÓ ÒÚ· Î·È Ù· ÏÂÙ¿ ηٿ ¤Ó· ‚‹Ì·. ∫Ú·ÙÒÓÙ·˜ ÙÔ ÎÔ˘Ì› ·ÙË̤ÓÔ, Ô ·ÚÈıÌfi˜ ·˘Í¿ÓÂÙ·È ÁÚ‹ÁÔÚ·. ◆ √Ù·Ó Ú˘ıÌ›ÛÂÙ ÙËÓ ÒÚ·, ·Ù‹ÛÙ ÙÔ ÎÔ˘Ì› ÚÔÁÚ·ÌÌ·ÙÈÛÌÔ‡ ¤ˆ˜ fiÙÔ˘ ÔÈ ÂӉ›ÍÂȘ ÛÙËÓ ÔıfiÓË ÂÍ·Ê·ÓÈÛÙÔ‡Ó. ◆ ∞Ê‹ÛÙ ÙÔ ÎÔ˘Ì› ÚÔÁÚ·ÌÌ·ÙÈÛÌÔ‡. ∏ ÔıfiÓË ı· ‰Â›ÍÂÈ ÙÒÚ· ÙË Ú˘ıÌÈṲ̂ÓË ÒÚ·. 18 E¿Ó Ë Û˘Û΢‹ ‰ÂÓ Â›Ó·È Û˘Ó‰Â‰Â̤ÓË ÛÙËÓ Ú›˙·, ÙÔ ÚÔÏfiÈ ı· ·ӷʤÚÂÈ ÛÙËÓ ÒÚ· 12:00. °È· Ó· ÊÙÈ¿ÍÂÙ ηʤ À¿Ú¯Ô˘Ó 2 ÙÚfiÔÈ ÏÂÈÙÔ˘ÚÁ›·˜: ÌÂ Î·È ¯ˆÚ›˜ ÚfiÁÚ·ÌÌ· §ÂÈÙÔ˘ÚÁ›· Û˘Û΢‹˜ ¯ˆÚ›˜ ÚfiÁÚ·ÌÌ· ◆ £¤ÛÙ ÙË Û˘Û΢‹ Û ÏÂÈÙÔ˘ÚÁ›· ·ÙÒÓÙ·˜ ÙÔÓ ‰È·ÎfiÙË on/off (1) Ì›· ÊÔÚ¿. ∏ ʈÙÂÈÓ‹ ¤Ó‰ÂÈÍË ÏÂÈÙÔ˘ÚÁ›·˜ (6) ı· ·Ó¿„ÂÈ. ◆ ∆Ô ‰Ô¯Â›Ô ÓÂÚÔ‡ ı· ıÂÚÌ·Óı› Î·È Ó· ·Ú¯›ÛÂÈ Ó· Ú¤ÂÈ Ì¤Û· ÛÙÔ Ï·ÛÙÈÎfi ÂÚ›‚ÏËÌ· ˘Ô‰Ô¯‹˜ Ê›ÏÙÚÔ˘. ªÂÙ¿ ·fi Ï›ÁÔ, Ô Î·Ê¤˜ ı· ·Ú¯›˙ÂÈ Ó· ÛÙ¿˙ÂÈ Ì¤Û· ÛÙÔ Á˘¿ÏÈÓÔ ‰Ô¯Â›Ô. ◆ ∆·˘Ùfi¯ÚÔÓ·, Ë ıÂÚÌ·ÈÓfiÌÂÓË ‚¿ÛË (8) ı· ıÂÚÌ·Óı›. ∏ ıÂÚÌ·ÈÓfiÌÂÓË ‚¿ÛË ı· ·Ú·Ì›ÓÂÈ ˙ÂÛÙ‹ ÁÈ· 2 ÒÚ˜ Î·È ÌÂÙ¿ ı· Û‚‹ÛÂÈ ·˘ÙfiÌ·Ù·. ◆ ∏ Û˘Û΢‹ ÌÔÚ› Ó· ÙÂı› ÂÎÙfi˜ ÏÂÈÙÔ˘ÚÁ›·˜ ÔÔÈ·‰‹ÔÙ ÛÙÈÁÌ‹ ·ÙÒÓÙ·˜ ‰‡Ô ÊÔÚ¤˜ ÙÔÓ ‰È·ÎfiÙË on/off. ∏ ʈÙÂÈÓ‹ ¤Ó‰ÂÈÍË ÏÂÈÙÔ˘ÚÁ›·˜ ı· Û‚‹ÛÂÈ. ªËÓ ·Ê‹ÓÂÙ ÙÔ Á˘¿ÏÈÓÔ ‰Ô¯Â›Ô ¿ӈ ÛÙË ıÂÚÌ·ÈÓfiÌÂÓË ‚¿ÛË fiÙ·Ó ÙÔ ‰Ô¯Â›Ô Â›Ó·È ¿‰ÂÈÔ ‹ ÂÚȤ¯ÂÈ Ôχ Ï›ÁÔ Î·Ê¤. §ÂÈÙÔ˘ÚÁ›· Ì ÚfiÁÚ·ÌÌ· ◆ ¶·Ù‹ÛÙ ‰‡Ô ÊÔÚ¤˜ ÙÔ ÎÔ˘Ì› ÚÔÁÚ·ÌÌ·ÙÈÛÌÔ‡ PROG (2). ∏ ʈÙÂÈÓ‹ ¤Ó‰ÂÈÍË AUTO (5) ı· ·Ó¿„ÂÈ. ™ÙËÓ ÔıfiÓË (7) ı· ÂÌÊ·ÓÈÛÙ› Ë ¤Ó‰ÂÈÍË «¯ÚÔÓfiÌÂÙÚÔ» Î·È Ë ÒÚ· ÂΛÓË ÙË ÛÙÈÁÌ‹. ◆ EÓÒ ÂÌÊ·Ó›˙ÂÙ·È Ë ¤Ó‰ÂÈÍË «¯ÚÔÓfiÌÂÙÚÔ» ÛÙËÓ ÔıfiÓË, ¯ÚËÛÈÌÔÔÈ‹ÛÙ ٷ ÎÔ˘ÌÈ¿ ÒÚ·˜ Î·È ÏÂÙÒÓ (4 & 3) ÁÈ· Ó· Ú˘ıÌ›ÛÂÙ ÙËÓ ÒÚ· ÂÎΛÓËÛ˘. ◆ ¶·Ù‹ÛÙ ‰‡Ô ÊÔÚ¤˜ ÙÔÓ ‰È·ÎfiÙË on/off. ∏ ʈÙÂÈÓ‹ ¤Ó‰ÂÈÍË AUTO (5) ı· ·Ú·Ì›ÓÂÈ ·Ó·Ì̤ÓË. ◆ √Ù·Ó ¤ÚıÂÈ Ë ÒÚ· ÂÎΛÓËÛ˘, Ë ÊˆÙÂÈÓ‹ ¤Ó‰ÂÈÍË AUTO ı· Û‚‹ÛÂÈ Î·È ÊˆÙÂÈÓ‹ ¤Ó‰ÂÈÍË RUN(6) ı· ·Ó¿„ÂÈ. ∏ Û˘Û΢‹ ı· ÍÂÎÈÓ‹ÛÂÈ Ó· ÊÙÈ¿¯ÓÂÈ Î·Ê¤ fiˆ˜ Î·È ÛÙÔÓ ÙÚfiÔ ÏÂÈÙÔ˘ÚÁ›·˜ ¯ˆÚ›˜ ÚfiÁÚ·ÌÌ·. ∂§§∏¡π∫∞ §ÂÈÙÔ˘ÚÁ›· ·ÔÊ˘Á‹˜ ÚÔ‹˜ ηʤ. ∏ Û˘Û΢‹ ‰È·ı¤ÙÂÈ ÏÂÈÙÔ˘ÚÁ›· ·ÔÊ˘Á‹˜ ÚÔ‹˜, Ë ÔÔ›· Û·˜ ÂÈÙÚ¤ÂÈ Ó· ·Ê·ÈÚ›Ù ÙÔ Á˘¿ÏÈÓÔ ‰Ô¯Â›Ô ÔÔÈ·‰‹ÔÙ ÛÙÈÁÌ‹, ·ÎfiÌ· Î·È fiÙ·Ó Ô Î·Ê¤˜ Û˘Ó¯›˙ÂÈ Ó· ÛÙ¿˙ÂÈ ·fi ÙÔ Ï·ÛÙÈÎfi ÂÚ›‚ÏËÌ·. ◆ ∞ÔÌ·ÎÚ‡ÓÂÙ ÙÔ Á˘¿ÏÈÓÔ ‰Ô¯Â›Ô (9) ·fi ÙË ıÂÚÌ·ÈÓfiÌÂÓË ‚¿ÛË (8) Î·È ·‰ÂÈ¿ÛÙ ÙËÓ ÂÈı˘ÌËÙ‹ ÔÛfiÙËÙ· ηʤ. ◆ E·Ó·ÙÔÔıÂÙ‹ÛÙ ÙÔ Á˘¿ÏÈÓÔ ‰Ô¯Â›Ô ÛÙË ‚¿ÛË Î·È ·Ê‹ÛÙ ÙÔ ˘fiÏÔÈÔ ÙÔ˘ ηʤ Ó· ÛÙ¿ÍÂÈ Ì¤Û· ÛÙÔ ‰Ô¯Â›Ô. ∫∞£∞ƒπ™ª√™ ∫∞π ™À¡∆∏ƒ∏™∏ ¶ÚÈÓ ·fi ÙÔÓ Î·ı·ÚÈÛÌfi Î·È ÙË Û˘ÓÙ‹ÚËÛË, ı¤ÛÙ ÙË Û˘Û΢‹ ÂÎÙfi˜ ÏÂÈÙÔ˘ÚÁ›·˜ Î·È ‚Á¿ÏÙ ÙÔ ÊȘ ·fi ÙËÓ Ú›˙·. ◆ ÃÚËÛÈÌÔÔÈÒÓÙ·˜ ÙȘ ¯ÂÈÚÔÏ·‚¤˜, ·Ê·ÈÚ¤ÛÙ ÙÔ Ê›ÏÙÚÔ (15) Î·È ÙËÓ ˘Ô‰Ô¯‹ Ê›ÏÙÚÔ˘ (14) ·fi ÙÔ Ï·ÛÙÈÎfi ÂÚ›‚ÏËÌ·. ∞Ê·ÈÚ¤ÛÙ ÙÔÓ ¯ÚËÛÈÌÔÔÈË̤ÓÔ Î·Ê¤ ·fi ÙÔ Ê›ÏÙÚÔ. ◆ ¶Ï‡ÓÂÙ ÙÔ Á˘¿ÏÈÓÔ ‰Ô¯Â›Ô(9), ÙËÓ ˘Ô‰Ô¯‹ Ê›ÏÙÚÔ˘ Î·È ÙÔ Ê›ÏÙÚÔ Ì ˙ÂÛÙfi ÓÂÚfi Î·È Û·Ô‡ÓÈ. ™ÙÂÁÓÒÛÙ fiÏ· Ù· ̤ÚË Ù˘ Û˘Û΢‹ Î·È Â·Ó·ÙÔÔıÂÙ‹ÛÙ ٷ. ◆ ™ÎÔ˘›ÛÙ ÙÔ Â͈ÙÂÚÈÎfi Ù˘ Û˘Û΢‹˜ Ì ¤Ó· ˘ÁÚfi ·Ó›. ™ËÌ›ˆÛË: ∆Ô Á˘¿ÏÈÓÔ ‰Ô¯Â›Ô ‰ÂÓ Â›Ó·È ·ÓıÂÎÙÈÎfi Û χÛÈÌÔ ÛÂ Ï˘ÓÙ‹ÚÈÔ È¿ÙˆÓ. ∞Ê·›ÚÂÛË ·Ï¿ÙˆÓ Ù˘ Û˘Û΢‹˜. ∞Ó Ë Û˘Û΢‹ ¯ÚËÛÈÌÔÔÈÂ›Ù·È Û ÂÚÈÔ¯‹ Ì ÛÎÏËÚfi ÓÂÚfi, Û˘ÓÈÛÙ¿Ù·È Ó· ·Ê·ÈÚ›Ù ٷ ¿Ï·Ù· Ù˘ Û˘Û΢‹˜ ηٿ ‰È·ÛÙ‹Ì·Ù·. ◆ ÃÚËÛÈÌÔÔÈ‹ÛÙ ¤Ó· ̤ÛÔ ·Ê·Ï¿ÙˆÛ˘ ÙÔ˘ ÂÌÔÚ›Ô˘ ÁÈ· ηÊÂÙȤÚ˜, ‹ ¯ÚËÛÈÌÔÔÈ‹ÛÙ ÓÂÚfi Î·È Í‡‰È fiˆ˜ ÂÚÈÁÚ¿ÊÂÙ·È ·Ú·Î¿Ùˆ. ◆ °ÂÌ›ÛÙ ÙÔ ‰Ô¯Â›Ô ÓÂÚÔ‡ (13) Î·È ÚÔÛı¤ÛÙ 3 ÎÔ˘Ù·Ï¿ÎÈ· ͢‰ÈÔ‡. £¤ÛÙ ÙË Û˘Û΢‹ Û ÏÂÈÙÔ˘ÚÁ›· fiˆ˜ fiÙ·Ó ÊÙÈ¿¯ÓÂÙ ηʤ ¤ˆ˜ fiÙÔ˘ ·‰ÂÈ¿ÛÂÈ ÙÔ ‰Ô¯Â›Ô ÓÂÚÔ‡. ◆ ∞‰ÂÈ¿ÛÙ ÙÔ ¯ÚËÛÈÌÔÔÈË̤ÓÔ ÓÂÚfi Î·È Â·Ó·Ï¿‚ÂÙ ÙËÓ ‰È·‰Èηۛ· 2 Ì 3 ÊÔÚ¤˜ Ì ÊÚ¤ÛÎÔ ÓÂÚfi. ¶ƒ√™∆∞™π∞ ∆√À ¶Eƒπµ∞§§√¡∆√™ ∏ Black & Decker ‰›ÓÂÈ ÙË ‰˘Ó·ÙfiÙËÙ· ·Ó·Î‡ÎψÛ˘ ÙˆÓ ÚÔ˚fiÓÙˆÓ Ù˘ Ô˘ ¤¯Ô˘Ó Û˘ÌÏËÚÒÛÂÈ ÙË ‰È¿ÚÎÂÈ· ˙ˆ‹˜ ÙÔ˘˜. ∏ ˘ËÚÂÛ›· ·˘Ù‹ Â›Ó·È ‰ˆÚ¿Ó. ∞Ó ı¤ÏÂÙ ӷ ¯ÚËÛÈÌÔÔÈ‹ÛÂÙ ÙËÓ ÂÓ ÏfiÁˆ ˘ËÚÂÛ›·, ÂÈÛÙÚ¤„Ù ÙÔ ÚÔ˚fiÓ Û·˜ Û ÔÔÈÔ‰‹ÔÙ ÂÍÔ˘ÛÈÔ‰ÔÙË̤ÓÔ Î¤ÓÙÚÔ ÂÈÛ΢ÒÓ, fiÔ˘ ı· ÙÔ ·Ú·Ï¿‚Ô˘Ó ÂΠ̤ÚÔ˘˜ Û·˜. EÓËÌÂÚˆı›Ù ÁÈ· ÙÔ ÏËÛȤÛÙÂÚÔ Î¤ÓÙÚÔ ÂÈÛ΢ÒÓ Ù˘ ÂÚÈÔ¯‹˜ Û·˜, ÂÈÎÔÈÓˆÓÒÓÙ·˜ Ì ٷ ÁÚ·Ê›· Ù˘ Black & Decker ÛÙË ‰È‡ı˘ÓÛË Ô˘ ·Ó·ÁÚ¿ÊÂÙ·È ÛÙÔ ÂÁ¯ÂÈÚ›‰ÈÔ. E›Û˘, ÁÈ· Ó· ÏËÚÔÊÔÚËı›Ù ÁÈ· Ù· ÂÍÔ˘ÛÈÔ‰ÔÙË̤ӷ ΤÓÙÚ· ÂÈÛ΢ÒÓ Ù˘ Black & Decker, ÙȘ ÏÂÙÔ̤ÚÂȘ Î·È ÙÔ˘˜ ·ÚÌfi‰ÈÔ˘˜ ÙˆÓ ˘ËÚÂÛÈÒÓ Ô˘ ·Ú¤¯ÔÓÙ·È ÌÂÙ¿ ÙËÓ ÒÏËÛË, ÌÔÚ›Ù ӷ ·Ó·ÙÚ¤ÍÙ ÛÙÔ ¢È·‰›ÎÙ˘Ô ÛÙË ‰È‡ı˘ÓÛË: www.2helpU.com. E°°À∏™∏ ∏ Black & Decker Â›Ó·È Û›ÁÔ˘ÚË ÁÈ· ÙËÓ ÔÈfiÙËÙ· ÙˆÓ ÚÔ˚fiÓÙˆÓ Ù˘ Î·È ·Ú¤¯ÂÈ ÛËÌ·ÓÙÈ΋ ÂÁÁ‡ËÛË. ∏ ·ÚÔ‡Û· ÁÚ·Ù‹ ÂÁÁ‡ËÛË ·ÔÙÂÏ› ÚfiÛıÂÙÔ ‰Èη›ˆÌ¿ Û·˜ Î·È ‰ÂÓ ˙ËÌÈÒÓÂÈ Ù· Û˘ÓÙ·ÁÌ·ÙÈο Û·˜ ‰ÈηÈÒÌ·Ù·. ∏ ÂÁÁ‡ËÛË ÈÛ¯‡ÂÈ ÂÓÙfi˜ Ù˘ ÂÈÎÚ¿ÙÂÈ·˜ ÙˆÓ ∫Ú·ÙÒÓ ªÂÏÒÓ Ù˘ E˘Úˆ·˚΋˜ EÓˆÛ˘ Î·È Ù˘ E˘Úˆ·˚΋˜ ∑ÒÓ˘ EÏ¢ı¤ÚˆÓ ™˘Ó·ÏÏ·ÁÒÓ. ™Â ÂÚ›ÙˆÛË Ô˘ οÔÈÔ ÚÔ˚fiÓ Ù˘ Black & Decker ·ÚÔ˘ÛÈ¿ÛÂÈ ‚Ï¿‚Ë ÂÍ·ÈÙ›·˜ ÂÏ·Ùو̷ÙÈÎÒÓ ˘ÏÈÎÒÓ, ÔÈfiÙËÙ·˜ ÂÚÁ·Û›·˜ ‹ ¤ÏÏÂȄ˘ Û˘Ìʈӛ·˜ Ì ÙȘ ÚԉȷÁڷʤ˜ ÂÓÙfi˜ 24 ÌËÓÒÓ ·fi ÙËÓ ËÌÂÚÔÌËÓ›· ·ÁÔÚ¿˜, Ë Black & Decker ÂÁÁ˘¿Ù·È ÙËÓ ·ÓÙÈηٿÛÙ·ÛË ÙˆÓ ÂÏ·Ùو̷ÙÈÎÒÓ ÙÌËÌ¿ÙˆÓ, ÙËÓ ÂÈÛ΢‹ ÚÔ˚fiÓÙˆÓ Ô˘ ¤¯Ô˘Ó ˘ÔÛÙ› ‡ÏÔÁË ÊıÔÚ¿ ÏfiÁˆ ¯Ú‹Û˘ ‹ ÙËÓ ·ÓÙÈηٿÛÙ·ÛË ÙˆÓ ÚÔ˚fiÓÙˆÓ ÚÔÎÂÈ̤ÓÔ˘ Ó· ÂÍ·ÛÊ·Ï›ÛÂÈ ÙËÓ ÂÏ¿¯ÈÛÙË ÂÓfi¯ÏËÛË ÛÙÔ˘˜ ÂÏ¿Ù˜ Ù˘, ÂÎÙfi˜ ·Ó: 19 ∂§§∏¡π∫∞ ◆ ◆ ◆ ◆ ∆Ô ÚÔ˚fiÓ ¤¯ÂÈ ¯ÚËÛÈÌÔÔÈËı› Û ÂÚÁ·ÛÈ·Îfi, ·ÁÁÂÏÌ·ÙÈÎfi ÂÚÈ‚¿ÏÏÔÓ ‹ ·Ó ¤¯ÂÈ ÂÓÔÈÎÈ·ÛÙ› E¯ÂÈ Á›ÓÂÈ ÂÛÊ·Ï̤ÓË ¯Ú‹ÛË ÙÔ˘ ÚÔ˚fiÓÙÔ˜ ‹ ·Ó ¤¯ÂÈ ·Ú·ÌÂÏËı› ∆Ô ÚÔ˚fiÓ ¤¯ÂÈ ˘ÔÛÙ› ‚Ï¿‚Ë ·fi ¿ÏÏ· ·ÓÙÈΛÌÂÓ·, ·fi Ô˘Û›Â˜ ‹ ÏfiÁˆ ·Ù˘¯‹Ì·ÙÔ˜ E¯ÂÈ Á›ÓÂÈ ÚÔÛ¿ıÂÈ· ÂÈÛ΢‹˜ ·fi ÌË ÂÍÔ˘ÛÈÔ‰ÔÙË̤ӷ ΤÓÙÚ· ÂÈÛ΢ÒÓ ‹ ·fi ÚÔÛˆÈÎfi Ô˘ ‰ÂÓ ·Ó‹ÎÂÈ ÛÙÔ ÚÔÛˆÈÎfi Ù˘ Black & Decker °È· Ó· ÈÛ¯‡ÛÂÈ Ë ÂÁÁ‡ËÛË, Ú¤ÂÈ Ó· ˘Ô‚¿ÏÂÙ ·fi‰ÂÈÍË ·ÁÔÚ¿˜ ÛÙÔÓ ˆÏËÙ‹ ‹ ÙÔ ÂÍÔ˘ÛÈÔ‰ÔÙË̤ÓÔ Î¤ÓÙÚÔ ÂÈÛ΢ÒÓ. EÓËÌÂÚˆı›Ù ÁÈ· ÙÔ ÏËÛȤÛÙÂÚÔ Î¤ÓÙÚÔ ÂÈÛ΢ÒÓ Ù˘ ÂÚÈÔ¯‹˜ Û·˜, ÂÈÎÔÈÓˆÓÒÓÙ·˜ Ì ٷ ÁÚ·Ê›· Ù˘ Black & Decker ÛÙË ‰È‡ı˘ÓÛË Ô˘ ·Ó·ÁÚ¿ÊÂÙ·È ÛÙÔ ÂÁ¯ÂÈÚ›‰ÈÔ. E›Û˘, ÁÈ· Ó· ÏËÚÔÊÔÚËı›Ù ٷ ÂÍÔ˘ÛÈÔ‰ÔÙË̤ӷ ΤÓÙÚ· ÂÈÛ΢ÒÓ Ù˘ Black & Decker Î·È ÙȘ ÏÂÙÔ̤ÚÂȘ Î·È ÙÔ˘˜ ·ÚÌfi‰ÈÔ˘˜ ÙˆÓ ˘ËÚÂÛÈÒÓ Ô˘ ·Ú¤¯ÔÓÙ·È ÌÂÙ¿ ÙËÓ ÒÏËÛË, ÌÔÚ›Ù ӷ ·Ó·ÙÚ¤ÍÙ ÛÙÔ ¢È·‰›ÎÙ˘Ô ÛÙË ‰È‡ı˘ÓÛË: www.2helpU.com. 20 21 22 23 EÏÏ¿˜ España Italia United Kingdom 583259-00 24 Black & Decker (EÏÏ¿˜) ∞.E. ™ÙÚ¿‚ˆÓÔ˜ 7 & µÔ˘ÏÈ·Á̤Ó˘ 159 16674 °Ï˘Ê¿‰·, ∞ı‹Ó·, EÏÏ¿‰· Black & Decker Spain Parque de Negocios “Mas Blau” Edificio Muntadas, c/Bergadá, 1, Of. A6 08820 El Prat de Llobregat (Barcelona) Black & Decker Italia SpA Viale Elvezia 2 20052 Monza (MI) Black & Decker 210 Bath Road Slough, Berkshire SL1 3YD ∆ËÏ. (010) 8981 616 ∆ËÏ. (010) 8982 630 º·Í Service (010) 8983 285 Tel. 934 797 400 Fax 934 797 419 Tel. 039-23871 Fax 039-2387592/2387594 Numero verde 800-213935 Tel. 01753 511234 Fax 01753 551155 Helpline 01753 574277 11/02