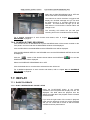
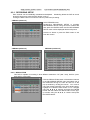
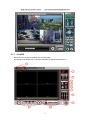
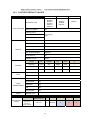
1
H.264 16/8/4CH Pentaplex Digital Video Recorder V2.6 MODEL: CDR1660 / CDR0860 / CDR0460 Copyright © 2009 Clover Electronics U.S.A. All Rights Reserved MODEL: CDR1660 / CDR0860 / CDR0460 H.264 STAND-ALONE DVR USER MANUAL V 2.6 2 MODEL: CDR1660 / CDR0860 / CDR0460 H.264 STAND-ALONE DVR USER MANUAL V 2.6 Table of Contents ABOUT THIS MANUAL ............................................................................................ 7 1. UNPACKING ...................................................................................................... 8 1.1. H.264 STAND-ALONE DIGITAL VIDEO RECORDER................................................................................................. 9 2. FEATURES ....................................................................................................... 10 3. WHAT TO DO AT THE TIME OF INSTALLATION....................................................... 11 4. SPECIFICATIONS ............................................................................................ 12 5. OVERVIEW AND CONTROLS ......................................................................... 15 5.1. 5.2. 5.3. 5.4. FRONT PANEL ......................................................................................................................................................................15 REAR PANEL .........................................................................................................................................................................17 IR REMOTE CONTROLLER.............................................................................................................................................19 MOUSE CONTROL AND OPERATIONS......................................................................................................................20 6. INSTALLATION AND CONNECTIONS ............................................................ 24 6.1. 6.2. 6.3. 6.4. 6.5. 6.6. 6.7. 6.8. NOTE FOR INSTALLATION...............................................................................................................................................24 CAMERA CONNECTION ...................................................................................................................................................24 MONITOR CONNECTION.................................................................................................................................................24 6.3.1. CONNECTION OF VGA MONITOR ................................................................................ 24 6.3.2. CONNECTION OF MONITOR ......................................................................................... 25 SENSOR CONNECTION ...................................................................................................................................................25 ALARM (RELAY) CONNECTION.....................................................................................................................................26 RS485 CONNECTION.........................................................................................................................................................26 CONNECTION TO AN ETHERNET NETWORK ........................................................................................................27 POWER CABLE CONNECTION .....................................................................................................................................27 7. HOW TO OPERATE ......................................................................................... 28 7.1. 7.2. 7.3. 7.4. 7.5. GENERAL INFORMATION ................................................................................................................................................28 OPERATING INTERFACE .................................................................................................................................................28 POWER ON/OFF ..................................................................................................................................................................28 MAIN SCREEN ......................................................................................................................................................................28 LIVE............................................................................................................................................................................................29 7.5.1. 7.5.2. 7.5.3. 7.5.4. 7.5.4.1. 7.5.5. 7.5.6. 7.5.7. 7.5.8. 7.5.9. 7.6. RECORD .................................................................................................................................................................................34 7.6.1. 7.6.2. 7.6.3. 7.6.4. 7.7. FULL SCREEN ...................................................................................................................... 29 SPLIT SCREEN .................................................................................................................... 29 SEQUENCING SCREENS .................................................................................................... 29 LIVE AUDIO .......................................................................................................................... 30 COMMUNICATION BETWEEN MONITOR AND CLIENT COMPUTER VIA INTERNET ...... 30 ZOOM ................................................................................................................................... 30 PICTURE-IN-PICTURE (PIP) ................................................................................................ 31 SPOT MONITOR ................................................................................................................... 32 OSD ON / OFF ...................................................................................................................... 33 PAN /TILT .............................................................................................................................. 33 MANUAL (CONTINUOUS) RECORDING ............................................................................. 34 MOTION RECORDING ......................................................................................................... 35 ALARM (SENSOR) RECORDING ......................................................................................... 35 SCHEDULE (TIME) RECORDING ........................................................................................ 36 REPLAY....................................................................................................................................................................................36 7.7.1. 7.7.1.1. 7.7.1.2. 7.7.1.3. BASIC PLAYBACK ................................................................................................................ 36 PLAY / REVERSE PLAY / PAUSE / STOP ............................................................................ 36 FAST FORWARD / REWIND ................................................................................................. 37 PICTURE-BY-PICTURE ........................................................................................................ 38 3 MODEL: CDR1660 / CDR0860 / CDR0460 7.7.1.4. 7.7.1.5. 7.7.1.6. 7.7.1.7. 7.7.2. 7.7.2.1. 7.7.2.2. 7.7.2.3. 7.8. H.264 STAND-ALONE DVR USER MANUAL V 2.6 SLOW .................................................................................................................................... 38 LOOP PLAYBACK ................................................................................................................. 39 PLAYBACK BUTTONS.......................................................................................................... 40 AUDIO PLAYBACK ............................................................................................................... 41 ADVANCED PLAYBACK ....................................................................................................... 41 CALENDAR SEARCH ........................................................................................................... 41 TIME / DATE SEARCH.......................................................................................................... 43 EVENT SEARCH .................................................................................................................. 43 COPY ........................................................................................................................................................................................45 7.8.1. 7.8.2. 7.8.3. 7.8.4. 7.8.5. 7.8.6. CD-RW / DVD-RW / DVD+RW / DVD RAM .......................................................................... 45 CD-R ..................................................................................................................................... 49 USB FLASH MEMORY ......................................................................................................... 49 EXTERNAL HARD DISK DRIVE ........................................................................................... 51 COPY STOP ......................................................................................................................... 51 FULL MEDIA CAPACITY DURING COPYING ...................................................................... 52 8. SETUP .............................................................................................................. 53 8.1. SCREEN ..................................................................................................................................................................................53 8.1.1. 8.1.2. 8.1.2.1. 8.1.2.2. 8.1.2.3. 8.1.2.4. 8.1.2.5. 8.1.2.6. 8.1.2.7. 8.1.3. 8.1.4. 8.1.4.1. 8.1.4.2. 8.1.5. 8.1.5.1. 8.1.5.2. 8.1.5.3. 8.1.5.4. 8.1.5.5. 8.1.6. 8.2. AUTO SEQUENCE ............................................................................................................... 54 DISPLAY ............................................................................................................................... 54 HDD FREE SPACE ............................................................................................................... 54 HDD FREE SPACE MODE ................................................................................................... 55 RECORD STATUS ................................................................................................................ 55 CLOCK DISPLAY .................................................................................................................. 55 TIME & DATE FORMAT ........................................................................................................ 55 TITLE DISPLAY ..................................................................................................................... 55 BORDER COLOR ................................................................................................................. 55 CAMERA ............................................................................................................................... 56 SPOT .................................................................................................................................... 59 SPOT OUTPUT ..................................................................................................................... 59 SPOT DWELL TIME .............................................................................................................. 59 VIDEO ENHANCEMENT....................................................................................................... 60 CHANNEL ............................................................................................................................. 60 BRIGHTNESS ....................................................................................................................... 60 CONTRAST........................................................................................................................... 61 HUE ....................................................................................................................................... 61 SATURATION ........................................................................................................................ 61 EVENT SCREEN MODE ....................................................................................................... 62 RECORD .................................................................................................................................................................................62 8.2.1. RECORDING SETUP ........................................................................................................... 63 8.2.1.1. RESOLUTION ....................................................................................................................... 63 8.2.1.2. RECORDING SPEED (FRAMES PER SECOND) ................................................................ 64 8.2.1.3. QUALITY ............................................................................................................................... 64 8.2.1.4. SCHEDULE RECORDING .................................................................................................... 65 8.2.1.5. MOTION RECORDING ......................................................................................................... 65 8.2.1.5.1. MOTION RECORDING ...................................................................................................... 65 8.2.1.5.2. PRE RECORDING TIME.................................................................................................... 66 8.2.1.5.3. POST RECORDING TIME ................................................................................................. 66 8.2.1.5.4. SENSITIVITY ..................................................................................................................... 66 8.2.1.5.5. AREA SETUP ..................................................................................................................... 66 8.2.1.6. ALARM RECORDING ........................................................................................................... 67 8.2.1.6.1. ALARM RECORDING ........................................................................................................ 67 8.2.1.6.2. PRE RECORDING TIME.................................................................................................... 67 8.2.1.6.3. POST RECORDING TIME ................................................................................................. 67 8.2.1.6.4. SENSOR INPUT TYPE ...................................................................................................... 67 8.2.2. AUDIO RECORDING ............................................................................................................ 67 8.3. SYSTEM...................................................................................................................................................................................68 8.3.1. 8.3.1.1. 8.3.1.2. 8.3.1.3. 8.3.2. 8.3.2.1. 8.3.2.2. HDD (HARD DISK DRIVE) .................................................................................................... 68 REC HDD FORMAT .............................................................................................................. 68 HDD INFORMATION ............................................................................................................. 69 MEDIA INFORMATION ......................................................................................................... 69 CLOCK .................................................................................................................................. 69 TIME & DATE ........................................................................................................................ 70 TIME ADJUST ....................................................................................................................... 70 4 MODEL: CDR1660 / CDR0860 / CDR0460 H.264 STAND-ALONE DVR USER MANUAL V 2.6 8.3.2.2.1. INTERNET TIME ADJUST ................................................................................................. 70 8.3.2.2.2. SELECT TIME ZONE ......................................................................................................... 70 8.3.2.2.3. DAYLIGHT SAVING TIME .................................................................................................. 71 8.3.2.3. TIME TRIMMING ................................................................................................................... 71 8.3.3. BUZZER ................................................................................................................................ 72 8.3.4. PASSWORD .......................................................................................................................... 72 8.3.4.1. PASSWORD .......................................................................................................................... 72 8.3.4.2. SET PASSWORD .................................................................................................................. 73 8.3.5. FACTORY DEFAULT SETTING ............................................................................................ 74 8.3.6. FIRMWARE UPDATE ............................................................................................................ 74 8.3.7. SYSTEM IFORMATION ........................................................................................................ 75 8.4. LINK ...........................................................................................................................................................................................75 8.4.1. NETWORK ............................................................................................................................ 76 8.4.1.1. DHCP .................................................................................................................................... 76 8.4.1.2. STATIC IP .............................................................................................................................. 76 8.4.1.2.1. IP ADDRESS ...................................................................................................................... 77 8.4.1.2.2. SUBNET MASK .................................................................................................................. 77 8.4.1.2.3. GATEWAY .......................................................................................................................... 77 8.4.1.2.4. DNS .................................................................................................................................... 77 8.4.1.3. PORT .................................................................................................................................... 77 8.4.1.4. DDNS SERVER .................................................................................................................... 77 8.4.1.4.1. SERVER 1.......................................................................................................................... 78 8.4.1.4.2. SERVER 2.......................................................................................................................... 78 8.4.1.5. BANDWIDTH......................................................................................................................... 78 8.4.2. RS485 ................................................................................................................................... 79 8.4.2.1. SYSTEM ID ........................................................................................................................... 79 8.4.2.2. BAUD RATE .......................................................................................................................... 79 8.4.2.3. DATA BIT ............................................................................................................................... 79 8.4.2.4. PARITY BIT ........................................................................................................................... 79 8.4.2.5. STOP BIT .............................................................................................................................. 79 8.4.3. E-MAIL .................................................................................................................................. 79 8.4.3.1. SEND E-MAIL ....................................................................................................................... 80 8.4.3.2. E-MAIL ADDRESS SETUP ................................................................................................... 80 8.5. 8.6. SEARCH ..................................................................................................................................................................................81 COPY ........................................................................................................................................................................................81 9. CLIENT PROGRAM: DVR VIEWER ...................................................................... 82 9.1. SYSTEM REQUIREMENT.................................................................................................................................................82 9.1.1. 9.1.1.1. 9.1.1.2. 9.2. 9.3. 9.4. 9.5. 9.6. 9.7. VIEWER - LAYOUT...............................................................................................................................................................86 CONFIG....................................................................................................................................................................................87 CONNECTION.......................................................................................................................................................................89 CAPTURE................................................................................................................................................................................90 STATUS ....................................................................................................................................................................................91 REPLAY....................................................................................................................................................................................91 9.7.1. 9.8. 9.9. 9.10. INSTALLING THE DVR VIEWER & H.264 CODEC .............................................................. 82 DVR VIEWER INSTALLATION .............................................................................................. 82 CODEC INSTALLATION ....................................................................................................... 84 PLAYER ................................................................................................................................ 92 COPY ........................................................................................................................................................................................98 Switch the Normal Screen to Full Screen..........................................................................................................................98 Pan / Tilt and Preset Buttons.................................................................................................................................................99 10. INTERNET EXPLORER (WEB BROWSER) .................................................. 101 11. Hard Disk Drive (HDD) Installation.................................................................. 105 12. APPENDIX...................................................................................................... 106 12.1. TIME ZONE LISTING ............................................................................................................................................................. 106 12.2. RECORDING TIME TABLE............................................................................................................................................. 108 12.3. FACTORY DEFAULT VALUES....................................................................................................................................... 109 12.4. Warranty & Factory Service................................................................................................................................................112 5 MODEL: CDR1660 / CDR0860 / CDR0460 H.264 STAND-ALONE DVR USER MANUAL V 2.6 6 MODEL: CDR1660 / CDR0860 / CDR0460 H.264 STAND-ALONE DVR USER MANUAL V 2.6 ABOUT THIS MANUAL This is the Instruction Manual for H.264 Stand-Alone Digital Video Recorder, Model CDR1660, CDR0860 and CDR0460. The middle digit(s) of the model numbers (e.g.: 4, 8 and 16) represent the number of cameras of the DVR. This Manual describes how to install and operate the DVR system and provides specifications and features. Please read this manual thoroughly and follow the installation process before using the system. Note: Be sure to correctly follow chapter 3. What to do at the time of installation on page 11. Contact our distributors or dealers when you have any queries. 7 MODEL: CDR1660 / CDR0860 / CDR0460 H.264 STAND-ALONE DVR USER MANUAL V 2.6 1. UNPACKING Care should be taken when unpacking to avoid damaging the system. Please ensure that the following items are included. Note: Contact your dealer immediately if any components are missing. 8 MODEL: CDR1660 / CDR0860 / CDR0460 H.264 STAND-ALONE DVR USER MANUAL V 2.6 1.1. H.264 STAND-ALONE DIGITAL VIDEO RECORDER CDR1660/CDR0860/CDR0460 is the most reliable and functional embedded DVR system available today. The system displays 4/8/16 channels of live images in real time speed, compresses data digitally and records them to the Hard disk drive, which can be replayed and searched easily any time. The CDR1660/CDR0860/CDR0460 supports easy backup (copy) via USB port, external Hard Disk Drive/CD RW/DVD RW and networking in both static and dynamic IP modes. User can remotely view live images or search the recorded images. It is a very user-friendly DVR system. User can control this DVR by USB Mouse, IR Remote Controller or buttons on the Front Panel. 9 MODEL: CDR1660 / CDR0860 / CDR0460 H.264 STAND-ALONE DVR USER MANUAL V 2.6 2. FEATURES H.264 Compression Algorithm The most advanced compression available today. Multi Functional Record Powerful, multiple record modes available: Normal (Continuous, Manual), Alarm, Motion Detection and Schedule Recording. Pentaplex Function This DVR operates live, record, playback, copy and network transmission of pictures (over the RJ-45 Interface) simultaneously. Multiple Control Methods This unit can be controlled by IR Remote Controller, Mouse or buttons on the Front Panel. Easy Data Playback in any PC. The backup data can be converted to the .AVI file format with the help of Viewer Software. User Friendly GUI. A very simple buttons for easy control. Easy PTZ control via RS port - No need to use PTZ controller - PTZ control from remote PC - Networking DHCP based automatic network set-up-easy Network Configuration from Dynamic IP to Dynamic IP - Support TCP/IP and Remote Control on all DVR features - Up to 16 users can remote access the system through DVR Client viewer or Internet Explorer - DDNS support Easy Backup Method. USB Memory Stick, External CD-RW/DVD-RW and External HDD. 2 Way Audio Communicate between the system and cameras or between the system and client computer through the internet. 10 MODEL: CDR1660 / CDR0860 / CDR0460 H.264 STAND-ALONE DVR USER MANUAL V 2.6 3. WHAT TO DO AT THE TIME OF INSTALLATION The system should be installed in the following order; 1. Make sure all the required hardware is available. - CDR0460/ 0860/ 1660, 4CH/ 8CH/ 16CH DVR - Up to 4/ 8/ 16 cameras - CCTV monitor or TV set if necessary - Network cable if connecting to a PC 2. Connect the cameras to the DVR (Refer to chapter 6.2 CAMERA CONNECTION on page 24.). 4. Confirm if live video is displayed on the monitor before going to the next step. 5. Select the Setup Menu and set current date and time (Refer to chapter 8.3.2.1 TIME & DATE on page 69.). 6. Perform HDD formatting. 7. Escape from Setup Menu. 8. Set values for required options. 9. Network cable should be connected to the monitor before turning the power on (Refer to chapter 6.7 CONNECTION TO AN ETHERNET NETWORK for the cable specification on page 27.). 11 MODEL: CDR1660 / CDR0860 / CDR0460 H.264 STAND-ALONE DVR USER MANUAL V 2.6 4. SPECIFICATIONS Video Video Input 16/8/4 CH (BNC) Input Level 1.0Vp-p±10% Composite, 75Ω Balanced Video Standard AUTO Main Monitor Output 1.0 Vp-p Composite, 75Ω Balanced Analog Spot Monitor Output 1.0 Vp-p Composite, 75Ω Balanced Camera Name Max. 8 Characters Screen Split Control 1, 4, 8, 16 screens Screen Rotate Control 1~60 seconds Display 720(H)× 480(V) Speed NTSC 720(H) × 480(V) PAL 720(H) × 576(V) NTSC 480 / 240 / 120 frames(Every CH Real Time) PAL 400 / 200 / 100 frames(Every CH Real Time) Function Auto sequence 1, 4, 8,16 Split, PIP Audio Compression ADPCM Audio Input(Line) 1CH (RCA) Input Level 0.5~1.4Vp-p@20kΩ Audio Output(Line) 1CH (RCA) Recording Compression H.264 Resolution NTSC Speed NTSC 720(H) × 480(V), 720(H) × 240(V), 360(H) × 240(V) PAL PAL 720(H) × 576(V), 720(H) × 288(V), 360(H) × 288(V) 360 x240 Max. 240/ 240/ 120 fps (CIF) 720 x240 Max.120/ 120/ 120 fps (Half D1) 720 x480 Max. 60/ 60/ 60 fps (D1) 360 x288 Max. 200/ 200/ 100 fps (CIF) 720 x288 Max. 100/ 100/ 100 fps (Half D1) 720 x576 Max. 50/ 50/ 50 fps (D1) Duplex or Triplex Each CH Pentaplex Frame Setting Available Event, Normal Available Resolution Changed totally Quality Changed at 4 level(Low, Normal, Fine, Best) Setup per Channel Individual Record limit Automatic data delete for privacy Data Size 1~3KB(CIF), 3~7KB(D1/2), 6~15KB(D1) Recording Mode Normal(Continuous, Manual), Event( Motion detection, Alarm), Schedule Pre-Alarm 5 seconds Watermark Support Schedule 24 groups per day by an hour, Holidays are same as Sunday Summer Time Support HDD Internal Storage Max. 2 SATA HDDs Speed 7200RPM DMA 45MHz DMA Type SATA compatible External Storage Not supported 12 MODEL: CDR1660 / CDR0860 / CDR0460 H.264 STAND-ALONE DVR USER MANUAL V 2.6 Searching and Playback Searching Method Time/Date, Calendar, Event Playback(Reverse) 1, 2, 4, 8,16, 32, 64, 128 velocity 1/2, 1/4,1/8,1/16, 1/32, 1/64, 1/128 Copy Device Internal CD/DVD RW Not supported Media Support USB 2.0 USB(2.0) memory stick, CD-R, CD-RW, DVD-RW, DVD+RW, DVD RAM, External HDD USB(2.0) memory stick, External CD RW/ DVD RW/ HDD Copied File Compatibility with PC (Windows) Compatible Alarm Sensor Input 16/ 8/ 4 CH (Terminal) Alarm Output 1 Relay out (Programmable, NO: Normal Open), Terminal Motion Detection Available For Each Camera Multi-Detection Level Multi-Remote Surveillance Monitoring Environment DVR Viewer Software, Web Browser Transmission Rate Approx. 120fps(CIF) Full Motion Transmission(16 Clients accessible) Search Supporting Multi-Client(16 Clients accessible) System Monitoring and Recovery System Logging Power Failure Checkable/Menu Change/Network connect Monitoring Software Watchdog Recovery Auto-Reboot By Watchdog Automatic Database Recovery Others OS Embedded Linux Languages Supported English Control Device Front key, Remote controller, USB Mouse PTZ(16 kinds) SPD (Samsung Techwin), SRX (Samsung Techwin), SCC-643(Samsung Electronics), SD-290 (Smile CAM), CS-854A(Panasonics), LPT-A100L, DSC-230S (Dongyang Unitech), SK-D106(Sunkwang), VC-C4R(Canon), PELCO P-TYPE (Pelco), PELCO D-TYPE (Pelco), TK-C655/676 (JVC), DMP23(DAIWA), BOSCH, PCS-SERIES, EZ PROTOCOL(E-RONIX), QPIX-D, QPIX-P 50,000 per HDD Number of Event list Connector Video Input 16/ 8/ 4 CH (BNC) Main Monitor Output Spot Monitor Output Composite (BNC 1 port(Rear)), S-Video( Not Supported), VGA(1 port) BNC 1 port Audio Input (Line) 1CH (RCA) Audio Output (Line) 1CH Line Output (RCA) Firmware Update USB 2.0 Port, Network Sensor Input 16/ 8/ 4 CH (Terminal Block) (Include Ground Common 4 pins) Alarm Output 1 Relay output 2 pins Terminal Block (NO, Common) x 1=2P (Total) PTZ (RS-485) 2 pins Terminal Block, Half Duplex Ethernet RJ-45, 10/100 Mbps USB 2.0 Front 2 ports Electrical Power Source DC 12V, 5A Power Consumption Approx. 50 Watt ( Including 1 HDD) 13 MODEL: CDR1660 / CDR0860 / CDR0460 H.264 STAND-ALONE DVR USER MANUAL V 2.6 Environmental Operating Temp 0℃ ~ + 40℃ Storage Temperature -10℃ ~ + 60℃ Humidity 30 ~ 90%RH (non-condensing) Physical Construction Shape Consumer Style Construction Material Plastics Front Steel Case Body Color Black color With Plastic Key Dimension 340 (W) x 60(H) x 248 (D) mm Weight Approx. 2 kgs 14 MODEL: CDR1660 / CDR0860 / CDR0460 H.264 STAND-ALONE DVR USER MANUAL V 2.6 5. OVERVIEW AND CONTROLS There are 3 ways to operate the system by pressing the buttons on the front panel or buttons on the remote controller and clicking the mouse. 5.1. FRONT PANEL 1. REC Key Press this key to start to record. In order to stop recording, press this key again. 2. ESC Key Press this key to go back to the previous menu or exit from the present screen. 3. MENU Key This key allows the user to access the Main Menu Screen. 4. USB Ports. These USB 2.0 ports can be used to connect to USB 2.0 mouse and numerous USB 2.0 backup devices, individual external hard drives, external optical drives and USB memory sticks. 5. POWER LED The red LED is lit when the Power switch on the rear of the system is ON. 6. REC LED The red LED will light on when the system is in recording mode. 7. LAN LED The red LED will blink when the system is connected to the network. 8. STOP Press this key to exit the playback mode and return to the live monitoring mode. 9. MULTI/ AUTO a) Press this key to display multiple screens. * CDR1660/CDR0860: In case of 8CH and 16CH, this key is used to toggle between multiple Displays Modes: 4CH, 8CH and 16CH split screen display modes. b) If you press this button for 2~3 seconds long will be activates the automatic channel sequence, and press once and the screen returns to normal. 15 MODEL: CDR1660 / CDR0860 / CDR0460 H.264 STAND-ALONE DVR USER MANUAL V 2.6 10. CH SELECT/ ENTER Key a) Press this key to select the desired channel in full screen. This key is used to toggle between single channels. b) Press this key to execute the selected function in the menu screen or enter the selected submenu. 11. FAST FORWARD/ NUMERIC/ UP DIRECTIONAL Key a) Press this key repeatedly to toggle between 2X normal playback speed through 128X normal playback speed b) Press this key to enter the numeric password, 1. c) Press this key to navigate up in the menu screen. 12. PLAY/ PAUSE/ NUMERIC/ RIGHT DIRECTIONAL Key a) Press this key to start the playback of recorded data. By default, the playback starts from the earliest recording. If the recording has been played back, the playback will start from where it was left off. b) Toggles between playback and pause mode. c) Press this key to enter the numeric password, 2. d) Press this key to navigate right in the menu screen. 13. SLOW PLAYBACK/ NUMERIC/ DOWN DIRECTIONAL Key. a) Press this key repeatedly to toggle between 1/2 normal playback speed through 1/128 normal playback speed. b) Press this key to enter the numeric password, 3. c) Press this key to navigate down in the menu screen. 14. DIRECTION/ NUMERIC/ LEFT DIRECTIONAL Key. a) Press this key to change the playback direction. b) Press this key to enter the numeric password, 4. c) Press this key to navigate left in the menu screen. 16 MODEL: CDR1660 / CDR0860 / CDR0460 H.264 STAND-ALONE DVR USER MANUAL V 2.6 5.2. REAR PANEL 17 MODEL: CDR1660 / CDR0860 / CDR0460 H.264 STAND-ALONE DVR USER MANUAL V 2.6 ① CAMERA INPUT BNC connectors for composite video signal input ② SPOT OUTPUT Spot monitor BNC connector for composite video signal output ③ MAIN MONITOR OUTPUT BNC connector for main monitor composite video signal output ④ AUDIO INPUT RCA connectors for audio signal input ⑤ AUDIO OUTPUT RCA connectors for audio signal output ⑥ VGA OUTPUT D-sub 15-pin connector for PC Monitor out ⑦ RJ-45 ETHERNET PORT 10/100 Base-T RJ-45 port for network connection ⑧ FAN Fan used for cooling the components internally. ⑨ ALARM(SENSOR) INPUT Alarm input 1 through 4 on CDR0460, 1 through 8 on CDR0860 and 1 through 16 on CDR1660 ⑩ RS-485 TERMINAL BLOCK Terminal blocks for RS-485 ⑪ RELAY OUT Terminal blocks for relay out ⑫ POWER SWITCH This switch turns the DVR on or off ⑬ POWER IN DC Power socket for 12VDC 5Amps 18 MODEL: CDR1660 / CDR0860 / CDR0460 H.264 STAND-ALONE DVR USER MANUAL V 2.6 5.3. IR REMOTE CONTROLLER Button Name Description 1. (IRIS-/+) Iris close and open of PTZ / Frame by Frame(field by field) playback 2. (ZOOM-/+) Zoom in and out of PTZ 3. SPOT / ESC Enter the spot mode / Return to the previous mode 4. ENTER (HOME) Enter / Go home Position in PTZ mode 5. ( ◀ ) Move the cursor in left direction in the setup menu 6. ( ▲ ) / MENU Move the cursor up to the next line in the setup menu / Display the setup menu Move the cursor down to the next line / Enter the PIP mode / Exit the loop playback mode Move the cursor in right direction in the setup menu. / Control of zoom in and out 7. ( ▼ ) / PIP 8. ( ▶ ) / D-ZOOM 9. AUTO / ( - ) / F(-) Auto sequence / Downward value / Focus control of PTZ 10. FREEZE / ( + ) / F(+) Freeze / Up-going value / Focus control of PTZ 11. SEARCH / (PRESET) Display the search menu / Enter the preset mode of PTZ 12. COPY / (AF) Display the copy menu / Auto focus of PTZ 13. (PTZ) Enter the PTZ mode 14. SLOW ( Press this button to slow-down playback speed ) Press this button to begin playback. If press again during the playback, a still picture is displayed 15.PLAY/PAUSE ( ) 16. FAST ( Press this button to speed-up playback speed ) 17. LV/PB ( ) Convert the screen into real display mode during the playback 18. DIR ( ) Change the direction of playback 19. RECORD ( ) Begin and stop recording 20. MULTI Display multi-screen 21. TEXT Reserved 22. AUDIO SELECT Audio Mute ON/ OFF 23. CHANNEL ID Camera number select button 24. FUNCTION Used when AUDIO ON/ OFF NOTE: NO 4. ENTER (HOME): Protocol supported function of PTZ Home Position move. SPD / DSC-230 / CS-854 / EZ / PCS-SERIES 19 MODEL: CDR1660 / CDR0860 / CDR0460 H.264 STAND-ALONE DVR USER MANUAL V 2.6 5.4. MOUSE CONTROL AND OPERATIONS Insert the USB Mouse to the USB port which is on the front panel of the DVR as shown in the below figure. NOTE: We recommend you to connect the USB mouse into Port 2 and use Port 1 for USB memory stick. 1 One-click on the left button ○ Select the desired item 1 Double-click on the left button ○ Full screen display/ Return the multi-screen Enter the selected item from the Main Menu 2 Scroll ○ 3 One-click on the right button ○ Reserved Icon Window Display/ Exit Connect the mouse to the USB port of the DVR and click on the right button of the mouse and the Icon Window (Menu bar) will be displayed like the following picture. 20 MODEL: CDR1660 / CDR0860 / CDR0460 H.264 STAND-ALONE DVR USER MANUAL V 2.6 a) RECORD Button Click the left button of the mouse on REC icon of the Menu bar to start to record. To stop recording, click the left button of the mouse on REC icon once again. b) SEARCH Button Click the left button of the mouse on SEARCH icon of the Menu bar to access to search functions like CALENDER SEARCH, TIME/DATE SEARCH and EVENT SEARCH and the following screen will be displayed. (EXIT) button to return to the LIVE mode. Click the For detail information of search menu, refer to chapter 7.7.2. ADVANCED PLAYBACK on page 41. c) COPY Button Click the left button of the mouse on COPY icon of the Menu bar in order to copy the data in external devices like USB memory device, External CD/DVD-RW or HDD and the following screen will be displayed. 21 MODEL: CDR1660 / CDR0860 / CDR0460 H.264 STAND-ALONE DVR USER MANUAL V 2.6 (EXIT) button to return to the LIVE mode. Click the For detail information of copy menu, refer to chapter 7.8. COPY on page 45. d) SETUP Button. Click the left button of the mouse on SETUP icon of the Menu bar to access the main menu and the following screen will be displayed. Click the (EXIT) button to return to the LIVE mode. For detail information of main menu, refer to chapter 8. SETUP on page 53. e) PIP Click the left button of the mouse on PIP (PICTURE-IN-PICTURE) icon of the Menu bar to enter the PIP mode and the PIP control bar will be displayed on right below of the screen like the following picture. (EXIT) button of the PIP control bar to return to the LIVE mode. Click the For detail information of PIP control, refer to chapter 7.5.6. PICTURE-IN-PICTURE (PIP) on page 31. f) PTZ Click the left button of the mouse on PTZ icon of the Menu bar to work some basic functions of PTZ Cameras like PAN/TILT/ZOOM, IRIS OPEN/CLOSE etc and the PTZ control bar will be displayed. 22 MODEL: CDR1660 / CDR0860 / CDR0460 H.264 STAND-ALONE DVR USER MANUAL V 2.6 (EXIT) button of the PTZ control bar to return to the LIVE mode. Click the For detail information of PTZ control, refer to chapter 7.5.9. PAN / TILT on page 33. g) DISPLAY Click the left button of the mouse on DISPLAY icon of the Menu bar to get Multi-channel Display. This button can be toggled for multi-screen of 4 channel and 8 channel in case of 8 channel unit, and 4 channel, 8 channel and 16 channel in case of 16 channel unit. h) ZOOM Click the left button of the mouse on ZOOM icon of the Menu bar if you want to see the image on the screen to be zoomed up to 4 times in the LIVE mode and the following screen will be displayed. NOTE: It is possible to zoom into a section of the screen to get a digital close-up during the live view mode and single channel display. Click the (EXIT) button of the zoom control bar to return to the LIVE mode. i) OSD Click the left button of the mouse on OSD icon of the Menu bar to turn the OSD (On Screen Display) ON or OFF. When the OSD is in OFF position, all texts on the screen will be disappeared. 23 MODEL: CDR1660 / CDR0860 / CDR0460 H.264 STAND-ALONE DVR USER MANUAL V 2.6 6. INSTALLATION AND CONNECTIONS 6.1. NOTE FOR INSTALLATION Install the system according to the instructions described in this manual. Avoid any area with high humidity or dust which can shorten lifetime of the system. Choose a well ventilated area and keep minimum of 10” away from obstructions. Do not place the system near heat generation devices. Avoid any area with movement as this can interfere with the internal Hard Drive. Use a compatible input/output signal type of cameras and monitors. Contact your dealer if you have any problems in regards to the installation of this system. 6.2. CAMERA CONNECTION Connect the Cameras with the BNC Cables to the “CAMERA IN” ports on the rear panel of the DVR as shown in the below figure. 6.3. MONITOR CONNECTION 6.3.1. CONNECTION OF VGA MONITOR Connect one end of the VGA Cable to the VGA port of the LCD monitor and the other end to the VGA port of the DVR as shown in the below diagram. < Model: CDR0460 > 24 MODEL: CDR1660 / CDR0860 / CDR0460 H.264 STAND-ALONE DVR USER MANUAL V 2.6 6.3.2. CONNECTION OF MONITOR Connect the composite Video Output (VIDEO OUT) of the DVR to the Video IN of Monitor as shown in the below diagram. 6.4. SENSOR CONNECTION If you want, you can install sensors on your DVR system. There are four sensor signal input terminals on the DVR. To install sensors on the DVR, follow the instruction below. The sensor signal input terminals are on the rear panel of the DVR. a) Connect the signal lines of the sensors as shown in below diagram. b) Connect the power lines of the sensors. < Model: CDR0860 > NOTE: Two signal input terminals are assigned to one channel. 25 MODEL: CDR1660 / CDR0860 / CDR0460 H.264 STAND-ALONE DVR USER MANUAL V 2.6 6.5. ALARM (RELAY) CONNECTION If you want, you can install alarm on your DVR system. There is one alarm power switch, which is controlled by the DVR. The ALARM OUTPUT is a relay contactor type and supports N.O.(Normal Open) and C.M.(Common). The Output capacity is DC 30W, AC 62.5VA. A higher capacity can cause system failure. The switch is closed when a sensor is activated. Refer to the below diagram to understand the circuitry for the alarm installation. * Connect the alarm power lines of the sensor as shown in the below diagram. 6.6. RS485 CONNECTION If you want, you can connect PTZ cameras or external keyboard controller(to be recommended by the DVR maker). Connect “TA(or TX+, TRX+ etc.)” of the PTZ cameras or external keyboard controller to “TA” port of 485 ports of the DVR and “TB(or TX-, TRX-, etc.)” of the PTZ cameras or external keyboard controller to “TB” port of 485 ports of the DVR with cables. No 1 2 DESCRIPTION TA(TX+) TB(TX-) RS485: Transmit data RS485: Receive data 26 MODEL: CDR1660 / CDR0860 / CDR0460 H.264 STAND-ALONE DVR USER MANUAL V 2.6 6.7. CONNECTION TO AN ETHERNET NETWORK Our Ethernet connector is a RJ45 type. The maximum cable length is 300 ft. When you want to use a longer cable, we suggest using repeater. The below figure shows the straight through and the Crossover cables which are normally used Network Cables. 6.8. POWER CABLE CONNECTION Connect the provided Power adapter and cable to the rear power socket of the DVR as shown in the below figure. The power source is DC 12V 5A. It should not be shared with other electrical equipment on the same line. Frequent power cuts can cause crucial failures, so if you have an unstable power source, we recommend the use of an Uninterrupted Power Supply or other backup power source. 27 MODEL: CDR1660 / CDR0860 / CDR0460 H.264 STAND-ALONE DVR USER MANUAL V 2.6 7. HOW TO OPERATE 7.1. GENERAL INFORMATION You can operate all functions of the system by use of buttons located on the front panel, remote controller and a mouse. Additionally, you can control this unit with an external keyboard controller via RS-485 or can remotely control via the Ethernet port located on the back of the unit. System status is indicated by either LED lights on the front panel or the monitor. The system is protected from any accidental pressing of any operator buttons, but care should be taken when using the functions of HDD formatting as this can lead to data loss. 7.2. OPERATING INTERFACE There are 3 ways to operate the system by pressing the buttons on the front panel or buttons on the remote controller and clicking the mouse. A lot of users mostly prefer to use a mouse on these kinds of products such as DVRs. Therefore we would like to describe all the instructions in this manual based on using the mouse. 7.3. POWER ON/OFF On the rear panel: Turn on the Power switch on the rear panel. The LED on the front panel is lit when the Power switch in ON. To turn off the DVR, turn off the Power switch on the rear panel. 7.4. MAIN SCREEN ① REMAINING HARD DRIVE SPACE / PLAYBACK STATUS The remaining hard drive space is displayed either in percentage or in Gigabytes in the live mode. 28 MODEL: CDR1660 / CDR0860 / CDR0460 H.264 STAND-ALONE DVR USER MANUAL V 2.6 The hard drive overwrite is on as default so the counter will remain as 0 and the DVR will continue to write on to the hard drive from the beginning. The counter will remain 0 as long as the hard drive is full with previously recorded data, and will display its original size once the hard drive is formatted. In playback mode, it displays the direction and the speed of the playback. ② CHANNEL STATUS The status of each channel is displayed in color codes. White: non-recording Yellow: continuous (manual) recording Red: event recording Blue: schedule recording. ③ DATE AND TIME Current date and time is displayed when in live monitoring mode. Recorded date and time is displayed when in playback mode. ④ CHANNEL INFORMATION The channel information is displayed. When the channel is in normal recording mode, it will display the channel title as entered by the user. When the channel is in event recording mode, it will display the appropriate event recording mode: ALARM and MOTION. NOTE: CDR0860 /CDR1660: It can be seen in information of the 8channel or 16channel 7.5. LIVE 7.5.1. FULL SCREEN A Full screen is available in the live mode or the record mode. Double-click the left button of the mouse on a certain camera’s screen in the live mode or in the record mode, and a full screen will be displayed. Double-click the left button of the mouse to return to the Split screen from the Full screen. ** You can operate with CH SELECT button of the front panel or the numeric buttons of remote controller. 7.5.2. SPLIT SCREEN A Split screen is available in the live mode or the record mode. Click the DIPLAY icon on the MENU bar (refer to g) DISPLAY of chapter 5.4 MOUSE CONTROL AND OPERATIONS on page 20 or double-click the left button of the mouse on the full screen. ** You can operate with MULTI ( ) button of the front panel or the remote controller. 7.5.3. SEQUENCING SCREENS Press the AUTO button of the front panel or the remote controller to activate the automatic sequence display. Please change “ADD AUTO SINGLE” option to ON in AUTO SEQUENCE menu of SCREEN menu of MAIN MENU to include single channel display into the automatic sequence. Any of the view modes can be skipped by selecting the dwell time to 0. Displaying the cameras in SEQUENCE is available in the live mode or the record mode. Each of the channels will be displayed in sequence and the dwell time can be adjusted in the AUTO SEQUENCE menu ( refer to chapter 8.1.1. AUTO SEQUENCE on page 54.). 29 MODEL: CDR1660 / CDR0860 / CDR0460 H.264 STAND-ALONE DVR USER MANUAL V 2.6 AUTO SEQ notification is displayed on the upper left hand corner of the screen while the system is in the AUTO SEQUENCE mode. 7.5.4. LIVE AUDIO This unit can support 1 channel audio (line audio only). Press the AUDIO SEL button of the remote controller to turn the Audio ON or OFF while pressing FUNCTION button. Change the “AUDIO RECORDING” to ON to do audio recording. 7.5.4.1. COMMUNICATION BETWEEN MONITOR AND CLIENT COMPUTER VIA INTERNET This system is normally in listening mode between the monitor and your computer through the internet (Client viewer or Internet Explorer). In order to communicate between the system and your computer, connect a headphone or a microphone and a speaker to the computer. Don’t forget to turn the AUDIO ON by clicking the audio icon of the viewer. 7.5.5. ZOOM The image on the screen will be zoomed up to 4 times when the ZOOM button is clicked in the live mode (This function is available on the full screen mode only). Double-click the left button of the mouse on the desired screen or press the CH SELECT button of the front panel or the numeric button of the remote controller to display a desired full screen. Click the right button of the mouse to display the MENU bar. Click the ZOOM icon or press the D-ZOOM button of the remote controller to enter the Zoom mode. And you can see the Zoom control box like the left picture. 30 MODEL: CDR1660 / CDR0860 / CDR0460 H.264 STAND-ALONE DVR USER MANUAL V 2.6 ① Use the directional buttons to move the zoom window to the desired location. ② Toggle x2, x4 and normal screens by clicking button. the ③ Click the button or press the ESC button of the remote controller to exit out of the zoom mode. 7.5.6. PICTURE-IN-PICTURE (PIP) Select the background channel by double-clicking the left button of the mouse on the desired channel, pressing the desired numeric button of the remote controller or pressing the CH SELECT button of the front panel. Click the right button of the mouse to display the menu bar. Click the PIP icon on the menu bar or press the PIP button of the remote controller to activate the PIP mode and you can see the PIP control bar like the left picture. 31 MODEL: CDR1660 / CDR0860 / CDR0460 H.264 STAND-ALONE DVR USER MANUAL V 2.6 ① Clicking the numeric buttons on the PIP control bar or pressing the numeric buttons of the remote controller will change the PIP window to change the channel to the desired channel. ② Click the directional buttons on the PIP control bar or press the directional buttons of the remote controller or the front panel to place the PIP window to the desired location on the screen. ③ Click this button or press the ENTER button of the remote controller or the front panel and the PIP window will be zoomed up. ④ Click the mode. button or press the ESC button of the remote controller to exit out of the PIP 7.5.7. SPOT MONITOR The spot monitor allows viewing of individual cameras in the live mode while the main monitor may be busy with different tasks, such as playback. This unit offers a single channel spot output. For detail explanation of the spot monitor setup, refer to chapter 8.1.4 SPOT on page 59. During any view modes, press the SPOT button of the remote controller for Spot monitor mode. Press any channel numbers of the remote controller or the CH SELECT button of the front panel to display the channel in full screen mode on the spot monitor. 32 MODEL: CDR1660 / CDR0860 / CDR0460 H.264 STAND-ALONE DVR USER MANUAL V 2.6 The spot monitor will display the channel accordingly. Press the SPOT button of the remote controller to exit from Spot monitor mode. 7.5.8. OSD ON / OFF OSD ON/OFF is possible in the live mode or record mode. Click the OSD icon on the MENU bar to turn the OSD (On Screen Display) ON or OFF. When the OSD is in OFF position, all the texts on the screen will be disappeared. Click the right button of the mouse to disappear the MENU bar. 7.5.9. PAN /TILT The DVR comes with an extensive list of compatible PTZ cameras. Please read and follow the PTZ manufacturer’s instruction manual and understand its settings fully prior to proceeding to attempt to connect and control the PTZ camera through the DVR. Please refer to PTZ model selection of chapter 8.1.3 CAMERA on page 56. NOTE: You can enter the PTZ mode in case of connecting a PTZ camera. 33 MODEL: CDR1660 / CDR0860 / CDR0460 H.264 STAND-ALONE DVR USER MANUAL V 2.6 Click the PTZ button on the MENU bar or press the PTZ button of the remote controller in the live mode to access the PAN/TILT cameras. ① ZOOM: Zoom in and out by clicking on the - or + buttons. ② FOCUS: Focus in and out by clicking on the – or + buttons. ③ IRIS: Control the iris open and iris close by clicking on the – or + buttons. ④ HOME: Return the PTZ camera to Home position by clicking this button. ⑤ AF(Auto Focus): Toggle Autofocus on or off by clicking on this button. ⑥ SPEED: Select the movement speed ratio by clicking on the – or + buttons. ⑦ Set preset points: Move the PTZ camera to the desired location, and then click on any of the 16 buttons to set a preset position. ⑧ Move to preset points: Click on any of the 16 buttons to move the PTZ camera to predefined preset position. ⑨ Directional buttons: Move the PTZ camera using the directional buttons. ⑩ EXIT: Click this button to exit the PTZ control bar or click the right button of the mouse on the screen. 7.6. RECORD This system provides Watchdog function. When power goes off during recording and then the power turns on, the system will automatically start recording. If you start to record, the circles representing the channel status will change color based on the recording mode. (Refer to 2) CHANNEL STATUS of chapter 7.4 MAIN SCREEN on page 28.) NOTE: In case of record modes except for the manual (continuous) recording, you don’t have to press the REC button. To turn on the REC button means to start the manual (continuous) recording so if you want EVENT recording or SCHEDULE recording, do not turn on the REC button. 7.6.1. MANUAL (CONTINUOUS) RECORDING Click the REC icon on the MENU bar, press the RECORD button of the remote controller or the REC button of the front panel in the live mode and the system will start the manual (continuous) recording. 34 MODEL: CDR1660 / CDR0860 / CDR0460 H.264 STAND-ALONE DVR USER MANUAL V 2.6 7.6.2. MOTION RECORDING Motion recording is yet another effective form of event recording that is triggered when a channel detects motion in its field of view as the H.264 compression algorithm allows for accurate and error-free motion detection. Click the SETUP icon on the MENU bar or press the MENU button of the remote controller or the front panel in the live mode and the MAIN MENU window will be displayed. Click the RECORD in the MAIN MENU and the RECORD menu will be displayed. Click the RECORDING SETUP in the RECORD menu and the RECORDING SETUP window will be displayed. Click the button of the desired channel below the MOTION ( MOTION menu will be displayed. ) icon and the Select the MOTION RECORDING ON or OFF and set the other items to the desired values. The channels which detect motion will display the “MOTION” message and you can hear the beep sound by 5 seconds interval for 30 seconds. The REC button will light up and the channel status will change the color to red in the channels in which the motion was detected. The recording will include the pre and post recording time on the channels that are recording. For a detailed explanation of each function and feature, refer to chapter 8.2.1.5 MOTION RECORDING on page 65. 7.6.3. ALARM (SENSOR) RECORDING Alarm recording is a form of event recording that triggers off of the circuit lines connected to the terminal blocks in the rear of the DVR. Typical circuits comprise of normally closed circuits (NC) and normally open circuits (NO). This unit can support only NO(Normal Open). Click the SETUP icon on the MENU bar or press the MENU button of the remote controller or the front panel in the live mode and the MAIN MENU window will be displayed. Click the RECORD in the MAIN MENU and the RECORD menu will be displayed. Click the RECORDING SETUP in the RECORD menu and the RECORDING SETUP window will be displayed. button of the desired channel below the ALARM ( Click the SENSOR menu will be displayed. 35 ) icon and the MODEL: CDR1660 / CDR0860 / CDR0460 H.264 STAND-ALONE DVR USER MANUAL V 2.6 Select the ALARM RECORDING ON or OFF and set the other items to the desired values. The channels on which the alarm is triggered will display the “ALARM” message and you can hear the beep sound by 5 seconds interval for 30 seconds. The REC button will light up as the DVR starts to record and the channel status will change to red. The recording will include the pre and post recording time on the channels that are recording. For a detailed explanation of each function and feature, refer to chapter 8.2.1.6 ALARM RECORDING on page 67. 7.6.4. SCHEDULE (TIME) RECORDING Click the SETUP icon on the MENU bar or press the MENU button of the remote controller or the front panel in the live mode and the MAIN MENU window will be displayed. Click the RECORD in the MAIN MENU and the RECORD menu will be displayed. Click the RECORDING SETUP in the RECORD menu and the RECORDING SETUP window will be displayed. button of the desired channel below the SCHEDULE ( Click the SCHEDULE menu will be displayed. ) icon and the Select the SCHEDULE RECORDING ON or OFF. Click the desired time to record and the selected time bar will be red. For a detailed explanation of each function and feature, refer to chapter 8.2.1.4. SCHEDULE RECORDING on page 65. 7.7. REPLAY 7.7.1. BASIC PLAYBACK 7.7.1.1. PLAY / REVERSE PLAY / PAUSE / STOP Press the PLAY/PAUSE button of the remote controller or the front panel and the play icon will be displayed. The DVR starts the playback from the earliest recorded data if the playback mode is entered for the first time. If you click the right button of the mouse in playback mode and the playback control bar will be displayed and you can control with a mouse as well as remote controller and front panel buttons. 36 MODEL: CDR1660 / CDR0860 / CDR0460 H.264 STAND-ALONE DVR USER MANUAL V 2.6 Click the button on the playback control bar or press the DIR (Direction) button of the remote controller or the front panel to change the playback direction. Click the button on the playback control bar or press the PLAY/PAUSE button during the playback to pause the playback. When the playback reaches the end of the recorded data, then the playback will pause automatically. 7.7.1.2. FAST FORWARD / REWIND During the playback or when the playback is paused, the video can be fast forwarded or rewound. The FAST( ) button of the playback control bar, the remote controller or the front panel accelerates the speed of playback in one direction. EACH pressing of the button accelerates the speed twice the previous speed. In other words, from normal speed, the acceleration increment is x2, x4, x8, x16, x32, x64 and x128. 37 MODEL: CDR1660 / CDR0860 / CDR0460 H.264 STAND-ALONE DVR USER MANUAL V 2.6 Clicking the button on the playback control bar or pressing the DIR button will change the direction of fast forward to rewind while maintaining the same speed. 7.7.1.3. PICTURE-BY-PICTURE Pause the playback by pressing the PLAY/PAUSE button of the remote controller or the front panel. Use the IRIS- and IRIS+ buttons of the remote controller to play or to play in reverse the recorded data picture-by-picture. 7.7.1.4. SLOW The SLOW ( ) button of the playback control bar, the remote controller or the front panel slows down the speed of playback in one direction. Each pressing of the button further slows down the speed twice the previous speed. In other words, from normal speed, the slow down increment is x1/2, x1/4, x1/8, x1/16, x1/32, x1/64 and x1/128. 38 MODEL: CDR1660 / CDR0860 / CDR0460 H.264 STAND-ALONE DVR USER MANUAL V 2.6 Clicking the button on the playback control bar or pressing the DIR button of the remote controller or the front panel will change the direction of slow playback to the opposite direction while maintaining the same speed. 7.7.1.5. LOOP PLAYBACK The playback can be marked in two different locations so that it can be looped repeatedly. During any playback mode, press the A button of the remote controller to mark the beginning of the loop, POSITION A. When the desired location is found, press the B button of the remote controller to mark the end of the loop, POSITION B. The desired location can be reached by any playback functions such as fast forward, slow, and etc. As soon as the end of the loop is marked, then the playback returns to POSITION A. 39 MODEL: CDR1660 / CDR0860 / CDR0460 H.264 STAND-ALONE DVR USER MANUAL V 2.6 When the end of the loop is reached, the playback returns to POSITION A and the loop playback is repeated. Press the PIP button of the remote controller to exit from the loop playback mode. 7.7.1.6. PLAYBACK BUTTONS Click the right button of the mouse in playback mode and you can see the playback control bar on the screen like the left picture. You can control the playback mode by clicking the desired button. 1) STOP: This button exits the playback mode and returns to the live monitoring mode. 2) SLOW: Slow playback. Press this button repeatedly to toggle between ½ normal playback speeds through 1/128 normal playback speed. 3) PLAY / PAUSE: Toggles between playback and pause mode. 4) FAST: Fast forward. Press this button repeatedly to toggle between 2X normal playback speed through 128X normal playback speed. 5) DIRECTION: Change the playback direction. 40 MODEL: CDR1660 / CDR0860 / CDR0460 H.264 STAND-ALONE DVR USER MANUAL V 2.6 7.7.1.7. AUDIO PLAYBACK The audio is always recorded in real time regardless of the recording speed. Press the AUDIO SEL button to turn the AUDIO ON or OFF while pressing FUNCTION button. 7.7.2. ADVANCED PLAYBACK To find and access the recorded data more efficiently, the DVR provides various search modes: calendar search, time/date search and event search. 7.7.2.1. CALENDAR SEARCH Calendar search provides a quick overview of the year, month, day and hours of the day so that the data can be accessed relatively quickly. Click the SEARCH icon on the MENU bar or press the SEARCH button of the remote controller and the SARCH menu will be displayed like the left picture. At the SEARCH menu, Double-click CALENDAR SEARCH or highlight CALENDAR SEARCH using ▲,▼,◀, ▶ buttons and then press the ENTER button of the remote controller or the front panel to access the CALENDAR SEARCH screen. It will start searching for the data automatically. The dates that contain recorded data will be displayed in red, whereas dates without data will be in white. Double-click the desired date or select the desired date using ▲, ▼, ◀, ▶ buttons and then press the ENTER button of the remote controller or the front panel. 41 MODEL: CDR1660 / CDR0860 / CDR0460 H.264 STAND-ALONE DVR USER MANUAL V 2.6 To change the month, click the MONTH button and then click the desired month or highlight the MONTH button using ▲,▼,◀, ▶ buttons and press the ENTER button and then highlight the desired month using ▲,▼,◀, ▶ buttons and then press the ENTER button of the remote controller or the front panel. To change the year, click the YEAR button and then click the desired numeric buttons and then click the ) button on the year input box. Or in case ENTER ( of using the remote controller or the buttons of front panel, highlight the YEAR button using ▲,▼,◀, ▶ buttons and press the ENTER button and then move the cursor to the desired numeric button using ▲,▼,◀, ▶ buttons and then press the ENTER button to select and then move the cursor to the ENTER ( ) button on the year input box and then press the ENTER button. When a date is selected, the DVR will then search again for the recorded data in a 24-hour period for the date. The hour blocks that contain data will be displayed in red. Click the desired hour block and then click the PLAY button. In case of using the remote controller or the buttons of front panel, move the highlight to the desired hour block using ◀, ▶ buttons and then move the cursor to PLAY button and then press the ENTER button to start the playback. Refer to chapter 7.7.1 BASIC PLAYBACK on page 36 to maneuver through the playback as needed. 42 MODEL: CDR1660 / CDR0860 / CDR0460 H.264 STAND-ALONE DVR USER MANUAL V 2.6 7.7.2.2. TIME / DATE SEARCH Time search provides an overview of the recorded data from the earliest available recording to the latest available recording. At the SEARCH menu, Double-click TIME/DATE SEARCH or highlight TIME/DATE SEARCH using ▲,▼,◀, ▶ buttons and then press the ENTER button of the remote controller or the front panel to access the TIME/DATE SEARCH screen. Select the year, month, date, hour, minutes and seconds of the beginning of the data to retrieve by clicking the left button of the mouse or moving the cursor using the ▲,▼,◀, ▶ buttons and pressing the ENTER button of the remote controller or the front panel. For more detail explanation of value setting, refer to chapter 7.7.2.1. TIME/DATA SEARCH on page 41. And then click PLAY button on TIME/DATE SEARCH screen or move the cursor to PLAY button using the ▲,▼,◀, ▶ buttons and then press the ENTER button of the remote controller or the front panel to start the playback. Refer to chapter 7.7.1. BASIC PLAYBACK on page 36 to maneuver through the playback as needed. 7.7.2.3. EVENT SEARCH Event search provides an overview of the all event related recordings so that a specific event can be quickly pinpointed and accessed. At the SEARCH menu, Double-click EVENT SEARCH or highlight EVENT SEARCH using ▲,▼,◀, ▶ buttons and then press the ENTER button of the remote controller or the front panel to access the EVENT SEARCH screen. 43 MODEL: CDR1660 / CDR0860 / CDR0460 H.264 STAND-ALONE DVR USER MANUAL V 2.6 If any of the channels need to be viewed in full screen mode, select the desired channel by clicking the left button of the mouse. Or in case of using the remote controller of the front panel buttons, highlight CHANNEL using the ▲,▼,◀, ▶ buttons and press the ENTER button and then highlight the desired channel and press the ENTER button. Select the event type by clicking the left button of the mouse. Or in case of using the remote controller of the front panel buttons, highlight EVENT using the ▲,▼,◀, ▶ buttons and press the ENTER button and then highlight the desired event type and press the ENTER button. Select the year, month, date, hour, minutes and seconds of the end of the data to retrieve by clicking the left button of the mouse. Or in case of using the remote controller or the front panel buttons, move the cursor using the ▲,▼, ◀, ▶ buttons and press the ENTER button to input the value. If all events need to be searched up to the present time, leave the time as is. For more detail explanation of value setting, refer to chapter 7.7.2.2. TIME/DATE SEARCH on page 43. And then click SEARCH button on EVENT SEARCH screen or move the cursor to SEARCH button using the ▲,▼,◀, ▶ buttons and then press the ENTER button of the remote controller or the front panel and the list of events will appear in chronological order, from the most recent to the oldest. 44 MODEL: CDR1660 / CDR0860 / CDR0460 H.264 STAND-ALONE DVR USER MANUAL V 2.6 To start the playback, double-click the desired event or highlight the desired event using the ▲,▼,◀, ▶ buttons and then press the ENTER button of the remote controller or the front panel. The example to the left is playing back motion triggered recording. Refer to chapter 7.7.1 BASIC PLAYBACK on page 36 to maneuver through the playback as needed. 7.8. COPY The DVR is capable of backing up to various media, such as DVD-RW, CD-RW, USB Flash drives, and external hard drives. Please note that besides the optical media, the backup devices must be USB 2.0 compliant and they can be connected to any of the two available USB slots. Every time a backup is made, the mini player will be copied along with the content to facilitate viewing of the backup video on any Windows based personal computers. All backup media will include a multichannel small viewer. NOTE: We recommend you to format the USB devices prior to copy the recorded data as follows, but the Media such as CD RW and DVD RW don’t need to format. Most media can be used with the system, but some of them may be not compatible with. Refer to the included instructions related to Media. 7.8.1. CD-RW / DVD-RW / DVD+RW / DVD RAM Connect the USB devices to the DVR. RW media was specifically chosen because of its unique ability to be used over and over. Data backups can be written to the same RW disk until its maximum capacity is reached. Once capacity is reached, the disk can then be reformatted and reused over and over. The following manufacturer’s models have been tested to be fully compatible with the DVR. * Recommended Medias Imation (CD-R, CD-RW, DVD-RW, DVD+RW) Panasonic (DVD RAM) Click the COPY icon on the MENU bar or press the COPY button of the remote controller. 45 MODEL: CDR1660 / CDR0860 / CDR0460 H.264 STAND-ALONE DVR USER MANUAL V 2.6 And the COPY menu will be displayed like the left picture. CD-RW, DVD±RW and DVD RAM media must be formatted prior to backup. Double-click the MEDIA FORMAT or move the cursor to MEDIA FORMAT using the ▲,▼ buttons of the remote controller or the front panel and then press the ENTER button to access MEDIA FORMAT submenu Select USB 1 or USB2 by clicking the left button of the mouse. Or press the ENTER button of the remote controller or the front panel and move the cursor using the ▲,▼ buttons and then press the ENTER button to change the value. Double-click MEDIA FORMAT to access the media formatting. Or highlight MEIDA FORMAT using the ▲,▼ buttons of the remote controller or the front panel and then press the ENTER button. 46 MODEL: CDR1660 / CDR0860 / CDR0460 H.264 STAND-ALONE DVR USER MANUAL V 2.6 Click YES to begin formatting and double-click NO to cancel. Or move the cursor using the ▲,▼ buttons of the remote controller or the front panel and then press the ENTER button to select YES or NO. FORMATTING will be displayed during the process. The process may take up to approximately 20 minutes depending on the format of the backup disk. When the process is completed, SUCCESS will be displayed. Click the X button to return to the previous menu. Double-click COPY to access the copy submenu. Or highlight COPY using the ▲,▼ buttons of the remote controller or the front panel and then press the ENTER button. 47 MODEL: CDR1660 / CDR0860 / CDR0460 H.264 STAND-ALONE DVR USER MANUAL V 2.6 CDR0460 (4channel) a. Select the MEDIA type (USB 1 or USB 2: DVR USB port number to be connected) by clicking the left button of the mouse or moving the cursor using ▲,▼ buttons and pressing the ENTER button from the remote controller or the front panel. b. Select the channels to be backed up. By default, all channels are selected. To exclude a channel, click a desired channel or highlight a channel number using ▲,▼,◀, ▶ buttons and then press the ENTER button of the remote controller or the front panel and switch them to “X“. c. Select the beginning time and the end time of the period to be backed up by clicking the left button of the mouse or press the ENTER button and move the cursor using ▲,▼,◀, ▶ buttons and then press the ENTER button to select the value. And then click COPY on the right below or move the cursor to COPY using ▲,▼,◀, ▶ buttons and press the ENTER button of the remote controller or the front panel to start the backup. CDR0860 (8channel) CDR1660 (16channel) The copying progress is displayed on the right upper corner of the screen, and will disappear automatically when the backup process is finished. The backup disk can be reformatted and reused over and over. Insert the CD into the CD-ROM or DVD-ROM of a computer, and the small player(file viewer) will load automatically showing all available data for playback. 48 MODEL: CDR1660 / CDR0860 / CDR0460 H.264 STAND-ALONE DVR USER MANUAL V 2.6 7.8.2. CD-R The process is same as above, chapter 7.8.1. CD-RW / DVD-RW / DVD+RW / DVD RAM on page 45. After clicking COPY to start the backup and before displaying the copying progress, The DVR will start creating a buffer for the selected data to be backed up. The status of the buffer being created will be displayed in the upper right corner of the screen. 7.8.3. USB FLASH MEMORY Insert the flash memory into any available USB 2.0 port. The flash memory will light up as it draws power from the DVR. NOTE: We recommend USB port 1 for a USB memory stick and USB port 2 for a mouse. The process is same as above, chapter 7.8.1. CD-RW / DVD-RW / DVD+RW / DVD RAM on page 45. After finishing the copying progress, If you want to playback the copied data from the USB Stick, it has plug in the USB device into the USB port of the PC. The copied files are listed as “Dvr-20060503202016.dvr”. They can be retrieved and played back using the client software, or the embedded program – “FileViewer.exe”. Double-click the FileViewer.exe to be created with copied data and the File playback viewer will be displayed. And select the playing data and then click the Play button. 49 MODEL: CDR1660 / CDR0860 / CDR0460 H.264 STAND-ALONE DVR USER MANUAL V 2.6 And you can see the playback image of the selected file like the left picture. RECOMMENDED USB BRANDS The USB 2.0 flash memory comes in various sizes, up to 8 Gigabytes of storage per flash memory. It is much faster in comparison to optical media when it comes to copying necessary files. The following manufacturers’ models have been tested to be fully compatible with the DVR. Standard USB A type SANDISK Cruzer Mini SANDISK Cruzer Micro LEXAR JumpDrive Lightening MEMOREX TravelDrive I/O MAGIC Giga Bank PNY Sony USM4GL Toshiba U2K-002GT(A) HP V120W BMK Technology New MemoRive slim Kingston DataTraveler Mini-Migo all capacities all capacities all capacities all capacities all capacities all capacities all capacities all capacities all capacities all capacities all capacities Other USB A type Samsung SUM-LCB8 LG UM8 Astic ATU_100 Memorette Dualgold Axxen I-Passion Sky XM MEMOREX TD Micro Circle Icon all capacities all capacities all capacities all capacities all capacities all capacities 50 MODEL: CDR1660 / CDR0860 / CDR0460 H.264 STAND-ALONE DVR USER MANUAL V 2.6 As the compatibility is continuously being tested, please check with the seller before using non-listed manufacturers’ models. <Figure1: Other USB A-Type> <Figure 2: Standard USB A-Type> NOTE: User should format a media before using. We recommend Standard USB A type and we don’t recommend use other USB A type. But if user has to use other USB A type, user should turn off the DVR and insert the USB memory stick and then turn on the DVR. 7.8.4. EXTERNAL HARD DISK DRIVE Follow the same procedure as the USB flash memory in section 7.8.3 Dvico UX-5 has been tested to be fully compatible with the DVR. NOTE: When you connect an external HDD via USB port, you have to connect the power of external HDD. 7.8.5. COPY STOP The backup process can be interrupted at any time during the process. To stop copying, click the COPY icon on the MENU bar of press the COPY button of the remote controller and you can see the STOP COPY window like the left picture. 51 MODEL: CDR1660 / CDR0860 / CDR0460 H.264 STAND-ALONE DVR USER MANUAL V 2.6 Double-click YES to stop the backup process. Or in case of using the remote controller or the front panel buttons, highlight YES using the ▲,▼,◀, ▶ buttons and then press the ENTER button. 7.8.6. FULL MEDIA CAPACITY DURING COPYING If the media is full during copying, you can see the message, “MEDIA FULL OR FAIL. PRESS [COPY]”. At that time, click the COPY icon on the MENU bar or press the COPY button of the remote controller. And you can see the COPY menu like the left picture. If the media is full, the MEDIA FREE will be displayed by 0 MB. If you progress the continue copy when the media is full, you can see the error message in 10 seconds after starting to copy. Change to the new media and if you need the media formatting, double-click MEDIA FORMAT to access the media formatting and then double-click YES. Refer to chapter 7.8.1. CD-RW / DVD-RW / DVD+RW / DVD RAM on page 45 for more detail explanation of media format. You can see the total free capacity next to MEDIA FREE. To continue copying, change to the new media and double-click CONTINUE COPY or highlight CONTINUE COPY using the ▲,▼,◀, ▶ buttons and then press the ENTER button of the remote controller of the front panel. 52 MODEL: CDR1660 / CDR0860 / CDR0460 H.264 STAND-ALONE DVR USER MANUAL V 2.6 Double-click YES to continue copying. Or in case of using the remote controller or the front panel buttons, highlight YES using the ▲,▼,◀, ▶ buttons and then press the ENTER button. If you want to stop copying, double-click NO or highlight NO and then press the ENTER button. 8. SETUP It is possible to set up the menus in the live mode and partly in the record mode. Click the right button of the mouse and the MENU bar will be displayed. Click the SETUP icon on the MENU bar and the MAIN MENU will be displayed. In case of using the remote controller or the front panel buttons, press the MENU button. In case of using the remote controller of the front panel buttons, use the ▲,▼,◀, ▶ buttons to move the cursor and press the ENTER button to select the item. 8.1. SCREEN Screen setup defines various screen related options. Any changes affect the main video as well as the spot monitor output of the DVR. At the MAIN MENU, Double-click SCREEN or highlight SCREEN and then press the ENTER button and you can see the SCREEN menu like the left picture. Click the X button or press the ESC button to exit from this screen. 53 MODEL: CDR1660 / CDR0860 / CDR0460 H.264 STAND-ALONE DVR USER MANUAL V 2.6 8.1.1. AUTO SEQUENCE CDR0460 (4channel) At the SCREEN menu, Double-click AUTO SEQUENCE or highlight AUTO SEQUENCE and then press the ENTER button and the AUTO SEQUENCE menu will be displayed like the left picture. Define the display duration from 0 to 10 seconds. 0 seconds disables the specific display mode’s inclusion in the sequence. The default is 2 seconds. Change the value by clicking the left button of the mouse on each value. CDR0860 /CDR1660 (8channel /16channel) In case of using the remote controller or the front panel buttons, move the cursor to the desired item using the ▲,▼ buttons and press the ENTER button and then select the desired value using the ◀, ▶ buttons and press the ENTER button. To exit the AUTO SEQUENCE menu, click the X button or press the ESC button of the remote controller or the front panel. * ADD AUTO SINGLE: Select the inclusion of single channels in the automatic sequence. The default is off. 8.1.2. DISPLAY At the SCREEN menu, Double-click DISPLAY or highlight DISPLAY and then press the ENTER button and the DISPLAY menu will be displayed like the left picture. Click the X button or press the ESC button to exit from this screen. 8.1.2.1. HDD FREE SPACE Select the display option for the remaining space on the hard disk drive. The default is ON. Click the left button of the mouse on the value. Or in case of using the remote controller or the front panel buttons, highlight HDD FREE SPACE using the ▲,▼ buttons and press the ENTER button and then move the cursor to the desired value(ON or OFF) and press the ENTER button. ON: Remaining capacity of the fixed HDDs will be displayed on the screen. 54 MODEL: CDR1660 / CDR0860 / CDR0460 H.264 STAND-ALONE DVR USER MANUAL V 2.6 8.1.2.2. HDD FREE SPACE MODE Select the display mode for the remaining free space on the hard disk drive. The default is in percentage. Click the left button of the mouse on the value. Or in case of using the remote controller or the front panel buttons, highlight HDD FREE SPACE MODE using the ▲,▼ buttons and press the ENTER button and then move the cursor to the desired value(PERCENT or GIGABYTE) and press the ENTER button. PERCENT: Remaining capacity of the fixed HDDs will be displayed on the screen in percent. GIGABYTE: Remaining capacity of the fixed HDDs will be displayed on the screen in gigabyte. 8.1.2.3. RECORD STATUS Select the display option for the recording status. The default is ON. Click the left button of the mouse on the value. Or in case of using the remote controller or the front panel buttons, highlight RECORD STATUS using the ▲,▼ buttons and press the ENTER button and then move the cursor to the desired value(ON or OFF) and press the ENTER button. ON: Displaying the recording status of each channel on the screen. 8.1.2.4. CLOCK DISPLAY Select the display option for the date and the time. The default is ON. Click the left button of the mouse on the value. Or in case of using the remote controller or the front panel buttons, highlight CLOCK DISPLAY using the ▲,▼ buttons and press the ENTER button and then move the cursor to the desired value(ON or OFF) and press the ENTER button. ON: The date and time will be displayed on the screen. 8.1.2.5. TIME & DATE FORMAT Select the date format. The default is MM/DD/YY. Click the left button of the mouse on the value. Or in case of using the remote controller or the front panel buttons, highlight TIME & DATE FORMAT using the ▲,▼ buttons and press the ENTER button and then move the cursor to the desired value(MM/DD/YY, DD/MM/YY or YY/MM/DD) and press the ENTER button. YY/MM/DD MM/DD/YY DD/MM/YY : All date and time will be displayed in numbers. Ex. 2005/01/01 00:00:00 : Ex. JAN. 01 2005 00:00:00 : Ex. 01. JAN 2005 00:00:00 8.1.2.6. TITLE DISPLAY Select the display option for the channel title. The default is ON. Click the left button of the mouse on the value. Or in case of using the remote controller or the front panel buttons, highlight RECORD STATUS using the ▲,▼ buttons and press the ENTER button and then move the cursor to the desired value(ON or OFF) and press the ENTER button. ON: Each channel title will be displayed on the screen. 8.1.2.7. BORDER COLOR Select the border color that divides the channels. The default is WHITE. 55 MODEL: CDR1660 / CDR0860 / CDR0460 H.264 STAND-ALONE DVR USER MANUAL V 2.6 Click the left button of the mouse on the value. Or in case of using the remote controller or the front panel buttons, highlight RECORD STATUS using the ▲,▼ buttons and press the ENTER button and then move the cursor to the desired value(WHITE or BLACK) and press the ENTER button. WHITE: The color of the border line will be displayed on the multi-channel screen in white. BLACK: The color of the border line will be displayed on the multi-channel screen in black. 8.1.3. CAMERA CDR0460 (4channel) At the SCREEN menu, Double-click CAMERA or highlight CAMERA and then press the ENTER button and the CAMERA menu will be displayed like the left picture. Click the X button or press the ESC button to exit from this screen. NOTE: CDR0860 / CDR1660: It can be seen in information of the 8channel or 16channel CDR0860 (8channel) CDR1660 (16channel) a) TITLE (CAMERA NAME) User can change the CHANNEL TITLE. Double-click the desired channel button below TITLE in the CAMERA menu and the On Screen Keyboard will be displayed like the left picture. - Click the desired character or move the cursor by using the directional ▲,▼,◀, ▶ buttons and press the ENTER button to select the characters. - Delete the existing NAME (Camera Title) with the ← button on the On Screen Keyboard. - Click the X button or press the ESC button to save and exit the changed title. - Up to eight characters can be entered for the channel title. 56 MODEL: CDR1660 / CDR0860 / CDR0460 H.264 STAND-ALONE DVR USER MANUAL V 2.6 b) COVERT (CAMERA ON/OFF) Each camera can be convert by setting ON or OFF in the CAMERA menu. The covert function is available in the live mode. Click the COVERT ON/OFF button of the desired channel and select ON or OFF. Or in case of using the remote controller or the front panel buttons, highlight the COVERT ON/OFF button of the desired channel and press the ENTER button and then highlight the desired value and press the ENTER button. The default is OFF. ON: Selected channel will be displayed in black screen (Hidden camera) in the live mode. c) PTZ The DVR can control as many Pan / Tilt / Zoom cameras as many as the number of channels it records on. As there are multiple vendors of PTZ cameras, the DVR also supports a variety of protocols. The following is the list of supported manufacturers and their models: Manufacturer Model Pelco Pelco Samsung Techwin Samsung Techwin Canon Smile Cam Samsung Electronics Dongyang Unitech Panasonic Daiwa LG Electronics Bosch JVC Sunkwang E-RONIX Ikegami Mark Global Mark Global Pelco D Pelco P SPD SRX-100B VC-C4R SD-290 SCC-643 DSC-230 CS-854 DMP23 LPT-A100L TC8560/TC700 TK-C655/C676 SK-D106 EZ (Xpress Dome) PCS-SERIES QPIX-D QPIX-P 57 MODEL: CDR1660 / CDR0860 / CDR0460 H.264 STAND-ALONE DVR USER MANUAL V 2.6 Click the PTZ button of the channel where the PTZ camera is connected and select the appropriate protocol type. Or in case of using the remote controller or the front panel buttons, highlight the PTZ button of the channel where the PTZ camera is connected and press the ENTER button and then highlight the desired value and press the ENTER button. The default is NONE. d) BAUD RATE You have to select the appropriate communication speed. Available speeds are from 1200 to 57600. Click the BAUD RATE button of the channel where the PTZ camera is connected and select the communication speed. Or in case of using the remote controller or the front panel buttons, highlight the BAUD RATE button of the channel where the PTZ camera is connected and press the ENTER button and then highlight the desired value and press the ENTER button. The default is 9600. e) ID You have to select and match the PTZ camera address. For example, if the PTZ camera is set to address 2, then the ID should be set to 2. Click the ID button of the channel where the PTZ camera is connected and click the matching PTZ camera address and then click the ENTER ( ) button. Or in case of using the remote controller or the front panel buttons, highlight the ID button of the channel where the PTZ camera is connected and press the ENTER button and then move the cursor using the ▲,▼,◀, ▶ buttons and press the ENTER button. Press the ESC button to save and exit the changed value. The default is 1. 58 MODEL: CDR1660 / CDR0860 / CDR0460 H.264 STAND-ALONE DVR USER MANUAL V 2.6 8.1.4. SPOT At the SCREEN menu, Double-click SPOT or highlight SPOT and then press the ENTER button and the SPOT menu will be displayed like the left picture. Click the X button or press the ESC button to exit from this screen. 8.1.4.1. SPOT OUTPUT User can select the SPOT OUTPUT type. There are 3 types of SPOT OUTPUT type namely MANUAL, EVENT and SEQUENCE. MANUAL: Manually select the channel of spot monitor. EVENT: Event channel will be displayed automatically on spot monitor. SEQUENCE: Every single channel will be switching and displaying in sequence. Click the left button of the mouse on the value and select the desired spot mode. Or in case of using the remote controller or the front panel buttons, highlight SPOT OUTPUT using the ▲,▼ buttons and press the ENTER button and then move the cursor to the desired spot mode using the ▲,▼ buttons and press the ENTER button. The default is MANUAL. 8.1.4.2. SPOT DWELL TIME Define the spot monitor sequence mode time from 0 to 10 seconds. Click the left button of the mouse on the value and select the desired value. Or in case of using the remote controller or the front panel buttons, highlight SPOT DWELL TIME using the ▲,▼ buttons and press the ENTER button and then move the cursor to the desired spot mode using the ◀, ▶ buttons and press the ENTER button. The default is 2 seconds. 59 MODEL: CDR1660 / CDR0860 / CDR0460 H.264 STAND-ALONE DVR USER MANUAL V 2.6 8.1.5. VIDEO ENHANCEMENT At the SCREEN menu, Double-click VIDEO ENHANCEMENT or highlight VIDEO ENHANCEMENT and then press the ENTER button and the VIDEO ENHANCEMENT menu will be displayed like the left picture. Click the X button or press the ESC button to exit from this screen. 8.1.5.1. CHANNEL Click the left button of the mouse on the value and select the channel which needs to be adjusted. Or in case of using the remote controller or the front panel buttons, highlight CHANNEL using the ▲,▼ buttons and press the ENTER button and then move the cursor to the desired channel using the ▲,▼ buttons and press the ENTER button. The default is 1. 8.1.5.2. BRIGHTNESS At the VIDEO ENHANCEMENT menu, Double-click BRIGHTNESS or highlight BRIGHTNESS and then press the ENTER button and the BRIGHTNESS menu will be displayed like the left picture. Adjust the brightness by clicking or pressing the ◀, ▶ buttons. The default is 50%. Click the X button or press the ESC button to exit from this screen. 60 MODEL: CDR1660 / CDR0860 / CDR0460 H.264 STAND-ALONE DVR USER MANUAL V 2.6 8.1.5.3. CONTRAST At the VIDEO ENHANCEMENT menu, Double-click CONTRAST or highlight CONTRAST and then press the ENTER button and the CONTRAST menu will be displayed like the left picture. Adjust the contrast by clicking or pressing the ◀, ▶ buttons. The default is 50%. Click the X button or press the ESC button to exit from this screen. 8.1.5.4. HUE At the VIDEO ENHANCEMENT menu, Double-click HUE or highlight HUE and then press the ENTER button and the HUE menu will be displayed like the left picture. Adjust the hue by clicking or pressing the ◀, ▶ buttons. The default is 50%. Click the X button or press the ESC button to exit from this screen. 8.1.5.5. SATURATION At the VIDEO ENHANCEMENT menu, Double-click SATURATION or highlight SATURATION and then press the ENTER button and the HUE menu will be displayed like the left picture. Adjust the saturation of the color by clicking or pressing the ◀, ▶ buttons. The default is 50%. Click the X button or press the ESC button to exit from this screen. 61 MODEL: CDR1660 / CDR0860 / CDR0460 H.264 STAND-ALONE DVR USER MANUAL V 2.6 8.1.6. EVENT SCREEN MODE Define how the main video output reacts when an event occurs. Click the left button of the mouse on the value and select the desired value. Or in case of using the remote controller or the front panel buttons, highlight EVENT SCREEN MODE using the ▲,▼ buttons and press the ENTER button and then move the cursor to the desired event screen mode using the ◀, ▶ buttons and press the ENTER button. The default is SCREEN HOLD. SCREEN HOLD : Maintains the current view mode even if the event occurs. EVENT F_RTN : When an event occurs, the view mode is changed to that of the channel with the event, and then returns to the previous view mode. 8.2. RECORD Record setup defines various recording options such as record schedule, audio recording, alarm recording and motion recording etc. At the MAIN MENU, Double-click RECORD or highlight RECORD and then press the ENTER button and you can see the RECORD menu like the left picture. Click the X button or press the ESC button to exit from this screen. 62 MODEL: CDR1660 / CDR0860 / CDR0460 H.264 STAND-ALONE DVR USER MANUAL V 2.6 8.2.1. RECORDING SETUP Each channel can be individually scheduled and adjusted. Scheduling allows the DVR to record at specific times even when the REC button is not on. Turning the REC button on means the manual (continuous) recording. CDR0460 (4channel) At the RECORD menu, Double-click RECORDING SETUP or highlight RECORDING SETUP using the ▲,▼ buttons and then press the ENTER button and the RECORDING SETUP menu will be displayed like the left picture. Click the X button or press the ESC button to exit from this screen. CDR0860 (8channel) CDR1660 (16channel) 8.2.1.1. RESOLUTION This DVR is capable of recording in three different resolutions: CIF (360 x 240), Half D1 (720 x 240) and D1 (720 x 480). Click the RESOLUTION button of the desired channel in the RECORDING SETUP menu and select one of the resolutions among D1, HALF D1 and CIF on the pop-up window by clicking the mouse. Or in case of using the remote controller or the front panel buttons, highlight the RESOLUTION button to be changed using the ▲,▼,◀, ▶ buttons and press the ENTER button and then select the desired value on the popup window using the ▲,▼,◀, ▶ buttons and press the ENTER button. 63 MODEL: CDR1660 / CDR0860 / CDR0460 H.264 STAND-ALONE DVR USER MANUAL V 2.6 8.2.1.2. RECORDING SPEED (FRAMES PER SECOND) This allows the user to configure the recording speed (FPS) for each channel. Click the F/S button of the desired channel in the RECORDING SETUP menu and select one of the recording speed among 1, 2, 4, 5, 6, 8, 10, 15, 30 and OFF on the pop-up window by clicking the mouse. Or in case of using the remote controller or the front panel buttons, highlight the F/S button to be changed using the ▲,▼,◀, ▶ buttons and press the ENTER button and then select the desired value on the pop-up window using the ▲,▼,◀, ▶ buttons and press the ENTER button. NOTE: You can see the used frames and the remained frames on the above window according to setting. If the entire sum has been exceeded in the middle choice of the F/S, is not a choice. * Maximum recording rate per resolution Model D1 CDR0460 (4channel) 60fps Half D1 120fps CIF 120fps CDR0860 (8channel) CDR1660 (16channel) 120fps 120fps 240fps 240fps 60fps 60fps 8.2.1.3. QUALITY Defines the record quality of each channel. There are 4 quality levels, LOW, NORMAL, FINE and BEST. Click the QUALITY button of the desired channel in the RECORDING SETUP menu and select one of the recording qualities among LOW, NORMAL, FINE and BEST on the pop-up window by clicking the mouse. Or in case of using the remote controller or the front panel buttons, highlight the QUALITY button to be changed using the ▲,▼,◀, ▶ buttons and press the ENTER button and then select the desired value on the pop-up window using the ▲,▼,◀, ▶ buttons and press the ENTER button. 64 MODEL: CDR1660 / CDR0860 / CDR0460 H.264 STAND-ALONE DVR USER MANUAL V 2.6 8.2.1.4. SCHEDULE RECORDING User can set the SCHEDULE recording of each Channel. Click the SCHEDULE ( ) button of the desired channel in the RECORDING SETUP menu and you can see the SCHEDULE menu like the left picture. Or in case of using the remote controller or the front panel buttons, highlight the SCHEDULE ( ) button of the desired channel using the ▲,▼,◀, ▶ buttons and press the ENTER button. User can set the SCHEDULE RECORDING to either “ON” or “OFF” by clicking the left button of the mouse. Or in case of using the remote controller of the front panel buttons, highlight SCHEDULE RECORDING and press the ENTER button and then move the cursor to the desired value using the ▲, ▼ buttons and press the ENTER button. If you set the schedule recording to ON, the SCHEDULE ( ( ) button will be displayed by “O” and in case of OFF, the SCHEDULE ) button will be displayed by “X” in the RECORDING SETUP. The default is OFF. User can schedule the WEEKDAY, SATURDAY and SUNDAY recording by clicking each hour bar or moving the cursor using the ▲,▼,◀, ▶ buttons and pressing the ENTER button. The selected hour will be displayed in red. The default is OFF. Click the X button or press the ESC button to exit from this screen. 8.2.1.5. MOTION RECORDING User can set the MOTION RECORDING of each Channel. Click the MOTION ( ) button of the desired channel in the RECORDING SETUP menu and you can see the MOTION menu like the left picture. Or in case of using the remote controller or the front panel buttons, highlight the MOTION ( ) button of the desired channel using the ▲,▼,◀,▶ buttons and press the ENTER button. Click the X button or press the ESC button to exit from this screen. 8.2.1.5.1. MOTION RECORDING Select the MOTION RECORDING to either “ON” or “OFF” by clicking the left button of the mouse. Or in case of using the remote controller or the front panel buttons, highlight MOTION RECORDING and press the ENTER button and then move the cursor to the desired value using the ▲, ▼ buttons and press the ENTER button. If you set the motion recording to ON, the ) button will be displayed by “O” and in case of OFF, the MOTION ( MOTION ( button will be displayed by “X” in the RECORDING SETUP. The default is ON. Click the button in the RECORDING SETUP menu to enable or disable all channels. 65 ) MODEL: CDR1660 / CDR0860 / CDR0460 H.264 STAND-ALONE DVR USER MANUAL V 2.6 8.2.1.5.2. PRE RECORDING TIME Select the desired time for PRE RECORDING TIME by clicking the left button of the mouse on the value. Or in case of using the remote controller or the front panel buttons, highlight PRE RECORDING TIME and press the ENTER button and then move the cursor to the desired value using the ◀, ▶ buttons and press the ENTER button. You can select from 0 to 5 seconds for pre record time and the default is 5 seconds. NOTE: The pre recording time of all channels will be changed totally. 8.2.1.5.3. POST RECORDING TIME Select the desired time for POST RECORDING TIME. Clicking the left button of the mouse on the value and the pop-up window will be displayed. Click the desired numeric button and then click the ENTER( ) button on the pop-up window. Or in case of using the remote controller or the front panel buttons, highlight POST RECORDING TIME and press the ENTER button and then move the cursor value using the ◀, ▶ buttons and ) button on the pop-up window. press the ENTER button and then press the ENTER( You can select from 0 to 60 seconds for pre record time and the default is 10 seconds. NOTE: If you change the post recording time of motion recording, the post recording time of alarm recording of the channel will be also changed. 8.2.1.5.4. SENSITIVITY User can set the SENSITIVITY values by clicking the left button of the mouse on the value. Or in case of using the remote controller or the front panel buttons, highlight SENSITIVITY and press the ENTER button and then move the cursor to the desired value using the ▲, ▼ buttons and press the ENTER button. The Sensitivity values are ranged from 1 to 5 and the default is 5. 8.2.1.5.5. AREA SETUP The Motion Detection Area displays in no tint on the screen and the green tint on the screen represents none of detection area. Double-click AREA SETUP or highlight AREA SETUP using the ▲, ▼ buttons and then press the ENTER button and the AREA SETUP window will be displayed like the left picture. Click the desired cell or click one of cells for the starting point of the area which you would like to designate and drag to the other one of cells for the ending point of area until the motion detection area is the size you want it to be. To able or disable the motion detection, click the cell or click and drag the area again. Or in case of using the remote controller or the front panel buttons, move the blue cursor around using the directional buttons and then press the ENTER button to disable each grid. Press the Z+ button of the remote controller to set all cells by motion detection on and press the Z- button of the remote controller to set all cells by motion detection off. The default is on for all grids. No tint: motion detection on Green tint: motion detection off Click the X button or press the ESC button to exit from this screen. 66 MODEL: CDR1660 / CDR0860 / CDR0460 H.264 STAND-ALONE DVR USER MANUAL V 2.6 8.2.1.6. ALARM RECORDING User can set the ALARM RECORDING of each Channel. Click the ALARM ( ) button of the desired channel in the RECORDING SETUP menu and you can see the SENSOR menu like the left picture. Or in case of using the remote controller or the front panel buttons, highlight the ALARM ( ) button of the desired channel using the ▲,▼,◀, ▶ buttons and press the ENTER button. Click the X button or press the ESC button to exit from this screen. 8.2.1.6.1. ALARM RECORDING Select the ALARM RECORDING to either “ON” or “OFF” by clicking the left button of the mouse. Or in case of using the remote controller or the front panel buttons, highlight ALARM RECORDING and press the ENTER button and then move the cursor to the desired value using the ▲, ▼ buttons and press the ENTER button. If you set the alarm recording to ON, the ALARM ( ) button will be displayed by “O” and in case of OFF, the ALARM( will be displayed by “X” in the RECORDING SETUP. The default is ON. Click the ) button button in the RECORDING SETUP menu to enable or disable all channels. 8.2.1.6.2. PRE RECORDING TIME Refer to chapter 8.2.1.5.2. PRE RECORDING TIME on page 66. 8.2.1.6.3. POST RECORDING TIME Refer to chapter 8.2.1.5.3. POST RECORDING TIME on page 66. 8.2.1.6.4. SENSOR INPUT TYPE Select the sensor input type or the type of the circuit to be used with each channel by clicking the left button of the mouse. Or in case of using the remote controller or the front panel buttons, highlight SENSOR INPUT TYPE and press the ENTER button and then move the cursor to the desired value using the ▲, ▼ buttons and press the ENTER button. Available options are normally closed (NC), normally open (NO) and not used. The default value is “NORMAL OPEN’. 8.2.2. AUDIO RECORDING User can set the AUDIO RECORDING to either “ON” or “OFF “by clicking the left button of the mouse on the value. Or in case of using the remote controller or the front panel buttons, highlight AUDIO RECORDING and press the ENTER button and then move the cursor to the desired value using the ▲, ▼ buttons and press the ENTER button. The Default value is “OFF” “ON” indicates that the audio will be recorded along with the Video signal. “OFF” indicates that the no audio will be recorded along with the Video signal. 67 MODEL: CDR1660 / CDR0860 / CDR0460 H.264 STAND-ALONE DVR USER MANUAL V 2.6 NOTE: This unit cannot use the Common Microphones. Instead, the User has to connect the audio out of a Camera or a Microphone with a Line Out facility. 8.3. SYSTEM System setup defines various system settings such as hard disk drive settings, system clock, password for multiple users and buzzer etc. Moreover the system settings can be reinitialized, saved or retrieved from the USB flash memory, as well as updating the DVR firmware. At the MAIN MENU, Double-click SYSTEM or highlight SYSTEM and then press the ENTER button and you can see the SYSTEM menu like the left picture. Click the X button or press the ESC button to exit from this screen. 8.3.1. HDD (HARD DISK DRIVE) At the SYSTEM menu, Double-click HDD or highlight HDD and then press the ENTER button and you can see the HDD menu like the left picture. User has to format the HDD before using it for recording. Click the X button or press the ESC button to exit from this screen. 8.3.1.1. REC HDD FORMAT The hard disk drives set for normal recording can be initialized at any time by accessing this menu. At the HDD menu, Double-click REC HDD FORMAT or highlight REC HDD FORMAT and then press the ENTER button and the REC HDD FORMAT window will be displayed like the left picture. If you want to initialize, double-click YES or move the cursor to YES using the ▲,▼ buttons and then press the ENTER button. If you want to cancel the HDD format, double-click NO or move the cursor to NO using the ▲,▼ buttons and then press the ENTER button. 68 MODEL: CDR1660 / CDR0860 / CDR0460 H.264 STAND-ALONE DVR USER MANUAL V 2.6 8.3.1.2. HDD INFORMATION User can see the details information for the installed HDDs. At the HDD menu, Double-click HDD INFORMATION or highlight HDD INFORMATION and then press the ENTER button and the HDD INFORMATION screen will be displayed like the left picture. Click the X button or press the ESC button to exit from this screen. TOTAL SPACE: Displays the total capacity of the HDD. FREE SPACE: Displays the available free space in the installed HDD. 8.3.1.3. MEDIA INFORMATION This unit displays whether a Media device like USB Memory stick, External CD/DVD or HDD is connected. At the HDD menu, Double-click MEDIA INFORMATION or highlight MEDIA INFORMATION and then press the ENTER button and the MEDIA INFORMATION screen will be displayed like the left picture. Click the X button or press the ESC button to exit from this screen. 8.3.2. CLOCK At the SYSTEM Menu, Double-click CLOCK or highlight CLOCK and then press the ENTER button and the CLOCK menu will be displayed like the left picture. Click the X button or press the ESC button to exit from this screen. 69 MODEL: CDR1660 / CDR0860 / CDR0460 H.264 STAND-ALONE DVR USER MANUAL V 2.6 8.3.2.1. TIME & DATE At the CLOCK Menu, Double-click TIME & DATE or highlight TIME & DATE and then press the ENTER button and the TIME & DATE setup screen will be displayed like the left picture. Select the values (year/month/date and hour:minute:second) by clicking the left button of the mouse and then click the APPLY button to set. Or in case of using the remote controller or the front panel buttons, use the ▲,▼,◀, ▶ buttons to move the cursor and press the ENTER button to select. Press ) button on the pop-up window to set the ENTER ( the selected value except for month setting. And move the cursor to the APPLY button and then press the ENTER button to set up the changed time and date. Click the X button or press the ESC button to exit from this screen. 8.3.2.2. TIME ADJUST At the CLOCK Menu, Double-click TIME ADJUST or highlight TIME ADJUST and then press the ENTER button and the TIME ADJUST menu will be displayed like the left picture. Click the X button or press the ESC button to exit from this screen. 8.3.2.2.1. INTERNET TIME ADJUST Select automatic time adjustment through internet time server on or off by clicking the left button of the mouse on the value. Or in case of using the remote controller or the front panel buttons, highlight INTERNET TIME ADJUST and press the ENTER button and then move the cursor to the desired value using the ▲,▼ buttons and press the ENTER button. The default is OFF. NOTE: If the INTERNET TIME ADJUST is “ON”, the time of DVR will be adjusted to the time offered by the internet server. 10 IP addresses of the time server are set in the DVR so the DVR will be adjusted the time with one of 10 IP addresses to have been set in advance. 8.3.2.2.2. SELECT TIME ZONE Select the time zone for the local time by clicking the left button of the mouse on the value. Or in case of using the remote controller or the front panel buttons, highlight SELECT TIME ZONE and press the ENTER button and then move the cursor to the desired value using the ▲,▼ buttons and press the ENTER button. For the list of the time zone for your local area, refer to the below TIME ZONE LISTING. 70 MODEL: CDR1660 / CDR0860 / CDR0460 H.264 STAND-ALONE DVR USER MANUAL V 2.6 The default GMT is GMT-08:00. Refer to Appendix 1. TIME ZONE LISTING on page 99. NOTE: You have to match the GMT related to their Country Zone. 8.3.2.2.3. DAYLIGHT SAVING TIME Select the DAYLIGHT SAVINGS TIME option on or off by clicking the left button of the mouse on the value. Or in case of using the remote controller or the front panel buttons, highlight DAYLIGHT SAVING TIME and press the ENTER button and then move the cursor to the desired value using the ▲,▼ buttons and press the ENTER button. The default value is “OFF”. If the DAYLIGHT SAVING TIME sets “ON”, define the daylight savings time starting and ending month, week, day and time by clicking the mouse or using the ▲,▼,◀, ▶ buttons to move the cursor and pressing the ENTER button to select. 8.3.2.3. TIME TRIMMING Normally, Clover is using the time trimming setting if the time is incorrect over 2 sec per day. When booting, you can see the TIME TRIMMING setup screen. <How to set up> NOTE: You can set the time trimming only with a Remote Controller. 1. 2. 3. Press "<(AR_RESET)” or ">(D-ZOOM)" button when “TIME TRIMMING: xxxxx” message is displayed on the monitor. “<” button means minus time adjustment and the second will be faster as much as setting time. “>” button means plus time adjustment and the second will be slower as much as setting time. For example, if one second per day is fast, please plus one second and if one second per day is slow please minus one second and you can see -1 or +1 on the monitor. (You can adjust from -9 to +9 and you can use “0~9” buttons or “<, >” buttons.) Press “ENTER” button to save and exit. If over 5 seconds passes without pressing “ENTER” button, the setup will be canceled and the DVR will enter to the normal DVR mode. ** You have to adjust several times to get the exact time. 71 MODEL: CDR1660 / CDR0860 / CDR0460 H.264 STAND-ALONE DVR USER MANUAL V 2.6 8.3.3. BUZZER You can hear the beep sound when event occurs or key operation if the BUZZER setup is ON. At the SYSTEM menu, Click the left button of the mouse on the value. Or in case of using the remote controller or the front panel buttons, highlight BUZZER and press the ENTER button and then move the cursor to the desired value using the ▲,▼ buttons and press the ENTER button. The Default value is ON. ON: The beep sounds when you press any buttons on the front panel of DVR or remote controller or click the mouse and any event happens. OFF: The beep does not sound. NOTE: Whenever there is Video Loss, Alarm, Motion or HDD error, this unit will display the specific message continuously for 30 seconds with an alarming sound having an interval of 5 Seconds each 8.3.4. PASSWORD At the SYSTEM menu, Double-click PASSWORD or highlight PASSWORD and then press the ENTER button and the PASSWORD menu will be displayed like the left picture. Click the X button or press the ESC button to exit from this screen. 8.3.4.1. PASSWORD At the PASSWORD menu, Select the PASSWORD option on or off by clicking the left button of the mouse on the value. Or in case of using the remote controller or the front panel buttons, highlight PASSWORD and press the ENTER button and then move the cursor to the desired value using the ▲,▼ buttons and press the ENTER button. The Default value is OFF. When enabled, it will prompt for password on the following functions. 72 REC button Search button Play button Direction button MODEL: CDR1660 / CDR0860 / CDR0460 H.264 STAND-ALONE DVR USER MANUAL V 2.6 Copy button Live Audio selection Main Menu button PTZ control button NOTE: In case of the PASSWORD CHECK is ON, only ADMIN can set the NEW PASSWORD. 8.3.4.2. SET PASSWORD At the PASSWORD menu, Double-click SET PASSWORD or highlight SET PASSWORD and then press the ENTER button and the PASSWORD INPUT screen will be displayed like the left picture. Click the X button or press the ESC button to exit from this screen. To modify the password, click the numeric buttons to enter the current password. Or in case of using the remote controller or the front panel buttons, move the cursor using the ◀, ▶ buttons and press the ENTER button to input. The asterisks will advance automatically as the numbers are entered. The default password is 11111111. If the entered password is correct, the new password input screen will be displayed like the left picture. (If the password is not eight digits, you have to click the ENTER ( input screen.) ) button to enter the new password Enter eight numbers for the new password and then re-enter the same password under CONFIRM section same as the current password input method. When finish the password setting correctly, you can see the message, “NEW PASSWORD NOW ACTIVE” like the left picture. NOTE: User can set a PASSWORD up to eight digits. 73 MODEL: CDR1660 / CDR0860 / CDR0460 H.264 STAND-ALONE DVR USER MANUAL V 2.6 8.3.5. FACTORY DEFAULT SETTING At the SYSTEM menu, Double-click FACTORY DEFAULT SETTING or highlight FACTORY DEFAULT SETTING and then press the ENTER button and the FACTORY DEFAULT window will be displayed like the left picture. Double-click YES to reset all menu settings back to factory default. Or double-click NO or click the X button to exit without resetting. In case of using the remote controller or the front panel buttons, move the cursor using the ▲,▼ buttons and press the ENTER button. Refer to Appendix 12.3. FACTORY DEFAULT VALUES on page 109. 8.3.6. FIRMWARE UPDATE The DVR’s software can be upgraded for the latest feature updates, fixes and improvements via the USB flash memory. The USB flash memory with the upgrade file must be inserted into the front USB port. At the SYSTEM menu, Double-click FIRMWARE UPDATE or highlight FIRMWARE UPDATE and then press the ENTER button and the FIRMWARE UPDATE window will be displayed like the left picture. Double-click YES to begin the firmware update. Or double-click NO or click the X button to exit without resetting. In case of using the remote controller or the front panel buttons, move the cursor using the ▲,▼ buttons and press the ENTER button. Upgrading percent message Reboot the system message 74 MODEL: CDR1660 / CDR0860 / CDR0460 H.264 STAND-ALONE DVR USER MANUAL V 2.6 8.3.7. SYSTEM IFORMATION System Information provides the information about the Software version (Firmware version) of the DVR and Hardware version of the FPGA chip. CDR0460 (4channel) At the SYSTEM menu, Double-click SYSTEM INFORMATION or highlight SYSTEM INFORMATION and then press the ENTER button and the SYSTEM INFORMATION screen will be displayed like the left picture. Click the X button or press the ESC button to exit from this screen. CDR0860 (8channel) CDR1660 (16channel) 8.4. LINK Link setup defines various settings such as internet connection, RS-485 and e-mails. At the MAIN MENU, Double-click LINK or highlight LINK and then press the ENTER button and you can see the LINK menu like the left picture. Click the X button or press the ESC button to exit from this screen. 75 MODEL: CDR1660 / CDR0860 / CDR0460 H.264 STAND-ALONE DVR USER MANUAL V 2.6 8.4.1. NETWORK At the LINK menu, Double-click NETWORK or highlight NETWORK and then press the ENTER button and you can see the NETWORK menu like the left picture. Click the X button or press the ESC button to exit from this screen. 8.4.1.1. DHCP At the NETWORK menu, Double-click DHCP or highlight DHCP and then press the ENTER button and you can see the DHCP menu like the left picture. Click the X button or press the ESC button to exit from this screen. Select the DHCP option ON or OFF by clicking the left button of the mouse. Or in case of using the remote controller or the front panel buttons, highlight DHCP and press the ENTER button and then move the cursor to the desired value using the ▲,▼ buttons and press the ENTER button. The default is OFF. DHCP (Dynamic Host Configuration Protocol) automates the assignment of the IP address, Subnet Mask, Gateway and other IP parameters. The DHCP should be enabled (ON) in order to utilize DDNS (Refer to section 8.4.1.4. DDNS SERVER on page 77). ON: If the DHCP is set to ON, the DVR will disregard the static IP and use a dynamic IP and you can see the information, IP ADDRESS, SUBNET MASK, GATEWAY and DNS to be provided by DHCP. 8.4.1.2. STATIC IP At the NETWORK menu, Double-click STATIC IP or highlight STATIC IP and then press the ENTER button and you can see the STATIC IP menu like the left picture. Click the X button or press the ESC button to exit from this screen. 76 MODEL: CDR1660 / CDR0860 / CDR0460 H.264 STAND-ALONE DVR USER MANUAL V 2.6 8.4.1.2.1. IP ADDRESS Define the IP address if the DHCP is set to off. The DVR should be provided with its own static IP address. Click the left button of the mouse on the value and the pop-up window will be displayed. Click the buttons and then click the ENTER ( ) button to enter the IP address. Or in case of using the remote controller or the front panel buttons, highlight IP ADDRESS and press the ENTER button and the pop-up window will be displayed. And move the cursor to the desired value using the ▲,▼,◀, ▶ buttons and press the ENTER button. And move the cursor to the ENTER button on the pop-up window and press the ENTER button. 8.4.1.2.2. SUBNET MASK Define the subnet mask. The subnet mask should also be provided along with the IP address. Refer to chapter 8.4.1.2.1. IP ADDRESS on page 77 for setting. 8.4.1.2.3. GATEWAY Define the gateway. The gateway should also be provided along with the IP address and the subnet mask. Refer to chapter 8.4.1.2.1. IP ADDRESS on page 77 for setting. 8.4.1.2.4. DNS Define the DNS (Domain Name Server). If the internet time server and/or the SMTP e-mail server are to be setup using alphabet rather than numbers, then the DNS must be defined in order for the DVR to locate the servers. The DNS is usually provided from the Internet Service Provider. Refer to chapter 8.4.1.2.1. IP ADDRESS on page 77 for setting. 8.4.1.3. PORT Define the port that the DVR will communicate through. Available ports are 5400 through 5499. Refer to chapter 8.4.1.2.1. IP ADDRESS on page 77 for setting. The default port is 5400. 8.4.1.4. DDNS SERVER Define the primary dynamic IP server’s address and the secondary dynamic IP server’s address if a proprietary server is to be setup and used in conjunction with the DVR. The Maker provides a dynamic IP server to find the DVR even if it is connected on a dynamic IP service. At the NETWORK menu, Double-click DDNS SERVER or highlight DDNS SERVER and then press the ENTER button and you can see the DDNS SERVER menu like the left picture. Click the X button or press the ESC button to exit from this screen. 77 MODEL: CDR1660 / CDR0860 / CDR0460 H.264 STAND-ALONE DVR USER MANUAL V 2.6 8.4.1.4.1. SERVER 1 At the DDNS SERVER menu, Double-click SERVER 1 or highlight SERVER 1 and then press the ENTER button and you can see the IP address input screen like the left picture. Click the X button or press the ESC button to exit from this screen. Input the IP address by clicking the mouse or using the directional buttons to move the cursor and pressing the ENTER button to select the character. The default is 211.174.251.155, the server to be provided from maker. 8.4.1.4.2. SERVER 2 Refer to chapter 8.4.1.4.1. SERVER 1 on page 78 for setting. The default is 211.174.251.160, the server to be provided from maker. 8.4.1.5. BANDWIDTH Select between 0MB to 10MB to optimize your network performance. The default is 10MB. Select the value by clicking the left button of the mouse. Or in case of using the remote controller or the front panel buttons, use the ◀, ▶ buttons to move the cursor and press the ENTER button to select. 78 MODEL: CDR1660 / CDR0860 / CDR0460 H.264 STAND-ALONE DVR USER MANUAL V 2.6 8.4.2. RS485 At the LINK menu, Double-click RS-485 or highlight RS-485 and then press the ENTER button and you can see the RS-485 menu like the left picture. Click the X button or press the ESC button to exit from this screen. 8.4.2.1. SYSTEM ID Select the DVR’s system ID between 0 to 255. The system ID should be issued when controlling multiple DVRs with a keyboard controller. The address should also be issued when controlling PTZ cameras from the DVR. The default ID is 1. Refer to chapter 8.4.1.2.1. IP ADDRESS on page 75 for setting. 8.4.2.2. BAUD RATE Select the communication speed. Available speeds are from 1200 to 57600. Click the left button of the mouse on the value. Or in case of using the remote controller or the front panel buttons, highlight BAUD RATE and press the ENTER button and then move the cursor to the desired value using the ▲,▼ buttons and press the ENTER button. The default speed is 57600. 8.4.2.3. DATA BIT Select the data bit. Available options are 6 to 8. The default bit is 8. Refer to chapter 8.4.2.2. BAUD RATE on page 79 for setting. 8.4.2.4. PARITY BIT Select the parity bit. Available options are ODD, EVEN and NONE. The default is NONE. Refer to chapter 8.4.2.2. BAUD RATE on page 79 for setting. 8.4.2.5. STOP BIT Select the stop bit. Available options are 1 and 2. The default is 1. Refer to chapter 8.4.2.2. BAUD RATE on page 79 for setting. 8.4.3. E-MAIL The DVR is capable of sending e-mails when an event occurs to up to five different e-mail addresses. NOTE: If you want to use this function, you have to input DNS address. 79 MODEL: CDR1660 / CDR0860 / CDR0460 H.264 STAND-ALONE DVR USER MANUAL V 2.6 At the LINK menu, Double-click E-MAIL or highlight E-MAIL and then press the ENTER button and you can see the E-MAIL menu like the left picture. Click the X button or press the ESC button to exit from this screen. 8.4.3.1. SEND E-MAIL Select the e-mail notification on or off by clicking the left button of the mouse on the value. Or in case of using the remote controller or the front panel buttons, highlight SEND E-MAIL and press the ENTER button and then move the cursor to the desired value using the ▲,▼ buttons and press the ENTER button. The default is OFF. 8.4.3.2. E-MAIL ADDRESS SETUP Enter the DVR’s e-mail address as assigned by the network administrator, or create one that conforms with the specification of the Internet Service Provider. NOTE: You have to set up the E-MAIL ADDRESS 1 to use the e-mail notification function Double-click one of E-MAIL ADDRESS 1~5 or highlight one of E-MAIL ADDRESS 1~5 and then press the ENTER button and you can see the E-MAIL ADDRESS input screen like the left picture. Enter the e-mail address by clicking the mouse or moving the cursor using the ▲, ▼,◀, ▶ buttons and pressing the ENTER button. Click the X button or press the ESC button to save and exit from this screen. If you want to delete the characters entered, using the space button. NOTE : Delete is erased from the front. NOTE: The Server can notify the following messages via Email. a) b) c) d) Alarm Power On HDD Fail V-Loss Please note that this unit doesn’t notify the Motion event type message due to incapability of large file size and frequent motions. 80 MODEL: CDR1660 / CDR0860 / CDR0460 H.264 STAND-ALONE DVR USER MANUAL V 2.6 8.5. SEARCH At the MAIN MENU, Double-click SEARCH or highlight SEARCH and then press the ENTER button and you can see the SEARCH menu like the left picture. Click the X button or press the ESC button to exit from this screen. Refer to chapter 7.7.2. ADVANCED PLAYBACK on page 41. 8.6. COPY At the MAIN MENU, Double-click COPY or highlight COPY and then press the ENTER button and you can see the COPY menu like the left picture. Click the X button or press the ESC button to exit from this screen. Refer to chapter 7.8. COPY on page 45. 81 MODEL: CDR1660 / CDR0860 / CDR0460 H.264 STAND-ALONE DVR USER MANUAL V 2.6 9. CLIENT PROGRAM: DVR VIEWER The DVR Viewer is a dedicated client program that connects to, monitors and manages up to 16 DVRs simultaneously. 9.1. SYSTEM REQUIREMENT The DVR Viewer receives, decodes and displays data for up to 16 DVRs or up to 256 cameras simultaneously requiring a powerful personal computer to take full advantage of the program. The following is the recommended PC specification. Recommended OS Windows XP/Vista CPU Pentium IV 2.8 Ghz RAM 512MB Video Card 128MB Free Space 2GB Resolution 1024x768x32 DirectX DirectX 9.0c Network Ethernet 10/100B-TX Port Port 5400 ~ 5499 TCP 9.1.1. INSTALLING THE DVR VIEWER & H.264 CODEC 9.1.1.1. DVR VIEWER INSTALLATION Insert the program CD into the CD-ROM or DVD-ROM drive of the computer and locate the SETUP.EXE file. Double-click on the setup file, and the program will start the installation. Click on NEXT. 82 MODEL: CDR1660 / CDR0860 / CDR0460 H.264 STAND-ALONE DVR USER MANUAL V 2.6 The DVR viewer will be installed in its default folder of C:\Program Files\DVR\DVR-Viewer. If the folder needs to be changed, click on ‘BROWSE…’ button and then select a different folder. Click on ‘INSTALL’ for installing the program. Click on ‘OK’ to finish the Installation process. 83 MODEL: CDR1660 / CDR0860 / CDR0460 H.264 STAND-ALONE DVR USER MANUAL V 2.6 NOTE: In case of the Windows XP OS, user has to download the UDF drivers prior to the installation of the DVR Viewer Program because the DVR is using the UDF file system while copying and playing the data. 9.1.1.2. CODEC INSTALLATION After DVR VIEWER setup is complete, CODEC installation will start the message. Click on NEXT. CODEC will be installed in its default folder of C:\Program Files\DVR\H.264_CODEC. If the folder needs to be changed, click on ‘BROWSE…’ button and then select a different folder. 84 MODEL: CDR1660 / CDR0860 / CDR0460 H.264 STAND-ALONE DVR USER MANUAL V 2.6 Click on ‘INSTALL’ for installing the program. Click on ‘OK’ to finish the Installation process. 85 MODEL: CDR1660 / CDR0860 / CDR0460 H.264 STAND-ALONE DVR USER MANUAL V 2.6 9.2. VIEWER - LAYOUT Locate the DVR Viewer icon on the desktop and double-click on it to run the client software. The program can also be located in START- Programs – DVR-Viewer. CDR0460 (4channel) NOTE : This unit can support only 1 Relay output. If the Alarm is triggered, you can see the 1 channel LED of the Relay out will turn to “RED”. Table. 1) 2) 3) 4) 5) 6) 7) 8) 9) 10) 11) 12) 13) 14) 15) 16) 17) 18) Description of DVR VIEWER Program. Minimization Button. Close Button. Current Time. Connection Button. Config Button. Player Execution Button. Capture Button. PAN /TILT Control Button Zoom Button Focus Button Iris Button Preset Button. Microphone Button. PC Speaker Button. Copy/ Status Button Display information about the Connected Camera, Sensor. Channel Button. Splits the screen in 4, 9, 16 & Full Screen Display. 86 MODEL: CDR1660 / CDR0860 / CDR0460 H.264 STAND-ALONE DVR USER MANUAL V 2.6 9.3. CONFIG ① Version Number Display the current version of the DVR Viewer program. CDR0860 (8channel) CDR (16channel) NOTE: CDR0860 /CDR1660: It can be seen in information of the 8channel or 16channel ② COPY Copy and the Live + Copy. ▫ Quick Copy Click on the Quick Copy for faster copying the recorded data from the DVR to the Host Program (DVR VIEWER) without live images. The copying speed of the Quick Copy is faster than the Live + Copy. ▫ Live + Copy Click on the Live + Copy for copying the recorded data from the DVR to the Host Program (DVR Master) with live images. The copying speed of the Live + Copy is slower than the Live + Copy. 87 MODEL: CDR1660 / CDR0860 / CDR0460 H.264 STAND-ALONE DVR USER MANUAL V 2.6 ③ Video Enhance User can adjust the Brightness of screen by clicking on the bar or dragging the slider on the bar. User can adjust the Contrast of screen by clicking on the bar or dragging the slider on the bar. User can adjust the Hue of screen by clicking on the bar or dragging the slider on the bar. User can adjust the Saturation of screen by clicking on the bar or dragging the slider on the bar. 4) DDNS SERVER User can find the DDNS SERVER IP address. 5) Remote DVR Menu By clicking the Remote DVR Menu with the help of mouse, User can view the live video in a full screen. 6) Firmware Update. User has to update the firmware of the connected DVR by clicking on the Firmware Update. Once the User click the Firmware Update, the below window will pop up. Select the latest firmware file by clicking on the File Select. Once the File is selected, click on the Firmware Update to proceed further. 88 MODEL: CDR1660 / CDR0860 / CDR0460 H.264 STAND-ALONE DVR USER MANUAL V 2.6 9.4. CONNECTION Click on the CONNECT button of the DVR VIEWER. By clicking the Connect button, the below window pops up. Click on the New button, the below screen appears. ] a) DVR NAME User can enter the DVR Name as he desires. For Example: User can input the Model Number or Name of the DVR. b) DVR IP Address User should enter the IP address of the connected DVR. c) DVR MAC User should enter the MAC address of the connected DVR. d) Port Enter the Port number for the DVR . e) PASSWORD Enter the password to access the DVR remotely. You have to use the password to be set in 89 MODEL: CDR1660 / CDR0860 / CDR0460 H.264 STAND-ALONE DVR USER MANUAL V 2.6 DVR. Once the User enters the above details, he can save the data by clicking on the SAVE button. 9.5. CAPTURE User can take a snapshot in the Live mode by clicking on the CAPTURE icon as shown in the below screen. By clicking the CAPTURE icon, the below screen pops up. 90 MODEL: CDR1660 / CDR0860 / CDR0460 H.264 STAND-ALONE DVR USER MANUAL V 2.6 a) Save to file. The picture can be saved as a JPEG or Bitmap format. b) Print Send the picture to the printer. c) Printer Setup User can print the .jpeg image by clicking on the Printer Setup. d) Close By pressing the Close button, the above screen will disappear. 9.6. STATUS If the Status button on the DVR Viewer is selected by clicking the mouse, the DVR Viewer displays the DVR’s status related to connections of cameras, sensors, relay outputs and remaining HDD (Hard Disk Drive) capacity available for recording as shown in the below figure. 9.7. REPLAY It is possible to replay the recorded data from the DVR system by using the Replay button in the Single and Multi mode. Click the Replay button to playback the recorded data from the DVR system, and then the Replay Time Setup Window will be displayed. 91 MODEL: CDR1660 / CDR0860 / CDR0460 H.264 STAND-ALONE DVR USER MANUAL V 2.6 9.7.1. PLAYER User has to this screen to playback the recorded video. By clicking the PLAYER icon on the DVR VIEWER, the below window pops up. 92 MODEL: CDR1660 / CDR0860 / CDR0460 H.264 STAND-ALONE DVR USER MANUAL V 2.6 1) MULTI SCREEN User can split the screen into 4, 9 and 16 by clicking the Multi Screen icon. 2) STATUS DISPLAY User can see the status of the playback data along with time and date by pressing the below said icons. 3) CHANNEL BUTTON User can select the desired channel by clicking on the CHANNEL button. 4) SEARCH User can search the recorded data by clicking on the SEARCH button. By clicking the SEARCH button, the below screen pops up. a) PLAY User can play the recorded data once the file is selected. b) FOLDER SELECT Initially, User has to select the folder where the recorded file has been stored. c) CLOSE User can press the CLOSE button to exit from the above screen. 93 MODEL: CDR1660 / CDR0860 / CDR0460 H.264 STAND-ALONE DVR USER MANUAL V 2.6 5) CONVERT AVI a) User can click on the CONVERT AVI button to convert the file into AVI format. At first, click the CONVERT AVI button b) Next, select the folder for AVI file will be saved. And click OK button. 94 MODEL: CDR1660 / CDR0860 / CDR0460 H.264 STAND-ALONE DVR USER MANUAL V 2.6 c) AVI Converting the Message. d) Converting Complete. 95 MODEL: CDR1660 / CDR0860 / CDR0460 H.264 STAND-ALONE DVR USER MANUAL V 2.6 6) PRINT In live or playback mode, select any of the channels and then click on PRINT to bring up the screen print window. e) Save to file. The picture can be saved as a JPEG or Bitmap format. f) Print Send the picture to the printer. g) Printer Setup User can print the .jpeg image by clicking on the Printer Setup. h) Close By pressing the Close button, the above screen will disappear. 7) CAPTURE User can capture a snapshot in the playback mode by clicking on the CAPTURE button. As the User clicks the Capture button, it will immediately ask for the location where the image has to be stored. 96 MODEL: CDR1660 / CDR0860 / CDR0460 H.264 STAND-ALONE DVR USER MANUAL V 2.6 8) BRIGHTNESS/CONTRAST/SATURATION User can adjust the Brightness of screen by clicking on the bar or dragging the slider on the bar User can adjust the Contrast of screen by clicking on the bar or dragging the slider on the bar User can adjust the Saturation of the screen by clicking on the bar or dragging the slider on the bar. 9) Exit button. If the user wants to exit from the Player screen, press this button. 10) SPEAKER. User can adjust the Audio of the speaker by dragging the slider. 11) PLAYBACK Control Buttons PLAY button Button for fast rewinding up to 128 times by repeatedly Button for viewing previous frame in still image. Button for viewing previous frame in still image. Button for viewing the next frame in still image. Button for fast forwarding up to 128 times by repeatedly 97 MODEL: CDR1660 / CDR0860 / CDR0460 H.264 STAND-ALONE DVR USER MANUAL V 2.6 9.8. COPY It is possible to copy the recorded data from the DVR system to a client PC by using the Copy button in the Multi mode only. Click the Copy button to view the below screen. To copy the recorded data from the DVR system to a PC, and then the Copy Time Setup Window will be displayed. The copied data will be saved in the Backup Files (Open Windows Explorer – click My Computer – click Program Files – click DVR VIEWER folder – click Backup Files). Check the Start Time and End Time on the upper part of the Copy Time Setup Window. Click the COPY button to set the Copy Start/End Time. Set the Copy Start/End Time in the Start/End Time Setting menu as shown in the above screen and click the COPY button. Select camera(s) you wish to copy by clicking “ALL” or camera channel number(s) in the Copy Time Setup Window. ALL” represents that all the cameras are selected. 9.9. Switch the Normal Screen to Full Screen User can switch on to the various screen modes like 4, 9, 16 and Full Screen Display as shown below.. User can set the screen by just clicking on the Multi Screen icons. If the User wants single screen, he has to double click the left button of the Mouse. 98 MODEL: CDR1660 / CDR0860 / CDR0460 H.264 STAND-ALONE DVR USER MANUAL V 2.6 9.10. Pan / Tilt and Preset Buttons User can control the PTZ camera through DVR Viewer. Please refer to the below diagram for more detailed explanation on PTZ functions. 1) CHANNEL SELECT Button User can select the desired channel by clicking on the Numeric icon as shown in the below figure. Also, user can pan and tilt the connected PTZ camera by clicking on the directional buttons. The below said protocols supports the IRIS function. 2) ZOOM Control Zoom in and out by clicking on the Tele and Wide buttons. 3) FOCUS control User can access the Focus function by clicking the Far, Near and Auto buttons. 4) IRIS Control. User can access the IRIS Control function by clicking the open and close. PELCO-D (PELCO) PELCO-P(PELCO) DSC-230S (D-MAX) TC-8560/TC-700(BOSCH) TK-C655/676 (JVC) EZ (E-RONIX) I-LAN 99 MODEL: CDR1660 / CDR0860 / CDR0460 H.264 STAND-ALONE DVR USER MANUAL V 2.6 5) PRESET Functions User can set a maximum of 255 preset positions. By clicking on the Move button, User can move the camera to the desired location. User can save the Preset positions by clicking on the Save button. 6) SPEAKER User can listen to any one of the 4/8/16 channels with audio recording over the internet by clicking the SPEAKER icon. 7) MICROPHONE For the voice communication over the internet, click on the MICROPHONE button and then talk into an available microphone. 100 MODEL: CDR1660 / CDR0860 / CDR0460 H.264 STAND-ALONE DVR USER MANUAL V 2.6 10. INTERNET EXPLORER (WEB BROWSER) The system requirement is same as network client viewer. Enter the address on internet window www.cloverddns.com Check the “firewall” or “security wall” in Internet option. How to abandon firewall or security wall : Click “TOOL” and “Internet option” Click the “Security” section on Internet option window. 101 MODEL: CDR1660 / CDR0860 / CDR0460 H.264 STAND-ALONE DVR USER MANUAL V 2.6 Click “Trusted site” and Enter “SITE” box. Add the address – https://www.cloverddns.com in blank and click the “ADD” button. Then, you can see the site (https://www.cloverddns.com) is added. Click OK button. 102 MODEL: CDR1660 / CDR0860 / CDR0460 H.264 STAND-ALONE DVR USER MANUAL V 2.6 If you still see this page, please allow the “Active control” and install it. And you can see the left Security window. Please Click “INSTALL” button. Use the following process. 1. DVR search button click 2. If you select one of the search window and press the select button. IP Address/Port information on the window will enter the IP address automatically. 3. Click the Connect button. NOTE: DVR Search function from the Web Viewer can be only connected to DVR in the local. If the DVR is connected to an external Internet, Input the IP(STATIC IP) address / Port to connect the DVR directly 103 MODEL: CDR1660 / CDR0860 / CDR0460 H.264 STAND-ALONE DVR USER MANUAL V 2.6 You can execute “Web browser” now. Enter the IP address or Mac address to connect the DVR. Refer to chapter 9. CLIENT PROGRAM: DVR VIEWER on page 82 for operating the web browser. 104 MODEL: CDR1660 / CDR0860 / CDR0460 H.264 STAND-ALONE DVR USER MANUAL V 2.6 11. Hard Disk Drive (HDD) Installation a) Remove the top cover of your DVR and connect both the power and Signal (SATA) cables to the HDD as shown below. Put the HDD on the HDD plate. Refer to the following pictures. b) Finally, Screw up to fix the HDD as the following pictures and then recover the DVR case. 105 MODEL: CDR1660 / CDR0860 / CDR0460 H.264 STAND-ALONE DVR USER MANUAL V 2.6 12. APPENDIX CONTENTS 12.1. 12.2. 12.3. 12.4. TIME ZONE LISTING RECORDING TIME TABLE FACTORY DEFAULT SETTINGS Warranty & Factory Service 12.1. TIME ZONE LISTING GMT-12:00 GMT-11:00 GMT-10:00 GMT-09:00 GMT-08:00 GMT-07:00 GMT-07:00 GMT-07:00 GMT-06:00 GMT-06:00 GMT-06:00 GMT-06:00 GMT-05:00 GMT-05:00 GMT-05:00 GMT-04:00 GMT-04:00 GMT-04:00 GMT-03:30 GMT-03:00 GMT-03:00 GMT-03:00 GMT-02:00 GMT-01:00 GMT-01:00 GMT GMT GMT+01:00 GMT+01:00 GMT+01:00 GMT+01:00 GMT+01:00 GMT+02:00 GMT+02:00 GMT+02:00 GMT+02:00 GMT+02:00 International Date Line West Midway Island, Samoa Hawaii Alaska Pacific Time (US and Canada); Tijuana Arizona Chihuahua, La Paz, Mazatlan Mountain Time (US and Canada) Central America Central Time (US and Canada) Guadalajara, Mexico City, Monterrey Saskatchewan Bogota, Lima, Quilto Eastern Time (US and Canada) Indiana (East) Atlantic Time (Canada) Caracas, La Paz Santiago Newfoundland Brasilia Buenos Aries, Georgetown Greenland Mid-Atlantic Azores Cape Verde Island. Casablanca, Monrovia Greenwich Mean Time: Dublin, Edinburgh, Lisbon, London Amsterdam, Berlin, Bern, Rome, Stoholm, Vienna Belgrade, Bratislava, Budapest, Ljubljana, Prague Brussels, Copenhagen, Madrid, Paris Sarajevo, Skopje, Warsaw, Zagreb West Central Africa Atehns, Beirut, Istanbul, Minsk Bucharest Cairo Harare, Pretoria Helsinki, Kyiv, Riga, Sofia, Tallinn, Vilnius 106 MODEL: CDR1660 / CDR0860 / CDR0460 GMT+02:00 GMT+03:00 GMT+03:00 GMT+03:00 GMT+03:00 GMT+03:30 GMT+04:00 GMT+04:00 GMT+04:30 GMT+05:00 GMT+05:00 GMT+05:30 GMT+05:45 GMT+06:00 GMT+06:00 GMT+06:00 GMT+06:30 GMT+07:00 GMT+07:00 GMT+08:00 GMT+08:00 GMT+08:00 GMT+08:00 GMT+08:00 GMT+09:00 GMT+09:00 GMT+09:00 GMT+09:30 GMT+09:30 GMT+10:00 GMT+10:00 GMT+10:00 GMT+10:00 GMT+10:00 GMT+11:00 GMT+12:00 GMT+12:00 GMT+13:00 H.264 STAND-ALONE DVR USER MANUAL V 2.6 Jerusalem Baghdad Kuwait, Riyadh Moscow, St. Petersburg, Volgograd Nairobi Tehran Abu Dhabi, Muscat Baku, Tbilisi, Yeveran Kabul Ekaterinburg Islamabad, Karachi, Tashkent Chennai, Kolkata, Mumbai, New Delhi Kathmandu Almaty, Novosibirsk Astana, Dhaka Sri Jayawardenepura Rangoon Bangkok, Hanoi, Jakarta Krasnoyarsk Beijing, Chongqing, Hong Kong, Urumqi Irkutsk, Ulaan Bataar Kuala Lumpur, Singapore Perth Taipei Osaka, Sapporo, Tokyo Seoul Yakutsk Adelaide Darwin Brisbane Canberra, Melbourne, Sydney Guam, Port Moresby Hobart Vladivostok Magadan, Solomon Island, New Caledonia Auckland, Wellington Fiji, Kamchatka, Marshal Island Nuku'alofa 107 MODEL: CDR1660 / CDR0860 / CDR0460 H.264 STAND-ALONE DVR USER MANUAL V 2.6 12.2. RECORDING TIME TABLE HDD : 500GB , Based on 4 cameras IMAGE SIZE IMAGE QUALITY 1CH Record Size RECORD Use HDD Cap POSSIBILITY acity (MB)hr DAY/500 GB 720 X480 BEST 67 936 22 720 X480 FINE 59 832 25 720 X480 NORMAL 41 584 36 720 X480 LOW 32 456 46 720 X240 BEST 42 588 35 720 X240 FINE 37 516 40 720 X240 NORMAL 23 328 64 720 X240 LOW 18 256 81 360 X240 BEST 23 324 64 360 X240 FINE 18 260 80 360 X240 NORMAL 12 164 127 360 X240 LOW 9 128 163 108 MODEL: CDR1660 / CDR0860 / CDR0460 H.264 STAND-ALONE DVR USER MANUAL V 2.6 12.3. FACTORY DEFAULT VALUES SCREEN CDR1660(16CH) CDR0860(8CH) QUAD-A QUAD-B QUAD-C QUAD-D EIGHT-A EIGHT-B QUAD-A QUAD-B EIGHT-A SEQUENCE TYPE AUTO SEQUENCE ADD AUTO SINGLE CDR0460(4CH) QUAD-A OFF CDR1660(16CH) each channel 2 SEC CDR0860(8CH) CDR0460(4CH) DISPLAY HDD FREE SPACE ON HDD FREE SPACE MODE PERCENT RECORD STATUS ON CLOCK DISPLAY ON TIME & DATE FORMAT MM/DD/YY TITLE DISPLAY ON BORDER COLOR WHITE CAMERA Model NO. COVERT PTZ BAUD RATE ID CDR1660 1~16CH OFF NONE 9600 1 CDR0860 1~8CH OFF NONE 9600 1 CDR0460 1~4CH OFF NONE 9600 1 SPOT OUTPUT MANUAL SPOT SPOT DWELL TIME 2 SEC VIDEO ENHANCEMENT EVENT SCREEN MODE RECORD RECORDING SETUP CHANNEL 1 BRIGHTNESS 50% CONTRAST 50% HUE 50% SATURATION 50% SCREEN HOLD Model RESOLUTION (Each Channel) F/S QUALITY SCHEDULE MOTION SENSOR CDR1660 (1,2,3,5,6, 7,9,10,11, 13,14,15 CH) HALF D1 8 NORMAL X X X 109 MODEL: CDR1660 / CDR0860 / CDR0460 H.264 STAND-ALONE DVR USER MANUAL V 2.6 CDR1660 (4,8,12,16CH) HALF D1 6 NORMAL X X X CDR0860 (1~8CH) HALF D1 15 NORMAL X X X CDR0460 (1~4CH) HALF D1 30 NORMAL X X X SCHEDULE RECORDING OFF WEEKDAY NONE SELECTED SATURDAY NONE SELECTED SUNDAY NONE SELECTED MOTION RECORDING OFF PRE RECORDING TIME 5 SEC POST RECORDING TIME 10 SEC SENSITIVITY 5 AREA SETUP ENABLE ALARM RECORDING OFF PRE RECORDING TIME 5 SEC POST RECORDING TIME 10 SEC SENSOR INPUT TYPE NORMAL OPEN SCHEDULE MOTION SENSOR AUDIO OFF RECORDING SYSTEM REC HDD FORMAT HDD HDD 1 TOTAL SPACE : ** MB FREE SPACE : ** MB HDD 2 TOTAL SPACE : ** MB FREE SPACE : **MB HDD INFORMATION USB STORAGE: NOT INSTALL USB CD/DVD : NOT INSTALL MEDIA INFORMATION TIME & DATE TIME ADJUST CLOCK BUZZER PASSWORD INTERNET TIME ADJUST OFF SELECT TIME ZONE GMT -08:00 DAYLIGHT SAVING TIME OFF ON PASSWORD OFF SET PASSWORD FACTORY DEFAULT SETTING FIRMWARE UPDATE 110 MODEL: CDR1660 / CDR0860 / CDR0460 H.264 STAND-ALONE DVR USER MANUAL V 2.6 SYSTEM LOG SYSTEM INFORMATION LINK DHCP STATIC IP NETWORK OFF IP ADDRESS 192.168.0.2 SUBNET MASK 255.255.255.0 GATEWAY 192.168.0.1 DNS 0.0.0.0 PORT 5400 SERVER 1 211.174.251.155 SERVER 2 211.174.251.160 DDNS SERVER BANDWIDTH 10 MB MAC ADDRESS DDNS SERVER RESPONSE RS485 SYSTEM ID 1 BAUD RATE 57600 DATA BIT 8 PARITY BIT NONE STOP BIT 1 OFF SEND E-MAIL E-MAIL E-MAIL ADDRESS 1~5 SEARCH CALENDAR SEARCH TIME/DATE SEARCH EVENT SEARCH CHANNEL ALL EVENT ALL MEDIA USB 1 CHANNEL ALL MEDIA USB 1 COPY COPY MEDIA FORMAT MEDIA FORMAT 111 MODEL: CDR1660 / CDR0860 / CDR0460 H.264 STAND-ALONE DVR USER MANUAL V 2.6 12.4. Warranty & Factory Service Limited 2Year Warranty This warranty gives the original purchaser specific legal rights and you may also have other rights, which may vary from state to state. If our products do not function because of any defect in material or workmanship, we will repair it for free for 2 years on parts and labor from the date of original purchase. This warranty does not cover modification, abuse, incidental or consequential damages unless the state of owner’s residence specially prohibits limitations on incidental or consequential damages. How to obtain Factory Service Original purchaser must fill out the warranty card and mail it to the factory with the model number, serial number and the date of purchase. We will repair or replace, and return the system to the owner under this limited warranty. Please pack the system carefully and securely using the original packing materials, and send it prepaid and insured to: 13073 E. 166th St, Cerritos, CA 90703. Please include a check for $30.00 to cover the cost of return postage and handling. If the system is returned within the warranty period, please include a proof of purchase. If the system is out of warranty, you will receive an estimate of the repair cost for your approval before repair work will be started. 112 INSTRUCTION MANUAL 3D-DNR DAY/NIGHT COLOR DOME CAMERA MODEL HDC238 Copyright © 2009 Clover Electronics U.S.A. All Rights Reserved. PRECAUTIONS • • • • • • • • To prevent fire or shock hazard, do not expose the product to rain or moisture. To avoid electrical shock, do not open the case of this product. Operate this product using only the recommended AC Power supply. Do not overload electrical outlets or extension cords; this can result in fire or electric shock. Keep this product away from strong magnetic fields. Do not expose this product in direct sunlight or strong reflected rays. Refer servicing to qualified personnel only. Do not change or modify this product, the warranty will be voided. FEATURES • • • • • • • • 1/3” Sony Super HAD CCD High Resolution 550 TV Lines (Color), 600 TV Lines (B/W) Day/Night Camera On Screen Display (OSD) 3D DNR (Digital Noise Reduction) with 3D filter D-WDR (Digital Wide Dynamic Range) 3-Axis Gimbals Bracket DC 12V Power Source INSTALLATION 1. In order to open the dome camera, insert a suitable “-“ driver into the slot① and twist the driver. 2. Attach the base housing② to the wall or ceiling, wherever you want to install the camera. Locate a wall stud or ceiling joist and secure the base housing② using the supplied screws③. 3. How to set angle of view: - Loosen the locking screws④⑤ and adjust the camera direction by turning the pan bracket⑤ left or right, the tilt bracket④ up or down, then fix the screws firmly. - Turn the camera body⑥ clockwise or counter-clockwise to upright images on the screen. 4. If necessary, change the settings to get the best images depending on your application by using the buttons on the rear of the camera (refer to the instruction manual for OSD control). 5. Assemble the dome cover⑦ by pushing back to the base housing②. 6. Connect the one end of BNC cable (not supplied) to the BNC (F) of 5’ cable attached to the camera and the other end (BNC) of cable to the video devices such as DVR, monitor/TV. Plug an AC power supply (not supplied) to the DC jack (red) on the camera. Note: ▪ Apply DC12V 250 mA regulated power supply (not included). ▪ To avoid fire or shock hazard, use a UL listed power supply. TROUBLE SHOOTING If the camera does not function properly, check the following points before contacting the service center. Troubles No video The image on the screen is dark The image on the screen is dim The camera is not working properly, and the surface of the camera case is hot The contrast on the screen is too weak Remedies Check the AC adapter and video cable between the camera and a monitor Check the brightness control on the monitor Check if the lens is stained. If dirty, clean it with soft and clean cloth Check if you have connected the provided AC adapter Adjust the contrast feature of the monitor. If the camera is exposed under too strong light, change the position The image on the screen flickers Picture rolls and jumps, scrambled picture Picture smaller than screen Does the camera face to directly to the sunlight or fluorescent light? Change the camera position Improper V-hold control. Setting on your monitor House current may be too low SPECIFICATIONS • • • • • • • • • • • • • • • • • • • • • • Image sensor Total pixels Effective Pixels Scanning system O.S.D Backlight Resolution S/N (Y signal) Min.illumination White Balance Sense-up 3 DNR D-WDR D&N selection Digital zoom Voltage Current consumption Lens Operating temperature/Humidity Storage temperature/Humidity Dimensions Weight 1/3” SONY Super HAD CCD 811(H) x 508(V) 768(H) x 494(V) 2:1 Interlace Available Off / HSBLC / BLC selectable 550TV Lines(color),600TV Lines(B/W) 52dB (AGC Off, Weight On) 0.00001Lux(sense-up x258) ATW / AWB / Manual / AWC→SET Off / Auto / (Selectable limit x2 ~ x258) Off / On (1~50 level adjustable) Indoor / Outdoor / Off Color / BW / Auto On(x32) / Off DC12V 130 mA @DC12V 4.0mm fixed board lens -10°C ~ +50°C. RH 95% Max. -20°C ~ +60°C. RH 95% Max. 110 (Ф) x 75(H)mm 0.7 Lbs LIMITED 2 YEAR WARRANTY This warranty gives the original purchaser specific legal rights and you may also have other rights, which vary from state to state. If our products do not function because of any defect in material or workmanship, we will repair free of charges for 2 years on parts and labor from the date of original purchase. This warranty does not cover modification, abuse, incidental or consequential damages unless the state of owner’s residence specially prohibits limitations on incidental or consequential damages. HOW TO OBTAIN FACTORY SERVICE 1. Original purchaser must fill out a warranty card and mail it to the factory with model number, serial number and the date of purchase. 2. We will repair or replace, and return to the owner the system under this limited warranty. 3. Please pack the system carefully and securely using the original packing materials, and send it prepaid and insured to: 13073 E. 166th St, Cerritos, CA 90703. 4. Please include a check for $15.00 to cover the cost of return postage and handling. If the system is returned within the warranty period, please include a proof of purchase. If the system is out of warranty, you will receive an estimate of the repair cost for your approval before repair work will be begun. AVAILABLE ACCESSORIES CDR0460 CDR4450 CDR0860 CDR1660 CDR0850 CDR1650 CA100BP ADT120250 Stand-alone 4 CH Digital Video Recorder (DVR) Stand-alone 4 CH Digital Video Recorder (DVR) Stand-alone 8 CH Digital Video Recorder (DVR) Stand-alone 16 CH Digital Video Recorder (DVR) Stand-alone 8 CH Digital Video Recorder (DVR) Stand-alone 16 CH Digital Video Recorder (DVR) 100’ BNC/Power to BNC/Power Extension cable and coupler AC Power Supply DC12V 250 mA Regulated PACKAGE INCLUDES 1-Day & Night Color Dome Camera 1-Hardware Accessories Kit 1-Instruction Manual 1-Instruction Manual for OSD Control 1-Warranty Registration Card