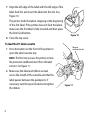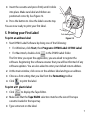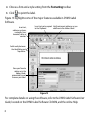
1
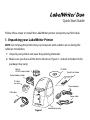
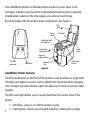
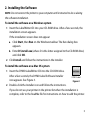
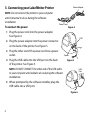
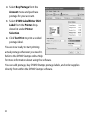
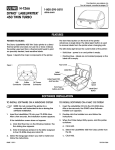
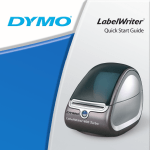
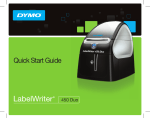
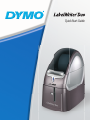
Quick Start Guide
© 2007 Sanford, L.P. All rights reserved.
DYMO and LabelWriter are registered trademarks of Sanford, L.P. All other trademarks are the
property of their respective holders.
English
Quick Start Guide
Follow these steps to install the LabelWriter printer and print your first label.
1. Unpacking your LabelWriter Printer
NOTE Do not plug the printer into your computer until asked to do so during the
software installation.
1 Unpack your printer and save the packing materials.
2 Make sure you have all the items shown in Figure 1. (Labels included in the
package may vary.)
Roll of
DYMO Stamps labels
CD-ROM
Quick Start Guide
Roll of Address labels
LabelWriter
Quick Start
D1 label
cassette
Power adapter
USB cable
ER.
DRY
SHOCK
OCA
L
NON-SERVIC
TION
RISK
FOR
HAZARD
USE
OF ELECTRIC
END USE
ONLY
WITHEABLE
.
MADE AST FOR
PS INSIDE.
SHOCK
ITE ART
ONLY
IN CHINA KONT
.
ORSMASKIN
CAU
TION
N10926
E198850
UL
Tes
with ted
FOR FCCto comply
OFFICEHOMEstandards
USE OR
15WM
I.T.E.
POWE
R SUPPLY
C
UL
Model
ng Adapte
U.S.
No
EuropeP/N: .:TESA
INPUT P/N:90819 2-2401000 r
OUTPUT
:100-240V924883
:24V
50/60Hz
---0-1.0A
Max0.64A
LISTED
Switchi
Figure 1
LabelWriter printer
Power cable
Your LabelWriter printer is a thermal printer and does not use toner or ink
cartridges. Instead, it uses heat from a thermal print head to print on specially
treated labels. Labels are the only supplies you will ever need to buy.
Become familiar with the printer’s major components. See Figure 2.
Top
cover
Platen
release
Label roll
Label feed path
and tear bar
Form-feed
button and LED
Label
spool
Tape tray
release button
DC power
connector
USB
connector
Label exit
slot
Label eject
button
Figure 2
LabelWriter Printer Features
The form-feed button on the front of the printer is used to advance a single label.
The label eject button is used to remove labels from the printer when changing
rolls. The tape tray release button opens the tape tray to insert or remove a label
cassette.
The LED status light allows you to visually determine the current state of the
printer:
2
• Solid blue - power is on and the printer is ready.
• Flashing blue - labels are not loaded properly or label spool is empty.
2. Installing the Software
NOTE Do not connect the printer to your computer until instructed to do so during
the software installation.
To install the software on a Windows system
1 Insert the LabelWriter CD into your CD-ROM drive. After a few seconds, the
installation screen appears.
If the installation screen does not appear:
a. Click Start, then Run on the Windows taskbar. The Run dialog box
appears.
b. Enter D:\install.exe (where D is the letter assigned to the CD-ROM drive)
and click OK.
2 Click Install and follow the instructions in the installer.
To install the software on a Mac OS system
1 Insert the DYMO LabelWriter CD into the CD-ROM drive.
After a few seconds, the DYMO Label Software Installer
icon appears. See Figure 3.
DYMO Label
Figure 3
2 Double-click the Installer icon and follow the instructions.
If you do not see your printer in the printer list when the installation is
complete, refer to the ReadMe file for instructions on how to add the printer.
3
3. Connecting your LabelWriter Printer
Power Adapter
NOTE Do not connect the printer to your computer
KINER.
SHOCK
RISK
HAZARD
USE
OF
ONLY.
ELECTRIC
ABLE
PARTS
ITE
SHOCK
ONLY.
INSIDE.
KONTORSMAS
FOR
USE
MADE
END
WITH
AST
IN CHINA
FOR
DRY
LOCATION
NON-SERVICE
CAUTION
Tested
with
FOR FCC to comply
OFFICEHOMEstandards
USE OR
N10926
E198850
I.T.E.
SUPPLY
POWER
C
UL
Model
g Adapter
U.S.
No.:TESA2
Europe P/N: 90819
-2401000
INPUT:100P/N:
OUTPUT:24
924883
240V-50/60
V
LISTED --- 0-1.0A Hz
Max0.64A
15WM
UL
Switchin
until instructed to do so during the software
installation.
Power Cord
To connect the power
Figure 4
1 Plug the power cord into the power adapter.
See Figure 4.
USB
2 Plug the power adapter into the power connector
on the back of the printer. See Figure 5.
3 Plug the other end of the power cord into a power
outlet.
4 Plug the USB cable into the USB port on the back
Power
Figure 5
of the printer. See Figure 5.
NOTE DO NOT CONNECT the other end of the USB cable
USB
Port
to your computer until asked to do so during the software
installation.
5 When prompted by the software installer, plug the
USB cable into a USB port.
Figure 6
4
4. Loading Labels
The LabelWriter Duo printer prints two types of labels: die-cut paper labels (such
as Address or DYMO Stamps™ Postage labels) and D1 label cassettes.
To load die-cut labels
1 Press the form-feed button to eject the labels that
Spool
guide
Spool
spindle
protected the printer during shipment.
2 Open the top cover and remove any packing
material inside the label compartment.
3 Remove the label spool from inside the cover.
Figure 7
4 Hold the spool spindle in your left hand and place the
label roll on the spindle so that the labels feed from
underneath and the left edge of the label roll is flush
against the side of the spool. See Figure 7.
5 Place the spool guide onto the right side of the spool
Figure 8
and press the guide tightly against the side of the
label roll, leaving no gap between the roll and the spool. See Figure 8.
NOTE The label roll must fit snugly against both sides of the
label spool, with no gaps, to avoid drifting as the labels feed
through the printer.
6 Insert the label spool into the slot in the printer cover with
the labels extending from underneath the roll. See Figure 9.
Figure 9
5
7 Align the left edge of the label with the left edge of the
label feed slot and insert the label into the slot. See
Figure 10.
The printer feeds the labels, stopping at the beginning
of the first label. If the printer does not feed the labels,
make sure the first label is fully inserted and then press
the form-feed button.
Figure 10
8 Close the top cover.
To load the D1 label cassette
1 Press the button on the front of the printer to
Remove
cardboard insert
open the label cassette tray.
NOTE The first time you use the printer, remove
the protective cardboard insert from the label
exit slot. See Figure 11.
2 Make sure the label and ribbon are taut
across the mouth of the cassette and that the
label passes between the guideposts. If
necessary, turn the spool clockwise to tighten
the ribbon.
6
Figure 11
3 Insert the cassette and press firmly until it clicks
into place. Make sure label and ribbon are
positioned correctly. See Figure 12.
4 Press the button to close the label cassette tray.
You are now ready to print your first label.
5. Printing your First Label
To print an address label
Push down gently
Figure 12
1 Start DYMO Label Software by doing one of the following:
• For Windows, click Start, then Programs>DYMO Label>DYMO Label.
• For Macintosh, double-click
in the DYMO Label folder.
The first time you open the application, you are asked to register the
software. Registering the software ensures that you will be informed of any
software updates. You are also asked to enter your default return address.
2 At the main window, click once on the address label and type an address.
3 Choose a font setting that you like from the Formatting toolbar.
4 Click
to print the label.
To print a D1 plastic label
1 Click
to display the Tape Editor.
2 Make sure that the Tape Width selection matches the size of the tape
cassette loaded in the tape tray.
3 Type some text on the label.
7
4 Choose a font and a style setting from the Formatting toolbar.
5 Click
to print the label.
Figure 13 highlights some of the major features available in DYMO Label
Software.
Insert text,
addresses, pictures,
rectangles, lines,
barcodes, dates, or
counters.
Insert text you’ve copied Verify and correct addresses as you
to the Clipboard.
add them to the Address Book.
Switch easily between
the Label Editor and
Tape Editor.
Store your favorite
addresses in the
Address Book;
automatically insert
them on your label.
Figure 13
For complete details on using the software, refer to the DYMO Label Software User
Guide, located on the DYMO Label Software CD-ROM, and the online Help.
8
Printing Postage with
DYMO Stamps™
Now you can print postage right from your desktop using your LabelWriter Duo
label printer. All you need is DYMO Stamps™ software, your LabelWriter printer,
DYMO Stamps labels, and an Internet connection .
To install DYMO Stamps and print postage
1 Sign up for your USPS account with Endicia. Go to:
www.endicia.com/dymostamps
2 At the end of the sign up process, download and install the DYMO Stamps
software.
DYMO Stamps software is available for both Windows and Mac OS X.
NOTE You must have DYMO Label Software and your LabelWriter printer
installed before installing the DYMO Stamps software.
The first time you start the DYMO
Stamps software, you are prompted
to enter the postage account
number assigned and the pass
phrase you created during the signup process.
3 Enter your account number and
pass phrase, and then click OK.
9
4 Select Buy Postage from the
Account menu and purchase
postage for your account.
5 Select DYMO LabelWriter DUO
Label from the Printer dropdown list under Printer
Selection.
6 Click Test Print to print a voided
postage label.
You are now ready to start printing
actual postage whenever you need it.
Refer to the DYMO Stamps online Help
for more information about using the software.
You can add postage, buy DYMO Stamps postage labels, and order supplies
directly from within the DYMO Stamps software.
10
Ordering Labels
Labels for your LabelWriter printer are available in a wide variety of sizes and
styles. You can purchase labels from your local computer and office supply retailer
or directly from DYMO. Visit www.dymo.com or call 1.800.426.7827.
DYMO Stamps labels are regulated by the United States Postal Service, and must
be purchased through the link in DYMO Stamps software or through your Endicia
postage account.
Troubleshooting or Customer Service
Visit www.dymo.com or call 203.588.2500 between 9 a.m. and 8 p.m. Eastern time.
www.sanford.com
Produced by:
DYMO
Stamford CT 06902
800-426-7827: www.dymo.com
A Newell Rubbermaid Company
1739700 Rev. 05/07