1
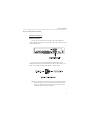
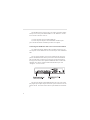
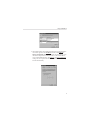
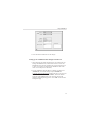
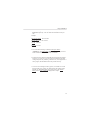
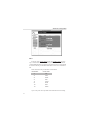
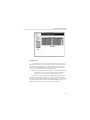
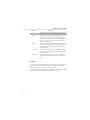
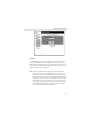
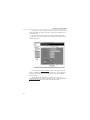
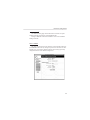
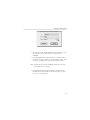
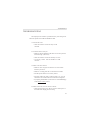
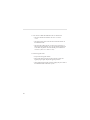
User’s Manual
PalmRouter Elite
(MIH-108)
acsense
R
Table of Contents
ABOUT THIS MANUAL . . . . . . . . . . . . . . . . . . . . . . . . . . . . . .1
INTRODUCTION . . . . . . . . . . . . . . . . . . . . . . . . . . . . . . . . . . . .3
BEFORE YOU START . . . . . . . . . . . . . . . . . . . . . . . . . . . . . . . .5
Package Overview . . . . . . . . . . . . . . . . . . . . . . . . . . . . . . . . . .5
Items Required . . . . . . . . . . . . . . . . . . . . . . . . . . . . . . . . . . . .5
System Requirements . . . . . . . . . . . . . . . . . . . . . . . . . . . . . . .5
EASY INSTALLATION . . . . . . . . . . . . . . . . . . . . . . . . . . . . . . .7
Hardware Installation . . . . . . . . . . . . . . . . . . . . . . . . . . . . . . .7
Software Configuration . . . . . . . . . . . . . . . . . . . . . . . . . . . . . .9
Windows 95 TCP/IP Configuration . . . . . . . . . . . . . . . . . . . . .10
Mac OS TCP/IP Configuration . . . . . . . . . . . . . . . . . . . . . . . .13
Setting Up the PalmRouter Elite through Web Browser . . . . . .15
ADVANCED CONFIGURATION . . . . . . . . . . . . . . . . . . . . . . .19
Intranet Setting . . . . . . . . . . . . . . . . . . . . . . . . . . . . . . . . . . . .19
Modem1 Setting . . . . . . . . . . . . . . . . . . . . . . . . . . . . . . . . . . .22
Modem2 Setting . . . . . . . . . . . . . . . . . . . . . . . . . . . . . . . . . . .27
Device Admin Setting . . . . . . . . . . . . . . . . . . . . . . . . . . . . . . .27
Status Monitor . . . . . . . . . . . . . . . . . . . . . . . . . . . . . . . . . . . . .28
Support . . . . . . . . . . . . . . . . . . . . . . . . . . . . . . . . . . . . . . . . . .28
Firmware Upgrade . . . . . . . . . . . . . . . . . . . . . . . . . . . . . . . . . .28
TROUBLESHOOTING . . . . . . . . . . . . . . . . . . . . . . . . . . . . . . .31
ii
APPENDIX A SPECIFICATIONS . . . . . . . . . . . . . . . . . . . . . .33
APPENDIX B HARDWARE DESCRIPTION . . . . . . . . . . . . .35
APPENDIX C GLOSSARY . . . . . . . . . . . . . . . . . . . . . . . . . . . .37
iii
About This Manual
ABOUT THIS MANUAL
The User's Manual will tell you how to connect a LAN to the Internet
using the MIH-108 PalmRouter Elite Internet Sharing Hub. This manual
assumes you are familiar with personal computers and network environments.
It is organized as follows:
Chapter
Content
Introduction
Describes the features and main applications of the PalmRouter Elite.
Before You Start
Describes the information and environment
needed to set up the PalmRouter Elite.
Easy Installation
Describes how to install the PalmRouter
Elite for ordinary applications.
Advanced Configuration
Describes the detail configuration options
for the PalmRouter Elite.
Troubleshooting
Lists problems and solutions one might
encounter when using the PalmRouter Elite
Appendix A
Hardware Description
Appendix B
Specifications
Appendix C
Glossary
1
Introduction
INTRODUCTION
Thank you for purchasing the Internet Sharing Hub, MIH-108
PalmRouter Elite. The PalmRouter Elite functions as an easy-to-use communication device allowing you to connect a local area network (LAN) to the
Internet. The PalmRouter Elite provides a convenient and economical solution for small office or home office (SOHO) users who want access to the
Internet at a lower cost.
Sharing Internet Access
The PalmRouter Elite provides high-speed Internet access to multiple
users by sharing the bandwidth of up to two dial-up accounts. It comes
equipped with two serial ports that can function as dial-on-demand dial-out
ports. The first serial port dials out when a request for the Internet is made.
The secondary serial port dials out when the bandwidth of the first serial port
has reached its limit. When users log off and the network traffic jam has been
relieved, the secondary serial port disconnects automatically. If no request is
made for Internet resources for a period of time, the PalmRouter Elite disconnects the first serial port automatically.
Modems Supported
The PalmRouter Elite supports 28.8/33.6/56K modems, ISDN TAs and
leased-line connections. Up to two modems can be connected simultaneously
to increase total bandwidth.
Authentication Protocol Supported
The PalmRouter Elite supports PAP/CHAP authentication protocols and
login scripts for PPP dial-up connections.
Built-in DHCP Server
The PalmRouter Elite allows for automatic TCP/IP configuration on computers over the LAN. The built-in DHCP server dramatically reduces the configuration and maintenance effort.
2
Introduction
8-Port Ethernet Hub Inside
In addition to Internet sharing capability, the PalmRouter Elite also functions as an Ethernet hub. It has eight 10BASE-T RJ-45 ports, allowing users
to connect with a small LAN.
Easy Configuration
The PalmRouter Elite can be configured through a Web browser, and features Web-based management for a simple, intuitive set up.
Virtual Server
Internet users can set up and access servers (such as WWW, and FTP)
through the Virtual Server mapping function of the PalmRouter Elite.
Security
The PalmRouter Elite provides firewall-like security to prevent unauthorized Internet users from accessing internal files. It can also filter out Internet
requests from certain nodes on a local network - a feature that is ideal for
administrative purposes.
3
Before You Start
BEFORE YOU START
This chapter provides information about package contents and requirements for installing the PalmRouter Elite.
Package Overview
Please check to make sure you have received the items listed below
before setting up your PalmRouter Elite.
¥ PalmRouter Elite
1
¥ Power Adapter
1
¥ Mini Din-8 to DB-9 Adapter
1
¥ User's Manual
1
Items Required:
¥ At least one Internet-access account from an ISP
¥ An analog telephone line or ISDN line
¥ A modem or ISDN terminal adapter
¥ UTP cable with RJ-45 connector
System Requirements
¥ Any personal computer equipped with a 10BASE-T Ethernet connection
interface that can support TCP/IP protocol on Ethernet.
¥ Windows 95/98, Windows NT 4.0 or later versions-Optional for using
PC version of firmware upgrade program only.
¥ Mac OS 7.5 or later versions-Optional for using Mac version of firmware
upgrade program only.
¥ Netscape Communicator 4.0 or above, Microsoft Internet Explorer 4.0 or
later versions are necessary for Web configuration.
4
Easy Installation
EASY INSTALLATION
Hardware Installation
Modem Connection
Connect one end of an RS-232 serial cable to the modem/ISDN TA.
Connect the other end to either of the two DB-9 serial ports found on the back
of the PalmRouter Elite.
If you are connecting a modem designed for Macintosh use to the
PalmRouter Elite's serial ports, the Mini-Din 8 to RS-232 DB-9 adapter (contained in the package with the PalmRouter Elite) should be used.
Note:If you want to reset the modem and you are using the Mini Din-8 to
RS-232 Adapter (to connect a modem designed for Macs), please
wait for 10 seconds after turning the power off in order to let the
PalmRouter Elite detect the disconnection.
5
The PalmRouter Elite can support up to two modem connections simultaneously. The two serial ports labeled "SERIAL 1" and "SERIAL 2" can function as dial-out connections. To do so:
1) Connect the phone line to the modem/ISDN TA.
2) Connect the power adapter to the modem/ISDN TA and keep the
power off until all hardware installation procedures are complete.
Connecting the PalmRouter Elite to Your Network Environment
Use standard twisted-pair Ethernet cables with RJ-45 connectors to connect computers or other Ethernet devices to the RJ-45 ports of the PalmRouter
Elite.
You can connect computers to any one of eight RJ-45 ports on the rear
panel of the PalmRouter Elite. But if you intend to connect the PalmRouter
Elite to another hub, we advise that you keep port No.8 free because this is
the only port that can be used to uplink the PalmRouter Elite to another hub.
Uplinking can be done by setting the DIP Switch beside the port from
"straight" to "crossover" mode.
Plug the power adapter of the PalmRouter Elite into an AC power outlet,
then plug the power adapter output cable into the power connector on the rear
panel of the unit. The Power LED on the front panel should be lit immediately.
6
Easy Installation
Software Configuration
TCP/IP Network Configuration of Clients
After installing the PalmRouter Elite hardware, the PalmRouter Elite
needs to be configured through a Web browser (such as Netscape Navigator,
Netscape Communicator, or Microsoft Internet Explorer). The computer that
will manage the PalmRouter Elite must have its TCP/IP settings configured
correctly. All other computers receiving Internet access through the
PalmRouter Elite must also have their TCP/IP settings configured correctly.
The PalmRouter Elite's default IP address is "192.168.1.1". In order to
connect the PalmRouter Elite, the computer designated for managing clients
must be on the same subnet as the PalmRouter Elite. Consequently, IP
addresses ranging from "192.168.1.2" to "192.168.1.252" are legal for clients
to use. IP addresses from "192.168.1.253" to "192.168.1.255" are reserved for
system use and network broadcasts.
The PalmRouter Elite can support both Windows and Macintosh
platforms. Please follow the proceeding steps to configure the Windows and
Macintosh TCP/IP settings.
7
Windows 95 TCP/IP Configuration
1. Double click the Control Panel icon in My Computer folder.
2. From the Control Panel, double click on the Network icon to show the
installed network interface card and network protocol on the
Configuration list. Double click the TCP/IP protocol on the list. If
TCP/IP does not appear on the list, you must install the TCP/IP protocol first. For the clients with TCP/IP already installed skip to step 4.
3. Keep your copy of Windows 95/98 CD-ROM on hand and on the
Configuration list of the Network window click the Add... button. In
the window that appears, double click Protocol, then on the Select
Network Protocol window choose Microsoft on the Manufacturers list
and select TCP/IP on the right side of the list. Follow the instructions
that appear on the monitor to complete the installation.
8
Easy Installation
4. After double clicking the installed TCP/IP protocol, the TCP/IP properties window appears. Click IP Address and select the Obtain IP
address automatically item. (This is a more convenient way to set up
the TCP/IP configuration of clients that relies on the built-in DHCP
server of the PalmRouter Elite). The Gateway and DNS Configuration
settings can also be ignored because the PalmRouter Elite will configure them automatically.
9
5. If there is already a DHCP server on the network, or if you
prefer not to use the PalmRouter Elite's DHCP function, you can still
set up the TCP/IP configuration manually. Remember, the IP address
you specify must be on the same subnet as the PalmRouter Elite's IP
address to avoid IP address conflicts. Set up the Subnet Mask as
Ó255.255.255.0Ó and specify the DNS address with the value that your
ISP provides. The Gateway IP address must be the same as the
PalmRouter Elite's IP address (the default IP address is "192.168.1.1").
6. After specifying the settings of TCP/IP click ÒOKÓ and restart
Windows to let the settings take effect.
10
Easy Installation
Mac OS TCP/IP Configuration
1. Open the TCP/IP control panel.
2. In Connect via field, select Ethernet if you intend to use the built-in
Ethernet interface on mainboard, or select an alternate network driver
if you have a third party Ethernet adapter installed in your computer.
3. In the Configure pull-down menu that appears, select Using DHCP
Server to allow the built-in DHCP server of the PalmRouter Elite to
assign an IP address and other TCP/IP configuration information to the
client automatically. Do this for each client that needs Internet access
through the PalmRouter Elite
11
4. If there is already a DHCP server on the network, or if you prefer not
to use the PalmRouter Elite's DHCP function, you can select Manually
to specify an IP address and other TCP/IP configuration information
yourself. Remember the IP address you specify must be on the same
subnet as the PalmRouter Elite's IP address to avoid IP address conflicts on your network. Set up the Subnet Mask as Ó255.255.255.0Ó
and the Router address the same as PalmRouter Elite's IP address. Set
up the DNS address with the value that your ISP provides.
12
Easy Installation
5. Close the TCP/IP window and save the changes.
Setting Up the PalmRouter Elite through a Web Browser
1. After performing the TCP/IP configuration of the computer that will
manage the PalmRouter Elite, start the Web browser to connect the
PalmRouter Elite. (Netscape Communicator 4.0, Internet Explorer 4.0
or above are necessary for configuring the PalmRouter Elite. Other
clients are not subject to this restriction).
2. Type the PalmRouter Elite's IP address in the Web site address area
(Ò192.168.1.1Ó as the default setting) and press ENTER. The
Username and Password Required window will pop up. Leave the User
Name blank and enter the Password ÓadminÓ, which is the default
password of the PalmRouter Elite. You can change the password
through a Web management page later. Click ÓOKÓ to enter the Web
management page.
13
3. The OnePage Setup window will pop up. Select the applicable ISP
name from the pull-down list. The default setting is Standard PPP.
For example, if you use CompuServe on-line service to access the
Internet, then select CompuServe.
Note: America Online (AOL) doesn't support PPP dial-up connections.
However, clients may use AOL through TCP/IP after an initial
connection has been made through a PPP dial up account.
14
Easy Installation
4. Fill in the ISPÕs phone number, DNS IP address, User ID and
Password respectively. You can obtain this information from your
ISP.
Example:
ISPÕs phone number: 444-555-6666
DNS IP address: 222.162.134.232
User ID: Macsense
Password: xxxxxxx
5. Leave the Intranet Settings as default, Gateway IP address
Ó192.168.1.1Ó and Subnet Mask Ó255.255.255.0Ó, unless you need to
make modifications to fit your network environment.
6. Examine all values before clicking Save and leaving the Web management page. In most cases you can connect to the Internet with these
settings completed. By launching a Web browser, e-mail application or
other program, the PalmRouter Elite will proceed to dial-up.
7. If an error occurs during the dial-up process, or if ISDN TAs will be
used for dialing up to an ISP, you should specify the modem settings
manually of the Modem Setting page. Please refer to the Modem
Setting section in the "Advanced Configuration" chapter.
15
Advanced Configuration
ADVANCED CONFIGURATION
Please refer to the previous chapter on how to enter the Web Management
page of the PalmRouter Elite. The Advanced Menu contains six submenus
including Intranet Setting, Modem1 Setting, Modem2 Setting, Device Admin,
Status Monitor, and Support.
Intranet Setting
Click Intranet Setting in the Advanced menu. There are three parts you
will need to set under this page: IP Setting, Filter,and Virtual Server.
IP Setting
The Gateway IP Address and Subnet Mask of the PalmRouter Elite can
be specified in this part. You can also choose if you would like to use the
built-in DHCP server on the Dynamic IP Address setting. Set the Starting IP
Address and Number of Users that the built-in DHCP server will assign when
the DHCP function is enabled. The default setting for Starting IP Address is
Ó192.168.1.100Ó. You can specify your own Starting IP Address, but remember to make sure the IP address you specify is on the same subnet as the
PalmRouter Elite.
16
Advanced configuration
Filter
In this part of the Intranet Setting menu, the IP Address Filter prevents
up to 5 local network clients from accessing certain services on the Internet
via the PalmRouter Elite. The specific types of Internet services to be filtered
are based on the TCP port numbers which these services use for communication.
Some well-known TCP port numbers are listed below:
Port number
Service name
21
FTP
23
Telnet
25
SMTP
53
DNS
70
Gopher
80
HTTP
110
POP3
161
SNMP
Up to 5 TCP ports can be specified on the Filtered Private Ports setting.
17
Advanced Configuration
Virtual Server
It is possible to set up a server such as a Web or FTP server on your network for Internet users to access. Internet users simply need to enter the IP
address that has been assigned to your dial-up connection to get access to
LAN servers. The PalmRouter Elite will redirect the request of the Internet
user to the specified IP address of the TCP port request.
Note: It will be much more convenient to have a fixed address from your
ISP. Failure to do so will result in being assigned a different IP
address every time a dial-up connection is made to the ISP.
For example, if you set up the TCP port 80 (HTTP: Hypertext Transfer
Protocol) to be redirected to IP address"192.168.1.2" on the Virtual Server
setting, the request from the Internet user via HTTP protocol (i.e. acquire Web
page from browser) will be transferred through the PalmRouter Elite to the
computer with IP address "192.168.1.2" on your local network.
18
Advanced configuration
Modem1 Setting
Modem1 is the modem connected to the Serial1 port of the PalmRouter
Elite. There are three parts to set up in this page.
General
Select the Line Type and the Baud Rate from the pull-down menu. The
selection in the Line Type field includes Dial-up, Leased Line and ISDN. It
is suggested that the Baud Rate should be about four times the maximum
speed of your modem. In the ISP Name pull-down menu, select Standard
PPP for common ISPs or select CompuServe for CompuServe online service. Enter the necessary ISP and Authentication information.
19
Advanced Configuration
If your ISP account needs a Login Script for authentication, click the
Script button and a window below will pop up. Enter the necessary script file
to connect to the ISP. The following is a sample script file with the proper
syntax and the meaning of the command.
20
Advanced configuration
Command
Description
~~
Wait for two seconds before executing the next script
line. The number of "~" stands for the time of seconds.
"ogin:"
The double quotes stands for sending/receiving the message. The 'ogin:' is part of 'login:'. To avoid mistakes
such as lowercase/uppercase error on the beginning letter "L". Use "ogin:" as criteria to verify that the ISP is
sending login message.
"Neil"
After receiving the login requirement from the ISP, you
can enter your login name 'Neil' within double quotes to
send the message. Please note that the login name is
provided by ISP.
~~"word"
'word' is part of 'password'. After sending out the login
user name, you may wait two seconds for the ISP to ask
for your password.
"a5831010"
After receiving the inquiry from your ISP, please enter
your password within double quotes to send the message.
IP Address
If you can get a fixed IP address from your ISP, you can enter the fixed
IP address here. The fixed IP address would be very useful for an Internet
user to get access to the resources on your local network.
Enter the DNS (Domain Name Server) IP address obtained from your ISP
on the DNS setting. Up to three DNS IP addresses can be set.
21
Advanced Configuration
Advanced
This page describes how to set up the initial string for the modem connected to the SERIAL 1 port of the PalmRouter Elite. You can use the predefined setting on the pull-down list if your modem appears on the list, or set
up the modem initial string manually. Please refer to the user's manual of your
modem for the initial string configuration.
Note: Unlike most modems, ISDN initial strings vary between different
ISDN TAs and there is no "Standard ISDN TA" initial string. If your
ISDN TA is not listed in the modem selection list, you must set up the
ISDN TA initial string by yourself. The initial string should be listed in
your ISDN TA user's manual. There are probably many initial strings
listed for your ISDN TA. The one you are looking for is Asyn-to-Sync
PPP (Asynchronous to Synchronous PPP). You can enter this initial
string if only one channel of you ISDN TA will be used. If you would
like to bundle both channels of your ISDN TA together, you should
use the initial string for Multilink-PPP instead.
22
Advanced configuration
You should also verify whether your ISDN TA supports the Dial-up string
ATDT. Most ISDN TAs support ATDT but a small portion of ISDN TAs support ATD or ATDI.
Please also note that to bundle the two channels of ISDN TA together,
you must enter the two phone numbers in the Telephone Number field of the
Modem Setting menu.
You can disable the Dial on Demand function on this page. The default
setting is ÒenableÓ and it is recommended. On this page, you can specify the
amount of idle time that passes in network activity before the PalmRouter
Elite disconnects.
Dynamic Bandwidth Allocation can be selected to be on or off. If
Bandwidth Allocation is enabled, the threshold to activate modem 2 should be
specified in the percentage of maximum traffic through modem 1.
23
Advanced Configuration
Modem2 Setting
The Modem2 Setting page contains the functions needed to set up the
modem connected to Serial2 port of the PalmRouter Elite.
Settings of Modem2 are identical to Modem1. Please refer to Modem1
Settings for details.
Device Admin
This page is designed to show the firmware version and MAC address of
this PalmRouter Elite. You may change the password or reset the device here.
Selecting "Yes" to the Factory defaults will clear all the settings previously
configured and return to the default configurations.
24
Advanced configuration
Status Monitor
This page provides information on the working status of the PalmRouter
Elite.
Support
This page will link to the Web site of Macsense Connectivity, Inc. for the
further firmware upgrade files and technical support.
Firmware Upgrade
Macsense is continually improving the firmware (software programmed
on a PROM) in each of its products. The PalmRouter Elite is shipped with
the most up-to-date software available at production time. If a firmware
upgrade becomes available, it will be posted in the service and support section of our Web site. To upgrade the PalmRouter Elite, you will need the
TFTP client and the firmware file named ÒCode.bin.Ó These two files can be
found on our Web site at www.macsensetech.com. Follow the upgrade procedure listed below.
1. Download the firmware updater from our Web site. The firmware
updater should have these two files:
1) TFTP client
2) ÒCode.binÓ
2. Double click the TFTP client icon to run the program. Enter both the
IP address of the PalmRouter Elite and your password.
25
Advanced Configuration
3. Click the button beside the File Name field. This will bring up a window allowing you to specify the location of the firmware file
ÓCode.binÓ.
4. Click the Upgrade button and the upgrade process will begin. After
the upgrade is complete remember to reset the PalmRouter Elite. This
can be done by unplugging the device and then plugging it back in.
Note: Keep the firmware file name ÓCode.binÓ unchanged or the TFTP
client software wonÕt recognize it.
5. If the upgrade has failed, the lights of Modem1 and Modem2 in the
PalmRouter Elite will flash back and forth. If this happens, try repeating steps 2 - 4 of this procedure.
26
Troubleshooting
TROUBLESHOOTING
This chapter provides solutions to problems that may occur during installation and operation of the MIH-108 PalmRouter Elite.
1. The Link LED is off.
¥ Check all connectors to make sure they are well
connected.
2. The collision LED is always lit.
¥ Make sure that the 10BASE-T cable does not exceed its specified
maximum length (100-meters).
¥ Check all connectors to make sure that they are secure.
¥ Use Category 5 cables. Each wire should have a solid
connector.
3. Modem is not able to dial out.
¥ Make sure all of the physical connections are secure and the
modem is powered on.
¥ Make sure a working phone line is connected to the modem.
¥ The ISP's phone number was incorrectly entered.
¥ The phone number may need a prefix digit such as "0," to get an
outside line. The comma stands for the connection waiting time.
¥ Try adjusting the Baud Rate. (Instructions are on the General page
of the Modem 1 Setting section).
4. Modem can dial out, but won't connect to the ISP.
¥ Check the initial string set up. Be sure to power off and power on
the modem after changing the initial string.
27
5. Can't connect to MIH-108 PalmRouter Elite via Web browser.
¥ Check out whether the IP address 192.168.1.1 is correct
or not.
¥ Check the network cable connection and LAN LED indicator on
the PalmRouter Elite.
¥ Check out the TCP/IP setup on your client. Type "winipcfg" on
DOS prompt under Windows 95 or open the TCP/IP control panel
on the Mac OS platform. The client should get an IP address of
192.168.1.x (where "x" is from 1 to 254.)
6. Firmware upgrade failed
¥ Escape from the upgrade window.
¥ Enter TFTP client again and you will be asked to execute the
upgrade program again. Repeat the upgrade procedure.
¥ After completing the upgrade procedure, unplug the power cable of
the PalmRouter Elite to reboot the system.
28
Specifications
APPENDIX A SPECIFICATIONS
Standards Compliance
IEEE 802.3 10BASE-T, PPP, TCP/IP, DHCP, CHAP/PAP
WAN Interface
Two RS-232 9-pin connectors
LAN Interface
Eight 10BASE-T RJ-45 ports
Web-based Management
Yes
LED Display
Power, Link/Activity for WAN/LAN ports, Collision/Partition for LAN
ports
Environment
Operation Temperature
0~45¡C (32~113¡F)
Storage Temperature
-20~70¡C (-4~158¡F)
Humidity
0~90%
Dimensions
LxWxH (mm)
142x236x46
LxWxH (in.)
5.59x9.29x1.81
Power
AC9V, 1A
Certifications
EMI/EMC
FCC Class B / CE Mark Class B / VCCI Class 1
Safety
CUL(UL&CSA)/LVD/T†V
29
Hardware Description
APPENDIX B Hardware Description
Front Panel Description
Label
LED
Description
PWR
green
Indicates that there is power to the unit.
Modem 1 /Modem 2
LK
green
Indicates the Modem has a live connection and the
PPP connection is established.
ACT
yellow
Flashing yellow LED indicates that data packets
are flowing through the modem ports.
Utilization green
Indicates the total traffic utilization of Internet
connection.
Ethernet
LK
green
Indicates proper connection to a computer or hub.
ACT
yellow
Flashing yellow LED indicates that there are packets flowing through this Ethernet port
PART
red
Indicates that there is severe collision at this port
and that this port is being isolated from the other
ports temporarily.
COL
yellow
Indicates that a collision is happening
30
Appendix B
Rear Panel Description
Ethernet Ports
Eight 10BASE-T Ethernet network (RJ-45) ports used for linking
hub/computer.
SERIAL 1 /SERIAL 2 ports
Used to connect modems, Two DB-9 pin male connectors
Configuration Switch
For future use.
Power AC 9V
Uses the power adapter in the package to connect this port.
Uplink switch
Used for setting uplink/normal mode of port No.8.
31
Glossary
APPENDIX C GLOSSARY
DHCP
DHCP is a protocol for automatic IP configuration. Client side computer
can get one IP from DHCP server automatically. Using DHCP can save the
effort of setting IP for every LAN computers.
Dial-up Access
Refers to connecting a device to a network via a modem and a public
telephone network. Dial-up access is really just like a phone connection,
except that the parties at the two ends are computer devices rather than people. Because dial-up access uses normal telephone lines, the quality of the
connection is not always good and data transfer rates are limited, but new
technologies such as ISDN provide faster speed.
An alternative way to connect two computers is through a leased line,
which is a permanent connection between two devices. Leased lines provide
faster throughput and better quality connections, but also more expensive.
Domain Name
A name that identifies one or more IP addresses. For example, the domain
name "microsoft.com" represents many IP addresses. Domain names are used
in URLs to identify particular Web pages. For example, in the URL
http://www.pcwebopedia.com/index.html, the domain name is
pcwebopedia.com.
IEEE
Abbreviation of Institute of Electrical and Electronics Engineers, pronounced "I-triple-E". Founded in 1884, the IEEE is an organization composed
of engineers, scientists, and students. The IEEE is best known for developing
standards for the computer and electronics industry. In particular, the IEEE
802 standards for local-area networks are widely adopted.
32
Appendix C
Internet
A global network connecting millions computers. As of 1998, the Internet
has more than 100 million users worldwide, and that number is growing
rapidly. More than 100 countries are linked into exchanges of data, news and
opinions.
IP Address
An identifier for a computer or device on a TCP/IP network. Networks
using the TCP/IP protocol route messages based on the IP address of the destination. The format of an IP address is a 32-bit numeric address written as
four numbers separated by periods. Each number's range is from 0 to 255. For
example, 1.160.10.240 could be a legal IP address.
ISDN
Abbreviation of integrated services digital network, an international communications standard for sending voice, video, and data over digital telephone
lines. ISDN requires special metal wires and supports data transfer rates up to
64 Kbps (64,000 bits per second).
ISP
Short for Internet Service Provider, a company that provides access to the
Internet. For a monthly fee, the service provider gives you a software package, username, password and access phone number. Equipped with a modem,
you can then log on to the Internet and browse the World Wide Web and
USENET, and send and receive e-mail.
Local Area Network (LAN)
A computer network that spans a relatively small area. Most LANs are
confined to a single building or group of buildings. However, one LAN can
be connected to other LANs over any distance via telephone lines and radio
waves. A system of LANs connected in this way is called a wide-area network (WAN)
33
Glossary
MAC Address
Short for Media Access Control address, a hardware address that uniquely identifies each node of a network. In IEEE 802 networks, the Data Link
Control (DLC) layer of the OSI Reference Model is divided into two sublayers: the Logical Link Control (LLC) layer and the Media Access Control
(MAC) layer. The MAC layer communicates directly with the network media.
Consequently, each different type of network media requires a different MAC
layer.
PPP
PPP (Point-to-Point protocol) is a communication protocol for transmitting information over analog telephone lines. A PPP account is a dial-up
account used to access the Internet. It is a dial-up account that actually calls
another computer to gain Internet access.
PAP/CHAP ISP
PAP stands for Password Authentication Protocol. CHAP means
Challenge Handshake Authentication Protocol. Most ISPs use one or the other
for user authentication. If your ISP does not support either of these two protocols, contact the ISP for login script. You have to key in the login script on
the PalmRouter Elite.
TCP/IP
Acronym for Transmission Control Protocol/Internet Protocol. TCP/IP is
a program consisting of two layers of protocols or languages used to control
the flow of information over the Internet. The Transmission Control Protocol
aids in packaging large files of information into smaller packets of data that
are ready for transport. The second layer Internet Protocol controls the
addressing system, in a sense determining where the data packets are sent.
34
Safety Precautions
1. Follow all warnings and instructions marked on the product.
2. Slots and openings on the device are provided for ventilation. To protect it from overheating, these openings must not be blocked or covered.
3. Do not subject the product to an environment that exceeds temperature
and humidity specifications (even if it is not plugged in). This product
should never be placed near or over a radiator or heat register, or in a
built-in installation unless proper ventilation is provided.
4. Unplug this product from the wall outlet before cleaning. Do not use
liquid cleaners or aerosol cleaners. Use a damp cloth for cleaning.
5. Do not place cords or cables where they may be walked on or tripped
over.
6. Be sure to comply with any applicable local safety standards or regulations.
7. General purpose cables are provided with this product. Any cables or
other requirements mandated by local authority are your responsibility.
8. Cables that are attached to devices in different locations that have different power sources and grounding may have
hazardous voltage potentials. Consult a qualified electrical
consultant before installing the product to see if this
phenomenon exists and, if necessary, take corrective action.
9. Never touch annunciated telephone wires or terminals unless the line
has been disconnected.
10. Avoid using telephone equipment or installing the product
during an electrical storm.
11. Never install telephone jacks, lines, network cables, this
product, or power connections in wet locations.
12. Never spill liquid of any kind on the product.
35
Copyright
Copyright © 1998 by this company. All rights reserved. No part of this
documentation may be reproduced in any form or by any means or used to
make any directive work (such as translation or transformation) without permission from Macsense Connectivity, Inc. Macsense Connectivity, Inc.
reserves the right to revise this documentation and to make occasional
changes in content without obligation to provide notification of such revision
or change.
FCC Notice
This equipment has been tested and found to comply with the
limits for a Class B digital device, pursuant to Part 15 of FCC Rules, These
limits are designed to provide reasonable protection against harmful interference in a residential installation. This equipment generates, uses, and can
radiate radio frequency energy and, if not installed and used in accordance
with the instructions, may cause harmful interference to radio communications. However, there is not guarantee that interference will not occur in a
particular installation. If this equipment does cause turning the equipment off
and on, the user is encouraged to try to correct the interference by one or
more of the following measures:
1. Reorient or relocate the receiving antenna.
2. Increase the distance between the equipment and the receiver.
3. Connect the equipment and the receiver to different outlets on separate
circuits.
4. Consult the dealer or an experienced radio/television technician for
help.
36