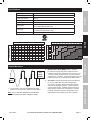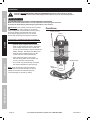
1
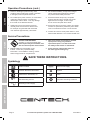
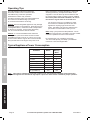
Table of Contents
Safety
Safety.......................................................... 2
Specifications.............................................. 5
Setup........................................................... 6
Operation..................................................... 7
Maintenance............................................... 10
Parts List and Diagram................................ 2
Warranty..................................................... 11
WARNING SYMBOLS AND DEFINITIONS
This is the safety alert symbol. It is used to alert you to potential personal injury hazards.
Obey all safety messages that follow this symbol to avoid possible injury or death.
Setup
Indicates a hazardous situation which, if not avoided,
will result in death or serious injury.
Indicates a hazardous situation which, if not avoided,
could result in death or serious injury.
Indicates a hazardous situation which, if not avoided,
could result in minor or moderate injury.
Addresses practices not related to personal injury.
Operation
Important Safety Information
Read all safety warnings and instructions.
Failure to follow the warnings and instructions may result in electric shock, fire and/or serious injury.
Save all warnings and instructions for future reference.
General Precautions
Maintenance
1. People with pacemakers should consult their
physician(s) before use. Electromagnetic fields in
close proximity to heart pacemaker could cause
pacemaker interference or pacemaker failure.
2. WARNING: The brass components of this
product contain lead, a chemical known to
the State of California to cause birth defects
(or other reproductive harm). (California
Health & Safety code § 25249.5, et seq.)
Page 2
3. WARNING: This product contains or, when
used, produces a chemical known to the
State of California to cause cancer and birth
defects or other reproductive harm. (California
Health & Safety Code § 25249.5, et seq.)
4. The warnings, precautions, and instructions
discussed in this instruction manual cannot
cover all possible conditions and situations
that may occur. It must be understood by the
operator that common sense and caution are
factors which cannot be built into this product,
but must be supplied by the operator.
For technical questions, please call 1-800-444-3353.
Item 66817
1. Do not install this inverter into a
building’s electrical system. This inverter
is a vehicular accessory. It is not designed
to be safely used in a building’s electrical
system and has not been evaluated to meet
building wiring codes. Improper application
may create a fire or electric shock hazard.
7. Keep inverter dry and clean. Do not expose
to rain, snow, spray, bilge water or dust.
2. To allow proper cooling, install in indoor wellventilated area and do not cover ventilation openings
or cooling fins. Do not install in engine compartment.
Especially avoid placing the Inverter on carpets
and rugs; they are not only flammable, but
they also obstruct vents underneath it.
9. Mount inverter horizontally.
10. Verify that installation surface has no hidden
utility lines before drilling or driving screws.
11. This product is not a toy. Keep it away from children.
12. Do not use with positive ground electrical
systems. (Most automobiles, trucks, and
RV’s have negative ground systems.)
4. Connect to 12 VDC power supply only. A power
supply with lower voltage will not operate the Inverter
correctly, and higher voltage could damage the unit.
13. The positive (+) battery on the Inverter must be the
last connection made, and must be connected before
the Inverter is turned on. There may be a small
spark during the final connection. This is normal.
5. Connect input polarity properly. Incorrect connection
will damage inverter and void warranty.
14. Properly ground the inverter’s case
as explained in this manual.
Setup
3. Keep combustible materials and gasses away
from the inverter. The inverter produces sparks
and heat during operation and can start a fire.
8. Install as close to DC source as possible, but not
in a closed area with vented lead-acid batteries.
Vented lead-acid batteries release explosive
hydrogen gas that can be ignited by the inverter.
Safety
Installation Precautions
6. Do not use in a marine application.
This inverter is not intended to withstand the highly
corrosive conditions in marine applications and
would quickly be rendered inoperable or unsafe.
1. Wear splash-resistant ANSI-approved
safety goggles and electrically insulated
gloves while working near batteries.
2. Charge, store, and maintain batteries
according to supplier’s instructions.
3. Locate batteries in a clean, well-ventilated area,
away from ignition sources and flammable
materials. Vented lead-acid batteries release
explosive hydrogen gas while charging.
4. Only connect similar batteries together. Do
not connect old and new batteries together,
wet and gel cells together, or batteries
of different capacities together.
5. Use only 12 V batteries with this item.
6. Connect batteries in parallel ONLY (negative
terminals together to one cable; positive
terminals together to the other cable).
Operation
Battery Precautions
7. Install a properly rated fuse on the
positive output of the battery bank.
1. Multiple outlet power strips with switches and
circuit breakers only interrupt power to the “hot”
receptacle terminals. The “neutral” terminals
remain powered with respect to the “ground”
terminals. So strip switch may be off, but
part of appliance may still be powered.
2. Inspect supply connections before use to ensure
they are tight and that insulation is not damaged.
Item 66817
3. Do not use this inverter to power sensitive
devices such as medical devices or computers.
However, it may be used to charge a computer
battery. Do not use in ignition protected areas.
4. Some rechargeable tools and appliances can
damage the Inverter. Check the temperature of the
device several times when it is charging. If the device
becomes extremely hot; turn the power off, remove
the device, and do not use with the Inverter again.
For technical questions, please call 1-800-444-3353.
Page 3
Maintenance
Operation Precautions
Operation Precautions (cont.)
Safety
5. Check for breakage of parts and any other
condition that may affect the Inverter’s operation.
If damaged, have it repaired before use.
8. Do not attach a battery charger if the charger
carries a warning that dangerous voltages
are present at the battery terminals.
6. Do not attempt to power a device, or combination
of devices, that will require more than the
rated output of this inverter. This may damage
the inverter or the attached devices.
9. Some fluorescent lamps may not operate
properly with this type of inverter. If the bulb
appears to be too bright, or fails to light,
do not use the lamp with this inverter.
7. Appliances such as microwave ovens will
normally draw more than their rated current.
For example: A typical 600 watt microwave
oven will draw approximately 1,000 watts.
10. Some fans with synchronous motors may slightly
increase in speed when powered by the inverter.
This is not harmful to the fan or to the inverter.
11. Inverter will consume some power while on, even
without loads attached. Turn inverter off after use.
Service Precautions
Do not open housing.
Contains no user-serviceable parts.
Internal parts may be electrified, even
with unit off and power disconnected.
1.
Setup
2. Maintain labels and nameplates on the
Inverter. These carry important safety
information. If unreadable or missing, contact
Harbor Freight Tools for a replacement.
3. Have your Inverter serviced by a qualified
repair person using only identical
replacement parts. This will ensure that
the safety of the Inverter is maintained.
4. Fuses must be replaced with fuses of
the same type and rating only.
Save these instructions.
Symbology
Operation
Double Insulated
Canadian Standards Association
Underwriters Laboratories, Inc.
V~
Volts Alternating Current
Direct Current Supply
A
Ø
Amperes
Phase
Equipment Grounding Conductor
Alternating Current Supply
Maintenance
Page 4
For technical questions, please call 1-800-444-3353.
Item 66817
Input Voltage
12 VDC (nominal)
Output Voltage
115 V~ / 60 Hz
Continuous Power
750 W
Surge Power
1500 W
Operating Conditions
32° - 104° F
Safety
Specifications
Two 3-prong grounded polarized AC outlets
One 5 VDC 500mA USB outlet
One 35 Amp Internal Blade-type Fuse
(professional replacement only)
Receptacles
Fuse Type
Overall Dimensions
9-1/4" L x 5-1/4" W x 2-1/2" H
12
10
10
10
8
8
8
6
6
16
14
12
10
10
8
8
8
6
6
6
16
14
10
10
8
8
6
6
6
6
4
16
14
10
10
8
8
6
6
6
4
4
16
14
10
8
8
6
6
6
4
4
4
14
14
10
8
6
6
6
4
4
4
4
14
14
10
8
6
6
6
4
4
4
4
14
12
8
8
6
6
4
4
4
4
4
14
12
8
8
6
4
4
4
4
4
2
14
12
8
8
6
4
4
4
4
2
2
1
2
3 16
4
14
5
6
7
8 14
9
12
10
20
30
12
Amp Load
40
50
60
10
80
8
8
90
100
6
6
10
8
70
4
6
4
4
2
Output Waveform
Modified
Sine
Wave
(MSW)
Sine
Wave
1. This inverter’s output is a Modified Sine Wave.
Power from most electric utilities is a Sine Wave.
Note: Only multimeters identified as “TRUE RMS“
will read Modified Sine Wave voltage accurately.
Item 66817
2. Modified Sine Wave (MSW) power is suitable
for most AC devices and power supplies used in
electronic equipment, transformers, and motors. Do
not use to power sensitive devices such as medical
equipment or computers. Some audio equipment may
perform poorly if run on Modified Sine Wave power.
3. Sine Wave inverters provide power that is identical
to, or even better than, the power supplied by
your power company. Motors start easier and run
cooler under Sine Wave power. Certain devices,
such as laser printers, variable speed motors and
digital clocks, require sine wave power to operate
properly. Sine wave inverters are typically more
expensive for their capacity than other inverters.
For technical questions, please call 1-800-444-3353.
Setup
14
10
Page 5
Operation
16
5
Maintenance
1
2
3
4
5
6
7
8
9
10
Amp Load
5 10 20 30 40 50 60 70 80 90 100
Distance (yards)
Distance (yards)
3069523
Installation
Read the entire Important Safety Information section at the beginning of this
manual including all text under subheadings therein before set up or use of this product.
Safety
TO PREVENT SERIOUS INJURY FROM ACCIDENTAL OPERATION:
Make sure that the Power Switch is in the off‑position and unplug the tool from
its electrical outlet before performing any procedure in this section.
CAUTION! This Inverter must only be connected
to batteries with a output voltage of 12 volts DC.
Lower voltage will not operate the Inverter properly,
and more voltage could damage the Inverter
or the device being powered. Do not use this
Inverter with positive ground electrical systems.
Functions
Power Inverter
Power
Terminals
Setup
The Inverter is configured to have a number of
shut-down points, for the safety of the operator,
the unit, and the devices being used with it.
• If the DC input voltage drops too low, the
alarm on the Inverter will sound. Should the
input voltage drop further, the Inverter will
shut down automatically to prevent permanent
battery damage. Recharge the battery soon.
Fan
Power Button
Fault LED
Power LED
• If the DC input voltage exceeds 15V the
Inverter will shut down automatically.
• If the output load power rises higher
than the rating power of the Inverter; the
unit may shut down automatically.
Operation
• The Inverter may automatically shut down
if its internal temperature gets too high.
Note: Even though this inverter has built-in
mechanisms to minimize damage, the above
situations should be avoided because they
can still damage the inverter or battery.
Alligator Clips
Ring
Terminals
USB
Outlet
Power
Outlets
Figure 1
Cable
Maintenance
Page 6
For technical questions, please call 1-800-444-3353.
Item 66817
Operating Instructions
Read the entire Important Safety Information section at the beginning of this
manual including all text under subheadings therein before set up or use of this product.
Safety
Tool Set Up
TO PREVENT SERIOUS INJURY FROM ACCIDENTAL OPERATION:
Make sure that all Power Switches/Triggers are in the off‑position and unplug the tool
from its electrical outlet before performing any procedure in this section.
2. To connect the Cable Ring Terminals to the
(Positive) red and (Negative) black Power
Terminals on the back of the Inverter:
a. Unthread the knobs covering the Power Terminals.
b. Slide the red Cable’s Ring Terminal over
the post of the red Power Terminal and
the black Cable’s Ring Terminal over the
post of the black Power Terminal.
c. Replace the knobs and tighten securely.
3. Apply the parking brake to the vehicle connected
to the battery. Place the transmission in “Park”
for an automatic transmission, or in “Neutral” for
a manual transmission. Start the car engine.
Note: If the green LED fails to light and the alarm
and red Fault LED lights up instead, check the
Troubleshooting Tips section near the end of this
manual to correct the issue before continuing.
6. To power each device or appliance:
a. With the device or appliance switched off,
plug it into one of the Power Outlets or
the USB Outlet on the Power Inverter.
b. Turn on the device and/or appliance.
7. After use, turn all connected devices or appliances
off, unplug them, then turn off the car engine if it is
running. Keep the inverter turned on and remove
the alligator clips from the battery posts, removing
the Negative (black) clip first, then the Positive (red)
clip. The Inverter green LED will turn off, and the
alarm and red LED light will turn on as the Inverter
powers down. Turn off the Inverter power button.
Maintenance
4. Attach the red Cable’s Alligator Clip to the
Positive (red) terminal on the battery, then
attach the black Cable’s Alligator Clip to a clean
unpainted metal part of the chassis. (Note: If
connecting to a battery not installed in a vehicle,
connect to the Negative (black) terminal.)
5. The red Fault LED will light up momentarily and
the alarm will sound as the Inverter draws power.
Then the alarm and red LED will turn off and the
green Power LED of the Inverter will light up.
Operation
1. Place the Power Inverter on a flat surface. Make
sure it has adequate ventilation and is not in direct
sunlight. Locate the Inverter close enough to the car
battery so that the Cables can easily reach between
the Inverter and the car battery. Position the Inverter
so that the Outlets are easily and safely accessible.
Make sure the Inverter is in the OFF position.
Setup
Operating Instructions
Item 66817
For technical questions, please call 1-800-444-3353.
Page 7
Operating Tips
The total wattage of all items plugged into
the Power Inverter must not use more than
750 watts during continuous operation,
otherwise the Inverter may overload.
Safety
If an alarm sound is heard, turn off the appliances
and check the Troubleshooting Tips section
to correct the issue before continuing.
Caution: Some rechargeable appliances may damage
the Power Inverter or the appliance. When first using a
rechargeable device, check the inverter’s temperature
for the first 10 minutes. If it becomes abnormally
hot, do not use this device with the Inverter.
Caution: It is recommended that the vehicle be
running when you first connect the Power Inverter.
Thereafter the engine can be on or off. If you run the
Power Inverter with the engine off it is recommended
that you start and run the engine every hour for at
least 10 minutes to recharge the battery. Doing this
will help prevent any unexpected shutdown of the
equipment. This will also help ensure that there will
be enough battery power to start the vehicle. Due to
the risk of carbon monoxide inhalation, do not run
the vehicle’s engine within an enclosed area.
You should not use your car battery to power
the Inverter for extended periods of time with
appliances requiring high continuous load
levels. The battery may become drained to the
point that it will not be able to start your car.
Note: Deep cycle (marine and RV) batteries can be
charged more times than a car battery, and are a better
choice for repeated use of the Power Inverter.
Setup
Do not discharge your car battery more than
10% of its total capacity, and deep cycle batteries
more than a 50% discharged state.
Typical Appliance Power Consumption
Running
Watts
Additional
Start-up
Watts
Stereo
200
0
Table Fan
200
200
TV-VCR
250
0
Small Refrigerator
350
700
Hand Drill - 1/2"
600
600
Light Bulb - 100 W
100
0
Microwave - 1000 W
1000
200
AC (5,000 BTU)
700
700
Product
Operation
Note:This chart is intended as a general guideline only, actual appliance wattage requirements will
vary. Some appliances listed above may require a pure sine wave inverter instead for proper operation.
Maintenance
Page 8
For technical questions, please call 1-800-444-3353.
Item 66817
Troubleshooting Tips
If the alarm sounds, this means that the input voltage is at or below 10.9 V. The
battery needs recharging. You should stop using the Power Inverter and recharge the
battery. If this is not done, the Inverter will shut off automatically at 10.5 V.
•
If you are unsure if the inverter will have the proper amount of current to run your
devices, add up the total of the continuous wattage for the items. If this figure is
under 750 then the Inverter will be able to run the items at the same time.
•
If your product, such as a television will not start, it is important to keep in mind that some
appliances (including many televisions) may require two to six times their wattage to start up.
•
If your audio system buzzes while using this inverter, it is because some sound systems can not filter out the
modified sine wave produced by the inverter. Use a sound system that incorporates a higher quality power supply.
•
This inverter is made to minimize the interference with TV signals. However, especially with weak TV
signals, some interference may still be visible. To correct this, place the inverter as far away as possible
from the television antenna and it’s cables. Next, adjust the orientation of the inverter to the antenna
cables and TV power cord to minimize the interference. Also use a shielded antenna cable.
•
If the low battery alarm is on all the time, try these corrective measures: Recharge battery if in
poor condition. Next, check the battery connection. You may need to clean the connectors.
•
If you are getting a low output voltage, try reducing the load to minimize watts. You may
have overloaded the inverter. Reduce the number of watts you are powering. Also,
keep input voltage above 11 volts to maintain a constant flow of power.
•
If you are not getting any power output, turn the power switch Off and On again, until the green power
light comes on. Your devices may draw too much power to operate them. The inverter may be in
thermal shutdown. Let it cool down and make sure there is adequate ventilation around the unit.
Maintenance
Operation
Setup
Safety
•
Item 66817
For technical questions, please call 1-800-444-3353.
Page 9
Maintenance and Servicing
Procedures not specifically explained in this manual must
be performed only by a qualified technician.
TO PREVENT SERIOUS INJURY FROM ACCIDENTAL OPERATION:
Make sure that all loads are disconnected from the Inverter, the Power Switch is in the off‑position and
the cables are disconnected from power source before performing any procedure in this section.
To prevent serious injury from tool failure:
Do not use damaged equipment. If abnormal noise or vibration
occurs, have the problem corrected before further use.
Cleaning, Maintenance, and Lubrication
1. BEFORE EACH USE, inspect the general
condition of the tool. Check for:
• damaged cord/electrical wiring,
3. Maintain batteries according to manufacturer’s
instructions. Check electrolyte level on all
batteries after charging and refill as needed.
Charge batteries according to manufacturer’s
recommendations only; incorrect charging
may cause battery damage or explosion.
• cracked or broken parts, and
4.
• loose hardware,
• misalignment or binding of moving parts,
• any other condition that may
affect its safe operation.
2. After Use, wipe external surfaces
of the tool with clean cloth.
Page 10
Do not open housing.
Contains no user-serviceable parts.
Internal parts may be electrified, even
with unit off and power disconnected.
5. Internal electronic components must be
disposed of properly or recycled.
For technical questions, please call 1-800-444-3353.
Item 66817
Harbor Freight Tools Co. makes every effort to assure that its products meet high quality and durability standards,
and warrants to the original purchaser that this product is free from defects in materials and workmanship for the
period of 90 days from the date of purchase. This warranty does not apply to damage due directly or indirectly,
to misuse, abuse, negligence or accidents, repairs or alterations outside our facilities, criminal activity, improper
installation, normal wear and tear, or to lack of maintenance. We shall in no event be liable for death, injuries
to persons or property, or for incidental, contingent, special or consequential damages arising from the use of
our product. Some states do not allow the exclusion or limitation of incidental or consequential damages, so the
above limitation of exclusion may not apply to you. This warranty is expressly in lieu of all other
warranties, express or implied, including the warranties of merchantability and fitness.
Safety
Limited 90 Day Warranty
To take advantage of this warranty, the product or part must be returned to us with transportation charges
prepaid. Proof of purchase date and an explanation of the complaint must accompany the merchandise.
If our inspection verifies the defect, we will either repair or replace the product at our election or we may
elect to refund the purchase price if we cannot readily and quickly provide you with a replacement. We will
return repaired products at our expense, but if we determine there is no defect, or that the defect resulted
from causes not within the scope of our warranty, then you must bear the cost of returning the product.
Maintenance
Operation
Setup
This warranty gives you specific legal rights and you may also have other rights which vary from state to state.
Item 66817
For technical questions, please call 1-800-444-3353.
Page 11
3491 Mission Oaks Blvd. • PO Box 6009 • Camarillo, CA 93011 • (800) 444-3353