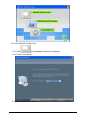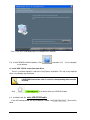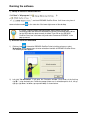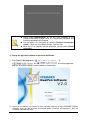
1
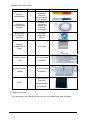
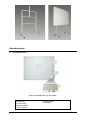
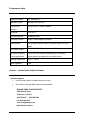
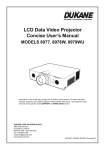
DUKANE AV
USER GUIDE
MODEL
LB77HA
INTERACTIVE WHITE BOARD
Information in this Guide may change due to product improvements. To obtain the latest manuals,
literature, and software please visit the Dukane web site at; www.dukcorp.com/av
and look at the
specific model SUPPORT or DOWNLOADS section.
DUKANE CORP AV SERVICE DEPT
2900 Dukane Drive
St Charles, IL 60174
800-676-2487 / 630-762-4032
Fax 630-584-5156
[email protected]
www.dukcorp.com/av
Doc LB77HA 9-16-09 Rev 00
1
Legends
Instruction: additional information about the software
Note: the issues which may occur during your using the board and how to
resolve or avoid them.
Warning: Harm may occur in the course of using, or damage to the product
may occur due to the improper use of the product.
To avoid electric shock, please do not install the interactive whiteboard in very
humid locations!
After the interactive whiteboard is installed, do not touch the pins of its power cable
or data cable!
Keep the interactive whiteboard away from fire, smoke, and direct sunlight!
After the interactive whiteboard is installed, make sure the whiteboard is firmly
secured!
When the interactive whiteboard is used together with a projector, do not look directly
into the light coming from the projector.
Important note
Only the erasable interactive whiteboards can be written on with color pens
(including normal whiteboard markers of the nonpermanent type). For other types of
boards use only the electronic pens.
For Dual-pen operation, use both pens simultaneously.
Please make sure the whiteboard is correctly connected to the computer. It is
preferable that the connection and power cables be hidden so the wiring can not be
damaged.
General note
• Do not scratch the surface or frame of the board with sharp or hard objects.
• The environment around the board must contain no intense magnetic fields. If a
nearby wall is made of metal and has magnetic properties, there should be a 10 ft.
distance between the whiteboard and wall.
When writing on the board with the electronic pen, please keep the pen vertical to
the board and write lightly.
2
Contents
DUKANE AV ........................................................................................................................................1
St Charles, IL 60174 ..............................................................................................................................1
Legends ..................................................................................................................................................2
Contents..................................................................................................................................................3
Introduction ............................................................................................................................................4
Brief Introduction ........................................................................................................................4
Features........................................................................................................................................4
Syetem Diagram ..........................................................................................................................4
System Requirements ..................................................................................................................5
Unpacking Interactive whiteboard..........................................................................................................5
1、The interactive whiteboard components:...............................................................................5
2、Standard Accessories .............................................................................................................5
3、Optional Accessories .............................................................................................................6
Board description ...................................................................................................................................7
Installation ..............................................................................................................................................8
1、Install Interactive whiteboard ................................................................................................8
2、Connect Interactive whiteboard CABLE...............................................................................9
3、Install Battery in Electronic Pen ..........................................................................................10
4、Express Installation of IPBOARD DualPen Software.........................................................10
5、Step-by-step Installation of IPBOARD DualPen Software .................................................13
6、Install USB-RS232 connection cable Driver ....................................................................15
Running the software............................................................................................................................17
1、Startup of interactive whiteboard driver ..............................................................................17
2、Orient the interactive whiteboard ........................................................................................17
3、Startup the application software of interactive whiteboard .................................................18
4、Create an individual account and password.........................................................................19
5、Dual Pens Function Setup....................................................................................................20
Function Keys.......................................................................................................................................22
Trouble Shooting ..................................................................................................................................23
Performance index................................................................................................................................25
Service ..................................................................................................................................................25
3
Introduction
Brief Introduction
Thank you for purchasing the Dukane interactive whiteboard. Please think of the board as a wall
sized mouse pad with special software.
As part of a new generation of digital educational devices, the interactive whiteboard is a
combination of electronic and software technology.
The Interactive Whiteboard is a computer -based input device, which, when connected with a
projector and computer, can perform functions such as writing, notation, drawing graphics, editing,
printing and storing images. The Interactive whiteboard is becoming a major component for
teaching, meetings, distance learning, and information exchange.
Features
It can create an interactive environment for teaching and demonstrations when connected to a
computer and projector while using the proper software.
The electronic pen can operate your computer instead of a mouse.
Using the electronic pen, you can write, mark, erase, copy, clone, replay, and save files.
The software provides functions such as magnifying, editing, searchlight focus, replaying,
calligraphy effect, camera, screen reveal, and other customized templates.
It also features a high tracking accuracy, quick response and sensitive operation. The
advanced processing algorithm adopted in this device results much better response speed and
the operation sensitivity compared to pressure sensitive and infrared-ultrasonic whiteboard
It also provides a rugged, good light reflection surface that permits continual viewing. This longlife board can endure over 10 million pen strokes at the same location.
It has a high precision pen locating system with resolution up to 4096×4096 pixels. You can
easily write words, and draw fine line or images.
It uses an independent Internet Protocol to provide freedom with many formats.
System Diagram
4
System Requirements
Hardware
Configuration
Software
configuration
Minimal configuration
CPU: 1GHz
RAM: 256 MB
Windows2000, XP、Vista
Suggested Configuration
CPU:1.7 GHz or more
RAM :512 MB or more
Windows2000, XP、Vista
Microsoft Internet Explorer 6.0.0
Microsoft Internet Explorer 6.0.0
Unpacking Interactive whiteboard
1、The interactive whiteboard components:
A set of Interactive whiteboard contains the following components:
Interactive whiteboard
(Color of the product will vary with board model)
2、Standard Accessories
5
Standard Accessories include:
Description
Quantity
electronic
whiteboard pen
2
Purpose
The pen specially
designed for
interactive
whiteboard, with
1.5 V batteries.
USB-RS232
connecting cable
10 meters
1
The cables for
connecting
computer and
interactive
whiteboard
IPBoard DualPen Software,
Install Disc
1
drive and
application
software
picture
DUKANE AV
Interactive
whiteboard User
Guide
Installation Hanger
(Top)
Installation Hanger
(bottom)
1
1
2
User Guide
For wall mounted
installation
For wall mounted
installation
For positioning the
Gasket
2
interactive
whiteboard while
wall mounted.
3、Optional Accessories
If the interactive is not installed on a wall, you may use a mobile floor stand. As follows:
6
Board description
Whiteboard items:
(Color of the product will vary with model)
Ⅰ:Writing Area
Ⅱ:Function keys
Ⅲ:Interface Board
Ⅳ:Pen Container
1. Power Socket
2. Serial port
7
Installation
1、
、Install Interactive whiteboard
Wall Hanging mount
1) Select the desired wall surface and attach the hangers on the wall surface at the proper
locations for the interactive whiteboard. Note that the following patterns are in mm (1 inch =
25.4 mm).
2) Attach the hangers to the wall according to the following diagrams:
(85-inch Board layout for installation)
(77-inch Board layout for installation)
8
Note: Stick gasket material to the back of the interactive whiteboard, see the figure below.
3) Attach the interactive whiteboard to the fixed wall hangers.
2、
、Connect Interactive whiteboard CABLE
Connect the cable to the board and run the cable to the PC. Do not connect to the PC till the
software is installed. The USB cable will supply the DC Power for the board.
9
1)
2)
Connect cable to the interactive whiteboard. Install cable run.
Do not connect interactive whiteboard cable to the PC yet.
The Interactive whiteboard and PC should have their power off when making all
connections!!! Except the USB connection after the drivers and software has
been installed.
3、
、Install Battery of Electronic Pen
Turn the rear cap of the electronic pen counter-clockwise to open it, load one 1.5V battery
according to the following figure, then tighten the rear cap clockwise.
4、
、Express Installation of IPBOARD DualPen Software
This installation option is recommended for first time installation of the software.
4.1) Insert; IPBOARD DualPen Software CD disc;
4.2) Click on program logo:
4.3) Proceed to Installation Guide window.
10
4.4) Click
to install IPBOARD DualPen Driver and IPBOARD
DualPen Software for Interactive whiteboard;
4.5) Choose the language for the installation.
4.6) Select the path for installation.
11
4.7)
After the software installation is completed the system will install the USB driver.
4.8)
If the USB cable provided with the interactive whiteboard is white, click “Yes” to
complete the installation of the USB driver. If the USB cable is black, click “No” and
proceed to
>
->
to install the driver.
-
4.8) After the driver installation is completed connect the USB cable to the PC to complete the
hookup.
4.9) Complete installation.
12
5、
、Step-by-step Installation of IPBOARD DualPen Software
This installation option is recommended when upgrading IPBOARD DualPen software or replacing
the USB cable.
5.1) Follow 4.1) - 4.3) to enter installation guide window.
5.2) Click
to install IPBOARD DualPen Driver, IPBOARD DualPen
software and USB cable by following the step-by-step guide.
13
5.3) Install IPBOARD DualPen Driver
to install driver for Interactive Whiteboard;
5.3.1) Click
5.3.2) Choose the language .
5.3.3) Select the path for installation.
14
5.3.4) Click NEXT and follow process to complete the installation.
5.4) Install IPBOARD DualPen Software, Click
the installation.
and follow 4.5) - 4.8) to complete
6、
、Install USB-
-RS232 connection cable Driver
There is no need to repeat this step when using Express Installation. This step is only required
when using Step-by-step Installation.
If USB-RS232 connection cable is used, the corresponding driver must be
installed.
Click
to install the driver for USB-RS232 cable.
6.1) Installation with the white USB-RS232 cable
If the USB cable provided with the whiteboard is white, click
driver.
15
to install the
After installing correctly “My Computer” ->“Properties” -> “Hardware” -> “Device
Manager” -> “Port” are shown as the device “USB Serial Port”
After installation of USB-RS232 cable is completed, plug-in the USB cable,
and to check the COM number of the USB Serial Port in “My Computer” >“Properties” -> “Hardware” -> “Device Manager” -> “Port” and to make
sure that the COM number is less then 10 and the baud rate is 19200.
6.2) Installation with the black USB-RS232 cable
If the cable provided with the interactive whiteboard black, click
the driver.
to install
Click
and begin to install USB-RS232 cable until complete installation
After installing correctly in “My Computer” -> “Properties” -> “Hardware” -> “Device
Manager” -> “Port” can see the device “CP210X USB to UART Bridge Controller”
After installation of USB-RS232 cable is completed, plug-in the USB cable,
and to check the COM number of the CP210X USB to UART Bridge
Controller
in “My Computer” -> “Properties” -> “Hardware” -> “Device Manager” ->
“Port” and to make sure that the COM number is less then 10 and the
baud rate is 19200.
16
Running the software
1、
、Startup of interactive whiteboard driver
Click"Start"->"All programs"->"
>"
->"
"-
", and start IPBOARD DualPen Driver. It will show a tray icon of
communication module
, in the status bar if the lower-right corner of the desktop.
If it shows "Communication with board failed", please make sure that the
connecting cable and Interactive whiteboard is correctly connected and the driver
for the USB cable has been correctly installed. Then click on the IPBOARD
DualPen Driver icon in the lower tray and select “Reconnect IPBOARD” in the
pop-up manual.
2、
、Orient the interactive whiteboard
1)
of interactive IPBOARD DualPen Driver by left key of mouse, select
Click tray icon
"Orientation" on the popup menu to enter orientation interface of IPBOARD DualPen Driver.
The following window appears..
2)
Left click "Re-orientation", it will open the Orientation window. Click center of the flashing
sign"十
十 " using electronic pen. Follow the prompt (there are six orientation points in all, left up,
right up, right down, left down, top up and middle) as shown below:
17
Please select "Re-orientation" for the first time installation of the
interactive IPBOARD DualPen Driver, or if the position of projector and
interactive whiteboard has changed.
You can obtain a fast orientation by selecting "Previous re-orientation
record", if there are no hardware changes since last time.
When there is no need for accurate orientation, you can select "default
orientation".
3、
、Startup the application software of interactive whiteboard
1) Click "Start"->"All programs"->"
"-
>
"->"
", and startup application
program, will provide a popup a Logon window as shown below;
2) Users can use default user account or their individual accounts to log-in IPBOARD DualPen
Software. Users are able to create customized toolbar, resources and templates if they are
using their individual accounts.
18
Ensure the connection between interactive whiteboard and PC is good and driver
of interactive whiteboard is running before starting up application software. If not,
the application program will not startup normally.
4、
、Create an individual account and password
1) Click "Start" ->"All Programs" ->"
"->"
"
"->
" and will pop-up the following window:
Key-in the administrator account to operate the software.
Default administrator account is: Administrator,
,Password: julong.
2) Enter the User Manager window
2)
Select "Edit"->"New User" to create an individual account.
3) Key-in the user name and password and select Create.
19
5) The new user will be displayed in the window after the process is completed:
N ew user
5、
、Dual Pens Function Setup
Click "Options”
, and the page below appears. Start the dual pen function.
20
21
Function Keys
Function
keys
Definition
Control Mode
Window Mode
Annotation Mode
Orientation
Orientation
Orientation
Orientation
Control
Mode
No Effect
Switch
mode
Annotation
Mode
Switch to annotation mode
Switch to
annotation mode
No Effect
Window
Mode
No Effect
Head Page
Head Page
Create
a
blank page
Create a blank page
Create
page
Page Up
No Effect
Page Up
Page Up
Page Down
No Effect
Page Down
Page Down
Normal Pen
Switch to annotation mode
and use Normal Pen
Normal Pen
Normal Pen
Transparent
Pen
Switch to annotation mode
and use Transparent Pen
Transparent Pen
Transparent Pen
Eraser
Eraser
Eraser
Eraser
Replay
Replay Pages
Replay Pages
Replay Pages
Print
Print
Print
Print
22
to
a
control
blank
Switch
mode
to
control
Create a blank page
Trouble Shooting
1.
If startup shows “Failed to verify the whiteboard, the program can't run further!”
please check whether there is a good connection between whiteboard and PC.””
Please check if using the special-purpose cable of whiteboard, and if there is a good
connection for cable.
When connection is made through the USB2.0 to RS232C cable, check whether it is
correctly connected with special-purpose adapter.
Check whether the whiteboard has power. (Normally the red indicator lamp is ON)
Check whether serial ports from COM1 to COM10 are selected. You must select one
serial port from COM1 to COM10 for whiteboard.
Check if the driver of whiteboard has been setup correctly.
2.
When startup software shows “Error happen when Loading XML File”.
Check the version of Internet Explorer, upgrade IE to version 6.0 if it is 5.0 or lower.
3.
When only part of whiteboard can be written on.
Check if the orientation of the whiteboard is correct.
4.
Some orientation points can not found when attempting to oriente the whiteboard.
Check if the lateral deviation and vertical offset of projector are correct. Ensure the complete
image on PC monitor is being projected on the whiteboard.
5.
Electronic pen cannot write normally.
Check current working mode of the software. Writing is effective only under the “Draw
Mode” or “Annotation Mode”, and not when in the “Control Mode”.
Do not press button on the electronic pen when writing.
Please keep the neb of electronic pen vertical to the whiteboard.
Do not press the electronic pen tightly.
Check if the pen battery has power, if not, replace it with a new one.
How to exit from the Dual Pen software ?
6.
Click icon button of "Pop Menu" on Floating Tool Bar, click "Exit" in the pop up menu.
Or click “File”(on main menu), then “Exit”.
7.
Why the projected image is trapezoidal in shape. How to adjust it?
It may be that projector is not level (like, the front is higher than the back). The image
will be distorted when trapezoidal, so you must adjust it.
Generally, it can be adjusted by using the keystone correction of the projector. For
details, please refer to user's manual of the projector.
Trapezoidal
8.
Rectangle
What type of projector is needed to match with the interactive whiteboard?
The projector should have the following properties.
1) Front image projector
2) Support the resolution of PC. Ex; XGA resolution for both the PC and projector.
23
3)
9.
Have at least 800 lumens of light output.
How to operate when the serial ports are occupied.
Both table top and notebook PCs allow the addition of a new serial port. There are 2 options;
Install a serial port card on the PC (note: generally, PCMCIA serial port card for a
notebook PC)
Using "USB2.0 to RS232C+ special designed cable ” to connect whiteboard and the PC.
10. Can 25-pin serial port replace 9-pin serial port?
Yes, but only if you have installed an adapter for 25 to 9 pins on the PC.
11. When having used an un-erasable (permanent) color pen to write on the whiteboard
Never use permanent color pens on the board! Once you have done it, clean it lightly using
absorbent cotton dipped with alcohol. Try writing over the permanent pen markings with a dry
erase marker. Then wipe the markings. The dry erase marker generally causes the permanent
ink to come loose.
12. How to clean the surface of the whiteboard?
Clean the surface lightly using a piece of damp cloth.
Attention: Please be sure to wring out the damp cloth, there must not be loose water on the
board. You must prevent water from entering the frame edges.
24
Performance index
Hardware Platform
PC, notebook PC
Operation System
Windows 2000/XP/Vista
Transmission
RS-232C/USB / Wireless Module
Interface
Resolution
8192×8192
Data-signaling rate
19200Baud Rate
Operating Principle
Wireless electromagnetic induction
Operate Mode
Control Mode/ Window Mode / Annotation Mode./Full-screen
USB Power Supply
Mode
DC 5V 100mA Or Powered by external 5V adapter
Service life of battery
Service life varies for different battery types. A common
in the electronic pen
alkaline battery can operate for over three months.
Working Temperature
-20℃ ~ +55℃
Power capability
< 2W
Service ; contact local dealer or Dukane
Technical Support
Please contact Dukane to obtain warranty services
All customers shall provide the purchasing information.
DUKANE CORP AV SERVICE DEPT
2900 Dukane Drive
St Charles, IL 60174
800-676-2487 / 630-762-4032
Fax 630-584-5156
[email protected]
www.dukcorp.com/av
25