1
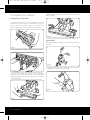
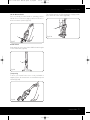
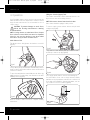
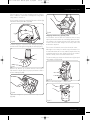
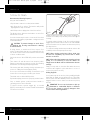
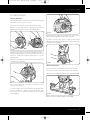
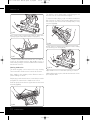
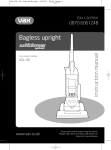
Vax V-120 User Guide.qxd
9/10/07
12:43
Page 1
Vax careline
0870 6061248
Vax model number:
V-120
www.vax.co.uk
instruction manual
Hard floor cleaner
Please read carefully before using this cleaner.
Always fully extend the mains cable before use.
Retain for future reference.
Vax V-120 User Guide.qxd
9/10/07
12:43
Page 2
www.vax.co.uk
1. Diagram
V-120
1
2
3
HAR D FLO O R
CLEANIN G
SOL UTION
20
16
4
4
5
17
6
7
9
8
18
10
18
15
11
12
13
Fig.1/1
1
2
3
4
5
6
7
Soft hand grip
On/off switch
Solution trigger
Mode selector
Clean solution tank cap
Clean solution tank
Clean solution tank release
2 parts overview
19
14
8
9
10
11
12
13
14
Recovery tank release
Recovery tank lid and filter
Recovery tank
Nozzle release buttons
Nozzle
Squeegee
Bumper
15
16
17
18
19
20
Soft-tread wheels
Carry handle
Upper handle release buttons
Cord hooks
Handle release pedal
Hard floor cleaning solution
Vax V-120 User Guide.qxd
9/10/07
12:43
Page 3
Vax Careline 0870 606 1248
2. Safety Information
FOR HOUSEHOLD USE ONLY.
19. Using improper voltage may result in damage to the
motor and possible injury to the user. The correct
voltage is listed on the rating label.
When using the hard floor cleaner, basic safety precautions
should always be observed, including the following:
20. To prevent dirty water from running into motor, do
not hold the appliance upside-down or lay on its side.
Use appliance in normal cleaning position.
1.
Do not leave the hard floor cleaner unattended for
long periods of time when charging.
21. Do not carry appliance while motor is running.
2.
Do not use outdoors.
3.
Not to be used as a toy. Children should be supervised to
ensure that they do not play with the appliance.
NOTE: The unit must be unplugged from the mains
socket outlet after use, and before cleaning or
maintaining the unit.
4.
This appliance is not intended for use by persons
(including children) with reduced physical, sensory or
mental capabilities, or lack of experience and
knowledge, unless they have been given supervision or
instruction concerning the use of the appliance by a
person responsible for their safety.
5.
Use only as described in this manual.
6.
Do not use with a damaged cord or charger. If the
supply cord and/or charger is damaged, they must be
replaced by the manufacturer, a Vax Service Agent or
similarly qualified persons in order to avoid hazard.
7.
Do not pull or carry the unit by the cord, use the cord
as a handle, allow the cord to come into contact with
hot or sharp surfaces or close a door on the cord.
8.
Do not unplug by pulling on the cord.
9.
Do not handle the plug or hard floor cleaner with wet
hands.
!
IMPORTANT: This unit is not intended for
commercial use.
PLEASE KEEP THESE INSTRUCTIONS
FOR FURTHER USE.
10. Do not put any objects into openings or operate with
openings blocked, keep them free of anything that
may reduce airflow.
11. Keep hair, loose clothing, fingers and all parts of the
body away from openings and moving parts.
12. Do not use the hard floor cleaner on any glowing,
burning or smoking particles.
13. Do not use without the clean and dirty water tanks
in place.
14. Do not use the hard floor cleaner without the filter in
place.
15. Do not use to pick up flammable or combustible
liquids such as petrol, or use in areas where they may
be present.
16. Keep the unit on the floor.
17. Do not attempt to remove blockages with sharp
objects as they may cause damage.
18. Store indoors put away after use to prevent tripping
accidents.
safety information
3
Vax V-120 User Guide.qxd
9/10/07
12:43
Page 4
www.vax.co.uk
3. Preparing the Cleaner
While holding nozzle in place, slide latches inward to lock in
place (Fig.3/4).
Installing Brushed and Nozzle
To install brushes, place handle in upright position. Tilt
cleaner back so that it rests on the floor. Align post (A) on
brush block with hole (B) on bottom of cleaner. Turn
brushes slightly until post fits easily into hole (Fig.3/1).
B
Fig.3/4
A
Unfold Handle
Raise upper handle to upright position until it locks in place
(Fig.3/5).
Fig.3/1
Press brush assembly firmly to snap into place (Fig.3/2).
Fig.3/5
To lower handle, press upper handle release button and
fold handle to storage position (Fig.3/6).
Fig.3/2
To install nozzle, make sure latches (A) are out. Align
middle section of nozzle with opening on cleaner. Remove
cardboard packing insert from squeegee area on underside
of nozzle (Fig.3/3).
A
Fig.3/6
A
Fig.3/3
4 preparation
Vax V-120 User Guide.qxd
9/10/07
12:43
Page 5
Vax Careline 0870 606 1248
Handle Release Pedal
Step on pedal (A) to lower handle to operating position.
Handle does not lock into a single position, but “floats” to
allow convenient operation (Fig.3/7).
The cleaner may also be lifted using the carrying handle
(A) on the front of the cleaner (Fig.3/10).
A
Fig.3/10
A
Fig.3/7
On/Off Switch
Push switch (A) once to turn cleaner ON. Push switch again
to turn cleaner OFF (Fig.3/8).
A
Fig.3/8
Transporting
To move your cleaner from room to room, put handle in
upright position, tilt cleaner back on rear wheels and push
forward (Fig.3/9).
Fig.3/9
preparation
5
Vax V-120 User Guide.qxd
9/10/07
12:43
Page 6
www.vax.co.uk
4. Operation
Your FloorMate cleaner can be used to both vacuum dry
debris and wet clean non-carpeted floor surfaces such as
vinyl, tile and sealed wood. It is not intended for use on
carpet or rugs.
CAUTION: To prevent damage to wood floors,
follow the flooring manufacturer’s cleaning
recommendations.
!
Filling the Solution (Upper) Tank
The solution tank holds solution and water that is to be
dispersed onto the surface being cleaned.
NOTE: Disconnect cleaner from electrical outlet.
Place cleaner handle in upright, locked position.
To remove tank, squeeze release button and pull tank
straight out (Fig.4/3).
NOTE: If using cleaner on sealed wood floors, inspect
floor surface for worn finish, bare wood or separated
joints. Do not use the cleaner to wet clean sealed
wood floors if any of these conditions exist.
Mode Selector Dial
The Mode selector dial (A) turns the brushes on and off
(Fig.4/1).
Fig.4/3
Carry tank to a sink. Rotate tank cap counter-clockwise
and lift up to remove cap (A) (Fig.4/4).
A
A
Fig.4/1
For dry debris pickup, turn the dial to the DRY VAC position.
In this position, the brushes will not rotate and are raised
off the floor surface.
To wet clean with brushes turned ON, turn the dial to the
WASH position. For wet pickup, turn the dial to the WET
PICKUP position (Fig.4/2).
Fig.4/4
Turn cap (A) upside down to serve as a measuring cup.
For hard surface floors such as vinyl, linoleum, marble,
laminate wood, polyurethane sealed wood or other wood
floors that can normally be cleaned using water, use one
cup of Vax Floor to Floor solution (Fig.4/5).
A
Fig.4/2
Refer to “How to clean” section for complete cleaning
instructions.
Fig.4/5
6 operation
Vax V-120 User Guide.qxd
9/10/07
12:43
Page 7
Vax Careline 0870 606 1248
Check for worn spots or joint separations before using, as
these conditions could lead to damaged flooring when
using water to clean floor.
Pour cleaning solution into tank (A). Fill tank to fill line (B)
with warm water (Max 40°C) (Fig.4/6).
A
Fig.4/9
B
Emptying the Recovery (Lower) Tank
Fig.4/6
If rubber ring (A) on cap has become dislodged, reposition
it with uneven side against ledge (B) as shown (Fig.4/7).
An automatic suction shut-off is built into the recovery
tank to prevent the tank from overflowing. When the shutoff activates, the cleaner will not pick up debris and the
sound of the motor will change. The recovery tank is full
and must be emptied.
Turn cleaner off and disconnect from electrical outlet.
A
Although not necessary for satisfactory performance, it is
recommended that the recovery tank be emptied after dry
vacuuming and before wet operation. Check the solution
tank also. It may need to be refilled at this time.
B
To remove tank, press down on release button (A) and pull
tank straight out (Fig.4/10).
Fig.4/7
Replace cap. Rotate cap clockwise until it locks in place.
Cap must be locked in place for proper performance and to
prevent leaking (Fig.4/8).
A
Fig.4/10
Remove tank lid (A) (Fig.4/11). Empty tank.
A
Fig.4/8
Slide tank straight into position until latch snaps in place
(Fig.4/9).
Fig.4/11
operation
7
Vax V-120 User Guide.qxd
9/10/07
12:43
Page 8
www.vax.co.uk
5. How to Clean
A
Recommended Cleaning Sequence
Use your Vax FloorMate to:
• Dry Vacuum to remove loose dirt, hair and debris.
• Wet Clean the floor surface. The brushes will provide
light agitation to help loosen dirt.
• Wet Pickup reduces drying time of the floor surface.
The Mode selector dial turns the brushes on and off as
described in section 4.
Your Vax cleaner may be used to clean wood floors that
have been sealed with a polyurethane coating and can be
cleaned with water.
CAUTION: To prevent damage to wood floors,
follow the flooring manufacturer’s cleaning
recommendations.
!
If using cleaner on sealed wood floors, inspect floor
surface for worn finish, bare wood or separated joints. Do
not use the cleaner to wet clean sealed wood floors if any
of these conditions exist.
Set Mode selector dial to DRY VAC position and vacuum
floor.
Turn cleaner off and disconnect from electrical outlet.
Empty recovery tank (see previous section). See “Cleaning
the brushes” for removing and replacing brushes.
Fig.5/1
Overlap strokes by one inch to help prevent streaking. The
cleaner’s suction will pick up the dirty solution throughout
cleaning.
To greatly enhance drying of the floor surface, release
trigger and turn Mode selector dial to the WET PICKUP
position. Continue to move cleaner over the area to pick up
the dirty solution.
To continue cleaning another area, turn Mode selector dial
to WASH position and repeat previous steps.
NOTE: When cleaning sealed wood floors, make sure
all areas are completely dry. Ensure that no water
remains on the floor.
NOTE: When switching between wet cleaning and wet
pickup, it is not necessary to turn the cleaner off.
Simply move the Mode selector dial between the two
settings.
Fill solution tank with cleaning solution and water (see
section 4 - “Filling the Solution (Upper) Tank”).
Empty recovery tank or clean the filter when the motor
sound becomes higher in pitch and there is a loss of
suction (see previous section).
Do not use solvent based cleaning concentrates in your
cleaner. Do not use any type of wax in your cleaner.
Picking Up Spills
Turn Mode selector dial to WASH position.
Dry hands and plug cleaner into a properly earthed outlet.
Step on handle release pedal and lower handle to
operating position. Turn cleaner ON.
To release solution, squeeze trigger (A) as needed
(Fig.5/1) and slowly move cleaner forward and backward
over area to be cleaned.
8 how to clean
Your cleaner may also be used to pick up small liquid spills
(max 5mm in depth) on non-carpeted floors. Turn Mode
selector dial to the WET PICKUP position and release the
trigger. Continue to move cleaner over the area to pick up
the spill.
IMPORTANT: Do not use the cleaner to pick up
flammable or combustible liquids or chemicals.
Do not use the cleaner to pick up detergents that
contain solvent based ingredients.
!
Vax V-120 User Guide.qxd
9/10/07
12:43
Page 9
Vax Careline 0870 606 1248
6. Maintenance
Cleaning the Filters
The tank lid contains a washable, reusable filter. Clean this
filter when suction is low or reduced.
A
Turn cleaner off and disconnect from electrical outlet.
Remove recovery tank and lid as described in Section 4.
Remove filter lid (A), then remove filter (B) (Fig.6/1).
Fig.6/3
B
Reposition pleated filter in lid. Replace lid onto recovery
tank, pressing down firmly until snapped in place.
To replace recovery tank, place bottom of tank behind
ledge (A) and push tank straight into cleaner body until it
is locked in place (Fig.6/4).
Fig.6/1
A
Remove loose debris from filter by tapping the filter or
gently brushing using your hand. The filter may also be
rinsed for additional cleaning. Allow filter to air dry
between uses.
Reposition filter. Replace filter lid. Press down firmly until
snapped in place (Fig.6/2).
A
Fig.6/4
Cleaning the Nozzle
Turn cleaner OFF and disconnect from electrical outlet.
The cleaner’s nozzle can be removed for easy cleaning.
Slide the two nozzle release latches (A) outward (Fig.6/5).
Fig.6/2
Dry or loose debris will also collect on the filter screen
located in the tank lid.
To remove debris from screen, remove the pleated filter
from the lid. Remove debris from screen (A). The filter
screen may also be cleaned by rinsing it under running
water (Fig.6/3).
A
A
Fig.6/5
Remove nozzle by pulling straight out (Fig.6/6).
maintenance
9
Vax V-120 User Guide.qxd
9/10/07
12:43
Page 10
www.vax.co.uk
The brushes can be washed with a mild detergent and
rinsed. Do not use a solvent based detergent.
To replace brushes, align post (A) on brush block with hole
(B) on bottom of cleaner. Turn brushes slightly until post
fits easily into hole. Press brush assembly firmly to snap
into place (Fig.6/9).
B
Fig.6/6
Rinse nozzle under running water. Remove debris from
squeegee (A) and wipe with a damp cloth (Fig.6/7).
A
Fig.6/9
Return cleaner to upright position. Replace nozzle, making
sure latches (E) are out (Fig.6/10).
A
A
Fig.6/7
To replace nozzle, make sure latches are out. With the
cleaner in the upright position, align middle section of
nozzle with opening on cleaner and slide latches inward as
described in Section 3.
Cleaning the Brushes
Fig.6/10
The brush assembly can be removed for easy cleaning.
Turn cleaner OFF and disconnect from electrical outlet.
Place handle in the upright position. Remove tanks to
prevent leaking. Set aside.
Pull the two nozzle release buttons out and remove nozzle
as Fig.6/3. Tilt cleaner back so handle rests on floor.
Push two brush release buttons (A) and remove the brush
assembly (Fig.6/8).
A
Fig.6/8
10 maintenance
A
Align middle section of nozzle with opening on cleaner.
While holding nozzle in place, slide latches inward to lock in
place. Replace tanks.
Vax V-120 User Guide.qxd
9/10/07
12:43
Page 11
Vax Careline 0870 606 1248
7. Troubleshooting
PROBLEM: Cleaner does not pick up dirty solution.
WARNING: To reduce the risk of personal injury,
! unplug the vacuum cleaner before performing
maintenance or troubleshooting checks.
Solution: Set mode selector switch to PICKUP.
PROBLEM: Cleaner won't run
Solution: Ensure that the dirty water tank is correctly
installed.
Cause:
No electricity in the electrical outlet.
Cause:
Cause:
Cleaner not set to PICKUP.
Dirty water tank not properly installed.
Solution: Check fuse or breaker.
Cause:
Cause:
Solution: Remove and empty the dirty water tank.
Blown fuse/tripped breaker.
Dirty water tank full / Automatic shut-off
engaged.
Solution: Reset circuit breaker or replace fuse.
Cause:
PROBLEM: Cleaner won’t pick up/loss of suction.
Solution: Ensure dirty water tank filter and filter lid are
positioned in the dirty water tank lid.
Cause:
Automatic shut-off activated.
Filter or filter lid missing or not positioned
correctly.
Solution: Turn cleaner off and then on again or empty
the dirty water tank (See page 6).
PROBLEM: Cleaner solution won’t dispense.
Cause:
Cause:
Filter or filter lid missing or not positioned
correctly.
Solution: Ensure dirty water tank filter and filter lid are
positioned in the dirty water tank lid.
Cause:
Cause:
Cause:
Dirty water tank or clean water tank not
positioned correctly.
Solution: Ensure both tanks are locked in place.
Cause:
Filter is dirty.
Clean water tank not firmly in place.
Solution: Ensure tank is securely locked in position.
Clean water tank empty.
Solution: Refill clean water tank.
Handle not assembled correctly.
Solution: Refer to page 4.
PROBLEM: Brushes won’t rotate.
Solution: Clean filter.
Cause:
Cause:
Solution: Move mode selector switch to SCRUB position.
Nozzle not properly positioned.
Mode selector switch set to PICKUP.
Solution: Ensure nozzle is replaced properly and locked.
PROBLEM: Water puddling behind cleaner.
Cause:
Excess cleaning solution foaming in tanks.
Solution: Use only Vax Floor Cleaner.
Cause:
Clean water tank not correctly installed.
Solution: Ensure tank is installed correctly.
Cause:
Dirty water tank is full.
Solution: Empty tank.
troubleshooting
11
Vax V-120 User Guide.qxd
9/10/07
12:43
Page 12
www.vax.co.uk
8. UK Service & Help
9. Technical Specification
Vax Care 0870 6061248
Voltage:
Capacity:
Monday-Friday 9.00am to 5.00pm.
An answerphone is available outside of these hours. Any
queries or concerns about using the Vax, call the Vax
Careline. Calls are charged at the UK national rate.
Please make a note of the serial number and model
number of the carpet cleaner before calling. There are
over 400 approved Vax Service Agents in the UK. For the
nearest Service Agent, please call the Vax Careline.
www.vax.co.uk
12 uk service & help / technical specification
Filters:
Weight:
220 -240V~50Hz
Solution tank: 1.1 litres
Recovery tank: 1.6 litres
Filter screen - washable
Main filter - washable
7.3kg
Subject to technical change without notice.
Vax V-120 User Guide.qxd
9/10/07
12:43
Page 13
Vax Careline 0870 606 1248
This page has been left intentionally blank
13
Vax V-120 User Guide.qxd
9/10/07
12:43
Page 14
www.vax.co.uk
This page has been left intentionally blank
14
Vax V-120 User Guide.qxd
9/10/07
12:43
Page 15
Vax Careline 0870 606 1248
This page has been left intentionally blank
15
Vax V-120 User Guide.qxd
9/10/07
12:43
Page 16
---
EEC STATEMENT OF COMPLIANCE
Manufacturer/EEC importer: Vax Limited, hereby on our own responsibility, declare that
the V-120 Floormate is manufactured in compliance with the following Directives:
Safety: 2006/95/EC Low Voltage Directive
EMC: 2004/108/EC Electromagnetic Compatibility Directive
Waste electrical products should not be disposed of with household waste. Please recycle where
facilities exist. Check with your Local Authority or retailer for recycling advice.
Vax Ltd., Kingswood Road, Hampton Lovett, Droitwich, Worcestershire, WR9 OQH, UK
email: [email protected] - website: www.vax.co.uk