1
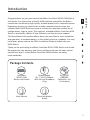
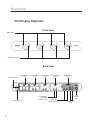
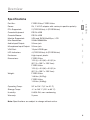
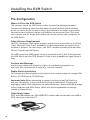
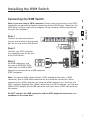
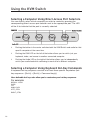
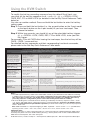
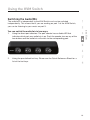
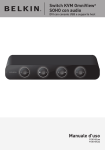
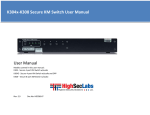
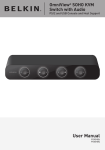
OmniView® SOHO KVM Switch with Audio PS/2 and USB Console and Host Support User Manual F1DS102Jea F1DS104Jea Table of Contents 1. Introduction................................................................................ 1 Package Contents.. ............................................................ 1 2. Overview....................................................................................... 2 Feature Overview............................................................... 2 Equipment Requirements................................................... 3 Unit Display Diagrams.. ...................................................... 4 Specifications.................................................................... 5 3. Installing the KVM Switch............................................................. 6 Pre-Configuration.. ............................................................. 6 Connecting the KVM Switch............................................... 7 Audio and Microphone Connections................................... 8 Powering Up the Systems.................................................. 9 4. Using the KVM Switch................................................................. 10 Selecting a Computer Using Direct-Access Port Selectors.. .......................................... 10 Selecting a Computer Using Keyboard Hot-Key Commands......................................... 10 Hot-Key Preceding Sequence Configuration..................... 11 Hot Key Quick Reference Table........................................ 12 Switching the Audio/Mic.................................................. 13 5. Firmware-Upgrade Guide........................................................... 14 Upgrade Using the Windows Version Utility...................... 14 Upgrade Using the Mac Version Utility............................. 18 6. FAQs........................................................................................... 24 7. Troubleshooting.......................................................................... 26 Firmware-Upgrade Troubleshooting.. ................................ 30 8. Information................................................................................. 31 Introduction section Congratulations on your purchase of the Belkin OmniView SOHO KVM Switch with Audio. Our diverse line of quality KVM solutions exemplifies the Belkin commitment to delivering high-quality, durable products at a competitive price. Engineered to give you control over multiple computers/servers from one console, Belkin KVM Switches come in a variety of capacities suitable for all configurations, large or small. This compact, affordable Belkin OmniView KVM Switch is backed by a Belkin 3-Year Warranty and free technical support. This User Manual will provide details about your new Switch, from installation and operation, to troubleshooting—in the unlikely event of a problem. For easy installation, please refer to the Quick Installation Guide included with your KVM Switch. Thank you for purchasing the Belkin OmniView SOHO KVM Switch with Audio. We appreciate your business and have confidence that you will soon see for yourself why over 1 million Belkin OmniView KVM Switches are being used worldwide. Package Contents OmniView SOHO KVM Switch with Audio Power Supply 9V, 1.1A DC Adapter With UK and European Plug User Manual Quick Installation Guide 2/4 SOHO USB/PS2 Cable Kits, 6 ft. (1.8 meters) 1 Overview Feature Overview Video Resolution The SOHO KVM Switch is able to support video resolutions of up to 2048x1536 so you can use the latest in video display technology for all your computers. Flash Upgrade With the firmware-upgrade feature, your investment in the KVM Switch is further ensured and its lifetime value is maximized. You don’t have to change your KVM Switch to solve compatibility problems since you can solve them with easy firmware upgrades. A special upgrade cable is not needed; you can use the same KVM cable that connects your computer. Speaker/Microphone Support The SOHO KVM Switch allows you to share one set of speakers and one microphone with all your computers, so you won’t need to unplug and reconnect your speakers and microphone every time you switch access from one computer to the next. Direct-Access Port Selectors Direct-access port selectors, conveniently located on the front face of the SOHO KVM Switch, allow you to easily switch access from one computer to the next. You can change the KVM port or the audio/mic using these buttons. Cables All the required cables are 6 feet in length and are included in the box for easier installation. The cables are also smaller and easier to manage. LED Display There are two LEDs on each button. One indicates which port the KVM is on and the other indicates which port the audio/mic is on. 2 Overview Equipment Requirements section Operating Systems OmniView SOHO KVM Switches with Audio are for use on CPUs using: Platforms Windows® 2000, XP, Vista®, Server 2003 DOS Linux® Novell® NetWare® 4.x/5.x Mac OS®* X v10.x *with USB support Keyboards Supports 101-/102-/104-/107-key keyboards Mice Mice with 2, 3, 4, or 5 buttons, compatible with Microsoft® Note: Mouse software is not supported Monitor VGA SVGA MultiSync® Microphone Multimedia microphone/stereo with 3.5mm connectors Audio Multimedia speaker/stereo with 3.5mm connectors Power Supply 9V, 1.1A DC power supply is required 3 Overview Unit Display Diagrams Front View KVM Switch Audio/Mic Switch Back View Port Indicators 4th Computer Port 3rd Computer 2nd Computer Port Port 1st Computer Port VGA Console Port Additional Computer Audio/Mic Console Jacks DC Power Jack 4 1st Computer Audio/Mic Console Jacks Audio/Mic Console Jacks PS/2 Console Port USB Console Port Overview Specifications F1DS102Jea, F1DS104Jea Power: 9V, 1.1A DC adapter with center pin-positive polarity PCs Supported: 2 (F1DS102Jea), 4 (F1DS104Jea) Console Keyboard: PS/2 & USB Console Mouse: PS/2 & USB Monitor Supported: VGA and SVGA MultiSync, LCD Max Resolution: 2048x1536@85Hz Audio Input/Output: 3.5mm jack section Part No.: Microphone Input/Output: 3.5mm jack VGA Port: 15-pin HDDB type LED Indicators: 4 (F1DS102Jea), 8 (F1DS104Jea) Enclosure: High-impact plastic Dimensions: F1DS102Jea 12.5 (L) x 5.5 (W) x 5.5 (D) in. (317.5 x 139.7 x 139.7mm) F1DS104Jea 12.5 (L) x 5.5 (W) x 5.5 (D) in. (317.5 x 139.7 x 139.7mm) Weight: F1DS102Jea 1.48 lbs. (0.67kg) F1DS104Jea 1.50 lbs. (0.68kg) Operating Temp: 32° to 104° F (0° to 40° C) Storage Temp: -4° to 140° F (-20° to 60° C) Humidity: 0-80% RH, non-condensing Warranty: 3 years Note: Specifications are subject to change without notice. 5 Installing the KVM Switch Pre-Configuration Where to Place the KVM Switch The compact size of the KVM Switch makes it perfect for desktop placement. Consider the following when deciding where to place the KVM Switch: whether or not you intend to use the direct-access port selectors; the length of the cables attached to your keyboard, mouse, and monitor; the location of your CPUs from your console; and the length of the cables you use to connect your computers to the KVM Switch. Cable-Distance Requirements For PS/2 computers: VGA signals are best retained when transmitted up to 25 feet (7.6m). Beyond 25 feet (7.6m), probability of video degradation increases with an increase in distance. For this reason, your PS/2 computer should be placed within 25 feet (7.6m) of the KVM Switch. For USB computers: USB signals can be transmitted up to 15 feet (4.6m) between the KVM Switch and the CPU. Beyond 15 feet (4.6m), probability of signal failure is likely. Cautions and Warnings Avoid having cables near fluorescent lights, air-conditioning equipment, or machines that create electrical noise (e.g., vacuum cleaners). Single-Switch Installation This section provides complete instructions for the hardware setup of a single KVM Switch. (F1DS102Jea or F1DS104Jea) Important Note: Before attempting to connect anything to the KVM Switch or into your computer(s), make sure that everything is powered off. Plugging and unplugging cables while computers are powered on may cause irreversible damage to the computers and KVM Switch. Belkin will not be responsible for damage caused by these actions. Cable/model types: PS/2 and USB models use: VGA/USB/PS/2 combo cable connected to the USB or PS/2 connector of the host PC 6 Installing the KVM Switch Connecting the KVM Switch section Note: If you are using a PS/2 computer: Please make sure that all of your PS/2 computers are powered off before connecting to the KVM Switch. Otherwise, the KVM Switch system might not be properly set up. However, USB computers do not have this limitation. Step 1 Connect the shared keyboard, mouse, and monitor to the console port on the rear of the KVM Switch. Step 2 Connect your PS/2 computer to a computer port on the rear of the KVM Switch. Step 3 For USB computers, use the special USB PS/2 KVM cable (with the USB-to-PS/2 adapter) for connection to a USB computer (PS/2 computer). Note: The special KVM cable provides a PS/2 keyboard connector, a USB connector, and an HDB video connector for the computer connection. When connecting to a USB computer, just plug the USB connector to it and leave the PS/2 connector dangling free. When connecting to a PS/2 computer, just add one USB-to-PS/2 adapter to the USB connector and you’ll have a PS/2 connector for the mouse. Do NOT connect the USB connector and the PS/2 keyboard connector to a computer at the same time. 7 Installing the KVM Switch Audio and Microphone Connections Note: Speakers and microphones are not required for use of your KVM Switch. Connect the Audio 1.Using the audio cable attached to your speakers, connect the male 3.5mm plug to the lime audio jack in the “Console” section of the KVM Switch. 2.Using the mic cable attached to your microphone, connect the male 3.5mm plug to the pink mic jack in the “Console” section of the KVM Switch. 3.Using the SOHO USB Cable Kit, connect one end of the lime male 3.5mm plug to the speaker jack of your sound card or computer, and connect the other end to the audio jack of the KVM Switch. 4.Using the KVM Cable, connect one end of the pink male 3.5mm plug to the mic jack of your sound card or computer, and connect the other end to the pink mic jack of the KVM Switch. 8 Installing the KVM Switch Powering Up the Systems The KVM Switch must be powered on before the computers. section Once all cables have been connected, power up the CPUs that are attached to the KVM Switch. All computers can be powered on simultaneously. The KVM Switch emulates a mouse and keyboard on each port and allows your computer to boot normally. Your KVM Switch should now be ready for use. You can select which computer to operate by either the direct-access port selectors located on the front panel of the KVM Switch or through keyboard hot-key commands. Note that it will take 1–2 seconds for the video to display after switching. This is due to the refresh of the video signal. There is also re-synchronization of the mouse and keyboard signal that takes place. This is normal operation and ensures that proper synchronization is established. 9 Using the KVM Switch Selecting a Computer Using Direct-Access Port Selectors You can directly select which computer you wish to control by pressing the corresponding direct-access port selector next to the appropriate port. The LED will be lit to indicate that the port is currently selected. • Pushing the button in the center switches both the KVM Switch and audio for that specific computer at the same time. •Pushing the KVM LED on the left of the button allows you to switch just your keyboard, video, and mouse to another connected computer. •Pushing the Audio LED on the right of the button allows you to independently switch your audio feed while continuing to work off of a different computer. Selecting a Computer Using Keyboard Hot-Key Commands A keyboard hot-key sequence consists of at least three specific keystrokes (hotkey sequence = [ScrLk] + [ScrLk] + Command key(s)). User-definable hot keys also allow you to customize your hot-key sequence. For example: SCROLL LOCK CAPS F12 NUM LOCK LEFT_CTRL RIGHT_CTRL 10 Using the KVM Switch Hot-Key Preceding Sequence Configuration For users who want to use a preceding sequence other than two consecutive Scroll Locks, there is also one convenient way to configure it. section 1. P ress “ScrollLock” + “ScrollLock” + H, and a beeping sound will signal readiness for a new preceding sequence selection [or press and hold down the center of the last front-panel button (Button 2 or Button 4) until you hear three beeps, then release the button]. 2. S elect and press the key you would like to use as your preceding sequence (SCROLL LOCK, CAPS, F12, NUM LOCK, LEFT_CTRL, RIGHT_CTRL keys are available for selection), and you will hear a beep for selection confirmation. Now you can use the new preceding sequence to execute your hot-key commands. Note: Each keystroke within a hot-key sequence should be pressed within two seconds. Otherwise, the hot-key sequence will not be validated. 11 Using the KVM Switch To modify the hot-key preceding sequence from the default Scroll Lock, you can either hit the hot-key sequence: scrlk – scrlk – H – (y), y = SCROLL LOCK, CAPS, ESC, F12 or NUM LOCK (as detailed in the Hot Key Quick Reference Table below).or You can use another method: Press and hold the last button to enter the hot-key setting mode. Step 1. Press and hold the last button (i.e., the second button on the 2-port model or the fourth button on the 4-port model) till you hear two beeps. Then release the button. Step 2. Within two seconds, you should hit any of the selectable hot-key triggers (y), y = SCROLL LOCK, CAPS, ESC, F12 or NUM LOCK, to be your hotkey trigger. For example, if you hit CAPS after hearing the two beeps, then the hot key will be: CAPS – CAPS – command key. For detailed hot-key sequences and their corresponding functional commands, please refer to the Hot Key Quick Reference Table below. Command Select Computer Channel 2 (Joint-select PC port/audio & mic, if binding is enabled) Hot Key Quick Reference Table 2-/4-Port SOHO KVM Switch with Audio & Mic -- Operation Commands for Hot Keys/Front-Panel Buttons Hot-key sequence = [ScrLk] + [ScrLk] + Command key(s) * user-definable preceding sequence = SCROLL LOCK, CAPS, F12 or NUM LOCK, LEFT_CTRL, RIGHT_CTRL Hot Keys1 Front-Panel Buttons Description ScrLk + ScrLk + (x) (x is a top-row number key) Press the computer icon on the Select the active computer channel x = 1~2 / x = 1~4 for PC left of a button to select the (Hot key: Joint-select PC port/audio & mic, if binding is enabled) channel no. active computer channel Select Audio & Mic Channel 2 (Joint-select PC port and audio & mic, if binding is enabled) ScrLk + ScrLk + (Fy) Fy = F5~F6/Fx=F5~F8 (Fy is a function key) -- Select the active audio & mic channel (Hot key: Joint-select PC and audio & mic channel, if binding is enabled) Bind Computer and Audio & Mic Switching 2 ScrLk + ScrLk + Q -- Enable the binding of PC port and audio & mic switching. (Hot key: Once this feature is enabled, any computer and/or audio & mic switching by hot keys is bound together) (factory default) ScrLk + ScrLk + W -- Disable the binding of PC port and audio & mic switching ScrLk + ScrLk + (arrow up) -- Select the next lower connected PC channel (Hot key: Joint-select PC/audio & mic, if binding is enabled) ScrLk + ScrLk + (arrow down) -- Select the next higher connected PC channel (Hot key: Joint-select PC/audio & mic, if binding is enabled) -- Toggle between the previous channel and current channel [Default] Unbind PC and Audio & Mic Switching 2 Next lower PC channel 2 (Joint-select PC/audio & mic, if binding is enabled) Next higher PC channel 2 (Joint-select PC/audio & mic, if binding is enabled) Previous PC channel Define Hot-Key Preceding Sequence Read KVM Firmware Version 12 ScrLk + ScrLk + Backspace ScrLk + ScrLk + H + (y) y = SCROLL LOCK, CAPS, ESC, F12, NUM LOCK, LEFT_CTRL, or RIGHT_CTRL Open Note Pad ScrLk + ScrLk + V Press and hold down last button (Button 2 / Button 4) until you hear three beeps, release the button, and then press (y) key. This resets hot-key preceding sequence to SCROLL LOCK. -- Select the hot-key preceding sequence among 5 alternative keys Read the version of firmware that is currently on the KVM Switch. This is helpful when a firmware upgrade is performed as it gives you the ability to read the version of firmware, before and after the upgrade, to ensure the firmware has installed correctly. Notes: 1. The USB keyboard hot keys allow faster and broader control of your KVM Switch and audio/mic switching in addition to the front-panel buttons. If you have configured a hot-key preceding sequence other than two consecutive scroll locks, you should change your hot-key sequence accordingly. (For hot-key preceding sequence configuration, please refer to the Hot Key Quick Reference Table.) 2. When the binding of PC and audio and mic switching is enabled by the hot-key sequence: ScrLk + ScrLk + Q, any PC and audio and mic switching by hot keys are bound together. (However, the binding will not affect the independent front-panel button operation.) To remove this binding, use the hot-key sequence: ScrLk + ScrLk + W. Mac® User: Standard PC keyboard mapping to MAC keyboard -- ScrLk + ScrLk + C = (CD/DVD drive eject key); ScrLk + ScrLk + F10 = F13 ; ScrLk + ScrLk + F11 = F14 ; ScrLk + ScrLk + F12 = F15. LED Information: Computer LED status (3 states: Lit/Flashing/Off). Lit = Active port with link established between KVM Switch and computer (either via PS/2 or USB interface); Flashing = Active port but with no link established between KVM Switch and computer; Off = Non-active port. Audio LED status (2 states: Lit/Off). Lit = Active port for audio output; Off = Non-active port for audio output. Using the KVM Switch Switching the Audio/Mic The audio/mic is independent to the KVM Switch and can be switched independently. This means that if you are working on port 1 of the KVM Switch, you can be listening to your music on port 3. section You can switch the audio/mic in two ways: 1.Using the direct-port selectors: The port selector has an Audio LED that indicates which port your audio/mic is on. Push the speaker icon on any of the four buttons and the audio/mic will switch to the corresponding port. 2.Using the pre-defined hot key: Please see the Quick-Reference Sheet for a list of the hot keys. 13 Firmware-Upgrade Guide This firmware-upgradeable KVM Switch allows you to upgrade firmware contents whenever it is needed to enhance its compatibility to other devices or its functionality and performance. We offer both Windows and Mac versions of the upgrade utility. You can choose either one depending on the computer platform on which you are going to perform the KVM Switch firmware uploading. The correct firmware-upgrade procedures using the Windows and Mac upgrade utilities are described below. Please follow the instructions to complete your firmware upgrade. The firmware upgrade is performed through port 1 of the KVM Switch, so the KVM cables that are connected to port 1 should remain connected. Unplug all remaining KVM cables and peripheral cables connecting the KVM Switch to your computers or peripherals. You can leave the power cable connected to the KVM Switch. The console keyboard, mouse, and monitor should be disconnected from the KVM Switch and plugged in directly to the host computer. The computer that is connected to port 1 of the KVM Switch will be performing the upgrade and will be referenced as the “Host PC” for this process. Upgrade Using the Windows Version Utility Prepare your KVM Switch and the Host PC Note: The host PC must be running Windows 2000 or above in order to complete the firmware upgrade. Step 1. Ensure that the power adapter is connected to the KVM Switch. Check to make sure that the KVM cables for port 1 remain connected to the KVM Switch. The monitor, mouse, and keyboard should be disconnected from the console port of the KVM Switch and plugged in directly to the host computer. The power supply should also remain connected to the KVM Switch. Step 2. The cables that are connected to port 1 of the KVM Switch also need to be connected to the host PC. Connect the VGA cable and also the USB cable to the host PC. Note: It is not recommended to use the PS/2 cable on the host PC to perform the firmware upgrade. 14 Important: Some host computers may not have enough USB ports to support the use of a USB keyboard, USB mouse, and the USB cable needed to perform the upgrade. (An example of this is a Mac mini, which only has two USB ports.) If this occurs, the keyboard does not have to be connected to the host computer since the mouse is used to perform the upgrade. Firmware-Upgrade Guide Step 3. Power on the host PC and copy/download the firmware-upgrade utility, “Belkin Soho.exe”, and the firmware-upgrade file, “.blk”, from belkin.com/ support. Activate the Firmware-Upgrade Utility Program Note: You should close any unnecessary running programs such as antivirus, system-monitoring, or automatic updates; otherwise, the stability of the system during the firmware-upgrade process might be undermined. section Step 4. Double-click the icon of “Belkin Soho.exe”, the firmware-upgrade utility program. A warning message box may appear if you have antivirus software running on the PC. Read it carefully for information (and close any unnecessary programs before upgrading). Click “OK”. A firmware file-selection dialog box appears. 15 Firmware-Upgrade Guide Connect your KVM Switch to the Host PC Step 5. Now press the first front-panel button on the KVM Switch until you hear two beeps. The KVM Switch has now entered into the upgrade mode. Step 6. Check to make sure the KVM cables from port 1 are connected to the host PC. Note: A special upgrade cable is not needed to perform the upgrade since you can use the same KVM cable that you use for connecting to the computers. However, depending on the different models, the KVM cables you use will vary. Step 7. Click the “Browse” button and locate the firmware-upgrade file, which is indicated with a file extension such as “.blk”. Select the upgrade file (for example: “UCF-30-11-07.blk”) and click “Open” to load the file. Then click “Upgrade” to make it ready for upload. 16 Firmware-Upgrade Guide Begin the File Upload Note: Before hitting the “Upgrade” button on the utility program, you should make sure that you are focused on port 1 of the KVM Switch where you have the computer connected. If not, switch to that computer before hitting the “Upgrade” button. Step 8. section After you click the “Upgrade” button, the file-transfer progress will begin in seconds and can be monitored through the advancement of the progress bar. Wait until the progress bar runs to its full length for the upgrade process to be completed. Note: Meanwhile, be careful not to power off the computer or disconnect the USB-cable connection. Otherwise, the file upload will be interrupted and the upgrade process will be aborted. If that does happen, please refer to the “Firmware-Upgrade Troubleshooting” section. The file upload is finished when the progress bar runs through 100 percent and a prompt tells you that the upgrade is OK. Click “OK”. The firmware-upgrade process is complete. 17 Firmware-Upgrade Guide Step 9. Finally, unplug the power cable from the back of the KVM Switch and all other cables from the KVM Switch, and perform a cold reset. Reconnect all the cables again to the KVM Switch. Now you can enjoy the newly added functionality and compatibility of the new firmware version. Note: After you have finished the firmware-upgrade process, try the port switching and other functionalities of the KVM Switch to see whether it works fine with the new firmware. If it does, then this upgrade process was successfully completed. Congratulations! If the file-upload process encounters an error and cannot complete successfully, please refer to the “Firmware-Upgrade Troubleshooting” section. Upgrade Using the Mac Version Utility Prepare your KVM Switch and the Mac Host Step 1. Ensure that the power adapter is connected to the KVM Switch. Check to make sure that the KVM cables for port 1 remain connected to the KVM Switch. The monitor, mouse, and keyboard should be disconnected from the console port of the KVM Switch and plugged in directly to the host computer. The power supply should also remain connected to the KVM Switch. Step 2. Power on the Mac host and copy/download the firmware-upgrade utility, “Belkin Soho.pkg”, and the firmware-upgrade file, “.blk”, to it. 18 Firmware-Upgrade Guide Install and Activate the Firmware-Upgrade Utility Program Note: You should close any unnecessary running programs such as antivirus, system-monitoring, or automatic updates; otherwise, the stability of the system during the firmware-upgrade process might be undermined. Step 3. Double-click the icon of “Belkin Soho.pkg”, the firmware-upgrade utility program, and a message box appears that will guide you through the installation process. section Click “Continue” and a firmware file-selection dialog box appears. Click the “Choose” button to select the installation path of the upgrade utility. Then go through the guided steps to install the upgrade utility. 19 Firmware-Upgrade Guide After you have installed the program, you can find the upgrade-utility icon in the “Application” folder. Step 4. Now, double-click the “Belkin Soho FW” icon to activate the upgrade utility. Now the upgrade utility program is ready. 20 Firmware-Upgrade Guide Connect your KVM Switch to the Mac Host Step 5. Press the first front-panel button on the KVM Switch until you hear two beeps. Now the KVM Switch has entered into the upgrade mode. Step 6. Check to make sure the KVM cables from port 1 are connected to the Mac host. section Note: A special upgrade cable is not needed to perform the upgrade since you can use the same KVM cable that you use for connecting to the computers. However, depending on the different models, the KVM cables you use will vary. 21 Firmware-Upgrade Guide Step 7. Click the “Browse” button and locate the firmware-upgrade file, which is indicated with a file extension such as “.blk”. Select the upgrade file (for example: “UCF-30-11-07.blk”) and click “Choose” to load the file. Then click “Upgrade” for upload. Begin the File Upload Note: Before clicking on the “Upgrade” button on the utility program, you should make sure that you are focused on port 1 of the KVM Switch where you have the Mac host connected. If not, switch to that port before clicking the “Upgrade” button. Step 8. After you click the “Upgrade” button, the file-transfer progress will begin in seconds and can be monitored through the advancement of the progress bar. Wait until the progress bar runs through its full length for the upgrade process to complete. Note: Meanwhile, be careful not to power off the computer or disconnect the USBcable connection. Otherwise, the file download will be interrupted and the upgrade process will be aborted. If that does happen, please refer to the “FirmwareUpgrade Troubleshooting” section. 22 Firmware-Upgrade Guide The file upload is finished when the progress bar runs through 100 percent and a prompt tells you that the upgrade is OK. section Click “OK”. The firmware-upgrade process is complete. Step 9. Finally, unplug the power cable from the back of the KVM Switch and all other cables from the KVM Switch, and perform a cold reset. Reconnect all the cables again to the KVM Switch. Now you can enjoy the newly added functionality and compatibility of the new firmware version. Note: After you have finished the firmware-upgrade process, try the port switching and other functionalities of the KVM Switch to see whether it works fine with the new firmware. If it does, then this upgrade process was successfully completed. Congratulations! If the file-upload process encounters an error and cannot complete successfully, please refer to the “Firmware-Upgrade Troubleshooting” section. 23 FAQs What operating systems does the KVM Switch support? The KVM Switch will support any operating system that runs on a PS/2 and USB platform. It will also work with non-USB-enabled SunTM and Mac operating systems using the appropriate adapter. Compatible operating systems include, but are not limited to, Windows 2000, XP, and Vista; Linux; and Mac OS. What does flash-upgrade capability mean? You can update your KVM Switch firmware with flash upgrades, when needed, by going to belkin.com. This ensures that your KVM Switch works with the most current computers and devices. How does the KVM Switch allow the user to switch between ports? The KVM Switch supports two methods of port selection. You can select computers using specially designated keyboard hot keys, or independently access the desired port by pushing the direct-access port selectors. How far can the second user be from the KVM Switch? When using PS/2 connections, the KVM Switch can be up to 25 feet (7.6m) away from your computer. When using a USB connection between your KVM Switch and computer, we recommend that your computer be no more than 15 feet (4.6m) from the KVM Switch. What is the maximum video resolution that the KVM Switch supports? The advanced video circuit in the KVM Switch supports a maximum resolution of 2048x1536@85Hz. Such higher-resolution support is ideal for graphic artists and designers who depend on high-quality video. What video bandwidth does the KVM Switch support? The KVM Switch supports 400MHz of video bandwidth. Can PS/2 and USB connections be used simultaneously on the same port? No, you must use either PS/2 or USB per CPU port on the KVM Switch. What are the benefits of the SOHO KVM Switch’s supporting audio and microphone inputs and outputs? The SOHO KVM Switch is perfect for the home- and small-office user who commonly uses multimedia applications. With multimedia support, you do not need an extra set of speakers for each computer that is connected to your KVM unit. The audio and mic also switch independently to the KVM Switch. 24 FAQs Do I have to install any software to use the KVM Switch? No, the KVM Switch does not require any drivers or software to be installed in your computers. Simply connect all your computers to the PC ports on the KVM Switch, then attach one keyboard, monitor, and mouse to the “Console” port and it is ready for use. Does the KVM Switch require an AC adapter? Yes, the KVM Switch requires a 9V, 1.1A DC power adapter with center pinpositive polarity. Can I use the KVM Switch to switch video signals only? section Yes, you may use the KVM Switch to switch between video signals only without having to connect the keyboard and mouse. The keyboard and mouse should be connected directly to the computer that the video signal is taken from to ensure that your computer functions properly. Can I use the SOHO KVM Switch on my Sun computer that supports USB? Yes, the KVM Switch works with any USB-capable computer. Does the SOHO KVM Switch support Linux? Yes, the KVM Switch works with all Linux kernels configured for USB support. Does the KVM Switch support Microsoft keyboards? Yes, the KVM Switch is compatible with Microsoft Internet Keyboard PRO, Natural® Keyboard PRO, and Logitech® keyboards with up to standard 107-key support only. How long is the warranty for the KVM Switch? The KVM Switch comes with a 3-Year Limited Warranty. 25 Troubleshooting VIDEO Problem: I am getting ghosting, shadowing, or fuzzy images on my monitor. Solution: •Check that all video cables are inserted properly. • Check that the monitor you are using supports the resolution and refresh-rate setting on your computer. • Check that the graphics card you are using supports the resolution and refreshrate setting on your computer. • Connect the monitor directly into the computer with which you are having trouble to see if the problem still appears. Problem: I am getting a black screen on my monitor. Solution: • Check that all video cables are inserted properly. • If you are not using a power adapter, check that the keyboard cable is connected and inserted properly between the computer and KVM Switch for the appropriate port. • If you are using the KVM Switch for video switching only and have no keyboard and mouse connection between the KVM Switch and PC, you will need to purchase the optional 9V DC, 600mA power adapter (F1D065-PWR-UK for UK version F1D065-PWR-GM for European version). • Connect your monitor directly to the computer to verify that your monitor is functioning properly. 26 Troubleshooting KEYBOARD Problem: The computer does not detect a keyboard and I get a keyboard error reported at boot up. Solution: • Check that the keyboard cable between the KVM Switch and the computer is connected properly. Tighten any loose connections. • Try swapping your keyboard with a different one. • Try connecting the computer to a different port. • If you are using the keyboard software that was included with your keyboard, uninstall it and install the standard Microsoft keyboard driver. Problem: section Some of the multifunction keys do not work when using a PS/2 keyboard. Solution: • Try using the PS/2 cable connection between the host computer and the KVM Switch instead of the USB cable connections. MOUSE Problem: Mouse is lost when I switch to a different channel. Solution: • Check that the mouse you are using is connected properly to the console of the KVM Switch. • If you are using a mouse driver that was included with your mouse, uninstall it and install the standard Microsoft mouse driver. • Disconnect and reconnect the mouse cable attached to the channel with which you are experiencing problems to resynchronize the mouse connection. • Attach the mouse directly to the computer with which you are experiencing mouse problems. • If the computer just awoke from standby mode, allow up to one minute to regain mouse function. • Deactivate power-management schemes on the PC with which you are experiencing problems. • Try swapping the mouse with a different one. 27 Troubleshooting Problem: The mouse is not detected at boot up. Solution: • Check the cables and make sure that they are inserted properly. Problem: The computer boots up fine, but the mouse does not work. Solution: • Make sure it is plugged in properly. • Make sure the mouse works when directly plugged into the computer. Rebooting may be necessary when trying this. • Try a different mouse. GENERAL Problem: My computer does not boot when connected to the KVM Switch and works fine when I connect the keyboard, video, and mouse directly to it. Solution: • Make sure that the keyboard and mouse cables are connected tightly between the KVM Switch and the computer. • Check that the keyboard and mouse cables are not crossed. Problem: I am connecting my computer to the SOHO KVM Switch via USB and my keyboard and mouse do not work. Solution: • Prior to connecting the SOHO KVM Switch, make sure that the HID USB driver is installed on each computer. (To install the HID USB driver, connect a USB mouse and USB keyboard to the computer. Windows should automatically install the drivers.) 28 Troubleshooting Problem: Some of the keys on my keyboard are not functioning properly when I use a Mac computer. Solution: • Because you are using a PC keyboard on a Mac computer, a few of the option keys on your PC keyboard may be reversed. All major keys will function as labeled. AUDIO AND MICROPHONE Problem: I have connected the speakers to the KVM Switch and I am not getting any sound from my computer. section Solution: • Check that the sound is enabled on the computer by going into the system setting. • Check that the volume is turned up in your sound configuration. • Make sure that the audio cable is connected properly and connected to the appropriate connector. • Check that the speakers you are using are functioning properly. • Check that you are on the correct port that is playing the music. 29 Troubleshooting Firmware-Upgrade Troubleshooting Problem: The progress bar stops for a long time without any advancement. Solution: Press and hold down the first front-panel button until two beeps are heard, and click the upgrade button on the upgrade utility program. The firmware-upload process will begin immediately, and you will see the progress bar advance gradually to full length. However, if the progress bar just stops somewhere in the middle and goes no further for a long time (longer than five minutes), there might be some problem. If so, simply unplug all the cables from the KVM Switch and start the whole firmware-upgrade procedure again as described in the Firmware-Upgrade Guide. However, if you find that the mouse and keyboard no longer work from the console of your KVM Switch, you can connect them directly to the host computer (although the USB cable still has to be reconnected to the KVM Switch), and complete the rest of the firmware-upgrade procedure. Note: Make sure that you have closed any unnecessary running programs on the host computer, such as antivirus, system-monitoring, or automatic updates, before you perform the upgrade procedure. Note: This firmware is crash-proof. If the upgrade has failed before its completion, just repeat the procedure again for another try. Problem: In the middle of the firmware-file transfer, my computer was shut down by an unexpected power failure or the USB connection was broken. What should I do now to restart the whole firmware-upgrade procedure? Solution: Follow the instructions as described in the previous question. 30 Information FCC Statement Declaration of Conformity with FCC Rules for Electromagnetic Compatibility We, Belkin International, Inc., of 501 West Walnut Street, Compton, CA 90220, declare under our sole responsibility that the products: F1DS102J, F1DS104J, to which this declaration relates: Comply with Part 15 of the FCC Rules. Operation is subject to the following two conditions: (1) this device may not cause harmful interference, and (2) this device must accept any interference received, including interference that may cause undesired operation. CE Declaration of Conformity section We, Belkin International, Inc., declare under our sole responsibility that the products F1DS102J, F1DS104J, to which this declaration relates, are in conformity with Emissions Standard EN55022 and with Immunity Standard EN55024, LVP EN61000-3-2, and EN61000-3-3. ICES This Class A digital apparatus complies with Canadian ICES-003. Cet appareil numérique de la classe A est conforme á la norme NMB-003 du Canada. 31 Information Belkin International, Inc., Limited 3-Year Product Warranty What this warranty covers. Belkin International, Inc. (“Belkin”) warrants to the original purchaser of this Belkin product that the product shall be free of defects in design, assembly, material, or workmanship. What the period of coverage is. Belkin warrants the Belkin product for three years. What will we do to correct problems? Product Warranty. Belkin will repair or replace, at its option, any defective product free of charge (except for shipping charges for the product). Belkin reserves the right to discontinue any of its products without notice, and disclaims any limited warranty to repair or replace any such discontinued products. In the event that Belkin is unable to repair or replace the product (for example, because it has been discontinued), Belkin will offer either a refund or a credit toward the purchase of another product from Belkin.com in an amount equal to the purchase price of the product as evidenced on the original purchase receipt as discounted by its natural use. What is not covered by this warranty? All above warranties are null and void if the Belkin product is not provided to Belkin for inspection upon Belkin’s request at the sole expense of the purchaser, or if Belkin determines that the Belkin product has been improperly installed, altered in any way, or tampered with. The Belkin Product Warranty does not protect against acts of God such as flood, lightning, earthquake, war, vandalism, theft, normal-use wear and tear, erosion, depletion, obsolescence, abuse, damage due to low voltage disturbances (i.e. brownouts or sags), non-authorized program, or system equipment modification or alteration. How to get service. To get service for your Belkin product you must take the following steps: 1.Contact Belkin International, Inc. at 501 W. Walnut St., Compton CA 90220, Attn: Customer Service, or call (800)-223-5546, within 15 days of the Occurrence. Be prepared to provide the following information: a. The part number of the Belkin product. b. Where you purchased the product. c. When you purchased the product. d. Copy of original receipt. 2.Your Belkin Customer Service Representative will then instruct you on how to forward your receipt and Belkin product and how to proceed with your claim. 32 Information Belkin reserves the right to review the damaged Belkin product. All costs of shipping the Belkin product to Belkin for inspection shall be borne solely by the purchaser. If Belkin determines, in its sole discretion, that it is impractical to ship the damaged equipment to Belkin, Belkin may designate, in its sole discretion, an equipment repair facility to inspect and estimate the cost to repair such equipment. The cost, if any, of shipping the equipment to and from such repair facility and of such estimate shall be borne solely by the purchaser. Damaged equipment must remain available for inspection until the claim is finalized. Whenever claims are settled, Belkin reserves the right to be subrogated under any existing insurance policies the purchaser may have. How state law relates to the warranty. THIS WARRANTY CONTAINS THE SOLE WARRANTY OF BELKIN. THERE ARE NO OTHER WARRANTIES, EXPRESSED OR, EXCEPT AS REQUIRED BY LAW, IMPLIED, INCLUDING THE IMPLIED WARRANTY OR CONDITION OF QUALITY, MERCHANTABILITY OR FITNESS FOR A PARTICULAR PURPOSE, AND SUCH IMPLIED WARRANTIES, IF ANY, ARE LIMITED IN DURATION TO THE TERM OF THIS WARRANTY. Some states do not allow limitations on how long an implied warranty lasts, so the above limitations may not apply to you. section IN NO EVENT SHALL BELKIN BE LIABLE FOR INCIDENTAL, SPECIAL, DIRECT, INDIRECT, CONSEQUENTIAL OR MULTIPLE DAMAGES SUCH AS, BUT NOT LIMITED TO, LOST BUSINESS OR PROFITS ARISING OUT OF THE SALE OR USE OF ANY BELKIN PRODUCT, EVEN IF ADVISED OF THE POSSIBILITY OF SUCH DAMAGES. This warranty gives you specific legal rights, and you may also have other rights, which may vary from state to state. Some states do not allow the exclusion or limitation of incidental, consequential, or other damages, so the above limitations may not apply to you. 33 OmniView® SOHO KVM Switch with Audio PS/2 and USB Console and Host Support Free Tech Support* You can find additional support information on our website www.belkin.com through the tech-support area. If you want to contact technical support by phone, please call the number you need from the list below*. *Local rates apply Country AUSTRIA BELGIUM CZECH REPUBLIC DENMARK FINLAND FRANCE GERMANY GREECE HUNGARY ICELAND IRELAND ITALY LUXEMBOURG NETHERLANDS NORWAY POLAND PORTUGAL RUSSIA SOUTH AFRICA SPAIN SWEDEN SWITZERLAND UNITED KINGDOM Number Internet adress 0820 200766 http://www.belkin.com/uk/support/ 07 07 00 073 http://www.belkin.com/nl/support/ 239 000 406 http://www.belkin.com/uk/support/ 701 22 403 http://www.belkin.com/uk/support/ 00800 - 22 35 54 60 http://www.belkin.com/uk/support/ 08 - 25 54 00 26 http://www.belkin.com/fr/support/ 0180 - 500 57 09 http://www.belkin.com/de/support/ 00800 - 44 14 23 90 http://www.belkin.com/uk/support/ 06 - 17 77 49 06 http://www.belkin.com/uk/support/ 800 8534 http://www.belkin.com/uk/support/ 0818 55 50 06 http://www.belkin.com/uk/support/ 02 - 69 43 02 51 http://www.belkin.com/it/ support 34 20 80 85 60 http://www.belkin.com/uk/support/ 0900 - 040 07 90 €0.10 per minute http://www.belkin.com/nl/support/ 81 50 0287 http://www.belkin.com/uk/support/ 00800 - 441 17 37 http://www.belkin.com/uk/support/ 707 200 676 http://www.belkin.com/uk/support/ 495 580 9541 http://www.belkin.com/support/ 0800 - 99 15 21 http://www.belkin.com/uk/support/ 902 - 02 43 66 http://www.belkin.com/es/support/ 07 - 71 40 04 53 http://www.belkin.com/uk/support/ 08 - 48 00 02 19 http://www.belkin.com/uk/support/ 0845 - 607 77 87 http://www.belkin.com/uk/support/ OTHER COUNTRIES +44 - 1933 35 20 00 Belkin Ltd. Express Business Park Shipton Way, Rushden NN10 6GL, United Kingdom Belkin B.V. Boeing Avenue 333 1119 PH Schiphol-Rijk Netherlands Belkin GmbH Hanebergstrasse 2 80637 Munich Germany Belkin SAS 130 rue de Silly 92100 Boulogne-Billancourt France Belkin Iberia Avda. Cerro del Aguila 3 28700 San Sebastián de los Reyes Spain Belkin Sweden Knarrarnäsgatan 7 164 40 Kista Sweden © 2008 Belkin International, Inc. All rights reserved. All trade names are registered trademarks of respective manufacturers listed. Mac OS and Mac are trademarks of Apple Inc., registered in the U.S. and other countries. Windows, Windows Vista, and Microsoft are either registered trademarks or trademarks of Microsoft Corporation in the United States and/or other countries. PM00312ea