1
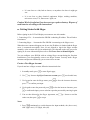
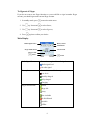
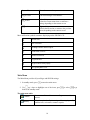
• User Manual •
SK9500
Depending on different models, not all features may be available in this general manual.
Contents
Introduction.................................................................................... 2
Overview ............................................................................................................2
Features ..............................................................................................................2
Installation and Basic Functions .................................................. 3
Package Content ................................................................................................3
The Handset and Base Unit at a glance.............................................................4
How to Install the Base ......................................................................................5
How to Install the Handset ................................................................................5
Important Safety Information ...........................................................................6
Getting Started with Skype................................................................................7
Adding Contacts............................................................................................... 11
Making and Answering Calls ..........................................................................12
Advanced Functions .................................................................... 17
Menu Structure of SK9500 ..............................................................................17
Skype Settings ..................................................................................................19
Phone Settings ..................................................................................................23
Resetting the System ........................................................................................30
Contacts............................................................................................................31
Handling Calls..................................................................................................33
Message Waiting Indicator function ...............................................................35
Troubleshooting ........................................................................... 35
Technical Details.......................................................................... 38
Declaration of Conformity.......................................................... 39
1
Introduction
Overview
Thank you for purchasing our Skype DECT product. With the SK9500 you can make
landline calls and Internet calls using Skype™, SkypeOut and SkypeVoice mail.
•
•
A landline call is a call between two telephone line subscribers.
A Skype™ call is between two registered Skype™ users. These calls are free of
charge.
• A SkypeOut call is made via the Internet to an ordinary telephone number
anywhere in the world using the Skype™ software.
• Skype Voice mail allows you to send and receive voicemail messages and record
a greeting.
This user manual describes how to install, configure and troubleshoot the cordless phone
with Skype model SK9500 .
Features
Key Features
•
•
•
•
•
Access Skype network without even turning on the PC
Proven DECT technology to deliver clear digital communication
Incorporate most of Skype feature like Voicemail, Call Forwarding, SkypeOut/In
services
Dual-phone: Calling on Skype and landline is on the same handset
Handsfree Speakerphone / LCD Backlight / Keypad Backlight enhanced features
Call Features
•
•
•
•
•
•
•
•
•
1.5" color LCD with Skype GUI
Skype buddy list
SkypeOut/In support
Call forwarding from Skype to landline
Skype Voicemail
Call Waiting
Skype User profile
Handsfree Speakerphone
LCD backlight
2
Installation and Basic Functions
Package Content
The contents of your product should contain the following items. For any missing items,
please contact your dealer immediately.
•
1 cordless SK9500 handset
•
1 SK9500 base
•
1 power supply for the base station
•
1 Ethernet cable
•
1 telephone cable
•
2 batteries (AAA; rechargeable)
•
1 User Manual
•
1 Easy Start Guide
3
The Handset and Base Unit at a glance
Left Key
Right Key
Press to enter menu and submenu mode;
Press to enter phonebook
menu;
Press to confirm selection;
Press during programming
to go back to the previous
option;
With the key “*” to lock or
unlock the keypad;
Press to clear digits from
the display.
Call / Recall Key
End /On-Off Key
Press to begin and answer a
telephone call.
Press to end a telephone
call.
You can activate Recall
function if your phone is
connected to a PABX, or if
you use Select Services.
Press and hold 2-3
seconds to switch the
handset on / off ;
Press to transfer an outside
call to another phone.
INT Key
Scrolling Key
Press to make an intercom
call (if you have more than
one handset).
Press during programming
to move through the menu;
Handset Locator Button
Press during a call to
change the volume in the
earpiece.
Press this to make the
handset ring, if you cannot
remember where you put it,
press it again to stop the
handset ringing.
Speakerphone Key
Press to turn the
speakerphone ON/OFF
Network Light
The Network light comes
on when you have a
connection to the Ethernet.
Charge Light
The CHARGE light comes
on when the handset's
batteries are being charged.
In Use Light
The IN USE light comes
on when you place calls.
Note: Before you can use the
handset to make calls for the first time,
you will need to fit and fully charge the
batteries for 15 hours.
4
How to Install the Base
1. Connect on the base to a LAN (Local Area Network) port on your broadband
connection (modem, router, hub, switch etc.) using the provided Ethernet cable.
2. Connect the power adapter to an active power outlet and connect the power port
on the base to the power adapter (9V, 500 mA).
on the base to a telephone socket (if available) using the provided
3. Connect
telephone cable.
How to Install the Handset
a)
1. Push the top of the battery compartment cover on the back of the handset
downwards.
2. Insert the two batteries provided with the handset making sure that the plus and
minus ends are facing the same way as shown in the illustrations on the sides of
the battery compartment.
3. Slide the battery compartment cover shut.
5
Important Safety Information
People with a heart pacemaker should consult their doctor before using the telephone.
If you wear a hearing aid, you should note SK9500 works by transmitting radio waves
between base and handset that may cause a humming noise.
1. DO NOT cleans any part of your phone with benzene, thinner or other solvent
chemicals, which may cause permanent damage to your phone. This damage is
not covered by the Guarantee. When necessary, clean it with a damp cloth.
Cleaning it with a wet cloth may give you an electric shock.
2. DO NOT uses this equipment in places where volatile or explosive materials may
be present.
3. DO NOT let the base unit get wet. Electrical equipment can cause serious injury
if used while you are wet or standing in water. NEVER use your phone during a
thunderstorm. Unplug the base unit from the telephone line and the mains socket
when there are storms in your area. Damage caused by lightning is not covered by
the Guarantee.
4. The SK9500 will produce a certain amount of heat during operation. For this
reason it is recommended that this equipment is NOT placed in direct contact
with antique, veneered or delicate furniture surfaces.
5. DO NOT dispose batteries with normal household waste, never burn them, or put
them where they could get punctured.
6. The SK9500 DECT phone emits radio signals which could interfere with other
electronic equipment, computers, radio, TV set, clock radio alarms, etc. A
distance of at least one meter should be maintained between SK9500 base station
and other equipment. This will minimize the risk of such interference.
7. When you do not need to carry your handsets around, leave them on the base unit
or charger pod, to keep the batteries charged.
8. If you hear a warning tone as move around during a call, and/ or the sound in the
earpiece becomes faint or distorted; you may be going out of range of the base
unit. Move nearer to the base unit within 20 seconds, until the tone stops.
Otherwise your call may be cut off.
9. The base unit should be placed on a level surface, in a position where:
•
The mains adapter plug will reach a 230 V AC switched mains supply socket;
never try to lengthen the mains power cable.
•
The telephone cable will reach your telephone line socket or extension socket.
•
It is not close to another telephone, this can cause radio interference.
6
•
It is not close to a sink, bath or shower, or anywhere else where it might get
wet.
•
It is not close to other electrical equipment, fridges, washing machines,
microwave ovens, TVs, fluorescent lights, etc.
Caution! Risk of explosion if an incorrect type replaces battery. Dispose of
used batteries according to the instructions.
Getting Started with Skype
Before signing-in, the LCD will display two sentences one after another:
1. Connecting ATA…: It means that the SK9500 is obtaining IP address. This will take a
few minutes.
2. Connecting Skype…: It means that The SK9500 is connecting to the Skype server.
When these two sentences disappear one by one, the IP address is obtained and the Skype
server is connected successfully. Now you are allowed to sign-in the Skype account
manually, or the account will sign in automatically. This depends on the style you set for
signing in, for more information please refer to To Choose Auto or Manual Sign In.
You can configure your SK9500 with an existing Skype account during the first-time
installation or you can optionally create a new Skype account. You only need a Skype
username and password defined by you to create a new account.
Create a New Skype Account
If you do not have a Skype account, follow the instruction below:
1. In standby mode, press
2. Use
to enter Sign-in page;
up / down to highlight Create new account, press
3. Use keypad to enter the Skype name, press
press
to select this item;
to clear the incorrect character,
to confirm your input.
4. Use keypad to enter the password, press
to clear the incorrect character, press
to confirm the input, you are asked to repeat the password by entering it again.
5. You are then directed to the Skype Agreement, use
entire text, then press
up / down to read the
to accept.
Notes:
1. Press
continuously to switch between the input methods, abc (lower case),
ABC (upper case), 123 (digit), Abc (all).
7
2. Press
to input punctuation marks when entering your Skype account.
3. Skype names can be 6 to 32 characters. You can use any mix of upper and lower
case characters, numbers and punctuation marks. You cannot use spaces and your
name cannot begin with a number or punctuation mark. If the name is already in
use, you will be prompted to try another name.
4. Password can be 4 to 20 characters. You can use any mix of upper and lower case
characters, numbers and punctuation marks. Your password cannot begin with a
number or punctuation mark, and it cannot be the same as your Skype name.
5. Please be patient as the creation of your Skype account may take several minutes
to perform.
To Sign in to Skype
When you already have a Skype account, you can sign in to Skype directly.
1. In standby mode, press
2. Use
to enter Sign-in page;
up / down to highlight Sign in to Skype, press
3. Use keypad to enter the Skype name, press
press
to select the entry;
to clear the incorrect character,
to confirm your input.
4. Use keypad to enter the password, press
to clear the incorrect character, press
to confirm the input;
5. You are now asked whether you want to save your Skype name and password for
automatic sign-in, press
to accept,
to decline.
Notes:
6. Skype does not allow emergency calls. Such calls are always routed to the
landline connection. Therefore it is important that you set the correct landline
country. Do not forget that your SK9500 has to be connected to a power outlet in
order to work. Your SK9500 will not function during a power failure.
7. For input methods please refer to the notes of Create a New Skype Account.
8. Please be patient as synchronization of Skype contacts might take several minutes.
9. If you have accepted the automatic sign-in, the account will sign in without any
prompting every time. For signing in another account, please refer to To Choose
Auto or Manual Sign In.
8
To Sign out of Skype
If you do not want to use Skype functions or you would like to sign in another Skype
account, you should sign out the current Skype account.
1. In standby mode, press
to enter the main menu.
2. Use
up / down and
to select Status;
3. Use
up / down and
to select Sign out;
4. Press
again to confirm your choice.
Main Display
Radio Signal Status
Battery Status
Notifications
Skype Online Status
Current Time
Skype Credit
Action
Radio Signal Status
Action
Indicates the strength of the radio signal.
Radio signal level.
No radio signal.
Battery Status
Indicates the status of the battery.
Low level.
Partially charged.
Fully charged.
Charging.
Skype Online Status
Online
Skype Me
Away
Not Available
Do Not Disturb
Invisible
Offline
9
Current Time
Shows the current time you set.
Skype Credit
Your current Skype credit balance.
Action
Left soft key
Selects the current menu item or confirms a
setting, depending on the current screen.
Action
Right soft key
Cancels the last action or returns to the previous
screen, depending on the current screen.
More notification symbols sometimes displaying on the SK9500 LCD:
Missed calls
New voicemail
Exchange contact details request.
Silent mode is active.
Headset connected.
Keypad locked.
Skype credit is nearly expiry.
The speakerphone is on.
Main Menu
The Main Menu provides all your Skype and SK9500 settings.
1. In standby mode, press
to enter the main menu.
up / down to highlight one of the items, press
2. Use
back to the standby mode.
to select,
to go
The main menu table:
Contacts
Your contact list and the current Skype status of your
contacts.
History
All calls, missed calls, incoming calls, outgoing calls,
Landline calls, voicemails, contacts requests.
10
Change status, My profile, Sign out
Status
Add Contact
Searches Skype users on line.
Search
Adds a Skype user or a SkypeOut number to your contact
list.
Services
Allows you to view Skype credit, SkypeIn and Skype
voicemail status.
Settings
Settings for Network, General, Call divert, Privacy, Tones,
Time and Date, Cordless Settings, Phone Settings and
information.
Adding Contacts
To Add a Skype Contact
1. In standby mode, press
2. Use
to enter the main menu;
up / down to highlight Add Contact, press
3. Press
to select;
to select Skype;
4. Use the keypad to enter the Skype name, press
before you press
to delete incorrect characters
;
5. You are asked if you let the account you add see you when you are online, press
to accept, press
to decline.
6. The account has been added to your contacts list. Press
to confirm, or press
to accept to send an authorization request.
7. Press
to send the authorization request.
To Add a SkypeOut Contact
1. In standby mode, press
2. Use
3. Press
to enter the main menu;
up / down to highlight Add Contact, press
up / down and
to select SkypeOut;
11
to select;
4. Use the keypad to enter the full phone number for use with SkypeOut, press
to delete incorrect characters before you press . SkypeOut numbers (even local
numbers) must be entered in the following format: “+” followed by “country
code”, “area code” and “number”.
To Search for a Skype User
1. In standby mode, press
to enter the main menu;
up / down to highlight Search, press
2. Use
to select;
3. Use the keypad to enter a Skype name or a full name or an email address, press
to search; press
again to stop or
to cancel searching if needed.
4. The display shows all the matched accounts, use
preferred one, press
5. Press
up / down to highlight your
to select;
to select Add to contacts.
6. You are asked if you let the account you add see you when you are online, press
to accept, press
to decline.
7. The account has been added to your contacts list. Press
to confirm, or press
to accept to send an authorization request.
8. Press
to send the authorization request.
Making and Answering Calls
The procedures for making and receiving calls apply to any type of calls — Skype-toSkype calls, SkypeOut calls and SkypeIn calls. Furthermore, you can use your phone for
landline telephony.
In standby mode, press any button on keypad except “Talk” button to make the backlight
come on before enabling any function. (It means 1st press to turn on the backlight, 2nd
press to activate the function button. This is correct for all buttons except for “Talk”
button.)
To Answer a Call
•
Press
•
Press
to a answer call or
to answer a call or
12
•
When the AUTO TALK is turned on, you can simply answer the call by lifting
the handset from the base unit (see AUTO TALK part).
Press
during an active call to turn the speakerphone on, press again to turn the
speakerphone off.
To Reject a Call
You are not allowed to reject a landline call.
•
Press
to reject a call before answering it.
To End a Call
•
Press
or
to hang up.
To Make a landline Call
Dial number from idle screen directly.
Use
to place call:
1. Input the telephone number you want to dial, press
2. Press
Use
up / down and
;
to select Landline.
to place call:
1. Input the telephone number you want to dial;
2. When your preferred line is set to Always landline, press
call directly;
to make a landline
When your preferred line is set to Always ask, press
up / down and
to
select Landline;
When your preferred line is set to Always SkypeOut, you can’t use
to place
landline call. (Refer to To set the preferred line for more information)
Note:
For Landline Calls, there is no prefix required, such as “+” or ”00”, you can dial the
number directly.
To Make a SkypeOut Call
SkypeOut allows you to use your Internet connection to call ordinary telephones and
mobile telephones worldwide. Requires the SkypeOut service from Service Provider for
landline calls first.
13
Dial number from idle screen directly.
Use
to place call:
1. Press and hold
until a “+” appears on the display, input the country code,
then the telephone number, press
2. Press
Use
up / down and
;
to select SkypeOut.
to place call:
1. Press and hold
until a “+” appears on the display, input the country code,
;
then the telephone number, press
2. When your preferred line is set to Always SkypeOut, press
SkypeOut call directly;
to make a
When your preferred line is set to Always ask, press
up / down and
to
select SkypeOut;
When your preferred line is set to Always Landline, you can’t use
to place
SkypeOut call. (Refer to To set the preferred line for more information)
To Call a Skype™ User
Make sure the Skype™ user is available in your Skype Contact list and is online.
Otherwise, add the online Skype™ user name you wish to call to the Contacts list first. It
will automatically appear in your phone’s Skype list. To call a Skype™ user:
1. In standby mode, press
to enter the main menu; press
the display shows the stored names;
2. Or press
to select Contacts,
to enter the Contacts menu in standby mode;
3. Press
up / down to highlight your preferred contact, press
4. Press
again to select call;
5. Press
up / down and
Office, Home).
to select your preferred number (Skype, Mobile,
To Make a Call from Contacts
1. In standby mode, press
2. Press
to select;
to enter the main menu;
to select Contacts, the display shows the stored names;
14
3. Press
up / down to highlight your preferred contact, press
4. Press
to select Call;
5. If you select a Skype account, press
number, press
and
to select;
again to call; if you select a landline
to select Landline or SkypeOut.
To Make a call from Call Logs
1. In standby mode, press
to enter the main menu;
2. Press
to select History, the display shows All calls, Missed calls, Incoming
calls, etc;
3. Press
up / down to highlight your preferred call logs, press
4. Press
up / down and
5. Press
to select Call;
to select;
to select the number you want to call;
6. When the selected log is a Skype account, press
up / down and
your preferred number (Skype, Mobile, Office, Home).
to select
Note:
You are also allowed to dial a landline number from the call logs by selecting
Landline calls (Received call, Dialed call, Missed call) under History mode.
To make a call From Network
1. In standby mode, press
2. Press
to enter the main menu;
up / down and
to select Search;
3. Use the keypad to enter the full name or Skype name or email address you want to
search, press
to confirm;
4. The display shows all the matched accounts, use
press
5. Use
up / down to highlight one,
to select;
and
to select Call.
6. Press
up / down and
Office, Home).
to select your preferred number (Skype, Mobile,
15
To Set Earpiece Volume
•
During an active call, you just press
earpiece, press
up/down to adjust the volume of the
to confirm.
To Mute the Mouthpiece
1. Press
during an active call;
2. Press
to select Mute microphone, this prevents the person on the active call
from hearing what you or someone else in the room is saying;
3. To cancel the Mute function, press
and
to select Unmute microphone
16
during the active call, use
up/down
Advanced Functions
Menu Structure of SK9500
Contacts
Call
Send voicemail
View profile
Advanced
View the contact’s profile
Rename
Remove
Block
Request details
Add a contact
All calls
Call
Send voicemail
Missed calls
Details
History
Delete
Incoming calls
View profile
Add to contacts
Outgoing calls
Clear list
Received Calls
Dialed Calls
Landline calls
Missed Calls
Play
Details
Delete
Voicemails
Call
Send voicemail
View profile
Add to contacts
My greeting
Contacts requests
Accept
View profile
Decline
Change status
Offline
Online
Status
Skype me
Away
Not available
Do not disturb
Invisible
17
Status
Continued
Mood message
My profile
Details shown to all
Private details
Sign out
Add Contact
Skype
SkypeOut
Search
Skype credit
Service
SkypeIn
Voicemail
IP Setting
IP address
Network
Subnet mask
Default gateway
Primary DNS
Secondary DNS
General
Change password
Auto sign in
Language
Software updates
Reset
Call divert
Call forwarding
Forward to
Voicemail
Welcome message
Privacy
Calls
SkypeIn calls
Manage blocked users
Settings
Incoming call alert
External Ring
External Vol.
Tones
Internal Ring
Internal Vol.
Notification tones
Keypad tones
18
Time
Time zone
Daylight saving
Time and Date
Time format
Time separator
Date
Date format
Settings
continued
Date separator
Select Base
Base Sub
De-register
Base Settings
Cordless Settings
Time out
Contrast
Phone Settings
Preferred Line
Auto-talk
Handset Name
Information
Skype Settings
To Change Your Online Status
Your online status can be seen by all Skype contacts authorized by you. For more on this,
please see Main Display in the Installation and Basic Functions section. For more on
authorizations, please refer to Exchange Contact Details Request in this section of the
manual.
1. In standby mode, press
Status, then use
and
2. Or in standby mode, use
3. Use
and
to enter the main menu; use
to select Change status;
up key to enter the Status menu;
to select your preferred status.
To Set Your Mood Message
You must be signed into Skype to set your mood message.
1. In standby mode, press
to enter the main menu;
19
and
to select
2. Use
and
to select Status;
3. Use
and
to select Mood message;
4. Use your keypad to enter the mood text, press
to delete;
5. Press
to clear the characters you want
to confirm.
To Change Your Skype Profile
You must be signed into Skype to change your Skype profile.
6. In standby mode, press
to enter the main menu;
7. Use
and
to select Status;
8. Use
and
to select My Profile;
9. Use
and
to select your preferred profile (Details shown to all, Private details).
10.There are two modes for you to edit your profile:
•
In Details shown to all, press
and
to select your preferred setting.
(Skype name, Full name, Gender, Birthdate, Country/Region,
State/Province, City, Language, Home phone, Office phone, Mobile,
Home page, About me).
a) In Skype name, please note that you cannot change your Skype name here.
b) In Full name, use the keypad to enter your data.
c) In Gender, use
to select (Unspecified, male, female).
d) In Birthdate, enter the date using the keypad, press
e) In Country/Region, use
>Zimbabwe).
and
or just
to confirm.
to select (Afghanistan-
f) In State/Province and City, use the keypad to enter your data, press
to confirm.
g) In Language, use
and
or just
to select (English->Chinese).
h) In Home phone, Office phone, Mobile, Home page, and About me, use
the keypad to enter your data.
•
In Private you can enter your e-mail address. The address will not be shown
to other Skype users and is merely used for the search function: Save your
private e-mail address in Private, and users who know this address will be
able to find you by searching for it on Skype.
20
a) In private, when there are existing email addresses press
options (edit, Remove, Add).
to select
To Change Your Password
You can change your Skype password here.
1. In standby mode, press
to enter the main menu;
2. Use
and
to select Settings;
3. Use
and
to select General;
4. Use
and
to select Change password;
5. Use the keypad to input the old password, press
6. Use the keypad to input the new password, press
7. Repeat the new password, press
to confirm;
to confirm;
to confirm.
To Choose Auto or Manual Sign In
Your first sign-in has to be manual, but after that you can activate Automatically sign in
and sign in to your Skype account automatically, in case you should turn off the base
station. If you activate Prompt for password, you have to enter your Skype password
every time you sign in.
1. In standby mode, press
to enter the main menu;
2. Use
and
to select Settings;
3. Use
and
to select General;
4. Press
to select Auto sign in;
5. Use
and
or just
to select your preferred sign-in mode. (Automatically
sign in, Prompt for password)
To Create a Personal Voicemail Greeting
Skype voicemail has a default voicemail greeting. You can also create your personal
welcome greeting, which will be played back to people calling you when you are unable
to answer the call.
1. In standby mode, press
to enter the main menu;
21
2. Press
and
to select Settings;
3. Press
to select Call divert;
4. Press
and
5. Press
to enter the options;
6. Press
and
to select Welcome message;
to select Record new, and select Play to listen to the message.
Note:
You have to buy a Skype voicemail subscription to use this service. See more at
www.skype.com.
To Listen to Your Voicemail
Callers can leave a message for you. Whenever someone sends you a voicemail, the
message You have 1 new voicemail will be displayed on your SK9500
1. In standby mode, press
and
History; press
2. Or press
3. Press
to enter the main menu; press
and
to select
to select Voicemails;
to enter Voicemail menu under standby mode;
and
or just
to select the voicemail you desired to listen to;
4. Press
and
or just
to select one option (Play, Details, Delete, Call,
Send voicemail, View profile, Add to contacts, My greeting).
To Set Privacy
You can specify which kinds of Skype and SkypeIn calls you want to accept.
1. Press
and
to select Settings under main menu mode;
2. Press
and
to select Privacy;
3. Press
to select Calls, you are allowed to select Anyone, Only my contacts,
Only if details shared. Press
and
to select one you prefer.
Anyone: All Skype users can call you, even users not on your Contact list.
Only my contacts: Skype users can call you only if they are on your Contact list.
Only if details shared: Only Skype users authorized by you can call you.
22
and
4. Or press
to select SkypeIn calls, you are allowed to select Anyone,
Known numbers, Only my contacts. Press
and
to select one you prefer.
Anyone: You can receive calls from anyone calling your SkypeIn number.
Known numbers: Only SkypeIn calls providing a Caller ID will be accepted.
Only my contacts: Only SkypeOut contacts on your Contact list can call you.
5. Or press
and
to select Manage blocked users, you are allowed to view the
blocked users. Press
and
to unblock the user you prefer.
Notification
You can choose whether you want to be alerted by a tone whenever you receive a
voicemail or an authorization request.
1. In standby mode, press
to enter main menu;
2. Press
b and
3. Press
and
to select Tones;
4. Press
and
to select Notification tones;
5. Press
and
to turn notification tones on or just
to select Settings;
to turn them on.
Phone Settings
Internet Settings
You can configure settings such as IP Setting, IP address, Subnet mask, Default gateway,
Primary DNS and Secondary DNS. However, if you have an advanced Internet
connection and are not familiar with firewalls and ports, we recommend that you consult
someone with knowledge on this or read more on the topic at www.skype.com.
In IP Setting you can choose DHCP (Dynamic Host Configuration Protocol) or Static.
The DHCP IP setting covers the needs of most users. Should you wish to attach the base
station to an Internet connection using the static IP mode instead, this is how to configure
this mode below.
1. Press
and
to select Settings under main menu mode;
2. Press
and
to select Network;
3. Press
to select IP Setting;
23
4. Press
and
to select Static;
Now it is easy to set IP address, Subnet mask, Default gateway, Primary DNS and
Secondary DNS here.
Tones
You can configure different kinds of tones on your SK9500.
To enter the Tones mode
1. In standby mode, press
to enter main menu;
2. Press
and
to select Settings;
3. Press
and
to select Tones;
To Change the Incoming Call Alert
You can define how you want your SK9500 to alert you with incoming calls:
Ringing: The handset will ring as long as the incoming call is active.
Ring once: The handset will ring only once.
Beep once: The handset will make one beep only on an incoming call.
Off: The handset will not make any voice on an incoming call.
1. Press
to select Incoming call alert under Tones mode;
2. Press
and
or just
once, Beep once, Off)
to select your preferred alert type. (Ringing, Ring
To Change the External Ring
1. Press
and
to select Incoming call alert under Tones mode;
2. Press
and
or just
to select your preferred ring;
If you wish to set the External Vol., Internal Ring and Internal Vol., this is easily done
here.
To Adjust the Keypad Tones
1. Press
and
to select Keypad tones under Tones mode;
2. Press
on.
and
to turn the keypad tones off or just
24
to turn the keypad tones
To Change the Handset Language
1. Press
and
to select Settings under main menu mode;
2. Press
and
to select General;
3. Press
and
to select Language;
4. Press
up/down and
to select your preferred language.
To Set the preferred line
You can configure how you want to route your outgoing calls when using
.
These are your options:
Landline: Select this option if you always want to route your landline and/or mobile
phone calls via the landline (traditional telephony).
SkypeOut: Select this option if you always want to route your calls to the landline and/or
mobile phones via the Internet (SkypeOut).
Always ask: Select this option if you want to always be prompted to specify the
preferred routing for a call
1. In standby mode, press
to enter the main menu;
2. Press
and
to select Settings;
3. Press
and
to select Phone settings;
4. Press
and
to select Preferred Line;
5. Press
and
or just
to select Landline, SkypeOut or Always ask
To Set the Time and Date
Your SK9500 will always obtain time and date information from the Internet. Thus, you
only have to configure the time zone and Daylight saving settings. When this is done,
the time and date obtained by your SK9500 from the Internet will be adjusted according
to your choices.
To Set Time Zone
1. In standby mode, press
to enter the main menu;
2. Press
and
to select Settings;
3. Press
and
to select Time and Date;
25
4. Press
and
to select Time zone;
5. Press
and
to select your preferred time zone;
To Set Daylight Saving
Choose Daylight saving when you are in a zone with summertime, and choose Standard
in all other zones.
1. Repeat the step 1-3 above;
2. Press
and
to select Daylight saving;
3. Press
and
to select your preferred mode (Standard, Daylight saving).
If you wish to adjust the Time format and Time separator as well as the Date format and
Date separator settings, this is easily done here.
Registration
Your SK9500 is supplied with the handset already registered to the base unit; you
shouldn't need to register it. But if you've bought extra handset, you'll need to register
each one to your original base unit. Maximum 4 handsets can be registered to one base.
To Enter Registration Mode
1. Press
and
to select Settings under menu mode;
2. Press
and
to select Cordless settings, and the display shows Select base,
Base sub De-register and Base setting.
To Register a Handset
1. Press and hold the Handset locator button on the base unit for a while, until you
hear "beep" sound twice continuously;
2. Press
and
to select Base Sub under Cordless settings mode, the display
shows BASE 1; BASE 2; BASE 3; BASE 4;
3. Press
and
to select the certain base;
4. Enter base PIN (0000), and press
to confirm;
5. After registered, the handset goes back to the standby mode.
To Select a Base
You may need to do this if your handset has been registered to more than one base, and
you need to select one to use.
26
and
to select Select Base under Cordless settings mode, the display
1. Press
shows BASE 1; BASE 2; BASE 3; BASE 4;
2. Press
and
to select the certain base.
To De-register a Handset
You may need to do this if you have more than one handset registered to your base unit
and you need to replace a faulty handset.
1. Press
and
to select De-register under Cordless settings mode;
2. Key in the PIN (default 0000), press
to confirm;
3. Then key in the number of the handset you want to de-register, press
confirm.
to
Note:
You cannot de-register the handset you are currently using.
To Set LCD time out
You can adjust the LCD time out here.
1. Press
and
to select Settings under main menu mode;
2. Press
and
to select Phone settings;
3. Press
to select Time out;
4. Press
min).
up/down and
to change the time interval (1 min, 2 min, 3 min, 4
To Set the Contrast
You can adjust the contrast of your display.
5. Press
and
to select Settings under main menu mode;
6. Press
and
to select Phone settings;
7. Press
to select Contrast;
8. Press
up/down and
to change the contrast.
27
Auto-talk Function
Normally, you need to press
to answer an incoming call. But with AUTOTALK
function turned on, when your handset is ringing for an incoming call, you can answer
the call by simply lifting the handset from the base unit without pressing
.
1. Press
and
to select Settings under main menu mode;
2. Press
and
to select Phone settings;
3. Press
and
to select Auto-talk;
4. Press
and
to select Off / On.
Note:
If you have turned Auto-talk on, do not press
after you've answered a call by
lifting the handset, otherwise, you'll disconnect the call.
To Set Handset Name
1. Press
and
to select Settings under main menu mode;
2. Press
and
to select Phone settings;
3. Press
and
to select Handset Name;
4. Enter the name of the handset, press
to save.
to clear the incorrect character, then
Base Settings
To Set Base Ringer
You are allowed to set the melody, volume of your SK9500 base here.
To set Ringer Volume (1-5 level)
1. Press
and
to select Settings under main menu mode;
2. Press
and
to select Cordless settings;
3. Press
and
to select Base settings;
4. Press
to select Ringer Settings;
28
5. Press
again to select Ringer Volume;
6. Press
setting.
up/down to change the volume level, then press
to confirm your
If you wish to set the Ringer Melody, this is easily done here.
Dial Settings
You are allowed to set flash time, auto pause and dial mode here.
To Set Flash Time
1. Repeat 1-3 steps above;
2. Press
and
to select Dial Settings;
3. Press
to select Flash Time;
4. Press
Long).
and
key or just
to select your preferred flash time (Short,
To Set Auto Pause
When you call a number with a pause, the phone waits a few seconds before transmitting
the next digits in the dialing sequence. This is useful when you have to dial a number for
access to an outside line, or for going into a voicemail system. You are allowed to set one
number in Auto Pause.
1. Press
and
to select Auto Pause under Dial Setting mode;
2. Use the keypad to input the PIN (0000), press
to confirm;
3. Use the keypad to input the number (for example “123”) you want to set auto
to confirm. When you dial number “123456”, the pause will
pause, press
happen between “123” and “456”.
To Set Dial Mode
1. Press
and
to select Dial Mode under Dial Setting mode;
2. Press
and
or just press
to select your preferred mode (Pulse, Tone).
To Set Call Barring
Call barring enables you to restrict or bar certain types of calls from your phone.
1. Press
and
to select Settings under main menu mode;
2. Press
and
to select Cordless settings;
29
3. Press
and
to select Base settings;
4. Press
and
to select Call Barring;
to confirm;
5. Use the keypad to key in the PIN (0000), press
6. Press
and
or just
(up to 5 numbers);
to select your preferred number to set call barring
7. Use the keypad to key in the number, press
to confirm;
To Set LCR (Least Cost Route)
With the LCR function, the phone will automatically replace a long number with a
comparative short number, to simplify the process of dialing a long number. For example,
if the user program to replace "00" with "17909", then when he dials "006567417211",
then the phone will automatically replace the number to be dialed out as
"179096567417211".
1. Press
and
to select LCR under Base Settings mode;
2. Use the keypad to key the PIN (Default:0000), press
to confirm;
3. Use the keypad to key in the SHORT number that you want to replace the long
number, press
to confirm;
to confirm.
4. Use the keypad to key in the LONG number, press
To Change PIN
1. Press
and
to select PIN under Base Settings mode;
2. Use the keypad to key in the original PIN (0000), press
to confirm;
3. Use the keypad to key in the new PIN you want to set, press
to confirm.
Default Settings
1. Press
and
to select Default under Base Settings mode;
2. Use the keypad to key in the current PIN, press
will return to their default settings.
to confirm, then all features
Resetting the System
If you have set a PIN and forgotten it, you need to reset the system. The PIN will be reset
to 0000. If you reset the system, you will lose all stored information and all features will
return to their default settings. You need to register the handset to the base unit again.
30
While you are resetting the system, you should disconnect the telephone line cord from
the back of the base unit, so you won't be interrupted by incoming calls. To reset the
system without the PIN:
1. Disconnect the power lead from the back of the base unit
2. Press and hold the HANDSET LOCATOR button in the base unit, at the same
time connect the power lead into the back of base unit. Release the LOCATOR
button after you hear “beep” sound for five times. The IN USE light on base unit
lights during this whole process.
3. After 2~3 seconds, you can hear “beep” sound for two times again and the IN
USE light goes off;
4. Disconnect the power lead from base. Reconnect and you will hear a confirmation
tone from the base unit.
Contacts
Your list of contacts contains all Skype users as well as all landline phone users that you
have added. There is a limit to the number of entries you can make, but your contact list
can nevertheless hold hundreds of contacts.
To Access your Contacts List
It will take about 4 minutes to load the contact list for the first time if the number of your
contacts is above 200.
Press
to access your contacts list in standby mode or
1. In standby mode, press
2. Press
and
to enter the main menu;
to select Contacts;
3. Browse your contacts using
, press
to select one;
4. Press
and
to select your desired action (Call, Send voicemail, View
profile, Advanced)
5. Under Advanced you can access more options (Rename, Remove, Block, Request
details, Add a contact).
Note: If the Skype name in the contact list is more than 15 characters, it cannot be
displayed completely, and you have to view profile to check the whole name.
To Exchange Contact Details Request
You can send an authorization request to a Skype user –and if it is accepted, you can
see his or her online status.
31
When adding a contact to your Contact list you will be prompted to specify if you want to
send an authorization request. We recommend that you send this request but you do not
have to do so –and you can send the request whenever you wish to. If you do not send the
request, you will never be able to see the contact’s online status. Users who have not been
authorized will be indicated by
1. In standby mode, press
2. Press
and
on your contact list.
to enter the main menu;
to select Contacts;
3. Browse your contacts using
authorization request;
, press
to select one you still have not sent an
4. Press
and
to select Advanced;
5. Press
and
to select Request Details;
6. Use the keypad to enter the text you want to send along with the request, press
to send the authorization request.
To Rename a Contact
1. Press
and
to select Rename under Advanced mode;
2. Use the keypad to enter the new name, press
press
to clear the incorrect characters,
to confirm;
To Remove a Contact
1. Press
and
to select Remove under Advanced mode;
2. Press
and
or just
to select your desired types of remove (Remove and
block contact, Remove only).
To Block a Contact
•
Press
and
to select Block under Advanced mode. When you block the
contact successfully, press
•
to go back to the Advanced mode;
To unblock the contact, press
to select Unblock under current Advanced mode;
To Check Contacts Requests
1. In standby mode, press
to enter the main menu;
32
2. Press
and
to select History;
3. Press
and
to select Contacts Requests;
4. Press
and
or just
5. Press
, the display shows you the options;
6. Press
to accept or press
to select the request you desire to check;
and
to decline the request.
Handling Calls
To Make an Intercom Call
To make an intercom call, you must register at least two handsets to one same base.
1. Press the
, you will hear Dial tone;
2. Key in the number of another handset. On the other handset's display, your
number appears, and the INT symbol flashes. Then the other handset user presses
to connect the call.
Call Waiting
SK9500 DECT has a Call Waiting feature that works with Caller ID service from your
telephone service operator. When you’re engaged on a landline ongoing call, if you
receive a second Skype call, your phone will use a call waiting signal to let you know
another call is ringing in. This way, you can switch between Skype and landline callers,
hook down Skype call.
To Hold / Un-hold an Active Call
1. Press
to enter option menu during an active call;
2. Press
and
3. Press
again to select Resume, you can retrieve the call.
to select Hold the call, then the incoming call is on hold;
To Switch between Skype Calls
1. When you already engaged on an ongoing call, if another call is received, press
or
2. Press
to answer;
to switch between the two calls;
33
to enter option menu; then press
3. Or press
press
and
will be on hold.
or just
and
to select Switch Calls;
to resume your desired contact and the other call
To Switch between landline call and Skype Call
1. When you already engaged on an ongoing landline call, if a Skype call is received,
press
2. Press
or
to switch between the two calls;
3. Or press
press
hold.
to answer;
to enter option menu; then press
and
or just
and
to select Switch Calls;
to resume your desired call and the other call is on
To Divert all Calls
You can configure your SK9500 to forward all incoming Skype calls either to a
landline/mobile phone or to your Voicemail. Please note that in order to use this function,
you have to have Skype credits.
1. In standby mode, press
to enter the main menu;
2. Press
and
to select Settings;
3. Press
and
to select Call divert;
4. Press
and
to select your desired action (Call forwarding, Forward to,
Voicemail, Welcome message)
Call forwarding: Activate forwarding to another phone number. You will be prompted
to enter the relevant number, which can be both a Skype name and an ordinary extension
number. Please remember to enter the country code.
Forward to: Edit the phone number when call forwarding is active.
Voicemail: Activate your Voicemail, allowing callers to leave a message after listening
to your welcome message.
Welcome message: After activating voicemail you can record your welcome message. If
you do not record a personal message, the Skype standard message will be used instead.
Skype conference call
The SK9500 cannot initiate a Skype conference call, but you can participate in a Skype
conference call initiated from a computer.
34
The operation is similar to answering a call. (Refer to To Answer a call section for more
details)
If the active call is a Skype conference call, you can see the participants via the View
Participants menu.
Message Waiting Indicator function
You must subscribe to Message Waiting Indicator from your service provider to use this
feature.
With this function, all your callers will be switched to the voicemail server to leave
messages, and the symbol “ ” will appear on idle screen when you have received new
messages, please follow the provider’s instruction to listen to the messages.
Troubleshooting
Always check first that:
•
You have followed the steps listed on pages to install and set up your SK9500.
•
All connects are firmly inserted in their sockets.
•
Mains power is switched on at the socket.
•
The handset’s batteries are correctly and securely installed, and are not run down.
If you experience difficulties with the working of your SK9500, refer to the advice given
below.
I cannot make or answer calls.
•
Check that the base unit’s mains power adapter is plugged in and power is switched
on. The base unit needs mains power for normal operation of the phone-not just
charging the batteries.
•
Make sure you are using the telephone line cable that was supplied with your SK9500.
Other telephone line cables might not work.
•
Move the handset closer to the base unit.
•
Check the batteries level symbol on the display. If it is low, replace the handset on the
base unit or charger pod to recharge the batteries.
•
Switch off power at the mains socket, wait for a few seconds and then switch back on.
This may solve the problem.
•
If you still can’t make calls, try re-registering the handset.
35
When I place Skype call, there is no sound.
•
Check the network.
I cannot enter Skype Contact List
Check that the Ethernet cable between
on the base station and the LAN port on your
broadband connection (modem, router, hub, switch etc.) is connected properly.
When I press keys on the handset, nothing happens.
•
Make sure the batteries are fitted in your handset. If the batteries level symbol on the
display shows “low”, recharge the batteries.
•
Check whether there’s a key symbol on the display. If so, the keypad is locked. Turn
to the user manual to find out how to unlock it.
When I press keys on the handset, digits appear on the display, but I can’t make an
outside call.
•
Try moving the handset closer to the base unit.
•
Try a different position for the base unit-perhaps higher, or further from other
electrical equipment.
The phone does not ring
•
Check that the base unit’s mains power adapter is plugged in and power is switched
on. The base unit needs mains power for normal operation of the phone-not just
charging the batteries.
•
Make sure you are using the telephone line cable that was supplied with your SK9500.
Other telephone line cables might not work.
•
Check that you have set the ringer volume to off. See the user manual for more
information.
•
Check that the total REN value of all equipment connected to your telephone line is
no more than 3. Disconnect one or more telephones and see whether that helps.
The base does not ring.
•
Check that the base power is ON, and the base ringer is set ON.
•
Check that the line cord is correctly fitted and undamaged.
The CHARGE light on the base unit does not come on.
•
Check the handset is properly stationed.
•
Check the connections between the base unit and mains power socket.
36
•
Clean the batteries charging contacts with a dry cloth.
When I press the CALL button, I hear a loud noise.
•
The strange noise is caused by interference. Disconnect the mains power lead from
the back of the base unit, and then wait for 30 seconds before reconnecting it.
There is 'beep' sound while I am on a call.
•
You may be going out of range of the base unit. Move closer, or your call may be cut
off.
•
Check the Batteries Level symbol on the display. If it is low, recharge the batteries.
The Caller Display feature isn’t working.
•
You need to subscribe to the Caller Display feature from your service provider.
•
The caller may have withheld their number, or they may be calling from a network
that does not transmit the Caller ID (for example, it may be an international call).
The handset’s batteries are running low within an hour or two.
•
Before you used the handset for the first time, you should have left it on the base unit
for up to 15 hours to charge the batteries fully.
•
You may need to replace the batteries.
I cannot transfer a call.
•
Make sure the other handset is within range of the base unit, and is not busy on a call.
•
Make sure you are keying in the correct number for the other handset.
No display on LCD screen.
•
Make sure the batteries have power.
I cannot register handset to base
•
Make sure the number of handset registered to base is less than 4.
•
Check that the base unit is not near other electrical equipment, such as TV or
computer
37
Technical Details
Full DECT GAP Compatible system
Standard
Digital Enhanced Cordless
Telecommunications (DECT)
Frequency range
1.8 GHz / 2.4 GHz
Channel bandwidth
1.728 MHz
Modulation
GFSK
Operating range
Up to 300 m outdoors;
Up to 50 m indoors
Operating time
Standby time: 120 hours
Talking time: 8 hours
Temperature range
Operating 00C to 400C
Storage -200C to 600C
Electrical power
Handset --- 2 x 1.2 V 750 mAh Ni-MH,
Rechargeable battery cell
Base unit--- Input 230 V AC, 50 Hz
Output DC 9 V, 500 mA.
PABX compatibility
Timed break recall: 100 ms for short flash;
250 ms for long flash
Pause length: 3 seconds
Signaling type: DTMF (dual-tone multi-frequency)
Pulse dialing
Humidity
10%~70%(non-condensing)
.
38
Declaration of Conformity
The SK9500 complies with the essential protective requirements and objectives of:
•
EC R& TTE Directive 1999/5/EC
•
EC Low Voltage Directive 73/23/EEC
•
EC EMC Directive 89/336/EEC
And conforms to the following relevant harmonized standards:
•
TBR 10:1999
•
TBR 22:1997
•
TBR 38:1998
•
EN 301406 V1.5.1:2003
•
EN 301437 V1.1.1:1999
•
EN 301489-01 V1.4.1:2002
•
EN 301489-06 V1.2.1:2002
•
EN 60950-1:2001
39