1
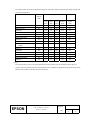
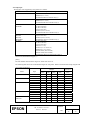
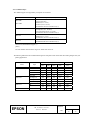
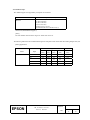
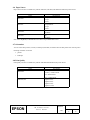
TM Printer Driver
User's Manual
Rev. 1.61 November 30, 2000
SEIKO EPSON CORPORATION
Contents
1.Foreword.................................................................................4
2.Operating Environment ..........................................................4
2.1. Operation System ............................................................................................................................................................. 4
2.2. Euro support Operation System ....................................................................................................................................... 4
2.3. Computer .......................................................................................................................................................................... 4
2.4. USB interface .................................................................................................................................................................. 4
2.5. Printer, Customer Display ................................................................................................................................................ 5
3.Installing the Driver................................................................7
3.1. Installing on Windows 95/98 ........................................................................................................................................... 7
3.2. Installing on WindowsNT4.0 ........................................................................................................................................... 7
3.3. Installing on Windows2000.............................................................................................................................................. 8
3.4. Print Processor.................................................................................................................................................................. 9
3.4.1. About print processor............................................................................................................................................ 9
3.4.2. Install print processor............................................................................................................................................ 9
3.4.3. Set up print processor............................................................................................................................................ 9
3.5. Installing the USB component ....................................................................................................................................... 10
3.5.1. USB port driver installation ................................................................................................................................ 10
3.5.2. TM printer driver and USB port monitor installation......................................................................................... 10
3.6. Printer Settings .............................................................................................................................................................. 10
4.Main Specifications ..............................................................11
4.1. Printer Fonts ................................................................................................................................................................... 11
4.2. Bar-Code Printing........................................................................................................................................................... 18
4.3. Special Functions............................................................................................................................................................ 19
4.4. Resolutions ..................................................................................................................................................................... 23
4.5. Paper Sizes...................................................................................................................................................................... 24
4.5.1. Rolled Paper (Receipt/Journal Paper)................................................................................................................. 24
4.5.2. Slip Paper ............................................................................................................................................................ 27
4.5.3. Validation Paper.................................................................................................................................................. 29
4.5.4. Endorse Paper ..................................................................................................................................................... 30
4.5.5. Label Paper ......................................................................................................................................................... 31
4.6. Paper Source .................................................................................................................................................................. 32
4.7. Orientation ...................................................................................................................................................................... 32
4.8. Print Quality ................................................................................................................................................................... 32
EPSON
TITLE
TM Printer Driver
User's Manual
SHEET
REVISION
160
NO
NEXT
3
SHEET
2
5. USB Interface ......................................................................33
5.1. Print to the following port .............................................................................................................................................. 33
5.2. Add Port......................................................................................................................................................................... 33
5.3. Delete Port ..................................................................................................................................................................... 34
5.4. Port Setting .................................................................................................................................................................... 34
6. Using the TM Printer from an Application..........................35
6.1. Controlling the Printer from WordPad........................................................................................................................... 35
6.1.1. WordPad Environment........................................................................................................................................ 35
6.1.2. Printing Text ....................................................................................................................................................... 35
6.1.3. Opening the Cash Drawer................................................................................................................................... 36
6.1.4. Print Bar code...................................................................................................................................................... 36
6.1.5. Cutting the Paper................................................................................................................................................. 37
6.2. Controlling the Printer from Visual Basic (Ver. 4.0) ..................................................................................................... 38
6.2.1. Selecting the Printer Driver ................................................................................................................................ 38
6.2.2. Selecting the Paper Source.................................................................................................................................. 38
6.2.3. Printing Text ....................................................................................................................................................... 39
6.2.4. Opening the Cash Drawer................................................................................................................................... 39
6.2.5. Cutting the Paper................................................................................................................................................. 40
6.2.6. Printing a Bar Code............................................................................................................................................. 40
6.2.7. Using ESC/POS commands................................................................................................................................ 41
6.2.8. Printing a Bitmap ................................................................................................................................................ 42
7.Attention in use.....................................................................43
TITLE
EPSON
TM Printer Driver
User's Manual
SHEET
REVISION
1.61
NO
NEXT
SHEET
4
3
1.Foreword
This manual explains how to install and use Windows printer drivers for Epson TM printers and DM-D customer display.
These drivers make it possible for Windows applications to print to EPSON TM printers and DM-D customer display.
Please read this manual carefully so that you will be able to take full advantage of the driver's capabilities. This manual should
be read in conjunction with the TM printer's Operator’s Manual and the DM-D customer display Information Manual.
2.Operating Environment
2.1. Operation System
The Epson TM printer drivers can run on any of the following operating systems.
- Microsoft Windows95
- Microsoft Windows98
- Microsoft Windows NT4.0
- Microsoft Windows 2000
2.2. Euro support Operation System
The Epson TM printer drivers can run on any of the following operating systems. Renew OS using the Euro support
update file which is provided from Microsoft. But, Microsoft Windows98,Windows2000 doesn't have to renew an
operating system using the update file.
- Microsoft Windows95: Euro Update Patch [w95euro.exe]
- Microsoft Windows98
- Microsoft Windows NT4.0: Euro Update Patch [nt4_euro.exe] / Service Pack 4
- Microsoft Windows2000
2.3. Computer
The drivers run on computers that support the operating systems listed above.
- NEC PC-9800-series
- EPSON PC-series
- AT-compatible
2.4. USB interface
TM printer is supporting USB interface. But, it supports only in the following environment:
• Operating system
Windows98 English 2nd edition
• Computer
AT compatible machine [The model which the USB port loads with]
• TM printer
The USB interface support model
English edition : TM-U210A/U675/H5000II/H6000/T88II/U590/J8000
When using TM printer through USB interface, must install the USB port driver: TMUSB90.SYS.
TITLE
EPSON
TM Printer Driver
User's Manual
SHEET
REVISION
1.61
NO
NEXT
SHEET
5
4
2.5. Printer, Customer Display
The table on the following pages shows the correspondence between drivers, printers, customer display and paper types.
Refer to the table to determine the driver(s) required to support the Epson printers, customer display and paper types that
you plan to use.
Printer
TM-U375
TM-U675
Paper Type
Printer Driver
JP
US (Euro support)
Journal
EPSON TM-U375 (Journal)
O
O (O)
Slip
EPSON TM-U375 (Slip)
O
O (O)
Validation
EPSON TM-U375 (Validation)
O
O (O)
Journal
EPSON TM-U675 No cut
O
O (O)
Slip
EPSON TM-U675 (Slip)
O
O (O)
Validation
EPSON TM-U675 (Validation)
O
O (O)
TM-U200B
Receipt
EPSON TM-U200B No cut
X
O (X)
EPSON TM-U200B Partial cut
X
O (X)
TM-U210A
Receipt
EPSON TM-U210A No cut
O
O (O)
EPSON TM-U210A Partial cut
O
O (O)
TM-U210AR
Receipt
EPSON TM-U210AR No cut
O
O (O)
EPSON TM-U210AR Partial cut
O
O (O)
EPSON TM-U210B No cut
X
O (O)
EPSON TM-U210B Partial cut
X
O (O)
TM-U210B
Receipt
TM-U210D
Receipt
EPSON TM-U210D
X
O (O)
TM-U300A
Receipt
EPSON TM-U300A No cut
O
O (O)
EPSON TM-U300A Partial cut
O
O (O)
EPSON TM-U300A Full cut
O
O (O)
EPSON TM-U300B No cut
O
O (O)
TM-U300B
TM-U300C
Receipt
EPSON TM-U300B Partial cut
O
O (O)
EPSON TM-U300B Full cut
O
O (O)
Receipt
EPSON TM-U300C (Receipt)
X
O (O)
Validation
EPSON TM-U300C (Validation)
X
O (O)
TM-U300D
Receipt
EPSON TM-U300D (Receipt)
O
O (O)
Validation
EPSON TM-U300D (Validation)
O
O (O)
TM-U325
Receipt
EPSON TM-U325D (Receipt)
X
O (O)
Validation
EPSON TM-U325D (Validation)
X
O (O)
TM-U950
Receipt,
EPSON TM-U950 No cut
O
O (O)
Journal
EPSON TM-U950 Partial cut
O
O (O)
EPSON TM-U950 Full cut
O
O (O)
Slip
EPSON TM-U950 (Slip)
O
O (O)
Receipt
EPSON TM-U925 No cut
X
O (O)
EPSON TM-U925 Partial cut
X
O (O)
TM-U925
Slip
EPSON TM-U925 Full cut
X
O (O)
EPSON TM-U925 (Slip)
X
O (O)
TITLE
EPSON
TM Printer Driver
User's Manual
SHEET
REVISION
1.61
NO
NEXT
SHEET
6
5
Printer
TM-U230
TM-T88II
Paper Type
Receipt
Receipt,
Printer Driver
JP
US (Euro support)
EPSON TM-U230 No cut
X
O (O)
EPSON TM-U230 Partial cut
X
O (O)
EPSON TM-T88II No cut
O
O (O)
EPSON TM-T88II Partial cut
O
O (O)
O
O (O)
TM-T88IIR
Receipt,
EPSON TM-T88IIR No cut
EPSON TM-T88IIR Partial cut
O
O (O)
TM-T285
Receipt,
EPSON TM-T285 No cut
O
X
Journal
EPSON TM-T285 Partial cut
O
X
EPSON TM-T285 Full cut
O
X
Receipt
EPSON TM-H5000II No cut
O
O (O)
EPSON TM-H5000II Partial cut
O
O (O)
Slip
EPSON TM-H5000II(Slip)
O
O (O)
Receipt
EPSON TM-H6000 No cut
O
O (O)
EPSON TM-H6000 Partial cut
O
O (O)
Slip
EPSON TM-H6000(Slip)
O
O (O)
TM-H5000II
TM-H6000
TM-J8000
TM-L60II
TM-L60
Endorse
EPSON TM-H6000(Endorse)
X
O (O)
Receipt
EPSON TM-J8000 No cut
O
O (O)
EPSON TM-J8000 Full cut
O
O (O)
Slip
EPSON TM-J8000(Slip)
O
O (O)
Receipt
EPSON TM-L60II(Receipt)
O
O (O)
Label
EPSON TM-L60II(Single)
O
O (O)
EPSON TM-L60II(Plural)
O
O (O)
Receipt
EPSON TM-L60(Receipt)
X
O (O)
Label
EPSON TM-L60(Single)
X
O (O)
EPSON TM-L60(Plural)
X
O (O)
TM-U590
Slip
EPSON TM-U590
O
O (O)
TM-U295
Slip
EPSON TM-U295
O
O (O)
EPSON DM-D 10X/20X
O
O (O)
DM-D10x,20x
[Note]
- The JP and US columns indicate whether the driver is available for Japanese and English operating systems,
respectively. A "O" means that the driver is available; an "X" means that it is not available.
- For printers equipped with an auto-cutting function, drivers are provided for each cut type, as follows.
- EPSON TM-xxxx Full cut
Full cut at end of each page.
- EPSON TM-xxxx Partial cut
Partial cut at end of each page.
- EPSON TM-xxxx No cut
No cutting.
- The TM-L60II/L60 label printer driver comes in two types, as follows.
- EPSON TM-L60II (Single)
Feeds each page to appropriate position for label removal.
(Press the FEED switch to proceed to printing of next label.)
- EPSON TM-L60II (Plural)
Prints all pages of data at once.
- Only the English edition of the Euro support model.
TITLE
EPSON
TM Printer Driver
User's Manual
SHEET
REVISION
1.61
NO
NEXT
SHEET
7
6
3.Installing the Driver
3.1. Installing on Windows 95/98
A.
When you execute the Tdr161e.exe file, the files are extracted. Follow the Setup Wizard.
B.
Click on the Start button, and then click on Settings → Printers.
C.
Double click on the Add Printer icon.
D.
Click on the Next button.
E.
Select "Local printer," and then click Next.
F.
Click the Have Disk button.
G.
Type in the pathname which is specified at A. (Default: C:\Tmdrve\WIN95). Then click on OK.
H.
Select the printer driver you wish to install, and then click on the Next button.
I.
Select the COM or LPT port that you wish to use for the printer, and then click on Next.
J.
Type in the printer name you wish to use for this printer, and select whether to use this as your default printer (if
applicable). Then click on Next.
K.
Select whether or not to print a test page, and then click on Finish.
L.
When installation is finished, an icon with the name of the newly installed printer driver will appear in the Printers
window.
M. If you can not print correct using test page, please make sure the setting of following points are as same as the setting
of connected device.
- Is the port you are connecting correct ? (COM, LPT)
- Particularly in the case of a serial connection, are the communications conditions set correctly?
3.2. Installing on WindowsNT4.0
A.
When you execute the Tdr161e.exe file, the files are extracted. follow the Setup Wizard.
B.
Click on the Start button, and then click on Settings → Printers.
C.
Double click on the Add Printer icon.
D.
Select My Computer, and then click Next.
E.
Select the port(s) that you want to use for the printer, and then click on Next.
F.
Click the Have Disk button.
G.
Type in the pathname which is specified at A. (Default: C:\Tmdrve\WINNT40). Then click on OK.
H.
Select the printer driver you wish to install, and then click on the Next button.
I.
Type in the printer name you wish to use for this printer, and then click on Next.
J.
Select whether you wish to allow the printer to be shared by other computers. Then click on Next.
K.
Select whether or not to print a test page, and then click on Finish,.
L.
When installation is finished, an icon with the name of the newly installed printer driver will appear in the Printers
window.
TITLE
EPSON
TM Printer Driver
User's Manual
SHEET
REVISION
1.61
NO
NEXT
SHEET
8
7
M. If you can not print correct using test page, please make sure the setting of following points are as same as the setting
of connected device.
- Is the port you are connecting correctly? (COM, LPT)
- Particularly in the case of a serial connection, are the communications conditions set correctly?
3.3. Installing on Windows2000
A.
When you execute the Tdr161e.exe file, the files are extracted. follow the Setup Wizard.
B.
Click on the Start button, and then click on Settings → Printers.
C.
Double click on the Add Printer icon.
D.
[Add Printer Wizard] will be displayed.
E.
Select [Local printer] and uncheck [Automatically detect and install my Plug and Play printer] box, and then click
[Next>].
F.
Select the port(s) that you want to use for the printer, and then click on Next.
G.
Click the Have Disk button.
H.
Type in the pathname which is specified at A. (Default: C:\Tmdrve\WIN2000). Then click on OK.
I.
Select the printer driver you wish to install, and then click on the Next button.
J.
Select whether or not to print a test page, and then click on Finish,
K.
Click [Yes] on [Digital Signature Not Found] dialog box.
L.
When installation is finished, an icon with the name of the newly installed printer driver will appear in the Printers
window.
M. If you can not print correct using test page, please make sure the setting of following points are as same as the setting
of connected device.
- Is the port you are connecting correctly? (COM, LPT)
- Particularly in the case of a serial connection, are the communications conditions set correctly?
TITLE
EPSON
TM Printer Driver
User's Manual
SHEET
REVISION
1.61
NO
NEXT
SHEET
9
8
3.4. Print Processor
3.4.1. About print processor
When you use a counter function of DM-D10x,20x Customer Display or ControlA font of TM-U230 in
WindowsNT4.0,Windows2000, you should install a print processor for DM-D or TM. You can not display a correct time
on the DM-D and can not use a ControlA font without this print processor.
In the case of Windows95/98, print processor is installed automatically in the installation of DM-D10x,20x or TM-U230
driver.
3.4.2. Install print processor
When you execute the Dpp161e.exe file or Tpp161e.exe file, the print processor is installed. follow the Setup Wizard.
3.4.3. Set up print processor
When you use DM-D10x,20x driver in WindowsNT4.0,Windows2000, please set up the print processor as follows. If
you use it in Win95/98, you don’t need to set up.
[WindowsNT4.0]
A.
Select a printer driver icon in the printer window and click a [Properties]. Properties dialog is shown.
B.
Display a [General] tag sheet and click a [Print Processor] button. Print Processor dialog is shown.
C.
Select a DMPROCES in the list box of print processor.
D.
Click a [OK] button.
[Windows2000]
A
Select a printer driver icon in the printer window and click a [Properties]. Properties dialog is shown.
B
Display a [Advanced] tag sheet and click a [Print Processor] button. Print Processor dialog is shown.
C
Select a DMPROCES in the list box of print processor.
D
Click a [OK] button.
E
.Check [Print directly to the printer] radio button in [Advanced] page on printer propaties dialog box, and then
click [OK].
TITLE
EPSON
TM Printer Driver
User's Manual
SHEET
REVISION
1.61
NO
NEXT
10
SHEET
9
3.5. Installing the USB component
When using TM printer through USB interface, the following files must be installed.
- TM printer driver : TMxxx.DRV
- USB port monitor : TMUSBMON.DLL
- USB port driver
: TMUSB90.SYS
3.5.1. USB port driver installation
Install USB port driver according to the following procedure.
- Confirm that USB interface board is connected to the TM printer.
- Confirm that Widows98 has started.
- Prepare TMUSB port driver [TMUSB90.SYS].
- Connect USB cable with the TM printer and the personal computer.
- Setup wizard is displayed on the screen. Follow the installation accordingly..
3.5.2. TM printer driver and USB port monitor installation
Use the setup disk of Windows98 edition of the TM printer driver.
Choose the setup INF file [ESCPOS.INF] which is in WIN98 folder.
Both TM printer driver and TMUSB port monitor can be installed at the same time.
But, it is supporting only USB support model.
- English edition support model
: TM-U210A/U675/T88II/H5000II/H6000/U590/J8000
[Note]
•
When the old version of the TMUSB PortMonitor is already installed in Windows98, the new version of TMUSB
PortMonitor cannot be normally installed. In this case, delete all printer drivers in the printer window. Then, after
rebooting Windows98, install the TM printer driver.
3.6. Printer Settings
This section is explained the way of following Printer Settings.
- Printing Resolution
- Paper Size
- Orientation
- Paper Source
- Print Quality (TM-J8000 and DM-D10x,20x Printer Driver only)
In Windows95/98, this can be set in the printer’s “Properties” dialog.
In Windows NT4.0, it can be set in the printer’s “Document Default” dialog.
In Windows 2000, it can be set in the printer’s “Printing Preferencest” dialog.
TITLE
EPSON
TM Printer Driver
User's Manual
SHEET
REVISION
1.61
NO
NEXT
11
SHEET
10
4.Main Specifications
4.1. Printer Fonts
These drivers support use of printer fonts as well as Windows fonts. Use of printer fonts permits faster printing. Available
printer fonts are listed below.
"Built-in fonts of a printer" can be specified with the application programs. The "built-in fonts" are as follows.
- Printer Font(Small)
- Printer Font(Large)
The font names that the user can choose in the application are as follows.
2 types of character-height can be chosen in each font.
Three kinds of the xxx cpi font and the xxx cpi Ext and the xxx cpi Euro. font are prepared for by English edition Driver..
The character code of 128 bytes of 80H - FFH varies in the difference in these printer fonts. A xxx cpi font supports an
ANSI character code. And, a xxx cpi Ext. font supports IBM expansion character code. And, a xxx cpi Euro font supports
an Euro symbol correspondence ANSI character code.
The TM-J8000 printer is supporting 10cpi[OCR] font. The character which can be printed by this printer font is only "SP
+ - 0123456789<>".
Printer Models
Japanese and English drivers
Printer Fonts
Sizes
JP
US
16cpi
9, 18
OK
OK
-TM-U300A/B/D
13.3cpi
9, 18
OK
OK
-TM-U375
8cpi
9, 18
OK
OK
-TM-U210A/AR
6.7cpi
9, 18
OK
OK
16cpi[Ext.]
9, 18
NO
OK
13.3cpi[Ext.]
9, 18
NO
OK
-TM-U200B/D
8cpi[Ext.]
9, 18
NO
OK
-TM-U210B/D
6.7cpi[Ext.]
9, 18
NO
OK
-TM-U300C
16cpi[Euro]
9, 18
NO
OK
-TM-U325
13.3cpi[Euro]
9, 18
NO
OK
-TM-U120
8cpi[Euro]
9, 18
NO
OK
6.7cpi[Euro]
9, 18
NO
OK
Mintyo 8.9cpi
8, 16
OK
NO
Mintyo 4.7cpi
8, 16
OK
NO
English drivers only
TITLE
EPSON
TM Printer Driver
User's Manual
SHEET
REVISION
1.61
NO
NEXT
12
SHEET
11
Printer Models
Japanese and English drivers
Printer Fonts
Sizes
JP
US
16cpi[RED]
9, 18
OK
OK
13.3cpi[RED]
9, 18
OK
OK
8cpi[RED]
9, 18
OK
OK
6.7cpi[RED]
9, 18
OK
OK
16cpi[RED Ext.]
9, 18
NO
OK
- TM-U210B/D
13.3cpi[RED Ext.]
9, 18
NO
OK
- TM-U300C
8cpi[RED Ext.]
9, 18
NO
OK
- TM-U230
6.7cpi[RED Ext.]
9, 18
NO
OK
16cpi[RED Euro]
9, 18
NO
OK
13.3cpi[RED Euro]
9, 18
NO
OK
8cpi[RED Euro]
9, 18
NO
OK
6.7cpi[RED Euro]
9, 18
NO
OK
Mintyo 8.9cpi[RED]
8, 16
OK
NO
Mintyo 4.7cpi[RED]
8, 16
OK
NO
16.7cpi
9, 18
OK
OK
-TM-U950
12.5cpi
9, 18
OK
OK
-TM-U590
8.3cpi
9, 18
OK
OK
-TM-H5000II(Slip)
6.25cpi
9, 18
OK
OK
16.7cpi[Ext.]
9, 18
NO
OK
12.5cpi[Ext.]
9, 18
NO
OK
8.3cpi[Ext.]
9, 18
NO
OK
6.25cpi[Ext.]
9, 18
NO
OK
16.7cpi[Euro]
9, 18
NO
OK
12.5cpi[Euro]
9, 18
NO
OK
8.3cpi[Euro]
9, 18
NO
OK
6.25cpi[Euro]
9, 18
NO
OK
Mintyo 8.3cpi
8, 16
OK
NO
Mintyo 4.2cpi
8, 16
OK
NO
- TM-U300A/B
- TM-U210A/AR
English drivers only
Japanese and English drivers
English drivers only
-TM-U925
TITLE
EPSON
TM Printer Driver
User's Manual
SHEET
REVISION
1.61
NO
NEXT
13
SHEET
12
Printer Models
Japanese drivers only
Printer Fonts
Sizes
JP
US
20cpi
9.5,19
OK
NO
15cpi
9.5,19
OK
NO
10cpi
9.5,19
OK
NO
7.5cpi
9.5,19
OK
NO
Mintyo 7.5cpi
9.5,19
OK
NO
Mintyo 3.8cpi
9.5,19
OK
NO
20cpi
6.5,13.5
OK
OK
-TM-T88II
15cpi
9.5,19
OK
OK
-TM-T88IIR
10cpi
6.5,13.5
OK
OK
-TM-H5000II(Receipt)
7.5cpi
9.5,19
OK
OK
20cpi[Ext.]
6.5,13.5
NO
OK
15cpi[Ext.]
9.5,19
NO
OK
10cpi[Ext.]
6.5,13.5
NO
OK
7.5cpi[Ext.]
9.5,19
NO
OK
20cpi[Euro]
6.5,13.5
NO
OK
15cpi[Euro]
9.5,19
NO
OK
10cpi[Euro]
6.5,13.5
NO
OK
7.5cpi[Euro]
9.5,19
NO
OK
Mintyo7.5cpi
9.5,19
OK
NO
Mintyo3.8cpi
9.5,19
OK
NO
20cpi
7,14.5
OK
OK
16cpi
9.5,19
OK
OK
10cpi
7,14.5
OK
OK
8cpi
9.5,19
OK
OK
10cpi[OCR]
9.5
OK
OK
20cpi[Ext.]
7,14.5
NO
OK
16cpi[Ext.]
9.5,19
NO
OK
10cpi[Ext.]
7,14.5
NO
OK
8cpi[Ext.]
9.5,19
NO
OK
20cpi[Euro]
7,14.5
NO
OK
16cpi[Euro]
9.5,19
NO
OK
10cpi[Euro]
7,14.5
NO
OK
8cpi[Euro]
9.5,19
NO
OK
-TM-T285
Japanese and English drivers
Japanese and English drivers
- TM-J8000
TITLE
EPSON
TM Printer Driver
User's Manual
SHEET
REVISION
1.61
NO
NEXT
14
SHEET
13
Printer Models
Japanese and English drivers
-TM-L60II
English drivers only
-TM-L60
Printer Fonts
JP
US
20cpi
9.5,19
OK
OK
15cpi
9.5,19
OK
OK
10cpi
9.5,19
OK
OK
7.5cpi
9.5,19
OK
OK
20cpi[Ext.]
9.5,19
NO
OK
15cpi[Ext.]
9.5,19
NO
OK
10cpi[Ext.]
9.5,19
NO
OK
7.5cpi[Ext.]
9.5,19
NO
OK
20cpi[Euro]
9.5,19
NO
OK
15cpi[Euro]
9.5,19
NO
OK
10cpi[Euro]
9.5,19
NO
OK
7.5cpi[Euro]
9.5,19
NO
OK
20cpi
6.5,13.5
NO
OK
15cpi
9.5,19
NO
OK
10cpi
6.5,13.5
NO
OK
7.5cpi
9.5,19
NO
OK
20cpi[Ext.]
6.5,13.5
NO
OK
15cpi[Ext.]
9.5,19
NO
OK
10cpi[Ext.]
6.5,13.5
NO
OK
7.5cpi[Ext.]
9.5,19
NO
OK
TITLE
EPSON
Sizes
TM Printer Driver
User's Manual
SHEET
REVISION
1.61
NO
NEXT
15
SHEET
14
Printer Models
Japanese and English drivers
Printer Fonts
Sizes
JP
US
16cpi
8.5,17
OK
OK
13.3cpi
8.5,17
OK
OK
8cpi
8.5,17
OK
OK
6.7cpi
8.5,17
OK
OK
16cpi[Ext.]
8.5,17
NO
OK
13.3cpi[Ext.]
8.5,17
NO
OK
8cpi[Ext.]
8.5,17
NO
OK
6.7cpi[Ext.]
8.5,17
NO
OK
16cpi[Euro]
8.5,17
NO
OK
13.3cpi[Euro]
8.5,17
NO
OK
8cpi[Euro]
8.5,17
NO
OK
6.7cpi[Euro]
8.5,17
NO
OK
English drivers only
20cpi
6.5,13.5
NO
OK
-TM-H6000(Receipt)
15cpi
9.5,19
NO
OK
10cpi
6.5,13.5
NO
OK
7.5cpi
9.5,19
NO
OK
20cpi[Ext.]
6.5,13.5
NO
OK
15cpi[Ext.]
9.5,19
NO
OK
10cpi[Ext.]
6.5,13.5
NO
OK
7.5cpi[Ext.]
9.5,19
NO
OK
17.8cpi
8,16
NO
OK
-TM-U675
13.3cpi
8,16
NO
OK
-TM-H6000(Slip)
8.9cpi
8,16
NO
OK
6.7cpi
8,16
NO
OK
17.8cpi[Ext.]
8,16
NO
OK
13.3cpi[Ext.]
8,16
NO
OK
8.9cpi[Ext.]
8,16
NO
OK
6.7cpi[Ext.]
8,16
NO
OK
13.3cpi
7
NO
OK
13.3cpi[Ext.]
7
NO
OK
-TM-U295
English drivers only
English drivers only
-TM-H6000(Endorse)
TITLE
EPSON
TM Printer Driver
User's Manual
SHEET
REVISION
1.61
NO
NEXT
16
SHEET
15
Printer Models
Japanese drivers only
-TM-H6000(Receipt)
Japanese drivers only
-TM-U675
Japanese and English drivers
-DM-D10x,20x
Printer Fonts
Sizes
JP
US
FontA
9.5
OK
NO
FontA DH
19
OK
NO
FontA DW
9.5
OK
NO
FontA DHDW
19
OK
NO
FontB
6.5
OK
NO
FontB DH
13.5
OK
NO
FontB DW
6.5
OK
NO
FontB DHDW
13.5
OK
NO
Mintyo Normal
9.5
OK
NO
Mintyo DH
19
OK
NO
Mintyo DW
9.5
OK
NO
Mintyo DHDW
19
OK
NO
FontA
9
OK
NO
FontA DH
18
OK
NO
FontA DW
9
OK
NO
FontA DHDW
18
OK
NO
FontB
9
OK
NO
FontB DH
18
OK
NO
FontB DW
9
OK
NO
FontB DHDW
18
OK
NO
Mintyo Normal
8
OK
NO
Mintyo DH
16
OK
NO
Mintyo DW
8
OK
NO
Mintyo DHDW
16
OK
NO
DM-D 1st Line
7
NO
OK
DM-D 2nd Line
7
NO
OK
[Note]
- The JP and US columns above indicate whether the font is available on JP and US drivers, respectively. A "OK"
means that the font is available; an "NO" means that it is not available.
- Although the TM-L60II / J8000 driver is provided in both JP and US types, note that neither type supports the
Myocho font.
- The "[RED]" indication means that the font prints in red ink.
- Fonts used with US drivers are either "non-extended" and "extended." (Extended fonts are marked by the "Ext."
suffix in the table above.) If you are using an extended font, character codes 80H and above will print extended
characters. If you are using a non-extended font, these codes are assigned to special printer functions (as described
TITLE
EPSON
TM Printer Driver
User's Manual
SHEET
REVISION
1.61
NO
NEXT
17
SHEET
16
below), so that the corresponding extended characters cannot be printed.
- The Euro font does support printing of TM PrinterDriver English edition. But, in the TM printer driver of
TM-U200B/L60, it isn't supporting Euro Font.
-For Printer Model: TM-U675/H6000, both xxxcpi printer font and xxxcpi[Ext.] printer font of these printer model
use CP1252 of MS-Windows code page. When using prnter font of these models, take note to the following point.
-TM Printer Driver for these models don't include xxxcpi[Euro] font. You can print Euro symbol using xxxcpi or
xxxcpi[Ext.] fonts.
- xxxcpi font doesn't include special function. You must use control printer font when using supecial function.
- DM-D 1st Line font is used for displaying text at the 1st line of the Customer Display.
- DM-D 2nd Line font is used for displaying text at the 2nd line of the Customer Display.
- For printer TM-J8000, using font 10cpi[OCR] only "SP+,-0123456789<>".
TITLE
EPSON
TM Printer Driver
User's Manual
SHEET
REVISION
1.61
NO
NEXT
18
SHEET
17
-
4.2. Bar-Code Printing
The following printers support bar-code printing.
TM-T285, TM-T88II, TM-T88IIR, TM-L6011, TM-L60, TM-H5000II, TM-J8000, TM-H6000, TM-U675
Bar-code printer drivers are available for each of these printers. To print a bar code on these printers, you simply select the
font whose name corresponds to the desired bar-code type.
Note that application editing windows will display text only; they will not display the bar-code image that will be
produced on the printout.
Codabar
Number of Encoded
Characters
1 or more
Code39
1 or more
Printer Font
Supported Characters
Numeric:
Symbols:
Letters:
0 to 9
$, +, -, :, /
A to D
Numeric:
0 to 9
Symbols:
Letters:
space, %, $, +, -, ., /
A to Z
ITF
1 or more (even number)
Numeric:
0 to 9
JAN 13 (EAN)
13
Numeric:
0 to 9
JAN 8 (EAN)
8
Numeric:
0 to 9
UPC-A
12
Numeric:
0 to 9
UPC-E
12
Numeric:
0 to 9
[Note]
The drivers can print HRI characters together with the bar code. For information, see Section 3.3, "Special Functions,"
directly below.
If you find that you are unable to print barcodes on Windows NT4.0,Windows2000, you can correct the problem by
reducing the left margin to its lowest possible value.
Sometimes the barcode may not be able to print continuously in Windows NT4.0 and Windows2000. You sould
specify HRI characters each time this problem occurs.
TITLE
EPSON
TM Printer Driver
User's Manual
SHEET
REVISION
1.61
NO
NEXT
19
SHEET
18
4.3. Special Functions
The TM printer drivers can be used to execute a variety of special non-printing functions, as indicated in the table below.
You can execute these functions by selecting the printer's special "control font" and then sending the appropriate
character code to the driver. (Note that you cannot use the control font to print normal characters.)
You can also execute these commands by issuing codes 80H above when using non-extended printer fonts (all fonts other
than those marked by "Ext." in the printer font table in Section 4.1 above). But, The TM-U675/H6000 printer doesn't
support.
Extended character code
(on all fonts other than
those marked "Ext.")
Control-Font Character
Code
A
Function
Open Drawer 1 (50ms drive pulse width)
81H
B
Open Drawer 1 (100ms drive pulse width)
82H
C
Open Drawer 1 (150ms drive pulse width)
83H
D
Open Drawer 1 (200ms drive pulse width)
84H
E
Open Drawer 1 (250ms drive pulse width)
85H
a
Open Drawer 2 (50ms drive pulse width)
89H
b
Open Drawer 2 (100ms drive pulse width)
8AH
c
Open Drawer 2 (150ms drive pulse width)
8BH
d
Open Drawer 2 (200ms drive pulse width)
8CH
e
Open Drawer 2 (200ms drive pulse width)
8DH
0
Set Slip paper position
1
Print to journal.
91H
2
Print to receipt.
92H
3
Print to journal and receipt.
93H
5
HT
95H
6
LF
96H
7
CR
97H
8
Print to front surface of Slip
-
9
Print to back surface of Slip
p
Do not include HRI characters with bar code.
98H
q
Print HRI characters above bar code (using font A).
99H
r
Print HRI characters below bar code (using font A).
9AH
s
Print HRI characters above bar code (using font B).
9BH
t
Print HRI characters below bar code (using font B).
9CH
!
Stamp on receipt.
9FH
f
Cut receipt (full cut) without paper feeding.
F
Cut receipt (full cut).
9DH
P
Cut receipt (partial cut).
9EH
TITLE
EPSON
TM Printer Driver
User's Manual
SHEET
REVISION
1.61
NO
NEXT
20
SHEET
19
Control-Font Character
Code
G
Extended character code
(on all fonts other than
those marked "Ext.")
Function
NV Bitmap image data 1 (Printing normal size)
-
H
NV Bitmap image data 2 (Printing normal size)
-
I
NV Bitmap image data 3 (Printing normal size)
-
J
NV Bitmap image data 4 (Printing normal size)
-
K
NV Bitmap image data 5 (Printing normal size)
-
Q
NV Bitmap image data 1
characters)
(Printing double-wide
-
R
NV Bitmap image data 2
characters)
(Printing double-wide
-
S
NV Bitmap image data 3
characters)
(Printing double-wide
-
T
NV Bitmap image data 4
characters)
(Printing double-wide
-
U
NV Bitmap image data 5
characters)
(Printing double-wide
-
V
NV Bitmap image data 1
characters)
(Printing double-high
-
W
NV Bitmap image data 2
characters)
(Printing double-high
-
X
NV Bitmap image data 3
characters)
(Printing double-high
-
Y
NV Bitmap image data 4
characters)
(Printing double-high
-
Z
NV Bitmap image data 5
characters)
(Printing double-high
-
[
NV
Bitmap
image
data
double-high/double-wide characters)
1
(Printing
-
]
NV
Bitmap
image
data
double-high/double-wide characters)
2
(Printing
-
^
NV
Bitmap
image
data
double-high/double-wide characters)
3
(Printing
-
_
NV
Bitmap
image
data
double-high/double-wide characters)
4
(Printing
-
`
NV
Bitmap
image
data
double-high/double-wide characters)
5
(Printing
-
Supported functions vary according to each printer's capabilities. The journal/receipt selection functions, for example,
are available only on printer types TM-U950 and TM-T285.
TITLE
EPSON
TM Printer Driver
User's Manual
SHEET
REVISION
1.61
NO
NEXT
21
SHEET
20
The DM-D customer display drivers can be used to execute a variety of special non-printing functions, as indicated in the
table below.
Control-Font Character
Code
Function
a
Clear screen (CLR)
b
Clear 1st line (CAN for 1st Line)
c
Clear 2nd line (CAN for 2nd Line)
d
Screen is always blinking.
e
Screen is blinking at 10x5msec intervals.
f
Screen is blinking at 20x5msec intervals.
g
Screen is blinking at 40x5msec intervals.
h
Screen is blinking at 60x5msec intervals.
i
Put out light with saving displayed contents.
j
Set and display a counter time. (US T h m)
k
Display a counter. (US U)
l
Enable reversed character (US r n)
m
Disable reversed character (US r n)
n
Define macro process (US :)
o
Do macro process (US ^ n m, n=5 m=60)
TITLE
EPSON
TM Printer Driver
User's Manual
SHEET
REVISION
1.61
NO
NEXT
22
SHEET
21
"ControlA" font is provided as an inherent special function for the TM-U230.By using with a command defined file
(TmCtrla.ini), you can designate a desired command string as the "ControlA" font arbitrary character (a character code
with a range between 20 to 7F). Details on how to use this are as follows:
1. ControlA command defined files:
[File Name] TmCtrla.ini
[Installation destination] The printer processor folder for each OS:
95/98. . . The OS System folder
NT/2K. . . The OS System32\Spool\Prtprocs\W32x86 folder
2. Description method:
1) Write descriptions similar to normal INI file format.
[Section Name]
Key_1=Data_1
Key_2=Data_2
Key_3=Data_3
.
.
.
2) Specify the printer name as the section name.
Eg. [TM-U230]
3) Specify each key in a hexadeciaml character code corresponding to ControlA font.
Eg. When "A" is specified for ControlA font, write the key as 41=.
* The range that can be specified for each key is 20 to 7F.
4) Specify each data as a hexadecimal command corresponding to the character code specified in ControlA font.
Eg. When you want to send the initialization command (ESC @), write the data as 1B40.
5) Sample description of an INI file:
[TM-U230]
40=1B40
41=1B313131
TITLE
EPSON
TM Printer Driver
User's Manual
SHEET
REVISION
1.61
NO
NEXT
23
SHEET
22
4.4. Resolutions
The following table shows the resolution settings supported by each printer.
Printer
Resolutions
TM-U200B, TM-U210A,TM-U210AR,
TM-U210B,TM-U210D,
TM-U300A,TM-U300B,TM-U300C,
80× 72
160× 72(*)
160× 144
TM-U300D,TM-U325,TM-U375
TM-H6000(Slip),TM-U675,TM-U230
80× 72
TM-H6000(Endorse)
127× 72(*)
TM-U590,TM-U950,TM-U925,
75× 72
TM-H5000II(Slip)
160× 72(*)
150× 72(*)
150× 144
TM-T285,TM-L60II, TM-L60
90× 60
180× 60
90× 180
180× 180(*)
TM-T88II,TM-T88IIR,
TM-H5000II(Receipt)
TM-H6000(Receipt)
90× 90
180× 90
90× 180
180× 180(*)
TM-J8000
180× 180
TM-U295
80× 60
360× 360(*)
160× 60(*)
[NOTE]
Asterisks in the table denote the driver's default resolution.
TITLE
EPSON
TM Printer Driver
User's Manual
SHEET
REVISION
1.61
NO
NEXT
24
SHEET
23
4.5. Paper Sizes
4.5.1. Rolled Paper (Receipt/Journal Paper)
The paper sizes supported by each printer are as follows.
Printer
Paper Size (W × L)
TM-L60II
TM-L60
A4 length (60 x 297 mm)
B5 length (60 x 257 mm)
6-inch page (2.36 x 6 in.)
Letter length (2.36 x 11 in.)
Executive length (2.36 x 10.5 in.)
Receipt length (60 x 3276 mm) (*)
User-defined (60x152.4 to 60x3276 mm) (**)
A4 length (70 x 297 mm)
B5 length (70 x 257 mm)
6-inch page (2.75 x 6 in.)
Letter length (2.75 x 11 in.)
Executive length (2.75 x 10.5 in.)
Receipt length (70 x 3276 mm) (*)
User-defined (70x152.4 to 70x3276 mm) (**)
A4 length (76 x 297 mm)
B5 length (76 x 257 mm)
6-inch page (2.99 x 6 in.)
Letter length (2.99 x 11 in.)
Executive length (2.99 x 10.5 in.)
Receipt length (76 x 3276 mm) (*)
User-defined (76x152.4 to 76x3276 mm) (**)
A4 length (76 x 297 mm)
B5 length (76 x 257 mm)
6-inch page (2.99 x 6 in.)
Letter length (2.99 x 11 in.)
Executive length (2.99 x 10.5 in.)
Receipt length (76 x 2311.8 mm) (*)
User-defined (76x152.4 to 76x2311.8 mm) (**)
A4 length (80 x 297 mm)
B5 length (80 x 257 mm)
6-inch page (3.14 x 6 in.)
Letter length (3.14 x 11 in.)
Executive length (3.14 x 10.5 in.)
Receipt length (80 x 3276 mm) (*)
User-defined (80x152.4 to 80x3276 mm) (**)
TM-U950,
TM-U925
TM-U200B,
TM-U210A/AR,
TM-U210B/D,
TM-U300A/B/C/D,
TM-U325,
TM-U375
TM-U230
TM-J8000
TM-T88II,
TM-T88IIR,
TM-T285,
TM-H5000II,
TITLE
EPSON
TM Printer Driver
User's Manual
SHEET
REVISION
1.61
NO
NEXT
25
SHEET
24
Printer
Paper Size (W × L)
A4 length 80 × 297 mm
B5 length 80 × 297 mm
6 in Page 3.14 × 6 in
Executive length 3.14 × 10.5 in
Letter length 3.14 × 11 in
A4 length 58 × 297 mm
B5 length 58 × 297 mm
6 in Page 2.28 × 6 in
Executive length 2.28 × 10.5 in
Letter length 2.28 × 11 in
Receipt length 80 × 3276mm(*)
Receipt length 58 × 3276mm(*)
User-defined(58 × 152.4 to 80 × 3276 mm) (**)
A4 length 82.5 × 297 mm
B5 length 82.5 × 297 mm
6 in Page 3.24 × 6 in
Executive length 3.24 × 10.5 in
Letter length 3.24 × 11 in
A4 length 76 × 297 mm
B5 length 76 × 297 mm
6 in Page 2.99 × 6 in
Executive length 2.99 × 10.5 in
Letter length 2.99 × 11 in
Receipt length 82.5 × 3276mm(*)
Receipt length 76 × 3276mm(*)
User-defined(76 × 152.4 to 82.5 × 3276 mm) (**)
TM-H6000
TM-U675
WindowsNT4.0,Windows2000 support (*)
Windows95,WINDOWS98 support (**)
[Note]
- The user-defined values show the range over which sizes can be set.
TITLE
EPSON
TM Printer Driver
User's Manual
SHEET
REVISION
1.61
NO
NEXT
26
SHEET
25
The following table shows the recommended margins for each printer. Refer to this table when setting margins from
your printing applications.
Printer
Hard Top
Margins
Print Area
Margin
(mm)
Left
Right
Top
Bottom
Width
(mm)
(mm)
(mm)
(mm)
(mm)
TM-L60II/L60
14.8
3.0
2.7
0.0
0.1
54.3
TM-U950/U925
38.5
6.1
2.2
0.0
0.2
67.7
-
6.1
2.2
0.0
0.2
67.7
27.0
5.5
6.4
0.0
0.2
64.1
TM-U950
TM-U200B
TM-U210A/U210AR
27.0
5.5
6.4
0.0
0.2
64.1
TM-U210B/U210D
27.0
5.5
6.4
0.0
0.2
64.1
TM-U230
27.0
5.5
6.4
0.0
0.2
64.1
TM-U325
30.3
5.5
6.4
0.0
0.2
64.1
TM-U300A/U300B/U300C/
36.0
6.4
5.5
0.0
0.2
64.1
U300D
TM-U375
33.0
8.1
3.8
0.0
0.2
64.1
TM-J8000
76.9
5.3
5.5
0.0
0.2
65.2
TM-T88/T88IIR
26.0
3.8
4.0
0.0
0.0
72.2
TM-T285
44.0
4.0
3.8
0.0
0.0
72.2
TM-H5000II/H6000
29.0
3.8
4.0
0.0
0.0
72.2
TM-U675
35.5
5.1
6.1
0.0
0.2
71.4
[Note]
The 'hard top margin' refers to the margin placed between the top of the form (for example, from the paper cut
position) to the top printable position. This hard margin is always applied. The application's top margin setting is then
added to the hard margin to produce the actual top margin.
TITLE
EPSON
TM Printer Driver
User's Manual
SHEET
REVISION
1.61
NO
NEXT
27
SHEET
26
4.5.2. Slip Paper
The slip paper sizes supported by each printer are as follows.
Printer
Paper Size (W × L)
TM-U295
B5 (182 x 257 mm)
Statement (5.5 x 8.5 in.)
User-defined (80x69 to 182x257 mm) (*)
TM-U375
B5 (182 x 257 mm)
Statement (5.5 x 8.5 in.)
User-defined (80x160 to 182x257 mm) (*)
TM-U675,
A4 (210 x 297 mm)
TM-H6000
A5 (148 x 210 mm)
A6 (105 x 148 mm)
B5 (182 x 257 mm)
Executive (7.25 x 10.5 in.)
User-defined (90x150 to 148x297 mm) (*)
TM-U590,
A4 (210 x 297 mm)
TM-U925,
B5 (182 x 257 mm)
TM-U950,
Executive (7.25 x 10.5 in.)
TM-H5000II
User-defined (150x70 to 210x297 mm) (*)
TM-J8000
A4 (210 x 297 mm)
A6 (105 x 148 mm)
B5 (182 x 257 mm)
Letter (8.5 x 11 in)
Executive (7 1/4 x 10 1/2 in.)
Statement (5 1/2 x 8 1/2 in.)
Personal Check (160 x 70 mm)
Business Check (210 x 90 mm)
User-defined (70x201.9 to 296.9x215.9 mm) (*)
Windows95,WINDOWS98 support (*)
[Note]
The user-defined values show the range over which sizes can be set.
The following table shows the recommended margins for each printer. Refer to this table when setting margins from
your printing applications.
Printer
Paper
TM-U295
B5
Statement
B5
Statement
A4
A5
A6
B5
Executive
A4
B5
Executive
A4
B5
Executive
TM-U375
TM-U675/H6000
TM-U950/U925
TM-H5000II
TM-U590
Left
(mm)
0.0
0.0
0.0
0.0
0.0
0.0
0.0
0.0
0.0
0.0
0.0
0.0
0.0
0.0
0.0
Margins
Right
Top
(mm)
(mm)
115.6
26.2
73.2
26.2
118.5
0.0
76.2
0.0
124.1
4.9
62.2
4.9
19.2
4.9
96.1
4.9
98.2
4.9
74.5
7.8
46.5
7.8
48.7
7.8
74.5
18.7
46.5
18.7
48.7
18.7
TITLE
EPSON
TM Printer Driver
User's Manual
Bottom
(mm)
32.2
32.2
0.2
0.0
18.7
18.6
18.6
18.6
18.6
18.7
18.7
18.7
20.7
20.7
20.7
SHEET
REVISION
1.61
Print Area
Width
(mm)
65.8
65.8
64.1
64.1
85.8
85.8
85.8
85.8
85.8
135.6
135.6
135.6
135.6
135.6
135.6
NO
NEXT
28
SHEET
27
Printer
Paper
TM-J8000
A4
A6
B5
Letter
Executive
Statement
Personal Check
Business Check
Left
(mm)
0.0
0.0
0.0
10.6
0.0
0.0
0.0
4.8
Margins
Right
Top
(mm)
(mm)
0.1
9.0
3.4
9.0
3.3
9.0
3.5
9.0
3.4
9.0
3.4
9.0
3.4
9.0
3.4
9.0
TITLE
EPSON
TM Printer Driver
User's Manual
Bottom
(mm)
17.0
13.0
14.0
18.0
14.0
17.5
16.0
18.0
SHEET
REVISION
1.61
Print Area
Width
(mm)
201.8
101.6
178.7
201.8
193.45
136.3
156.6
201.8
NO
NEXT
29
SHEET
28
4.5.3. Validation Paper
The validation paper sizes supported by each printer are as follows.
Printer
Paper Size (W × L)
A4 (210 x 297 mm)
B5 (182 x 257 mm)
Statement (5.5 x 8.5 in.)
Executive (7.25 x 10.5 in.)
User-defined (135x70 to 210x297 mm) (*)
Envelope C6 (114 x 162 mm)
Envelope B6 (176 x 125 mm)
6-3/4-in. Envelope (3-5/8 x 6-1/2 in.)
User-defined (135x70 to 210x297 mm) (*)
B5 (182 x 257 mm)
Statement (5.5 x 8.5 in.)
User-defined (135x70 to 182x257 mm) (*)
A5 (148 x 210 mm)
User-defined (90x150 to 148x210 mm) (*)
TM-U300C
TM-U300D
TM-U325
TM-U375
TM-U675
Windows95,WINDOWS98 support (*)
[Note]
The user-defined values show the range over which sizes can be set.
The following table shows the recommended margins for each printer. Refer to this table when setting margins from your
printing applications.
Printer
Paper
TM-U300C/U300D
TM-U325
Left
(mm)
Margins
Right
Top
(mm)
(mm)
Bottom
(mm)
Print Area
Width
(mm)
A4
0.0
146.5
0.0
292.0
64.1
B5
Statement
0.0
118.5
0.0
252.0
64.1
0.0
76.2
0.0
210.9
64.1
Executive
0.0
120.6
0.0
261.7
64.1
Envelope C6
0.0
50.5
0.0
0.1
64.1
Envelope B6
6 3/4 Envelope
0.0
112.5
0.0
0.1
64.1
0.0
28.6
0.0
0.0
64.1
0.2
64.1
TM-U375
B5
Statement
0.0
118.5
0.0
0.0
76.2
0.0
0.0
64.1
TM-U675
A5
0.0
62.2
0.0
177.8
85.8
TITLE
EPSON
TM Printer Driver
User's Manual
SHEET
REVISION
1.61
NO
NEXT
30
SHEET
29
4.5.4. Endorse Paper
The validation paper sizes supported by each printer are as follows.
Printer
Paper Size (W × L)
A4 (210 x 297 mm)
A5 (148 x 210 mm)
A6 (105 x 148 mm)
B5 (182 x 257 mm)
Executive (7.25 x 10.5 in.)
User-defined (90x150 to 148x297 mm) (*)
TM-U675
Windows95,WINDOWS98 support(*)
[Note]
The user-defined values show the range over which sizes can be set.
The following table shows the recommended margins for each printer. Refer to this table when setting margins from your
printing applications.
Printer
Paper
TM-H6000
Left
(mm)
Margins
Right
Top
(mm)
(mm)
Print Area
Width
(mm)
A4
0.0
162.0
6.7
6.7
48.0
A5
A6
0.0
0.0
100.0
57.0
6.7
6.6
6.7
6.6
48.0
48.0
B5
0.0
134.0
6.7
6.6
48.0
Executive
0.0
136.1
6.7
6.4
48.0
TITLE
EPSON
Bottom
(mm)
TM Printer Driver
User's Manual
SHEET
REVISION
1.61
NO
NEXT
31
SHEET
30
4.5.5. Label Paper
Supported label paper sizes are as follows.
Printer
Paper Size (W × L)
1-in. labels (60 x 25.4 mm)
2-in. labels (60 x 50.8 mm)
3-in. labels (60 x 76.2 mm)
4-in labels. (60 x 101.6 mm)
User-defined (60x25.4 to 60x101.6 mm) (*)
TM-L60II/L60
Windows95,WINDOWS98 support(*)
[Note]
The user-defined values show the range over which sizes can be set.
The following table shows the recommended margins. Refer to this table when setting margins from your printing
applications.
Hard Top Margin
Margins
Print Area
(mm)
Printer
TM-L60II/L60
1.5
Left
(mm)
Right
(mm)
Top
(mm)
Bottom
(mm)
Width
(mm)
4.1
4.0
0.0
3.0
51.9
[Note]
The 'hard top margin' refers to the margin placed between the top of the form (for example, from the paper cut
position) to the top printable position. This hard margin is always applied. The application's top margin setting is
then added to the hard margin to produce the actual top margin.
TITLE
EPSON
TM Printer Driver
User's Manual
SHEET
REVISION
1.61
NO
NEXT
32
SHEET
31
4.6. Paper Source
Paper-source selection is available only with the TM-U950, TM-T285, TM-J8000 and TM-U295 printer drivers.
Printer
Paper Source
Receipt/Journal
TM-U950
Receipt
Journal
Receipt/Journal
TM-T285
Receipt
Journal
Slip
TM-J8000
Slip(BOF)
Slip
TM-U295
Slip(BOF)
Note. Set to Slip(BOF) to enable BOF sensor. Select Slip to disable BOF sensor.
4.7. Orientation
You can select either portrait (vertical) or landscape (horizontal) orientation. But note that printer fonts will not print if
landscape orientation is selected.
• portrait
• landscape
4.8. Print Quality
Print Quality selection is available only with the TM-J8000 and DM-D10x,20x printer drivers.
Printer
Print Quality
Economy + Bidirectional
TM-J8000
Economy + Unidirectional
Fine + Bidirectional
Fine + Unidirectional
Brightness 20%
DM-D10x,20x
Brightness 40%
Brightness 60%
Brightness 100%
TITLE
EPSON
TM Printer Driver
User's Manual
SHEET
REVISION
1.61
NO
NEXT
33
SHEET
32
5. USB Interface
Setting the following item is explained.
•
printing to port
•
adding of port
•
deleting of port
•
setting of port
Click once on the TM printer-driver icon within the Printers window, and then open the window's File menu and click on
Properties. This will open a printer property window. Click on the Details tab and then set the printer port as follows.
5.1. Print to the following port
Click the appropriate printer port in the "USB Port"
When choosing TMUSBxxx, the print in the USB port becomes possible.
The display form in this place is as follows.
TMUSBxxx (Character)
xxx is the 3 digit identify which distinguishes a port.
() is the character string is as follows with the condition.
Connect
Connected
Condition
User identify
character
Power ON defined
Power
Not defined
Not Connected
Power
OFF
X
Character
Printer Condition
X
X
ONLINE
OFFLINE
ERROR
X
X
X
User definition
character
Printer Name
Offline Status
Unknown Printer
Not Connected
Not Connected
5.2. Add Port
When clicking [Add Port] button, [Add Port] dialog is displayed. It is displayed with "EPSON TM USB Port Monitor" in
the type of port to add. However, it does not add even if it pushes "OK" button.
A new port is automatically added by the Plug&Play function of USB.
TITLE
EPSON
TM Printer Driver
User's Manual
SHEET
REVISION
1.61
NO
NEXT
34
SHEET
33
5.3. Delete Port
When clicking [Delete Port] button, [Delete Port] dialog is displayed.
The port is deleted when choosing TMUSBxxx and pushing "OK" button.
But, in case of the following condition, the port cannot be deleted.
- When a printer is connected with the port
- When choosing at [Print to the following port]
- When choosing a system port
5.4. Port Setting
When clicking a [Port Setting] button, an error message [There is nothing to configure for this port.] is displayed,
because there is no item to set with the USB port monitor.
TITLE
EPSON
TM Printer Driver
User's Manual
SHEET
REVISION
1.61
NO
NEXT
35
SHEET
34
6. Using the TM Printer from an Application
6.1. Controlling the Printer from WordPad.
We use WordPad on Windows95 as an example, to show the instructions for using this from an application. However,
the printer fonts are not available in WordPad bundled with WindowsNT4.0. Please use the other applications.
6.1.1. WordPad Environment
Begin by setting your default printer and the WordPad environment as follows.
Start up WordPad, and enter appropriate settings for the follows.
- Size
- Resolution
- Orientation
- Source
- Margins
6.1.2. Printing Text
Use the following procedure to generate a printout from WordPad.
1.
2.
3.
4.
Select the font you wish to use from the font list.
Select the font size you wish use from the
font-size list.
Type in some text into the WordPad text-input
area.
Open the File menu, and click on Print. The TM
printer will print out the text you entered at Step
3.
For fastest printing, select a printer font (rather than a
Windows font) from the font list.
TITLE
EPSON
TM Printer Driver
User's Manual
SHEET
REVISION
1.61
NO
NEXT
36
SHEET
35
6.1.3. Opening the Cash Drawer
1.
2.
3.
4.
Select the "control" font from the font list.
Set the font size to 10.
Type an "A" into the WordPad text-input area.
Open the File menu, and click on Print .
Clicking on Print will cause cash drawer #1 to open at
a drive speed of 50ms. By changing the character that
you input at Step 3, you can select a different drive
speed or open the other drawer (drawer #2). Refer to
Section 4.3, "Special Functions," for a listing of
characters and their functions.
6.1.4. Print Bar code
Use the following procedure to print a bar code.
1.
2.
3.
4.
5.
6.
7.
8.
Select the "control" font from the font list.
Set the font size to 10.
Type an "r" into the WordPad text-input area.
Hit the Enter key.
Select JAN13(EAN) from the font list.
Set the font size to 42.
Enter the code you wish to generate.
Open the File menu, and click on Print .
Clicking on Print causes the printer to print the bar code corresponding to the value you entered at Step 7, with HRI
characters along the bottom of the bar-code pattern. You can change the HRI printout (disable it, or change the HRI font
or location) by changing the character that you enter at Step 3. (Refer to Section 4.3, "Special Functions.") You can
change the bar-code type by making different selections at Steps 5 and 6. (Refer to Section 4.2, "Bar Code Printing. ")
TITLE
EPSON
TM Printer Driver
User's Manual
SHEET
REVISION
1.61
NO
NEXT
37
SHEET
36
6.1.5. Cutting the Paper
The following procedure will cause the printer to print the entered text and then cut the paper.
1.
2.
3.
4.
5.
6.
7.
8.
Select any font other than "control" from the font list.
Set the font size as desired.
Type in the text you wish to print.
Hit the Enter key.
Select the "control" font from the font list.
Set the font size to 10.
Type in an "F".
Open the File menu, and click on Print .
When you click on Print, the printer prints the text you entered at Step 3 and then executes a full cut. If you wish to
execute a partial cut instead, enter a "P" rather than an "F" at Step 7. (But note that some printers cannot execute a full
cut.)
TITLE
EPSON
TM Printer Driver
User's Manual
SHEET
REVISION
1.61
NO
NEXT
38
SHEET
37
6.2. Controlling the Printer from Visual Basic (Ver. 4.0)
This section shows how you can control the TM printer using Visual Basic (version 4.0). Note that the TM printer drivers
include sample Visual Basic programs that provide additional examples.
6.2.1. Selecting the Printer Driver
The following code establishes the specified printer driver as your "default printer."
'Set the specified printer driver as the "default printer."
For E ach prnPrinter In Printers
IfprnPrinter.D eviceN am e = “E PSO N TM -300A N o cut” Then
Set Printer = prnPrinter
E xit For
E nd If
N ext
6.2.2. Selecting the Paper Source
Use the following code to set or change the paper source when printing out text.
'Selecting the paper source.
Printer.FontSize = 10
'Set up the controlfont.
Printer.FontN am e = "control"
Printer.Print “3”
'
'E nter the special-function
corresponding to the desired
source.
'1:Journal
'2:R eceipt
'3:B oth
'E nter and print text.
Printer.FontSize = 10
'Select the text font size.
Printer.FontN am e = "20 cpi"
'Select the text font.
Printer.Print “test print”
'E nter and print the text string.
TITLE
EPSON
TM Printer Driver
User's Manual
SHEET
REVISION
1.61
NO
NEXT
39
SHEET
38
6.2.3. Printing Text
The following code prints a text string using a Windows font, and then prints another text string using a printer font. Each
string gives the name and size of the font being used.
'Print in W indow s font
Printer.FontSize = 10
Printer.FontN am e = “Tim es N ew R om an”
Printer.Print Printer.FontN am e + " " + Str(Printer.FontSize)
'Print in printer font
Printer.FontSize = 10
Printer.FontN am e = “20 cpi”
Printer.Print Printer.FontN am e + " " + Str(Printer.FontSize)
Printer.E ndD oc
6.2.4. Opening the Cash Drawer
The next example shows how to open the desired cash drawer at the desired speed.
Printer.FontSize = 10
Printer.FontName = "control"
Printer.Print "A"
'Set up the control font.
'Use special-function character to open the
cash drawer.
'A: Open drawer 1 at 50 ms.
'B: Open drawer 1 at 100 ms.
'C: Open drawer 1 at 150 ms.
'D: Open drawer 1 at 200 ms.
'E: Open drawer 1 at 250,ms.
'a: Open drawer 2 at 50ms.
'b: Open drawer 2 at 100ms.
'c: Open drawer 2 at 150ms.
'd: Open drawer 2 at 200ms.
'e: Open drawer 2 at 250 ms.
Printer.EndDoc
TITLE
EPSON
TM Printer Driver
User's Manual
SHEET
REVISION
1.61
NO
NEXT
40
SHEET
39
6.2.5. Cutting the Paper
The following code causes the printer to cut the paper.
Printer.FontSize = 10
Printer.FontName = "control"
Printer.Print "F"
'Set up the control font.
'Use special-function character to cut the
paper.
'F: Full cut
'P: Partial cut
Printer.EndDoc
6.2.6. Printing a Bar Code
The next example shows how to print out a bar code.
‘Set H R I characters
Printer.FontSize = 10
Printer.FontN am e = "control"
Printer.Print "q"
'Set up the controlfont.
'U se special-function character to select the
bar-code type.
'p:N o H R I characters
'q:Include H R I characters above bar code
(using font A ).
'r:Include H R I characters below bar code
(using font A ).
's:Include H R I characters above bar code
(using font B ).
't:Include H R I characters below bar code
(using font B ).
'Print the bar code.
Printer.FontSize = 42
'Set the bar-code font size.
Printer.FontN am e = "ITF"
'Select the bar-code printer font.
Printer.Print "123456"
'Print the bar-code data.
Printer.E ndD oc
TITLE
EPSON
TM Printer Driver
User's Manual
SHEET
REVISION
1.61
NO
NEXT
41
SHEET
40
6.2.7. Using ESC/POS commands
The following example shows how you can use the Win32 API to transmit ESC/POS commands directly to the printer.
For more details, refer to the Win32 API help information.
Public Type DOCINFO
pDocName As String
pOutputFile As String
pDatatype As String
End Type
‘'Win32 API external reference definitions
Public Declare Function ClosePrinter Lib "winspool.drv" (ByVal hPrinter As Long) As Long
Public Declare Function EndDocPrinter Lib "winspool.drv" (ByVal hPrinter As Long) As Long
Public Declare Function EndPagePrinter Lib "winspool.drv" (ByVal hPrinter As Long) As Long
Public Declare Function OpenPrinter Lib "winspool.drv" Alias "OpenPrinterA" _
(ByVal pPrinterName As String, phPrinter As Long, ByVal pDefault As Long) As Long
Public Declare Function StartDocPrinter Lib "winspool.drv" Alias "StartDocPrinterA" _
(ByVal hPrinter As Long, ByVal Level As Long, pDocInfo As DOCINFO) As Long
Public Declare Function StartPagePrinter Lib "winspool.drv" _
(ByVal hPrinter As Long) As Long
Public Declare Function WritePrinter Lib "winspool.drv" (ByVal hPrinter As Long, _
pBuf As Any, ByVal cdBuf As Long, pcWritten As Long) As Long
‘##### Source Code #####
Dim lhPrinter
As Long
Dim lReturn
As Long
Dim lpcWritten As Long
Dim lDoc
As Long
Dim sWrittenData As String
Dim MyDocInfo
As DOCINFO
lReturn = OpenPrinter(Printer.DeviceName, lhPrinter, 0)
If lReturn = 0 Then
MsgBox "Open Printer Error!"
End If
MyDocInfo.pDocName = "SAMPLE"
MyDocInfo.pOutputFile = vbNullString
MyDocInfo.pDatatype = vbNullString
lDoc = StartDocPrinter(lhPrinter, 1, MyDocInfo)
Call StartPagePrinter(lhPrinter)
‘'Output ESC/POS commands and the string to be displayed
sWrittenData = Chr(&H1B) + "=" + Chr(&H2)
'Select the peripheral device.
sWrittenData = sWrittenData + Chr(&H1B) + "t" + Chr(&H0) 'Select the character code table.
sWrittenData = sWrittenData + Chr(&H1B) + "R" + Chr(&H0)
'Select international characters.
sWrittenData = sWrittenData + “SEIKO EPSON ESC/POS"
'String to be displayed.
lReturn = WritePrinter(lhPrinter, ByVal sWrittenData, Len(sWrittenData), lpcWritten)
lReturn = EndPagePrinter(lhPrinter)
lReturn = EndDocPrinter(lhPrinter)
lReturn = ClosePrinter(lhPrinter)
TITLE
EPSON
TM Printer Driver
User's Manual
SHEET
REVISION
1.61
NO
NEXT
42
SHEET
41
6.2.8. Printing a Bitmap
The following example shows how to print out bitmap data.
'R ead bitm ap file from frm B m p form .
'M atch H and V size to bitm ap file.
frm B M P.H eight = 0
frm B M P.picB m p.Picture = LoadPicture(“SA M PLE .B M P”)
frm B M P.picB m p.Top = 0
frm B M P.picB m p.Left = 0
frm B M P.H eight = frm B M P.H eight + frm B M P.picB m p.H eight
frm B M P.W idth = frm B M P.picB m p.W idth
'Print the frm B M P form .
frm B M P.PrintForm
TITLE
EPSON
TM Printer Driver
User's Manual
SHEET
REVISION
1.61
NO
NEXT
43
SHEET
42
7.Attention in use.
1)
When you connect the printer over the serial (COM) port, be sure to set the flow control to Xon/Xoff. In the cases
below, however, please set the hardware control on OS side and set TM printer to DTR/DSR.
* When using EPSON DM-D10x, 20x Printer Driver
• TM Printer Driver's settings when connecting TM printer via DM-D customer display.
Also,
please
use
the
following
cables
to
connect
between
PC
and
DM-D
customer
display(DM-D101/DM-D105/DM-D205).
"The available cables diagram"
Printer side
User side
D-sub25 Connector
Signal
Signal name
D-sub25 Connector Pin
Pin Number
name
8
(NC)
DCD
1
3
RxD
RxD
2
2
TxD
TxD
3
20
DTR
DTR
4
7
SG
SG
5
6
DSR
DSR
6
4
RTS
RTS
7
5
CTS
CTS
8
22
(NC)
RI
9
Number
Furthermore, though the cables on the market have the one that is listed in the following wiring structure, its type
can not be used.
"The unavailable cables diagram"
Printer side
User side
D-sub25 Connector
Signal
Pin Number
name
Signal name
D-sub25 Connector Pin
8
(NC)
DCD
1
3
RxD
RxD
2
2
TxD
TxD
3
20
DTR
DTR
4
Number
7
SG
SG
5
6
DSR
DSR
6
4
RTS
RTS
7
5
CTS
CTS
8
22
(NC)
RI
9
TITLE
EPSON
TM Printer Driver
User's Manual
SHEET
REVISION
1.61
NO
NEXT
44
SHEET
43
2) In some cases a serially-connected printer will not operate correctly on Windows 95 and Windows98 under the
default FIFO-buffer settings. You can correct the problem by reducing the FIFO Transmit Buffer setting for the
COM port to which the printer is connected.
3) In some cases a serially-connected printer will not operate correctly on Windows NT 4.0/Windows2000 while
FIFO buffering is enabled. You can correct the problem by disabling the FIFO buffer.
4) The top margin for receipts and journals will be larger than the top margin value that you set. The additional margin
is equal to the distance between the paper cut position and the top printable position.
5) Strike-though, italic, and other such attribute settings are ignored when printing with printer fonts. If you need to
use these attributes, you must select a Windows font.
6) Printer fonts will not printed the orientation is set to landscape. When using landscape orientation, be sure to select
a Windows font.
7) Although some printers provide red printer fonts, it is never possible to print both red characters and black
characters on the same line.
8) Although it is possible to print both a printer font and graphic data (Windows font, straight line, etc.) on the same
line, print results may be uneven.
9) Print results may also be uneven if you print a double-height font together with some other font on the same line.
10) If you find that you are unable to print barcodes on Windows NT4.0,Windows2000, you can correct the problem by
reducing the left margin to its lowest possible value.
11) Sometimes the barcode may not be able to print continuously in Windows NT4.0 and Windows2000. You should
specify HRI characters each time this problem occurs.
12) When changing the paper source with a paper-source selection character (special-function character), you must
place the character at the beginning of the line.
13) When printing by the serial connection to the TM printer of the high resolution, the print speed as the expectations
can not be gotten. To print out at higher speed, it recommends use in parallel connection.
14) When using TM printer in parallel interface, the paper empty error occurs when turning on the power in the
condition of the paper-near-end. it can not print. exchange to the new paper.
15) TM printer driver does not support printing of MICR.
16) Setting DIP switch 2-1 (the BUSY condition) of the TM printer to ON ( receive buffer full) is recommended.
17) When the old version of the TMUSB Port Monitor is already installed in Windows98, the new version of TMUSB
Port Monitor cannot be normally installed. In this case, delete all printer drivers in the printer window. Then, after
rebooting Windows98, install the TM printer driver.
18) When using WindowsNT4.0,Windows2000 English version in NTFS format, the users who don't have the
Administrator authority may not be able to print correctly. If so, please change the access of Everyone which is in
the directory of WindowsNT System folder\Spool\Printer to full control.
19) If either TM-U300/A/B/C/D or TM-U210A/AR/B/D is used on WindowsNT4.0,Windows2000, the color may not
be printed as you expected. If so, please print such as a space using the font in the color you expect first.
20) Driver EPSON DM-D10X/20X doesn't support DM-D202. Also, If TM printer doesn't work if it is connected with
TITLE
EPSON
TM Printer Driver
User's Manual
SHEET
REVISION
1.61
NO
NEXT
45
SHEET
44
DM-D202.
21) If any of Customer display DM-D101, 105 or 205 is used independently without connecting to TM Printer, it may
not displayed correctly. If so, please connect the connect terminal of Customer Display's Printer with the loop-back
connecter which is shorted between TxD-RxD and DTR-DSR and RTS-CTS.
22) If you connect TM-U300A/B/C/D and TM-U200B and TM-U210A/AR/B/D and TM-U295 and TM-L60 and
TM-L60II with Customer Display, please use DM-D10X, 20X driver and display such as a space on Customer
Display and then print using each driver of TM printer.
23) Customer display isn't supported in USB connection.
24) For printer TM-J8000, using font 10cpi[OCR] only "SP+,-0123456789<>"
25) Unable to print correctly with the paper sizes: Reserved48/Reserved49. Select the other available paper sizes.
TITLE
EPSON
TM Printer Driver
User's Manual
SHEET
REVISION
1.61
NO
NEXT
46
SHEET
45