1
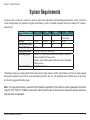
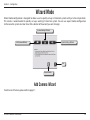
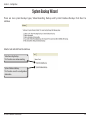
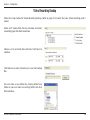
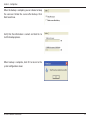
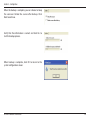
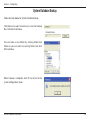
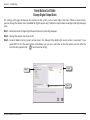
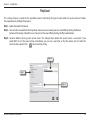
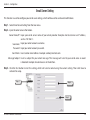
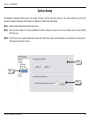
Table of Contents Table of Contents Product Overview................................................................................. 4 System Requirements.................................................................. 4 Introduction.................................................................................... 5 Features............................................................................................. 5 Installing Your IP Camera............................................................ 6 Software Installation............................................................................ 7 Using D-ViewCam...............................................................................10 Add Camera Wizard....................................................................11 Using D-ViewCam Software.....................................................15 Main Display Area........................................................................16 System Board Area......................................................................17 Select Device and Map Area....................................................17 Preview Window Area................................................................18 Split Screen Area..........................................................................18 Manual Control Area..................................................................19 Snapshot Button..................................................................19 Start/Stop Manual Recording Button...........................20 Start/Stop 2-Way Audio Button......................................21 Freeze Video Display Button............................................22 PTZF Control Area.......................................................................23 Program Control Area................................................................24 Setting and Search Area............................................................25 Event Action Log Area...............................................................26 D-Link D-ViewCam User Manual Configuring D-ViewCam...................................................................27 Wizard Mode.................................................................................28 Add Camera Wizard............................................................28 System Backup Wizard.......................................................29 Quick Settings.......................................................................33 Expert Mode..................................................................................34 Main Screen Interface........................................................35 Wizard......................................................................................36 Add Camera Wizard............................................................36 System Backup Wizard.......................................................36 System.............................................................................................40 Event Action..........................................................................40 User...................................................................................................48 Administrator........................................................................48 Normal User...........................................................................49 My Map....................................................................................50 Device Setting..............................................................................53 Information............................................................................53 DI/DO Setting........................................................................54 Playback..................................................................................................66 Video Search and Playback Management..........................66 Event Search and Playback Management..........................69 2 Table of Contents Frequently Asked Questions...........................................................71 D-Link D-ViewCam Features....................................................71 D-Link D-ViewCam Operation.................................................74 Open Source Software Notification..............................................80 D-Link D-ViewCam User Manual 3 Section 1 - Product Overview Product Overview System Requirements To ensure your D-ViewCam system can maintain high video monitoring and recording performance, certain minimum system configurations are required. A higher performance system is required especially when the number of IP cameras exceeds nine. Number of IP Cameras 1-4 5-9 10-16 16+ CPU P4 2.8 GHz Memory Hard Disk Size (GB) * Display Memory Display Resolution Operating System 512 MB 512 MB 1GB 40 60 80 32MB 1024x768; 1280x1024; 1600x1024 Windows XP Professional Service Pack 2 English/ Traditional Chinese/ Simplified Chinese version. Windows Vista (32 Bit) English/ Traditional Chinese/ Simplified Chinese version. Network Interface 10/100 Mbps Ethernet P4 2.8 GHz P4 3.0 GHz P4 Dual Core 1.8 GHz or better 1-2 GB 120 * Recording video over a long period of time will consume large amounts of disk space. Make sure that you have enough disk space available if you want to use the recording function. You can still complete the installation even if you have less than the suggested free disk space. Note: If a mega pixel camera is used with the D-ViewCam application, the minimum system requirement should be raised to CPU: Intel P-4 3.4GhZ or above with 1GB of memory due to the resources required to process and store large amounts of image data. D-Link D-ViewCam User Manual 4 Section 1 - Product Overview Introduction Thank you for purchasing a D-Link IP camera, which provides state-of-the-art camera technology combined with IP network capabilities. You can build a home or small business surveillance system by using D-Link IP cameras and the latest features offered by the D-ViewCam application software. Features • D-ViewCam can automatically locate and add IP cameras in the local network. • Storage management for recording files. • Single and multiple video stream monitoring (up to 32 video channels). • Two-way audio communication. • Intelligent filter and search capabilities for scheduling recording and/or event recording. D-Link D-ViewCam User Manual 5 Section 1 - Product Overview Installing Your IP Camera Before installing D-ViewCam, please make sure you have installed your D-Link IP camera(s) that will be managed by D-ViewCam. Step 1 -Follow the installation procedures that came with your IP camera(s) to complete the camera installation process. Step 2 -Verify that you are able to view the video images from the IP camera(s) by accessing the camera’s built-in web configuration page. It is recommended that all IP cameras be installed in the same subnet as your management PC running the D-ViewCam software. Step 3 -Please refer to page 11 to add IP camera(s) to the D-ViewCam system. Note: D-ViewCam is optimized for small-scale LAN environment. To protect the system and cameras from attack from the Internet, place D-ViewCam behind a firewall or an IP sharing device. D-Link D-ViewCam User Manual 6 Section 2 - Installation Software Installation Turn on the computer and insert the IP Camera Installation CD into the CD-ROM drive. Below step-by-step instructions will be shown if you are using Windows® XP. However, similar instructions and screens will also be provided for other Windows operating systems. When the autorun screen starts, click Install D-ViewCam. Note: If the Installation Wizard does not start automatically, you can manually start the wizard by double-clicking the setup.exe file from the CD. Select a language and click OK. Click OK Click Next to continue. Click Next D-Link D-ViewCam User Manual 7 Section 2 - Installation Click Next to install the software into the default folder. Otherwise, click Browse to select a folder. Click Next Click Next to start the installation process. Note: The D-ViewCam installation may take several minutes to complete. Click Next D-Link D-ViewCam User Manual 8 Section 2 - Installation Click Finish to complete the installation. Click Finish D-Link D-ViewCam User Manual 9 Section 3 - Configuration Using D-ViewCam This section will show you how to start and configure D-ViewCam. To start D-ViewCam, select Start > All Programs > D-Link > D-Link D-ViewCam. Enter Admin as the default username and leave the password blank. Click OK to log into the system. Note: You can change the admin password by clicking the lock icon or you can skip this step and change your password by following the steps on page 48. D-Link D-ViewCam User Manual 10 Section 3 - Configuration Add Camera Wizard Welcome to the camera wizard. Use this wizard to add your cameras to the D-ViewCam system. Note: Use the left or right arrow to navigate the wizard. Click Next to continue. Click Next D-Link D-ViewCam User Manual 11 Section 3 - Configuration Choose which method to add your camera(s). You can choose Auto Discovery to automatically search for your camera(s), or choose Add Manually to add your camera(s) via the camera’s IP address. Click Next to continue. If you choose Auto Discovery, the system will search all cameras that are located in the same subnet within a LAN environment. The system will place all found cameras at the default map called My Map. Click Next to continue. If you choose Add Manually, enter the IP address or domain name, http port, model name, camera ID and password. Click the “?” button to auto detect the camera’s model name, then the model name will appear in the Model Name box. Click Next to continue. D-Link D-ViewCam User Manual 12 Section 3 - Configuration D-ViewCam shows the detected IP camera(s) information. You will be able to schedule which recording type you wish to set for each camera. • 24/7 Continuous Recording: Start scheduled recording 24 hours a day, 7 days a week. • 24/7 Motion Detection Recording: Continuously monitoring the videos but ONLY make recording when motion is detected. • Office Hours Only: Continuously monitoring the videos during office hours (08:00 AM to 06.00 PM) and ONLY make recording when motion is detected. • Non-Office Hours Only: Continuously monitoring the videos during non-office hours (06:00 PM to 08.00 AM) and ONLY make recording when motion is detected. Note: Excluding 24/7 Continuous Recording, other schedule recording types can ONLY be activated when motion detection is configured on the camera. Please refer to page 56 in the users manual for more information. Click Next to continue. D-Link D-ViewCam User Manual 13 Section 3 - Configuration Select Yes to add other camera(s), or select No if you have no additional camera(s) to add. Click Next to continue. The Add Camera wizard is now complete. Click Close to access the D-ViewCam main screen interface. D-Link D-ViewCam User Manual 14 Section 3 - Configuration Using D-ViewCam Software D-ViewCam software provides advanced security monitoring and device management functions when used in configuration with D-Link IP camera(s). D-ViewCam uses IP technology to provide comprehensive management functions, such as system controls, live video feeds, and archived recordings. The main user interface includes ten areas, refer to the table below for more descriptions. 1 2 3 4 5 6 8 9 D-Link D-ViewCam User Manual 10 7 15 Section 3 - Configuration Main Display Area The main screen interface is where live images from the cameras or e-Map are displayed. For live images, depending on the split-screen configuration, this area can display images from multiple cameras. There is an information bar for each image that can be used to identify a camera and its current status. This bar will not be displayed in high split-screen configuration such as 10, 16 or 32. Event Status This icon will display the event status. Grey indicates no event action setting, Green indicates event action setting is on, and if the icon is flashing red this indicates that an event is detected. Camera Name Displays the camera name. If the video display is empty the camera name will not be displayed. D-Link D-ViewCam User Manual Video Status This icon displays the status of your video. Gray indicates video is lost, Green is normal, and Red indicates video is recording. Config Click this thumbnail to access the configuration settings of the camera. Remove Click to remove the camera from the display window. 16 Section 3 - Configuration System Board Area This area displays the D-ViewCam logo, system date and time, and version information. Select Device and Map Area This area displays your map and camera(s) in a tree structure. 1.Left click the tree node of My Map or New Map, the e-map will appear on the Main Display area. 2.Right click the My Map or New Map tree node, the Main Display area will show all the cameras in split screen mode. The split screen mode selection (4, 6, 9, 10, 16 and 32) is according to the number of cameras allocated under the map. 3.Double-click the camera node in the tree list to bring up the expert mode configuration. D-Link D-ViewCam User Manual 17 Section 3 - Configuration Preview Window Area This area will display an image preview of a selected camera from My Map. If a map is selected (instead of a camera), this preview window will cycle through images (one after the other) from all of the available cameras. Split Screen Area Split Screen Select a split-screen display layout by clicking on the desired layout icon. The system provides 4, 6, 9, 10, 16 and 32 split screen modes. To switch to single camera display, double-click the camera’s image. To return to the previous configuration screen, press the Esc key or double-click on the screen again. D-Link D-ViewCam User Manual Rotation Control the rotation of the video monitoring screen. The live video display will start to rotate from the upper left to the lower right. Click the rotation icon to start or stop the rotation. If the number of cameras is more than the current split screen configuration, the main display window will arrange in multiple pages. You can access all the cameras by using the paging mechanism. 18 Section 3 - Configuration Manual Control Area Snapshot Button Snapshot Button Click this button to capture a selected video image immediately. When a camera is selected and live video image can be seen in the main display or preview area, you can take a snapshot using the snapshot button. When this button is pressed, the system will show a dialogue window with the snapshot image and options as shown below: OSD Button Click this button to change the content of the overlay information and select a text color. Browse Button Click this button to select a folder where the image file will be saved, and then input a file name. Note: You can save the file in a different format by typing the file format after the file name, such as: .png, .gif, .jpg. D-Link D-ViewCam User Manual 19 Section 3 - Configuration Start/Stop Manual Recording Button Start/Stop Manual Recording Button By clicking this button you can start or stop manual recording of video. When performing a manual recording, the video window will be marked red and the recording time information will be displayed red in the lower right hand corner of the screen. If you want to manually record multiple videos, follow these three steps below. 1.Select a group of live videos by pressing and holding the Ctrl key on the keyboard, and then click on all of the camera images that you want recorded in the video display area. 2.To start recording, click the Start Manual Recording button. 3.To stop multiple recordings, select the cameras you wish to stop recording by repeating step 1, and then click the Manual Record button to stop recording. All video data is recorded in the QVGA or CIF format. The frame rate depends on the camera that you select and should be configured via the camera’s web interface. D-Link D-ViewCam User Manual 20 Section 3 - Configuration Start/Stop 2-Way Audio Button For camera(s) that support audio, D-ViewCam provides two-way audio features, which enable a user to start an audio conversation with another person near the camera(s). To start an audio conversation, first select a camera and then press the Start/Stop 2-Way Audio button. You can press the button again to stop the function. Note: If the two-way audio mode is on and you select another camera, the audio conversation session will automatically terminate. Start / Stop 2-Way Audio Button With cameras that support two-way audio, you may select this button to start or stop two-way audio. D-Link D-ViewCam User Manual 21 Section 3 - Configuration Freeze Video Display Button Freeze Video Display Button This button can be used to temporarily stop displaying all live images. If you press this button again, it will resume video display. Note: This feature only freezes the live image display; all other functions such as event and recording are not affected. D-Link D-ViewCam User Manual 22 Section 3 - Configuration PTZF Control Area PTZF control area provides pan, tilt, zoom and focus functions to control the movement of PTZF capable cameras. Zoom Click + to zoom in and - to zoom out. PT Control Controls to point the camera up, down, left, or right. Focus Click + or - to adjust the focus of the camera in order to obtain a clearer image. Auto Pan Enable auto panning on the PT camera. Go to Select a preset point for the camera to point to. For the preset point setting, please refer to page 55. Auto Patrol Enable auto patrolling to the preset location for the PT camera. Speed Adjust the pan and tilt speed of the camera. D-Link D-ViewCam User Manual 23 Section 3 - Configuration Program Control Area This area provides you 4 buttons to control the program or obtain help information. On/Off Button Click this button to shut down D-ViewCam. Help Button Click this button for descriptions, definitions and details about D-ViewCam. Minimize Button Click this button to minimize D-ViewCam to the taskbar. Auto-Hide Button Click this button to enable or disable the auto-hide panel. With the auto-hide button enabled, this will make the panel disappear until you mouse over its location. With the Auto-hide button disabled, the panel will always show on the bottom. D-Link D-ViewCam User Manual 24 Section 3 - Configuration Setting and Search Area This area enables you to view the video in full screen mode by clicking the first button. The second button enables you to configure the system in two different modes. Last, the third and fourth button enable you to search and playback the video(s) and event(s). Full Screen Button Click this button to switch the video mode to full screen mode. To return to the previous screen, double-click the screen or press the Esc key on your keyboard. System Configuration Button Clicking this button will provide the user with two configuration modes, wizard mode and expert mode. D-Link D-ViewCam User Manual Video Search and Playback Button Click to search and watch the recorded video, such as scheduled recording, event recording and manual recording. Please refer to page 66 for details. Event Search and Playback Button Click to search and watch the specific event and recorded system information. Please refer to page 69 for more information. 25 Section 3 - Configuration Event Action Log Area Event Action Log Area This area displays the 20 most recent events and starts with the most recently recorded event first. If you double-click an event item, the system will bring up the detail information of the event. If there is a recording, you can do playback immediately after the recording has completed. Event canceling will be handled according to your system setting. Event Action Disabled This icon indicates the event action setting is set to off. You can configure the event on/off in Expert mode. Event Action Enabled This icon indicates the event action setting is set to on. Event Action Detected This icon indicates that an event has been detected. When event action is enabled, event canceling will be handled according to your system setting: • Automatic event canceling - the cancel event button will be flashing for a pre-determined period of time and then the event will automatically cancel. • Manual event canceling - the cancel event button will keep flashing until it is clicked. Click the cancel event button and then the system will cancel all active events D-Link D-ViewCam User Manual 26 Section 3 - Configuration Configuring D-ViewCam The D-ViewCam application is designed so that it can easily set up a simple home and/or small business surveillance application. It provides two modes of configuration, wizard mode and expert mode. Wizard mode is designed for basic configuration, including Add Camera, System Backup and Quick Recording Settings. Expert mode is for more advanced use with comprehensive configuration options. The user can switch between these two modes at any time. To configure D-ViewCam, follow the instructions below: Step 1 -Move your mouse pointer to the bottom of the screen if the Setting and Search Area is hidden. Step 2 -The Setting and Search Area will raise automatically. Step 3 -Click the System Configuration button. For Wizard Mode, please refer to page 28. For Expert Mode, please refer to page 34. System Configuration Button D-Link D-ViewCam User Manual 27 Section 3 - Configuration Wizard Mode Wizard mode configuration is designed to allow a user to quickly set up a D-ViewCam system with just a few simple clicks. This mode is recommended to quickly set up a working D-ViewCam system. You can use expert mode configuration to fine-tune the system at a later time. Click a button of the wizard you wish to begin. System Backup Wizard Quick Settings Wizard Add Camera Wizard Exit Expert Mode Add Camera Wizard To add a new IP camera, please refer to page 11. D-Link D-ViewCam User Manual 28 Section 3 - Configuration System Backup Wizard There are two system backup types, Video Recording Backup and System Database Backup. Click Next to continue. Select a task and click Next to continue. Video Recording Backup This function saves video recording. System Database Backup This function saves the configuration information. D-Link D-ViewCam User Manual 29 Section 3 - Configuration Video Recording Backup Follow the steps below for Video Recording backup. Refer to page 45 to verify that your video recording path is correct. Select an IP camera from the tree structure and select a recording type. Click Next to continue. Choose a start and end date and time. Click Next to continue. Click Browse to select a directory to save the backup files. You can make a new folder by clicking Make New Folder or you can select an existing folder and click OK to continue. D-Link D-ViewCam User Manual 30 Section 3 - Configuration When the backup is complete, you can choose to Keep the source or Delete the source after backup. Click Next to continue. Verify that the information is correct and click Yes to start the backup process. When backup is complete, click OK to return to the system configuration screen. D-Link D-ViewCam User Manual 31 Section 3 - Configuration System Database Backup Follow the steps below for the System Database backup. Click Browse to select a directory to save the backup files. Click Next to continue. You can make a new folder by clicking Make New Folder or you can select an existing folder and click OK to continue. When backup is complete, click OK to return to the system configuration screen. D-Link D-ViewCam User Manual 32 Section 3 - Configuration Quick Settings This setting will apply to all cameras. For user convenience, the system provides four different recording methods for a user to choose. 24/7 Continuous Recording - This setting will record all IP cameras 24 hours a day and 7 days a week continuously. Note: This recording arrangement will need larger disk space. 24/7 Economic Recording - This setting will record anytime when motion is detected. Note: This setting may consume a large amount of your CPU resources. Office Hours Only - The scheduled recording time is Monday through Friday from 8:00 AM to 6:00 PM and will start recording when motion is detected. Non-Office Hours Only - The scheduled recording time is Monday through Friday from 6:00 PM to 8:00 AM and will start recording when motion is detected. Notes: If these quick settings do not meet your recording schedule, you may set up a custom schedule for each IP camera. Please refer to page 61 for more information. Excluding 24/7 Continuous Recording, other schedule recording types can be activated ONLY when the image motion detection window is created on your cameras. D-Link D-ViewCam User Manual 33 Section 3 - Configuration Expert Mode Expert mode is similar to wizard mode. These two modes differ in the amount of available settings. Wizard mode offers minimal amount of settings, while expert mode provides comprehensive options and settings that you can modify. To access Expert Mode, follow the steps below: Step 1 -Move your mouse pointer to the bottom of the screen if the Setting and Search Area is hidden. Step 2 -The Setting and Search Area will appear automatically. Step 3 -Click the System Configuration button and select the Expert Mode button. The system will bring up the expert mode configuration panel. System Configuration Button D-Link D-ViewCam User Manual 34 Section 3 - Configuration Main Screen Interface Expert mode is for more advanced use with comprehensive configuration options. 1 2 3 4 Follow these steps to configure Expert Mode. D-Link D-ViewCam User Manual 35 Section 3 - Configuration Wizard This wizard is the same as Wizard Mode (explained previously), which is designed to allow a user to quickly set up a D-ViewCam system with few simple clicks. This wizard is recommended to quickly set up a working D-ViewCam system. Click on the button of the wizard you wish to begin. Add Camera Wizard To add a new IP camera, please refer to page 11. System Backup Wizard There are two system backup types, Video Recording Backup and System Database Backup. Click Next to continue. Select a task and click Next to continue. Video Recording Backup This function saves video recording. System Database Backup This function saves the configuration information. D-Link D-ViewCam User Manual 36 Section 3 - Configuration Video Recording Backup Follow the steps below for Video Recording backup. Refer to page 45 to verify that your video recording path is correct. Select an IP camera from the tree structure and select a recording type. Click Next to continue. Choose a start and end date and time. Click Next to continue. Click Browse to select a directory to save the backup files. You can make a new folder by clicking Make New Folder or you can select an existing folder and click OK to continue. D-Link D-ViewCam User Manual 37 Section 3 - Configuration When the backup is complete, you can choose to Keep the source or Delete the source after backup. Click Next to continue. Verify that the information is correct and click Yes to start the backup process. When backup is complete, click OK to return to the system configuration screen. D-Link D-ViewCam User Manual 38 Section 3 - Configuration System Database Backup Follow the steps below for System Database backup. Click Browse to select a directory to save the backup files. Click Next to continue. You can make a new folder by clicking Make New Folder or you can select an existing folder and click OK to continue. When backup is complete, click OK to return to the system configuration screen. D-Link D-ViewCam User Manual 39 Section 3 - Configuration System In system configuration, you can set the Event Action, Storage Setting, E-mail Server Setting and Database Backup. Event Action Follow these steps to set event actions for Recording Path Error or Disk Full system events. For device event actions, please refer to page 57. Step 1 - Select the Event Action from the Node selection and preview area. Step 2 -Choose an event from Add Event. The system will show the Event Action List Table window. For help with the settings, please refer to pages 42, 43, and 44. Step 3 -After you have finished setting the event action, the action’s configuration will be displayed on the Action Table. You can use the Modify or Remove button to modify or remove the settings. D-Link D-ViewCam User Manual 40 Section 3 - Configuration Step 2 Step 1 Step 3 D-Link D-ViewCam User Manual 41 Section 3 - Configuration Event Action List Table Change Digital Output State This setting will trigger the devices that connect to the system, such as alarm lights and sirens. When an event occurs, you can change the device status (available for digital output only). Follow the steps below to configure the digital output state. Step 1 -Select the action Change Digital Output State and set the digital output. Step 2 -Change the output state to on or off. Step 3 -Seconds before starting event action means the delayed time before the event action is executed. If you prefer NOT to start the event action immediately, you can set a wait time so that the action will start after the wait time has expired. Click /OK to activate the setting. Step 1 Step 2 Step 3 D-Link D-ViewCam User Manual 42 Section 3 - Configuration Send E-mail This setting will send email to the specified accounts indicating the type of event, as well as attaching an image taken while the event occurred. Follow the steps below to configure Send Email. Step 1 -Select the action Send Email and enter the email address. Check the Attach image if you want the system to send the image(s) taken from the selected IP camera. Step 2 -Seconds before starting event action means the delayed time before the event action is executed. If you prefer NOT to start the event action immediately, you can set a wait time so that the action will start after the wait time has expired. Click /OK to activate this setting. Step 2 Step 1 D-Link D-ViewCam User Manual 43 Section 3 - Configuration Play Sound This setting will play a sound for the specified accounts indicating the type of event when the event occurred. Follow the steps below to configure Play Sound. Step 1 -Select the action Play Sound. Step 2 -You can select a sound from the drop-down menu or you can select your own sound file by clicking the Browse button and choosing a Wave file (.wav). You can test the sound file by clicking the Play Sound button. Step 3 -Seconds before starting event action means the delayed time before the event action is executed. If you prefer NOT to start the event action immediately, you can set a wait time so that the action will start after the wait time has expired. Click /OK to activate the setting. Step 2 Step 1 Step 3 D-Link D-ViewCam User Manual 44 Section 3 - Configuration Basic Setting Step 1 - Select Basic Setting from the tree menu. Step 2 -Assign recording paths for schedule recording, event recording, manual recording, snapshot recording and backup. Step 3 - You can change the system language to English, Chinese Traditional or Chinese Simplified. Step 4 - Enable or Disable the event action function. Click Save to save your settings. The system will detect whether the assigned recording path exists. If not, the system will inform you to change it to an appropriate path. Please follow the instructions below. Step 2 Step 1 Recycle The system will automatically delete out-dated data to reclaim storage space. You can choose the recycle unit (in GB or days) from the drop-down list, and enter a value, or select from the list of data to define the recycle value. Available Space (GB) The system will count and display the available space of your disk in this text box. Step 4 Step 3 Note: Please configure the recording path for the scheduled event and manual recording options differently from D-ViewCam. Note: It is recommended to leave enough work space (around one hour of schedule recording space) for the temporary file created by the schedule and event recording. Note: D-ViewCam keeps the live video alive whether or not the video is being recorded. 1. This feature provides continuous video display, even if an external storage (such as NAS) stops working. 2. D-ViewCam won’t check the available recording space when an external storage (such as NAS) stops working. D-Link D-ViewCam User Manual 45 Section 3 - Configuration Email Server Setting This function is used to configure your email sever settings, which will be used to send event notifications. Step 1 -Select Email Server Setting from the tree menu. Step 2 -Input the email server information. Server Name/IP: Input your email server name of your email provider. Example: mail.test.com or an IP address, such as 192.168.1.1. Username: Input your email account username. Password: Input your email account password. Send From: Insert sender email address. Example: [email protected] Message Subject: Insert a subject for your email message. This message will send to your email once an event is detected. Example: An alarm occurs in the kitchen. Step 3 -Click the Test button to test the setting, which will send an email using the current setting. Then click Save to activate this setup. Step 1 Step 2 Step 3 D-Link D-ViewCam User Manual 46 Section 3 - Configuration Database Backup The database backup function saves all system settings and the event log. You can set a time when the system will execute a database backup automatically on a daily basis. Follow the steps below. Step 1 - Select Database Backup from the tree menu. Step 2 -You can click Import to restore predefined system settings, or Export to save or backup your current setting for future use. Step 3 - Set the time by using the drop-down menu, for when the system will backup the system data on a daily basis. Click Save to activate this setup. Step 2 Step 1 Step 3 D-Link D-ViewCam User Manual 47 Section 3 - Configuration User D-ViewCam provides five user accounts, one administrator account and four normal user accounts. Administrator Only an administrator can modify these settings. Follow the steps below to set up an administrator’s account. Step 1 - Select Administrator from the tree structured menu. Step 2 - You can click the Browse button to upload a picture for the administrator. Step 3 -Enter or change the user’s Basic Information. Then click Save to activate this setup. Step 2 Step 1 Step 3 D-Link D-ViewCam User Manual 48 Section 3 - Configuration Normal User The administrator may manage up to four normal user accounts. You can modify or remove all these accounts but can not add more than four accounts. To modify the user(s) accounts, follow the steps below. Step 1 -Select User1 from the tree structured menu. Step 2 -You can upload a picture for the user, as well as enter or modify the user’s Basic Information and privilege setting here. A normal user can be administrator if he/she receives administrator’s privilege. You can adjust the user’s valid time and then click Save to activate this setup. Step 2 Step 1 Step 3 D-Link D-ViewCam User Manual 49 Section 3 - Configuration My Map My Map is the default map for the system. You can build your own map(s) by adding it into My Map, and assign it to your device(s). Follow below steps to add a map. Add a Map Step 1 - Click the /Add Map button. Step 2 - Input a map name or browse to locate the desired map filename. Step 3 - Select an image file and click Open. Step 4 - Click /OK to save the setting. The new map will be added to the tree menu on the left. Step 2 Step 3 Step 4 D-Link D-ViewCam User Manual 50 Section 3 - Configuration Modify Map Step 1 - Click the /Modify Map button Step 2 - Click Browse to locate the desired image file or input the image filename directly. Step 3 - Select an image file and click Open. Step 4 - Click /OK to save the setting. The modified map will be updated to the tree menu on the left. Step 2 Step 3 Step 4 D-Link D-ViewCam User Manual 51 Section 3 - Configuration Placing Device to eMap Step 1 -Select the My Map icon at the Node Selection and Preview Area. The selected eMap will be displayed in the Map Display area. Step 2 -Drag the device icon (of the selected camera) from the Node Selection and Preview Area, and then drop it onto the eMap Display Area. Right click the device icon, a pop-up window will indicate the direction where the IP camera is facing. Double-click the device icon placed in the e-Map interface to bring up the device web server. Note: All devices can be deleted by right clicking the device icon in the eMap interface and then by clicking the Delete button. Step 1 Step 2 Move Center Zoom Out Pointer Default Scale Area Zoom D-Link D-ViewCam User Manual Center Zoom In 52 Section 3 - Configuration Device Setting Device setting can be configured in Expert Mode. If the device is disconnected, the device settings such as preset, motion detection, and image quality will be disabled. The following section will explain the details of device setting. Information Camera Information Camera Name, ID and Password: You can change this information. Model name, MAC Address, and Status: The system will load this information automatically, and you can not modify this information. Select Orientation If the camera is installed upside down, use the setting of Vertical Flipped to flip the image upside down, or mirror the image to flip it to the left, right or both. Networking Information IP Address, Device Port: You can change the camera IP address and its port number. If this information changed through the camera web server, please remember to update the information here as well. Status: The system will load this information automatically, and you can not modify the status manually. Audio Choose to Enable or Disable the two way audio function. Access to Device By default, this option will connect and log on to the camera directly. Note: However, if you change the camera’s user name or password, a login prompt appears. Enter the user name and password to login. Note: If you change the device information, it would result in short-term interruption of schedule recording. D-Link D-ViewCam User Manual 53 Section 3 - Configuration DI/DO Setting To configure the camera’s sensor and relay, expand the camera node from the Node selection and preview, then select the Sensor or Relay node. You can re-name the sensor/relay and define the normal status for the Sensor or Relay on the sensor/relay page. The Sensor and Relay will be triggered when the status is different from its normal state. D-Link D-ViewCam User Manual 54 Section 3 - Configuration Preset Point Preset Location specifies where the IP camera should point. Preset Name specifies the position name of the pointer. Follow the step below to set the Preset Point. Step 1 -Use the PT Control interface to adjust the direction of the IP camera. Choose a number in the Preset Location field, and enter a name for this pointer in the Preset Name text box. Step 2 -Click Save and the newly added preset name will show up in the Preset Location field (you can also add other preset points in the same way). Note: To remove a preset, select the Preset Location and click Remove. Auto Scan Period The IP camera will auto pan and auto patrol within this time interval. You may get service of Periodically Auto Pan and Periodically Auto Patrol by assigned interval, but this service will stop the alarm service of that IP camera, including Event Action of Go Preset. D-Link D-ViewCam User Manual 55 Section 3 - Configuration Motion Detection To detect specific area motion detection, you have to define at least one detection zone. Follow the steps below. Step 1 -Click the New button and a small window will appear on the screen, you can drag the mouse to draw a detection zone. You may define more than one zone on the screen by repeating the same process. Step 2 -Adjust the window to define the detection zone. Step 3 -Input a window name, then click the Save button. Enable Motion Detection Check the box to activate. Sensitivity Modify the sensitivity setting by changing the slider control. Move toward right will increase the sensitivity level, which means a relatively small movement will trigger an action. Move the slider control toward left will reduce the sensitivity for movement detection. Window Name Give the detection zone a name. Save Save the settings. New Create a new window. Percentage Modify the percentage setting by changing the slider control. D-Link D-ViewCam User Manual 56 Section 3 - Configuration Event Actions These event actions are more related to the device events, such as Image Motion Detected, Sensor Alarm Detected, and Video Lost. For system event action setting, please refer to page 40. Follow the steps below. Step 1 -Select the Device Icon from the Node selection and preview area. Step 2 - Choose an event from Add Event. The system will show the Set Event Action window. For help with the settings, please may refer to pages 42, 43, 44, 58, 59 and 60. Step 3 -After finishing setting the Event Action, the action’s configuration will show on the Action Table. You can use the Modify and Remove buttons to modify or remove the settings. Note: Accept next event after (seconds) means the time interval between the first event and next event that can be processed. Any event(s) that occurs during the interval will be ignored. Step 1 Step 2 Step 3 D-Link D-ViewCam User Manual 57 Section 3 - Configuration Event Action List Table Show Live Video Follow the steps below to show live video. Step 1 - Select Show Live Video action. Step 2 - Select a video source. Then, Click /OK to activate this setup. 1. If only one event is triggered, the camera images will be displayed on the four split screens. They are arranged starting from up-left to up-right, low-left, and low-right. 2. If multiple events are triggered, live video will be displayed accordingly. If more than four cameras are triggered, the live video will be displayed rotational. Note: Seconds before starting event action means the delayed time before executing the event action. If you prefer NOT to start the event action immediately, you can set a wait time so that the action will start after the wait time has expired. Step 1 D-Link D-ViewCam User Manual Step 2 58 Section 3 - Configuration Start Recording The event recording of a breached camera; event recording time is set by number of seconds. Step 1 - Select the Start Recording action. Step 2 - Select a video source. Click /OK to activate this setup. Note: Seconds before starting event action means the delayed time before executing the event action. If you prefer NOT to start the event action immediately, you can set a wait time so that the action will start after the wait time has expired. Step 2 Step 1 D-Link D-ViewCam User Manual 59 Section 3 - Configuration Go to Preset Point Turn to the preset location upon the motion triggering. Step 1 - Select the Go to Preset Point action. Step 2 - Select from the Preset Point field. When event is detected, the system will turn PT camera to the specified preset location. Then, click /OK to activate this setup. Note: Seconds before starting event action means the delayed time before executing the event action. If you prefer NOT to start the event action immediately, you can set a wait time so that the action will start after the wait time has expired. Step 2 Step 1 D-Link D-ViewCam User Manual 60 Section 3 - Configuration Schedule / Recording (Settings) Recording Rate Set the recording frame rate, in frames per second (FPS). Event Recording Length Define the time length of event recording for pre-event and post-event. D-Link D-ViewCam User Manual 61 Section 3 - Configuration Schedule / Recording (Schedule) Follow the steps below to set the schedule. Step 1 -Select Set Scheduled Recording to schedule recording, or select Set Scheduled Event to schedule event recording. Set Scheduled Recording The system provides four Scheduled Recording types: Disable: No video will be recorded for this schedule. 24/7: Video will always be recorded. Select: Video will be recorded according to your schedule. Economic: Video will only be recorded when motion is detected. Set Scheduled Event Setting Disable: When an event occurs, no video will be recorded. 24/7: When an event occurs, the video will always be recorded. Select: When an event occurs, the video will be recorded according to your schedule. Step 2 - Select the time or period when you want to schedule the recording. The activated block will be colored. To cancel or modify a schedule setting, click the colored block to deactivate it. D-Link D-ViewCam User Manual 62 Section 3 - Configuration Templates Provides a list of available templates for you to choose and apply. You must add/set a template first before apply it to other devices. Add Template You can add and save your setting for the scheduled recording into a template. Apply Template You can select an available template from the drop-down menu and then click Apply. This will save some efforts in scheduling the recording. D-Link D-ViewCam User Manual 63 Section 3 - Configuration Schedule / Recording (Specific Date) Follow the steps below to set a specific date. Step 1 - Select the start date and end date. Step 2 - Put a remark for the specific date. Step 3 - Click Add to add your specific date to the table on the right. Step 4 - If you want to modify the specific date, click a specific date from the table, then modify the date and remarks, and click Modify. Step 5 - Click Import/Export button to load or output the specific date. Step 6 - Select a specific date and click Remove to delete the specific date. Remarks You can put a remark to describe the specific date. Date Select the specific date period. Add Click Add to add a specific date. Export Click Export to save your current setting into a text file for future use or backup. Modify You can modify the specific date by selecting a specific date and click Modify button. Remove Remove the specific date. D-Link D-ViewCam User Manual Import Click Import to import from a text file. 64 Section 3 - Configuration Image Quality Below is a description of the Image Quality screen. Brightness Adjust the brightness between -5 and +5 Contrast Adjust the contrast between -5 and +5. Saturation Adjust the saturation between -5 and +5. Hue Adjust the hue between -5 and +5. D-Link D-ViewCam User Manual Default Click the “Default” button to preset all the setting to default values. 65 Section 3 - Configuration Playback Video Search and Playback Management The Video search and playback button allows you to playback recorded video through the schedule recording, event recording, manual recording, or all recordings. This function also provides additional features for exporting video files into AVI format. The playback speed can be specified with the control bar. Follow the steps below. Step 1 - Select the video type, start and end date. Step 2 - Select the device type, and then click Query. Step 3 - Double-click the file you want to playback from the result list. Step 4 - You can backup the video files by clicking the Backup button. Step 5 - You can use the buttons in the Playback Control area to playback the video. The system allows you to rewind, fast backward, stop/pause, fast-forward, snapshot an image, and play the video in full screen mode by clicking the Switch to full mode button (you may click the Switch to default mode to go back to video search and playback page.) Step 6 - Click /Close button to return to the main screen. D-Link D-ViewCam User Manual 66 Section 3 - Configuration Step 2 Step 1 Step 3 Step 4 Step 5 Step 6 Pause Play Snapshot Fast Backward Switch to Full Mode Rewind Cue In Cue Out D-Link D-ViewCam User Manual View Result Convert AVI Fast forward 67 Section 3 - Configuration Type of Video The system provides three types of video, schedule recording, event recording and manual recording. Select Device The system lists all the devices attached on your system. List View / Thumbnail View Switch the result list to list view or thumbnail view. Histogram The red mark in the Histogram area helps you quickly locate the moment of motion video if the motion detection is setup. The histogram can be partially enlarged by dragging the mouse to show details. From, To You can assign the system to query particular date. Result List A query result will appear in the spreadsheet. You can assign the system to print out how many records in a page and use the paging button to navigate the page of the spreadsheet. Video File Backup You can backup a video, backup then delete or delete without backup. D-Link D-ViewCam User Manual Playback Control You can use the button in the control area to operate the video. Video Export Export the video files in AVI format. 68 Section 3 - Configuration Event Search and Playback Management The Event search and playback button allows you to select and query both the event(s) and camera(s), and playback the event(s) which has been recorded by the system. This function also provides additional features for exporting video files in AVI format, and exporting the event log information (Date/Time, Source, Type, Action, Relation Source and Context information) in .txt file. The playback speed can be specified with the playback control bar. Step 1 - Select the event type, start and end date. Step 2 - Select device type, and then click Query. Step 3 - If the result list has a recording file, double-click the list, then the system will pop up a video display page and playback the video. Click the Close button to return to the event search and playback page. Step 4 - You can export the log lists by clicking the Export button. Step 5 - Click /Close button to return to main screen. D-Link D-ViewCam User Manual 69 Section 3 - Configuration Type of Event The system provides several types of device event, and each device has different event action(s). Select Device The system lists all the devices attached on your system. Step 2 Step 1 From, To You can schedule the system to query event. Log List List the unusual event history that had been detected by the system. Step 3 Export Export the event log information in .txt file. Step 4 Step 5 D-Link D-ViewCam User Manual 70 Section 5 - Troubleshooting Frequently Asked Questions D-Link D-ViewCam Features 1. What is the difference between D-Link D-ViewCam and the traditional surveillance system? D-Link D-ViewCam records video in MJPEG and MPEG4 formats, stores high quality image data on computer hard disks, and provides easy query and review of the stored video. Traditional surveillance systems use videotape for storage and review, which is hard to managed, time consuming and the recorded video will degrade over a period of time or usage. 2. Why use the D-Link D-ViewCam Intelligent Solution? D-Link D-ViewCam is the bundled video surveillance system software that provides advanced security monitoring and device management functions to use with D-Link Internet cameras. This software uses IP technology to provide comprehensive management functions such as system controls, live video feeds and archived recordings. 3. We have security guards on duty 24 hours a day, 7 days a week. Do we still need D-Link D-ViewCam? Security guards and camera surveillance systems can complement each other. Your security guards can catch thieves red-handed but not in other circumstances, such as if they are preoccupied with another task. D-Link’s D-ViewCam can always automatically record events for review or to be used as evidence. Your surveillance cameras can connect to any I/O devices, and D-ViewCam can discreetly and timely alert your security guards of inadvertent events, allowing them to react to the situation in an effective manner. 4. What kind of network does D-Link D-ViewCam run on? D-Link D-ViewCam runs on standard TCP/IP networks, such as a local area network (LAN), and over the Internet. If using Internet, a broadband DSL or cable modem connection is recommended to ensure good quality of video image is being transferred over the Internet. D-Link D-ViewCam User Manual 71 Section 5 - Troubleshooting 5. How are multiple camera views displayed on the screen? If you deploy several cameras and they are all displaying video at the same time, you have several options to arrange the display of these videos on your computer screen. One option is to reserve a major part of the screen to display the video from a single camera. Another option is to split the screen to show videos from multiple cameras. To switch the display from one camera to another, you can either manually select a camera, or have the system automatically display videos from all cameras in turn, called auto rotation. 6. Does D-Link D-ViewCam support cameras that have motion detection capability? Yes. If the camera has motion detection function, D-ViewCam will take advantage of that. When the camera does not have motion detection capability, D-ViewCam will perform software motion detection for it, at the cost of system performance. 7. How do I estimate an adequate disk space to store the recorded video? The Disk Space required can be calculated with these two formulas: 1. For MJPEG cameras: Frame Size x Frame per Second x Total Second, or 2. For MPEG4 cameras: Bit rate / 8 x Total second. For example: MJPEG cameras: Recording at medium quality CIF (10 Kbytes/frame) at 30 FPS for a week requires 173G Bytes/ camera MPEG4 cameras: Recording with bit rate at 64kbps (low quality CIF) for a week = 4.6 G Bytes/camera Note: The data revealed here is only for reference. The real recording capacity depends on the view and environment. 8. Do I need a very powerful computer to run D-Link D-ViewCam? Please refer to the System Requirements table on page 4. To monitor more than 16 cameras simultaneously, the quality of the live video display may depend on your hardware specification. Note: If a mega pixel camera is used with the D-ViewCam application, the minimum system requirement should be raised to CPU: Intel P-4 3.4GhZ or above with 1GB of memory due to the resources required to process and store large amounts of image data. D-Link D-ViewCam User Manual 72 Section 5 - Troubleshooting 9. Please describe the privilege-based access of D-Link D-ViewCam. D-Link D-ViewCam uses a simple privilege control scheme to let users access the system and use different functions. A user can have administration privilege or normal user privilege. 10. Windows Vista operating system’s user account control feature may interfere with the normal operation of the D-ViewCam application. For Windows Vista users: please go to User Accounts and Family Safety > User Accounts > Turn User Account Control on or off, then uncheck the “Use User Account Control (UAC) to help protect your computer” checkbox. Restart your computer to validate the setting. For additional information of User Account Control, please go to http://www.microsoft.com/windows/products/windowsvista/features/details/useraccountcontrol.mspx. D-Link D-ViewCam User Manual 73 Section 5 - Troubleshooting D-Link D-ViewCam Operation Video Image Configuration 1. How are video images stored? Video images are compressed into MJPEG or MPEG4 format, and then stored on your computer hard disk or a designated network storage device. 2. What frame sizes does D-Link D-ViewCam use? For MJPEG, each frame is approximately 14 to 15KB each. However, it also depends on your camera’s specifications and setting. 3. What should I do when saving image configuration or image quality and the system pops up “Parameter setup error” message? One of the following might cause this problem: 1. Camera is disconnected. 2. Network is unstable. 3. Firewall. If you install D-ViewCam on a PC with firewall software running, the firewall software may reject some Internet packets, which are considered insecure. You need to turn off Internet Security or disable Personal Firewall in order to save image configure/ image quality of your camera. Remember to turn on Internet Security or enable Personal Firewall later to secure your system. 4. Can we change the FPS (frame per second) rate of a camera? FPS is the number of image frames that a camera shoots in a video operation. For MJPEG file, you can set the FPS rate according to your requirement. Note: Not all setting of your camera is available in D-ViewCam. The FPS rate that you set cannot exceed the maximum FPS rate of your camera. For MPEG4 format, you can change bit rate instead of FPS. Please make detail configurations on camera’s web interface. D-Link D-ViewCam User Manual 74 Section 5 - Troubleshooting 5. Which format could my recorded video file covert into? D-Link D-ViewCam can convert the recorded video into AVI format with the available codec in your operating system. Video Display 6. What should I do if there is no video display of the camera after I have just added it to D-ViewCam? Please check to see if you correctly typed in the IP address of the camera. If you changed the default user name and password of the camera, you must input that information in D-ViewCam in Expert mode. The changed value will take effect after you re-login to D-ViewCam. Please refer to page 48 for changing the camera ID and Password. 7. Why isn’t video displayed from the connected camera(s)? The possible root causes: 1. The network is unstable 2. The workload is too heavy for your computer to handle. 3. Changing the camera’s video parameters (by using the camera web server) in the middle of a D-ViewCam operation, can cause D-ViewCam to fail. 8. How do I record video in D-ViewCam? D-Link D-ViewCam provides four different recording methods: 1. Manual recording (capture of video feed at the moment you command the system to). 2. Schedule recording (automatic recording according to the time periods that you set). 3. Event recording (automatic recording according to the event settings). 4. Motion detection recording in scheduled time. In the time periods you set, start recording only when motion is detected. This can make disk usage more economical. 9. Can I change the audio format at the camera web server while using two-way audio function? No. Please make sure to complete all camera configurations at the camera web server before using the D-ViewCam application. Changing camera parameters using the camera web server in the middle of a D-ViewCam operation can cause D-ViewCam to fail. D-Link D-ViewCam User Manual 75 Appendix A - Wireless Basics 10. Why does my computer screen always display Connecting or Disconnected? For cameras determined to be offline, and when D-ViewCam is trying to reconnect, a “Connecting” status will appear on the display during the retry. If D-ViewCam fails to connect, a “Disconnected” status will appear on the display. If the connection is stable, but the video stream is non-existent, the reconnect interval will be within 30 seconds. If the connection fails, the reconnect interval will be within 60 seconds. 11. How to get a better image view in D-ViewCam? D-ViewCam adopts drop frame to optimize the application performance. So if you want to get better image view, please consider below items: 1. Disable the rotation mechanism. 2. For viewing MJPEG video format in CIF resolution, the video FPS display in D-ViewCam is adjusted according to the number camera displayed in the main screen. The higher the FPS, the smoother the motion will appear. 1-split screen display 30 FPS, 4/6/9/10/16-split screen, display 5 - 15 FPS. 32-split screen, display 1 FPS. 3. For viewing MPEG4/H.264 video format, adjust the image resolution to 640*480 and showed in 4-split screen. For the camera with the resolution larger than 1024*640, D-ViewCam will decode I-frame only. Firewall 10. What about firewalls? Do they affect D-Link D-ViewCam? If you use D-Link D-ViewCam on computers with Windows XP SP2 or any other applications with personal firewalls, please configure the firewall to allow D-Link D-ViewCam to pass through. Most the personal firewalls will automatically prompt you to permit D-ViewCam program to be used in the network. 11. What about firewalls like Nod 32 which has to be manually input to permit D-ViewCam installation? If you use D-Link D-ViewCam on computers with Nod32 personal firewall, please configure the firewall manually after you have installed D-ViewCam as following steps: Click NOD32 antivirus system icon on the task bar to open it. D-Link D-ViewCam User Manual 76 Appendix A - Wireless Basics Select IMON > Setup > Miscellaneous > Exclusion > Edit > Add to C:\Program Files\D-Link D-ViewCam\Exes\Admin.exe, Control. exe, Monitor.exe, and VideoProxy.exe to the Exclude applications window. Note: Paths depend on your software installation. Note: D-ViewCam is not compatible with the ESET NOD32 anti virus version 2.7. Please upgrade your anti virus version to 3.0 and it is also recommended to stop the anti virus application while executing the D-ViewCam installation. Click OK to exit Exclude applications window. Click OK to exit IMON Setup window. Click Quit to unload IMON. Click Start to load IMON Event 12. How does the event management operate? D-Link D-ViewCam can receive input from Motion Detection or Sensor (DI, or Device Input) to create an event. Then, the event can be used to trigger DO (Device Output), video recording, show live video, e-mail notification, play sound, and go to preset point (on cameras with Pan and Tilt functions). D-Link D-ViewCam User Manual 77 Appendix A - Wireless Basics 13. How does event recording work? It starts recording automatically according to your event settings. 14. In what format can I export the event report to? D-ViewCam can export the event report in text format. Note that Microsoft Word 2000 is currently not supported. 15. When an event occurs, how do I know which camera it comes from? Please look at the Event Notification Log in the main screen. The source column shows the event source. 16. How do I get event notifications? D-Link D-ViewCam sends event messages in different ways, based on the event action setting of a camera. For example, if the event action is Email, the message will be sent by Email. For details, please refer to User’s Manual of D-ViewCam 17. After I’ve changed the time or date of my computer system, the D-Link D-ViewCam event function does not seem to work anymore? Please exit D-ViewCam then reboot your computer after you’ve changed your computer system’s time and date. Then run D-ViewCam again. The event function should go back to normal. Database 18. What’s the purpose of database backup? The configuration data, operating parameters and log data of D-ViewCam are stored in database. D-Link D-ViewCam can backup database periodically and automatically. So, you can restore it if the system is corrupted inadvertently. 19. What is the purpose of database restore function in D-Link D-ViewCam? The database restore function is provided to safeguard your D-ViewCam program database in case if it is corrupted inadvertently. D-ViewCam can backup the database automatically but you have to restore the database manually. For details, please refer to D-ViewCam User’s Manual. D-Link D-ViewCam User Manual 78 Appendix A - Wireless Basics Save and Copy to Setting 20. Why do we need to use “Save Setting” and “Copy to” functions in D-Link D-ViewCam? These two functions are designed to let users configure cameras efficiently. Camera configurations such as: Area setting, map file, device ratio, configurations in Camera Setting, Image Alarm Setting, Preset, eMap location and sensor alarm setting can all be saved and copy to another camera. However, please remember to review the settings of the target camera after “copy to” to make sure all settings are correct and work as intended. Storage Space Setting 21. What will happen when my hard disk or network storage device is running out of space? When your hard disk or network storage device is approaching 90% full, and if you have enabled the Recycle function, the system will automatically start to delete the oldest recorded video on your hard disk or network storage to make space for the new files. To prevent losing recorded video data, please remember to periodically back up your recorded video files and delete the unwanted ones. For details on how to use this function, please refer to page 36. 22. How to configure the schedule recording, event recording, manual recording path? To avoid system failure due to insufficient disk space, please configure the recording path for schedule, event and manual recording options differently from the D-ViewCam installation path. D-Link D-ViewCam User Manual 79 Appendix B - Open Source Software Notification Open Source Software Notification D-ViewCam 2.x product makes use of the following software licensed under GPL (General Public License). Copies of the GPL licensed software are included in the software distribution CD of D-ViewCam 2.x product. You can also download the software from the official web site listed here. 1. Xvid MPEG-4 video codec version 1.1.3 (www.xvid.org, GPL v2) © 1989, 1991 Free Software Foundation, Inc., 51 Franklin Street, Fifth Floor, Boston, MA 02110-1301 USA Everyone is permitted to copy and distribute verbatim copies of this license document, but changing it is not allowed. TERMS AND CONDITIONS FOR COPYING, DISTRIBUTION AND MODIFICATION 0. This License applies to any program or other work which contains a notice placed by the copyright holder saying it may be distributed under the terms of this General Public License. The “Program,” below, refers to any such program or work, and a “work based on the Program” means either the Program or any derivative work under copyright law: that is to say, a work containing the Program or a portion of it, either verbatim or with modifications and/or translated into another language. (Hereinafter, translation is included without limitation in the term “modification.”) Each licensee is addressed as “you.” Activities other than copying, distribution and modification are not covered by this License; they are outside its scope. The act of running the Program is not restricted, and the output from the Program is covered only if its contents constitute a work based on the Program (independent of having been made by running the Program). Whether that is true depends on what the Program does. 1. You may copy and distribute verbatim copies of the Program’s source code as you receive it, in any medium, provided that you conspicuously and appropriately publish on each copy an appropriate copyright notice and disclaimer of warranty; keep intact all the notices that refer to this License and to the absence of any warranty; and give any other recipients of the Program a copy of this License along with the Program. You may charge a fee for the physical act of transferring a copy, and you may at your option offer warranty protection in exchange for a fee. D-Link D-ViewCam User Manual 80 Appendix B - Open Source Software Notification 2. You may modify your copy or copies of the Program or any portion of it, thus forming a work based on the Program, and copy and distribute such modifications or work under the terms of Section 1 above, provided that you also meet all of these conditions: a) You must cause the modified files to carry prominent notices stating that you changed the files and the date of any change. b) You must cause any work that you distribute or publish, that in whole or in part contains or is derived from the Program or any part thereof, to be licensed as a whole at no charge to all third parties under the terms of this License. c) If the modified program normally reads commands interactively when run, you must cause it, when started running for such interactive use in the most ordinary way, to print or display an announcement including an appropriate copyright notice and a notice that there is no warranty (or else, saying that you provide a warranty) and that users may redistribute the program under these conditions, and telling the user how to view a copy of this License. (Exception: if the Program itself is interactive but does not normally print such an announcement, your work based on the Program is not required to print an announcement.) These requirements apply to the modified work as a whole. If identifiable sections of that work are not derived from the Program, and can be reasonably considered independent and separate works in themselves, then this License, and its terms, do not apply to those sections when you distribute them as separate works. But when you distribute the same sections as part of a whole which is a work based on the Program, the distribution of the whole must be on the terms of this License, whose permissions for other licensees extend to the entire whole, and thus to each and every part regardless of who wrote it. Thus, it is not the intent of this section to claim rights or contest your rights to work written entirely by you; rather, the intent is to exercise the right to control the distribution of derivative or collective works based on the Program. In addition, mere aggregation of another work not based on the Program with the Program (or with a work based on the Program) on a volume of a storage or distribution medium does not bring the other work under the scope of this License. 3. You may copy and distribute the Program (or a work based on it, under Section 2) in object code or executable form under the terms of Sections 1 and 2 above provided that you also do one of the following: a) Accompany it with the complete corresponding machine-readable source code, which must be distributed under the terms of Sections 1 and 2 above on a medium customarily used for software interchange; or, b) Accompany it with a written offer, valid for at least three years, to give any third party, for a charge no more than your cost of physically performing source distribution, a complete machine-readable copy of the corresponding source code, D-Link D-ViewCam User Manual 81 Appendix B - Open Source Software Notification to be distributed under the terms of Sections 1 and 2 above on a medium customarily used for software interchange; or, c) Accompany it with the information you received as to the offer to distribute corresponding source code. (This alternative is allowed only for noncommercial distribution and only if you received the program in object code or executable form with such an offer, in accord with Subsection b above.) The source code for a work means the preferred form of the work for making modifications to it. For an executable work, complete source code means all the source code for all modules it contains, plus any associated interface definition files, plus the scripts used to control compilation and installation of the executable. However, as a special exception, the source code distributed need not include anything that is normally distributed (in either source or binary form) with the major components (compiler, kernel, and so on) of the operating system on which the executable runs, unless that component itself accompanies the executable. If distribution of executable or object code is made by offering access to copy from a designated place, then offering equivalent access to copy the source code from the same place counts as distribution of the source code, even though third parties are not compelled to copy the source along with the object code. 4. You may not copy, modify, sublicense, or distribute the Program except as expressly provided under this License. Any attempt otherwise to copy, modify, sublicense or distribute the Program is void, and will automatically terminate your rights under this License. However, parties who have received copies, or rights, from you under this License will not have their licenses terminated so long as such parties remain in full compliance. 5. You are not required to accept this License, since you have not signed it. However, nothing else grants you permission to modify or distribute the Program or its derivative works. These actions are prohibited by law if you do not accept this License. Therefore, by modifying or distributing the Program (or any work based on the Program), you indicate your acceptance of this License to do so, and all its terms and conditions for copying, distributing or modifying the Program or works based on it. 6. Each time you redistribute the Program (or any work based on the Program), the recipient automatically receives a license from the original licensor to copy, distribute or modify the Program subject to these terms and conditions. You may not impose any further restrictions on the recipients’ exercise of the rights granted herein. You are not responsible for enforcing compliance by third parties to this License. D-Link D-ViewCam User Manual 82 Appendix B - Open Source Software Notification 7. If, as a consequence of a court judgment or allegation of patent infringement or for any other reason (not limited to patent issues), conditions are imposed on you (whether by court order, agreement or otherwise) that contradict the conditions of this License, they do not excuse you from the conditions of this License. If you cannot distribute so as to satisfy simultaneously your obligations under this License and any other pertinent obligations, then as a consequence you may not distribute the Program at all. For example, if a patent license would not permit royalty-free redistribution of the Program by all those who receive copies directly or indirectly through you, then the only way you could satisfy both it and this License would be to refrain entirely from distribution of the Program. If any portion of this section is held invalid or unenforceable under any particular circumstance, the balance of the section is intended to apply and the section as a whole is intended to apply in other circumstances. It is not the purpose of this section to induce you to infringe any patents or other property right claims or to contest validity of any such claims; this section has the sole purpose of protecting the integrity of the free software distribution system, which is implemented by public license practices. Many people have made generous contributions to the wide range of software distributed through that system in reliance on consistent application of that system; it is up to the author/donor to decide if he or she is willing to distribute software through any other system and a licensee cannot impose that choice. This section is intended to make thoroughly clear what is believed to be a consequence of the rest of this License. 8. If the distribution and/or use of the Program is restricted in certain countries either by patents or by copyrighted interfaces, the original copyright holder who places the Program under this License may add an explicit geographical distribution limitation excluding those countries, so that distribution is permitted only in or among countries not thus excluded. In such case, this License incorporates the limitation as if written in the body of this License. 9. The Free Software Foundation may publish revised and/or new versions of the General Public License from time to time. Such new versions will be similar in spirit to the present version, but may differ in detail to address new problems or concerns. Each version is given a distinguishing version number. If the Program specifies a version number of this License which applies to it and “any later version,” you have the option of following the terms and conditions either of that version or of any later version published by the Free Software Foundation. If the Program does not specify a version number of this License, you may choose any version ever published by the Free Software Foundation. D-Link D-ViewCam User Manual 83 Appendix B - Open Source Software Notification 10. If you wish to incorporate parts of the Program into other free programs whose distribution conditions are different, write to the author to ask for permission. For software which is copyrighted by the Free Software Foundation, write to the Free Software Foundation; we sometimes make exceptions for this. Our decision will be guided by the two goals of preserving the free status of all derivatives of our free software and of promoting the sharing and reuse of software generally. NO WARRANTY 11. BECAUSE THE PROGRAM IS LICENSED FREE OF CHARGE, THERE IS NO WARRANTY FOR THE PROGRAM, TO THE EXTENT PERMIT TED BY APPLICABLE LAW. EXCEPT WHEN OTHER WISE STATED IN WRITING THE COPYRIGHT HOLDERS AND/OR OTHER PARTIES PROVIDE THE PROGRAM “AS IS” WITHOUT WARRANT Y OF ANY KIND, EITHER EXPRESSED OR IMPLIED, INCLUDING, BUT NOT LIMITED TO, THE IMPLIED WARRANTIES OF MERCHANTABILITY AND FITNESS FOR A PARTICULAR PURPOSE. THE ENTIRE RISK AS TO THE QUALITY AND PERFORMANCE OF THE PROGRAM IS WITH YOU. SHOULD THE PROGRAM PROVE DEFEC TIVE, YOU ASSUME THE COST OF ALL NECESSARY SERVICING, REPAIR OR CORRECTION. 1 2 . I N N O E V E N T U N L E S S R E Q U I R E D BY A P P L I C A B L E L AW O R AG R E E D TO I N W R I T I N G W I L L A N Y COPYRIGHT HOLDER, OR ANY OTHER PARTY WHO MAY MODIFY AND/OR REDISTRIBUTE THE PROGRAM AS PERMITTED ABOVE, BE LIABLE TO YOU FOR DAMAGES, INCLUDING ANY GENERAL, SPECIAL, INCIDENTAL OR CONSEQUENTIAL DAMAGES ARISING OUT OF THE USE OR INABILITY TO USE THE PROGRAM (INCLUDING BUT NOT LIMITED TO LOSS OF DATA OR DATA BEING RENDERED INACCURATE OR LOSSES SUSTAINED BY YOU OR THIRD PARTIES OR A FAILURE OF THE PROGRAM TO OPERATE WITH ANY OTHER PROGRAMS), EVEN IF SUCH HOLDER OR OTHER PARTY HAS BEEN ADVISED OF THE POSSIBILITY OF SUCH DAMAGES. D-Link D-ViewCam User Manual 84