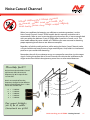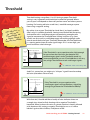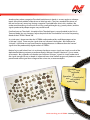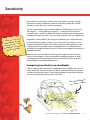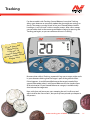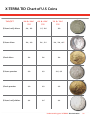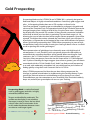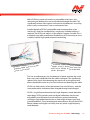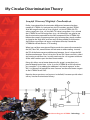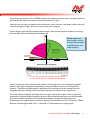
1
Understanding your
by Randy Horton (AKA Digger)
for
w
o
n
k
r
eve
n
l
l
”
it ”
u
o
d
a
e
“y
r
u
s yo
s
e
l
n
u
.
.
sure .
Contents
Introduction
Getting Started
Ground Balance
Discrimination
Coils
Practical Detecting
Technology
4
5
6
8
Greetings from Digger
Product Timeline
Product Comparison
Minelab’s Documentation
10
11
12
14
16
Battery Status
Noise Cancel Channel
Threshold
Sensitivity
Volume
18
20
21
22
24
Manual Ground Balance
Auto Ground Balance
Tracking
Tracking Ground Balance Offset
Beach Ground Balance
26
30
34
38
40
Discrimination Patterns
X-TERRA TID Chart of US Coins
Treasure Talk - Notch Discrimination
Audio Tones
Treasure Talk - Hunting by Ear
44
47
52
56
Coil Options
Coil Applications
Treasure Talk - Controlling the Search Coil
Coil Design & Manufacture
60
62
64
66
70
Applying What We’ve Learned (so far)
The Hunt
Pinpointing
To Dig, or Not to Dig - My Three Rules of Consistency
Gold Prospecting
72
76
79
Minelab’s VFLEX Technology
My Circular Discrimination Theory
Q & A with Laurence
86
88
90
92
94
My Settings
Review
Glossary of Terms
Conclusion
Success Stories from Minelab
Final Words
= When you see this icon click to find out more infromation online.
Introduction ...
Greetings from Digger
Dear Rea
der,
I was fortu
nate to be
chosen to
test the fir
help field
st series of
Minelab’s
metal dete
X-TERRA
ctors. Sin
ce that ti
thousand
me , I’ve sp
s of hours
ent
trying to
how to ma
better und
ximize th
erstand
e perform
truly ama
ance of th
zing meta
is
l detector
X-TERRA
. Althoug
is quite ca
h the
pable of o
“turn on
perating a
- and - g
sa
o” detecto
technique
r, there ar
s I’ve disc
e so
overed th
its perform
at have im me
ance in th
proved
e sites I h
unt.
I primari
ly hunt fo
r old coin
sites. Thes
s at old
e sites inc
lude mun
private la
icipal par
wns, athl
ks,
etic fields
old farm
, homeste
sites, ghos
ads,
t towns an
fair groun
d abando
ds. I’ve us
ned
ed every c
for the Xoil availa
TERRA , a
ble
nd made
compariso
“in the fi
ns of thei
eld”
r effective
ness.
This eBoo
k is not in
tended to
X-TERRA
replace th
Instructio
e
n Manual
with the d
that come
etector. Bu
s
t instead ,
to help yo
is intende
u better u
nderstand
d
functiona
the X-TER
lity and c
RA’s
apabilitie
technique
s, using
s I’ve deve
loped .
May 2011
Understanding your X-TERRA - Introduction
4
Product Timeline
You can see from the timeline below, that there have been two different
generations of X-TERRA metal detectors.
• The first generation consisted of the X-TERRA 30, X-TERRA 50 &
X-TERRA 70.
• The second generation consists of the X-TERRA 305, X-TERRA 505,
X-TERRA 705 & 705 Gold Pack .
November 2005
X-TERRA 30
March 2006
X-TERRA 70
X-TERRA 50
X-TERRA 305
April 2009
X-TERRA 705
June 2010
X-TERRA 705
Gold Pack
X-TERRA 505
See the following pages for more details on the differences between each model .
Understanding your X-TERRA - Introduction
5
Product Comparison
X-TERRA 30
X-TERRA 50
X-TERRA 70
Application
Coin, Relic & Jewelry
Coin, Relic & Jewelry
Coin, Relic, Jewelry, Beach & Gold
Prospecting
Detect Modes
(1) Coin & Treasure
(1) Coin & Treasure
(2) Coin & Treasure, and
Prospecting
Discrimination
One factory Discrimination
Pattern that can be
personalized & All Metal. 12
segment Discrimination Scale.
Two factory Discrimination
Patterns that can be
personalized & All Metal. 18
segment Discrimination Scale.
Three factory Discrimination
Patterns that can be
personalized, All Metal & Iron
Mask. 28 segment
Discrimination Scale.
18
Audio Tones
3
Ground Balance
Factory Preset.
4
1, 2, 3, 4 & Multi (28)
Manual adjustment
(0 to 20).
Manual adjustment (0 to 90),
Automatic, Beach & Tracking.
Pinpoint
Audio & visual.
Audio & visual.
Audio & visual.
Sensitivity
Adjustable (1 to 10)
Adjustable (1 to 20)
Adjustable (1 to 30)
Noise Cancel
No
3 channels ( -1, 0, 1)
Manual
5 Channels (-2, -1, 0, 1, 2),
Manual & Automatic
Threshold
No
No
Adjustable (-5 to 25)
Volume
Adjustable (0 to 10)
Adjustable (0 to 20)
Adjustable (0 to 30)
Backlight
No
No
No
Transmission
Frequency
7.5 kHz
7.5 & 18.75 kHz - change
frequency by changing coils
3, 7.5 & 18.75 kHz - change
frequency by changing coils
Coil (standard)
9” Concentric lightweight,
waterproof 7.5 kHz
9” Concentric lightweight,
waterproof 7.5kHz
9” Concentric lightweight,
waterproof 7.5 kHz
Understanding your X-TERRA - Introduction
6
X-TERRA 305
X-TERRA 505
X-TERRA 705
X-TERRA 705 Gold Pack
Application
Coin, Relic & Jewelry
Coin, Relic & Jewelry
Coin, Relic, Jewelry, Beach &
Gold Prospecting
Detect Modes
(1) Coin & Treasure
(1) Coin & Treasure
(2) Coin & Treasure, and
Prospecting
Discrimination
Two factory Discrimination
Patterns that can be
personalized & All Metal.
12 segment Discrimination
Scale.
Three factory Discrimination
Patterns that can be
personalized & All Metal.
19 segment Discrimination
Scale.
Four factory Discrimination
Patterns that can be
personalized, All Metal & Iron
Mask. 28 segment
Discrimination Scale.
Audio Tones
1, 2, 3 & Multi (12)
1, 2, 3, 4 & Multi (19)
1, 2, 3, 4 & Multi (28)
Ground Balance
Manual adjustment
(0 to 20).
Manual adjustment
(0 to 50).
Manual adjustment (0 to 90),
Automatic, Beach, Tracking &
Tracking Offset.
Pinpoint
Audio & visual.
Audio & visual.
Audio & visual plus two modes:
Automatic & Sizing.
Sensitivity
Adjustable (1 to 10)
Adjustable (1 to 20)
Adjustable (1 to 30)
Noise Cancel
3 Channels (-1, 0, 1)
Manual
5 channels (-2, -1, 0, 1, 2)
Manual
5 Channels (-2, -1, 0, 1, 2),
Manual & Automatic
Threshold
Adjustable (-5 to 25)
Adjustable (-5 to 25)
Adjustable (-5 to 25)
Volume
Adjustable (0 to 10)
Adjustable (0 to 30)
Adjustable (0 to 30)
Backlight
No
No
Yes
Transmission
Frequency
7.5 & 18.75 kHz - change
frequency by changing coils
3, 7.5 & 18.75 kHz - change
frequency by changing coils
Coil (standard)
9” Concentric lightweight,
waterproof 7.5 kHz
9” Concentric lightweight,
waterproof 7.5 kHz
3, 7.5 & 18.75 kHz - change
frequency by changing coils
X-TERRA 705 9” Concentric
lightweight,
waterproof
7.5 kHz
Understanding your X-TERRA - Introduction
X-TERRA 705
Gold Pack 10x5” eliptical
lightweight
18.75 kHz
7
Minelab’s Documentation
st
u
j
t
’
n
Do
read
ds!
r
o
w
the
• My first bit of advice is to read the Instruction
Manual thoroughly.
• Don’t just read the words.
• Apply what you read to your particular
circumstances. It is important to know how to set up
the detector for effectively hunting a specific site.
• Gain an understanding of how each of those
settings can (and will) affect your hunt.
• Learn when and how to tweak your X-TERRA to best
accomplish your task.
ERRA
T
X
ls
nt
Curre on Manua
i
ct
Instru
I am a contr
ibutor
to the Treasu
re
Talk blog an
d
moderator of
the
X-TERRA fo
rum
on Find’s Tre
asure
Forums.
If you wish to find out more, further tips and advice are also available
from:
• Minelab’s Treasure Talk blog at www.minelab.com/treasure-talk
• The X-TERRA forum on Find’s Treasure Forums at www.findmall.com.
Understanding your X-TERRA - Introduction
8
Getting Started ...
Battery Status
The first thing I do after arriving at and analyzing a site is to turn on the
detector and make sure I have sufficient battery life.
Some detector makes and models use an unregulated battery voltage
for transmission. This results in a loss of detection depth as the battery
discharges. Not so with the X-TERRA. The X-TERRAs are capable of using
1.5 volt AA alkaline, 1.5 volt AA carbon, 1.5 volt AA non-rechargeable
lithium, 1.2 volt AA NiMH rechargeable or 1.2 volt AA NiCad rechargeable
batteries.
Regardless of which type of cells you use, know that the internal voltage
of the X-TERRA is regulated all the time. As such, you can keep detecting
with your X-TERRA until the batteries are used up, without any loss of
performance. However, I’ve found that the initial reading on the battery
indicator does not reflect the true battery life. I suggest you let your
X-TERRA operate for a few minutes, then check the indicator again to get
a better estimate of the remaining battery life.
When you are out detecting, feel confident that you don’t have to
change a set of batteries until they run completely out. But as a matter
of convenience, I’d recommend carrying a set of four matching AA cells in
your pouch for when they do finally run out. Otherwise it could be long
walk back to the truck!
Full
Two black segments
inside the outline.
Half
One black segment
inside the outline.
Low
The icon will begin to
flash for a period of
time and there will be
audio announcements
every 60 seconds
before the detector
finally shuts down.
1.5 V Alkaline
1.2 V NiMH/NiCad
Battery Voltage (volts)
d
men
m
o
of
ec
I’d r ng a set
yi
ng
carr matchi
ur
four ls in yo
cel
h !!
AA
pouc
X-TERRA 705 manual p.45
Overvoltage
If the battery voltage
is too high (above 8V),
the battery icon will
flash and the detector
will shut down.
Approximate Time in Hours
Understanding your X-TERRA - Getting Started
10
Noise Cancel Channel
ise Cancel
o
N
e
h
t
g
n
i
tt
While se
hold the
u
o
y
e
r
u
s
e
k
a
l objects
ta
Channel , m
e
m
e
g
r
a
l
y
om an
coil away fr
When I am confident the batteries are sufficient to maintain operation, I set the
Noise Cancel Channel. Some X-TERRA models do this manually and others do it
automatically. Refer to your Instruction Manual to learn how this is best accomplished
with your particular detector. If your X-TERRA offers Auto Noise Cancel, use it! The
Auto modes offered by some models of X-TERRA are far more accurate at obtaining
proper operating levels than we are able to accomplish.
Regardless of which model you have, while setting the Noise Cancel Channel, make
sure you hold the coil away from any large metal objects. And, hold it in a horizontal
position as you would while detecting.
Remember, the coil of your detector acts as an antenna for more than just the target
signals. Setting the proper Noise Cancel Channel will minimize the interference you
might receive from electrical equipment, power lines or other metal detectors.
Minelab fact!!!
Did you know that the Noise Cancel
adjustment shifts the transmit
frequency by 40 Hz steps for the
7.5 kHz coils?
Here’s an example of how the
frequency changes for the different
Noise Cancel Channels for a 7.5 kHz
coil on the X-TERRA 705.
+2
+1
0
-1
-2
=
=
=
=
=
7.580 kHz
7.540 kHz
7.500 kHz
7.460 kHz
7.420 kHz
For more details
see Q & A with
Laurence on p.84
Understanding your X-TERRA - Getting Started
11
Threshold
Threshold settings range from -5 to 25. Having a proper Threshold
setting is very important and should not be taken for granted. Where
you set yours will depend on how well you hear tones and where you are
hunting. For hunting old coins at old sites, I would discourage anyone
from using a negative setting.
vice is
My ad
our
to set y
old at
h
s
e
r
h
T
that is
l
e
v
e
l
a
.
udible
a
y
l
e
r
ba
My advice is to set your Threshold at a level that is just barely audible
(that’s why it is called a threshold). Setting it too loud will be distracting
and could result in small/deep targets not producing enough audio
signal to overcome the Threshold tone. Setting it too low (e.g. silent
search) can also result in small/deep targets not making enough audio
tone to reach the level of your Threshold. Remember, the Threshold tone
is a starting point where all audio signals begin. If it is set too high, you
won’t hear those subtle changes.
Volume
= 30
Audible Target Response
Target #1
Target #2
Threshold
=
If the Threshold is set to a positive value, high enough
for you to hear the faint hum, the detector will
produce target signals and a Threshold sound. It is
recommended that you set a Threshold that is still very
low; a high Threshold can mask small target signals.
X-TERRA 705 manual p.35
And if it is set too low, you might miss “whisper” signals from those deep
old coins (that others have missed).
Volume
= 30
Audible Target Response
Target #2
Inaudible
Target #1
If the Threshold is set to a negative value,
small target signals will not produce a signal big
enough to go above the Threshold of audibility.
Threshold
=
X-TERRA 705 manual p.34
With that said, I should add that a buddy of mine indicates there are
a couple sites where he finds hunting with a negative Threshold is
beneficial. When he hunts for coins at a picnic area that is heavily infested
with aluminum foil, setting a negative Threshold serves as a “surface
blanker” against those shallow, small pieces of foil.
Understanding your X-TERRA - Getting Started
12
Another place where a negative Threshold could come in handy is on wet sand at a saltwater
beach. Here, black pebbles of basalt act as little hot rocks. They can sound off like pieces of
foil and can be very annoying. Having a negative Threshold helps him in this situation. But
understand that doing so can result in missing small gold targets (e.g. jewelry chains) and the
signals produced by deeper targets may not be heard.
One final note on Threshold... the pitch of the Threshold tone is not adjustable in the Coin &
Treasure Mode. You can, however, adjust the pitch of the Threshold for use in the Prospecting
Mode of the X-TERRA 70 and 705.
As a side note, I do not consider the X-TERRA audio produced by small/deep targets to be
a “whisper” signal. There may be signals that are “narrower” than others. But I believe the
“whisper” signal that we may have heard on analog detectors is different than the “narrow”
signals that are produced by digital audio in X-TERRAs.
Maybe I’m just old school, but it is my theory that these narrow signals are simply a result of the
detection field being narrower at extreme depths. Whisper? Narrow? Maybe it is just a matter
of semantics. But, regardless of whether you call them “whisper” signals or simply understand
the signal strength lessens as depth is increased, know that shallow targets can produce a more
pronounced audio signal than a target of the same size, at extreme depths.
Headphon
e
Threshold
&
Speaker T
hreshold
are adjus
ted
separately
.
Understanding your X-TERRA - Getting Started
13
Sensitivity
Next, I check my Sensitivity setting. Sensitivity determines how strongly
the receive circuit of a detector responds to anything under the coil. By
anything, I mean the soil as well as any targets.
Sensitivity parameters vary with the model of X-TERRA you are using. The
305 range is 1 - 10, the 505 has a range of 1 - 20 and the 705 can be set
anywhere from 1 to 30. The difference being is that the more setting options
available, the more “precisely” you can set your detector for your application.
un my
r
o
t
e
I lik
p
ivity u ,
Sensit
can
h as I
g
i
h
s
a
ausing
c
t
u
o
with
gnals.
false si
Regardless of the model, if I am going to be detecting in a wide open area
with relatively few targets, I like to run my Sensitivity up as high as I can,
without causing false signals. These false signals are more apparent as the
sweep speed is increased or when switching directions with the coil. But
running it on the brink of being “too hot” allows me to obtain the maximum
depth of detection.
However, do not be misled into thinking that a higher Sensitivity always
results in more depth. In areas congested with adjacent targets, or areas
with high levels of mineralization, running a high Sensitivity can have an
adverse effect on the depth of detection.
Comparing Sensitivity to car headlights
I like to compare the Sensitivity of a detector to the headlights on a car. On
nights when the skies are clear and visibility is not obstructed, you are best
served with your high beams. They penetrate deep into the night, allowing
you to see everything that may cross your path.
s
dlight
a
e
h
r
Ca
night
r
a
e
l
c
on
Understanding your X-TERRA - Getting Started
14
On the other hand, when you are driving in foggy conditions and your
view is obstructed, low beams provide a clearer line of sight. If you were
to turn on the high beams in fog, you will find that the light bounces back
toward you, making visibility very difficult.
ounces
b
t
h
g
Li
f fog
back of
s
dlight
a
e
h
r
Ca
ht
gy nig
g
o
f
a
on
Fog
Similarly, if you are hunting in an area where there are multiple targets in
each sweep, or the mineralization is extreme, having your Sensitivity too
high will cause the target signal to “splatter” or bounce back toward the
coil. This results in false signals and loss of depth because good target
signals can be hidden by the false signals.
als
sign
e
s
l
a
f
signal
t
e
g
r
a
T
g back
n
i
c
n
u
bo
er)
(splatt
Understanding your X-TERRA - Getting Started
15
Volume
X-TERRA 705 manual p.37
One X-TERRA setting that I never change
is my Volume, which is always left at the
maximum setting. My headphones have
volume controls. So if I ever want to turn
down the audio, I can do it easily on the
headphones.
A couple of things I would like to
mention are that the different models
of X-TERRA have different parameters
for audio volume settings. For example,
the 305 adjusts from 0 to 10, whereas
the 505 and 705 adjust from 0 to 30.
The minimum volume and maximum
volume are virtually the same for each
model. But the amount of variance with
each incremental setting is based on the
total number available on that model of
X-TERRA.
The other thing to note is that the
Volume setting for use with headphones
is a separate function than the Volume
setting for use without headphones
(using the built in speaker). As such, you
need to make sure you have properly
adjusted the Volume for how you
monitor the audio of your X-TERRA.
MINELAB WARNING!!!!
When using headphones, it is
recommended that the Volume
be set so that a loud target
signal will not damage your
hearing!
Volume
=
Target #2
Target #1
Threshold
Target #2
Volume
=
Target #1
Threshold
Volume is the level of sound
emitted by the detector when a
target is detected. The Volume
control limits the maximum
volume of target signals.
one
h
p
d
Hea
me & me
u
l
o
V
lu
r Vo d
e
k
a
Spe adjuste
are
tely.
a
r
a
sep
Understanding your X-TERRA - Getting Started
16
Ground Balance ...
Manual Ground Balance
After adjusting my Sensitivity setting, I establish the proper Ground
Balance (GB). Once again, each model (with the exception of the X-TERRA
30, which has a factory preset GB) has a different degree of “fine tuning”
for Ground Balance.
The 50 and 305 offer Manual Ground Balance with settings ranging from
0 to 20. The 505 offers Manual Ground Balance with settings ranging from
0 to 50. And the 70 and 705 offer Manual Ground Balance with settings
ranging from 0 to 90. The 70 and 705 offer the ability to set your Ground
Balance automatically and operate in either a Tracking or Beach Tracking.
The 705 also allows the user to offset the Ground Balance setting while in
Tracking .
at the
h
t
e
ot
N
s
RA ha
R
E
T
X
ility to y
the ab
ectivel
ff
e
e
t
c
opera
agneti
m
h
ot
in b
uctive
d
n
o
c
and
.
ground
Ground Balance Settings
X-TERRA Model
X-TERRA 30
Settings Range
Factory Preset
X-TERRA 50
X-TERRA 305
X-TERRA 505
X-TERRA 70
X-TERRA 705
Ground Balance is the simplest form of discrimination in that it allows you
to adjust the ground phase of your detector to compensate for the level
of ground mineralization. In other words, you are setting your detector in
an effort to discriminate out the adverse effects of the ground. Note that
the X-TERRA has the ability to operate effectively in both magnetic and
conductive ground.
Highly mineralized
soil producing false
signals distracting you
from real targets.
5
RA 70
X-TER l p.17
a
manu
Understanding your X-TERRA - Ground Balance
18
ce
Balan
d
n
u
Gro
pad
+ Pad
5
RA 70
X-TER l p.8
a
manu
- Pad
Pinpoi
nt/Det
ect
pad
The theory behind manually ground balancing your detector is the
same, regardless of model. Your objective is to “tune the ground phase”
of your detector to a setting that compensates for the mineralization at
a particular site. In other words, you are trying to neutralize the effects of
mineralization. This is accomplished by pressing the Ground Balance pad
and “bobbing” the coil a few inches off the ground.
I like to set my Ground Balance with my X-TERRA in All Metal so I know
that I am not setting the GB over anything metal. You can set up in a
Discrimination Pattern. But if you happen to have the coil over a target
that is set to reject, you’ll get an incorrect GB setting. Regardless, make
sure you don’t actually touch the ground on the down stroke. As the
coil is lowered to the ground you will hear a change of tone. If that tone
has a low pitch, the current GB setting is numerically lower than the site
requires.
Another way of looking at it is that you are setting the ground phase too
low, over-compensating for that particular site’s “mineralization”. When
this happens, increase the ground phase setting by pressing the + pad. If,
on the other hand, the tone is high, the ground is more mineralized than
your detector is currently set for. Thus, you’ll need to decrease the ground
phase setting by pressing the - pad. Continue bobbing the coil and make
the appropriate adjustments.
Your objective is to find a setting that allows for the least pitch variation
when lowering the coil. Once you have a proper setting, press the
Pinpoint/Detect pad (or press the GB pad again) and you’re ready to hunt.
st nd
i
r
cto grou
e
t
De ing ce
rm lan
o
f
r
ba
pe
4” (10 cm)
the
g
n
i
b
e
Bob
ng th
i
v
o
m
coil :
coil
r
o
t
c
dete
down
&
p
u
Understanding your X-TERRA - Ground Balance
19
Auto Ground Balance
If I am
runnin
with a
g
fixed G
B,
I like t
o check
it ever
y few
minut
es.
If your X-TERRA has the Auto GB function (X-TERRA 70 & 705), you can
accomplish a proper Ground Balance by pressing the Ground Balance
pad, then pressing the Mode pad while bobbing the coil a few inches off
the ground. The letters AU will appear on the display, and within a few
seconds, your X-TERRA will have set the Ground Balance for you by using
the software parameters established within the electronics.
Just as when you set the Ground Balance manually, the Auto GB value
will remain until you physically change it. All you’ve done differently
by using Auto GB is to allow the detector to select the proper ground
phase setting for the earth below the spot where you were suspending
the coil. And for those of you who have an X-TERRA that offers Auto GB,
remember...
Auto Ground Balance and Tracking are >10 times more
accurate than Manual Ground Balance!
Minelab analogy - Comparing Auto and Manual Ground Balance
Auto
7
8
Manual
9
10
Exact ground balance
(Manual Ground Balance can be compared to the inch scale on a ruler in that it only
changes in whole inches, whereas Auto Ground Balance (and Tracking) are set in
fractions of inches. )
If you do want to update this “locked in” Ground Balance (ground phase
setting), you can by following the same steps as when you initially set it.
If I am running with a fixed GB, I like to check it every few minutes, just
to make sure I am running with optimized settings. If you’ve not checked
yours while you are hunting, I’d encourage you to do so. You might be
surprised at how much variation there is in the earth’s mineralization,
within any given site.
Understanding your X-TERRA - Ground Balance
20
Tracking
For those models with Tracking Ground Balance, know that Tracking
allows your detector to constantly update the ground phase setting, on
the fly. That means you don’t have to set your Ground Balance before
hunting as it will “set itself” within a couple sweeps. After a few sweeps,
you can either lock in the current ground phase setting by pressing the
Tracking pad again, or you can continue to hunt in Tracking.
round
g
u
o
y
If
e to
balanc it
t,
a targe ally
actu
t
could
ate tha
n
i
m
i
r
disc
out.
target
Be aware that while in Tracking, repeated X-ing over a target might result
in your detector thinking that the target is part of the ground matrix.
If that happens, it could Ground Balance to the target instead of the
ground. Remember when I said Ground Balance was the simplest form
of discrimination? If you Ground Balance to a target, it could actually
discriminate that target out.
Now, with that said, once you start sweeping the coil, it will reset and
adjust itself to the “new matrix”, but you may have passed up a keeper in
the process.
Understanding your X-TERRA - Ground Balance
21
Tracking Ground Balance Offset
ally, in
n
o
s
r
e
P
es
the sit
of
t
s
o
o
m
I like t
,
t
n
u
A
Ih
-TERR
X
y
m
run
slight
a
h
t
i
w
d
Groun
e
v
i
t
i
pos
e.
Balanc
A feature unique to the 705 is Tracking Ground Balance Offset. In
simple terms, this allows the user to run in Tracking and at the same
time, maintain a Ground Balance setting that varies from the one
“recommended” by the electronics of the X-TERRA.
On the 705, you can adjust this offset to be anywhere from +1 to +15 or
from -1 to -15. There has been some discussion as to whether lowering
the ground phase number makes the GB of the X-TERRA more positive
or more negative. I think the use of the word “Offset” is what makes this
confusing. Setting a + number into the Tracking GB Offset will provide a
more negative ground phase than the number the detector has chosen
as “neutral”.
For example, if you are hunting an area in Tracking, and let’s say the
X-TERRA has determined at a given time the proper GB setting is 35. That
means the 705 software is going to set its ground phase at 35 in an effort
to best neutralize the effects of that soil. If you had programmed your
705 with Tracking Ground Balance Offset of +5, your X-TERRA will actually
indicate a 40 on the display. In this situation, the 40 that you see on the
screen is the sum of what the X-TERRA software has determined to be
required (remember it was 35 in this example), plus the +5 Offset that you
programmed into it. By setting a +5 in your program, you have told the
705 that you want to run a negative Offset of 5, in combination with what
it determines to be the proper setting.
After pressing the
Ground Balance
button , press the
Accept/Reject button
to enter Tracking GB
Offset.
On the other hand, if you want to run a positive Offset, you’ll need to
enter a negative number. For example, if you want to track with a positive
Offset of three, you would need to enter a -3 into the procedure. If, as in
the situation above, the 705 determines that the perfect setting would be
35, your positive GB offset of -3 would actually make the display indicate
a 32. Personally, in most of the sites I hunt, I like to run my X-TERRA with a
slight positive Ground Balance (ground phase setting).
Understanding your X-TERRA - Ground Balance
22
Press the + or - buttons
to adjust the Offset.
For more information see
X-TERRA 705 manual p.44
If I am manually setting the GB on my X-TERRAs, I will properly Ground Balance the detector and
then lower the ground phase number by a few clicks of the - pad. Now, with the Offset Tracking
functionality of the 705, if I want to maintain Tracking and keep it a bit positive, I can insert a -3
(or whatever level I determine I want) into the mix. That allows me to track and maintain a Ground
Balance that is 3 points on the positive side of what the 705 has determined to be neutral. In my
mind, I’m simply “fooling the detector” into thinking the ground is more mineralized than it actually
is.
I’m convinced that, in my moderately mineralized soil, running a slight positive Ground Balance
allows me to hear a sharper audio response on deeply buried targets. Don’t be surprised if you notice
an increase in the Threshold volume as you lower the coil, when hunting with the GB a bit positive.
And be aware that running too much of a positive Offset in trashy areas can create false signals, loss
of depth and instability of operation.
My best advice, when attempting to utilize Tracking Ground Balance Offset is to try different
combinations for the type of hunting you do. Spend time in your test garden, tweaking the various
settings. Knowing what settings are appropriate for your sites and style of hunting will dramatically
increase the effectiveness of your X-TERRA.
ing in my
c
i
t
c
a
r
p
t
u
O
rden
own test ga
Understanding your X-TERRA - Ground Balance
23
Beach Ground Balance
For salt water beach hunting, the X-TERRA 70 and X-TERRA 705 incorporate
functionality referred to as Ground Balance Beach. Manual, Auto, Tracking &
Tracking offset Ground Balance options are all available in Ground Balance
Beach. Ground Balance Beach is capable of minimizing the affects of both
magnetic and conductive mineralization in the sand. When combined with
a Double-D coil, the negative effects of highly mineralized black sand can be
greatly reduced. To activate Ground Balance Beach, press and hold the GB
pad for three seconds. When the functionality is implemented, a small beach
umbrella icon will appear at the top right corner of your display.
X-TERRA 705 manual p.41
Typically, as you near the water’s edge, mineralization levels will increase,
causing a “drop” in your ground phase reading (check your ground phase
reading by momentarily pressing the GB pad). As you near the water’s edge,
set your Sensitivity as high as you can tolerate, without causing undue falsing.
You will likely be able to increase that level of Sensitivity as you enter areas of
dry sand. But on the other hand, hitting pockets of “hot rocks” or black sand
will likely result in more false signals, due to the increased mineralization.
You can reduce these false signals and effectively hunt those areas by
lowering your Sensitivity level or by slowing down your sweep speed.
Just as I refer to “normal Tracking” as being “ Ground
Balance on the fly”, you can expect Ground Balance
Beach Tracking to quickly compensate for those
mineralization changes you encounter when moving
around the beach. And at an even faster “update”
than by using “normal” Tracking. However, I primarily
recommend that Ground Balance Beach Tracking be
used in areas where you don’t have multiple targets
under the coil at one time.
Operating in Beach Tracking can also sometimes
“over-compensate” for the mineralization levels,
resulting in some ferrous and low conductive targets
being ignored (balanced out). To help overcome this,
slow down your sweep speed, implement Pinpoint
for isolating targets, and don’t over-drive your
Sensitivity settings.
Understanding your X-TERRA - Ground Balance
24
Discrimination ...
Discrimination Patterns
Once the Volume, Threshold, Sensitivity and Ground Balance are set, it is
time to decide whether you want to hunt in a Discrimination Pattern or in
All Metal.
Discrimination Pattern is the term used on the X-TERRA to describe notch
discrimination. The X-TERRA offers multiple Pattern options. The number
of available Patterns depends on which model you have. Each X-TERRA
offers a “factory preset” for the notch segments that are either accepted
or rejected. But rest assured that each of the Patterns is easily changed
to accept or reject any notch segments you desire. This is done by
simply scrolling (+/- pad) to the number representing that specific notch
segment, and clicking on the accept/reject pad.
Speaking of notch segments, each model has a different
number of these notch segments (“categories”) where targets
of different conductive and ferrous properties are placed .
18
•
The X-TERRA 30 and X-TERRA 305 have
12 notch segments with each segment
representing a spread of 4 TID digits.
•
The X-TERRA 50 has 18 notch segments,
with each segment representing a
spread of 3 TID digits.
•
The X-TERRA 505 has 19 notch segments
with each segment representing a
spread of 3 TID digits.
•
The X-TERRA 70 and X-TERRA 705 have
28 notch segments with each segment
representing a spread of 2 TID digits.
See table on next page for
X-TERRA 705 Patterns
Understanding your X-TERRA - Discrimination
26
X-TERRA 705 Discrimination Patterns (28 segments)
Examples of accepted
targets for each Pattern
All Metal Pattern
Pattern 1
Pattern 2
Pattern 3
Pattern 4
X-TERRA 705 manual p.23
Understanding your X-TERRA - Discrimination
27
Discrimination Patterns
Definitions !!!
Ferrous:
Ferrous objects/targets contain
iron and therefore are attracted
to a magnet.
Conductivity:
Conductivity refers to how well
a target allows electrical current
to flow through it. In other words
a highly conductive target has
low electrical resistance and
therefore allows current to flow
more easily. Conversely, a target
with low conductivity has high
electrical resistance and does not
allow current to flow easily.
are
argets
t
s
u
o
r
Fer
in the
d
e
z
i
r
o
h
categ
ve notc
i
t
a
g
e
n
ts. And
segmen
ets
ve targ
i
t
c
u
d
in
con
found
e
b
l
l
i
ch
w
ive not
t
i
s
o
p
the
ts.
segmen
The term notch segment relates to where the target is placed, in
regard to how ferrous or non-ferrous (conductive) it is. Each notch
segment on the X-TERRA is preprogrammed to accept targets within
a specific range of ferrous and/or conductive properties. Those
notches below zero represent ferrous targets. Those notch segments
above zero represent non-ferrous (conductive) properties. For
example, a U.S. nickel typically provides a Target ID (TID) of 12 on all
X-TERRA models.
The TID is the same on all models of X-TERRA because all three
detectors have the number 12 represented on their scales (12 is
divisible by 2, 3 and 4, representing the number of notch segments
on each model). For a U.S. silver three-cent piece, all three detectors
will likely register a TID of 24 (again, 24 is divisible by 2, 3 and 4). And
silver dimes can register a 36 on each of the models (same thing in
that 36 is divisible by 2, 3 and 4).
The thing to remember is that all three models have a maximum
and minimum range of conductivity. Again ferrous targets are
categorized in the negative notch segments. And conductive targets
will be found in the positive notch segments. The difference between
the X-TERRA models is the number of notch segments assigned to
each model (see page 26).
As I mentioned, the 30 and 305 have 12 of those segments, meaning
all targets will be identified as having one of twelve possible TID
values. Each of those notch segments represents a four digit range
of numbers (counting by 4’s) -4, +4, +8, +12, +16, +20, +24, +28, +32,
+36, +40, +44.
The 505 has 19 segments, meaning all targets will have one of
nineteen possible TID values. Each of the 505 segments represents
a three digit range of numbers (counting by 3’s) -9, -6, -3, +3, +6, +9,
+12, +15, +18, +21, +24, +27, +30, +33, +36, +39, +42, +45, +48 (the
X-TERRA 50 is similar, with the exception of not having the +48 notch
segment).
Understanding your X-TERRA - Discrimination
28
ore
The m
ts
egmen
s
h
c
ot
n
e
ble , th
availa
pecific
more s
get
the tar on .
cati
identifi
Also, both the 70 and 705, with 28 segments, will put all targets into one
of 28 TID segments. Those 28 segments represent two digit notches.
(Counting by two’s from -8 through +48).
So again, the difference between the three models of the X-TERRA, as far
as TID is concerned, is the degree in which they can categorize targets.
The more notch segments available, the more specific the target
identification. If a Seated Liberty dime reads a 38 on the 705, what would
it read on the 505 or 305? Well, since neither the 305 nor the 505 have
a TID of 38 on their scale, it can’t read a 38. Since the 305 has four digit
notches, (numbers divisible by 4) I’d bet that same dime will read either
a 36 or 40 on it (kind of a toss-up since 38 is halfway between 36 and 40).
Considering the 505 has three digit notches (numbers divisible by 3), I’d
bet this dime will read a 39 on it. It might read a 36. But since it didn’t
read 36 on the 705, and was “categorized” into the number 38 notch on
the 705, I’d bet that this specific Seated dime will come in as a 39 on the
505 (38 is closer to 39 than 36).
Target ID Stability
Target ID Stability is a program incorporated into the functionality of the
705 which allows those hunting in highly mineralized soil to choose a
more accurate visual ID of the target. However, be aware that when using
TID Stability, the audio tone may not match your stabilized TID.
+
X-TERRA 705 manual p.20
Please see next page for the U.S. coin chart that I
have developed for the X-TERRA lineup
Understanding your X-TERRA - Discrimination
29
X-TERRA TID Chart of U.S. Coins
• These TID numbers were obtained by airtest with coins lying flat.
• Depending on many factors, your in-field results may vary.
• However, as a general rule , your numbers should be within one
notch segment.
Pictures of coins I have aquired while detecting
(Coins are not to scale)
TARGET
30 & 305
TID
U.S. large cent
44
45
44
Flying Eagle cent
20
21
20,22
Indian Head cent
24, 28, 32*
Wheat cent
32, 36
50 & 505
TID
70 & 705
TID
24, 27, 30, 33* 24, 28, 30, 32*
33, 36
34, 36, 38*
Understanding your X-TERRA - Discrimination
30
TARGET
30 & 305
TID
50 & 505
TID
70 & 705
TID
Zinc cent
32
30
32
Two-cent
40, 44
42
42
Nickel three-cent
4, 8
6
6
Silver three-cent
24
24
24
U.S. nickle
12
9, 12
10, 12
12, 16
15
12, 14, 16*
40% Silver nickle
Understanding your X-TERRA - Discrimination
31
X-TERRA TID Chart of U.S Coins
TARGET
30 & 305
TID
50 & 505
TID
70 & 705
TID
Silver half-dime
28, 32
27, 30
30
Silver dime
36, 40
36, 39
36, 38, 40*
Clad dime
36
36
36
Silver quarter
40
42
40, 42
Clad quarter
40
42
42
Silver half dollar
44
45
44
Understanding your X-TERRA - Discrimination
32
TARGET
30 & 305
TID
50 & 505
TID
70 & 705
TID
Clad half dollar
44
45
44
Silver dollar
44
45
46
$5 Gold
28
27
26
$10 Gold
32
33
34
$20 Gold
36
36
38
d
n
o fi
t
l
l
S ti
d
S
n
o fi
t
l
til
* The reason for wide TID variances is due to their metallic composition changing
during the years they were minted. Also the change in metallic composition, wear
and corrosion (aka patina) also contributes to a wide TID range.
Some silver coins from the 1900s
Understanding your X-TERRA - Discrimination
33
Treasure Talk -
My blog posts
Notch Discrimination on the X-TERRA
Ever wonder what you're missing?
Part one: Friday, September 24, 2010
A guide for U.S. coin-shooters
A metal detector does exactly what the name implies. It detects metals. Set
to accept everything, you will find nails, foil, pull tabs, jewelry, coins, tokens,
relics etc. Anything that is metal. In order to avoid digging those targets
you don’t want to dig, we implement a feature known as discrimination.
Metal detector discrimination is basically the same for all makes and models.
Some may do it better than others, but the theory is universal. Simply put,
discrimination is the ability to adjust your detector so that it accepts most of
the targets you want to dig and rejects most of those targets you don’t want
to dig.
Some detector models use a variable discrimination (such as Minelab’s
Sovereign GT). When you set a variable discriminator (potentiometer) to
reject a certain item, every item with a lower conductivity value will also be
rejected. For example, if you set your detector to reject a certain pull tab
with variable discrimination, you will also be rejecting U.S. nickels.
Discrimination control on the Soverign GT
Discrimination on the X-TERRA is comprised of notch segments. Notch
discrimination allows the user to accept or reject specific ranges of targets,
based on their conductivity. You can reject individual notch segments,
groups of notches or randomly select those segments you want to reject.
With notch discrimination, you can chose to reject the notch representing
pull tabs, and set the notch representing nickels to be accepted. For many,
notch discrimination allows you to cherry pick a site more thoroughly than
variable discrimination. But don’t think for a minute that you are not missing
“goodies” with either type of discrimination.
Understanding your X-TERRA - Discrimination
34
For the sake of discussion, I will make reference to the Target Identification
(TID) scale of the X-TERRA 70 and 705. I will also be using the factory values
of Pattern 2, to demonstrate my thoughts. Although the X-TERRA 30, 305, 50
and 505 are similar, the notch segments do have a slightly different value. So,
if you are using the X-TERRA 30, 305, 50 or 505, adjust the numbers I’m going
to provide, to match your notch segments and TID scale.
Discrimination scale on the X-TERRA 705
The X-TERRA 70 and 705 have 28 pre-determined notch segments. Each
notch segment is represented by an even number ranging from a low of
-8, to a high of +48. These numbers represent the conductive properties
of your targets. The lowest number, -8, represents the least conductive
(most ferrous) targets you will encounter. In turn, the highest number,
+48, represents the most conductive targets (least ferrous) that you will
encounter. Ferrous targets are those targets with high levels of iron. Large,
deeply buried ferrous targets can (and will) occasionally provide a target
response similar to a highly conductive target. I’ve found, by implementing
the multiple tone mode on my X-TERRA, and slowly dragging the coil away
from the target while X-ing over it, I am able to hear changing harmonic
tones (and bouncing TID numbers) as the target leaves the field of
detection. If you are using a single tone for all ferrous targets, -8, -6, -4 and
-2 will sound the same, making the identification of those deep ferrous
targets difficult to differentiate.
In Part Two, I’ll provide examples of gold and silver targets you may be
walking over, by using too much discrimination.
Randy Horton (Digger)
You’ll never know for sure... unless you dig it!
www.minelab.com/treasure-talk
35 35
Treasure Talk -
My blog posts
Notch Discrimination on the X-TERRA
Ever wonder what you're missing?
Part two: Wednesday, October 06, 2010
Now that I’ve outlined how the ferrous vs. conductive properties are
represented by the visual and audio TID, let’s evaluate some targets. If
you turn your X-TERRA 70 or 705 to the Coin/Treasure Mode, and set it to
hunt in factory preset Pattern 2, you will be rejecting notch segments -8,
-6, -4, -2, +2, +4, +6, +14, +16, +18, +20, +22, +24, +26 and +48. You will be
accepting notch segments 8, 10, 12, 28, 30, 32, 34, 36, 38, 40, 42, 44 and
46. Those of you who have performed TID tests with your X-TERRA know
that this setting will accept U.S. pennies, nickels, dimes, quarters, half
dollars and dollar coins. A Coin hunters dream? Not necessarily. Although
repeated tests indicate that modern U.S. coins will TID within the
ranges set by Pattern 2, there are many variables that can affect the TID
information provided to the user. Some of these variables include coins on
edge, adjacent trash that distorts the information sent to the processor,
multiple coins in close proximity, target depth, soil conditions, ground
balance settings etc. There are simply too many variables to guarantee
that one TID number will always represent a specific target for every site.
Coins wear thin; jewelry can be of many different metallic compositions,
shapes and sizes. And, the mineralization of the site can fluctuate
dramatically. Hopefully, what I am about to share with you will help you
find more treasures. You will likely have to dig more trash while finding it.
But if you understand what your discrimination setting is doing for you (or
to you), you’re bound to find more good stuff!
X-TERRA 705 Pattern 2
Understanding your X-TERRA - Discrimination
36
To get a better idea of what you might be passing over as trash, let’s
check out the conductive properties of various items some might “skip
over” while detecting. Again, these numbers are based on the X-TERRA
70 and 705 TID, using the parameters of factory preset Pattern 2.
Remember, as I mentioned above, TID numbers are not cast in stone.
If you are passing over targets represented by the X-TERRA 70 and the
705 with a numeric TID of +2, +4 and +6, you risk missing rose gold
rings, platinum rings, white gold rings and some foreign coins.
If you are passing over targets represented with a TID of +6, +8 and +10,
you risk missing more white gold rings, more platinum rings, thin yellow
gold rings, lead and brass shells and the U.S. nickel three-cent piece.
If you set your detector to reject TID numbers +14 and +16, you will
risk missing very thin silver coins, the $1.00 U.S. Gold coin, thin yellow
gold rings, Shield nickels, Liberty V nickels, 40% silver War nickels, many
wedding bands, 10kt class rings, tokens and more foreign coins.
If you set your notches to reject +16, +18 and +20, you will risk missing
gold rings, tokens, various gold jewelry, 14kt rings, brass, the U.S. $2.50
gold piece, Indian Head cents, Flying Eagle cents, more foreign coins
and even large 10kt class rings.
If you rejected notch segments +20, +22, +24 and +26, you risk missing
more Indian Head pennies, the U.S. silver three-cent piece, the U.S.
$5 Gold piece, large gold rings, small silver pieces, gold jewelry and
medallions, and still more old tokens.
So there you have it. A few of the items that some of you might be
passing over, in an attempt to not dig foil, pull tabs and other “trash”
items. I realize that each of us has our own preferences for setting
the discrimination on our detectors. I suppose you could say we are
all creatures of habit. But the next time you hit that old park or picnic
ground, you might want to ask yourself if you’re rejecting notch
segments that include targets that you wouldn’t mind digging.
Enjoy the Hunt!
Randy Horton (Digger)
You’ll never know for sure... unless you dig it!
www.minelab.com/treasure-talk
37 37
Audio Tones
The next setting to analyze is the number of tones you
want to hear. This is simply a matter of preference. And
depending on the X-TERRA model you are using, the
number of available tones varies.
ine the
m
r
e
t
e
d
If I can
ductive
n
o
c
r
o
a
ferrous
values of
y
rt
e
y
p
o
pr
simply b
,
t
e
g
r
a
t
ar
particul
a tone ...
g
n
i
r
a
e
h
nt time
u
h
y
m
ize
I maxim ving to glance
a
e
by not h
ok at th
o
l
d
n
a
down
display.
The 305 offers the flexibility to hunt with one tone,
two tones, three tones or multiple (12) tones. The 505
and 705 each offer one tone, two tones, three tones,
four tones or multiple (19 & 28 respectively) tones. One
tone means that all accepted targets will produce the
same tone. Two tones break all targets into one of two
tone groups; three tones break all the targets into one
of three tone groups; four tones puts each target into
one of four tones. And in the multiple tones, each notch
segment will produce a separate tone.
Some folks like to dig when their detector beeps, and don’t care what sound it
makes. Just as long as it makes one. And there are those, such as myself, who
enjoy coin hunting “by ear”. If I can determine the ferrous or conductive property
values of a particular target, simply by hearing a tone assigned to the notch
segment that target is associated with, I maximize my hunt time by not having to
glance down and look at the display.
The number of TID tones are shown in this
chart.
1 Tone
450Hz
450Hz
450Hz
2 Tones
130Hz
130Hz
700Hz
700Hz
130Hz
700Hz
3 Tones
130Hz
450Hz
700Hz
130Hz
450Hz
130Hz
450Hz
700Hz
130Hz
450Hz
700Hz
Not available on the 305
4 Tones
700Hz
950Hz
130Hz
450Hz
700Hz
950Hz
Mutiple
tones
130Hz
950Hz
12 Tones
130Hz
950Hz
19 Tones
130Hz
950Hz
28 Tones
Understanding your X-TERRA - Discrimination
38
Again, the number of tones you set for your X-TERRA is simply a matter
of personal preference. If you chose single tone, all targets will provide
an audio report at 450 Hz. Regardless of whether you chose two tones,
three tones or four tones, targets with a negative TID (ferrous targets) will
produce an audio report of 130 Hz. With the exception of the single tone
setting, once you get into the positive side of the notch segments, the
pitch of the audio response will increase as the conductivity value of the
target increases.
The tone assigned to each target value will vary by the model of your
detector, due to each model having a different number of notch
segments. Therefore, check your Instruction Manual for the specifics of
your detector. On a side note... although Minelab display the multiple
tones as 99, there aren’t 99 tones. There is actually one tone for each
notch segment, as shown in the chart on page 38.
Indian
My first 1877
nd
Head cent fou
2009
November 11,
1877
Second
ent
Head c
010
Indian
14th , 2
y
l
u
J
found
The 1877 Indian Head cent
is the most treasured of all
Indian cents. I have had the
good fortune of finding three of
these rare coins. All found with
Minelabs and all found within
a 12 month period of time .
Thir
d
Head 1877
In
Nov cent fou dian
emb
er 1 nd
st, 2
010
Understanding your X-TERRA - Discrimination
39
Treasure Talk -
My blog posts
Hunting by ear...
Audio tones on the X-TERRA
Monday, December 06, 2010
With “old” being a relative term, I hunt for old coins at old sites. The part
of the world that I live in wasn’t settled until the mid 1850’s. So finding
coins older than 1900 is considered to be a good hunt.
Many of my favorite spots to detect are old homesteads and farm sites.
With the houses and out buildings long gone, to the passerby, most of
these places look like any other corn field in this part of the country.
Pieces of brick, stone, glass and pottery are some of the things that
I look for when wandering across these corn fields. And when I start
hearing the low tones produced by nails and other “farm trash”, I know
I’m getting close to where I want to be. Unfortunately, even though
these pieces of deeply buried iron are a good indicator of where the
buildings once stood, their occasional “wrap around” high tones can
cause a lot frustration. I’d venture to say that there isn’t one among
us who hasn’t dug a piece of deeply buried iron or an old rusty nail,
expecting it to be a coin.
Now, I’m not going to tell you that the method I use to help eliminate
these targets will keep you from digging all of them. But I will tell
you that the X-TERRA has the ability to identify most of these “trashy”
targets, even when providing an initial “keeper” tone. It’s just a matter
of properly setting up your X-TERRA, knowing how to work the coil and
listening to what the detector is telling you. And it is for those “wrap
around” targets that I have written this short article.
Understanding your X-TERRA - Discrimination
40
This process is fairly simple… but to implement it, your X-TERRA must
be capable of operating in the Multiple Tone mode (X-TERRA 305,
X-TERRA 505, X-TERRA 70, or X-TERRA 705). And you must be using zero
discrimination (or All Metal mode). Although I’ve found that the 9-inch
Concentric coil at 3kHz provides the most easily distinguishable low
tones on deeply buried iron, all of the coils will do it to a certain degree.
When you first get the “hit” on what sounds like a good target, slowly
“X” over the target from several directions. Much of the deep iron will
produce broken or choppy signals when working your coil around the
target. If the audio response locks on a high tone, make a mental note
as to where the strongest target signal is coming from so you can center
the target under the coil. Once you get the target centered under the
coil, continue wiggling the coil back and forth over the target while
slowly working the coil closer toward you. As the target leaves the front
edge of the field of detection, listen even more intently to the tones. If
the audio tone is high and drops off suddenly, get out your digging tool
and retrieve your coin.
If the audio tone starts out high, then transforms into a blended
harmonic of low tones when the target leaves the detection field, I’d bet
the ranch that it is going to be a piece of iron.
By design, the Double-D coil will not lose the target signal until the
target “slips past” the front tip of the coil. Whereas the concentric coils
may lose the audio signal prior to passing under the front edge of the
coil, depending on the depth of the target.
41 41
Treasure Talk -
My blog posts
Regardless of which coil is your coil of choice, make sure you center
the target under the coil before working the coil toward you. And
remember, for this method to work effectively, you must have all
notches set to accept. Rejected notches create target blanking and
audio tones will not be provided for those notch segments. And since all
ferrous targets produce the same sound in anything less than multiple
tone mode, you wouldn’t hear harmonic (blended) low tones if you are
using one, two, three or four tone modes either. You must use multiple
tone audio mode with zero discrimination for this procedure to work
properly.
Next time you’re out hunting a site where deeply buried iron is giving
you the “wrap around effect”, give this procedure a try. If you hunt the
kind of places I hunt, you‘ll find using this procedure will result in your
digging a lot less iron.
Randy Horton (Digger)
You’ll never know for sure... unless you dig it!
www.minelab.com/treasure-talk
Understanding your X-TERRA - Discrimination
42
Coils...
Coil Options
sa
ERRA i
The X-T
in
r
detecto
unique
lly
a
an liter
that it c rational
pe
switch o
ply
s by sim
e
i
c
n
e
u
freq
fferent
g to a di
changin
y coil .
frequenc
The X-TERRA range is a unique series of metal detectors in that they can
literally switch operational frequencies by simply changing to a different
frequency coil. In the previous model series, the X-TERRA 30 was capable
of using the 7.5 kHz coils. The X-TERRA 50 could utilize either the 7.5 kHz
or the 18.75 kHz coils. And the X-TERRA 70 could utilize the 7.5 kHz,
18.75 kHz or the 3 kHz coils. The newer released 305 can utilize the
7.5 kHz or the 18.75 kHz coils. And both the 505 and 705 can use all three
frequencies.
Currently there are eight coils available for the X-TERRA. Five are
waterproof and three are water resistant.
Water resistant: May be splashed, washed, used in drizzling rain, or
moved through wet grass. Must not be submersed under water.
Waterproof: Submersible to one meter. Ideal for shallow water wading
and gold prospecting in shallow streams .
From Minelab’s Coil Selection Guide
A Concentric
coil will hunt
deeper than a
comparably sized
Double-D coil ,
in moderately
mineralized soil .
•
The stock coil (except for the 705 Gold Pack) is a waterproof 9-inch
Concentric, at 7.5 kHz. Also available in the waterproof 9-inch
Concentric is a high frequency 18.75 kHz and low frequency 3 kHz.
•
There are two waterproof 6-inch coils available. A small Concentric
at 7.5 kHz and a small Double-D at 18.75 kHz.
•
The stock coil in the 705 Gold Pack, is the 18.75 kHz water resistant
elliptical Double-D, measuring 5” x 10”.
•
And there are two water resistant 10.5-inch Double-D coils. One at
7.5 kHz and the other at 18.75 kHz.
In a nutshell, larger coils will detect larger targets deeper than a
smaller coil, but smaller coils are more sensitive to small objects.
Higher frequencies are better suited for lower conductive targets, such
as gold. And lower frequencies are better suited for higher conductive
targets such as silver and copper. A Concentric coil will hunt deeper
than a comparably sized Double-D coil, in moderately mineralized
soil. But due to the design characteristics, Double-D coils are the best
application for highly mineralized soil. And, a Double-D coil separates
targets better than a comparably sized Concentric.
Understanding your X-TERRA - Coils
44
(not compatible with
X-TERRA 305)
7.5 kHz
Concentric
9”
18.75 kHz Concentric
9”
7.5 kHz
Double-D
10.5”
18.75 kHz Double-D
10.5”
18.75 kHz Double-D
10” x 5”
7.5 kHz
6”
Concentric
18.75 kHz Double-D
ic coil
Concentr
Transmit
winding
Water resistant
9”
Waterproof
Concentric
Best ground
coverage
3 kHz
Best pinpointing
Size
Large/deep
targets
Type
Medium targets
Freq.
Small targets
X-TERRA coils comparison table
a
a
a
a
a
a
a
a
6”
Receive
winding
Detection
field
gets narro
wer
with dept
h
Due to the design characteristics of an X-TERRA Concentric coil, (think
of a circle within a circle with the outer coil being the transmit winding
and the inner coil being the receive winding), the detection field near
the surface is much broader than the Double-D coil. However, as the
detection field of a Concentric coil penetrates the earth, it narrows from
all directions. Because of this, I try to overlap my sweeps by at least a half
when using a Concentric coil.
Understanding your X-TERRA - Coils
45
Coil Options
coil
Double-D
ric
Receive winding
Detection
field
front to b
ack
ent
6” Conc
Transmit winding
”
x5
0
1
-D
ble
Dou
With the Double-D coil, one “D” is the transmit wire winding and the
other “D” is the receive wire winding. This is easier to understand when
you think of the coil as being two capital letter D’s, with the right side
facing properly and the left side reversed. The detection field on a
Double-D coil is down the center of the coil, front tip to back tip, at a
fairly consistent depth. This detection field does not diminish in the same
regard as the Concentric coils. But all coil designs have a diminishing
detection field, the farther they penetrate into the earth.
Even though the detection field of the Double-D doesn’t diminish as
quickly as the Concentric coil, I still like to overlap the swaths on a
Double-D coil by at least 1/3. Now, with all that said, let me reiterate
that ALL X-TERRA coils are capable of finding ALL metals. Some just do
it better than others. It all depends on the site you are hunting and the
targets you are looking for.
9” Conc
ent
ric
re
a
s
l
i
o
c
RA
R
E
.
T
s
l
a
X
t
e
L
L
m
A
...
ALL
g
n
i
d
n
fi
of
e
l
b
a
p
a
c
und
o
R
”
10.5 ble-D
Dou
Understanding your X-TERRA - Coils
46
Coil Applications
Here are some of the applications I use each specific coil for:
9-Inch 7.5 kHz Concentric Coil
The stock 9-inch 7.5 kHz Concentric coil is an excellent “all-around” coil.
It is good for coin shooting, relic hunting and general detecting. It offers
excellent depth in moderately mineralized soils. And, it provides excellent
target response on targets of all conductive levels. So, if you’ve only got
the 9-inch Concentric at 7.5 kHz, don’t feel you have to run out and buy
more coils. However, I believe the 9-inch Concentric coil at 3 kHz provides
more audio information for the types of targets I hunt, and the places I
hunt them.
9” Conc
en
tric
be
I may not in
l co
a typica
in that
r
e
ot
o
h
s
unt in
h
o
t
e
k
i
Il
l , with
All Meta
e tones.
multipl
I may not be a typical coin shooter in that I like to hunt in All Metal, with
multiple tones. Actually, I usually hunt in a Discrimination Pattern without
any notch segments rejected, as in zero-discrimination. I didn’t always
hunt like this. But I have proven to myself that I was missing targets
by not hearing everything that passed under the coil. For example, if
I am running a Discrimination Pattern that rejects ferrous targets, the
detector will blank out every time the coil passes over one of them. Then
if there happens to be a coin laying between two nails, I am more likely
to miss it (target masking) when the Threshold blanks out on both nails,
as opposed to the Threshold being replaced by the low tone of a nail,
followed by the high tone of the coin, followed by another low tone nail.
Target Masking
(coin is disciminated
with the nails)
Detector coil passing
over targets
nd
Sou
Sound cuts out
Understanding your X-TERRA - Coils
47
Coil Applications
Multiple Tone
(no targets are masked)
Detector coil passing
over targets
Low
tone
High
tone
Low
tone
Threshold
es
wav
d
n
Sou
Sound changes
Part of missing target audio response can be due to a fairly fast
sweep. But I am able to maintain a fairly quick sweep speed in All
Metal (zero-discrimination), multiple tone, and remain confident I am
hearing everything under the coil. When the Threshold blanks out in a
Discrimination Pattern, I don’t have any idea how many rejected targets
I’m passing over. That is because the Threshold is replaced by silence
while those rejected targets are still within detection range. In All Metal,
multiple tone, the Threshold goes away. But instead of silence on rejected
targets, I hear a tone for everything. Again, this is another one of those
“personal preference” settings. Back to the coils...
9-Inch 3 kHz Concentric Coil
9”
c
Con
en
tric
As I said, I like the 9-Inch 3 kHz Concentric coil. Not only because it is
theoretically better with higher conductive silver and copper. But being
better suited for higher conductive targets results in it being not as well
suited for lower conductive targets (like deep iron).
Understanding your X-TERRA - Coils
48
I hunt a lot of old farmsteads. As such, many of them are littered with
broken pieces of implements and rusty nails from fences and barns.
Simply put, I find these ferrous targets produce a very distinct audio
response that is more easily distinguished by my using the 3 kHz coil.
When I get an “iffy” target, I simply sweep back and forth over it, while
dragging the coil back toward my feet. As the target leaves the detection
field, if it produces multiple low audio tones, you can bet it is not a coin.
Old house
foundations
If I were in a Discrimination Pattern, with specific notches rejected, the
detector could “blank” over all of them. And even if I were hunting with
all notches accepted or All Metal, using anything less than Multiple Tones
will result in the detector only producing the same “one tone” for all the
ferrous targets.
For example, if the TID on a piece of iron bounces between -6 and -8 in
multiple tone, I will hear one tone when the -6 registers and a different
tone when the -8 registers. If in one tone, two tones, three tones or four
tones, all ferrous targets provide the same audio tone. As such, I wouldn’t
be able to hear the different pitches of tones or a “blending of multiple
tones” that I do with the multiple tones.
This could result in my not being able to identify the target as iron until
I dig it up. These pitch differentiations are best heard with the 3 kHz coil,
because the properties of ferrous targets are more easily identified at
lower frequencies. As the detector’s frequency increases, it becomes more
difficult to identify those ferrous properties. By combining the 3 kHz coil
with target sizing and other techniques I’ve learned, I’m able to effectively
eliminate most of the deep iron from my hunts.
Understanding your X-TERRA - Coils
49
Coil Applications
9-Inch 18.75 kHz Concentric Coil
9” Conc
en
tric
The 9-inch Concentric at 18.75 kHz is a bit more sensitive to the ground
than the other two 9-inch Concentric coils. As such, I’ve discovered that
I have to lower my Sensitivity setting to keep it stable. As well, I find that
it is more sensitive to lower conductive targets. That is a good thing for
small gold jewelry. But aluminum can slaw (“can slaw” is a term I use for
those shreds of aluminum cans, after being hit by a lawn mower) also falls
into that category . For the types of places I hunt, I prefer the two lower
frequencies of the 9-inch Concentric coils. With that said, if I lived near a
beach, I would be using the higher frequency coil as it is very sensitive to
gold jewelry.
5 x 10-Inch Double-D Coil
-D
uble
o
D
10” ical
5x
t
Elip
The 5 x 10-inch Double-D elliptical at 18.75 kHz is a good coil for beach
hunters and prospectors. But I don’t live near the water, don’t nugget hunt
and have moderately mineralized soil conditions. I have used the elliptical
several times in picked corn fields and it does allow me to maneuver
between the downed stalks with more ease than the Concentric coil, due
to the solid bottom of the elliptical compared to the Concentric coil’s open
web design. But I don’t find it has the depth of the Concentric coils in my
neck of the woods, due to the Double-D design. And I don’t find that the
depth of detection is any better than the 6-inch Double-D at 18.75 kHz.
Depending on your application, your results may vary!
10.5-Inch Double-D Coil
Both of the 10.5-inch Double-D coils are excellent choices for those who
want to cover a lot of ground and maximize their depth of detection in
highly mineralized sites. Coin hunters who are searching for those old silver
and copper coins will appreciate the stability of the 7.5 kHz version. Beach
hunters will find the 18.75 kHz to be more sensitive to jewelry and small
targets than the 7.5 kHz version of this coil. Relic hunters should do well
with either frequency. However, I’ve visited with some relic hunters who
swear by the higher frequency coil for old buttons and lead. But again, in
my neck of the woods, with moderately mineralized soil, the depth of the
larger Double-D coils does not exceed that of the 9-inch Concentric coils.
10.5 “ D
ouble-D
I keep mentioning my moderately (magnetic) mineralized soil. Let me
explain how I determine whether or not I need to hook up a Double-D
coil... Keep in mind this is by no means scientific. Just something I’ve
come up with having used all the coils extensively. If I am able to properly
ground balance a 9-inch Concentric coil with a ground phase number of
28 or larger, I am confident the Concentric coil will hunt as deep or deeper,
operate with more stability, and identify targets better, than a comparable
sized Double-D coil.
Understanding your X-TERRA - Coils
50
If, however, when I properly ground balance the Concentric coil and
the ground phase number is less than 28, I find the Double-D coil will
hunt deeper and provide a more stable operation. The TID when using a
Double-D coil is not as accurate as with a Concentric coil. Especially on
the more deeply buried targets. But the Double-D design allows for more
coverage per sweep than the Concentric coil, allowing me to cover more
area in a given period of time.
The biggest “down-side” for me is the weight of the 10.5-inch coils. I’m not
as young and athletic as I use to be. As such, the weight and balance of
these coils is not conducive to a long day of detecting. I’ve tried several
aftermarket apparatus, with mixed results. But by mid-day, I’ll usually
resort back to one of the 9-inch Concentric coils or the even smaller
6-inch coils, depending on the site.
6-Inch Concentric Coil
6 “ Con
centric
As I mentioned, the 6-inch coils come in both Concentric and Double-D
versions. The 6-inch Concentric is a 7.5 kHz coil and is extremely hot. In
fact, when I was field testing these coils, I commented to Minelab that
I thought this one was too hot. The reason I want a small coil is not for
extreme depth. It is for target separation in trashy areas. And the 6-inch
Concentric coil just didn’t let me isolate targets as sharply as I would have
liked. But for working in around weeds and stubble in harvested fields, it
is an excellent choice.
6-Inch Double-D Coil
D
ble6 “ Dou
Fortunately, for extreme target separation, Minelab also produces a
6-inch Double-D coil for the X-TERRA. I can’t stress enough that this small
Double-D coil is an excellent tool for a serious coin shooter. Surprisingly
deep, excellent separation and extremely sensitive to small targets. I’ve
found mine to be a silver dime and Indian Head cent killer.
Handful of Indian Head cents
Understanding your X-TERRA - Coils
51
Treasure Talk -
My blog posts
X-TERRA...
Controlling the search coil
Tuesday, January 04, 2011
When it comes to sweep speed, the X-TERRA is a very forgiving
detector. You can operate with a relatively quick sweep in wide open
areas, and slow down when targets are abundant. But to gain a better
understanding of how sweep technique may affect the quantity of
our finds, let’s first analyze the field of detection for both the X-TERRA
Concentric coils and the Double-D coils.
Based on my field analysis, with the center of the coil as the “hot spot”,
I find the field of detection for a Concentric coil will go “straight down”
until you reach approximately 55 - 60% of the maximum depth for a
specific target. In other words, if you are capable of detecting a target
at maximum of 10 inches, you will find the circular field of detection
begins to narrow at the 5.5 to 6 inch depth level (see Concentric
diagram). The deeper the target, the more closely centered (under the
coil) it must be, to provide a target response. As such, if you are not
overlapping your Concentric coil by half the width of the coil, you risk
missing those deeper targets that are not directly centered under the
coil as you pass over them. By overlapping your swath by half the width
of the coil, you’ve increased the field of detection “coverage” at any
given point, maximizing the opportunity for a solid target response.
Inner
Inner winding
winding (receive)
(receive)
Outter
winding(transmit)
(transmit)
Outer winding
Concentric coil
Double-D coils are designed to help neutralize the effects of
mineralization. Part of those design characteristics place the “hot spot”
of the coil directly down the center, from the front tip to the rear heel.
Don’t be misled into thinking that the field of detection goes straight
down, from front to back, until the maximum depth is achieved.
Understanding your X-TERRA - Coils
52
Although not to the degree of Concentric coils, I’ve found the field of
detection from a Double-D coil also gets “more narrow” (front to back)
as target depth increases (see Double-D diagram). To ensure that you
are not missing those deeper targets, I recommend overlapping the
swath of a Double-D coil by third. Again, this allows you to maintain a
maximum field of detection during your hunt.
Double-D coil
As to sweep speed… the majority of us have a tendency to sweep more
quickly over a wide-open, smooth surface than when working the coil in
and around vegetation. Another thing I’ve noticed is that, when walking
uphill or downhill, our swaths don’t get overlapped as consistently
as when we are walking on flat ground. It’s almost as if our arm feels
compelled to keep up with our feet in both speed and distance covered!
Regardless of whether you are in a field or on a beach, walking uphill,
downhill or on level ground, I encourage you to maintain a consistent,
even sweep when you work the coil. If you notice that your X-TERRA is
chirping as you sweep the coil, and your X-TERRA has been properly set
up, you are likely sweeping too quickly.
When that happens, the first instinct of many would be to adjust the
Threshold, lower the Sensitivity or set the ground phase a bit more
negative. If they were set properly for the site, don’t change them.
Instead of overcompensating with electronic adjustments, simply slow
down your sweep speed and concentrate on working the coil.
By maintaining the proper electronic settings and modifying your
sweep speed, you’ll find those deep and partially masked targets that
others have missed.
53
Treasure Talk -
My blog posts
If your X-TERRA makes false signals when you change the direction of
your sweep, you’re probably tipping the edge of your coil. Again, slow
down the sweep speed and keep the bottom of the coil parallel to the
surface of the ground at all times. As I near the end of each sweep, I’ll
make a wide, deliberate turn with the coil, to maintain my rhythm. This
not only reduces the chance of me tipping the edge of the coil, but
allows me to line up with the proper “overlap” for the return sweep (see
sweep path diagram).
Each of us have different detecting styles and hunting techniques. Being
6 feet tall, the width of my typical sweep is around 42 inches. Yours
may vary, dependent on your stature and physical ability. Regardless,
my recommendation is to sweep comfortably, without over-reaching
and without lifting the coil from the surface of the ground. When I’m
searching an old homestead site, I’ll usually begin my hunt with my
3kHz Concentric coil and pace myself at 2 - 2.5 seconds for each swath.
When I get into an abundance of targets, indicating I’ve reached an
area with past activity, I’ll switch to the 6-inch Double-D for superior
target separation and slow my pace, according to the number of targets
per sweep. A fast sweep speed in an area with multiple targets can be
overwhelming (and under-achieving).
Understanding your X-TERRA - Coils
54
I’ve hunted some areas that were so nail infested, proper target
separation required a sweep speed of no more than 6 inches per
second. As someone who hunts “by ear”, using multiple tones and
minimal discrimination, I find the slower sweep speed allows me to
process the audio response of every single target. And by using a
controlled sweep, I am able to maximize my hunt time by minimizing
the number of false signals.
Randy Horton (Digger)
You’ll never know for sure... unless you dig it!
www.minelab.com/treasure-talk
Did you know that Minelab has a Treasure Talk blog?
Minelab has handpicked its most knowledgeable staff and detectorists to present regular metal
detecting blog posts on topics close to their heart. They would like you to join in and make it a
conversation.
I am one of the many detectorists regulary contributing to the Treasure Talk blog.
To read more visit www.minelab.com/treasure-talk
Me!
There are new posts every week!
Coil Design & Manufacture
How to design and manufacture an X-TERRA coil
You may think that a coil is just a bunch of wires in
a plastic housing, but it is actually a complex and
critical component of the overall X-TERRA detection
system. Here are some of the details straight from the
guys at Minelab about how a coil gets designed and
built.
Coil Design
Coil design is a long and complex task that requires many steps to ensure the coil
will continue to work correctly for many years. These steps are generally divided
into two main teams that initially work independently and then combine their
skills to finalize the product. The teams are the electronics designers and the
mechanical designers.
Electronic design process includes:
•
•
•
•
•
Calculating and modeling electromagnetic fields
Designing specifications for wire size, type and number of turns
Manufacturing prototype templates for windings
Manufacturing prototype windings and soldering to cable
Constructing a prototype search coil by attaching windings to
the template
Testing, calibrating and programming the microcontroller with
initial software parameters
Measuring and refining the software parameters for the
microcontroller
•
•
Mechanical design process includes:
•
•
•
•
•
•
Designing mechanical CAD (Computer Aided Design) model
Constructing mould flow and analyzing the structure using
specialized mechanical engineering software tools
Building rapid prototype models of coil housing parts
Building prototype cables and strain relief
Building prototype coil using draft electronic specifications
Field testing the prototype coil
Understanding your X-TERRA - Coils
56
The two design teams then combine resources to assess the prototype coils:
• Manufacturing multiple prototype coils
• Testing and revising electronic specifications
• Mechanical testing, including:
- Temperature stability cycle testing
- Cable stretching and bend testing
- Rubbing, vibration and impact testing
- Accelerated aging and salt spray testing
• Field testing second prototypes using internal and external field testers from around the world
• Finalizing specifications and drawings
That is not the end of the process! Minelab’s
manufacturing team then get involved with
building prototypes using final off tool parts and
then ALL of the engineering tests are repeated to
confirm the design.
Understanding your X-TERRA - Coils
57
Coil Design & Manufacture
Coil Manufacture
Due to the wide variation in size, shape, frequency and configuration, each of the eight
X-TERRA coils have slightly different manufacturing requirements.
Below is a summary of the overall processes to manufacture a coil:
•
•
•
•
•
•
•
•
•
•
•
Winding coil to specification
Assembling coil housing and encasing coil windings
Soldering coil cable to coil circuit board
Tuning coil windings and fixing to housing
Testing coil assembly for functional defects
Pouring epoxy resin over coil windings to hold in place
Applying shielding material
Sealing coil housing with glue and/or epoxy (depending on type of coil)
Calibrating and programming of microcontroller
Final testing
Labelling and packing for shipping
Overall, the Minelab philosophy of:
•
•
•
design, test and test again,
confirm the design, test and test again
then manufacture test and test again
is why Minelab coils are so consistent and reliable.
Minelab is a quality accredited ISO 9001 company
Understanding your X-TERRA - Coils
58
Practical Detecting...
Applying What We’ve Learned (so far!)
OK, so now we’ve learned the basic functionality of the X-TERRA. We’ve
learned the importance of an accurate setup. I’ve introduced you to the
various coils available. And I’ve mentioned the importance of hunting
where people gathered. Now it is time to talk a little bit about an actual
hunt.
thing I
The first
I arrive
do when te is to
si
at a new urvey
s
visually
.
the area
The first thing I do when I arrive at a new site is to visually survey the area.
If it is an old farm site, can I see any traces of where the buildings were?
Is there a creek nearby where the family got their water? How about a
grove of trees where children played or grownups rested after a hard
day’s work? If there are the remains of old buildings, can I see where the
clothesline once was? Can I determine where the back door was? The
reason I mention the clothesline and backdoor is because these are two
of my favorite places to hunt. I’ve dug quite a few pieces of silverware
and several rings that were apparently thrown out with the dishwater.
And when the overalls were hung on the line to dry, they were always
hung upside down. As such, if there were any coins in the pockets, there
is a good chance they fell out when those overalls were blowing in the
breeze. These are just a few of the things I think about as I plan my hunt.
zing
i
l
a
Visu ere
wh ing
yth
ever to be
used
Understanding your X-TERRA - Practical Detecting
60
Choosing the Right Coil
te I’m
The si
t
to hun
t
u
o
b
a
te
defini
a
s
a
h
on the
g
n
i
r
a
be
ill be
w
I
l
i
co
h.
ut wit
o
g
n
i
start
The site I’m about to hunt has a definite bearing on the coil I will be
starting out with. If it is a wide open area, I’ll likely put on a 9-inch
Concentric coil so I can cover the area quicker than if I started with a
6-inch coil. For those of you hunting in highly mineralized sites, or those
wishing to cover even more area with each swath, you’ll likely opt for one
of the 10.5-inch Double-D coils. If it is a cultivated field, and I can see all
sorts of broken glass and nails, I’ll save myself the frustration of target
masking and start out with the 6-inch Double-D due to its superior target
separation characteristics.
To those who drive by, this looks
like any other farm field in the
area. But through historical
research , I found that a family
lived in a house at the edge of this
timber, back in the 1870’s.
Old ch
urch
m
e fro
r
a
w
lver tead
i
s
Old homes
Understanding your X-TERRA - Practical Detecting
61
The Hunt
X-TERRA Settings
After setting the Noise Cancel Channel, Volume level, Sensitivity, Ground
Balance and making sure I’m set up in the proper Discrimination Pattern
and with the correct number of tones, I’m good to go.
Sweeping the Coil
As I walk along, I’m careful to overlap my swaths. On Double-D coils I like
to overlap by at least 1/3. On Concentric coils, I try to overlap by 1/2. My
swath width depends on the circumstances. If I am hunting between
rows in a field of corn, I’m limited to the 30-inch row width. If I am in open
territory, I have a slightly wider sweep. Yours will depend on your height
and arm length. Just make sure you don’t get your feet going faster than
your arm. In other words, overlap those swaths! And don’t be in such a
hurry to work an area that you take too wide of swaths. Doing so can
cause you to raise the lip of the coil up as you switch directions, causing
false signals and missed targets. You’re better off making narrower
swaths, and taking more passes.
The sweep speed I have depends on the number of targets I am getting
in each sweep. As one who hunts in zero discrimination (or All Metal)
with multiple tones, I know what is under the coil at any given time. If you
choose to hunt in a Discrimination Pattern, with some notches rejected,
don’t be misled into thinking there is nothing in the ground just because
your detector isn’t beeping. Those rejected targets also have to be
processed. And the blanking effect they produce is important too.
ns
are coi
s
t
e
g
r
my ta
Not all
Understanding your X-TERRA - Practical Detecting
62
dvice I
The best a ne on
anyo
can give
e “right ”
finding th
ed is to
sweep spe
rself a
build you
en , and
coin gard
practice ,
practice ,
practice!
Target blanking is caused by the detector losing its Threshold while
passing over a rejected target. If you are sweeping the coil and your
X-TERRA is silent for what seems like seconds at a time, you’re going
too fast and are likely passing over too many close targets to allow the
Threshold to reset. It could be that those rejected targets are adjacent to
coins. If you don’t slow down, you’re going to miss them.
I have a sweep speed of about 12 - 18 inches per second, depending on
the soil and site conditions. If I run into multiple targets, I’ll slow down so I
can better analyze the sounds they produce. If it is a wide open area, with
very few targets, I’ll hunt a little faster. The best advice I can give anyone
on finding the “right” sweep speed is to build yourself a coin garden, and
practice, practice, practice!
r one
Hunted fo e
h
hour in t
g
evenin
Hunt
ed for
two h
ours
in th
e mor
ning
f.
hem of er
t
g
n
i
ilv
ash
fter w ver is still s nts
a
s
d
n
l
ead ce
the si
Both fi
H
,
e
n
e
s
a
i
can
Ind
As you nickels and y crusty.
e
ett
and th are still pr
Understanding your X-TERRA - Practical Detecting
63
Pinpointing
Pinpointing
Each of the X-TERRA models offer visual and audio Pinpointing. When
you press the Pinpoint pad, your detector switches to an All Metal,
non-motion detector, with a visual display and audio tone with volume
modulation.
Pinpoint Auto
After getting an initial target signal, press the Pinpoint pad and slowly
sweep across the target from multiple directions. The Pinpoint Auto
Mode will progressively mask the target response by automatically
reducing the Sensitivity with each pass of the coil. This will allow the
X-TERRA to create a very narrow target response.
sing a
When u
D coil ,
e
l
b
u
o
D
to sweep
I prefer
back
h over
and fort
t.
the targe
If you take a look at the Pinpoint icon in the display, you will see a circular
scale that becomes more complete as the center of the coil passes over
the target. When using a Concentric coil, I prefer to sweep the coil in a
series of multi-directional X’s, slowly reducing the size of my sweep until
I am confident that I have centered the target under the coil. When using
a Double-D coil, I prefer to sweep back and forth over the target, slowly
drag the coil toward my feet, getting farther from the target center with
each sweep. When the target audio disappears, the target can generally
be located directly off the front tip of the coil.
By the way, although I don’t use the functionality, there is a depth gauge
on the display. It has five segments that represent the approximate
depth of a coin sized target. For those of you who use it successfully,
good for you. Personally, since the coins I am after vary in size from a
silver three-cent piece to a silver dollar, I know that when I dig straight
down after pinpointing, I’ll find it.
An
examp
le of a
field I
detect
in
X-TERRA 705 manual pg. 26
Understanding your X-TERRA - Practical Detecting
64
Pinpoint Sizing - X-TERRA 705
In addition to Pinpoint Auto, the 705 also offers the option of a Pinpoint Sizing Mode.
Pinpoint Sizing Mode allows the user to maintain the Sensitivity at a constant level, allowing you
to trace the size and general shape of the target. With practice, you will be able to separate coins
in areas that are too cluttered for most other detectors.
By activating Pinpoint Sizing Mode near the target, you will be able to mask part of the audio
response, similar to the manner in which Auto Pinpoint reduces the Sensitivity. However, in
Pinpoint Sizing Mode, you control the degree of masking by how close you are to the target when
you set up to Pinpoint.
Full response
Masked response
X-TERRA 705 manual pg. 27
If you have a 705, I encourage you to read the Instruction Manual on the two Pinpoint
Modes and practice in your test garden. You’ll be surprised at the functionality this offers.
ld
From an o
fairground
Understanding your X-TERRA - Practical Detecting
65
To Dig, or Not to Dig?
My Three Rules of Consistency
As I have mentioned , I like to hunt in zero
discrimination (or All Metal) with multiple tones.
And , I’ve explained why. When I am hunting a
site , I live by my three rules of consistency. They are
the consistency of location , consistency of sound
and consistency of TID.
1. Consistent Location
By consistency of location, I am referring to where a target is located in
relationship to some sort of marking on the ground: a reference point. It
can be a leaf, a blade of grass, a small pebble or a clod of dirt. Whatever
catches your eye. When I first pass over a target, I sweep back and forth
over it from a variety of directions. Not just left to right and right to left.
I will literally walk around the target, X-ing over it as I rotate around
it. All the time, I am listening for that audio tone and watching if it is
consistently coming from beneath that same leaf, blade of grass or clod
of dirt. Coins and other valuables will not vary in their location. Deeply
buried iron will generally give its loudest target response from more
than one location, as you sweep it from different directions. If the target
produces the same tone when I pass over it from varying directions, it is
worth a bit more investigation.
lection
l
o
c
a
Using
s as a
e
v
a
e
l
le
of map ce point
referen
Understanding your X-TERRA - Practical Detecting
66
2. Consistent Sound
I’ve learned the X-TERRA has a very forgiving sweep speed which I use to my advantage when
determining whether to “dig or not”. By varying the sweep speed as I “X” over the target, I am
able to work the coil very slowly, while maintaining an accurate TID. On the same token, I will
regularly increase my sweep speed while X-ing over a target, trying to make the sound “break up”.
If it does, it is usually a deep ferrous target. While X-ing over the target, I’ll also work the coil back
toward my feet, listening intently as the coil crosses the target repeatedly. Already knowing the
location of the target (leaf, blade of grass etc) I know when that target is about to leave the field
of detection. At that time, if the sound breaks up or I get a blending of more than one tone (I refer
to this blending of tones as harmonics), I would almost bet that the target is not a coin.
If, however, the single tone remains consistent as I
drag the coil away, then drops off without changing
pitch, I’m betting it is going to be worth digging.
Hunting in Multiple Tones allows me to have the
possibility of 28 different tones on any given target.
Those multiple tones are why I am able to hear
“harmonic tones” on deeply buried iron. If I had been
using one tone, two tones, three tones or even four
tones, I would have gotten that same “one pitch
sound”, regardless of the ferrous reading of the target.
By having Multiple Tones activated, I can hear any
changes in tone as the target “moves” from one notch
segment to another because each notch segment is
assigned a specific and separate tone.
ingle
s
e
h
t
.
.
If.
mains
tone re
ent...
t
s
i
s
n
o
c
ing it
I’m bett o be
gt
is goin ging.
dig
worth
Understanding your X-TERRA - Practical Detecting
67
To Dig, or Not to Dig?
3. Consistency of TID
Having located a target with a consistent location and a consistent audio
tone, it is time to check the TID. At this point, I already know if I am going
to be digging this target, based on the location and sound. But if those
two things “pass my test”, I’ll check the TID primarily to see if it is going to
be copper, silver, nickel or gold when it is exposed. As I sweep back and
forth across the target again, I take notice of the display.
I know this comment will create some disagreement, but I am convinced
that in my moderately mineralized soil, (and when my detector is
properly setup) single coin targets, lying flat, will not produce a TID that
varies by more than two notch segments. That means if I get a TID of 38
and it occasionally reads a 36 or 40, I’m looking in the hole for a silver
dime. Notice I said that the numbers would be consistent IF there are no
adjacent targets and the target is laying flat. And I am talking about a part
of the country where the mineralization levels are relatively low.
When there are adjacent targets, the TID can become skewed if those
adjacent targets are larger than the “desired” target or shallower than
the desired target. Even if they are the same size and depth, if they are in
close proximity, the TID can be misleading. Typically, a coin on edge will
give a strong signal response as you pass the coil in the same direction as
the “length” of that edge. But will produce a broken audio, a double tone,
or no audio at all, when passing the coil perpendicular to the top edge
of that coin. As well, the TID for coins on edge will change when swept
from varying directions. The reason for these audio and TID variances
is because the detection pattern of a metal detector is penetrating the
surface area of the target with its electromagnetic field.
8
=3
D
I
T
TID = 44
Briefly stated, the eddy currents induced back to the receive circuit on a
flat coin are of a much different phase than those from the edge of that
same coin. For those that have doubts, try air testing some coins. No
mineralization, no adjacent targets and make sure you hold them flat. I
guarantee that they will provide a solid tone and a stable TID. But if you
don’t have your X-TERRA set up properly, all bets are off.
Understanding your X-TERRA - Practical Detecting
68
My Recommendation...
Again, practice with coins at home. Listen for the sounds and study the TID for different sweep speeds
and varying angles. Once you get an understanding of the language of the X-TERRA, go back to the
local park and re-hunt along those sidewalks. Think about it... most of the coins that fell from pockets
and hit the concrete, rolled off the edge of the sidewalk. The edge of the sidewalk is vertical, making
those coins fall “on edge”. Those who may have hunted it before you simply walked down the sidewalk,
swinging left to right. Go at it from a variety of directions and I’ll bet you find some coins. A friend
of mine gave me this tip several years ago and I have dug a lot of coins along the sidewalks at many
hunted out locations, by following his advice.
ocket and
Coin falls out of p
k’s edge .
rolls off the sidewal
Coins found in
an old ball field
Understanding your X-TERRA - Practical Detecting
69
Gold Prospecting
Prospecting Mode on the X-TERRA 70 and X-TERRA 705 is primarily designed to
find metal objects in highly mineralized conditions. Particularly gold nuggets and
relics. In Prospecting Mode, there are no TID numbers as found in the
Coin/Treasure Mode. Instead, targets are identified by a change in the pitch and
volume of the Threshold Tone. The operational pitch of the Threshold Tone can be
changed (ranging from 140 Hz to 1010 Hz) by using the Tones menu. Although
the display does not provide TID numbers, it does provide a numerical indication
of the level at which your Iron Mask is operating. The Iron Mask range is 0 - 20,
allowing the user to select the level of iron targets (ferrous properties) that will be
rejected. The higher the number selected, the more iron signals you will reject. It
also displays a segment bar at the bottom of the screen that indicates the amount
of iron signals being rejected by the X-TERRA. When prospecting in areas of high
mineralization, keep your Iron Mask setting low. Setting it above a five or six could
result in rejecting the smaller gold targets.
Most concentrations of gold deposits are located in areas with high levels of
mineralization. As such, Double-D coils are typically chosen for their ability to
more effectively neutralize the effects of the ground. When searching for small
specimens, the 18.75 kHz Double-D coils will provide the most stability and
sensitivity. Many prospectors favor the size and shape of the 18.75 kHz elliptical
coil. If you are searching for larger nuggets (one ounce or greater), you will obtain
more depth with the 7.5 kHz Double-D coil. And if you find yourself prospecting
in an area with moderately mineralized soil, you could improve your chances of
finding gold by using the 9-inch Concentric coil at 18.75 kHz.
Many X-TERRA prospectors find that they are best able to compensate for
changes in ground mineralization by implementing the Tracking feature. If your
ground has minimal variance in mineralization and you chose to use a fixed
Ground Balance, pay close attention to your Threshold. If the Threshold suddenly
drops out, recheck your ground phase or turn on your Tracking.
Prospecting Mode is used to find metal
such as gold nuggets and relics in highly
mineralized, ‘difficult’ areas.
Targets are identified by audio only. The
number on the display is not related to
the target; instead, it shows the Iron Mask
value, as does the Discrimination Scale.
In this mode the detector becomes more
sensitive to small target signals.
X-TERRA 705 manual pg. 19
ch as these ,
Small specimens su
d using the
are frequently foun
ting Mode .
X-TERRAs Prospec
Understanding your X-TERRA - Practical Detecting
70
Technology...
Minelab’s VFLEX Technology
lab’s
Here is Mine
ation of
n
a
l
p
x
e
l
a
i
c
offi
ology
VFLE X techn
VFLEX technology transforms the common analogue single frequency
metal detector into a fully digital machine including a small computer,
called a microcontroller, inside the control box and also inside the search
coil.
The microcontroller in the control box generates a perfect high quality
sine wave. The sine wave is produced in the same way that your digital
CD player produces high quality sound. This is important, because perfect
sine waves don’t have distortions that create harmonic side frequencies.
With the removal of harmonic side frequencies maximum power is
transferred to the coil and detection depth is greatly improved with
increased sensitivity, TID accuracy and immunity to noise.
Due to small variations in the windings, no two search coils will be exactly
identical. This means that a search coil tuned to 3 kHz might actually be
a 3.0438 kHz coil or a 2.9635 kHz coil. The difference may not sound like
very much, however if your detector keeps transmitting at 3 kHz it can
mean the difference between missing or finding a valuable target.
Understanding your X-TERRA - Technology
72
Also when the detector’s transmit frequency is slightly different to the search coil’s tuned
frequency, noise and interference will be introduced, reducing sensitivity and detection depth.
VFLEX technology corrects this by adjusting the transmit frequency to exactly match the tuned
frequency of the search coil. This is only possible because the microcontroller in the search coil
communicates information about the search coil’s tuned frequency to the control box. So if the
coil is 3.0584 kHz then the transmit frequency from the control box will also be 3.0584 kHz.
Because the search coil can communicate with the control box there’s not just one, but up to
three different frequency search coils available: 3 kHz, 7.5 kHz and 18.75 kHz.
Changing the transmit frequency significantly changes the operation of the detector.
Low frequency option for deep, large, high conductive
targets such as silver, copper, large rings and relics.
Mid frequency option for all-round detecting.
High frequency option is very sensitive and optimized
for jewelry, fine chains and sub gram gold nuggets.
There are other single frequency metal detectors available that have multiple frequency options,
however they spread the components that determine the search coil’s frequency between the
search coil and the control box. This introduces noise and distortion reducing sensitivity and
detection depth.
VFLEX has all the components that determine the search coil’s tuned frequency located together
in the search coil. This ensures that the pure sine wave is transmitted at maximum power into
the ground without distortion.
cal
r electri
o
t
i
c
a
p
a
C
symbol
Tuned
circuit symbol
Search
coil
Winding symbol
VFLEX – Precision tuned as all the tuning
components are contained within the search coil
Understanding your X-TERRA - Technology
73
Minelab’s VFLEX Technology
Control
box
Capacitor
eletrical
symbol
Conventional multiple frequency
VLF metal detector
Tuned circuit
symbol
Winding symbol
Search coil
Other multiple frequency VLF metal detectors have the
tuning components spread between the search coil and
the control box, introducing noise and instability.
As a metal detector’s search coil is moved close to mineralized ground the tuned
frequency of the search coil is affected. VFLEX continuously monitors the search
coil for the effects of ground mineralization and compensates the received
signal to achieve maximum depth and consistently accurate TIDs.
Most metal detectors have the receive winding connected directly to the
cable. This means that the very small signals received by the search coil are
sent directly up the cable to the control box. Because the signals are so small
they need a lot of amplification in the control box and any electromagnetic
noise picked up by the cable also gets amplified. This results in false signals and
reduced sensitivity.
Understanding your X-TERRA - Technology
74
With VFLEX the search coil contains a preamplifier that boosts the
received signal before noise can be introduced through the cable. This
significantly reduces false signals and increases the detector’s sensitivity,
even in noisy environments such as under power lines.
Another benefit of VFLEX’s preamplifier and microcontroller in the
search coil is that the standard heavy weight twin shielded cable isn’t
required. The VFLEX coil cable is a light weight ‘Category 5e’ cable. This is
a relatively new cable specification and because of its immunity to noise
is widely used for high speed computer networking.
s
cable i
e
5
y
r
Catego
high
VFLE X ght and has
ei
lightw munity
m
i
noise
S tandard cable
contains more
copper and is th
erefore heavier
and more likely
to be detected
when bumped
This has two advantages; one, the detector is lighter and two, the much
finer wires aren’t detected when the cable is bumped. This significantly
reduces false signals from bumping the search coil on the ground and
allows the detector to be very sensitive without ever detecting the cable.
VFLEX uses little power, so four AA batteries last over 20 hours, with the
same performance maintained from charged through to discharged.
VFLEX is a significant advancement of single frequency metal detection
technology. VFLEX provides precision digital calibration with the coil,
adjustable transmit frequency and continuous ground monitoring,
resulting in high performance across a wide range of target types and
ground conditions. These technological advancements ensure that VFLEX
detects deeper with higher sensitivity than any other single frequency
metal detector.
Understanding your X-TERRA - Technology
75
My Circular Discrimination Theory
Lowest Ferrous/Highest Conductive
Earlier, I mentioned the discrimination differences between the three
models of X-TERRAs. As I pointed out, the TID numbers on the X-TERRA
30 & 305 range from a low of -4 to a high of +44, the X-TERRA 50’s TID
values range from -9 to +45, the 505’s TID values range from -9 to +48 and
the X-TERRA 70 and 705 range from -8 to +48. Although I was glad to see
the discrimination expanded on the 505 (compared to the X-TERRA 50), I
believe these notch segment numbers may be more than simply numbers
assigned to the “high end” and “low end” of the available Discrimination
Scale. When scanning a coil over a small piece of ferrite, I found the
X-TERRA 50 will lock onto a -9 TID reading.
When I passed that same piece of ferrite under the same coil connected to
the 505, 70 or 705, none of them will lock onto a stable reading. Instead,
the TID of the ferrite target would bounce between -9 and +48 on the 505.
And bounce between -8 and +48 on the 70 and 705. Because of this, when I
am hunting an old farm site, I usually notch out the +48 segment and leave
all the other notches open on these three models.
Doing this allows me to better determine if a target is more than just a
piece of deeply buried iron. Is the -9 on the X-TERRA 50 or 505 more than
just a number? Or by adding the additional +48 “notch segment” to the
505, is it “allowed” to provide the same “bounce” on the most ferrous targets
as the X-TERRA 70 and 705?
Based on these questions, and my tests in the field, I’ve come up with what I
call my “circular discrimination” theory.
+
+
+
-
+
Understanding your X-TERRA - Technology
76
My Circular Discrimination Theory
My circular discrimination theory would likely apply to all VLF detectors with notch
discrimination capabilities. But for the sake of explanation, I’ll use the 705 as my example.
If I were to ask you what direction, in degrees, that straight North represented, what would
you say? Is it 360 degrees? Or is it 0 degrees? Actually, it is both. Take a look at your compass.
Many of us think of metal detector discrimination as being linear. In our minds we can
visualize a straight line, running horizontally, with the most ferrous targets located on the left
end. And the highest conductive targets clear over on the right. In the case of the X-TERRA 70
and 705, there are 28 target notches spaced evenly in between.
e just
I believ
,
ompass
like a c he
that t
ination
m
i
r
c
s
i
D
,
ircular
c
s
i
e
l
Sca
ear.
not lin
The X-TERRA doesn’t give any indication that its discrimination arrangement is circular. In
fact, the X-TERRA stops scrolling when you try to go lower than the lowest non-conductive
number, or higher than the highest conductive number. I submit that is what leads us to
think of it as being linear. But I believe, just like a compass, that the Discrimination Scale is
circular, not linear.
Follow me along on this... Take that flat line of notch segments and bend them into a circle,
like the numbers on a clock. Instead of twelve numbers representing the hours, we have
28 separate notch segments, evenly spaced in a circular pattern. Starting at the top and
moving clockwise, they range from a low of -8, to -6, -4, -2, +2, +4 ... on and on, all the way
around the dial to the +48. The spacing between each notch segment is the same, including
the space between -8 and +48. If you have a target that has a TID that bounces between
36 and 38, you know it is a target with a fairly high conductivity. With a TID of 36 to 38, it is
most likely a dime. If you have a target that reads a -4, and jumps down to a -6, you might
not know what it is. But it is definitely a target with a low conductivity (or high ferrous)
content.
Understanding your X-TERRA - Technology
77
My Circular Discrimination Theory
Now, if you consider that piece of ferrite I
mentioned, and think about those deep pieces
of iron you dug this summer (anticipating a
silver dollar because they read a +48 ), and toss
in this theory of circular discrimination, you get
an idea as to how it happened. You dug a piece
of iron that provided a TID of +48. Did it read a
negative number after it was dug up? Probably.
Did the X-TERRA mislead you, making you think
it was a highly conductive target when it was
still in the ground? Yes, it can be misleading.
But based on the information available, the
X-TERRA made its “best guess” as to where
to position that target in its field of “circular
discrimination”.
Just as a dime reading 36 can bounce to a 38 under given conditions, a piece
of iron can bounce between -8 and +48. And, since the 705 we are discussing
does not have any notch segments between the adjacent notches of +48 and
-8, the iron will identify with the one it is most closely aligned to. Factor in the
ground conditions, and you can see how that deep old iron can fool you into
thinking it is a silver dollar.
My theory is, regardless of how many notch segments could be added
between the -8 and +48, there will always be targets that “fall” between the
most negative TID and the most positive TID. The best solution I have to offer
is to use the tips I’ve tried to provide throughout this eBook, and listen more
intently to the audio response made by these wrap around signals. When
working the coil over the target, iron tends to provide both high tone and
low tone harmonic signals.
From a strictly technical point of view, I don’t believe the wrapping of ferrous
and non-ferrous is truly circular, or 360 degrees. I believe it to be semicircular at 180 degrees. However, in an attempt to not make my explanation
more confusing, I used the example of a compass, and the terms circular and
360 degrees, instead.
have
u
o
y
t
a
Now th theory lets
my
of
heard
estions X
u
q
e
ask som tor of VFLE
nce
ven
the in y, Dr. Laure
log
techno amatescu.
St
Understanding your X-TERRA - Technology
78
Q & A with Laurence
Dr. Laurence Stamatescu
Dr. Laurence Statmatescu is the inventor of VFLEX technology. He
worked as a nuclear physicist in a nuclear research institute in Romania,
then moved to Australia in 1992.
Laurence completed a PhD in Optics (lasers) gaining experience in
electronics and signal processing. He joined Minelab’s engineering team
in 1996, with the XT 18000 (the predecessor of the Eureka Gold) being
his first project.
Q
A
VFLEX technology was Laurence’s own design that he started at home as a ‘spare time’ project. He is a Senior
Technical Manager in Minelab’s engineering team and responsible for the research and development of new
metel detection tetechnologies.
Question .
Answer.
Is there a correlation between target properties when comparing the negative
TID numbers (ferrous targets) while using the Coin & Treasure Mode and the
Iron Mask numbers while using the Prospecting Mode? Are the Iron Mask
settings an extension of the Coin & Treasure Mode’s ferrous discrimination scale,
but on a more refined level?
The short answer is no. The long answer is as follows.
TID and Iron Mask have somewhat different purposes: TID aims at giving
each target the best ID, while Iron Mask aims at separating the ferrous and
non-ferrous targets in conditions of high mineralization. Ferrous/non-ferrous
discrimination is difficult in high mineralization conditions, where in fact
most of the gold nuggets are. Thus, the Iron Mask feature gives the user a
way to adjust where the compromise lies. In other words, the user can choose
anywhere between two extremes:
1. “I am prepared to dig each detected target, because I do not want to miss any nuggets”- In this case I
set the Iron Mask at minimum (0, All metal).
2. “I do not want to dig ferrous junk, even if I might miss some nuggets”- In this case I set the Iron Mask
at maximum (20).
Ferrous targets
0
Gold targets
20
Iron Mask adjustment
As the mineralization makes identification harder the Iron Mask sets the boundary between what it
believes to be a good or a bad target, based on both the user preference and the measurements of the
ground interference.
Understanding your X-TERRA - Technology
79
Q & A with Laurence
Q
A
Question .
Answer.
If most metallic targets have both ferrous and non-ferrous
properties, what triggers whether a specific target registers in
the ferrous range (negative TID numbers) or the non-ferrous
range (positive TID numbers) on the X-TERRA?
There are three “ingredients” of a target that determin its TID.
These are:
1)Conductance
2)Inductance
3)
Magnetic response
Ferrous Objects
Ferrous objects are very interesting, because they have all three properties:
•
they have conductance – current flows through iron but not very well,
•
they have inductance – due to their shape, the currents flow along
certain paths and cannot vary easily,
•
they also have a magnetic response, because iron is a magnetic material
and enhances the magnetic field.
Non-Ferrous Objects
Non-ferrous objects, for example gold rings or coins, lack the third ingredient
and thus they only have two properties:
•
they have conductance – current flows through
them better if they are thick and if they have good
conductivity, like copper, aluminium, gold,
•
they have inductance – rings and coins in particular
have well defined paths for the current due to their
symmetry.
Time delay
Tx
Tx
Rx
Rx
Transmit (Tx) and Receive (Rx) wave forms
Understanding your X-TERRA - Technology
80
Single frequency detectors, like X-TERRA, perform discrimination based on the time delay (phase) of
the received (Rx) signal with respect to the transmitted (Tx) signal.
Given the way the signals are processed in electronics and in software, non-ferrous objects can only
have positive phase angles. This can be shown on a phase diagram.
Conductance
Ferrous objects generally have negative phase angles, because the magnetic response is stronger
than the effect of the inductance and conductance.
Please note: these
phase angles actually
overlap but have been
simplified for ease of
understanding.
Ferrous Targets
Non-Ferrous
Targets eg. coins,
gold rings, etc
Mineralized
Ground
Magnetic Response
Inductance
P
Q
Time delay (phase) diagram
The 705 Discrimination Scale is the
end result of this digital processing.
Ferrous/non-ferrous discrimination works better at low frequencies. Even though the magnetic
response of a target is frequency independent, inductance effect increases as the frequency
increases. Therefore, at high frequency, the effect of the inductance can be stronger than the
magnetic response resulting in a ferrous object being misclassified as a non-ferrous one.
This is more likely to happen with larger ferrous targets of particular shapes and/or in particular
orientations. Although higher frequency detectors have somewhat poorer ferrous discrimination,
they have excellent sensitivity for low conductivity objects, so there are advantages and
disadvantages for single frequency detectors having one fixed frequency. This is why the X-TERRA
detectors were designed with 3 kHz, 7.5 kHz and 18.75 kHz options by changing coils.
Understanding your X-TERRA - Technology
81
Q & A with Laurence
Q
A
Question .
In sweeping the 3 kHz low frequency (LF) and 7.5 kHz medium
frequency (MF) 9-inch Concentric coils over an old U.S. silver
dollar (90% silver), the TID displays a value of 48 at distances
less than 2-inches from the coil. At distances greater than
2-inches, the TID is 46. When using 18.75 kHz high frequcey
(HF) Double-D coils, (6-inch, elliptical and 10.5-inch round) the
same U.S. silver dollar registers a 48 regardless of the distance
between the target and the coil. What causes this TID variation
between coils?
Answer.
This is a somewhat surprising effect, because one would expect
the TID from MF and certainly LF to be more stable for a high
conductivity target than that from the HF coil. Therefore, the
question requires discussion on two fronts before I can offer an
answer:
How TID’s are affected by coil frequency
As mentioned in the previous answer, the TID is calculated
based on the phase angle of the received signal with respect
to the transmitted signal. Each TID corresponds to a range of
phase angles (a “bin”). For example, the X-TERRA 705 has 24
non-ferrous TID’s in 90 degrees, so about 3.75 degrees for each
“bin”. The accuracy of TID for a particular target is dominated
by whether the measured angle is close to the centre of a TID
“bin” or if it is close to the boundary between two “bins”. If the
target phase angle is close to the boundary, its TID is more
likely to flicker between two values, depending on orientation,
proximity to the coil etc.
7.5 kHz- standard TID
“bin” separation
3 kHz - modified TID
“bin” separation
24
2
18.75 kHz - modified TID
“bin” separation
2
4
4
46
46
48
46
48
Understanding your X-TERRA - Technology
48
48
82
+
+
-
Normally, changing the frequency of the coil
by a large amount (e.g. from 7.5 kHz to 3 kHz or
18.75 kHz) would drastically change the TID of a
target. However, because we wanted the TID’s to
be the same regardless of the coil frequency, the
correspondence between the phase angles and
TID’s for the LF and HF coils has been modified
(see illustration on pg. 82) to be similar to those
for the standard MF coil. This further distorts the
TID “bin” size for LF and HF coils.
How coils identify targets in very close proximity to the windings
It is known that continuous wave metal detectors can be unbalanced (detuned) by targets, in
particular higher conductivity and larger mass coins, that are in close proximity to the coil and
this can change the target phase angle of the TID sufficiently to push it into the next “bin”. Also,
close to the windings, the target is seen more like a collection of parts than a whole and this also
affects the TID.
Now that we have covered the background theory, the answer in this case is: the recalculated TID
of the U.S. silver dollar is closer to the centre of “bin” 48 for the HF coil than it is for the LF or MF
coils. Small changes due to proximity to the windings are not enough to make it flip into “bin” 46
for the HF coil, but they do so for LF and MF coils.
+
+
+
-
+
+
-
+
Understanding your X-TERRA - Technology
83
Q & A with Laurence
Q
A
Question .
Answer.
For many metal detectors, implementing Noise Cancel is
typically a slight shift in operating frequency. If the Noise
Cancel process of the X-TERRA is similar, how much of a
frequency shift does each channel of Noise Cancel represent?
Similar to other metal detectors, the Noise Cancel in X-TERRA
changes the operating frequency of the detector by a small
amount around the resonant frequency of the coil. This
precludes narrow band interfering signals from affecting
the operation of the detector. Because X-TERRA uses pure
sine waves for demodulation, the interference must be very
close to the operating frequency to be a problem. Of course,
broadband interference (like that from car ignition, electric
welding or thunderstorms) cannot be cured with Noise
Cancel, but in this case the very sharp and deep attenuation
of the digital filters helps minimize the effects.
The number of steps (3 or 5) for Noise Cancel depends on the model of detector,
with frequency 0 being always the resonant frequency of the coil, as recorded
in the coils microcontroller during the calibration at the factory. The steps in
frequency depend on the coil frequency, with LF coils having smaller steps and HF
coils having the largest steps:
• LF Noise Cancel frequency step: 35 Hz
• MF Noise Cancel frequency step: 40 Hz
• HF Noise Cancel frequency step: 80 Hz
Noise Cancel Channel
Detector
X-TERRA 305
X-TERRA 505
X-TERRA 705
Coil freq.
-2
-1
0
1
2
7.5 kHz
7.420 kHz
7.460 kHz
7.500 kHz
7.540 kHz
7.580 kHz
18.75 kHz 18.590 kHz
18.670 kHz
18.750 kHz
18.830 kHz
18.910 kHz
3 kHz
2.930 kHz
2.965 kHz
3.000 kHz
3.035 kHz
3.070 kHz
7.5 kHz
7.420 kHz
7.460 kHz
7.500 kHz
7.540 kHz
7.580 kHz
18.75 kHz 18.590 kHz
18.670 kHz
18.750 kHz
18.830 kHz
18.910 kHz
3 kHz
2.930 kHz
2.965 kHz
3.000 kHz
3.035 kHz
3.070 kHz
7.5 kHz
7.420 kHz
7.460 kHz
7.500 kHz
7.540 kHz
7.580 kHz
18.75 kHz 18.590 kHz
18.670 kHz
18.750 kHz
18.830 kHz
18.910 kHz
It should be noted that operating on a frequency different from the resonance
of the coil introduces a phase angle shift, but VFLEX technology accurately
compensates for this and neither Ground Balance nor TID are affected.
Understanding your X-TERRA - Technology
84
Final Words...
My Settings
When people ask what settings I use, I generally tell them that
they should adjust their detector for their site, using the procedure
I’ve outlined in this book. Then I tell them I hunt in All Metal, (zero
discrimination), with Multiple Tones. All Metal allows you to hear every
metallic target the coil passes over. But if I had to pick one specific
setting, I would chose to hunt in a Discrimination Pattern with all the
notches set to accept. I refer to this as zero discrimination because it is a
Discrimination Pattern that is not rejecting any notch segments.
I like using zero discrimination in a Pattern for two reasons:
Reason one...
Running in a Discrimination Pattern with zero discrimination more
accurately identifies deep iron as a ferrous target, compared to the
All Metal. In other words, deep iron gives fewer +48 signals in a zero
Discrimination Pattern than it does in the All Metal. Again, I believe this
reinforces my circular discrimination theory mentioned previously, as
properties assigned to a specific notch segment are the only target
properties you will detect.
an old
Found in
hurch
country c
d
and a yar
Understanding your X-TERRA - Final Words
86
In All Metal, those deep iron targets are more likely to bounce between the most
conductive reading of +48 and the most ferrous reading of -8. Having a specific notch
segment established to accept the most ferrous property values (-8) results in less
TID bouncing (-8 to +48 ) on deep iron targets. X-TERRA users will find that the higher
frequency coils produce more “wrap around” signals than lower frequency coils. This is
due to the fact that the higher frequency coils expand the TID range for low conductive
targets, but compress the TID range of higher conductive targets. Since the highest
notch segment of the X-TERRA 505, 70 and 705 is “tighter” (by design) than the other
notch segments, you can greatly reduce the effects of deeply buried iron by rejecting
the +48 notch segment.
er finds
Some silv
h my
made wit
etector.
Minelab d
Reason two...
When you turn the X-TERRA on, all the settings you used the last time you hunted are
saved, with one exception. It will not turn back on to All Metal. It always sets up in the
last Discrimination Pattern you used. So, in order to not have to worry about forgetting
to switch to All Metal, I established one of my Discrimination Patterns to accept all
notches. This way, when I turn on the detector, it sets up in a Discrimination Pattern with
zero discrimination.
Understanding your X-TERRA - Final Words
87
d
Review
Study the Instruction Manual.
Know what functionality is controlled by each
setting, and how proper adjustment of those settings
will directly impact the success of your hunt.
Always check your Noise Cancel Channel and Ground
Balance every time you change sites or switch coils.
Check your Ground Balance every few minutes.
Recognizing that the software application of the
X-TERRA is much more precise than our ears, use the
Auto features whenever possible.
o
t
Au
ce
b
n
ala
10
9
8
l
Ma
a
nu
When you set your Sensitivity, remember the analogy
of headlights in the fog. Having the Sensitivity too
high can result in missing good targets because they
are hidden amongst false signals.
Learn to discern the audio tones. Hearing the audio
tones produced by an adjacent piece of trash AND
a good target is much more productive than a good
target being blanked out by the rejection of the
trash.
Understanding your X-TERRA - Final Words
88
If you want to find a deep “keeper” that the last person
missed, keep discrimination levels low and apply the
three rules of consistency; location, sound and TID.
As you approach a hunt site, don’t be afraid to think
“outside the box”. Instead of just walking around the
base of that big tree, try hunting that area that is shady
during the late afternoon/evening hours.
Analyze the site, plan your hunt and hunt your plan.
I’ve found many coins by hunting over an area from a
different direction than my initial instinct told me to hunt.
As you sweep the coil, overlap your swaths accordingly
and slow down your sweeps.
Learn how to separate target sounds.
Having metal detected for almost 40 years, I’m convinced
there are more old coins left in the ground due to target
masking as opposed to being at extreme depth.
Understanding your X-TERRA - Final Words
89
Glossary of Terms
Concentric coil
A Concentric coil has an inner circle and an outer circle wire winding. Its search
pattern is cone shaped and can be useful for accurately pinpointing a target.
Conductivity
Conductivity refers to how well a target allows electrical current to flow through it.
In other words a highly conductive target has low electrical resistance and therefore
allows current to flow more easily.
Discrimination
Discrimination is a metal detector function that recognizes the differences between
various types of targets. The discrimination feature on Minelab metal detectors
measures two target properties: ferrous properties and conductive properties.
Double-D coil
A Double-D coil has two overlapping wire windings in the shape of two D’s (one
reversed). The characteristics of a Double-D coil are stability (especially in heavily
mineralized ground), good depth and sensitivity, and a very thorough search pattern.
Eddy currents
Eddy currents are tiny electrical currents that are induced into targets when a metal
detector’s electromagnetic field is present. These eddy currents then generate an
electromagnetic field around the target which can be received by a metal detector’s
search coil.
Ferrous
Ferrous objects/targets contain iron and therefore are attracted to a magnet. e.g.
horse shoes, nails, tin cans.
Frequency
The frequency of a detector refers to how fast it is sending (transmitting) signals into
the ground and receiving them back. Different frequencies find certain targets better
than others, e.g. high frequencies find very small targets while low frequencies find
deeper/larger targets.
Understanding your X-TERRA - Final Words
90
Hot rocks
Hot rocks are rocks that are mineralized differently to their surrounding ground. For example a highly
mineralized rock buried in mildly mineralized ground would be considered to be a hot rock. However, a
highly mineralized rock in an equally highly mineralized ground would not be considered to be a hot rock.
Ground mineralization
Ground mineralization refers to how magnetic the ground is. This doesn’t mean that mineralized ground
produces a magnetic field, but it does mean that particles or grains in the soil will be attracted to a
magnet.
Noise Cancel
Noise cancel is a metal detector feature that shifts the metal detector’s operating frequency or frequencies
to reduce the effect of environmental electrical noise, such as power lines, cell phone towers and other
metal detectors.
Non-ferrous
Non-ferrous materials do not contain iron and are not attracted to a magnet. e.g. coins, gold & silver rings,
copper artefacts.
Signal
Signal refers to both the transmitted magnetic field from the detector’s search coil and the received
magnetic field from a metal target.
Target
Target refers to any metal object that can be detected by a metal detector. A target can be either valuable
coins or junk like bottle tops. The term does not refer to the value of the object.
Target ID (TID)
TID numbers are numbers that identify targets based on their ferrous and/or conductive properties.
Threshold
Threshold is the continuous sound emitted by a metal detector that is used by the operator to monitor for
target signals . The Threshold will also blank to indicate that a discriminated target has been detected.
VLF - Very Low Frequency (also known as CW – Continuous Wave)
VLF is a type of metal detection technology. Metal detectors that use VLF technology create an
electromagnetic field that is applied to the ground in a continuous wave.
Understanding your X-TERRA - Final Words
91
Conclusion
ion:
lus
In conc
ifferent
d
e
b
y
a
sure” m
a
e
r
t
“
d fair
of
n
a
n
o
s
i
e
t
t
i
i
s
n
be the
My defi
ld farm
o
ot
e
n
h
y
T
a
.
m
urs
d,
to hunt
than yo
e
k
i
nt. An
l
u
I
h
t
o
a
t
h
ke
st
r
ground
s you li
e
c
a
es in ou
l
i
t
p
i
r
of
a
l
e
i
p
y be sim
same ty
of our
a
e
m
m
e
o
r
s
e
t
a
h th
dent th
fi
althoug
n
o
c
yle , I’m
hunt st
l vary.
l
i
w
s
e
u
nd
techniq
et-up a
s
I
w
o
h
mary of
m
“final
u
e
s
h
t
a
s
ot
i
n
is
ook
RA . It
This eB
R
ential of
E
ot
T
p
e
X
h
y
t
m
ize
ord”.
operate
w
maxim
l
o
t
a
n
w
fi
o
“
d
on h
re is no
e
h
word”
each an
T
.
n
r
A
a
e
R
l
R
TE
e to
ontinu
your Xc
e
w
s
g.
long a
etectin
Not as
d
o
g
e
ime w
to
every t
as been
h
k
o
o
B
e
ng this
TERRA
i
t
i
X
r
r
w
u
o
l in
t
ost of y
m
My goa
e
h
ly wha
t
p
e
p
k
a
a
l
m
’l
s
u
ou
erience
help yo
fully, y
p
e
x
p
e
o
e
H
s
o
th
nce .
ild on
u
experie
b
,
e
r
als.
read he
own go
you’ve
r
u
o
y
hieve
and ac
t.
he hun
t
y
o
j
n
E
igger ”
D
“
a
k
a
Randy
011
May 2
Understanding your X-TERRA - Final Words
92
Best
Awarded
2009 &
Finds Of
h finds
2010. Bot
7 Indian
were 187
ts.
Head cen
Western & Eastern Treasures Magazine
www.treasurenet.com/westeast/
Understanding your X-TERRA - Final Words
93
Success Stories from Minelab
Dear Reader,
ding your X-TERRA” by Randy Horton.
We hope you have enjoyed reading “Understan
to www.minelab.com by other
Here are some more Success Stories submitted
world.
successful X-TERRA detectorists from around the
Regards from the Minelab Team
“ I was daydreaming of how nice it would be to find
a coin from the early 1800’s or 1700’s but that
will never happen to me because I live in Montana.
And WHAM! The next day I find a 1758 penny.
I absolutely love my X-TERRA 705 for both coin
hunting and gold nugget shooting.”
Reese Townes – Montana, USA
X-TERRA 705
“I dug down and a hexagonal shaped object
popped out. After a clean with some water
I found out that it was a Western Australia
dog registration tag dated 1909”
Max Fusco (11 years old) – WA, Australia
X-TERRA 705
“Thirty two coins from 1946-1948. They
have not a big charge , but for beginner and
moreover by Good Friday it is a big adventure .”
Paul Tresl - Czech Republic
X-TERRA 70
“I found a 1953 silver quarter, a silver heart
shaped pendent, a 1973 dime , a 1965 penny
and a lot of iron targets as well ... There’s just no
better metal detector than a Minelab as far as I
am concerned .”
Martin Boersma – Michigan, USA
X-TERRA 505
Understanding your X-TERRA - Final Words
94
“With metal detector X-TERRA 705 I found these
old objects. They are from 3rd century (ROMEMPIRE) 3 coins, 1 silver bracelet, 1 old key, 1
old padlock . The big coin is from Gaius Aurelius
Valerius Diocletianus, was a roman emperor from
284 to 305.”
Stojan - Macedonia
X-TERRA 705
“HOLY CATS MAN its a STANDING LIBERT Y
QUARTER . WOW, I was so stoked . I jumped to my
feet and held that awesome Quarter towards Heaven
and thanked God out loud .”
Jeff Pearson - WA, USA
X-TERRA 705
“After only an hour of hunting I dug a 10k gold
ring. In all the hours I had put in on my old
detector I had never found any gold items... Every
day I can’t wait to get out and use the detector
again .”
Travis Cole – Indiana, USA
X-TERRA 305
“This coin hoard was found with the X-TERRA
705 in “La Media Luna” in Jalisco, Mexico. We were
following a family history about an old man who
buried this cache of coins... 98 coins were found ,
from silver to copper, from 1920 to 1950.”
Ignacio Moreno Nava - Mexico
X-TERRA 705
© 2011 Minelab Electronics Pty Ltd
Doc name: RHUYXT2011
This document contains proprietary information which is protected by copyright. Apart from
any use as permitted under the Copyright Act 1968, no part may be reproduced by any process without
written permission from Minelab Electronics Pty Ltd, 118 Hayward Avenue, Torrensville, SA 5031, Australia.
WARNING. This document contains Minelab Electronics Pty Ltd rights, technical data or
restricted rights data, or both. Patents and trademarks apply. X-TERRA and Minelab
are all trademarks of Minelab Electronics Pty Ltd
This document is for personal use only and is not permissible to use on other websites.
Whilst this document is available for print and download it is not available for sale and
no profits are to be generated directly from this product.
Note: Some of the views expressed in this eBook are only those of the primary author, Randy Horton,
and may not necessarily be the same as other documentation from Minelab Electronics.
95
About the Author
Randy (or Digger as he’s known) has been metal detecting
in the Central US for nearly 40 years and has a passion for
finding old coins at old sites. In addition to performing
field tests for several manufacturers (including the
Minelab X-TERRA series), he also serves as Moderator on
the X-TERRA forum at Find’s Treasure Forums. Digger has
written several articles, and enjoys sharing his thoughts and
tips on various aspects of the hobby. His detectors of choice
include the X-TERRA, E-TRAC and Musketeer Advantage.
Minelab Electronics Pty Ltd
Minelab International Ltd
Minelab Americas Inc
PO Box 537, Torrensville Plaza
Adelaide, South Australia, 5031
Australia
Tel: +61 (0)8 8238 0888
Fax: +61 (0)8 8238 0890
Email: [email protected]
Unit 207, Harbour Point Business Park
Little Island, Co-Cork
Ireland
Tel: +353 (0)21 423 2352
Fax: +353 (0)21 423 2353
Email: [email protected]
2777 Finley Rd, Unit 4
Downers Grove, IL 60515
USA
Tel: +1 630 401 8150
Toll Free: 1-888-949-6522
Fax: +1 630 401 8180
Email: [email protected]