1
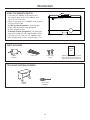
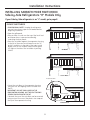
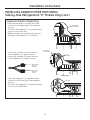
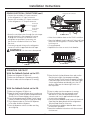
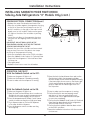
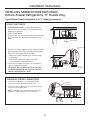
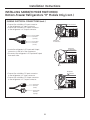
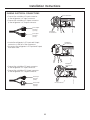
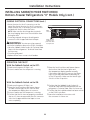
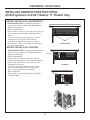
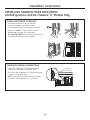
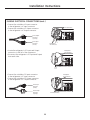
Installation Instructions Sabbath Mode Product Kit ZSAB1 For Use With Monogram Built-In Refrigerators: 36", 42" & 48" Side-by-Side “R” Models (Manufactured On or After February 2004) and “X” Models 36" Bottom-Freezer “R” Models (Manufactured On or After April 2004) and “X” Models 36" All-Refrigerator/ All-Freezer “X” Models Safety Instructions WARNING – • FOR PERSONAL SAFETY: Remove house fuse or open circuit breaker before beginning installation. READ CAREFULLY. KEEP THESE INSTRUCTIONS. ATTENTION – FOR YOUR SAFETY SÉCURITÉ : Enlever le fusible du circuit ou déclencher le disjoncteur avant de commencer l’installation. Read and observe all CAUTION and WARNINGS shown throughout these instructions. While performing installations described in this booklet, gloves, safety glasses or goggles should be worn. Read these instructions completely and carefully. • IMPORTANT – Save these instructions For Monogram local service in your area, 1.800.444.1845. For Monogram service in Canada, 1.800.561.3344. For Monogram Parts and Accessories, call 1.800.626.2002. for local inspector’s use. Observe all governing codes and ordinances. • Completion Time – 30 Minutes to 1 Hour. New installations require more time than replacement installations. Note to GE Factory Service Technician or GE Customer Care Service Technician – Be sure to leave these instructions with the Consumer. • Note to Consumer – Keep these instructions with your Owner’s Manual for future reference. • Skill Level – The Sabbath Mode Product Kit must only be installed by a qualified GE Factory Service Technician or GE Customer Care Appliance Service Technician. Product failure due to installation by anyone else is not covered under the GE Appliance Warranty. CONTENTS Introduction About the Sabbath Mode ....................................................3 Using the Sabbath Switch ..................................................4 Parts Included ..........................................................................4 Tools and Materials Needed ..............................................4 Installation Instructions Bottom-Freezer Refrigerators – X Models Mount Switchbox ..................................................................14 Making Electrical Connections................................15, 16 Operation Checklist ............................................................16 Installation Instructions Side-by-Side Refrigerators – R Models Mount Switchbox ....................................................................5 Making Electrical Connections ....................................6, 7 Operation Checklist ................................................................7 Installation Instructions All-Refrigerator and All-Freezer – X Models Remove Grilles........................................................................17 Install Switchbox to Bracket............................................18 Making Electrical Connections................................18, 19 Install Switchbox and Bracket ........................................20 Operation Checklist ............................................................20 Installation Instructions Side-by-Side Refrigerators – X Models Mount Switchbox ....................................................................8 Making Electrical Connections ..................................9, 10 Operation Checklist ............................................................10 Consumer Information Frequently Asked Questions............................................21 Warranty ..................................................................................24 Installation Instructions Bottom-Freezer Refrigerators – R Models Mount Switchbox ..................................................................11 Making Electrical Connections ..............................11–13 Operation Checklist ............................................................13 2 Introduction ABOUT THE SABBATH MODE This feature was designed for use on the Jewish Sabbath and Holidays. The Sabbath Mode feature makes it possible for observant Jews to refrigerate and freeze food during the duration of the holiday. When set, the Sabbath Mode feature will override typical reactions to actions in your refrigerator. While in Sabbath Mode your refrigerator will still operate normally, but the refrigerator will not respond to your actions. The fan may or may not be running when the door is opened; however, this is not a result of your actions. The fan will operate at random times. Defrost Heater Ice and Water Dispenser • The defrost heater will continue to defrost the refrigerator and freezer. • The defrost heater will be activated on a fixed timer during Sabbath Mode. Defrost heater will not defrost as a result of door openings or any action by the consumer. • The proximity sensor and dispenser touch sensor icons on the ice and water dispenser will not operate. • Ice and water cannot be retrieved from the dispenser while the refrigerator is in Sabbath Mode. Displays and Alarms • Interior lights and dispenser light will not operate. Lights • The main temperature control and Quick Chill or Express Chill displays will not be lit. The touch pad sensors will not sound a tone or operate to change the set temperature when in Sabbath Mode. • The temperature and Quick Chill settings will remain at the previously set temperatures during and after Sabbath Mode. • Door alarms will not operate while in Sabbath Mode. Icemaker • The icemaker is automatically disabled in Bottom-Freezer models. • The icemaker will Power Switch Icemaker continue to operate in Side-by-Side and All-Freezer models, but should be disabled by opening the ice bin door and by setting the icemaker power switch Green to O (off) or OFF. Power Light Feeler Arm • To obtain ice, open Icemaker the freezer door and remove the cubed ice from the ice bin. Power Switch 3 Feeler Arm Introduction USING THE SABBATH SWITCH • To activate the Sabbath Mode feature, raise the top grille panel and set the Sabbath Mode switch to the ON position. • When the refrigerator is in Sabbath mode, a green LED light will be visible. On Side-by-Side Refrigerators, the green light will be visible between the top grille panel and the refrigerator door. On Bottom-Freezer Refrigerators, the green light may not be visible with the top grille panel closed. If you are not sure if the unit is in Sabbath Mode, raise the grille panel to see if the green light is on. On/Off LED PARTS INCLUDED TECHNICAL DATA Sabbath Switchbox 2 Self-Piercing Screws 4 Wire Ties TOOLS AND MATERIALS NEEDED Stepladder or Stool Phillips Head Screwdriver 4 Sabbath Mode Product Kit Technical Data Sheet (Place with refrigerator’s Technical Data Sheet for future use) Installation Instructions INSTALLING SABBATH MODE SWITCHBOX Side-by-Side Refrigerators “R” Models Only If your Side-by-Side refrigerator is an “X” model, go to page 8. MOUNT SWITCHBOX • FOR PERSONAL SAFETY: Unplug the refrigerator, remove house fuse or open circuit breaker before beginning installation. • Open the grille panel. • Place a sheet or towel over the top of the fresh food and freezer doors to prevent accidentally scratching the door panels. • Place the switchbox against the evaporator housing to the left of the main control board cover (on 36" and 42" models) or to the right of the main control board cover (on 48" models). Make sure the green LED light on the side of the switchbox is pointing DOWN. Sabbath Switchbox Mounting Location 48" Models Sabbath Switchbox Mounting Location 36" & 42" Models AC Connector Wire • Mount the switchbox to the evaporator housing using the two self-tapping screws included with the kit. IMPORTANT: DO NOT DRILL HOLES IN THE EVAPORATOR HOUSING. USE THE SELF-TAPPING SCREWS SUPPLIED WITH THE KIT. If desired, the top of the switchbox can be mounted using a screw from one of the plastic wire straps at the top of the evaporator housing. Screws Green LED Light DC Connector Wire 48" Model Shown 5 Installation Instructions INSTALLING SABBATH MODE SWITCHBOX Side-by-Side Refrigerators “R” Models Only (cont.) MAKING ELECTRICAL CONNECTIONS • Locate the Refrigerator’s AC Input and Output connectors to the upper right of the evaporator housing. • Disconnect the refrigerator’s AC Input and Output connectors from each other. NOTE: If possible, try to avoid exposing the wires attached to the refrigerator’s AC connectors. • Connect the switchbox AC Input connector to the refrigerator’s AC Input connector. • Connect the switchbox AC Output connector to the refrigerator’s AC Output connector. Refrigerator AC Connectors Refrigerator AC Connectors Kit AC Connectors Kit AC Output Connector (3 prongs) Kit AC Input Connector (3 holes) 48" Model Shown • Locate the refrigerator’s DC Input and Output connectors to the lower right of the evaporator housing. • Disconnect the refrigerator’s DC Input and Output connectors from each other. Connector 6 Installation Instructions MAKING ELECTRICAL CONNECTIONS (cont.) Refrigerator DC Connectors • Connect the switchbox DC Input connector to the refrigerator’s DC Input connector. • Connect the switchbox DC Output connector to the refrigerator’s DC Output connector. Kit DC Input Connector (2 holes) Kit DC Output Connector (2 prongs) Kit DC Connectors • Route the switchbox wires through the wire straps already attached to the evaporator housing. Arrange the connectors as far back in the refrigerator as possible. If necessary, use the wire ties included with the kit to dress the wires. • Cover any exposed wiring on the refrigerator connectors with UL approved electrical tape. 48" Model Shown • Write the installation date on the ZSAB1 switchbox. • Place the Sabbath Mode Product Kit Technical Data Sheet with the refrigerator’s Technical Data Sheet for future use. • Close grille panel. • Replace house fuses or reset circuit breaker. WARNING: No wires are to be exposed. Wire Strap 36" & 42" Models 48" Models OPERATION CHECKLIST With the Sabbath Switch set to OFF: Make sure the green LED light is off. Make sure the dispenser is operating normally. Listen to make sure the compressor is running. Open the fresh food and freezer doors and confirm that the interior lights, the temperature display and the Climate Control Drawer all operate normally. If the interior lights do not come on, the Master Light Switch may have been accidentally set to the OFF position. Make sure the Master Light Switch is in the ON position. With the Sabbath Switch set to ON: Listen to make sure the compressor is running. Confirm that the kit wires are properly routed and that no AC wires are exposed at the unit connector side. Use UL approved electrical tape to cover wires completely. Confirm that the Sabbath Mode Product Kit Technical Data Sheet has been placed with the refrigerator’s Technical Data Sheet for future use. Confirm that the installation date has been written on the ZSAB1 switchbox. Leave the Installation Instructions with the consumer for future use. Make sure the green LED light is on. Open the fresh food and freezer doors to make sure the lights do not come on and the temperature and Climate Control Drawer displays do not come on. Press the temperature and Climate Control Drawer controls to make sure they do not light up or beep. Try to dispense water or ice from the dispenser. Ice or water should not dispense. Press the dispenser controls to make sure they do not light up. 7 Installation Instructions INSTALLING SABBATH MODE SWITCHBOX Side-by-Side Refrigerators “X” Models Only If your Side-by-Side refrigerator is an “R” model, go to page 5. MOUNT SWITCHBOX • FOR PERSONAL SAFETY: Unplug the refrigerator, remove house fuse or open circuit breaker before beginning installation. • Open the grille panel. • Place a sheet or towel over the top of the fresh food and freezer doors to prevent accidentally scratching the door panels. • Remove the water filter. • Remove the 2 screws that secure the water filter bracket. Remove the bracket to expose the wiring harnesses. Sabbath Switchbox Mounting Location Sabbath Switchbox Mounting Location 8 Installation Instructions MAKING ELECTRICAL CONNECTIONS • Locate the Refrigerator’s AC Input and Output connectors to the upper right of the evaporator housing. • Disconnect the refrigerator’s AC Input and Output connectors from each other. NOTE: If possible, try to avoid exposing the wires attached to the refrigerator’s AC connectors. • Connect the switchbox AC Input connector to the refrigerator’s AC Input connector. • Connect the switchbox AC Output connector to the refrigerator’s AC Output connector. Refrigerator AC Connectors Refrigerator AC Connectors Kit AC Connectors Kit AC Output Connector (3 prongs) Kit AC Input Connector (3 holes) • Locate the refrigerator’s DC Input and Output connectors to the lower right of the evaporator housing. • Disconnect the refrigerator’s DC Input and Output connectors from each other. • Connect the switchbox DC Input connector to the refrigerator’s DC Input connector. • Connect the switchbox DC Output connector to the refrigerator’s DC Output connector. Kit DC Input Connector (2 holes) Kit DC Output Connector (2 prongs) • Route the switchbox wires through the wire straps already attached to the evaporator housing. Arrange the connectors as far back in the refrigerator as possible. If necessary, use the wire ties included with the kit to dress the wires. • Cover any exposed wiring on the refrigerator connectors with UL approved electrical tape. Refrigerator DC Connectors WARNING: No wires are to be exposed. Kit DC Connectors 9 Installation Instructions INSTALLING SABBATH MODE SWITCHBOX Side-by-Side Refrigerators “X” Models Only (cont.) MAKING ELECTRICAL CONNECTIONS (cont.) • Replace the water filter bracket and water filter. • Place the switchbox against the evaporator housing to the left of the main control board cover (on 36" and 42" models) or to the right of the main control board cover (on 48" models). Make sure the green LED light on the side of the switchbox is pointing DOWN. • Mount the switchbox to the evaporator housing using the two self-tapping screws included with the kit. IMPORTANT: DO NOT DRILL HOLES IN THE EVAPORATOR HOUSING. USE THE SELF-TAPPING SCREWS SUPPLIED WITH THE KIT. If desired, the top of the switchbox can be mounted using a screw from one of the plastic wire straps at the top of the evaporator housing. • Write the installation date on the ZSAB1 switchbox. • Place the Sabbath Mode Product Kit Technical Data Sheet with the refrigerator’s Technical Data Sheet for future use. • Close grille panel. • Replace house fuses or reset circuit breaker. Screws Green LED Light DC Connector Wire OPERATION CHECKLIST With the Sabbath Switch set to OFF: Make sure the green LED light is off. Make sure the dispenser is operating normally. Listen to make sure the compressor is running. Open the fresh food and freezer doors and confirm that the interior lights, the temperature display and the Climate Control Drawer all operate normally. If the interior lights do not come on, the Master Light Switch may have been accidentally set to the OFF position. Make sure the Master Light Switch is in the ON position. With the Sabbath Switch set to ON: Listen to make sure the compressor is running. Confirm that the kit wires are properly routed and that no AC wires are exposed at the unit connector side. Use UL approved electrical tape to cover wires completely. Confirm that the Sabbath Mode Product Kit Technical Data Sheet has been placed with the refrigerator’s Technical Data Sheet for future use. Confirm that the installation date has been written on the ZSAB1 switchbox. Leave the Installation Instructions with the consumer for future use. Make sure the green LED light is on. Open the fresh food and freezer doors to make sure the lights do not come on and the temperature and Climate Control Drawer displays do not come on. Press the temperature and Climate Control Drawer controls to make sure they do not light up or beep. Try to dispense water or ice from the dispenser. Ice or water should not dispense. Press the dispenser controls to make sure they do not light up. 10 Installation Instructions INSTALLING SABBATH MODE SWITCHBOX Bottom-Freezer Refrigerators “R” Models Only If your Bottom-Freezer refrigerator is an “X” model, go to page 14. MOUNT SWITCHBOX • FOR PERSONAL SAFETY: Unplug the refrigerator, remove house fuse or open circuit breaker before beginning installation. • Open the grille panel. • Place a sheet or towel over the top of the fresh food door to prevent accidentally scratching the door panel. Sheet or Towel AC Connector Wire • Place the switchbox against the left side of the grille panel opening, placing the switchbox as far toward the front of the refrigerator as possible. – Make sure to leave clearance for the door hinge (if necessary). – Make sure the green LED light on the side of the switchbox is pointing DOWN. • Mount the switchbox using the two self-tapping screws included with the kit. IMPORTANT: DO NOT DRILL HOLES IN THE SIDE OF THE REFRIGERATOR. USE THE SELF-TAPPING SCREWS SUPPLIED WITH THE KIT. Screws DC Connector Wire MAKING ELECTRICAL CONNECTIONS • Locate the refrigerator’s AC Input and Output connectors to the right of the water filter. • Disconnect the refrigerator’s AC Input and Output connectors from each other. NOTE: If possible, try to avoid exposing the wires attached to the refrigerator’s AC connectors. Refrigerator AC Connectors 11 Green LED Light Installation Instructions INSTALLING SABBATH MODE SWITCHBOX Bottom-Freezer Refrigerators “R” Models Only (cont.) MAKING ELECTRICAL CONNECTIONS (cont.) • Connect the switchbox AC Input connector to the refrigerator’s AC Input connector. • Connect the switchbox AC Output connector to the refrigerator’s AC Output connector. Kit AC Connectors Kit AC Output Connector (3 prongs) Refrigerator AC Connectors Kit AC Input Connector (3 holes) Refrigerator DC Connectors • Locate the refrigerator’s DC Input and Output connectors to the left of the compressor. • Disconnect the refrigerator’s DC Input and Output from each other. Refrigerator DC Connectors • Connect the switchbox DC Input connector to the refrigerator’s DC Input connector. • Connect the switchbox DC Output connector to the refrigerator’s DC Output connector. Kit DC Input Connector (2 holes) Kit DC Connectors Kit DC Output Connector (2 prongs) 12 Installation Instructions MAKING ELECTRICAL CONNECTIONS (cont.) • Route the wires for the AC connectors over the water filter. Route the wires for the DC connectors under the door trim. If necessary, use the wire ties included with the kit to dress the wires. Water Filter NOTE: Make sure the door hinge does not pinch the wires hanging down from the switchbox when closing the door. • Cover any exposed wiring on the refrigerator connectors with UL approved electrical tape. WARNING: No wires are to be exposed. • Write the installation date on the ZSAB1 switchbox. • Place the Sabbath Mode Product Kit Technical Data Sheet with the refrigerator’s Technical Data Sheet for future use. • Close the grille panel. • Replace house fuses or reset circuit breaker. Make sure door hinge does not pinch wires when closing the door. Door Trim OPERATION CHECKLIST With the Sabbath Switch set to OFF: Make sure the green LED light is off. Listen to make sure the compressor is running. Open the fresh food door and freezer drawer and confirm that the interior lights and the temperature display operate normally. If the interior lights do not come on, the Master Light Switch may have been accidentally set to the OFF position. Make sure the Master Light Switch is in the ON position. With the Sabbath Switch set to ON: Confirm that the Sabbath Mode Product Kit Technical Data Sheet has been placed with the refrigerator’s Technical Data Sheet for future use. Confirm that the installation date has been written on the ZSAB1 switchbox. Leave the Installation Instructions with the consumer for future use. Make sure the green LED light is on. Open the fresh food door and freezer drawer to make sure the lights do not come on and the temperature display does not come on. Listen to make sure the compressor is running. Confirm that the kit wires are properly routed and that no AC wires are exposed at the unit connector side. Use UL approved electrical tape to cover wires completely. 13 Installation Instructions INSTALLING SABBATH MODE SWITCHBOX Bottom-Freezer Refrigerators “X” Models Only If your Bottom-Freezer refrigerator is an “R” model, go to page 11. MOUNT SWITCHBOX • FOR PERSONAL SAFETY: Unplug the refrigerator, remove house fuse or open circuit breaker before beginning installation. • Open the grille panel. • Place a sheet or towel over the top of the fresh food door to prevent accidentally scratching the door panel. Sheet or Towel • Place the switchbox against the left side of the grille panel opening, placing the switchbox as far toward the front of the refrigerator as possible. – Make sure to leave clearance for the door hinge (if necessary). – Make sure the green LED light on the side of the switchbox is pointing DOWN. • Mount the switchbox using the two self-tapping screws included with the kit. IMPORTANT: DO NOT DRILL HOLES IN THE SIDE OF THE REFRIGERATOR. USE THE SELF-TAPPING SCREWS SUPPLIED WITH THE KIT. AC Connector Wire Screws DC Connector Wire 14 Green LED Light Installation Instructions MAKING ELECTRICAL CONNECTIONS Kit AC Connectors • Connect the switchbox AC Input connector to the refrigerator’s AC Input connector. • Connect the switchbox AC Output connector to the refrigerator’s AC Output connector. Kit AC Output Connector (3 prongs) Refrigerator AC Connectors Kit AC Input Connector (3 holes) • Locate the refrigerator’s DC Input and Output connectors to the left of the compressor. • Disconnect the refrigerator’s DC Input and Output from each other. Refrigerator DC Connectors Refrigerator DC Connectors • Connect the switchbox DC Input connector to the refrigerator’s DC Input connector. • Connect the switchbox DC Output connector to the refrigerator’s DC Output connector. Kit DC Input Connector (2 holes) Kit DC Connectors Kit DC Output Connector (2 prongs) 15 Installation Instructions INSTALLING SABBATH MODE SWITCHBOX Bottom-Freezer Refrigerators “X” Models Only (cont.) MAKING ELECTRICAL CONNECTIONS (cont.) • Route the wires for the AC connectors over the water filter. Route the wires for the DC connectors under the door trim. If necessary, use the wire ties included with the kit to dress the wires. NOTE: Make sure the door hinge does not pinch the wires hanging down from the switchbox when closing the door. • Cover any exposed wiring on the refrigerator connectors with UL approved electrical tape. Water Filter Make sure door hinge does not pinch wires when closing the door. WARNING: No wires are to be exposed. Door Trim • Write the installation date on the ZSAB1 switchbox. • Place the Sabbath Mode Product Kit Technical Data Sheet with the refrigerator’s Technical Data Sheet for future use. • Close the grille panel. • Replace house fuses or reset circuit breaker. OPERATION CHECKLIST With the Sabbath Switch set to OFF: Make sure the green LED light is off. Listen to make sure the compressor is running. Open the fresh food door and freezer drawer and confirm that the interior lights and the temperature display operate normally. If the interior lights do not come on, the Master Light Switch may have been accidentally set to the OFF position. Make sure the Master Light Switch is in the ON position. With the Sabbath Switch set to ON: Confirm that the Sabbath Mode Product Kit Technical Data Sheet has been placed with the refrigerator’s Technical Data Sheet for future use. Confirm that the installation date has been written on the ZSAB1 switchbox. Leave the Installation Instructions with the consumer for future use. Make sure the green LED light is on. Open the fresh food door and freezer drawer to make sure the lights do not come on and the temperature display does not come on. Listen to make sure the compressor is running. Confirm that the kit wires are properly routed and that no AC wires are exposed at the unit connector side. Use UL approved electrical tape to cover wires completely. 16 Installation Instructions INSTALLING SABBATH MODE SWITCHBOX All-Refrigerators and All-Freezers “X” Models Only REMOVE GRILLES IN ALL-REFRIGERATOR • FOR PERSONAL SAFETY: Unplug the refrigerator, remove house fuse or open circuit breaker before beginning installation. • Open the grille panel. • Place a sheet or towel over the top of the fresh food door to prevent accidentally scratching the door panel. • Use a 1/4" hex driver and remove the 2 screws at the bottom of the grille. Pull the bottom of the grille forward, down and out to remove. • Remove the 2 screws securing the wire grille that is over the main switch. Screws ALL-REFRIGERATORS REMOVE GRILLES IN ALL-FREEZERS • FOR PERSONAL SAFETY: Unplug the freezer, remove the house fuse or open the circuit breaker before beginning installation. • Open the grille panel. • Place a sheet or towel over the top of the door to prevent accidentally scratching the door panels. • Remove the water filter as instructed in the unit installation instructions. • Use a 1/4" hex driver and remove the 2 screws from the bracket behind the water filter and the 2 screws at the bottom of the grille. Remove the grille. • Remove the 2 screws that attach the front grille to the back grille. Water Filter ALL-FREEZERS Remove 4 screws 17 Installation Instructions INSTALLING SABBATH MODE SWITCHBOX All-Refrigerators and All-Freezers “X” Models Only INSTALL SWITCHBOX TO BRACKET • Use a flat screwdriver to pry up the tabs on the front bracket you have removed. • Use needle nose pliers to straighten these tabs. • Attach the Sabbath Mode Switchbox to these bracket tabs using the screws provided. • ALL-FREEZER MODELS: Reinstall the second portion of the bracket that was removed earlier. MAKING ELECTRICAL CONNECTIONS • Locate the refrigerator’s AC Input and Output connectors to the right of the water filter. • Disconnect the refrigerator’s AC Input and Output connectors from each other. NOTE: If possible, try to avoid exposing the wires attached to the refrigerator’s AC connectors. Refrigerator AC Connectors 18 Installation Instructions MAKING ELECTRICAL CONNECTIONS (cont.) • Connect the switchbox AC Input connector to the refrigerator’s AC Input connector. • Connect the switchbox AC Output connector to the refrigerator’s AC Output connector. Kit AC Connectors Kit AC Output Connector (3 prongs) Kit AC Input Connector (3 holes) Refrigerator AC Connectors • Locate the refrigerator’s DC Input and Output connectors to the left of the compressor. • Disconnect the refrigerator’s DC Input and Output from each other. Refrigerator DC Connectors • Connect the switchbox DC Input connector to the refrigerator’s DC Input connector. • Connect the switchbox DC Output connector to the refrigerator’s DC Output connector. Refrigerator DC Connectors Kit DC Input Connector (2 holes) Kit DC Output Connector (2 prongs) Kit DC Connectors 19 Installation Instructions INSTALLING SABBATH MODE SWITCHBOX All-Refrigerators and All-Freezers “X” Models Only INSTALL SWITCHBOX AND BRACKET • Reinstall the bracket(s) using screws removed earlier. Make sure the wires go OVER the bracket and out of the way before installing. NOTE: Make sure the door hinge does not pinch the wires hanging down from the switchbox when closing the door. • Cover any exposed wiring on the refrigerator connectors with UL approved electrical tape. WARNING: No wires are to be exposed. • Write the installation date on the ZSAB1 switchbox. • Place the Sabbath Mode Product Kit Technical Data Sheet with the refrigerator’s Technical Data Sheet for future use. • Reinstall the grille on All-Refrigerator models in the same manner as it was removed. • Close the grille panel. • Replace the house fuses or reset the circuit breaker. • Lower the grille panel. All-Freezer model shown OPERATION CHECKLIST With the Sabbath Switch set to OFF: Make sure the green LED light is off. Listen to make sure the compressor is running. Open the door and confirm that the interior lights and the temperature display operate normally. If the interior lights do not come on, the Master Light Switch may have been accidentally set to the OFF position. Make sure the Master Light Switch is in the ON position. With the Sabbath Switch set to ON: Confirm that the Sabbath Mode Product Kit Technical Data Sheet has been placed with the refrigerator’s Technical Data Sheet for future use. Confirm that the installation date has been written on the ZSAB1 switchbox. Leave the Installation Instructions with the consumer for future use. Make sure the green LED light is on. Open the fresh food door and freezer drawer to make sure the lights do not come on and the temperature display does not come on. Listen to make sure the compressor is running. Confirm that the kit wires are properly routed and that no AC wires are exposed at the unit connector side. Use UL approved electrical tape to cover wires completely. 20 Consumer Information FREQUENTLY ASKED QUESTIONS • How long can I run my refrigerator in Sabbath Mode? We recommend against running the refrigerator for longer than 4 days at a time in Sabbath mode, as the overall cooling capability of the refrigerator may be affected. • Can I use Sabbath Mode in a hot or humid environment? Yes. • Why do Quick Chill and Express Chill not work while the refrigerator is in Sabbath Mode? The Quick Chill and Express Chill features are disabled during Sabbath Mode. • How will a power outage affect Sabbath Mode? Once the power returns, the refrigerator will automatically return to Sabbath Mode. • How will Sabbath Mode affect the temperature settings? The temperature settings of the refrigerator will remain unchanged when turning Sabbath Mode on or off. • What will happen if I touch the controls while the refrigerator is in Sabbath Mode? Touching the controls while in Sabbath Mode will not affect the refrigerator settings. All control pads and displays are disabled during Sabbath Mode. • How do I get ice while the refrigerator or All-Freezer is in Sabbath Mode? Any ice made by icemaker will remain frozen and will be available in the ice storage bin. For additional ice, use ice trays. • Why are the interior lights not working when I turn the Sabbath Switch OFF? The Master Light Switch may have accidentally been set to OFF. The Master Light Switch must be turned ON for the interior lights to function properly. Refer to the refrigerator’s Owner’s Manual for the location of the switch. • Why won’t the icemaker in my Side-by-Side refrigerator or All-Freezer work after turning the Sabbath Mode feature off? Make sure the icemaker power switch is in the I (on) or ON position. The Sabbath Mode switch does not affect or control the icemaker on Side-by-Side refrigerator and All-Freezer models. Instead, the icemaker is disabled by opening the ice bin and setting the icemaker power switch to O (off) or OFF. To resume normal automatic ice production, open the ice bin and set the icemaker power switch to I (on) or ON. 21 Notes 22 Notes 23 Consumer Information WARRANTY Staple sales slip or canceled check here. Proof of original purchase date is needed to obtain service under warranty. WHAT IS COVERED From the Date of the Original Purchase • FULL TWO-YEAR WARRANTY For two years from date of original purchase, we will provide, free of charge, parts and service labor in your home to repair or replace any part of the Sabbath Mode Product Kit that fails because of a manufacturing defect. This warranty is extended to the original purchaser and any succeeding owner for products purchased for ordinary home use in the 48 mainland states, Hawaii, Washington, D.C. or Canada. In Alaska the warranty is the same except that it is LIMITED because you must pay to ship the product to the service shop or for the service technician’s travel costs to your home. All warranty service will be provided by our factory Service Centers or by our authorized Customer Care® servicers during normal working hours. Should your appliance need service, during warranty period or beyond, in the U.S.A call 800.444.1845. In Canada: 800.561.3344. WHAT IS NOT COVERED: • Service trips to your home to teach you how to use the product. • Replacement of house fuses or resetting of circuit breakers. • Damage to the product caused by accident, fire, floods or acts of God. • Failure of the product if it is used for other than its intended purpose or used commercially. • Improper installation, delivery or maintenance. • Loss of food due to spoilage (in the U.S.A. only). • Incidental or consequential damage caused by possible defects with this appliance. Some states/provinces do not allow the exclusion or limitation of incidental or consequential damages, so the above limitation or exclusion may not apply to you. This warranty gives you specific legal rights, and you may also have other rights which vary from state to state/province to province. To know what your legal rights are in your state/province, consult your local or state/provincial consumer affairs office or your state’s Attorney General. Warrantor in U.S.A.: General Electric Company, Louisville, KY 40225 Warrantor in Canada: Mabe Canada Inc. GE Consumer & Industrial Pub. No. 31-46147-1 Part No. 224D2401P001 09-08 JR Printed in the United States Appliances General Electric Company Louisville, KY 40225 ge.com