1
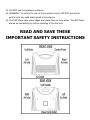
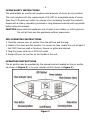
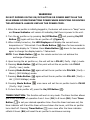
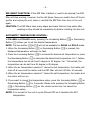
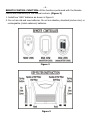
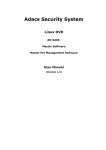
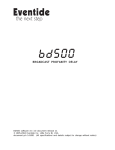
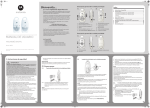
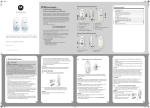
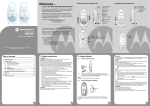
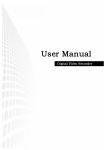
2 in 1 AIR PURIFIER
INFRARED ZONE HEATING SYSTEM with ELECTROSTATIC
COLLECTOR AND HEATER
OWNER’S MANUAL
Model No. ATI-HPE-PD
www.advancedtechinfrared.com
READ AND SAVE THESE
IMPORTANT SAFETY INSTRUCTIONS
► Read carefully before attempting to assemble, install, operate or
maintain the appliance.
► Protect yourself and others by observing all safety information.
► Failure to comply with instruction could result in personal injury and/or
property damage.
► Retain instruction for future reference.
When using electrical appliances, basic precautions should always be followed to
reduce the risk of fire, electric shock and injury to persons, including the following:
1. Read all instructions before using the appliance. Use this appliance only as
described in this manual. Any other use not recommended by the manufacturer
may cause fire, electrical shock, or injury to persons.
2. To avoid fire or shock hazard, plug the appliance directly into an exact AC
electrical outlet. Make certain that the power source conforms to the electrical
requirements of appliance.
3. Keep the cord out of heavy traffic areas. To avoid fire hazard, NEVER put the cord
under rugs, near heat registers, radiator, stoves, or heaters.
4. To protect against electrical hazards, DO NOT immerse in water or other liquids.
Do not use near water.
5. Extreme caution is necessary when any appliance is used by or near children, or
invalids and whenever the appliance is left operating unattended. Children should
be supervised to ensure that they do not play with the appliance.
6. Always unplug the air purifier before moving it, opening the grill, changing filters,
cleaning, or whenever the air purifier is not in use. Be sure to pull by the plug and
not the cord.
7. Where possible, avoid to use of extension cords because the extension cord may
overheat and cause a risk of fire. Never use a single extension cord to operate
more than one appliance.
8. DO NOT operate any appliance with a damaged cord or plug or, if motor fan fails
to rotate, after the appliance malfunctions, or if it has been dropped or damaged
in any manner. Return appliance to manufacturer for examination, electrical or
mechanical adjustment, or repair.
-1-
9. NEVER insert or allow fingers or foreign objects to enter any ventilation or exhaust
opening as it may cause an electric shock or fire or damage the appliance.
Do not block or tamper with the appliance in any manner while it is in operation.
10. Use appliance only for intended household use as described in this manual. Any
other use not recommended by the manufacturer may cause fire, electric shock,
or injury to persons.
11. NEVER block the air openings, grilles/outlets or place on a soft surface such as a
bed or sofa, as this could cause the unit to tip over, blocking the air Intake
opening.
12. Always place the appliance on a stable, flat, level surface when operating, to
avoid the chance of the appliance overturning. Locate the power cord so the
appliance or other objects are not resting on it. Do not run power cord under
carpeting. Do not cover power cord with throw rugs, runners, or the like. Arrange
power cord away from room traffic and where it will not be tripped over.
13. This appliance is hot when use in heating mode. To avoid burns, do not let bare
skin touch hot surfaces. Always use handle when moving this appliance. Keep
combustible materials, such as furniture, pillows, bedding, papers, clothes and
curtains at least 0.9m from the front of the heater and keep them at least 0.3m
from the sides and rear.
14. This appliance has hot and arcing or sparking parts inside. It must not be used in
potentially dangerous locations such as flammable, explosive, chemical-laden or
wet atmosphere.
15. This appliance is not intended for use in wet or damp locations. Never locate a
appliance where it may fall into a bathtub or other water container.
16. Do not use this appliance in the immediate surroundings of a bath, a shower or a
swimming pool.
17. WARNING: In order to avoid overheating, do not cover the appliance.
18. The appliance must not be located immediately below a socket- outlet.
19. Keep unit away from heated surfaces and open flames.
20. DO NOT place anything on top of unit.
21. DO NOT attempt to repair or adjust any electrical or mechanical functions on
this unit. Doing so will void your warranty. The inside of the unit contains no user
serviceable parts. All servicing should be performed by qualified personnel only.
-2–
22. DO NOT use the appliance outdoors.
23. WARNING: To reduce the risk of fire or electric shock, DO NOT use this air
purifier with any solid-state speed control device.
24. The ESP filters have many edges and areas that can trap water. The ESP filters
should be completely dry before installing it into the unit.
READ AND SAVE THESE
IMPORTANT SAFETY INSTRUCTIONS
-3OZONE SAFETY INSTRUCTIONS
The electrostatic air purifier will produce small amounts of ozone as a by-product.
This unit complies with the requirements of UL 867 for acceptable levels of ozone
(less than 0.05 parts per million by volume of air circulating through the product).
People with a history respiratory problems or lung disease should consult a physician
before using this product.
CAUTION: Keep electrical appliances out of reach from children or infirm persons.
Do not let them use the appliances without supervision.
PRE-OPERATING INSTRUCTIONS
1. Carefully remove your air purifier from the gift box and the bag.
2. Select a firm level and flat location. For proper air flow, locate the unit at least 3
feet (1M) from any wall or furniture. Ensure no grilles are blocked.
3. Plug the power cord into a 120V AC outlet.
4. Always lift your air purifier by the handle of the unit.
OPERATING INSTRUCTIONS
The air purifier may be operated by the manual controls located on the air purifier
(as shown in Figure 1) or by your remote control (shown in Figure 2).
Figure 1
-4-
WARNING!
DO NOT DEPEND ON THE ON/OFF BUTTON OR POWER SWITCH AS THE
SOLE MEANS OF DISCONNECTING POWER WHEN SERVICING OR MOVING
THE APPLIANCE. ALWAYS UNPLUG THE POWER CORD.
1. When the air purifier is initially plugged in, the buzzer will come on a “beep” voice
and Power Indicator will remain lit indicating that there is power to the unit.
2. Turn the air purifier on by pressing On/Off Button (
Button (
) and pressing On/Off
) again will turn the air purifier off. (Figure 1)
3. When initially turned on, the LED Displayer will display the current room
temperature in ° Fahrenheit. Press Mode Button (
) down for two seconds to
change the display to ° Celsius. Press Mode Button (
again to change the display back to ° Fahrenheit.
) down for two seconds
NOTE: Press Mode Button ( ) on the remote control can not achieve the
exchange of temperature.
4. Upon turning the air purifier on, the unit will be in PU:HI ( Purify : High ) mode.
5. Pressing Mode Button (
( Purify : Low ) mode.
) at this point will set the air purifier into PU:LO
6. Pressing Mode Button ( ) again will set the air purifier into PU+WA ( Purify +
Warm ) (900 Wattage) mode.
7. Pressing Mode Button ( ) again will set the air purifier into PU+HO ( Purify +
Hot ) (1500 Wattage) mode.
8. Pressing Mode Button (
( Purify : High ) mode.
) once more will set the air purifier back to PU:HI
9. To turn the air purifier off, press the On/Off Button (
).
TIMER FUNCTION: This function will work in any mode. The timer function allows
you to set the length of operation from 1 hour (1H) to 8 hours (8H). Press Timer
Button ( ) to set your desired operation time. Once the timer has been set, the
timer indicator will lit and the timer will count down the hours, until the air purifier
turns itself off. Pressing Timer Button ( ) once more after the timer indicator
reflects 8 hours (8H) will reset the air purifier to continuous running.
-5ESP RESET FUNCTION: If the ESP filter is defect or need to be cleaned, the ESP
filter will stop working, however, the fan still blows. Now you need to turn off the air
purifier and unplug the unit, clean or reinstall the ESP filter then turn on the unit
again.
CAUTION: The ESP filters have many edges and areas that can trap water after
washing so they should be completely dry before installing into the unit.
AUTOMATIC TEMPERATURE CONTROL:
In PU+WA and PU+HO mode, pressing the Increasing Button (
Button (
) or Decreasing
) allows you to set the desired temperature.
NOTE: The two button (
&
) will not be available for PU:HI and PU:LO mode.
1. When the Increasing Button ( ) or Decreasing Button (
displayed temperature will begin to flash.
2. Press the Increasing Button (
) is pressed, the
) to increase the desired set temperature or press
the Decreasing Button ( ) to decrease the desired set temperature. For ° Celsius,
the temperature can be set from 5 degree to 30 degree. For ° Fahrenheit, the
temperature can be set from 40 degree to 85 degree.
3. When the air temperature reaches 2° above the set temperature, the heater will
shut off at once and the motor and the ESP filter will shut off after 15 seconds.
4. When the air temperature reaches 1° below the set temperature, the heater and
the motor will turn on.
5. If you want to cancel the temperature setup, press the Increasing Button (
Decreasing Button (
) for 2 seconds. Please note pressing the Increasing Button
( ) or Decreasing Button (
temperature setup.
) on the remote control can not cancel the
NOTE: It is normal for the unit to cycle ON and OFF as it maintains the SET
temperature.
) or
-6REMOTE CONTROL FUNCTION: All the functions performed with the Remote
Control work identically to the manual controls. (Figure 2)
1. Install two “AAA” batteries as shown in Figure 2.
2. Do not mix old and new batteries. Do not mix alkaline, standard (carbon-zinc) or
rechargeable (nickel-cadmium) batteries.
Figure 2
Figure 3
-7REMOVING/CLEANING/INSTALLING PRE-FILTERS (See Figure 3)
● To remove air inlet covers
1. Turn off and unplug the unit;
2. Press the spring buttons and take off the air inlet covers from the unit. The
pre-filters are attached on the air inlet covers. (See Figure 3 and consult the
indication of arrow)
● To clean pre-filters
1. Clean pre-filters with the vacuum brush attachment of your vacuum cleaner.
This will remove lint and dirt from the filter;
2. Use a clean, damp, soft cloth to wipe the pre-filters again.
● To install air inlet covers
1. Direct the air inlet covers bottom toward the hooks on the bottom-side of the unit;
2. Install the air inlet covers to the unit by gripping and pressing the spring buttons;
3. Ensure the air inlet covers are flush with the surrounding surface and securely
latch in place.
REMOVING/CLEANING/INSTALLING ESP FILTERS (See Figure 3)
1. Turn off and unplug the unit;
2. Press the spring buttons and take off the air inlet covers from the unit.
3. With the air inlet covers removed, grip the handles of ESP filters and pull them out.
Wash and use a soft, damp cloth to wipe the ESP filters.
4. Ensure the ESP filters are completed dry before they are inserted back to the unit.
5. Install the air inlet covers to the unit and ensure the air inlet covers are flush with
the surrounding surface and securely latch in place.
NOTE: Clean the ESP filters every 2-3 weeks, sooner if needed.
CAUTION: The ESP filters have many edges and areas that can trap water after
washing so they should be completely dry before installing into the unit.
--- For tobacco smoke or particles that are not easily removed
1. Remove the ESP filters from unit as described above;
2. Use a scrub sponge coated with a mild soap or water solution and wipe the ESP
filters from top to bottom;
3. Wipe down the ESP filters with a damp cloth and ensure that no soap residue
remains on the ESP filters and they are completely dry.
-84. Insert the ESP filters back into the unit.
NOTE: The product may experience some discoloration on ESP filters over time.
This is normal and does not affect the performance of the product in any way.
CLEANING AND MAINTENANCE THE UNIT
1. The unit should be checked at least once every week and the pre-filter should be
cleaned every week. More frequent cleaning may be required depending upon
environmental conditions.
2. Clean the pre-filter as REMOVING/CLEANING/INSTALLING PRE-FILTERS.
3. Clean the ESP filters every 2-3 weeks as REMOVING/CLEANING/
INSTALLING ESP FILTERS.
4. If ESP Reset Indicator illuminates, you need to turn off the unit and unplug it,
then check or clean the ESP filters as REMOVING/CLEANING/
INSTALLING ESP FILTERS.
5. Use a clean, dry, soft cloth to wipe the external surface of unit.
NOTE: Do not stick any foreign objects or your fingers inside the unit.
CAUTION: Do not use gasoline, benzine, thinner, harsh cleaners, etc., as
they will damage the product. NEVER use ALCOHOL OR SOLVENTS.
SAFETY FEATURE
1. A thermal overload protector is built in to prevent overheating.
2. When an overheat temperature is reached, the product will be automatically shut
off. It can only resume operation when the user resets the unit.
To Reset Heater:
1. Unplug the unit and wait 10 minutes for the heater to cool down.
2. After the heater has cooled down, plug the unit into an exact AC electrical outlet
and follow the operation instructions described in this manual.
-9TROUBLE SHOOTING TIPS
If the product shuts off unexpectedly, safety features may have been activated to
prevent damage or injury. If this happens:
1. Be sure the product is plugged into a working electrical outlet;
2. Check to be sure the ESP filters is firmly seated in place;
3. Check to be sure the air inlet covers are latched firmly in place.
NOTE: IF YOU CONTINUE TO EXPERIENCE A PROBLEM, PLEASE RETURN THE
PRODUCT TO THE PLACE OF ORIGINAL PURCHASE OR SEE YOUR WARRANTY. DO
NOT ATTEMPT TO TAKE APART THE UNIT BY YOURSELF. DOING SO MAY
VOID YOUR WARRANTY AND CAUSE DAMAGE TO THE PRODUCT OR PERSONAL
INJURY.
- 10 -