
1
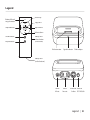
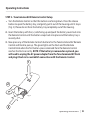
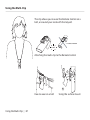
User Manual
TuneCommand™ AV for iPod®
Introduction
Designed to let you roam and control your audio and video content from virtually
anywhere in your home, TuneCommand AV delivers the flexibility and convenience that
iPod users desire. Using wireless radio frequency technology, TuneCommand AV works
from up to 120 feet away from your stereo. Please review this User Manual carefully so
that you can be sure to get the most from your new Belkin product.
What’s in the Box
TuneCommand AV
Dock for iPod
AC Power Adapter
TuneCommand AV
Remote Control
Introduction | 01
5 Insert Trays
AV Cable
Multi-Clip
Surface-Mount
Hook
Battery
(Model CR 2032)
Lanyard
Adjuster
Lanyard
Legend
Battery-life and
range indicator
Skip backward
Volume up
Play/pause
Skip forward
Volume down
Shuffle button
Repeat button
Battery door
release button
(on the back)
iPod connector
Signal indicator
Dock adapter
Battery door
(on the bottom)
Stereo
AV out
Stereo
line out
Video out Power in
S-video DC 12V/0.8A
Legend | 02
Operating Instructions
STEP 1 - TuneCommand AV Dock Setup
iPod mini
4GB 6GB
1. Place the TuneCommand AV Dock in
the desired location on your home
entertainment system.
�������������������������������������
iPod
20GB
U2 Special Edition
�������������������������������������
2. Insert the barrel plug of the included AC
power adapter into the “power in” port on
the TuneCommand AV Dock. Plug the other
end of the AC power adapter into your wall
socket or surge protector.
����������������������������������������������������
iPod
40GB
�������������������������������������
����������������������������������������������������
iPod with color display
20GB 30GB
U2 Special Edition
�������������������������������������
3. Insert the 3.5mm end of the included AV
cable into the “Stereo AV Out” port on the
TuneCommand AV Dock. Plug the other end
of the AV cable into the input ports on the
back of your TV or stereo receiver.
NOTE: For optional connectivity, you can
use your own 2-RCA-to-2-RCA and S-video
cables in lieu of the included AV cable.
Connecting through the RCA outputs
disables the volume-control functionality of
the Remote Control.
4. Select the appropriate insert tray for your
iPod and insert it into the top well of the
TuneCommand AV Dock (Fig. 1). Inserts for
the iPod video and iPod nano are included
with your purchase of the iPod.
5. Insert the iPod into the
TuneCommand AV Dock.
Operating Instructions | 03
����������������������������������������������������
iPod with color display
40GB 60GB
����������������������������������������������������
SNAP
Fig. 1
Pull up here to remove the insert
Operating Instructions
STEP 2 - TuneCommand AV Remote Control Setup
1. Turn the Remote Control so that the buttons are facing down. Press the release
button to open the battery tray, and gently pull it out of the housing until it stops
(Fig. 2). Please do not force the battery tray completely out of the housing.
2. Insert the battery with the (+) side facing up and push the battery cover back into
the Remote Control until the button snaps back into place and the battery tray is
securely shut.
3. Now press any of the Remote Control’s buttons for the TuneCommand AV Remote
Control and Dock to pair up. The green lights on the Dock and the Remote
Control blink when the first button-press command from the Remote Control
reaches the Dock correctly. NOTE: If the battery is removed or replaced, you
will need to unplug the AC power adapter from the TuneCommand AV Dock
and plug it back in to reestablish connection with the Remote Control.
1
2
Fig. 2
3
Operating Instructions | 04
Operating Instructions
You can now use your TuneCommand AV Remote Control to control the iPod’s play/
pause, skip forward, skip backward, and volume up/down functions. In addition, you
can conveniently control the shuffle and repeat functions, using the two small round
buttons. Each press of a button advances the setting to the next stage. When used with
the iPod video, nano, or photo, TuneCommand AV lets you scroll through your videos
(iPod video only), slideshows, or presentations, wirelessly!
NOTE:
• Slideshows must be started manually on the iPod before the TV will display them
When using the iPod video:
• Videos must be placed in a playlist in order to use the
Remote Control (play/pause, forward/back, etc.)
• The iPod video settings need to be switched to “TV Out > NTSC or PAL”
The shuffle key (
) advances the iPod’s shuffle settings as follows:
shuffle off > shuffle songs > shuffle albums.
The repeat button (
) advances the iPod’s repeat settings like this:
repeat off > repeat one > repeat all.
Follow the icons on the iPod’s screen to see the current settings, represented by small
icons on the upper right, below the battery-status indicator.
Operating Instructions | 05
LED Chart
Every time you push a button on the Remote Control, the green lights on the Remote
Control and the Dock will blink, indicating that the signal has been received correctly.
If the Remote Control and the Dock are too far apart to communicate, the light on the
Remote Control blinks orange (after a short delay) instead of green when you press a
button. The light on the Dock will not blink.
The Remote Control’s battery level is automatically checked after every button press.
If the battery level is low, the Remote Control’s red light will blink, following the green
or amber blink. If you see this happen, the low battery should be replaced soon with a
new one of the same type (CR 2032). Your TuneCommand AV will continue to function
normally until the battery is exhausted.
GREEN
The receiver receives the signal
ORANGE
Out of range
The battery is out
GREEN
Received the signal
LED Chart | 06
Using the Multi-Clip
The clip allows you to wear the Remote Control on a
belt, or around your neck with the lanyard.
Do not slide on
SNAP
Attaching the multi-clip to the Remote Control
�
�
�
�
How to wear on a belt
Using the Multi-Clip | 07
Using the surface mount
Troubleshooting
•
Dock is not powering on when plugged in.
Ensure the AC power adapter is completely plugged into the wall and “power in” port
on the TuneCommand AV Dock. Ensure your iPod is fully inserted into the connector
on the top of the Dock.
•
Remote Control is not powering on.
Ensure that the Remote Control’s battery is inserted correctly, with the (+) facing up,
that the battery tray is fully pushed in, and the release button is snapped
back into position.
• After connecting the Dock and Remote Control, there is no sound.
- Select a song on the iPod and press “PLAY”.
- Make sure the audio cable is correctly plugged into the
TuneCommand AV Dock and the back of the entertainment system.
- When connected to a stereo system, ensure the
stereo system is set to the correct input channel.
- Make sure the iPod and stereo system are powered on.
- Turn up the volume using the TuneCommand AV Remote Control.
- Repeat STEP 1 and STEP 2 of the setup section.
•
The Remote Control does not work after replacing the battery.
After replacing the battery, unplug the power adapter from the TuneCommand AV
Dock and plug it back in to reestablish connection with the Remote Control.
•
The video is playing on my iPod but there is no video on the TV screen.
Make sure the iPod video setting is set to “TV Out > NTSC or PAL”.
Troubleshooting | 08
Specifications
Operating Range: Up to 120 ft. (36.6m)
Transmission Method: Radio frequency
Frequency: 2.44GHz
Remote Battery: CR 2032 3V
Remote Dimensions: 3.5” x 1.5” x 0.5” (8.9cm x 3.8cm x 1.3cm)
(not including belt clip; 0.75” (1.9cm) max depth including belt clip)
Remote Weight (including battery): 0.8 oz. (22.6g)
Dock Dimensions: 3.5” x 3.5” x 1.00” (8.9cm x 8.9cm x 2.5cm)
Dock Weight: 3.4 oz. (96.4g)
Clip/Surface Mount/Lanyard: 0.47oz. (13.2g)
Specifications | 09
Information
FCC Statement
DECLARATION OF CONFORMITY WITH FCC RULES FOR ELECTROMAGNETIC COMPATIBILITY
We, Belkin Corporation, of 501 West Walnut Street, Compton, CA 90220, declare under our sole
responsibility that the product:
F8Z065
to which this declaration relates:
Has been tested and found to comply with the limits for a Class B digital device, pursuant to part
15 of the FCC Rules. These limits are designed to provide reasonable protection against harmful
interference in a residential installation. This equipment generates, uses, and can radiate radio
frequency energy and, if not installed and used in accordance with the instructions, may cause
harmful interference to radio communications. However, there is no guarantee that interference
will not occur in a particular installation. If this equipment does cause harmful interference to radio
or television reception, which can be determined by turning the equipment off and on, the user is
encouraged to try to correct the interference by one or more of the following measures:
.
Reorient or relocate the receiving antenna.
.
Increase the separation between the equipment and receiver.
.
Connect the equipment into an outlet on a circuit different from that to
which the receiver is connected.
.
Consult the dealer or an experienced radio/TV technician for help.
ICES
This Class B digital apparatus complies with Canadian ICES-003. Cet appareil numérique de la
classe Best conforme á la norme NMB-003 du Canada.
Information | 10
Belkin Corporation Limited 3-Year Product Warranty
What this warranty covers.
Belkin Corporation warrants to the original purchaser of this Belkin product that the product shall be
free of defects in design, assembly, material, or workmanship.
What the period of coverage is.
Belkin Corporation warrants the Belkin product for three years.
What will we do to correct problems?
Product Warranty.
Belkin will repair or replace, at its option, any defective product free of charge (except for shipping
charges for the product).
What is not covered by this warranty?
All above warranties are null and void if the Belkin product is not provided to Belkin Corporation
for inspection upon Belkin’s request at the sole expense of the purchaser, or if Belkin Corporation
determines that the Belkin product has been improperly installed, altered in any way, or tampered with.
The Belkin Product Warranty does not protect against acts of God (other than lightning) such as flood,
earthquake, war, vandalism, theft, normal-use wear and tear, erosion, depletion, obsolescence, abuse,
damage due to low voltage disturbances (i.e. brownouts or sags), non-authorized program, or system
equipment modification or alteration.
How to get service.
To get service for your Belkin product you must take the following steps:
1. Contact Belkin Corporation at 501 W. Walnut St., Compton CA 90220, Attn: Customer Service, or call
(800)-223-5546, within 15 days of the Occurrence. Be prepared to provide the following information:
a. The part number of the Belkin product.
b. Where you purchased the product.
c. When you purchased the product.
d. Copy of original receipt.
2. Your Belkin Customer Service Representative will then instruct you on how to forward your receipt
and Belkin product and how to proceed with your claim.
Warranty | 11
Belkin Corporation Limited 3-Year Product Warranty
Belkin Corporation reserves the right to review the damaged Belkin product. All costs of shipping the
Belkin product to Belkin Corporation for inspection shall be borne solely by the purchaser. If Belkin
determines, in its sole discretion, that it is impractical to ship the damaged equipment to Belkin
Corporation, Belkin may designate, in its sole discretion, an equipment repair facility to inspect and
estimate the cost to repair such equipment. The cost, if any, of shipping the equipment to and from
such repair facility and of such estimate shall be borne solely by the purchaser. Damaged equipment
must remain available for inspection until the claim is finalized. Whenever claims are settled, Belkin
Corporation reserves the right to be subrogated under any existing insurance policies the purchaser
may have.
How state law relates to the warranty.
THIS WARRANTY CONTAINS THE SOLE WARRANTY OF BELKIN CORPORATION, THERE ARE NO OTHER
WARRANTIES, EXPRESSED OR, EXCEPT AS REQUIRED BY LAW, IMPLIED, INCLUDING THE IMPLIED
WARRANTY OR CONDITION OF QUALITY, MERCHANTABILITY OR FITNESS FOR A PARTICULAR PURPOSE,
AND SUCH IMPLIED WARRANTIES, IF ANY, ARE LIMITED IN DURATION TO THE TERM OF THIS WARRANTY.
Some states do not allow limitations on how long an implied warranty lasts, so the above limitations
may not apply to you.
IN NO EVENT SHALL BELKIN CORPORATION BE LIABLE FOR INCIDENTAL, SPECIAL, DIRECT, INDIRECT,
CONSEQUENTIAL OR MULTIPLE DAMAGES SUCH AS, BUT NOT LIMITED TO, LOST BUSINESS OR PROFITS
ARISING OUT OF THE SALE OR USE OF ANY BELKIN PRODUCT, EVEN IF ADVISED OF THE POSSIBILITY OF
SUCH DAMAGES.
This warranty gives you specific legal rights, and you may also have other rights, which may vary from
state to state. Some states do not allow the exclusion or limitation of incidental, consequential, or other
damages, so the above limitations may not apply to you.
Warranty | 12
Belkin Corporation
501 West Walnut Street
Los Angeles, CA 90220, USA
310-898-1100
310-898-1111 fax
Belkin Ltd.
Express Business Park, Shipton Way
Rushden, NN10 6GL, United Kingdom
+44 (0) 1933 35 2000
+44 (0) 1933 31 2000 fax
Belkin B.V.
Boeing Avenue 333
1119 PH Schiphol-Rijk, The Netherlands
+31 (0) 20 654 7300
+31 (0) 20 654 7349 fax
Belkin Ltd.
7 Bowen Crescent, West Gosford
NSW 2250, Australia
+61 (0) 2 4372 8600
+61 (0) 2 4372 8603 fax
Tech Support
US: 310-898-1100 ext. 2263
800-223-5546 ext. 2263
Europe: 00 800 223 55 460
Australia: 1800 235 546
New Zealand: 0800 235 546
© 2006 Belkin Corporation. All rights reserved.
All trade names are registered trademarks of respective manufacturers listed. iPod is a
trademark of Apple Computer, Inc., registered in the U.S. and other countries.
F8Z065
P75047


![Stealth Protect Series catalogue 2011_We[...]](http://vs1.manualzilla.com/store/data/005809212_1-caf297493bfcf938dba2b64bb0d79842-150x150.png)