1
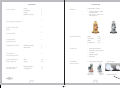
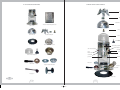
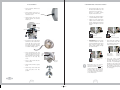
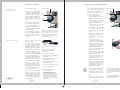
M A C H I N E S
AD: Holbein & Partners - Edition January 2006
C O F F E E
E S P R E S S O
Elektra
training
manual
I T A L I A N
I T A L I A N
E S P R E S S O
Miniverticale
M A C H I N E S
manual
C O F F E E
Elektra
SHARING THE PASSION
Miniverticale
Elektra srl - Via A. Volta, 18 - 31030 Dosson di Casier ( Treviso ) Italy - Tel. +39.0422.490.405 r.a. - Fax +39.0422.490.620
E-mail: [email protected] - Web: www.elektrasrl.com
b
o
o
k
7
s
e
v
e
n
CONTENTS
1.Overview
1.OVERVIEW
Models
3
Specifications
3
Features
3
Available accessories
3
2.Package contents
4
3.Mini verticale
parts
5
4.Assembly
6
Models
Available in three versions:
1. A1 Copper and brass machine,
brown wood base
2. A1C Chrome machine and
black wood base
1.
Specifications
5.Operating
instructions
6.Making coffee
7
Working the machine
8
Making coffee
8
Features
Weight
13 kg
Tank capacity
2 litres
Height
69 cm
Base Diameter
26 cm
2.
1. Electric pump and boiler
2. Commercial size group head
and handle
9
7.Frothing
or heating milk
3. Drainable drip tray
4. Cup warmer
8.Maintenance
and cleaning
Daily
10
Weekly
10
9.Background
information
Operating principles
11
The group head
11
Available
accessories
1. Coffee grinders, two models:
2. Cups, two types:
TC (Cappuccino – Ivory)
Chrome finish
(model MSC)
Copper and brass
finish (model MS)
02
03
TE (Espresso – Ivory)
3. Cleaning brush (SPA)
2.PACKAGE CONTENTS
3.MINI VERTICALE PARTS
eagle
spacer
water tank cover
Micro casa mini verticale espresso
coffee machine
Instruction manual with guarantee card
brass bolt
Water tank cover
Decorative handle parts
water tank
bolt for attaching
water tank
Wooden base
Brass or chrome drip tray cover
cup warming compartment
element indicator light
coffee extraction button
steam button
power
indicator light
Water tank and holding bolt
Metal drip tray
steam tap
on/off switch
group head
steam wand
filter basket
Coffee handle
Single and double filter baskets
drip tray cover
drip tray (metal)
coffee handle
Dosing spoon
Tamper
wooden base
04
05
4.ASSEMBLY
5.OPERATING INSTRUCTIONS
1. Place decorative timber base
onto bench.
1. Remove water tank cover and
fill water tank with fresh, cold
water. (For best results use
filtered or bottled water.)
Replace water tank cover.
2. Place machine onto base so
the power lead sits in the slot
cut into the base.
2. Connect the electrical plug to
a suitable 240V power outlet.
3. Attach water tank onto top
support bracket and connect
water hose.
3. Switch on power outlet, then
switch on the machine at its
power switch. Both indicator
lamps should light. See photos
below.
water tank
hose connection
point
water hose
support
bracket
indicator lamps off
green spot
Power switch off (out position)
4. Immediately press the coffee
extraction button to activate
pump and fill boiler from water
tank. Release button when
water starts flowing through
the coffee handle.
4. If supplied, connect the plastic
drain hose to the outlet on the
metal drip tray. Lay the drain
hose in the slot in the wooden
base. Run the tube to a bucket
or suitable drainage point.
5. Place chrome/brass drip tray
cover onto drip tray. The cover
should be placed so the copper drain tube locates into the
large hole in the drip tray
cover.
6. Place a filter basket into the
coffee handle.
7. Attach coffee handle to group
head.
copper
drain
tube
indicator lamps on
orange spot
Power switch on (in position)
5. After about five minutes, the
boiler element lamp will go
out, indicating the boiler is up
to its correct pressure.
power indicator,
always on when
on-off switch is on
Operate coffee extraction
button until water starts
flowing
hole in drip
tray cover
8. Attach eagle onto water tank
cover and place cover into
position.
Boiler water level – it’s essential
to ensure the boiler is never
allowed to run dry as the heating
element will burn out. Make sure
the water tank is at least half full
at all times. Also always perform
step 4 above when the machine
is first switched on.
06
07
element
on indicator,
on when boiler
is heating
6. Press the coffee brewing
pushbutton and run half a cup
of water through the group
head into a cup. Although the
machine is now at the correct
pressure it’s important to work
the machine to get it to the
correct operating temperature.
See next page.
6.MAKING COFFEE
Working
the machine
1. Press the steam button.
2. When the element indicator
light goes out, insert steam
wand into a jug half filled with
cold water. Turn on the steam
tap and heat the water until it’s
nearly boiling. Switch off
steam button and empty the
jug.
7.FROTHING OR HEATING MILK
element indicator light
Froth or heat milk before making
coffee. This ensures the boiler is at
the optimum temperature and
pressure to make coffee.
element indicator light
steam
button
To froth or heat milk:
steam button
1. Press the steam button.
This will usually cause the element indicator lamp to light.
steam
tap
2. When the lamp goes out, turn
the steam tap anticlockwise to
purge the steam wand of
condensation by releasing
steam into a container.
3. Place empty jug under steam
wand and turn steam tap on.
4. Press the coffee brewing
button until a continual stream
of water flows from the steam
wand into the jug.
5. When the light goes out, press
the coffee brewing button to
run about 30mls of water
through the group head into
a cup.
Making coffee
The machine is ready when water
from the group head hisses with
steam. Remove the handle to
check. Return it to the group head
to keep it warm. If necessary
repeat the above steps.
4mm
1. Remove coffee handle from
the machine and:
• To make a single cup — with
the single cup filter basket fitted to the handle, add one
rounded espresso dosing
spoon of coffee grounds to the
basket, and tamp down firmly.
• To make a double cup — with
the double cup filter basket fitted to the handle, add a level
espresso dosing spoon of coffee grounds to the filter basket
and tamp down firmly. Add
another level dosing spoon of
coffee grounds and tamp firmly.
2. Wipe off excess coffee
grounds from the rim of the
filter basket and fit the coffee
handle securely into the group
head by pulling the handle
horizontally to the right.
If too high, the handle won’t fit into the group
head.
In all cases, the tamped coffee grounds
should be around 4mm from the top
of the filter basket.
4. Remove the handle by
carefully pulling it horizontally
to the left.
5. Dump the used coffee cake
into dumping box or by
tapping the coffee handle on a
non-metal surface.
6. Rinse the handle/basket and
return to the group head.
Note:
•
3. Place coffee cup(s) onto metal
drip tray. Press the coffee
brewing button and extract
coffee to the required level.
Press the button again to stop
coffee flow. Then remove cups
from drip tray.
08
steam tap
It normally takes 25–35 seconds
to extract a shot of coffee.
• When the coffee brewing button is
turned off, an electric solenoid valve
operates to release the pressure inside
the group head. This also has the benefit
of extracting the remaining water from
the coffee cake. The water is expelled
into the drip tray, so you need to regularly
empty this tray.
3. Fill a stainless steel jug with
the required amount of milk.
Avoid filling jug more than half
way.
4. Immerse the tip of the steam
wand into the centre of the
jug, just below the surface of
the milk.
5. Turn on the steam tap
anticlockwise until you hear
a soft “psst-psst” sound, which
indicates the milk is being
frothed. As the milk level rises,
lower the jug to ensure the
wand stays just under the
surface of the milk to maintain
the “psst-psst” sound.
6. When the milk is sufficiently
frothed, lower the steam wand
into the milk to heat it.
Move the wand around the
milk to ensure even heating.
Do not boil the milk!
Correct temperature can be
judged by holding your hand
against the jug. When the temperature is too hot to the
touch, wait four seconds or so,
then turn off the steam.
7. Remove the jug and top up the
boiler water level. To do this:
• Insert the steam wand into an
empty jug and open the steam
tap.
• Press the coffee extraction
button until a continual stream
09
of water flows through the
steam wand, indicating the
boiler is full. This will also flush
out any milk deposits inside
the wand.
• Wipe the steam wand with
a clean damp cloth to remove
any milk before it dries.
8.MAINTENANCE AND CLEANING
Daily
1. Use a clean sponge, cloth or
brush to clean the shower
head and up inside the group
head.
9.BACKGROUND INFORMATION
Looking into the group head.
Clean all parts, including the rubber sealing
ring and the surface of the shower head.
Operating
principles
group head
rubber sealing ring
2. Flush a small amount of water
through the group head.
3. Place a small jug of cold water
under the steam wand and
release steam to remove any
milk deposits from the wand.
4. Wipe the surface of the wand
with a soft damp cloth,
including all grooves or places
where milk could build up.
Do not use any alcohol,
solvent or abrasive creams or
cloths on the surface of the
machine.
Weekly
• With commercial espresso
machine cleaning chemical
1. Put three teaspoons
of cleaning chemical into half
a litre of very hot water.
2. Place coffee baskets and
handle into the solution to
soak for 20 to 30 minutes.
Ensure that the bakelite part of
the handle is not immersed in
the solution.
The Elektra micro casa mini
verticale has features normally
only found on a commercial
espresso machine. When the
coffee brewing pushbutton is
pressed, water is pumped from
the boiler into the group head and
through the coffee grounds into
the cup. During this process,
water is pumped from the water
tank into the boiler.
Correct pressure and temperature
are maintained automatically.
When the boiler is heating, the
element indicator lamp is on.
Steam is produced in the boiler by
operating the steam button to
cause the boiler element to come
on. Note that sometimes it is not
necessary to operate the steam
button, as the boiler pressure and
temperature will be high enough
to produce steam.
The coffee handle fits into the
group head, with water flowing
through a “shower screen”, as
below. If the basket is too full, the
grounds will press against the
shower screen, stopping the
handle from being fitted to the
group head.
Coffee handle and group head.
shower head
5. Remove filter baskets from
coffee handle and wash in
warm soapy water.
Rinse them thoroughly under
hot running water.
6. Remove the drip tray cover
and drip tray and wash them
in warm soapy water.
7. Use a clean, wet paper towel
or soft cloth to remove marks
from the surface of the
machine (while warm) and
polish with a clean, dry soft
paper towel or soft cloth.
The group head
The coffee handle has two lugs
either side that locate into two
slots in the group head.
The handle is fitted by aligning the
lugs and slots, then pushing the
handle up so it can be twisted to
the right.
When the coffee handle is fitted
into the group head, a rubber ring
inside the group head seals
against the top of the filter basket.
It’s therefore important to make
sure the top of the filter basket is
clean and free of coffee grounds.
Otherwise leakage can occur, and
in some cases the rubber seal can
become dislodged due to a build-up
of coffee grounds behind the seal.
3. Rinse and wash all parts with
warm soapy water.
4. Rinse thoroughly in hot water.
10
This machine does not allow the
user to extract coffee and
froth/heat milk at the same time.
11
Water passes through the shower screen
to give an even flow of water through
the coffee grounds.
shower screen
locating lug