1
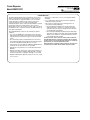
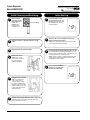
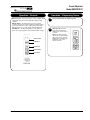
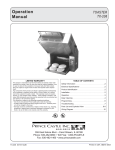
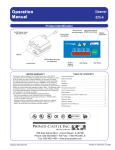
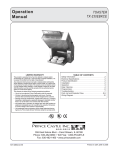
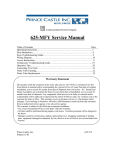
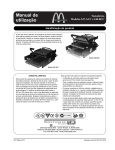
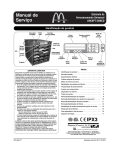
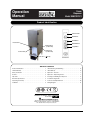
Cream
Dispenser
Model SKMCD1P/C1
Operation
Manual
Product Identification
Indicator Panel
Refill Button
Small Button
Product Valve
Medium Button
Power Switch
(on back side)
Large Button
Power Cord
(on back side)
Control Panel
Drip Tray
Control Panel
TABLE OF CONTENTS
Product Identification . . . . . . . . . . . . . . . . . . . . . . . . . . . . . . .
1
Initial Cleaning and Sanitizing . . . . . . . . . . . . . . . . . . . . . . . .
6
Limited Warranty . . . . . . . . . . . . . . . . . . . . . . . . . . . . . . . . . .
2
Initial Start-Up. . . . . . . . . . . . . . . . . . . . . . . . . . . . . . . . . . . . .
6
Safety Information . . . . . . . . . . . . . . . . . . . . . . . . . . . . . . . . .
3
Operation – General. . . . . . . . . . . . . . . . . . . . . . . . . . . . . . . .
7
General . . . . . . . . . . . . . . . . . . . . . . . . . . . . . . . . . . . . . . . . .
3
Operation – Dispensing Cream . . . . . . . . . . . . . . . . . . . . . . .
7
Important . . . . . . . . . . . . . . . . . . . . . . . . . . . . . . . . . . . . . . . .
3
Cleaning and Refilling the Dispenser . . . . . . . . . . . . . . . . . . .
8
Electrical Specifications . . . . . . . . . . . . . . . . . . . . . . . . . . . .
3
Troubleshooting Guide . . . . . . . . . . . . . . . . . . . . . . . . . . . . . .
9
Unpacking and Setup. . . . . . . . . . . . . . . . . . . . . . . . . . . . . . .
4
Parts List and Exploded View . . . . . . . . . . . . . . . . . . . . . . . . 10
Installation . . . . . . . . . . . . . . . . . . . . . . . . . . . . . . . . . . . . . . .
5
Wiring Diagram . . . . . . . . . . . . . . . . . . . . . . . . . . . . . . . . . . . 11
PRINCE CASTLE LLC
WORLDWIDE
355 East Kehoe Blvd. • Carol Stream, IL 60188 USA
Telephone: 630-462-8800 • Toll Free: 1-800-PCASTLE
Fax: 630-462-1460 • www.princecastle.com
36132-EN
Printed in USA 10/13 © 2013
Cream Dispenser
Model SKMCD1P/C1
PRINCE CASTLE LLC
WORLDWIDE
Limited Warranty
This Silver King branded product is warranted to be free from
defects in material and/or workmanship for a period of two (2)
years from the date of original installation, not to exceed 30
months from date of shipment from our factory. Any part or
component which proves to be faulty in material and/or
workmanship (in the opinion of Prince Castle) within the warranty
period will be replaced or repaired (at the option of Prince
Castle) without cost to the customer for parts or labor, except as
provided below. The compressor will carry an additional three (3)
years parts only warranty.
This Limited Warranty is subject to the following exceptions/
conditions.
• Use of any non OEM parts voids warranty unless otherwise
approved by Prince Castle. All work must be performed by an
authorized Prince Castle Service Agent, except as provided
herein.
• All covered labor requires preauthorization from the factory
(Call 1-888-375-2938) and shall be performed during regular
work hours. Overtime premium will not be covered.
• Travel charges are to be limited to 100 miles (200 Kilometers)
round trip: 2 hours travel time per one trip repair.
• Adjustments of any kind are not covered under this Limited
Warranty.
• Damage caused by carelessness, neglect, and/or abuse (e.g.,
using incorrect voltage, dropping, tampering with or altering
electrical components, or improper cleaning) is not covered.
• Equipment damaged in shipment or by fire, flood or act of God
is not covered.
Printed in USA 10/13 © 2013
• Damage to coated surfaces is not covered by this Limited
Warranty.
• Use of refrigerants other than specified on the equipment
serial plate voids the warranty.
• Labor repair or replacement of the following parts is not
covered by this Limited Warranty:
– Electronic Board p/n 35896; Prince Castle will provide
replacement parts to customer so customer can replace
such parts if they are defective. Replacement instructions
are included with part supplied.
– Door Gasket p/n 10310-61, Container Kit p/n 31348, Drip
Tray and Cover Kit p/n 33177, Drip Tray p/n 37676 and Drip
Tray Cover p/n 37677 are considered wear items and are
not included under the warranty.
PRINCE CASTLE SHALL NOT BE LIABLE FOR INCIDENTAL
OR CONSEQUENCIAL DAMAGES, LOSSES, OR EXPENSES.
PRINCE CASTLE MAKES NO OTHER WARRANTY, EXPRESS
OR IMPLIED. ALL IMPLIED WARRANTIES OF
MECHANTABILITY AND/OR FITNESS FOR ANY PARTICULAR
PURPOSE ARE HEREBY DISCLAIMED AND EXCLUDED.
2
36132-EN
Cream Dispenser
Model SKMCD1P/C1
PRINCE CASTLE LLC
WORLDWIDE
Safety Information
General
The SKMCD1P Cream Dispenser is designed to hold and
dispense bulk coffee cream. It will dispense three portion sizes
– 1 cream packet, 2 cream packets or 3 cream packets.
WARNING
Indicates information important to the proper operation of
the unit. Failure to observe may result in damage to the
equipment and/or severe bodily injury or death.
CAUTION
Indicates information important to the operation of the unit.
Failure to observe may result in damage to the equipment.
Important
Prince Castle reserves the right to change specifications
and product design without notice. Such revisions do not
entitle the buyer to corresponding changes, improvements,
additions or replacements for previously purchased
equipment.
General Precautions
WARNING
Risk of Electric Shock.
• Always unplug the power cord before servicing the unit or
removing the back panel or front apron to avoid electric
shock.
• Unit MUST be plugged into a 3-prong plug for grounding.
Cutting off the grounding spike on the power cord could
result in electric shock to the operator during operation.
• Unit must be plugged into a 15 or 20 ampere fuse- or
breaker-protected circuit. Use of a larger fuse or breaker
could result in damage to the unit and electric shock to the
operator.
Electrical Specifications
115V 60 Hz 1 Phase
WARNING
Moving or Handling Hot Parts.
• Some parts may remain hot even after being unplugged.
Always use caution when servicing.
WARNING
Possible Back Injury.
• Assistance in moving this piece of equipment is strongly
recommended to avoid injury.
• Always lift with your legs and not your back when lifting this
unit.
36132-EN
3
Printed in USA 10/13 © 2013
Cream Dispenser
Model SKMCD1P/C1
PRINCE CASTLE LLC
WORLDWIDE
Unpacking and Setup
1
Inspect for shipping damage. Examine the shipping
container immediately upon receipt. Any damage to
the container or equipment due to shipping should be
reported to the transportation company immediately.
Claims should be filed within 24 hours. Shipping
damage is not the responsibility of Prince Castle nor
its Silver King division.
2
Unpack the unit. Take care with box cutters or other
sharp instruments not to nick the equipment when
opening the shipping container.
Carefully remove the unit from the shipping box. Be
sure to follow any orientation or caution labels on the
box.
3
Plan the unit’s location. When locating this unit,
convenience and accessibility are important
considerations, but the following factors must be
observed:
• Proximity to a 3-prong 110 VAC receptacle for
grounding (see Step 4).
• When placing the unit on a counter, the counter
must be able to support a minimum of 100 lbs.
(45 kg).
• When placed on a counter, the unit must be on the
legs supplied. If the legs are removed, the unit will
not operate properly and the warranty will be void.
• There must be at least 4" (10.2 cm) of space above,
on the sides and behind the unit and open in front.
• Correct serving height is important so that it can be
operated properly.
• The unit must be level. The legs are adjustable to
aid in leveling the unit.
• Avoid placing the unit next to an oven, heating
element or hot air source which would affect the
performance of the unit.
4
Meet electrical requirements. Prior to connecting the
unit to power, be sure to check the data plate located
on the end panel of the cabinet for required voltage.
The specifications on the data plate supersede any
information contained in this manual.
The standard unit is equipped with a seven (7) foot
power cord that requires a 115 Volt, 60 Cycle, 1
Phase, properly grounded electrical receptacle,
protected with a 15 or 20 ampere fuse or breaker.
WARNING
Printed in USA 10/13 © 2013
The power cord comes with a 3-prong plug for
grounding purposes. Any attempt to cut off this
grounding spike or to connect to an ungrounded
adapter plug could result in serious injury, will
void the warranty and terminates the
manufacturer’s responsibility.
4
36132-EN
Cream Dispenser
Model SKMCD1P/C1
PRINCE CASTLE LLC
WORLDWIDE
Installation
5
WARNING
To avoid injury, it is recommended that the unit be moved
by two people.
Connect the unit to power. Plug in the power cord on
the back of the unit, at the left rear. Run the cord along
the rear of the shelf and plug it into the designated
outlet.
WARNING
1
Locate the unit. Move the unit to its mounting
location.
2
Install the four legs underneath the unit. The
dispenser is shipped without legs attached. To install
them, carefully tilt the unit and thread the legs into the
four corner holes on the bottom of the dispenser.
The power cord comes with a 3-prong plug for
grounding purposes. Any attempt to cut off this
grounding spike or to connect to an ungrounded
adapter plug could result in serious injury, will
void the warranty and terminate the
manufacturer’s responsibility.
IMPORTANT
After installation and assembly and before the unit goes into
service, it must be cleaned and sanitized.
3
Level the unit. In order for the unit to function
properly, level the unit front to back and side to side.
Adjust the legs to level the unit.
4
Install the drip tray
and drip tray cover.
36132-EN
5
Printed in USA 10/13 © 2013
Cream Dispenser
Model SKMCD1P/C1
PRINCE CASTLE LLC
WORLDWIDE
Initial Cleaning and Sanitizing
1
Make sure that
the switch on the
back of the unit is
in the “off”
position. The
indicator panel
should be unlit.
1
Power Switch
2
Wash the surfaces of the unit with warm, soapy
water.
3
Rinse the surfaces with warm water.
4
Remove the valve
insert. Press on the
valve slide and remove
the valve insert by
pulling it straight up.
5
Clean the valve and valve
area. Use a brush and
warm, soapy water to
clean the valve, or clean
the valve in a dishwasher.
Clean the valve area of the
dispenser with a brush and
warm, soapy water. Rinse
with warm water.
6
Sanitize the valve and valve area. With an approved
sanitizing solution, thoroughly clean the valve and
valve area. Allow to air dry.
Printed in USA 10/13 © 2013
Initial Start-Up
Place the switch on the
back of the unit in the “on”
position. The indicator panel
should display the current
unit temperature.
72
2
Allow the unit to run a minimum of two hours
before loading it with product.
NOTE: It is completely normal for the exterior of the
unit to feel warm while it is running.
3
Load cream into the cream dispenser. Once the unit
has achieved proper operating temperature, observe
the procedures noted in the label on the door liner for
loading cream into the cream dispenser.
NOTE: It may be easier to install the dispensing tube
in the valve by removing the valve insert first, then
installing the cream container.
4
Press and hold the REFILL
button for 3 seconds until
the indicator flashes 00.
00
6
36132-EN
Cream Dispenser
Model SKMCD1P/C1
PRINCE CASTLE LLC
WORLDWIDE
Operation – General
Operation – Dispensing Cream
Indicator Panel – The indicator panel contains a digital LED
display that reads the product temperature during normal
operation.
REFILL Button – The upper button is used to reset the
computer whenever the cream is refilled. This button must be
pressed each time the cream is refilled. Press and hold the
REFILL button for 3 seconds until the indicator flashes 00.
Size Buttons – The three lower buttons on the indicator
panel are for selecting portion sizes (small, medium or large).
Indicator Panel
Refill Button
1
Place the drink under the dispensing tube.
2
Select the size. Press the
proper drink size button to
dispense the correct amount
of cream.
NOTE: The end of the tube
may need to be cleaned daily
with a clean cloth to prevent
buildup which could affect the
dispensing of the correct
amount of cream.
Small Button
Medium Button
Large Button
Control Panel
36132-EN
7
Printed in USA 10/13 © 2013
Cream Dispenser
Model SKMCD1P/C1
PRINCE CASTLE LLC
WORLDWIDE
Cleaning and Refilling the Dispenser
1
Remove the empty bag of cream. When removing
an empty bag of cream, be sure to push the valve slide
in fully before pulling the dispensing tube out of the
valve.
2
Remove the valve
insert. To remove the
valve insert once the
beverage container is
empty, simply press
on the valve slide and
remove the valve
insert by pulling it
straight up.
3
4
Clean the valve and
valve area. Once
removed, the valve
can be cleaned with a
brush and warm
soapy water or in a
dishwasher. The
valve area in the
dispenser should also
be cleaned with a
brush and warm
soapy water.
5
Install the container
and bag. Place the
container inside the
cabinet and guide the
tube through valve
area. Be sure the
tube is straight and
centered to avoid
kinking, which could
result in reduced
product flow or
leaking.
6
Install the valve
insert. Push and hold
the valve slide while
inserting the valve
insert from above.
7
Cut the tube. Cut the
tube 1" (2.5 cm)
below the valve.
8
Press the REFILL
button. Press and
hold the REFILL
button for 3 seconds
(the display will read
00) to alert the
dispenser that a new
beverage bag has
been installed.
Insert a new bag into the container. Insert a new
beverage bag into the container. Lock the tube into
place at the bottom of the container.
Printed in USA 10/13 © 2013
8
36132-EN
Cream Dispenser
Model SKMCD1P/C1
PRINCE CASTLE LLC
WORLDWIDE
Troubleshooting Guide
WARNING
RISK OF ELECTRIC SHOCK! Always unplug the power cord before servicing the unit to avoid electric shock.
PROBLEM
PROBABLE CAUSE
SOLUTION
Compressor will not run
No voltage at wall receptacle
Check circuit breaker or fuse.
Compressor runs but no
refrigeration
Compressor short cycles
Compressor runs too much or
constantly
Noisy
Beverage leaking or not
flowing
36132-EN
Service cord pulled out of wall receptacle
Replace.
Low voltage causing compressor to cycle
on overload
Contact power company and confirm that voltage fluctuation
does not exceed 10% plus or minus from the nominal rating.
Power switch is in “Off” position
Turn switch on.
Inoperative control
Call for service (888-375-2938).
Compressor stuck
Call for service (888-375-2938).
Compressor windings open
Call for service (888-375-2938).
Compressor overload stuck open
Call for service (888-375-2938).
Relay lead loose
Call for service (888-375-2938).
Relay loose or inoperative
Call for service (888-375-2938).
Power cord disconnected from dispenser
Call for service (888-375-2938).
Faulty cabinet wiring
Call for service (888-375-2938).
System out of refrigerant
Call for service (888-375-2938).
Compressor not pumping
Call for service (888-375-2938).
Restricted filter drier
Call for service (888-375-2938).
Restricted capillary tube
Call for service (888-375-2938).
Moisture in system
Call for service (888-375-2938).
Erratic control thermostat
Call for service (888-375-2938).
Faulty relay
Call for service (888-375-2938).
Low voltage
Contact power company and confirm that voltage fluctuation
does not exceed 10% plus or minus from the nominal rating.
Compressor draws excessive wattage
Call service technician.
Temperature too low
Adjust temperature control.
Erratic control
Call service technician.
Abnormally high room temperature
Reduce room temperature or relocate dispenser.
Door or lid gaskets not sealing
Adjust or call for service (888-375-2938).
System undercharged due to leaks
Call for service (888-375-2938).
System undercharged from factory
Call for service (888-375-2938).
System overcharged
Call for service (888-375-2938).
System not clean
Call for service (888-375-2938).
Restricted filter drier
Call for service (888-375-2938).
Restricted capillary tube
Call for service (888-375-2938).
Tubing vibrates
Call for service (888-375-2938).
Internal compressor noise
Call for service (888-375-2938).
Compressor vibrating on cabinet frame
Call for service (888-375-2938).
Tube kinked
Remove valve and pull tube straight through valve area.
Valve stuck
Clean valve and valve area or call for service (888-375-2938).
9
Printed in USA 10/13 © 2013
Cream Dispenser
Model SKMCD1P/C1
PRINCE CASTLE LLC
WORLDWIDE
Parts List and Exploded View
NOTE: To order Parts/Service, Contact Silver King Refrigeration at 800-328-3329 for technical assistance.
Item
No
1
2
3
4
5
6
7
8
9
10
11
12
13
14
15
16
17
Item
No
Part
No
Description
31106
10310-61
25226
35416
33883
10343-51
10344-51
20481
98106
22401
22677
30876
10314-89
35832
33368
37676
37677
Door Assembly (Less Hinges)
Door Gasket
Hinge
Switch
Power Cord 115V
Compressor Kit 115V
Electricals Kit (Relay and Overload) 115V
Compressor Mount Grommet
Hairpin clip
Compressor Mount Washer
Drier
Heat Exchanger
Leg Kit 4"
Back Panel
Apron
Drip Tray
Drip Tray Cover
18
19
20
21
22
23
24
25
26
27
28
29
30
31
32
33
34
Part
No
Description
33177
22938
31348
31942
33369
31944
27019
33726
26155
35810
35896
32034
26039
34877
35826
35841
35842
Drip Tray and Cover Kit
Screw
Container Kit
Valve Body
Valve Slide
Valve Insert
Valve Spring
Cap Sleeve
Thermistor
Solenoid 115V
Electronic Board (3-Button) with Thermistor
Membrane Switch (3-Button)
Transformer 115V Assembly
Plunger
Power Module
Relay
Relay Socket
20
3
12
2
14
21
1
24
25
23
6
22
4
34
33
5
11
19
7
32
27
8 9 10
31
30
17
28 26
18
13
29
Printed in USA 10/13 © 2013
15
10
16
36132-EN
Cream Dispenser
Model SKMCD1P/C1
PRINCE CASTLE LLC
WORLDWIDE
Wiring Diagram
36132-EN
11
Printed in USA 10/13 © 2013