1
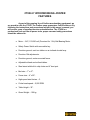
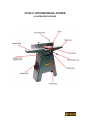
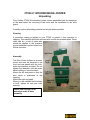
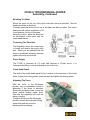
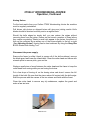
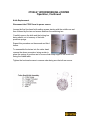
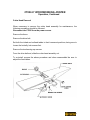
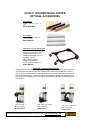
OWNER’S MANUAL CT056 – 6” Jointer CRAFTEX CT056 6” WOODWORKING JOINTER INDEX GENERAL SAFETY INSTRUCTIONS SPECIFIC SAFETY INSTRUCTIONS CT056 Features Features Illustration Unpacking Assembly Mounting the Motor Tensioning the Belt Power Supply Cutter Head Guard Fence Adjustment Outfeed Table Adjusting Knife Adjusting Operation Edge Planing Planing Safely Rabbeting Honing Knives Knife Replacement Cutter Head Removal Schematic Drawings CT056 Jointer Base Parts List Parts List Continued CT056 Accessories Warranty PAGE 3 PAGE 4 Page 5 Page 6 Page 7 Page 8 Page 8 Page 8 Page 8 Page 8 Page 9 Page 9 Page 10 Page 10 Page 11 Page 12 Page 13 Page 14 Page 15 Page 16 Page 17 Page 18 Page 19 Page 20 2 GENERAL SAFETY INSTRUCTIONS EXTREME CAUTION SHOULD BE USED IN OPERATING ALL POWER TOOLS. KNOW YOUR POWER TOOL, BE FAMILIAR WITH ITS OPERATION. READ THE OWNER’S MANUAL AND PRACTICE SAFE USAGE PROCEDURES AT ALL TIMES. CONNECT your machine ONLY to the matched and specified power source. WEAR SAFETY GLASSES, RESPIRATORS, HEARING PROTECTION and SAFETY SHOES when operating heavy machinery. Always wear safety glasses. DO NOT wear loose clothing or jewellery when operating machinery. A Safe Environment is important. Keep the area free of dust, dirt and other debris in the immediate vicinity of the machine. BE ALERT! Do Not Use prescription or other drugs that may affect your ability or judgement to safely use this machine. DISCONNECT the power source when changing drill bits, hollow chisels or making other adjustments or repairs. NEVER leave an operating tool unattended. NEVER reach over the table when the tool is in operation. ALWAYS keep blades, knives or bits sharp and properly aligned. ALWAYS keep all safety guards in place and ensure their proper function. ALWAYS use push sticks and featherboards to safely feed your work through the machine. ALWAYS make sure that any tools used for adjustments are removed before operating the machine. ALWAYS secure your work with the appropriate clamps or vises. ALWAYS keep bystanders safely away while operating machinery. THINK SAFETY. WORK SAFELY. Never attempt a procedure if it does not feel safe or comfortable. 3 CT056 JOINTER SPECIFIC SAFETY INSTRUCTIONS Always keep the cutter head knives sharp and free of rust, tar and pitch Always use push blocks when jointing stock that does not provide a reasonable distance of safety for your hands. Never allow your hands to pass directly over the cutter head. Always make sure that the exposed cutter head behind the fence is guarded particularly when jointing near the leading edge such as in rabbetting. Never perform jointing operations on wood materials shorter than 8”, narrower than 3/4" or less than 1/4" in thickness. Do not perform planing operations on wood material shorter than 4”, narrower than 3/4", wider than 8” or thinner than 1/2". Maintain the proper relationship of the infeed and outfeed table surfaces and the cutter head knife path. Never back your workpiece into the spinning cutter head. Never make cuts deeper than 1/16”” in a single pass to prevent overloading the machine and to prevent dangerous kickback. 4 CT056 6” WOODWORKING JOINTER FEATURES As part of the growing line of Craftex woodworking equipment, we are proud to offer the CT056. The Craftex name guarantees Craft Excellence. By following the instructions and procedures laid out in this owner’s manual, you will receive years of excellent service and satisfaction. The CT056 is a professional tool and like all power tools, proper care and safety procedures should be adhered to. Motor – 1HP, 110/220 volt (Pre-wired for 110v) Ball Bearing Motor. Safety Power Switch with removable key. Precision-ground, cast-iron tables on an inclined dovetail way. Precision Gib adjustments. Precision-ground, center-mounted fence. Adjustable infeed and outfeed tables. Steel stand with built-in chip chute and 4” dust port. Bed size – 7” x 47”. Fence size – 4” x 29”. High-speed steel knives – 3. Cutter-head speed – 5,000 RPM Table Height – 32”. Gross Weight – 106 kg. 5 CT056 6” WOODWORKING JOINTER ILLUSTRATED FEATURES 6 CT056 6” WOODWORKING JOINTER Unpacking Your Craftex CT056 Woodworking Jointer comes assembled with the exception of the steel stand, the mounting of the motor and the installation of the knife guard. Carefully remove all packing material and recycle where possible. Cleaning A protective coating is applied to your CT056 to protect it from corrosion in shipping. This material should be removed with a cloth and mineral spirits. When clean and dry, a coat of paste wax should be applied to the precision ground surfaces to protect them from further corrosion. Assembly The Dust Chute doubles as a motor mount and must be fastened to the front and rear panels with the nuts, bolts and washers provided. Do not tighten the fasteners until the entire base is sitting on a level surface. Attach the left end panel so that the dust chute is positioned in the opening. Attach the right end panel. When you are satisfied that the base is level, tighten all nuts and bolts securely. Please refer to page 16 for numerical order of base assembly 7 CT056 6” WOODWORKING JOINTER Assembly, Continued Mounting The Motor Mount the motor on the top of the dust chute with the bolts provided. The bolt heads should be in the chute. Carefully place the jointer unit on top of the base and bolt into place. This unit is heavy and will require assistance to lift it and position it on top of the base. When in position, place the drive belt on the sheave of the motor and the cutter head sheave. Tensioning The Drive Belt The illustration shows the correct way to install and tension the motor drive belt. When you are satisfied that the motor is positioned correctly, securely tighten the motor mount bolts. Power Supply The CT056 is pre-wired at 110 volts and requires a 15-amp circuit. It is recommended that you use a dedicated circuit for the tool. Cutter Head Guard The shaft of the cutter head guard fits into a socket on the side face of the infeed table. Loosen the locking screw, insert the shaft and tighten the locking screw. Adjusting The Fence With the fence in the 90-degree position, use a combination square to determine if the fence is accurate. Should this not be the case, loosen the fence vertical locking screw lever. Fine-tune the adjusting bolt until the fence is vertical. To adjust the fence in the 45-degree position, loosen the horizontal locking screw lever and fine–tune the adjusting bolt accordingly. 8 CT056 6” WOODWORKING JOINTER Assembly, Continued Adjusting The Outfeed Table CAUTION: The following operation must be done with the CT056 Jointer disconnected from its power source. For accurate results from your CT056 Jointer, the outfeed table MUST be level with the cutter head knives at their highest point. The knives must be parallel to the outfeed table and project equally from the cutter head. To achieve this, loosen the outfeed table lock. Using a straightedge, lay it across the outfeed table where the cutter head opening is located. Rotate the cutter head slowly by hand by rotating the drive belt sheave at the rear of tool. CAUTION: Do not attempt to rotate the cutter head itself as the knives are extremely sharp. If all the (3) knives appear to high or too low, rotate the outfeed table height wheel accordingly. Tighten the outfeed table lock. The knife edges must just touch the straightedge. If one knife is too high or too low, the knives must be re-set. Adjusting Knives A knife may be reset by loosening the 5 lock screws on the cutter head for that particular knife. Set your straightedge over the center of that knife so that the edge of the knife touches it. Snug the center lock screw. Reposition the straightedge to the ends of the knife and repeat the procedure. When it is determined that the knife is parallel through its full length, secure the locking screws. 9 CT056 6” WOODWORKING JOINTER Operation Edge Planing Prior to starting any jointing operation, it is best to inspect the workpiece to determine the direction of the wood grain. The best jointing results are gained by feeding the wood into the knives with the grain. Adjust the infeed table to remove the minimum amount of stock required by lowering or raising the infeed table. Loosen the infeed table lock and adjust accordingly. Securely lock the table. Planing Safely For edge planing grasp your workpiece as shown, being sure to keep fingers well above the table surface. 10 CT056 6” WOODWORKING JOINTER Operation, Continued Should the workpiece be too small to safely use your hands, push pads or push sticks should be employed as illustrated. Rabbeting To form a rabbet you must bring the fence forward to the required distance from the end of the knives. Lower the infeed table for the first pass. Remove the knife guard. Rabbeting should not be attempted in one pass. Several small passes will result in better quality work. Be sure to replace the guard when rabbeting is complete. 11 CT056 6” WOODWORKING JOINTER Operation, Continued Honing Knives For the best results from your Craftex CT056 Woodworking Jointer the machine must be regularly maintained. Dull knives, dirty knives or chipped knives will give poor jointing results. Knife blades should be checked routinely and on a regular basis. Should the knife edges be simply dull, you can restore the edges without removing them from the jointer. Knives can be honed a number of times before they require re-grinding. Should a small nick appear in the knives, the effects of this can be corrected by re-setting one of the knives slightly to the left or right (See Adjusting Knives). Honing can be best achieved by using the Busy Bee B1659 Jointer Knife Honing Tool. Disconnect the power supply. Remove the fence (or slide it back to expose all of the knife surfaces), remove the blade guard and lower the infeed table. Clean the cutter head and knives with mineral spirits to remove pitch, gum and tar. Wedge a small piece of wood between the cutter head and the frame to keep the cutter head from moving while you are honing the knives. Put a few drops of honing oil on the honing stone and draw it across the full length of the knife. Be sure that the stone makes full contact with the knife edge. Start the process with the coarser of the two stones and finish with the finest. Clean the cutter head to remove any oily substances, replace the guard and make a few test cuts. Model B1659 12 CT056 6” WOODWORKING JOINTER Operation, Continued Knife Replacement Disconnect the CT056 from its power source. Loosen the five Hex-head knife-setting screws starting with the middle one and then followed by the two end screws and then the remaining two. Carefully remove the knife and the locking bar being careful not to lose any of the knife pressure springs. Repeat this procedure on the second and third knives. To reassemble the knives into the cutter head, reverse the above procedure, being certain to place the springs in position and to be sure that sharp edges of the knives are facing the infeed table. Tighten the hex-head screws in reverse order being sure that all are secure. 13 CT056 6” WOODWORKING JOINTER Operation, Continued Cutter Head Removal When necessary to remove the cutter head assembly for maintenance, the following procedures should be followed. Disconnect the CT056 from the power source. Remove the fence. Remove the drive belt. Set both the infeed and outfeed tables to their lowermost positions, being sure to loosen the butterfly lock screws first. Remove the two bearing cap screws. From the drive belt end, slide the cutter head assembly out. To re-install, reverse the above procedure and when reassembled be sure to adjust the feed tables. 14 CT056 6” WOODWORKING JOINTER Schematic Diagram- Main Body 15 CT056 6” WOODWORKING JOINTER Schematic Diagram- Base Follow steps 1 – 7 for fast and accurate results in stand set up. This stand is designed to give better stability and balance. 16 CT056 6” WOODWORKING JOINTER 17 CT056 6” WOODWORKING JOINTER 18 CT056 6” WOODWORKING JOINTER OPTIONAL ACCESSORIES Extra Blades H.S.S - Set of 3 – 8” x 1” x 1/8” Model B706N006 Extra Blades Carbide Tipped – Set of 3 – 8” x 1” x 1/8” Model B706C6 Adjustable Universal Mobile Base Made By Port-A-Mate Exclusive to Busy Bee Tools Maximum square: 31" x 31" Maximum rectangle: 19" x 43" Capacity: 300 lbs. Heavy-duty 3" wheels Stable 4-wheel design 2-point rubber leveling feet Model PM1000 CRAFTEX - Dust Collection Systems These powerful lower noise factor dust collection systems are portable or may be set up in semi-permanent locations. Rigid pipe connectors are ideal for fixed installations with flex pipe to machine. Shake dust from top bag and remove dust and chips from lower bag only. New dust bags reduce to 1 micron the size of dust particles entering your workplace from the collector. New polyethylene (lower) bags are transparent and allow visual inspection of the contents. 1 HP, 825 CFM, 1 Micron Top Bag. Model CT029N 2 HP, 220V, 1596 CFM, 1 Micron Top Bag Model CT030 For more information on these and other accessories, visit www.busybeetools.com 3 HP, 220V, 2300 CFM, 1 Micron Top Bags. Model CT031 19 WARRANTY CRAFTEX 2 YEAR LIMITED WARRANTY Craftex warrants every product to be free from defects in materials and agrees to correct such defects where applicable. This warranty covers two years for parts and 90 days for labour (unless specified otherwise), to the original purchaser from the date of purchase but does not apply to malfunctions arising directly or indirectly from misuse, abuse, improper installation or assembly, negligence, accidents, repairs or alterations or lack of maintenance. Proof of purchase is necessary. All warranty claims are subject to inspection of such products or part thereof and Craftex reserves the right to inspect any returned item before a refund or replacement may be issued. This warranty shall not apply to consumable products such as blades, bits, belts, cutters, chisels, punches etceteras. Craftex shall in no event be liable for injuries, accidental or otherwise, death to persons or damage to property or for incidental contingent, special or consequential damages arising from the use of our products. RETURNS, REPAIRS AND REPLACEMENTS To return, repair, or replace a Craftex product, you must visit the appropraite Busy Bee Tools showroom. Craftex is a brand of equipment that is exclusive to Busy Bee Tools. For replacement parts directly from Busy Bee Tools, for this machine, please call 1-800-461BUSY(2879), and have your credit card and part number handy. • All returned merchandise will be subject to a minimum charge of 15% for re-stocking and handling with the following qualifications. • Returns must be pre-authorized by us in writing. • We do not accept collect shipments. • Items returned for warranty purposes must be insured and shipped pre-paid to the nearest warehouse (see locations on inside back cover of this manual). • Returns must be accompanied with a copy of your original invoice as proof of purchase. Returns must be in an un-used condition and shipped in their original packaging a letter explaining your reason for the return. Incurred shipping and handling charges are not refundable. • Busy Bee will repair or replace the item at our discretion and subject to our inspection. • Repaired or replaced items will be returned to you pre-paid by our choice of carriers. • Busy Bee reserves the right to refuse reimbursement or repairs or replacement if a third party without our prior authorization has carried out repairs to the item. • Repairs made by Busy Bee are warranted for 30 days on parts and labour. • Any unforeseen repair charges will be reported to you for acceptance prior to making the repairs. • The Busy Bee Parts & Service Departments are fully equipped to do repairs on all products purchased from us with the exception of some products that require the return to their authorized repair depots. A Busy Bee representative will provide you with the necessary information to have this done. • For faster service it is advisable to contact the nearest Busy Bee location for parts availability prior to bringing your product in for repairs. For more information, call Toll Free 1-800-461-BUSY(2879) or visit www.busybeetools.com 20 21 22