1
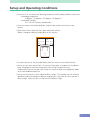
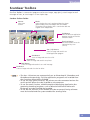
Canon Color Image Scanner
CanoScan D1230U/D2400U
Product Guide
As an ENERGY STAR Partner, Canon Inc. has determined that this model meets the ENERGY
STAR Program for energy efficiency.
The International ENERGY STAR Office Equipment Program is an international program that promotes energy saving
through the use of computers and other office equipment. The program backs the development and dissemination
of products with functions that effectively reduce energy consumption. It is an open system in which business
proprietors can participate voluntarily. The targeted products are office equipment such as computers, displays,
printers, facsimiles, copiers, scanners and multifunction systems. Their standards and logos are uniform among
participating nations.
Use of a shielded cable with the ferrite core provided with the scanner is necessary to comply with the technical
requirements of the EMC Directive.
Warning
When you use this product, you should pay attention to the following legal issues:
• Scanning of certain documents, such as bank notes (bank bills), government bonds and public
certificates, may be prohibited by law and may result in criminal and/or civil liability.
• You may be required under law to obtain authorization from a person possessing copyrights or other
legal rights to the item being scanned.
If you are uncertain of the legality of scanning any particular item, you should consult your legal
adviser in advance.
• CanoScan, ScanGear and Canon Plug-in Module are trademarks of Canon Inc.
• Adobe®, Acrobat® and Photoshop® are trademarks of Adobe Systems Incorporated.
• Macintosh, Power Macintosh and Mac OS are trademarks of Apple Computer, Inc., registered in the U.S. and other
countries.
• iMac is a trademark of Apple Computer, Inc.
• Microsoft and Windows are registered trademarks of Microsoft Corporation in the U.S. and other countries.
• OmniPage Pro and OmniPage SE are trademarks of ScanSoft, Inc.
• Other names and products not mentioned above may be trademarks or registered trademarks of their respective
companies.
Copyright © 2001 Canon Inc. All rights reserved.
2
Table of Contents
Handling and Care of the Scanner
Safety Precautions .................................................................................... 5
Setup and Operating Conditions ................................................................... 7
Before Transporting the Scanner .................................................................. 8
Care and Maintenance ................................................................................... 9
Guide to the Software
Software for Windows
ScanGear CS-U .......................................................................... 11
ScanGear Toolbox .................................................................... 13
Adobe Photoshop LE ............................................................... 19
ArcSoft PhotoBase ................................................................... 20
ScanSoft OmniPage Pro ........................................................... 21
Canon PhotoRecord ................................................................. 22
Software for Macintosh
Canon Plug-in Module CS-U .................................................... 16
CanoScan Toolbox .................................................................... 18
Adobe Photoshop LE ............................................................... 19
ArcSoft PhotoBase ................................................................... 20
ScanSoft OmniPage SE ............................................................. 21
Canon Image Browser .............................................................. 22
Precautions for Scanning at High Resolutions ............................................ 23
Customer Support Help Desk ........................................................................................... 24
3
Handling and Care of the Scanner
This section describes the general precautions for using the scanner. Please be sure to read each
section for safe handling and operation.
Safety Precautions .................................................................................... 5
Setup and Operating Conditions ................................................................... 7
Before Transporting the Scanner .................................................................. 8
Care and Maintenance ................................................................................... 9
4
Safety Precautions
Please read and take note of the following precautions before using the equipment.
WARNING
Indicates a warning concerning operations that may lead to death or injury to
persons if not performed correctly. In order to use the equipment safely, always pay
attention to these warnings.
CAUTION
Indicates a caution concerning operations that may lead to injury to persons or
damage to property if not performed correctly. In order to use the equipment
safely, always pay attention to these cautions.
About Locations
WARNING
• Do not place the equipment near flammable liquids such as alcohol or thinners. If
the internal electrical parts come in contact with flammable liquids, fire or electrical
shock may result.
• Do not place the following objects on top of the equipment. If the internal
electrical parts come in contact with these objects, fire or electrical shock may
result.
- metallic objects, such as necklaces
- containers with liquid, such as cups, vases and flower pots
• Do not place the equipment on shaky stands, unstable surfaces or surfaces subject
to frequent vibrations. If the equipment falls, it may cause injuries.
• Do not place heavy objects on the equipment. Objects may fall and cause injuries.
About the Power Supply
WARNING
• Do not damage, mutilate or modify the AC adapter. Do not place heavy objects on,
pull or excessively bend the cord of the AC adapter. Damaged wires may cause fire
or electrical shock.
• Do not plug in/unplug the AC adapter with wet hands. Fire or electrical shock may
result.
• Do not connect excessive numbers of plugs into one electrical outlet. Fire or
electrical shock may result.
• Do not twist or tie the AC adapter together. Fire or electrical shock may result.
• Always plug the AC adapter in all the way. If it is not plugged in completely, fire or
electrical shock may result.
• Do not use AC adapters other than the one supplied. Fire or electrical shock may
result.
• As a rule, do not use electrical extension cords. Fire or electrical shock may result. If
the use of an extension cord is necessary, do not use one longer than 5 m (15 feet).
Make sure that the extension cord is not twisted, and that the AC adapter is fully
plugged into the extension cord. Do not use multiple extension cords.
• Do not use extension cords in corridors or other high traffic areas where they can
be stepped on or tripped over. This could damage the cords and result in fire or
electrical shock.
• Do not use the AC adapter outdoors or in exposed areas.
5
CAUTION
• Do not plug the equipment into outlets with voltages other than the specified
voltages. Incorrect voltages may result in fire or electrical shock.
• When unplugging the AC adapter, always pull on the main body. Pulling on the
cord may damage the wires and lead to fire or electrical shock.
• Do not place objects around the AC adapter in case it needs to be unplugged
during emergencies.
• Unplug the AC adapter from the outlet at least once a year and clean the area
around the base of the AC adapter’s metal pins to ensure that all dust is removed. If
dust accumulates in this area, it may result in fire.
General Handling Precautions
WARNING
• Do not take apart or modify the equipment. Fire or electrical shock may result from
improper handling of its components.
• If you hear unusual noises, see smoke, feel excessive heat or smell anything
unusual, immediately unplug the AC adapter and contact your retailer or Canon
Customer Support Help Desk. Continued use may result in fire or electrical shock.
• Do not use flammable sprays near this equipment. Also do not spill water, liquids,
or flammable liquids on the equipment. If these fluids enter this equipment and
contact the electrical parts, fire or electrical shock may result. If anything enters
the equipment, immediately unplug the AC adapter and contact your retailer or
Canon Customer Support Help Desk.
• When cleaning the equipment, always unplug the AC adapter. Otherwise, fire or
electrical shock may result.
• When cleaning the equipment, use a water-moistened cloth that is well wrung out.
Do not use flammable liquids, such as alcohol, benzene or thinners. If a flammable
liquid enters the inner electrical parts, fire or electrical shock may result.
CAUTION
• Carefully close the document cover in order not to pinch your hands.
• Do not press heavily on the document cover. The document glass may break and
injure you.
• When not in use for extended periods, such as long weekends, unplug the AC
adapter for safety.
• When transporting the equipment, be extremely careful. Dropping it could cause
an injury.
• Wait until the equipment has cooled before placing a cover over it. Otherwise fire
may result.
• Do not use the supplied CD-ROM in regular CD players. It produces excessively loud
sound that may cause hearing damage.
6
Setup and Operating Conditions
• Please use in an area where the following temperature and humidity conditions can be met.
Surrounding temperature:
10 degrees - 35 degrees C (50 degrees - 95 degrees F)
Surrounding humidity:
10% - 90% RH (without condensation)
• Please use where the electrical conditions (normal home outlets) can be met in your
country.
• Make certain there is plenty of clear space around the scanner.
(Below is a diagram looking straight down on the scanner)
Approx. 20 cm
(8 in)
Approx. 10 cm
(4 in)
Approx. 10 cm
(4 in)
• Set up the scanner so that the cable reaches from the scanner to the electrical outlet.
• Do not set up in areas where there is an excessive fluctuation in temperature. Also do not
move the equipment from low temperature areas to hight temperature areas.
Condensation may cause image errors. Leave the scanner enough time to gradually adapt
to the new conditions before use.
• Do not use the scanner in areas subject to direct sunlight. The humidity may rise inside the
equipment and cause damage or decrease image quality. If you have to use the scanner in
direct sunlight, make sure to use a thick curtain to block the light.
7
Before Transporting the Scanner
Always lock the scanning unit by pushing the lock switch toward the lock mark before moving or
transporting the scanner.
○
○
○
○
○
○
○
○
○
○
○
○
○
○
○
○
○
○
○
○
○
○
○
○
○
○
○
○
○
○
○
○
○
○
○
○
○
○
○
○
○
○
○
1.
Unplug the AC adapter from the electrical outlet and detach the
USB cable from the computer.
2.
Confirm the position of the scanning unit.
○
○
○
○
○
○
○
○
○
○
○
○
○
○
○
○
○
○
○
○
○
○
○
○
○
○
○
○
○
○
○
○
○
○
○
○
○
○
○
○
○
○
○
○
○
Open the document cover, and confirm that the scanning unit is at the back of the
scanner. If it has not returned, follow the procedures below to return the scanning unit
to the home position.
1 Ensure that there are no items on the document glass (platen).
2 Turn on the computer.
3 Close the document cover, connect the AC adapter to the electrical outlet, and
connect the USB cable to the computer.
4 Start ScanGear CS-U (Windows)/Canon Plug-in Module CS-U (Macintosh), and
click the [Preview] button.
5 Confirm that the scanning unit has completely returned to the back of the
scanner.
6 Disconnect the AC adapter and USB cable.
Scanning Unit
Confirm that the scanning
unit is in this position
○
3.
○
○
○
○
○
○
○
○
○
○
○
○
○
○
○
○
○
○
○
○
○
○
○
○
○
○
○
○
○
○
○
○
○
○
○
○
○
○
○
○
○
○
○
Lock the scanning unit by pushing the lock switch toward the
lock mark ( ).
Lock Switch
Locked
• Carrying or transporting the scanner without locking the scanning unit
may damage it. Be particularly careful to lock the scanning unit when
transporting the scanner in a vehicle.
8
Care and Maintenance
Clean off the dirt and dust that adheres to the exterior, document glass and document cover of the
scanner during the course of ordinary operation using the following procedures.
○
○
○
○
○
○
○
○
○
○
○
○
○
○
○
○
○
○
○
○
○
○
○
○
○
○
○
○
○
○
○
○
○
○
○
○
○
○
○
○
○
○
○
1.
Unplug the AC adapter from the electrical outlet and detach the
USB cable from the computer.
2.
When cleaning the document cover or document glass, dampen
a clean, soft cloth with water and wring the cloth well. Use the
well-wrung cloth to gently remove dirt and dust. Then,
thoroughly remove any moisture or water vapor with a soft,
dry cloth. Be particularly careful to remove any traces of dirt or
liquid when wiping the document glass.
○
○
○
○
○
○
○
○
○
○
○
○
○
○
○
○
○
○
○
○
○
○
○
○
○
○
○
○
○
○
○
○
○
○
○
○
○
○
○
○
○
○
○
○
○
• Moisture left on the document glass or cover may damage photographs and other
documents as well as produce poor results.
• Do not dampen the connectors, ports or other metallic components on the scanner’s
back panel. Immediately remove any moisture that contacts these components by
wiping them with a dry cloth.
• Do not use a sodden cloth or apply a liquid directly to any portion of the scanner.
Any moisture that enters the interior, the underside of the document glass or the
sensors may degrade image quality and lead to malfunctions.
• Never use substances containing alcohol, thinners or benzene on the equipment.
Use of these substances may deform, discolor or dissolve the casing.
Outer Casing
Document Cover
Document Glass
Never use substances
containing alcohol,
thinners or benzene to
clean the equipment.
9
Guide to the Software
This section introduces to the software programs bundled with the scanner. For detailed instructions of
each program, please read the respective PDF manuals contained in the CD-ROM.
Software for Windows
ScanGear CS-U .......................................................................... 11
ScanGear Toolbox .................................................................... 13
Adobe Photoshop LE ............................................................... 19
ArcSoft PhotoBase ................................................................... 20
ScanSoft OmniPage Pro ........................................................... 21
Canon PhotoRecord ................................................................. 22
Software for Macintosh
Canon Plug-in Module CS-U .................................................... 16
CanoScan Toolbox .................................................................... 18
Adobe Photoshop LE ............................................................... 19
ArcSoft PhotoBase ................................................................... 20
ScanSoft OmniPage SE ............................................................. 21
Canon Image Browser .............................................................. 22
Precautions for Scanning at High Resolutions ............................................ 23
10
Windows
ScanGear CS-U
ScanGear CS-U is the specialized driver for Windows that allows you to scan and load images from the
scanner. It cannot be used as a stand-alone program. And must be started within an application
program. It is also called a TWAIN driver (see the next page for information about TWAIN drivers).
Window in the Simple Mode
All you need to do is select the Image Type to scan immediately at the optimal settings.
Image Type
Toolbar
Adjust images easily with the
zoom, rotate and auto crop
buttons, etc.
Preview Button
Previews items and displays the
results in the preview area.
Preview Area
Displays the preview image. Use it
to select a scan area or adjust the
image.
Simple/Advanced Mode Button
Window in the Advanced Mode
Set the Color Mode and Output Resolution to scan. Image brightness, contrast and color
balance can be fine-tuned.
11
Windows
ScanGear CS-U Features
• Scan with the optimal settings just by selecting the Image Type to suit your purposes in the
Simple Mode
• Adjust various settings, such as the color mode, resolution, color balance and brightness, in
the Advanced Mode
• Initiate various functions with the single press of a toolbar button
• See the image clearly in the large, easy-to-see preview area
Starting ScanGear CS-U
Select ScanGear CS-U as a TWAIN driver from ScanGear Toolbox, Adobe Photoshop LE,
OmniPage Pro or other TWAIN-compliant application programs. Please refer to each
program’s manual for the correct procedure since it varies between programs.
What is a TWAIN Driver?
• TWAIN is the acronym for a set of worldwide standards for software that processes data
exchanged between graphics application programs and input devices, such as scanners. A device
driver based on these standards is called a TWAIN driver.
• ScanGear CS-U is not a stand-alone program that can be started by itself. It is used as a TWAIN
driver. Start the application program first, then start ScanGear CS-U from within the program.
The images scanned while both programs are running will be directly loaded into the
application program (the application program must comply with the TWAIN_32 standard).
Photoshop LE
Start TWAIN driver from within
an application program.
ScanGear CS-U works as a TWAIN driver on top of
the application program’s window.
• The methods for starting TWAIN drivers vary between application programs. See the respective
manuals for other programs.
12
Windows
ScanGear Toolbox
ScanGear Toolbox is a convenient program used to scan images, copy (print), attach images to email
messages or faxes, or save images in a few simple steps.
ScanGear Toolbox Toolbar
Scanner
Select your
scanner.
Mode
Select whether the scan is performed from the platen
(platen mode) or the Film Adapter Unit (film mode).
This option will not display with a scanner that does not
support a Film Adapter Unit.
Link Button
Links the driver or application
program used by each of the
function buttons.
Easy Scan Button
Use these buttons to set the
settings for Easy Scan.
(➜ P.15)
Scan (1-3) Buttons
Scans an image and sends it to a
linked application program.
Save Button
Scans an image and saves it to a file.
Copy Button
Scans an image and sends it to a printer.
Mail Button
Scans an image and attaches it to a mail message.
Fax Button
Scans an image and sends it to the fax driver.
• The Scan 1-3 buttons are automatically set to Photoshop LE, PhotoBase and
PhotoRecord respectively, if all the application programs are installed from
the CanoScan Setup Utility CD-ROM.
• To use the copy (print) function, the printer must be connected and on-line
and its printer driver must be installed on the computer.
• To use the email function, a MAPI-compliant (Messaging Application Programming Interface) program, such as Microsoft Outlook or Microsoft
Exchange, must be installed and enabled.
• To use the fax function, a fax modem must be connected, faxing software
must be installed and the system enabled for sending faxes.
13
Windows
How to Use ScanGear Toolbox
Starting ScanGear Toolbox
• Push the Start Button in front of the scanner, or push the Film Scan Button on top of the Film
Adapter Unit (option).
How to Scan
You can start a scan without starting the driver software simply by clicking a button on the
ScanGear Toolbox toolbar and specifying the scan conditions.
Copy (Print) Example
1. Click the [Copy] button on the toolbar.
2. The [Scan Settings] dialog will appear. Set the [Image type], [Image quality] and [Paper
Size], and click the [OK] button.
3. The printer driver settings dialog will display. Set the paper settings and other desired
settings and click the [OK] button.
4. The scanner will start scanning the image and the printer will print it.
14
Windows
How to Use the Easy Scan Funtion
It is convenient to use the Easy Scan function when you wish to scan repeatedly with the same
settings.
Setting the Initial Settings
Copy (Print) Example
1. Click the [Easy Copy] button.
2. After the confirmation dialog, the [Easy Copy Settings] dialog will appear.
• Set the [Image type], [Image quality], [Paper size] and [Number of copies] settings and
click the [OK] button.
3. The [Easy Copy] button on the toolbar will remain depressed.
Scanning with the Easy Scan Function
Copy Example
1. Click the [Copy] button or press the scanner’s Start Button.
2. The image will be scanned and sent to the printer.
• You can scan additional images simply by changing the item on the scanner and repeating
Step 1.
• Easy Scan can be performed as long as the Easy button remains depressed on the toolbar.
• To cancel Easy Scan, click the [Easy] button again (when it appears to be depressed on the
toolbar). The button will return to its original state.
15
Macintosh
Canon Plug-in Module CS-U
Canon Plug-in Module CS-U is the specialized Macintosh driver that allows you to scan and load
images from the scanner. It cannot be used as a stand-alone program and must be started from within
an application program. It is also called a plug-in module (see the next page for information about
plug-in modules).
Tool Buttons
Edit images easily
with the zoom,
rotate, tone
adjustment, auto
tone adjustment and
browser buttons.
Preview Area
Displays the
preview image.
Use it to select a
scan area or
adjust the image.
Preview Button
Previews items and displays the
results in the preview area.
Click the [Tone Adjustment] button to access
five methods of adjusting the image coloring.
Canon Plug-in Module CS-U Features
• Designed with an ergonomic control panel for effective access to all functions
• Supports a large, easy-to-view preview area that adjusts to the size (resolution) of your display
• Supports ColorSync color matching for consistent colors between the scanner, display and
printer
• Displays details of the scanned image prior to scanning for accurate checks with the browser
function
• Provides full-featured tone adjustment with the histogram, tone curve, brightness and
contrast, color balance and gamma value functions
16
Macintosh
Starting Canon Plug-in Module CS-U
Select Canon Plug-in Module CS-U as a plug-in from CanoScan Toolbox, Photoshop LE,
OmniPage SE or other plug-in-compliant application programs. Please refer to each program’s
manual for the correct procedure since it varies between programs.
What is a Plug-in?
• A plug-in is a program that augments the functions of a plug-in compatible application program
(such as CanoScan Toolbox or Photoshop LE). It may be called a plug-in or plug-in module.
• Canon Plug-in Module CS-U is not a stand-alone program that can be started by itself. It is used
as a plug-in program. In this case, start an application program first, then select [CanonPI CS-U
4.1.0...] from within the program. The scanned images will load directly into that application
program.
Photoshop LE
Start the plug-in from the
application software
The plug-in operates in the
application program window
• The methods for starting plug-ins vary between application programs. See the respective
manuals for other programs.
17
Macintosh
CanoScan Toolbox
CanoScan Toolbox is a convenient program to scan or edit images, create or edit albums, copy (print),
or attach images to faxes. When it is linked to image editing programs such as Photoshop LE, you can
start the application and open an image file just by dragging and dropping an image from an album
onto the application icon.
Canon Scanner Assistant
CanoScan Toolbox Toolbar
Launches Canon Plug-in Module CS-U
Opens the image and allows you to use the editing tools, brush and color palettes
Opens an image stored in a catalog
Starts linked applications when an image file
from an album is dropped on the icon
Closes the CanoScan Toolbox Toolbar.
To open the toolbar again, click [CanoScan Toolbox] from the [Window] menu.
• To use the fax function, a fax modem must be connected, generic faxing
software or the bundled fax software must be installed and the system
enabled for sending faxes.
• To use the print function, the printer must be connected and on-line and its
printer driver must be installed on the computer.
• To link applications to the toolbar, click the Unassigned buttons and select
the application files.
How to Use CanoScan Toolbox
Starting CanoScan Toolbox
• Push the Start Button in front of the scanner, or push the Film Scan Button on top of the Film
Adapter Unit (option).
• Double click the CanoScan Toolbox icon in the CanoScan Toolbox folder.
How to Use the Functions
• Click a button on the toolbar.
• Drag the image from an album and drop it on the application icon.
18
Windows & Macintosh
Adobe Photoshop LE
Adobe Photoshop 5.0 LE can be used to retouch and manipulate images.
• Correcting images, such as those that are too dark or bright
• Adding special effects, such as the mosaic or wave effect
• Creating reports, presentation materials or websites with images
• Effortlessly creating original postcards, invitations, business cards, labels or CD covers with
images
Scan
Apply Special Effects
Stitch
Starting Photoshop LE and the Driver Software
Windows
1. Click the Windows [Start] button and select [Programs], [Adobe], [Adobe Photoshop 5.0 LE]
and [Adobe Photoshop 5.0 LE]. Photoshop LE will start.
2. Click the [File] menu, select [Import] and [TWAIN_32]. ScanGear CS-U will start and display
its main window.
• If other TWAIN driver is installed on your computer, you must choose this
scanner before proceeding to Step 2. Click the [File] menu, select [Import] and
[Select TWAIN_32 Source], and select [CanoScan D1230U] or [CanoScan D2400U]
on the dialog box.
Macintosh
1. Open the [Adobe Photoshop LE] folder and double-click the [Photoshop LE] icon. Photoshop
LE will start.
2. Open the [File] menu and select [Acquire] and [CanonPI CS-U 4.1.0...]. Canon Plug-in
Module CS-U will start and display its control panel.
19
Windows & Macintosh
ArcSoft PhotoBase
PhotoBase is an image database program that can create and edit image albums, perform image
searches and create slide shows. It also handles sound and video files. The Windows version can
prepare images for pasting into web sites or send images as attachments for email.
Create Albums
Paste Images into Web Pages
(Windows)
Starting ArcSoft PhotoBase and the Driver Software
Windows
1. Click the Windows [Start] button and select [Programs], [ArcSoft PhotoBase] and
[PhotoBase]. PhotoBase will start.
2. Click the [Edit] menu and select [Acquire]. In the Select Source dialog, select [CanoScan
D1230U] or [CanoScan D2400U]. ScanGear CS-U will start and display its main window.
Macintosh
1. Open the [ArcSoft PhotoBase] folder and double-click the [ArcSoft PhotoBase] icon.
PhotoBase will start.
2. Open the [File] menu and select [Import] and [CanonPI CS-U 4.1.0...]. Canon Plug-in Module
CS-U will start and display its control panel.
20
Windows & Macintosh
ScanSoft OmniPage
ScanSoft OmniPage Pro (Windows) / SE (Macintosh) is an optical character recognition (OCR) program
that converts characters scanned from a book, magazine or newspaper into text data for editing or
digital transmission. After conversion, the text can be edited with word processors and similar
programs.
Windows
Macintosh
Starting OmniPage and the Driver Software
Windows
When you install OmniPage Pro, the Add Scanner Wizard will display. Choose the [CanoScan
D1230U] or [CanoScan D2400U] option. This instructs OmniPage Pro to select the correct
scanner for scanning.
1. Click the Windows [Start] button and select [Programs], [Caere Applications] and
[OmniPage Pro 9.0]. OmniPage Pro will start.
2. Click the [Scan Image] button on the toolbar, or open the [Process] menu and select [Scan
Image]. The scanner will start scanning and display the scanned image in OmniPage Pro.
• If the toolbar button displays as [Load Image], click the arrow and select [Scan
Image]. Or if the Process menu item displays as [Load Image], open the [Process]
menu and select [Process Settings]. In the [Process] tab, select [Scan Image].
Macintosh
1. Open the [OmniPage 8 SE Folder] folder and double-click the [OmniPage 8 SE] icon.
OmniPage SE will start.
• For the initial setting, open the [Settings] menu and select [Select Scanner], then
select [CanoScan D1230U] or [CanoScan D2400U].
2. Click the [Scan Image] button on the toolbar, or open the [Process] menu and select [Scan
Image]. Canon Plug-in Module CS-U will start and display its control panel.
3. Select [Black & White] as the scan mode and [OCR(300dpi)], [OCR(400dpi)] or [OCR(600dpi)]
as the output device. Click the [Scan] button. The scanned image will display in OmniPage SE.
• If the toolbar button displays as [Load Image], select [Scan Image] from the
button below it. Or if the Process menu item is labeled [Load Image], open the
[Process] menu and select [Process Settings] and [Scan Image].
21
Windows & Macintosh
Canon PhotoRecord (Windows)
Canon Image Browser (Macintosh)
Canon PhotoRecord
Canon PhotoRecord is a photo printing software running on Windows.
As sticking photos on an album, you can stick the image files on the album window of the
PhotoRecord and layout them. You can also decorate the background of the album window, trim the
images, and adjust the color.
You can save the album window as a file and can print it to the printer as is.
Refer to the bundled “Enjoying Digital Photos” about the Canon perforated paper printing with the
PhotoRecord.
Canon Image Browser
Canon Image Browser is a photo printing software running on Macintosh.
You can make a thumbnail index and print it to the printer or convert it to a data for a home page.
Refer to the bundled “Enjoying Digital Photos” about the Canon perforated paper printing with the
Image Browser.
22
Precautions for Scanning at High Resolutions
Please note that file sizes increase almost exponentially as the resolution is raised when scanning in
color mode. Scanning at high resolutions may require more time for scanning and image processing.
You are recommended to avoid raising the resolution beyond the minimum requirement to scan in
color mode.
File Size Estimates for Scanning an A4 Size Original in Color
-
75 dpi
100 dpi
150 dpi
300 dpi
600 dpi
1200 dpi
1.6 MB
2.8 MB
6.3 MB
25.5 MB
102 MB
408 MB
408 MB
102 MB
A4 color image
25.5 MB
1.6 MB
2.8 MB
75 dpi
100 dpi
6.3 MB
150 dpi
300 dpi
600 dpi
1200 dpi
* These numbers are approximate and may differ from actual scan results.
Resolution Guidelines
• For uploading to a web site or viewing on a computer monitor, choose 75 dpi
• For scanning print photos and magazine clippings, choose 150 - 300 dpi
• For printing on a inkjet printer, choose a resolution approximately half the printer’s rating (180 dpi,
360 dpi, 720 dpi)
A resolution higher than 600 dpi is effective in case for scanning relatively small originals that will be
blown up to larger sizes for printing.
12"(30cm)
Scanning at double
of the resolution
6"(15cm)
8"(20cm)
4"(10cm)
Scanning at half
of the resolution
3"(7.5cm)
2"(5cm)
The maximum size of a file scanned by the bundled PhotoBase is limited by Windows Me/98 to 256
MB. Windows 2000 Professional does not impose these limits.
23
Customer Support Help Desk
CANON INC.
CANON ESPAÑA S.A.
30-2, Shimomaruko 3-chome, Ohta-ku
Tokyo 146-8501, Japan
CANON U.S.A., INC.
Digital Home and Personal Systems Division
2995 Redhill Avenue
Costa Mesa, CA 92626, U.S.A.
1-800 OK CANON
http://www.ccsi.canon.com
C/Joaquin Costa No 41, 28002
Madrid, Spain
Help Desk: 906.301255
Tel.: 91-5384500 Fax.: 91-4117780
CANON DANMARK
Vasekær 12, DK-2730 Herlev, Denmark
Hotline: 44 88 26 66
http://www.canon.dk
CANON NORGE AS
CANON CANADA INC.
Hallagerbakken 110, Boks 33, Holmlia, 1210 Oslo 12, Norway
Tlf: 2262 9321 FAX. 2262 0615
6390 Dixie Road, Mississauga
Ontario L5T 1P7, Canada
1-800 OK CANON
http://www.canon.ca
CANON SVENSKA AB
Gustav III:s Boulevard 26, S-169 88 Solna, Sweden
Tel 08-744 85 00
Fax 08-744 64 65
http://www.canon.se
CANON LATIN AMERICA, INC.
6505 Blue Lagoon Drive, Suite 325
Miami, Florida 33126, U.S.A.
CANON OY AB
CANON MEXICANA, S. de R.L. de C.V.
Kornetintie, 3, 00380 Helsinki, Finland
Puhelin: 010 544 20
Helpdesk: 0600-0-22606
(maksu 14,80 mk/min)
Fax: 010 544 4571
Anillo Periferico Sur No. 4124, Torre Zafiro (II) Colonia
Ex-Rancho de Anzaldo, Piso 5 y 6, Mexico D.F.
Tel. (525) 5490-2000
CANON PANAMA, S.A.
Apartado 7022, Panama 5
Rep. de Panama
Tel. (507) 279-8900
CANON SINGAPORE PTE. LTD.
79 Anson Road #09-01/06
Singapore 079906
http://www.canon-asia.com
CANON CHILE, S.A.
Ave. Manquehue Norte #1337, Piso 3, Casilla 187-9,
Santiago, Chile
Tel. (562) 366-6600
CANON MARKETING SERVICES PTE. LTD.
No. 1, Jalan Kilang Timor
#09-00 Pacific Tech Centre
Singapore 159303
Tel: 65-7998888, Fax: 65-2736786,
Hotline: 65-3342726
http://www.canon.com.sg
CANON ARGENTINA, S.A.
Ave. Corrientes 420 (1043)
Buenos Aires, Argentina
Tel. (5411) 432-59800
CANON MARKETING (MALAYSIA) SDN. BHD.
CANON EUROPA N.V.
Block D, Peremba Square
Saujana Resort, Section U2, 40150 Shah Alam
Selangor Darul Ehsan, Malaysia
Tel: 603-7446000, Fax: 603-7446048,
Helpdesk: 603-7446008/9
Enquiry: print&[email protected]
http://www.canon.com.my
P.O. Box 2262 1180 EG Amstelveen,
The Netherlands
CANON (UK) LTD.
Woodhatch, Reigate
Surrey RH2 8BF, United Kingdom
For technical support, please contact Canon Helpdesk.
Helpdesk:
P.O. Box 431, Wallington, Surrey SM6 0XU
TEL: (08705) 143 723
FAX: (08705) 143 340
For sales enquiries: (0121) 666-6262
CANON MARKETING (THAILAND) CO. LTD.
179/34-45 Bangkok City Tower, 9th-10th Floor
South Sathorn Road, Thungmahamek,
Sathorn, Bangkok 10120, Thailand
Tel: 662-3449999, Fax: 662-3449968
http://www.canon.co.th
CANON FRANCE S.A.
17, quai du Président Paul-Doumer
92414 Courbevoie Cedex, France
Tél.01 4199 7777 Fax.01 4199 7951
Hotline: Tél.01 4199 7070
CANON MARKETING (PHILIPPINES) INC.
Marvin Plaza Building, 2153 Don Chino Roces Ave,
Makati City, Metro Manila, Philippines
Tel: 632-8126047, Fax: 632-8120067/8109797
CANON DEUTSCHLAND GmbH
CANON INDIA PVT LTD.
Postfach 528, 47705 Krefeld, Germany
CANON- Hotline-Service
Customer Support: (0 21 51) 349-555
Info-Desk: (0 21 51) 349-566
Mailbox: (0 21 51) 349-577
Telefax: (0 21 51) 349-588
Neela Gagan, Mandi Road,
Mehrauli, New Delhi-110030, India
Tel: 91-11-6806572, Fax: 91-11-6807180
CANON HONGKONG CO., LTD.
9/F, The Hong Kong Club Building
3A Chater Road, Central, Hong Kong
TEL: (852) 2739 0802
FAX: (852) 2739 6428
CANON ITALIA S.p.A
Palazzo L, Strada 6,
20089 Milanofiori-Rozzano (MI), Italy
TEL: 02/8248. 1 FAX: 02/8248. 4604
Pronto Canon 02/8249. 2000
http://www.canon.it
CANON AUSTRALIA PTY. LTD.
1 Thomas Holt Drive, North Ryde, Sydney N.S.W. 2113, Australia
Info-Line: (02) 9805 2864
CANON BENELUX NEDERLAND N.V.
CANON NEW ZEALAND LTD.
Neptunusstraat 1, 2132 JA Hoofddorp
The Netherlands
Tel: 023-5 670 123 Fax: 023-5 670 124
Helpdesk: 023-5 681 681
Fred Thomas Drive, Takapuna
P.O. Box 33-336, Auckland, New Zealand
Info-Line: 0900-522666
CANON BENELUX BELGIUM N.V./S.A.
ADOBE SYSTEMS INCORPORATED
Bessenveldstraat 7, 1831 Diegem, Belgium
Tel: 02 7220411 Fax: 02 7213274
Helpdesk: 02 7220404
http://www.adobe.com
ARCSOFT, INC.
http://www.arcsoft.com
CANON GmbH
SCANSOFT, INC.
Zetschegasse 11, 1232 Wien, Austria
http://www.scansoft.com
CANON (SCHWEIZ) A.G.
Industriestrasse 12, CH-8305 Dietlikon
Switzerland
Tel: (01) 835 61 61 Fax: (01) 835 68 60
Hotline: 157 30 20
I-OE-058A
012001CDS
© CANON INC. 2001
24