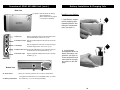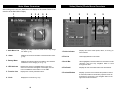
1
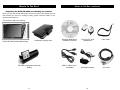
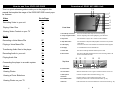
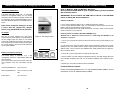
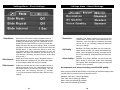
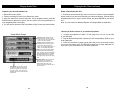
IMPORTANT INFORMATION
IMPORTANT INFORMATION (CONT.)
Important safeguards for you and your new product
Your product has been manufactured and tested with your safety in mind. However, improper use can
result in potential electrical shock or fire hazards. To avoid defeating the safeguards that have been
built into your new product, please read and observe the following safety points when installing and
using your new product, and save them for future reference. Observing the simple precautions discussed in this booklet can help you get many years of enjoyment and safe operation that are built into
your new product. This product complies with all applicable U.S. Federal safety requirements, and
those of the Canadian Standards Association.
Warning
Use of this product is for your personal use only. Unauthorized recording or duplication of
copyrighted material may infringe upon the rights of third parties and may be contrary to
copyright laws.
CAUTION
RISK OF ELECTRIC SHOCK
DO NOT OPEN
WARNING - TO REDUCE THE RISK OF ELECTRIC
SHOCK DO NOT REMOVE COVER (OR BACK). NO USER
SERVICEABLE PARTS INSIDE. REFER TO QUALIFIED
PERSONNEL.
Battery can only be repaired or replaced by authorized service personnel.
The lighting flash with arrowhead symbol, within an equilateral triangle, is intended to
alert the user to the presence of uninsulated “dangerous voltage” within the product’s
enclosure that may be of sufficient magnitude to constitute a risk of electric shock to persons.
The exclamation point within an equilateral triangle is intended to alert the user to the
presence of important operating and maintenance (servicing) insturctions in the literature
accompanying the appliance.
WARNING:
TO PREVENT FIRE OR SHOCK HAZARDS, DO NOT EXPOSE ANY PART OF THIS PRODUCT TO
RAIN OR MOISTURE.
REGULATORY INFORMATION
This equipment has been tested and found to comply with the limits for a Class B digital device, pursuant
to Part 15 of the FCC Rules. These limits are designed to provide reasonable protection against harmful
interference in a residential installation. This equipment generates, uses and can radiate radio frequency energy and, if not installed and used in accordance with the instructions, may cause harmful interference to radio communications. However, there is no guarantee that interference will not occur in a particular installation. If this equipment does cause harmful interference to radio or television reception,
which can be determined by turning the equipment off and on, the user is encouraged to try to correct the
interference by one or more of the following measures:
- Reorient or relocate the receiving antenna.
- Increase the separation between the equipment and receiver.
- Connect the equipment into an outlet on a circuit different from that to which the receiver is connected.
- Consult the dealer or an experienced radio/TV technician for help.
Any changes or modifications not expressly approved by the party responsible for compliance could void
the user’s authority to operate the equipment.
1
Caution
• Keep product out of direct sunlight. Exposure to direct sunlight or extreme heat (such as
inside a parked car) may cause damage or malfunction.
• Do not expose to rain or moisture.
Warning
• To avoid hearing loss, do not play your headphones at a high volume. Hearing experts
warn against extended high-volume play.
• If you experience a ringing in your ears, reduce volume or discontinue use.
• You should use extreme caution or temporarily discontinue use in potentially hazardous
situations.
Even if your headphones are an open-air type designed to let you hear outside sounds,
don’t turn up the volume so high that you are unable to hear what is around you.
Use of headphones while operating an automobile or moving vehicle is not recommended
and is unlawful in some states and areas. Be careful and attentive on the road. Stop operation of the unit if you find it disruptive or distracting while driving.
Back up your data
As with any device that has a hard disk drive which has moving parts, you should back up
the drive regularly. Apex Digital Inc. is not responsible for lost data.
Disclaimers
This document may describe features that are not currently implemented or available for
the E2GO MP-2000. Please visit www.apexdigitalinc.com for more information.
The MP-2000 supports “clear” or “unprotected” WMA content only. Does not support
secure music downloads from services that require Digital Rights Management (DRM)
capabilities.
This product incorporates copyright protection technology that is protected by method
claims of certain U.S. patents and other intellectual property rights owned by Macrovision
Corporation and other rights owners. Use of this copyright protection technology must be
authorized by Macrovision Corporation, and is intended for home and other limited
viewing uses only unless otherwise authorized by Macrovision Corporation.
Reverse engineering or disassembly is prohibited.
There may be circumstances where a multimedia file that is transferred from your computer to the MP-2000 may not work properly. THIS IS NOT A MALFUNCTION OF THE MP2000 - this is a common occurence with media files due to the differences in how the original file was encoded.
2
Table of Contents
Introduction
Congratulations!
Thank you for your purchase of the E2GO MP-2000 Portable Media Player by Apex
Digital . This player allows you to take your music, photos, movie files and voice recordings
with you wherever you go. Record non-copyright protected content from your VCR, DVD,
or camcorder. Transfer your existing audio and video files from your PC using the USB 2.0
connection. View your media files on the stunning 3.5" TFT color screen or view them with
others on a TV
With the freedom to take all of this with you, the MP-2000's battery life (as long as 7.5 hours
playing MP3s and w/ LCD off function enabled) will keep you entertained for hours on end.
With a large 20GB hard drive onboard, you can store thousands upon thousands of media
files, even record your voice with the built-in microphone!
Please visit our website at: www.apexdigitalinc.com for any product updates or information.
Files Playable by this unit:
AUDIO
PHOTOS
MP3,WMA*,,LPCM,ADPCM JPEG,GIF,BMP,TIF
*(Does not support “Protected”
WMA Files)
VIDEO
MP4,DIVX(V 4,5)MOTION
JPEG
WINDOWS MEDIA
Minimum Computer System Requirements:
- Pentium III 500MHz or higher recommended
- Windows 98SE (Use enclosed Driver disk), ME, 2000(SP3),XP
- 100MB free hard disc space for software/files to transfer
- 64MB RAM (128 MB recommended)
- CD-ROM drive capable of digital audio extraction (for CD to
MP3/WMA file conversion)
- USB port (2.0 recommended, 1.1 compliant)
- Installed Sound Card
- 16 bit color video card
Important Information............................ 1
Chapter 1: Introduction & Overview
Introduction............................................. 3
Computer System Requirements............. 4
Table Of Contents..................................... 4
Using the Voice Record Function...............
How to Record a Voice File............................
Play a Recorded Voice File............................
Delete a Recorded Voice File.........................
Recording Video to Your Unit..................... 28
A/V Recording from External A/V Equipment 28
What's in the Box?................................. 5
Play a Recorded AV File.............................. 29
How to use your E2GO MP-2000........... 7
Delete a Recorded AV File........................... 29
Overview of E2GO MP-2000 Unit........... 8
Viewing Video Content on your TV............. 29
Battery Installation & Charging Info .... 10
Recording Audio to Your Unit...................... 30
Audio Recording from external Audio
Equipment....................................................... 30
E2GO MP-2000 Driver Software Setup.. 12
Software Installation ................................
Installing the Driver Software....................
Firmware/Software Updates.....................
Connecting the MP-2000 to the Computer
Transferring Files......................................
Disconnecting the player..........................
12
12
12
13
13
14
Chapter 2: MP-2000 Operating Menu
Main Menu Overview.............................. 15
Video/Music/Photo Menu Overview..........
Voice Record Sub-Menu Overview...........
AV Record Sub-Menu Overview...............
Setting Menu Overview
Display Settings......................
Photo Settings........................
Record Settings......................
System Tab..............................
Info Tab....................................
Chapter 3: Playing and Recording
Files
16
17
18
19
20
21
22
23
24
Playing Audio Files........................................ 31
Playback your recorded audio files................. 31
Delete a Recorded Audio File.......................... 32
Listening to Audio Content on your Audio
Equipment........................................................ 32
Viewing Photo Files.......................................
To View a Single Photo file..............................
To View a Slide Show......................................
Rotate a Photo File..........................................
View a Screen of tumbnails.............................
Delete a Photo File..........................................
Viewing Photos on your TV.............................
33
33
33
33
33
34
34
Chapter 4: Additional Information
FAQ & Troubleshooting................................ 35
Specifications................................................. 37
Warranty......................................................... 38
How to Playback and Record AV Files 26
To Playback a Video or Audio File............ 26
Volume Adjustment................................... 26
3
27
27
27
27
4
What’s In The Box?
What’s In The Box -continued
Unpacking the E2GO MP-2000 and checking the contents
Before you start using the MP-2000, please review the contents of the package and verify
that everything is in the box. If anything is missing, please contact the retailer you purchased the MP-2000 from.
You should have ONE of the following:
Leatherette Carrying Case
E2GO MP-2000 Portable Media Player
MP-2000 Rechargable Lithium-Ion
Battery
5
Windows 98/ME Driver
Installation CD-ROM
“Over the Ear” Style
Headphones
Hand Strap
USB 2.0 Cable (Ver.1.1
compatible)
AC Adapter/Charger
A/V Cable
6
How to use Your E2GO MP-2000
Overview of E2GO MP-2000 Unit
78
This is a quick reference guide to refer you to the pages in this
manual that explain the usage of the E2GO MP-2000’s most popular features.
1
2
Video
Go to Page:
Recording Video to your unit
28
Playing Video Files
29
Viewing Video Content on your TV
29
Audio
Recording a Voice Memo/File
27
Playing a Voice Memo/File
27
Transferring Audio files to the player
13
Recording Audio to your unit
30
Playing Audio files
31
Connecting the player to an audio system
32
Photos
Viewing Photos
33
Viewing a Photo Slideshow
33
Viewing Photos on your TV
34
7
3
4
5
6
Front View
1: Hand Strap Connection
Secure the included hand strap here for hand carrying.
2: 4-way navigation button
Used for navigating menus and highlighting your selections.
3: Play/ Enter
Press this button to play a file or confirm a menu selection.
4: Stop/ Exit button
5: LCD Display
Press this button to stop file media playback and return to the previous
or main menu.
This is where the unit’s user interface and multimedia content appear.
6: Handgrip
For comfortable and secure handheld use.
7: Power LED
When lit, this LED light indicates that the power is ON.
8: Record LED
When lit, the LED light indicates when the unit is recording, either in AV
Record or Voice Record mode.
9
10
11
12
13
Top View
9: Power Button
Press this button to turn the unit on or off.
10: Lock Switch
Slide this switch left to lock or right to unlock the buttons on the unit.
11: Microphone
Use this microphone when Voice Recording. (p. 27)
12: Volume
Control/Mute button
Rock the switch to control volume level output. (p. 26)
Pressing the switch also controls the Mute function. (p. 26)
13: Record
Press this button to record in AV Record or Voice Record modes. (p. 29)
8
Overview of E2GO MP-2000 Unit (cont.)
Battery Installation & Charging Info
Back View
14: Speaker External speaker for listening
without Headphones.
(When headphones are plugged
in, the speaker is disabled).
Installing your battery
1.
1. Open Battery compartment by applying slight
downward pressure and
sliding the compartment
open. (see figure 1.)
15: A/V Input
Plug the supplied A/V cable here to allow audio & video
to be recorded directly into the unit. (p. 28)
16: Headphone Input Plug the supplied headphones into this input for private
listening.
17: AV Output
Plug the supplied A/V cable here, to output the signal
to another display device, such as a TV (p. 29)
18: USB 2.0 mini input Connect the USB cable from your computer to this port
for file transfers and other related tasks. (p. 13)
19: AC Power input
Plug the supplied AC adapter into this input to recharge
the battery. (p. 11)
Side View
2.
2. Insert Supplied
Rechargable Lithium-Ion
battery into battery compartment. (see figure 2.)
Close compartment and
then follow the charging
procedures on the next
page.
Bottom View
20
21
20: Tripod Socket
Allows you to securely mount the unit on a tripod or similar device.
21: Battery Compartment
The supplied removable lithium-Ion rechargeable battery is located
here. Please see p. 11 on how to charge the battery.
9
10
Battery Installation & Charging Info-continued
Note to Windows 98SE and Windows Me Users:
Do not connect the MP-2000 to your computer before you have installed
the necessary drivers.
CHARGING THE BATTERY
The E2GO MP-2000 comes with a removable
Lithium-Ion rechargeable battery. You can charge
the battery via the included AC adapter. Please visit
our accessory store at www.apexdigitalinc.com to
purchase additional batteries or other related accessories.
IMPORTANT: Do not connect the USB cable to the PC or the MP-2000
before or during the driver installation.
Software Installation:
If you’re running Windows 2000 or XP, no additional drivers are required.
If you’re running Windows 98SE or Me, you must install the device drivers from the CDROM in order for the MP-2000 to function properly.
Note: Windows 2000 users must install Service Pack 3 or later in order to ensure proper
device connection to your computer.
Note: Please charge the battery for at least
4 hours with the supplied AC adapter
before using the MP-2000 for the first time.
AC Adapter
Plug the AC Power Adapter into a wall outlet.
Connect the AC power adapter to the MP-2000 via
the AC charging input (see figure A). The Amber
Power LED will flash during charging. The battery is
fully charged when the meter shows Full (see figure
B.) To stop charging, disconnect the MP-2000 from
the AC Power Adapter.
E2GO MP-2000 Driver Software Setup
Figure A - AC Charger input
Installing the Driver Software (Windows 98SE&ME only):
Windows XP or 2000 users please proceed to “Connecting the MP-2000 to the
Computer” on page 13.
1. Turn on your computer and place the driver CD that came with your MP-2000 into your
CD drive.
FULL
EMPTY
Battery Consumption Reference
2. If the setup screen does not appear, double click My Computer, double click your CDROM drive icon. Now double click the “drivers” folder and then double click the “windows
98&me” folder. Here you will see the installation files, simply double click the “setup.exe”
file to install the drivers.
3. Follow the on-screen instructions to install all necessary files.
The internal battery is 2200mAhr, 3.7V, 1 Cell
rechargeable Lithium-ion. Approximate battery life
rates are below.
Note: These battery times were tested under optimum conditions. Your own unit’s battery life may
vary.
Figure B- battery charge meter
4. When complete, a “Finish” dialog box will appear that says “The USB” storage driver has
been installed completely” Click “OK” now to complete installation of the selected component.
5. Restart your computer to finalize the driver installation.
Video Playback/Record
Up to 3.5 hours
Firmware/Software Updates:
Music Playback/Record
Up to 7.5 hours ( w/ LCD
Off)
Please visit www.apexdigitalinc.com for any firmware/software updates, and for
instructions on how to implement these updates.
Photo Viewer
Up to 3.5 hours
11
12
Connecting the E2GO MP-2000 to the Computer
In order to fully use the E2GO MP-2000, you will need to connect it to your personal computer. This will allow you to transfer video, music, and photo files from your PC’s hard drive
to the hard disk on the MP-2000.
Windows 98SE or Windows Me Users: Please make sure the appropriate drivers
are installed before proceeding. See p. 12 for details.
1. (For Windows 98/ME users, please ensure that you have installed the device drivers
from the enclosed CD Rom before proceeding) Connect the supplied USB (2.0) cable to
your PC. The larger end should fit into the USB port on your computer. NOTE: (Due to the
higher transfer speed of USB 2.0, Apex recommends that your computer support this version. USB 2.0 is version 1.1 backwards compatible, however at a much slower data transfer speed).
2. Connect the USB cable to the MP-2000. The smaller end will fit into the USB port on the
side of the unit (see item 18, p. 9)
3. A message should appear on your PC monitor, saying that a USB device - “MP-2000”,
has been found, and that it is available for use.
4. To verify that the unit is connected, go to My Computer. You should see a drive listed as
MP-2000, followed by a drive letter. Double-click that drive. Your unit’s LCD screen will also
indicate that the USB is connected. You are now ready to transfer files to your MP-2000 for
viewing or listening!
Transferring Files
Once the MP-2000 has been connected, you may transfer files to it from your PC. See
above for connecting the unit to your computer.
Important:
It is recommended that compatible Audio content be copied into the AUDIO subfolder off of
the root of the device.
Video content MUST be copied into the VIDEO subfolder off of the root of the device to be
properly recognized by the device.
Photo content MUST be copied into the PHOTOS subfolder off of the root of the device to
be properly recognized by the device.
Transferring Files-continued
1. On your PC, locate the file you want to transfer to the MP-2000. For multiple files, hold
down the CTRL or SHIFT key when selecting the files. Right-click, and select ‘Copy’ from
the menu that appears.
2. Open My Computer and double-click on the drive labeled “MP-2000”.
3. Locate the correct folder for the file you have copied. (i.e., MUSIC for music files, VIDEO
for Video files, Photo for photo files, etc.) Double-click that folder.
4. Right-click, and select ‘Paste’ from the menu that appears. A window should appear, indicating that the file is being copied from your PC to the MP-2000.
That’s it! Simply repeat this process for any other files you wish to copy to your MP-2000.
Disconnecting the Player
Note: Before disconnecting the USB cable from the computer or the MP-2000 follow these
instructions to ensure that there is no data loss.
(Apex Digital is not responsible for any form of data loss, always back up your files
before transferring them.)
1. From the System Tray, left click on the Icon (or the icon in Windows 98SE/ME and
select Unplug or eject hardware. The Unplug or Eject Hardware screen appears. Select
the drive(s) corresponding to your unit and click stop.
2. The "Stop a Hardware Device" screen appears. Select the device to be stopped for confirmation and click OK.
You can also stop your MP-2000 by right clicking on the connected hardware icon from the
system tray and selecting the drive corresponding to your player.
Note:
There may be circumstances where a multimedia file that is transferred from your computer to the MP-2000 may not work properly. THIS IS NOT A MALFUNCTION OF THE MP2000 - this is a common occurence with media files due to the differences in how the original file was encoded.
13
14
Main Menu Overview
Video/Music/Photo Menu Overview
After turning on the unit, the Main Menu will display on the screen. Below is an
overview of the Main Menu Display
1
2
3 4
5
1
6
2
3
4
5
1. Main Menu List
Displays all available functions; scroll via the 4 way navigation button. (p. 8)
1. Folder Indicator
Displays the current folder (Video, Music, or Photo) you
have selected.
2. Alarm
Displays the current on/off status of the built in alarm clock.
(p. 24)
2. File List
Lists all playable files in this folder.
3. Battery Meter
Displays the real time status of the battery, also indicates
whether the unit is charging or not. (p. 11)
3. Scroll Bar
4. HDD Indicator
Displays the amount of available space on the hard
drive. The more bars that appear in the display, the less
room for additional content there is on the HDD.
When highlighted, shows that there are more files in the list
off-screen. Use the 4-way navigation button to scroll
through these files.
4. File Detail
Displays file size and creation date of the selected file.
5. Function Icon
Displays the currently selected function.
5. Preview Window
6. Clock
Displays the current time. (p. 24)
Displays a preview of the selected file (Visual for Photos
& Video files, audible for audio files) A preview of file can
be started by moving the 4-way navigation button to the
right when the file is selected.
15
16
Voice Record Sub-Menu Overview
1
2
AV Record Sub-Menu Overview
1
1. Record Indicator
Indicates whether or not the unit is recording. If recording,
shows the time elapsed while recording.
2. Recording Mode(s)
Displays the current recording Mode(s), there are 4:
Standard - record at Standard quality mode
Fine- record at Fine quality mode
Better - record at Better quality mode
Best - record at the Best quality mode
17
1. Record Indicator
2. Recording Mode(s)
2
Indicates whether or not the unit is recording. If recording, shows the time elapsed while recording. Note: for
optimum viewing on your TV, select the Better or Best
quality mode.
Displays the current recording mode(s). There are 4:
Standard - record at Standard quality mode
Fine- record at Fine quality mode
Better - record at Better quality mode
Best - record at the Best quality mode
18
Setting Menu - Display Settings
Setting Menu Overview
The Setting menu is where you will make various adjustments to the
functions of the E2GO MP-2000.
The Setting submenu has several screens. Access the individual screens by pressing right or left on the 4-way navigation button. Press down to access the settings
for each screen. The screens are:
Display - p. 20
Record - p. 22
Photo - p. 21
Brightness -
Use the 4-way navigation Button to adjust brightness
of unit’s LCD screen. (Click Left for Darker, Right for
Brighter) Press ENTER button to confirm your selection. Exiting the Menu will save your settings. Battery
life tip: Save battery life by selecting a darker setting.
TV Standard -
Allows you to select the unit’s video output between
NTSC & PAL TV Systems for maximum flexibility. Use
the 4-way navigation button to cycle through these
options. Press ENTER to confirm your selection.
Exiting the Menu will save your settings.
Monitor-
LCD Setting: selects the unit’s LCD panel for viewing.
TV Setting: when the unit’s A/V cables are connected
to the AV out, use this setting to view the unit’s on
screen display on your TV screen. This allows you to
view your stored photos and videos on the TV. (see
page 29 for further details on viewing the MP-2000’s
output through your TV). Use the 4-way navigation
button to cycle through these options. Press ENTER to
confirm your selection. Exiting the Menu will save your
settings.
Note, when TV mode is selected, the unit’s lcd panel
will go dark and the output will be transferred to the TV.
System - p. 23-24
Info - p. 25
19
20
Settings Menu - Photo Settings
Slide Music - Select ON or OFF with the 4-way navigation button to
Slide Repeat -
select whether or not you would like to hear music while
viewing your photos when you view a slideshow of your
stored pictures. Press ENTER to confirm your selection.
Exiting the Menu will save your settings. (Note: to activate
this feature, during the slideshow, simply click and press the
ENTER button to play consecutive tracks of music from
your MUSIC folder in the background while you view the
slideshow. The player will select the first file at the top of
your directory’s file listing, and play all tracks in the folder
until you exit.)
Select this function with the 4-way navigation button to
decide whether the slideshow of your photos will repeat
or not. Exiting the Menu will save your settings.
Slide Interval - Select this function with the 4-way navigation button to
adjust the amount of time your viewed photo shows on
the screen before it moves to the next image. You can
choose from the following intervals (in seconds)
1,3,5,10,20,30 seconds. Exiting the Menu will save your
settings.
Settings Menu - Record Settings
Resolution -
AV Quality -
Standard, Fine, Better, and Best, use your 4-way navigation button to select your output Audio/Video file’s
resolution. Note: the higher the resolution, the larger
the file size of your recording. Exiting the Menu will
save your settings.
Standard, Fine, Better, and Best, use your 4-way navigation button to select your output Audio/Video file’s
quality. Note: the higher the quality, the larger the file
size of your recording. Exiting the Menu will save your
settings.
Voice Quality - Standard, Fine, Better, and Best, use your 4-way navigation button to select your output Voice Recording
file’s quality. Note: the higher the quality, the larger the
file size of your recording.
An important note about recording resolution/AV quality:
Here are some technical specifications on the quality & resolution settings when
your MP-2000 is recording from an audio/video source:
Standard: Video size: 240x180 @ 96kbps
Fine: Video size: 272x240 @ 128kbps
Better: Video size:304x240 @ 192kbps
Best: Video size:320x240 @ 224kbps
21
22
Settings Menu - System Tab
LCD Off -
Power Off -
Language-
Use your 4-way navigation button to select and press
ENTER to confirm. if you would like the LCD to shut
off after a certain period of time, this helps to save batteries and the life of the LCD’s backlight. Select from
the follwing options: Off,3,5,10,15,30 seconds and 1
minute.
Use your 4-way navigation button to select, press
ENTER to confirm and save your selection. if you
would like the unit to automatically shut off after a certain period of time, this helps to save battery life.
Select from the follwing options: 15,30 seconds,
1,2,5,10 minutes.
This unit’s default language is English.
Date Format-
Use the 4-way navigation button to select between 2
settings: MM/DD/YY or DD/MM/YY.
Use LEFT/RIGHT to access different values of time
setting; use UP/DOWN to change the values.
Date Setting-
Use the 4-way navigation button to set the unit’s date.
Use LEFT/RIGHT to access different values of time
setting; use UP/DOWN to change the values.
23
Settings Menu - System Tab-continued
Time Setting-
Use the 4-Way navigation button to enter the current
time in Hours, minutes and seconds.
Time Format-
Use the 4-way navigation button to select between 12
and 24 hour time formats. Press ENTER to confirm your
selection.
Alarm-
Use the 4-way navigation button to turn the unit’s alarm
ON or OFF. Press ENTER to confirm your selection.
Alarm Time-
Use the 4-way navigation button to slect the alarm’s ON
time. Press ENTER to confirm your selection.
24
Settings Menu - Info Tab
How to Playback and Record AV Files
The E2GO MP-2000 can playback files in the following formats:
Video: MPEG-4, DivX 4/5, Motion JPEG, and WMV-9
Photo: JPEG, GIF, BMP, and TIFF
Music: MP3,WMA, LPCM, ADPCM,
To playback a Video or Audio file:
1. Press the POWER button to turn the unit on. Note: If you locked the Hold
Switch before power on, you will not be able to power on the device. Unlock the
Hold Switch and continue.
Volume Adjustment
Volume Display
Mute Function
2. Push the volume control rocker switch left/right in intervals to
increase/decrease the volume level. When released, the control will return to its
“center” position. The volume status bar will display the changes in real time (see
above) as you adjust the volume.
HDD Free Space-
This shows the remaining free space left on the
unit’s internal hard drive.
Software Version-
This informs you of the current firmare/software
version. Note: Check www.apexdigitalinc.com
for any current updates.
Update Software-
This setting is preset at the factory, ensures
that you can update the unit’s firmware and
software settings.
Load Default Setting-
This setting allows you to reset all settings and
restore them to the factory defaults.
3. Pressing the Volume Control rocker switch “in” sets the device to Mute mode.
The unit will resume normal volume level when you adjust the volume or press
the volume button again. (note, when the MUTE function is active (see picture
above, you will see the speaker icon on the unit’s volume display crossed out).
4. Select the correct sub-menu (Video,Music or Photo) from the Main Menu. See
p.16 for details on how to do this.
5. Select the desired file from the list. Using UP/DOWN on the 4-way navigation
button, move the cursor over the desired file. If it is a video or photo file, the preview screen in the upper right corner will show the first frame of the selected title
when you press the 4 way navigation button to the right. ‘Click’ the ENTER button to activate the file. Playback will start immediately.
6. To stop playback, press the STOP/EXIT key. The video will stop and you will
return to the previous menu. Also, you may press the MENU key to stop the playback and return to the Main Menu.
Note:
There may be circumstances where a multimedia file that is transferred from
your computer to the MP-2000 may not work properly. THIS IS NOT A MALFUNCTION OF THE MP-2000 - this is a common occurence with media files
due to the differences in how the original file was encoded.
25
26
Using the Voice Record Function
The MP-2000 may also be used as a voice recording device, with its built-in
microphone, you can use it for notes, quick reminders, dictation, or a speech.
How to Record a Voice File:
1. Select Voice Record by pushing the 4-way navigation button up or down. Then,
after selecting the Voice Record function, depress the ENTER button, and then
press the REC button to start recording, Note that the Record LED will flash, indicating that recording is in progress and the record screen will show the elapsed
time and quality mode of the recording in progress. The built-in microphone is
quite sensitive, optimum range is 12”-36” from microphone.
2. To stop recording, simply press REC button again. You will see a recording file
name generated and placed in the Record sub folder that is located in the Music
menu of the unit. The file name starts from [V000000.mp3], [V000001.mp3], etc.
Note: The maximum length of the recording depends on how much available hard
drive space is left while recording.
Play a Recorded Voice File:
1.To play a recorded voice file, exit Record mode and go to the Music menu.
2. Browse the “record” folder using the 4-way navigation button that is located in
the Music Menu.
3. Once the required voice file is selected, press down the ENTER button to play
the file.
Delete a Recorded Voice File:
To delete a recorded voice file, select it on the list. Push the 4-way navigation button to the left; you will see a Dialog Box (see below) to confirm the deletion. Push
the 4-way navigation button left or right to select Yes/No, and press ENTER for
your selection.
Recording Video to your Unit
The MP-2000 can also record Video. Please read the following to learn more.
A/V Recording from external A/V Equipment:
1. Connect the MP-2000 with an AV output device (such as TV or Video
device) by using the supplied AV cable Match the Red,white and Yellow
cable to the AV outputs on your TV or video device.
2. Select AV Record by pushing the 4-way navigation button up or down, and
then press ENTER to make your selection.
3. A menu screen will pop up giving you a choice to record “Audio/Video” or
“Audio only” please choose Audio/Video to record your video. Select by
pressing the 4-way navigation button. Once you have accessed this, you will
see your source material on screen, be sure to press ENTER to make your
selection.
4. Press REC button to start to record, and the Record LED will flash. Your
recording’s quality and elapsed time of recording will be seen at the top of the
screen.
5. To stop recording, simply press the REC button. For Audio/Video option
selected at step 2, a recorded file will be generated and placed under Video\
Record folder. The files will be named from [AV00000.mp4] - [AV00001.mp4],
and etc.
Note: The maximum length of the recording depends on how much available
hard drive space is left while recording.
Note: You can also use Windows Explorer to manage/delete
recorded files when the E2GO MP-2000 is connected to your PC.
See p. 13 for further details.
Note: The maximum length of the recording depends on how
much available hard drive space is left while recording.
27
28
Playing Video
Recording Audio to your Unit
Play a Recorded AV File
1. Select Video menu option.
2. Find the recording file name in the Record sub menu.
3. Once the video file is selected using the 4-way navigation button, press the
ENTER button to play the file.
Delete a Recorded AV File
1. To delete a recorded AV file, select it on the list. Push the 4-way navigation button to the left;you will see a Dialog Box to confirm the deletion. Push the 4-way
navigation button left or right to select Yes/No, and press ENTER for your selection.
Note: you can easily use Windows Explorer to manage/delete recorded files.
Viewing Video Content on your TV
1. Connect the supplied A/V cable 1/4” mini plug to the “AV out” on the side
of your MP-2000.
2. Plug the Yellow,Red,White RCA connectors to the corresponding audio/video
inputs on your TV.
3. On your MP-2000, exit to the Main Menu, then select the “Setting” menu. You
are now in the “Display” folder, using the 4-way navigation button, scroll down to
the “monitor” selection, highlight “LCD” setting, then using the 4-way navigation button, click it to the right, the unit’s LCD screen will go blank (this is normal) and your
unit’s output can now be viewed and heard from your TV! Simply toggle the navigation button to cycle back to the unit’s LCD screen.
The MP-2000 can also record Audio. Please read the following to learn more.
Audio Recording from external Audio Equipment:
1. Connect the MP-2000 with an Audio output device (such as CD Player, cassette deck, or other audio source) by using the supplied AV cable Match the
Red and white to the audio outputs on your source unit.
2. Select AV Record by pushing the 4-way navigation button up or down, and
then click ENTER to make your selection.
3. A menu screen will pop up giving you a choice to record “Audio/Video” or
“Audio only”. Choose “Audio only” to record from your audio source. Select by
pressing the 4-way navigation button and press ENTER to make your selection.
Once you have accessed this, you will hear your source material through the
unit’s speakers or headphones, Please make sure your unit’s level output is
adjusted to your preference (if applicable).
4. Press REC button to start to record, and the Record LED will flash. Your
recording’s quality and elapsed time of recording will be seen at the top of the
screen (see sample of screen below).
5. To stop recording, simply press the REC button. A recorded file will be generated and placed under Music\ Record folder. The files will be named from
[AV00000.mp3] - [AV00001.mp3], and etc.
Note: The maximum length of the recording depends on how much available
hard drive space is left while recording.
29
30
Playing Audio Files
Playing Audio Files-continued
Playback your Recorded Audio File:
Delete a Recorded Audio File:
1. Select Music menu option.
2. Find the recording file name in the Record sub menu.
3. Once the audio file is selected using the 4-way navigation button, press the
ENTER button to play the file. (Note, you can preview the file by pressing the 4way navigation button to the right)
4. You will now be directed to the Virtual Music Player screen (see photo below)
1. To delete a recorded Audio file, select it on the list. Push the 4-way navigation
button to the left; you will see a Dialog Box to confirm the deletion. Push the 4-way
navigation button left or right to select Yes/No, and press ENTER for your selection.
Note: you can easily use Windows Explorer to manage/delete recorded files.
Listening to Audio Content on your Audio Equipment:
Virtual Music Player
Random: Select On/Off to use the
Random feature. This mode when
active will set the unit to play all audio
tracks in the folder randomly.
Repeat: Select Single/All/off to use
the Repeat feature. “Single” repeat
will play one track over and over
again. “All” will repeat all tracks in the
folder. “off” will disable this feature.
1. Connect the supplied A/V cable 1/4” mini plug to the “AV out” on the side
of your MP-2000.
2. Plug the Red and White RCA connectors to the corresponding inputs on your
audio equipment.
3. Follow the directions on playing audio files and you are now ready to share
your music with others. Note: The MP-2000’s output level is fixed, adjust the volume level to your preference from your audio equipment.
EQ: Use the 4-way navigation button
to select between Normal,Rock,Pop,
Jazz, Classical, Light and Hall settings.
These EQ settings tailor the Low,Mid
and High frequencies to a particular
music type, simply choose your preferance.
Playback Status: Use the 4-way navigation button to select between
Play/Pause (press up/down) 2x/4x
Fast Forward and rewind. This
screen also shows the elapsed time of
the current track.
Track Status: Use the 4-way navigation button to select the next song or
previous song (push left for previous,
and right for next) This screen also
scrolls the title of the current track and
the total time.
31
32
Viewing Photo Files
Viewing Photo Files-continued
To View a single Photo File:
Delete a Photo File:
1. Enter the Photo Menu using the 4-way navigation button.
2. Once the photo file is selected using the 4-way navigation button, press the
ENTER button to play the file. (Note, you can preview the file by pressing the 4way navigation button to the right)
1. To delete a Photo file, select it on the list. Push the 4-way navigation button to
the left; you will see a Dialog Box to confirm the deletion. Push the 4-way navigation button left or right to select Yes/No, and press ENTER for your selection.
Note: you can easily use Windows Explorer to manage/delete recorded files.
To View a Slide show:
Viewing Photos on your TV
This unit allows you to view your photo files in a “slideshow” presentation. While
viewing a photo file press the ENTER button. Photos will now display in a
slideshow presentation. Note: Refer to page 21 to review other slide show
options.
1. Connect the supplied A/V cable 1/4” mini plug to the “AV out” on the side
of your MP-2000.
2. Plug the Yellow,Red,White RCA connectors to the corresponding audio/video
inputs on your TV.
3. On your MP-2000, exit to the Main Menu, then select the “Setting” menu. You
are now in the “Display” folder, using the 4-way navigation button, scroll down to
the “monitor” selection, highlight “LCD” setting, then using the 4-way navigation
button, press it to the right. The unit’s LCD screen will go blank (this is normal)
and your unit’s output can now be viewed and heard from your TV! Press the
navigation button the opposite way to cycle back to the unit’s LCD screen, now
you’re ready to share your multimedia files with others!
Rotate a Photo File:
You may desire to rotate the selected photo’s orientation to view it to your liking.
View the photo as you normally would, and press the 4-way navigation button to
the right to rotate the photo 90 degrees at a time. (Note: this will not affect the file)
View a screen of Thumbnails:
To view up to 9 thumbnail versions of photos view a photo as you normally would,
and press the 4-way navigation button to the left to view thumbnail versions of
your stored photo files. If you have more than 9 photos stored on the unit, navigate through multiple screens by using the 4-way navigation button. To view the
selected file, press ENTER. To exit this mode, press the EXIT button.
33
34
FAQ & Troubleshooting
FAQ & Troubleshooting-continued
Question: Why doesn’t the MP-2000 automatically recognize multimedia content
and assign them to the appropriate folders on the unit?
Question: I have correctly connected the MP-2000 to the TV using the supplied
AV cable and have also verified the connections. Why doesn’t the picture display on the TV?
Answer: Because of the massive storage capacity of the MP-2000, the device
isn’t capable of this. Video files MUST be stored in the "Video" sub folder of the
MP-2000. Photo content must be stored in the "Photo" sub folder of the MP-2000,
etc.
Note: Sub folders can be created in Windows Explorer under each of the three
main folders to further sort and manage your files. Example; "My New Baby",
"Birthday Party 2004", "Our New Car", could be created under the "Photos" folder. This would allow you to locate and navigate specific folders much quicker
Question: Why must I use the Unplug or Eject Hardware icon in the system tray
before disconnecting the USB cable?
Answer: Most Windows operating systems (98SE, Me and 2000) do not have
the ability to quick disconnect a USB device without removing the USB connection via the system tray. To do this, move your mouse/cursor to the system tray
and locate the icon (or) that displays "safely remove storage device" or "Unplug
or Eject Hardware" when the cursor hovers over it. Click on that system tray icon
and select the “MP-2000” or “Mass Storage Device” for safe removal.
Answer: Be sure to enable the external video mode by accessing the
Setting/Display menu (see Page 20 of this manual) This will disable the internal LCD and enable the external video mode.
Note: the MP-2000 can not display images on the both the LCD and your TV
simultaneously.
If you can see the video playback on the display of the AV, the external video
mode is not enabled. Note: Be sure you have the correct setting for TV Standard
(NTSC or PAL).
Question: I converted a video file to AVI and it plays fine on my computer, but
when I play it on the MP-2000, there is no sound. What did I do wrong?
Answer: The audio track of your AVI has been encoded with a codec other
than MP3. It plays on your computer because you have the codec installed
and your computer is able to “decode” the sound track.
Question: Can I configure Windows XP for USB quick removal?
The MP-2000 only supports MP3 encoded audio tracks. Using wave (WAV) or
any other audio format, other than MP3, will result in a file that will have no
sound when played on the unit.
Answer: Yes. Follow the steps below-
Question: Some of my stored videos and mp3s will not play on the unit.
Turn on your MP-2000 and connect it to your computer via the USB cable
Right Click the "My Computer" icon on the Windows XP desktop or press "Start"
from the main menu, and right press on the "My Computer" listing
Select "Properties" from the menu
Click the "Hardware" tab, and then the "Device Manager" tab in the Device
Manager field
Locate the "Disk Drives" field, and expand it by clicking on the "+" sign
Locate the "MP-2000 USB Device" and right press it
Select "Properties" from the open window
From the Properties box, select the "Policies" tab
Select the "Optimize for Quick Removal" selection
Press "OK"
Close the Device Manager and the System Properties Windows
Your Windows XP operating system is now configured for safe quick removal of
the MP-2000.
Answer: There may be circumstances where a multimedia file that is transferred
from your computer to the MP-2000 may not work properly. THIS IS NOT A MALFUNCTION OF THE MP-2000 - this is a common occurence with media files due
to the differences in how the original file was encoded.
35
36
Specifications
Dimensions
Weight
4.7 x 3.0 x 0.8 inches; 119 x 76 x 21 mm (W x H x D)
8.5 oz. ; 240g (with battery)
Operating Temp.
Storage Temp.
Operating Humidity
32 °F ~ 113°F; 0 °C ~ 45°C
-4 °F ~ 158°F; -20°C ~ +70 °C
20% ~ 80%
OS Support
Windows 98SE (needs driver install); Windows Me
(needs driver install); Windows 2000 (Service Pack 3 &
Above); Windows XP, Home or Professional
USB
Supports USB 1.1 or USB 2.0
LCD type
3.5" TFT 480x234 resolution with LED backlight
Hard Disk Specs
1.8'' 20 GB
System Memory
32 MB
System Flash
4 MB
Inputs & Outputs
Mini-USB connector; Earphone jack; AV-Out jack;
Speakers; Microphone; AC adapter jack; AV-In jack
Audio Output
60mWrms (30mW/channel); 20 to 20KHz; ~90dB
Headphone
Over the ear-clip type with 3.5mm plug; max. output
20mW
Battery
Built-in Lithium-Ion rechargeable; 2200 mAhr, 3.7V
Power Adapter
Input :100~240Vac, 0.6A, 50-60Hz
Output: 5Vdc, 2.0A
Warranty
Limited North American Warranty
E2GO MP-2000
Apex Digital makes the following limited warranties. These warranties extend to the original consumer purchaser or
product received as a gift and no other purchaser or transferee. You must retain the original bill of sale for proof of
purchase.
Limited One (1) Year Warranty
Apex Digital warrants the parts in this product against defects in material or workmanship for a period of one (1) year
after date of original purchase with the exception of the remote control which is guaranteed for 90 days. During this
period Apex Digital will replace a defective part with a new or refurbished part without charge to you. You are responsible to pay all labor charges involved in the part replacement of your unit.
Limited Ninety (90) Day Warranty
Apex Digital warrants this product and its parts against defects in material or workmanship for a period of ninety days
after the date of original retail purchase. During this period, Apex Digital will repair or replace a defective part or product at its sole option, with a new or refurbished part or product without charge to you except for shipping charges to
the Service Center.
Rental Product
The warranty for a rental product begins with the original date of receipt by the rental firm.
Your Responsibility
The above warranties are subject to the following conditions:
You must provide a copy of the original sales receipt with your return as proof of purchase. There are no exceptions.
You are also responsible for the cost(s) involved in packaging, transportation and insurance charges for the unit to
the Authorized Service Center. You must receive a return authorization number before sending in the unit for repair.
You must call customer service for an assessment of the problem. No service or shipment of product will be accepted unless the RMA# and your return address is clearly visible on the shipping carton.
Once your unit has been serviced, Apex Digital, Inc. will ship the unit back to you (prepaid) via regular ground service.
Note: Apex Digital, Inc is not responsible for the shipping costs associated with unauthorized or refused packages.
These warranties are effective only if product is purchased through an Authorized retail reseller and the unit is operated in North America. Warranties extend only to defects in materials or workmanship as limited above and do not
extend to any other products or parts that have been lost, discarded or damaged by misuse, accident, neglect, acts
of God, such as lightning or voltage surges in the home, improper installation, improper maintenance or use in violation of instructions provided or product which has been modified, had serial number removed, altered, or rendered
illegible. Warranties do not cover cosmetic damage, lost accessories or dead pixels in the screen panel.
How to Obtain Warranty Service
If after following the operating instructions, the Troubleshooting Guide and the FAQ pages on televisions, found at
our website, www.apexdigitalinc.com. Should it be necessary to contact Customer Service Center directly, call (866)
427-3946. You will be instructed on how your claim will be processed. Have your pertinent information available
including proof of purchase and an understanding of the complaint.
Ordering Accessories:
Please visit our online accessory store at: www.apexdigitalinc.com
Limitations
All warranties implied by state law are expressly limited to the duration of the limited warranties set forth above with
the exception of warranties implied by state law as herby limited, the foregoing warranty is exclusive and in lieu of
all other warranties, guarantees, agreements etc., with respect to repair or replacement of any parts. Apex Digital
shall not be liable for consequential or incidental damage
The warranty gives you specific rights and you may also have these rights that may vary from state to state. Some
states do not allow limitation on how long a warranty lasts, or the exclusions or limitation of incidental or consequential damages, so the above may not apply to you.
37
38