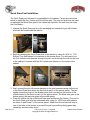
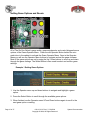
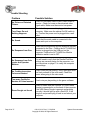
1
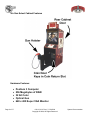
Six Gun Select
System Documentation
040-1101-01 Rev C
! Read this manual before use.
! Keep this manual with the machine at all times.
www.globalvr.com
[email protected]
1-408-597-3400
Table of Contents
Safety……………………………………..………………….……….. 3
Warnings………………………………….………………..………... 3
Environmental Conditons……………..……………..….............. 4
Regulatory Notices………………………..………………...….….. 4
Six Gun Select Game Description…..………….………...……... 5
SGS Cabinet Features…...………………………………………… 6
Cabinet Inspection……………..………...………………...…....… 7
Quick Draw Post Installation..……………………………………. 8
Setting Game Options and Resets……....……………..….….. 10
Main Menu……………………….…………………...………..…... 11
Game Mode Menu……………………….…..…………...……….. 12
Game Resets Menu……………………………………………….. 14
Coin Stats...………………………………………………………… 16
Game Stats…………………………….…………………………… 16
Diagnostics Menu..……………………………………………….. 17
Monitor Calibration Test…………………………………………. 18
Starting a Game…………………………………………………… 19
USB Game Dongle………………………………………………… 20
Computer Bios Settings…………………………………………. 21
System Restore CD’s…………………………………………….. 22
Computer Rear Panel Diagram…………………………….…… 23
Trouble Shooting………………………………………………….. 24
SGS Warranty Info………………………………………………… 25
Technical Support..……………………………………………..... 26
Legal Info…………………………………………………………… 27
Page 2 of 27
040-1101-01 Rev C 5/19/2004
Copyright © 2004, All Rights Reserved
System Documentation
Safety
•
•
•
•
•
•
•
•
•
•
•
The following safety instructions apply to all game operators and service personnel.
Specific warnings and cautions will be found throughout this manual where they
apply. We recommend that you read this page before preparing your arcade cabinet
for game play.
Use the following safety guidelines to help protect the system from potential damage
and to ensure your personal safety.
To help avoid damage to the computer, the power supply on the computer
automatically detects the voltage to match the AC power available at the location:
o 115 volts / 60Hz in most of North and South America and some Far Eastern
countries such as Japan, South Korea and Taiwan
o 230 volts / 50Hz in most of Europe, the Middle East and the Far East
To help prevent electric shock, plug the system into properly grounded power
source. These cables are equipped with 3-prong plugs to help ensure proper
grounding. Do not use adapter plugs or remove the grounding prong from a cable.
If you must use an extension cable, use a 3 wire cable with properly grounded plugs
To help protect your system from sudden, transient increases and decreases in
electrical power, use a surge suppressor, line conditioner or Uninterruptible Power
Supply (UPS).
Be sure nothing rests on the system's cables and that the cables are not located
where they can be stepped on or tripped over.
Do not spill food or liquid on the cabinet.
Do not push any objects into the openings of the system. Doing so can cause fire or
electric shock by shorting out interior components.
Keep your computer far away from radiator and heat sources.
Always return the cabinets leg levelers to the extreme upright position before
attempting to move the game.
Do not block cooling vents.
Warnings
WARNING
To avoid electrical shock, unplug the
cabinet before performing the installation
procedures.
GLOBAL VR assumes no liability for any
damages or injuries incurred while setting
up the cabinet. As such, only qualified
service personnel should perform this
installation!
System Documentation
040-1101-01 Rev C 5/19/2004
Copyright © 2004, All Rights Reserved
Page 3 of 27
Environmental Conditions
The Six Gun Select cabinet is intended for indoor use only. Be sure to keep the cabinet dry and
maintain operating temperatures of 10-40 Celsius or 50-104 Fahrenheit.
Regulatory Notices
FCC Notices (United States)
Electromagnetic Interference (EMI) is any signal or emission, radiated in free space or
conducted along power or signal leads, that endangers the functioning of a radio navigation or
other safety service or seriously degrades, obstructs, or repeatedly interrupts a licensed radio
communications service. Radio communications services include, but are not limed, to AM/FM
commercial broadcast, television, cellular services, radar, air-traffic control, pager, and Personal
Communication Services (PCS). These licensed services, along with unintentional radiators
such as digital devices, include computer systems, contribute to the electromagnetic
environment.
Elector magnetic Compatibility (EMC) is the ability of items of electronic equipment to function
properly together in the electronic environment. While this computer system has been designed
and determined to be compliant with regulatory agency limits for EMI, there is no guarantee that
interference will not occur in a particular installation. If this equipment does cause interference
with radio communications services, which can be determined by turning the equipment off and
on, you are encouraged to try to correct the interference by one or more of the following
measures:
#
#
#
#
Reorient the receiving antenna
Relocate the computer with respect to the receiver
Move the computer away from the receiver
Plug the computer into a different outlet so that the computer and the receiver are on
different branch circuits
If necessary, consult a Regulatory EMC representative of GLOBAL VR or an experienced
radio/television technician for additional suggestions. You may find the FCC Interference
Handbook, 1986, to be helpful. It is available from the U.S. Government Print Office,
Washington, DC 20402, Stock No. 004-000-00450-7 or on the word wide web at
http://www.fcc.gov/bureaus./compliance/www/tvibookt.html.
This device has been tested and found to comply with the limits for a Class A digital device
pursuant to Part 15 of the FCC Rules. These limits are designed to provide reasonable
protection against harmful interference when the equipment is operated in a commercial
environment. This equipment generates, uses and can radiate radio frequency energy, and if
not installed and used in accordance with the instruction manual, may cause harmful
interference with radio communications. Operation of this equipment in an residential area is
likely to cause harmful interference, in which case you will be required to correct the
interference at your own expense. Operation is subject to the following conditions:
# This device may not cause harmful interference.
# This device must accept any interference received, including interference that may cause
undesired operation.
Page 4 of 27
040-1101-01 Rev C 5/19/2004
Copyright © 2004, All Rights Reserved
System Documentation
Six Gun Select Game Description
The Classic Top Earners are back and better than ever! 4 notorious outlaws are on
the loose and you're the only one who can stop 'em. Strap on your six-shooter and call
them out!
The Six Gun Select cabinet is built to last utilizing the latest in PC Technology. NO
LASERDISCS!
Fast action game play requires a sharp eye and quick draw to make it through alive.
NEW PLAY MODE:
action.
Players can outgun a gang of outlaws in fast-draw shooting
Fast Draw Showdown and Last Bounty Hunter are released now. Mad Dog McCree I
and II will be makin' their way to your cabinet as future releases
GLOBAL VR utilizes a state-of-the-art PC-based interactive visual computing system.
The GLOBAL VR Multi-Game software shell allows multiple games to be installed and
played on one cabinet at any time. This PC-based configuration provides the advantage
of follow-on periodic new game releases for the Six Gun Select cabinet.
System Documentation
040-1101-01 Rev C 5/19/2004
Copyright © 2004, All Rights Reserved
Page 5 of 27
Six Gun Select Cabinet Features
Hardware Features:
•
•
•
•
•
Page 6 of 27
Pentium 3 Computer
256 Megabytes of RAM
32 bit Color
Optical Gun
640 x 480 Super VGA Monitor
040-1101-01 Rev C 5/19/2004
Copyright © 2004, All Rights Reserved
System Documentation
Cabinet Inspection
Carefully remove the cabinet from the shipping container. Give yourself plenty of space
around the cabinet as you remove it from the shipping container. Inspect the exterior of
the cabinet for any damage.
The 1st set of keys will be located in the coin return slot shown by the arrow. The 2nd
set will be hanging on the inside of the coin mech door shown by the circle in the picture
below.
Remove the back door from the cabinet and inspect the computer system. Verify that all
cables and major assemblies are securely connected to the computer and mounted to
the side of the cabinet. Page 24 has a Computer Rear Panel Diagram to help verify the
cable connections.
Connect the wall cord to a grounded (3-terminal) AC wall outlet.
Power on the game using the On/Off switch located on the lower rear of the cabinet to
verify proper operation.
System Documentation
040-1101-01 Rev C 5/19/2004
Copyright © 2004, All Rights Reserved
Page 7 of 27
Quick Draw Post Installation
The Quick Draw post will need to be assembled to the cabinet. Follow the instructions
below to install the Gun, Holster and Quick Draw post. The nuts and bolts that are used
to assemble the Quick Draw post to the cabinet are located in the cash box just under
the Coin Mechs.
1. Unwrap the Quick Draw post from the packaging and unwrap the gun with holster,
which will be found inside the cabinet.
2. Begin by attaching the Quick Draw post to the cabinet by using 8x 10/32 x 1 T-25
Security Torx bolts shown by the arrows in the picture above. You will need to run
the Gun Holster’s wire harness through the post, and in through the hole on the front
of the cabinet to connect with the Gun Holster wire harness on the inside of the
cabinet.
3. Next, connect the gun’s 6 pin wire harness to the wire harness coming out the front
of the Quick Draw post shown by the circle in part A of the picture above. The two
spade connectors plug into the arcade button that is located on the bottom of the
Holster shown by the arrow in part A of the picture above. The black wire goes to the
bottom prong, the gray wire goes to the middle prong.
4. Place the Holster on top of the Quick Draw post and secure the Holster / Gun unit to
the Quick Draw post from the underneath side, using 2 x 10/32 bolts with washers
as shown in part B and C of the picture above. Attach the Ground wire with loop to
one of the bolts on the holster to prevent the gun from misfiring during game play
caused by electrical static shock.
Page 8 of 27
040-1101-01 Rev C 5/19/2004
Copyright © 2004, All Rights Reserved
System Documentation
5. Finally connect the wire harness coming from the Quick Draw post to the two Molex
connectors located next to the hole on the inside of the cabinet as shown by the
arrows in the picture below.
6. You can test the Gun and Holster operation by going into the Operator Menu and
selecting the Diagnostics Test to verify the Gun and Holster are working properly.
System Documentation
040-1101-01 Rev C 5/19/2004
Copyright © 2004, All Rights Reserved
Page 9 of 27
Setting Game Options and Resets
All of The Six Gun Select’s game audits, game adjustments, and control diagnostics are
options of the Game Operator Menu. Press the red Operator Button behind the coin
mech door in the cabinet to activate the Game Operator Menu. Once in the Operator
Menu you will use the Operator Menu buttons to navigate and set the game software.
Most of the game options are set by using the Up / Down buttons to scroll up and down
through the game settings. The Select Button is then used to select and confirm game
settings.
Example 1 Setting Game Options
1. Use the Operator menu up and down buttons to navigate and highlight a game
option.
2. Press the Select Button to scroll through the available game options.
3. When finished use the Operator menu UP and Down buttons again to scroll to the
next game option or setting.
Page 10 of 27
040-1101-01 Rev C 5/19/2004
Copyright © 2004, All Rights Reserved
System Documentation
Main Menu
The Main menu is the default screen displayed when you press the Operator Button to
enter into the Operator Menus.
Game Mode
This button is used to Enter the Game Mode Menu. You can
then adjust Game play and Coin settings for the cabinet.
Coin Stats
This button is used to Enter the Coin Stats Menu.
Game Stats
This button is used to Enter the Game Stats Menu.
Diagnostics
This button is used to Enter the Diagnostics Menu. You can
then verify that the cabinet hardware is working properly and
make adjustments as needed.
Game Resets
This button is used to Enter the Game Resets Menu. In this
menu, you can reset the Game and Coin Stats for the cabinet.
Play
This will exit the Operator Menu and start the game software.
System Documentation
040-1101-01 Rev C 5/19/2004
Copyright © 2004, All Rights Reserved
Page 11 of 27
Game Mode Menu
The Game Mode menu is used to setup the type of money or credits used at your
location, the amount of coins that are needed to start a game, and game play difficulty.
Credit Display
Defines whether Money or Arcade Credits are used to play this
cabinet. The options to choose from are: Money, or Credits.
Coins Per Pulse
This sets how many credits are shown on screen for each coin
drop.
Free Play
This will turn free play ON or OFF. The options to choose from
are: ON and OFF.
Coins Per Game
This number defines how many coins or credits it will take to start
a Game. The options to choose from are 1-10.
Coins Per Continue
This number defines how many coins or credits it will take to
continue a current Game. The options to choose from are 1-10.
Number of Lives
This number defines how many chances / lives a player receives
per game before the Continue Game Message appears. The
options to choose from are 1-5.
Game Volume
This will adjust the volume for the game during game play. The
options to choose from are: 1- 10.
Page 12 of 27
040-1101-01 Rev C 5/19/2004
Copyright © 2004, All Rights Reserved
System Documentation
Attract Volume
This will adjust the attract volume for the game during the attract
mode. The options to choose from are: 1- 10.
Difficulty
This will reduce the amount of time a player is given to shoot a
bad guy on screen. The options to choose from are Easy and
Hard.
Main Menu
This will return you to the previous Main Menu screen.
System Documentation
040-1101-01 Rev C 5/19/2004
Copyright © 2004, All Rights Reserved
Page 13 of 27
Game Resets Menu
Restore Factory
Settings
Sets the Game Mode optional settings to the
Factory Settings listed below
U.S.A. Factory Settings
Credit Display
Coins Per Pulse
Free Play
Credits Per Game
Credits Per Continue
Number of Lives
Game Volume
Attract Volume
Difficulty
Dollars
1
OFF
2
2
3
7
7
Easy
U.K. Factory Settings
Credit Display
Coins Per Pulse
Free Play
Pounds
1
OFF
Credits Per Game
Credits Per Continue
Number of Lives
Game Volume
Attract Volume
Difficulty
4
4
3
7
7
Easy
Coin Stats
Resets the Coin Stats menu for the cabinet. This reset does not
affect the Lifetime records held by the game.
Lifetime Coin
Stats
Resets the Lifetime Records for the Coin Stats menu on the
cabinet.
Game Stats
Resets the Game Stats records held by the cabinet. This reset
does not affect the Lifetime records held by the game.
Lifetime Game
Stats
Resets the Lifetime Records for the Game Stats menu on the
cabinet.
Page 14 of 27
040-1101-01 Rev C 5/19/2004
Copyright © 2004, All Rights Reserved
System Documentation
High Scores
Resets the High Scores held in the game.
Reset All
This will Reset all the records including High Scores and the
Lifetime Records held by the game software.
Main Menu
This will return you to the previous Main Menu screen.
System Documentation
040-1101-01 Rev C 5/19/2004
Copyright © 2004, All Rights Reserved
Page 15 of 27
Coin Stats
The Coin Stats menu shows the total number of coins collected for the cabinet, and the
average game time per coin, as well as the last date and time the stats were reset.
Both the Coin Stats and Lifetime Stats can be reset through the Game Resets menu.
Press the Select Operator button to return to the previous Menu screen.
Game Stats
The Game Stats menu shows the total number of games played, continued games and
Easy / Hard game plays for the cabinet, as well as the last date and time the stats were
reset. You can also view how many games were played by day, week, and month. Both
the Game Stats and Lifetime Stats can be reset through the Game Resets menu. Press
the Select Operator button to return to the previous Menu screen.
Page 16 of 27
040-1101-01 Rev C 5/19/2004
Copyright © 2004, All Rights Reserved
System Documentation
Diagnostics Menu
The Diagnostics menu will perform different computer or monitor tests to verify the hardware
on the cabinet is working properly. The Debug boxes will allow the game to be played with
large boxes outlining the shooting targets within the game. This diagnostic test is used to verify
the gun calibration is working correctly within the game play mode. This can also be turned on,
so that very young players ages 3 and up will understand what targets to shoot at during game
play. The Main Menu button will return you to the previous menu screen.
Gun Calibration
The Gun Calibration Test will validate that the Holster is working correctly for the quick
draw sequences in the game. When you put the gun in the holster you will see the GUN
IN HOLSTER words appear across the screen when it is operating correctly as shown
in the picture above. When the gun is removed from the Holster the words disappear
from the screen. When you are finished testing, shoot the word EXIT on screen to exit
and get back to the Diagnostic menu.
The Gun Calibration test will fine-tune the calibration of the gun to the screen shots
shown in the game. To begin the calibration shoot the word CALIBRATE on screen.
When the test starts you will shoot all four corners of the screen in a sequence. When
the calibration test finishes, you can view the results by shooting on the screen to see if
the gun is aligned correctly. If the gun is working correctly, shoot at the word EXIT on
screen to exit the calibration test.
System Documentation
040-1101-01 Rev C 5/19/2004
Copyright © 2004, All Rights Reserved
Page 17 of 27
Monitor Calibration Test
When you begin the Monitor Calibration Test, use the Select Button to Start the test and
to scroll through each monitor screen test. To exit the Monitor Calibration Test, press
the Operator button. Use each monitor calibration screen test separately to adjust and
fine-tune the picture on your monitor. Each screen is designed to either align the
horizontal and vertical sync, or adjust the white balance, and color hues. If you notice a
color distortion on the monitor; press the degausser button on the Monitor Control Panel
may be necessary to fix the color distortion.
Use the Monitor Control Panel to adjust and fine-tune the picture quality on your
monitor. The Monitor Adjustment Options will display on screen, use the buttons on the
Monitor Control Panel to select, adjust, and set the available options. The Monitor
Control Panel is located under the monitor by the rear cabinet door.
Page 18 of 27
040-1101-01 Rev C 5/19/2004
Copyright © 2004, All Rights Reserved
System Documentation
Starting a Game
With the proper amount of credits inserted use the Gun and shoot the screen. You
begin by choosing the difficulty of play: Easy and Hard. Once the game begins, use the
gun to shoot bad guys on the screen and aim the gun to select levels. During the Draw
sequence, you are required to holster your gun, and you can only remove it once the
word DRAW has be displayed on screen.
During game play you have 4 information bars that tell you how many lives or bullets
are left, and if you’re good enough to be a sharp shooter. Here is a description of each
information bar.
1. How much money you have earned as a Bounty Hunter.
2. How many lives you have left.
3. You Sharp Shooter Bonus, you earn this by using one bullet to kill each bad guy.
As long as you don’t shoot twice to kill one bad guy or miss, you get your Sharp
Shooter Bonus.
4. How many bullets are left in your gun, to reload your gun shoot outside the
monitor screen.
System Documentation
040-1101-01 Rev C 5/19/2004
Copyright © 2004, All Rights Reserved
Page 19 of 27
USB Game Dongles
The Six Gun Select cabinet comes with a USB Game Dongle to activate the game
software. The USB Game Dongle is installed on USB port 2 on the back of the
computer. When the USB Dongle is installed and working properly a Red LED light will
illuminate inside the Dongle. In order for a USB Game Dongle to be recognized
correctly it must be inserted into the USB port before the cabinet is powered ON. If for
some reason the USB Dongle is not recognized power the cabinet OFF then ON to see
if this resolves the problem.
Page 20 of 27
040-1101-01 Rev C 5/19/2004
Copyright © 2004, All Rights Reserved
System Documentation
Computer BIOS Settings
The Computer Bios settings for the Parallel port must be set correctly in order for the Coin
Inputs and Operator buttons to work correctly with the Joshua OS. If you run into a problem
with the both Coin Inputs and Operator buttons not working, use the PS/2 keyboard provided
with your cabinet to verify the Bios setting on your computer are set correctly.
1. While the computer is powered off, plug the PS/2 Keyboard into the purple colored PS/2
port on the back of the computer.
2. Next power the computer ON, and during the first boot-up screen showing the CPU speed
and memory hit the Delete Key on the keyboard to enter the Bios Setup Menu.
3. Use the arrows keys to scroll down and highlight Integrated Peripherals, press the Enter
button to enter this menu.
4. At the Integrated Peripherals Menu screen us the arrow keys to scroll down the long list of
available options until you find Parallel Port Mode and EPP Select Mode. Use the Page
Up and Page Down keys next to the number pad to scroll through and change each option.
5. Verify and/or change the Parallel Port Mode to EPP and EPP Select Mode to EPP 1.7
when you are finished press the F10 Key to Exit and Save the new Bios Settings.
6. You can now unplug the keyboard from the computer and reboot the computer to
verify the Coin Inputs and Operator buttons are working correctly.
System Documentation
040-1101-01 Rev C 5/19/2004
Copyright © 2004, All Rights Reserved
Page 21 of 27
System Restore CD’s
In the event the software running on the computer becomes corrupt, or you run into software
problems GLOBAL VR provides a way of restoring the software running on your Six Gun
Select computer. The System Restore CD’s will load the Operating System and Game
software on 1 CD. Please be aware when you use the System Restore CD’s you have the
option of erasing all history for the coin and game audits held in the game software.
Operating System and Game Software Restore CD
1. The cabinet should be powered ON and the game running, open the CD drive to INSERT
the CD labeled Six Gun Select. Next power the cabinet OFF then ON and when the
computer reboots the CD should automatically start up.
2. At the Install Menu the use the Operator Up/ Down buttons to highlight 1 of 2 options and
press the select button to start the install process (1) Install and Format use this option if
you wish to erase all previous game and coin collection info on the Hard-Drive and start
over. You will need to re-install any other games after this step. (2) ADD / Update Games
– use this option to install the new games on the cabinet without erasing any of the games
that are currently installed or coin collection info. Once the new game is installed it will
automatically become available in the game selection menu in the game attract mode.
3. When the Hard-Drive Image process has finished the game software will automatically
start. Remove the CD from the computer and keep this is in a safe place.
4. When the game starts up for the first time, it is important to synchronize the new game
software with the cabinet’s hardware. This is done by coining up the machine (insert 2
credits), then verify that the two credits are shown (i.e., $0.50) on the monitor. Finally,
power the system Off and On to complete the synchronization process.
Page 22 of 27
040-1101-01 Rev C 5/19/2004
Copyright © 2004, All Rights Reserved
System Documentation
Computer Rear Panel Diagram
Port
Computer Ports Description or Use
1
Video to ACT
LABS Gun
The Video Port on the computer connects first to the ACT
LABS Gun module. Use the Video Port on the ACT LABS Gun
Module to connect to the SVGA Monitor.
2
USB 0
USB Port 0 on the computer connects to the USB ACT LABS
Gun Module.
3
Parallel Port
The Parallel port connects to the Operator Buttons, and Coin
Door Mechs through the wiring harness
4
Audio Out
The Green Audio Out Port on the computer connect to the
speakers
5
USB 2
The USB Game Dongle connects to the USB Port 2 on the
lower part of the computer
6
AC Power
AC Power input must use a IEC 14 connector.
7
Video Out
The 15-pin video port connects to the Super VGA Monitor
cable inside the cabinet.
System Documentation
040-1101-01 Rev C 5/19/2004
Copyright © 2004, All Rights Reserved
Page 23 of 27
Trouble Shooting
Problem
Possible Solution
No Picture or Distorted
Picture.
Check for bad video cable or faulty video board or
monitor. Check for loose or disconnected video
signal cable. Make sure the monitor has power.
Turn Game On and
Nothing Happens.
Check that the power cord is plugged into the
computer. Make sure the cabinet On/Off switch is
on. Confirm the power cord is plugged into a wall
outlet.
No Sound.
Check that the audio cable is connected to the
green audio port on the computer.
No Response from Gun.
Check that the signal and ground wires are correctly
connected to the Gun. Confirm the ACT LABS Gun
Module is plugged into the USB port on the
computer. Confirm the ACT LABS Gun Module
calibration switch is set to OFF.
No Response from Coin
Inputs and Operator
Buttons
You will need to verify that the Parallel Port Bios
settings are correctly setup for the computer, use
the instructions on page 21 to verify the computer
Bios settings.
No Credits given when
Coins are Inserted
Check coins per play setting. Verify the signal wires
are firmly connect to the coin mech. Check the
power wires going to the coin mech.
Too many Credits for
Number of Coins Inserted
Check coin per play setting in the game software.
Game Dongle not found
Check to make sure the GLOBAL VR USB Game
Dongle is connected to on the back of the computer.
If the USB Game Dongle is present and working
correctly it should light up with a Red LED. If the
dongle is not present plug it back in and reboot your
computer.
Page 24 of 27
040-1101-01 Rev C 5/19/2004
Copyright © 2004, All Rights Reserved
System Documentation
Six Gun Select Warranty Info
LIMITED WARRANTY
GLOBAL VR warrants that its computer circuit boards, hard drives, power supplies, monitors, displays, controls, sensors,
and mechanical structures are free from defects in materials and workmanship under normal use and service for a period
of ninety (90) days from the date of shipment.
All software and accompanying documentation furnished with, or as part of the Product, is supplied “AS IS” with no
warranty of any kind except where expressly provided otherwise in any documentation or license agreement furnished
with the Product.
During the warranty period, GLOBAL VR will, at no charge, repair the Product, provided:
1) Purchaser believes that the Product is defective in material or workmanship and promptly notifies GLOBAL VR in
writing with an explanation of the claim;
2) All claims for warranty service are made within the warranty period;
3) Products are returned adequately packed and freight prepaid to GLOBAL VR’s designated service center;
4) GLOBAL VR’s inspection or test of the Product verifies to GLOBAL VR’s satisfaction that the alleged defect(s) existed
and were not caused by accident, misuse, neglect, unauthorized or attempted repair or testing, unauthorized
modification, incorrect installation, vandalism, failure to follow the maintenance schedule or procedures; or operation
in out-of-specification environmental conditions.
GLOBAL VR will return the repaired Product freight prepaid to the Purchaser. All freight costs associated with
replacement of warranty parts after expiration of the original warranty period are the responsibility of the Purchaser.
GLOBAL VR is not obligated to provide the Purchaser with a substitute unit or on-site service during the warranty period
or at any time. If after investigation GLOBAL VR determines that the reported problem was not covered by the warranty,
Purchaser shall pay GLOBAL VR for the cost of investigating the problem at its then prevailing per incident billing rate.
No repair or replacement of any Product or part therein shall extend the warranty period as to the entire Product. The
warranty on the repaired part only shall be in effect for a period of ninety (90) days following the repair or replacement of
that part or the remaining period of the Product parts warranty, whichever is greater.
Purchaser’s exclusive remedy and GLOBAL VR’s sole obligation is to supply or pay for all labor necessary to repair any
Product found to be defective within the warranty period and to supply, at no extra charge, new or rebuilt replacements for
defective parts. If repair or replacement fails to remedy the defect, then, and only in such event, shall GLOBAL VR refund
to Purchaser the purchase price for said Product. Purchaser’s failure to make a claim as provided above or continued use
of the Product shall constitute an unqualified acceptance of said Product and a waiver by Purchaser of all claims thereto.
IN NO EVENT SHALL GLOBAL VR BE LIABLE FOR LOSS OF PROFITS, LOSS OF USE, INCIDENTAL OR
CONSEQUENTIAL DAMAGES RESULTING FROM OPERATION OF THE GAME IN ANY CONDITION. GLOBAL VR
SHALL NOT BE RESPONSIBLE FOR THE SUITABILITY, PERFORMANCE, OR SAFETY OF ANY NON-GLOBAL VR
PART OR ANY MODIFICATION PERFORMED BY ANY PRODUCT DISTRIBUTOR UNLESS SUCH WORK IS
EXPRESSLY AUTHORIZED IN ADVANCE BY GLOBAL VR.
THIS WARRANTY IS IN LIEU OF ALL OTHER EXPRESSED OR IMPLIED WARRANTIES, INCLUDING THE IMPLIED
WARRANTIES OF MERCHANTABILITY AND FITNESS FOR A PARTICULAR PURPOSE, AND ALL OTHER
OBLIGATIONS OR LIABILITIES ON GLOBAL VR’S PART, EXCEPT FOR ANY EXPRESS WARRANTY SET FORTH IN
A WRITTEN CONTRACT BETWEEN GLOBAL VR AND PURCHASER CONTAINING SPECIFIC TERMS WHICH
SUPERSEDE THE TERMS HEREIN. THIS WARRANTY DOES NOT AUTHORIZE ANY OTHER PERSON TO ASSUME
OTHER LIABILITIES, IF ANY, CONNECTED WITH THE SALE OF PRODUCTS BY GLOBAL VR.
System Documentation
040-1101-01 Rev C 5/19/2004
Copyright © 2004, All Rights Reserved
Page 25 of 27
Technical Support
Free telephone, email and online support are provided for the Six Gun Select systems during
the warranty period. In addition to helping with trouble shooting and diagnosing defective parts
technical support is prepared to help you with questions about the operation of your Six Gun
Select game.
When you contact technical support at GLOBAL VR, please provide the following background
information to aid our technical support process:
Your mailing address and telephone number
Your Six Gun Select cabinet Serial Number
A summary of the question or a detailed description of the problem with your Six
Gun Select cabinet
Technical Support is available from 9:00-5:00PST, Monday through Friday.
Call +1-408-597-3400 to reach a technical support staff member.
Email support is available if you email [email protected]
Warranty Service
If at some point you require warranty service, contact your distributor. If technical support staff
determines that parts on your Six Gun Select cabinet are defective, a Return Merchandize
Authorization (RMA) number will be issued.
Page 26 of 27
040-1101-01 Rev C 5/19/2004
Copyright © 2004, All Rights Reserved
System Documentation
Legal Statements
(c) 2004 GLOBAL VR, Inc. All Rights Reserved
The Six Gun Select is a trademark of American Laser Games Inc./ Her Interactive Inc.
Programming (C) 2002 Digital Leisure Inc. All Rights Reserved.
GLOBAL VR and the GLOBAL VR logo are trademarks of Global VR, Inc.
All other trademarks are the property of their respective owners.
System Documentation
040-1101-01 Rev C 5/19/2004
Copyright © 2004, All Rights Reserved
Page 27 of 27