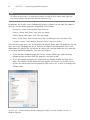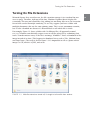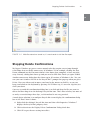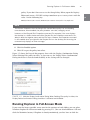
1
Paul McFedries
Microsoft
Windows 7
®
UNLEASHED
800 East 96th Street, Indianapolis, Indiana 46240 USA
Microsoft Windows 7 Unleashed
Copyright © 2010 by Pearson Education, Inc.
All rights reserved. No part of this book shall be reproduced, stored in a retrieval
system, or transmitted by any means, electronic, mechanical, photocopying, recording,
or otherwise, without written permission from the publisher. No patent liability is
assumed with respect to the use of the information contained herein. Although every
precaution has been taken in the preparation of this book, the publisher and author
assume no responsibility for errors or omissions. Nor is any liability assumed for
damages resulting from the use of the information contained herein.
ISBN-13: 978-0-6723-3069-8
ISBN-10: 0-672-33069-5
Library of Congress Cataloging-in-Publication Data:
McFedries, Paul.
Microsoft Windows 7 unleashed / Paul McFedries.
p. cm.
ISBN 978-0-672-33069-8
1. Microsoft Windows (Computer file) 2. Operating systems (Computers) I. Title.
QA76.76.O63M398163 2010
005.4'46—dc22
2009024027
Printed in the United States of America
First Printing: July 2009
Trademarks
All terms mentioned in this book that are known to be trademarks or service marks
have been appropriately capitalized. Pearson Education, Inc. cannot attest to the accuracy of this information. Use of a term in this book should not be regarded as affecting
the validity of any trademark or service mark.
Warning and Disclaimer
Every effort has been made to make this book as complete and as accurate as possible, but no warranty or fitness is implied. The information provided is on an “as is”
basis. The author and the publisher shall have neither liability nor responsibility to any
person or entity with respect to any loss or damages arising from the information
contained in this book.
Bulk Sales
Pearson offers excellent discounts on this book when ordered in quantity for bulk
purchases or special sales. For more information, please contact:
U.S. Corporate and Government Sales
1-800-382-3419
[email protected]
For sales outside of the U.S., please contact:
International Sales
+1-317-581-3793
[email protected]
Associate Publisher
Greg Wiegand
Acquisitions Editor
Rick Kughen
Development Editor
Rick Kughen
Managing Editor
Patrick Kanouse
Project Editor
Jennifer Gallant
Copy Editor
Keith Cline
Indexer
Tim Wright
Proofreader
Sheri Cain
Technical Editor
Mark Reddin
Publishing
Coordinator
Cindy Teeters
Interior Designer
Gary Adair
Cover Designer
Gary Adair
Compositor
Mark Shirar
Contents at a Glance
Introduction . . . . . . . . . . . . . . . . . . . . . . . . . . . . . . . . . . . . . . . . . . . . . . . . . . . . . . . . . . . . . . . . . . . . . . . . . . . . . . . . . . . 1
Part I
Unleashing Windows 7 Customization
1
Customizing Windows Explorer . . . . . . . . . . . . . . . . . . . . . . . . . . . . . . . . . . . . . . . . . . . . . . . . . . . . . . . . . 7
2
Customizing Internet Explorer . . . . . . . . . . . . . . . . . . . . . . . . . . . . . . . . . . . . . . . . . . . . . . . . . . . . . . . . . 27
3
Customizing the File System . . . . . . . . . . . . . . . . . . . . . . . . . . . . . . . . . . . . . . . . . . . . . . . . . . . . . . . . . . . . 45
4
Customizing Startup and Shutdown . . . . . . . . . . . . . . . . . . . . . . . . . . . . . . . . . . . . . . . . . . . . . . . . . . 63
5
Customizing the Start Menu and Taskbar . . . . . . . . . . . . . . . . . . . . . . . . . . . . . . . . . . . . . . . . . . . 89
Part II
Unleashing Windows 7 Performance and Maintenance
. . . . . . . . . . . . . . . . . . . . . . . . . . . . . . . . . . . . . . . . . . . . . . . . . . . 111
6
Tuning Windows 7’s Performance
7
Maintaining Your Windows 7 System
Part III
. . . . . . . . . . . . . . . . . . . . . . . . . . . . . . . . . . . . . . . . . . . . . . 135
Unleashing Windows 7 Power User Tools
8
Controlling Windows 7 with Control Panel . . . . . . . . . . . . . . . . . . . . . . . . . . . . . . . . . . . . . . 165
9
Policing Windows 7 with Group Policies . . . . . . . . . . . . . . . . . . . . . . . . . . . . . . . . . . . . . . . . . . 181
10
Configuring the Microsoft Management Console . . . . . . . . . . . . . . . . . . . . . . . . . . . . . . . 197
11
Controlling Services . . . . . . . . . . . . . . . . . . . . . . . . . . . . . . . . . . . . . . . . . . . . . . . . . . . . . . . . . . . . . . . . . . . . . . 209
12
Tweaking the Windows 7 Registry . . . . . . . . . . . . . . . . . . . . . . . . . . . . . . . . . . . . . . . . . . . . . . . . . . . 225
13
Controlling Windows 7 from the Command Line . . . . . . . . . . . . . . . . . . . . . . . . . . . . . . 245
Part IV
Unleashing Windows 7 Security
14
Securing Windows 7 . . . . . . . . . . . . . . . . . . . . . . . . . . . . . . . . . . . . . . . . . . . . . . . . . . . . . . . . . . . . . . . . . . . . . 297
15
Configuring Internet Explorer Security . . . . . . . . . . . . . . . . . . . . . . . . . . . . . . . . . . . . . . . . . . . . . 315
16
Implementing Email Security
17
Securing the File System . . . . . . . . . . . . . . . . . . . . . . . . . . . . . . . . . . . . . . . . . . . . . . . . . . . . . . . . . . . . . . . . 359
18
Setting Up User Security . . . . . . . . . . . . . . . . . . . . . . . . . . . . . . . . . . . . . . . . . . . . . . . . . . . . . . . . . . . . . . . . 373
19
Implementing Network Security. . . . . . . . . . . . . . . . . . . . . . . . . . . . . . . . . . . . . . . . . . . . . . . . . . . . . . 409
20
Tightening Wireless Network Security . . . . . . . . . . . . . . . . . . . . . . . . . . . . . . . . . . . . . . . . . . . . . . 423
Part V
. . . . . . . . . . . . . . . . . . . . . . . . . . . . . . . . . . . . . . . . . . . . . . . . . . . . . . . . . 341
Unleashing Windows 7 Troubleshooting
21
Troubleshooting and Recovering from Problems . . . . . . . . . . . . . . . . . . . . . . . . . . . . . . . . 439
22
Troubleshooting Devices . . . . . . . . . . . . . . . . . . . . . . . . . . . . . . . . . . . . . . . . . . . . . . . . . . . . . . . . . . . . . . . . 461
23
Troubleshooting Startup . . . . . . . . . . . . . . . . . . . . . . . . . . . . . . . . . . . . . . . . . . . . . . . . . . . . . . . . . . . . . . . . 481
iv
Microsoft Windows 7 Unleashed
Part VI
Unleashing Windows 7 Networking
24
Troubleshooting Networking . . . . . . . . . . . . . . . . . . . . . . . . . . . . . . . . . . . . . . . . . . . . . . . . . . . . . . . . . . 491
25
Setting Up a Small Network. . . . . . . . . . . . . . . . . . . . . . . . . . . . . . . . . . . . . . . . . . . . . . . . . . . . . . . . . . . . 511
26
Accessing and Using Your Network . . . . . . . . . . . . . . . . . . . . . . . . . . . . . . . . . . . . . . . . . . . . . . . . . . 553
27
Making Remote Network Connections . . . . . . . . . . . . . . . . . . . . . . . . . . . . . . . . . . . . . . . . . . . . . 585
28
Turning Windows 7 into a Web Server . . . . . . . . . . . . . . . . . . . . . . . . . . . . . . . . . . . . . . . . . . . . . 611
29
Adding Macs to Your Windows 7 Network . . . . . . . . . . . . . . . . . . . . . . . . . . . . . . . . . . . . . . . . 641
Part VII
Unleashing Windows 7 Scripting
30
Scripting Windows 7 with WSH . . . . . . . . . . . . . . . . . . . . . . . . . . . . . . . . . . . . . . . . . . . . . . . . . . . . . . 657
31
Scripting Windows with PowerShell
Part VIII
. . . . . . . . . . . . . . . . . . . . . . . . . . . . . . . . . . . . . . . . . . . . . . . . 703
Appendixes
. . . . . . . . . . . . . . . . . . . . . . . . . . . . . . . . . . . . . . . . . . . . . . . . . . . . . . 731
A
Windows 7 Keyboard Shortcuts
B
Understanding TCP/IP. . . . . . . . . . . . . . . . . . . . . . . . . . . . . . . . . . . . . . . . . . . . . . . . . . . . . . . . . . . . . . . . . . . 741
Index . . . . . . . . . . . . . . . . . . . . . . . . . . . . . . . . . . . . . . . . . . . . . . . . . . . . . . . . . . . . . . . . . . . . . . . . . . . . . . . . . . . . . . . . . 759
v
Contents
Table of Contents
Introduction
1
Who Should Read This Book . . . . . . . . . . . . . . . . . . . . . . . . . . . . . . . . . . . . . . . . . . . . . . . . . . . . . . . . . . . . . 2
How This Book Is Organized . . . . . . . . . . . . . . . . . . . . . . . . . . . . . . . . . . . . . . . . . . . . . . . . . . . . . . . . . . . . . . 3
Part I: Unleashing Windows 7 Customization . . . . . . . . . . . . . . . . . . . . . . . . . . . . . . . 3
Part II: Unleashing Windows 7 Performance and Maintenance . . . . . . . . 3
Part III: Unleashing Windows 7 Power User Tools . . . . . . . . . . . . . . . . . . . . . . . . . . 3
Part IV: Unleashing Windows 7 Security . . . . . . . . . . . . . . . . . . . . . . . . . . . . . . . . . . . . . . 3
Part V: Unleashing Windows 7 Troubleshooting . . . . . . . . . . . . . . . . . . . . . . . . . . . . 4
Part VI: Unleashing Windows 7 Networking . . . . . . . . . . . . . . . . . . . . . . . . . . . . . . . . . 4
Part VII: Unleashing Windows 7 Scripting . . . . . . . . . . . . . . . . . . . . . . . . . . . . . . . . . . . . 4
Part VIII: Appendixes . . . . . . . . . . . . . . . . . . . . . . . . . . . . . . . . . . . . . . . . . . . . . . . . . . . . . . . . . . . . . . . . 4
Conventions Used in This Book . . . . . . . . . . . . . . . . . . . . . . . . . . . . . . . . . . . . . . . . . . . . . . . . . . . . . . . . . 5
How to Contact Me. . . . . . . . . . . . . . . . . . . . . . . . . . . . . . . . . . . . . . . . . . . . . . . . . . . . . . . . . . . . . . . . . . . . . . . . . . 6
1
Customizing Windows Explorer
7
Returning the Menus to Their Rightful Place . . . . . . . . . . . . . . . . . . . . . . . . . . . . . . . . . . . . . . . . 7
Changing the View . . . . . . . . . . . . . . . . . . . . . . . . . . . . . . . . . . . . . . . . . . . . . . . . . . . . . . . . . . . . . . . . . . . . . . . . . . 8
Viewing More Properties . . . . . . . . . . . . . . . . . . . . . . . . . . . . . . . . . . . . . . . . . . . . . . . . . . . . . . . . . . . . . . . . . . . 9
Turning On File Extensions . . . . . . . . . . . . . . . . . . . . . . . . . . . . . . . . . . . . . . . . . . . . . . . . . . . . . . . . . . . . . . 11
Stopping Delete Confirmations . . . . . . . . . . . . . . . . . . . . . . . . . . . . . . . . . . . . . . . . . . . . . . . . . . . . . . . . 13
Running Explorer in Full-Screen Mode . . . . . . . . . . . . . . . . . . . . . . . . . . . . . . . . . . . . . . . . . . . . . . . 15
Exploring the View Options . . . . . . . . . . . . . . . . . . . . . . . . . . . . . . . . . . . . . . . . . . . . . . . . . . . . . . . . . . . . . 16
Moving User Folders . . . . . . . . . . . . . . . . . . . . . . . . . . . . . . . . . . . . . . . . . . . . . . . . . . . . . . . . . . . . . . . . . . . . . . . 19
Taking Ownership of Your Files . . . . . . . . . . . . . . . . . . . . . . . . . . . . . . . . . . . . . . . . . . . . . . . . . . . . . . . . 20
Running Custom Searches . . . . . . . . . . . . . . . . . . . . . . . . . . . . . . . . . . . . . . . . . . . . . . . . . . . . . . . . . . . . . . . 22
Using Advanced Query Syntax to Search Properties . . . . . . . . . . . . . . . . . . . . . . 22
Using Natural Language Queries . . . . . . . . . . . . . . . . . . . . . . . . . . . . . . . . . . . . . . . . . . . . . . . 25
2
Customizing Internet Explorer
27
Displaying the Internet Options . . . . . . . . . . . . . . . . . . . . . . . . . . . . . . . . . . . . . . . . . . . . . . . . . . . . . . . 28
Controlling the Web Page Cache . . . . . . . . . . . . . . . . . . . . . . . . . . . . . . . . . . . . . . . . . . . . . . . . . . . . . . 28
Configuring the Page History . . . . . . . . . . . . . . . . . . . . . . . . . . . . . . . . . . . . . . . . . . . . . . . . . . . . . . . . . . . 29
Adding More Search Engines to Internet Explorer . . . . . . . . . . . . . . . . . . . . . . . . . . . . . . . . 30
Using Any Search Engine from the Address Bar . . . . . . . . . . . . . . . . . . . . . . . . . . . . . . . . . . . 32
Make Tabs More Efficient . . . . . . . . . . . . . . . . . . . . . . . . . . . . . . . . . . . . . . . . . . . . . . . . . . . . . . . . . . . . . . . . 34
Loading Multiple Home Pages at Startup . . . . . . . . . . . . . . . . . . . . . . . . . . . . . . . . . . . . . . . . . . . . 35
Understanding Internet Explorer’s Advanced Options . . . . . . . . . . . . . . . . . . . . . . . . . . 37
vi
Microsoft Windows 7 Unleashed
3
Customizing the File System
45
Understanding File Types . . . . . . . . . . . . . . . . . . . . . . . . . . . . . . . . . . . . . . . . . . . . . . . . . . . . . . . . . . . . . . . . 46
File Types and File Extensions . . . . . . . . . . . . . . . . . . . . . . . . . . . . . . . . . . . . . . . . . . . . . . . . . . 46
File Types and the Registry . . . . . . . . . . . . . . . . . . . . . . . . . . . . . . . . . . . . . . . . . . . . . . . . . . . . . . . 47
Working with Existing File Types . . . . . . . . . . . . . . . . . . . . . . . . . . . . . . . . . . . . . . . . . . . . . . . . . . . . . . 49
Setting the Default Action. . . . . . . . . . . . . . . . . . . . . . . . . . . . . . . . . . . . . . . . . . . . . . . . . . . . . . . . 49
Creating a New File Type Action . . . . . . . . . . . . . . . . . . . . . . . . . . . . . . . . . . . . . . . . . . . . . . . 50
Example: Opening the Command Prompt in the Current Folder . . . . 51
Hiding a File Type’s Extension . . . . . . . . . . . . . . . . . . . . . . . . . . . . . . . . . . . . . . . . . . . . . . . . . . 52
Associating an Extension with a Different Application . . . . . . . . . . . . . . . . . . 53
Associating an Application with Multiple File Types . . . . . . . . . . . . . . . . . . . . . 55
Creating a New File Type . . . . . . . . . . . . . . . . . . . . . . . . . . . . . . . . . . . . . . . . . . . . . . . . . . . . . . . . . . . . . . . . . 56
Associating Two or More Extensions with a Single File Type . . . . . . . . . . . . . . . . . . 57
Customizing the New Menu . . . . . . . . . . . . . . . . . . . . . . . . . . . . . . . . . . . . . . . . . . . . . . . . . . . . . . . . . . . . 57
Adding File Types to the New Menu . . . . . . . . . . . . . . . . . . . . . . . . . . . . . . . . . . . . . . . . . . 58
Deleting File Types from the New Menu . . . . . . . . . . . . . . . . . . . . . . . . . . . . . . . . . . . . . 59
Customizing Windows 7’s Open With List. . . . . . . . . . . . . . . . . . . . . . . . . . . . . . . . . . . . . . . . . . 59
Opening a Document with an Unassociated Application . . . . . . . . . . . . . . . 59
How the Open With Feature Works . . . . . . . . . . . . . . . . . . . . . . . . . . . . . . . . . . . . . . . . . . . 60
Removing an Application from a File Type’s Open With Menu. . . . . . . 61
Removing a Program from the Open With List . . . . . . . . . . . . . . . . . . . . . . . . . . . . 61
Adding a Program to the Open With List . . . . . . . . . . . . . . . . . . . . . . . . . . . . . . . . . . . 62
Disabling the Open With Check Box . . . . . . . . . . . . . . . . . . . . . . . . . . . . . . . . . . . . . . . . . 62
4
Customizing Startup and Shutdown
63
Customizing Startups Using the Boot Configuration Data . . . . . . . . . . . . . . . . . . . . . 63
Using Startup and Recovery to Modify the BCD . . . . . . . . . . . . . . . . . . . . . . . . . . 65
Using the System Configuration Utility to Modify the BCD . . . . . . . . . . . 66
Using BCDEDIT to Customize the Startup Options. . . . . . . . . . . . . . . . . . . . . . . 69
Customizing Startups with the Advanced Options Menu . . . . . . . . . . . . . . . . . . . . . . 73
Useful Windows 7 Logon Strategies . . . . . . . . . . . . . . . . . . . . . . . . . . . . . . . . . . . . . . . . . . . . . . . . . . . 76
Logging On to a Domain . . . . . . . . . . . . . . . . . . . . . . . . . . . . . . . . . . . . . . . . . . . . . . . . . . . . . . . . . 76
Enabling the Administrator Account . . . . . . . . . . . . . . . . . . . . . . . . . . . . . . . . . . . . . . . . . . 76
Setting Up an Automatic Logon . . . . . . . . . . . . . . . . . . . . . . . . . . . . . . . . . . . . . . . . . . . . . . . . 79
Disabling Automatic Logon Override . . . . . . . . . . . . . . . . . . . . . . . . . . . . . . . . . . . . . . . . . 80
Setting Up One-Click Restarts and Shutdowns. . . . . . . . . . . . . . . . . . . . . . . . . . . . . . . . . . . . . 81
Create a Restart Shortcut . . . . . . . . . . . . . . . . . . . . . . . . . . . . . . . . . . . . . . . . . . . . . . . . . . . . . . . . . 83
Create a Shutdown Shortcut . . . . . . . . . . . . . . . . . . . . . . . . . . . . . . . . . . . . . . . . . . . . . . . . . . . . . 84
Turning Off Your Windows 7 Computer from Anywhere . . . . . . . . . . . . . . . . . . . . . . 84
Customizing the Start Menu’s Power Button . . . . . . . . . . . . . . . . . . . . . . . . . . . . . . . . . . . . . . . 86
Customizing Your Notebook’s Power and Sleep Buttons . . . . . . . . . . . . . . . . . . . . . . . . 87
Contents
5
Customizing the Start Menu and Taskbar
vii
89
Customizing the Start Menu for Easier Program and
Document Launching . . . . . . . . . . . . . . . . . . . . . . . . . . . . . . . . . . . . . . . . . . . . . . . . . . . . . . . . . . . . . . . . . . . 90
Getting More Favorite Programs on the Start Menu . . . . . . . . . . . . . . . . . . . . . . 90
Pinning a Favorite Program Permanently to the Start Menu. . . . . . . . . . . 92
Clearing the Recent Programs List . . . . . . . . . . . . . . . . . . . . . . . . . . . . . . . . . . . . . . . . . . . . . 94
Setting Program Access and Defaults . . . . . . . . . . . . . . . . . . . . . . . . . . . . . . . . . . . . . . . . . . 94
Streamlining the Start Menu by Converting Links to Menus . . . . . . . . . . 96
Adding, Moving, and Removing Other Start Menu Icons . . . . . . . . . . . . . . 97
Customizing the Taskbar for Easier Program and
Document Launching . . . . . . . . . . . . . . . . . . . . . . . . . . . . . . . . . . . . . . . . . . . . . . . . . . . . . . . . . . . . . . . . . . . 98
Improving Productivity by Setting Taskbar Options . . . . . . . . . . . . . . . . . . . . . . 98
Pinning a Favorite Program to the Taskbar . . . . . . . . . . . . . . . . . . . . . . . . . . . . . . . . 100
Pinning a Destination to a Program’s Jump List . . . . . . . . . . . . . . . . . . . . . . . . . 101
Using the Windows Key to Start Taskbar Programs . . . . . . . . . . . . . . . . . . . . . 102
Taking Control of the Notification Area . . . . . . . . . . . . . . . . . . . . . . . . . . . . . . . . . . . . 103
Displaying Multiple Clocks for Different Time Zones . . . . . . . . . . . . . . . . . . 106
Displaying the Built-In Taskbar Toolbars . . . . . . . . . . . . . . . . . . . . . . . . . . . . . . . . . . . 108
Setting Some Taskbar Toolbar Options . . . . . . . . . . . . . . . . . . . . . . . . . . . . . . . . . . . . . . 108
Creating New Taskbar Toolbars . . . . . . . . . . . . . . . . . . . . . . . . . . . . . . . . . . . . . . . . . . . . . . . 109
Modifying the Start Menu and Taskbar with Group Policies . . . . . . . . . . . . . . . . . 109
6
Tuning Windows 7’s Performance
111
Monitoring Performance. . . . . . . . . . . . . . . . . . . . . . . . . . . . . . . . . . . . . . . . . . . . . . . . . . . . . . . . . . . . . . . . 112
Viewing Your Computer’s Performance Rating . . . . . . . . . . . . . . . . . . . . . . . . . . . 112
Monitoring Performance with Task Manager . . . . . . . . . . . . . . . . . . . . . . . . . . . . . 114
Using the Resource Monitor . . . . . . . . . . . . . . . . . . . . . . . . . . . . . . . . . . . . . . . . . . . . . . . . . . . 117
Using the Performance Monitor . . . . . . . . . . . . . . . . . . . . . . . . . . . . . . . . . . . . . . . . . . . . . . 119
Optimizing Startup . . . . . . . . . . . . . . . . . . . . . . . . . . . . . . . . . . . . . . . . . . . . . . . . . . . . . . . . . . . . . . . . . . . . . . . 121
Reducing or Eliminating BIOS Checks . . . . . . . . . . . . . . . . . . . . . . . . . . . . . . . . . . . . . . 121
Reducing the OS Choices Menu Timeout . . . . . . . . . . . . . . . . . . . . . . . . . . . . . . . . . . 122
Turning Off the Startup Splash Screen . . . . . . . . . . . . . . . . . . . . . . . . . . . . . . . . . . . . . . 122
Upgrading Your Device Drivers . . . . . . . . . . . . . . . . . . . . . . . . . . . . . . . . . . . . . . . . . . . . . . . 123
Using an Automatic Logon . . . . . . . . . . . . . . . . . . . . . . . . . . . . . . . . . . . . . . . . . . . . . . . . . . . . . 123
Configuring the Prefetcher . . . . . . . . . . . . . . . . . . . . . . . . . . . . . . . . . . . . . . . . . . . . . . . . . . . . . 123
Optimizing Applications . . . . . . . . . . . . . . . . . . . . . . . . . . . . . . . . . . . . . . . . . . . . . . . . . . . . . . . . . . . . . . . . 123
Adding More Memory . . . . . . . . . . . . . . . . . . . . . . . . . . . . . . . . . . . . . . . . . . . . . . . . . . . . . . . . . . . 124
Installing to the Fastest Hard Drive . . . . . . . . . . . . . . . . . . . . . . . . . . . . . . . . . . . . . . . . . . 124
Optimizing Application Launching . . . . . . . . . . . . . . . . . . . . . . . . . . . . . . . . . . . . . . . . . . 124
Getting the Latest Device Drivers . . . . . . . . . . . . . . . . . . . . . . . . . . . . . . . . . . . . . . . . . . . . 124
Optimizing Windows 7 for Programs . . . . . . . . . . . . . . . . . . . . . . . . . . . . . . . . . . . . . . . 124
Setting the Program Priority in Task Manager . . . . . . . . . . . . . . . . . . . . . . . . . . . . 125
viii
Microsoft Windows 7 Unleashed
Optimizing the Hard Disk . . . . . . . . . . . . . . . . . . . . . . . . . . . . . . . . . . . . . . . . . . . . . . . . . . . . . . . . . . . . . . 126
Examining Hard Drive Performance Specifications . . . . . . . . . . . . . . . . . . . . . 126
Performing Hard Drive Maintenance . . . . . . . . . . . . . . . . . . . . . . . . . . . . . . . . . . . . . . . . 127
Disabling Compression and Encryption . . . . . . . . . . . . . . . . . . . . . . . . . . . . . . . . . . . . 128
Turning Off the Content Indexing . . . . . . . . . . . . . . . . . . . . . . . . . . . . . . . . . . . . . . . . . . . 128
Enabling Write Caching . . . . . . . . . . . . . . . . . . . . . . . . . . . . . . . . . . . . . . . . . . . . . . . . . . . . . . . . . 128
Converting FAT16 and FAT32 Partitions to NTFS . . . . . . . . . . . . . . . . . . . . . . . . 129
Turning Off 8.3 Filename Creation . . . . . . . . . . . . . . . . . . . . . . . . . . . . . . . . . . . . . . . . . . 130
Disabling Last Access Timestamp . . . . . . . . . . . . . . . . . . . . . . . . . . . . . . . . . . . . . . . . . . . . . 130
Optimizing Virtual Memory . . . . . . . . . . . . . . . . . . . . . . . . . . . . . . . . . . . . . . . . . . . . . . . . . . . . . . . . . . . 131
Storing the Page File Optimally . . . . . . . . . . . . . . . . . . . . . . . . . . . . . . . . . . . . . . . . . . . . . . . 131
Splitting the Page File . . . . . . . . . . . . . . . . . . . . . . . . . . . . . . . . . . . . . . . . . . . . . . . . . . . . . . . . . . . . 131
Customizing the Page File Size . . . . . . . . . . . . . . . . . . . . . . . . . . . . . . . . . . . . . . . . . . . . . . . . 131
Watching the Page File Size . . . . . . . . . . . . . . . . . . . . . . . . . . . . . . . . . . . . . . . . . . . . . . . . . . . . 132
Changing the Paging File’s Location and Size . . . . . . . . . . . . . . . . . . . . . . . . . . . . 132
7
Maintaining Your Windows 7 System
135
Checking Your Hard Disk for Errors . . . . . . . . . . . . . . . . . . . . . . . . . . . . . . . . . . . . . . . . . . . . . . . . . 135
Understanding Clusters . . . . . . . . . . . . . . . . . . . . . . . . . . . . . . . . . . . . . . . . . . . . . . . . . . . . . . . . . 137
Understanding Cycles. . . . . . . . . . . . . . . . . . . . . . . . . . . . . . . . . . . . . . . . . . . . . . . . . . . . . . . . . . . . 138
Running the Check Disk GUI . . . . . . . . . . . . . . . . . . . . . . . . . . . . . . . . . . . . . . . . . . . . . . . . . 138
Checking Free Disk Space . . . . . . . . . . . . . . . . . . . . . . . . . . . . . . . . . . . . . . . . . . . . . . . . . . . . . . . . . . . . . . 140
Deleting Unnecessary Files . . . . . . . . . . . . . . . . . . . . . . . . . . . . . . . . . . . . . . . . . . . . . . . . . . . . . . . . . . . . . 143
Defragmenting Your Hard Disk . . . . . . . . . . . . . . . . . . . . . . . . . . . . . . . . . . . . . . . . . . . . . . . . . . . . . . . 145
Running the Disk Defragmenter Tool . . . . . . . . . . . . . . . . . . . . . . . . . . . . . . . . . . . . . . . 146
Changing the Disk Defragmenter Schedule . . . . . . . . . . . . . . . . . . . . . . . . . . . . . . . 147
Changing Which Disks Get Defragmented . . . . . . . . . . . . . . . . . . . . . . . . . . . . . . . . 148
Preparing for Trouble . . . . . . . . . . . . . . . . . . . . . . . . . . . . . . . . . . . . . . . . . . . . . . . . . . . . . . . . . . . . . . . . . . . . 149
Setting System Restore Points . . . . . . . . . . . . . . . . . . . . . . . . . . . . . . . . . . . . . . . . . . . . . . . . . 149
Creating a System Repair Disc . . . . . . . . . . . . . . . . . . . . . . . . . . . . . . . . . . . . . . . . . . . . . . . . . 152
Backing Up Your Files. . . . . . . . . . . . . . . . . . . . . . . . . . . . . . . . . . . . . . . . . . . . . . . . . . . . . . . . . . . . . . . . . . . . 153
Configuring Automatic File Backups . . . . . . . . . . . . . . . . . . . . . . . . . . . . . . . . . . . . . . . . 155
Creating a System Image Backup . . . . . . . . . . . . . . . . . . . . . . . . . . . . . . . . . . . . . . . . . . . . . 157
Checking for Updates and Security Patches . . . . . . . . . . . . . . . . . . . . . . . . . . . . . . . . . . . . . . . 158
Reviewing Event Viewer Logs . . . . . . . . . . . . . . . . . . . . . . . . . . . . . . . . . . . . . . . . . . . . . . . . . . . . . . . . . 160
Setting Up a 9-Step Maintenance Schedule . . . . . . . . . . . . . . . . . . . . . . . . . . . . . . . . . . . . . . . 162
8
Controlling Windows 7 with Control Panel
165
Touring the Control Panel Window . . . . . . . . . . . . . . . . . . . . . . . . . . . . . . . . . . . . . . . . . . . . . . . . . 166
Reviewing the Control Panel Icons . . . . . . . . . . . . . . . . . . . . . . . . . . . . . . . . . . . . . . . . . . . . . . . . . . 167
Understanding Control Panel Files . . . . . . . . . . . . . . . . . . . . . . . . . . . . . . . . . . . . . . . . . . . . . . . . . . 172
Easier Access to Control Panel . . . . . . . . . . . . . . . . . . . . . . . . . . . . . . . . . . . . . . . . . . . . . . . . . . . . . . . . 175
Contents
ix
Alternative Methods for Opening Control Panel Icons . . . . . . . . . . . . . . . . 175
Putting Control Panel on the Start Menu . . . . . . . . . . . . . . . . . . . . . . . . . . . . . . . . . . 176
Removing an Icon from Control Panel . . . . . . . . . . . . . . . . . . . . . . . . . . . . . . . . . . . . . . . . . . . . . 177
Showing Only Specified Control Panel Icons . . . . . . . . . . . . . . . . . . . . . . . . . . . . . . . . . . . . . 178
9
Policing Windows 7 with Group Policies
181
Understanding Group Policies . . . . . . . . . . . . . . . . . . . . . . . . . . . . . . . . . . . . . . . . . . . . . . . . . . . . . . . . 181
Local Group Policy Editor and Windows Versions . . . . . . . . . . . . . . . . . . . . . . . . . . . . . . 182
Launching the Local Group Policy Editor . . . . . . . . . . . . . . . . . . . . . . . . . . . . . . . . . . . . . . . . . 183
Working with Group Policies . . . . . . . . . . . . . . . . . . . . . . . . . . . . . . . . . . . . . . . . . . . . . . . . . . . . . . . . . . 184
Configuring a Policy . . . . . . . . . . . . . . . . . . . . . . . . . . . . . . . . . . . . . . . . . . . . . . . . . . . . . . . . . . . . . 185
Filtering Policies . . . . . . . . . . . . . . . . . . . . . . . . . . . . . . . . . . . . . . . . . . . . . . . . . . . . . . . . . . . . . . . . . . . 187
Group Policy Examples. . . . . . . . . . . . . . . . . . . . . . . . . . . . . . . . . . . . . . . . . . . . . . . . . . . . . . . . . . . . . . . . . . 189
Customizing the Windows Security Window . . . . . . . . . . . . . . . . . . . . . . . . . . . . . 189
Customizing the Places Bar . . . . . . . . . . . . . . . . . . . . . . . . . . . . . . . . . . . . . . . . . . . . . . . . . . . . 191
Increasing the Size of the Recent Documents List . . . . . . . . . . . . . . . . . . . . . . . 193
Enabling the Shutdown Event Tracker . . . . . . . . . . . . . . . . . . . . . . . . . . . . . . . . . . . . . . 194
10
Configuring the Microsoft Management Console
197
Reviewing the Windows 7 Snap-Ins . . . . . . . . . . . . . . . . . . . . . . . . . . . . . . . . . . . . . . . . . . . . . . . . . 197
Launching the MMC . . . . . . . . . . . . . . . . . . . . . . . . . . . . . . . . . . . . . . . . . . . . . . . . . . . . . . . . . . . . . . . . . . . . . 200
Adding a Snap-In . . . . . . . . . . . . . . . . . . . . . . . . . . . . . . . . . . . . . . . . . . . . . . . . . . . . . . . . . . . . . . . . . . . . . . . . . 200
Saving a Console . . . . . . . . . . . . . . . . . . . . . . . . . . . . . . . . . . . . . . . . . . . . . . . . . . . . . . . . . . . . . . . . . . . . . . . . . . 202
Creating a Custom Taskpad View . . . . . . . . . . . . . . . . . . . . . . . . . . . . . . . . . . . . . . . . . . . . . . . . . . . . 203
Controlling Snap-Ins with Group Policies . . . . . . . . . . . . . . . . . . . . . . . . . . . . . . . . . . . . . . . . . 207
11
Controlling Services
209
Controlling Services with the Services Snap-In . . . . . . . . . . . . . . . . . . . . . . . . . . . . . . . . . . 209
Controlling Services at the Command Prompt. . . . . . . . . . . . . . . . . . . . . . . . . . . . . . . . . . . 212
Controlling Services with a Script . . . . . . . . . . . . . . . . . . . . . . . . . . . . . . . . . . . . . . . . . . . . . . . . . . . . 213
Disable Services for Faster Performance . . . . . . . . . . . . . . . . . . . . . . . . . . . . . . . . . . . . . . . . . . . . 217
Make Windows Shut Down Services Faster . . . . . . . . . . . . . . . . . . . . . . . . . . . . . . . . . . . . . . . . 222
Reset a Broken Service . . . . . . . . . . . . . . . . . . . . . . . . . . . . . . . . . . . . . . . . . . . . . . . . . . . . . . . . . . . . . . . . . . . 222
12
Tweaking the Windows 7 Registry
225
Firing Up the Registry Editor . . . . . . . . . . . . . . . . . . . . . . . . . . . . . . . . . . . . . . . . . . . . . . . . . . . . . . . . . . 226
Getting to Know the Registry . . . . . . . . . . . . . . . . . . . . . . . . . . . . . . . . . . . . . . . . . . . . . . . . . . . . . . . . . 227
Navigating the Keys Pane . . . . . . . . . . . . . . . . . . . . . . . . . . . . . . . . . . . . . . . . . . . . . . . . . . . . . . . 227
Understanding Registry Settings . . . . . . . . . . . . . . . . . . . . . . . . . . . . . . . . . . . . . . . . . . . . . . 228
Getting to Know the Registry’s Root Keys . . . . . . . . . . . . . . . . . . . . . . . . . . . . . . . . . 229
Understanding Hives and Registry Files . . . . . . . . . . . . . . . . . . . . . . . . . . . . . . . . . . . . 231
x
Microsoft Windows 7 Unleashed
Keeping the Registry Safe . . . . . . . . . . . . . . . . . . . . . . . . . . . . . . . . . . . . . . . . . . . . . . . . . . . . . . . . . . . . . . . 233
Preventing Other Folks from Messing with the Registry. . . . . . . . . . . . . . . 233
Backing Up the Registry . . . . . . . . . . . . . . . . . . . . . . . . . . . . . . . . . . . . . . . . . . . . . . . . . . . . . . . . . 234
Saving the Current Registry State with System Restore . . . . . . . . . . . . . . . . 234
Protecting Keys by Exporting Them to Disk. . . . . . . . . . . . . . . . . . . . . . . . . . . . . . . 235
Working with Registry Entries . . . . . . . . . . . . . . . . . . . . . . . . . . . . . . . . . . . . . . . . . . . . . . . . . . . . . . . . 236
Changing the Value of a Registry Entry . . . . . . . . . . . . . . . . . . . . . . . . . . . . . . . . . . . . 237
Renaming a Key or Setting . . . . . . . . . . . . . . . . . . . . . . . . . . . . . . . . . . . . . . . . . . . . . . . . . . . . . 243
Creating a New Key or Setting . . . . . . . . . . . . . . . . . . . . . . . . . . . . . . . . . . . . . . . . . . . . . . . . 243
Deleting a Key or Setting . . . . . . . . . . . . . . . . . . . . . . . . . . . . . . . . . . . . . . . . . . . . . . . . . . . . . . . 243
Finding Registry Entries . . . . . . . . . . . . . . . . . . . . . . . . . . . . . . . . . . . . . . . . . . . . . . . . . . . . . . . . . . . . . . . . . 244
13
Controlling Windows 7 from the Command Line
245
Getting to the Command Line. . . . . . . . . . . . . . . . . . . . . . . . . . . . . . . . . . . . . . . . . . . . . . . . . . . . . . . . 246
Running Command Prompt as the Administrator . . . . . . . . . . . . . . . . . . . . . . 246
Running CMD . . . . . . . . . . . . . . . . . . . . . . . . . . . . . . . . . . . . . . . . . . . . . . . . . . . . . . . . . . . . . . . . . . . . . 247
Working at the Command Line . . . . . . . . . . . . . . . . . . . . . . . . . . . . . . . . . . . . . . . . . . . . . . . . . . . . . . 251
Running Commands . . . . . . . . . . . . . . . . . . . . . . . . . . . . . . . . . . . . . . . . . . . . . . . . . . . . . . . . . . . . . 251
Working with Long Filenames . . . . . . . . . . . . . . . . . . . . . . . . . . . . . . . . . . . . . . . . . . . . . . . . 252
Changing Folders Faster . . . . . . . . . . . . . . . . . . . . . . . . . . . . . . . . . . . . . . . . . . . . . . . . . . . . . . . . . 253
Taking Advantage of DOSKEY . . . . . . . . . . . . . . . . . . . . . . . . . . . . . . . . . . . . . . . . . . . . . . . . . 254
Redirecting Command Output and Input . . . . . . . . . . . . . . . . . . . . . . . . . . . . . . . . . 256
Piping Commands . . . . . . . . . . . . . . . . . . . . . . . . . . . . . . . . . . . . . . . . . . . . . . . . . . . . . . . . . . . . . . . . 259
Understanding Batch File Basics . . . . . . . . . . . . . . . . . . . . . . . . . . . . . . . . . . . . . . . . . . . . . . . . . . . . . . 260
Creating Batch Files . . . . . . . . . . . . . . . . . . . . . . . . . . . . . . . . . . . . . . . . . . . . . . . . . . . . . . . . . . . . . . 260
REM: Adding Comments to a Batch File . . . . . . . . . . . . . . . . . . . . . . . . . . . . . . . . . . . 261
ECHO: Displaying Messages from a Batch File . . . . . . . . . . . . . . . . . . . . . . . . . . . 261
PAUSE: Temporarily Halting Batch File Execution . . . . . . . . . . . . . . . . . . . . . . . 262
Using Batch File Parameters . . . . . . . . . . . . . . . . . . . . . . . . . . . . . . . . . . . . . . . . . . . . . . . . . . . . 263
FOR: Looping in a Batch File . . . . . . . . . . . . . . . . . . . . . . . . . . . . . . . . . . . . . . . . . . . . . . . . . . 264
GOTO: Jumping to a Line in a Batch File . . . . . . . . . . . . . . . . . . . . . . . . . . . . . . . . . . 265
IF: Handling Batch File Conditions . . . . . . . . . . . . . . . . . . . . . . . . . . . . . . . . . . . . . . . . . . 266
Working with the Command-Line Tools . . . . . . . . . . . . . . . . . . . . . . . . . . . . . . . . . . . . . . . . . . . 269
Working with Disk Management Tools . . . . . . . . . . . . . . . . . . . . . . . . . . . . . . . . . . . . . 269
Working with File and Folder Management Tools . . . . . . . . . . . . . . . . . . . . . . . 276
Working with System Management Tools . . . . . . . . . . . . . . . . . . . . . . . . . . . . . . . . . 288
14
Securing Windows 7
297
Thwarting Snoops and Crackers . . . . . . . . . . . . . . . . . . . . . . . . . . . . . . . . . . . . . . . . . . . . . . . . . . . . . . 297
First, Some Basic Precautions . . . . . . . . . . . . . . . . . . . . . . . . . . . . . . . . . . . . . . . . . . . . . . . . . . 298
Locking Your Computer . . . . . . . . . . . . . . . . . . . . . . . . . . . . . . . . . . . . . . . . . . . . . . . . . . . . . . . . . 300
Requiring Ctrl+Alt+Delete at Startup . . . . . . . . . . . . . . . . . . . . . . . . . . . . . . . . . . . . . . . . 302
Contents
xi
Checking Your Computer’s Security Settings . . . . . . . . . . . . . . . . . . . . . . . . . . . . . . . . . . . . . 303
Making Sure Windows Firewall Is Turned On . . . . . . . . . . . . . . . . . . . . . . . . . . . . 303
Making Sure Windows Defender Is Turned On . . . . . . . . . . . . . . . . . . . . . . . . . . . 303
Making Sure User Account Control Is Turned On . . . . . . . . . . . . . . . . . . . . . . . 307
Making Sure the Administrator Account Is Disabled . . . . . . . . . . . . . . . . . . . 307
Managing Windows Firewall . . . . . . . . . . . . . . . . . . . . . . . . . . . . . . . . . . . . . . . . . . . . . . . . . . . . . . . . . . 308
Making Sure the Firewall Is Up to Snuff . . . . . . . . . . . . . . . . . . . . . . . . . . . . . . . . . . . . 309
Creating a Windows Firewall Exception . . . . . . . . . . . . . . . . . . . . . . . . . . . . . . . . . . . . 309
15
Configuring Internet Explorer Security
315
Enhancing Your Browsing Privacy . . . . . . . . . . . . . . . . . . . . . . . . . . . . . . . . . . . . . . . . . . . . . . . . . . . 316
Deleting Your Browsing History . . . . . . . . . . . . . . . . . . . . . . . . . . . . . . . . . . . . . . . . . . . . . . 316
Clearing the Address Bar List . . . . . . . . . . . . . . . . . . . . . . . . . . . . . . . . . . . . . . . . . . . . . . . . . . 320
Enhancing Online Privacy by Managing Cookies . . . . . . . . . . . . . . . . . . . . . . . 322
Total Privacy: InPrivate Browsing and Filtering . . . . . . . . . . . . . . . . . . . . . . . . . . 325
Enhancing Your Browsing Security . . . . . . . . . . . . . . . . . . . . . . . . . . . . . . . . . . . . . . . . . . . . . . . . . . 327
Blocking Pop-Up Windows . . . . . . . . . . . . . . . . . . . . . . . . . . . . . . . . . . . . . . . . . . . . . . . . . . . . . 327
Adding and Removing Zone Sites . . . . . . . . . . . . . . . . . . . . . . . . . . . . . . . . . . . . . . . . . . . . 328
Changing a Zone’s Security Level . . . . . . . . . . . . . . . . . . . . . . . . . . . . . . . . . . . . . . . . . . . . 330
Protected Mode: Reducing Internet Explorer’s Privileges . . . . . . . . . . . . . . 331
Thwarting Phishers with the SmartScreen Filter . . . . . . . . . . . . . . . . . . . . . . . . . 332
Encoding Addresses to Prevent IDN Spoofing . . . . . . . . . . . . . . . . . . . . . . . . . . . . 334
Managing Add-Ons . . . . . . . . . . . . . . . . . . . . . . . . . . . . . . . . . . . . . . . . . . . . . . . . . . . . . . . . . . . . . . . 336
Total Security: Internet Explorer Without Add-Ons . . . . . . . . . . . . . . . . . . . . . 336
Understand Internet Explorer’s Advanced Security Options . . . . . . . . . . . . . . . . . 337
16
Implementing Email Security
341
Protecting Yourself Against Email Viruses . . . . . . . . . . . . . . . . . . . . . . . . . . . . . . . . . . . . . . . . . 341
Configuring Windows Defender to Scan Email . . . . . . . . . . . . . . . . . . . . . . . . . . . . . . . . . . 345
Thwarting Spam with Windows Live Mail’s Junk Filter. . . . . . . . . . . . . . . . . . . . . . . . 345
Setting the Junk Email Protection Level . . . . . . . . . . . . . . . . . . . . . . . . . . . . . . . . . . . . 347
Specifying Safe Senders . . . . . . . . . . . . . . . . . . . . . . . . . . . . . . . . . . . . . . . . . . . . . . . . . . . . . . . . . . 348
Blocking Senders . . . . . . . . . . . . . . . . . . . . . . . . . . . . . . . . . . . . . . . . . . . . . . . . . . . . . . . . . . . . . . . . . . 349
Blocking Countries and Languages . . . . . . . . . . . . . . . . . . . . . . . . . . . . . . . . . . . . . . . . . . 349
Email Phishing Protection . . . . . . . . . . . . . . . . . . . . . . . . . . . . . . . . . . . . . . . . . . . . . . . . . . . . . . . . . . . . . . 350
Maintaining Your Privacy While Reading Email . . . . . . . . . . . . . . . . . . . . . . . . . . . . . . . . . 351
Blocking Read Receipts . . . . . . . . . . . . . . . . . . . . . . . . . . . . . . . . . . . . . . . . . . . . . . . . . . . . . . . . . . 352
Squashing Web Bugs . . . . . . . . . . . . . . . . . . . . . . . . . . . . . . . . . . . . . . . . . . . . . . . . . . . . . . . . . . . . . 352
Sending and Receiving Secure Email . . . . . . . . . . . . . . . . . . . . . . . . . . . . . . . . . . . . . . . . . . . . . . . . 353
Setting Up an Email Account with a Digital ID . . . . . . . . . . . . . . . . . . . . . . . . . . 354
Obtaining Another Person’s Public Key. . . . . . . . . . . . . . . . . . . . . . . . . . . . . . . . . . . . . 355
xii
Microsoft Windows 7 Unleashed
Sending a Secure Message. . . . . . . . . . . . . . . . . . . . . . . . . . . . . . . . . . . . . . . . . . . . . . . . . . . . . . . 356
Receiving a Secure Message . . . . . . . . . . . . . . . . . . . . . . . . . . . . . . . . . . . . . . . . . . . . . . . . . . . . 356
17
Securing the File System
359
Setting Security Permissions on Files and Folders . . . . . . . . . . . . . . . . . . . . . . . . . . . . . . . 359
Assigning a User to a Security Group. . . . . . . . . . . . . . . . . . . . . . . . . . . . . . . . . . . . . . . . 361
Assigning a User to Multiple Security Groups . . . . . . . . . . . . . . . . . . . . . . . . . . . . 362
Assigning Standard Permissions . . . . . . . . . . . . . . . . . . . . . . . . . . . . . . . . . . . . . . . . . . . . . . 363
Assigning Special Permissions . . . . . . . . . . . . . . . . . . . . . . . . . . . . . . . . . . . . . . . . . . . . . . . . . 364
Encrypting Files and Folders . . . . . . . . . . . . . . . . . . . . . . . . . . . . . . . . . . . . . . . . . . . . . . . . . . . . . . . . . . . 366
Encrypting a Disk with BitLocker . . . . . . . . . . . . . . . . . . . . . . . . . . . . . . . . . . . . . . . . . . . . . . . . . . . . 367
Enabling BitLocker on a System with a TPM . . . . . . . . . . . . . . . . . . . . . . . . . . . . . . 369
Enabling BitLocker on a System Without a TPM . . . . . . . . . . . . . . . . . . . . . . . . 369
18
Setting Up User Security
373
Understanding User Account Control (UAC) . . . . . . . . . . . . . . . . . . . . . . . . . . . . . . . . . . . . . 374
Elevating Privileges . . . . . . . . . . . . . . . . . . . . . . . . . . . . . . . . . . . . . . . . . . . . . . . . . . . . . . . . . . . . . . . 375
Configuring User Account Control . . . . . . . . . . . . . . . . . . . . . . . . . . . . . . . . . . . . . . . . . . 377
User Account Control Policies . . . . . . . . . . . . . . . . . . . . . . . . . . . . . . . . . . . . . . . . . . . . . . . . . 379
Creating and Enforcing Bulletproof Passwords . . . . . . . . . . . . . . . . . . . . . . . . . . . . . . . . . . . 380
Creating a Strong Password . . . . . . . . . . . . . . . . . . . . . . . . . . . . . . . . . . . . . . . . . . . . . . . . . . . . 381
User Account Password Options . . . . . . . . . . . . . . . . . . . . . . . . . . . . . . . . . . . . . . . . . . . . . . 381
Taking Advantage of Windows 7’s Password Policies . . . . . . . . . . . . . . . . . . . 382
Recovering from a Forgotten Password . . . . . . . . . . . . . . . . . . . . . . . . . . . . . . . . . . . . . 383
Creating and Managing User Accounts . . . . . . . . . . . . . . . . . . . . . . . . . . . . . . . . . . . . . . . . . . . . . 384
Working with the User Accounts Dialog Box . . . . . . . . . . . . . . . . . . . . . . . . . . . . . 386
Working with the Local Users and Groups Snap-In . . . . . . . . . . . . . . . . . . . . . 388
Setting Account Policies . . . . . . . . . . . . . . . . . . . . . . . . . . . . . . . . . . . . . . . . . . . . . . . . . . . . . . . . . . . . . . . . 389
Setting Account Security Policies . . . . . . . . . . . . . . . . . . . . . . . . . . . . . . . . . . . . . . . . . . . . . 389
Setting User Rights Policies . . . . . . . . . . . . . . . . . . . . . . . . . . . . . . . . . . . . . . . . . . . . . . . . . . . . . 391
Setting Account Lockout Policies . . . . . . . . . . . . . . . . . . . . . . . . . . . . . . . . . . . . . . . . . . . . . 391
Working with Users and Groups from the Command Line . . . . . . . . . . . . . . . . . . 393
The NET USER Command . . . . . . . . . . . . . . . . . . . . . . . . . . . . . . . . . . . . . . . . . . . . . . . . . . . . . . 393
The NET LOCALGROUP Command . . . . . . . . . . . . . . . . . . . . . . . . . . . . . . . . . . . . . . . . . 394
Using Parental Controls to Restrict Computer Usage . . . . . . . . . . . . . . . . . . . . . . . . . . 395
Activating Parental Controls . . . . . . . . . . . . . . . . . . . . . . . . . . . . . . . . . . . . . . . . . . . . . . . . . . . 395
Example: Setting Up Parental Controls for Games . . . . . . . . . . . . . . . . . . . . . . 397
More User Security Tricks . . . . . . . . . . . . . . . . . . . . . . . . . . . . . . . . . . . . . . . . . . . . . . . . . . . . . . . . . . . . . . . 400
Preventing Elevation for All Standard Users . . . . . . . . . . . . . . . . . . . . . . . . . . . . . . . 400
Closing Off Your Computer by Disabling All Other Users . . . . . . . . . . . . 402
Hiding Usernames in the Logon Screen . . . . . . . . . . . . . . . . . . . . . . . . . . . . . . . . . . . . 403
Contents
xiii
Renaming Built-In Accounts for Better Security . . . . . . . . . . . . . . . . . . . . . . . . . . 405
Using the Guest Account to Give Folks Temporary Access. . . . . . . . . . . . 406
Determining Who Is Logged On. . . . . . . . . . . . . . . . . . . . . . . . . . . . . . . . . . . . . . . . . . . . . . 407
19
Implementing Network Security
409
Configuring Windows 7 for Secure Networking . . . . . . . . . . . . . . . . . . . . . . . . . . . . . . . . . 410
Making Sure Password-Protected Sharing Is Enabled . . . . . . . . . . . . . . . . . . . 410
Deactivating the Sharing Wizard . . . . . . . . . . . . . . . . . . . . . . . . . . . . . . . . . . . . . . . . . . . . . 410
Setting Sharing Permissions on Shared Folders . . . . . . . . . . . . . . . . . . . . . . . . . . . . . . . . . . 411
Setting Security Permissions on Shared Folders . . . . . . . . . . . . . . . . . . . . . . . . . . . . . . . . . . 414
Hiding Your Shared Folders . . . . . . . . . . . . . . . . . . . . . . . . . . . . . . . . . . . . . . . . . . . . . . . . . . . . . . . . . . . . 415
Disabling the Hidden Administrative Shares . . . . . . . . . . . . . . . . . . . . . . . . . . . . . . . . . . . . . 417
Removing Stored Remote Desktop Credentials. . . . . . . . . . . . . . . . . . . . . . . . . . . . . . . . . . . 418
Preventing Users from Logging On at Certain Times. . . . . . . . . . . . . . . . . . . . . . . . . . . 420
Setting a User’s Logon Hours . . . . . . . . . . . . . . . . . . . . . . . . . . . . . . . . . . . . . . . . . . . . . . . . . . 421
Automatically Logging Off a User When the
Logon Hours Expire . . . . . . . . . . . . . . . . . . . . . . . . . . . . . . . . . . . . . . . . . . . . . . . . . . . . . . . . . . . . 422
20
Tightening Wireless Network Security
423
Displaying the Router’s Setup Pages . . . . . . . . . . . . . . . . . . . . . . . . . . . . . . . . . . . . . . . . . . . . . . . . . 424
Entering the Router’s IP Address . . . . . . . . . . . . . . . . . . . . . . . . . . . . . . . . . . . . . . . . . . . . . . 424
Using the Network Window . . . . . . . . . . . . . . . . . . . . . . . . . . . . . . . . . . . . . . . . . . . . . . . . . . . 426
Specifying a New Administrative Password . . . . . . . . . . . . . . . . . . . . . . . . . . . . . . . . . . . . . . . 428
Positioning the Access Point for Maximum Security . . . . . . . . . . . . . . . . . . . . . . . . . . . 428
Encrypting Wireless Signals with WPA . . . . . . . . . . . . . . . . . . . . . . . . . . . . . . . . . . . . . . . . . . . . . 430
Changing the Wireless Connection Security Properties. . . . . . . . . . . . . . . . 431
Disabling Network SSID Broadcasting . . . . . . . . . . . . . . . . . . . . . . . . . . . . . . . . . . . . . . . . . . . . . . 432
Connecting to a Hidden Wireless Network . . . . . . . . . . . . . . . . . . . . . . . . . . . . . . . . 434
Changing the Default SSID . . . . . . . . . . . . . . . . . . . . . . . . . . . . . . . . . . . . . . . . . . . . . . . . . . . . . . . . . . . . 435
Enabling MAC Address Filtering . . . . . . . . . . . . . . . . . . . . . . . . . . . . . . . . . . . . . . . . . . . . . . . . . . . . . . 436
Getting the MAC Address of Your Wireless NIC . . . . . . . . . . . . . . . . . . . . . . . . . 437
21
Troubleshooting and Recovering from Problems
439
Troubleshooting Strategies: Determining the Source of a Problem . . . . . . . . . 440
Did You Get an Error Message? . . . . . . . . . . . . . . . . . . . . . . . . . . . . . . . . . . . . . . . . . . . . . . . 440
Does an Error or Warning Appear in the Event Viewer Logs? . . . . . . . . 441
Does an Error Appear in System Information? . . . . . . . . . . . . . . . . . . . . . . . . . . . 442
Did You Recently Edit the Registry? . . . . . . . . . . . . . . . . . . . . . . . . . . . . . . . . . . . . . . . . . 442
Did You Recently Change Any Windows Settings?. . . . . . . . . . . . . . . . . . . . . . 442
Did Windows 7 “Spontaneously” Reboot? . . . . . . . . . . . . . . . . . . . . . . . . . . . . . . . . . 442
xiv
Microsoft Windows 7 Unleashed
Did You Recently Change Any Application Settings?. . . . . . . . . . . . . . . . . . . 445
Did You Recently Install a New Program? . . . . . . . . . . . . . . . . . . . . . . . . . . . . . . . . . 446
Did You Recently Install a New Device? . . . . . . . . . . . . . . . . . . . . . . . . . . . . . . . . . . . . 446
Did You Recently Install an Incompatible Device Driver?. . . . . . . . . . . . . 447
Did You Recently Apply an Update from Windows Update? . . . . . . . . . 447
General Troubleshooting Tips . . . . . . . . . . . . . . . . . . . . . . . . . . . . . . . . . . . . . . . . . . . . . . . . . . . . . . . . . 447
More Troubleshooting Tools . . . . . . . . . . . . . . . . . . . . . . . . . . . . . . . . . . . . . . . . . . . . . . . . . . . . . . . . . . . 448
Running the Windows 7 Troubleshooters . . . . . . . . . . . . . . . . . . . . . . . . . . . . . . . . . 448
Understanding Disk Diagnostics . . . . . . . . . . . . . . . . . . . . . . . . . . . . . . . . . . . . . . . . . . . . . . 449
Understanding Resource Exhaustion Detection . . . . . . . . . . . . . . . . . . . . . . . . . . 450
Running the Memory Diagnostics Tool. . . . . . . . . . . . . . . . . . . . . . . . . . . . . . . . . . . . . 451
Checking for Solutions to Problems . . . . . . . . . . . . . . . . . . . . . . . . . . . . . . . . . . . . . . . . . 452
Troubleshooting Using Online Resources . . . . . . . . . . . . . . . . . . . . . . . . . . . . . . . . . . . . . . . . . . 455
Recovering from a Problem . . . . . . . . . . . . . . . . . . . . . . . . . . . . . . . . . . . . . . . . . . . . . . . . . . . . . . . . . . . . 456
Booting Using the Last Known Good Configuration . . . . . . . . . . . . . . . . . . . 456
Recovering Using System Restore. . . . . . . . . . . . . . . . . . . . . . . . . . . . . . . . . . . . . . . . . . . . . 457
22
Troubleshooting Devices
461
Managing Your Hardware with Device Manager . . . . . . . . . . . . . . . . . . . . . . . . . . . . . . . . . 462
Controlling the Device Display . . . . . . . . . . . . . . . . . . . . . . . . . . . . . . . . . . . . . . . . . . . . . . . 463
Viewing Device Properties . . . . . . . . . . . . . . . . . . . . . . . . . . . . . . . . . . . . . . . . . . . . . . . . . . . . . . 463
Showing Nonpresent Devices in Device Manager . . . . . . . . . . . . . . . . . . . . . . . 464
Working with Device Drivers . . . . . . . . . . . . . . . . . . . . . . . . . . . . . . . . . . . . . . . . . . . . . . . . . . 464
Configuring Windows to Ignore Unsigned Device Drivers . . . . . . . . . . . 466
Writing a Complete List of Device Drivers to a Text File . . . . . . . . . . . . . . 469
Uninstalling a Device . . . . . . . . . . . . . . . . . . . . . . . . . . . . . . . . . . . . . . . . . . . . . . . . . . . . . . . . . . . . 471
Working with Device Security Policies . . . . . . . . . . . . . . . . . . . . . . . . . . . . . . . . . . . . . . . . . . . . . . 472
Troubleshooting Device Problems. . . . . . . . . . . . . . . . . . . . . . . . . . . . . . . . . . . . . . . . . . . . . . . . . . . . 472
Troubleshooting with Device Manager . . . . . . . . . . . . . . . . . . . . . . . . . . . . . . . . . . . . . 473
Displaying a List of Nonworking Devices . . . . . . . . . . . . . . . . . . . . . . . . . . . . . . . . . . 474
Troubleshooting Device Driver Problems . . . . . . . . . . . . . . . . . . . . . . . . . . . . . . . . . . 477
Tips for Downloading Device Drivers . . . . . . . . . . . . . . . . . . . . . . . . . . . . . . . . . . . . . . . 478
Troubleshooting Resource Conflicts . . . . . . . . . . . . . . . . . . . . . . . . . . . . . . . . . . . . . . . . . 479
23
Troubleshooting Startup
481
First Things First: Some Things to Try Before Anything Else . . . . . . . . . . . . . . . . . 481
When to Use the Various Advanced Startup Options . . . . . . . . . . . . . . . . . . . . . . . . . . 482
Safe Mode . . . . . . . . . . . . . . . . . . . . . . . . . . . . . . . . . . . . . . . . . . . . . . . . . . . . . . . . . . . . . . . . . . . . . . . . . . . 483
Safe Mode with Networking . . . . . . . . . . . . . . . . . . . . . . . . . . . . . . . . . . . . . . . . . . . . . . . . . . . 483
Safe Mode with Command Prompt . . . . . . . . . . . . . . . . . . . . . . . . . . . . . . . . . . . . . . . . . . 483
Enable Boot Logging . . . . . . . . . . . . . . . . . . . . . . . . . . . . . . . . . . . . . . . . . . . . . . . . . . . . . . . . . . . . . 483
Enable Low-Resolution Video (640¥480) . . . . . . . . . . . . . . . . . . . . . . . . . . . . . . . . . . . 484
Contents
xv
Last Known Good Configuration . . . . . . . . . . . . . . . . . . . . . . . . . . . . . . . . . . . . . . . . . . . . . 484
Directory Services Restore Mode . . . . . . . . . . . . . . . . . . . . . . . . . . . . . . . . . . . . . . . . . . . . . . 484
Debugging Mode . . . . . . . . . . . . . . . . . . . . . . . . . . . . . . . . . . . . . . . . . . . . . . . . . . . . . . . . . . . . . . . . . . 484
Disable Automatic Restart on System Failure . . . . . . . . . . . . . . . . . . . . . . . . . . . . . 484
Disable Driver Signature Enforcement . . . . . . . . . . . . . . . . . . . . . . . . . . . . . . . . . . . . . . 485
What to Do If Windows 7 Won’t Start in Safe Mode . . . . . . . . . . . . . . . . . . . . . . . . . . . 485
Recovering Using the System Recovery Options . . . . . . . . . . . . . . . . . . . . . . . . . . . . . . . . . 485
Troubleshooting Startup Using the System Configuration Utility . . . . . . . . . . 487
24
Troubleshooting Networking
491
Repairing a Network Connection . . . . . . . . . . . . . . . . . . . . . . . . . . . . . . . . . . . . . . . . . . . . . . . . . . . . 491
Checking the Connection Status . . . . . . . . . . . . . . . . . . . . . . . . . . . . . . . . . . . . . . . . . . . . . . . . . . . . . 493
General Solutions to Network Problems . . . . . . . . . . . . . . . . . . . . . . . . . . . . . . . . . . . . . . . . . . . 494
Turning On Network Discovery . . . . . . . . . . . . . . . . . . . . . . . . . . . . . . . . . . . . . . . . . . . . . . . 495
Updating the Router Firmware . . . . . . . . . . . . . . . . . . . . . . . . . . . . . . . . . . . . . . . . . . . . . . . . 497
Troubleshooting from the Command Line . . . . . . . . . . . . . . . . . . . . . . . . . . . . . . . . . . . . . . . . 499
A Basic Command-Line Troubleshooting Procedure . . . . . . . . . . . . . . . . . . . . 501
Checking Connectivity with the PING Command . . . . . . . . . . . . . . . . . . . . . . 502
Tracking Packets with the TRACERT Command . . . . . . . . . . . . . . . . . . . . . . . . . 504
Troubleshooting Cables . . . . . . . . . . . . . . . . . . . . . . . . . . . . . . . . . . . . . . . . . . . . . . . . . . . . . . . . . . . . . . . . . 506
Troubleshooting the NIC . . . . . . . . . . . . . . . . . . . . . . . . . . . . . . . . . . . . . . . . . . . . . . . . . . . . . . . . . . . . . . . 507
Troubleshooting Wireless Network Problems . . . . . . . . . . . . . . . . . . . . . . . . . . . . . . . . . . . . . 508
25
Setting Up a Small Network
511
Setting Up a Peer-to-Peer Network . . . . . . . . . . . . . . . . . . . . . . . . . . . . . . . . . . . . . . . . . . . . . . . . . . . 512
Changing the Computer and Workgroup Name . . . . . . . . . . . . . . . . . . . . . . . . . 513
Connecting to a Wireless Network . . . . . . . . . . . . . . . . . . . . . . . . . . . . . . . . . . . . . . . . . . . 514
Working with Windows 7’s Basic Network Tools and Tasks . . . . . . . . . . . . . . . . . . 516
Accessing the Network and Sharing Center . . . . . . . . . . . . . . . . . . . . . . . . . . . . . . . 516
Setting Up a Homegroup. . . . . . . . . . . . . . . . . . . . . . . . . . . . . . . . . . . . . . . . . . . . . . . . . . . . . . . . 518
Turning Off Homegroup Connections . . . . . . . . . . . . . . . . . . . . . . . . . . . . . . . . . . . . . . 522
Viewing Network Computers and Devices . . . . . . . . . . . . . . . . . . . . . . . . . . . . . . . . . 523
Displaying a Network Map . . . . . . . . . . . . . . . . . . . . . . . . . . . . . . . . . . . . . . . . . . . . . . . . . . . . . 524
Viewing Network Status Details . . . . . . . . . . . . . . . . . . . . . . . . . . . . . . . . . . . . . . . . . . . . . . . 525
Customizing Your Network . . . . . . . . . . . . . . . . . . . . . . . . . . . . . . . . . . . . . . . . . . . . . . . . . . . . 528
Managing Network Connections . . . . . . . . . . . . . . . . . . . . . . . . . . . . . . . . . . . . . . . . . . . . . . . . . . . . . 529
Opening the Network Connections Window . . . . . . . . . . . . . . . . . . . . . . . . . . . . . 530
Renaming a Network Connection . . . . . . . . . . . . . . . . . . . . . . . . . . . . . . . . . . . . . . . . . . . . 530
Enabling Automatic IP Addressing . . . . . . . . . . . . . . . . . . . . . . . . . . . . . . . . . . . . . . . . . . . 531
Setting Up a Static IP Address . . . . . . . . . . . . . . . . . . . . . . . . . . . . . . . . . . . . . . . . . . . . . . . . . 534
Finding a Connection’s MAC Address . . . . . . . . . . . . . . . . . . . . . . . . . . . . . . . . . . . . . . 537
xvi
Microsoft Windows 7 Unleashed
Using a Network Connection to Wake Up a
Sleeping Computer . . . . . . . . . . . . . . . . . . . . . . . . . . . . . . . . . . . . . . . . . . . . . . . . . . . . . . . . . . . . . 539
Disabling a Network Connection . . . . . . . . . . . . . . . . . . . . . . . . . . . . . . . . . . . . . . . . . . . . . 541
Managing Wireless Network Connections . . . . . . . . . . . . . . . . . . . . . . . . . . . . . . . . . . . . . . . . . 542
Opening the Manage Wireless Networks Window . . . . . . . . . . . . . . . . . . . . . . 542
Creating an Ad Hoc Wireless Network . . . . . . . . . . . . . . . . . . . . . . . . . . . . . . . . . . . . . . 543
Working with Wireless Connection Properties . . . . . . . . . . . . . . . . . . . . . . . . . . . 545
Renaming Wireless Connections . . . . . . . . . . . . . . . . . . . . . . . . . . . . . . . . . . . . . . . . . . . . . 548
Reordering Wireless Connections . . . . . . . . . . . . . . . . . . . . . . . . . . . . . . . . . . . . . . . . . . . . 548
Creating User-Specific Wireless Connections . . . . . . . . . . . . . . . . . . . . . . . . . . . . . 549
Removing Wireless Connections . . . . . . . . . . . . . . . . . . . . . . . . . . . . . . . . . . . . . . . . . . . . . 551
26
Accessing and Using Your Network
553
Accessing Shared Network Resources . . . . . . . . . . . . . . . . . . . . . . . . . . . . . . . . . . . . . . . . . . . . . . . . 554
Viewing a Computer’s Shared Resources . . . . . . . . . . . . . . . . . . . . . . . . . . . . . . . . . . . 554
Working with Network Addresses . . . . . . . . . . . . . . . . . . . . . . . . . . . . . . . . . . . . . . . . . . . . 556
Mapping a Network Folder to a Local Drive Letter. . . . . . . . . . . . . . . . . . . . . . . . . . . . . . 558
Creating the Mapped Network Folder . . . . . . . . . . . . . . . . . . . . . . . . . . . . . . . . . . . . . . . 559
Mapping Folders at the Command Line . . . . . . . . . . . . . . . . . . . . . . . . . . . . . . . . . . . . 561
Disconnecting a Mapped Network Folder . . . . . . . . . . . . . . . . . . . . . . . . . . . . . . . . . . 561
Creating a Network Location for a Remote Folder . . . . . . . . . . . . . . . . . . . . . . . . . . . . . . 562
Accessing a Shared Printer. . . . . . . . . . . . . . . . . . . . . . . . . . . . . . . . . . . . . . . . . . . . . . . . . . . . . . . . . . . . . . 563
Sharing Resources with the Network . . . . . . . . . . . . . . . . . . . . . . . . . . . . . . . . . . . . . . . . . . . . . . . . 565
Setting Sharing Options . . . . . . . . . . . . . . . . . . . . . . . . . . . . . . . . . . . . . . . . . . . . . . . . . . . . . . . . . 566
Creating User Accounts for Sharing . . . . . . . . . . . . . . . . . . . . . . . . . . . . . . . . . . . . . . . . . 567
Monitoring Your Shared Resources . . . . . . . . . . . . . . . . . . . . . . . . . . . . . . . . . . . . . . . . . . . 568
Working with Network Files Offline. . . . . . . . . . . . . . . . . . . . . . . . . . . . . . . . . . . . . . . . . . . . . . . . . 571
Activating the Offline Files Feature . . . . . . . . . . . . . . . . . . . . . . . . . . . . . . . . . . . . . . . . . . 572
Making a File or Folder Available for Offline Use . . . . . . . . . . . . . . . . . . . . . . . . 572
Changing the Amount of Disk Space Used by Offline Files . . . . . . . . . . 574
Prohibiting a Network Folder from Being
Made Available Offline . . . . . . . . . . . . . . . . . . . . . . . . . . . . . . . . . . . . . . . . . . . . . . . . . . . . . . . . 575
Encrypting Offline Files . . . . . . . . . . . . . . . . . . . . . . . . . . . . . . . . . . . . . . . . . . . . . . . . . . . . . . . . . 577
Working with Network Files While You're Offline. . . . . . . . . . . . . . . . . . . . . . . 577
Synchronizing Your Offline Files . . . . . . . . . . . . . . . . . . . . . . . . . . . . . . . . . . . . . . . . . . . . . 579
Dealing with Synchronization Conflicts . . . . . . . . . . . . . . . . . . . . . . . . . . . . . . . . . . . 582
27
Making Remote Network Connections
585
Setting Up the Remote Computer as a Host . . . . . . . . . . . . . . . . . . . . . . . . . . . . . . . . . . . . . . 586
Windows Versions That Can Act as Hosts . . . . . . . . . . . . . . . . . . . . . . . . . . . . . . . . . 586
Setting Up User Accounts on the Host . . . . . . . . . . . . . . . . . . . . . . . . . . . . . . . . . . . . . . 586
Contents
xvii
Configuring Windows 7 or Vista to Act as a
Remote Desktop Host . . . . . . . . . . . . . . . . . . . . . . . . . . . . . . . . . . . . . . . . . . . . . . . . . . . . . . . . . . 587
Configuring XP to Act as a Remote Desktop Host . . . . . . . . . . . . . . . . . . . . . . . 590
Installing Remote Desktop on an XP Client Computer. . . . . . . . . . . . . . . . . . . . . . . . 591
Connecting to the Remote Desktop . . . . . . . . . . . . . . . . . . . . . . . . . . . . . . . . . . . . . . . . . . . . . . . . . 592
Making a Basic Connection . . . . . . . . . . . . . . . . . . . . . . . . . . . . . . . . . . . . . . . . . . . . . . . . . . . . 592
Making an Advanced Connection. . . . . . . . . . . . . . . . . . . . . . . . . . . . . . . . . . . . . . . . . . . . 593
Working with the Connection Bar . . . . . . . . . . . . . . . . . . . . . . . . . . . . . . . . . . . . . . . . . . . 598
Disconnecting from the Remote Desktop. . . . . . . . . . . . . . . . . . . . . . . . . . . . . . . . . . . . . . . . . . 599
Connecting to a Remote Desktop via the Internet . . . . . . . . . . . . . . . . . . . . . . . . . . . . . . 599
Changing the Listening Port . . . . . . . . . . . . . . . . . . . . . . . . . . . . . . . . . . . . . . . . . . . . . . . . . . . 600
Configuring Windows Firewall . . . . . . . . . . . . . . . . . . . . . . . . . . . . . . . . . . . . . . . . . . . . . . . . 601
Determining the Host IP Address . . . . . . . . . . . . . . . . . . . . . . . . . . . . . . . . . . . . . . . . . . . . . 602
Setting Up Port Forwarding . . . . . . . . . . . . . . . . . . . . . . . . . . . . . . . . . . . . . . . . . . . . . . . . . . . . 602
Connecting Using the IP Address and New Port . . . . . . . . . . . . . . . . . . . . . . . . . 603
Using Dynamic DNS to Access Your Network . . . . . . . . . . . . . . . . . . . . . . . . . . . . . . . . . . . . 604
Configuring a Network Computer for Remote Administration. . . . . . . . . . . . . . 605
Using Virtual Private Network Connections . . . . . . . . . . . . . . . . . . . . . . . . . . . . . . . . . . . . . . 605
Configuring a Network Gateway for VPN . . . . . . . . . . . . . . . . . . . . . . . . . . . . . . . . . . 606
Configuring the VPN Client . . . . . . . . . . . . . . . . . . . . . . . . . . . . . . . . . . . . . . . . . . . . . . . . . . . 608
Making the VPN Connection . . . . . . . . . . . . . . . . . . . . . . . . . . . . . . . . . . . . . . . . . . . . . . . . . . 609
28
Turning Windows 7 into a Web Server
611
Understanding Internet Information Services . . . . . . . . . . . . . . . . . . . . . . . . . . . . . . . . . . . . 612
Installing Internet Information Services . . . . . . . . . . . . . . . . . . . . . . . . . . . . . . . . . . . . . . . . . . . 613
Accessing Your Website. . . . . . . . . . . . . . . . . . . . . . . . . . . . . . . . . . . . . . . . . . . . . . . . . . . . . . . . . . . . . . . . . . 614
Creating a Windows Firewall Exception for
the Web Server . . . . . . . . . . . . . . . . . . . . . . . . . . . . . . . . . . . . . . . . . . . . . . . . . . . . . . . . . . . . . . . . . . . 614
Accessing Your Website over the Network . . . . . . . . . . . . . . . . . . . . . . . . . . . . . . . . . 615
Accessing Your Website over the Internet . . . . . . . . . . . . . . . . . . . . . . . . . . . . . . . . . . 617
Understanding the Default Website . . . . . . . . . . . . . . . . . . . . . . . . . . . . . . . . . . . . . . . . . . . . . . . . . 617
Viewing the Default Website Folder . . . . . . . . . . . . . . . . . . . . . . . . . . . . . . . . . . . . . . . . . 618
Viewing the Default Website with IIS Manager . . . . . . . . . . . . . . . . . . . . . . . . . . 619
Adding Folders and Files to the Default Website . . . . . . . . . . . . . . . . . . . . . . . . . . . . . . . . 621
Setting Permissions on the Default Website Folder . . . . . . . . . . . . . . . . . . . . . 621
Adding a File to the Default Website . . . . . . . . . . . . . . . . . . . . . . . . . . . . . . . . . . . . . . . . 622
Changing the Default Website Home Page . . . . . . . . . . . . . . . . . . . . . . . . . . . . . . . . 624
Adding a Folder to the Default Website . . . . . . . . . . . . . . . . . . . . . . . . . . . . . . . . . . . . 626
Controlling and Customizing Your Website . . . . . . . . . . . . . . . . . . . . . . . . . . . . . . . . . . . . . . 628
Stopping Your Website . . . . . . . . . . . . . . . . . . . . . . . . . . . . . . . . . . . . . . . . . . . . . . . . . . . . . . . . . . . 628
Restarting Your Website . . . . . . . . . . . . . . . . . . . . . . . . . . . . . . . . . . . . . . . . . . . . . . . . . . . . . . . . . 629
xviii
Microsoft Windows 7 Unleashed
Renaming the Default Website . . . . . . . . . . . . . . . . . . . . . . . . . . . . . . . . . . . . . . . . . . . . . . . . 629
Changing the Website Location . . . . . . . . . . . . . . . . . . . . . . . . . . . . . . . . . . . . . . . . . . . . . . 630
Setting the Website’s Default Document . . . . . . . . . . . . . . . . . . . . . . . . . . . . . . . . . . . 631
Working Without a Default Document . . . . . . . . . . . . . . . . . . . . . . . . . . . . . . . . . . . . . 632
Disabling Anonymous Access. . . . . . . . . . . . . . . . . . . . . . . . . . . . . . . . . . . . . . . . . . . . . . . . . . 635
Viewing the Server Logs . . . . . . . . . . . . . . . . . . . . . . . . . . . . . . . . . . . . . . . . . . . . . . . . . . . . . . . . . 637
29
Adding Macs to Your Windows 7 Network
641
Making Sure That SMB Support Is Activated in Mac OS X Tiger . . . . . . . . . . . . 641
Connecting to the Windows Network . . . . . . . . . . . . . . . . . . . . . . . . . . . . . . . . . . . . . . . . . . . . . . 643
Connecting to a Windows Shared Folder . . . . . . . . . . . . . . . . . . . . . . . . . . . . . . . . . . . . . . . . . . 644
Connecting to a Seen Windows PC . . . . . . . . . . . . . . . . . . . . . . . . . . . . . . . . . . . . . . . . . . 644
Connecting to an Unseen Windows PC . . . . . . . . . . . . . . . . . . . . . . . . . . . . . . . . . . . . 645
Working with the Windows PC’s Shared Folders . . . . . . . . . . . . . . . . . . . . . . . . 647
Unmounting a Windows Shared Folder . . . . . . . . . . . . . . . . . . . . . . . . . . . . . . . . . . . . 648
Backing Up Mac Data to a Windows Shared Folder . . . . . . . . . . . . . . . . . . . . . 648
Using a Mac to Make a Remote Desktop Connection to
Windows 7 . . . . . . . . . . . . . . . . . . . . . . . . . . . . . . . . . . . . . . . . . . . . . . . . . . . . . . . . . . . . . . . . . . . . . . . . . . . . . . . . 649
Letting Windows Computers See Your Mac Shares . . . . . . . . . . . . . . . . . . . . . . . . . . . . . 652
30
Scripting Windows 7 with WSH
657
Understanding Windows Script Host . . . . . . . . . . . . . . . . . . . . . . . . . . . . . . . . . . . . . . . . . . . . . . . 657
Scripts and Script Execution . . . . . . . . . . . . . . . . . . . . . . . . . . . . . . . . . . . . . . . . . . . . . . . . . . . . . . . . . . . 659
Running Script Files Directly . . . . . . . . . . . . . . . . . . . . . . . . . . . . . . . . . . . . . . . . . . . . . . . . . . 660
Using WScript for Windows-Based Scripts . . . . . . . . . . . . . . . . . . . . . . . . . . . . . . . . . 660
Using CScript for Command-Line Scripts . . . . . . . . . . . . . . . . . . . . . . . . . . . . . . . . . . 661
Script Properties and .wsh Files . . . . . . . . . . . . . . . . . . . . . . . . . . . . . . . . . . . . . . . . . . . . . . . 662
Running a Script as the Administrator . . . . . . . . . . . . . . . . . . . . . . . . . . . . . . . . . . . . . . 664
Programming Objects . . . . . . . . . . . . . . . . . . . . . . . . . . . . . . . . . . . . . . . . . . . . . . . . . . . . . . . . . . . . . . . . . . . . 665
Working with Object Properties . . . . . . . . . . . . . . . . . . . . . . . . . . . . . . . . . . . . . . . . . . . . . . 666
Working with Object Methods . . . . . . . . . . . . . . . . . . . . . . . . . . . . . . . . . . . . . . . . . . . . . . . . 667
Assigning an Object to a Variable . . . . . . . . . . . . . . . . . . . . . . . . . . . . . . . . . . . . . . . . . . . . 668
Working with Object Collections. . . . . . . . . . . . . . . . . . . . . . . . . . . . . . . . . . . . . . . . . . . . . 669
Programming the WScript Object . . . . . . . . . . . . . . . . . . . . . . . . . . . . . . . . . . . . . . . . . . . . . . . . . . . . 670
Displaying Text to the User . . . . . . . . . . . . . . . . . . . . . . . . . . . . . . . . . . . . . . . . . . . . . . . . . . . . 671
Shutting Down a Script. . . . . . . . . . . . . . . . . . . . . . . . . . . . . . . . . . . . . . . . . . . . . . . . . . . . . . . . . . 671
Scripting and Automation . . . . . . . . . . . . . . . . . . . . . . . . . . . . . . . . . . . . . . . . . . . . . . . . . . . . . . 671
Programming the WshShell Object . . . . . . . . . . . . . . . . . . . . . . . . . . . . . . . . . . . . . . . . . . . . . . . . . . 677
Referencing the WshShell Object. . . . . . . . . . . . . . . . . . . . . . . . . . . . . . . . . . . . . . . . . . . . . 677
Displaying Information to the User . . . . . . . . . . . . . . . . . . . . . . . . . . . . . . . . . . . . . . . . . 677
Running Applications . . . . . . . . . . . . . . . . . . . . . . . . . . . . . . . . . . . . . . . . . . . . . . . . . . . . . . . . . . . . 681
Contents
xix
Working with Shortcuts . . . . . . . . . . . . . . . . . . . . . . . . . . . . . . . . . . . . . . . . . . . . . . . . . . . . . . . . . 682
Working with Registry Entries . . . . . . . . . . . . . . . . . . . . . . . . . . . . . . . . . . . . . . . . . . . . . . . . . 685
Working with Environment Variables . . . . . . . . . . . . . . . . . . . . . . . . . . . . . . . . . . . . . . . 687
Programming the WshNetwork Object . . . . . . . . . . . . . . . . . . . . . . . . . . . . . . . . . . . . . . . . . . . . . 689
Referencing the WshNetwork Object . . . . . . . . . . . . . . . . . . . . . . . . . . . . . . . . . . . . . . . . 689
WshNetwork Object Properties . . . . . . . . . . . . . . . . . . . . . . . . . . . . . . . . . . . . . . . . . . . . . . . 689
Mapping Network Printers . . . . . . . . . . . . . . . . . . . . . . . . . . . . . . . . . . . . . . . . . . . . . . . . . . . . . 689
Mapping Network Drives . . . . . . . . . . . . . . . . . . . . . . . . . . . . . . . . . . . . . . . . . . . . . . . . . . . . . . . 690
Example: Scripting Internet Explorer . . . . . . . . . . . . . . . . . . . . . . . . . . . . . . . . . . . . . . . . . . . . . . . 691
Displaying a Web Page. . . . . . . . . . . . . . . . . . . . . . . . . . . . . . . . . . . . . . . . . . . . . . . . . . . . . . . . . . . 691
Navigating Pages . . . . . . . . . . . . . . . . . . . . . . . . . . . . . . . . . . . . . . . . . . . . . . . . . . . . . . . . . . . . . . . . . . 692
Using the InternetExplorer Object’s Properties . . . . . . . . . . . . . . . . . . . . . . . . . . . 693
Running Through a Sample Script . . . . . . . . . . . . . . . . . . . . . . . . . . . . . . . . . . . . . . . . . . . 693
Programming the Windows Management
Instrumentation Service. . . . . . . . . . . . . . . . . . . . . . . . . . . . . . . . . . . . . . . . . . . . . . . . . . . . . . . . . . . . . . . 695
Referencing the WMI Service Object . . . . . . . . . . . . . . . . . . . . . . . . . . . . . . . . . . . . . . . . 695
Returning Class Instances. . . . . . . . . . . . . . . . . . . . . . . . . . . . . . . . . . . . . . . . . . . . . . . . . . . . . . . 696
Scripting a Remote Computer . . . . . . . . . . . . . . . . . . . . . . . . . . . . . . . . . . . . . . . . . . . . . . . . . 700
31
Scripting Windows with PowerShell
703
Getting Started with PowerShell . . . . . . . . . . . . . . . . . . . . . . . . . . . . . . . . . . . . . . . . . . . . . . . . . . . . . . 704
Starting a PowerShell Session . . . . . . . . . . . . . . . . . . . . . . . . . . . . . . . . . . . . . . . . . . . . . . . . . . 704
Understanding PowerShell Cmdlets . . . . . . . . . . . . . . . . . . . . . . . . . . . . . . . . . . . . . . . . . 705
Running PowerShell Cmdlets . . . . . . . . . . . . . . . . . . . . . . . . . . . . . . . . . . . . . . . . . . . . . . . . . . . . . . . . . 709
Scripting Objects . . . . . . . . . . . . . . . . . . . . . . . . . . . . . . . . . . . . . . . . . . . . . . . . . . . . . . . . . . . . . . . . . . . . . . . . . . 714
Returning Object Members . . . . . . . . . . . . . . . . . . . . . . . . . . . . . . . . . . . . . . . . . . . . . . . . . . . . . 714
Selecting Object Members . . . . . . . . . . . . . . . . . . . . . . . . . . . . . . . . . . . . . . . . . . . . . . . . . . . . . . 715
A Brief Aside About Formatting Output . . . . . . . . . . . . . . . . . . . . . . . . . . . . . . . . . . . . 717
Filtering Object Instances . . . . . . . . . . . . . . . . . . . . . . . . . . . . . . . . . . . . . . . . . . . . . . . . . . . . . . . 719
Sorting Object Instances . . . . . . . . . . . . . . . . . . . . . . . . . . . . . . . . . . . . . . . . . . . . . . . . . . . . . . . . 720
Assigning an Object to a Variable . . . . . . . . . . . . . . . . . . . . . . . . . . . . . . . . . . . . . . . . . . . . 722
Working with Object Properties . . . . . . . . . . . . . . . . . . . . . . . . . . . . . . . . . . . . . . . . . . . . . . 723
Returning the Value of a Property . . . . . . . . . . . . . . . . . . . . . . . . . . . . . . . . . . . . . . . . . . . . 723
Setting the Value of a Property . . . . . . . . . . . . . . . . . . . . . . . . . . . . . . . . . . . . . . . . . . . . . . . . 723
Working with Object Methods . . . . . . . . . . . . . . . . . . . . . . . . . . . . . . . . . . . . . . . . . . . . . . . . 724
Working with Object Collections. . . . . . . . . . . . . . . . . . . . . . . . . . . . . . . . . . . . . . . . . . . . . 724
Creating PowerShell Scripts . . . . . . . . . . . . . . . . . . . . . . . . . . . . . . . . . . . . . . . . . . . . . . . . . . . . . . . . . . . . 726
Setting the Script Execution Policy . . . . . . . . . . . . . . . . . . . . . . . . . . . . . . . . . . . . . . . . . . 726
Working with the PowerShell Integrated
Scripting Environment . . . . . . . . . . . . . . . . . . . . . . . . . . . . . . . . . . . . . . . . . . . . . . . . . . . . . . . . 726
Running PowerShell Scripts . . . . . . . . . . . . . . . . . . . . . . . . . . . . . . . . . . . . . . . . . . . . . . . . . . . . 728
xx
Microsoft Windows 7 Unleashed
A
Windows 7 Keyboard Shortcuts
731
B
Understanding TCP/IP
741
What Is TCP/IP? . . . . . . . . . . . . . . . . . . . . . . . . . . . . . . . . . . . . . . . . . . . . . . . . . . . . . . . . . . . . . . . . . . . . . . . . . . . 742
Understanding IP . . . . . . . . . . . . . . . . . . . . . . . . . . . . . . . . . . . . . . . . . . . . . . . . . . . . . . . . . . . . . . . . . . . . . . . . . 743
The Structure of an IP Datagram . . . . . . . . . . . . . . . . . . . . . . . . . . . . . . . . . . . . . . . . . . . . . 743
The Structure of an IP Address . . . . . . . . . . . . . . . . . . . . . . . . . . . . . . . . . . . . . . . . . . . . . . . . 745
IP Routing . . . . . . . . . . . . . . . . . . . . . . . . . . . . . . . . . . . . . . . . . . . . . . . . . . . . . . . . . . . . . . . . . . . . . . . . . . . 748
Dynamic IP Addressing . . . . . . . . . . . . . . . . . . . . . . . . . . . . . . . . . . . . . . . . . . . . . . . . . . . . . . . . . . 751
Domain Name Resolution . . . . . . . . . . . . . . . . . . . . . . . . . . . . . . . . . . . . . . . . . . . . . . . . . . . . . . 751
Understanding TCP . . . . . . . . . . . . . . . . . . . . . . . . . . . . . . . . . . . . . . . . . . . . . . . . . . . . . . . . . . . . . . . . . . . . . . 755
TCP Sockets . . . . . . . . . . . . . . . . . . . . . . . . . . . . . . . . . . . . . . . . . . . . . . . . . . . . . . . . . . . . . . . . . . . . . . . . . 755
The Structure of a TCP Segment . . . . . . . . . . . . . . . . . . . . . . . . . . . . . . . . . . . . . . . . . . . . . . 756
TCP Features . . . . . . . . . . . . . . . . . . . . . . . . . . . . . . . . . . . . . . . . . . . . . . . . . . . . . . . . . . . . . . . . . . . . . . . . 758
Index
759
About the Author
Paul McFedries is a full-time technical author who has worked with computers in one
form or another since 1975 and has used Windows since version 1. He is the author of
more than 60 computer books that have sold over three million copies worldwide. His
recent titles include the Sams Publishing book Microsoft Windows Home Server Unleashed
and the Que Publishing books Tweak It and Freak It: A Killer Guide to Making Windows Run
Your Way, Networking with Microsoft Windows Vista, and Build It. Fix It. Own It: A Beginner’s
Guide to Building and Upgrading a PC. Paul is also the proprietor of Word Spy
(www.wordspy.com), a website devoted to tracking new words and phrases as they enter
the English language. Please visit Paul’s personal website at www.mcfedries.com or follow
him on Twitter at twitter.com/paulmcf and twitter.com/wordspy.
Dedication
For Karen, of course, and for Gypsy, the Dog Unleashed!
Acknowledgments
I’ve been writing computer books for more than 18 years now (ouch!), which is a long
time to do anything, much less something that exercises the old noodle the way researching and writing a computer book does. Despite that, however, I still leap out of bed most
mornings and can’t wait to get my hands on the keyboard once again and start tapping
away.
Maintaining enthusiasm for your job is never easy, but it sure helps when you get to work
with some amazingly smart, talented, and nice people. I speak, of course, of the bright
lights who populate the Que editorial department, who are as awesome a collection of
Hoosiers as you’re ever likely to meet (assuming you come across Hoosier collections regularly). In particular, I’d like to extend my heartfelt and profuse thanks to the editors I
worked with directly on this book, including Acquisitions Editor and Development Editor
Rick Kughen; Project Editor Jennifer Gallant; Copy Editor Keith Cline; and Technical
Editor Mark Reddin. Thanks to all of you for the excellent work.
We Want to Hear from You!
As the reader of this book, you are our most important critic and commentator. We value
your opinion and want to know what we’re doing right, what we could do better, what
areas you’d like to see us publish in, and any other words of wisdom you’re willing to
pass our way.
As an associate publisher for Sams Publishing, I welcome your comments. You can email
or write me directly to let me know what you did or didn’t like about this book—as well
as what we can do to make our books better.
Please note that I cannot help you with technical problems related to the topic of this book. We
do have a User Services group, however, where I will forward specific technical questions related to
the book.
When you write, please be sure to include this book’s title and author as well as your
name, email address, and phone number. I will carefully review your comments and share
them with the author and editors who worked on the book.
Email:
[email protected]
Mail:
Greg Wiegand
Associate Publisher
Sams Publishing
800 East 96th Street
Indianapolis, IN 46240 USA
Reader Services
Visit our website and register this book at informit.com/register for convenient access to
any updates, downloads, or errata that might be available for this book.
Introduction
We shall not cease from exploration
And the end of all our exploring
Will be to arrive where we started
And know the place for the first time.
—T. S. Eliot
Well, that was easy. After the “two steps forward, one
step back” development process of Windows Vista, after the
interminable Vista beta releases, and after the hype and
hoopla that accompanied the Vista release, Windows 7
seemed to arrive on our digital doorsteps fully formed, like
a kind of electronic Athena from the skull of some programming Zeus (or something like that).
The development and release of Microsoft’s latest bouncingbaby operating system was nothing like its older sibling,
but does that mean that Windows 7 itself is nothing like
Windows Vista? Actually, in many ways, that’s true. Sure, if
you’re familiar with Windows Vista, you’ll have a relatively
benign learning curve with Windows 7. But Microsoft
didn’t spend the past 3 years working on new desktop backgrounds! Windows 7 is loaded with new and changed
features; some of them are almost too subtle to notice,
whereas others represent veritable system sea changes.
Coincidentally (or not, depending on where you fall in the
conspiracy theory spectrum), my approach to Windows has
also changed in this edition of the book. Unlike in previous
editions, Windows 7 Unleashed is not my attempt to cover all
the features of Windows from Aero Glass to AutoPlay.
Windows has simply become too big for that kind of book,
and most Windows users know (or can figure out) the basics
of most features. So in this edition of the book, I’ve changed
2
Introduction
the focus from components (Internet Explorer, Mail, and so on) to subjects: customization,
performance, power tools, security, troubleshooting, and networking, and scripting. You
get in-depth and useful coverage of these seven areas that will help you unleash the full
potential of Windows 7.
Who Should Read This Book
All writers write with an audience in mind. Actually, I’m not sure whether that’s true for
novelists and poets and the like, but it should be true for any technical writer who wants
to create a useful and comprehensible book. Here are the members of my own imagined
audience:
. IT professionals—These brave souls must decide whether to move to Windows 7,
work out deployment issues, and support the new Windows 7 desktops. The whole
book has information related to your job and Windows 7.
. Power users—These elite users get their power via knowledge. With that in mind,
this book extends the Windows power user’s know-how by offering scripts, Registry
tweaks, group policy configurations, and other power tools.
. Business users—If your company is thinking of or has already committed to
moving to Windows 7, you need to know what you, your colleagues, and your staff
are getting into. You also want to know what Windows 7 will do to improve your
productivity and make your life at the office easier. You learn all of this and more
in this book.
. Small business owners—If you run a small or home business, you probably want
to know whether Windows 7 will give you a good return on investment. Will it
make it easier to set up and maintain a network? Will Windows 7 computers be
more stable? Will your employees be able to collaborate easier? The answer turns out
to be “yes” for all of these questions, and I’ll show you why.
. Home users—If you use Windows 7 at home, you probably want to maximize performance, keep your system running smoothly, max out security, and perform customizations that make Windows 7 conform to your style. Check, check, check,
check. This book’s got your covered in all these areas.
Also, to keep the chapters uncluttered, I’ve made a few assumptions about what you know
and what you don’t know:
. I assume that you have knowledge of rudimentary computer concepts, such as files
and folders.
. I assume that you’re familiar with the basic Windows skills: mouse maneuvering,
dialog box negotiation, pull-down menu jockeying, and so on.
. I assume that you can operate peripherals attached to your computer, such as the
keyboard and printer.
How This Book Is Organized
3
. I assume that you’ve used Windows for a while and are comfortable with concepts
such as toolbars, scrollbars, and, of course, windows.
. I assume that you have a brain that you’re willing to use and a good supply of
innate curiosity.
How This Book Is Organized
As I mentioned earlier, I’ve completely revamped the structure and coverage in this
edition, so the next few sections offer a summary of what you’ll find in each part.
Part I: Unleashing Windows 7 Customization
Your purchase of this book (a sound and savvy investment on your part, if I do say so
myself) indicates that you’re not interested in using Windows 7 in its out-of-the-box
configuration. If you’re looking to make Windows 7 your own, begin at the beginning
with the five chapters in Part I. You learn how to customize Windows Explorer (Chapter
1), Internet Explorer (Chapter 2), the file system (Chapter 3), startup and shutdown
(Chapter 4), and the Start menu and taskbar (Chapter 5).
Part II: Unleashing Windows 7 Performance and Maintenance
Everybody wants Windows to run faster, so you’ll no doubt be pleased that I devote an
entire chapter to this important topic (Chapter 6). Everybody wants Windows to run
smoother, so you’ll also no doubt be pleased that I devote yet another chapter to that
important topic (Chapter 7).
Part III: Unleashing Windows 7 Power User Tools
The chapters in Part III kick your advanced Windows 7 education into high gear by covering the ins and outs of a half dozen important Windows 7 power tools: Control Panel
(Chapter 8), Local Group Policy Editor (Chapter 9), Microsoft Management Console
(Chapter 10), the Services snap-in (Chapter 11), the Registry Editor (Chapter 12), and
Command Prompt (Chapter 13).
Part IV: Unleashing Windows 7 Security
With threats to our digital lives coming at us from all sides these days, security may just
be the most vital topic in technology. So perhaps that’s why Part IV is the biggest section
in the book, with no less than seven chapters devoted to various aspects of Windows 7
security. Your first learn some general techniques for locking down Windows 7 (Chapter
14), and you then learn how to configure web security (Chapter 15), email security
(Chapter 16), file system security (Chapter 17), user security (Chapter 18), wired network
security (Chapter 19), and wireless network security (Chapter 20).
4
Introduction
Part V: Unleashing Windows 7 Troubleshooting
Windows 7 may represent the state of Microsoft’s operating system art, but it is still
Windows, which means problems, bugs, and glitches are pretty much inevitable. The four
chapters in Part V can help when the Windows demons strike. You learn general troubleshooting techniques (Chapter 21), and how to troubleshoot device (Chapter 22),
startup (Chapter 23), and networking (Chapter 24).
Part VI: Unleashing Windows 7 Networking
It’s a rare home or small office that doesn’t have (or doesn’t want to have) a network, and
Part VI is a reflection of this fact (that I just made up). You learn how to set up a small
network (Chapter 25), how to access and use that network (Chapter 26), how to access
your network from remote locations (Chapter 27), how to use Windows 7 as a web server
(Chapter 28), and how to incorporate Macs into your network (Chapter 29).
Part VII: Unleashing Windows 7 Scripting
To close out the main part of this book, Part VII takes an in-depth look at two methods for
automating Windows tasks with scripts: Windows Scripting Host (Chapter 30) and
Windows PowerShell (Chapter 31).
Part VIII: Appendixes
To further your Windows 7 education, Part VIII presents two appendixes that contain
extra goodies. You’ll find a complete list of Windows 7 shortcut keys (Appendix A), and a
detailed look at the TCP/IP protocols that underlie Windows 7 networking (Appendix B).
Conventions Used in This Book
5
Conventions Used in This Book
To make your life easier, this book includes various features and conventions that help
you get the most out of this book and Windows 7 itself:
Steps
Throughout the book, I’ve broken many Windows 7 tasks into easyto-follow step-by-step procedures.
Things you type
Whenever I suggest that you type something, what you type appears
in a bold monospace font.
Filenames, folder
names, and code
These things appear in a monospace font.
Commands
Commands and their syntax use the monospace font, too. Command
placeholders (which stand for what you actually type) appear in an
italic monospace font.
Pull-down menu
commands
I use the following style for all application menu commands: Menu,
Command, where Menu is the name of the menu that you pull down
and Command is the name of the command you select. Here’s an
example: File, Open. This means that you pull down the File menu
and select the Open command.
Code continuation
character
When a line of code is too long to fit on only one line of this book, it
is broken at a convenient place and continued to the next line. The
continuation of the line is preceded by a code continuation character
([➥]). You should type a line of code that has this character as one
long line without breaking it.
This book also uses the following boxes to draw your attention to important (or merely
interesting) information:
NOTE
The Note box presents asides that give you more information about the current topic.
These tidbits provide extra insights that give you a better understanding of the task. In
many cases, they refer you to other sections of the book for more information.
TIP
The Tip box tells you about Windows 7 methods that are easier, faster, or more efficient than the standard methods.
6
Introduction
CAUTION
The all-important Caution box tells you about potential accidents waiting to happen.
There are always ways to mess things up when you’re working with computers. These
boxes help you avoid at least some of the pitfalls.
How to Contact Me
If you have any comments about this book, or if you want to register a complaint or a
compliment (I prefer the latter), please don’t hesitate to send a missive my way. The
easiest way to do that is to drop by my website, have a look around, and post a message
to the forum: www.mcfedries.com/.
If you do the Twitter thing, you can follow my tweets here: http://twitter.com/paulmcf.
CHAPTER
1
Customizing
Windows Explorer
IN THIS CHAPTER
. Returning the Menus to Their
Rightful Place
. Changing the View
. Viewing More Properties
. Turning On File Extensions
. Stopping Delete Confirmations
Whoso would be a man, must be a nonconformist.
—Ralph Waldo Emerson
. Running Explorer in FullScreen Mode
Although I’m sure you’ve got countless more important
. Exploring the View Options
things to do with your precious time, at least some of your
Windows 7 face time will be spent dealing with files,
folders, and other Windows “f-words.” These file system
maintenance chores are the unglamorous side of the digital
lifestyle, but they are, regrettably, necessary for the smooth
functioning of that lifestyle.
This means that you’ll likely be spending a lot of time with
Windows Explorer over the years, so customizing it to your
liking will make you more efficient and more productive,
and setting up Windows Explorer to suit your style should
serve to remove just a bit of the drudgery of day-to-day file
maintenance. This chapter takes you through a few of my
favorite Windows Explorer customizations.
Returning the Menus to Their
Rightful Place
Microsoft seems to hate pull-down menus, for some reason.
Over the past few years, Microsoft has hidden the menu
system in many programs, and gotten rid of it altogether in
Office 2007 (although the old menu keystroke combinations still work). In those programs where the menus are
merely hidden, you can display them at any time by tapping
the Alt key. This works in Windows Explorer, too, and that’s
a good thing because Windows Explorer’s pull-down menus
. Moving User Folders
. Taking Ownership of Your Files
. Running Custom Searches
8
CHAPTER 1
Customizing Windows Explorer
have several useful commands that simply aren’t available through the taskbar, keyboard
shortcuts, or even by right-clicking.
Still, it sticks in my craw that accessing the Windows Explorer menus requires the extra
step of Alt, particularly if I’m in mouse mode. If you feel the same way, follow these steps
to force Windows Explorer to display the menu bar full-time:
1. If you have a folder window open, select Organize, Folder and Search Options. (No
folder windows open at the moment? Click Start, type folder, and then press Enter
to select Folder Options in the search results.) The Folder Options dialog box
appears.
2. Click the View tab.
3. Click to activate the Always Show Menus check box.
4. Click OK. Windows Explorer (perhaps a tad grudgingly) restores the menu bar to its
rightful place.
Changing the View
The icons in Windows Explorer’s content area can be viewed in no less than eight different ways, which seems a tad excessive, but Windows has never been about restraint when
it comes to interface choices. To see a list of these views, either pull down the Views
button in the task pane or click View in the menu bar. You get four choices for icon sizes:
Extra Large Icons, Large Icons, Medium Icons, and Small Icons. You also get four other
choices:
. List—This view divides the content area into as many rows as will fit vertically, and
it displays the folders and files alphabetically down the rows and across the
columns. For each object, Windows Explorer shows the object’s icon and name.
. Details—This view displays a vertical list of icons, where each icon shows the data
in all the displayed property columns (such as Name, Date Modified, Type, and
Size). See “Viewing More Properties,” later in this chapter, to learn how to add to
these columns.
TIP
The default property columns you see depend on the template that the folder is using.
To change the folder template, right-click the folder, click Properties, and then display
the Customize tab. In the Optimize This Folder For list, choose the type you want:
General Items, Documents, Pictures, Music, or Videos.
. Tiles—This view divides the content area into as many columns as will fit horizontally, and it displays the folders and files alphabetically across the columns and
down the rows. For each object, Windows Explorer shows the object’s icon, name,
file type, and (for files only) size.
Viewing More Properties
.
9
FIGURE 1.1 In Windows 7, Windows Explorer comes with a new Content view.
Viewing More Properties
Explorer’s Details view is the preferred choice for power users because it displays a great
deal of information in a relatively compact format. (The new Content view also provides
lots of information, but each object takes up quite a bit of space, and the object properties
that you see aren’t customizable.) Details view also gives you a great deal of flexibility. For
example, here are some techniques to you can use when working with the Details view:
. You can change the order of the property columns by dragging the column headings
to the left or right.
. You can sort on a column by clicking the column heading.
. You can adjust the width of a column by pointing the mouse at the right edge of the
column’s heading (the pointer changes to a two-headed arrow) and dragging the
pointer left or right.
. You can adjust the width of a column so that it’s as wide as its widest data by double-clicking the right-edge of the column’s heading.
1
Content—This view, new to Windows 7, displays a vertical list of objects,
and for each object it displays the object’s icon, name, last modified date,
size (files only), and any metadata associated with the object, such as author names
and tags; the album name, genre, and track length (for music; see Figure 1.1); and
the dimensions and date taken (for photos).
CHAPTER 1
10
Customizing Windows Explorer
TIP
To adjust all the columns so that they’re exactly as wide as their widest data, right-click
any column header and then click Size All Columns to Fit.
In addition, the Details view is informative because it shows you not only the name of
each file, but also other properties, depending on the folder:
Documents—Name, Date Modified, Type, and Size
Pictures—Name, Date Taken, Tags, Size, and Rating
Videos—Name, Date Taken, Type, Size, and Length
Music—Track Name, Track Number, Track Title, Contributing Artists, and Album Title
Contacts—Name, E-mail Address, Business Phone, and Home Phone
These are all useful, to be sure, but Explorer can display many more file properties. In fact,
there are nearly 300 properties in all, and they include useful information such as the
dimensions of a picture file, the bit rate of a music file, and the frame rate of a video file.
To see these and other properties, you have two choices:
. To see the most common properties for the current folder type, right-click any
column header and then click the property you want to add.
. To see the complete property list, right-click any column header and then click
More. The Choose Details dialog box that appears (see Figure 1.2) enables you to
activate the check boxes for the properties you want to see, as well as rearrange the
column order.
FIGURE 1.2 Use the Choose Details dialog box to add or remove property columns in
Windows Explorer.
Turning On File Extensions
11
Turning On File Extensions
For example, Figure 1.3 shows a folder with 18 different files, all apparently named
Project. Windows unrealistically expects users to tell files apart just by examining their
icons. To make matters worse, if the file is an image, Windows 7 shows a thumbnail of the
image instead of an icon. (This happens in thumbnail views such as Tiles, Medium Icons,
and Large Icons.) The result is that in Figure 1.3 it’s impossible to tell at a glance which
image is a GIF, which is a JPEG, and so on.
FIGURE 1.3 With file extensions turned off, it’s tough to tell one file from another.
1
Microsoft figures that, crucial or not, the file extension concept is just too hard for new
users to grasp. Therefore, right out of the box, Windows Explorer doesn’t display file
extensions. This may not sound like a big whoop, but not being able to see the extension
for each file can be downright confusing. To see why, suppose you have a folder with
multiple documents that use the same primary name. This is a not uncommon scenario,
but it’s also a fiendish one because it’s often difficult to tell which file is which.
12
CHAPTER 1
Customizing Windows Explorer
The need to become an expert in Windows iconography is bad enough, but it gets worse.
Not being able to see file extensions also leads to two other problems:
. You can’t rename extensions—For example, suppose you have a text file named
index.txt and you want to rename it to index.html to make it a web page file.
Nope, sorry, you can’t do it with file extensions hidden. If you try—that is, if you
click the file, press F2 to choose the Rename command, and then type index.html—
you just end up with a text file named index.html.txt.
. You can’t save a document under an extension of your choice—Similarly, with
file extensions turned off, Windows 7 forces you to save a file using the default
extension associated with an application. For example, if you’re working in Notepad,
every file you save must have a .txt extension. If you create your own web pages,
for example, you can’t rename these text files with typical web page extensions such
as .htm, .html, .asp, and so on.
TIP
There is a way to get around the inability to save a document under an extension of
your choice. In the Save As dialog box, use the Save as Type list to select the All Files
option, if it exists. You can then use the File Name text box to type the filename with
the extension you prefer to use.
You can overcome all these problems by turning on file extensions, as described in the
following steps:
1. If you have a folder window open, select Organize, Folder and Search Options (or
Tools, Folder Options if you have the menu displayed; otherwise, click Start, type
folder, and then press Enter to select Folder Options in the search results). The
Folder Options dialog box appears.
2. Click the View tab.
3. Deactivate the Hide Extensions for Known File Types check box.
4. Click OK.
Figure 1.4 shows the Project files with extensions in full display.
Stopping Delete Confirmations
13
1
FIGURE 1.4 With file extensions turned on, it’s much easier to tell the files apart.
Stopping Delete Confirmations
My biggest Windows pet peeves center around tasks that require you to jump through
extra hoops that are totally unnecessary. In Windows XP, for example, clicking the Shut
Down command on the Start menu doesn’t shut down your computer, at least not right
away. Instead, a dialog box shows up and you need to click Shut Down yet again. Dumb!
Another unnecessary dialog box that shows up in all versions of Windows is the “Are you
sure you want to move this file to the Recycle Bin?” prompt that pops up when you press
Delete. Now you either need to move your hand to the mouse to click Yes, or you can
keep your hands on the keyboard by pressing Alt+Y. Either way, it’s an extra step that just
slows you down.
One way to avoid this confirmation dialog box is to click and drag the file you want to
delete and then drop it on the desktop’s Recycle Bin icon. That’s nice to know, but most of
us rarely see our desktops these days, so this method is not very practical.
A much better solution is to configure Recycle Bin to not display the confirmation dialog
box at all. Here’s how it’s done:
1. Right-click the desktop’s Recycle Bin icon and then click Properties. Windows 7
displays the Recycle Bin’s property sheet.
2. Click to deactivate the Display Delete Confirmation Dialog check box.
3. Click OK to put the new setting into effect.
14
CHAPTER 1
Customizing Windows Explorer
Now let’s consider this tweak from the opposite point of view. The reason Windows
displays the delete confirmation dialog box by default is to prevent you from accidentally
deleting a file. You and I are savvy, knowledgeable users, so we know when we want to
delete something, but not everyone falls into this boat. If you have young kids or elderly
folks who use Windows, you know that the delete confirmation dialog box is an excellent
safeguard for these and other inexperienced users.
In that case, you might be wondering if there’s a way to ensure that a novice user can’t
turn off the delete confirmation dialog box. Yes, in fact, there is, although it’s a bit harder
to implement because it involves changing a policy setting on the user’s computer. A
policy setting is a kind of rule that an administrator applies to a Windows system, and that
rule can’t be overridden except by another administrator. To apply a policy setting, you
use the Local Group Policy Editor, which I discuss in detail in Chapter 9, “Policing
Windows 7 with Group Policies.”
NOTE
The Local Group Policy Editor is available only with Professional, Enterprise, and
Ultimate versions of Windows 7. If you’re not running one of these versions, I’ll show
you how to perform the same tweak using the Registry (see Chapter 12, “Tweaking the
Windows 7 Registry”).
You can use two ways to prevent a user from turning off delete confirmations:
. Disable the Display Delete Confirmation Dialog check box that appears in the
Recycle Bin’s property sheet.
. Disable the Recycle Bin’s Properties command so that the user can’t display the
Recycle Bin’s property sheet.
Follow these steps to implement one of these policies:
1. On the other user’s computer, click Start, type gpedit.msc, and then press Enter to
select the gpedit program that appears in the search results.
2. Open the User Configuration branch.
3. Open the Administrative Templates branch.
4. Display the property sheet of the policy you want to use, as follows:
. If you want to disable the Display Delete Confirmation Dialog check box, open
the Windows Components branch and then click Windows Explorer. Double-click
the policy named Display Confirmation Dialog When Deleting Files. If you don’t
have access to the Group Policy Editor, open the Registry Editor and create a
DWORD setting named ConfirmFileDelete with the value 1 in the following key:
HKCU\Software\Microsoft\Windows\CurrentVersion\Policies\Explorer
. If you want to disable the Recycle Bin’s Properties command, click Desktop and
then double-click the Remove Properties from the Recycle Bin Context Menu
Running Explorer in Full-Screen Mode
15
HKCU\Software\Microsoft\Windows\CurrentVersion\Policies\Explorer
NOTE
The Remove Properties from the Recycle Bin Context Menu policy has a misleading
name because, when enabled, the policy disables some but, strangely, not all
instances of the Recycle Bin’s Properties command. For example, if the user displays
the desktop in a folder window and clicks Recycle Bin, the Properties command is disabled in both the Organize menu and the File menu. However, the Properties command
is still enabled when you right-click the Recycle Bin icon the desktop, but choosing the
command only displays an error message.
5. Click the Enabled option.
6. Click OK to put the policy into effect.
Figure 1.5 shows the Recycle Bin property sheet with the Display Confirmation Dialog
When Deleting Files policy in effect. As you can see, the Display Delete Confirmation
Dialog check box is activated and disabled, so the setting can’t be changed.
FIGURE 1.5 With the Display Confirmation Dialog When Deleting Files policy in effect, the
Display Delete Confirmation Dialog check box is activated and disabled.
Running Explorer in Full-Screen Mode
If you want the largest possible screen area for the contents of each folder, you can place
Windows Explorer in full-screen mode by pressing F11. (You can also hold down Ctrl and
click the Maximize button; if Explorer is already maximized, you first have to click the
1
policy. If you don’t have access to the Group Policy Editor, open the Registry
Editor and create a DWORD setting named NoPropertiesRecycleBin with the
value 1 in the following key:
16
CHAPTER 1
Customizing Windows Explorer
Restore button.) This mode takes over the entire screen and hides the title bar, menu bar,
status bar, address bar, and search bar. To work with the address bar or search bar, move
your mouse pointer to the top of the screen. To restore the window, either press F11 again
or display the address bar and search bar and then click the Full Screen button (which is
to the right of the Search box).
Exploring the View Options
Windows Explorer’s view boasts a large number of customization options that you need to
be familiar with. To see these options, you have two choices:
. In Windows Explorer, select Organize, Folder and Search Options (or Tools, Folder
Options if you have the menu bar displayed).
. Click Start, type folder, and then press Enter to select the Folder Options item in
the search results.
Either way, the view options can be found, appropriately enough, on the View tab of the
Folder Options dialog box, as shown in Figure 1.6.
FIGURE 1.6 The View tab has quite a few options for customizing Windows Explorer.
Here’s a complete list of the various items in the Advanced Settings list:
. Always Show Icons, Never Thumbnails—Activate this check box to prevent
Windows Explorer from displaying file thumbnails. This can speed up the display of
some folders that are heavy on pictures and other “thumbnail-able” file types.
Exploring the View Options
17
. Display File Icon on Thumbnails—When this check box is activated, Windows
Explorer superimposes the file type icon on the lower-right corner of each file’s
thumbnail. This is usually a good idea because the extra icon allows you to figure
out the file type at a glance. However, if you find the icon getting in the way of the
thumbnail image, deactivate this setting.
. Display File Size Information in Folder Tips—When this setting is activated and
you hover your mouse pointer over a folder icon, Windows Explorer calculates the
size of the files and subfolders within the folder, and displays the size in a pop-up
banner. This is useful information, but if you find that your system takes too long to
calculate the file size, consider deactivating this setting.
NOTE
If you activate the Display File Size Information in Folder Tips setting, you must also activate the Show Pop-Up Description for Folder and Desktop Items setting, described later.
. Display the Full Path in the Title Bar—Activate this setting to place the full pathname of the current folder in the Windows Explorer title bar. The full pathname
includes the drive, the names of the parent folders, and the name of the current
folder. Note that this only applies to Classic folders, which you activate by clicking
the Use Windows Classic Folders option in the General pane.
. Hidden Files and Folders—Windows 7 hides certain types of files by default. This
makes sense for novice users because they could accidentally delete or rename an
important file. However, it’s a pain for more advanced users who might require
access to these files. You can use these options to tell Windows Explorer which files
to display:
Do Not Show Hidden Files, Folders, or Drives—Activate this option to avoid
displaying objects that have the hidden attribute set.
Show Hidden Files, Folders, and Drives—Activate this option to display the
hidden files.
NOTE
Files are hidden from view by having their Hidden attribute activated. You can work with
this attribute directly by right-clicking a visible file, clicking Properties, and then toggling
the Hidden setting on and off.
1
. Always Show Menus—As you saw earlier (see “Returning the Menus to Their
Rightful Place”), you activate this check box to display the menu bar full time in
Windows Explorer.
18
CHAPTER 1
Customizing Windows Explorer
. Hide Extensions for Known File Types—As you saw earlier (see “Turning On File
Extensions”), you deactivate this setting to display file extensions.
. Hide Protected Operating System Files—This setting is activated by default, and it
tells Windows 7 to hide files that have the System attribute activated. This is not
usually a problem because you rarely have to do anything with the Windows system
files. However, if you do need to see one of these files, deactivate this setting. When
Windows 7 asks whether you’re sure, click Yes.
. Launch Folder Windows in a Separate Process—Activating this setting tells
Windows 7 to create a new thread in memory for each folder you open. This makes
Windows Explorer more stable because a problem with one thread won’t crash the
others. However, this also means that Windows Explorer requires far greater
amounts of system resources and memory. Activate this option only if your system
has plenty of resources and memory.
. Show Drive Letters—If you deactivate this check box, Windows Explorer hides the
drive letters in the Computer folder and in the address bar when you open a drive.
NOTE
If you hide drive letters, Windows Explorer displays drive names such as Local Disk.
This isn’t particularly useful, so consider renaming your drives. Right-click the drive
and then click Rename. Note that you must enter administrator credentials to perform
this operation.
. Show Encrypted or Compressed NTFS Files in Color—When this setting is activated, Windows Explorer shows the names of encrypted files in a green font and the
names of compressed files in a blue font. This is a useful way to distinguish these
from regular files, but you can deactivate it if you prefer to view all your files in a
single color. Note that this only applies to files on NTFS partitions because only
NTFS supports file encryption and compression.
. Show Pop-Up Description for Folder and Desktop Items—Some icons display a
pop-up banner when you point the mouse at them. For example, the default desktop
icons display a pop-up banner that describes each icon. Use this setting to turn these
pop-ups on and off.
. Show Preview Handlers in Preview Pane—When this check box is activated,
Windows Explorer includes controls for previewing certain types of files in the
Moving User Folders
19
Reading pane. For example, when you display a video file in the Reading pane,
Windows Explorer includes playback controls such as Play, Pause, and Stop.
. Use Sharing Wizard—When this check box is activated, Windows 7 uses a simplified file and folder sharing method called the Sharing Wizard. Power users will want
to disable the Sharing Wizard (see Chapter 26, “Accessing and Using Your Network”).
. See “Deactivating the Sharing Wizard,” p. 410.
. When Typing into List View—These options determine Windows Explorer’s behavior when you open a folder and begin typing:
Automatically Type into the Search Box—Activate this option to have your typing
appear in the Search box.
Select the Typed Item in the View—Activate this option to jump to the first item
in the folder with a name that begins with the letter you type.
Moving User Folders
By default, all your user folders are subfolders of the %USERPROFILE% folder, which is
usually the following (where User is your username):
C:\Users\User
This is not a great location because it means that your documents and Windows 7 are on
the same hard disk partition. If you have to wipe that partition to reinstall Windows 7 or
some other operating system, you’ll need to back up your documents first. Similarly, you
might have another partition on your system that has lots of free disk space, so you might
prefer to store your documents there. For these and other reasons, moving the location of
your user folder is a good idea. Here’s how:
1. Create the folder in which you want your user folder to reside.
2. Click Start, type c:\users\ (replace c with the letter of the drive where your version
of Windows 7 is installed), and then click your username in the search results.
Windows 7 displays your user profile folders.
3. Right-click the user folder you want to move, and then click Properties. The folder’s
property sheet appears.
4. In the Location tab, use the text box to enter the full path (drive and folder name)
of the folder you created in step 1. (Or click Move to select the folder using a
dialog box.)
5. Click OK. If Windows Explorer asks whether you want to create the new folder and
then to move your documents to the new location, click Yes in both cases.
1
. Use Check Boxes to Select Items—Activate this check box to add check boxes beside
each folder and file. You can then select objects by activating their check boxes.
20
CHAPTER 1
Customizing Windows Explorer
TIP
An ideal setup is to have Windows 7 and your programs in one partition and your documents (that is, your user folders) in a separate partition. That way, your documents
remain safe if you have to wipe the system partition.
Taking Ownership of Your Files
When you’re working in Windows 7, you may have trouble with a folder (or a file)
because Windows tells you that you don’t have permission to edit (add to, delete, whatever) the folder. You might think the solution is to give your user account Full Control
permissions on the folder (see Chapter 17, “Securing the File System”), but it’s not as easy
as that. Why not? Because you’re not the owner of the folder. (If you were, you’d have the
permissions you need automatically.) So the solution is to first take ownership of the
folder, and then assign your user account Full Control permissions over the folder.
. See “Setting Security Permissions on Files and Folders,” p. 359.
Here are the steps to follow:
1. Use Windows Explorer to locate the folder you want to take ownership of.
2. Right-click the folder and then click Properties to open the folder’s property sheet.
3. Display the Security tab.
4. Click Advanced to open the Advanced Security Settings dialog box.
5. Display the Owner tab.
6. Click Edit.
7. In the Change Owner To list, click your user account.
8. Activate the Replace Owner on Subcontainers and Objects check box.
9. Click OK. Windows 7 warns you that you need to reopen the property sheet to
change the folder’s permissions.
10. Click OK in the open dialog boxes.
11. Right-click the folder and then click Properties to open the folder’s property sheet.
12. Display the Security tab.
13. If you do not see your user account in the Group or User Names list, click Edit, click
Add, type your username, and click OK.
14. Click your username.
15. Click the Full Control check box in the Allow column.
16. Click OK in the open dialog boxes.
Taking Ownership of Your Files
21
NOTE
You can find the Registry Editor file (TakeOwnership.reg) on my website at
www.mcfedries.com/Windows7Unleashed.
LISTING 1.1 A Registry Editor File That Creates a Take Ownership Command
Windows Registry Editor Version 5.00
[HKEY_CLASSES_ROOT\*\shell\runas]
@=”Take Ownership”
“NoWorkingDirectory”=””
[HKEY_CLASSES_ROOT\*\shell\runas\command]
@=”cmd.exe /c takeown /f \”%1\” && icacls \”%1\” /grant administrators:F”
“IsolatedCommand”=”cmd.exe /c takeown /f \”%1\” && icacls \”%1\” /grant administrators:F”
[HKEY_CLASSES_ROOT\Directory\shell\runas]
@=”Take Ownership”
“NoWorkingDirectory”=””
[HKEY_CLASSES_ROOT\Directory\shell\runas\command]
@=”cmd.exe /c takeown /f \”%1\” /r /d y && icacls \”%1\” /grant administrators:F /t”
“IsolatedCommand”=”cmd.exe /c takeown /f \”%1\” /r /d y && icacls \”%1\” /grant
administrators:F /t”
To use the file, double-click it and then enter your UAC credentials when prompted. As
you can see in Figure 1.7, right-clicking (in this case) a folder displays a shortcut menu
with a new Take Ownership command. Click that command, enter your UAC credentials,
and sit back as Windows does all the hard work for you!
1
Note that, obviously, this is quite a bit of work. If you only have to do it every once in a
while, it’s not big thing, but if you find you have to take ownership regularly, you’ll probably want an easier way to go about it. You’ve got it! Listing 1.1 shows a Registry Editor
file that modifies the Registry in such a way that you end up with a Take Ownership
command in the shortcut menu that appears if you right-click any folder and any file.
22
CHAPTER 1
Customizing Windows Explorer
FIGURE 1.7 When you install the Registry mod, you see the Take Ownership command when
you right-click a file.
Running Custom Searches
When you open a folder window, you know that you can click inside the Search box, type
some text, and you get a list of files and folders that match your text. This worked well in
Windows Vista, but it really rocks in Windows 7 because the latest version of the Desktop
Search engine is even faster. However, simple text searches aren’t going to radically boost
anyone’s productivity or help you find a file needle in a hard disk haystack. To take
searching to the next level, you need to know about two obscure but powerful search
features: Advanced Query Syntax and natural language queries.
Using Advanced Query Syntax to Search Properties
When you run a standard text search from any Search box, Windows looks for matches
not only in the filename and the file contents, but also in the file metadata: the properties
associated with each file. That’s cool and all, but what if you want to match only a
particular property. For example, if you’re searching your music collection for albums that
include the word Rock in the title, a basic search on rock will also return music where the
artist’s name includes rock and the album genre is Rock. This is not good.
Running Custom Searches
23
To fix this kind of thing, you can create powerful and targeted searches by using a special
syntax—called Advanced Query Syntax (AQS)—in your search queries.
property:value
Here, property is the name of the file property you want to search on, and value is the
criteria you want to use. The property can be any of the metadata categories used by
Windows. For example, the categories in a music folder include Name, Track, Title, Artists,
Album, and Rating. Right-click any column header in Details view to see more properties
such as Genre and Length, and you can click More to see the complete list.
Here are a few things to bear in mind:
. If the property name is a single word, use that word in your query. For example, the
following code matches music where the Artists property is Coldplay:
artists:coldplay
. If the property name uses two or more words, remove the spaces between the words
and use the resulting text in your query. For example, the following code matches
pictures where the Date Taken property is August 23, 2009:
datetaken:8/23/2009
. If the value uses two or more words and you want to match the exact phrase,
surround the phrase with quotation marks. For example, the following code matches
music where the Genre property is Alternative & Punk:
genre:”alternative & punk”
. If the value uses two or more words and you want to match both words in any
order, surround them with parentheses. For example, the following code matches
music where the Album property contains the words Head and Goats in any order:
album:(head goats)
. If you want to match files where a particular property has no value, use empty
braces, [], as the value. For example, the following code matches files where the Tags
property is empty:
tags:[]
You can also refine your searches with the following operators and wildcards:
>
Matches files where the specified property is greater than the specified value. For
example, the following code matches pictures where the Date Taken property is
later than January 1, 2009:
datetaken:>1/1/2009
1
For file properties, you use the following syntax:
24
CHAPTER 1
>=
Customizing Windows Explorer
Matches files where the specified property is greater than or equal to the specified value. For example, the following code matches files where the Size property
is greater than or equal to 10000 bytes:
size:>=10000
<
Matches files where the specified property is less than the specified value. For
example, the following code matches music where the Bit Rate property is less
than 128 (bits per second):
bitrate:<128
<=
Matches files where the specified property is less than or equal to the specified
value. For example, the following code matches files where the Size property is
less than or equal to 1024 bytes:
size:<=1024
..
Matches files where the specified property is between (and including) two values.
For example, the following code matches files where the Date Modified property is
between and including August 1, 2008 and August 31, 2008:
datemodified:8/1/2008..8/31/2008
*
Substitutes for multiple characters. For example, the following code matches
music where the Album property includes the word Hits:
album:*hits
?
Substitutes for a single character. For example, the following code matches music
where the Artists property begins with Blu and includes any character in the fourth
position:
artists:blu?
For even more sophisticated searches, you can combine multiple criteria using Boolean
operators:
AND (or
+)
Use this operator to match files that meet all of your criteria. For example, the
following code matches pictures where the Date Taken property is later than
January 1, 2009 and the Size property is greater than 1000000 bytes:
datetaken:>1/1/2009 AND size:>1000000
OR
Choose this option to match files that meet at least one of your criteria. For
example, the following code matches music where the Genre property is either
Rock or Blues:
genre:rock OR genre:blues
Running Custom Searches
Choose. For example, the following code matches pictures where the Type property is not JPEG:
type:NOT jpeg
NOTE
The Boolean operators AND, OR, and NOT must appear with all-uppercase letters in
your query.
Using Natural Language Queries
In the preceding section, I showed you how to use advanced query syntax to create
powerful search queries. The only problem is that it’s a chore having to memorize all
those operators and what they’re used for. If you’re not up for all that, Windows 7 offers
an alternative. It’s called natural language search, and it enables you to perform complex
searches without using any operators. Sweet!
First, follow these steps to turn on natural language search:
1. If you have a folder window open, select Organize, Folder and Search Options (or
Tools, Folder Options if you have the menu displayed; otherwise, click Start, type
folder, and then press Enter to select Folder Options in the search results). The
Folder Options dialog box appears.
2. Select the Search tab.
3. Activate the Use Natural Language Search check box.
4. Click OK to put the new setting into effect.
Crafting natural language queries is a bit of a black art because Microsoft has no documentation available. Feel free to experiment to get the feel of these queries.
A basic natural language query looks like this:
adjective kind verb value
Here, adjective is an optional value that narrows down the search, usually by using a
value from a property (such as a genre for music or a file type for images); kind is the type
of file, such as music or images; verb is a verb that more or less corresponds to the property
you want to match, such as modified (the Date Modified property), (the Date Created property), from (the From property in an email), and by (the Artist property in a music file);
and value is the specific value you want to match.
For example, if you want to return all the pop music done by the band Sloan, you’d enter
the following query:
pop music by sloan
1
NOT
(or –)
25
26
CHAPTER 1
Customizing Windows Explorer
Similarly, if you want all the JPEG images that were created today, you’d use the following
query:
jpeg images created today
You can keep adding more properties and values to target your searches. For example, if
we want our Sloan search to return only those songs rated with five stars, we’d modify the
search as follows:
pop music by sloan rating *****
You can still perform Boolean searches in natural language queries. For example, if you
want documents where the Author property includes Paul or Karen, you’d use the
following query:
documents by paul or karen
Similarly, if you want to return all your videos except those in the QuickTime format,
you’d use the following:
videos not quicktime
NOTE
Unlike with AQS, the Boolean operators or and not can appear in lowercase letters.
(The Boolean operator and is implied in all multiterm natural language queries, so you
never have to use it.)
Finally, note that when you’re working with dates, there are several keywords you can use
in your natural language queries, including the following: yesterday, today, tomorrow,
week, month, year, last, this, and next. For example, if you want to see all the TIFF
images created this week, you’d use the following:
jpeg images created this week