1
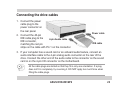
E1637
®
DVD-E616P2
DVD-ROM Drive
User Guide
First Edition V1
May 2004
ASUS contact information
ASUSTeK COMPUTER INC. (Asia-Pacific)
Address
Telephone
Web site
150 Li-Te Road
Peitou, Taipei, Taiwan 112
+886-2-2894-3447
www.asus.com.tw
Technical Support
Tel. MB/Optical Drives
Notebook
Desktop/Server
Networking
Support fax
+886-2-2890-7121 (English)
+886-2-2890-7122 (English)
+886-2-2890-7123 (English)
+886-2-2890-7902 (English)
+886-2-2890-7698
ASUS COMPUTER INTERNATIONAL (America)
Address
Fax
E-mail
Web site
44370 Nobel Drive, Fremont,
CA 94538, USA
+1-502-608-4555
[email protected]
usa.asus.com
Technical Support
Tel. General
Notebook
Support fax
Support e-mail
+1-502-995-0883
+1-501-739-3777
+1-502-933-8713
[email protected]
ASUS COMPUTER GmbH (Germany and Austria)
Address
Telephone
Fax
Online contact
2
Harkort Str. 25, D-40880
Ratingen, Germany
+49-2102-95990
+49-2102-959911
www.asuscom.de/sales
Technical Support
Telephone
Fax
Online support
Website
ASUS DVD-E616P2
+49-2102-95990
+49-2102-959910
www.asuscom.de/support
www.asuscom.de/news
No part of this documentation, including the products and software described in it, may be reproduced, transmitted,
transcribed, stored in a retrieval system, or translated into any language in any form or by any means, except
documentation kept by the purchaser for backup purposes, without the express written permission of ASUSTeK
COMPUTER INC. (“ASUS”).
ASUS PROVIDES THIS DOCUMENTATION “AS IS” WITHOUT WARRANTY OF ANY KIND, EITHER EXPRESS
OR IMPLIED, INCLUDING BUT NOT LIMITED TO THE IMPLIED WARRANTIES OR CONDITIONS OF
MERCHANTABILITY OR FITNESS FOR A PARTICULAR PURPOSE. IN NO EVENT SHALL ASUS, ITS
DIRECTORS, OFFICERS, EMPLOYEES OR AGENTS BE LIABLE FOR ANY INDIRECT, SPECIAL, INCIDENTAL,
OR CONSEQUENTIAL DAMAGES (INCLUDING DAMAGES FOR LOSS OF PROFITS, LOSS OF BUSINESS,
LOSS OF USE OR DATA, INTERRUPTION OF BUSINESS AND THE LIKE), EVEN IF ASUS HAS BEEN ADVISED
OF THE POSSIBILITY OF SUCH DAMAGES ARISING FROM ANY DEFECT OR ERROR IN THIS
DOCUMENTATION OR PRODUCT.
Product warranty or service will not be extended if: (1) the product is repaired, modified or altered, unless such
repair, modification of alteration is authorized in writing by ASUS; or (2) the serial number of the product is defaced
or missing.
Products and corporate names appearing in this documentation may or may not be registered trademarks or
copyrights of their respective companies, and are used only for identification or explanation and to the owners’
benefit, without intent to infringe.
For documentation updates, visit the ASUS website at www.asus.com.tw.
The specifications and information contained in this documentation are furnished for informational use only, and
are subject to change at any time without notice, and should not be construed as a commitment by ASUS. ASUS
assumes no responsibility or liability for any errors or inaccuracies that may appear in this documentation, including
the products and the software described in it.
Copyright © 2004 ASUSTeK COMPUTER INC. All Rights Reserved.
ASUS DVD-E616P2
3
Contents
ASUS contact information ..................................................................... 2
Notices .................................................................................................... 6
Safety information .................................................................................. 8
Installation notices .............................................................................. 8
Using the device ................................................................................. 9
Conventions used in this guide ........................................................ 10
Package contents ................................................................................ 11
Welcome ............................................................................................... 12
Product introduction ............................................................................ 12
Specifications ................................................................................... 12
Front panel ....................................................................................... 14
Rear panel ........................................................................................ 16
Installing the drive .............................................................................. 20
4
ASUS DVD-E616P2
Contents
Drive basics .......................................................................................... 24
Placing a disc into the drive .............................................................. 24
Ejecting a disc from the drive ........................................................... 26
Using the emergency eject pinhole .................................................. 27
Using compact discs ........................................................................... 29
Cleaning a disc ................................................................................. 29
Handling a disc ................................................................................. 29
Technical information .......................................................................... 30
Environmental specifications ............................................................ 30
Electrical and audio specifications ................................................... 31
DVD region codes ................................................................................ 32
ASUS DVD-E616P2
5
Notices
Federal Communications Commission Statement
This device complies with Part 15 of the FCC Rules. Operation is subject to the
following two conditions:
•
•
This device may not cause harmful interference, and
This device must accept any interference received including interference that
may cause undesired operation.
This equipment has been tested and found to comply with the limits for a Class B
digital device, pursuant to Part 15 of the FCC Rules. These limits are designed to
provide reasonable protection against harmful interference in a residential
installation. This equipment generates, uses and can radiate radio frequency
energy and, if not installed and used in accordance with manufacturer’s
instructions, may cause harmful interference to radio communications. However,
there is no guarantee that interference will not occur in a particular installation. If
this equipment does cause harmful interference to radio or television reception,
which can be determined by turning the equipment off and on, the user is
encouraged to try to correct the interference by one of the following measures.
6
ASUS DVD-E616P2
•
•
•
•
Reorient or relocate the receiving antenna.
Increase the separation between the equipment and receiver.
Connect the equipment to an outlet on a circuit different from that to which the
receiver is connected.
Consult the dealer or an experienced radio/TV technician for help.
WARNING! The use of shielded cables for connection of the monitor to the
graphics card is required to assure compliance with FCC regulations. Changes
or modifications to this unit not expressly approved by the party responsible for
compliance could void the user’s authority to operate this equipment.
Canadian Department of Communications Statement
This digital apparatus does not exceed the Class B limits for radio noise emissions
from digital apparatus set out in the Radio Interference Regulations of the
Canadian Department of Communications.
This class B digital apparatus complies with Canadian ICES-003.
ASUS DVD-E616P2
7
Safety information
Observe the following precautions before installing and using the drive.
Installation notices
8
Do not place this
device in an unstable
position, or on
vibrating surfaces.
Do not place this
device under direct
sunlight, or in humid
or damp places.
Do not use or place
this device near
magnetic fields,
televisions, or radios
to avoid electronic
interference that
affects drive
performance.
Do not attempt to
disassemble or
repair the drive.
Opening the drive
may result to
exposure to laser
radiation.
ASUS DVD-E616P2
Using the device
•
•
•
•
•
•
•
•
•
Use of any controls, adjustments, or procedures other than those specified in this
manual may result to hazardous radiation exposure.
Do not attempt to disassemble the drive.
Do not move the device from a cold to a warm or hot environment. Drastic change of
temperature is harmful to the device.
Before moving or uninstalling the drive, remove disc from it, if any.
Prevent liquids or any metal to get into the device. If this situation occurs, contact your
retailer for help.
Do not use any evaporating solvents to clean the device. If you accidentally sprayed
any solvent on the device, use a clean cloth to wipe it. You may also use a neutral
cleaner to dilute the solvent to easily wipe it from the device.
Try not to interrupt the supply of power while the device is in reading or writing mode.
Do not place damaged or warped discs inside the device. A warped disc may break
while in use and damage the device.
Do not place discs into the device immediately if they came from a cold environment,
specially during cold seasons. Wait until the discs have reached room temperature.
ASUS DVD-E616P2
9
Conventions used in this guide
To make sure that you perform certain tasks properly, take note of the following
symbols used throughout this guide.
WARNING/DANGER: Information to prevent injury to yourself when
trying to complete a task.
CAUTION: Information to prevent damage to the components when
trying to complete a task.
IMPORTANT: Information that you MUST follow to complete a task.
NOTE: Tips and additional information to aid in completing a task.
10
ASUS DVD-E616P2
Package contents
Upon opening your ASUS DVD-E616P2 drive package, check if all the following
items are present and in good condition. If any of the items is damaged or missing,
contact your retailer immediately.
•
ASUS DVD-E616P2 DVD-ROM Drive
•
Audio cable
•
Mounting screw package
•
User guide (English) with multi-language Quick Installation Guide
•
DVD playback software CD
The above items are available in retail boxes only.
ASUS DVD-E616P2
11
Welcome
TThank you for buying the ASUS DVD-E616P2 Drive!
Read the instructions and important information in this manual for proper use and
installation of this device.
Product introduction
Specifications
The DVD-E616P2 has the following specifications:
Sustained transfer rate
DVD
CD
16x max. ~ 21640KB/sec
48x max. ~ 7200KB/sec
Random access time
DVD
CD-ROM
120 ms
120 ms
ATAPI specification
512 KB/sec
Interface
Data Buffer Size
12
ASUS DVD-E616P2
Specifications
Application Discs
DVD
CD
OS Compatibility
Power Supply
Dimensions
Mass
12cm or 8cm diameter, 1.2mm thick
DVD-5, DVD-9, DVD-10, DVD-18
DVD-ROM, DVD-R, DVD-RW
DVD-Video, DVD+R, DVD+RW
Audio CD, CD-ROM/XA, Video CD, CD-I,
Multi-session photo CD, Karaoke CD,
CD-Extra, CD-Text
Windows® 98SE/ME/2000/NT/XP,
DOS 6.xx, Linux
DC 5 x (+/- 5%) V
DC 12 X (+/- 5%) V
148.5 (w) x 173 (d) x 42.6 mm (h)
830 g
Refer to “Technical information” on page 30 for detailed specifications.
ASUS DVD-E616P2
13
Front panel
1
2
3
4
1. Emergency eject pinhole
The Emergency Eject Pinhole allows you to manually eject a disc when the
Eject Button does not work due to power failure or software problems. Insert
the emergency eject pin into this hole to manually eject the tray and the disc.
Refer to page 27 for details.
Turn off your computer before using the Emergency Eject Pinhole.
14
ASUS DVD-E616P2
2. Disc loading tray
This tray holds the disc. Open the loading tray by pressing the Eject Button.
Place a CD or DVD on the tray with the label side up. Press the Eject Button or
push the front part of the tray to load the disc.
3. READ indicator
This LED lights up when data is being read on the disc.
4. Eject button
Press this button to eject the tray and load or remove a disc.
ASUS DVD-E616P2
15
Rear panel
5
6
7
8
9
5. Digital audio output
This connector is for a 2-pin digital audio cable that attaches a sound card to
the drive.
6. Analog audio output
This connector is for an analog audio output cable. This connector is
compatible with “Molex 70553”.
16
ASUS DVD-E616P2
Pin
Name
Description
1
2&3
L
G
Left channel audio output
Ground
4
R
Right channel audio output
7. Device configuration jumper
These pins allow you to select either Master, Slave, or Cable Select
mode for the DVD-ROM device. (Refer to page 18 for jumper settings.)
Pin
1
2
Name
MA
SL
Switch Status
ON
ON
3
CS
ON
Description
Master mode
Slave mode
Cable select mode
8. Host IDE interface
This connector is for a 40-pin IDE cable to connect the drive to the IDE
interface on the motherboard.
9. DC input
This DC connector is for a 4-pin power cable from the system power supply.
ASUS DVD-E616P2
17
Setting the jumper terminals
Configure the jumpers to set the device to master or slave mode before installing it
to the computer chassis. Use jumper blocks to short the pins to your desired
setting.
Make sure you correctly put the jumper blocks over the pins. Failure to do so
can cause irreparable damage to the drive!
Jumper terminals
18
ASUS DVD-E616P2
PIN 1
Master Mode
Cover the two pins labeled MA (see illustration) to set the
DVD-ROM drive as a secondary master drive. This is possible
only if your computer supports four IDE devices. The hard disk
in the computer is set as Primary Master.
MA
PIN 1
Slave Mode
Cover the two pins labeled SL (see illustration) to set the drive
as a slave device if your computer supports only two IDE
devices. If your computer supports four IDE devices, this
setting sets your DVD-ROM drive either as a Primary Slave or
a Secondary Slave.
SL
PIN 1
Cable Select Mode
Cover the two pins labeled CS (see illustration) if your
computer supports a Cable Select (CSEL) signal. You need an
exclusive interface cable for this setting. Refer to your
computer manual for details.
ASUS DVD-E616P2
CS
19
Installing the drive
Follow these steps to install the drive into the computer chassis.
Refer to your computer manual for specific instructions on opening the chassis
and installing drives.
1. Remove the cover of an
empty 5.25-inch drive bay.
20
ASUS DVD-E616P2
2. Carefully insert the drive into
the bay and push it inward
until it is flushed to the chassis
front panel. The holes on the
sides of the drive should align
with the holes on the drive
bay.
ASUS DVD-E616P2
21
3. Secure the drive with
screws that came with
the drive package. Use
two screws on each side
of the drive.
Depending on the space on your chassis, you may need to connect the drive
cables before securing the drive into the chassis. For cable connections,
proceed to the following section, “Connecting the Drive Cables.”
22
ASUS DVD-E616P2
Connecting the drive cables
1. Connect the power
cable plug to the
power connector on
the rear panel.
2. Connect the 40-pin
IDE cable plug to the
4-pin Audio cable
IDE connector,
matching the red pin
stripe on the cable with Pin 1 on the connector.
Power cable
IDE cable
3. If your computer has a sound card or an onboard audio feature, connect an
audio interface cable to the 4-pin analog audio connector on the rear of the
drive. Connect the other end of the audio cable to the connector on the sound
card or on the 4-pin CD connector on the motherboard.
All the cable plugs are slotted so that they fit in only one orientation. If a plug
does not fit in completely, try reversing it. DO NOT apply too much force when
fitting the cable plugs.
ASUS DVD-E616P2
23
Drive basics
Placing a disc into the drive
1. Press the eject button on the front of
the drive to eject the tray.
2. When the drive tray ejects out of the drive,
place the disc on the tray with the label
(printed) side up.
24
ASUS DVD-E616P2
If you are using a 12-cm disc, place it
on the tray making sure that it fits the
outer circular border. This border
helps hold the disc in place. If you are
using an 8-cm disc, place it on the
inner circular border on the tray.
12-cm Disc
8-cm Disc
3. Press the drive eject button or lightly
push the center of the drive tray to
replace the tray inside the drive.
ASUS DVD-E616P2
25
Ejecting a disc from the drive
1. Press the STOP/EJECT button on the front of the drive to eject the tray.
2. Carefully remove the disc from the tray.
3. Press the drive STOP/EJECT button or lightly push the center of the drive tray
to load the tray back into the drive.
26
ASUS DVD-E616P2
Using the emergency eject pinhole
The emergency eject pinhole on the front of the drive allows you to manually eject
the drive tray and remove a disc from the drive in the following instances:
•
supply of power to the computer is cut due to electrical power outage
•
the drive malfunctions
Use the manual method only as a last resort when the eject button does not
work. Make sure that you have turned off your optical drive before ejecting the
drive tray. Locate the power switch button on the rear panel to turn off the drive.
To eject the drive tray using the emergency pinhole:
1. Insert the eject pin that came with the
drive package. You can also use a
paper clip or any pointed rod small
enough to fit into the emergency
pinhole.
ASUS DVD-E616P2
27
2. Carefully pull the tray out and remove
the disc.
Do not force the tray open; wait until the eject pin has dislodged the tray to
avoid breaking the tray panel.
28
ASUS DVD-E616P2
Using compact discs
Take note of the instructions in this section when using compact discs. These
instructions will help you avoid damaging the discs and your drive.
Cleaning a disc
Spray the disc with compressed air for about five
seconds to get rid of the dust on a disc.
Handling a disc
Hold a disc by the edges. Do not touch the disc
surface.
ASUS DVD-E616P2
29
Technical information
Environmental specifications
Temperature
Humidity
Vibration
Impact
Operation
Storage
Operation
Storage
Operation
Storage
Non-operation
Packaged
Acoustic
Sound pressure
Reliability
MTTR*
MTBF
+5°C to +45°C
- 20°C to +60°C
20% to 80% non-condensing
15% to 85% non-condensing
0.2 G peak at 10 ~ 300 Hz
1.5 G peak at 10 ~ 300 Hz
1 oct/min – no damage
Less than 50G - (half sine wave, 11 ms/10s interval)
1 oct/min – no damage
76 cm high (1 corner, 3 edges, 6 surfaces)
Less than 40 dB (microphone should be 1 meter away
from the drive)
100,000 power on hours
30 minutes
* Mean Time To Repair
30
ASUS DVD-E616P2
Electrical and audio specifications
Power Source
Voltage
Tolerance
+5V DC
+/- 5%
IO Terminal
Power connector
ATAPI terminal
Audio out
Digital output
4-pin +5V, +12V
40-pin
4-pin analog
2-pin
Audio
No. of channels
Sampling frequency
Quantization
Distortion
S/N ratio
Line Out
2 (stereo)
44.1 kHz
16 bits
0.2% max. (at 1 kHz)
70 dB
0.70 V rms (typical)
ASUS DVD-E616P2
+12V DC
+/- 10%
31
DVD region codes
DVDs and DVD players are regionally coded to protect the DVD industry from
piracy and unfair promotions. For example, a DVD encoded for Region 1 may only
be played on a Region 1 DVD-ROM or DVD player. Regional codes on DVDs are
optional. All DVD players can play DVDs with no specified region code.
Follow the instructions to play a regionally-coded DVD on the drive.
1. Check the region code of the DVD, then insert the disc into the drive.
2. When the DVD playback prompts you to enter your country/location, select a
country/location within the region code of the DVD. Refer to the map and table
below.
You are only allowed to change your country/location up to five times.
This limitation makes the drive adaptable for use in many regions while
maintaining compliance with RPC-II regulations.
The ability to switch from one region to another is not an ongoing feature. Set
the drive to your local region to avoid incorrect setting.
32
ASUS DVD-E616P2
ASUS DVD-E616P2
33
Region Code
34
Area
1
U.S., U.S. Territories, Canada
2
Europe, Middle East, Japan, Egypt, S. Africa, Greenland
3
South Eastern Asia, Taiwan, Hong Kong, Korea
4
Australia, New Zealand, Latin America, Pacific Islands
5
Russia, Eastern Europe, India, Africa, North Korea
6
China
ASUS DVD-E616P2