1
User Manual
44601 Fremont Blvd., Fremont, CA 94538, USA
Tel: +1.510.440.9901 • Fax: +1.510.440.1270 • www.arcsoft.com
Copyright © 2007 ArcSoft, Inc. All rights reserved. ArcSoft, the
ArcSoft logo, and ArcSoft ShowBiz are registered trademarks of
ArcSoft, Inc. in the United States. All other product and companies
named herein may be trademarks of their respective owners.
Table of Contents
1. Introduction ............................................. 1
1.1
Installation ............................................. 3
1.2
System Requirements............................... 4
1.3
Workflow Overview .................................. 5
2. Capture..................................................... 7
2.1
Video Capture ......................................... 9
2.2
Audio Capture ........................................14
3. Edit......................................................... 15
3.1
Video Clip Components ............................17
3.2
Player ...................................................18
3.3
Media ....................................................20
3.4
Storyboard.............................................23
3.5
Timeline ................................................26
3.6
Text ......................................................30
3.7
Transitions .............................................32
3.8
Effects...................................................33
3.9
Export ...................................................34
4. Create..................................................... 35
4.1
Media ....................................................37
4.2
Themes .................................................38
4.3
Customize..............................................39
4.4
Text ......................................................40
4.5
Set Chapters ..........................................41
4.6
Preview Area ..........................................43
4.7
Slide Shows ...........................................45
4.8
Write Disc ..............................................48
5. Quick DVD .............................................. 49
5.1
Quick DVD Steps ....................................51
6. Menus..................................................... 55
6.1
File .......................................................57
6.2
Edit.......................................................58
6.3
View .....................................................59
6.4
Options .................................................60
6.5
Play ......................................................61
6.6
Extras & Help .........................................62
6.7
Keyboard Shortcuts.................................63
7. How Tos ................................................. 67
7.1
Capture Video ........................................69
7.2
Capture Audio ........................................70
7.3
Create New Album ..................................71
7.4
Add Content to Storyboard .......................72
7.5
Modify Content .......................................73
7.6
Create DVD............................................74
7.7
Create Slide Show...................................75
7.8
Add Pan & Zoom .....................................76
7.9
Perform Advanced Editing ........................78
7.10 Design Menus.........................................80
7.11 Burn To Disc ..........................................82
Reference...................................................... 85
Customer Support.............................................86
Technical Support .............................................87
Registering Your Product....................................88
ArcSoft Product Family ......................................89
Licensing Agreement .........................................92
About ArcSoft...................................................96
INDEX ........................................................... 97
Chapter 1: Introduction
1. Introduction
Installation
System Requirements
Workflow Overview
1
Chapter 1: Introduction
Welcome to ArcSoft ShowBiz® DVD 2, a powerful video
application that includes everything you need to edit your home
videos and create spectacular DVDs.
This Introduction covers the installation and system requirements
and provides an overview of the typical ShowBiz workflow. The
rest of the user manual covers how to capture video, edit and
assemble video clips, and create a DVD movie. There is also a
chapter that covers the program's menus and commands, and a
set of "how tos" to walk you through common tasks.
2
Chapter 1: Introduction
1.1
1.
2.
3.
Installation
Insert the CD into your CD-ROM drive.
The installer should start automatically.
Follow the on-screen instructions to complete the
installation.
Take note as to where the program is installing, and where it can
be found in the Start menu.
Note: If the installer does not start automatically, you will need to
run it manually:
1. Insert the CD into your CD-ROM drive.
2. Click Start>Run.
3. In the Run dialog, type "X:/setup.exe". ("X" is the drive
letter associated with your CD-ROM drive. This letter will
vary from system to system.)
4. Click OK.
5. Follow the on-screen instructions to complete the
installation.
3
Chapter 1: Introduction
1.2
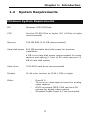
System Requirements
Minimum System Requirements
OS
Windows 2000/XP/Vista
CPU
Pentium III 800 MHz or higher (P4 1.6 GHz or higher
recommended)
Memory
128 MB RAM (512 MB recommended)
Hard disk space 400 MB available hard disk space for program
installation
4 GB+ free hard disk space recommended for video
capture and editing (1 hour of DV video requires 13
GB of hard disk space)
Hard drive
7200 RPM hard drive recommended
Display
16-bit color monitor at 1024 x 768 or higher
Other
-
DirectX 9
TV-tuner or video capture board for analog
video capture
OHCI-compliant IEEE-1394 card and DV
camera for digital video capture
Windows Media Player 9.0 recommended
4
Chapter 1: Introduction
1.3
Workflow Overview
ShowBiz DVD 2 is divided into four main sections, or "modules."
You can start in any module, depending on what you are
interested in!
Capture
Record video from your DV camera or other video device.
Edit
Edit your videos and combine them with other video clips,
transitions, effects, text, and more.
Create
Use your finished video clips to create your DVD or VCD (each clip
will become an individual chapter in your final movie); customize
the menu; and burn your movie to a DVD disc or a CD.
Quick DVD
Capture video and create a DVD movie with just a few clicks.
5
Chapter 1: Introduction
When you first launch ShowBiz, the Welcome screen offers several
options for common starting places. Selecting an option takes you
right into one of the four modules: Create, Edit, Capture, or Quick
DVD.
6
Chapter 2: Capture
2. Capture
Video Capture
Audio Capture
7
Chapter 2: Capture
The Capture module is where you record video and audio. It
consists of two tabs: Video and Audio.
Choose Video to record video from DV camcorders and other
connected devices.
Choose Audio to record sound clips, voiceovers, and other sounds.
When you are in the Capture module, a red Record button in the
Player lets you start capturing video. The Live and Playback
buttons let you toggle between viewing the video as it's captured
from your device and reviewing the captured video. When you are
recording, the Record button turns into a Stop button.
8
Chapter 2: Capture
2.1
Video Capture
You can capture video from a multitude of video devices, including
DV camcorders. The available options vary depending on the
device.
Capturing from a DV Tape
When capturing from a DV device, playback controls appear. You
can use these controls to navigate to a specific location on the DV
tape. Use these controls to go to the beginning of the section you
wish to capture.
When you're ready, click the red Record button within the Player.
Capturing from a TV Tuner
When capturing from a TV tuner, first select the channel from
which you would like to record. You can choose between cable and
antenna reception.
9
Chapter 2: Capture
Auto Scan: Click to have the program scan for available channels.
Audio Device: Check the box if you would like to record audio as
well. If you check the box, choose your device from the pull-down.
The following buttons may also be available. (Specific options are
dependent on your device. Contact the device manager if you
have any questions regarding what these options do.)
Video Settings: Generally contains options for selecting your video
standard (NTSC or PAL) as well as basic video enhancement
settings.
Video Format: Options here typically include frame rate,
compression, and output size (resolution).
Video Input: If your capture card has various input options, select
the one you want to use here.
Audio Settings: Choose the bit rate and frequency of your
captured audio.
Audio Input: Contains options specific to your sound capture
device.
TV Settings: Properties and settings for your TV tuner.
To start recording, click the red Record button within the Player.
10
Chapter 2: Capture
Capturing from VFW Devices
VFW ("Video for Windows") devices follow an older Microsoft
multimedia framework. Older webcams, USB devices, or PCI
devices may use the VFW standard.
To capture video from VFW devices, select your desired VFW
device from the pull-down. The Source and Format buttons may
have various image size and format options available, and will
vary from device to device.
Check the Audio Device box to record audio from your selected
sound source.
When you're ready, click the red Record button.
Capturing from WDM Devices
WDM ("Windows Driver Model") devices follow a newer Microsoft
driver framework. Newer webcams, USB devices, or PCI devices
might use the WDM standard.
To capture video from WDM devices, select your desired WDM
device from the pull-down. The Settings, Format, and Input
buttons may contain various options including enhancement
features and compression, depending on the device.
11
Chapter 2: Capture
Check the Audio Device box to record audio from your selected
sound source.
When you're ready, click the red Record button.
Save As
For capturing from any device, after you click the red Record
button, you'll be prompted with the Save As window.
In the Save As window, enter in the file name and save location
for the captured video. You can also select the save format. (AVI
is generally the format for video coming from a DV tape.)
Check the "Set Capture Duration" box if you would like to stop
capturing after a set amount of time.
Check the "Add to Album" box if you would like the captured video
included into an album of your choice. Albums are discussed in
more detail in Section 3.3.
12
Chapter 2: Capture
Lastly, you can set the scene detection. Scene detection is
discussed further in Section 3.3.
If you choose to have scene detection, you can either do it
manually during the capture process (by pressing the space bar
on your keyboard), or automatically. For automatic scene
detection, scenes can either be separated by date and time, or by
changes in content. Use the slider to adjust the sensitivity of the
automatic scene detection.
When you're ready, click OK. The program begins to capture video
from your device. Click the Stop button within the Player to stop
recording. Click the Playback button to review the video you just
recorded.
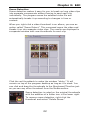
If you enabled scene detection, the album thumbnail representing
the file displays a folder icon. Click the folder icon to bring up a
window that contains each individual scene.
13
Chapter 2: Capture
2.2
Audio Capture
When capturing audio, you have the choice of extracting music
from a CD, or recording audio from a sound device.
If you are extracting audio from a CD, select the letter associated
with the drive you plan to use. You can then preview the CD
tracks with the standard playback controls (play, stop, rewind,
etc.).
Use the Start and End markers (scissors) to trim the audio if you
wish. Simply drag the marks to the desired spots.
If you are recording audio from a sound device, choose the device
from the pull-down. The Format button lets you select the bit rate
and other audio settings. The options available after clicking the
Source button are dependent on your sound capture device.
When you're ready, click the Record button in the Player. You
must then specify the file name for the soon-to-be recorded audio,
along with the save location. If you want, you can have the audio
automatically put into an album of your choice upon being
recorded. Albums are discussed in more detail in Section 3.3
To stop recording, click the Stop button within the Player.
To play back your new recording, click the Playback button within
the Player. Standard playback controls become available.
14
Chapter 3: Edit
3. Edit
Video Clip Components
Player
Media
Storyboard
Timeline
Text
Transitions
Effects
Export
15
Chapter 3: Edit
The Edit module is where you assemble various components to
create a new video clip. It contains four primary tabs, one for
each type of component you can add to your video clip: Media,
Text, Transitions, Effects. A fifth tab, Export, appears as soon as
you have content in your video clip. When you're finished, you can
use the video clip in your final DVD or VCD movie.
16
Chapter 3: Edit
3.1
Video Clip Components
Everything you need to create your video clips is in one of four
tabs: Media, Text, Transitions, and Effects.
Media – Choose still images, video files, and audio files that you'd
like to use to create a new video clip.
Text – Choose text templates to apply to your video clip, such as
scrolling text.
Transitions – Add cool effects between each still image or video
file. For example, if you have added two video files (from the
Media tab), you can add a transition that shows the first video
fading away as the second one fades in.
Effects – Apply frames and various "filters" to your video clip
components.
Export – This fifth tab appears as soon as you have content in
your video clip. Here, you can save all of the components you
have added as a single video clip.
17
Chapter 3: Edit
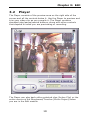
3.2
Player
The Player consists of the preview area on the right side of the
screen and all the controls below it. Use the Player to preview and
trim your video clip as you compile it. The Player contains
standard play/pause/rewind buttons, along with other controls
that depend on what you are previewing or recording.
The Player can play back either selected clips (Active Clip) or the
entire movie on the Storyboard/Timeline (Entire Project) when
you are in the Edit module.
18
Chapter 3: Edit
There are two timers. The left timer indicates the total playing
time of the selected component. The right timer indicates the
current time.
When viewing an audio or video component, the timer (slider)
beneath the preview window has two markers: the Start Marker
and the End Marker. You can click and drag these to trim the
component. You can also click one of the two Trim buttons to set
the Start/End Marker at the current point in the component.
Other Player Options:
Print Frame - Click this button to print the current frame
shown in the preview window.
Save Frame - Click this button to save the current frame
within the preview window as a standard image file.
Full Screen Preview - Click this button to view the
preview window full screen.
19
Chapter 3: Edit
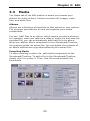
3.3
Media
The Media tab of the Edit module is where you browse your
albums for video content. Content includes still images, video
files, and audio files.
Albums
Albums are collections of shortcuts to files stored on your system.
The program uses albums to help you organize your media
components.
You can "add" files to an album, which means you add a shortcut.
For example, when you capture a video or audio clip and save the
recorded file, you can automatically add that file to an album.
When you add an album component to the Storyboard/Timeline,
the program grabs the actual file. You can delete the contents of
an album without worrying about affecting the actual files.
Compiling Media
To start compiling a video clip, add media components to the
Storyboard/Timeline. To add a file to the Storyboard/Timeline,
simply click it to select it. Then, click the arrow beneath the
thumbnails.
20
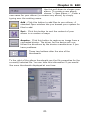
Chapter 3: Edit
Use this pull-down to choose your
album. To create a new album,
choose "< New Album >". Enter a
new name for your album (or rename any album) by simply
typing over the existing name.
Add - Click this button to add files to your album. A
standard Open window lets you browse your system for
files to add.
Sort - Click this button to sort the content of your
album in a number of ways.
Acquire - Click this button to capture an image from a
connected device. The driver for the device will run;
follow the directions by the device manufacturer if you
have problems.
These two buttons alter the size of the
thumbnails.
To the right of the album thumbnails are the file properties for the
currently selected file. You can hide this information if you would
like more thumbnails displayed at one time.
21
Chapter 3: Edit
Scene Detection
Scene detection makes it easy for you to break up long video clips
into separate components without having to save each clip
individually. The program scans the selected video file and
automatically breaks it up according to changes in time or
content.
When you right-click a video thumbnail in an album, you see an
option called "Scene Detect." This command scans the video and
breaks it up into separate video clips. The results are displayed in
a separate window with new thumbnails for each clip.
Click the red thumbtack to make the window "sticky." It will
remain on top of the program desktop as long as it is stuck. You
can click and drag the thumbnails to the Storyboard/Timeline just
as you can any other thumbnail from the Media section.
Scene detection is noted on the original thumbnails
with the addition of a folder icon in the lower right.
To remove scene detection, right-click the
thumbnail and select "Delete Scene."
22
Chapter 3: Edit
3.4
Storyboard
The Storyboard is one place where you arrange your video clip
components. It serves as the template for video construction. You
add a still image or video clip to each spot on the Storyboard.
Then, when you save your video, all of the components are
combined into a single file. You can then use the file in the Create
module as a chapter in a DVD movie. Or, you can just leave it as a
stand-alone file.
When constructing a video, you can add components by going to
the Media, Text, Transitions, and Effects tabs. (The Media tab is
where you add still images, video, and audio.) The Storyboard
displays the Media and Transitions components that you have
added (except for audio). For a more detailed view of everything
you are using to make your video, as well as additional editing
options, switch to the Timeline (see Section 3.5).
The Storyboard is divided into several large squares, with smaller
squares in between. The larger squares are spots that are
reserved for still images and video files.
As you add still images or video from the Media tab, the larger
squares fill up. As you add transitions from the Transitions tab,
the smaller squares fill up.
23
Chapter 3: Edit
All of the components on the Storyboard are swappable, meaning
you can drag and drop them to swap them with other
components. This makes it easy to rearrange video clips and still
images, or swap transitions from one spot to another.
Use the arrows at the beginning and end of the Storyboard to
scroll through additional components if you cannot view them all
on screen.
While working in the Storyboard, you have the following options
available:
Undo – Undoes the last command.
Redo – Undoes the last undo command. You can perform
the Undo/Redo commands multiple times to go back and forth
between various editing stages of your video.
Split and Combine
The Split command divides a single video into two components on
the Storyboard or Timeline. It creates two separate video files,
split at the current point of the timer in the Player. Click and drag
24
Chapter 3: Edit
the timer to the spot where you want the split performed, then
right-click the video component on the Storyboard or Timeline and
select Split. You can recombine two split videos by selecting them
both on the Storyboard or Timeline, right-clicking, and selecting
Combine.
Delete – Removes the selected clip(s) from the
Storyboard.
Record Audio – Opens the Record Audio window. See
Section 7.2 for more information.
25
Chapter 3: Edit
3.5
Timeline
The Timeline is the other place where you arrange your video clip
components. It serves as the template for video construction. It
offers a more in-depth view of your constructed movie than the
Storyboard. Every component that you have added (still images,
videos, audio, transitions, text, and special effects) can be seen
and altered here.
The top area of the Timeline shows any added text effects. The
section below shows all of your still images, video files,
transitions, and any associated special effects. Immediately
beneath are the various audio tracks, the first being reserved for
audio that is embedded into video files. Two additional audio
tracks are available.
The "-" and "+" buttons let you contract and expand the Timeline.
If you want to focus on one key area of the Timeline, expand it. If
you want to see more components at one time, contract it.
Text Track
Items on the Text Track include text and text effects added from
the Text tab of the Edit module (see Section 3.6). Text effects can
be added to either the beginning or end of their respective text
component.
Click and drag the edge of a text component to adjust the display
time.
Right-click a Text Track component to display a pop-up menu with
various options. These include delete options (for deleting
everything on the Text Track as well as individual or every text
effect), alignment options (you can align added text to the
26
Chapter 3: Edit
beginning or end of video clips or the entire movie), and cut,
copy, and paste commands.
Editing Text Effects. To edit text effects, click the Edit Text button
that appears on the left of the Player. Options for editing text are
discussed in Section 3.6.
Video Track
Items on the Video Track include still images, video clips,
transitions, and special effects.
You can drag and drop them to arrange their order (except for
effects, which are "stuck" to video clips or still images).
Click and drag the edge of a still image, video, effect, or transition
to adjust the display time.
Right-click to see additional options. Right-click options include
adding random transitions to the entire Timeline, standardizing
the display time for still images and transitions, and modifying
how still images are displayed.
One right-click option that is exclusive to video components is
Split (this command is also available from the Storyboard).
Having a variety of image and video dimensions can lead to
frames within your video looking out of place because of empty
space. However, with the available options here, you can stretch
your image (Stretch to Fit), crop and enlarge it (Fill & Crop), or
enlarge it to the largest size without cropping out any areas (Best
Fit).
Editing Videos. When a video is selected on the Timeline (or
Storyboard), editing options appear to the left of the Player.
•
Use the top slider to adjust the overall volume for any
audio that the video may have.
•
Use the sliders below to adjust video brightness,
contrast, hue, and saturation.
•
Use the bottom slider to modify the video speed. You can
speed up and slow down video to create cool effects.
Check the Smooth box to eliminate any choppiness that
may result from altering your video timing.
Editing Still Images. When a still image is selected on the Timeline
(or Storybard), editing options appear.
27
Chapter 3: Edit
•
•
Drag the sliders to the left of the Player to adjust the
brightness, contrast, hue, and saturation.
Use the top timer to modify the display time for each still
image. This is the time that the image remains on the
screen before changing to the next component on the
Timeline.
Editing Transitions. Select a transition on the Timeline (or
Storyboard) to see the available editing options to the left of the
Player.
•
Use the timer to modify the duration of the transition.
•
Use the pull-down to select options for your transition;
the options are dependent on the specific transition.
Generally you can modify the direction that the transition
moves.
Editing Special Effects. Click a special effect to see the available
editing options to the left of the Player. The options are dependent
on the specific effect. You can play around with the various
options to create unique video effects.
Audio Tracks
There are a total of three audio tracks.
The top audio track is reserved for audio that is embedded into a
video component. The other two audio tracks can be used to
include songs, special sound effects, narration, etc. You can add
multiple files to each track.
Click and drag the edge of an audio component to trim it.
Right-click options let you align the audio, or remove all audio
content on a specific track.
Click and drag the blue line that appears across an audio
component to modify its volume. You can do this at virtually any
point; the volume during the span of the audio clip can fluctuate
however you want.
Editing Audio Tracks. Click any audio file on the Timeline to
display a slider on the left of the Player. Adjust the slider to
control the volume of the selected audio component.
You can "lock" any of the tracks on the Timeline by clicking the
icon on the left. Locking a track makes all of the related
28
Chapter 3: Edit
components uneditable. This is useful if you want to move around
or edit specific areas without having to worry about
unintentionally modifying other components.
While working in the Timeline, you have the following options
available:
Undo – Undoes the last command.
Redo – Undoes the last undo command. You can perform
the Undo/Redo commands multiple times to go back and forth
between various editing stages of your video.
Split and Combine
The Split command divides a single video into two components on
the Storyboard or Timeline. It creates two separate video files,
split at the current point of the timer in the Player. Click and drag
the timer to the spot where you want the split performed, then
right-click the video component on the Storyboard or Timeline and
select Split. You can recombine two split videos by selecting them
both on the Storyboard or Timeline, right-clicking, and selecting
Combine.
Delete – Removes the selected clip(s) from the Timeline.
Record Audio – Opens the Record Audio window. See
Section 7.2 for more information.
29
Chapter 3: Edit
3.6
Text
Add text over any video clip or still image. Click on any text option
to preview it in the Player. Add the selected text component to
your project by dragging it to the Storyboard/Timeline.
The Text tab is divided into two categories: Style and Effect.
Components from the Effect category are attached to the actual
text messages from the Style category. Once you have added text
to the Storyboard/Timeline, you will be in Edit Mode and you can
see options for editing your text:
Click anywhere on the image to start typing your text. Standard
text formatting options are available, including font, size,
30
Chapter 3: Edit
alignment, color, and style (bold and italic). On the right is a
column of text styles. Chose the one you like best.
In Edit mode, choose either Move or
Text. With Move selected, you can
reposition your text by clicking and
dragging. With Text selected, your mouse functions as it would in
a word processor.
Check the box to have the text scroll as it is displayed.
The scroll buttons designate in which direction the
added text will move.
Check the TV-Safe Area box to display the
area that is ideal for text placement to ensure
that the text can be fully seen on a TV.
31
Chapter 3: Edit
3.7
Transitions
Transitions are special effects that can be inserted between video
clips or still images on the Storyboard/Timeline. In the Transitions
tab, choose your transition from the available categories, then
click the arrow to add it to the Storyboard/Timeline.
The available options for a transition vary depending on the type
of transition you choose.
On the Storyboard/Timeline, click and drag a transition to
reposition it. On the Timeline, click and drag the edge of a
transition to alter the display time.
32
Chapter 3: Edit
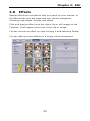
3.8
Effects
Special effects are included to help you spice up your movies. In
the Effects tab, they are organized into various categories
including crop shapes, frames, and filters.
Click and drag an effect onto any video clip or still image on the
Timeline. It will appear at the top of the clip or image.
You can remove an effect by right-clicking it and selecting Delete.
You can add up to two effects on a single movie component.
33
Chapter 3: Edit
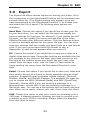
3.9
Export
The Export tab offers various options for saving your video. All of
the components on the Storyboard/Timeline will be combined into
a single video file. (The Export section only appears once you
have components on the Storyboard/Timeline.) You choose how
and where the file is saved. The following save options are
available:
Hard Disk. Choose this option if you would like to save your file
to your hard drive. You can select the file type and modify the
various settings for that type. For example, if you choose the AVI
file type, you can modify the frame rate and size of the video.
Different formats offer different options. Click the Settings button
to see the available options for any given file type. You can even
keep any settings that you modify and save them as a new format
type. If you are unsure about what file format to use, a
description of each format appears after you select it.
DV. Choose this option if you would like to save your video to a
digital video device tape. Camcorder controls are available that let
you navigate to any point on the tape. Use these controls to set
the tape at the location where you would like your new video
saved. Once the tape is set, click the Save To Tape button to
being sending the movie from the Storyboard/Timeline to your
tape.
Email. Choose this option if you would like to save your video and
then send it directly to a friend or family member using an email
program. Supported email programs include Hotmail, Microsoft
Outlook, Mozilla, and Outlook Express. The available file types for
you to choose are WMV (Windows Media) and MOV (QuickTime).
Generally, choose WMV if you are sending a message to a
Windows user; choose MOV if you are sending a message to a
Macintosh user. You can set a few options such as frame rate and
size. When you're ready, choose your mail client, then click Send.
VHS. Choose this option to play your movie for recording onto a
VHS tape. A diagram appears, showing you how to connect your
computer to your VCR for recording. Simply follow the diagram,
then click Start to begin.
34
Chapter 4: Create
4. Create
Media
Themes
Customize
Text
Set Chapters
Preview Area
Slide Shows
Write Disc
35
Chapter 4: Create
The Create module is where you go after you have edited your
video files, when you want to create a DVD or VCD. The module is
divided into six tabs:
Media – In this tab, you choose individual video files that you
want to use in your DVD movie. Each video that you add becomes
a separate chapter. (You can also divide a single file into multiple
chapters; see Section 4.5.)
Themes – This tab consists of creative content for designing
menus that focus on a particular motif.
Customize – This tab lets you modify the chapter thumbnail
borders and layout.
Text – This tab lets you alter your menu text, and any text
beneath the chapter thumbnails.
Set Chapters – In this tab, you can break up individual chapters
into multiple chapters. They will then be grouped together under
one submenu.
Write Disc – In this tab, you can burn your movie onto a DVD
disc, or save it to your hard drive.
36
Chapter 4: Create
4.1
Media
The Media tab is where you choose the videos you want to include
in your DVD movie. Each video you add is made into its own
chapter in your movie. The preview area on the right side of the
screen shows you your current movie layout. As you add video
files, thumbnails for each video appear.
To add a video file to your movie, click one to select it, then click
the arrow button between the album and the preview area.
You can also include an introduction video clip that will play before
the main DVD menu appears. To do this, simply drag and drop a
video clip over the Introduction Video box.
37
Chapter 4: Create
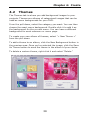
4.2
Themes
The Themes tab is where you add background images to your
projects. Themes are albums of categorized images that can be
used as menu backgrounds for your DVD.
From the pull-down, select the category you want. You can then
choose the exact menu background. Double-click it to add it as
the background for the current menu. You can have a different
background for each submenu or menu page.
To create your own album of themes, select "< New Theme >"
from the pull-down.
To add a theme to an album, click the New Background button in
the preview area. Once you've selected the image, click the Save
As Theme button to save the theme in the album of your choice.
To delete a custom theme, right-click it and select "Delete."
38
Chapter 4: Create
4.3
Customize
The Customize tab lets you customize the look and feel of the
chapter thumbnails seen in your menus.
You can choose the thumbnail borders as well as the thumbnail
arrangements. If you update one thumbnail frame and would to
apply that frame either to all thumbnails on the current menu or
to all thumbnails throughout the project, right-click the thumbnail
and choose "Apply frame to all thumbnails in this menu" or "Apply
frame to all thumbnails in all menus," respectively.
You can also click and drag the chapter buttons, thumbnails, and
text around the page.
39
Chapter 4: Create
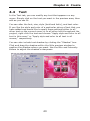
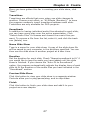
4.4
Text
In the Text tab, you can modify any text that appears on any
menu. Simply click on the text you want in the preview area, then
edit as you see fit.
You can alter the font, size, style (bold and italic), and text color.
If you like the style and color of a particular string of text that you
have added and would like to apply those settings either to all
other text on the current menu or to all other text throughout the
project, right-click the text and choose "Apply style and color to all
text in this menu" or "Apply style and color to all text in all
menus," respectively.
You can also include text shadow by clicking the "Shadow" box.
Click and drag the shadow within the little preview window to
position the shadow where you want. Use the Blur and Intensity
sliders to adjust the shadow's sharpness.
40
Chapter 4: Create
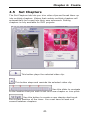
4.5
Set Chapters
The Set Chapters tab lets you trim video clips and break them up
into multiple chapters. Videos that contain multiple chapters will
automatically be turned into their own submenus. Setting
chapters is only available for DVD projects.
This button plays the selected video clip.
This button stops and rewinds the selected video clip.
Use this slider to navigate
to the location that you wish to set as a new chapter or trim point.
Use this button to create a new chapter starting at
the current position of the timer. You must have at least one
second between chapters.
41
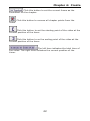
Chapter 4: Create
Click this button to set the current frame as the
thumbnail for the chapter.
Click this button to remove all chapter points from the
video.
Click this button to set the starting point of the video at the
current position of the timer.
Click this button to se the ending point of the video at the
current position of the timer.
The left time indicates the total time of
the video. The right time indicates the current position of the
timer.
42
Chapter 4: Create
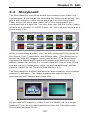
4.6
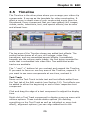
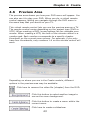
Preview Area
The preview area shows you how your DVD menu will appear. You
can also use it to play your DVD. When you do, a virtual remote
control appears, letting you navigate through the DVD menu in
the same way that you would on your TV.
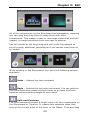
This virtual remote control lets you use the preview area as a TV.
The remote control varies depending on the project type (DVD or
VCD). When creating a DVD, arrow buttons let you navigate over
menus. When creating a VCD, the bulk of the remote control is a
number pad. Each number corresponds to a specific chapter
thumbnail on the current menu screen. For example, if you only
have four thumbnails, only numbers 1-4 on the remote control will
work.
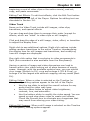
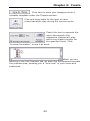
Depending on where you are in the Create module, different
options in the preview area may be available:
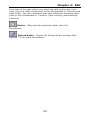
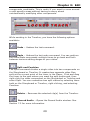
Click here to remove the video file (chapter) from the DVD.
Click this button to select another image to
use as the menu background.
Click this button to create a menu within the
current menu.
Click here to create a slideshow.
43
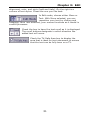
Chapter 4: Create
Click here to save your background as a
reusable template under the Themes section.
Click and drag audio to this spot to have
music/narration play during the current menu.
Check this box to animate the
menu thumbnails (the
respective chapter will play
within the chapter button for
the specified time). Click
"Preview Animation" to see it at work.
When you are
working in the Set Chapters tab, an area like this appears beneath
the preview area, showing you a "tree view" of your menu and
submenus.
44
Chapter 4: Create
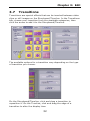
4.7
Slide Shows
Slide shows can be added to your movie as separate chapters.
Double-clicking the respective chapter button lets you edit an
existing slide show. To start creating a slide show, make sure you
are in the Media tab of the Create module and click the "Create
Slideshow" button below the preview area.
Choose Photos
Gather photos for your slide show by clicking "Add Photos."
Browse through your system and pick the images you want to
use.
If you have a scanner or digital camera and wish to download
images, use the "Acquire Photos" button. Depending on the
hardware you have connected, choose either TWAIN or WIA, and
follow the instructions to capture your images.
Arrange Photos
Click and drag the photos to arrange them in the order you want.
You can also right-click photos and cut/copy/paste them to change
the order or add duplicate slides.
Orient Photos
If a photo needs to be rotated, select it (by clicking it), and then
click the appropriate rotate button until the photo is oriented
correctly.
Insert Blank Slides
Click the button to add a blank slide anywhere in your slide show.
Blank slides are great to serve as breaks or title pages (adding
text is described below). Change the background color of any slide
by right-clicking it and selecting "Background Color." You have the
option of applying the color you select to all slides.
Enhance Photos
Each slide can be edited in a variety of ways. Select a slide, then
click "Edit Photo." See Section 3.5 for more information.
45
Chapter 4: Create
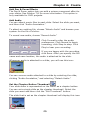
Add Pan & Zoom Effects
The Pan & Zoom option lets you add a unique movement effect to
your slides. See Section 7.8 for more information. This option is
only available for DVD projects.
Add Audio
You can attach music files to each slide. Select the slide you want,
and then click "Audio Annotation."
To attach an existing file, choose "Attach Audio" and browse your
system for the file of choice.
To record new audio, choose "Record Audio."
Click Format to alter the audio
preferences. Click Record to begin
recording; click Stop to stop. Click
Play to hear your recording.
If you are happy with the recording,
click Save. After you specify the file
name and save location, the audio is attached to the slide.
Whenever audio is attached to a slide, you will see this icon:
You can remove audio attached to a slide by selecting the slide,
clicking "Audio Annotation," and selecting "Detach Audio."
Set the Chapter Button Thumbnail
Your slide show is represented on the menu as a chapter button.
You can set a single slide as the chapter thumbnail. Select the
slide you want and then click the "Set Thumbnail" button.
The slide that is set as the chapter thumbnail will display this icon:
46
Chapter 4: Create
Once you have gotten this far in creating your slide show, click
"Next."
Transitions
Transitions are effects that occur when one slide changes to
another. Choose a set effect, or "All Effects (Random)," to have
the program randomly insert transitions between each slide.
Transitions are only available for DVD projects.
Soundtrack
In addition to having individual audio files attached to each slide,
you can have music play over the entire presentation. Click
"Select Audio Files" to browse and choose the music files you
want. To remove a file from the list, select it, and click the trash
can (delete) icon.
Name Slide Show
Type in a name for your slide show. A copy of the slide show file
will be saved to your computer in the directory specified. You can
then use the slide show in another project at a later time.
Duration
Set the duration for each slide. Check "Repeat soundtrack to fit" if
you would like to loop the audio you have added until the slide
show is finished. If you choose the "Auto-Fit to Soundtrack"
option, the program automatically adjusts the display time of each
slide to fit the duration of the audio files you have included in the
"Soundtrack" section.
Preview Slide Show
Click this button to view your slide show in a separate window.
Controls allow you to play/pause/stop, and to skip slides.
Finish
Click this button to finish your slide show and add it to your
project as a new chapter.
47
Chapter 4: Create
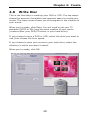
4.8
Write Disc
This is the final step in creating your DVD or VCD. The top meter
shows the amount of available and required space to create your
movie. The lower meter shows you the progress in the creation of
your movie.
When you're ready, click Start. You will need to set your TV
standard (NTSC or PAL) and the save location of your movie
(choose either your DVD/CD writer or your hard drive).
If you choose to burn a DVD or VCD, select the drive you want to
use, then choose the burn speed.
If you choose to save your movie to your hard drive, select the
directory in which you want it saved.
When you're ready, click OK.
48
Chapter 5: Quick DVD
5. Quick DVD
49
Chapter 5: Quick DVD
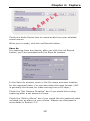
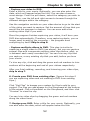
By choosing the Quick DVD option, you'll have a "wizard" that will
walk you through each step in order to capture and create your
movie. Just follow the instructions in each step. The wizard is
designed to guide you throughout the entire process.
50
Chapter 5: Quick DVD
5.1
Quick DVD Steps
The Quick DVD wizard guides you through the following steps. You
can start the Quick DVD wizard at any time by selecting File >
Quick DVD.
1. Choose the drive to which your DVD will be saved. You
can choose either a DVD writeable (or rewriteable) drive, or your
hard drive.
2. Choose the type of DVD that you'd like to create.
DVD-Video discs are playable on most set-top DVD players.
DVD+VR and DVD-VR discs can be edited on most DVD+VR and
DVD-VR recorders, respectively. Double-layer DVD+R discs are
also supported. Choose the option that best suits your needs. If
you have a DVD recorder, verify which format (DVD+VR or DVDVR) is supported so that you make the right choice.
3. Choose the option that best describes the total length of
your movie. The shorter the time, the higher the quality
(depending on your choice, the program will automatically select
the bit rate, which affects the video quality).
The exact choices offered here are dependent on your audio
setting (under "DVD Options"). Using MPEG or Dolby audio allows
up to around 4 hours for a single-layer DVD, or up to around 8
hours for a double-layer DVD. (Dolby may not be available in all
versions of the program.) PCM audio allows up to around 2.5
hours for single-layer DVD and up to around 5 hours for a doublelayer DVD.
4. The program then searches for a connected video device.
If no device is found, you can still create a DVD from existing
video clips on your computer. If this is the case, skip to step 6.
5. Choose if you would like to create a DVD from saved
video files, capture one video to DVD, or capture multiple
videos to DVD. Here's what happens when you select each
option:
- Create a DVD from saved video files: Skip to step 6.
51
Chapter 5: Quick DVD
- Capture one video to DVD:
Enter a title for your movie. Optionally, you can also enter the
date, which will appear below the title. You can also choose a
menu design. From the pull-down, select the category you wish to
view. Then, use the left and right arrows to browse through the
different designs within the category.
Use the navigation controls on your video device to go to the start
of the video you want to capture. Set the amount of time that you
would like the program to capture. You can even add a few
existing video clips if you want.
Once the program finishes capturing your video, it will burn your
DVD disc automatically. Therefore, once capturing starts, you no
longer need to wait by the computer – the program does
everything by itself! Skip to step 8.
- Capture multiple videos to DVD: This step is similar to
capturing a single video to DVD (see above), but you can capture
several clips and incorporate existing video clips before, after, or
in between each newly recorded clip. You can trim any clip that
you capture, or any existing clip that you add, before you burn
your movie.
To trim any clip, click and drag the green and red markers to trim
sections at the beginning and end of your videos respectively.
After you finish adding, recording, and trimming your video clips,
skip to step 7.
6. Create your DVD from existing clips. (Ignore this step if
you are capturing video and not creating a DVD from existing
clips.)
Click "Get Files" to browse your system for files to add to your
project. The files you add appear on the Storyboard at the bottom
of the wizard. Click a thumbnail on the Storyboard, and then click
"Preview" to view the clip.
You can trim video clips by dragging the green and red markers
along the video timer.
7. Design your DVD. Enter a title for your movie. Optionally, you
can also enter the date, which will appear below the title.
52
Chapter 5: Quick DVD
You can also choose a menu design. From the pull-down, select
the category you wish to view. Then, use the left and right arrows
to browse through the different designs within the category.
Finally, set the number of discs to be burned. (This option is not
available when creating DVD-VR discs, or when saving your
project to your hard drive.)
8. Print a jewel case or DVD case cover. Simply choose what
you'd like to print from the pull-down.
53
Chapter 5: Quick DVD
54
Chapter 6: Menus
6. Menus
File
Edit
View
Options
Play
Extras & Help
Keyboard Shortcuts
55
Chapter 6: Menus
The menus are located at the top of the program desktop. The
menus include: File, Edit, View, Options, Play, Extras, and Help.
This chapter also includes information on keyboard shortcuts.
56
Chapter 6: Menus
6.1
File
The following commands are available under the File menu:
New Project – Takes you to the Edit module (if you are not
already there), where you can create a new video clip.
Open Project – Lets you open a previously saved project.
Save Project – Saves your current project.
Save Project As – Lets you save the current project with a new
name (and new save location, if desired).
Convert Current Project To – Convert your DVD project to a
VCD project, or vice versa.
Import Media Files – Lets you add files to your albums.
Import Video Clips from DVD – Grab video segments from a
previously created DVD.
Quick DVD – Launches the Quick DVD wizard, where you can
capture video and create a DVD in just a few clicks. The wizard
walks you through each simple step. See Chapter 5.
Edit ArcSoft DVD Disc – Lets you edit the contents of a
previously created ArcSoft DVD.
Recent Projects – Displays a list of the most recently opened
projects.
57
Chapter 6: Menus
6.2
Edit
The following commands are available under the Edit menu:
Undo – Reverses the last command.
Redo – Reverses the last Undo command.
Cut – Removes the selected component and stores it in memory.
Copy – Places a copy of the selected component in memory.
Paste – Places the contents of the previous Cut or Copy command
into the selected location.
58
Chapter 6: Menus
6.3
View
The following commands are available under the View menu:
Capture – Takes you to the Capture module. See Chapter 2.
Edit – Takes you to the Edit module. See Chapter 3.
Create – Takes you to the Create module. See Chapter 4.
TV Safe Zone – Displays a dashed border in the Player, indicating
the possible view boundaries of a TV.
Storyboard – Switches you to the Storyboard view.
Timeline– Switches you to the Timeline view.
59
Chapter 6: Menus
6.4
Options
The following commands are available under the Options menu:
Preferences – Lets you view and modify various program
settings. Settings include: default display time for still images,
text, transitions, and special effects; automatic scene detection;
automatic rewind; progressive or interlaced video; TV standard
(NTSC or PAL); and photo resize options (Best Fit, Fill & Crop, and
Stretch to Fit, as discussed in Section 3.5).
DVD Quality Setting – Lets you choose the bit rate for DVD files.
Temporary Folder – Lets you choose the location in which
temporary and backup files are stored on your system.
Timeline View Options – Lets you choose how files appear on
the Timeline.
DVD Options – Here you can change the default settings for your
DVD projects.
DVD Playback: Choose to have your movies play their chapters
back to back (one after another), or return to the menu after each
chapter is played.
DVD Navigation: Check the box to add a "Play All" option to your
main menu. Your movie will start on the first chapter and play all
the way through.
Audio Type: Choose the type of audio you would like for your
movie. The "Dolby" option may or may not be available depending
on your specific version of the program. Older set-top DVD players
may have problems playing discs with "MPEG" audio. Typically,
DVDs played through digital audio output may not have sound.
Media Type: Choose between single- and double-layer DVD media.
60
Chapter 6: Menus
6.5
Play
The following commands are available under the Play menu:
Play/Pause – Starts/pauses playback of the currently selected
video component.
Play Entire Storyboard/Timeline – Plays all of the components
on the Storyboard/Timeline in order.
Stop – Stops video playback.
Previous Frame – Goes back one frame on the video track.
Next Frame – Advances one frame on the video track.
Back – Goes back one component on the video track.
Forward – Jumps to the next component on the video track.
Full Screen – Displays the entire preview window over the entire
screen. Press ESC to return to the normal view.
61
Chapter 6: Menus
6.6
Extras & Help
The following commands are available under the Extras menu:
More ArcSoft Products – Offers additional ArcSoft products that
complement your program.
Updates and Patches – Automatically detects and installs the
latest program updates to your software.
Available Upgrades – Checks the web for any program
upgrades.
Register Product – Opens the product registration form, using
your default web browser. Here you can view your product serial
number and register your product. An Internet connection is
required to register your product.
Send Us Feedback – Brings up an online feedback form where
your comments can be submitted.
Visit ArcSoft.com – Visit the ArcSoft home page.
The following commands are available under the Help menu:
Help – Opens the online help.
About – Displays the program splash screen, which contains the
product version number.
62
Chapter 6: Menus
6.7
Keyboard Shortcuts
Menu Shortcuts:
File: ALT + F
Edit: ALT + E
View: ALT + V
Options: ALT + O
Play: ALT + P
Extras: ALT + X
Help: ALT + H
Capture Module: ALT + 1
Capture Video: ALT + I
Capture Audio: ALT + U
Live Toggle: ALT + L
Playback Toggle: ALT + Y
Edit Module: ALT + 2
Media: ALT + M
Add: ALT + D
Sort: ALT + S
Acquire: ALT + Q
Text: ALT + T
Transitions: ALT + N
Effects: ALT + C
Produce: ALT + R
Disk: ALT + K
Email: ALT + I
DV Tape: ALT + D
VHS: ALT + S
Create Module: ALT + 3
Media: ALT + D
Select: ALT + L
New Background: ALT + B
Create Submenu: ALT + U
Create Slideshow: ALT + W
Themes: ALT + M
New Background: ALT + N
Save As Theme: ALT + A
Customize: ALT + C
Text: ALT + T
Set Chapters: ALT + S
Set Chapter: ALT + C
63
Chapter 6: Menus
Set Thumbnail: ALT + U
Write Disc: ALT + R
Start: ALT + A
Main Menu: ALT + U
Intro: ALT + I
Quick DVD: CTRL + D
Player Shortcuts:
Active Clip: ALT + A
Entire Project: ALT + J
Storyboard View: ALT + Y
Timeline View: ALT + L
Video Track: CTRL + 1
Text Track: CTRL + 2
Audio Track 1: CTRL + 4
Audio Track 2: CTRL + 5
Move Clip: CTRL + Right/Left ARROW
Frame Seek: ALT + Right/Left ARROW
Start Marker Trim: I
End Marker Trim: O
Clear Start Marker: D
Clear End Marker: F
Clear Both Markers: G
Cut: CTRL + X
Copy: CTRL + C
Paste: CTRL + V
Select All: CTRL + A
Stop and Rewind: HOME
Undo: CTRL + Z
Redo: CTRL + Y
Delete: DELETE
Navigation: ARROW Keys
Contract Timeline: CTRL + Expand Timeline: CTRL + +
Create Clip Copy: CTRL + Mouse drag to new location
Select Multiple Clips: SHIFT + ARROW keys
Album Shortcuts:
Scroll Up: PAGE UP
Scroll Down: PAGE DOWN
Jump to Top: HOME
Jump to Bottom: END
Thumbnail Navigation: ARROW keys
64
Chapter 6: Menus
Delete Thumbnail/File: DELETE
Select All: CTRL + A
Deselect All: CTRL + D
Cut: CTRL + X
Copy: CTRL + C
Paste: CTRL + V
Save: CTRL + S
Add to Storyboard/Timeline: ENTER
Edit Panel: ALT + I (Use this shortcut to jump to the editing
panel when any component is selected on the Storyboard/Timeline
or within any text, effect, or transition album.)
Text Editing:
Once within the Color Palette, use the ARROW keys to select your
color, then press Enter.
Bold: CTRL + B
Italic: CTRL + I
Decrease Font Size: CTRL + SHIFT + <
Increase Font Size: CTRL + SHIFT + >
Misc. Shortcuts:
New Project: CTRL + N
Open Project: CTRL + O
Save Project: CTRL + S
Save Project As: CTRL + SHIFT + S
Import Media File: CTRL + I
Edit ArcSoft DVD Disc: CTRL + E
Start/Pause Video: SPACE
Stop/Rewind: HOME
Previous Frame: ALT + Left ARROW
Next Frame: ALT + Right ARROW
Back: CTRL + ALT + Left ARROW
Forward: CTRL + ALT + Right Arrow
Full Screen: ALT + ENTER
Print Current Frame: CTRL + P
Execute Current Button/Checkbox/Etc.: SPACE
F1 - Help
F2 - Display right-click options
F7 - Narrate (ESC to stop recording)
F9 - Small View
F11 - Full Screen
65
Chapter 6: Menus
66
Chapter 7: How Tos
7. How Tos
Capture Video
Capture Audio
Create New Album
Add Content to Storyboard
Modify Content
Create DVD
Create Slide Show
Add Pan & Zoom
Perform Advanced Editing
Design Menus
Burn to Disc
67
Chapter 7: How Tos
ShowBiz DVD can seem like a complex program. In this chapter,
rather than descriptions of the user interface function by function,
you'll find short "how to" procedures for common tasks.
68
Chapter 7: How Tos
7.1
Capture Video
Step 1. Connect your camera to the computer and turn the power
on. Launch the program. From the welcome wizard, select
"Capture, create, or edit videos." From the next screen, select
"Capture From Device."
If you already have the program open, click "Capture" at the top
of the screen to go to the Capture module.
Step 2. Once within the Capture module, you'll see controls for
navigating through the video on your camera.
Use the playback controls to
jump to the spot where you
would like to begin recording.
Step 3. Click the big red Record button beneath the preview
window. You'll be prompted to define the specifics of the file you
are about to capture:
Choose the file name and save location.
Set the file type. If you plan on using the video when you
create a DVD, choose the DVD (MPEG-2) file type.
Optionally, enter a capture time. If you have a really long
video and only want to capture a small part, use this
option.
Optionally, check the box to add your captured file to an
album. If you plan on doing any type of editing, your file
will need to be in an album. See Section 3.3 for more
information on albums.
Step 4. When you are finished recording, click Stop. You can view
your captured file by clicking the Playback button.
For more information on capturing video, see Section 2.1.
69
Chapter 7: How Tos
7.2
Capture Audio
Step 1. Launch the program and click "Capture" at the top of the
screen to go to the Capture module.
Step 2. Click the Audio tab. Select to record audio from a CD or
from a recording device.
If recording from a CD, select the track and then use the playback
controls to jump to the spot where you would like to begin
recording.
If recording from a recording device, select the device from the
pull-down. Click the Format button to select the bit rate and other
audio settings.
Step 3. Click the big red Record button beneath the preview
window. You'll be prompted to define the specifics of the file you
are about to capture:
Choose the file name and save location.
Optionally, check the box to add your captured file to an
album. If you plan on doing any type of editing, your file
will need to be in an album. See Section 3.3 for more
information on albums.
Step 4. When you are finished recording, click Stop. You can
listen to your captured file by clicking the Playback button.
For more information on capturing audio, see Section 2.2.
70
Chapter 7: How Tos
7.3
Create New Album
In order to add content to the Storyboard/Timeline, you need to
first create an album. Albums consist of shortcuts that link to the
picture, music, and video files stored on your computer. There are
a few sample albums included in the program.
Step 1. Launch the program and click "Edit" at the top of the
screen to go to the Edit module.
Step 2. Click the Media tab. From the album pull-down, choose
"< New Album >."
Step 3. Enter in a new album name. Just click on and type over
the existing name.
Step 4. Click where indicated to browse your system for files to
add to the album.
You can add still pictures, video clips, and audio
tracks.
Step 5. Add additional files to your album at any time.
Select the album from the pull-down and click
the Add button.
Don't forget that you can create more than one album. Organize
your media so that it's easy to find what you need when you're
making your movies.
For more information about albums, see Section 3.3.
71
Chapter 7: How Tos
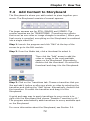
7.4
Add Content to Storyboard
The Storyboard is where you add content to piece together your
movie. The Storyboard consists of several squares.
The larger squares are for STILL IMAGES and VIDEOS. The
smaller squares are for TRANSITIONS. (Transitions are effects
that occur as one video or image changes to another.) When your
final movie is compiled, everything on the Storyboard is combined
into a single video file.
Step 1. Launch the program and click "Edit" at the top of the
screen to go to the Edit module.
Step 2. From the Media tab, click a thumbnail to select it.
Then click the "Add" arrow to add the
video or image to the next available
space on the Storyboard. Alternatively,
double-click the thumbnail. Or select the
thumbnail and drag it to the Storyboard.
Step 3. Click on the Transitions tab. Choose a transition that you
like and add it before or after any photo or video by selecting the
transition and clicking the "Add" arrow. Alternatively, double-click
the transition. Or select the transition and drag it to the
Storyboard.
A quick and easy way to apply transitions to your movie is to
right-click the Storyboard and choose "Random Transition to All."
The program automatically adds transitions to every available spot
on the Storyboard.
For more information about the Storyboard, see Section 3.4.
72
Chapter 7: How Tos
7.5
Modify Content
This section covers simple content modifications that can be done
on the Storyboard. For more information on advanced editing, see
Section 3.5 and Section 7.9.
Modification 1: Rearranging Photos and Videos
Rearrange photos and videos on the Storyboard by clicking and
dragging any thumbnail on the Storyboard to a new location.
Modification 2: Rearranging Transitions
Transitions are replaced, rather than rearranged. Clicking and
dragging any transition on the Storyboard to a new location
replaces the transition that was at that location.
Modification 3: Editing Still Images
Select a photo on the Storyboard. In the preview area, specify the
display time duration (hours, minutes, seconds, frames). To use
the same display time for
multiple photos, right-click an
image thumbnail and choose
"Apply Duration to All
Following." You can also use the
sliders in the preview area to
adjust each image's brightness,
contrast, hue, and saturation.
Modification 4: Editing
Video Clips
Select a video clip on the
Storyboard. In the
preview area, you can
adjust the brightness,
contrast, hue, and
saturation, as well as the
volume and playback
speed. In the player, you
can trim the video by
either dragging the green
and pink trim markers, or adjusting the timer to the spot you
want and clicking the respective Trim button (pink and green
scissors).
73
Chapter 7: How Tos
7.6
Create DVD
The Create module of the program is where you actually put
together your DVD (or VCD).
Step 1. Launch the program and click "Create" at the top of the
screen to go to the Create module.
Step 2. From the Media tab, choose the album that has the video
clips you wish to add.
Step 3. Double-click the video clip you want to add. The video clip
appears on the DVD menu as a new chapter. Add all the video
chapters that you plan on including in your movie. You can choose
video clips from several different albums.
Step 4. Once your content is added, you can customize the look
and feel of your menu by changing the background, title, and
chapter button layout and text. Menu customization options are
covered in detail in Section 7.10.
Step 5. Introduction videos play as soon as the disc is inserted
into a DVD player. Once the introduction video clip completes, the
main movie menu is shown. To add an introduction video, click
and drag the desired video from the album area to the
Introduction Video box.
Step 6. Click the Write Disc tab to burn your movie to disc. You
can preview the movie first, or just click Start. More details on
burning your movie to disc are in Section 7.11.
74
Chapter 7: How Tos
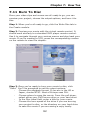
7.7
Create Slide Show
You can create a photo slide show, which is added to your movie
as a separate chapter.
Step 1. Launch the program and click "Create" at the top of the
screen to go to the Create module.
Step 2. From the Media tab, click "Create Slideshow."
Step 3. Click "Add Photos" to browse your system for photos to
add to your slide show, or click the "Acquire Photos" button to add
photos directly from your scanner.
Step 4. Click and drag the photos you have added to order them.
Step 5. Use the buttons in the Slide Show dialog to further
customize your slide show. When you're finished, click "Next."
Click "Edit Photo" to crop, enhance, or add text to the
selected photo.
Click "Pan & Zoom" to apply your own scrolling and zoom
effect to each photo. See Section 7.8 for more
information on Pan & Zoom.
Use the buttons along the top of the dialog to rotate the
selected photo, add blank slides, add an audio annotation
to the selected photo, or set the selected photo as the
chapter button thumbnail.
Step 6. If you would like to include a soundtrack, click "Select
Files" and choose the audio tracks you would like to add. The
soundtrack plays over the entire presentation, whereas the audio
annotation from Step 5 plays just for one slide.
Step 7. In the "Duration" section, set the display time for the
slides. To automatically time the slide show according to the
length of your soundtrack, choose "Auto-fit to Soundtrack."
Step 8. In the "Transition" section, choose the transition or
special effect you want.
Step 9. When you're ready to produce your slide show, click
"Finish." The program will compile it and add it to your movie.
More information about slide shows is in Section 4.7.
75
Chapter 7: How Tos
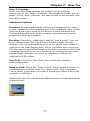
7.8
Add Pan & Zoom
Pan & Zoom is a neat effect that can be applied to photos on the
Storyboard while in the Edit module, or to slides in slide shows
created in the Create module.
In the Create module, check the "Auto-Pan & Zoom" box to have
the program automatically apply a random Pan & Zoom effect to
each slide in the slide show.
In the Create or Edit module, you can also create a custom Pan &
Zoom effect for each photo. Check "Enable Pan & Zoom" and then
click "Edit" (Edit module), or just click "Pan & Zoom" (Create
module, slide show dialog).
Step 1. Set the "Begin" focus.
In the "Begin" window, notice the green marquee around the
entire photo. Click and drag the corners, edges, and within the
marquee to resize, rotate, and reposition it any way you like.
When the slide show reaches the photo, only the area within the
marquee will be displayed to start out.
Step 2. Set the "End" focus.
In the "End" window, reposition the red marquee over the area
that you want displayed just before the photo switches to the next
slide.
76
Chapter 7: How Tos
Step 3. Preview.
When the slide show reaches the photo, the focus will be
exclusively on the "Begin" marquee. The display will then "pan &
zoom" to the "End" marquee. Use the preview to get an idea how
the effect works.
Additional Options:
Rotation. Rotate marquees by clicking and dragging the rotate
marker located on the top-center bar of the marquee. Also, notice
that there is a single point in the center of each marquee box.
Click and drag this point to any location; the marquee revolves
around the point as it rotates.
Duration. Generally, slides don't need to "pan & zoom" over the
entire display time. The Pan & Zoom duration slider has two
markers. Use these markers to shorten the pan & zoom effect in
relation to the total display time. When you leave both cursors at
0%, the pan & zoom effect lasts for the entire duration of the slide
(meaning the slide is panning, zooming, or rotating for the entire
display time). Preview your work as necessary until you're
satisfied with the effect.
Pan Only. Check the "Pan Only" box to lock the marquee
width/height ratio.
Snap to Grid. Check the "Snap to Grid" box to make it easier to
horizontally or vertically align the "Begin" and "End" marquees.
This is useful if you want to create a simple pan effect that scrolls
up/down or left/right.
Slides that have the pan & zoom effect applied to them display the
following icon:
77
Chapter 7: How Tos
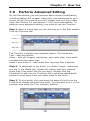
7.9
Perform Advanced Editing
On the Storyboard, you can perform basic content modification,
including adding still images, video clips, and transitions to your
movie, as well as enhance your still images and trim your video
clips. See Section 3.4 and Section 7.5 for more information. To
perform more advanced editing, you need to use the Timeline.
Step 1. Open a movie that you are working on in the Edit module.
Click the Timeline tab.
The Timeline is divided into separate tracks. The tracks are:
Text – add text effects
Video – add still images, transitions, and video clips; view audio
included with the video clips
Audio 1 and Audio 2 – add audio files, layering files if desired
Step 2. To add audio to the Audio 1 or Audio 2 track, make sure
you are in the Media tab. Choose the album with your desired
audio files, then select the file you want. Double-click the
thumbnail to add it to the Timeline. Click and drag added audio
tracks to move them from one audio track to the other.
Step 3. To trim audio, click and drag the edge of the file on the
Timeline to change the start/end point. You can also trim it in the
preview area using the Trim (scissor) buttons.
78
Chapter 7: How Tos
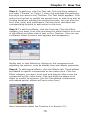
Step 4. To add text, click the Text tab. Click the Style category
you want ("Simple" or "Fancy"), then click and drag the particular
text style you want to the Timeline. The Text Editor appears. Click
within the text box to modify the sample text, or add more text by
clicking anywhere outside the existing text box. You can alter the
font, size, style, and justification. Use the Scroll checkbox and
corresponding buttons to add motion to the text.
Step 5. To add text effects, click the Text tab. Click the Effect
category you want, then click and drag the effect directly over one
of the effects on either side of text on the Timeline. (You can use
a different effect for when text appears and disappears.)
Modify text or text effects by clicking on the component and
adjusting the options, such as display time and effects properties.
Step 6. To add special effects, click the Effects tab. These effects
are added to specific components on the video track. Click the
Effect category you want, then click and drag an effect onto the
component on the video track. Click and drag the edges of an
effect to modify its duration. (On the Storyboard, components
with added special effects will have a star icon.)
More information about the Timeline is in Section 3.5.
79
Chapter 7: How Tos
7.10 Design Menus
Once you have added content to your DVD in the Create module,
you can customize the look and feel of your menu.
Modification 1: Organizing Chapter Buttons
To organize the chapter buttons, click the Customize tab. In the
Layout section, double-click the layout that you want. You can
also click and drag the chapter buttons to customize the layout.
Modification 2: Animating Chapter Buttons
Chapter buttons, rather than being static, can actually play the
videos they represent. From the Media tab, check the "Animated
Thumbnails" box. Set the time (in seconds) that the video should
play before it loops. Click "Preview Animation" to see how it looks.
Note that there may be considerable processing time depending
on your system and the length of the animated loop.
Modification 3: Updating Chapter Button Frames
Each chapter button can have its own unique frame. Click the
Customize tab. Then, select the chapter button that you want to
update and double-click the frame you want to use.
Modification 4: Adding Audio
Add music to your menu by clicking and dragging an audio file to
the "Background Music" section beneath the preview area. You
can add a different track to each menu page.
80
Chapter 7: How Tos
Modification 5: Choosing a New Background
To choose a new background, click the Themes tab. Double-click
the theme that you want. You can also click the "New
Background" button in the preview area and browse your system
for an image that you want to use.
Modification 6: Customizing Menu Text
To customize menu text, click the Text tab. Double-click any text
on the menu to edit it. You can modify the font, size, style,
alignment, and color, and add a shadow effect.
Modification 7: Creating Submenus
Submenus are useful if you have lots of different videos under a
broad subject. For example, your DVD might be titled "Vacation,"
with submenus for your various trips (each of which has several
video clips).
You can create a submenu by clicking "Create Submenu" beneath
the main preview area when you are in the Media tab.
You can also break a longer video clip into separate chapters, and
have a submenu created automatically created for the video file,
with new chapter buttons appearing for each chapter break you
set. Here's how:
Select the video clip you wish to
break up into smaller segments.
Click the Set Chapters tab.
Use the playback controls/slider
to go to the point where you
would like to insert a chapter
break.
Click "Set Chapter." A chapter
break is inserted.
You can also trim the overall
length of the video using the left
and right bracket icons.
81
Chapter 7: How Tos
7.11 Burn To Disc
Once your video clips and menus are all ready to go, you can
preview your project, choose the output options, and burn it to
disc.
Step 1. When you're all ready to go, click the Write Disc tab in
the Create module.
Step 2. Preview your movie with the virtual remote control. It
should work similarly to a standard DVD player remote control.
Use it to navigate through your various menus and play back your
movie. If you're creating a VCD, press the corresponding number
on the remote to view the chapter.
Step 3. Once you're ready to burn your movie to disc, click
"Start." You'll be prompted to set the output options:
Choose the playback format. If you are in the US or
Japan, choose NTSC. Most of Europe uses PAL.
Choose where to save the movie. From the pull-down,
select either your DVD burner drive or your hard drive.
In the Disc Label field, enter a title for your movie.
Choose the burn speed of the drive if you are burning
your project to disc, or the directory on your hard drive
to save the movie if you are saving a copy locally.
82
Chapter 7: How Tos
When you're ready, click "OK." Your movie is converted into DVD
or VCD format, and the burned to your disc or written to your
hard drive.
83
Chapter 7: How Tos
84
Reference
Licensing Agreement
PLEASE READ THE FOLLOWING TERMS ("Agreement")
CAREFULLY. USE OF THE SOFTWARE (defined below) PROVIDED
BY ARCSOFT IS PERMITTED ONLY UNDER AND IN ACCORDANCE
WITH THIS AGREEMENT. IF YOU DO NOT AGREE TO BE BOUND BY
THIS AGREEMENT, PLEASE DO NOT USE THIS SOFTWARE. IF YOU
OBTAIN THIS SOFTWARE IN FORM OF CD WITHOUT PRINT COPY
OF THIS AGREEMENT, AND YOU DO NOT HAVE OPPORTUNITY TO
READ THIS AGREEMENT, YOU MAY RECEIVE A FULL REFUND OF
THE ORIGINAL PURCHASE PRICE IF YOU (i) DO NOT USE THIS
SOFTWARE, AND (ii) RETURN IT WITH PROOF OF PAYMENT TO
THE PLACE WHERE IT WAS PURCHASED WITHIN 30 DAYS OF THE
PURCHASE DATE.
1. Grant of License. This Agreement permits you to use one copy
of the Software or the Software included in this package or device
on any single computer ("Software"). For each software licensee,
the program can be "in use" on only one computer or hardware
device at any given time. The Software is "in use" when it is either
downloaded, copied, loaded into RAM or installed into the hard
disk or other permanent memory of a computer or other hardware
device.
2. License Restrictions. YOU MAY NOT RENT, LEASE, SUBLICENSE,
SELL, ASSIGN, LOAN OR OTHERWISE TRANSFER THE SOFTWARE
OR ANY OF YOUR RIGHTS AND OBLIGATIONS UNDER THIS
AGREEMENT. You may not modify, translate, reverse assemble,
decompile, disassemble or otherwise attempt (i) to defeat, avoid,
bypass, remove, deactivate or otherwise circumvent any software
protection mechanisms in the Software, including without
limitation any such mechanism used to restrict or control the
functionality of the Software, or (ii) to derive the source code or
the underlying ideas, algorithms, structure or organization from
the Software (except to the extent that such activities may not be
prohibited under applicable law). However, you may transfer all
your right to use the Software to another person or organization,
provided that (a) the followings are also transferred with the
Software, (i) this Agreement; (ii) other software if contained in
the original package, and/or hardware that the Software is
bundled; (iii) any original or updated version of the Software; (b)
no copies including back-up and installed in your computer or
other device are at your possession after the transfer, and (c) the
recipient accepts all the terms of this Agreement. In no event shall
you transfer the Software obtained as a trial, test version, or
84
Reference
otherwise specified as not for resale. A special license permit from
ArcSoft is required if the program is going to be installed on a
network server for the sole purpose of distribution to other
computers.
3. Copyright. The Software or the Software contained in this
package or device is protected by United States copyright laws,
international treaty provisions, and all other applicable national
laws. The Software must be treated like all other copyrighted
materials (e.g. books and musical recordings). This license does
not allow the Software to be rented or leased, and the written
materials accompanying the Software (if any) may not be copied.
4. Ownership. Title, ownership rights, and all intellectual property
rights in and to the Software and any accompanying
documentation, and any copy of the foregoing, shall remain the
sole and exclusive property of ArcSoft and/or its third party
licensers. You agree to abide by the copyright law and all other
applicable laws. You acknowledge that the Software contains
valuable confidential information and trade secrets of ArcSoft
and/or its third party licensers.
5. Warranty Disclaimer. THE SOFTWARE IS MADE AVAILABLE TO
YOU ON "AS IS" BASIS. NO WARRANTIES, EITHER EXPRESS OR
IMPLIED, ARE MADE WITH RESPECT TO THIS SOFTWARE,
INCLUDING BUT NOT LIMITED TO THE IMPLIED WARRANTIES OF
MERCHANTABILITY AND FITNESS FOR A PARTICULAR PURPOSE
AND WARRANTIES FOR NON-INFRINGEMENT OF INTELLECTUAL
PROPERTY, AND ARCSOFT EXPRESSLY DISCLAIMS ALL
WARRANTIES NOT STATED HEREIN. YOU ASSUME THE ENTIRE
RISK AS TO THE QUALITY AND PERFORMANCE OF THE
SOFTWARE. SHOULD THE SOFTWARE PROVE DEFECTIVE, YOU,
AND NOT ARCSOFT OR AN AUTHORIZED RESELLER, ASSUME THE
ENTIRE COST OF NECESSARY SERVICING, REPAIR, OR
CORRECTION. SOME STATES DO NOT ALLOW THE EXCLUSION OF
IMPLIED WARRANTIES, SO THE ABOVE EXCLUSION MAY NOT
APPLY TO YOU. THIS WARRANTY GIVES YOU SPECIFIC LEGAL
RIGHTS, AND YOU MAY ALSO HAVE OTHER RIGHTS THAT VARY
FROM STATE TO STATE. YOUR SOLE REMEDY AND THE ENTIRE
LIABILITY OF ARCSOFT ARE SET FORTH ABOVE.
6. No Liability for Consequential Damages. YOU AGREE THAT IN
NO EVENT SHALL ARCSOFT OR ITS AGENTS BE LIABLE FOR ANY
LOSS OF ANTICIPATED PROFITS, LOSS OF DATA, LOSS OF USE,
BUSINESS INTERRUPTION, COST OF COVER OR ANY OTHER
INDIRECT, INCIDENTAL, SPECIAL, PUNITIVE OR CONSEQUENTIAL
DAMAGES WHATSOEVER ARISING OUT OF THE USE OF OR
INABILITY TO USE THE SOFTWARE, HOWEVER CAUSED AND ON
ANY THEORY OF LIABILITY (WHETHER FOR BREACH OF
85
Reference
CONTRACT, TORT (INCLUDING NEGLIGENCE) OR OTHERWISE),
EVEN IF ARCSOFT HAS BEEN ADVISED OF THE POSSIBILITY OF
SUCH DAMAGES. IN NO EVENT WILL ARCSOFT BE LIABLE TO YOU
FOR DAMAGES IN AN AMOUNT GREATER THAN THE FEES PAID
FOR THE USE THE FOREGOING LIMITATIONS APPLY TO THE
EXTENT PERMITTED BY APPLICABLE LAWS IN YOUR
JURISDICTION.
7. Export. You will not export or re-export the product
incorporating the Software without the appropriate United States
or foreign government licenses.
8. U.S. Government Restricted Rights. If you are a unit or agency
of the United States government, the Software and related
documentation are deemed to be "commercial computer software"
and "commercial computer software documentation," respectively,
pursuant to DFAR Section 227.7202 and FAR Section 12.212(b),
as applicable. Any use, modification, reproduction, release,
performing, displaying or disclosing of the Software and/or the
related documentation by the United States government shall be
governed solely by the terms of this Agreement and shall be
prohibited except to the extent expressly permitted by the terms
of this Agreement. Any technical data provided that is not covered
by the above provisions is deemed to be "technical
data?commercial items" pursuant to DFAR Section 227.7015(a).
Any use, modification, reproduction, release, performing,
displaying or disclosing of such technical data shall be governed
by the terms of DFAR Section 227.7015(b).
9. Termination. THIS AGREEMENT SHALL BE EFFECTIVE UPON
INSTALLATION OF THE SOFTWARE AND SHALL TERMINATE UPON
THE EARLIER OF: (i) YOUR FAILURE TO COMPLY WITH ANY TERM
OF THIS AGREEMENT; OR (ii) RETURN, DESTRUCTION OR
DELETION OF ALL COPIES OF THE SOFTWARE IN YOUR
POSSESSION. ArcSoft's rights and your obligations shall survive
the termination of this Agreement.
10. High Risk Activities. The Software is not fault-tolerant and is
not designed or intended for use in hazardous environments
requiring fail-safe performance, or any other application in which
the failure of the Software could lead directly to death, personal
injury, or severe physical or property damage (collectively, "High
Risk Activities"). ARCSOFT EXPRESSLY DISCLAIMS ANY EXPRESS
OR IMPLIED WARRANTY OF FITNESS FOR HIGH RISK ACTIVITIES.
11. Governing Law and Jurisdiction. This Agreement will be
governed by and construed under the laws of the State of
California and the United States as applied to agreements entered
into and to be performed entirely within California, without regard
to conflicts of laws provisions thereof and the parties expressly
86
Reference
exclude the application of the United Nations Convention on
Contracts for the International Sales of Goods. Suits or
enforcement actions must be brought within, and each party
irrevocably commits to the exclusive jurisdiction of the state and
federal courts located in Santa Clara County.
87
Reference
About ArcSoft
ArcSoft, Inc. is an industry leading software developer of
multimedia technologies and applications across desktop and
embedded platforms. Working closely with major OEM
manufacturers, ArcSoft offers a full line of imaging and video
solutions that enhance the features, performance, and user
experience of mobile phones, digital cameras, optical drives,
personal computers, and consumer electronics devices.
Established in 1994, ArcSoft is headquartered in Fremont,
California, with regional commercial and development facilities in
Europe and the Far East. For further details, please visit us at our
corporate web site: www.arcsoft.com.
88
INDEX
INDEX
brightness, 27, 28, 73
< New Album >, 21, 71
< New Theme >, 38
C
A
cable, 9
Capture, 59
Capture module, 8, 69, 70
CD, 14, 70
chapter button, 80
chapter thumbnails, 39
chapters, 37, 41, 81
Choose Photos, 45
Combine, 25, 29
contrast, 27, 28, 73
Convert Current Project To,
57
Copy, 58
Create, 59
Create module, 74, 75, 76,
80, 82
Create Slideshow, 43, 45,
75
Create Submenu, 43, 81
crop shapes, 33
Customize tab, 36, 39, 80
Cut, 58
Acquire, 21
Acquire Photos, 45, 75
Active Clip, 18
Add, 21
Add Audio, 46
Add Photos, 45, 75
Add to Album, 12
album, 14, 20
Animated Thumbnails, 80
animation, 44
antenna, 9
Arrange Photos, 45
Attach Audio, 46
Audio, 11, 12
Audio Annotation, 46, 75
Audio Device, 10
Audio Input, 10
Audio Settings, 10
Audio tab, 8, 70
audio track, 28, 78
editing, 28
Auto Scan, 10
Auto-Fit to Soundtrack, 47
Auto-Pan & Zoom, 76
AVI, 12, 34
D
Delete, 25, 29
Delete Scene, 22
Detach Audio, 46
Disc Label, 82
display time, 28, 32, 73
Dolby, 51, 60
double-layer
DVD, 60
DVD+R, 51
duration, 73, 77, 79
Duration, 47
DV, 34
DV camcorders, 8, 9
B
Back, 61
Background Color, 45
Background Music, 44, 80
Begin, 76
Best Fit, 27, 60
bit rate, 10, 51, 60, 70
blank slides, 75
insert, 45
Blur, 40
89
INDEX
Full Screen Preview, 19
DV Tape, 9
DVD, 16, 23, 37, 38, 41, 43,
46, 48, 57, 74, 80, 82
DVD Options, 51, 60
DVD Quality Setting, 60
DVD+VR, 51
DVD-Video, 51
DVD-VR, 51, 53
G
Get Files, 52
H
Hard Disk, 34
Help menu, 62
Hotmail, 34
hue, 27, 28, 73
E
Edit, 59
Edit ArcSoft DVD Disc, 57
Edit menu, 58
Edit Mode, 30
Move, 31
Text, 31
Edit module, 20, 71, 72, 76,
78
Edit Photo, 75
Edit Text, 27
Effect, 30
Effect category, 30, 79
Effects tab, 16, 17, 33, 79
Email, 34
Enable Pan & Zoom, 76
End, 76
End Marker, 19
Enhance Photos, 45
Entire Project, 18
Export tab, 16, 17, 34
Extract Audio From CD, 14
Extras menu, 62
I
Import Media Files, 57
Import Video Clips from
DVD, 57
Input, 11
Insert Blank Slides, 45
Intensity, 40
interlaced video, 60
introduction video, 37, 74
Introduction Video, 37, 74
K
keyboard shortcuts, 63
L
Layout section, 80
lock, 28
F
M
File menu, 57
file properties, 21
Fill & Crop, 27, 60
filters, 33
Format, 11, 14, 46, 70
Forward, 61
frame rate, 34
frames, 33
Full Screen, 61
Media tab
Create module, 36, 37,
45, 74, 75, 80, 81
Edit module, 16, 17, 20,
71, 72, 78
menu text, 81
Microsoft Outlook, 34
MOV, 34
90
INDEX
Q
Mozilla, 34
MPEG, 51, 60
MPEG-2, 69
Quick DVD, 51, 57
QuickTime, 34
N
R
Name Slide Show, 47
New Background, 38, 43, 81
New Project, 57
Next Frame, 61
NTSC, 10, 48, 60, 82
Recent Projects, 57
Record, 9, 11, 12, 14, 69,
70
Record Audio, 14, 25, 29, 46
Redo, 24, 29, 58
remote control, 43
Repeat soundtrack to fit, 47
rotate, 45, 75, 77
O
Open Project, 57
Options menu, 60
Orient Photos, 45
Outlook Express, 34
S
saturation, 27, 28, 73
Save As, 12
Save As Theme, 38, 44
Save Frame, 19
Save Project, 57
Save Project As, 57
Save To Tape, 34
Scene Detect, 22
scene detection, 13, 22
scroll, 31
Select Audio Files, 47
Send, 34
serial number, 62
Set Capture Duration, 12
Set Chapter, 41, 81
Set Chapters tab, 36, 41, 81
Set the Chapter Button
Thumbnail, 46
Set Thumbnail, 42, 46
Settings, 11, 34
Shadow, 40
single-layer DVD, 60
slide show, 75, 76
Snap to Grid, 77
Sort, 21
soundtrack, 47
Source, 11, 14
P
PAL, 10, 48, 60, 82
Pan & Zoom, 46, 75, 76
Pan Only, 77
Paste, 58
PCM, 51
Play Entire
Storyboard/Timeline, 61
Play menu, 61
Play/Pause, 61
Playback, 13, 14, 69, 70
playback speed, 73
Player, 9, 18
Preferences, 60
Preview, 52
Preview Animation, 44, 80
preview area, 18, 37, 40,
43, 45, 73
Preview Slide Show, 47
Previous Frame, 61
Print Frame, 19
progressive video, 60
91
INDEX
Trim, 19, 73, 78
TV Safe Zone, 59
TV Settings, 10
TV standard, 48, 60
TV tuner, 9
TV-Safe Area, 31
TWAIN, 45
special effects, 27, 33
editing, 28
Split, 24, 27, 29
Start Marker, 19
still images, 27, 72
editing, 27
Stop, 61
Storyboard, 23, 59, 72, 76
Storyboard/Timeline, 20
Stretch to Fit, 27, 60
Style, 30
Style category, 30, 79
submenu, 38, 41, 81
U
Undo, 24, 29, 58
V
VCD, 16, 43, 48, 57, 74, 82
VCR, 34
version number, 62
VFW, 11
VHS, 34
Video Format, 10
Video Input, 10
Video Settings, 10
Video tab, 8
video track, 27, 78
videos, 72
editing, 27
View menu, 59
volume, 27, 73
T
Temporary Folder, 60
text, 26, 30
Text Editor, 79
text effects, 26
editing, 27
Text tab
Create module, 36, 40,
81
Edit module, 16, 17, 26,
79
text track, 26, 78
Themes tab, 36, 38, 81
thumbnail, 21
Timeline, 26, 59, 78
Timeline tab, 78
Timeline View Options, 60
Transition, 75
transitions, 27, 32, 47, 72,
73
editing, 28
Transitions tab, 16, 17, 32,
72
W
WDM, 11
WIA, 45
Windows Media, 34
WMV, 34
Write Disc tab, 36, 74, 82
92
NOTES
NOTES