1
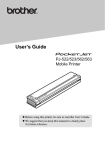
USER’S GUIDE
PJ-622/PJ-623/
PJ-662/PJ-663
Mobile Printer
Before using this printer, be sure to read
this Users Guide.
We suggest that you keep this manual in a
handy place for future reference.
Version B
US ENG
Introduction
Thank you for purchase of the Brother mobile printer PocketJet PJ-622/PJ-623/PJ-662/PJ-663.
The PJ-622/PJ-623/PJ-662/PJ-663 (hereafter referred to as “the printer”) is a mobile thermal
printer. Be sure to read User’s Guide, Safety and Legal Guide, Quick Setup Guide and P-touch®
Editor Software User’s Guide (PJ-623/663 only) before using the printer. We suggest that you
keep this document in a handy place for future reference.
Symbols Used in This Document
The following symbols are used throughout this document.
This symbol indicates information or directions that should be followed. Ignoring them may
result in damage, or failed operations.
This symbol indicates notes that provide information or directions that can help you better
understand and use the product more efficiently.
About This Document
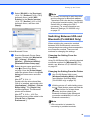
This document (PDF) is included on the CD-ROM.
Note
If using Adobe® Reader® to view this document on a computer, the cursor changes to
when
the cursor is placed on a link. Click the link to open the corresponding page. For information
about using Adobe® Reader®, see the help file included with Adobe® Reader®.
i
Table of Contents
1
Setting Up the Printer
1
General Description ...............................................................................................1
Connecting the Printer to External Power.............................................................. 1
Connecting to an AC Power Outlet (Optional)................................................. 1
Connecting to a DC Power Outlet (Optional)................................................... 2
Using the Rechargeable Ni-MH Battery (Optional)................................................2
Installing the Rechargeable Ni-MH Battery ..................................................... 2
Charging the Rechargeable Ni-MH Battery ..................................................... 3
Tips on Using the Rechargeable Ni-MH Battery.............................................. 4
Explaining Battery Terms ................................................................................5
Using the Rechargeable Li-ion Battery (Optional) ................................................. 6
Installing the Rechargeable Li-ion Battery....................................................... 6
Charging the Rechargeable Li-ion Battery ...................................................... 7
Tips on Using the Rechargeable Li-ion Battery ............................................... 8
Rechargeable Battery Overview ............................................................................ 9
Installing and Uninstalling the Driver ................................................................... 10
Install the Printer Driver ................................................................................. 10
Uninstall the Printer Driver............................................................................. 11
Connecting the Computer and Printer ................................................................. 12
USB Connection ............................................................................................ 12
Bluetooth Connection (PJ-662/663 Only) ...................................................... 13
Switching Between IrDA and Bluetooth (PJ-662/663 Only)........................... 15
2
Using the Printer
17
Operation Panel................................................................................................... 17
Power Button and Feed Button Functions..................................................... 17
Indicators ....................................................................................................... 18
Printing Solutions................................................................................................. 19
Printing ................................................................................................................ 19
Making Prints Lighter or Darker..................................................................... 20
Setting Printer Driver Options .............................................................................. 21
Paper Type .................................................................................................... 21
Density........................................................................................................... 21
2-ply Mode..................................................................................................... 21
Form Feed Mode ........................................................................................... 21
Feed Margin for No Feed option.................................................................... 21
Roll Paper Pause (Windows® Only) .............................................................. 22
Dash Line Print .............................................................................................. 22
Automatically Switch Command Mode (Windows® Only) ............................. 22
Setting Paper Size ............................................................................................... 22
For Windows® Users ..................................................................................... 22
For Mac OS® Users....................................................................................... 23
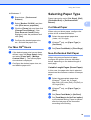
Selecting Paper Type .......................................................................................... 23
Cut Sheet Paper ............................................................................................ 23
Non-Perforated Roll Paper ............................................................................ 23
Perforated Roll Paper .................................................................................... 24
ii
Tips on Using Paper ............................................................................................24
Use Genuine Brother Thermal Paper ............................................................24
Usage and Handling Instructions...................................................................24
Clearing a Paper Jam....................................................................................25
Cutting Roll Paper .........................................................................................25
3
PJ-600 Series Utility
26
Overview..............................................................................................................26
Installing PJ-600 Series Utility .............................................................................26
For Windows® Users .....................................................................................26
For Mac OS® Users.......................................................................................26
Uninstalling PJ-600 Series Utility.........................................................................27
For Windows® Users .....................................................................................27
For Mac OS® Users.......................................................................................27
Using PJ-600 Series Utility ..................................................................................27
Before Using PJ-600 Series Utility ................................................................27
Starting PJ-600 Series Utility .........................................................................27
How to Use PJ-600 Series Utility...................................................................28
Parameters ....................................................................................................29
4
Other Function
39
JPEG Printing ......................................................................................................39
5
Maintaining the Printer
40
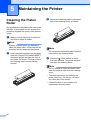
Cleaning the Platen Roller ...................................................................................40
Cleaning the Printer’s Exterior .............................................................................41
6
Reference
42
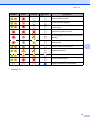
Indicators .............................................................................................................42
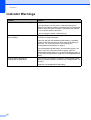
Indicator Warnings...............................................................................................44
Printing a Printer Report ......................................................................................46
7
Troubleshooting
47
Overview..............................................................................................................47
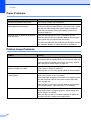
Paper Problems .............................................................................................48
Printed Image Problems ................................................................................48
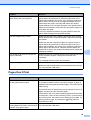
Pages Don’t Print...........................................................................................49
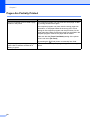
Pages Are Partially Printed............................................................................50
8
Technical Information
51
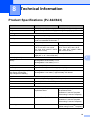
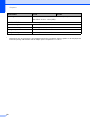
Product Specifications (PJ-622/623) ...................................................................51
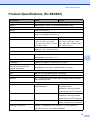
Product Specifications (PJ-662/663) ...................................................................53
A
iii
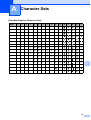
Character Sets
55
1
Setting Up the Printer
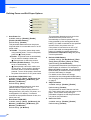
General Description
1
9
10
8
1
2
34
Connecting the Printer
to External Power
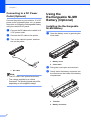
Connecting to an AC Power
Outlet (Optional)
1
1
1
Connect the printer to a nearby AC power
outlet to power the printer or charge the
rechargeable battery using AC power.
7
56
1
16
17
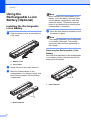
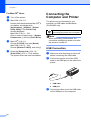
a
b
Connect the AC adapter to the printer.
c
Connect the AC power cord to a nearby
AC power outlet (100 - 240 VAC,
50 - 60 Hz).
Connect the AC power cord to the AC
adapter.
15
11
12
13
1
(Power) button
2
(Feed) button
3
POWER indicator
4
DATA indicator
5
STATUS indicator
6
14
1
2
(Bluetooth) indicator (PJ-662/663 only)
7
Release cover
8
Paper outlet slot
9
Tear bar
10 Paper input slot
11 IrDA port
12 USB port
13 AC/DC connector
14 Battery cover latch
15 Battery cover
1
AC adapter
2
AC power cord
Note
The AC adapter and AC power cord are
optional accessories. When purchasing,
purchase the adapter and power cord
appropriate for the region where the
printer will be used.
16 Battery removal ribbon
17 Battery compartment
1
Chapter 1
Connecting to a DC Power
Outlet (Optional)
Connect the printer to your vehicle’s 12 V DC
power outlet (cigarette lighter, etc.) to power
the printer or charge the rechargeable battery
using the vehicle’s DC power.
a
Connect the DC cable to the vehicle’s 12
V DC power outlet.
b
c
Connect the DC cable to the printer.
1
Using the
Rechargeable Ni-MH
Battery (Optional)
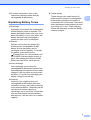
Installing the Rechargeable
Ni-MH Battery
a
Open the battery cover by pressing the
cover latch.
Turn on the vehicle’s power, and then
turn on the printer.
1
2
1
1
DC cable
Note
• The DC cable is an optional accessory.
b
c
1
Battery cover
2
Cover latch
Swing the cover open and remove it.
Gently insert the battery connector into
the terminal on the inside of the battery
compartment.
• The voltage supplied by a vehicle
fluctuates. The printing speed may differ
depending on the supplied voltage.
3
4
2
3
Terminal
4
Battery connector
1
1
Setting Up the Printer
d
e
c
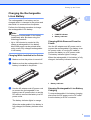
Grasp the battery removal ribbon, which
is attached to the inside of the battery
compartment. Make sure that enough
ribbon is exposed after the rechargeable
Ni-MH battery installed so that you can
pull the ribbon to remove the battery.
1
1
While holding onto the ribbon, tilt the
rechargeable Ni-MH battery and insert it
into the battery compartment. After the
rechargeable Ni-MH battery passes the
outer edges of the compartment, press it
securely into position.
Note
1
• Make sure that the side of the
rechargeable Ni-MH battery marked
“Ni-MH” faces away from the battery
compartment, otherwise the battery cover
will not close properly.
Battery removal ribbon
Note
If the battery removal ribbon is caught
behind the rechargeable Ni-MH battery,
insert a thin metal object such as a
flat-blade screwdriver between the battery
and the case at the end away from the
AC/DC connector and tilt it out of its
compartment.
• The rechargeable Ni-MH battery contains
a heat sensor that stops the flow of
electricity if the battery overheats.
f
Gently pull the battery removal ribbon
until the rechargeable Ni-MH battery
starts to tilt out of its compartment.
Attach the battery cover to the end of the
battery compartment opposite the
AC/DC connector. Close and latch the
cover. If necessary, gently push the
cover latch towards the AC/DC
connector until it latches.
Note
• Be careful that you do not pinch the
battery connector cord.
d
Remove the rechargeable Ni-MH
battery from the compartment.
e
Gently pull the rechargeable Ni-MH
battery connector and remove it from
the terminal inside the printer.
Charging the Rechargeable
Ni-MH Battery
• The voltage supplied by the rechargeable
Ni-MH battery fluctuates. The printing
speed may also fluctuate depending on
the voltage.
1
Perform the following procedure to charge
the rechargeable Ni-MH battery.
Note
Removing the Rechargeable Ni-MH
Battery
a
Open the battery cover by pressing the
cover latch.
b
Swing the cover open and remove it.
1
• Charge the rechargeable Ni-MH battery
immediately after purchase using the
following procedure.
• Up to 120 minutes is needed to fully
charge a rechargeable Ni-MH battery.
About 70 pages can be printed when
using a new, fully-charged rechargeable
Ni-MH battery.
3
Chapter 1
a
Tips on Using the
Rechargeable Ni-MH Battery
Install the rechargeable Ni-MH battery in
the printer.
b
Use the AC adapter and AC power cord
to connect the printer to an AC power
outlet, or use the DC cable to connect
the printer to a DC power outlet.
c
Make sure that the printer is turned off.
d
Press and hold the (Power) button for
a few seconds until the POWER
indicator begins to blink in green and
orange.
Charge the rechargeable Ni-MH battery
immediately after purchase. Do not use it
before it is charged.
The rechargeable Ni-MH battery loses its
charge gradually over time, even if it is not
used. Therefore, we recommend charging
the rechargeable Ni-MH battery before
using it.
While the printer is connected to an AC or
DC power outlet, a small amount of current
is used to charge the rechargeable Ni-MH
battery. This is called “trickle charging”.
Trickle charging compensates for the
battery’s tendency to gradually discharge.
For this reason, we recommend
connecting the printer to an AC or DC
power outlet even if a rechargeable Ni-MH
battery is installed.
Note
• While the POWER indicator is blinking in
green and orange, the battery is being
refreshed (see Explaining Battery Terms
on page 5).
• The rechargeable Ni-MH battery may be
charged without being refreshed,
depending on the setting in PJ-600 Series
Utility (see Refresh Ni-MH Battery
on page 32).
The rechargeable Ni-MH battery charging
can take place in 41°F-104°F (5°C-40°C)
environments.
Darker prints discharge the rechargeable
Ni-MH battery faster than lighter prints.
Adjust the print density setting in the
printer driver’s dialog box (see Setting
Printer Driver Options on page 21) or in
PJ-600 Series Utility (see Print Density
on page 34).
• If there is still a considerable amount of
charge in the rechargeable Ni-MH battery,
it may not be refreshed.
• While the rechargeable Ni-MH battery is
being refreshed, press and hold the
(Power) button to stop refreshing the
battery and begin charging it.
e
To stop rechargeable Ni-MH battery from
charging, press the (Power) button quickly
two times.
4
If you are experiencing problems with the
rechargeable Ni-MH battery, try refreshing
the battery before deciding to replace it.
After the rechargeable Ni-MH battery
has been refreshed, charging begins
automatically.
The POWER indicator blinks in green
until charging is complete.
When charging is complete, the POWER
indicator turns off.
Stopping Rechargeable Ni-MH Battery
Charging
1
If the Printer Will Not be Used For
a Long Period of Time
If the printer will not used for a long period
of time, remove the rechargeable Ni-MH
battery from the printer and store it in
a cool place away from direct sunlight.
1
A rechargeable Ni-MH battery that is not
used for a long period of time may become
over-discharged or inactive. For this
reason, we recommend refreshing and
charging the rechargeable Ni-MH battery
every 3 to 6 months.
1
Setting Up the Printer
For other precautions, refer to the
instruction manual included with the
rechargeable Ni-MH battery.
Explaining Battery Terms
Discharge
Discharge occurs when the rechargeable
Ni-MH battery's power is depleted. The
battery discharges slowly over time, even
when the battery is not in use. When the
battery has been fully-discharged, it
cannot be used until it is recharged.
Trickle charge
1
Trickle charge is the small amount of
power used to charge the rechargeable
Ni-MH battery whenever the printer is
connected to AC or DC power. The battery
slowly discharges (loses power) over time,
even when not in use. Trickle charging
offsets this discharge, so that the battery
remains charged.
Refresh
Refresh occurs when the printer fully
discharges the rechargeable Ni-MH
battery so that the battery can be
recharged to its full capacity. To refresh
the battery, press and hold the
(Power) button for a few seconds until
the POWER indicator begins to blink in
green and orange (see Refresh Ni-MH
Battery on page 32 for more options).
Over-discharge
Over-discharge occurs when the
rechargeable Ni-MH battery's power has
been depleted to the point that even when
charged, it will not retain as much power
as before. To avoid over-discharging the
battery, charge it periodically.
Inactivity
Inactivity is the condition when the
rechargeable Ni-MH battery has been
unused for too long, and it cannot retain as
much power as before. The battery can be
restored to its earlier capacity by
refreshing it one or two times. If more than
one year has passed since the battery
was last use, it will not return to its earlier
capacity.
5
1
Chapter 1
Using the
Rechargeable Li-ion
Battery (Optional)
Installing the Rechargeable
Li-ion Battery
a
Note
When installing the rechargeable Li-ion
battery, insert the battery removal ribbon
into the battery compartment, and then
install the battery. The battery removal
ribbon is not needed when removing the
rechargeable Li-ion battery.
1
1
d
Open the battery cover by pressing the
cover latch.
Move the slide switches outward to lock
the battery in place.
Note
The voltage supplied by the rechargeable
Li-ion battery fluctuates. The printing
speed may also fluctuate depending on
the voltage.
Removing the Rechargeable Li-ion
Battery
1
Move the slide switches on the rechargeable
Li-ion battery inward, and then remove the
battery from the printer.
2
b
c
1
Battery cover
2
Cover latch
Swing the cover open and remove it.
Move the slide switches on the
rechargeable Li-ion battery inward, and
then insert the battery into the battery
compartment.
1
1
3
3
6
Slide switches
Slide switches
1
Setting Up the Printer
Charging the Rechargeable
Li-ion Battery
1
1
1
2
The rechargeable Li-ion battery can be
charged while it is inserted in the printer and
also while it is removed from the printer.
Perform the following procedure to charge
the rechargeable Li-ion battery.
Note
• Charge the rechargeable Li-ion battery
immediately after purchase using the
following procedure.
1
POWER indicator
2
Battery indicator
Charging While Removed From the
Printer
• Up to 180 minutes is needed to fully
charge a rechargeable Li-ion battery.
About 300 pages can be printed when
using a new, fully-charged rechargeable
Li-ion battery.
1
Use the AC adapter and AC power cord to
connect the rechargeable Li-ion battery to an
AC power outlet, or use the DC cable to
connect the battery to a DC power outlet.
Charging While Installed in the Printer
The battery indicator lights in orange.
1
a
b
Make sure that the printer is turned off.
When the rechargeable Li-ion battery is fully
charged, the battery indicator turns off.
Make sure that the rechargeable Li-ion
battery is installed in the printer.
1
1
c
Use the AC adapter and AC power cord
to connect the rechargeable Li-ion
battery to an AC power outlet, or use the
DC cable to connect the battery to a DC
power outlet.
Battery indicator
Stopping Rechargeable Li-ion Battery
Charging
1
To stop rechargeable Li-ion battery charging,
disconnect the AC power cord or DC cable
from the battery’s AC/DC connector.
The battery indicator lights in orange.
When the rechargeable Li-ion battery is
fully charged, the battery indicator turns
off.
7
Chapter 1
Tips on Using the
Rechargeable Li-ion Battery
Charge the rechargeable Li-ion battery
immediately after purchase. Do not use it
before it is charged.
Darker prints discharge the rechargeable
Li-ion battery faster than lighter prints.
Adjust the print density setting in the
printer driver’s dialog box (see Setting
Printer Driver Options on page 21) or in
PJ-600 Series Utility (see Print Density
on page 34).
Unlike the rechargeable Ni-MH battery,
battery refreshing and trickle charging are
not necessary when using the
rechargeable Li-ion battery
The rechargeable Li-ion battery charging
can take place in 32°F-104°F (0°C-40°C)
environments. Charge the rechargeable
Li-ion battery in an environment in this
temperature range. If the surrounding
temperature is out of this range, the
rechargeable Li-ion battery will not be
charged, and the battery indicator will
remain lit.
If the printer is used when both the
rechargeable Li-ion battery is installed
and the AC adapter or DC cable is
connected, the auto power off function will
turn off the printer after the specified
amount of time (see Auto Power
Off(AC/DC/Li-ion) on page 32) passes,
after which the rechargeable Li-ion battery
will be charged. When 180 minutes (max.)
have passed since the printer was turned
on, the battery indicator turns off and
charging stops.
If the printer is used when both the
rechargeable Li-ion battery is installed
and the AC adapter or DC cable is
connected, the battery indicator may turn
off and charging may stop even if the
rechargeable Li-ion battery has not been
fully charged.
8
1
When charging the rechargeable Li-ion
battery while the DC cable is connected,
the amount of voltage required to fully
charge the rechargeable Li-ion battery
may not be supplied by the DC power
outlet. When 180 minutes (max.) have
passed since charging started, the battery
indicator turns off and charging stops even
if the rechargeable Li-ion battery has not
been fully charged.
Rechargeable Li-ion Battery
Characteristics
Understanding the properties of the
rechargeable Li-ion battery will allow you to
optimize its usage.
Using or storing the rechargeable Li-ion
battery in a location exposed to high or low
temperatures may accelerate its
deterioration. In particular, using a
rechargeable Li-ion battery with a high
charge (charged 90% or more) in a
location exposed to high temperatures will
considerably accelerate battery
deterioration.
Using the printer while the rechargeable
Li-ion battery is installed and charging
may accelerate the battery’s deterioration.
If using the printer when the rechargeable
Li-ion battery is installed, disconnect the
AC adapter or DC cable.
Try to fully discharge the rechargeable
Li-ion battery before charging it.
If the printer will not be used for a long
period of time, remove the rechargeable
Li-ion battery from the printer when its
charge is 50% or less, and then store the
battery in a cool place away from direct
sunlight.
If the rechargeable Li-ion battery will not
be used for a long period of time, we
recommend charging it every 6 months.
For other precautions, refer to the
instruction manual included with the
rechargeable Li-ion battery.
1
Setting Up the Printer
Rechargeable Battery Overview
1
The characteristics of the two types of rechargeable batteries that can be used with the printer are
described in the following table.
Ni-MH battery
Li-ion battery
Internal
External
Print while charging
Yes
Yes
Trickle charge battery
Yes
No
Battery charger location
Inside Printer
Inside Battery
Approximate charge time
120 min
180 min
Approximate number of pages/charge
70 pages
300 pages
Refresh battery feature
Yes
No
Charge without the printer
No
Yes
Battery mounting
9
1
Chapter 1
Installing and
Uninstalling the Driver
Install the Printer Driver
Select the model.
1
c
d
1
e
Click [Finish] to close the installation
screen.
Note
For Mac OS® Users
• Please do not connect the printer to your
computer via the USB cable until you have
installed the printer driver. If you
accidentally do so, cancel the “New
Hardware Wizard”, disconnect the printer,
and install the driver as described below.
• To use the Bluetooth interface
(PJ-662/663 only), install a Bluetooth
driver on the computer before installing
the printer driver and PJ-600 Series Utility.
For Windows® Users
a
b
If you click [Standard Installation], the
following items are installed depending
on the model.
For PJ-622/662:
Printer driver and PJ-600 Series Utility
For PJ-623/663:
Printer driver, PJ-600 Series Utility and
P-touch® Editor
10
a
Insert the CD-ROM into your computer’s
CD-ROM drive.
b
Open the [Mac OS X] folder and then
double-click [Brother PJ-XXX
Driver.pkg] to start the driver installer.
c
Follow the on-screen instructions to
install the software.
d
For PJ-622/623:
After the installation is completed, click
[Close].
For PJ-662/663:
When the installation is completed, click
[Restart]. The computer restarts.
e
f
Turn on the printer.
1
Insert the CD-ROM into your computer’s
CD-ROM drive.
Click [PC (Windows) software], and
then click [Standard Installation] or the
specific item you want to install.
Follow the on-screen instructions to
install the software.
1
Mac OS® X 10.4.11:
Double-click the drive where Mac OS® X
is installed, and double-click
[Applications] - [Utilities] - [Printer
Setup Utility]. The [Printer List]
window displayed.
Mac OS® X 10.5.x - 10.6:
Click in order of Apple menu - [System
Preferences...], and click [Print & Fax].
g
Click the [Add] / [+] button to add your
machine.
h
Choose [PJ-XXX] / [Brother PJ-XXX]
and then click [Add]. The printer is now
ready to print.
Setting Up the Printer
Uninstall the Printer Driver
For Windows® Users
Windows®
a
b
c
d
XP
Turn off the printer.
[start] - [Control Panel] - [Printers
and Other Hardware] - [Printers
and Faxes].
Choose [Brother PJ-XXX], and click
[File] - [Delete] or right click on the
icon and then click [Delete].
Go to [File] - [Server Properties].
The [Print Server Properties]
window displayed.
e
Click the [Drivers] tab and choose
[Brother PJ-XXX]. Then, click
[Remove].
f
Close the [Print Server Properties]
window. The printer driver has been
uninstalled.
1
1
e
f
Choose [Remove driver and driver
package] and click [OK]. Follow the
on-screen instructions.
g
Close the [Print Server Properties]
window. The printer driver has been
uninstalled.
Windows® 7
a
b
Turn off the printer.
c
Choose [Brother PJ-XXX], and click
[Remove device] or right click on the
icon, and then click [Remove
device].
If a User Account Control message
displayed, type in the password, and
then click [Yes].
d
Choose [Fax] or [Microsoft XPS
Document Writer] in the [Devices
and Printers] window, and then click
[Print server properties], which
appeared in the menu bar.
e
Click the [Drivers] tab, and then click
[Change Driver Settings]. If a User
Account Control message displayed,
type in the password, and then click
[Yes]. Choose [Brother PJ-XXX],
and then click [Remove...].
f
Choose [Remove driver and driver
package], and then click [OK].
Follow the on-screen instructions.
g
Close the [Print Server Properties]
window. The printer driver has been
uninstalled.
Windows Vista®
a
b
Turn off the printer.
Start button - [Control Panel] [Hardware and Sound] - [Printers].
c
[Brother PJ-XXX], and click [Delete
this printer] or right click on the icon,
and then click [Delete].
d
In the [Printers] window, right click
and select [Run as administrator] [Server Properties...].
If the authorization confirmation
dialog displayed, click [Continue].
If the [User Account Control] dialog
displayed, enter the password and
click [OK]. The [Print Server
Properties] window displayed.
Click the [Drivers] tab and choose
[Brother PJ-XXX]. Then, click
[Remove...].
Start button - [Devices and
Printers].
11
1
Chapter 1
For Mac OS® Users
a
b
c
d
1
Turn off the printer.
Mac OS® X 10.4.11:
Double-click the drive where Mac OS® X
is installed, and double-click
[Applications] - [Utilities] - [Printer
Setup Utility]. The [Printer List]
window displayed.
Mac OS® X 10.5.x - 10.6:
Click in order of Apple menu - [System
Preferences...], and click [Print & Fax].
Mac OS® X 10.4.11:
Choose [PJ-XXX], and click [Delete].
Mac OS® X 10.5.x - 10.6:
Choose [Brother PJ-XXX], and click [-].
Close the [Printer List] (10.4.11) /
[Print & Fax] (10.5.x - 10.6) window.
The printer driver has been uninstalled.
Connecting the
Computer and Printer
The printer can be connected to your
computer via USB cable and Bluetooth
(PJ-662/663 only).
Install the printer driver before
connecting the printer to the computer.
Note
When connecting via Bluetooth, the
connection settings are saved even after
the printer is turned off.
USB Connection
1
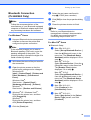
a
Make sure that the printer is turned off
before connecting the USB cable.
b
Connect the printer end of the USB
cable to the USB port on the side of the
printer.
1
2
c
12
1
1
USB cable
2
USB port
Connect the other end of the USB cable
to the USB port on the computer.
Setting Up the Printer
Bluetooth Connection
(PJ-662/663 Only)
f
Select the port name confirmed in
step b (“COM” plus a number).
g
Click [OK] to close the properties dialog
box.
h
Close the printers window to finish.
Note
Follow the recommendations of the
manufacturer of your Bluetooth-equipped
computer or Bluetooth adapter and install
any necessary hardware and software.
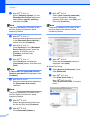
For Windows® Users
a
Use your Bluetooth device management
software to discover the printer and
configure the printer connection.
Note
If the software prompts you to enter a
Bluetooth passkey (PIN code), enter the
passkey assigned to the printer. The
printer's passkey is the last four digits of its
serial number by default.
b
Write down the name of the port used for
the connection.
c
Open the printer screen so that the
printer’s port settings can be changed.
Windows® XP:
[start] - [Control Panel] - [Printers and
Other Hardware] - [Printers and
Faxes].
Windows Vista®:
Start button - [Control Panel] [Hardware and Sound] - [Printers].
Windows® 7:
Start button - [Devices and Printers].
d
Windows® XP / Windows Vista® :
Right-click the printer icon, and then
click [Properties].
Windows® 7:
Right-click the printer icon, and then
click [Printer Properties].
e
Click the [Ports] tab.
1
1
Note
1
Refer to your Bluetooth device
management software’s documentation
for details on connection settings,
confirming the port name, etc.
For Mac OS® Users
1
Bluetooth Setup
a
Mac OS® X 10.4.11:
Select [Set up Bluetooth Device...]
from the (Bluetooth) menu in the
menu bar. The [Bluetooth Setup
Assistant] window displayed. Go to
step b.
Mac OS® X 10.5.x:
Select [Browse Device...] from the
(Bluetooth) menu in the menu bar.
The [Browse Files] window
displayed. Go to step h.
Mac OS® X 10.6:
Select [Set up Bluetooth Device...]
from the (Bluetooth) menu in the
menu bar. The [Bluetooth Setup
Assistant] window displayed. Go to
step i.
b
Mac OS® X 10.4.11:
Click [Continue] in the
[Introduction] screen.
c
Mac OS® X 10.4.11:
Select [Any device] in the [Select
Device Type] screen, and click
[Continue].
13
Chapter 1
d
Mac OS® X 10.4.11:
Select [Passkey Options...] in the
[Bluetooth Device Set Up] screen,
select [Use a specific passkey],
and then click [OK].
Note
The printer’s passkey (PIN code) is the
last four digits of the printer’s serial
number by default.
e
Mac OS® X 10.4.11:
Select the desired printer from the list
in the [Bluetooth Device Set Up]
screen and click [Continue].
f
Mac OS® X 10.4.11:
Click [Continue] in the [Bluetooth
Device Set Up] screen, enter the
passkey (PIN code) next to
[Passkey], and then click
[Continue].
g
Mac OS® X 10.4.11:
Click [Continue] to display the
[Conclusion] screen, and then click
[Quit].
Note
If [There were no supported services
found on your device.] is displayed, click
[Continue].
h
Mac OS® X 10.5.x:
Select the desired printer and select
the [Remember this device]
checkbox.
Note
The printer’s passkey (PIN code) is the
last four digits of the printer’s serial
number by default.
14
i
Mac OS® X 10.6:
Select the appropriate printer from
the list and then click [Continue].
j
Mac OS® X 10.6:
Click [Passcode Options...].
k
Mac OS® X 10.6:
Select [Use a specific passcode]
enter to the printer’s Bluetooth
passkey (PIN code), click [OK], and
then click [Continue].
Note
The printer’s passkey (PIN code) is the
last four digits of the printer’s serial
number by default.
l
Mac OS® X 10.6:
When the [Conclusion] screen is
displayed, click [Quit].
Serial Port Setup
a
Open [System Preferences...] and
click [Bluetooth].
b
Mac OS® X 10.4.11:
Click [Edit Serial Ports...].
Mac OS® X 10.5.x-10.6:
Select [Edit Serial Ports...] from the
menu.
Setting Up the Printer
c
Select [RS-232] in the [Port type]
(10.4.11) / [Protocol] (10.5.x-10.6)
pull-down menu, select [SPP
Printing] in the [Device service]
(10.4.11) / [Service] (10.5.x-10.6)
pull-down menu, and then click
[Apply].
Note
A PIN may be required to pair the printer
and the computer or Bluetooth adapter.
The default PIN is the last four characters
of the printer’s serial number. Use PJ-600
Series Utility to change the PIN if
necessary. For more information see
Bluetooth Settings (PJ-662/663 only)
on page 37.
Switching Between IrDA and
Bluetooth (PJ-662/663 Only)
Add Bluetooth Printer
a
b
Start the Bluetooth Printer Setup
program. Double-click [Macintosh
HD] - [Library] - [Printers] [Brother] - [PocketJet Utilities] [Bluetooth Printer Setup.app].
Select the port name specified in
step c of Serial Port Setup
on page 14 as the [Printer Name],
select the printer driver in the [Print
Using] pull-down menu and click
[Add].
Mac OS® X 10.4.11:
Double-click the drive where Mac
OS® X is installed, and double-click
[Applications] - [Utilities] - [Printer
Setup Utility]. The [Printer List]
window displayed. The Bluetooth
printer will be added.
Mac OS® X 10.5.x - 10.6:The
Bluetooth printer will be added in the
[Print & Fax] of [System
Preferences...].
1
1
When switching the connection method
between IrDA and Bluetooth connection,
change the printer settings that correspond to
the connection method. There are two
methods for changing the settings.
Changing the Setting From the
Computer
1
Using PJ-600 Series Utility, select the desired
connection method for [Wireless I/O]. For
details, see Wireless I/O (PJ-662/663 only)
on page 35.
Changing the Setting From the Printer
1
a
Use PJ-600 Series Utility to set
[Wireless Switching Mode] to [Enable]
(see Wireless Switching Mode
(PJ-662/663 only) on page 35).
b
With the printer off, while holding down
the (Feed) button, press and hold the
(Power) button for at least three
seconds, and then check if the
Bluetooth indicator lights (Bluetooth
connection established) or is off (no
Bluetooth connection).
Note
• IrDA connection is intended for
connecting to portable terminals.
15
Chapter 1
• To connect to a portable terminal using a
IrDA or Bluetooth connection, refer to the
documentation included with the portable
terminal.
16
2
Using the Printer
2
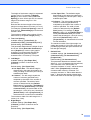
Operation Panel
2
The operation panel consists of the
(Power) button,
1
6
2
4
5
1
(Power) button
2
(Feed) button
3
POWER indicator
4
DATA indicator
5
STATUS indicator
6
2
(Feed) button and the indicators.
(Bluetooth) indicator (PJ-662/663 only)
3
Power Button and Feed Button Functions
(Power) button function
2
Operation
Turn the printer on
While the printer is turned off, press and hold the (Power) button for
about one second until the POWER indicator turns on.
Turn the printer off
Press the (Power) button quickly two times. (If the Auto-Off feature
is enabled in PJ-600 Series Utility, the printer will turn itself off
automatically after the selected period of inactivity.)
Charge the rechargeable Ni-MH
battery
While the printer is turned off, press and hold the (Power) button for
two or more seconds until the POWER indicator begins to blink in
green and orange. The POWER indicator continues to blink until
charging is complete. For details on charging the rechargeable Ni-MH
battery, see Charging the Rechargeable Ni-MH Battery on page 3.
The rechargeable Ni-MH battery may be charged without being
refreshed, depending on the setting specified for [Refresh Ni-MH
Battery] in PJ-600 Series Utility (see Refresh Ni-MH Battery
on page 32).
Skip rechargeable Ni-MH battery
refresh, begin charging
While the rechargeable Ni-MH battery is being refreshed, press and
hold the (Power) button to stop refreshing the battery and begin
charging it.
Turn the printer off while charging
the rechargeable Ni-MH battery
Press the
(Power) button quickly two times.
Note
Rechargeable Li-ion battery is not controlled by these functions.
17
Chapter 2
(Feed) button function
Eject the paper manually (manual
form feed)
Operation
Make sure that the printer is turned on and that there is paper loaded,
and then press the
(Feed) button. Paper is slowly ejected as long
as the button is held down.
If you continue to hold down the
(Feed) button after about 1/2 inch
(12.7 mm) of paper has been ejected, about one page length of paper
is ejected at high speed. The amount of paper ejected is determined
by the [Form Feed Mode] setting (see Form Feed Mode on page 21
or 34).
In order to assure that printing is complete before permitting a form
feed, manual form feeds cannot be performed for five seconds after
the printer has received any data.
Set the printer to service mode
Make sure that the printer is turned on and that there is no paper
loaded, and then press and hold the
(Feed) button for two or more
seconds until the DATA indicator turns red. Service mode is used for
printing the printer settings report (see Printing a Printer Report
on page 46).
Indicators
The indicators light and flash to indicate the printer’s status. Each indicator may light or blink in
green, red, orange, or blue. For details, see Indicators on page 42.
18
2
Using the Printer
Printing Solutions
Your printer can be used with several
versions of the Windows® and Mac OS®
operating systems.
In most situations, the printer requires driver
software to communicate with your computer.
These drivers can be installed using the setup
CD-ROM, and the latest versions can be
downloaded from the Brother Solutions Center
website (http://solutions.brother.com/). We
recommend that you visit the website to make
sure that you have the latest version of the
drivers.
2
Printing
2
For typical printing, use the following
procedure.
a
b
Open the document to be printed.
c
Turn the printer on by pressing the
2
Make sure that the printer is properly
powered. Use a charged battery, or
connect the printer to an AC or DC
power outlet.
(Power) button. The POWER
indicator lights.
1
2
1
(Power) button
2
POWER indicator
d
Connect the printer to a computer, using
either USB, IrDA, or Bluetooth
(PJ-662/663 only).
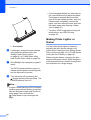
e
Load the paper. Use both hands to hold
the paper straight, and then gently insert
the paper into the printer’s input slot until
the roller pulls it into the starting
position. Use genuine Brother paper.
Note
• Make sure that the bottom edge of the
paper is parallel to the roller.
• Only one side of the paper can be printed
on. Check the paper, and load it so that
the smooth, coated side faces down (see
Tips on Using Paper on page 24).
19
Chapter 2
1
• If you load paper before you start the print
job, you will have time to adjust the paper.
If the paper is skewed after the printer
pulls it into the starting position, open the
release cover completely, remove the
paper, and then close the cover and load
the paper again (see Clearing a Paper
Jam on page 25.)
• To print a JPEG image without using the
printer driver, see JPEG Printing
on page 39.
Making Prints Lighter or
Darker
1
f
g
Print surface
If necessary, change the print settings
using either the printer driver (see
Setting Printer Driver Options
on page 21) or PJ-600 Series Utility
(see PJ-600 Series Utility on page 26).
Click [Print] in the computer program’s
menu.
The DATA indicator blinks in green to
indicate that the printer is receiving data,
and the document is printed.
h
Turn the printer off by pressing the
(Power) button quickly two times. The
POWER indicator turns off.
Note
• If paper is loaded and the DATA indicator
remains green without blinking, the printer
has not received enough data to print an
entire page. Press and hold the
(Feed) button to print and eject the
page.
20
You can make prints lighter or darker by
adjusting the print density setting in the
printer driver’s dialog box (see Setting Printer
Driver Options on page 21) or PJ-600 Series
Utility (see Print Density on page 34).
When using the battery, changing the print
density setting may result in slight changes in
printing speed and the number of pages that
can be printed on a single charge.
2
Using the Printer
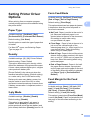
Setting Printer Driver
Options
Form Feed Mode
2
When printing from a computer program,
various printing options can be selected using
the printer driver.
Paper Type
2
This option determines how paper is ejected;
it determines how the printer responds to
form feed command.
2
No Feed - Paper is not fed at the end of a
job. Because additional paper is not
ejected when at the end of the document,
this setting is useful when using
non-perforated roll paper.
Default setting: [Cut Sheet]
Set this option to match the type of paper that
is loaded.
Fixed Page - Paper is fed at the end of a
job to suit the vertical length of the
selected page size (i.e., letter, legal, A4, or
user-defined size). Select this setting
when using cut sheet paper.
For Mac OS® users, see Selecting Paper
Type on page 23.
2
Available settings: [0] - [10], Printer Default
Default setting: Printer Default
This option determines print density, which
affects the darkness of the printed document.
A lower value produces lighter print; a higher
value produces darker print.
End of Page - Paper is fed until the printer
detects that no paper remains in the input
slot, or until 14" (355.6 mm) of paper has
been fed. Select this setting when using
perforated paper.
End of Page Retract - Paper is fed until
the paper sensor detects a pre-printed
end-of-page mark on the paper or the end
of the sheet. When this setting is selected,
set [Paper Type] to [Perforated Roll
Retract].
[Printer Default] is the value set when the
machine leaves the factory (Default setting),
or a value set by the PJ-600 series utility.
Feed Margin for No Feed
option
Darker print uses more battery power, but
may be easier to read if the font or other
document content is made up of narrow lines.
If battery conservation is important, select a
lower value.
2-ply Mode
Available settings: [No Feed], [Fixed Page],
[End of Page], [End of Page Retract]
Default setting: [Fixed Page]
Available settings: [Cut Sheet], [Roll],
[Perforated Roll], [Perforated Roll Retract]
Density
2
2
Available settings: [None], [1/2 inch (12.7
mm)], [1 inch (25.4 mm)], [1-1/2 inches
(38.1 mm)], [2 inches (50.8 mm)]
2
Available settings: [Disable], [Enable]
Default setting: [Disable]
This option is used when 2-ply paper is
loaded. When [Enable] is selected, the
printer produces prints that are darker (and
print slower) than when [Density] is set to 10.
Default setting: [1 inch (25.4 mm)]
This option is used when [Form Feed Mode]
is set to [No Feed]. Paper is ejected after the
last page of the document according to the
setting.
21
Chapter 2
Setting Paper Size
Note
This option only affects the last page of a
document. The bottom margin specified
by the computer program has no effect,
and the top margin determines the total
top and bottom margin between pages of
a multi-page document.
Roll Paper Pause (Windows®
Only)
To use a pre-defined paper size (letter, legal,
A4, etc.), select the desired paper size in the
page setup dialog.
If the desired paper size has not been
defined, use the following procedure to add
and configure the desired paper size.
For Windows® Users
2
Windows® XP
Available settings: [Disable], [Enable]
Default setting: [Disable]
a
If the desired paper size has not
been defined, open [Control Panel]
- [Printers and Other Hardware] [Printers and Faxes].
b
Make sure no items are selected,
and then right-click in the [Printers
and Faxes] window and select
[Server Properties]. The [Server
Properties] window is displayed.
c
Click the [Forms] tab, configure the
desired paper size, etc., and then
add the paper size.
This option is used to display a confirmation
message for each page when printing on roll
paper.
Dash Line Print
2
Available settings: [Disable], [Enable]
Default setting: [Disable]
This option is used to print perforation lines
between pages, useful when printing on roll
paper. When [Enable] is selected, set [Form
Feed Mode] to [Fixed Page]. Note that
perforation lines are printed on the paper;
they are not punched in the paper.
Automatically Switch
Command Mode (Windows®
Only)
Windows Vista®
a
Open [Control Panel] - [Hardware
and Sound] - [Printers].
b
Make sure no items are selected,
and then right-click in the [Printers]
window and select [Run as
administrator] - [Server
Properties...]. If the authorization
confirmation dialog displayed, click
[Continue]. If the [User Account
Control] dialog displayed, enter the
password and click [OK].
c
Click the [Forms] tab, configure the
desired paper size, etc., and then
add the paper size.
2
Available settings: [Disable], [Enable]
Default setting: [Enable]
Select whether or not the mode switching
command is automatically sent when the
commands are switched while using the
printer.
22
2
2
Using the Printer
Selecting Paper Type
Windows® 7
a
Start button - [Devices and
Printers].
b
Select [Brother PJ-XXX], and then
click [Print server properties].
c
Click the [Forms] tab, and then click
[Change Form Settings]. If the
[User Account Control] dialog
displayed, enter the password and
click [Yes].
d
a
b
Paper type can be set to [Cut Sheet], [Roll],
[Perforated Roll] or [Perforated Roll
Retract].
Cut Sheet Paper
If the desired paper size has not been
defined, open the [Page Setup] dialog
and select [Paper size] - [Manage
Custom Sizes...]. The custom paper
size window is displayed.
Configure the desired paper size, etc.,
and add the paper size.
2
2
When using cut sheet paper, configure the
printer driver as described below.
Configure the desired paper size,
etc., and add the paper size.
For Mac OS® Users
2
2
a
Select the appropriate paper size
(Letter, A4, or Legal).
b
Windows® only, set [Paper Type] to
[Cut Sheet].
c
Set [Form Feed Mode] to [Fixed Page].
Non-Perforated Roll Paper
2
When using non-perforated roll paper,
configure the printer driver as described
below, depending on the desired length of
each page.
Variable-Length Pages (Saves Paper)
2
In this case, the paper size that is selected
determines the maximum number of lines per
page.
a
Select the appropriate paper size.
Windows® :Letter, A4, or Legal
Mac OS® :US Letter (Roll), A4 (Roll), or
US Legal (Roll)
b
Windows® only, set [Paper Type] to
[Roll].
c
d
Set [Form Feed Mode] to [No Feed].
Set [Feed Margin for No Feed option]
to the desired setting. Paper is ejected
after the last page of the document
according to the setting.
23
Chapter 2
Infinite Length Pages (Such as
Geological Recordings or Polygraph
Charts)
a
b
Tips on Using Paper
2
Set the paper size to [Infinite].
Windows® only, set [Paper Type] to
[Roll].
c
d
Set [Form Feed Mode] to [No Feed].
e
Confirm that the top and bottom margins
specified within the computer program
are set to zero (0).
Usage and Handling
Instructions
2
When loading paper, make sure that the
smooth, coated side faces the back of the
printer.
When using perforated roll paper, configure
the printer driver as described below.
To avoid wrinkling and tearing, keep paper
in its box or bag until ready to use.
a
Do not fold, crease, or wrinkle paper prior
to loading it.
Select the appropriate paper size.
Windows® :Letter, A4, or Legal
Mac OS® :US Letter (Perforated Roll) or
US Letter (Perforated Roll Retract) and
so on.
b
Windows® only, set [Paper Type] to
[Perforated Roll] or [Perforated Roll
Retract].
c
Set [Form Feed Mode] to [End of Page]
or [End of Page Retract].
When [Perforated Roll] is selected,
paper is not fed between pages, and the
printable area for any paper size
(including custom sizes) is reduced.
When [Perforated Roll Retract] is
selected, paper is fed between pages,
and the printable area is the same as
when using cut sheet paper.
24
2
Thermal paper eliminates the use of toner,
ribbons or ink. Brother guarantees optimum
compatibility with your printer when you use
genuine Brother thermal paper, which has
been specifically designed and tested for
optimal compatibility with the PocketJet
printer family.
Set [Feed Margin for No Feed option]
to the desired setting. Paper is ejected
after the last page of the document
according to the setting.
Perforated Roll Paper
Use Genuine Brother Thermal
Paper
2
When storing paper, avoid high
temperatures and humidity.
Avoid prolonged exposure to intense
ultraviolet light.
Avoid contact with Diazo (blueprint),
carbon-less, or cast-coated papers.
Avoid contact with vinyl or acetate
materials, such as many notebook or
report covers.
Avoid contact with organic solvents, oils,
and ammonia.
When using a colored marker, be sure to
use one with a water-based ink. If you use
a solvent-based marker, it may darken the
paper.
2
Using the Printer
Clearing a Paper Jam
If paper becomes jammed, remove the paper
according to the following procedure.
a
Press and hold the
(Feed) button.
The drive motor will start and move
slowly for a few seconds, then move
faster as long as you hold the button
down. This can be repeated as many
times as necessary.
If this does not eject the jammed paper,
continue to the next step.
b
Gently open the release cover
completely.
c
Gently pull the paper out of the printer in
either direction.
2
d
e
Close the release cover.
Insert a new sheet of paper and print
again.
Cutting Roll Paper
2
Roll paper can be cut using the printer’s tear
bar. Pull one edge of the ejected paper up
and toward the other edge diagonally.
The tear bar is sharp. To avoid injury, do
not touch the tear bar.
25
2
3
PJ-600 Series Utility
Overview
PJ-600 Series Utility is computer program
that allows you to change the printer's default
settings.
Normally when using a computer program to
print a document, print settings are specified
in the printer driver's dialog box and then the
data is sent to the printer (for details on the
printer driver settings, see Setting Printer
Driver Options on page 21). PJ-600 Series
Utility can be used to adjust settings that are
more advanced than the printer driver’s
settings.
Most users will not need to change these
settings; generally they are relevant only
when printing simple text data from a
computer that does not have this printer’s
driver installed.
Use PJ-600 Series Utility to configure
the printer only when the printer is idle.
The printer may malfunction if you
attempt to configure it while it is
handling a job.
3
Installing PJ-600
Series Utility
For Windows® Users
a
Insert the CD-ROM into your computer's
CD-ROM drive.
b
Click [PC (Windows) software] and
then click [PJ-600 Series Utility].
3
3
Note
You can install PJ-600 Series Utility and
other software at the same time by clicking
[PC (Windows) software] - [Standard
Installation] (see Installing and
Uninstalling the Driver on page 10).
For Mac OS® Users
PJ-600 Series Utility is automatically installed
when the printer driver is installed (see
Installing and Uninstalling the Driver
on page 10).
[Macintosh HD] - [Library] - [Printers] [Brother] - [PocketJet Utilities] - [Brother
PJ-600 Series Utility.app]
26
3
3
PJ-600 Series Utility
Uninstalling PJ-600
Series Utility
For Windows® Users
a
b
3
3
Windows®
XP:
[start] - [Control Panel] - [Add or
Remove Programs]. The [Add or
Remove Programs] window displayed.
Windows Vista® / Windows® 7:
Start button - [Control Panel] [Programs] - [Programs and
Features]. The [Uninstall or change a
program] window displayed.
Windows® XP:
Choose [Brother PJ-600 Series
Utility], and click [Remove].
Windows Vista® / Windows® 7:
Choose [Brother PJ-600 Series
Utility], and click [Uninstall].
c
Click [Yes]. When the [User Account
Control] dialog box displayed, click
[Allow]. If a password is requested, type
in the password, and then click [Yes].
The uninstall operation starts.
d
Close the [Add or Remove Programs]
(Windows® XP) / [Programs and
Features] (Windows Vista® / Windows®
7) window. PJ-600 Series Utility has
been uninstalled.
For Mac OS® Users
To uninstall PJ-600 Series Utility, open the
folder specified below and throw the
application Brother PJ-600 Series Utility.app
in the trash.
[Macintosh HD] - [Library] - [Printers] [Brother] - [PocketJet Utilities] - [Brother
PJ-600 Series Utility.app].
Using PJ-600 Series
Utility
3
Before Using PJ-600 Series
Utility
3
3
Connect the printer to an AC or DC power
outlet, or make sure that the battery is
fully-charged.
Make sure that the printer driver has been
installed and is functional.
Connect the printer to a computer via USB
or Bluetooth (PJ-662/663 only).
(When using PJ-600 Series Utility on a
Macintosh, the printer can be configured
only when it is connected by USB.)
Starting PJ-600 Series Utility
3
Note
While the Windows® and Macintosh
versions of PJ-600 Series Utility provide
the same features, the appearance of the
two versions differs. The Windows®
version of PJ-600 Series Utility is shown in
the screenshots in this section.
For Windows® Users
3
To start PJ-600 Series Utility, click the start
button - [All Programs] - [Brother
PocketJet] - [Brother PJ-600 Series Utility].
3
For Mac OS® Users
3
To start PJ-600 Series Utility, double-click
[Macintosh HD] - [Library] - [Printers] [Brother] - [PocketJet Utilities] - [Brother
PJ-600 Series Utility.app].
27
Chapter 3
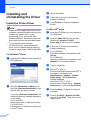
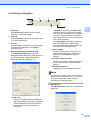
The main window (shown below) opens, and
the printer’s default settings are displayed.
Settings that are specified using the
printer driver are used during printing and
are saved until the printer is turned off.
When the printer is turned on again, the
settings specified using PJ-600 Series
Utility are used as the default settings.
Settings shown here vary by country and may
have been specially configured for some
customers.
How to Use PJ-600 Series
Utility
a
In the main window of the PJ-600 Series
Utility, select the check boxes of the
parameters with settings that can be
changed.
b
Select the desired settings from the
pull-down menus or enter the desired
values.
c
Click [Send Settings] to save the
settings in the printer.
Note
Some parameters can be adjusted using
both the printer driver's dialog box and
PJ-600 Series Utility. For the following
parameters, the setting specified in the
printer driver’s dialog box has priority.
[Paper Size]
[Density] ([Print Density])
[Form Feed Mode]
[Dash Line Print]
28
3
PJ-600 Series Utility
Parameters
3
Note
• Most users will not need to change these settings; generally they are relevant only when
printing simple text data from a computer that does not have this printer's driver installed.
• The parameters which are common to all operating systems include Auto Power On, Auto
Power Off and Pre-feed.
3
Changing Parameter Settings
1
1
2
3
2
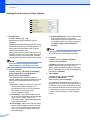
Printer
Displays a list of the compatible printers that
are connected to the computer. When using
PJ-600 Series Utility to change printer settings,
the settings of the printer selected in this list will
be changed.
Update List (Windows® only)
Refreshes the printer list. If a printer is
connected to the computer or is turned on
while PJ-600 Series Utility is running, click this
button to refresh the list and select the desired
printer.
3
3
4
Import
Loads a configuration file created with PJ-600
Series Utility that was saved previously using
the export feature.
Note
To send a previously saved configuration file to
the printer, use the import feature to load the
file, then click [Send Settings].
4
Export
Saves the current settings as a configuration
file.
Note
PJ-662/663 only:The PIN code and Bluetooth
address are not exported.
29
Chapter 3
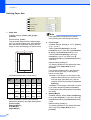
Defining Paper Size
3
1
2
3
4
5
6
7
1
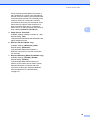
Paper Size
Available settings: [Letter], [A4], [Legal],
[Custom]
Default setting: [Letter]
This parameter determines the default paper
size. For standard paper sizes, this parameter
also determines the default margins and the
length for each printed page, as shown below.
Note
If this parameter is changed in the printer
driver’s dialog box, that setting has priority.
2
Form Length
Available settings: [Lines] (6 - 127*), [Inches]
(1.00 - 21.16**)
*When [Text Line Spacing] is set to [6
Lines/Inch]: 6-127; when set to [8 Lines/Inch
(0.125")] or [8 Lines/Inch (0.12")]: 8-127
**When [Text Line Spacing] is set to [6
Lines/Inch]: 1.00-21.16; when set to [8
Lines/Inch (0.125")] or [8 Lines/Inch (0.12")]:
1.00-15.87
Default setting: [Lines] (6)
The setting specified for this parameter takes
effect only when [Paper Size] is set to
[Custom].
Form length is determined by specifying the
number of lines per page, or the length in
inches of each page.
Lines - Form length (i.e. the height of the
page) is determined by the number of text
lines per page (specified here), and the
height of each line (specified for [Text Line
Spacing]).
Inches - Form length is specified in inches.
If you switch between [Lines] and [Inches],
PJ-600 Series Utility automatically recalculates
the setting.
3
Bottom Margin
Available settings: When [Text Line Spacing]
is set to [6 Lines/Inch]: 3-126; when set to [8
Lines/Inch (0.125")] or [8 Lines/Inch (0.12")]:
4-126
Default setting: [Lines] (3)
The setting specified for this parameter takes
effect only when [Paper Size] is set to
[Custom].
B
C
A
E
E
D
(All measurements are in inches (mm))
Paper
Size
A
B
C
D
E
Letter
11
8-1/2
0.10
0.23
0.17
(279)
(216)
(2.5)
(5.8)
(4.3)
11.69
8.27
0.10
0.59
0.13
(297)
(210)
(2.5)
(15)
(3.3)
14
8-1/2
0.10
0.23
0.17
(356)
(216)
(2.5)
(5.8)
(4.3)
A4
Legal
When [Custom] is selected, the following
parameters determine the page specifications.
[Form Length]
[Bottom Margin]
[Left Margin]
[Right Margin]
30
PJ-600 Series Utility
Use Paper Size - The default margins
determined by the paper size setting are
used, providing for 8 inches (203.2 mm) of
available print width.
The height of the bottom margin is expressed
in lines of text. For example, if [Bottom
Margin] is set to 6 lines, and if [Text Line
Spacing] is set to 6 lines per inch, the actual
height of the bottom margin is 1 inch
(25.4 mm).
Note that the minimum height of the bottom
margin must be at least 0.5 inches (12.7 mm).
For example, if [Text Line Spacing] is set to 6
lines per inch, [Bottom Margin] must be set to
at least 3 lines.
The maximum setting is the number of lines
determined by the [Form Length] setting – 1.
4
5
Text Line Spacing
Available settings: [6 Lines/Inch], [8
Lines/Inch (0.125")], [8 Lines/Inch (0.12")]
Default setting: [6 Lines/Inch]
This parameter determines the height of each
line of text. When [Extended Characters] is
set to [Graphics] in order to print graphic
characters, we recommend selecting [8
Lines/Inch (0.12")] because graphic
characters are 0.12 inches (3.1 mm) tall.
Left Margin
Available settings: [Use Paper Size],
[Columns] (number of columns can be
specified)
Default setting: [Use Paper Size]
Use Paper Size - The default margins
determined by the paper size setting are
used, providing for 8 inches (203.2 mm) of
available print width.
Columns - The left margin equals the
number of columns (specified here)
multiplied by the width of the number of
columns specified. The width of each
column is determined by the [Default
Pitch] setting. For example, if [Left Margin]
is set to 12, and [Default Pitch] is set to [12
characters/inch], the actual width of the
left margin is 1 inch (25.4 mm). Note that if
[Default Pitch] is set to [Proportional], 10
characters/inch is used for this calculation.
The maximum width of the left margin is 4.5
inches (114.3 mm).
6
Columns - The right margin equals the
number of columns (specified here)
multiplied by the width of the number of
columns specified. The width of each
column is determined by the [Default
Pitch] setting. For example, if [Right
Margin] is set to 12, and [Default Pitch] is
set to [12 characters/inch], the actual
width of the left margin is 1 inch (25.4 mm).
Note that if [Default Pitch] is set to
[Proportional], 10 characters/inch is used
for this calculation.
The maximum width of the right margin is a
setting that results in 0.2 inches (5.08 mm) of
printable page width (the space between the
left and right margins).
7
Default Pitch
Available settings: [10 characters/inch], [12
characters/inch], [15 characters/inch],
[Proportional]
Default setting: [12 characters/inch]
This parameter determines character width.
When 10, 12, or 15 characters/inch is selected,
each character is the same width. For
example, the letters “w” and “i” will be the same
width. When [Proportional] is selected,
character width varies by character. For
example, the letter “w” will be wider than the
letter “i”. Note that the setting selected here
affects the width of the left and right margins.
Right Margin
Available settings: [Use Paper Size],
[Columns] (number of columns can be
specified)
Default setting: [Use Paper Size]
31
3
Chapter 3
Defining Power and Roll Paper Options
3
1
2
3
4
5
6
1
2
3
32
Auto Power On
Available settings: [Disable], [Enable],
[Enable (No Main Button)]
Default setting: [Disable]
This parameter determines how the printer
responds when it is connected to an AC or DC
power outlet.
Disable - The printer enters sleep mode,
using minimal power. To turn on the printer,
press the (Power) button.
Enable - The printer turns on automatically.
This is useful in situations where the
(Power) button is difficult to access.
Enable (No Main Button) - The printer
turns on automatically. The
(Power) button cannot be used to turn
off the printer. This is useful in situations
where the button could be accidentally
pressed. To turn off the printer, disconnect
the printer from the AC or DC power outlet.
Auto Power Off(AC/DC/Li-ion)
Available settings: [None], [10 Minutes], [20
Minutes], [30 Minutes], [40 Minutes], [50
Minutes], [60 Minutes]
Default setting: [None]
This parameter determines how much time
passes before the printer turns off
automatically to conserve power when it is
being powered by AC power, DC power, or a
rechargeable Li-ion battery. If no data is
received for the specified amount of time, the
printer turns off.
Auto Power Off(Ni-MH)
Available settings: [None], [10 Minutes], [20
Minutes], [30 Minutes], [40 Minutes], [50
Minutes], [60 Minutes]
Default setting: [10 Minutes]
This parameter determines how much time
passes before the printer turns off
automatically to conserve power when it is
being powered by the rechargeable Ni-MH
battery. If no data is received for the specified
amount of time, the printer turns off.
If the printer is connected to an AC or DC
power outlet while a rechargeable Ni-MH
battery is installed, the setting selected for
[Auto Power Off(AC/DC/Li-ion)] has priority
over this parameter.
4
Refresh Ni-MH Battery
Available settings: [Do Not Refresh], [Each
Time], [Every 5 Times], [Every 10 Times]
Default setting: [Do Not Refresh]
This parameter determines how frequently the
Ni-MH battery is refreshed. For example, if
[Every 5 Times] is selected, the rechargeable
Ni-MH battery is refreshed one time for every
five times the battery is charged.
For details on the refresh and charge
operations for the rechargeable Ni-MH battery,
see Charging the Rechargeable Ni-MH Battery
on page 3.
5
Skip Perforation
Available settings: [Disable], [Enable]
Default setting: [Disable]
This parameter is used to leave a one-inch
(25.4 mm) margin at the top and bottom of the
paper. This is useful when printing on
perforated roll paper so that the printer does
not print on the perforation.
6
Dash Line Print
Available settings: [Disable], [Enable]
Default setting: [Disable]
PJ-600 Series Utility
This parameter is used to print dash lines
between pages, useful when printing on roll
paper. When [Enable] is selected, set [Form
Feed Mode] to [Fixed Page]. Note that dash
lines are printed on the paper; they are not
punched in the paper.
Note
If this parameter is changed in the printer
driver’s dialog box, that setting has priority.
3
33
Chapter 3
Defining Print Density and Other Options
3
1
2
3
4
5
6
7
1
Print Density
Available settings: [0] - [10]
Default setting: [6] (PJ-623/663), [4] (PJ622/662)
This parameter determines print density, which
affects the darkness of the printed document. A
lower value produces lighter print; a higher
value produces darker print.
Darker print uses more battery power, but may
be easier to read if the font or other document
content is made up of narrow lines. If battery
conservation is important, select a lower value.
End of Page Retract - Paper is fed until the
paper sensor detects a pre-printed
end-of-page mark on the paper or the end
of the sheet. When this setting is selected,
set [Paper Type] to [Perforated Roll
Retract].
Note
If this parameter is changed in the printer
driver’s dialog box, that setting has priority.
3
Pre-Feed
Available settings: [Disable], [Enable]
Default setting: [Disable]
If [Enable] is selected, the printer ejects a short
length of paper when the printer turns on.
When using perforated roll paper or roll paper
that is pre-printed, we recommend setting this
parameter to [Disable].
4
CR-LF Mode
Available settings: [LF=LF CR=CR],
[LF=CR+LF CR=CR+LF]
Default setting: [LF=LF CR=CR]
This parameter determines how the printer
responds when LF and CR commands (ASCII
characters 10 and 13) are received. By default,
the print head advances to the next line for an
LF (line feed) command, and the print head
returns to the left margin for a CR (carriage
return).
Note
If this parameter is changed in the printer
driver’s dialog box, that setting has priority.
2
34
Form Feed Mode
Available settings: [No Feed], [Fixed Page],
[End of Page], [End of Page Retract]
Default setting: [Fixed Page]
This parameter determines how paper is
ejected; it determines how the printer responds
to form feed commands received from any
source.
No Feed - Paper is not fed at the end of a
job. Because additional paper is not
ejected when at the end of the document,
this setting is useful when using
non-perforated roll paper.
Fixed Page - Paper is fed at the end of a
job to suit the vertical length of the selected
page size (i.e., letter, legal, A4, or
user-defined size). Select this setting when
using cut sheet paper.
End of Page - Paper is fed until the printer
detects that no paper remains in the input
slot, or until 14" (355.6 mm) of paper has
been fed. Select this setting when using
perforated paper.
PJ-600 Series Utility
When the device sends data to the printer, it
may send both an LF and a CR command at
the end of a line in order to move the print head
to the left margin (via the CR command) of the
next line (via the LF command). However,
some devices send only one command, and in
these cases, the printer must respond as if
both commands were sent. If your device
sends only LF or CR commands at the ends of
lines, select [LF=CR+LF CR=CR+LF].
5
Paper Sensor Threshold
Available settings: Setting a number (0 - 255)
Default setting: [128]
This parameter determines the threshold of the
paper detection sensor.
6
Wireless I/O (PJ-662/663 only)
Available settings: [Bluetooth], [IrDA]
Default setting: [Bluetooth]
This parameter determines whether a
Bluetooth connection or an IrDA connection
can be used.
7
Wireless Switching Mode (PJ-662/663 only)
Available settings: [Disable], [Enable]
Default setting: [Disable]
This parameter determines whether the
buttons on the printer can be used to switch
between Bluetooth connection and IrDA
connection modes (see Switching Between
IrDA and Bluetooth (PJ-662/663 Only)
on page 15).
3
35
Chapter 3
Defining Internal Font Settings
3
1
2
3
4
5
1
Extended Characters
Available settings: [Italic], [Graphics]
Default setting: [Graphics]
This parameter determines which characters
are used when printing ASCII characters 128
to 255. When [Italic] is selected, italic versions
of ASCII characters 32 to 127 are used. When
[Graphics] is selected, the characters shown
in the table on page 55 are used.
2
Character Set Map
Available settings: [USA], [France],
[Germany], [United Kingdom], [Denmark I],
[Sweden], [Italy], [Spain I], [Japan], [Norway],
[Denmark II], [Spain II], [Latin America],
[Korea], [Legal]
Default setting: [USA]
This parameter determines which character set
is used, allowing you to print special characters
appropriate for the language selected. See the
table on page 56 for details.
3
Default Font
Available settings: [Serif], [Sans Serif]
Default setting: [Serif]
This parameter determines which built-in font
is used. A serif font (similar to Courier) and a
Sans Serif font (similar to Letter Gothic) are
built-in.
4
Reduce Character Size
Available settings: [Disable], [Enable]
Default setting: [Disable]
This parameter determines whether text is
printed at a reduced size. The actual size of the
text depends on the setting selected for
[Default Pitch], as shown below.
36
Default Pitch
Reduced Size
10 characters/inch
16.67 characters/inch
12 characters/inch
20 characters/inch
Proportional
Half the character
width
15 characters/inch
Does not change
5
Character Attribute
Available settings: [Bold], [Double Width],
[Underline]
This parameter determines the attributes used
for printed text.
PJ-600 Series Utility
PJ-600 Series Utility Menu
1
3
3
5
4
2
6
7
1
Select All
Click [Select All] to select all of the check
boxes in PJ-600 Series Utility.
2
Clear All
Click [Clear All] to clear all of the check boxes
in PJ-600 Series Utility.
3
Current
Click [Current] to retrieve the current settings
from the printer selected in the [Printer]
pull-down menu.
4
Bluetooth Settings (PJ-662/663 only)
Click [Bluetooth Settings] to open the
Bluetooth settings dialog box, which allows you
to name the printer, change the printer’s
Bluetooth PIN code (passkey), etc.
If [Enable] is selected in the [PIN code]
pull-down menu, the PIN code specified
here must also be stored on the computer
in order to communicate with the printer
when using Bluetooth. You can change the
PIN code if necessary.
If the [Encryption] checkbox is selected,
data sent using PJ-600 Series Utility
between the computer and printer will be
encrypted when using Bluetooth.
Device Name
Allows you to specify a name (up to 30
characters) for the printer. Useful when
there are multiple Bluetooth printers
present.
Visible to Other Devices
Allows you to specify whether the printer
can be “discovered” by other Bluetooth
devices.
Bluetooth Address
Displays the current Bluetooth address.
Note
The PIN code and the device name must use
alphanumeric characters (A-Z, a-z, 0-9) only.
The device name can contain a space
character; the PIN code cannot.
5
Maintenance
Click [Maintenance] to open the maintenance
dialog box.
PIN code
Allows you to select whether a Bluetooth
PIN code (passkey) is required, change the
printer's Bluetooth PIN code, and select
whether Bluetooth communication is
encrypted.
37
3
Chapter 3
Clean Unit
See Cleaning the Platen Roller on page 40.
Print Unit Settings
Click [Print Unit Settings] to print a report
containing firmware version, image quality,
and configuration information, as shown
below.
You can also print this report using the
(Feed) button (see Printing a Printer
Report on page 46).
Auto Paper Sensor Threshold
Adjustment
Click [Auto Paper Sensor Threshold
Adjustment] and follow the on-screen
instructions to adjust the paper detection
sensor automatically.
Factory Reset
Click [Factory Reset] to reset PJ-600
Series Utility to its default settings and send
them to the printer.
6
Exit
Click [Exit] to exit PJ-600 Series Utility.
7
Send Settings
Click [Send Settings] to save the settings
displayed with a checkmark in PJ-600 Series
Utility to a configuration file on the computer
and then send the settings to the printer. These
settings become the default settings when the
printer is turned on.
38
4
Other Function
JPEG Printing
4
When using an IrDA connection or
a Bluetooth connection (PJ-662/663 only),
image data (JPEG) can be printed without
using the printer driver.
4
The image is printed with the
height-to-width proportion of the received
data.
Note
4
• The IrOBEX protocol is used for printing
via an IrDA connection.
• The Bluetooth Basic Imaging Profile (BIP)
is used for printing via a Bluetooth
connection.
• This printer will convert a color JPEG
image to a ‘Black & White’ image using a
dithering process.
• When sending a JPEG image that is
already ‘Black & White’ this dithering
process may make your printed image
fuzzy.
• To improve the image quality, try to turn
off any preprocessing of the JPEG image.
Only JPEG images can be printed.
(Limited to files with the .jpg extension.)
The maximum file size is 5 MB.
The maximum resolutions are as follows.
300 dpi: Height × Width = 3300 × 2400
dots
200 dpi: Height × Width = 2200 × 1600
dots
If these limits are exceeded, the data
received by the printer will be discarded
and not printed.
Print is at 1 pixel = 1 dot.
This printer performs binary processing
(simple binary) to print the image.
Printing begins in the upper-left corner of
the paper.
39
5
Maintaining the Printer
Cleaning the Platen
Roller
c
Remove the backing paper on the upper
half of the cleaning sheet, as shown.
5
Dirt and debris on the platen roller can cause
the roller to feed paper into the printer at an
angle and degrade the quality of the printed
image.
a
Make sure that the printer is turned on
and that no paper is loaded.
Note
If paper is loaded when you attempt to
clean the platen roller, a form feed will be
executed and the paper will be ejected.
b
Insert the cleaning sheet into the paper
input slot. The text “CLEANING SHEET”
should be upright and face the front of
the printer, as shown. The roller will pull
the cleaning sheet into the starting
position.
Note
Do not remove the backing paper from the
lower half of the cleaning sheet.
d
Press the
(Feed) button for more
than two seconds. The printer will feed
and eject the cleaning sheet.
Note
• Do not attempt to clean the platen roller
with any material other than the cleaning
sheet.
• The cleaning sheet is for cleaning the
platen roller only. Do not use it to clean
any other part of the printer.
• Contact Brother or your reseller for a
replacement cleaning sheet.
40
5
Maintaining the Printer
Cleaning the Printer’s
Exterior
5
Clean the exterior of the printer by wiping it
with a dry cloth.
Note
• Do not wet the cloth or allow water to enter
the printer.
• Do not use benzene, alcohol, paint
thinner, or cleaners that are abrasive,
alkaline, or acidic. Such cleaners may
damage the printer’s case.
5
41
6
Reference
6
Indicators
6
The indicators light and flash to indicate the printer’s status. The following symbols are used in
this section to explain the meaning of the different indicator colors and patterns.
or
or
or
Indicator is lit in the color shown
Indicator is blinking in the color shown
or
or
Indicator is blinking in alternating colors as shown
Indicator is lit or blinking in any color or pattern
Indicator is off
POWER
DATA
STATUS
(Bluetooth) 1
Description
AC adapter/DC cable/Rechargeable Li-ion
battery in use
Rechargeable Ni-MH battery in use
Rechargeable battery in use, battery charge
is full
/
/
(Once every
4 seconds)
/
(Twice every
4 seconds)
/
(Once every
second)
Rechargeable battery in use, battery charge
is half-full
Rechargeable battery in use, battery charge
is low
Rechargeable battery needs to be charged
Rechargeable Ni-MH battery is discharging
Rechargeable Ni-MH battery is charging
42
/
Printing or receiving data
/
Buffer contains unprinted data
Reference
POWER
DATA
STATUS
(Bluetooth) 1
Description
/
Receiving flash upgrade
/
Printer Receiving upgrade
/
Printer is in service mode (for printing a
printer report)
System error (call for service)
No rechargeable Ni-MH battery found when
charging
Time-out when charging the rechargeable
Ni-MH battery
/
Head or motor is cooling down
/
Data reception error
/
Buffer full or format error
/
Printer is in boot mode
6
Ready for Bluetooth communication
1
PJ-662/663 only
43
Chapter 6
Indicator Warnings
6
Problem
Solution
The POWER indicator does not light
The printer is receiving no power.
If you are using AC or DC power, make sure that the AC
adapter or DC cable is properly connected (see Connecting the
Printer to External Power on page 1) and make sure that the
AC or DC power outlet is turned on.
If you are using DC power, check the fuse.
No rechargeable Ni-MH battery found
when charging
The printer did not detect a rechargeable Ni-MH battery when
you tried to charge the battery.
Make sure that the rechargeable Ni-MH battery is installed
properly and that there are no broken wires at the battery or
connector. For more information, see Installing the
Rechargeable Ni-MH Battery on page 2.
If the rechargeable Ni-MH battery is connected properly, the
battery may have overheated while charging. Allow the
rechargeable Ni-MH battery to cool before charging it again. If
this is a reoccurring problem, replace the rechargeable Ni-MH
battery.
Time-out when charging the
rechargeable Ni-MH battery
Too much time is needed to charge the rechargeable Ni-MH
battery (normally the battery should be fully-charged within 120
minutes).
Replace the rechargeable Ni-MH battery.
44
Reference
Problem
Solution
Head or motor is cooling down
The thermal head or motor is too hot.
Head:
If the thermal head becomes even hotter, the thermal head may
produce imaging on the paper in areas not intended to be
printed. This condition is normal when printing documents with
a great deal of “black” content.
The printer will stop and resume printing after the print head
has cooled down.
To avoid or delay the onset of this condition, print using a lighter
density setting, reduce the amount of black space being printed
(for example, remove background shading and colors in graphs
and presentation documents), and make sure that the printer
has adequate ventilation and is not located in an enclosed
space.
Motor:
Do not use the printer continuously. If the printer is used
continuously, the motor will become too hot. In this case, the
printer will stop and resume printing after the motor has cooled
down.
Note
This condition may occur more often when the printer is
used at high altitude (more than 10,000 feet) due to a lower
air density available to cool the printer.
Data reception error
Data is not being received properly, most likely because of a
poor IrDA connection.
Reposition the printer and/or IrDA port on the computer and try
again.
Printer is in boot mode
The AC adapter was unplugged while the firmware was being
updated, and the printer started up in boot mode the next time
it was started.
Contact your reseller or Brother Customer Service for
assistance.
45
6
Chapter 6
Printing a Printer
Report
This feature is used to print a letter-size
printer settings report without connecting the
printer to a computer. The report contains
firmware version, image quality, and
configuration information.
a
Make sure that the printer is turned on
and that no paper is loaded.
b
Press and hold the
(Feed) button for
two or more seconds until the DATA
indicator turns red.
c
Insert a piece of genuine Brother
thermal paper into the printer’s paper
input slot. The report will print
automatically, and then the printer will
return to an idle state.
Note
This operation can also be performed
using PJ-600 Series Utility (see Print Unit
Settings on page 38).
46
6
7
Troubleshooting
Overview
7
7
If you have any problems with the printer, first
check to make sure that you have performed
the following tasks correctly.
Install the battery or connect the printer to
an AC or DC power outlet (see
Connecting the Printer to External Power
on page 1).
Install and select the proper printer driver
(see Installing and Uninstalling the Driver
on page 10).
Connect the printer to the computer (see
Connecting the Computer and Printer
on page 12).
7
If you still have problems, read the
troubleshooting tips in this chapter for help.
47
Chapter 7
Paper Problems
7
Problem
Solution
The paper is jammed in the printer
See Clearing a Paper Jam on page 25.
The paper moves through the printer, but
nothing appears on the paper
Make sure that you are using genuine Brother thermal paper
and that the paper is loaded properly, with the smooth, coated
side (the print side) facing down (see Printing on page 19).
Check the print density setting (see Setting Printer Driver
Options on page 21).
The paper does not feed even though the
motor is running
Make sure that the release cover is completely closed.
Make sure that you are using genuine Brother thermal paper.
Heavy paper may not pass through the printer.
If you still have problems, the printer may be damaged. Contact
your reseller or Brother Customer Service for assistance.
Printed Image Problems
7
Problem
Solution
The printed image is out of alignment
Make sure that you are using genuine Brother thermal paper
and that the paper is loaded properly (see Printing on page 19).
Check if whether the platen roller is dirty. If it is dirty, clean it
(see Cleaning the Platen Roller on page 40).
Print quality is poor, and the printed
image is too light or too dark
Adjust the density setting using the printer driver (see Making
Prints Lighter or Darker on page 20).
Make sure that you are using genuine Brother thermal paper.
The image is compressed and stretched
in many places
Make sure that the release cover was not left open during
printing. If it is open, close it completely.
Check if the paper is slipping in the printer. If it is slipping, make
sure that the platen roller is clean (see Cleaning the Platen
Roller on page 40).
Make sure that you are using genuine Brother thermal paper.
Before loading paper, make sure that it is not wrinkled.
The top margin is incorrect
Make sure that the correct margins have been set in PJ-600
Series Utility and the computer program. Adjust the top and
bottom margins as needed.
Make sure that you are not forcefully inserting the paper into
the paper input slot. Always insert paper gently.
48
Troubleshooting
Problem
Solution
The image for one page requires more or
fewer sheets than you expected
Make sure that the computer program, the printer, and the
printer driver have been set to match the paper size of the
paper that is loaded in the printer. If the computer program or
printer driver has been set to print legal-size paper and you
insert letter-size paper, the image will require two sheets.
Adjust settings in the computer program or the printer driver’s
dialog box as needed or reduce the size of the print image to fit
on a letter-size page.
The DATA indicator remains lit in green if data is still in the
printer after the page has completed printing.
The side margins are incorrect
Make sure that the correct margins have been set in PJ-600
Series Utility and the computer program. Adjust the left margin
as needed.
Make sure that the computer program, the printer, and the
printer driver have been set to match the paper size of the
paper that is loaded in the printer. If the computer program or
printer driver has been set to a different width of paper, the
image will not print in the proper horizontal position. Adjust the
settings as needed.
The printed page does not contain the
proper characters
7
Make sure that you have defined the proper character set (font)
in the computer program. Change the character set if
necessary.
Try changing the font used in the document.
The printed page contains random dots
Check the printer driver to make sure that it is set correctly.
Make sure that the USB cable is connected firmly and correctly.
Try using another USB cable.
Pages Don’t Print
7
Problem
Solution
The DATA indicator remains lit in green
but the printer does not print
The printer has not printed all the data received.
If no paper is loaded, insert a new sheet of paper. If paper is
loaded, remove the paper and insert it again. The printer should
start printing.
If the printer does not start printing, turn the printer off, turn it on
again, and then print the document again.
The problem may occur when sending simple ASCII text data
to the printer. If a line of text is missing a CR/LF or form feed at
the end of the line, the printer may be waiting for more data. Try
printing another page, or pressing the
(Feed) button to
manually form feed.
The computer program should be
sending data to the printer, but the DATA
indicator does light in green
Make sure that the USB cable is connected firmly and correctly.
Try using another USB cable.
49
Chapter 7
Pages Are Partially Printed
7
Problem
Solution
The DATA indicator turns off while a page
remains in the printer
The computer program may not have sent a full page of data.
Try printing the document again.
The computer program may have sent the wrong page size
information, or the paper loaded is the wrong size. Check
settings in the computer program and the print driver for the
proper page size. Make sure that the page size specified in the
computer program matches the paper that is loaded.
Make sure that the [Form Feed Mode] setting of the printer
driver is not set to [No Feed].
Try pressing the
The printer ejects a partially printed page,
and the DATA indicator remains lit or
blinking in green
50
(Feed) button to manually form feed.
Make sure that the computer program’s paper size setting is
correct.
8
Technical Information
8
Product Specifications (PJ-622/623)
Model Name
PJ-622
Dimensions
10.04 (W) x 2.17 (D) x 1.18 (H) in. / 255 (W) x 55 (D) x 30 (H) mm
Weight
Approximately 1.036 lb. / 470g (excluding battery, paper)
8
PJ-623
Printing
Method
Direct thermal printing
Print Speed
Average: 9.4 sec./page
(under our standard environment 1)
Resolution
203 x 200 dpi
300 x 300 dpi
Printable Area
Configure with printer driver (min.
3.73" x 0.9"/ 94.7 mm x 22.8
mm - max. 8.16" x 99.67" / 207.2
mm x 2531.6 mm)
Configure with printer driver (min.
3.73" x 0.9"/ 94.7 mm x 22.8
mm - max. 8.21" x 99.67 / 208.5
mm x 2531.6 mm")
Paper Size
A4 (8.27" x 11.69" / 210 x 297 mm), Letter (8.5" x 11" / 216 x 279 mm),
Legal (8.5" x 14" / 216 x 356 mm)
Power (optional)
Battery
Rechargeable Ni-MH battery:14.4 V
Rechargeable Li-ion battery:11.1 V
Adapter
AC adapter (15 V)
Car adapter
Cigarette car adapter or Wired type (12 V (DC))
Battery Yield (printing duty 5%
with density 5 and using
fully-charged new battery)
Rechargeable Ni-MH battery: Approximately 70 sheets
Rechargeable Li-ion battery: Approximately 300 sheets
Interface
USB
USB Ver.2.0 (Full Speed) (mini-B, Peripheral)
IrDA
Ver.1.2 (IrCOMM and IrOBEX)
Bluetooth
No
Software
Printer font size
10 cpi, 12 cpi, 15 cpi and
proportional sizes
10 cpi, 12 cpi, 15 cpi and
proportional sizes
(based on P-touch® Template
when using P-touch® Template)
Printer font face
Serif and Sans Serif
Serif and Sans Serif
(based on P-touch® Template
when using P-touch® Template)
Barcode generation
No
Yes
(When using P-touch® Template)
51
8
Chapter 8
Model Name
PJ-622
PJ-623
Operating environment
Windows® XP/Windows Vista®/Windows® 7 (USB)
Mac OS® X 10.4.11 - 10.6 (USB)
ENVIRONMENTAL
Operation temperature
32 - 104 °F/0 - 40 °C
Operation humidity
30 - 80 % (No condensation)
Storage temperature
5 - 122 °F/-15 - 50 °C
Storage humidity
30 - 85 % (No condensation)
1
52
These figures vary by environment. “Our standard environment” is as follows: JEITA J1 pattern on A4 size paper and
continuous printing. USB interface and AC adapter power. Temperature: 77 °F/25 °C
Technical Information
Product Specifications (PJ-662/663)
Model Name
PJ-662
Dimensions
10.04 (W) x 2.17 (D) x 1.18 (H) in. / 255 (W) x 55 (D) x 30 (H) mm
Weight
Approximately 1.043 lb. / 473g (excluding battery, paper)
8
PJ-663
Printing
Method
Direct thermal printing
Print Speed
Average: 9.4 sec./page
(under our standard environment 1)
Resolution
203 x 200 dpi
300 x 300 dpi
Printable Area
Configure with printer driver (min.
3.73" x 0.9"/ 94.7 mm x 22.8
mm - max. 8.16" x 99.67" / 207.2
mm x 2531.6 mm)
Configure with printer driver (min.
3.73" x 0.9"/ 94.7 mm x 22.8
mm - max. 8.21" x 99.67 / 208.5
mm x 2531.6 mm")
Paper Size
A4 (8.27" x 11.69" / 210 x 297 mm), Letter (8.5" x 11" / 216 x 279 mm),
Legal (8.5" x 14" / 216 x 356 mm)
Power (optional)
Battery
Rechargeable Ni-MH battery:14.4 V
8
Rechargeable Li-ion battery:11.1 V
Adapter
AC adapter (15 V)
Car adapter
Cigarette car adapter or Wired type (12 V (DC))
Battery Yield (printing duty 5%
with density 5 and using fully
charged new battery)
Rechargeable Ni-MH battery: Approximately 70 sheets
Rechargeable Li-ion battery: Approximately 300 sheets
Interface
USB
USB Ver.2.0 (Full Speed) (mini-B, Peripheral)
IrDA
Ver.1.2 (IrCOMM and IrOBEX)
Bluetooth
Ver. 2.0 +EDR Serial Port Profile, Basic Imaging Profile and Object
Push Profile supported
Software
Printer font size
10 cpi, 12 cpi, 15 cpi and
proportional sizes
10 cpi, 12 cpi, 15 cpi and
proportional sizes
(based on P-touch® Template
when using P-touch® Template)
Printer font face
Serif and Sans Serif
Serif and Sans Serif
(based on P-touch® Template
when using P-touch® Template)
Barcode generation
No
Yes
(When using P-touch® Template)
Operating environment
Windows® XP/Windows Vista®/Windows® 7 (USB, Bluetooth)
Mac OS® X 10.4.11 - 10.6 (USB, Bluetooth)
53
Chapter 8
Model Name
PJ-662
PJ-663
ENVIRONMENTAL
Operation temperature
32 - 104 °F/0 - 40 °C
Operation humidity
30 - 80 % (No condensation)
Storage temperature
5 - 122 °F/-15 - 50 °C
Storage humidity
30 - 85 % (No condensation)
1
54
These figures vary by environment. “Our standard environment” is as follows: JEITA J1 pattern on A4 size paper and
continuous printing. USB interface and AC adapter power. Temperature: 77 °F/25 °C
A
Character Sets
A
Extended Graphics Character Table
MSB>
0
1
2
LSB 0
3
4
5
6
7
8
9
A
0
@
P
`
p
Ç
É
á
1
!
1
A
Q
a
q
ü
æ
í
2
“
2
B
R
b
r
é
Æ
ó
3
#
3
C
S
c
s
â
ô
ú
4
$
4
D
T
d
t
ä
ö
ñ
5
%
5
E
U
e
u
à
ò
Ñ
6
&
6
F
V
f
v
å
û
a
7
‘
7
G
W
g
w
ç
ù
o
8
(
8
H
X
h
x
ê
ÿ
¿
9
)
9
I
Y
i
y
ë
Ö
A
*
:
J
Z
j
z
è
Ü
B
+
;
K
[
k
{
ï
¢
½
C
,
<
L
\
l
¦
î
£
¼
D
-
=
M
]
m
}
ì
¥
¡
E
.
>
N
^
n
~
Ä
F
/
?
O
_
o
Å
B
C
D
E
F
ß
±
µ
÷
º
•
A
ø
²
«
ƒ
»
55
International Character Set Table
23
24
40
5B
5C
5D
5E
USA
#
$
@
[
\
]
France
#
$
à
°
Ç
Germany
#
$
§
Ä
United Kingdom
£
$
@
Denmark I
#
$
Sweden
#
Italy
7B
7C
7D
7E
^
{
¦
}
~
§
^
é
ù
è
Ø
Ö
Ü
^
ä
ö
ü
ß
[
\
]
^
{
¦
}
~
@
Æ
Ø
Å
^
æ
ø
å
~
¤
É
Ä
Ö
Å
Ü
é
ä
ö
å
ü
#
$
@
°
\
é
^
ù
à
ò
è
ì
Spain I
Pts
$
@
¡
Ñ
¿
^
Ø
ñ
}
~
Japan
#
$
@
[
¥
]
^
{
¦
}
~
Norway
#
¤
É
Æ
Ø
Å
Ü
é
æ
ø
å
ü
Denmark II
#
$
É
Æ
Ø
Å
Ü
é
æ
ø
å
ü
Spain II
#
$
á
¡
Ñ
¿
é
í
ñ
ó
ú
Latin America
#
$
á
¡
Ñ
¿
é
í
ñ
ó
ú
Korea
#
$
@
[
]
^
{
¦
}
~
Legal
#
$
§
°
¶
©
®
†
™
56
60
ü