1
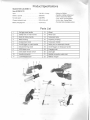
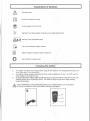
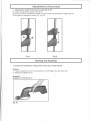
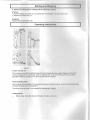
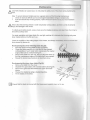
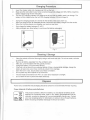
Eurmm
The Clean Air Choice
OPERATOR'S MANUAL
Cordless Shear/Shrubber
This product is covered by U.S. patents and other international patents
Copyright. All Rights Reserved.
i
Model #M1E-LD-200M/7.2
ltem#PSS10172
242767
This product has been engineered and manufactured to our high standard for dependability,
ease of operation, and operator safety. Properly cared for, it will give you years of rugged,
trouble-free performance.
A WARNING: To reduce the risk of injury, the user must read and understand the operator's manual
. before using this product.
Thank you for your purchase.
SAVE THIS MANUAL FOR FUTURE REFERENCE
Product Specifications
Model # M1E-LD-200M/7.2
ltem#PSS10172
Input
7.2V DC, 1.0 Amp
Battery capacity
1350mAH
No load speed
1200 RPM
Charger (adaptor) input
120V, 60 Hz AC
Battery charging time
3 to 5 hours
-Lithium-ion Battery
-5 position rotating cutting head
-3.75 in. Grass Shear Blade
-7.5 in. Shrub Trimming Blade
- 5/16 in. Max. Cutting Width
-Tool-less blade changing system
Parts List
1
Soft grip main handle
12
Wheel
2
Safety lock on main handle
13
Wheel cart
3
Knob for rotary handle
14
Telescopic tube
4
Main housing
15
Adjusting coupling
5
Grass shear blade
16
Telescopic handle
6
On/off trigger on main handle
17
Safety lock on telescopic handle
7
Shrub trimming blade
18
On/off trigger on telescopic handle
8
SDS blade cover
19
Charging inlet
9
SDS blade release switch
20
LED Light
10
Handle connector
21
Handle connection cable inlet
11
Lock/Release lever
22
Battery charger
3
2
1
Explanation of Symbols
Warning notice
Read the instruction manual.
Do not expose the tool to rain.
Warning! The cutting blades continue to move after switching off.
Warning! Keep bystanders away.
Only use the battery charger indoors.
Battery charger contains a safety transformer
Eye protection must be used
Charging the battery
The battery should be fully charged before using for the first time. The charging time is about 3-5
hours.(See page 13 for instructions.)
The battery charger supplied matches the lithium battery installed in the tool. DO NOT use any
other charger to recharge the tool.
To protect the lithium battery against deep discharging, when the battery is flat, the tool will automatically switch off via a protective circuit. The blade will stop moving and a slight whistling
sound will be heard.
If the On/Off switch is used continually at this point, the lithium battery can be damaged.
Do not try to continue to use the tool before recharging the battery.
19
IMPORTANT SAFETY WARNINGS
TO REDUCE RISK OF INJURY: Before use, be sure everyone using this tool reads and understands all safety instructions and other information contained in this manual.
WARNING: Personal Injury and Damage! Keep your hands and feet away from the cutting tool,
especially when the products are switched on! Never adjust the cutting head when the product is in
the "on" position. Do not touch moving blades.
Save these instructions and review frequently prior to use and when instructing others.
WARNING: When using electric gardening appliances, basic safety precautions should always be
to reduce risk of fire, electric shock, and personal injury.
k followed
READ ALL INSTRUCTIONS
GENERAL SAFETY
AVOID DANGEROUS ENVIRONMENTS - Do not use this product in the rain or in damp or wet
i conditions. Do not operate this product in gaseous or explosive atmospheres. Motors in these tools
normally spark. It is possible the spark might ignite fumes.
DRESS PROPERLY - Don't wear loose clothing or jewelry while using this product. Wear
protective hair covering to contain long hair. They can be caught in moving parts. Use of rubber
gloves and protective footwear is recommended when working outdoors.
USE SAFETY GLASSES - Wear safety glasses with side shields or goggles that are marked to
comply with ANSI Z87.1 standard when operating this product. Use face or dust mask if environment is dusty.
DANGER: Risk of cut. Keep hands away from blades.
USE RIGHT APPLIANCE - Do not use appliance for any job except that for which it is intended.
WARNING! Switch off before adjusting or cleaning.
CAUTION! The blades continue to move for a few seconds after the tool is switched off.
AVOID UNINTENTIONAL STARTING - Do not carry this product with finger on switch.
IMPORTANT! Any use which is not expressly permitted in the manual may result in da ~ = -.-. : -•=
tool and place the user in serious danger. Please carefully read the restrictions in the operating
instructions.
IMPORTANT! Before each use check for damaged/worn parts. Check the blade for proper
alignment.
STORE INDOORS -When not in use, this product should be stored indoors in a dry location out
of reach of children.
STAY ALERT-Watch what you are doing. Use common sense. Do not operate ttvs product i
you are tired or under the influence of medications, drugs or alcohol.
DANGER: If blade jams on any electrical cord or line. DO NOT TOUCH THE BLADE' iTCAN
BECOME ELECTRICALLY LIVE AND VERY DANGEROUS.
possible. Disconnect the damaged electrical cord or line from the |
:
.
safely. If in doubt, call an electrician or the electrical contractor for;
Danger can result in serious personal injury and possible death.
LIGHTING - Only operate this tool in daylight or good artificial fight
DON'T OVERREACH - Keep proper footing and balance at aS fries
Make sure power source is removed when clearing jammed material torn Made
=>
:• • :r -:-~ance and to reduce
MAINTAIN TOOL WITH CARE - Keep blades s-3" a — : e = the risk of injury. Keep handle dry, clean and free from o =-:
CALIFORNIA PROPOSITION 65
DARNING: Use of this tool may cause exposure t: ;-e~ :a ^ ' =• : a*e • ~:.'.n to the state of Califorr a ::
cause cancer, birth defects or other reproductive harm. Oust ar : :e:-s cheated during cutting, drilling.
grinding or sanding on some materials may contain chemicals I -:.-.- :o the State of California to ------cancer or birth defects or other reproductive harm. To reduce e iwsure to these chemicals, always -se
approved safety equipment, work in a well-ventilated a-ea ^-~- .ea- ~usk mask that filters out
microscopic particles.
Assembly
PACKING LIST
- Shear with Grass Shear Blade Assembled- Shrub Trimming Blade - Blade Protection Guard
- Telescopic Handle - Wheels and Wheel Shaft - Battery Charger - Instruction Manual
UNPACKING
This product requires some assembly.
Carefully remove the product and any accessories from the box. Make sure that all items listed in the
packing list are included.
Inspect the product carefully to make sure no breakage or damage occurred during shipping.
Do not discard the packing material until you have carefully inspected and satisfactorily operated
the product.
WARNING: If any parts are damaged or missing do not operate this product until the parts are
^replaced. Failure to heed this warning could result in serious personal injury.
Call 1-800-313-5111 for assistance.
Assembling / Removing the Wheels (Fig.3-5)
The wheels are only used for ground level grass trimming and lawn edging purposes.
Fig.3
Fig.4
Fig.5
Assembling the wheels:
Insert the wheel shaft through the wheel cart (13), assemble the other wheel into place as shown in
figure 3-5.
There are 3 holes on the wheel cart for different height choice. Choose the right hole according to
the desired cutting height.
Removing the wheels:
Remove the wheels in the exact reverse order in which they were assembled.
Assembling/Removing the telescopic handle (Grass shear only) (Fig.6-7)
The telescopic handle is designed only for use with the grass shear blade at ground level.
Do not use the telescopic handle with the shrub shear or above ground level.
Fig.6
Fig.7
Fig.8
Assembling the telescopic handle:
1) Move the lock/release lever (11) to its unlock position (Fig. 7).
2) Align the grooves on the tool with the fixture on the wheel cart, and at the same time align the
Lock/release lever (11) with the slot on rear end of tool (Fig.6)
3) Move the lock/release lever (11) to it's lock position. There will be a "click" sound when the position is locked. (Fig.7 ) .
4) Plug the handle connector (10) into handle connection cable inlet (the upper hole)(21) (Fig.8)
Assembly
Removing the telescopic handle (Fig 9-10):
1) Make sure the handle connector (10) is disconnected from the handle connection cable inlet (21)
(Fig.9)
2) Move the lock/release lever (11) to the unlock position (fig 7). To release the tool from the wheel
cart, pull the tool in the direction shown in Fig.10
Fig.10
Fig.9
Adjustments on this product
1. Adjusting the cutting head. (Fig.11-12)
The cutting head can be rotated in 5 angles from 90°. 45 ° ,0 ° to -45 ° ,-90° to get the desirec
position.(Fig.11):
1) Push the knob for rotary handle (3) backv/ards.
2) Rotate the cutting head into the desired position .(Fig.12 )
3) Release the knob and make sure it is securely fixed in position.
The tool can not be switched on during the adjustment of the cutting head.
Fig. 12
Fig. 11
2. Adjusting for edging mode (Grass shear only) (Fig.13)
1) Rotate the cutting head in 90° or -90° direction to postfon tne
tool in the vertical edging mode. (Fig.13)
2) Plug the handle connector (10) into handle connection cable
inlet (the upper hole) (21)
Fig. 13
Adjustments on this product
3.
1)
2)
3)
Adjusting the length of telescopic handle (Fig.14-15)
Loosen the adjusting coupling (15) (Fig.14)
Pull the tube out to increase the height, or push the tube in to decrease the height. (Fig.15)
Re-tighten the adjusting coupling (15). (Fig.14)
Fig.14
Fig.15
Starting and Stopping
1. Starting and Stopping for cutting without telescopic handle (Fig.16)
Starting:
1) Push the safety lock button (2) and press the On/Off trigger (6) at the same time.
2) Release the safety lock (2).
Stopping:
Release the On/Off switch (6).
Fig. 16
Starting and Stopping
2. Starting and Stopping for cutting with the telescopic handle:
Starting:
1) Push the safety lock button (17) and press the On/Off trigger (18) at the same time.
2) Release the safety lock (17).
Stopping:
Release the On Off switch (18).
Operating Instructions
Fig 17
Proper use (Fig.17):
This product is intended for light trimming of shrubs, hedges and lawn edges. Please note that f- s
tool is not designed for commercial, trade or industrial use. Only use this product for the purpose
specified in these instructions. Any other use will void the warranty.
Shrub trimming blade
Use the shrub tr-r^g oiade for trimming and shaping individual bushes, shrubs, and URiiiMig plants
in private domest z 3"c "obby gardens.
The shrub trimming blade is not intended for cutting grass edging.
Cutting shrubs
.
Before using, check the shrubs for foreign objects e.g. wire. etc.
Operating Instructions
•
•
•
When using the tool hold it away from yourself and stand in a secure position with your weight
evenly balanced on both feet.
When cutting, move steadily along the line of cut, so that stems are fed directly into the cutter
blades.
After use, install the blade guard.
Recommended cutting/trimming times:
-Cut hedges with deciduous leaves in June and October.
-Cut evergreen hedges in April and August.
-Cut conifer and other fast growing shrubs approx. every six weeks from May through October.
Grass shear blade
Use the grass shear blade for cutting the edges of lawns and small areas of grass in private gardens
and hobby areas.
The grass shear blade is not intended for cutting hedges or chopping material up for composting.
Edging
When using the tool hold it away from yourself and stand in a secure position with your weight evenly
balanced on both feet.
Guide the tool along the edge of the lawn. For larger lawns, it is advisable to use the telescopic
handle. Attach wheels and telescopic handle to the tool with grass shear blade for edging mode,
Guide the tool along the edge of the lawn.
The telescopic handle is designed only for use with the grass shear blade at ground level. Do not use
the telescopic handle with the shrub trimming blade or above ground level.
After use install the blade guard.
Tips:
•
•
•
Do not force the unit through dense growth, and if the blades slow down, reduce your speed.
Avoid trimming too close to dirt, sand or gravel, as this could dull the blades and reduce the
cutting efficiency.
Do not allow the blade to contact paved surfaces, stones or garden walls, as this will rapidly
wear down the blade.
Changing Blades
!\ Wear gloves when changing blades.
|\ Blades can cause injury. Do not press the safety lock of the shear during blade changes.
Removing the blades (Fig. 18-21)
•
Slide your thumb under the SDS blade changing release switch (9) and then slide the cover (8)
away from the housing as shown in Fig. 18-19
Fig. 18
Fig. 19
Lift the cover (8) away from the housing (Fig.20).
Remove the blade. (Fig. 21)
Fig. 20
Fig.21
Changing Blades
Installing the blades (Fig. 22-24)
There are two holes on the blade and two driving pins on the body. First align the end of the blade
inside the plastic housing. Align the rear hole in the blade onto the rear drive pin .
Move the raised rib (23) up and down (Fig.22) for shrub trimming blade or move the raised rib (23) left
and right for grass shear blade (Fig.23) to allow the front drive pin to enter the front hole in the
blade.
When reinstalling the SDS blade cover, ensure all 4 prongs are inside the housing before sliding the
cover into place.
Secure the blade cover by sliding it toward the blade (Fig.24).
Fig.22
Fig.23
Fig.24
11
Maintenance
CAUTION: Blades can cause injury. Do not press the safety lock of the shear during maintenance
^work.
Note: To ensure long and reliable service, regularly carry out the following maintenance:
•
Check for obvious defects such as a damaged/ loose blade, fixings or components.
•
If the tool should stop working properly, repair should be earned out by your local hardware
store.
A Never clean the trimming shears in water (especially running water
" injury and damage to the shears.
To obtain good cutting results, always make sure the blades are
time with a soft dry cloth.
as :~T'5 s a risk of personal
a-: : ea" : n em from time to
For easier operation and longer blade life, use light machine oil to
shear blades before and after each use.
Check the condition of the cutting edges of the blades, and always immediately remove notches and
burrs caused by stones etc.
Re-sharpening the shrub trimming blade (Fig.25):
•
Allow the shrub trimming blade to stop completely.
•
Clamp the blade assembly in a vice and file the exposed
cutting surface of each blade tooth, making sure the original
angle of the tooth is maintained (Fig.24).
•
Remove the blade from the vice, start and stop the shear so
that the unsharpened edges of the blade teeth are exposed.
•
Repeat the sharpening procedure as described above.
Re-sharpening the grass shear blade (Fig.26):
•
Remove the blade from the shear.
•
Separate the upper blade (24) and lower blade (25) (Fig.26).
•
Remove any grass and dirt between the upper and lower
blades.
•
Sharpen the blades by using a sharpening stone.
•
Fit the blades on the shear.
Fig. 26
Ensure that the blade is covered with the blade guard supplied when not in use.
Charging Procedure
1.
2.
3.
Insert the charger cable into charging inlet (19) on the tool.
Make sure the wall outlet in your home is normal household voltage (AC120V, 60Hz). Insert the
battery charger plug into the wall outlet.
The red LED charging indicator (20) lights up to tell you that the battery pack is on charge. The
battery is fully charged when the red LED charging indicator (20) is no longer lit.
During the charging process, it is normal for the handle of the tool to warm up.
When not using the tool for extended periods, disconnect the battery charger from the socket.
When the trimming shears are charging, you must not use them.
Only charge the battery between 0°- 45° C
After prolonged use, allow battery to cool down first before recharging.
Fig. 1
Fig. 2
Cleaning / Storage
Clean the exterior of the tool thoroughly using a soft brush and cloth. Do not use water, solvents
or polishes.
Remove all debris, especially from the ventilation slots.
After use, cover the blades with the guards provided.
Charge the battery 3-5 hours before storing.
If the tool is to be stored for an extended period of time or during winter storage, charge the
battery at least once every three months to protect it from damage.
Store the tool in a dry, secure place out of reach of children.
Do not place any other objects on top of the tool.
This tool must not be stored over 45° C or under direct exposure to sunlight.
Do not store the tool in places with static electricity.
Disposal
Power tools, accessories and packaging should be sorted for environmentally-friendly recycling.
Proper disposal of battery packs/batteries:
Li-Ion
This product contains a lithium-ion battery. Do not dispose of battery packs/
batteries into household waste, water or fire. Battery packs/batteries must be
collected, recycled or disposed of in an environmentally-friendly way. Contact
your local recycling center for information on where to drop off spent batteries.
Before recycling completely discharge the lithium-ion battery.
WARRANTY
LIMITED WARRANTY FOR GRASS & SHRUB SHEAR
This product is manufactured for The Great States Corporation/American Lawn Mower Company. The Great States
Corporation/American Lawn Mower Company. Shelbyville, Indiana, has been making lawn mowers for over 100 years and
it warrants to the original owner that each new product and service part is free from defects in material and workmanship
and agrees to repair or replace under this warranty any defective product or part from the original date of purchase for one
(1) year except for the conditions and circumstances listed below. Proof of purchase (original dated sales receipt) must
accompany all warranty claims.
THIS WARRANTY IS NOT TRANSFERABLE AND DOES NOT COVER:
Products sold damaged or incomplete, sold "as is", sold
reconditioned, or used as rental equipment.
Expendable items that become worn during normal use.
Cosmetic defects that do not interfere with tool functionaly.
Delivery, installation, or normal adjustments explained
in the operator's manual.
Damage or liability caused by shipping, improper handling, improper installation, incorrect voltage or improper
wiring, improper maintenance, improper modification, or
the use of accessories and/or attachments not specifically recommended.
Repairs necessary because of operator abuse or negligence, or the failure to install, operate, maintain, or
store the product according to the instructions in the
operator's manual.
Damage caused by cold, heat rain, excessive
humidity, corrosive environments and materials, or
other contaminants.
Freight costs from customer to vendor
Repair and transportation costs of products or parts
determined not to be defective.
ANY INCIDENTAL, INDIRECT, OR CONSEQUENTIAL
LOSS. DAMAGE OR EXPENSE THAT MAY RESULT
FROM ANY DEFECT. FAILURE. OR MALFUNCTION
OF THE PRODUCT Some states do not allow the
exclusion or limitation on how long an implied warranty
lasts, so the above limitations may not apply to you.
ANY NON-RESIDENTIAL USE OR COMMERCIAL
USE VOIDS ALL WARRANTIES.
CALL US FIRST!!
Call us first with questions about operating or maintaining this
product at 1.800.313.5111 between 7:30 a.m. - 4:30 p.m.
Eastern Standard Time, or send emails to [email protected].
The Great States Corporation
American Lawn Mower Company
830 Webster Street
Shelbyville, IN 46176
Phone 1-800-313-5111
www reelm com/earthwise
In a continued commitment to improve quality, the Manufacturer reserves the right to
make component changes or design changes when necessary.