1
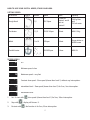
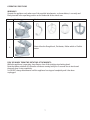
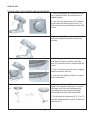
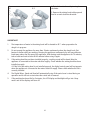
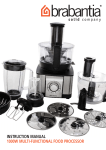
INSTRUCTION MANUAL
DIGITAL MIXER, STAND AND BOWL
DIGITAL MIXER, STAND AND BOWL
INSTRUCTION MANUAL
MODEL NO.: BBEK1091
1
IMPORTANT SAFEGUARDS
1. Please read through the following safety precautions carefully before switching on the Digital
Mixer, Stand and Bowl.
2.
Keep this instruction manual in a safe place for future reference. Also keep the sales receipt
and, if possible, the gift box with the inner packaging.
3.
Failure to follow all the instructions listed may result in electric shock, fire or serious personal
injury.
4.
Before plugging the Digital Mixer, Stand and Bowl into the mains electrical supply, check that
the voltage and power supply comply with the specifications indicated on the rating plate of the
appliance.
5.
Do not plug the appliance into the power supply until it is fully assembled and always unplug
before disassembling the appliance.
6.
The Digital Mixer, Stand and Bowl is not intended for use for by persons (including children)
with reduced physical, sensory or mental capabilities, or lack of experience and knowledge,
unless they have been given supervision or instruction concerning use of the appliance by a
person responsible for their safety.
7.
Always place the Digital Mixer, Stand and Bowl on a stable, flat, heat-resistant surface. Also
ensure that the surface can take the weight of the unit during use.
8.
The Digital Mixer, Stand and Bowl is intended for DOMESTIC USE ONLY and should not be used
for commercial purposes. The Digital Mixer, Stand and Bowl should only be used for its intended
purpose.
9.
When heating, never exceed the 3 litre level which is marked on the inside of the stainless steel
mixing bowl.
10. Be careful when handling or touching any part of the appliance when it is in ‘COOK’ mode, IN
PARTI CUL A R TH E BOW L, SPL ASH GU AR D A ND ATTAC HM EN TS, as they will remain
HOT long after the appliance has been switched off. Use the handles to remove and carry the
mixing bowl. Use oven gloves when handling the hot bowl and hot attachments.
11. The underside of the mixing bowl will remain hot long after the heating process is complete or
stopped. Use caution when handling it and place the hot mixing bowl on heat-resistant surface
or mat.
12. Be careful of steam escaping from the mixing bowl, particularly when opening the lid and
removing the splash guard and attachments.
13. If transferring hot food from the bowl to a liquidiser, always allow the ingredients to cool down
to room temperature before placing in a liquidiser.
14. Never operate the appliance in the ‘COOK’ mode if the mixing bowl is empty.
15. Always keep the Digital Mixer, Stand and Bowl out of reach of children. Close adult supervision
is necessary when the Digital Mixer, Stand and Bowl is used by or near children.
16. Do not leave the unit unattended when not in use.
17. Do not move or lift the Digital Mixer, Stand and Bowl while it is operating or while it is
connected to an electrical socket.
2
18. The use of attachments, not specifically recommended by the manufacturer, must not be used as
they may cause personal injury or damage to the appliance.
19. Do not operate the Digital Mixer, Stand and Bowl if the plug or power cord has been damaged,
is not working properly, has been dropped or has been exposed to water or other liquid.
20. Check the Digital Mixer, Stand and Bowl power cord carefully regularly for damage. If the
power cord is damaged in any way, it must be replaced by the manufacturer or its service agent
or a similarly qualified person in order to avoid an electrical hazard.
21. Do not allow the power cord to hang over sharp table edges or come into contact with hot
surfaces.
22. Make sure that the Digital Mixer, Stand and Bowl is switched off and remove the plug from the
mains electrical supply when it is not in use, before it is cleaned, before changing accessories or
moving parts and while it is being repaired.
23. To prevent the risk of electrical shock, do not immerse the power cord, plug, or any nonremovable parts of this Digital Mixer, Stand and Bowl in water or any other liquid.
24. The Digital Mixer, Stand and Bowl base must not be submerged in water, as any contact with
the electrical parts would create the risk of malfunction and electric shock.
25. For the correct and safe operation of the appliance, ensure that the bowl base and temperature
sensors are clean and dry before cooking.
26. Do not use the appliance for deep frying foods.
27. Do not use the appliance with wet hands.
28. Do not use the Digital Mixer, Stand and Bowl outdoors.
29. Always switch the power OFF before removing the plug from the wall socket.
30. To unplug the appliance, grasp the plug firmly and remove it from the mains electrical supply.
DO NOT PU LL ON T HE COR D.
31. Never use the Digital Mixer, Stand and Bowl if it is damaged in any way.
32. All repairs should be done by a qualified electrician. Improper repairs may place the user at risk.
33. When handing this product over to a third party, ensure that this instruction manual is supplied
with the appliance.
TECHNICAL DATA
Power: 220-240V ~ 50/60Hz
Motor Power: 1000W
Heating Power: 900W
CAPACITY OF BOWL
1.5kg flour and 750ml water
5 YEAR GUARANTEE
3
KNOW YOUR DIGITAL MIXER, STAND AND BOWL
1.
2.
3.
4.
5.
6.
Swivel arm
Digital control panel
Motor spindle protective cover
Non-slip foot
Base
Arm release
7.
8.
9.
10.
11.
12.
13.
DIGITAL DISPLAY CONTROL PANEL
4
Plastic cover with window feed
Flat beater
Splash guard
Ballon whisk
Dough hook
High temperature flexible beater
Stainless steel mixing bowl
HOW TO USE YOUR DIGITAL MIXER, STAND AND BOWL
SETTING SPEED
Accessories
Picture
Button
Speed
Time
Capacity
1500 g flour
and
750 ml water
Dough Hook
1,2
35/ 50rpm
1.5min at
button1 and 8
min at
button2
Flat beater
1,2,3
25/35/ 50rpm
10min
MAX 1.2Kg
Whisk
1 to10
145rpm
10min
8 egg whites or
600ml cream
Flexible beater
-3 2 1 1 2
20/35/50rpm
1 hour
MAX 3L
SPEED LEVELS
OFF
Minimum speed--slow
Maximum speed—very fast
Constant slow speed - Slow speed (slower than level 1) without any interruptions .
intermittent level - Slow speed (slower than level 1) for 5sec, 5sec interruption.
Intermittent level
1.
Set -3: start with
2.
Stop with
3.
Re-start with
, slow speed (slower than level 1) for 5sec, 30sec interruption.
: display still shows -3.
, the function is for 5sec, 30sec interruption.
5
THE MIXING TOOLS (ATTACHMENTS) AND SOME OF THEIR USES:
1.
Flat beater-Formixinglightertypesofdough,cakemixtures,biscuits,pastry,icing,fillings,
éclairsandmashedpotato.
2.
Ballon whisk-Forwhiskingeggs,cream,batters,sponges,meringues,cheesecakes,mousses
andformixinglightcakemixes.Donotusetheballonwhiskforheavymixtures-youcould
damageit.
3.
Dou gh ho ok-Suitableforheavydough,mincedmeatorotherdemandingkneadingjobs.
4.
High tem perature flexi ble beater-Suitableformanycookingoperationsinparticular
custards,scrambledeggsandsauces.Alsosuitabletosautévegetables.
5.
Idealforscrapingmixesbothhotandcoldfromthesidesofthebowlduringmixing.
6
OPERATING POSITIONS
WARNING!
Operatetheapplianceonlywhenoneofthesuppliedattachments,asshownbelow,iscorrectlyand
firmlyinsertedintheoperatingpositionontheundersideoftheswivelarm.
Item
Position
Attachments
1.
SelecteithertheDoughhook,Flatbeater,BallonwhiskorFlexible
beater.
2.
RISK OF INJURY FROM THE ROTATING ATTACHMENTS:
Whiletheapplianceisoperating,keepfingersclearofthestainlesssteelmixingbowl.
Notethatwhenswitchedoff,themotorcontinuesrunningbrieflyfor5secondsduetoinertiaand
thenonlydoesitstopcompletely.
SoDONOTchangeattachmentsuntiltheappliancehasstoppedcompletelyandithasbeen
unplugged.
7
HOW TO USE:
DOUGH HOOK, FLAT BEATERS AND BALLON WHISK
1.Placetheapplianceonasturdyflatsurface
1.
e.g.akitchencounter,andmakesureitis
standingfirmly.
2.Turnthearmreleasebutton(6)clockwise.
Atthesametimelifttheswivelarm(1)so
thatitlocksatanupwardtiltedpositionwith
aclick.
Fittheplasticlid(7)ontotheswivelarm(1)
andturnitslightlyclockwisesothatitfits
securely.
2.
3.
1.Placetheingredientsintothestainless
steelbowl(13)thenassembleitontothe
base(5)sothatthearrowisalignedwiththe
circle.
2.Turnitclockwiseuntilthearrowisaligned
withthearrowonthebase
3.Turnthebowlslightlyclockwise,sothatit
locksintoposition.
4.
4.1
1.Placethesplashguard(9)ontothedough
hook(11)asshowninthepicture.Turnanticlockwiseandfixitontothedoughhook.
Thesplashguard(9)preventsthedough
fromrisingatthetopofthedoughhook.
2.Fittherequiredattachment(8,9,10or11)
ontothemotorspindle(3)whichisunderthe
swivelarm(1).
8
4.2
5.
3.Turntheattachmentsothatthepinson
thespindlearealignedwiththedepressions
ontheattachment.Presstheattachment
againsttheswivelarmandturnitanticlockwiseuntilthepinsengageandthe
attachmentlocksintopositionsecurely.The
attachmentmustnotbeloosenorshouldyou
beabletopullitfree.
1.Lowertheswivelarmsothatitlocksinto
placewithaclick.Thelid(7)mustfittightly
ontothemixingbowl(13),otherwiseitis
fittedincorrectly.Theapplianceisnowready
foruse.
2.Plugintomainselectricalsupply.The
displaywillshowandbeep
.
or
buttontosetthe
3.Pressthe
speed.Tosettime,refertothe‘U
U sin gthe
coun t-do wnt imer’ instructionsbelow.
Recommendedspeeds,timeandcapacity
areshowninthetableasabove.
4.Press‘motorstart’button
tostartor
stoptheoperation.Thetimerwillcountupin
1secondintervals.The
speed/timer/temperaturecanbechangedat
anytimewhilethemixerisoperating.
5.Ifyouneedtoscrapethedoughinsideof
thestainlesssteelbowl,waituntilthe
accessoryhasstoppedcompletely.Usea
spatula.Donotuseyourfingers.
1.Switchofftheappliancebypressing
the
buttonwhenyouhavefinished
mixing.Switchofftheapplianceandunplug
itfromthemainselectricalsupplybeforeyou
changetheattachments,orbeforeyoutake
theapplianceapartorwhenitisnotinuse.
2.Turnthearmreleasebutton(6)clockwise.
Atthesametimelifttheswivelarmsothatit
locksatplacewithaclick.
7.
9
1.Detachtheattachmentbyturningit
clockwise.
2.Removethemixingbowlwithprepared
foodinananti-clockwisedirection.
8.
8.18.2
IMPORTANT!
1.
Thetemperatureofwaterinthemixingbowlwillbeheatedto40whenpreparationfor
doughisinprogress.
2.
Donotoperatetheapplianceformorethan10minscontinuouslywhenthedoughhook,flat
beatersorballonwhiskareworking.Runningtheappliancecontinuouslyfortoolongwithouta
breakmayreducethelifespanoftheappliance.Afterhavingusedtheappliancefor10minutes,
takeabreakandwaitatleast40-45minutesbeforeusingitagain.
3.
Ifthemixingbowlhasnotbeeninstalledproperly,arushingsoundwillbeheardafterthe
applianceisconnectedtothemainselectricalsupply.Checkwhetherthemixingbowlhasbeen
installedcorrectly.
4.Ifthelidofthemixingbowlisnotinstalledproperly,thedigitalcontrolpanelwillnotoperate
whentheapplianceisconnectedtothemainselectricalsupply.Pleasecheckwhetherthelidis
correctlyinstalled.
4.
TheDigitalMixer,StandandBowlwillautomaticallystopiftheswivelarmisraisedduringan
operationanditwillnotre-startwhentheswivelarmislowered.
5.
Ifthemachinehasbeenidlefor5minutes,theLCDdisplayandbacklightwillgointo‘sleep
mode’andallthedisplayswillturnoff.
10
SETTING UP THE DIGITAL MIXER, STAND AND BOWL
1.
ConnecttheDigitalMixer,StandandBowltothemainselectricalsupply.Thedisplaywillshow
upandbeep.
2.
SelecttherequiredSpeedsettingbypressingthe
-3(lowestspeed)and+10(highestspeed)
3.
onetimetoselecttheTimesetting.Pressthe
Press
decreasethetimeasdesired.
4.
onetimeagaintoselecttheTemperaturesetting.Pressthe
Press
raiseorlowerthetemperatureasdesired.
5.
Press
onetimetoSTARTthestirringorheatingprocess.
6.
Press
onetimeatanytimeduringoperationtoSTOPtheprocess.
7.
for2secondsandthenreleaseforafurther2secondsforthetimeand
Holddownthe
temperaturetoautomaticallyreverttozero.
8.
Thetimeandtemperaturecanthenbereset.
9.
Ifthebowltemperatureexceeds60°C,thespeedisautomaticallylimitedasasafetyprecaution
evenifahigherspeedhasbeenselected.Thespeedwillnotautomaticallyincreasewhenthe
temperaturedropsbelow60°C.Thespeedcontrolmustbeswitchedofffirst.Thenre-select
speedandproceed.
11
or
buttonsforspeedsbetween
or
buttonstoincreaseor
or
buttonsto
USING THE COUNT-DOWN TIMER
andselectthetimer
.
1.
Pressthetemperatureandtimebutton
2.
Pressthe
3.
The timer can only be used in the mixing mode. If a count-down time has not been selected, the
timer will automatically count at one second intervals while the mixing process is taking place.
4.
TheTimermaximumsettingis60minutesandtheminimumsettingis1minute.Thetimerwill
countdownin1secondintervals.
5.
If the Countdown time is set beyond 60 minutes, the appliance will automatically stop working.
6.
for 2 seconds and waiting a further 2 seconds, the time will
After pressing the reset button
automatically revert to zero. The timer can then be reset.
and
buttonstoincreaseordecreasebasetimebyoneminute.
APPLICATION EXAMPLES
Beating of egg-whites
8egg-whitesintheBOWL
withtheWHISKatspeed5.
Beating of cream
600gcreamintheBOWL
withtheFLATBEATERatspeed3.
Kneading of dough
1kgflour
15gsalt
28gbutter
28gsugar
approx.500mlwaterheatedinthebowltoatemp.of40.
10min
12
CLEANING AND MAINTAINANCE
Whencleaningtheapplianceyoushouldpayattentiontothefollowingpoints:
1. Removeplugfromthepowersupplyandallowtheappliancetocooldowncompletelybefore
cleaningit.
2.
Donotimmersethemotorsectionoftheapplianceinwaterandmakesurenowaterentersthe
appliance.
DO N O T im merse the stainless steel mixing b owl in water.Fillthebowlwithwarm
soapywaterandallowittostandfor20minutestoloosenleftoverdoughmix.Thenpouroutthe
dirtysoapywaterandfillthemixingbowlwithfreshwaterandrinseitoutthoroughly.Whenclean,
drywithasoftdrycloth.Ensurethattheundersideofthebowlwhichhousestheelectricalpinsis
completelydry.
3.
Neverimmersetheconnectorinwater.Wipeoverwithadampcloth.
4.
Cleanthemainbodyandmotorsectionbywipingwithadampcloth.Alittledetergentcanbe
addediftheapplianceisheavilysoiled.
5.
Donotusescouringpads,steelwooloranyformofstrongsolventsorabrasivecleaningagents
tocleantheappliance,astheymaydamagetheoutsidesurfacesoftheappliance.
6.
Disassembleandcleanalltheattachmentsseparately.Attachmentscanbewashedinwarm
soapywaterorinthedishwasher.
7.
Becarefulnottotouchthebladesorsharppartsduringuseandcleaning.
IMPORTANT!Allowallpartstodryfullyaftercleaningbeforeusingagain.Donotusetheappliance
ifitisdamp.
8.
Afterwashinganddrying,storetheappliancewithitsattachmentsinadry,safeplaceoutofthe
reachofchildren.
13
ENVIRONMENT FRIENDLY DISPOSAL
This marking indicates that this product should not be disposed with other household
wastes throughout the EU. To prevent possible harm to the environment or human health
from uncontrolled waste disposal, recycle it responsibly to promote the sustainable reuse
of material resources. To return your used device, please use the return and collection
systems or contact the retailer where the product was purchased. They can take this
product for environmental safe recycling.
14
%*(*5"-.*9&3 45"/%"/%#08MODEL NO : BBEK
BRABANTIA CU4TOMER CARE LINE FOR 6, ONLY
08