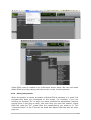
1
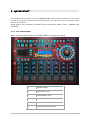
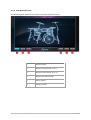
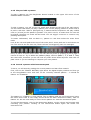
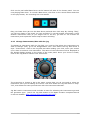
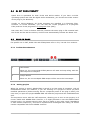
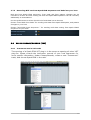
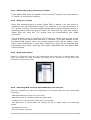
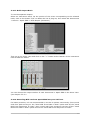
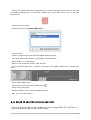
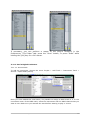
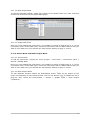
QUICK START
Information contained in this manual is subject to change without notice and does not represent a
commitment on the part of ARTURIA. The hardware unit and the software product described in this
manual are provided under the terms of a license agreement or non-disclosure agreement. The
license agreement specifies the terms and conditions for its lawful use. No part of this manual may
be produced or transmitted in any form or by any purpose other than purchaser’s personal use,
without the explicit written permission of ARTURIA S.A. All other products, logos or company
names quoted in this manual are trademarks or registered trademarks of their respective owners.
© ARTURIA SA – 1999-2013 – All rights reserved.
4, Chemin de Malacher
5776-D Lindero Cyn Rd #239
38240 Meylan
Westlake Village, CA 91362
France
USA
http://www.arturia.com
January 2013 1.0 edition
ARTURIA – SPARK EDM – QUICK START
2
PROJECT MANAGER
Emilie de Fouchecour
PRODUCT MANAGERS
Glen Darcey
Romain Dejoie
PROGRAMMING
Kevin Molcard (Lead Developer)
Emilie de Fouchécour
DESIGN
Shaun Ellwood
Thomas & Wolfgang Merkle (Bitplant)
Axel Hartmann (Design Box)
Morgan Perrier
Daniel Vester
SOUND DESIGN
Simon Carter
Mike Hoska
Stéphane Schott
MANUAL WRITING
William Talgorn
Emilie de Fouchécour
MANUAL TRANSLATION
Tomoya Fukuchi
Sylvain Missemer
SPECIAL THANKS
Denis Da Silva, Sean Weitzmann, Sébastien Rochard, Patrick Kunz (TAL), Paul Kelett
Houston Haynes
ARTURIA – SPARK EDM – QUICK START
3
Thank you for purchasing Spark EDM!
In this package you will find:
· A DVD-ROM containing Spark EDM installer for Mac OS X and Windows XP/Vista/Seven
· A registration card (credit card format) including the Serial Number and Unlock Code.
· The Quick guide for Spark EDM software.
Carefully store your registration card!
In order to actually use the software, you have to register, then authorize your virtual
instrument. By registering, you identify yourself as the legitimate owner and thus will be
sure to receive the latest news and updates for your instrument.
The Serial Number and Unlock Code are required to register & authorize Spark EDM, so
these codes are the real value of your product.
Special Message Section
SPECIFICATIONS SUBJECT TO CHANGE:
The information contained in this manual is believed to be correct at the time of printing.
However, Arturia reserves the right to change or modify any of the specifications without
notice or obligation to update existing units.
IMPORTANT:
The product used either alone or in combination with an amplifier, headphones or
speakers, may be able to produce sound levels that could cause permanent hearing loss.
DO NOT operate for long periods of time at a high level or at a level that is
uncomfortable.
If you encounter any hearing loss or ringing in the ears, you should consult an
audiologist.
NOTICE:
Service charges incurred due to a lack of knowledge relating to how a function or feature
works (when the unit is operating as designed) are not covered by the manufacturer’s
warranty, and are therefore the owner's responsibility. Please study this manual carefully
and consult your dealer before requesting service.
HANDLING CD-ROMS:
Avoid touching or scratching the shiny underside (encoded surface) of the disc. A
damaged or dirty CD-ROM disc may not read properly. Keep your CD-ROMs clean, using
a commercially available CD cleaner.
ARTURIA – SPARK EDM – QUICK START
4
Table of Contents
1 INTRODUCTION ............................................................................................................................................. 7 1.1 WELCOME TO SPARK EDM ........................................................................................................................ 7 1.2 HISTORY ..................................................................................................................................................... 7 2 QUICK START ............................................................................................................................................... 9 2.1.1 The Center panel ................................................................................................................................ 9 2.1.2 The Bottom panel ............................................................................................................................. 10 2.1.3 The Top panel ................................................................................................................................... 11 2.2 NAMES AND CONCEPTS YOU SHOULD KNOW ............................................................................................ 11 2.2.1 Project .............................................................................................................................................. 11 2.2.2 Kit ..................................................................................................................................................... 11 2.2.3 Instrument......................................................................................................................................... 11 2.2.4 Audio Source .................................................................................................................................... 12 2.2.5 Bank .................................................................................................................................................. 12 2.2.6 Pattern .............................................................................................................................................. 12 2.2.7 Song .................................................................................................................................................. 12 2.2.8 Channel ............................................................................................................................................ 12 2.2.9 Track................................................................................................................................................. 12 2.3 AUDIO AND MIDI SETUP .......................................................................................................................... 12 2.3.1 Windows ........................................................................................................................................... 12 2.3.2 Mac OS X ......................................................................................................................................... 12 2.4 FIRST STEPS WITH SPARK EDM.............................................................................................................. 13 2.4.1 Loading a project ............................................................................................................................. 14 2.4.2 Select and play a pattern .................................................................................................................. 14 2.4.3 Change Instrument parameters ........................................................................................................ 14 2.4.4 Select an Instrument and change filter and mixer parameters ........................................................ 15 2.4.5 Play and edit a pattern ..................................................................................................................... 16 2.4.6 Record a pattern with instrument pads ............................................................................................ 16 2.4.7 Change Instruments/Kits with the jog .............................................................................................. 17 2.4.8 Save your project .............................................................................................................................. 18 2.4.9 Advanced Settings ............................................................................................................................ 18 3 MODES OF OPERATION .......................................................................................................................... 19 3.1 STANDALONE ........................................................................................................................................... 19 3.1.1 Launch the application ..................................................................................................................... 19 3.1.2 Configuration of the instrument ....................................................................................................... 19 3.2 VST 2 ....................................................................................................................................................... 20 3.3 VST 3 ....................................................................................................................................................... 20 3.4 RTAS ....................................................................................................................................................... 20 3.5 AU............................................................................................................................................................ 20 3.6 64 BIT COMPATIBILITY .............................................................................................................................. 21 3.7 PLUG-IN MODE ......................................................................................................................................... 21 3.7.1 Toolbar Extra Buttons ...................................................................................................................... 21 3.7.2 Saving project ................................................................................................................................... 21 3.7.3 Recording Midi out From Spark EDM Sequencer and Pads into your host .................................... 22 3.8 USE IN CUBASE/NUENDO (VST) .............................................................................................................. 22 3.8.1 Instrument use in VST mode ............................................................................................................. 22 3.8.2 Rescan the plug-in directory in Cubase ........................................................................................... 23 3.8.3 Saving of presets.............................................................................................................................. 23 3.8.4 Multi Output Mode ........................................................................................................................... 23 3.8.5 Recording Midi out from Spark EDM into your VST host ............................................................... 23 3.9 USING IN PRO TOOLS (RTAS) .................................................................................................................. 24 3.9.1 Opening of the plug-in...................................................................................................................... 24 3.9.2 Saving the presets ............................................................................................................................. 25 3.9.3 Automation under Pro Tools ............................................................................................................ 26 3.10 USING IN LOGIC, MAC OS X (AU) ......................................................................................................... 26 ARTURIA – SPARK EDM – QUICK START
5
3.10.1 Multi Output Mode ........................................................................................................................... 27 3.10.2 Recording Midi out from Spark EDM into your VST host ............................................................... 27 3.11 USING IN ABLETON LIVE (AU AND VST)............................................................................................... 28 3.11.1 Use in Digital Performer.................................................................................................................. 29 3.11.1.1 3.11.1.2 3.11.1.3 Stereo Mode ............................................................................................................................................. 29 Multi Ouput Mode .................................................................................................................................... 30 Assign Midi Track .................................................................................................................................... 30 3.11.2.1 3.11.2.2 Stereo Mode ............................................................................................................................................. 30 Multi Output Mode .................................................................................................................................. 30 3.11.2 Stereo Mode and Multi Output Mode ............................................................................................... 30 SPARK EDM LEGAL INFORMATION .......................................................................................................... 31 3.12 SOFTWARE LICENSE AGREEMENT ........................................................................................................... 31 ARTURIA – SPARK EDM – QUICK START
6
1 INTRODUCTION
1.1 W ELCOME TO SPARK EDM
Spark EDM contains 30 kits with 480 instruments and 960 patterns of hard hitting,
drums, and filter modulated mayhem.
Spark EDM is not just another sample library. Spark EDM makes use of samples as well
as custom programed virtual analog synths, drums and effects. It is the complete
rhythm track construction kit for building the rawest sounding tracks to get the crowd on
their feet.
When you include the ease of use and the ability to automate and edit the sounds and
the live performance functions, you will see that Spark EDM stands on its own against all
comers.
1.2
HISTORY
In early 2001, Arturia began working on advanced algorithms for the digital emulation of
analog circuit audio characteristics. They are known as TAE®, standing for True Analog
Emulation. In non-technical language, this is an unprecedented way of creating the very
unique sound one finds in a synthesizer such as the Moog Modular. Nearly a year after
they began work on the algorithms, Arturia was ready for feedback. At the 2002 NAMM
show in California, Arturia shared an early version of what would later be the Moog
Modular V with the renowned maker of the original Moog synthesizer, Doctor Bob Moog.
In seeking insight from sound production experts, such as Dr. Moog, as well as avid
synthesizer users, Arturia was able to ensure the quality of the instruments they made;
so well in fact the Dr. Moog himself endorsed the Moog Modular V. The launch of this
sound powerhouse was an instant success, winning awards from several top magazines,
and leading to the development of other synth recreations.
Shortly thereafter, Arturia started receiving many requests from musicians, producers
and bands. Many of them explained how they were planning to replace their original
hardware synthesizers by virtual instruments. Artists around the globe were beginning to
see the advantages of a software alternative to hardware-based synthesizers.
The CS-80V emulated the legendary Yamaha CS-80, considered by many as "the
ultimate polyphonic" synthesizer, and was launched at the AES 2003 in New York.
Imagine some of your favorite music from diverse artists such as Keith Emerson or
Stevie Wonder, and you'll get an idea of what the CS-80V is capable of.
The ARP 2600 V was launched at the NAMM 2005 in Anaheim. This is a faithful
reproduction of the ARP 2600 and is great for just about any sound one might wish to
create: everything from drum n’ bass stabs to Star Wars’ R2-D2 sounds have been made
with the ARP.
At the Winter NAMM Show 2006, ARTURIA announced the release of its seventh product:
the Prophet V. This powerful hybrid gives you two instruments in one: it combines the
warmth of the legendary Prophet 5 programmable analog synth with the unique Vector
Synthesis textures of the digital Prophet VS.
And finally, at the summer 2007 NAMM Show, Arturia launched the Jupiter-8V. In terms
of sonic possibilities, it complemented its “Arturian siblings” by bringing something
ARTURIA – SPARK EDM – QUICK START
7
different. The Jupiter-8 V was capable of creating very versatile sounds. You could easily
make 'fat' or ‘Crystal’ sounds with it. In fact, the Jupiter-8 sounded the way it looked,
‘sleek and polished’.
The electro-pop community became quickly convinced by the qualities of the original
Jupiter-8. 'Relax', by Frankie Goes to Hollywood was produced incorporating a Jupiter 8,
and players such Vince Clarke, John Foxx, and Martyn Ware also used it abundantly. The
path to classic status of the Jupiter started there.
Other artists that have used The Jupiter-8 include: Howard Jones, Tangerine Dream,
Underworld, Jean Michel Jarre, Depeche Mode, Prince, Gary Wright, Adrian Lee, Heaven
17, Kitaro, Elvis Costello, Tears for Fears, Huey Lewis and the News, Journey, Moog
Cookbook, Yes, Devo, Freddy Fresh, Simple Minds, Jan Hammer and BT.
In the year 2011, Arturia introduced the SPARK Creative Drum Machine. This powerful
hybrid instrument was aimed at the producer and the live beat maker. It proposed a
unique workflow mixing the 16-step style of programming with the live approach of
pads, filtering, slicing and looping functions. Taking advantage its expertise in virtual
analog, Arturia not only integrated emulations of classic analog drum machines, but also
acoustic drums, physical models, and powerful electronic kits all rolled up in one easy to
use interface. Spark was quickly used widely by top producers and artists such as Sandy
Vee, the Glitch Mob, the Mars Volta, Vitalic, DJ Quick, Yeasayer.
ARTURIA – SPARK EDM – QUICK START
8
2
QUICK START
This chapter will introduce you to the SPARK EDM’s user interface elements. If you need
to look up a certain user interface element’s name, you can return to this chapter at any
time for a refresher!
Spark EDM 's user interface is divided in three main panels called: "TOP", "CENTER" and
"BOTTOM".
2.1.1 The Center panel
When launching SPARK EDM, the CENTER PANEL will appear by default.
1.
Digital Display
2.
Sequencer zone
3.
Song/Pattern zone
4.
Jog dial
5.
FX live Pad
6.
Instruments control zone
ARTURIA – SPARK EDM – QUICK START
9
2.1.2 The Bottom panel
The Bottom panel features the Studio, the Mixer and the Library.
1.
Studio Button
2.
Display Instruments 1 to 8
3.
Display Instruments 9 to 16
4.
Display all Instruments
5.
Mixer button
6.
Library button
ARTURIA – SPARK EDM – QUICK START
10
2.1.3 The Top panel
The Top panel features the Pattern, the Song and the Preferences interfaces.
1.
Pattern button
2.
Song button
3.
Preferences
2.2 NAM ES AND CONCEPTS YOU SHOULD KNOW
This chapter will introduce you to SPARK's terminology and explain how these different
elements relate to one another.
2.2.1 Project
A Project contains all data needed for a Song: a 16 instrument kit and up to 64 Patterns
with their settings, automations and FX.
2.2.2 Kit
Each kit is made up of 16 instruments, i.e. Bass drum, Hi-hat, etc.
You will find all of the instrument Kits in the Library, under the project window (Bottom
panel).
2.2.3 Instrument
An instrument is a sound generated from an audio source assigned to a track pad. For
example, you can assign the instrument Bass Drum to track 1, which you will then hear
when hitting the bottom left pad in the main panel.
ARTURIA – SPARK EDM – QUICK START
11
2.2.4 Audio Source
Sample (.wav, .aiff audio files)
Physical (Physical parameters)
Analog (Vintage drum machines with analog parameters)
2.2.5 Bank
SPARK features 4 banks of 16 MIDI patterns each, called A-B-C-D.
Go to the main panel, click on "A" and then "1" in the Song/Pattern zone. Then click on
the play/pause button: you will hear the pattern number 1 of Bank A.
2.2.6 Pattern
A Pattern is a sequence of notes played by instruments.
2.2.7 Song
A Song is an editable ordered sequence of several patterns that defines your song
structure.
SPARK allows songs made of 64 patterns maximum.
2.2.8 Channel
A specific channel is assigned to each instrument in the Mixer.
The channels are numbered from 1 to 16 in the same way the instruments are.
2.2.9 Track
The pattern window in the Top Panel shows you the 16 instrument tracks. Each track is
the score played by one instrument.
2.3 AUDIO AND MIDI SETUP
2.3.1 Windows
To access the preferences window, click on the SPARK EDM menu > Setup > Audio &
MIDI Settings. This window allows you to configure the global preferences of SPARK
EDM. These are saved automatically.
2.3.2 Mac OS X
To access the preferences window click on the SPARK EDM menu > Preferences. The
Audio settings window will appear. This window features the global preferences of SPARK
EDM. These are saved automatically.
For further details on how to setup Audio and MIDI, please refer to the chapter 2.3 of
this manual.
ARTURIA – SPARK EDM – QUICK START
12
2.4 FIRST STEPS W ITH SPARK EDM
A help mode is available for displaying all controller shortcuts. Click on the
in
the upper left corner in order to switch Spark EDM interface to show all the
shortcuts. Any text that is in Blue above a button shows that by pressing and
holding SELECT+ the button, you will select this secondary function.
ARTURIA – SPARK EDM – QUICK START
13
2.4.1 Loading a project
To load a project, go to the tool bar and click on LOAD.
Move your cursor over "Factory Project" and click on a project in the drop-down list, for
example "FUNK".
This project is now loaded into SPARK EDM and its name appears in the window next to
the button "SAVE".
2.4.2 Select and play a pattern
To select and play a pattern, move your cursor to the "Song/Pattern" zone and choose a
Bank of patterns, for example the BANK A (click on "A") and a pattern in BANK A, for
example pattern #1 (Click on "1"). You will notice that your selection is now highlighted.
Now, go to the transport zone and click on the "Play/Pause" button to listen to Pattern
#1 in Bank A. To listen to a different pattern, just click on another pattern number. You
do not necessarily need to stop playing a pattern to listen to another. The same applies
to switching from Bank to Bank.
2.4.3 Change Instrument parameters
The three knobs above each of the instrument's pad are the instrument's parameters.
Let's try and change the pitch of the snare drum. While the pattern is playing, place your
cursor over the "Pitch" knob, click on it and while maintaining your click and move your
cursor up and down slowly. This will turn the "Pitch" knob up and down. Listen how the
pitch of the Snare drum is changing. The Digital display window in the center of the main
panel shows the changes applied to the Pitch (number of semitones).
ARTURIA – SPARK EDM – QUICK START
14
2.4.4 Select an Instrument and change filter and mixer parameters
To select an instrument, for example the snare drum, move your cursor to the dividing
line above the 2nd pad from the left called "Snare Drum". The dividing line is to the right
of the instrument and will be highlighted to let you know that you have entered its
selection zone.
Click once. The "Snare drum" pad is now lit as well as the red LED. The instrument
"Snare Drum" is now selected. Alternatively, hold the Select Button and press an
instrument pad to select it.
To change the filter and/or the mixer parameters, first select an instrument and simply
click on one of the filter or mixer parameter buttons. While holding your click, move your
mouse up or down to change the parameter's value. The Digital display window in the
center of the main panel shows you the changes applied to the selected parameter in
real time.
ARTURIA – SPARK EDM – QUICK START
15
2.4.5 Play and edit a pattern
To play a pattern use the Play/Pause button located in the upper left corner of the
CENTER PANEL interface.
To edit a pattern, you will use the 16 small pads located at the top of the main panel.
You will notice that when you play a pattern, the current playing position is shown with a
lit pad in real time. When a pad lights up, it means that the sequencer will play a MIDI
note-on (a beat) at this pattern's position. If a pad is not lit, it means that no note will
be played, therefore no sound will be heard. You can trigger a note-on or remove it by
pressing these pads.
To better understand, click on Bank A / pattern #1 and then select the snare drum
track:
Look at the 16 small pads at the top of the main panel: some pads are lit and others are
not. The ones lit are the note-ons, those unlit are not triggering note-on messages.
Every lit pad is a Snare drum's beat. You can edit this track by pressing a pad to add or
remove a note-on. Try it! While the pattern plays, click on pads 2, 3, 4 and 5. They
are now unlit, therefore you do not hear any snare drum beats anymore. Now click on
pads 1 and 4: you are starting to compose your own pattern.
2.4.6 Record a pattern with instrument pads
To do so, we will start by erasing the current pattern and start from scratch.
First, click on the "ERASE" BUTTON, right above the digital display window and then go
to the Song/Pattern zone and click on the currently selected pattern – it should be
Pattern #1 of BANK A:
The pattern #1 of Bank A is now erased. The 16 editing pads are not lit anymore (since
the snare drum track is now empty as well as all the other instrument tracks). Click on
Pattern #1. We are now ready to record a new pattern #1 with the instruments pads.
To use the Metronome, click on the Metronome Button, set its volume and proceed with
recording your pattern. Clicking on the Metronome button again will switch the
metronome off.
ARTURIA – SPARK EDM – QUICK START
16
Click on the pad called Bass Drum at the bottom left side of the Center panel. You are
now playing bass drum. To record a Bass drum, click first on the record button and then
on the play button, the recording has now started.
Play your Bass drum part on the Bass Drum pad and then click stop. By clicking "Play",
you will now listen to the track you just recorded. To record another instrument, select
another instrument track (If you forgot how to do this, go back to 2.4.4 Select an
instrument) and repeat the same steps to start recording.
2.4.7 Change Instruments/Kits with the jog
To change an instrument with the Jog Dial, you need to first select the instrument you
want to change. Now, go to the Song/Pattern zone. Click above the Jog Dial where it
says: "Instrument". Click on the Jog Dial and while holding your click, move your mouse
up or down to select a new instrument. The name of the instrument will be displayed in
the Digital display window in the center of the main panel. Once your choice is made,
click on the Jog Dial to load the new instrument.
The procedure to change a Kit is the same, except that you do not need to select an
instrument since you're loading all of them. Just click below the Jog Dial where it says:
"Kit", and follow the same procedure as with the instrument selection.
Jog dial used in instrument mode includes a menu for selecting the instrument type and
the generator type. (See 5.2.4 Jog Dial section in the Spark Creative complete Manual
on Arturia website: http://www.arturia.com/manuals.html).
ARTURIA – SPARK EDM – QUICK START
17
2.4.8 Save your project
To save your project, go to the toolbar and click "Save". A drop down menu will appear.
Choose “Save as…”
Give a name to your project and choose a style from the drop down menu. Click "OK".
Your first project is now saved. Congratulations!
The name you gave to your project is now showing in the display window next to the
button save.
2.4.9 Advanced Settings
SPARK EDM's interface is made up of 3 main panels. The "TOP" panel, the "CENTER"
panel and the "BOTTOM" panel.
To show the "TOP" panel, go to the toolbar and click on "TOP". In the TOP" panel you
have access to the
-
Pattern panel for advanced pattern editing: Edit pattern resolution, length, time
signature, automations..
-
Song panel for advanced song editing
-
Preferences panel to customize Spark EDM preferences
To show the "BOTTOM" panel, click on "BOTTOM".
access to the
In the "BOTTOM" panel you have
-
Studio panel for advanced Instrument editing: Load
parameters and instrument type, name and parameters.
instrument,
-
Mixer panel: Edit Instrument pan, volume, set insert, aux and main effects
-
Library panel for
edit
o
Advanced editing of your project: edit picture, type, load instruments
o
Browsing your library
o
Importing and exporting from your library
filter
For more information on advanced settings please refer to the Spark Creative complete
Manual on Arturia website: http://www.arturia.com/manuals.html
ARTURIA – SPARK EDM – QUICK START
18
3
MODES OF OPERATION
3.1 STANDALONE
Spark EDM can be used as an instrument independently from a sequencer
software (Standalone mode).
This allows you launch the application as a single instrument, and to play it
using an external MIDI keyboard.
3.1.1 Launch the application
To launch the Spark EDM application,
•
on Windows, go to the menu Start > Programs > Arturia > Spark EDM,
and choose “Spark EDM”.
•
on Macintosh, open the finder > Applications > Arturia and double-click
on the Spark EDM application icon.
3.1.2 Configuration of the instrument
Click on the “Settings” (Windows, on the application menu bar) or
“Preferences” (Mac). It will show the following “Audio MIDI Settings” dialog
box.
ARTURIA – SPARK EDM – QUICK START
19
In this option menu you can:
• Set the audio output port
• Choose the audio interface
• Choose memory buffer size (smaller size will increase the load on the
CPU but will reduce latency, and reciprocally)
• Choose sample rate between 44100 Hz and 96000 Hz
• Choose one or several active MIDI input port(s)
• Choose one midi clock input to control Spark EDM Sequencer
• Set Midi Clock Sample offset when sending midi clock from Spark EDM
Sequencer
3.2 VST 2
VST (Virtual Studio Technology) is a plug-in standard created by Steinberg. It
allows you to integrate software audio synthesizers and effect plug-ins with
audio DAWs and host software. VST is supported by a large number of audio
applications like Cubase, Nuendo, Wavelab, FL Studio, Audacity, Samplitude,
Sonar, Audition, Live, etc.
The VST interface was updated to version 2 in 1999. One of the additions was
the ability for plug-ins to receive MIDI data. This allowed for the introduction
of VSTi (Virtual Studio Technology Instrument) format plug-ins.
3.3 VST 3
VST3 is a new update of VST audio plugins protocol. It was updated in 2008.
This has improved performance over previous versions of VST and has many
new features as well. Cubase 6 and Nuendo 5 are using this new protocol.
With VST3 on Windows, users do not have to choose a folder path to install
the plug-in. The installer will put VST3 files automatically into the appropriate
directory on your hard drive.
3.4 RTAS
RTAS, short for Real-Time AudioSuite is an audio plug-in developed by
Digidesign (AVID technology) for their Pro Tools systems.
3.5 AU
AU for Audio Units is a plug-in protocol developed by Apple Computer. It used
by Apple applications such as GarageBand, Soundtrack Pro, Logic Express,
Logic Audio, Final Cut Pro, Mainstage, Ardour, Ableton Live, REAPER and
Digital Performer.
ARTURIA – SPARK EDM – QUICK START
20
3.6
64 BIT COM PATIBILITY
Spark EDM is optimized for both 32-bit and 64-bit modes. If you have a 64-bit
operating system and a 64-bit digital audio workstation, you should use 64-bit version
of the plug-in (for Windows).
Usually on 32-bit Windows, all 32-bit programs are installed in C:\Program Files.
However on 64-bit Windows, you can find the 64-bit programs in C:\Program
Files\ and the 32-bit programs in C:\Program Files (x86)\.
Mac users don´t have to bother with this, because the same plug-in file contains both
the 32-bit and the 64-bit versions, and the host automatically chooses the better one.
3.7
PLUG-IN MODE
For specific use in VST, Audio Unit and RTAS please refer to 3.8, 3.9 and 3.10 sections.
3.7.1 Toolbar Extra Buttons
When using SPARK EDM in Plug-in mode, the toolbar features 2 additional buttons:
1.
Host button
When on, the current Spark EDM pattern will start and stop along with the
Host sequencer transport.
2.
Tempo button
When on, the current Spark EDM tempo will be set to the host tempo.
3.7.2
Saving project
When the project is saved, SPARK EDM is saved in its last mode of operation, with all
modifications intact. For instance, if you are working on a project in which you have
modified parameters (without saving this as a separate preset in the plug-in itself), the
next time you open the project SPARK EDM will load the project and the modifications as
well.
The drop-down menu with the VST sequencer, allowing you to save a new project, is of
course usable with SPARK EDM. However, it is highly advised to use the SPARK EDM’s
internal menu: the presets saved in this way are usable in any other mode (standalone
or with another sequencer), and can be exported and exchanged more easily, as well as
remain compatible with future SPARK versions.
ARTURIA – SPARK EDM – QUICK START
21
3.7.3
Recording Midi out From Spark EDM Sequencer and Pads into your host
Midi Out from Spark EDM sequencer, from pads and from pattern changes can be
recorded in a host. All notes coming out from the Spark EDM’s patterns can be recorded,
additionally to automations.
Use the preferences to select which kind of midi data has to be sent:
Choose “Send Midi From Pads” for sending midi data from Spark EDM pads, and pattern
changes to your host
Choose “Send Midi From Sequencer ” for sending midi data coming from Spark EDM’s
sequencer to your host.
3.8
3.8.1
USE IN CUBASE/NUENDO (VST)
Instrument use in VST mode
The opening of a Spark EDM VST plug-in is the same as opening all other VST
plug-ins. Please consult the instruction manual of your host sequencer for
more specific information. Under Cubase/Nuendo, create a new “Instrument”
track, and choose Spark EDM in the rack.
ARTURIA – SPARK EDM – QUICK START
22
3.8.2
Rescan the plug-in directory in Cubase
If the Spark EDM does not appear in the list of VST plug-ins, you can perform
a “rescan” of the plug-in directory.
3.8.3
Saving of presets
When the session/project is saved, Spark EDM is saved in its last mode of
operation, with all modifications intact. For instance, if you were working on a
“P1” preset in which you had modified parameters (without saving them as a
separate preset within the plug-in itself), the next time you open the project,
Spark EDM will load the “P1” preset plus the modifications you made
previously.
The drop-down menu in which the VST sequencer allows you to save a new
preset is of course usable with Wurlitzer V. However, it is highly advised to use
the Spark EDM internal menu: the presets saved in this way are usable in any
other mode (standalone or with other sequencers), they can be exported and
exchanged more easily, and they will remain compatible with the Spark EDM
future versions.
3.8.4
Multi Output Mode
Create an instrument using the VST Instrument Menu then click on Spark EDM, then
select the output you want to enable by clicking on the button just on the left of the
instrument name in this menu.
3.8.5
Recording Midi out from Spark EDM into your VST host
Here’s an example of a VST Host configuration for recording Midi out from Spark EDM
using LIVE.
- Add Spark EDM VST plugin on a Live track.
- Add a Midi track for recording Midi from Spark EDM
- Configure the new Midi Track (left track on the image):
. Set ‘Midi From’ to ‘Spark EDM’ and change ‘Pre FX’ to ‘Spark EDM’ in the following
combo
. Set Monitor to ‘Auto’
. Arm the session recording
ARTURIA – SPARK EDM – QUICK START
23
- Configure the Spark EDM Track (right track on the image):
. Set ‘Midi From’ to the new Midi Track (2 Midi in this example)
. Set Monitor to ‘Auto’
Press Record button in Live. Note that Host and Tempo button must be on in Spark EDM
software.
Display the Arrangement view (press Tab) in Live and check that you’ve recorded some
midi notes.
Set Monitor to ‘in’ on the Spark EDM track
Set Spark EDM Host button to off (Pressing Play button in Live will not start Spark EDM
sequencer anymore )
Press play in Live from the beginning of your arrangement. You should hear Spark EDM
playing notes previously recorded from Spark EDM and now sent by Live.
Note: For Cubase users: use Menu > Devices > VST Instrument to load Spark EDM in
order to be able to select Spark EDM as Midi source. Creating a vst instrument Track will
not display Spark EDM as Midi source.
3.9 USING IN PRO TOOLS (RTAS)
3.9.1
Opening of the plug-in
Access to the Spark EDM plug-in is like all other plug-ins in Pro Tools, via a
new Instrument Track creation:
ARTURIA – SPARK EDM – QUICK START
24
Spark EDM must be loaded on an instrument stereo track. We can now make
Spark EDM sound by playing with the mouse on the virtual keyboard.
3.9.2
Saving the presets
When the session is saved, the status of Spark EDM is saved as it is, even if its
programming does not correspond to the preset. For example, if you are
working on a preset “P1” in which you have modified the parameters (without
saving them in the plug-in itself), the next time you open the session, Spark
EDM will load the “P1” preset plus the modifications you made to it. The
“Librarian Menu” of Pro Tools can be used with Spark EDM like with all other
plug-ins.
ARTURIA – SPARK EDM – QUICK START
25
Nevertheless it is highly recommended to use the internal Spark EDM menu:
with the presets saved like this, they are usable no matter which mode is
chosen (standalone or other sequencer), and they can be exported, exchanged
more easily, and will stay compatible with future versions of Wurlitzer V.
3.9.3
Automation under Pro Tools
Automation function with Spark EDM functions like with all RTAS/HTDM plugins (check the Pro Tools documentation for more details on plug-in
automations).
3.10 USING IN LOGIC, M AC OS X (AU)
Make sure the plug-in has been tested OK in the Logic Audio Units Manager.
To launch it, click on the menu “Preferences > Start Logic AU Manager”.
Create a new Software Instrument track.
On the channel of the mixer corresponding to the selected track, click on the
button “I/O” to list the available plug-ins, then select “AU Instruments >
Arturia > Spark EDM > Stereo”.
ARTURIA – SPARK EDM – QUICK START
26
3.10.1 Multi Output Mode
To use the separate outputs:
Select an Instrument track. On the portion of the mixer corresponding to the selected
track, click on the button “I/O” to obtain the list of plug-ins, then select AU Instruments
> Arturia > Spark EDM > Multi Output (16xStereo).
Then go to the mixer view and click on the “+” button at the bottom of the instrument
track to add Aux tracks.
You can choose the output number of each instrument in Spark EDM in the Mixer View.
(see chapter 5.3.2.1.
3.10.2 Recording Midi out from Spark EDM into your VST host
For better precision, it’s not recommended to use the 2 options concurrently: First record
midi from pads turning on the “Send Midi From Pads to Host” option and off the “Send
Midi From Sequencer to Host”, then record midi from sequencer turning off the “Send
Midi From Pads to Host” option and on the “Send Midi From Sequencer to Host”.
ARTURIA – SPARK EDM – QUICK START
27
- Launch the ‘Audio Midi Setup Application’ to configure the IAC Driver that will be used
for sending Midi data to the AU host. Double clic on the IAC Driver Icon in the Midi
Studio view
- Check ‘Device is online’
- Rename firt port to ‘Spark1 MIDI OUT’
- Launch Logic
- Create an instrument track and Add Spark EDM AU plugin
- Turn Host and Tempo button on into Spark EDM Software
- Open Window > Environment
- Select in the upper left combo ‘Click & Ports’
- In the Physical Input box , create a connection from Spark1 MIDI OUT’ to Sequencer
Input
- Select Spark EDM Track
- Set ‘Record’ OFF on the Spark EDM track
- Press record into Logic
- Set Host button to off into Spark EDM Software
- Play your recorded pattern
3.11 USING IN ABLETON LIVE (AU AND VST)
From the plug-ins tab, simply double click on the Spark EDM ST or AU icon, or
drag-and-drop the plug-in into a MIDI track:
ARTURIA – SPARK EDM – QUICK START
28
If necessary, you can perform a rescan of the plug-in directory in the
Preferences, “File Folder” tab: press the “Scan” button, or press “Scan” while
holding the [Alt] key for a full rescan.
3.11.1 Use in Digital Performer
3.11.1.1 Stereo Mode
To add an instrument, choose the menu Project > Add Track > Instrument Track >
Arturia > Spark EDM (stereo)
Once you have added this instrument, it’s possible to assign a MIDI track to it. In the
connection menu of the MIDI track, select the instrument and the MIDI channel that you
want to use. Make sure you activate the track before starting to play or record.
ARTURIA – SPARK EDM – QUICK START
29
3.11.1.2 Multi Ouput Mode
To use the separate outputs, create the number of new Audio tracks you want, and then
choose the correct OUT of the Spark EDM plugin.
3.11.1.3 Assign Midi Track
Once you have added this instrument, it’s possible to assign a MIDI track to it. In the
connection menu of the MIDI track, select the instrument and the MIDI channel that you
want to use. Make sure you activate the track before starting to play or record.
3.11.2 Stereo Mode and Multi Output Mode
3.11.2.1 Stereo Mode
To add an instrument, choose the menu Project > Add Track > Instrument Track >
Arturia > SPARK EDM.
Once you have added this instrument, it’s possible to assign a MIDI track to it. In the
connection menu of the MIDI track, select the instrument and the MIDI channel that you
want to use. Make sure you activate the track before starting to play or record.
3.11.2.2 Multi Output Mode
To use separate outputs: select an Instrument track. Then on the portion of the
mixer corresponding to the selected track, click on the button “I/O” to obtain the list of
plug-ins, then select AU Instruments > Arturia > SPARK EDM > Multi Output
(16xStereo).
ARTURIA – SPARK EDM – QUICK START
30
SPARK EDM LEGAL INFORMATION
3.12 SOFTW ARE LICENSE AGREEM ENT
In consideration of payment of the Licensee fee, which is a portion of the price you paid,
Arturia, as Licensor, grants to you (hereinafter termed “Licensee”) a nonexclusive right
to use this copy of the Spark EDM Software (hereinafter the “SOFTWARE”).
All intellectual property rights in the software belong to Arturia SA (hereinafter:
“Arturia”). Arturia permits you only to copy, download, install and use the software in
accordance with the terms and conditions of this Agreement.
The product contains product activation for protection against unlawful copying. The OEM
software can be used only following registration.
Internet access is required for the activation process. The terms and conditions for use
of the software by you, the end-user, appear below. By installing the software on your
computer you agree to these terms and conditions. Please read the following text
carefully in its entirety. If you do not approve these terms and conditions, you must not
install this software. In this event give the product back to where you have purchased it
(including all written material, the complete undamaged packing as well as the enclosed
hardware) immediately but at the latest within 30 days in return for a refund of the
purchase price.
1. Software Ownership
Arturia shall retain full and complete title to the SOFTWARE recorded on the enclosed
disks and all subsequent copies of the SOFTWARE, regardless of the media or form on or
in which the original disks or copies may exist. The License is not a sale of the original
SOFTWARE.
2. Grant of License
Arturia grants you a non-exclusive license for the use of the software according to the
terms and conditions of this Agreement. You may not lease, loan or sub-license the
software.
The use of the software within a network is illegal where there is the possibility of a
contemporaneous multiple use of the program.
You are entitled to prepare a backup copy of the software which will not be used for
purposes other than storage purposes.
You shall have no further right or interest to use the software other than the limited
rights as specified in this Agreement. Arturia reserves all rights not expressly granted.
3. Activation of the Software
Arturia may use a compulsory activation of the software and a compulsory registration of
the OEM software for license control to protect the software against unlawful copying. If
you do not accept the terms and conditions of this Agreement, the software will not
work.
In such a case the product including the software may only be returned within 30 days
following acquisition of the product. Upon return a claim according to § 11 shall not
apply.
ARTURIA – SPARK EDM – QUICK START
31
4. Support, Upgrades and Updates after Product Registration
You can only receive support, upgrades and updates following the personal product
registration. Support is provided only for the current version and for the previous version
during one year after publication of the new version. Arturia can modify and partly or
completely adjust the nature of the support (hotline, forum on the website etc.),
upgrades and updates at any time.
The product registration is possible during the activation process or at any time later
through the Internet. In such a process you are asked to agree to the storage and use of
your personal data (name, address, contact, email-address, and license data) for the
purposes specified above. Arturia may also forward these data to engaged third parties,
in particular distributors, for support purposes and for the verification of the upgrade or
update right.
5. No Unbundling
The software usually contains a variety of different files which in its configuration ensure
the complete functionality of the software. The software may be used as one product
only. It is not required that you use or install all components of the software. You must
not arrange components of the software in a new way and develop a modified version of
the software or a new product as a result. The configuration of the software may not be
modified for the purpose of distribution, assignment or resale.
6. Assignment of Rights
You may assign all your rights to use the software to another person subject to the
conditions that (a) you assign to this other person (i) this Agreement and (ii) the
software or hardware provided with the software, packed or preinstalled thereon,
including all copies, upgrades, updates, backup copies and previous versions, which
granted a right to an update or upgrade on this software, (b) you do not retain
upgrades, updates, backup copies und previous versions of this software and (c) the
recipient accepts the terms and conditions of this Agreement as well as other regulations
pursuant to which you acquired a valid software license.
A return of the product due to a failure to accept the terms and conditions of this
Agreement, e.g. the product activation, shall not be possible following the assignment of
rights.
7. Upgrades and Updates
You must have a valid license for the previous or more inferior version of the software in
order to be allowed to use an upgrade or update for the software. Upon transferring this
previous or more inferior version of the software to third parties the right to use the
upgrade or update of the software shall expire.
The acquisition of an upgrade or update does not in itself confer any right to use the
software.
The right of support for the previous or inferior version of the software expires upon the
installation of an upgrade or update.
8. Limited Warranty
Arturia warrants that the disks on which the software is furnished is free from defects in
materials and workmanship under normal use for a period of thirty (30) days from the
date of purchase. Your receipt shall be evidence of the date of purchase. Any implied
warranties on the software are limited to thirty (30) days from the date of purchase.
Some states do not allow limitations on duration of an implied warranty, so the above
ARTURIA – SPARK EDM – QUICK START
32
limitation may not apply to you. All programs and accompanying materials are provided
“as is” without warranty of any kind. The complete risk as to the quality and
performance of the programs is with you. Should the program prove defective, you
assume the entire cost of all necessary servicing, repair or correction.
9. Remedies
Arturia's entire liability and your exclusive remedy shall be at Arturia's option either (a)
return of the purchase price or (b) replacement of the disk that does not meet the
Limited Warranty and which is returned to Arturia with a copy of your receipt. This
limited Warranty is void if failure of the software has resulted from accident, abuse,
modification, or misapplication. Any replacement software will be warranted for the
remainder of the original warranty period or thirty (30) days, whichever is longer.
10. No other Warranties
The above warranties are in lieu of all other warranties, expressed or implied, including
but not limited to, the implied warranties of merchantability and fitness for a particular
purpose. No oral or written information or advice given by Arturia, its dealers,
distributors, agents or employees shall create a warranty or in any way increase the
scope of this limited warranty.
11. No Liability for Consequential Damages
Neither Arturia nor anyone else involved in the creation, production, or delivery of this
product shall be liable for any direct, indirect, consequential, or incidental damages
arising out of the use of, or inability to use this product (including without limitation,
damages for loss of business profits, business interruption, loss of business information
and the like) even if Arturia was previously advised of the possibility of such damages.
Some states do not allow limitations on the length of an implied warranty or the
exclusion or limitation of incidental or consequential damages, so the above limitation or
exclusions may not apply to you. This warranty gives you specific legal rights, and you
may also have other rights which vary from state to state.
ARTURIA – SPARK EDM – QUICK START
33


![[EN] SPARK Manual April2011](http://vs1.manualzilla.com/store/data/005899229_1-00bdd099054b23c9b74e57dfb72b875f-150x150.png)