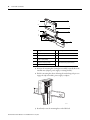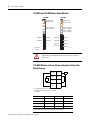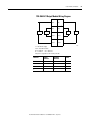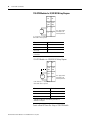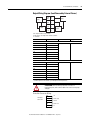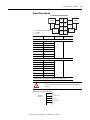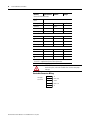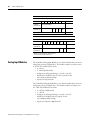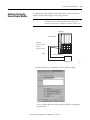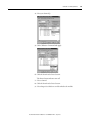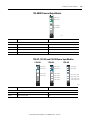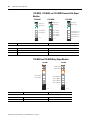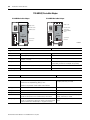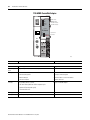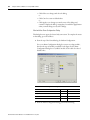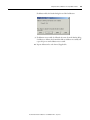
1
User Manual
POINT I/O Digital and Analog Modules and
POINTBlock I/O Modules
Catalog Numbers 1734-IA2, 1734-IM4, 1734-IB2, 1734-IB4, 1734-IB8, 1734-IB4D, 1734-IM2, 1734-IM4, 1734IV2, 1734-IV4, 1734-IV8, 1734-OA2, 1734-OA4, 1734-OB2, 1734-OB2EP, 1734-IV8, 1734-OA2, 1734-OA4, 1734OB2, 1734-OB2EP, 1734-OB2E, 1734-OB4, 1734-OB4E, 1734-OB8, 1734-OB8E, 1734-OV2E, 1734-OV4E,
1734-OV8E, 1734-OW2, 1734-OW4, 1734-OX2, 1734-IE2C, 1734-IE2V, 1734-OE2C, 1734-OE2V, 1734D-IA16,
1734D-IA8XOA8, 1734D-IA8XOW8, 1734D-IB16, 1734D-IB8XOB8, 1734D-IB8XOW8
Important User Information
Solid state equipment has operational characteristics differing from those of electromechanical equipment. Safety Guidelines for
the Application, Installation and Maintenance of Solid State Controls (publication SGI-1.1 available from your local Rockwell
Automation sales office or online at http://literature.rockwellautomation.com) describes some important differences between
solid state equipment and hard-wired electromechanical devices. Because of this difference, and also because of the wide variety of
uses for solid state equipment, all persons responsible for applying this equipment must satisfy themselves that each intended
application of this equipment is acceptable.
In no event will Rockwell Automation, Inc. be responsible or liable for indirect or consequential damages resulting from the use or
application of this equipment.
The examples and diagrams in this manual are included solely for illustrative purposes. Because of the many variables and
requirements associated with any particular installation, Rockwell Automation, Inc. cannot assume responsibility or liability for
actual use based on the examples and diagrams.
No patent liability is assumed by Rockwell Automation, Inc. with respect to use of information, circuits, equipment, or software
described in this manual.
Reproduction of the contents of this manual, in whole or in part, without written permission of Rockwell Automation, Inc., is
prohibited.
Throughout this manual, when necessary, we use notes to make you aware of safety considerations.
WARNING: Identifies information about practices or circumstances that can cause an explosion in a hazardous
environment, which may lead to personal injury or death, property damage, or economic loss.
ATTENTION: Identifies information about practices or circumstances that can lead to personal injury or death,
property damage, or economic loss. Attentions help you identify a hazard, avoid a hazard, and recognize the
consequence
SHOCK HAZARD: Labels may be on or inside the equipment, for example, a drive or motor, to alert people that
dangerous voltage may be present.
BURN HAZARD: Labels may be on or inside the equipment, for example, a drive or motor, to alert people that
surfaces may reach dangerous temperatures.
IMPORTANT
Identifies information that is critical for successful application and understanding of the product.
Allen-Bradley, POINT I/O, POINTBus, Rockwell Automation, RSLogix, RSNetWorx, RSNetWorx for DeviceNet, and TechConnect are trademarks of Rockwell Automation, Inc.
Trademarks not belonging to Rockwell Automation are property of their respective companies.
Summary of Changes
This publication contains new and revised information not in the last release.
New Information
See the table that shows what we added to this publication.
Item Added
Cat. No.
Input Modules
1734-IA4
1734-IB4D
1734-IM4
Output Modules
1734-OA4
Specialty Modules
1734-IR2E
One-piece Terminal Bases
1734-TOP, 1734-TOPS
1734-TOP3, 1734-TOP3S
Revised Information
We updated additional information as necessary to more fully explain certain
procedures.
Change Bars
Change bars (as shown with this paragraph) show the areas in this manual that
are different from previous editions and indicate the addition of new or
revised information.
Publication 1734-UM001E-EN-P - July 2013
iv
Summary of Changes
Notes:
Publication 1734-UM001E-EN-P - July 2013
Preface
Purpose of This Manual
This manual describes how to install, configure, and troubleshoot your
POINT I/O modules.
The POINT I/O modules in this manual are DeviceNet ready. Each module can
exist on the DeviceNet network as one of the following:
• As an individual node
• With an adapter (catalog number 1734-ADN or 1734-ADNX) as a single
node
When using these POINT I/O modules with an adapter, use this manual in
conjunction with the user manual for the adapter you are using as shown in the
table.
For applications using these modules in a network with a 1734-PDN DeviceNet
Communication Interface, or a 1734D-xx POINTBlock I/O module, this user
manual is the primary documentation.
Who Should Use This
Manual
When Using POINT I/O Modules
on This Network
Refer to User
Manual for
Cat. No.
Publication
No.
DeviceNet network
DeviceNet adapter
1734-ADN
1734-ADNX
1734-UM002
ControlNet network
ControlNet adapter
1734-ACNR
1734-UM008
EtherNet/IP network
EtherNet/IP adapter
1734-AENT
1734-UM011
PROFIBUS network
PROFIBUS adapter
1734-APB
1734-UM005
In this manual, we assume you know how to do the following:
• Use RSNetWorx software or similar configuration software to set up and
calibrate these modules.
• Have the capability to download and use electronic data sheet (EDS) files.
If you do not, refer to your software documentation or online help before
attempting to use these modules.
Rockwell Automation Publication 1734-UM001E-EN-P - July 2013
xiv
Preface
Additional Resources
Refer to this table for a list of related 1734 products and documentation. Most of
these are available from http://literature.rockwellautomation.com/. For
specification and safety certification information, refer to the installation
instructions.
Resource
Description
Analog Modules
Analog Current and Voltage Input Module Installation Instructions,
publication 1734-IN027
Provides installation information for 1734-IE2C and 1734-IE2V input
modules
Analog Current and Voltage Output Module Installation Instructions,
publication 1734-IN002
Provides installation information about 1734-OE2C and 1734-OE2V modules
Communication Devices
ControlNet Adapter Installation Instructions, publication 1734-IN582
Provides installation information about 1734-ACNR adapters
ControlNet Adapter User Manual, publication 1734-UM008
Describes how to use 1734-ACNR adapters
DeviceNet Communication Interface Module Installation Instructions,
publication 1734-IN057
Provides installation information about 1734-PDN modules
DeviceNet Adapter Installation Instructions, publication 1734-IN026
Provides installation information about 1734-ADN and 1734-ADNX
adapters
DeviceNet Adapter User Manual, publication 1734-UM002
Describes how to use 1734-ADN and 1734-ADNX adapters
EtherNet/IP Adapter Installation Instructions, publication 1734-IN590
Provides installation information about 1734-AENT adapters
EtherNet/IP Adapter User Manual, publication 1734-UM011
Describes how to use 1734-AENT adapters
PROFIBUS Adapter Installation Instructions, publication 1734-IN014
Provides installation information about 1734-APB adapters
PROFIBUS Adapter User Manual, publication 1734-UM005
Describes how to use 1734-APB adapters
Digital AC Input Modules
220V AC Input Module Installation Instructions, publication 1734-IN008
Provides installation information about 1734-IM2 and 1734-IM4 modules
120V AC Input Module Installation Instructions, publication 1734-IN010
Provides installation information about 1734-IA2 and 1734-IA4 modules
Digital AC Output Modules
120/220V AC Output Module Installation Instructions, publication
1734-IN009
Provides installation information about 1734-OA2 and 1734-OA4 modules
Digital DC Input Modules
Sink Input Module Installation Instructions, publication 1734-IN051
Provides installation information about 1734-IB2, 1734-IB4, and 1734-IB8
modules
Source Input Module Installation Instructions, publication 1734-IN052
Provides installation information about 1734-IV2, 1734-IV4, and 1734-IV8
modules
Digital DC Output Modules
Protected Output Module Installation Instructions, publication 1734-IN586
Provides installation information about 1734-OB2EP modules
Protected Sink Output Module Installation Instructions, publication
1734-IN585
Provides installation information about 1734-OV2E, 1734-OV4E, and
1734-OV8E modules
Protected Source Output Module Installation Instructions, publication
1734-IN056
Provides installation information about 1734-OB2E, 1734-OB4E, and
1734-OB8E modules
Protected Source Output Module Installation Instructions, publication
1734-IN018
Provides installation information about 1734-OB2, 1734-OB4, and 1734-OB8
modules
POINTBlock Modules
8 AC Input/8 AC Output Module Installation Instructions,
publication 1734-IN022
Rockwell Automation Publication 1734-UM001E-EN-P - July 2013
Provides installation information about 1734D-IA8XOA8 modules
Preface
Resource
Description
8 AC Input/8 AC Relay Output Module Installation Instructions, publication
1734-IN023
Provides installation information about 1734D-IA8XOW8 modules
8 DC Input/8 Output Module Installation Instructions, publication
1734-IN020
Provides installation information about 1734D-IB8XOB8 modules
8 DC Input/8 DC Output Module Installation Instructions, publication
1734-IN021
Provides installation information about 1734D-IB8XOW8 modules
16 AC Input Module Installation Instructions, publication 1734D-IN001
Provides installation information about 1734D-IA16 modules
16 DC Input Module Installation Instructions, publication 1734D-IN002
Provides installation information about 1734D-IB16 modules
xv
Power Supplies, Wiring Base Assemblies, Miscellaneous
Cold Junction Wiring Base Assembly Installation Instructions, publication
1734-IN583
Provides installation information about 1734-TBCJC assemblies
Field Potential Distributor Installation Instructions, publication 1734-IN059
Provides installation information about 1734-FPD distributors
POINT I/O 24V DC Expansion Power Supply Installation Instructions,
publication 1734-IN058
Provides installation information about 1734-EP24DC power supplies
POINT I/O 120/240V AC Expansion Power Supply Installation Instructions,
publication 1734-IN017
Provides installation information about 1734-EPAC power supplies
POINT I/O Common Terminal Module Installation Instructions, publication
1734-IN024
Provides installation information about 1734-CTM modules
POINT I/O Voltage Terminal Module Installation Instructions, publication
1734-IN024
Provides installation information about 1734-VTM modules
POINT I/O Wiring Base Assembly Installation Instructions, publication
1734-IN511
Provides installation information about 1734-TB and 1734-TBS assemblies
POINT I/O Wiring Base Assembly Installation Instructions, publication
1734-IN013
Provides installation information about 1734-TB3 and 1734-TB3S
assemblies
POINT I/O One-piece Wiring Base Assembly Installation Instructions,
publication 1734-IN028
Provides installation information about 1734-TOP, 1734-TOPS, 1734-TOP3
and 1734-TOP3S assemblies
Relay Modules
Relay Output Module Installation Instructions, publication 1734-IN055
Provides installation information about 1734-OW2 and 1734-OW4 modules
Relay Output Module Installation Instructions, publication 1734-IN587
Provides installation information about 1734-OX2 modules
Specialty Modules
Encoder/Counter Module Installation Instructions, publication 1734-IN005
Provides installation information about 1734-IJ and 1734-IK modules
Encoder/Counter Module User Manual, publication 1734-UM006
Describes how to use 1734-IJ and 1734-IK modules
Very High-speed Counter Module Installation Instructions,
publication 1734-IN003
Provides installation information about 1734-VHSC5 and 1734-VHSC24
modules
Very High-speed Counter Module User Manual, publication 1734-UM003
Describes how to use 1734-VHSC5 and 1734-VHSC24 modules
Address Reserve Module Installation Instructions, publication 1734-IN019
Provides installation information about 1734-ARM modules
ASCII RS-232 and 485 Module Installation Instructions, publication
1734-IN588
Provides installation information about 1734-232ASC and 1734-485ASC
modules
ASCII RS-232 and 485 Module User Manual, publication 1734-UM009
Describes how to use 1734-232ASC and 1734-485ASC modules
RTD and Isolated Thermocouple Input Module Installation Instructions,
publication 1734-IN011
Provides installation information about 1734-IR2, 1734-IT2I, and 1734-IR2E
modules
Rockwell Automation Publication 1734-UM001E-EN-P - July 2013
xvi
Preface
Resource
Description
RTD and Isolated Thermocouple Input User Manual, publication
1734-UM004
Describes how to use 1734-IR2, 1734-IT2I, and 1734-IR2E modules
Synchronous Serial Interface Encoder Module Installation Instructions,
publication 1734-IN581
Provides installation information about 1734-SSI modules
Synchronous Serial Interface Encoder Module User Manual, publication
1734-UM007
Describes how to use 1734-SSI modules
Rockwell Automation Publication 1734-UM001E-EN-P - July 2013
Table of Contents
Preface
Purpose of This Manual. . . . . . . . . . . . . . . . . . . . . . . . . . . . . . . . . . . . . . . . . . . 13
Who Should Use This Manual . . . . . . . . . . . . . . . . . . . . . . . . . . . . . . . . . . . . 13
Additional Resources . . . . . . . . . . . . . . . . . . . . . . . . . . . . . . . . . . . . . . . . . . . . . 14
Chapter 1
About the Modules
About This Chapter . . . . . . . . . . . . . . . . . . . . . . . . . . . . . . . . . . . . . . . . . . . . . .
Digital Modules . . . . . . . . . . . . . . . . . . . . . . . . . . . . . . . . . . . . . . . . . . . . . . . . . .
Input Modules . . . . . . . . . . . . . . . . . . . . . . . . . . . . . . . . . . . . . . . . . . . . . . .
Output Modules. . . . . . . . . . . . . . . . . . . . . . . . . . . . . . . . . . . . . . . . . . . . . .
Relay Output Modules . . . . . . . . . . . . . . . . . . . . . . . . . . . . . . . . . . . . . . . .
Analog Modules. . . . . . . . . . . . . . . . . . . . . . . . . . . . . . . . . . . . . . . . . . . . . . . . . .
Input Modules . . . . . . . . . . . . . . . . . . . . . . . . . . . . . . . . . . . . . . . . . . . . . . .
Output Modules. . . . . . . . . . . . . . . . . . . . . . . . . . . . . . . . . . . . . . . . . . . . . .
Specialty Modules . . . . . . . . . . . . . . . . . . . . . . . . . . . . . . . . . . . . . . . . . . . . . . . .
Power Supplies, Wiring Base Assemblies, and Miscellaneous Modules.
17
17
18
18
19
20
21
21
22
22
Chapter 2
Install POINT I/O Modules
About This Chapter . . . . . . . . . . . . . . . . . . . . . . . . . . . . . . . . . . . . . . . . . . . . . .
Install the Mounting Base Assembly . . . . . . . . . . . . . . . . . . . . . . . . . . . . . . .
Install an I/O Module . . . . . . . . . . . . . . . . . . . . . . . . . . . . . . . . . . . . . . . . . . . .
Install the Removable Terminal Block. . . . . . . . . . . . . . . . . . . . . . . . . . . . . .
Remove a Mounting Base . . . . . . . . . . . . . . . . . . . . . . . . . . . . . . . . . . . . . . . . .
Wiring Digital Modules. . . . . . . . . . . . . . . . . . . . . . . . . . . . . . . . . . . . . . . . . . .
1734-IB2, 1734-IB4, and 1734-IB8 Sink Input Modules . . . . . . . . .
1734-IB4D Modules . . . . . . . . . . . . . . . . . . . . . . . . . . . . . . . . . . . . . . . . .
1734-IV2, 1734-IV4, and 1734-IV8 Source Input Modules . . . . . .
1734-OB2E, 1734-OB4E, 1734-OB8E, 1734-OB2,
1734-OB4, and 1734-OB8 Protected Output Modules . . . . . . . . . .
1734-OB2EP Protected Output Modules. . . . . . . . . . . . . . . . . . . . . . .
1734-OW2 and 1734-OW4 Relay Output Module s . . . . . . . . . . . .
1734-OW2 Modules with Load Powered by Internal Power Bus
Wiring Diagram . . . . . . . . . . . . . . . . . . . . . . . . . . . . . . . . . . . . . . . . . . . . . .
1734-OW2 Modules with Load Powered by
External Power Wiring Diagram . . . . . . . . . . . . . . . . . . . . . . . . . . . . . . .
1734-OW4 Modules with Load Powered by
External Power Wiring Diagram . . . . . . . . . . . . . . . . . . . . . . . . . . . . . . .
1734-OV2E, 1734-OV4E, and 1734-OV8E
Sink Output Modules . . . . . . . . . . . . . . . . . . . . . . . . . . . . . . . . . . . . . . . . .
1734-OX2 2-relay Output Modules . . . . . . . . . . . . . . . . . . . . . . . . . . . .
1734-OX2 Module with Load Powered by
Internal Power Bus Wiring Diagram . . . . . . . . . . . . . . . . . . . . . . . . . .
1734-OX2 Modules with Load Powered by External Power Bus
Wiring Diagram . . . . . . . . . . . . . . . . . . . . . . . . . . . . . . . . . . . . . . . . . . . .
Rockwell Automation Publication 1734-UM001E-EN-P - July 2013
23
24
26
28
29
30
30
34
35
38
41
42
42
43
44
47
49
50
50
xviii
1734-IA2 and 1734-IA4 120 V AC Input Modules . . . . . . . . . . . . .
1734-IM2 and 1734-IM4 220V AC Input Modules . . . . . . . . . . . . .
1734-IM2 120V AC 2 Input Module Wiring Diagram . . . . . . . . . .
1734-IM4 2 Input Module Wiring Diagram . . . . . . . . . . . . . . . . . . . .
1734-OA2 and 1734- OA4 120/220V AC Output Modules . . . . .
1734-OA2 AC 2 Output Module Wiring Diagram. . . . . . . . . . . . . .
1734-OA4 AC 2 Output Module Wiring Diagram. . . . . . . . . . . . . .
Wiring Analog Modules . . . . . . . . . . . . . . . . . . . . . . . . . . . . . . . . . . . . . . . . . .
1734-IE2C Analog Current Input Module . . . . . . . . . . . . . . . . . . . . .
1734-IE2C Analog Current Input Module Wiring Diagram . . . . .
1734-IE2V Analog Voltage Input Module . . . . . . . . . . . . . . . . . . . . . .
1734-IE2V Analog Voltage Input Module Wiring Diagram . . . . . .
1734-OE2C Analog Current Output Module . . . . . . . . . . . . . . . . . .
1734-OE2C Analog Current Output Module
Wiring Diagram. . . . . . . . . . . . . . . . . . . . . . . . . . . . . . . . . . . . . . . . . . . . . .
1734-OE2V Analog Voltage Output Module . . . . . . . . . . . . . . . . . . .
1734-OE2V Analog Voltage Output Module
Wiring Diagram. . . . . . . . . . . . . . . . . . . . . . . . . . . . . . . . . . . . . . . . . . . . . .
Wiring Power Distribution and Other Modules . . . . . . . . . . . . . . . . . . . .
1734-PDN Communication Interface Module. . . . . . . . . . . . . . . . . .
1734-PDN Module Wiring Diagram . . . . . . . . . . . . . . . . . . . . . . . . . .
1734-FPD Field Potential Distributor Module. . . . . . . . . . . . . . . . . .
1734-FPD Modules for 12/24V DC Wiring Diagram . . . . . . . . . . .
1734-EP24DC Expansion Power Supply . . . . . . . . . . . . . . . . . . . . . . .
12/24v DC Wiring Diagram . . . . . . . . . . . . . . . . . . . . . . . . . . . . . . . . . .
1734-EPAC AC Expansion Power Supply . . . . . . . . . . . . . . . . . . . . . .
120/240V AC Wiring Diagram . . . . . . . . . . . . . . . . . . . . . . . . . . . . . . .
1734-ARM Address Reserve Module. . . . . . . . . . . . . . . . . . . . . . . . . . .
1734-CTM and 1734-VTM Modules . . . . . . . . . . . . . . . . . . . . . . . . . .
Sink Input Wiring Diagram . . . . . . . . . . . . . . . . . . . . . . . . . . . . . . . . . . .
Source Input Wiring Diagram . . . . . . . . . . . . . . . . . . . . . . . . . . . . . . . . .
Source Output Wiring Diagram . . . . . . . . . . . . . . . . . . . . . . . . . . . . . .
Sink Output Wiring Diagram . . . . . . . . . . . . . . . . . . . . . . . . . . . . . . . . .
General Purpose Wiring Diagram . . . . . . . . . . . . . . . . . . . . . . . . . . . . .
Rockwell Automation Publication 1734-UM001E-EN-P - July 2013
53
55
55
56
57
57
58
59
59
59
60
60
61
61
62
62
63
63
63
65
65
68
68
71
72
74
74
75
75
76
76
76
xix
Chapter 3
Install POINTBlock I/O Modules About This Chapter . . . . . . . . . . . . . . . . . . . . . . . . . . . . . . . . . . . . . . . . . . . . . . 77
Wiring POINTBlock Modules . . . . . . . . . . . . . . . . . . . . . . . . . . . . . . . . . . . .
1734D-IB8XOB8 POINTBlock 8 DC In/8 DC Out Modules. . .
8 Input/8 Output Module Wiring Diagram . . . . . . . . . . . . . . . . . . . .
Sink Input Wiring Diagram . . . . . . . . . . . . . . . . . . . . . . . . . . . . . . . . . . .
Output Wiring Diagram . . . . . . . . . . . . . . . . . . . . . . . . . . . . . . . . . . . . . .
1734D-IB8XOW8 POINTBlock 8 DC In/8 Relay
Out Modules . . . . . . . . . . . . . . . . . . . . . . . . . . . . . . . . . . . . . . . . . . . . . . . . .
8 Input/8 Relay Output Module Wiring Diagram . . . . . . . . . . . . . . .
Sink Input Wiring . . . . . . . . . . . . . . . . . . . . . . . . . . . . . . . . . . . . . . . . . . . .
Output Wiring Diagram (Load Powered by
External Power) . . . . . . . . . . . . . . . . . . . . . . . . . . . . . . . . . . . . . . . . . . . . . .
1734D-IA8XOA8 POINTBlock 8 AC In/8 AC Out Modules. . .
1734D-IA8XOA8 POINTBlock 8 AC In/8 AC Out Modules
Wiring Diagram . . . . . . . . . . . . . . . . . . . . . . . . . . . . . . . . . . . . . . . . . . . . . .
Input Wiring Diagram . . . . . . . . . . . . . . . . . . . . . . . . . . . . . . . . . . . . . . . .
Output Wiring Diagram . . . . . . . . . . . . . . . . . . . . . . . . . . . . . . . . . . . . . .
1734D-IA8XOW8 POINTBlock 8 AC In/8 Relay
Out Modules . . . . . . . . . . . . . . . . . . . . . . . . . . . . . . . . . . . . . . . . . . . . . . . . .
1734D-IA8XOW8 POINTBlock 8 AC In/8 Relay
Out Modules Wiring Diagram. . . . . . . . . . . . . . . . . . . . . . . . . . . . . . . . .
Input Wiring Diagram . . . . . . . . . . . . . . . . . . . . . . . . . . . . . . . . . . . . . . . .
Output Wiring Diagram . . . . . . . . . . . . . . . . . . . . . . . . . . . . . . . . . . . . . .
1734D-IA16 POINTBlock 16 AC Input Modules . . . . . . . . . . . . . .
Wire the 16 AC Input Module Wiring Diagram . . . . . . . . . . . . . . . .
Input Wiring Diagram . . . . . . . . . . . . . . . . . . . . . . . . . . . . . . . . . . . . . . . .
1734D-IB16 POINTBlock 16 DC Input Modules . . . . . . . . . . . . . .
16 DC Input Module Wiring Diagram . . . . . . . . . . . . . . . . . . . . . . . . .
Sink Input Wiring Diagram . . . . . . . . . . . . . . . . . . . . . . . . . . . . . . . . . .
Rockwell Automation Publication 1734-UM001E-EN-P - July 2013
78
78
78
79
80
82
82
82
84
85
85
86
87
88
88
89
90
91
91
92
94
94
95
xx
Chapter 4
POINT I/O Module Data
About This Chapter. . . . . . . . . . . . . . . . . . . . . . . . . . . . . . . . . . . . . . . . . . . . . . 97
Digital Input Modules . . . . . . . . . . . . . . . . . . . . . . . . . . . . . . . . . . . . . . . . . . . . 97
Digital DC Input Modules . . . . . . . . . . . . . . . . . . . . . . . . . . . . . . . . . . . . 97
Digital AC Input Modules . . . . . . . . . . . . . . . . . . . . . . . . . . . . . . . . . . . . 99
Digital Output Modules . . . . . . . . . . . . . . . . . . . . . . . . . . . . . . . . . . . . . . . . . 100
Digital DC Output Modules . . . . . . . . . . . . . . . . . . . . . . . . . . . . . . . . . 100
Digital AC Output Modules . . . . . . . . . . . . . . . . . . . . . . . . . . . . . . . . . 102
Relay Output Modules . . . . . . . . . . . . . . . . . . . . . . . . . . . . . . . . . . . . . . . . . . 103
Analog Input Modules. . . . . . . . . . . . . . . . . . . . . . . . . . . . . . . . . . . . . . . . . . . 104
Data. . . . . . . . . . . . . . . . . . . . . . . . . . . . . . . . . . . . . . . . . . . . . . . . . . . . . . . . 104
Communicate with Your Module. . . . . . . . . . . . . . . . . . . . . . . . . . . . . 105
Scaling. . . . . . . . . . . . . . . . . . . . . . . . . . . . . . . . . . . . . . . . . . . . . . . . . . . . . . 106
Channel Status . . . . . . . . . . . . . . . . . . . . . . . . . . . . . . . . . . . . . . . . . . . . . . 106
Latch Alarms. . . . . . . . . . . . . . . . . . . . . . . . . . . . . . . . . . . . . . . . . . . . . . . . 107
Alarm Disable. . . . . . . . . . . . . . . . . . . . . . . . . . . . . . . . . . . . . . . . . . . . . . . 107
Calibration Status . . . . . . . . . . . . . . . . . . . . . . . . . . . . . . . . . . . . . . . . . . . 107
Digital Filter . . . . . . . . . . . . . . . . . . . . . . . . . . . . . . . . . . . . . . . . . . . . . . . . 108
Update Rate . . . . . . . . . . . . . . . . . . . . . . . . . . . . . . . . . . . . . . . . . . . . . . . . 108
Notch Filter . . . . . . . . . . . . . . . . . . . . . . . . . . . . . . . . . . . . . . . . . . . . . . . . 108
Alarms . . . . . . . . . . . . . . . . . . . . . . . . . . . . . . . . . . . . . . . . . . . . . . . . . . . . . 109
Range Status . . . . . . . . . . . . . . . . . . . . . . . . . . . . . . . . . . . . . . . . . . . . . . . . 109
Channel Indicator Behavior . . . . . . . . . . . . . . . . . . . . . . . . . . . . . . . . . . 110
Analog Output Modules. . . . . . . . . . . . . . . . . . . . . . . . . . . . . . . . . . . . . . . . . 110
Data. . . . . . . . . . . . . . . . . . . . . . . . . . . . . . . . . . . . . . . . . . . . . . . . . . . . . . . . 110
Operational Modes . . . . . . . . . . . . . . . . . . . . . . . . . . . . . . . . . . . . . . . . . . 112
Scaling. . . . . . . . . . . . . . . . . . . . . . . . . . . . . . . . . . . . . . . . . . . . . . . . . . . . . . 112
Fault and Idle/Program Mode Action . . . . . . . . . . . . . . . . . . . . . . . . . 113
Channel Status . . . . . . . . . . . . . . . . . . . . . . . . . . . . . . . . . . . . . . . . . . . . . . 114
Low and High Clamps . . . . . . . . . . . . . . . . . . . . . . . . . . . . . . . . . . . . . . . 115
Latch Alarms. . . . . . . . . . . . . . . . . . . . . . . . . . . . . . . . . . . . . . . . . . . . . . . . 115
Alarm Disable. . . . . . . . . . . . . . . . . . . . . . . . . . . . . . . . . . . . . . . . . . . . . . . 115
Channel Indicators . . . . . . . . . . . . . . . . . . . . . . . . . . . . . . . . . . . . . . . . . . 116
POINTBlock I/O Modules . . . . . . . . . . . . . . . . . . . . . . . . . . . . . . . . . . . . . . 116
Rockwell Automation Publication 1734-UM001E-EN-P - July 2013
xxi
Chapter 5
Calibrate Your Analog Modules About This Chapter . . . . . . . . . . . . . . . . . . . . . . . . . . . . . . . . . . . . . . . . . . . . . 121
Tools Required to Calibrate Your Analog Modules. . . . . . . . . . . . . . . . .
Calibrate the Analog Current Input Module. . . . . . . . . . . . . . . . . . . . . . .
Calibrate the Analog Current Output Module. . . . . . . . . . . . . . . . . . . . .
Calibrate the Analog Voltage Input Module . . . . . . . . . . . . . . . . . . . . . . .
Calibrate the Analog Voltage Output Module . . . . . . . . . . . . . . . . . . . . .
122
123
127
132
136
Chapter 6
Troubleshoot with the
Indicators
About This Chapter . . . . . . . . . . . . . . . . . . . . . . . . . . . . . . . . . . . . . . . . . . . . .
About Module Diagnostics . . . . . . . . . . . . . . . . . . . . . . . . . . . . . . . . . . .
Network and Module Status Indications. . . . . . . . . . . . . . . . . . . . . . .
Troubleshoot Digital Modules . . . . . . . . . . . . . . . . . . . . . . . . . . . . . . . . . . .
1734-IB2, 1734-IB4, and 1734-IB8 Sink Input Modules . . . . . . . .
1734-IB4D Sink Input Modules with Diagnostics . . . . . . . . . . . . . .
1734-OB2E, 1734-OB4E, and 1734-OB8E Source
Output Modules. . . . . . . . . . . . . . . . . . . . . . . . . . . . . . . . . . . . . . . . . . . . .
1734-OB2, 1734-OB4, and 1734-OB8 Source
Output Modules. . . . . . . . . . . . . . . . . . . . . . . . . . . . . . . . . . . . . . . . . . . . .
1734-OB2EP Protected Output Module . . . . . . . . . . . . . . . . . . . . . .
1734-IV2, 1734-IV4, and 1734-IV8 Source Input Modules . . . . .
1734-OV2E, 1734-OV4E, and 1734-OV8E
Protected Sink Output Modules . . . . . . . . . . . . . . . . . . . . . . . . . . . . . .
1734-OW2 and 1734-OW4 Relay Output Modules. . . . . . . . . . . .
1734-OX2 Relay Output Module . . . . . . . . . . . . . . . . . . . . . . . . . . . . .
1734-IA2 and 1734-IA4 120V AC Input Module . . . . . . . . . . . . . .
1734-OA2 and 1734-OA4 120/220V AC Output Module . . . . .
1734-IM2 and 1734-IM4 220V AC Input Module . . . . . . . . . . . . .
Troubleshoot Analog Modules . . . . . . . . . . . . . . . . . . . . . . . . . . . . . . . . . . .
1734-IE2C Analog Current Input Module . . . . . . . . . . . . . . . . . . . .
1734-OE2C Analog Current Output Module . . . . . . . . . . . . . . . . .
1734-IE2V Analog Voltage Input Module . . . . . . . . . . . . . . . . . . . . .
1734-OE2V Analog Voltage Output Module. . . . . . . . . . . . . . . . . .
Troubleshoot I/O Communication Modules . . . . . . . . . . . . . . . . . . . . . .
1734-ADN (X) DeviceNet Adapter. . . . . . . . . . . . . . . . . . . . . . . . . . .
1734-ACNR ControlNet Adapter . . . . . . . . . . . . . . . . . . . . . . . . . . . .
1734-APB PROFIBUS Adapter . . . . . . . . . . . . . . . . . . . . . . . . . . . . . .
1734-AENT EtherNet/IP Adapter . . . . . . . . . . . . . . . . . . . . . . . . . . .
Rockwell Automation Publication 1734-UM001E-EN-P - July 2013
141
141
142
144
144
144
145
145
146
146
147
148
149
149
150
150
151
151
152
152
153
154
155
157
160
162
xxii
Appendix A
Default Data Maps
About This Appendix . . . . . . . . . . . . . . . . . . . . . . . . . . . . . . . . . . . . . . . . . . .
Digital Module Default Data Maps . . . . . . . . . . . . . . . . . . . . . . . . . . . . . . .
1734-IB2 Sink Input Module. . . . . . . . . . . . . . . . . . . . . . . . . . . . . . . . .
1734-IB4 Sink Input Module. . . . . . . . . . . . . . . . . . . . . . . . . . . . . . . . .
1734-IB8 Sink Input Module. . . . . . . . . . . . . . . . . . . . . . . . . . . . . . . . .
1734-IB4D Sink Input Modules with Diagnostics. . . . . . . . . . . . . .
1734-IV2 Source Input Module . . . . . . . . . . . . . . . . . . . . . . . . . . . . . .
1734-IV4 Source Input Module . . . . . . . . . . . . . . . . . . . . . . . . . . . . . .
1734-IV8 Source Input Module . . . . . . . . . . . . . . . . . . . . . . . . . . . . . .
1734-IA2 Input Module . . . . . . . . . . . . . . . . . . . . . . . . . . . . . . . . . . . . .
1734-IA4 Input Module . . . . . . . . . . . . . . . . . . . . . . . . . . . . . . . . . . . . .
1734-IM2 Input Module. . . . . . . . . . . . . . . . . . . . . . . . . . . . . . . . . . . . .
1734-IM4 Input Module. . . . . . . . . . . . . . . . . . . . . . . . . . . . . . . . . . . . .
1734-OA2 Output Module . . . . . . . . . . . . . . . . . . . . . . . . . . . . . . . . . .
1734-OA4 Output Module . . . . . . . . . . . . . . . . . . . . . . . . . . . . . . . . . .
1734-OB2E, 1734-OB2 Electronically Protected
Output Module . . . . . . . . . . . . . . . . . . . . . . . . . . . . . . . . . . . . . . . . . . . . .
1734-OB4E, 1734-OB4 Electronically Protected
Output Module . . . . . . . . . . . . . . . . . . . . . . . . . . . . . . . . . . . . . . . . . . . . .
1734-OB8E, 1734-OB8 Electronically Protected
Output Module . . . . . . . . . . . . . . . . . . . . . . . . . . . . . . . . . . . . . . . . . . . . .
1734-OB2EP Protected Output Module . . . . . . . . . . . . . . . . . . . . . .
1734-OV2E Output Module . . . . . . . . . . . . . . . . . . . . . . . . . . . . . . . . .
1734-OV4E Output Module . . . . . . . . . . . . . . . . . . . . . . . . . . . . . . . . .
1734-OV8E Output Module . . . . . . . . . . . . . . . . . . . . . . . . . . . . . . . . .
1734-OW2 Relay Sink/Source Output Module. . . . . . . . . . . . . . . .
1734-OW4 Relay Sink/Source Output Module. . . . . . . . . . . . . . . .
1734-OX2 Relay Output Module. . . . . . . . . . . . . . . . . . . . . . . . . . . . .
Analog Module Default Data Maps . . . . . . . . . . . . . . . . . . . . . . . . . . . . . . .
1734-IE2C Analog Current Input Module . . . . . . . . . . . . . . . . . . . .
1734-IE2V Analog Voltage Input Module . . . . . . . . . . . . . . . . . . . . .
1734-OE2C Analog Current Output Module . . . . . . . . . . . . . . . . .
1734-OE2V Analog Voltage Output Module . . . . . . . . . . . . . . . . . .
165
166
166
166
166
167
168
168
168
169
169
169
169
170
170
170
171
171
171
172
172
173
173
173
174
174
174
175
175
176
Appendix B
Mounting Dimensions
About This Appendix . . . . . . . . . . . . . . . . . . . . . . . . . . . . . . . . . . . . . . . . . . .
POINT I/O Module with a 1734-ADN, 1734-ACNR,
1734-AENT, or 1734-APB Adapter . . . . . . . . . . . . . . . . . . . . . . . . . . . . . .
POINT I/O Module with a 1734-PDN Module. . . . . . . . . . . . . . . . . . .
POINTBlock Module . . . . . . . . . . . . . . . . . . . . . . . . . . . . . . . . . . . . . . . . . . .
Rockwell Automation Publication 1734-UM001E-EN-P - July 2013
179
180
181
182
xxiii
Appendix C
Configure POINT I/O Modules in About This Appendix . . . . . . . . . . . . . . . . . . . . . . . . . . . . . . . . . . . . . . . . . . . 183
Use the Help Button . . . . . . . . . . . . . . . . . . . . . . . . . . . . . . . . . . . . . . . . . . . . 183
RSLogix 5000 Software
Configure Digital Modules. . . . . . . . . . . . . . . . . . . . . . . . . . . . . . . . . . . . . . .
About Fault/Program Action and Configuration Dialogs . . . . . . .
Understanding Data and Connection Formats . . . . . . . . . . . . . . . . .
Understanding Transition to Hard Run Behavior . . . . . . . . . . . . . .
Working with Dialogs for Digital Input Modules. . . . . . . . . . . . . . .
Working with Dialogs for Digital Output Modules. . . . . . . . . . . . .
Configure Analog Modules . . . . . . . . . . . . . . . . . . . . . . . . . . . . . . . . . . . . . .
Understanding Data and Connection Formats . . . . . . . . . . . . . . . . .
Working with Dialogs for Analog Input Modules . . . . . . . . . . . . . .
Working with Dialogs for Analog Output Modules . . . . . . . . . . . .
183
186
186
187
188
190
195
196
197
203
Appendix D
Configure POINT I/O Modules
for DeviceNet Networks
About This Appendix . . . . . . . . . . . . . . . . . . . . . . . . . . . . . . . . . . . . . . . . . . .
Configuring POINT I/O Modules . . . . . . . . . . . . . . . . . . . . . . . . . . . . . . .
Commissioning a Node . . . . . . . . . . . . . . . . . . . . . . . . . . . . . . . . . . . . . . . . . .
Using the RSNetWorx Commissioning Tool . . . . . . . . . . . . . . . . . .
Use Sequential Auto Addressing . . . . . . . . . . . . . . . . . . . . . . . . . . . . . .
Using Third-party Configuration Software . . . . . . . . . . . . . . . . . . . .
Configure Digital Modules Using RSNetWorx Software . . . . . . . . . . .
Configure Analog Modules Using RSNetWorx Software . . . . . . . . . . .
Index
Rockwell Automation Publication 1734-UM001E-EN-P - July 2013
211
211
211
211
213
213
213
227
xxiv
Notes:
Rockwell Automation Publication 1734-UM001E-EN-P - July 2013
Chapter
About the Modules
About This Chapter
This chapter introduces POINT I/O and related modules to include the
following:
• Digital modules
• Relay output modules
• Analog modules
• Specialty modules
• Power supplies, wiring base assemblies, and miscellaneous modules
Digital Modules
This table lists the1734 digital modules.
Digital Module Description
Cat. No.
2, 4, and 8 sink input modules
1734-IB2, 1734-IB4, 1734-IB8, 1734-IB4D
2, 4, and 8 source input modules
1734-IV2, 1734-IV4, 1734-IV8
2, 4, and 8 sink output modules
1734-OV2E, 1734-OV4E, 1734-OV8E
2, 4, and 8 protected
source output modules
1734-OB2, 1734-OB4, 1734-OB8,
1734-OB2E, 1734-OB4E, 1734-OB8E
2 protected source output modules
1734-OB2EP
2 and 4 relay output modules
1734-OW2, 1734-OW4
2 relay output modules
1734-OX2
2 120/220V AC output modules
1734-OA2, 1734-OA4
2 120V AC input modules
1734-IA2, 1734-IA4
2 240V AC input modules
1734-IM2, 1734-IM4
This table lists the 1734D POINTBlock modules.
POINTBlock Module Description
Cat. No.
8 AC input and 8 AC output
1734D-IA8XOA8 and 1734-IA8XOA8S
8 AC input and 8 relay output
1734D-IA8XOW8 and 1734-IA8XOW8S
8 DC input and 8 DC output
1734D-IB8XOB8 and 1734-IB8XOB8S
8 DC input and 8 relay output
1734D-IB8XOW8 and 1734-IB8XOW8S
16 AC input
1734D-IA16 and 1734-IA16S
16 DC input
1734D-IB16 and 1734-IB16S
Rockwell Automation Publication 1734-UM001E-EN-P - July 2013
1
2
About the Modules
Input Modules
For input modules, DC inputs are 24V DC nominal, with an input range of
10…28.8V dc, and are offered with 2, 4,or 8 sinking style inputs, or 2, 4, or 8
sourcing style inputs. The 1734-IB2, 1734-IB4, 1734-IB4D, and 1734-IB8 input
modules are sinking modules. The 1734-IV2, 1734-IV4, and 1734-IV8 modules
are sourcing input modules.
For input modules, AC inputs are 120V AC nominal with an input range of
85…132V ac, or 220V AC nominal with an input range of 159…264V ac, with
sinking inputs.
Features of the all input modules include the following:
• Autobaud (will match baud of existing devices on the network)
• Selectable input filter times (0…65 ms with 1 ms default)
• Sequential auto addressing
Output Modules
The 1734-OB2, 1734-OB4, 1734-OB8, 1734-OB2E, 1734-OB4E, and 1734OB8E DC output modules have current limited sourcing outputs, which source a
positive voltage of up to 1 A with respect to their DC return per channel. The
1734-OB2EP sources a positive voltage of up to 2 A with respect to its DC
return per channel. The outputs are not isolated from each other. For these
modules, DC outputs are 24V DC nominal, with a range of 10…28.8V dc. A
number of output diagnostic features are incorporated to assist in
troubleshooting. The 1734-OB2E, 1734-OB2EP, 1734-OB4E, and 1734-OB8E
modules feature the following:
• Output diagnostics (short circuit and wire-off indication and reporting
bits per channel)
• Current limited outputs
• Autobaud (will match baud of existing devices on the network)
• Sequential auto addressing
The 1734-OV2E, 1734-OV4E, and 1734-OV8E modules are protected sink
output modules protected to 1 A. The outputs are not isolated from each other.
For these modules, DC outputs are 24V DC nominal, with a range of 10…28.8V
dc. A number of output diagnostic features are incorporated to assist in
troubleshooting. The 1734-OV2E, 1734-OV4E, and 1734-OV8E modules
feature the following (note that 1734-OV2E, 1734-OV4E, and 1734-OV8E
modules have no wire-off indication):
• Output diagnostics (short circuit and reporting bits per channel)
• Current limited outputs
• Autobaud (will match baud of existing devices on the network)
• Sequential auto addressing
Rockwell Automation Publication 1734-UM001E-EN-P - July 2013
About the Modules
3
The 1734-OA2 and 1734-OA4 AC output modules have sourcing outputs,
which source a voltage of up to 0.75 A per channel. The outputs are not isolated
from each other. For this module, AC outputs are 120/220V AC nominal, with a
range of 74…264V dc. The 1734-OA2 and 1734-OA4 modules feature the
following:
• Autobaud (will match baud of existing devices on the network)
• Sequential auto addressing
Relay Output Modules
Two versions of relay modules are:
• 1734-OW2, 1734-OW4 relay module.
• 1734-OX2 relay module.
The 1734-OW2 and 1734-OW4 relay outputs are Type A (Normally Open),
the 1734-OX2 relay outputs are Type 2 Form C. Both modules’ outputs sink or
source a current with respect to power or return. Contact outputs are isolated
from each other. Each output is rated 5…240V rms at 2 A (current is load
dependant). Features include:
• Autobaud (will match baud of existing devices on the network).
• Sequential auto addressing.
Analog Modules
The 1734 analog modules consist of input modules (1734-IE2C and 1734IE2V) and output modules (1734-OE2C and 1734-OE2V). Each module has
two single-ended, non-isolated channels.
Cat. No.
Module Type
Number of
Channels
Resolution
1734-IE2C
Analog Input
2
16 bits across 0…21 mA
1734-IE2V
Analog Input
2
15 bits plus sign across -10…10V
1734-OE2C
Analog Output
2
13 bits across 0…21 mA
1734-OE2V
Analog Output
2
14 bits across -10…10V
The features of the analog modules depend on the type of analog module: input
or output. These are features common to both input and output modules.
• Data - The current input and output modules operate in unipolar mode
only. Voltage input and output modules operate in unipolar or bipolar
modes. Data returned from the module is scaled by the user to any 16 bit
signed integer
(–32,768...+32,767).
• Input modules produce 6 bytes of data.
– Channel 0 Data (2 bytes)
– Channel 1 Data (2 bytes)
– Channel 0 Status (1 byte)
Rockwell Automation Publication 1734-UM001E-EN-P - July 2013
4
About the Modules
•
•
•
•
•
– Channel 1 Status (1 byte)
Output modules consume 4 bytes of data.
– Channel 0 Data (2 bytes)
– Channel 1 Data (2 bytes)
Output modules produce 2 bytes of data.
– Channel 0 Status (1 byte)
– Channel 1 Status (1 byte)
Operational modes
– Current - two modes
• 0 to 20 mA
• 4 to 20 mA (default mode)
– Voltage - two modes
• 0 to 10V (default mode)
• -10 to +10V
Individually set channel mode
Scaling - conversion to engineering units
Input Modules
These features are available on input modules.
• Latching alarms, when set, latch low- and high-alarm status information.
Available alarms include:
– Low.
– Low Low.
– High.
– High High.
• Disable alarms - disables all channel alarms and faults so they are not
reported in the channel status field. Four different alarms are available.
• Settable update rate update rate determines how often an input channel is
scanned.
• Notch filter is selectable for both inputs (50, 60, 250, and
500 Hz).
• Digital filter sets a time constant.
Output Modules
These are features available on output modules.
• Latching alarms, when set, latch low and high clamp alarm status
information.
Rockwell Automation Publication 1734-UM001E-EN-P - July 2013
About the Modules
5
• Low and high clamps can be set individually or on a channel basis. When
the output value reaches clamp value, a status bit is set, indicating the
output is clamped.
• Disable alarms - disables all channel alarms and faults so they are not
reported in the channel status field.
• Fault and Idle mode action let you select what happens to the output if
a fault occurs or if the module is in idle mode. The choices are the
following:
– Hold Last State
– Low Clamp
– High Clamp
– User-defined value
Specialty Modules
Power Supplies, Wiring
Base Assemblies, and
Miscellaneous Modules
For more information about the following 1734 specialty modules, refer to the
installation instructions and user manuals listed in the Related Products and
Documentation section of this manual.
Module Description
Cat. No.
5V Encoder/Counter Module
1734-IJ
24V Encoder/Counter Module
1734-IK
24V Very High-speed Counter Module
1734-VHSC24
5V Very High-speed Counter Module
1734-VHSC5
ASCII RS-232 and RS-485 Module
1734-232ASC, 1734-485ASC
Isolated Thermocouple Input Module
1734-IT2I
RTD Input Module
1734-IR2, 1734-IR2E
Synchronous Serial-interface Encoder Module
1734-SSI
For more information about the following, refer to the installation instructions
and user manuals listed in the Related Products and Documentation section of
this manual.
Module Description
Cat. No.
Cold-junction Wiring Base Assembly
1734-TBCJC
Field Potential Distributor
1734-FPD
POINT I/O 24V DC Expansion Power Supply
1734-EP24DC
POINT I/O Common Terminal Module
1734-CTM
POINT I/O Voltage Terminal Module
1734-VTM
Wiring Base Assembly
1734-TB, 1734-TBS,
1734-TB3, 1734-TB3S,
1734-TOP, 1734-TOPS,
1734-TOP3, 1734-TOP3S
Address Reserve Module
1734-ARM
Rockwell Automation Publication 1734-UM001E-EN-P - July 2013
6
About the Modules
Notes:
Rockwell Automation Publication 1734-UM001E-EN-P - July 2013
Chapter
2
Install POINT I/O Modules
About This Chapter
Read this chapter for installation and wiring information including how to
complete the following:
• Install the mounting base assembly.
• Install an I/O module.
• Install the removable terminal block.
• Remove a mounting base.
• Wire digital modules.
• Wire analog modules.
• Wire power distribution and other modules, such as communication
interface modules, field potential distributor modules, expansion power
supplies, and addressable reserve modules.
Environment and Enclosure
ATTENTION:
This equipment is intended for use in a Pollution Degree 2 industrial
environment, in overvoltage Category II applications (as defined in IEC
publication 60664-1), at altitudes up to 2000 m (6561 ft) without derating.
This equipment is considered Group 1, Class A industrial equipment
according to IEC/CISPR Publication 11. Without appropriate precautions,
there may be potential difficulties ensuring electromagnetic compatibility
in other environments due to conducted as well as radiated disturbance.
This equipment is supplied as open-type equipment. It must be mounted
within an enclosure that is suitably designed for those specific
environmental conditions that will be present and appropriately designed
to prevent personal injury resulting from accessibility to live parts. The
interior of the enclosure must be accessible only by the use of a tool.
Subsequent sections of this publication may contain additional information
regarding specific enclosure type ratings that are required to comply with
certain product safety certifications.
See NEMA Standards publication 250 and IEC publication 60529, as
applicable, for explanations of the degrees of protection provided by
different types of enclosure. Also, see the appropriate sections in this
publication, as well as the Allen-Bradley publication 1770-4.1 (Industrial
Automation Wiring and Grounding Guidelines), for additional installation
requirements pertaining to this equipment.
Rockwell Automation Publication 1734-UM001E-EN-P - July 2013
8
Install POINT I/O Modules
ATTENTION: POINT I/O is grounded through the DIN rail to chassis
ground. Use zinc-plated, yellow-chromated steel DIN rail to assure
proper grounding. The use of DIN rail materials (for example, aluminum
or plastic) that can corrode, oxidize, or are poor conductors, can result in
improper or intermittent grounding.
Secure DIN rail to mounting surface approximately every 200 mm
(7.8 in.).
Explosion Hazard
WARNING:
• Do not disconnect equipment unless power has been removed or the
area is known to be nonhazardous.
• Do not disconnect connections to this equipment unless power has been
removed or the area is known to be nonhazardous. Secure any external
connections that mate to this equipment by using screws, sliding
latches, threaded connectors, or other means provided with this product.
• Substitution of components may impair suitability for Class I, Division 2.
• If this product contains batteries, they must only be changed in an area
known to be nonhazardous.
Prevent Electrostatic Discharge
ATTENTION: This equipment is sensitive to electrostatic discharge,
which can cause internal damage and affect normal operation. Follow
these guidelines when you handle this equipment:
•
•
•
•
•
•
Rockwell Automation Publication 1734-UM001E-EN-P - July 2013
Touch a grounded object to discharge potential static.
Wear an approved grounding wriststrap.
Do not touch connectors or pins on component boards.
Do not touch circuit components inside the equipment.
Use a static-safe workstation, if available.
Store the equipment in appropriate static-safe packaging when not in
use.
Install POINT I/O Modules
Install the Mounting Base
Assembly
9
The 1734-TB, 1734-TBS, 1734-TB3, or 1734-TB3S wiring base assembly
consists of a 1734-MB mounting base and a 1734-RTB or 1734-RTBS removable
terminal block.
An alternative is the 1734-TOP, 1734-TOPS, 1734-TOP3, or 1734-TOP3S
POINT I/O one-piece terminal base.
Refer to the figures that show these wiring bases.
2
1
0
2
S 4V
O ou DC
ut rc
pu e
t
N
S e
1
N ta tw
O tu o
D s rk
E:
1
M
S t od
at u
us le
To install the mounting base assembly on the DIN rail, proceed as follows.
3
1
O 73
B 4
4E
2
10
9
8
3
4
7
6
5
46145
Description
Description
1
Module Locking Mechanism
2
Slide-in Writable Label
3
RTB Removing Handle
4
Removable Terminal Block (RTB)
5
Mounting Base
6
Interlocking Side Pieces
7
DIN Rail Locking Screw (orange)
8
Mechanical Keying (orange)
9
Module Wiring Diagram
10
Insertable I/O Module
Rockwell Automation Publication 1734-UM001E-EN-P - July 2013
10
Install POINT I/O Modules
1
2
9
3
8
4
7
6
5
46116
Description
Description
1
Module Locking Mechanism
2
Slide-in Writable Label
3
Insertable I/O Module
4
Handle
5
One-piece Terminal Base with
Screw or Spring Clamp
6
Interlocking Side Pieces
7
Mechanical Keying (orange)
8
DIN Rail Locking Screw (orange)
9
Module Wiring Diagram
1. Position the mounting base (wiring base assembly) vertically above the
installed units (adapter, power supply, or existing module).
2. Slide the mounting base down, allowing the interlocking side pieces to
engage the adjacent module, power supply, or adapter.
46117
3. Press firmly to seat the mounting base on the DIN rail.
Rockwell Automation Publication 1734-UM001E-EN-P - July 2013
Install POINT I/O Modules
11
The mounting base snaps into place.
4. To remove the mounting base from the DIN rail, remove any installed
module (and any module immediately to the right), and use a small-bladed
screwdriver to rotate the DIN-rail locking screw to a vertical position and
release the locking mechanism.
5. Lift straight up to remove the mounting base.
Install an I/O Module
Install the module before or after base installation. Make sure that the mounting
base is correctly keyed before installing the module into the mounting base. In
addition, make sure the mounting base locking screw is positioned horizontal
referenced to the base.
WARNING: When you insert or remove the module while
backplane power is on, an electrical arc can occur. This could cause
an explosion in hazardous location installations. Be sure that power
is removed or the area is nonhazardous before proceeding.
1. Using a bladed screwdriver, rotate the keyswitch on the mounting base
clockwise until the number required for the type of module aligns with the
notch in the base.
Notch
Position 3 is shown
46148
Module
Keyswitch Position
1734-ARM (1)
–
1734-CTM, 1734-VTM
5
1734-IA2, 1734-IA4
8
1734-IB2,1734-IB4, 1734-IB8
1
1734-IE2C, 1734-IE2V
3
1734-IM2, 1734-IM4
8
1734-IV2, 1734-IV4, 1734-IV8
1
1734-OA2, 1734-OA4
8
1734-OB2, 1734-OB4, 1734-OB8, 1734-OB2E, 1734-OB4E, 1734-OB8E
1
1734-OB2EP
1
1734-OE2C, 1734-OE2V
4
1734-OV2E, 1734-OV4E, 1734-OV8E
1
1734-OW2, 1734-OW4
7
1734-OX2
7
(1) Use the same keyswitch position as the removed module.
Rockwell Automation Publication 1734-UM001E-EN-P - July 2013
12
Install POINT I/O Modules
2. Make certain the DIN-rail locking screw is in the horizontal position,
noting that you cannot insert the module if the locking mechanism is
unlocked.
46149
M
Sta od
tu ule
s
1
O 73
B 4
4E
3
2
1
0
2
S 4V
O ou DC
utp rc
ut e
N
S e
N ta tw
O tu o
D s rk
E:
3. Insert the module straight down into the mounting base and press to
secure, locking the module into place.
46150
Install the Removable
Terminal Block
A removable terminal block is supplied with your mounting base assembly. To
remove, pull up on the removable terminal block (RTB) handle. This lets you
remove and replace the base as necessary without removing any of the wiring. To
reinsert the removable terminal block, proceed as follows.
WARNING: When you connect or disconnect the RTB with field-side
power applied, an electrical arc can occur. This could cause an explosion
in hazardous location installations. Be sure to remove power or that the
area is nonhazardous before proceeding.
1. Insert the RTB end opposite the handle into the base unit.
This end has a curved section that engages with the mounting base.
Rockwell Automation Publication 1734-UM001E-EN-P - July 2013
Install POINT I/O Modules
13
2. Rotate the terminal block into the mounting base until it locks itself in
place.
3. If an I/O module is installed, snap the RTB handle into place on the
module.
Remove a Mounting Base
To remove a mounting base, you must remove any installed module, and remove
the removable terminal block (RTB), if wired.
WARNING: When you insert or remove the module while backplane
power is on, an electrical arc can occur. This could cause an explosion in
hazardous location installations. Be sure to remove power or that the
area is nonhazardous before proceeding.
1. Unlatch the RTB handle on the I/O module.
2. Pull on the RTB handle to remove the RTB.
3. Press in on the module lock on the top of the module, and pull up on the
I/O module to remove it from the base.
4. Remove the module to the right of the base you are removing, noting that
the interlocking portion of the base sits under the adjacent module.
5. Use a small-bladed screwdriver to rotate the orange DIN-rail locking screw
on the mounting base to a vertical position, noting that this releases the
locking mechanism.
6. Lift the mounting base straight up to remove.
30880
Rockwell Automation Publication 1734-UM001E-EN-P - July 2013
14
Install POINT I/O Modules
Wiring Digital Modules
Refer to this section to wire digital modules.
1734-IB2, 1734-IB4, and 1734-IB8 Sink Input Modules
1734-IB4
1734-IB2
1734-IB8
Module
Status
Module
Status
Module
Status
Network
Status
Network
Status
Network
Status
NODE:
NODE:
NODE:
24VDC
Sink
Input
24VDC
Sink
Input
0
Status of Input 0
0
1
Status of Input 1
1
24VDC
Sink
Input
Status of Input 0
Status of Input 1
Status of Input 2
Status of Input 3
2
3
0
4
1
5
2
6
3
Input 0
NC
Status - Input 1 & 5
Status - Input 2 & 6
Status - Input 3 & 7
7
1734
IB8
1734
IB4
1734
IB2
Status - Input 0 & 4
Input 1
Input 0
Input 1
Input 0
Input 1
NC
Input 2
Input 3
Input 2
Input 3
C
C
C
C
Input 4
Input 5
V
V
V
V
Input 6
Input 7
Input = 0 and 1
NC = No Connection (2 and 3)
C = Common (4 and 5)
V = Supply (6 and 7)
Input = 0, 1, 2 and 3
C = Common (4 and 5)
V = Supply (6 and 7)
Input = 0, 1, 2, 3, 4, 5, 6 and 7
V and C are daisychained from either the adapter,
1734-FPD module, 1734-EP24DC power supply, or a
user-supplied auxiliary terminal block.
1734-IB2 Module Wiring Diagram
Sink Input
0
Prox
2-wire
2
4
6
V = 12/24V DC
C = Common
1
In 0
In 1
NC
NC
C
C
V
V
3
Prox
5
3-wire
7
Channel
Input
Common
Voltage
0
0
4
6
1
1
5
7
Connect common on 3-wire proximity switches. 12/24V DC is supplied
through the internal power bus.
Rockwell Automation Publication 1734-UM001E-EN-P - July 2013
Install POINT I/O Modules
1734-IB4 Module Wiring Diagram
Sink Input
0
1
In 0
2-wire
3-wire
In 1
2
3
In 2
Prox
Prox
In 3
4
6
Prox
5
C
C
V
V
Prox
7
V = 12/24V DC
C = Common
Channel
Input
Common
Voltage
0
0
4
6
1
1
5
7
2
2
4
6
3
3
5
7
Connect common on 3- proximity switches. 12/24V DC is supplied
through the internal power bus.
1734-IB8 Module Wiring Diagram
Sink Input
3-wire
3-wire
0
Prox
1
In 0
2-wire
Prox
3-wire
Prox
3
In 3
4
2-wire
Prox
V
2
In 2
Prox
In 1
2-wire
Prox
3-wire
Prox
5
In 4
In 5
In 6
In 7
6
7
2-wire
Prox
C
C
V = 12/24V DC
C = Common
Channel
Input
Channel
Input
0
0
4
4
1
1
5
5
Rockwell Automation Publication 1734-UM001E-EN-P - July 2013
V
15
16
Install POINT I/O Modules
Channel
Input
Channel
Input
2
2
6
6
3
3
7
7
Daisychain common and power connections from 1734 adapter,
1734-FPD module, 1734-EP24DC power supply, or from a usersupplied external auxiliary terminal block.
ATTENTION: When connecting more than one wire in a termination
point, make sure that both wires are the same gauge and type.
Example of Wiring - 1734-IB8 Module Using 2-Wire Proximity Switches
Module
Status
Module
Status
Network
Status
Network
Status
DeviceNet
System
Power
DeviceNet
Power
0
4
0
4
1
5
1
5
2
6
2
6
7
3
3
1734
OB8E
7
1734
IB8
Prox
Prox
Prox
Prox
Prox
Prox
Prox
Prox
24V dc Return
24V dc
Terminal Block with Bus connector strip
Terminal Block
with Bus Connector Strip
Rockwell Automation Publication 1734-UM001E-EN-P - July 2013
Install POINT I/O Modules
17
Example of Wiring - 1734-IB8 Module Using 3-wire Proximity Switches
1734-IB8
1
0
In 0
V
V
5
In 4
In 5
V
In 6
In 7
Prox
V
5
4
7
6
C
C
C
3
5
C
V
6
7
6
V
4
C
2
3
In 3
4
V
2
3
1
0
1
0
Prox
In 1
2
In 2
1734-CTM
1734-VTM
7
C
V
C
C
C = Common
V = Voltage Out
Example of Wiring - 1734-IB8 Module Using 3-wire Proximity Switches
DeviceNet
System
Power
DeviceNet
Power
Module
Status
Module
Status
Network
Status
Network
Status
0
4
0
4
1
5
1
5
2
6
2
6
3
7
3
1734
OB8E
7
1734
IB8
Prox
Prox
Prox
Prox
Prox
Prox
Prox
Prox
24V dc Return
24V dc
Terminal Block with bus connector strip
Terminal Block with bus connector strip
Terminal Block with Bus Connector Strip
Rockwell Automation Publication 1734-UM001E-EN-P - July 2013
18
Install POINT I/O Modules
1734-IB4D Modules
Module Status
Network Status
Status of Input 0
Status of Input 1
Status of Input 2
Status of Input 3
Note that voltage and current are
daisychained from either the
adapter, 1734-FPD module, or
1734-EP24DC module.
Common connections for threewire devices require an external
wiring connection. A 1734-CTM
module can provide the common
connection.
Input 0
SSV 0
Input 1
SSV 1
Input 2
SSV 2
Input 3
SSV 3
46118
1734-IB4D Module Wiring Diagram
Sink Input
0
Prox
1
In 0
V0
2
3
In 1
V1
In 2
V2
4
Prox
5
6
In 3
Prox
7
Prox
V3
V=10/28.8V DC
If a common connection is required (three-wire devices), then a 1734-CTM common terminal module
can be required.
Channel
Terminal Number
Input
Common
0
0
External(1)
1
2
2
4
3
6
Connect common on three-wire proximity switches. 10/28.8V DC is supplied through the internal
power bus.
(1)
Common connections require an external connection, such as a 1734-CTM module.
Rockwell Automation Publication 1734-UM001E-EN-P - July 2013
Install POINT I/O Modules
19
1734-IV2, 1734-IV4, and 1734-IV8 Source Input Modules
1734-IV2
Module
Status
Network
Status
NODE:
1734-IV4
Module Status
Network Status
Module Status
Module
Status
Module Status
Network
Status
Network Status
Network
Status
Network Status
NODE:
Status of Input 1
0
1
2
3
1734
IV2
Input 0
NC
24VDC
Source
Input
24VDC
Source
Input
Status of Input 0
1
Module
Status
NODE:
24VDC
Source
Input
0
1734-IV8
1734
IV4
Status of Input 0
0
4
Status of Input 1
Status of Input 2
Status of Input 3
1
5
2
6
7
3
1734
IV8
Status of Input 0 and 4
Status of Input 1 and 5
Status of Input 2 and 6
Status of Input 3 and 7
Input 1
Input 0
Input 1
Input 0
Input 1
NC
Input 2
Input 3
Input 2
Input 3
C
C
C
C
Input 4
Input 5
V
V
V
V
Input 6
Input 7
Input = 0, 1, 2 and 3
C = Common (4 and 5)
V = Supply (6 and 7)
Input = 0 and 1
NC = No Connection (2 and 3)
C = Common (4 and 5)
V = Supply (6 and 7)
Input = 0, 1, 2, 3, 4, 5, 6 and 7
V and C are daisychained from either the
adapter, 1734-FPD module, 1734-EP24DC
power supply, or from a user-supplied auxiliary
terminal block.
1734-IV2 Module Wiring Diagram
Source Input
0
1
In 0
In 1
NC
NC
C
C
2
Prox
3
4
2-wire
6
Prox
5
V
V
41974
3-wire
7
V = 12/24V DC,
C = Common
Channel
Input Terminal
Common
Terminal
Power
Channel 0
0
4
6
Channel 1
1
5
7
Connect power on 3-wire proximity switches. 12/24V DC is supplied through the
internal power bus.
Rockwell Automation Publication 1734-UM001E-EN-P - July 2013
20
Install POINT I/O Modules
1734-IV4 Module Wiring Diagram
Source Input
1
0
3-wire
In 0
In 1
In 2
In 3
C
C
2-wire
2
Prox
Prox
3
Prox
5
4
6
Prox
7
V
V
V = 12/24V DC
C = Common
Channel
Input Terminal
Common Terminal
Power
Channel 0
0
4
6
Channel 1
1
5
7
Channel 2
2
4
6
Channel 3
3
5
7
Connect power on 3-wire proximity switches. 12/24V DC is supplied through the internal
power bus.
1734-IV8 Module Wiring Diagram
Source Input Wiring
1734-IB8
1
0
In 0
2
2-wire
In 2
In 3
In 5
In 6
Prox
In 7
C
6
V
V
V
V
5
6
7
C
3
4
5
C
3-wire
7
6
C
4
V
2
3
C
5
4
In 4
C
V
C
2
3
1
0
1
0
Prox
In 1
1734-VTM
1734-CTM
7
V
C
V
V = Voltage Out
C = Common
Channel
Input Terminal
Channel
Input Terminal
Channel 0
0
Channel 4
4
Channel 1
1
Channel 5
5
Channel 2
2
Channel 6
6
Channel 3
3
Channel 7
7
Daisychain common and power connections from 1734 Adapter, 1734-FPD, 1734-EP24DC
or from user supplied external auxiliary terminal block.
Rockwell Automation Publication 1734-UM001E-EN-P - July 2013
Install POINT I/O Modules
21
WARNING: When you connect or disconnect wiring while field side
power is on, an electrical arc can occur. This could cause an explosion in
hazardous location installations.
Be sure that power is removed or the area is nonhazardous before
proceeding.
ATTENTION: When connecting more than one wire in a termination
point, make sure that both wires are the same gauge and type.
1734-OB2E, 1734-OB4E, 1734-OB8E, 1734-OB2, 1734-OB4, and
1734-OB8 Protected Output Modules
1734-OB2E
Module
Status
Network
Status
NODE:
1734-OB8E
1734-OB4E
Module Status
Network Status
Module
Status
Module
Status
Network
Status
Network
Status
NODE:
NODE:
24VDC
Source
Output
24VDC
Source
Output
Status of Output 0
Status of Output 1
0
1
0
1
Status of Output 2
Status of Output 3
2
3
1734
OB2E
Status of Output 0
Status of Output 1
24VDC
Source
Output
0
4
1
5
2
6
3
1734
OB4E
Status of Output 0 & 4
Status of Output 1 & 5
Status of Output 2 & 6
Status of Output 3 & 7
7
1734
OB8E
Output 0
Output 1 Output 0
Output 1 Output 0
Output 1
Output 0
Output 1 Output 2
Output 3 Output 2
Output 3
C
C
C
C
Output 4
Output 5
V
V
C
C
Output 6
Output 7
C = Common
V = Supply
Rockwell Automation Publication 1734-UM001E-EN-P - July 2013
42016
22
Install POINT I/O Modules
1734-OB2
Module
Status
Network
Status
NODE:
Module Status
Network Status
Module
Status
Network
Status
NODE:
24VDC
Source
Output
24VDC
Source
Output
Status of Output 0
Status of Output 1
1
Module
Status
Network
Status
NODE:
24VDC
Source
Output
0
1734-OB8
1734-OB4
Status of Output 0
Status of Output 1
Status of Output 2
Status of Output 3
0
1
2
3
1734
OB2
0
4
1
5
2
6
3
7
Status of Output 0 & 4
Status of Output 1 & 5
Status of Output 2 & 6
Status of Output 3 & 7
1734
OB8
1734
OB4
Output 0
Output 1 Output 0
Output 1
Output 0
Output 1
Output 0
Output 1 Output 2
Output 3
Output 2
Output 3
C
C
C
C
Output 4
Output 5
V
V
C
C
Output 6
Output 7
C = Common
V = Supply
42016
1734-OB2 and 1734-OB2E Module Wiring Diagram
1
0
Out 0
Load
Out 1
2
Load
3
Out 0
Out 1
4
C
C
V
V
6
5
7
V = 12/24V DC, C = Common
Field power is supplied from internal power bus
44338
Channel
Output
Terminal
Common
Terminal
Power
Channel 0
0, 2
4
6
Channel 1
1, 3
5
7
Module power is supplied from the internal power bus.
Rockwell Automation Publication 1734-UM001E-EN-P - July 2013
Install POINT I/O Modules
1734-OB4 and 1734-OB4E Module Wiring Diagram
1
0
Out 0
Out 1
2
3
Out 2
Out 3
Load
Load
Load
4
C
C
C
C
6
Load
5
7
V = 12/24V DC,
C = Common
Field power is supplied from internal power bus
Channel
Output
Terminal
Common
Terminal
Channel 0
0
6
Channel 1
1
7
Channel 2
2
4
Channel 3
3
5
Module power is supplied from internal power bus.
Rockwell Automation Publication 1734-UM001E-EN-P - July 2013
44339
Power
23
24
Install POINT I/O Modules
1734-OB8 and 1734-OB8E Module Wiring Diagram
0
Load
1
Out 0
3
2
Load
Out 2
5
Out 4
Out 5
Out 6
Out 7
6
Load
Load
Out 3
4
Load
Load
Out 1
Load
7
Load
C
C
Common must be daisychained from a 1734 adapter, 1734-FPD module, 1734-EP24DC
power supply, or from a user-supplied auxiliary terminal block. The 24V DC power to the
module is supplied by the internal power bus and comes from the same 1734 adapter,
1734-FPD module, or 1734-EP24DC power supply as common.
Channel
Number
Output Terminal
Common Terminal
Power
Channel 0
0
Channel 1
1
Channel 2
2
Channel 3
3
Channel 4
4
Channel 5
5
Common is
daisychained from
either a 1734 adapter,
1734-FPD module,
1734-EP24DC power
supply, or from a usersupplied external
terminal block.
The 24V DC power for
the module is supplied
by the internal power
bus and originates
from the same adapter,
1734-FPD module, or
1734-EP24DC power
supply as common.
Channel 6
6
Channel 7
7
Module power is supplied from the internal power bus.
1734-CTM
1734-OB8, 1734-OB8E
0
Out 0
2
Out 2
4
Out 4
6
Out 6
1
Out 1
3
Out 3
5
Out 5
7
Out 7
0
Load
2
Load
Load
4
6
Load
1
C
C
C
C
C
C
C
C
5
7
O
Rockwell Automation Publication 1734-UM001E-EN-P - July 2013
3
Install POINT I/O Modules
1734-OB2EP Protected Output Module
Module Status
Network Status
Module
Status
Network
Status
NODE:
Protected
Sourcing
Output
Status of Output 0
Status of Output 1
0
1
1734
OB2EP
Output 1
Connection
Output 1
Connection
C
Output 0
Connection
Output 0
Connection
C
V
V
C = Common
V = Supply
42016
1734-OB2EP DC Protected Output Module Wiring Diagram
1
0
Out 0
Out 1
2
3
Out 0
Load
Out 1
4
C
C
V
V
6
V = 12/24V DC, C = Common
Field power is supplied from internal power
bus
Load
5
7
Channel
Output
Terminal
Common
Terminal
Power
Channel 0
0, 2
4
6
Channel 1
1, 3
5
7
Module power is supplied from the internal power bus.
Rockwell Automation Publication 1734-UM001E-EN-P - July 2013
25
26
Install POINT I/O Modules
1734-OW2 and 1734-OW4 Relay Output Modules
1734-OW2
Module
Status
Network
Status
1734-OW4
Module Status
Network Status
Module
Status
Network
Status
NODE:
NODE:
Relay
Output
Relay
Output
Status of Output 0
Status of Output 1
0
1
Module Status
Network Status
Status of Output 0
Status of Output 1
Status of Output 2
Status of Output 3
0
1
2
3
1734
OW2
1734
OW4
Output 0A
Output 1A
Output 0A
Output 1A
Output 0B
Output 1B
Output 0B
Output 1B
C
C
Output 2A
Output 3A
V
V
Output 2B
Output 3B
C = Common
V = Supply
41974
ATTENTION: Relay contacts are not powered by the internal power bus.
Load power can be provided by the internal power bus or an external
power source.
1734-OW2 Modules with Load Powered by Internal Power Bus
Wiring Diagram
1
0
Out 0A
Out 1A
3
2
Out 0B
Load
Load
Out 1B
4
C
C
V
V
6
5
7
Out = Output channel relay contacts
V = Supply (can range from +5V DC…240V AC)
C = Common
Channel
Output
Common
Supply
0A
0
4
6
0B
2
4
6
1A
1
5
7
1B
3
5
7
Supply voltage can range from +5V DC…240V AC, depending on relay load.
Power for the module can be provided by the internal power bus.
Rockwell Automation Publication 1734-UM001E-EN-P - July 2013
Install POINT I/O Modules
1734-OW2 Modules with Load Powered by External Power
Wiring Diagram
1
0
Power
Supply
Out 0A
3
2
Out 0B
Out 1B
5
4
C
C
Load
Power
Supply
Out 1A
Load
7
6
V
V
Out = Output channel relay contacts
Power Supply = can range from +5V DC…240V AC
C = Common
Channel
Output
Common
Supply(1)
0A
0
Not used
Not used
0B
2
Not used
Not used
1A
1
Not used
Not used
1B
3
Not used
Not used
(1)
Supply voltage can range from +5V DC…240V AC, depending on relay load. Power for
the module can be provided by the external power supply.
1734-OW4 Modules with Load Powered by External Power
Wiring Diagram
1
0
Power
Supply
Out 0A Out 1A
2
Load
3
Out 0B
Out 2A
Out 3A
Out 2B
Out 3B
Load
Power
Supply
7
6
Load
Out 1B
5
4
Power
Supply
Power
Supply
Load
Out = Output channel relay contacts
Channel
Output
0A
0
0B
2
1A
1
Common
Rockwell Automation Publication 1734-UM001E-EN-P - July 2013
Supply(1)
27
28
Install POINT I/O Modules
Channel
Output
1B
3
2A
4
2B
6
3A
5
3B
7
Common
Supply(1)
(1) Supply voltage can range from +5V DC… 240V AC, depending on relay load.
12/24V DC power for the module is provided by the external power supply.
The power supply voltage may be daisychained from a 1734 adapter, 1734-FPD module,
or 1734-EP24DC power supply communication interface. Each channel is individually
isolated and may have a unique supply or voltage as necessary.
ATTENTION: Do not attempt to increase load current or wattage
capability beyond the maximum rating by connecting two or more
outputs in parallel. The slightest variation in relay switching time may
cause one relay to momentarily switch the total load current.
Make certain that all relay wiring is properly connected before applying any
power to the module.
Total current draw through the wiring base unit is limited to 10 A. Separate
power connections to the terminal base unit may be necessary.
Use the end cap from your adapter or interface module to cover the exposed
interconnections on the last mounting base on the DIN rail. Failure to do so
could result in equipment damage or injury from electric shock.
Relay Modules Using AC Only
PDN OW2 OW2
0
1
0
1
0
1
AC Power Bus
120V AC
Rockwell Automation Publication 1734-UM001E-EN-P - July 2013
Install POINT I/O Modules
29
Relay Modules Using a 1734-FPD or 1734-EPAC Module to Create a New AC Power Bus
PDN
IB2 IV2 IB4 IV4
FPD OW2 OW2 OW2
PDN
IB2 IV2 IB4 IV4 EPAC OW2 OW2 OW2
AC
Power
Bus
C V
DC
Power
Bus
AC
Power
Bus
DC
Power
Bus
C V
120V AC
120V AC
Relay Modules Using External Wiring for AC Power
PDN
IB2
0
1
0
IV4 OW2 OW2 OW2
IB4 IV2
1
0
1
0
1
0
1
0
1
0
1
0
1
DC Power
Bus
24V
DC Power
Bus
L2/N
L1
120V AC/240V AC
Rockwell Automation Publication 1734-UM001E-EN-P - July 2013
42010
30
Install POINT I/O Modules
1734-OV2E, 1734-OV4E, and 1734-OV8E Sink Output Modules
1734-OV2E
1734-OV4E
Module Status
Network Status
Module
Status
Network
Status
NODE:
Module Status
Network Status
Module
Status
Network
Status
NODE:
Module
Status
Network
Status
Module Status
Network Status
NODE:
24VDC
Sink
Output
24VDC
Sink
Output
Status of Output 0
Status of Output 1
0
1
0
1
2
2
3
Status of Output 0 & 4
Status of Output 1 & 5
Status of Output 2 & 6
Status of Output 3 & 7
1734
OV4E
1734
OV2E
Output 0
1734-OV8E
24VDC
Sink
Output
0
4
1
5
2
6
7
3
Status of Output 0 & 4
Status of Output 1 & 5
Status of Output 2 & 6
Status of Output 3 & 7
1734
OV8E
Output 1 Output 0
Output 1
Output 0
Output 1
N/C
Output 3
Output 2
Output 3
N/C
Output 2
C
C
V
V
Output 4
Output 5
V
V
V
V
Output 6
Output 7
46121
46120
46122
C = Common
V = Supply
DC Sink Output Module Cat. No. 1734-OV2E Wiring Diagram
0
1
Out 0 Out 1
2
3
NC
Load
NC
4
Load
5
C
C
V
V
6
7
V = 12/24V DC, C = Common
Field power is supplied from internal power bus
Channel
Output Terminal Power
Common
Terminal
Channel 0
0
6
4
Channel 1
1
7
5
Module power is supplied from the internal power bus.
Rockwell Automation Publication 1734-UM001E-EN-P - July 2013
Install POINT I/O Modules
DC Sink Output Module Cat. No. 1734-OV4E Wiring Diagram
0
1
Out 0 Out 1
2
3
Out 2 Out 3
Load
Load
4
5
V
V
V
V
6
Load
Load
7
V = 12/24V DC, C = Common
Field power is supplied from internal power bus
Channel
Output Terminal
Power
Channel 0
0
6
Channel 1
1
7
Channel 2
2
4
Channel 3
3
5
Common Terminal
Module power is supplied from internal power bus.
DC Sink Output Module Cat. No. 1734-OV8E Wiring Diagram
1734-VTM
1734-OV8E
1
0
V
V
3
2
V
V
5
4
V
Load
7
V
1
Out 0
Out 1
Out 2
Out 3
Out 4
Out 5
Out 6
Out 7
2
Load
Load
3
5
4
V
6
V
0
7
6
Load
V = Voltage Out
Rockwell Automation Publication 1734-UM001E-EN-P - July 2013
31
32
Install POINT I/O Modules
1734-OX2 2-relay Output Modules
0
1
2
3
4
5
6
7
Module
Status
Module Status
Network Status
Network
Status
NODE:
Relay
Output
Status of Output 0
0
Status of Output 1
1
NC = Normally closed
NO = Normally open
RC = Relay Common
+V = Positive Supply
1734
OX2
Output 0 Connection - NC
NC - Output 1 Connection
Output 0 Connection - NO
NO - Output 1 Connection
Output 0 Relay Common - RC
RC - Output 1 Relay Common
+V
+V
41974
ATTENTION: Relay contacts are not powered by the internal power bus.
Load power can be provided by the internal power bus or an external
power source.
1734-OX2 Module with Load Powered by Internal Power Bus
Wiring Diagram
1
0
Out 0
NC
2
Out 0
NO
Load
L1
4 Out
RC
L2/N
Out 1
NC
Out 1 3
NO
0 Out 1 5
RC
6
L2/N
Load
7
+V
L1
+V
NC = Normally closed
NO = Normally open
RC = Relay Common
+V = Positive Supply
Channel
Output
Relay Common
Supply
0 (N.C.)
0
4
6
0 (N.O.)
2
1 (N.C.)
1
5
7
1 (N.O.)
3
Supply voltage can range from +5V DC…240V AC, depending on relay load.
12V, 24V DC, 120V, 240V AC power for the module is provided by the internal power bus.
Rockwell Automation Publication 1734-UM001E-EN-P - July 2013
Install POINT I/O Modules
33
1734-OX2 Modules with Load Powered by External Power Bus
Wiring Diagram
L1
Power
Supply
L2/N
Load
0
1
2
3
Out 0 Out 1
NC NC
Out 0 Out 1
NO NO
4
5
Out 1 Out 0
RC
RC
6
Power
L1
L2/N
Load
7
+V
+V
Out = Output channel relay contacts
Power Supply = can range from +5V DC…240V AC
RC = Relay Common
Channel
Output
Relay
Common
Supply(1)
0 (N.C.)
0
4
6
0 (N.O.)
2
1 (N.C.)
1
5
7
1 (N.O.)
3
(1) Supply voltage can range from +5V DC…240V AC, depending on relay load. 12V, 24V DC,
120V, 240V AC power for the module is provided by the internal power bus
ATTENTION: Do not attempt to increase load current or wattage
capability beyond the maximum rating by connecting two or more
outputs in parallel. The slightest variation in relay switching time may
cause one relay to momentarily switch the total load current.
Make certain that all relay wiring is properly connected before applying any
power to the module.
Total current draw through the wiring base unit is limited to 10 A. Separate
power connections to the terminal base unit may be necessary.
Use the end cap from your adapter or interface module to cover the exposed
interconnections on the last mounting base on the DIN rail. Failure to do so
could result in equipment damage or injury from electric shock.
Rockwell Automation Publication 1734-UM001E-EN-P - July 2013
34
Install POINT I/O Modules
Wire with AC Modules Only using a 1734-PDN Module or
1734-PDN Module to Create a New AC Power Bus
PDN OX2 OX2
0
1
0
1
0
PDN IB2 IV2 IB4 IV4 FPD OX2 OX2 OX2
1
0
1
0
1
0
1
0 1
0
1
0
1 0
1
0
1
AC Power
Bus
C
120V AC
Wiring With AC
Modules Only
V
24V DC
120V AC or 240V AC Based on I/O Modules
Wiring Using a 1734-FPD Module To Create a New AC
Power Bus
42090OX
Rockwell Automation Publication 1734-UM001E-EN-P - July 2013
Install POINT I/O Modules
Wire with AC Modules Only Using a 1734-AENT Module, or
Using a 1734-AENT Module to Create a New AC Power Bus
AENT
AENT IB2 IV2 IB4 IV4 FPD OX2 OX2 OX2
OX2 OX2
0
1
0
1
0
1
0 1
0 1
C V
24V DC
C V
24V DC
0 1
0 1
0 1
0 1
0 1
0 1
0 1
120V AC or 240V AC Based on I/O Modules
46123
AENT
0
1
C V
24V DC
0
1
0
IB2 IV2 IB4 IV4 EPAC OX2 OX2 OX2
AENT
OX2 OX2
1
0 1
C
0 1
0 1
0 1
0 1
0 1
0 1
0 1
0 1
V
24V DC
120V AC or 240V AC Based on I/O Modules
46124
Rockwell Automation Publication 1734-UM001E-EN-P - July 2013
35
36
Install POINT I/O Modules
Wire Using External Power Source for AC Relay Power
PDN
IB2 IB4 IV2 IV4 OX2OX2 OX2
0
24V
1
0
1
0
1
0
1
0
1
0
1
0
1
0
1
L2/N L1
120V/240V AC
1734-IA2 and 1734-IA4 120 V AC Input Modules
1734-IA4
1734-IA2
Module
Status
Module
Status
Network
Status
NODE:
Network
Status
Module Status
Network Status
NODE:
120VAC
Input
120VAC
Input
0
Status of Input 0
1
Status of Input 1
0
Status of Input 0
1
2
Status of Input 1
Status of Input 2
3
L2/N
L1
Status of Input 3
1734
IA4
1734
IA2
Channel 0
Connection
No Connection
Module Status
Network Status
Channel 1
Connection
No Connection
L2/N
L2/N
L1
Channel 0
Connection
No Connection
L2/N = 120V AC return
L1 = 120V AC Supply
46125
Rockwell Automation Publication 1734-UM001E-EN-P - July 2013
L1
Channel 1
Connection
No Connection
L2/N
L1
46126
Install POINT I/O Modules
1734-IA2 120 V AC Input Module Wiring Diagram
0
1
Ch 0
Ch 1
2
Prox
3
NC
NC
L2/N
L2/N
L1
L1
4
2-wire
6
Ch 0 = Channel 0
NC = No connection
Prox
5
3-wire
7
Ch 1 = Channel 1
L2/N = 120V AC Neutral
L1 = 120V AC
Channel
Input Terminal
Return
Supply
0
0
4
6
1
1
5
7
Module power is supplied from the internal power bus.
1734-IA4 120 V AC Input Module Wiring Diagram
0
1
Ch 0
Ch 1
2
3
Ch 2
Prox
Prox
Ch 3
4
5
L1
Prox
L1
7
6
L1
Prox
L1
L2/N
L2/N
Ch0 = Channel 0 Input
Ch3 = Channel 3 Input
Ch1 = Channel 1 Input
L2/N = 120V AC Neutral
Ch2 = Channel 2 Input
L1 = 120V AC
Channel
Input Terminal
0
0
4
1
1
5
2
2
6
3
3
7
Module power is supplied from the internal power bus.
Rockwell Automation Publication 1734-UM001E-EN-P - July 2013
Common
Terminal
Power
37
38
Install POINT I/O Modules
1734-IM2 and 1734-IM4 220V AC Input Modules
1734-IM4
1734-IM2
Module
Status
Network
Status
Module
Status
Module Status
Network Status
Network
Status
NODE:
NODE:
220VAC
Input
220VAC
Input
0
1
Status of Input 0
0
Status of Input 0
Status of Input 1
1
Status of Input 1
2
2
1734
IM4
1734
IM4
L2/N
L1
Status of Input 2
3
3
Channel 0
Connection
No Connection
Module Status
Network Status
Channel 0
Connection
No Connection
Channel 1
Connection
No Connection
L2/N
L2/N
L1
L1
46134
Rockwell Automation Publication 1734-UM001E-EN-P - July 2013
Status of Input 3
Channel 1
Connection
No Connection
L2/N
L1
L2/N = 220V AC return
L1 = 220V AC Supply
46134
Install POINT I/O Modules
1734-IM2 120V AC 2 Input Module Wiring Diagram
0
1
Ch 0
Ch 1
2
Prox
3
NC
NC
L2/N
L2/N
L1
L1
4
2-wire
6
Ch 0 = Channel 0 input
NC = No connection
L1 = 220V AC
Prox
5
3-wire
7
Ch 1 = channel 1 input
L2/N = 220V AC Neutral
41966B
Channel
Input Terminal
Return
Supply
0
0
4
6
1
1
5
7
Module power is supplied from the internal power bus.
0
1
Ch 0
Ch 1
2
3
Ch 2
Prox
Prox
Ch 3
4
5
L1
Prox
L1
7
6
L1
Prox
L1
L2/N
L2/N
Ch0 = Channel 0 Input
Ch3 = Channel 3 Input
Ch1 = Channel 1 Input
Ch2 = Channel 2 Input
L2/N = 120V AC Neutral
L1 = 120V AC
Channel
Input Terminal
Common
Terminal
Power
0
0
4
1
1
5
2
2
6
3
3
7
Module power is supplied from the internal power bus.
Use an external neutral bus or a 1734-CTM module for AC (220V) neutral connections, if required.
Rockwell Automation Publication 1734-UM001E-EN-P - July 2013
39
40
Install POINT I/O Modules
1734-OA2 and 1734- OA4 120/220V AC Output Modules
1734-OA2
Module
Status
Network
Status
1734-OA4
Module Status
Network Status
Module
Status
Network
Status
NODE:
NODE:
NODE:
120VAC
Input
120/220VAC
Output
Status of Output 0
Status of Output 1
0
1
Status of Output 1
Status of Output 2
1
Status of Output 3
3
1734
OA2
No Connection
L2/N
L1
L2/N = 120/220V AC
return
Status of Output 0
0
2
Channel 0
Connection
Module Status
Network Status
1734
OA4
Channel 1
Connection
Channel 0
Connection
Channel 1
Connection
No Connection
Channel 2
Connection
Channel 3
Connection
L2/N
L2/N
L2/N
L1
L1/N
L1/N
46132
46133
1734-OA2 AC 2 Output Module Wiring Diagram
0
1
Ch 1
Ch 0
2
3
NC
NC
Load
4
Load
5
L2/N
L2/N
7
6
L1
L1
L1 =120/220V AC supply,
L2/N = 120/220V AC return
Ch 0 = Channel 0
Ch 1 = Channel 1
Field power is supplied from internal power bus
Channel
Output
Terminal
Return
Supply
Channel 0
0
4
6
Channel 1
1
5
7
Module power is supplied from the internal power bus.
Rockwell Automation Publication 1734-UM001E-EN-P - July 2013
Install POINT I/O Modules
1734-OA4 AC 2 Output Module Wiring Diagram
0
1
Ch 0
Ch 1
2
3
Ch 2
Load
Load
Ch 3
4
5
L2/N
Load
Load
L2/N
7
6
L2/N
L2/N
44399
L1 =120/220V AC Supply
L2/N = 120/220V AC Return
Ch 0 = Channel 0 Ch 2 = Channel 2
Ch 1 = Channel 1 Ch 3 = Channel 3
Field power is supplied from the internal power bus.
Channel
Output
Terminal
Common
Terminal
0
0
4
1
1
5
2
2
6
3
3
7
Rockwell Automation Publication 1734-UM001E-EN-P - July 2013
Power
41
42
Install POINT I/O Modules
Wiring Analog Modules
1734-IE2C Analog Current Input Module
Module
Status
Network
Status
Module Status
Network Status
NODE:
4-20mA
Analog
Input
0
Status of Input 0
1
Status of Input 1
1734
IE2C
Input 1 Connection
Input 0 Connection
Chas Gnd
Chas Gnd
C
C
V
V
Chas Gnd = Chassis ground
C = Common
V = Supply
41974
1734-IE2C Analog Current Input Module Wiring Diagram
AC or
DC
Current
Input
1
0
In 0
2
4-wire
3
Chas Chas
Gnd Gnd
5
4
6
Current
Input
Device
2-wire
In 1
C
C
V
V
7
In = Input channel
Chas Gnd = Chassis Ground
C = Common
V = 12/24V DC supply
Channel
Current Input
Chassis Ground
Common
Voltage
0
0
2
4
6
1
1
3
5
7
12/24V DC is provided by the internal power bus.
Rockwell Automation Publication 1734-UM001E-EN-P - July 2013
Install POINT I/O Modules
1734-IE2V Analog Voltage Input Module
Module
Status
Module Status
Network Status
Network
Status
NODE:
Analog
Voltage
Input
Status of Input 0
Status of Input 1
0
1
1734
IE2V
Input 1 Connection
Input 0 Connection
Chas Gnd
Chas Gnd
C
C
V
V
41974
Chas Gnd = Chassis ground
C = Common
V = Supply
1734-IE2V Analog Voltage Input Module Wiring Diagram
0
Voltage
Input
1
In 0
2
Chas Chas
Gnd Gnd
4
In = Input channel
Chas Gnd = Chassis Ground
C = Common
V = 12/24V DC supply
Voltage
Input
In 1
3
5
C
C
V
V
7
6
Channel
Voltage Input Chassis Ground
Common
Supply
0
0
2
4
6
1
1
3
5
7
12/24V DC is provided by the internal power bus.
Rockwell Automation Publication 1734-UM001E-EN-P - July 2013
43
44
Install POINT I/O Modules
1734-OE2C Analog Current Output Module
Module Status
Network Status
Module
Status
Network
Status
NODE:
4-20mA
Analog
Output
Status of Output 0
0
Status of Output 1
1
1734
OE2C
Output 1 Connection
Output 0 Connection
Chas Gnd
Chas Gnd
C
C
V
V
ChasGnd = Chassis ground
C = Common
V = Supply
41974
1734-OE2C Analog Current Output Module Wiring Diagram
Current Output
Device
AC or
DC
0
1
Out 0
Out 1
Chas
Gnd
Chas
Gnd
C
C
V
V
2
4-wire
3
4
Out = Output channel
Chas Gnd = Chassis ground
C = Common
V = Not used
Current Output
Device
2-wire
5
6
7
Channel
Current Output
Common
Chassis Ground
Supply
0
0
4
2
6
1
1
5
3
7
12/24V DC power is provided by the internal power bus.
Rockwell Automation Publication 1734-UM001E-EN-P - July 2013
Install POINT I/O Modules
45
1734-OE2V Analog Voltage Output Module
Module Status
Network Status
Module
Status
Network
Status
NODE:
Analog
Voltage
Output
Status of Output 0
0
Status of Output 1
1
1734
OE2V
Output 1 Connection
Output 0 Connection
Chas Gnd
Chas Gnd
C
C
V
V
Chas Gnd = Chassis ground
C = Common
V = Supply
41974
1734-OE2V Analog Voltage Output Module Wiring Diagram
1
0
Voltage
Output
Out 0
2
Chas
Gnd
Voltage
Output
Out 1
Chas
Gnd
4
3
5
C
C
V
V
6
7
Out = Output channel
Chas Gnd = Chassis ground
C = Common
V = 12/24V Supply
42017IRR
Channel
Voltage Output
Chassis Ground
Common
Supply
0
0
2
4
6
1
1
3
5
7
12/24V DC power is provided by the internal power bus.
Rockwell Automation Publication 1734-UM001E-EN-P - July 2013
46
Install POINT I/O Modules
Wiring Power Distribution
and Other Modules
1734-PDN Communication Interface Module
DeviceNet Connector
System Power
DeviceNet Power
NC
NC
CHAS GND
CHAS GND
C
C
V
V
NC = No Connection
CHAS GND = Chassis Ground
C = Common
V = Supply
41970
1734-PDN Module Wiring Diagram
0
1
NC
NC
2
3
CHAS CHAS
GND GND
4
12/24V DC
V DC
Power
5
C
C
6 V
V
This supply will be
connected to the internal
field power bus.
7
NC = No Connection
CHAS GND = Chassis Ground
C = CommonV = Supply
DeviceNet
connection
Black 1
Blue
2
CAN - Low
Bare
3
Shield
White 4
Red
Rockwell Automation Publication 1734-UM001E-EN-P - July 2013
-V
5
CAN - High
+V
Install POINT I/O Modules
Wire the Communication Interface Module for AC Modules Only
PDN OW2 OW2
0
1
0
1
0
1
AC Power Bus
120V AC
1734-FPD Field Potential Distributor Module
NC
CHAS GND
NC
CHAS GND
C
C
V
V
NC = No Connection
CHAS GND = Chassis Ground
C = Common V = Supply
Rockwell Automation Publication 1734-UM001E-EN-P - July 2013
47
48
Install POINT I/O Modules
1734-FPD Modules for 12/24V DC Wiring Diagram
0
1
NC
NC
CHAS
GND
CHAS
GND
2
3
4
5
C
C
V DC
6
7
V
V
This supply will be
connected to the
internal power bus.
V = 12/24V DC, C = Common
CHAS GND = Chassis ground
Connect
Terminal
+V DC
6
-V DC
4
Chas Gnd
2
12/24V DC becomes the internal power bus for modules
to the right.
1734-FPD Modules for 120/240V AC Wiring Diagram
0
1
NC
NC
CHAS
GND
CHAS
GND
2
3
4
5
L2/N
L2/N
V AC
6
7
L1
L1
This supply will be
connected to the
internal power bus.
L2/N = Neutral, L1 = 120/240V AC
CHAS GND = Chassis ground
Connect
Terminal
L1
6
L2/N
4
Chas Gnd
2
120/240V DC becomes the internal power bus for
modules to the right.
Create a New AC Power Bus Using a 1734-FPD Module
Rockwell Automation Publication 1734-UM001E-EN-P - July 2013
Install POINT I/O Modules
This configuration changes the power bus voltage for AC modules.
PDN
IB2
IV2 IB4
IV4
FPD
OW2 OW2 OW2
AC Power Bus
C
L2/N L1
Digital
Power Bus
V
Wiring Using a 1734-FPD Module to Create a New DC Power Bus
This configuration changes power bus voltage for 12/24V DC systems.
PDN IB2 IB4 OB2E OB4E FPD IB2 IB4 IV2 OB4E
0
1
0
1
0
1
0 1
0
1
0
1 0
1
0
1
12V DC
C
24V Digital I/O
Power Bus
12V
Digital I/O
Power Bus
Rockwell Automation Publication 1734-UM001E-EN-P - July 2013
42009
49
50
Install POINT I/O Modules
Wiring Using a 1734-FPD Module to Create a New Analog Power Bus
This configuration isolates noisy digital I/O power from sensitive analog I/O
power.
PDN
IB4
IB2
0
1
0
1
0
OB2E OB4E
1
0 1
0
FPD
IE2C
1
0
OE2C OE2C
1 0
1
0
1
24V DC
C 24V
Digital I/O
Power Bus
24V
Analog I/O
Power Bus
42009
1734-EP24DC Expansion Power Supply
1734-EP24DC
System
Power
Field
Power
NC
CHAS GND
C
V
Rockwell Automation Publication 1734-UM001E-EN-P - July 2013
NC
CHAS GND
C
V
NC = No Connection
CHAS GND = Chassis Ground
C = Common
V = Supply
41970
Install POINT I/O Modules
12/24V DC Wiring Diagram
ATTENTION: Use the 1734-EP24DC expansion power supply only with
adapter class products. This 1734-EP24DC power supply cannot be used
with a 1734-PDN module or 1734D POINTBlock modules. Do not connect
120/240V AC power to this supply.
0
1
NC
Do not connect 120/240V AC
power to this supply.
2
NC
CHAS CHAS
GND GND
4
3
5
C
C
V DC
6
This DC supply is
connected to the
internal power bus.
7
V
V
V = 12/24V DC, C = Common
CHAS GND = Chassis ground
Connect
Terminal
Terminals (for continuing power)
+V DC
6
7
-V DC
4
5
Chas Gnd
2
3
12/24V DC becomes the internal power bus for modules to the right.
Example of Continuing Power
ADN
EP24DC
Adapter
Status
DeviceNet
Status
PointBus
Status
I
B
4
I
B
2
O
B
2
E
I
E
2
C
O
B
4
E
I
E
2
V
O
E
2
C
1734-EP24DC
1734-ADN
System
Power
DeviceNet
Power
System
Power
DeviceNet
Power
0
12/24V DC only
1
0
1
0
1
0
1
0
1
0
1
0
1
0
1
Example of continued power.
Rockwell Automation Publication 1734-UM001E-EN-P - July 2013
1734adn4
51
52
Install POINT I/O Modules
Example of Functional Partitioning
EP24DC
ADN
I
B
2
Adapter
Status
DeviceNet
Status
PointBus
Status
I
B
4
O
B
2
E
O
B
4
E
I
E
2
C
1734-EP24DC
I
E
2
C
O
E
2
C
1734-ADN
System
Power
System
Power
DeviceNet
Power
DeviceNet
Power
0
1
0
1
0
1
0
1
0
1
0
1
0
1
0
1
12/24V DC
Analog Supply
12/24V DC
Digital Supply
IMPORTANT
1734adn4A
The 1734-EP24DC expansion power supply can be used with POINT I/O
adapters only. This 1734-EP24DC power supply cannot be used with a
1734-PDN module or 1734D POINTBlock modules.
Example of Logical Partitioning
EP24DC
ADN
Adapter
Status
DeviceNet
Status
PointBus
Status
I
E
2
C
O
E
2
C
I
B
2
O
B
2
E
I
B
2
1734-EP24DC
O
B
2
E
O
B
4
E
1734-ADN
System
Power
System
Power
DeviceNet
Power
DeviceNet
Power
0 1
0 1
0 1
0 1
0 1 0 1
0 1
0 1
12V DC Supply
1734adn4A
24V DC Supply
Rockwell Automation Publication 1734-UM001E-EN-P - July 2013
Install POINT I/O Modules
1734-EPAC AC Expansion Power Supply
NC
NC
PE
PE
L2/N
L2/N
L1
L1
NC = No Connection
PE = Protective Earth Ground
L2/N = Neutral
L1 = 120/240V AC
120/240V AC Wiring Diagram
1
0
Connect ground wire to
PE terminal.
NC
NC
PE
PE
L2/N
L2/N
L1
L1
2
This AC supply will be
connected to the internal
power bus.
3
5
4
V AC
6
L1 = 120/240V AC
L2/N = 120/240V AC
PE = Protective Earth Ground
7
Connect
Terminal
Terminals (for continuing power)
L1 (120/240V AC)
6
7
L2/N( Neutral)
4
5
PE (Protective Earth ground)
2
3
120/240V AC becomes the internal power bus for modules to the right.
ATTENTION: If you connect or disconnect wiring while field side power
is on, an electrical arc can occur. This could cause an explosion in
hazardous location installations.
Be sure that power is removed or the area is nonhazardous before
proceeding.
Rockwell Automation Publication 1734-UM001E-EN-P - July 2013
53
54
Install POINT I/O Modules
ATTENTION: Use the 1734-EPAC AC expansion power supply only with
adapter class products.
IMPORTANT
The 1734-EPAC AC expansion power supply can be used only with
POINT I/O adapters.
Example of Functional Partitioning
1734-EPAC
1734-ADN
Adapter
Status
DeviceNet
Status
PointBus
Status
I
B
2
I
B
4
O
B
2
E
O
B
4
E
1734-EPAC
I
A
2
I
A
2
O
A
2
I I
M M
2 2
O
A
2
1734-EPAC
1734-EPAC
1734-ADN
DeviceNet
Power
0
12/24V DC
Digital Supply
System
Power
Field
Power
System
Power
Field
Power
System
Power
1
0
1
0
1
0
1
0
1
0
1
0
1
0
120V AC Supply
1
0
1
0
1
0
1
0
1
240V AC Supply
46131
Rockwell Automation Publication 1734-UM001E-EN-P - July 2013
Install POINT I/O Modules
Example of Logical Partitioning
1734-ADN
Adapter
Status
DeviceNet
Status
PointBus
Status
1734-EPAC
I
E
2
C
I
E
2
V
O
E
2
C
O
E
2
V
I
A
2
O
A
2
O
W
2
1734-EPAC
1734-ADN
System
Power
Field
Power
System
Power
DeviceNet
Power
0
1
0
1
0
1
0
1
0
1
0
1
0
1
0
120V AC Supply
24V DC Supply
1
46130
1734-ARM Address Reserve Module
The 1734-ARM
module requires no
external wiring.
NC
NC
NC
NC
NC
NC
NC
NC
NC = No connection
Rockwell Automation Publication 1734-UM001E-EN-P - July 2013
46129
55
56
Install POINT I/O Modules
1734-CTM and 1734-VTM Modules
1734-CTM
1734-VTM
0
0
1
1
1734
CTM
1734
VTM
Voltage Out
Voltage Out
Common
Common
Voltage Out
Voltage Out
Common
Common
Voltage Out
Voltage Out
Common
Common
Voltage Out
Voltage Out
Common
Common
Common = 0 to 7
Voltage Out = 0 to 7
46127
46128
Sink Input Wiring Diagram
1734-IB8
1
0
In 0
In 3
In 5
In 6
V
3-wire
In 7
5
Prox
C
C
3
5
C
7
V
C
4
V
6
C
2
V
4
7
6
3
V
5
In 4
V
1
0
V
2
3
4
1
0
Prox
In 1
2
In 2
1734-CTM
1734-VTM
2-wire
V
C
6
7
C
C
C = Common
V = Voltage Out
Rockwell Automation Publication 1734-UM001E-EN-P - July 2013
Install POINT I/O Modules
Source Input Wiring Diagram
1734-IB8
1
0
In 0
2-wire
C
In 3
In 4
In 5
In 6
In 7
Prox
V
V
V
5
C
6
7
6
V
4
5
C
3-wire
3
C
4
6
7
C
V
2
3
C
5
4
V
C
2
3
1
0
1
0
Prox
In 1
2
In 2
1734-VTM
1734-CTM
7
V
C
V
V = Voltage Out
C = Common
Source Output Wiring Diagram
1734-CTM
1734-OV8
1
0
Out 0
Out 1
3
2
Out 2
Out 3
5
4
Out 4
Out 5
7
6
Out 6
Out 7
0
Load
2
Load
Load
4
6
Load
1
C
C
C
C
C
C
C
C
3
V = Voltage Out
5
7
Sink Output Wiring Diagram
1734-VTM
1734-OV8
0
Out 0
2
Out 2
4
Out 4
6
Out 6
1
Out 1
3
Out 3
5
Out 5
7
Out 7
0
Load
2
Load
Load
4
6
Load
Rockwell Automation Publication 1734-UM001E-EN-P - July 2013
1
V
V
V
V
V
V
V
V
3
V = Voltage Out
5
7
57
58
Install POINT I/O Modules
General Purpose Wiring Diagram
Adapter
1734
CTM
1734
VTM
C = Common
V = Voltage Out
Power
Supply
Rockwell Automation Publication 1734-UM001E-EN-P - July 2013
Other
Devices
Chapter
3
Install POINTBlock I/O Modules
About This Chapter
Read this chapter for information about how to wire POINTBlock I/O modules
to include the following:
• 1734D-IB8XOB8 POINTBlock 8 DC In/8 DC Out Modules
• 1734D-IB8XOW8 POINTBlock 8 DC In/8 Relay Out Modules
• 1734D-IA8XOA8 POINTBlock 8 AC In/8 AC Out Modules
• 1734D-IA8XOW8 POINTBlock 8 AC In/8 Relay Out Modules
• 1734D-IA16 POINTBlock 16 AC Input Modules
• 1734D-IB16 POINTBlock 16 DC Input Modules
Wiring POINTBlock
Modules
1734D-IB8XOB8 POINTBlock 8 DC In/8 DC Out Modules
Module Status
Network Status
Inputs
Outputs
0
4
0
4
1
5
1
5
10-60
2
6
2
6
0-9
3
7
3
7
I/O status
1’s Node Address Rotary Switch
10’s Node Address Rotary Switch
Rockwell Automation Publication 1734-UM001E-EN-P - July 2013
42004
78
Install POINTBlock I/O Modules
8 Input/8 Output Module Wiring Diagram
Field
Power
12/24V dc
Power
V dc
Inputs
Outputs
0
1
0
NC NC 0
1
1
0
4
1
5
0
2
3
2
NC NC
2
4
5
4
Cin Cin C
3
3
2
5
C
2
6
4
C
5
C
4
6
7
6
Vin Vin V
7
V
6
V
7
V
6
RTB 0
3
RTB 1
0
7
RTB 2
1
1
0
3
2
2
3
4
C
5
C
7
C
6
C
RTB 3
4
1
5
3
6
7
5
C
C
C
7
C
RTB 4
This supply will be connected to the internal power bus.
NC = No Connection Chas Gnd = Chassis Ground
C = Common
V = Supply
Sink Input Wiring Diagram
0
1
In 0
2-wire
3-wire
2
3
In 2
Prox
Prox
In 1
In 3
4
6
5
C
C
V
V
Prox
Prox
7
V = 12/24V dc
C = Common
Channel
Input Terminal
Common
Voltage
Remote Termination Block 1
0
0
4
6
1
1
5
7
2
2
4
6
3
3
5
7
Remote Termination Block 2
4
0
4
6
5
1
5
7
6
2
4
6
7
3
5
7
Connect common on 3-wire proximity switches.
12/24V DC is supplied through the internal power bus.
Rockwell Automation Publication 1734-UM001E-EN-P - July 2013
Install POINTBlock I/O Modules
79
ATTENTION: When connecting more than one wire in a
termination point, make sure that both wires are the same gauge
and type.
Output Wiring Diagram
0
1
Out 0 Out 1
2
3
Out 2 Out 3
Load
Load
4
5
C
C
C
C
6
Load
Load
7
V = 12/24V dc, C = Common
Field power is supplied from internal power bus
Channel
Output Terminal
Common Terminal
Power
Remote Termination Block 3
Channel 0
0
6
Channel 1
1
7
Channel 2
2
4
Channel 3
3
5
Remote Termination Block 4
Channel 4
0
6
Channel 5
1
7
Channel 6
2
4
Channel 7
3
5
Module power is supplied from the internal power bus.
ATTENTION: When connecting more than one wire in a
termination point, make sure that both wires are the same gauge
and type.
Outputs are electronically protected to 0.75 A. Module outputs are selectable for
latched mode or auto-reset mode. (Latched/auto reset is set by module, not by
individual channel.) Each channel is assigned a bit in the data table to indicate the
faulted condition. Outputs in the latched mode can only be reset with a user
command to the module.
Rockwell Automation Publication 1734-UM001E-EN-P - July 2013
80
Install POINTBlock I/O Modules
Latch Mode Functionality
State
Indication
Error Bit
Off
Dark
0
On
Yellow
0
Faulted/On
Red
1
Faulted/Off
Flashing Red
1
To reset an output, the reset bit for the output can be set, or the output bit must
be cycled off/on.
Auto Retry Mode Functionality
State
Indication
Error Bit
Off
Dark
0
On
Yellow
0
Faulted/On
Red
1
Faulted/Off
Flashing Red
1
In auto retry, the output recovers once the fault is removed.
DeviceNet Connector Wiring
DeviceNet
Connection
Rockwell Automation Publication 1734-UM001E-EN-P - July 2013
Red
+V
White
CAN - High
Bare
Shield
Blue
Black
CAN - Low
-V
Install POINTBlock I/O Modules
1734D-IB8XOW8 POINTBlock 8 DC In/8 Relay Out Modules
Module Status
Network Status
Inputs
Outputs
0
4
0
4
1
5
1
5
10-60
2
6
2
6
0-9
3
7
3
7
I/O status
1’s Node Address Rotary Switch
10’s Node Address Rotary Switch
42004
8 Input/8 Relay Output Module Wiring Diagram
12/24V dc
Field Power
Power
V dc
Inputs
Outputs
0
1
0
NC NC 0
1
1
0
4
1
5
0
2
3
2
NC NC
2
4
5
4
Cin Cin C
3
3
5
C
2
6
4
C
5
C
2
3
2
3
OB 1B 4B 5B
4
5
4
5
2A 3A 6A 7A
6
7
6
Vin Vin V
7
V
6
V
7
V
6
2B
RTB 0
3
RTB 1
7
RTB 2
0A
1
0
1
1A 4A 5A
7
3B
RTB 3
6
6B
RTB 4
This supply will be connected to the internal power bus.
NC = No Connection
C = Common
Chas Gnd = Chassis Ground
V = Supply
Rockwell Automation Publication 1734-UM001E-EN-P - July 2013
7
7B
81
82
Install POINTBlock I/O Modules
Sink Input Wiring
0
1
In 0
In 1
NC
NC
C
C
V
V
2
Prox
3
4
2-wire
6
Prox
5
3-wire
7
V = 12/24V dc
C = Common
Channel
Input Terminal
Common
Voltage
Remote Termination Block 1
0
0
4
6
1
1
5
7
2
2
4
6
3
3
5
7
Remote Termination Block 2
4
0
4
6
5
1
5
7
6
2
4
6
7
3
5
7
Connect common on 3-wire proximity switches.
12/24V DC is supplied through the internal power bus.
ATTENTION: When connecting more than one wire in a
termination point, make sure that both wires are the same gauge
and type.
Rockwell Automation Publication 1734-UM001E-EN-P - July 2013
Install POINTBlock I/O Modules
Output Wiring Diagram (Load Powered by External Power)
Out Out
0A 1A
Out Out
0B 1B
1
4
Out Out
2A 3A
5
6
Out Out
2B 3B
7
0
Power
Supply
2
Load
Power
Supply
3
Load
Out = Output channel relay contacts
Power Supply = can range from +5V DC to 240V ac
C = Common
Channel
Output
Common
Supply
Not used
Not used
Not used
Not used
Remote Termination Block 3
0A
0
0B
2
1A
1
1B
3
2A
4
2B
6
3A
5
3B
7
Remote Termination Block 4
4A
0
4B
2
5A
1
5B
3
6A
4
6B
6
7A
5
7B
7
Supply voltage can range from +5V DC to 240V ac, depending on relay load.
12/24V DC power for the module is provided by the internal power bus.
ATTENTION: When connecting more than one wire in a
termination point, make sure that both wires are the same gauge
and type.
DeviceNet Connector Wiring
DeviceNet
Connection
Red
+V
White
CAN - High
Bare
Shield
Blue
Black
CAN - Low
-V
Rockwell Automation Publication 1734-UM001E-EN-P - July 2013
83
84
Install POINTBlock I/O Modules
1734D-IA8XOA8 POINTBlock 8 AC In/8 AC Out Modules
Module Status
Network Status
Inputs
Outputs
0
4
0
4
1
5
1
5
10-60
2
6
2
6
0-9
3
7
3
7
I/O status
1’s Node Address Rotary Switch
10’s Node Address Rotary Switch
42004
1734D-IA8XOA8 POINTBlock 8 AC In/8 AC Out Modules Wiring
Diagram
120V ac
Power
Field Power
Inputs
0
1
0
NC NC 0
V ac
2
NC
4
L2in
1
1
3
2
3
NC
2
3
5
4
5
L2in L2 L2
6
7
6
7
L1in L1in L1 L1
RTB 0
RTB 1
Outputs
0
4
1
0
5
1
0
0
1
1
4
5
2
3
2
3
2
3
6
7
2
3
6
7
4
5
4
5
4
5
L2 L2 L2 L2
L2 L2
6
L1
7
6
7
6
7
L1 L2 L2
L2 L2
RTB 2
RTB 3
RTB 4
This supply will be connected to the internal power bus.
NC = No Connection
Chas Gnd = Chassis Ground
L2/N = AC Return/Neutral L1 = AC Power
Rockwell Automation Publication 1734-UM001E-EN-P - July 2013
Install POINTBlock I/O Modules
Input Wiring Diagram
0
1
In 0
In 1
2
3
In 2
In 3
Prox
Prox
4
6
5
L2
L2
L1
L1
7
L1 = 120V ac
L2 = Return
Channel
Input Terminal
Return
Voltage
Remote Termination Block 1
0
0
4
6
1
1
5
7
2
2
4
6
3
3
5
7
Remote Termination Block 2
4
0
4
6
5
1
5
7
6
2
4
6
7
3
5
7
120V AC is supplied through the internal power bus.
ATTENTION: When connecting more than one wire in a
termination point, make sure that both wires are the same gauge
and type.
Rockwell Automation Publication 1734-UM001E-EN-P - July 2013
85
86
Install POINTBlock I/O Modules
Output Wiring Diagram
0
1
In 0
In 1
2
3
In 2
Load
Load
In 3
Load
4
6
5
L2
L2
L2
L2
Load
7
L1 = 120V ac
L2 = Return
Channel
Output Terminal
Common Terminal
Power
Remote Termination Block 3
Channel 0
0
6
Channel 1
1
7
Channel 2
2
4
Channel 3
3
5
Remote Termination Block 4
Channel 4
0
6
Channel 5
1
7
Channel 6
2
4
Channel 7
3
5
Module power is supplied from the internal power bus.
ATTENTION: When connecting more than one wire in a
termination point, make sure that both wires are the same gauge
and type.
DeviceNet Connector Wiring
DeviceNet
Connection
Rockwell Automation Publication 1734-UM001E-EN-P - July 2013
Red
+V
White
CAN - High
Bare
Shield
Blue
Black
CAN - Low
-V
Install POINTBlock I/O Modules
87
1734D-IA8XOW8 POINTBlock 8 AC In/8 Relay Out Modules
Module Status
Network Status
Inputs
Outputs
0
4
0
4
1
5
1
5
10-60
2
6
2
6
0-9
3
7
3
7
I/O status
1’s Node Address Rotary Switch
10’s Node Address Rotary Switch
42004
1734D-IA8XOW8 POINTBlock 8 AC In/8 Relay Out Modules Wiring
Diagram
120V ac
Power
Field Power
0
1
0
NC NC 0
V ac
2
NC
4
L2in
Inputs
1
1
3
2
3
NC
2
3
5
4
5
L2in L2 L2
6
7
6
7
L1in L1in L1 L1
0
4
Outputs
1
0
5
1
0A
0
1A
1
4A
5A
2
3
2
3
2
3
6
7
0B 1B 4B 5B
4
5
4
5
4
5
L2 L2 2A 3A 6A 7A
6
L1
7
6
7
6
7
L1 2B 3B 6B 7B
RTB 0
RTB 1
RTB 2
RTB 3
RTB 4
This supply will be connected to the internal power bus.
NC = No connection
L2/N = AC Return/Neutral
L1 = AC Power
Rockwell Automation Publication 1734-UM001E-EN-P - July 2013
88
Install POINTBlock I/O Modules
Input Wiring Diagram
1
0
In 1
In 0
3
2
In 3
In 2
Prox
6
Prox
5
4
L2
L2
L1
L1
7
L1 = 120V ac
L2 = Return
Channel
Input Terminal
Return
Voltage
Remote Termination Block 1
0
0
4
6
1
1
5
7
2
2
4
6
3
3
5
7
Remote Termination Block 2
4
0
4
6
5
1
5
7
6
2
4
6
7
3
5
7
120V AC is supplied through the internal power bus.
ATTENTION: When connecting more than one wire in a
termination point, make sure that both wires are the same gauge
and type.
Rockwell Automation Publication 1734-UM001E-EN-P - July 2013
Install POINTBlock I/O Modules
Output Wiring Diagram
Load Powered by External Power
0
Power
Supply
1
Power
Supply
Out 0A Out 1A
2
3
Out 0B Out 1B
4
5
Out 2A Out 3A
Out = Output channel relay contacts
L1 = 120V ac
L2 = Return
Channel
Output
Load
6
7
Load
Out 2B Out 3B
Common
Supply
Not used
Not used
Not used
Not used
Remote Termination Block 3
0A
0
0B
2
1A
1
1B
3
2A
4
2B
6
3A
5
3B
7
Remote Termination Block 4
4A
0
4B
2
5A
1
5B
3
6A
4
6B
6
7A
5
7B
7
Supply voltage is 120V ac.
120V AC power for the module is provided by the internal power bus.
ATTENTION: When connecting more than one wire in a
termination point, make sure that both wires are the same gauge
and type.
DeviceNet Connector Wiring
DeviceNet
Connection
Red
+V
White
CAN - High
Bare
Shield
Blue
Black
CAN - Low
-V
Rockwell Automation Publication 1734-UM001E-EN-P - July 2013
89
90
Install POINTBlock I/O Modules
1734D-IA16 POINTBlock 16 AC Input Modules
Module Status
Network Status
I/O Status
1’s Node Address Rotary Switch
10’s Node Address Rotary Switch
42004
Wire the 16 AC Input Module Wiring Diagram
120V ac
Power
0
NC
1
NC
0
0
1
1
0
2
3
2
3
2
NC
4
NC
5
2
4
3
5
4
L2in L2in
V ac
Inputs
Field Power
6
L1in
0
1
4
5
2
3
6
7
L2
L2
L2
7
6
L1in L1
7
L1
6
L1
10
L2
L1
11
L2
14
L2
15
5
L2
6
L1
13
3
4
7
L1
1
12
2
5
6
7
9
3
4
5
0
1
8
L2
7
L1
RTB 0
RTB 1
RTB 2
RTB 3
RTB 4
This supply will be connected to the internal power bus.
NC = No Connection
Chas Gnd = Chassis Ground
L2/N = AC Return/Neutral L1 = AC Power
Rockwell Automation Publication 1734-UM001E-EN-P - July 2013
L1
Install POINTBlock I/O Modules
Input Wiring Diagram
RTB 1
0
1
In 0
In 1
2
3
In 2
In 3
Prox
Prox
4
6
L1 = 120V ac
L2 = Return
5
L2
L2
L1
L1
7
Repeat for RTB 2, 3 and 4
ATTENTION: When connecting more than one wire in a
termination point, make sure that both wires are the same gauge
and type.
Channel
Input Terminal
Return
Voltage
Remote Termination Block 0
Field Power
Block
Vin (L1)
6 and/or 7
Return (L2/N)
4 and/or 5
Remote Termination Block 1
0
0
6
1
1
7
2
2
6
3
3
7
Remote Termination Block 2
4
0
6
5
1
7
6
2
6
7
3
7
Remote Termination Block 3
8
0
6
9
1
7
10
2
6
11
3
7
Remote Termination Block 4
12
0
6
13
1
7
Rockwell Automation Publication 1734-UM001E-EN-P - July 2013
91
92
Install POINTBlock I/O Modules
Channel
Input Terminal
Return
Voltage
14
2
6
15
3
7
120V AC is supplied through the internal power bus.
DeviceNet Connector Wiring
DeviceNet
Connection
Blue
+V
CAN - High
Shield
CAN - Low
Black
-V
Red
White
Bare
1734D-IB16 POINTBlock 16 DC Input Modules
Module Status
Network Status
I/O status
10’s Node Address Rotary Switch
1’s Node Address Rotary Switch
42004
Rockwell Automation Publication 1734-UM001E-EN-P - July 2013
Install POINTBlock I/O Modules
16 DC Input Module Wiring Diagram
12/24V dc
V dc
Field
Power
NC =
No Connection
Inputs
0
1
0
NC NC 0
1
1
0
4
1
5
0
8
1
9
0
12
1
13
2
3
2
NC NC
2
4
5
4
Cin Cin C
3
2
6
4
C
3
2
10
4
C
3
11
5
C
2
14
4
C
3
15
5
C
3
5
C
7
5
C
6
7
6
7
6
7
6
7
6
7
Vin Vin V
V
V
V
V
V
V
V
RTB 0
RTB 1
RTB 2
RTB 3
RTB 4
This supply will be connected to the internal power bus.
Sink Input Wiring Diagram
RTB 1
0
1
In 0
2-wire
3-wire
In 1
2
3
In 2
Prox
Prox
Channel
5
4
6
V = 12/24V dc
C = Common
In 3
C
C
V
V
Prox
Prox
7
Repeat for RTB 2, RTB 3 and RTB 4.
Input Terminal
Common
Voltage
Remote Termination Block 0
Field Power
Block
Vin (supply)
6 and 7
Common)
4 and 5
Remote Termination Block 1
0
0
4
6
1
1
5
7
2
2
4
6
3
3
5
7
Remote Termination Block 2
4
0
4
6
5
1
5
7
Rockwell Automation Publication 1734-UM001E-EN-P - July 2013
C = Common
Chas Gnd =
Chassis Ground
V = Supply
93
94
Install POINTBlock I/O Modules
Channel
Input Terminal
Common
Voltage
Remote Termination Block 0
Field Power
Block
Vin (supply)
6 and 7
Common)
4 and 5
6
2
4
6
7
3
5
7
Remote Termination Block 3
8
0
4
6
9
1
5
7
10
2
4
6
11
3
5
7
Remote Termination Block 4
12
0
4
6
13
1
5
7
14
2
4
6
15
3
5
7
Connect common on 3-wire proximity switches.
12/24V DC is supplied through the internal power bus.
ATTENTION: When connecting more than one wire in a
termination point, make sure that both wires are the same gauge
and type.
DeviceNet Connector Wiring
DeviceNet
Connection
Rockwell Automation Publication 1734-UM001E-EN-P - July 2013
Red
+V
White
CAN - High
Bare
Shield
Blue
Black
CAN - Low
-V
Chapter
4
POINT I/O Module Data
About This Chapter
Read this chapter for information about module status, input, output, and
configuration data, and default data maps forPOINT I/O modules to include
the following:
• Digital Input Modules
• Digital Output Modules
• Relay Output Modules
• Analog Input Modules
• Analog Output Modules
• POINTBlock I/O Modules
Digital Input Modules
Read this section for information about digital input modules.
Digital DC Input Modules
The 1734 digital DC input modules feature the following:
•
•
•
•
•
•
24V DC nominal DC inputs
Input range of 10...28.8V dc
2, 4, or 8 sinking or sourcing style inputs
Autobaud (will match baud of existing devices on the network)
Selectable input filter times (0…65 ms with 1 ms default)
Sequential auto addressing
I/O messages are sent to (consumed) and received from (produced) these
POINT I/O modules. These messages are mapped into the processor memory.(1)
These POINT I/O modules produce one byte of input data (scanner Rx). They
do not consume I/O data (scanner Tx).
(1) These are mapped through scan lists in DeviceNet networks and Direct, Listen Only, or Rack Optimized
connections in ControlNet and EtherNet/IP networks.
Rockwell Automation Publication 1734-UM001E-EN-P - July 2013
96
POINT I/O Module Data
Default Data Map for the 1734-IB2 and 1734-IV2 Input Modules
Message Size: 1 Byte
7
6
5
Produces (scanner Rx)
Not used
Consumes (scanner Tx)
No consumed data
4
3
2
1
0
Ch1
Ch0
Where: Ch0 = input channel 0, Ch1 = input channel 1, 0 = off, 1 = on
Default Data Map for the 1734-IB4 and 1734-IV4 Input Modules
Message Size: 1 Byte
7
6
Produces (scanner Rx)
Not used
Consumes (scanner Tx)
No consumed data
5
4
3
2
1
0
Ch3
Ch2
Ch1
Ch0
Where: Ch0 = input channel 0, Ch1 = input channel 1, Ch2 = input channel 2, Ch3 = input channel 3, 0 = off, 1 = on
Default Data Map for the 1734-IB8 and 1734-IV8 Input Modules
Message Size: 1 Byte
7
6
5
4
3
2
1
0
Produces (scanner Rx)
Ch7
Ch6
Ch5
Ch4
Ch3
Ch2
Ch1
Ch0
Consumes (scanner Tx)
No consumed data
Where: Ch0 = input channel 0, Ch1 = input channel 1, Ch2 = input channel 2, Ch3 = channel 3, Ch4 = input channel 4, Ch5 = input channel
5, Ch6 = input channel 6, Ch7 = input channel 7, 0 = off, 1 = on
Default Data Map for 1734-IB4D Module - Produced Assembly Instance 101
Message Size: 2 Bytes
7
6
5
4
3
2
1
0
Produce 0 (Rx)
Fault 3
Fault 2
Fault 1
Fault 0
Input 3
Input 2
Input 1
Input 0
Produce 1 (Rx)
SC 3
SC 2
SC 1
SC 0
OW 3
OW 2
OW 1
OW 0
Consume (Tx)
No consumed data
Where: OW = open wire, SC = short circuit, fault = open wire or short circuit.
Default Data Map for 1734-IB4D Module - Produced Assembly Instance 23
Message Size: 1 Byte
7
6
5
4
3
2
1
0
Produce 0 (Rx)
Fault 3
Fault 2
Fault 1
Fault 0
Input 3
Input 2
Input 1
Input 0
Consume (Tx)
No consumed data
Where: Fault = open wire or short circuit.
Rockwell Automation Publication 1734-UM001E-EN-P - July 2013
POINT I/O Module Data
97
Default Data Map for 1734-IB4D Module - - Configuration Assembly Instance 103
Message Size: 18 Bytes
7
6
Consume 0
Input 0 Off to On Filter Byte 0
Consume 1
Input 0 Off to On Filter Byte 1
Consume 2
Input 0 On to Off Filter Byte 0
Consume 3
Input 0 On to Off Filter Byte 1
Consume 4
Input 1 Off to On Filter Byte 0
Consume 5
Input 1 Off to On Filter Byte 1
Consume 6
Input 1 On to Off Filter Byte 0
Consume 7
Input 1 On to Off Filter Byte 1
Consume 8
Input 2 Off to On Filter Byte 0
Consume 9
Input 2 Off to On Filter Byte 1
Consume 10
Input 2 On to Off Filter Byte 0
Consume 11
Input 2 On to Off Filter Byte 1
Consume 12
Input 3 Off to On Filter Byte 0
Consume 13
Input 3 Off to On Filter Byte 1
Consume 14
Input 3 On to Off Filter Byte 0
Consume 15
Input 3 On to Off Filter Byte 1
Consume 16
Autobaud Disable
Consume 17
Produced Assembly Instance
Produce (Tx)
No produced data
5
4
3
2
1
0
Enable OW3
Enable OW2
Enable OW1
Enable OW0
Where: OW = open wire.
Digital AC Input Modules
The 1734 digital AC input modules feature the following:
• 120 or 220V AC nominal are AC inputs
• Input range of 65…132 for 120V AC inputs; 159…264 for 220V AC
inputs
• Two sinking style inputs
• Autobaud (will match baud of existing devices on the network)
• Selectable input filter times (0…65 ms with 1 ms default)
• Sequential auto addressing
I/O messages are sent to (consumed) and received from (produced) these
POINT I/O modules. These messages are mapped into the processor memory.(1)
(1) These are mapped through scan lists in DeviceNet networks and Direct, Listen Only, or Rack-optimized
connections in ControlNet and EtherNet/IP networks.
Rockwell Automation Publication 1734-UM001E-EN-P - July 2013
98
POINT I/O Module Data
These POINT I/O modules produce one byte of input data (scanner Rx). They
do not consume I/O data (scanner Tx).
Default Data Map for the 1734-IA2 and 1734-IM2 Input Modules
Message Size: 1 Byte
7
6
5
4
3
2
Produces (scanner Rx)
1
0
Ch1
Ch0
Consumes (scanner Tx) No consumed data
Where: Ch0 = channel 0, Ch1 = channel 1; 0 = off, 1 = on
Default Data Map for the 1734-IA4 and 1734-IM4 Input Modules
Message Size: 1 Byte
7
6
5
Produces (scanner Rx)
4
3
2
1
0
Ch3
Ch2
Ch1
Ch0
Consumes (scanner Tx) No consumed data
Where: Ch0 = channel 0, Ch1 = channel 1; Ch2 = channel 2, Ch3 = channel 3,
0 = off, 1 = on
Digital Output Modules
Read this section for information about digital output modules.
Digital DC Output Modules
The features of DC output modules include the following:
• 24V DC outputs with a range of 10…28.8V dc
• Output diagnostic features are incorporated to assist in troubleshooting
• Current limited outputs of up to 2 A with respect to their DC return
• Autobaud (will match baud of existing devices on the network)
• Sequential auto addressing
I/O messages are sent to (consumed) and received from (produced) these
POINT I/O modules. These messages are mapped into the processor memory.(1)
These POINT I/O modules produce one byte of input data (scanner Rx). They
consume one byte of output data (Scanner Tx).
Rockwell Automation Publication 1734-UM001E-EN-P - July 2013
POINT I/O Module Data
Default Data Map for 1734-OB2, 1734-OB2E, and 1734-OV2E Output Module
Message Size: 1 Byte
7
6
5
4
3
2
Produces
Not used
(scanner Rx)
1
0
Ch
1
Ch
0
1
0
Ch
1
Ch
0
Channel status
(1734-OB2E module only) (1)
Where: 0 = no error, 1 = error
Message Size: 1 Byte
7
6
5
4
3
2
Consumes Not used
(scanner Tx)
Channel state
Where: 0 = off, 1 = on
(1) The 1734-OB2, 1734-OB4, and 1734-OB8 Digital DC Output modules do produce one byte of data (Scanner
RX), but it is always zero.
Default Data Map for 1734-OB4, 1734-OB4E, and 1734-OV4E Output Module
Message Size: 1 Byte
7
Produces
(scanner Rx)
6
5
4
Not used
3
2
1
0
Ch3 Ch2 Ch1 Ch0 Channel status
(1734-OB4E module
only)(1)
Where: 0 = no error, 1 = error
Message Size: 1 Byte
7
Consumes
(scanner Tx)
6
5
4
Not used
3
2
1
0
Ch3 Ch2 Ch1 Ch0 Channel state
Where: 0 = off, 1 = on
(1) The 1734-OB2, 1734-OB4, and 1734-OB8 Digital DC Output modules do produce one byte of data (Scanner
RX), but it is always zero.
Default Data Map for 1734-OB8, 1734-OB8E, and 1734-OV8E Output Module
Message Size: 1 Byte
Produces
(scanner Rx)
7
6
5
4
3
2
1
0
Ch
7
Ch
6
Ch
5
Ch
4
Ch
3
Ch
2
Ch
1
Ch
0
Where: 0 = no error, 1 = error
Message Size: 1 Byte
Rockwell Automation Publication 1734-UM001E-EN-P - July 2013
Channel status
(1734-OB8E module
only)(1)
99
100
POINT I/O Module Data
Default Data Map for 1734-OB8, 1734-OB8E, and 1734-OV8E Output Module
Consumes
(scanner Tx)
7
6
5
4
3
2
1
0
Ch
7
Ch
6
Ch
5
Ch
4
Ch
3
Ch
2
Ch
1
Ch
0
Channel state
Where: 0 = off, 1 = on
(1) The 1734-OB2, 1734-OB4, and 1734-OB8 Digital DC Output modules do produce one byte of data (Scanner RX),
but it is always zero.
Default Data Map for the 1734-OB2EP Output Module
Message Size: 1 Byte
7
Produces
(scanner Rx)
6
5
4
3
2
1
Not used
0
Ch1 Ch0
Channel status
Where: 0 = no error, 1 = error
Message Size: 1 Byte
7
Consumes
(scanner Tx)
6
5
4
3
2
1
Not used
0
Ch1 Ch0
Channel state
Where: 0 = Off, 1 = On
Digital AC Output Modules
The 1734-OA2 AC output module features include the following:
•
•
•
•
120V AC outputs with a range of 74…264V AC (120/220V AC nominal)
Each output is rated at 0.10 A minimum to 0.75 A maximum
Autobaud (will match baud of existing devices on the network)
Sequential auto addressing
Default Data Map for the 1734-OA2 Output Module
7
6
5
4
Produces (scanner Rx)
No produced data
Consumes (scanner
Tx)
Not used
Where: 0 = Off, 1 = On
Rockwell Automation Publication 1734-UM001E-EN-P - July 2013
3
2
1
0
Ch1 Ch0 Channel state
POINT I/O Module Data
101
Default Data Map for 1734-OA4 Modules
7
6
5
4
Produces (scanner Rx)
No produced data
Consumes (scanner Tx)
Not used
3
2
1
Ch
3
Ch 2 Ch
1
0
Ch
0
Channel
state
Where: 0 = Off, 1 = On
Relay Output Modules
The relay output modules consist of 1734-OW2 and 1734-OW4 2-relay output
modules and 1734-OX2 4-relay output modules. Features of the 1734-OW2 and
1734-OW4 relay modules include the following:
• Type A Normally Open relays
• Sink or source a current with respect to power or return
• Contact outputs isolated from each other
• Each output rated 5…240V dc/V rms at 2 A (current is load dependant)
• Autobaud (will match baud of existing devices on the network)
• Sequential auto addressing
Features of the 1734-OX2 relay modules include the following:
• Two Form C isolated (normally open; normally closed)
electromechanical relays
• Sink or source a current with respect to power or return
• Contact outputs isolated from each other
• Each output rated 5…240V dc/V rms at 2 A (current is load dependant)
• Autobaud (will match baud of existing devices on the network)
• Sequential auto addressing
I/O messages are sent to (consumed) and received from (produced) these
POINT I/O modules. These messages are mapped into the processor memory.
Default Data Map for the 1734-OW2 Output Module
Message Size: 1 Byte
7
6
5
4
Produces
(scanner Rx)
No produced data
Consumes
(scanner Tx)
Not used
3
2
1
0
Ch
1
Ch
0
Where: 0 = off, 1 = on
Rockwell Automation Publication 1734-UM001E-EN-P - July 2013
Channel state
102
POINT I/O Module Data
Default Data Map for the 1734-OW4 Output Module
Message Size: 1 Byte
7
6
5
4
Produces
(scanner Rx)
No produced data
Consumes
(scanner Tx)
Not used
3
2
1
0
Ch
3
Ch
2
Ch
1
Ch
0
Channel state
Where: 0 = off, 1 = on
Default Data Map for the 1734-OX2 Relay Output Module
Message Size: 1 Byte
7
6
5
4
Produces
(scanner Rx)
No produced data
Consumes
(scanner Tx)
Not used
3
2
1
0
Ch
1
Ch
0
Channel state
Where: 0 = NO contact off, NC contact on
1 = NO contact on, NC contact off
Analog Input Modules
The 1734-IE2C Analog Input Module is a two-channel module that converts an
analog input current to a digital value. The module resolution is 16 bits across 0
to 21 mA. The module has two modes.
• 0…20 mA
• 4…20 mA (default mode)
• Scaling to any 16-bit signed integer (–32,768…+32,767) Default for 1734-IE2C scalers are +3277 @ 4 mA for low
and +16,383 @ 20 mA for high
• Operates in Unipolar mode
The 1734-IE2V Analog Input Module is a two-channel module that converts an
analog input voltage to a digital value. The module resolution is 16 bits across 10…+10V. The module has two modes.
• 0…10V DC (default mode)
• +/- 10V dc
• Scaling to any 16-bit signed integer (–32,768…+32,767) Default for 1734-IE2V scalers are 0 @ 0V for low
and +10,000 @ 100V for high
• Operates in Unipolar or Bipolar modes
Rockwell Automation Publication 1734-UM001E-EN-P - July 2013
POINT I/O Module Data
103
Data
The1734-IE2C module operates in unipolar mode only; the 1734-IE2V module
operates in unipolar or bipolar modes. Data returned from the module is scaled
by the user to any 16-bit signed integer (–32,768…+32,767). Six bytes of data are
read from the 1734-IE2C and 1734-IE2V modules. No data is written to the
input modules.
• Channel 0 Data (2 bytes)
• Channel 1 Data (2 bytes)
• Channel 0 Status (1 byte)
• Channel 1 Status (1 byte)
Communicate with Your Module
I/O messages are sent to (consumed) and received from (produced) the
POINT I/O modules. These messages are mapped into the processor’s
memory.(1) These POINT I/O input modules produces six bytes of input data
(scanner Rx) and fault status data. It does not consume output data (scanner Tx).
Default Data Map for the 1734-IE2C Analog Input Module
Message Size: 6 Bytes
15
Produces (scanner Rx)
14
13
12
11
10
09
08
07
06
05
04
Input Channel 0 High Byte
Input Channel 0 Low Byte
Input Channel 1 High Byte
Input Channel 1 Low Byte
Status Byte for Channel 1
Status Byte for Channel 0
OR
UR
HHA LLA
HA
LA
CM
Consumes (scanner Tx)
No consumed data
Where:
CF = Channel Fault status; 0 = no error, 1 = fault
LA = Low Alarm; 0 = no error, 1 = fault
LLA = Low/Low Alarm: 0 = no error, 1 = fault
UR = Underrange; 0 = no error, 1 = fault
CF
OR
UR
HHA
LLA
03
02
01
00
HA
LA
CM
CF
CM = Calibration Mode; 0 = normal, 1 = calibration mode
HA = High Alarm; 0 = no error, 1 = fault
HHA = High/High Alarm; 0 = no error, 1 = fault
OR = Overrange; 0 = no error, 1 = fault
Default Data Map for the 1734-IE2V Analog Input Module
Message Size: 6 Bytes
15
14
13
12
11
10
09
08
07
06
05
04
03
02
01
(1) These are mapped through scan lists in DeviceNet networks and Direct, Listen Only, or Rack-optimized
connections in ControlNet and EtherNet/IP networks.
Rockwell Automation Publication 1734-UM001E-EN-P - July 2013
00
104
POINT I/O Module Data
Default Data Map for the 1734-IE2V Analog Input Module
Produces (scanner Rx)
Input Channel 0 - High Byte
Input Channel 0 - Low Byte
Input Channel 1 - High Byte
Input Channel 1 - Low Byte
Status Byte for Channel 1
Status Byte for Channel 0
OR
Consumes (scanner Tx)
Where:
UR
HHA
LLA
HA
LA
CM
CF
OR
UR
HHA
LLA
HA
LA
CM
CF
No consumed data
CF = Channel Fault status; 0 = no error, 1 = fault
LA = Low Alarm; 0 = no error, 1 = fault
LLA = Low/Low Alarm; 0 = no error, 1 = fault
UR = Underrange; 0 = no error, 1 = fault
CM = Calibration Mode; 0 = normal, 1 = calibration mode
HA = High Alarm; 0 = no error, 1 = fault
HHA = High/High Alarm; 0 = no error, 1 = fault
OR = Overrange; 0 = no error, 1 = fault
Scaling
Select scaling for each channel by making the selection on the configuration
dialog. Scaling is the conversion of unscaled data to engineering units.
The high and low scalers (Engineering Units) are signed integers. There are no
restrictions on these units.
• Defaults for 1734-IE2C scalers are +3277 @ 4 mA for low
and +16,383 @ 20 mA for high.
• Defaults for 1734-IE2V scalers are 0 @ 0V for low
and +10,000 @ 100V for high.
Set each scaler individually or on a per channel basis.
The 1734-IE2C module reads a current input between 0 or 4 mA (low) and
20 mA (high) dependent on mode selected. The 1734-IE2V module reads a
voltage input between -10V or 0V (low) and +10V (high) dependent on mode
selected.
Channel Status
Channel Status Byte
Bit 7
Bit 6
Bit 5
Bit 4
Bit 3
Over
Range
Under
Range
High High Low Low High
Alarm
Alarm
Alarm
Bit 2
Bit 1
Bit 0
Low
Alarm
CAL
Mode
Channel
Fault
• Channel Fault Description - General channel health bit indicates whether
the module is operating with or without faults. If any alarms or faults are
detected, this bit is set. Channel Status can be read on a per channel basis
or by reading the Channel Status Byte (Bit 0) in the Module Produce
Assembly.
Rockwell Automation Publication 1734-UM001E-EN-P - July 2013
POINT I/O Module Data
105
• Calibration Mode Bit - This bit (Channel Status Bit 1) is set when you
begin calibration. See the Calibrate Your Analog Modules chapter of this
manual for calibration details. When set, the channel status indicator
blinks green.
• Low Alarm Value Bit - When the input signal is less than the Low Alarm
value, this bit (Channel Status Bit 2) is set. The default value for this alarm
is as follows:
• 1734-IE2C module is 3113 counts (3.8 mA)
• 1734-IE2V module is 500 counts = 500 mV (0.5V).
• High Alarm Value Bit - When the input signal is more than the High High
Alarm value, this bit (Channel Status Bit 3) is set. The default value for
this alarm is as follows:
• 1734-IE2C module is 16547 counts (20.2 mA).
• 1734-IE2V module is 9500 counts = 9500 mV (9.5V).
• Low Low Alarm Value Bit - When the input signal is less than the Low
Low Alarm value, this bit (Channel Status Bit 4) is set. The default value
for this alarm is as follows:
• 1734-IE2C module is 2867 counts (3.5 mA).
• 1734-IE2V module is 200 counts = 200 mV (0.2V).
• High High Alarm Value Bit - When the input signal is more than the High
Alarm value, this bit (Channel Status Bit 5) is set. The default value for
this alarm is as follows:
• 1734-IE2C module is 16792 counts (20.5 mA).
• 1734-IE2V module is 9800 counts = 9800 mV (9.8V).
• Under-range Status Bit - This bit (Channel Status Bit 6) is set when the
module returned data is at a minimum. 1734-IE2C module is 98 counts
(around 120 μA); 1734-IE2V module is -0.25 or -10.25V, depending on
range. When set, the channel status indicator blinks red.
• Over-range Status Bit - This bit (Channel Status Bit 7) is set when the
module returned data is at a maximum. 1734-IE2C module is around 21
mA. 1734-IE2V module is +10.25V. When set, the channel status
indicator blinks red.
Latch Alarms
The latch alarms lets low- and high-alarm status information to be latched when
an alarm is set. Even if an alarm is momentarily set, the status bit stays set until a
reset latch service is issued. Default setting is Unlatched. Each channel can be
configured individually.
Rockwell Automation Publication 1734-UM001E-EN-P - July 2013
106
POINT I/O Module Data
Alarm Disable
This function disables all channel alarms and faults so they are not reported in
the channel status field. The channel indicator stays solid green, alarms are
ignored. The default state is Alarms Enabled. Each channel can be configured
individually.
Calibration Status
This status bit is set when the channel is in Calibration mode. At Begin
Calibration, the module is put into Calibration mode. This bit is reset when the
Accept Low Calibration, or Accept High Calibration, commands are sent. This is
not the Bad Calibration Status bit, which is set if the module is not calibrated.
Digital Filter
A digital filter is available on the input modules. You set a time constant that is
used in the equation:
Yn = Yn-1 + (dt / (dt + TA) * (Xn-Yn-1)
Where: Yn = new data
Yn-1 = old data.
dt = Channel Update Rate in milliseconds
TA = digital filter time constant
Xn = present unfiltered data
TA can be an integer from 0...10,000 ms. If set to 0, the filter is disabled
The default setting is disabled. This is done by setting the time constant (TA) to
zero. Each channel can be configured individually for time constant but update
rate (dt) is done on a per module basis.
Update Rate
The update rate determines how often a channel is scanned. The maximum rate is
determined by the notch filter setting. The minimum update rate is 10,000 ms.
• 120 ms maximum update rate - 50 Hz
• 100 ms update rate - 60 Hz
• 24 ms update rate - 250 Hz
• 12 ms update rate - 500 Hz
Notch Filter
Select a notch filter. The notch filter is for both inputs. Valid settings are the
following:
• 50 Hz - 120 ms maximum update rate
Rockwell Automation Publication 1734-UM001E-EN-P - July 2013
POINT I/O Module Data
107
• 60 Hz - 100 ms update rate
• 250 Hz - 24 ms update rate
• 500 Hz - 12 ms update rate
The update rate determines the rate at which the inputs are sampled. Maximum
update rate is determined by the notch filter setting. The notch filter parameter is
used to select the fastest possible rate. Minimum update rate is 10,000 ms.
Alarms
Available alarms include the following:
• Low
• Low Low
• High
• High High
Each alarm has one status bit which is set to indicate when the input goes beyond
its set point. All Alarm Status bits can be read individually or from the Channel
Status Byte (bits 2…5).
You can configure each channel alarm individually.
Range Status
The module reports both Under Range and Over Range status.
• Under Range Status - This bit (Channel Status Bit 6) is set when the
module returned data is at a minimum.
– For the 1734-IE2C module, the value is 98 counts
(around 120 μA).
– For the 1734-IE2V module, the value is -0.25 or -10.25V, depending on
mode.
– When set, the channel status indicator blinks red.
– On the 1734-IE2C module, a wire-off condition sets this bit.
• Over Range Status - This bit (Channel Status Bit 7) is set when the
module returned data is at a maximum.
– For the 1734-IE2C module, the value is around 21 mA
– For the 1734-IE2V module, the value is +10.25V.
– When set, the channel status indicator blinks red.
– On the 1734-IE2V module, a wire-off condition sets this bit.
Rockwell Automation Publication 1734-UM001E-EN-P - July 2013
108
POINT I/O Module Data
Channel Indicator Behavior
See the table for a listing of channel indicator states for given module conditions.
Indication
Probable Cause
Channel Status
Analog Output Modules
Off
Module in CAL mode
Solid green
Normal (channel scanning inputs)
Flashing green
Channel being calibrated
Solid red
No power or major channel fault
Flashing red
Channel at end of range
1734-IE2C module - (0 mA or 21 mA)
1734-IE2V module - (-0.25, -10.25, or +10.25)
The 1734-OE2C Analog Output Module is a two-channel module that converts
a digital code to an analog output current. The module resolution is 13 bits
across 0…21 mA.
The 1734-OE2V Analog Output Module is a two-channel module that converts
a digital code to an analog output voltage. The module resolution is 14 bits
across -10…+10V.
Data
The 1734-OE2C module operates in Unipolar mode; the 1734-OE2V module
operates in Unipolar or Bipolar modes. Data sent to the module is scaled by the
user to any 16-bit number. All data sent to the module is signed integer, ranging
from –32768…+32767 counts.
The 1734-OE2C module:
• consumes 4 bytes of data (scanner Rx) in this format:
– Channel 0 Data (2 bytes)
– Channel 1 Data (2 bytes)
• produces 2 bytes of data (scanner Tx) in this format:
– Channel 0 Status (1 byte)
– Channel 1 Status (1 byte)
Rockwell Automation Publication 1734-UM001E-EN-P - July 2013
POINT I/O Module Data
Default Data Map for the 1734-OE2C Analog Output Module
Message Size: 4 Bytes
15
Consumes (Tx)
14
13
12
11
10
09
08
07
06
05
04
Output Channel 0 High Byte
Output Channel 0 Low Byte
Output Channel 1 High Byte
Output Channel 1 Low Byte
03
02
01
00
03
02
01
00
LCA
CM
CF
Message Size: 2 Bytes
15
Produces (Rx)
14
13
12
11
10
09
08
High Byte - Channel 1 Status
Not used
07
06
05
04
Low Byte - Channel 0 Status
HCA
LCA
CM
CF
Not used
HCA
Where: CF = Channel Fault status; 0 = no error, 1 = fault
CM = Calibration Mode; 0 = normal, 1 = calibration mode
LCA = Low Clamp Alarm; 0 = no error, 1 = fault
HCA = High Clamp Alarm; 0 = no error, 1 = fault
The 1734-OE2V module:
• consumes 4 bytes of data (scanner Rx) in this format:
– Channel 0 Data (2 bytes)
– Channel 1 Data (2 bytes)
• produces 2 bytes of data (scanner Tx) in this format:
– Channel 0 Status (1 byte)
– Channel 1 Status (1 byte)
Default Data Map for the 1734-OE2V Analog Output Module
Message Size: 4 bytes
15
Consumes (Tx)
14
13
12
11
10
09
08
07
06
05
04
03
Output Channel 0 High Byte
Output Channel 0 Low Byte
Output Channel 1 High Byte
Output Channel 1 Low Byte
High Byte - Channel 1 Status
Low Byte - Channel 0 Status
02
01
00
LCA
CM
CF
Message Size: 2 Bytes
Produces (Rx)
Not used
HCA
LCA
CM
CF
Not used
Where: CF = Channel Fault status; 0 = no error, 1 = fault
CM = Calibration Mode; 0 = normal, 1 = calibration mode
LCA = Low Clamp Alarm; 0 = no error, 1 = fault
HCA = High Clamp Alarm; 0 = no error, 1 = fault
Rockwell Automation Publication 1734-UM001E-EN-P - July 2013
HCA
109
110
POINT I/O Module Data
Operational Modes
The 1734-OE2C module has these modes:
• 0…20 mA
• 4…20 mA (Default mode)
The 1734-OE2V module has these modes:
• 0… 10V DC (Default mode)
• -10…10V dc
You can set Channel Mode individually. The effective difference in the two
modes is how you apply the scalers. There is no internal offset, meaning that the
resolution is not changed.
For the 1734-OE2C module, in both modes, you assign the high scaler the value
of 20 mA. For the low scaler you assign the following:
• In 0…20 mA mode, the value of 0 mA
• In 4… 20 mA mode, the value of 4 mA
For the 1734-OE2V module, in both modes, you assign the high scaler the value
of +10V. For the lower scaler you assign the following:
• In 0…10V mode, the value of 0V
• In +10V mode, the value of -10V
Scaling
Scaling is the conversion of unscaled data to Engineering Units. The high and
low scalers (Engineering Units) are Signed Integers. There are no restrictions on
these units.
Default scaling points are 1638 @ 4 mA and 8191 @ 20 mA counts for the 1734OE2C module and 0 and 10,000 for the 1734-OE2V module. Each scaler can be
set individually and on a per-channel basis.
The 1734-OE2C module calculates and outputs a current between
0 mA or 4 mA (low scaler) and 20 mA (high scaler); the 1734-OE2V module
calculates and outputs a voltage between -10V or 0V (low scaler) and +10V (high
scaler).
Rockwell Automation Publication 1734-UM001E-EN-P - July 2013
POINT I/O Module Data
111
Since scalers have no restrictions, use care when configuring the module. If the
lower scaler is set to –32,768 and the module is in 4…20 mA (or -10V…10V)
mode, the module is incapable of setting the output to 0 mA (or less than -10V
on the 1734-OE2V module) because that requires a number smaller than –
32,768. –32,768 is the smallest number that you can represent with a signed
integer.
Fault and Idle/Program Mode Action
You can select what happens to the output if a fault occurs or if the module is in
Idle/Program mode. The choices are the following:
• Hold Last State
• Low Clamp
• High Clamp
• User defined value
The module default for both Fault and Idle/Program state is Low Clamp. All
values are scaled. You can set each action individually and on a per channel basis.
For an example of what would happen if the module lost communication, see the
table.
Channel Configuration
When a fault
occurs
When module Is in Idle/
program mode
Module Mode = 4…20 mA with
Scalers set at 0 and 8191 counts
Low Clamp = 0 counts
High Clamp = 8191 counts
Fault State = User Defined
Idle State = Low Clamp
Fault Value = 4095 counts
Channel 0 goes to 4095
counts which equals
12 mA.
Channel 0 goes to 0 counts which
equals 4 mA.
Module Mode = 0…10V with
Scalers set at 0 and 10000 counts
Low Clamp = 0 counts
High Clamp = 10000 counts
Fault State = User Defined
Idle State = Low Clamp
Fault Value = 5000 counts
Channel 0 goes to 5000
counts which equals 5V.
Channel 0 goes to 0 counts which
equals 0V.
Channel Status
The module status bits included in each Channel Status Byte are the following:
• Channel Fault
• CAL Mode
• Low Clamp
• High Clamp
Rockwell Automation Publication 1734-UM001E-EN-P - July 2013
112
POINT I/O Module Data
Channel Status can be read individually using RSNetWorx software or by reading
the Channel Status Byte in the Module Produce Assembly.
Bit 7
Bit 6
Bit 5
Not Used
Bit 4
Bit 3
Bit 2
Bit 1
Bit 0
High
Clamp
Low
Clamp
CAL
Mode
Channel
Fault
• Channel Fault Bit -This general channel health bit (Channel Status Bit 0)
indicates that the module is operating with or without faults. If any alarms
or faults are detected, this bit is set.
• Calibration Status Bit - This status bit (Channel Status Bit 1) is set when
the channel is in Calibration mode. At Begin Calibration, the module is
put into Calibration mode. This bit does not get set until the Output Low
Reference or Output High Reference commands are sent. Do not confuse
this bit with the Bad Calibration Status bit, which is set if the module is
not calibrated.
• Low Clamp Status Bit - This status bit (Channel Status Bit 2) is set when
the output data is clamped to it’s minimum level. The default value is
-32,768 counts. Low Clamp Status can be read on a per-channel basis or
by reading the Module Produce Assembly.
• High Clamp Status Bit - This status bit (Channel Status Bit 3) is set when
the output data is clamped to its maximum level. The default value is
32,767 counts. High Clamp Status can be read on a per channel basis or by
reading the Module Produce Assembly.
Open-wire Detection (1734-OE2C only)
This condition has no unique status bit, but if an open-wire condition exists, the
general Channel Status bit is set. The module can’t determine what the condition
is: open wire or loss of field power. The Channel indicators blinks red.
Power Fail Detection (1734-OE2V only)
This condition has no unique status bit, but if a power failure condition exists,
the general Channel Status bit is set. The Channel indicators goes to solid red.
Low and High Clamps
The clamps define the maximum and minimum values of the output. These
default to the following with the data scaled:
• -32,768 counts (0 or 4 mA) and +32,767 counts (21 mA) for the
1734-OE2C module
• -32,768 counts (0 or -10V) and +32,767 counts (+10V) for the
1734-OE2V module
Each clamp can be set individually and on a per-channel basis. When the output
value reaches clamp value, a status bit is set, indicating the output has been
Rockwell Automation Publication 1734-UM001E-EN-P - July 2013
POINT I/O Module Data
113
clamped. The clamps are absolute. Regardless of what is sent to the module or
what the fault state values are, the module does not operate outside these settings.
Latch Alarms
The latched alarms let low and high clamp status information to be latched. If an
output is clamped momentarily, the clamp status bit stays set until a reset latch
service is issued. The default setting is Unlatched. Each channel can be
configured individually. You can enable the Latch on a per-channel basis.
Alarm Disable
This function disables all channel alarms and faults so they are not reported in
the channel status field. The channel LED status indicator stays solid green, and
Latch Alarms are ignored. Change-of-state has no effect on module behavior.
Default state is Alarms Enabled. Each channel can be configured individually.
You can disable Alarms on a per-channel basis or they can be set with the Module
Configuration Assembly.
Channel Indicators
See the table for channel indicator states for given module condition.
Indication
1734-OE2C Probable Cause
1734-OE2V Probable Cause
Off
Module in CAL mode
Module in CAL mode
Solid green
Channel actively controlling
outputs
Channel actively controlling
outputs
Blinking green
Channel calibrating
Channel calibrating
Blinking red
Open wire or no power
Low/High Clamp alarm
Solid red
Unrecoverable fault - may require Loss of field power
device replacement
Channel Status
Rockwell Automation Publication 1734-UM001E-EN-P - July 2013
114
POINT I/O Module Data
POINTBlock I/O Modules
Mount these 1734D input/output modules on DIN rail with an integrated
DeviceNet communication interface, 8 inputs and 8 outputs, removable
terminations, and a POINTBus expansion port.
The modules include a non-isolated DeviceNet communication interface. The
24V DC from the DeviceNet connection powers a non-isolated DC/DC
converter that generates +5V DC that powers the POINTBlock electronics and
connects to the POINTBus port to power the expansion I/O electronics.
Module
Termination
Cage-clamp
1734D-IB8XOB8E
12/24V DC
X
1734D-IB8XOW8
X
12/24V DC
1734D-IB8XOW8S
X
1734D-IA8XOA8
X
120V AC
1734D-IA8XOA8S
X
1734D-IA8XOW8
X
120V AC
1734D-IA8XOW8S
X
1734D-IA16
X
120V AC
1734D-IA16S
X
1734D-IB16
X
12/24V DC
1734D-IB16S
X
En
CH
24
CL
CH
5V
GND
SH
CL
Spring-clamp
X
1734D-IB8XOB8ES
DeviceNet
Connector
Voltage
24V
to 5V
POINTBus
Expansion
Port
RT
Microprocessor
Field Bus
Connector
I/O Circuits
Power
Connections
120V AC or 24V DC
Rockwell Automation Publication 1734-UM001E-EN-P - July 2013
I/O Connections
41971
POINT I/O Module Data
115
ATTENTION: Whatever field power you supply is connected to the
internal field-power bus. For example, if 120V AC is applied to the
power connections, there will be 120V AC applied to the modules
through the internal field-power bus.
POINT I/O modules to the right of the module will also have that
internal power bus voltage applied, unless you use a 1734-FPD,
1734-EP24DC, or 1734-EPAC module to interrupt and change the field
power-bus voltage.
I/O messages are sent to (consumed) and received from (produced) the
POINT I/O modules. These messages are mapped into the processor’s memory.
The 1734D-IB8XOB8E module produces one byte of input data (scanner Rx)
status. It consumes one byte of output data (scanner Tx).
Default Data Map for the 1734D-IB8XOB8E DC Input/Output Module
Message Size: 1 Byte
Produces
(scanner Rx)
7
6
5
4
3
2
1
0
Ch7
Ch6
Ch5
Ch4
Ch3
Ch2
Ch1
Ch0
7
6
5
4
3
2
1
0
Ch7
Ch6
Ch5
Ch4
Ch3
Ch2
Ch1
Ch0
Input Data
Where: 0 = off, 1 = on
Message Size: 1 Byte
Consumes
(scanner Tx)
Output Data (or
state)
Where: 0 = off, 1 = on
The 1734D-IB8XOW8 module produces one byte of input data (scanner Rx)
status. It consumes one byte of output data (scanner Tx).
Default Data Map for the 1734D-IB8XOW8 DC Input/Relay Output Module
Message Size: 1 Byte
Produces
(scanner Rx)
7
6
5
4
3
2
1
0
Ch7
Ch6
Ch5
Ch4
Ch3
Ch2
Ch1
Ch0
7
6
5
4
3
2
1
0
Ch7
Ch6
Ch5
Ch4
Ch3
Ch2
Ch1
Ch0
Input Data
Where: 0 = off, 1 = on
Message Size: 1 Byte
Consumes
(scanner Tx)
Where: 0 = off, 1 = on
Rockwell Automation Publication 1734-UM001E-EN-P - July 2013
Output Data
116
POINT I/O Module Data
The 1734D-IA8XOA8 module produces one byte of input data (scanner Rx)
status. It consumes one byte of output data (scanner Tx).
Default Data Map for the 1734D-IA8XOA8 AC Input/Output Module
Message Size: 1 Byte
Produces
(scanner Rx)
7
6
5
4
3
2
1
0
Ch7
Ch6
Ch5
Ch4
Ch3
Ch2
Ch1
Ch0
7
6
5
4
3
2
1
0
Ch7
Ch6
Ch5
Ch4
Ch3
Ch2
Ch1
Ch0
Input Data
Where: 0 = off, 1 = on
Message Size: 1 Byte
Consumes
(scanner Tx)
Output Data
Where: 0 = off, 1 = on
The 1734D-IA8XOW8 module produces one byte of input data (scanner Rx)
status) It consumes one byte of output data (scanner Tx).
Default Data Map for the 1734D-IA8XOW8 AC Input/Relay Output Module
Message Size: 1 Byte
Produces
(scanner Rx)
7
6
5
4
3
2
1
0
Ch7
Ch6
Ch5
Ch4
Ch3
Ch2
Ch1
Ch0
7
6
5
4
3
2
1
0
Ch7
Ch6
Ch5
Ch4
Ch3
Ch2
Ch1
Ch0
Input Data
Where: 0 = off, 1 = on
Message Size: 1 Byte
Consumes
(scanner Tx)
Output Data
Where: 0 = off, 1 = on
The 1734D-IA16 module produces two bytes of input data (scanner Rx). It does
not consume output data (scanner Tx).
Default Data for the 1734D-IA16 Module
Message Size: 2 Bytes
15
14
13
12
11
10
9
8
7
6
5
4
3
2
1
0
Produces (Rx)
I15 I14 I13 I12 I11 I10 I9 I8 I7 I6 I5 I4 I3 I2 I1 I0
Consumes (Tx)
No consumed data
Where: I0 = channel 0, I1 = channel 1; 0 = off, 1 = on
For 1734D-IB16 modules, I/O messages are sent to (consumed) and received
from (produced) the POINTBlock I/O modules. These messages are mapped
into the processor’s memory. This module produces two bytes of input data
(scanner Rx) and does not consume output data (scanner Tx).
Rockwell Automation Publication 1734-UM001E-EN-P - July 2013
POINT I/O Module Data
117
Default Data for the 1734D-IB16 Module
Message Size: 2 bytes
15
14
13
12
11
10
9
Produces
(Rx)
I15
I14
I13
I12
I11
I10
I9 I8 I7 I6 I5 I4 I3 I2 I1 I0
Consumes
(Tx)
No consumed data
Where: I0 = channel 0, I1 = channel 1; 0 = off, 1 = on
Rockwell Automation Publication 1734-UM001E-EN-P - July 2013
8
7
6
5
4
3
2
1
0
118
POINT I/O Module Data
Notes:
Rockwell Automation Publication 1734-UM001E-EN-P - July 2013
Chapter
5
Calibrate Your Analog Modules
About This Chapter
Read this chapter for information about how to calibrate analog modules. Your
analog I/O module is factory-calibrated. You may choose to recalibrate your
module in your system to increase its accuracy for your specific application. This
chapter covers the following:
• Tools required to calibrate analog modules
• Calibrate analog current input modules
• Calibrate analog current output modules
• Calibrate analog voltage input modules
• Calibrate analog voltage output modules
You do not have to configure a module before you calibrate it. If you decide to
calibrate your analog I/O modules first, you can configure it at the same time.
IMPORTANT
Analog I/O modules can be calibrated on a channel by
channel basis or with the channels grouped together.
Regardless of which option you choose, we recommend
you calibrate all channels on your module each time you
calibrate. This helps you maintain consistent calibration
readings and improve module accuracy.
Calibration is meant to correct any hardware inaccuracies
that may be present on a particular channel or in your
system. The calibration procedure compares a known
standard, either input signal or recorded output, with the
channel’s performance and then calculates a linearcorrection factor between the measured and the ideal.
The linear-calibration correction factor is applied on every
input or output in the same manner to obtain maximum
accuracy.
When you calibrate input modules, use current or voltage calibrators to send a
signal to the module to calibrate it.
When you calibrate output modules, use a digital multimeter (DMM) to
measure the signal the module is sending out.
Rockwell Automation Publication 1734-UM001E-EN-P - July 2013
120
Calibrate Your Analog Modules
Tools Required to Calibrate
Your Analog Modules
To maintain your module’s accuracy specifications, we recommend you use
calibration instruments with specific ranges. See the table for a list of the
recommended instruments for each module.
Module
Recommended Instrument Range
1734-IE2C
1.00…20.00 mA (+/-0.15 μA) current source
1734-OE2C
DMM better than 0.6 μA
1734-IE2V
Voltage source 0.0…10.0V (+0.3 mV)
1734-OE2V
DMM better than 0.5 mV
You must be online to calibrate your analog I/O modules. We recommend the
module not be actively controlling a process when you calibrate it.
IMPORTANT
The module ignores output data sent to the module until
after calibration ends. This could be hazardous if active
control were attempted during calibration.
Input calibration consists of the following steps for an example of 2 channels.
1. Connect the calibration system.
2. Allow the system to warmup for at least 10 minutes.
3. Connect current or voltage source to channel 0 by applying
4 mA (current) or 0V (voltage).
4. Begin calibration.
5. Select both channels.
6. Accept Low cal for channel 0 (both status indicators blink).
7. Set current or voltage source to high value (20 mA current; or +10V
voltage).
8. Accept High cal for channel 0 (channel 0 status indicator turns off if
calibration was good, but channel 1 status indicator still blinks).
9. Connect current or voltage source to channel 1.
10. With high cal now applied to channel 1, accept High cal for channel 1.
11. Set current or voltage source to Low value.
12. Accept Low cal for channel 1.
Rockwell Automation Publication 1734-UM001E-EN-P - July 2013
Calibrate Your Analog Modules
Calibrate the Analog
Current Input Module
To calibrate your current input module, connect the module in a system similar
to that shown in the figure.
Apply power to the power supply and module for at least
10 minutes before calibrating the module. This allows
internal temperatures to stabilize, and reduces drift errors.
IMPORTANT
PDN IE2C
AENT IE2C
DeviceNet Input
Module
Status
EtherNet/IP Input
00 2
Network Activity
Status
Network
Status
PointBus
Status
1734-AENT
Channel 0
Connect to 0 and 4
Channel 1
Connect to 1 and 5
Channel 0
Connect to 0 and 4
System
Power
Field
Power
0 1
0
1
0
1
0
1
0
1
0
1
0
1
Power Supply Voltage
Current Source
0 1
0 1
0 1
0 1
0 1 0 1
Channel 1
Connect to 1 and 5
250 Ω
250 Ω
250 Ω resistor
protects the current
source in the event
of shorted wires.
121
250 Ω resistor
protects the current
source in the event
of shorted wires.
Power Supply Voltage
Current Source
44037
44035
1. Double-click the icon to bring up the General parameter dialog.
Rockwell Automation Publication 1734-UM001E-EN-P - July 2013
122
Calibrate Your Analog Modules
The EDS editor asks you if you want to upload the configuration from the
device.
2. From the EDS editor, click Upload
3. From the General parameter dialog, click Device Parameters.
You see the Device Parameters dialog.
This is the group
pull-down.
4. Select Calibration at the Groups pull-down.
5. Click Calibration Command, and select Begin Calibration.
6. Click the Download to Device button.
Both channel status indicators turn off.
Rockwell Automation Publication 1734-UM001E-EN-P - July 2013
Calibrate Your Analog Modules
123
Leave on single.
7. Click Calibration Channel Set to bring up channel selections, and select a
channel.
8. Click the Download to Device button.
9. Apply 4.00 mA to the input.
10. Click Accept Low Calibration.
Rockwell Automation Publication 1734-UM001E-EN-P - July 2013
124
Calibrate Your Analog Modules
11. From the Device Parameters dialog, click the Download to Device button.
The status indicator for the channel being calibrated blinks.
12. Set the current source to 20 mA.
13. Click Accept High Calibration.
14. Click the Download to Device button.
Calibration is complete as soon as High and Low calibration for the
selected channels are done successfully.
15. Repeat above steps to calibrate the other channel, noting that both high
and low inputs must be accepted in order for the module to finish
calibration.
Calibration is now complete. If the module does not accept calibration
(status indicator is still blinking), click Abort Calibration and start over.
Rockwell Automation Publication 1734-UM001E-EN-P - July 2013
Calibrate Your Analog Modules
Calibrate the Analog
Current Output Module
125
To calibrate your output module, connect the module in a DeviceNet system
similar to that shown in the figure, and use this procedure.
IMPORTANT
Apply power to the power supply and module for at least
10 minutes before calibrating the module. This allows
internal temperatures to stabilize and reduces drift errors.
PDN OE2C
DeviceNet Input
Channel 0
Connect to 0 and 4
0
1
0
1
0
1
0
1
0
1
0
1
Channel 1
Connect to 1 and 5
250 Ω
Power Supply Voltage
Current Meter
44032
1. Double-click the icon to bring up the General parameter dialog.
You see the EDS editor ask you if you want to upload the configuration
from the device.
Rockwell Automation Publication 1734-UM001E-EN-P - July 2013
126
Calibrate Your Analog Modules
2. From the EDS editor dialog, click Upload.
3. Click Device Parameters.
You see the Device Parameters dialog.
4. Select Calibration at the Group pull-down.
Group pull-down
5. From the Device Parameters dialog, click Calibration Command, and
select Begin Calibration.
6. From the Device Parameters dialog, click the Download to Device button.
Rockwell Automation Publication 1734-UM001E-EN-P - July 2013
Calibrate Your Analog Modules
127
7. Click Calibration Channel Sel to bring up channel selections, and select a
channel.
8. Click the Download to Device button.
9. Select Output Low Reference, and download to the module.
The selected channel status indicator blinks green.
Rockwell Automation Publication 1734-UM001E-EN-P - July 2013
128
Calibrate Your Analog Modules
10. Enter the value shown on your DVM for the Channel Low Value (4.044 in
the example).
11. From the Device Parameters dialog, select the Output High Value, and
download to the module.
12. From the Device Parameters dialog, enter the value shown on the DVM,
which is 20.231 in this example.
13. Repeat these steps for the other channel.
14. From the Device Parameters dialog, click All and Finish Calibration to
complete the calibration process.
Rockwell Automation Publication 1734-UM001E-EN-P - July 2013
Calibrate Your Analog Modules
15. From the Device Parameters dialog, click Apply.
You see the EDS Editor and are prompted to download to the module:
16. From the EDS Editor dialog, click Yes:
If calibration was accomplished, the Cal Status reflects good.
Your module is now calibrated.
Rockwell Automation Publication 1734-UM001E-EN-P - July 2013
129
130
Calibrate Your Analog Modules
Calibrate the Analog
Voltage Input Module
To calibrate your voltage input module, connect the module in a DeviceNet
system similar to that shown in the figure.
IMPORTANT
Apply power to the power supply and module for at least
10 minutes before calibrating the module. This allows
internal temperatures to stabilize, and reduces drift errors.
You can calibrate both voltage input channels at the same time using one voltage
source.
DeviceNet Input
Channel 0
Connect to 0 and 4
0
1
0
1
0
1
0
1
0
1
0
1
Channel 1
Connect to 1 and 5
Power Supply Voltage
4032
250 Ω
Voltage Source
1. Double-click the icon to bring up the General parameter dialog.
2. Click Device Parameters to view the parameters.
You see the EDS Editor dialog that asks you if you want to upload the
configuration from the device.
Rockwell Automation Publication 1734-UM001E-EN-P - July 2013
Calibrate Your Analog Modules
131
3. From the EDS Editor dialog, click Upload.
4. From the General Parameters dialog, select Calibration at the Groups pulldown.
This is the group
pull-down.
5. Select your channel.
6. Click Calibration Command, and Apply.
7. Click the Download to Device button.
Rockwell Automation Publication 1734-UM001E-EN-P - July 2013
132
Calibrate Your Analog Modules
Both channel status indicators turn off.
8. Apply 0.0V to the input.
9. Click Accept Low Calibration.
10. Click the Download to Device button.
The status indicator for the channel being calibrated blinks.
11. Set the voltage source to +10.0V.
12. Click Accept High Calibration.
13. Click the Download to Device button.
Calibration is complete as soon as High and Low calibration for the
selected channels are done successfully.
Rockwell Automation Publication 1734-UM001E-EN-P - July 2013
Calibrate Your Analog Modules
133
14. Repeat these steps to calibrate the other channel, if desired.
Both high and low inputs must be accepted in order for the module to
finish calibration.
Calibration is now complete. If the module does not accept calibration
(status indicator is still blinking), from the Device Parameters dialog, click
Abort Calibration and start over.
Calibrate the Analog
Voltage Output Module
To calibrate your output module, connect the module in a DeviceNet system
similar to that shown in the figure and use this procedure.
IMPORTANT
Apply power to the power supply and module for at least
10 minutes before calibrating the module. This allows
internal temperatures to stabilize, and reduces drift errors.
PDN OE2V
DeviceNet Input
Channel 0
Connect to 0 and 4
0
1
0
1
0
1
0
1
0
1
0
1
Channel 1
Connect to 1 and 5
250 Ω
Power Supply Voltage
Voltage Meter
Rockwell Automation Publication 1734-UM001E-EN-P - July 2013
134
Calibrate Your Analog Modules
1. Double-click the icon to bring up the General parameter dialog.
You see the EDS Editor dialog ask you if you want to upload the
configuration from the device.
2. From the EDS Editor dialog, click Upload.
.
3. From the Device Parameters dialog, select Calibration at the Groups
pull-down.
Groups pull-down
Click Calibration.
Rockwell Automation Publication 1734-UM001E-EN-P - July 2013
Calibrate Your Analog Modules
4. Select your channel(s).
5. Click Calibration Command and Apply.
6. Click the Download to Device button.
The channel status indicator turns off.
7. Select a channel.
8. Click the Download to Device button.
9. Select Output Low Reference and download to the module.
Rockwell Automation Publication 1734-UM001E-EN-P - July 2013
135
136
Calibrate Your Analog Modules
The selected channel status indicator blinks green.
10. Enter the value shown on your DVM for the Channel Low Value
(-10.1234 in the example).
Type in the
resulting value
from your DVM.
11. Select the Output High Value and download to the module.
Rockwell Automation Publication 1734-UM001E-EN-P - July 2013
Calibrate Your Analog Modules
137
12. Enter the value shown on the DVM onto your dialogs (10.0057 in this
example).
Type in the
resulting value
from your
DVM.
13. Repeat these steps for the other channel.
14. From the Device Parameters dialog, select All, and click Finish Calibration
to complete the calibration process.
You see the EDS Editor dialog that prompts you to download to the
module.
15. From the EDS Editor dialog, click Yes.
Rockwell Automation Publication 1734-UM001E-EN-P - July 2013
138
Calibrate Your Analog Modules
If calibration was accomplished, the Cal Status reflects good.
Your module is now calibrated.
Rockwell Automation Publication 1734-UM001E-EN-P - July 2013
Chapter
6
Troubleshoot with the Indicators
About This Chapter
Read this chapter for information about troubleshooting with the following
indicators:
• Module status
• Network status
• Power indication
• Calibration status
• I/O POINT status (ON/OFF/fault or diagnostic)
Refer to each module’s individual indicators for detailed information.
About Module Diagnostics
All status and diagnostic information (strobed, polled, cyclic, or change-of-state)
is reported back over the network communication adapter. A single point of
failure is detected and reported at the module and to the control system.
Module Status
Module
Status
Network Status
Network
Status
NODE:
Node-level Diagnostics:
24VDC
Sink
Input
· Module Status Indicator
indicates the health of the
module
· Network Status Indicator
indicates the health of the
POINTBus or backplane
Point-level Diagnostics:
· Digital outputs
Short circuit for ON-state
Open circuit for OFF-state
· Analog I/O
Loss of field power
Open wire
Calibration status
0
1
2
3
1734
IB4
· I/O Point Indicator
indicates I/O (ON/OFF or fault/
diagnostic) status
Rockwell Automation Publication 1734-UM001E-EN-P - July 2013
I/O Channel Status
42011
140
Troubleshoot with the Indicators
Network and Module Status Indications
The network and module status indications are the same for all modules.
Module
Status
Module Status
Network
Status
Network Status
NODE:
24VDC
Sink
Input
0
1
1734
IB2
Indication
Probable Cause
Recommended Action
Off
No power applied to device.
Apply power to device.
Solid green
Device is operating normally.
None.
Flashing green
Device needs commissioning due to configuration missing,
incomplete, or incorrect.
Configure device properly.
Flashing red
Recoverable fault is present.
Device did not pass internal test.
1. Cycle power to device.
2. If condition persists, replace device.
Solid red
Unrecoverable fault may require device replacement.
Replace device.
Flashing red/green
Device is in self-test.
None.
Off
Device is not online.
- Device has not completed Auto Baud detection
because there is no network traffic.
- Device has not completed dup_MAC_id test.
- Device not powered - check module status indicator.
Apply power to device, wait for MAC_id to complete, and
correct, as needed.
Flashing green
Device is online but has no connections in the established
state.
None - device is in Idle or Program mode.
Solid green
Device is online and has connections in the established state.
None.
Flashing red
One or more I/O connections are in timed-out state.
Check for I/O module failure, and correct, as needed.
Solid red
Critical link failure is present with failed communication device. Verify that adapter and terminal bases are properly installed,
Device detected error that prevents it from communicating on and reinstall, as needed.
the network.
Flashing red/green
Communication faulted device - the device has detected a
network access error and is in communication faulted state.
Device has received and accepted an Identify Communication
Faulted Request - long protocol message.
Module Status
Network Status
Rockwell Automation Publication 1734-UM001E-EN-P - July 2013
Verify that adapter is properly installed, and reinstall, as
needed.
Troubleshoot with the Indicators
Troubleshoot Digital
Modules
141
The I/O status indicators provide input and output indications for each module.
Individual meanings are indicated in the tables.
1734-IB2, 1734-IB4, and 1734-IB8 Sink Input Modules
1734-IB4
1734-IB2
Module
Status
Network
Status
Module Status
Network Status
NODE:
Status of Input 0
Status of Input 1
Status of Input 1
Status of Input 2
Status of Input 3
1734
IB2
Indication
24VDC
Sink
Input
24VDC
Sink
Input
0
Status of Input 0 & 4
0
4
1
Status of Input 1 & 5
1
5
Status of Input 2 & 6
Status of Input 3 & 7
2
3
1734
IB4
Probable Cause
Recommended Action
Off
Input is in the off-state.
None.
Yellow
Input is in the on-state.
None.
I/O Status
1734-IB4D Sink Input Modules with Diagnostics
Module Status
Network Status
Status of Input 0
Status of Input 1
Status of Input 2
Status of Input 3
Indication
46136
Probable Cause
Recommended Action
Off
Input is in the off-state.
None.
Yellow
Input is in the on-state.
None.
Red
Short circuit detected.
Check I/O wiring or terminal base.
Flashing red
Open wire detected.
Check I/O wiring or terminal base.
I/O Status
Rockwell Automation Publication 1734-UM001E-EN-P - July 2013
Module
Status
Network
Status
NODE:
NODE:
Status of Input 0
1
Module Status
Network Status
Module
Status
Network
Status
24VDC
Sink
Input
0
1734-IB8
2
6
3
7
1734
IB8
142
Troubleshoot with the Indicators
1734-OB2E, 1734-OB4E, and 1734-OB8E Source Output Modules
1734-OB2E
Module Status
1734-OB4E
Module
Status
Network Status
Module Status
Module
Status
Network Status
Network
Status
0
Status of Output 1
1
Network
Status
NODE:
24VDC
Source
Output
Status of Output 0
Module
Status
Network Status
Network
Status
NODE:
NODE:
24VDC
Source
Output
Status of Output 0
Status of Output 1
Status of Output 2
Status of Output 3
1734
OB2E
Indication
1734-OB8E
Module Status
24VDC
Source
Output
Status of Output 0 & 4
0
Status of Output 1 & 5
Status of Output 2 & 6
1
2
Status of Output 3 & 7
3
0
4
1
5
2
6
3
7
1734
OB4E
1734
OB8E
Probable Cause
Recommended Action
Off
All outputs are inactive.
None.
Yellow
One or more output is active and under control.
None.
Flashing red
Open circuit detected - no load (Off-state only).
Connect load or disable no load detection.
Solid red
Short circuit detected (On-state only).
Remove short or overloaded circuit.
I/O Status
1734-OB2, 1734-OB4, and 1734-OB8 Source Output Modules
1734-OB2
1734-OB4
Module Status
Module
Status
Module Status
Module
Status
Module Status
Module
Status
Network Status
Network
Status
Network Status
Network
Status
Network Status
Network
Status
NODE:
NODE:
24VDC
Source
Output
NODE:
24VDC
Source
Output
24VDC
Source
Output
Status of Output 0
0
Status of Output 0
0
Status of Output 0 & 4
0
4
Status of Output 1
1
Status of Output 1
1
Status of Output 1 & 5
1
5
Status of Output 2
2
Status of Output 2 & 6
2
6
Status of Output 3
3
Status of Output 3 & 7
3
7
1734
OB2
Indication
1734-OB8
1734
OB4
Probable Cause
Recommended Action
Off
All outputs are inactive.
None.
Yellow
One or more outputs is active and under control.
None.
I/O Status
Rockwell Automation Publication 1734-UM001E-EN-P - July 2013
1734
OB8
Troubleshoot with the Indicators
1734-OB2EP Protected Output Module
Module
Status
Network
Status
Module Status
Network Status
NODE:
Protected
Sourcing
Output
0
Status of Output 0
1
Status of Output 1
1734
OB2EP
41974
Indication
Probable Cause
Recommended Action
Off
All outputs are inactive.
None.
Yellow
One or more output is active and under control.
None.
Flashing red
Open circuit detected - no load (Off-state only).
Connect load or disable no load detection.
Solid red
Short circuit detected (On-state only).
Remove short or overloaded circuit.
I/O Status
1734-IV2, 1734-IV4, and 1734-IV8 Source Input Modules
1734-IV2
Module
Status
Module Status
Network
Status
Network Status
NODE:
1734-IV4
Module
Status
Network
Status
1734-IV8
Module Status
NODE:
24VDC
Source
Input
0
Status of Input 0
1
Status of Input 1
Module Status
Module
Status
Network Status
Network
Status
Network Status
NODE:
24VDC
Source
Input
24VDC
Source
Input
Status of Input 0
0
4
Status of Input 0 and 4
1
Status of Input 1
1
5
Status of Input 1 and 5
2
Status of Input 2
2
6
Status of Input 2 and 6
3
7
Status of Input 3 and 7
0
Status of Input 3
3
1734
IV2
1734
IV4
1734
IV8
41974
Indication
Probable Cause
Recommended Action
Off
Input is in the off-state.
None.
Yellow
Input is in the on-state.
None.
I/O Status
Rockwell Automation Publication 1734-UM001E-EN-P - July 2013
143
144
Troubleshoot with the Indicators
1734-OV2E, 1734-OV4E, and 1734-OV8E Protected Sink Output
Modules
1734-OV2E
Module
Status
Network
Status
1734-OV4E
Module Status
Module
Status
Network Status
Network
Status
1734-OV8E
Module Status
Network Status
NODE:
NODE:
0
Status of Output 0
0
1
Status of Output 1
1
Module Status
Network Status
NODE:
24VDC
Sink
Output
24VDC
Sink
Output
Module
Status
Network
Status
24VDC
Sink
Output
Status of Output 0
0
4
Status of Output 0 & 4
1
5
Status of Output 1 & 5
2
6
3
7
Status of Output 1
2
2
Status of Output 2
Status of Output 3
3
1734
OV2E
Indication
1734
OV4E
46137
46138
1734
OV8E
Probable Cause
Recommended Action
Off
All outputs are inactive.
None.
Yellow
One or more output is active and under control.
None.
Red
Short circuit detected (On-state only).
Remove short or overloaded circuit.
I/O Status
1734-OW2 and 1734-OW4 Relay Output Modules
1734-OW2
1734-OW4
Module
Status
Module Status
Network
Status
Network Status
NODE:
Module
Status
Network
Status
NODE:
Relay
Output
Relay
Output
Status of Output 0
0
Status of Output 0
0
Status of Output 1
1
Status of Output 1
1
Status of Output 2
2
Status of Output 3
3
1734
OW2
1734
OW4
41974
Indication
Probable Cause
Recommended Action
Off
Output is off (contacts open).
None.
Yellow
Output is on (contacts closed).
None.None.
I/O Status
Rockwell Automation Publication 1734-UM001E-EN-P - July 2013
41974
Status of Output 2 & 6
Status of Output 3 & 7
46139
Troubleshoot with the Indicators
1734-OX2 Relay Output Module
Module
Status
Module Status
Network Status
Network
Status
NODE:
Relay
Output
Status of Output 0
0
Status of Output 1
1
1734
OX2
Indication
41974
Probable Cause
Recommended Action
Off
Output is off.
None.
Yellow
Output is on.
None.
I/O Status
1734-IA2 and 1734-IA4 120V AC Input Module
1734-IA2
1734-IA4
Module Status
Module Status
Network Status
Network Status
Status of Input 0
Status of Input 0
Status of Input 1
Status of Input 1
Status of Input 2
Status of Input 3
46140
46141
Indication
Probable Cause
Recommended Action
Off
Input is in the off-state.
None.
Yellow
Input is in the on-state.
None.
I/O Status
Rockwell Automation Publication 1734-UM001E-EN-P - July 2013
145
146
Troubleshoot with the Indicators
1734-OA2 and 1734-OA4 120/220V AC Output Module
1734-OA4
1734-OA2
Module Status
Module Status
Network Status
Network Status
Status of Output 0
Status of Output 0
Status of Output 1
Status of Output 1
Status of Output 2
46142
Indication
Status of Output 3
46143
Probable Cause
Recommended Action
Off
All outputs are inactive.
None.
Yellow
One or more outputs is active and under
control.
None.
I/O Status
1734-IM2 and 1734-IM4 220V AC Input Module
1734-IM2
Module Status
Network Status
1734-IM4
Module Status
Network Status
Status of Input 0
Status of Input 0
Status of Input 1
Status of Input 1
Status of Input 2
Status of Input 3
46144
Indication
Probable Cause
Recommended Action
Off
Input is in the off-state
None.
Yellow
Input is in the on-state
None.
I/O Status
Rockwell Automation Publication 1734-UM001E-EN-P - July 2013
Troubleshoot with the Indicators
Troubleshoot Analog
Modules
Each analog module has I/O indicators to show the status of the inputs/outputs.
Refer to the individual module for I/O status information.
1734-IE2C Analog Current Input Module
Module Status
Network Status
Module
Status
Network
Status
NODE:
4-20mA
Analog
Input
Status of Input 0
Status of Input 1
0
1
1734
IE2C
41974
Indication
Probable Cause
Recommended Action
Off
Module is in CAL mode.
None.
Solid green
Normal operation present with channel scanning inputs.
None.
Flashing green
Channel being calibrated.
None.
Solid red
No power or major channel fault present.
Apply field power, or replace module, as needed.
Flashing red
Channel is at end of range (0 mA or 21 mA).
Operate within normal range.
Channel Status
1734-OE2C Analog Current Output Module
Module Status
Network Status
Module
Status
Network
Status
NODE:
4-20mA
Analog
Output
Status of Output 0
Status of Output 1
0
1
1734
OE2C
41974
Indication
147
Probable Cause
Recommended Action
Off
Module is in CAL mode.
None.
Solid green
Channel actively controlling outputs
None.
Flashing green
Channel calibrating.
None.
Solid red
Unrecoverable fault may require device replacement.
Replace device.
Flashing red
No power, or open wire present.
Apply power or verify wiring to load, and correct, as needed.
Channel Status
Rockwell Automation Publication 1734-UM001E-EN-P - July 2013
148
Troubleshoot with the Indicators
1734-IE2V Analog Voltage Input Module
Module Status
Network Status
Module
Status
Network
Status
NODE:
Analog
Voltage
Input
Status of Input 0
0
Status of Input 1
1
1734
IE2V
41974
Indication
Probable Cause
Recommended Action
Off
Module is in CAL mode.
None.
Solid green
Normal operation present with channel scanning inputs.
None.
Flashing green
Channel being calibrated.
None.
Solid red
No power or major channel fault present.
Apply field power, or replace module, as needed.
Flashing red
Channel is at end of range (-0.25, -10.25, or +10.25V).
Operate within normal range.
Channel Status
1734-OE2V Analog Voltage Output Module
Module Status
Network Status
Module
Status
Network
Status
NODE:
Analog
Voltage
Output
Status of Output 0
0
Status of Output 1
1
1734
OE2V
41974
Indication
Probable Cause
Recommended Action
Off
Module is in CAL mode.
None.
Solid green
Normal operation present with channel actively controlling outputs.
None.
Flashing green
Channel being calibrated.
None.
Flashing red
A Low or High Clamp alarm is present.
Operate within normal range.
Solid red
No field power is present.
Apply field power.
Channel Status
Rockwell Automation Publication 1734-UM001E-EN-P - July 2013
Troubleshoot with the Indicators
Troubleshoot I/O
Communication Modules
The status indicators on the communication modules provide system power and
DeviceNet power indications.
1734-PDN DeviceNet Communication Interface Module
System Power
DeviceNet Power
Indicator
Indication
Probable Cause
System Power
Off
• Device is not active.
Recommended Action
1. Verify DeviceNet power is on, and apply power if needed.
2. Verify backplane power not exceeded, and correct, as needed.
• DeviceNet power is off, or DC- 3. Replace 1734-PDN module.
DC converter problem is
present.
Green
• System power is on.
None.
• DC-DC converter is active (5V).
DeviceNet Power
Off
• Device is not active.
Apply DeviceNet 24V power.
• DeviceNet power is off.
Green
149
Power is on with 24V present.
None.
Rockwell Automation Publication 1734-UM001E-EN-P - July 2013
150
Troubleshoot with the Indicators
1734-ADN (X) DeviceNet Adapter
1734-ADN DeviceNet Adapter
1734-ADNX DeviceNet Adapter
Adapter Status
Adapter
Status
Adapter Status
Adapter
Status
DeviceNet
Status
DeviceNet Status
DeviceNet
Status
DeviceNet Status
Subnet
Status
Subnet Status
(includes POINTBus
status)
PointBus
Status
POINTBus Status
1734-ADNX
1734-ADN
System
Power
Field
Power
System Power
System
Power
System Power
Field Power
Field
Power
Field Power
1734adnx
Indication
Probable Cause
Recommended Action
Off
No power applied to device.
Apply power to device.
Solid green
Device is operating normally.
None.
Flashing green
Device needs commissioning due to configuration missing,
incomplete, or incorrect.
Check configuration and recommission the adapter.
Flashing red
Recoverable fault is present.
1. Make sure the adapter does not need a FLASH update.
2. Verify MAC_id switch has not changed since power-up.
Solid red
Unrecoverable fault may require device replacement.
Replace the adapter.
Flashing red/green
Device is in self-test.
Wait for the self-test to finish.
Indication
Probable Cause
Recommended Action
Device is not online.
Apply power to device, wait for no duplicate MAC_id
to complete, and correct, as needed.
Adapter Status
DeviceNet Status
Off
• Device has not completed Dup_MAC_ID test.
• Device is not powered - check module status indicator.
Flashing green
Device is online, but has no connections in the established state.
None - device is in Idle or Program mode.
Solid green
Device is online and has connections in the established state.
None.
Flashing red
One or more I/O connections are in timed-out state
Check for I/O module failure, and correct, as needed.
Solid red
Critical link failure present with failed communication device. Device
detected error that prevents it from communicating on the network.
Verify that adapter and terminal bases are properly
installed, and reinstall, as needed.
Flashing red/green
Communication faulted device - the device detected a network access
Verify adapter is properly installed, and reinstall, as
error and is in communication faulted state. Device received and accepted needed.
an Identify Communication Faulted Request - long protocol message.
Rockwell Automation Publication 1734-UM001E-EN-P - July 2013
Troubleshoot with the Indicators
151
Subnet and POINTBus Status
Off
Device is not online.
• Device has not completed Dup_MAC_ID test.
Check adapter status indicator to determine if more
time is needed to complete the dup_MAC_id test
or if the adapter needs to be powered.
• Device is not powered - check module status indicator.
Flashing green
Device is online but has no connections in the established state.
None.
Solid green
Device is online and has connections in the established state.
None.
Flashing red
No scanlist is available. I/O module is missing.
1. Make sure all I/O modules are connected and
using the correct MAC IDs.
2. Check Cycling Node Status parameter in
RSNetWorx for DeviceNet software.
Solid red
Critical link failure - failed communication device present. Device detected 1. Make sure an I/O module is not using a
error that prevents it from communicating on the network.
MAC ID = 0.
2. Make sure all backplane modules are
communicating at the proper communication
rate.
Indicator
Indication
Probable Cause
Recommended Action
System Power
Off
Field power is OFF, or DC-DC converter problem.
1. Verify field power is on.
2. Verify backplane power (load current) is not
exceeded.
3. Replace 1734-ADN(X) adapter.
Green
System power is on. DC-DC converter is active (5V).
None.
Off
Field power is off.
Turn field power on.
Green
Power is on with 24V present.
None.
Field Power
Rockwell Automation Publication 1734-UM001E-EN-P - July 2013
152
Troubleshoot with the Indicators
1734-ACNR ControlNet Adapter
Module
Status
0 2
PointBus
Status
ControlNet A
Status
ControlNet B
Status
Module Status
POINTBus Status
ControlNet A Status
ControlNet B Status
1734-ACNR
System
Power
Field
Power
System Power
Field Power
A
B
43265
Indication
Probable Cause
Recommended Action
Off
No power applied to device.
Apply power to device.
Alternating red/
green
LED power cycle test (module self-test) is present.
None.
Module Status
Flashing red
Solid red
Recoverable fault has occurred:
• Firmware (NVS) update
• Complete firmware update.
• MAC ID changed
• Return module to correct node address.
• CPU load exceeded
• Reduce CPU load.
Unrecoverable fault has occurred:
Replace 1734-ACNR adapter.
• Self test failure (checksum failure at power cycle
• Ramtest failure at power cycle)
• Firmware fatal error
Flashing green
Waiting for connection or ControlNet cable break.
Check cable and make connection, as needed.
Solid green
Module is operating correctly (normal mode).
None.
Rockwell Automation Publication 1734-UM001E-EN-P - July 2013
Troubleshoot with the Indicators
Indication
Probable Cause
Recommended Action
Device not powered - check module status indicator.
Apply power to device.
153
POINTBus Status
Off
Alternating red/green LED power cycle test is present.
Flashing red
Recoverable fault has occurred:
• Change chassis size to match number of
modules present.
• At power up the number of expected modules does not equal the number of
modules present
• Replace missing module.
• A module is missing
• Node fault (I/O connection timeout)
Flashing green
None.
• Check for I/O Module failure and correct, as
needed.
Adapter online with no connections established.
• Adapter chassis size has not been configured
• Set adapter chassis size.
• Controller in program/idle mode
• None.
• ControlNet cable break
• Check cable and connect, as needed.
• Firmware (NVS) update
• Complete firmware update.
Solid green
Adapter online with connections established (normal operation, in run mode) None.
Solid red
Unrecoverable fault occurred - the adapter is bus off.
1. Cycle power to device.
2. If condition persists, replace device.
Indication
Probable Cause
Recommended Action
ControlNet A/B Status
Viewed Together (A and B)
Both Steady Off
Reset, no power, or entire network interface deactivated.
None or cycle power.
Alternating red/green Self test mode is present.
None.
Alternating red/Off
Incorrect configuration is present.
Check network address and other ControlNet
configuration parameters.
Both Steady red
Faulted unit is present.
Cycle power or reset unit. If fault persists, contact
A-B representative or distributor.
Viewed Individually (A or B)
Steady Off
Channel disabled.
Program network for redundant media, if required.
Flashing red/green
Incorrect network configuration is present.
Cycle power or reset unit. If fault persists, contact
A-B representative or distributor.
Flashing red/Off
• Media fault.
• Check media for items such as broken cables,
loose connectors, and missing terminators.
• No other nodes present on network.
• Add other nodes to the network.
Flashing green/Off
• Temporary channel errors are present.
• Node is not configured to go on line.
Steady green
Make sure the configuration manager node is
present and working and selected address is not
greater than selected UMAX.(1)
Normal operation - MAC frames are being received without detected errors. None.
(1) The configuration manager node is the node responsible for distributing ControlNet configuration data to all nodes on the network.
Rockwell Automation Publication 1734-UM001E-EN-P - July 2013
154
Troubleshoot with the Indicators
Indication
Probable Cause
Recommended Action
System Power
Off
Not active - field power is off or DC-DC converter problem. 1. Verify field power is on.
2. Verify backplane power (load current) is not exceeded.
3. Replace 1734-ACNR adapter.
Green
System power is on, and DC-DC converter is active (5V).
None.
Off
Not active - field power is off.
Apply power to device.
Green
Power is on - 24V is present.
None.
Field Power
1734-APB PROFIBUS Adapter
Adapter
Status
PROFIBUS
Status
PointBus
Status
Adapter Status
PROFIBUS Status
POINTBus Status
1734-APB
System
Power
Field
Power
Indication
Probable Cause
System Power
Field Power
1734-2
Recommended Action
Adapter Status
Off
• No power supplied.
1. Apply power.
• Hardware check is in progress.
2. Wait for power self-test to complete.
• Initialization is in progress.
Green
Operation is normal.
None.
Red
Hardware check fault present.
Replace device.
Indication
Probable Cause
Recommended Action
Off
No power supplied.
Bus is offline.
Apply power, verify network cabling, and correct, as needed.
Solid green
Bus is online (data exchange).
None.
Flashing green
Adapter received a CLEAR command from the master.
None.
Solid red
Error in PROFIBUS initialization is present.
No modules installed in the backplane.
Verify configuration, proper installation of modules, and
correct, as needed.
PROFIBUS Status
Rockwell Automation Publication 1734-UM001E-EN-P - July 2013
Troubleshoot with the Indicators
Indication
Probable Cause
Recommended Action
Flashing red
1 Hz - Check_Configuration telegram rejected.
Max number of POINT I/O modules in master configuration
overridden.
2 Hz - SetPrm telegram rejected.
The first byte in user parameter data does not equal zero. Max
number of user parameter bytes overridden.
Check configuration.
Indication
Probable Cause
Recommended Action
• No power supplied.
Apply power.
155
POINTBus Status
Off
• Hardware check is in progress.
• Initialization is in progress.
Solid green
Normal operation present.
None.
Flashing red
1 Hz - Incorrect POINT I/O module installed.
POINT I/O module removed from backplane.
Verify module installation, no modules removed, and correct,
as needed.
Solid red
Critical link failure (BUS_OFF) is present.
Check network cabling, and correct, as needed.
Indicator
Indication
Probable Cause
Recommended Action
System Power
Off
System power not applied.
1. Verify field power is on.
2. Verify backplane power (load current) is not exceeded.
3. Replace 1734-APB adapter.
Green
System power (5V) present
None.
Off
Field power not applied.
Apply field power (24V).
Green
Field power (24V) applied.
None.
Field Power
Rockwell Automation Publication 1734-UM001E-EN-P - July 2013
156
Troubleshoot with the Indicators
1734-AENT EtherNet/IP Adapter
Module
Status
0 0 2
Network
Activity
Network
Status
PointBus
Status
Module Status
Network Activity
Network Status
POINTBus Status
1734-AENT
System
Power
Field
Power
System Power
Field Power
43248
Indication
Probable Cause
Recommended Action
Off
No power applied to device
Apply power to the device.
Flashing red/green
LED power cycle test (module self-test) present.
None.
Solid green
Device is operating normally.
None.
Flashing red
• Recoverable fault has occurred.
1. Complete firmware update.
2. Verify address switches.
Module Status
• Firmware (NVS) update present.
• Address switches changed.
Solid red
• Unrecoverable fault has occurred.
Replace adapter.
• Self-test failure present (checksum failure, or ramtest failure at power cycle).
• Firmware fatal error present.
Indication
Probable Cause
Recommended Action
Off
Device not powered - check module status indicator.
Apply power to device.
Flashing red/green
LED power cycle test present.
None.
Flashing red
Recoverable fault occurred:
POINTBus Status
• At power cycle the number of expected modules does not equal • Configure chassis size.
the number of modules present
• Check for missing module and reinstall as needed.
• A module is missing
• Check for I/O module failure and correct as needed.
• Node fault (I/O connection timeout) occurred.
Solid red
Unrecoverable fault occurred - the adapter is bus off.
1. Cycle power to device.
2. If condition persists, replace device.
Flashing green
Firmware (NVS) update in progress.
None.
Solid green
Adapter online with connections established (normal operation,
Run mode).
None.
Rockwell Automation Publication 1734-UM001E-EN-P - July 2013
Troubleshoot with the Indicators
Indication
Probable Cause
157
Recommended Action
System Power
Off
Not active; field power is off or DC-DC converter problem present. 1. Verify power is on, and apply power if needed.
2. Verify backplane power not exceeded, and correct, as
needed.
3. Replace 1734-AENT module.
Green
System power is on; DC-DC converter is active (5V).
None.
Off
Not active; field power is off.
Apply field power.
Green
Power is on; 24V is present.
None.
Indication
Probable Cause
Recommended Action
Off
No link established.
Verify network cabling, and correct, as needed.
Flashing green/Off
Transmit or receive activity present.
None.
Steady green
Link established.
None.
Off
Device not initialized. The module does not have an IP address.
Apply power to device, verify IP address, and
correct, as needed.
Flashing green
No CIP connections present. Device has an IP address, but no CIP connections are None.
established.
Solid green
CIP connections present. Device online and has an IP address, and CIP
connections are established.
None.
Flashing red
One or more CIP connections has timed-out.
Check for I/O module failure and controller
operation, and correct, as needed.
Solid red
Duplicate IP address detected.
Verify IP address setting and correct, as needed.
Flashing red/green
The module is performing a self-test (only occurs during power cycle test).
None.
Field Power
Network Activity
Network Status
Rockwell Automation Publication 1734-UM001E-EN-P - July 2013
158
Troubleshoot with the Indicators
Notes:
Rockwell Automation Publication 1734-UM001E-EN-P - July 2013
Appendix
A
Default Data Maps
About This Appendix
Read this appendix for a list of default data maps for
1734 POINT I/O modules.
For the Default Data Map of
See Page
Digital Modules
1734-IB2 Sink Input Module
166
1734-IB4 Sink Input Module
166
1734-IB8 Sink Input Module
166
1734-IV2 Source Input Module
168
1734-IB4D Sink Input Modules with Diagnostics
166
1734-IV4 Source Input Module
168
1734-IV8 Source Input Module
168
1734-IA2 Input Module
169
1734-IA4 Input Module
169
1734-IM2 Input Module
169
1734-IM4 Input Module
169
1734-OA2 Output Module
170
1734-OA4 Output Module
170
1734-OB2E, 1734-OB2 Electronically Protected Output Module
170
1734-OB4E, 1734-OB4 Electronically Protected Output Module
170
1734-OB8E, 1734-OB8 Electronically Protected Output Module
171
1734-OB2EP Protected Output Module
171
1734-OV2E Output Module
172
1734-OV4E Output Module
172
1734-OV8E Output Module
172
1734-OW2 Relay Sink/Source Output Module
173
1734-OW4 Relay Sink/Source Output Module
173
1734-OX2 Relay Output Module
173
Analog Modules
1734-IE2C Analog Current Input Module
174
1734-IE2V Analog Voltage Input Module
174
1734-OE2C Analog Current Output Module
175
1734-OE2V Analog Voltage Output Module
175
Rockwell Automation Publication 1734-UM001E-EN-P - July 2013
166
Default Data Maps
Digital Module Default
Data Maps
I/O messages are sent to (consumed) and received from (produced) the
POINT I/O modules. You map these messages into the processor memory.
1734-IB2 Sink Input Module
Message Size: 1 Byte
7
6
5
4
3
2
Produces (scanner Rx)
Consumes (scanner Tx)
1
0
Ch1
Ch0
No consumed data
Where: Ch0 = channel 0, Ch1 = channel 1; 0 = off 1 = on
1734-IB4 Sink Input Module
Message Size: 1 Byte
7
6
5
4
Produces (scanner Rx)
Consumes (scanner Tx)
Where: Ch 0 = input channel 0
3
2
1
0
Ch3
Ch2
Ch1
Ch0
No consumed data
Ch 1 = input channel 1
Ch 2 = input channel 2
Ch3 = channel 3
0 = off 1 = on
1734-IB8 Sink Input Module
Message Size: 1 Byte
7
6
5
4
3
2
1
0
Produces (scanner Rx)
Ch7
Ch6
Ch5
Ch4
Ch3
Ch2
Ch1
Ch0
Consumes (scanner Tx)
No consumed data
Where: Ch = input channel 0 = off 1 = on
1734-IB4D Sink Input Modules with Diagnostics
Default Data Map - Produced Assembly Instance 101
Message Size: 2 Bytes
Produce 0 (Rx)
7
6
5
4
3
2
1
0
Fault 3
Fault 2
Fault 1
Fault 0
Input 3
Input 2
Input 1
Input 0
Rockwell Automation Publication 1734-UM001E-EN-P - July 2013
Default Data Maps
Default Data Map - Produced Assembly Instance 101
Message Size: 2 Bytes
Produce 1 (Rx)
SC 3
SC 2
Consume (Tx)
No consumed data
SC 1
SC 0
OW 3
OW 2
OW 1
OW 0
Where: OW = open wire, SC = short circuit, fault = open wire or short circuit.
Data Map - Produced Assembly Instance 23
Message Size: 1 Byte
7
6
5
4
3
2
1
0
Produce 0 (Rx)
Fault 3
Fault 2
Fault 1
Fault 0
Input 3
Input 2
Input 1
Input 0
Consume (Tx)
No consumed data
Where: Fault = open wire or short circuit.
Default Data Map - Configuration Assembly Instance 103
Message Size: 18 Bytes
7
6
Consume 0
Input 0 Off to On Filter Byte 0
Consume 1
Input 0 Off to On Filter Byte 1
Consume 2
Input 0 On to Off Filter Byte 0
Consume 3
Input 0 On to Off Filter Byte 1
Consume 4
Input 1 Off to On Filter Byte 0
Consume 5
Input 1 Off to On Filter Byte 1
Consume 6
Input 1 On to Off Filter Byte 0
Consume 7
Input 1 On to Off Filter Byte 1
Consume 8
Input 2 Off to On Filter Byte 0
Consume 9
Input 2 Off to On Filter Byte 1
Consume 10
Input 2 On to Off Filter Byte 0
Consume 11
Input 2 On to Off Filter Byte 1
Consume 12
Input 3 Off to On Filter Byte 0
Consume 13
Input 3 Off to On Filter Byte 1
Consume 14
Input 3 On to Off Filter Byte 0
Consume 15
Input 3 On to Off Filter Byte 1
Consume 16
Autobaud Disable
Consume 17
Produced Assembly Instance
Produce (Tx)
No produced data
5
4
3
2
1
0
Enable OW3
Enable OW2
Enable OW1
Enable OW0
Where: OW = open wire.
Rockwell Automation Publication 1734-UM001E-EN-P - July 2013
167
168
Default Data Maps
1734-IV2 Source Input Module
Message Size: 1 Byte
7
6
5
4
3
2
Produces (scanner Rx)
Consumes (scanner Tx)
1
0
Ch1
Ch0
No consumed data
Where: Ch 0 = input channel 0 data
Ch 1 = input channel 1 data
1734-IV4 Source Input Module
Message Size: 1 Byte
7
6
5
4
Produces (scanner Rx)
Consumes (scanner Tx)
No consumed data
Where: Ch 0 = input channel 0
input channel 3
Ch 1 = input channel 1
3
2
1
0
Ch3
Ch1
Ch1
Ch0
Ch 2 = input channel 2
Ch 3 =
1734-IV8 Source Input Module
Message Size: 1 Byte
7
6
5
4
3
2
1
0
Produces (scanner Rx)
Ch7
Ch6
Ch5
Ch4
Ch3
Ch1
Ch1
Ch0
Consumes (scanner Tx)
No consumed data
Where: Ch 0 = input channel 0 Ch 1 = input channel 1 Ch 2 = input channel 2 Ch 3 = input channel
3 Ch 4 = input channel 4 Ch 5 = input channel 5
Ch 6 = input channel 6
Ch 7 = input channel 7
Rockwell Automation Publication 1734-UM001E-EN-P - July 2013
Default Data Maps
169
1734-IA2 Input Module
Message Size: 1 Byte
7
6
5
4
3
2
Produces (scanner Rx)
Consumes (scanner Tx)
1
0
Ch1
Ch0
No consumed data
Where: Ch0 = channel 0, Ch1 = channel 1; 0 = off, 1 = on
1734-IA4 Input Module
Message Size: 1 Byte
Table (cell) Heading
7
6
5
4
Produces (scanner Rx)
Consumes (scanner Tx)
3
2
1
0
Ch3
Ch2
Ch1
Ch0
No consumed data
Where: Ch0 = channel 0, Ch1 = channel 1, Ch2 - channel 2, Ch3 = channel 3 0 = Off, 1 = On
1734-IM2 Input Module
Message Size: 1 Byte
7
6
5
4
3
2
Produces (scanner Rx)
Consumes (scanner Tx)
1
0
Ch1
Ch0
No consumed data
Where: Ch 0 = channel 0, Ch 1 = channel 1; 0 = off, 1 = on
1734-IM4 Input Module
Message Size: 1 Byte
7
6
5
4
Produces (Rx)
Consumes (Tx)
3
2
1
0
Ch3
Ch2
Ch1
Ch0
No consumed data
Where: Ch0 = channel 0, Ch1 = channel 1, Ch2 - channel 2, Ch3 = channel 3
Rockwell Automation Publication 1734-UM001E-EN-P - July 2013
0 = Off, 1 = On
170
Default Data Maps
1734-OA2 Output Module
Message Size: 1 Byte
7
6
5
4
Produces (scanner Rx)
No produced data
Consumes (scanner Tx)
Not used
3
2
1
0
Ch1
Ch0
Channel state
Where: 0 = off, 1 = on
1734-OA4 Output Module
Message Size: 1 Byte
7
6
5
4
Produces (scanner Rx)
No produced data
Consumes (scanner Tx)
Not used
3
2
1
0
Ch 3
Ch 2
Ch1
Ch0
Channel state
Where: 0 = Off, 1 = On
1734-OB2E, 1734-OB2 Electronically Protected Output Module
Message Size: 1 Byte
7
Produces (scanner Rx)
6
5
4
3
2
Not used
1
0
Ch1
Ch0
Channel status
(1734-OB2E only)
Where: 0 = no error 1 = error
Message Size: 1 Byte
7
Consumes (scanner Tx)
6
5
4
3
2
Not used
1
0
Ch1
Ch0
Channel
state
Where: 0 = off 1 = on
1734-OB4E, 1734-OB4 Electronically Protected Output Module
Message Size: 1 Byte
7
Produces (scanner Rx)
5
Not used
Where: 0 = no error 1 = error
Rockwell Automation Publication 1734-UM001E-EN-P - July 2013
6
4
3
2
1
0
Ch3
Ch2
Ch1
Ch0
Channel status (1734OB4E only)
Default Data Maps
171
Message Size: 1 Byte
7
Consumes (scanner Tx)
6
5
4
Not used
3
2
1
0
Ch3
Ch2
Ch1
Ch0
Channel
state
Where: 0 = off 1 = on
1734-OB8E, 1734-OB8 Electronically Protected Output Module
Message Size: 1 Byte
Produces (scanner Rx)
7
6
5
4
3
Ch7
Ch6 Ch5 Ch4 Ch
2
1
0
Ch Ch
2 1
3
Ch
0
Channel status
(1734-OB8E only)
Where: 0 = no error 1 = error
Message Size: 1 Byte
Consumes (scanner
Tx)
7
6
5
4
3
Ch7
Ch6 Ch5 Ch4 Ch3
2
1
0
Ch2
Ch1
Ch0
Channel state
Where: 0 = off 1 = on
1734-OB2EP Protected Output Module
Message Size: 1 Byte
7
Produces (scanner Rx)
6
5
4
3
2
Not used
1
0
Ch1
Ch0
Channel status
Where: 0 = no error, 1 = error
Message Size: 1 Byte
7
Consumes (scanner Tx)
6
5
4
Not used
Where: 0 = off, 1 = on
Rockwell Automation Publication 1734-UM001E-EN-P - July 2013
3
2
1
0
Ch1
Ch0
Channel state
172
Default Data Maps
1734-OV2E Output Module
Message Size: 1 Byte
7
Produces (scanner Rx)
6
5
4
3
2
Not used
1
0
Ch1
Ch0
1
0
Channel status
Where: 0 = no error, 1 = error
Message Size: 1 Byte
7
Consumes (scanner Tx)
6
5
4
3
2
Not used
Ch1 Ch0 Channel state
Where: 0 = off, 1 = on
1734-OV4E Output Module
Message Size: 1 Byte
7
Produces (scanner Rx)
6
5
4
Not used
3
2
1
0
Ch3
Ch2
Ch1
Ch0
3
2
1
0
Ch3
Ch2
Ch1
Ch0
Channel status
Where: 0 = no error, 1 = error
Message Size: 1 Byte
7
Consumes (scanner Tx)
6
5
4
Not used
Channel state
Where: 0 = off, 1 = on
1734-OV8E Output Module
Message Side: 1 Byte
Produces (scanner Rx)
Where: 0 = no error 1 = error
Rockwell Automation Publication 1734-UM001E-EN-P - July 2013
7
6
5
4
3
2
1
0
Ch
7
Ch
6
Ch
5
Ch
4
C C
h3 h
2
C
h
1
C Channel
h0 status
Default Data Maps
173
Message Size: 1 Byte
7
Consumes (scanner Tx)
6
5
Ch C Ch
7 h6 5
4
3
2
1
0
Ch
4
Ch
3
Ch
2
Ch
1
Ch
0
2
1
0
Ch
1
Ch
0
Channel
state
Where: 0 = no error 1 = error
1734-OW2 Relay Sink/Source Output Module
Message Size: 1 Byte
7
Consumes (scanner Tx)
6
5
4
3
Not used
Channel
state
Where: 0 = off 1 = on
1734-OW4 Relay Sink/Source Output Module
Message Size: 1 Byte
7
Consumes (scanner Tx)
6
5
4
Not used
3
2
1
0
Ch
3
Ch
2
Ch
1
Ch
0
2
1
0
Channel
state
Where: 0 = off 1 = on
1734-OX2 Relay Output Module
Message Size: 1 Byte
7
Consumes (scanner Tx)
6
5
4
Not used
Where: 0 = NO contact Off, NC contact On
1 = NO contact On, NC contact Off
Rockwell Automation Publication 1734-UM001E-EN-P - July 2013
3
Ch1 Ch0 Channel state
174
Default Data Maps
Analog Module Default
Data Maps
I/O messages are sent to (consumed) and received from (produced) the
POINT I/O modules. You map these messages into the processor memory.
1734-IE2C Analog Current Input Module
Message Size: 6 Bytes
15
Produces (scanner Rx)
13
12
11
10
09
08
07
06
05
04
Input Channel 0 High Byte
Input Channel 0 Low Byte
Input Channel 1 High Byte
Input Channel 1 Low Byte
Status Byte for Channel 1
Status Byte for Channel 0
OR
Consumes (scanner Tx)
14
UR
HHA
LLA
HA
LA
CM
CF
OR
UR
HHA
LLA
03
02
01
00
HA
LA
CM
CF
No consumed data
Where: CF = Channel Fault status0 = no error1 = fault
CM = Calibration Mode 0 = normal1 = calibration mode
LA = Low Alarm 0 = no error1 = fault
HA = High Alarm 0 = no error1 = fault
LLA = Low/Low Alarm 0 = no error1 = fault
HHA = High/High Alarm 0 = no error1 = fault
UN = Underrange 0 = no error1 = fault
OR = Overrange 0 = no error1 = fault
Channel Status
Channel Status Bytes
Bit 7
Bit 6
Bit 5
Bit 4
Bit 3
Bit 2
Bit 1
Bit 0
Over Range
Under Range
High High Alarm
Low Low Alarm
High Alarm
Low Alarm
CAL Mode
Channel Fault
1734-IE2V Analog Voltage Input Module
Message Size: 6 Bytes
15
Produces (scanner Rx)
13
12
11
10
09
08
07
06
05
04
Input Channel 0 - High Byte
Input Channel 0 - Low Byte
Input Channel 1 - High Byte
Input Channel 1 - Low Byte
Status Byte for Channel 1
Status Byte for Channel 0
OR
Consumes (scanner Tx)
14
UR
HHA
LLA
HA
LA
CM
CF
OR
UR
HHA
No consumed data
Where: CF = Channel Fault status; 0 = no error, 1 = fault
CM = Calibration Mode; 0 = normal, 1 = calibration mode
LA = Low Alarm; 0 = no error, 1 = fault
HA = High Alarm; 0 = no error, 1 = fault
LLA = Low/Low Alarm; 0 = no error, 1 = fault HHA = High/High Alarm; 0 = no error, 1 = fault
UR = Underrange; 0 = no error, 1 = fault
OR = Overrange; 0 = no error, 1 = fault
Rockwell Automation Publication 1734-UM001E-EN-P - July 2013
LLA
03
02
01
00
HA
LA
CM
CF
Default Data Maps
175
1734-OE2C Analog Current Output Module
Message Size: 4 bytes
15
Consumes (Tx)
14
13
12
11
10
09
08
07
06
05
04
03
02
Output Channel 0 High Byte
Output Channel 0 Low Byte
Output Channel 1 High Byte
Output Channel 1 Low Byte
01
00
Message Size: 2 Bytes
15
Produces (Rx)
14
13
12
11
10
09
08
High Byte - Channel 1 Status
Not used
Where: CF = Channel Fault status 0 = no error
1 = fault
LCA = Low Clamp Alarm 0 = no error
1 = fault
HCA
07
06
05
04
03
02
01
00
LCA
CM
CF
Low Byte - Channel 0 Status
LCA
CM
CF
Not used
HCA
CM = Calibration Mode
0 = normal
1 = calibration mode
HCA = High Clamp Alarm 0 = no error
1 = fault
Channel Status
Channel Status Bytes
Bit 7
Bit 6
Bit 5
Bit 4
Not used
Bit 3
Bit 2
Bit 1
Bit 0
High Clamp
Low
Clamp
CAL Mode Channel Fault
1734-OE2V Analog Voltage Output Module
Message Size: 4 bytes
15
Consumes (scanner Tx)
14
13
12
11
10
09
08
07
06
05
04
03
02
Output Channel 0 High Byte
Output Channel 0 Low Byte
Output Channel 1 High Byte
Output Channel 1 Low Byte
01
00
Message Size: 2 Bytes
15
Produces (scanner Rx)
14
13
12
11
10
09
08
Channel 1 Status - High Byte
Not used
HCA
07
06
05
04
03
02
01
00
LCA
CM
ST
Channel 0 Status - Low Byte
LCA
CM
ST
Not used
Where: ST = Channel Fault Status; 0 = no error, 1 = fault CM = Calibration Mode; 0 = normal, 1 = calibration mode
LCA = Low Clamp Alarm; 0 = no error, 1 = fault
HCA = High Clamp Alarm; 0 = no error, 1 = fault
Rockwell Automation Publication 1734-UM001E-EN-P - July 2013
HCA
176
Default Data Maps
Notes:
Rockwell Automation Publication 1734-UM001E-EN-P - July 2013
Appendix
Mounting Dimensions
About This Appendix
Read this appendix for mounting dimensions for the following:
• POINT I/O module with a 1734-ADN adapter
• POINT I/O module with a 1734-PDN module
• POINTBlock modules
POINT I/O Module with a
1734-ADN, 1734-ACNR,
1734-AENT, or 1734-APB
Adapter
See the figure for mounting dimensions for a POINT I/O module with a
network adapter. The example figure shows a 1734-ADN adapter.
L = 2.16 + [# of I/O x 0.47] + [# of EP24DC or FPD x 1.0] in.
Allow a 25.4 (1.0)
air gap all around
L = 54.9 + [# of I/O x 12.0] + [# of EP24DC or FPD x 25.4] mm
Adapter
Status
DeviceNet
Status
PointBus
Status
133.4
(5.25)
1734-ADN
System
Power
Field
Power
mm (in)
1734-EP24DC or 1734-FPD (HxWxL)
76.2 (3.0) x 54.9 (2.16) x 133.4 (5.25)
1734-EP24DC or 1734-FPD (HxWxL)
76.2 (3.0) x 25.4 (1.0) x 133.4 (5.25)
1734-TB or 1734-TBS with I/O (HxWxL)
76.2 (3.0) x 12.0 (0.47) x 133.4 (5.25)
Secure DIN rail to mounting surface approximately every 200 mm (7.8 in.).
Rockwell Automation Publication 1734-UM001E-EN-P - July 2013
B
178
Mounting Dimensions
POINT I/O Module with a
1734-PDN Module
See the figure for mounting dimensions for POINT I/O module with a
1734-PDN DeviceNet Communication Interface module.
L = 1.0 + [# of I/O x 0.47] + [# of FPD x 1.0] in.
Allow a 25.4 (1.0)
air gap all around
L = 25.4 + [# of I/O x 12.0] + [# of FPD x 25.4] mm
133.4
(5.25)
mm (in)
1734-PDN (HxWxL)
1734-FPD (HxWxL)
76.2 (3.0 ) x 25.4 (1.0) x 133.4 (5.25) 76.2 (3.0) x 25.4 (1.0) x 133.4 (5.25)
1734-TB or 1734-TBS (HxWxL)
76.2 (3.0) x 12.0 (0.47) x 133.4 (5.25)
Secure DIN rail to mounting surface approximately every 200 mm (7.8 in.).
Rockwell Automation Publication 1734-UM001E-EN-P - July 2013
Mounting Dimensions
POINTBlock Module
Allow a 25.4 (1.0)
air gap all around
See the figure for mounting dimensions for a 1734-D POINTBlock module.
L = 60.0 + [# of I/O x 12.0] + [# of FPD x 25.4] mm
133.4
(5.25)
1
mm (in)
1734-D (HxWxL)
76.2 (3.0) x 60.0 (2.36) x 133.4 (5.25)
Secure DIN rail to mounting surface approximately every 200 mm (7.8 in.).
Rockwell Automation Publication 1734-UM001E-EN-P - July 2013
179
180
Mounting Dimensions
Notes:
Rockwell Automation Publication 1734-UM001E-EN-P - July 2013
Appendix
C
Configure POINT I/O Modules in RSLogix 5000
Software
About This Appendix
Read this appendix for information about how to configure digital and analog
POINT I/O modules, using RSLogix® 5000 software with one of the following:
• ControlNet network using a 1734-ACNR adapter
• Ethernet/IP network using a 1734-AENT adapter
Use the Help Button
From the dialogs you use to configure digital and analog POINT I/O modules,
click Help at the bottom of the dialog for information about how to complete
entries on the dialogs.
From a warning dialog, click Help at the bottom of the dialog to get information
about that specific error.
Configure Digital Modules
To configure POINT I/O digital modules in RSLogix 5000 software, using a
ControlNet or EtherNet/IP network, use these steps.
1. Configure your adapter, referring to the user manual for your 1734-AENT
adapter for EtherNet/IP networks or 1734-ACNR adapter for
ControlNet networks with information on how to select a controller and
communication module.
2. Add a digital module according to the instructions in your 1734-ACNR or
1734-AENT adapter user manual.
As an example, if you add 1734-OB2E, you see the New Module dialog.
Rockwell Automation Publication 1734-UM001E-EN-P - July 2013
182
Configure POINT I/O Modules in RSLogix 5000 Software
3. Choose the Connection tab at the top of the dialog.
4. Leave the following unchecked:
• Inhibit Module
• Major Fault On Controller If Connection Fails While in Run Mode
5. Complete the entry for Requested Packet Interval (RPI), if the field is
selectable, per the following table.
Adapter Configuration
Value for PRI for Module Type
Direct Connection
50 ms
Rack Optimization
RPI is not selectable
Digital
6. Choose Module Info to see a dialog that provides identification and status
information
7. See the appropriate sections of this appendix for information about the
following tabs and dialogs, which you see based on the module you added:
• Fault/Program Action
• Configuration
Rockwell Automation Publication 1734-UM001E-EN-P - July 2013
Configure POINT I/O Modules in RSLogix 5000 Software
183
About Fault/Program Action and Configuration Dialogs
You see Fault/Program Action and Configuration dialogs based on the module
and connection types. Refer to the following table.
For Module
Type
You See These Tabs(1)
With
Connection Type
Fault/Program Action
Configuration
Input
Data
x
Listen Only
Listen Only - Rack
Optimization
Rack Optimization
Output
Data
x
x
x
x
x
Listen Only
Listen Only - Rack
Optimization
Rack Optimization
(1) You see tabs for General, Connection, and Module Info for all module and connection types.
Understand Data and Connection Formats
For digital modules, the choices for data format and connection type are as
follows.
• Data Format - Integer
• Connection Type
– Data
– Listen only
– Listen only - rack optimization
– Rack optimization
When you change entries for data format and connection type, note the
following:
• You do not delete the existing module.
• You do not create a new module.
• You bring forward configuration data for the new settings.
• Any configuration data you do not bring forward sets to the default value.
After you apply new settings for data format and connection, note the following:
• This is the base configuration for the next change in connection and data
format settings.
• You lose all configuration data from previous data formats.
Rockwell Automation Publication 1734-UM001E-EN-P - July 2013
184
Configure POINT I/O Modules in RSLogix 5000 Software
The choices for connection type for modules depend on the communication type
format for the parent adapter, per the table.
Adapter
Communication
Format
Connection Type
Listen Only - Rack
Optimization
None
Rack Optimization
Input
Module
Output Module
1734-OA2
1734-OW2,4
1734-OX2
1734-OB2,
1734-OB4,
1734-OB8
1734-OB2E, 1734-OB4E, 1734-OB8E
1734-OB2EP, 1734-OV2E, 1734-OV4E,
1734-OV8E
Data (default)
x
x
x
x
Listen Only
x
Listen Only Rack Optimization
x
x
Data (default)
x
x
Listen Only
x
Data (default)
x
Listen Only
x
Rack Optimization
x
x
x
x
x
x
x
x
x
x
x
x
Understand Transition to Hard Run Behavior
While online with a controller in Remote Run mode, change fields on the dialogs
you select from the New Module dialog.
When you switch the controller to Hard Run, note the following:
• You disable all controls except for the Description field on the General
dialog, which remains active in all modes.
• You revert to each control that contains an edited value, including the
Description field on the General dialog, to include the following dialogs:
Rockwell Automation Publication 1734-UM001E-EN-P - July 2013
Configure POINT I/O Modules in RSLogix 5000 Software
–
–
–
–
185
General
Connection
Fault/Program Action
Configuration
Work with Dialogs for Digital Input Modules
To complete entries for the dialogs for input modules proceed as follows.
1. Add an input module with these entries for connection type.
• Data
• Rack Optimization
2. From the top of the General dialog, select Configuration,
You see the Configuration dialog, which is what you use to configure the
filter for input points for the following:
• Off to On
• On to Off
The Configuration dialog displays configuration data for each channel in
individual rows in a table. Input modules support separate filter times for
Off to On and On to Off transitions. The number of input channels varies
based on the type of module as in these examples.
• A 1734-IA2 module has 2 input channels (0 to 1).
• A 1734-IB4 module has 4 input channels (0 to 3).
See the figure for a Configuration dialog for an 8-point input module.
Rockwell Automation Publication 1734-UM001E-EN-P - July 2013
186
Configure POINT I/O Modules in RSLogix 5000 Software
3. From the Configuration dialog, complete entries for Input Filter Time
(ms) for Off-On and On-Off for each point, referring to the table.
Feature
Description
Channel
Displays channels you use to set channel configuration parameters
Input Filter
Time
Displays Off to On or On to Off transition filter constant
• A high signal must be present for this amount of time before the module
reports an On.
• a low signal must be present for this amount of time before the module
reports an Off.
• Enter a value in milliseconds.
• The default is 1 ms (1000 ms).
4. From the Configuration dialog, perform one of the following:
• Click another tab at the top of the dialog.
or
• Click OK to save changes and close the dialog.
or
• Click Cancel to return to default values.
or
• Click Apply to save changes you made on any of the dialogs and
continue to display the dialog, noting that you enable the Apply button
when you make changes to any of the dialogs.
Work with Dialogs for Digital Output Modules
Read this section to complete the Fault/Program Action and Configuration
dialogs for output modules. You typically select these dialogs from the General
dialog, when you add an output module with the following entries for
connection type:
• Data
• Rack Optimization
Enter values for the Fault/Program Action and Configuration dialogs based on
the following output modules:
• Without diagnostic status
• With overload diagnostic status
• With overload and open load diagnostic status
Enter Values on the Fault/Program Action Dialog
Enter values on this dialog to configure the module output state for output
modules when the controller mode changes to Program or Fault mode. To make
these entries, follow these procedures.
Rockwell Automation Publication 1734-UM001E-EN-P - July 2013
Configure POINT I/O Modules in RSLogix 5000 Software
187
1. From the General dialog, select Fault/Program Action.
You see the Fault/Program Action dialog. See the figure for the Fault/
Program Action dialog for an 8-point output module. The dialogs for 2point and 4-point output modules are identical except for the number of
point you can configure. Use this dialog to configure the Program mode
and Fault mode for channels for the following modules:
• Without diagnostic status
• With overload diagnostic status
• With overload and open load diagnostic status
2. From the Fault/Program Action dialog, complete entries, referring to the
table for a summary of how to make these entries.
Feature
Description
Point
Displays the channel numbers.
Program
Mode
• Select a value to determine the behavior of each output when the
controller transitions to the Program mode.
• Make a selection from the available values for each channel:
- Off (default)
- On
- Hold
• In Hard Run only, you disable editing this feature.
Fault Mode
• Select a value to determine the behavior of each output when
communication with the controller fails.
• Select from the available values for each channel:
- Off (default)
- On
- Hold
• In Hard Run only, you disable editing this feature.
3. From the Fault/Program Action dialog, perform one of the following:
Rockwell Automation Publication 1734-UM001E-EN-P - July 2013
188
Configure POINT I/O Modules in RSLogix 5000 Software
• Click another tab at the top of the dialog.
or
• Click OK, which closes the dialog.
or
• Click Cancel to return to default values.
or
• Click Apply to save changes you made on any of the dialogs and
continue to display the dialog, noting that you enable the Apply button
when you make changes to any of the dialogs.
Enter Values on the Configuration dialog
Enter values on this dialog based on the type of module with the following:
• Overload diagnostic status
• Overload and open load diagnostic status
To complete the entries on this dialog proceed as follows.
1. From the General dialog, select Configuration.
You see the Configuration dialog, which displays configuration data for
each channel in individual rows in a table. The number of output channels
varies based on the type of module as in the following examples:
• The 1734-OB2E module has two output channels (0 to 1).
• The 1734-OB4E module has four output channels (0 to 3).
• The 1734-OB8E module has eight output channels (0 to 7).
See the figure for a Configuration dialog for a 4-point output module. The
2-point and 8-point output modules are identical except for the number of point
you can configure.
Rockwell Automation Publication 1734-UM001E-EN-P - July 2013
Configure POINT I/O Modules in RSLogix 5000 Software
189
2. From the Configuration dialog, complete entries, referring to the table for
information about how to complete entries with No Load Detection.
Feature
Description
Point
Displays the channel numbers.
Latch Faults
• Use to determine how a status bit acts after the cause of the fault is
removed.
• Use latching for tracking transient or momentary faults.
• You do not affect status LEDs when using latched alarms.
If You Select
Latch Faults
(checked)
Reset Latch Faults
(unchecked)
Auto Restart
Then
Alarm bits stay faulted if an alarm
occurs. Clear the fault by using the
clear latched alarm service for the
channel (Reset pushbutton).
Alarm bits reflect the present state.
• The Reset mode defines the action of the output during a short circuit or
overload.
• A fault also occurs if you turn on an output when you do not apply field
power to it.
Select
Latched off (unchecked)
Auto restart (checked)
Point Fault
If you want the output to
Shut off
Continually try to turn on
• Select to clear latched alarms.
• A blue arrow denotes the use of explicit messaging.
3. At the top of the Configuration dialog, complete the header check boxes
for the following:
• No Load Detection
• Latch Faults
Rockwell Automation Publication 1734-UM001E-EN-P - July 2013
190
Configure POINT I/O Modules in RSLogix 5000 Software
• Auto Restart
See the figure where, as an example, if you want to configure all of the
channels the same way, you check the No Load Detection header. This
checks all the boxes in the column and enables the bit for all the
channels in the module.
4. From the bottom of the Configuration dialog, perform one of the
following:
• Click another tab at the top of the dialog.
or
• Click OK, which closes the dialog.
or
• Click Cancel to return to default values.
or
• Click Apply to save changes you made on any of the dialogs and
continue to display the dialog, noting that you enable the Apply button
when you make changes to any of the dialogs.
Rockwell Automation Publication 1734-UM001E-EN-P - July 2013
Configure POINT I/O Modules in RSLogix 5000 Software
Configure Analog Modules
191
To configure POINT I/O modules in RSLogix 5000 software, complete these
steps.
1. Configure your adapter, referring to the user manual for your adapter for
information on how to:
• Configure the adapter
• Add modules to the I/O configuration
• Select a controller and communication module
2. According to the instructions in your adapter user manual, add an analog
module and display the General dialog.
3. From the top of the General dialog, click Connection.
4. From the Connection dialog, leave the following unchecked:
• Inhibit Module
• Major Fault On Controller If Connection Fails While in Run Mode
5. From the Connection dialog, enter a value for Requested Packet Interval
(RPI), if the field is selectable, per the table.
Adapter Configuration
Default Value for RPI for Analog Module Type
Direct Connection
50 ms
Rack Optimization
RPI is not selectable
6. From the Connection dialog, click Choose Module Info from the top of
the dialog to see a dialog that provides identification and status
information.
7. For information about the Fault/Program Action, Configuration, Alarm
Configuration and Calibration tabs and dialogs, see the appropriate
sections of this appendix.
You see these tabs based on the module you added.
Understand Data and Connection Formats
For analog modules, the choices for data format and connection type are as
follows.
• Data Format
– Integer
• Connection Type
– Data
– Listen only
– Listen only - rack optimization
– Rack optimization
Rockwell Automation Publication 1734-UM001E-EN-P - July 2013
192
Configure POINT I/O Modules in RSLogix 5000 Software
When you change entries for Data Format and Connection Type, note the
following:
• You do not delete the existing module.
• You do not create a new module.
• You bring forward configuration data for the new settings.
• Any configuration data you do not bring forward sets to the default value.
After you apply new settings for data format and connection, note the following:
• This is the base configuration for the next change in connection and data
format settings.
• You lose all configuration data from previous data formats.
The choices for connection type for modules depend on the communication type
format for the parent adapter, as explained in the user manual for the adapter.
Work with Dialogs for Analog Input Modules
Read this section for information about how to complete entries on the following
dialogs for analog input modules:
• Configuration
• Alarm Configuration
• Calibration
To display the dialogs, you typically click Configuration, Alarm Configuration,
or Calibration at the top of the General dialog.
Work with the Configuration Dialog
This dialog does not appear for Listen Only connections. To complete the entries
on this dialog, proceed as follows.
1. From the top of the General dialog, click Configuration.
Rockwell Automation Publication 1734-UM001E-EN-P - July 2013
Configure POINT I/O Modules in RSLogix 5000 Software
193
You see a Configuration dialog for a current or voltage module, based on
the type of module you added. See the figure for a Configuration dialog
for a current input module.
2. From the Configuration dialog, complete entries, referring to the table.
For This Value
Select
Comments
High Engineering
-32768…32767
Default for 1734-IE2C analog input module is 16383.
Default for 1734-IE2V analog input module is 10000.
Low Engineering
-32768…32767
Default for 1734-IE2C analog input module is 3277.
Default for 1734-IE2V analog input module is 0.
Digital Filter (ms)
0…10000
Default is 0.
Current Range
4…0 mA
0…20 mA
Default is 4…20 mA.
Voltage Range
-10…10V
0…10V
Default is 0…10V
Real Time Sample (ms)
0…10000
Default is 100.
Refer to the Real Time Sample Values table for the relationship between
Notch Filter and Real Time Sample.
Notch Filter
50 Hz
60 Hz
250 Hz
500 Hz
Default is 60 Hz.
Refer to the Real Time Sample Values table for the relationship between
Notch Filter and Real Time Sample.
Real Time Sample Values
Real Time
Sample
Notch Filter Setting
50 Hz
60 Hz
250 Hz
500 Hz
Min
120 ms
100 ms
24 ms
12 ms
3. From the bottom of the Configuration dialog, perform one of the
following:
• Click another tab at the top of the dialog.
or
Rockwell Automation Publication 1734-UM001E-EN-P - July 2013
194
Configure POINT I/O Modules in RSLogix 5000 Software
• Click OK to save changes and close the dialog.
or
• Click Cancel to return to default values.
or
• Click Apply to save changes you made on any of the dialogs and
continue to display the dialog, noting that you enable the Apply button
when you make changes to any of the dialogs.
Work with the Alarm Configuration Dialog
This dialog does not appear for Listen Only connections. To complete the entries
on this dialog, proceed as follows.
1. From the top of the General dialog, click Alarm Configuration.
You see an Alarm Configuration dialog for a current or voltage module,
based on the type of module you added. See the figure for the Alarm
Configuration dialog for a 1734-IE2C module. See the table for a list of
default values.
Alarm Configuration Dialog Default Values
Value
1734-IE2C
1734-IE2V
High High
16793
9800
High
16547
9500
Low
3113
500
Low Low
2867
200
2. From the Alarm Configuration dialog, perform the following:
Rockwell Automation Publication 1734-UM001E-EN-P - July 2013
Configure POINT I/O Modules in RSLogix 5000 Software
195
a. Click a channel push button, such as 0 or 1, which is highlighted to
show it was pressed, selecting the corresponding channel for the values you
enter.
b. Enter values for low and high alarms in one of these ways:
• Type the numeric value.
• Drag the pointer on the corresponding slider control.
c. Choose unlatch options one of the following ways:
• Click Unlatch next to an individual alarm.
• Click Unlatch All to unlatch all the alarms at once.
d. Check the checkbox for the following, if desired:
• Disable All Alarms - A check in the checkbox tells the module to not
report alarms. This is disabled in Hard Run mode only.
• Latch Process Alarms - A check in the checkbox lets you latch transient
alarm conditions. This is disabled in Hard Run mode.
e. Click OK
Work with the Calibration Dialog
To complete entries on this dialog proceed as follows. Perform calibration in
Hard Run or Remote mode. For information about the tools and steps for
calibration, refer to the Calibrating Your Analog Module section of this manual.
1. From the General dialog, click Calibration.
You see the Calibration dialog for a current or voltage input module,
depending on the module type.
See the figure for a Calibration dialog for a current input module.
Rockwell Automation Publication 1734-UM001E-EN-P - July 2013
196
Configure POINT I/O Modules in RSLogix 5000 Software
2. Check the Calibrate checkbox to specify which channel to calibrate.
3. Under Calibrate Channels, select One At a Time.
4. Click Start Calibration, which is active when the system is online, and you
selected at least one of the channels.
Note that when you press the F1 button on your keyboard or click Help
from the wizards and warning messages that appear during calibration, you
get detailed information about related procedures.
You see a Danger dialog.
5. From the Danger dialog, for a module not currently used for control, click
OK.
You see the Low Value dialog.
6. From the Low Value dialog, click Next to start calibration.
You see the High Value dialog.
7. From the High Value dialog, click Next to start calibration.
Rockwell Automation Publication 1734-UM001E-EN-P - July 2013
Configure POINT I/O Modules in RSLogix 5000 Software
197
You see the Calibration Completed dialog that shows you saved the
changed calibration constants of the channel.
Work with Dialogs for Analog Output Modules
Read this section for information about how to complete entries on the following
dialogs for analog output modules:
• Configuration
• Alarm Configuration
• Fault/Program Action
• Calibration
To display the dialogs, you typically click Fault/Program Action, Configuration,
Alarm Configuration, or Calibration at the top of the General dialog.
Work with the Configuration Dialog
This dialog does not appear for Listen Only connections. To complete the entries
on this dialog, proceed as follows.
1. From the top of the General dialog, click Configuration.
You see a Configuration dialog for a current or voltage module, based on
the type of module you added.
Rockwell Automation Publication 1734-UM001E-EN-P - July 2013
198
Configure POINT I/O Modules in RSLogix 5000 Software
See the figure that shows configuration parameters for each channel in
individual rows on the grid with, for example, 1734-OE2C having two
output channels.
2. From the Configuration dialog, complete entries, referring to the table.
For This Value
Select
Comments
High Engineering
-32768…32767
Default for 1734-OE2C analog output module is 8191.
Default for 1734-OE2V analog output module is 10000.
Low Engineering
-32768…32767
Default for 1734-OE2C analog output module is 1638.
Default for 1734-OE2V analog output module is 0.
Current Range
4…20 mA
0…20 mA
Default is 4…20 mA.
Voltage Range
-10…10V
0…10V
Default is 0…10V
3. From the bottom of the Configuration dialog, perform one of the
following:
• Click another tab at the top of the dialog.
or
• Click OK to save changes and close the dialog.
or
• Click Cancel to return to default values.
or
• Click Apply to save changes you made on any of the dialogs and
continue to display the dialog, noting that you enable the Apply button
when you make changes to any of the dialogs.
Work with Alarm Configuration Dialog
This dialog does not appear for Listen Only connections. To complete the entries
on this dialog, proceed as follows.
Rockwell Automation Publication 1734-UM001E-EN-P - July 2013
Configure POINT I/O Modules in RSLogix 5000 Software
199
1. From the top of the General dialog, click Alarm Configuration.
You see an Alarm Configuration dialog for a current or voltage module,
based on the type of module you added.
2. Click a channel push button, such as 0 or 1, to show it pressed, selecting
the corresponding channel for the values you enter.
3. Enter values for Low and High Clamp limits by typing the numeric value
or dragging the pointer on the corresponding slider control, noting the
following:
• For High Clamp limit, default is 32767.
• For High Clamp limit, range is -32768 to 32767.
• For Low Clamp limit, default is -32768
• For Low Clamp limit, range is -32768 to 32767.
4. Choose unlatch options one of these ways.
• Click Unlatch to unlatch an individual alarm.
• Click Unlatch All to unlatch all the alarms at once.
5. Check the checkbox for the following, if desired:
• Disable All Alarms — A check in the checkbox tells the module to not
input alarms. This is disabled in Hard Run only.
• Latch Process Alarm — A check in the checkbox lets you latch
transient alarm conditions. This is disabled in Hard Run mode.
6. Click OK
Work with the Fault/Program Action Dialog
Use this dialog to configure and display the parameters controlling output states
during Fault and Program conditions. This dialog does not appear for Listen
Only connections. To complete the entries on the dialog, proceed as follows.
1. From the top of the General dialog, click Fault/Program Action.
Rockwell Automation Publication 1734-UM001E-EN-P - July 2013
200
Configure POINT I/O Modules in RSLogix 5000 Software
You see a Fault/Program Action dialog.
2. From the Fault/Program Action dialog, complete items, referring to the
table.
For This Value
Select
Comments
Fault Mode
Hold Last State
Go to Low Clamp
Go to High Clamp
Use Program Value
Default is Go to Low Clamp.
Fault Value
-32768…32767
Default is 0.
Program Mode
Hold Last State
Go to Low Clamp
Go to High Clamp
Use Program Value
Default is Go to Low Clamp.
Program Value
-32768…32767
Default is 0.
3. From the bottom of the dialog, perform one of the following:
• Click another tab at the top of the dialog.
or
• Click OK to save changes and close the dialog.
or
• Click Cancel to return to default values.
or
• Click Apply to save changes you made on any of the dialogs and
continue to display the dialog, noting that you enable the Apply button
when you make changes to any of the dialogs
Work with the Calibration Dialog
To complete entries on this dialog, proceed as follows. Perform calibration in
Hard Run or Remote mode. For information about the tools and steps for
calibration, refer to the Calibrating Your Analog Module section of this manual.
1. From the General dialog, click Calibration.
Rockwell Automation Publication 1734-UM001E-EN-P - July 2013
Configure POINT I/O Modules in RSLogix 5000 Software
201
You see the Calibration dialog for a current or voltage output module,
depending on the module type.
2. From the Calibration dialog, click one of these:
• In Groups
• One At a Time
3. From the Calibration dialog, check the Calibrate checkbox to specify
which channel to calibrate.
4. From the Calibration dialog, click Start Calibration, which is active when:
• the system is online, and
• you selected at least one of the channels.
Note that when you press the F1 button on your keyboard or click Help
from the wizards and warning messages that appear during calibration you
get detailed information about related procedures.
You see a Danger dialog.
5. From the Danger dialog, for a module not currently used for control, click
OK.
Rockwell Automation Publication 1734-UM001E-EN-P - July 2013
202
Configure POINT I/O Modules in RSLogix 5000 Software
You see a Low Value dialog.
6. From the Low Value dialog, follow the instructions you see and click Next.
You see the High Value dialog.
7. From the High Value dialog, follow the instructions you see and click Next
to start calibration.
8. If calibration completes successfully, you see the Calibration Completed
dialog.
Rockwell Automation Publication 1734-UM001E-EN-P - July 2013
Configure POINT I/O Modules in RSLogix 5000 Software
203
If calibration fails, the Results dialog shows a failed calibration.
9. If calibration is successful, click Finish; otherwise, from the Results dialog,
click Retry to calibrate the channel that did not calibrate successfully and
repeat the process until calibration is successful.
10. Repeat calibration for each channel, if applicable.
Rockwell Automation Publication 1734-UM001E-EN-P - July 2013
204
Configure POINT I/O Modules in RSLogix 5000 Software
Notes:
Rockwell Automation Publication 1734-UM001E-EN-P - July 2013
Appendix
D
Configure POINT I/O Modules for DeviceNet
Networks
About This Appendix
Read this appendix to learn how to configure POINT I/O modules in a
DeviceNet network. If you are using a ControlNet, EtherNet/IP, or PROFIBUS
network, refer to the appropriate manual.
• POINT I/O ControlNet Adapter User Manual, publication
1734-UM008
• POINT I/O EtherNet/IP Adapter User Manual, publication
1734-UM011
• POINT I/O PROFIBUS Adapter Module User Manual, publication
1734-UM005
Configuring POINT I/O
Modules
To configure POINT I/O modules, use RSNetWorx software to identify the
network and configure the I/O modules with electronic data sheet (EDS) files.
To obtain EDS files for use in configuration, go to
http://www.ab.com/networks/eds.
Commissioning a Node
Methods for commissioning nodes are the following:
• RSNetWorx commissioning pull-down
• Sequential Auto Addressing feature
• Third-party configuration software
Using the RSNetWorx Commissioning Tool
The RSNetWorx commissioning tool lets you commission devices (set the node
address and the data rate parameters) that are either connected to a DeviceNet
network or connected via a point-to-point connection.
The node commissioning tool works through RSLinx software; RSNetWorx
software does not have to be online when performing the operation.
Before you can add any device to a DeviceNet network, you must commission it.
This means you must program into the device a node address and data rate. Some
devices are precommissioned, meaning a node address (usually set to 63) and a
data rate (usually set to 125 Kbps) are programmed into the device at the factory
prior to shipment. You need to commission other devices in the field. Once a
Rockwell Automation Publication 1734-UM001E-EN-P - July 2013
206
Configure POINT I/O Modules for DeviceNet Networks
device has been commissioned and attached to a network, you can use the
RSNetWorx for DeviceNet node commissioning tool to edit the node address
and data rate that were set previously.
Exercise caution while editing node addresses when on a network. When you
apply a new node address, it immediately overwrites the node address data in the
device currently specified. If you decide to reassign node addresses, you should
first determine the order in which this needs to be done so that all the devices still
have unique node addresses when you finish.
For example, if two of the devices on your network are a photoelectric sensor and
a hand controller and you accidentally change the node address of the hand
controller to be the same as that of the photoelectric sensor, then the
photoelectric sensor no longer has a unique address. This means it is not able to
provide data to the scanner. If you cannot access a device, because you have used
its node address for another device, you have to remove it from the network,
recommission it, then reinstall it on the network.
ATTENTION: Do not change the data rate of devices while they
are connected to a network. Erratic operation may result. We
recommend that if you need to change the data rate of a device,
you should remove it from the network, establish a point-to-point
connection between the PC, which hosts the RSNetWorx for
DeviceNet software, and the target device, recommission it, and
then, reconnect it to the network.
Use Sequential Auto Addressing
Sequential Auto Addressing (SAA) reassigns the node address of every module to
the right of the one you select on the POINTBus network. Each module changes
its node address to one greater than its neighbor.
IMPORTANT
Make sure the node address of the selected module is the desired
value before issuing the SAA command.
When this command is set, each module to the right gets a new address one
greater than its neighbor. The addressing ripples through a line of POINT I/O
modules, assigning a node number to each module installed in a mounting base
on the same POINTBus network.
Follow these steps to Auto Address a line of POINT I/O modules.
1. Set the address of the first module you want to address.
2. Set the Auto Address command to Sequential Address.
All modules in line reset with new sequential addresses.
Rockwell Automation Publication 1734-UM001E-EN-P - July 2013
Configure POINT I/O Modules for DeviceNet Networks
207
For example, assume you have five POINT I/O modules in a line, and the address
of the first module is 10. After the Sequential Address command is sent to the
first module, the node address of the line is 10, 11, 12, 13, and 14.
Using Third-party Configuration Software
When using third-party configuration software, load the EDS files into the
software and follow the designers instructions.
Configure Digital Modules
Using RSNetWorx Software
To configure digital input modules, proceed as follows, noting that input
modules use dialogs similar to the one for the 1734-IB4 modules used in this
procedure.
1. Open your RSNetWorx for DeviceNet software.
2. Using the selections on the left, construct your system.
If your network is up, click Browse.
3. After setting up your system, double-click the module you want to
configure.
If you are online, upload the configuration.
Rockwell Automation Publication 1734-UM001E-EN-P - July 2013
208
Configure POINT I/O Modules for DeviceNet Networks
A dialog similar to the following appears.
4. Click the Device Parameters tab to get to the dialog for setting the
parameters.
Configure Input Modules
See the figure for a Device Parameters dialog for a 1734-IB4 input module
example. All digital input modules have parameters similar to this example.
On this dialog, you see all the parameters for the module. These include filters,
autobaud, sequential addressing, and communication rate(if not using
autobaud).
If you see a lock next to an
entry, you can’t change that
parameter.
Rockwell Automation Publication 1734-UM001E-EN-P - July 2013
Configure POINT I/O Modules for DeviceNet Networks
209
The Group’s pull-down includes the following:
• All parameters
• I/O
• Configure
• POINTBus
To complete entries from the Device Parameters dialog, use this procedure.
1. From the General Parameters dialog, at the groups list Select
Configuration and the parameters you want.
2. From the Device Parameters dialog, select Single and change or configure
parameters one at a time, or select All to change all selections at once.
Note that if autobaud is selected, the communication rate of this module
automatically matches the communication rate of the existing devices on
Rockwell Automation Publication 1734-UM001E-EN-P - July 2013
210
Configure POINT I/O Modules for DeviceNet Networks
the network, and you are prevented from selecting a specific
communication rate.
3. From the Device Parameters dialog, select the filter of your choice by
selecting and typing in the filter time, noting that each input channel can
have its own time selection.
4. From the Device Parameters dialog, click Download to Device.
Rockwell Automation Publication 1734-UM001E-EN-P - July 2013
Configure POINT I/O Modules for DeviceNet Networks
211
Configure Output Modules
To configure output modules, follow this procedure. Output modules use dialogs
similar to the one for the 1734-OB4E output module used in this procedure.
1. From the General Parameters dialog, click Device Parameters to get the
dialog for setting parameters.
2. From the Device Parameters dialog, set parameters for the module to
include sequential addressing and autobaud or, if not using autobaud,
communication rate.
The Group’s pull-down menu includes the following:
• All parameters
• I/O output value
Rockwell Automation Publication 1734-UM001E-EN-P - July 2013
212
Configure POINT I/O Modules for DeviceNet Networks
•
•
•
•
I/O output status
Reset services
POINTBus
Configuration
3. At the Groups pull-down menu, select Configuration and the parameters
you want.
4. Select Single to change or configure parameters one at a time, or All to
change all selections at once, noting that configurable parameters include
the following:
• Fault Value - Off/on
• Fault Action - Fault value/hold last state
• Idle Value - Off/on
• Idle Action - Idle value/hold last state
• Enable no load - No load enabled/no load disabled
• Reset mode - Latch off/auto restart
• Autobaud - Enable/disable
Note that if autobaud is selected, the communication rate of this module
automatically matches the communication rate of the existing devices on
the network and you are locked out from selecting a communication rate.
Rockwell Automation Publication 1734-UM001E-EN-P - July 2013
Configure POINT I/O Modules for DeviceNet Networks
See the figures for dialogs for selecting Fault Action and Fault Value.
See the figure for a dialog for selecting Idle Action and Idle Value.
See the figure for a dialog for Latching Alarms parameter select.
Rockwell Automation Publication 1734-UM001E-EN-P - July 2013
213
214
Configure POINT I/O Modules for DeviceNet Networks
See the figure for a dialog for selecting Enable No Load.
See the figure for a dialog for selecting Reset Mode.
Rockwell Automation Publication 1734-UM001E-EN-P - July 2013
Configure POINT I/O Modules for DeviceNet Networks
See the figure for a dialog for selecting autobaud.
5. From the Device Parameters dialog, click Download to Device.
To configure the 1734-OW2 relay output module, use this procedure.
1. From the General dialog, click Device Parameters to get the dialog for
setting parameters.
You see the EDS Editor.
2. From the EDS Editor, click Upload to load the latest information.
Rockwell Automation Publication 1734-UM001E-EN-P - July 2013
215
216
Configure POINT I/O Modules for DeviceNet Networks
3. From the Device Parameters dialog, click Configuration to set the
parameters for the module to include sequential addressing and autobaud,
or, if not using autobaud, the communication rate.
The Groups pull-down menu includes the following:
• All parameters
• I/O
• POINTBus
• Configuration - Select to set the paramters
Note that configurable parameters include the following:
• Fault Action - Fault value/Hold Last State
• Fault Value - Off/On
• Idle Action - Idle value/Hold Last State
• Idle Value - Off/On
• Run/Idle Command - Idle/Run
Rockwell Automation Publication 1734-UM001E-EN-P - July 2013
Configure POINT I/O Modules for DeviceNet Networks
• Autobaud - Enable/Disable
Rockwell Automation Publication 1734-UM001E-EN-P - July 2013
217
218
Configure POINT I/O Modules for DeviceNet Networks
4. From the Device Parameters dialog, at Groups select All parameters to
display each item and POINTBus to display only the run/idle command
and autobaud.
5. From the Device Parameters dialog, to monitor the output, click Start
Monitor, noting the following:
• The output value is displayed for each scan.
• Click All to scan all values.
• The Start Monitor button turns to Stop Monitor during monitoring.
• Click Stop Monitor to stop monitoring the selected parameters.
• Identify monitoring by a ball appearing momentarily next to the
selected item during each scan.
Monitoring is identified
by the ball appearing
momentarily next to the
selected item during
each scan.
Rockwell Automation Publication 1734-UM001E-EN-P - July 2013
Configure POINT I/O Modules for DeviceNet Networks
Configure Analog Modules
Using RSNetWorx Software
219
Read this for a description of how to configure any analog module. The 1734IE2C and 1734-OE2C modules in this procedure are representative of input and
output analog modules. The actual dialogs for your particular module may not be
identical to the ones shown here. To configure analog input modules, proceed as
follows.
1. Open your RSNetWorx for DeviceNet software.
You see the RSNetWorx for DeviceNet dialog.
2. From the RSNetworx for DeviceNet dialog, use the selections in the
window on the left construct your system, or if your network is up, click
Browse.
3. Double-click the graphic for the desired module to display the General
dialog.
4. From the General dialog, click Device Parameters to see the dialog for
setting parameters.
Rockwell Automation Publication 1734-UM001E-EN-P - July 2013
220
Configure POINT I/O Modules for DeviceNet Networks
An EDS Editor dialog appears.
5. From the EDS Editor dialog, click Upload to upload existing parameters
from the device.
6. From the Device Parameters dialog, at the Groups list select
Configuration to select parameters.
7. Select Single to change or configure parameters one at a time or All to
change all selections at once.
8. Change the configuration, or apply the uploaded parameters, noting that
to change the parameters you must downlown to the device.
Rockwell Automation Publication 1734-UM001E-EN-P - July 2013
Configure POINT I/O Modules for DeviceNet Networks
221
To configure the analog output module, use this procedure.
1. Double-click the icon.
The General dialog appears.
2. From the General dialog, click Device Parameters to set parameters.
You see the EDS Editor dialog.
3. From the EDS Editor dialog, click Upload to upload existing parameters
from the device.
4. From the Device Parameters dialog, from Groups select Configuration.
Rockwell Automation Publication 1734-UM001E-EN-P - July 2013
222
Configure POINT I/O Modules for DeviceNet Networks
5. From the Device Parameters dialog, set Run or Idle, noting that any
parameter with a lock indicated next to it is nonchangeable..
6. Select values for current or voltage.
For current, click one of the following:
• 4…20 mA
• 0…20 mA
For voltage, click one of the following:
• 0…10V
• -10…+10V
Note that fault states include the following:
• Hold Last state
• Go to Low Clamp
• Go to High Clamp
Rockwell Automation Publication 1734-UM001E-EN-P - July 2013
Configure POINT I/O Modules for DeviceNet Networks
• Go to Fault Value
7. For Enable Alarm Latch, select Enable Latching Alarms or Disable.
8. For Disable Alarm, select Alarms Enabled or Alarms Disabled.
9. For Autobaud, select Enable or Disable.
Rockwell Automation Publication 1734-UM001E-EN-P - July 2013
223
224
Configure POINT I/O Modules for DeviceNet Networks
With current or voltage modules if you change range values, note that it
affects range or scaling of the module.
Rockwell Automation Publication 1734-UM001E-EN-P - July 2013
Index
Numerics
1734D-IA16 module
about 14
wire 87
1734D-IA8XOA8 module
about 14
wire 81
1734D-IA8XOW8 module
about 14
wire 84
1734D-IB16 module
about 14
wire 90
1734D-IB8XOB module
about 14
wire 74
1734D-IB8XOW8 module
about 14
wire 78
1734-EP24DC module
wire 64
1734-EPAC module
wire 67
1734-FPD module
wire 61
1734-IA2 module
about 13
default data map 165
troubleshoot 145
wire 49
1734-IA4 module
about 13
default data map 165
troubleshoot 145
wire 49
1734-IB2 module
about 13, 14
default data map 162
troubleshoot 140
wire 26
1734-IB4 module
about 13, 14
default data map 162
troubleshoot 140
wire 26, 27
1734-IB4D module
about 13, 14
default data map 163
troubleshoot 140
wire 30
1734-IB8 module
about 13, 14
default data map 162
troubleshoot 140
wire 26, 27
1734-IE2C module
about 16
default data map 170
troubleshoot 147
wire 55
1734-IE2V module
about 16
default data map 171
troubleshoot 148
wire 56, 57
1734-IM module
about 13
default data map 165
troubleshoot 146
wire 51
1734-IV2 module
about 13, 14
default data map 164
troubleshoot 142
wire 31
1734-IV4 module
about 13, 14
default data map 164
troubleshoot 142
wire 31, 32
1734-IV8 module
about 13, 14
default data map 164
troubleshoot 142
wire 31, 32
1734-OA2 module
about 13
default data map 166
troubleshoot 146
wire 53
1734-OA4 module
about 13
default data map 166
troubleshoot 146
wire 53
1734-OB2 module
about 13
default data map 166
troubleshoot 141
wire 34, 35
1734-OB2E module
about 13
default data map 166
troubleshoot 141
wire 34, 35
Rockwell Automation Publication 1734-UM001E-EN-P - July 2013
226
Index
1734-OB2EP module
about 13
default data map 167
troubleshoot 142
wire 37
1734-OB4 module
about 13
default data map 167
troubleshoot 141
wire 35
1734-OB4E module
about 13
default data map 167
troubleshoot 141
wire 34, 35
1734-OB8 module
about 13
default data map 167
troubleshoot 141
wire 34, 36
1734-OB8E module
about 13
default data map 167
troubleshoot 141
wire 34, 36
1734-OE2C module
about 16
default data map 171
troubleshoot 148
wire 57
1734-OE2V module
about 16
default data map 172
troubleshoot 149
wire 58
1734-OV2E module
about 13
default data map 168
troubleshoot 143
1734-OV4E module
about 13
default data map 168
troubleshoot 143
wire 43
1734-OV8E module
about 13
default data map 169
troubleshoot 143
wire 43
1734-OW2 module
about 13
default data map 169
troubleshoot 144
226
wire 38
1734-OW4 module
about 13
default data map 169
troubleshoot 144
wire 38
1734-OX2 module
about 13
default data map 170
troubleshoot 145
wire 45
1734-PDN module
wire 59
A
about
analog input modules 17
analog output modules 17
digital input modules 14
digital output module 14
relay output modules 15
alarm 103, 105
configuration dialog 193
disable 103, 111
latch 103
analog
input modules 17, 100
modules 16, 100, 106, 117
output modules 17, 106
C
calibrating
analog current input module 119
analog current output module 123
analog modules 117, 194, 202
analog voltage input module 128
analog voltage output module 132
calibration
dialog 194, 202
instruments 118
status bit 103
status indicators 137
channel indicator states 106, 112
channel status
analog input modules 102
analog output modules 110
clamps
cage 112
high 17, 116
low 17, 116
spring 112
Rockwell Automation Publication 1734-UM001E-EN-P - July 2013
Index
commissioning
nodes 211
tool 212
configure analog modules
using RSLogix 5000 software 195
using RSNetWorx software 271
configure digital modules
using RSLogix 5000 software 183
using RSNetWorx software 213
configure the module 93
ControlNet network 9, 205
D
data maps 93, 161-172
default data maps 93, 161-172
DeviceNet network 9, 206
diagnostics, module 137
digital
AC input modules 95
AC output modules 98
DC input modules 93
DC output modules 96
filter 104
dimensions for mounting 173
DIN rail 21
disable alarms 103, 111
documentation 10
E
EDS, electronic data sheet 211
electronic data sheet 211
EtherNet/IP network 13, 211
F
fault and idle mode state 109
filter
notch 104, 192
H
high alarm 105, 194
high high alarm 105, 194
removable terminal block 24
L
latch alarms 103, 111
LED indicators 137
low alarm 108
low low alarm 108
M
module
status 93
module diagnostics 137
module status indicator 137
mounting
base assembly 21
dimensions POINT I/O module with a 1734-ADN adapter
174
dimensions POINT I/O module with a 1734-PDN
DeviceNet Communication Interface module
175
dimensions POINTBlock module 176
N
network
ControlNet 205
DeviceNet 205
EtherNet/IP 205
PROFIBUS 9
network status indicator 137
node commissioning tool 212
notch filter 104, 192
O
over range status 105
P
POINTBus 207
power indicator 137
PROFIBUS network 9
R
I
indicators, LED 137
install
I/O modules 22
mounting base assembly 21
Rockwell Automation Publication 1734-UM001E-EN-P - July 2013
range status 105
related documentation 10
relay
module 15
output modules 99
227
228
Index
remove a mounting base 25
RSNetWorx software 206
for DeviceNet node commissioning tool 212
S
SAA, sequential auto addressing 207
scaling
analog input modules 102
analog output modules 108
sequential auto addressing 207
specialty modules 18
T
third party configuration software 207
troubleshoot
1734-ACNR adapter 153
1734-ADN adapter 151
1734-AENT adapter 158
1734-APB adapter 156
1734-IA2 module 145
1734-IB2 module 140
1734-IB4 module 140
1734-IB8 module 140
1734-IE2C module 147
1734-IE2V module 148
1734-IM2 module 146
1734-IV2 module 142
1734-IV4 module 142
1734-IV8 module 142
1734-OA2 module 146
1734-OB2 module 141
1734-OB2EP module 142
1734-OB4 module 141
1734-OB4E module 141
1734-OB8 module 141
1734-OB8E module 141
1734-OE2C module 148
1734-OE2V module 149
1734-OV2E module 143
1734-OV4E module 143
1734-OW2 module 144
1734-OW4 module 144
1734-OX2 module 145
analog modules 147
digital modules 140
I/O communications modules 150
228
U
under range status 105
update rate 104
W
wiring
120/220V AC output module 53
120V AC input modules 49
1734-EP24DC module 64
1734-FPD module 61
1734-IA2 module 49
1734-IA4 49
1734-IA4 module 49
1734-IB2 module 26
1734-IB4 module 26
1734-IB4D module 30
1734-IB8 module 26
1734-IE2C module 55
1734-IE2V module 56
1734-IM2 module 51
1734-IV2 module 31
1734-IV4 module 31
1734-IV8 module 31
1734-OA2 module 53
1734-OB2 module 34
1734-OB2E module 34
1734-OB2EP module 37
1734-OB4 module 34
1734-OB4E module 34
1734-OB8 module 34
1734-OB8E module 34
1734-OE2C module 57
1734-OE2V modules 58
1734-OV2E module 43
1734-OV4E module 43
1734-OV8E module 43
1734-OW2 module 38
1734-OW4 module 38
1734-OX2 module 45
1734-PDN module 59
220V AC input modules 51
analog voltage input module 56
communication interface module 59
field potential distributor module 61
module 1734-IE2C 55
POINTBlock modules 74
protected output modules 34, 37
relay output modules 38, 45
source input modules 31
Rockwell Automation Publication 1734-UM001E-EN-P - July 2013
Rockwell Automation Support
Rockwell Automation provides technical information on the Web to assist you in using its products.
At http://www.rockwellautomation.com/support/, you can find technical manuals, a knowledge base of FAQs, technical and
application notes, sample code and links to software service packs, and a MySupport feature that you can customize to make
the best use of these tools.
For an additional level of technical phone support for installation, configuration, and troubleshooting, we offer
TechConnect support programs. For more information, contact your local distributor or Rockwell Automation
representative, or visit http://www.rockwellautomation.com/support/.
Installation Assistance
If you experience a problem within the first 24 hours of installation, review the information that is contained in this
manual. You can contact Customer Support for initial help in getting your product up and running.
United States or Canada
1.440.646.3434
Outside United States or
Canada
Use the Worldwide Locator at http://www.rockwellautomation.com/support/americas/phone_en.html, or contact
your local Rockwell Automation representative.
New Product Satisfaction Return
Rockwell Automation tests all of its products to ensure that they are fully operational when shipped from the
manufacturing facility. However, if your product is not functioning and needs to be returned, follow these procedures.
United States
Contact your distributor. You must provide a Customer Support case number (call the phone number above to obtain
one) to your distributor to complete the return process.
Outside United States
Please contact your local Rockwell Automation representative for the return procedure.
Documentation Feedback
Your comments will help us serve your documentation needs better. If you have any suggestions on how to improve this
document, complete this form, publication RA-DU002, available at http://www.rockwellautomation.com/literature/.
Rockwell Otomasyon Ticaret A.Ş., Kar Plaza İş Merkezi E Blok Kat:6 34752 İçerenköy, İstanbul, Tel: +90 (216) 5698400
Rockwell Automation Publication 1734-UM001E-EN-P - July 2013
Superseded Publication 1734-UM001D-EN-P April 2008
Copyright © 2013 Rockwell Automation, Inc. All rights reserved.