1
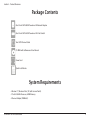
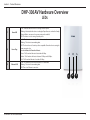
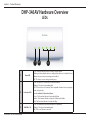
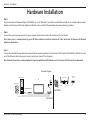
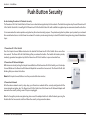
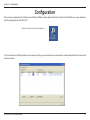
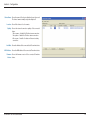
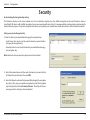
Version 1.0 | 03/11/2011
Table of Contents
Table of Contents
Product Overview............................................................... 3
Package Contents.......................................................................... 3
System Requirements.................................................................. 3
Introduction.................................................................................... 4
Features............................................................................................. 4
DHP-306AV Hardware Overview.............................................. 5
LEDs............................................................................................ 5
Connection.............................................................................. 6
DHP-346AV Hardware Overview.............................................. 7
LEDs............................................................................................ 7
Connection.............................................................................. 8
DHP-346AV Ethernet Port Traffic Priority.............................. 9
Hardware Installation......................................................10
Push Button Security........................................................11
Using the Setup Wizard....................................................12
Configuration................................................................................13
Security...........................................................................................15
Troubleshooting...............................................................17
DHP-346AV Technical Specifications..............................18
DHP-306AV Technical Specifications..............................19
D-Link DHP-347AV User Manual
2
Section 1 - Product Overview
Product
PackageOverview
Contents
One D-Link DHP-306AV PowerLine AV Network Adapter
One D-Link DHP-346AV PowerLine AV 4-Port Switch
Two CAT5 Ethernet Cable
CD-ROM with Software and User Manual
Power Cord
Quick Install Guide
System Requirements
• Windows® 7, Windows Vista®, XP (with Service Pack 3)
• PC with 233MHz Processor, 64MB Memory
• Ethernet Adapter (100Mbit/s)
D-Link DHP-347AV User Manual
3
Section 1 - Product Overview
Introduction
D-Link announces the PowerLine AV 4-Port Switch Starter Kit which uses the electrical wiring that’s already in your house to provide fast, reliable
speeds of up to 200Mbps* to any room in the house. Simply connect one adapter into an existing power outlet, connect it to your home network
router, and plug another adapter into any other room in your house to get instant shared network connections. With 4 Ports, you can connect more
devices per room and get blazing speeds in each room without tripping over tangled, messy wires. It’s cable management at its best.
• Provides Ethernet to PowerLine Connection
Features
• Fast Data Transfer Rate of up to 200Mbps*
• Four 10/100 Ethernet Ports (DHP-346AV)
• One 10/100 Ethernet Port (DHP-306AV)
• Plug & Play, Easy Installation
• Easy to use Management Utility
• Firmware Upgrade Support
• Push Button Security
• Power Saving mode
* Maximum throughput based on theoretical transmission PHY rate. Actual data throughput will vary. Network conditions and environmental factors, including volume of traffic and network
overhead, may lower actual data throughput rate. Interference from devices that emit electrical noise, such as vacuum cleaners and hair dryers, may adversely affect the performance of this
product. This product may interfere with devices such as lighting systems that have a dimmer switch, short wave radios, or other PowerLine devices that do not follow the HomePlug AV standard.
D-Link DHP-347AV User Manual
4
Section 1 - Product Overview
DHP-306AV Hardware Overview
LEDs
Power LED
• Solid - Indicates that the device is receiving electrical power.
• Blinking - Indicates that the device is setting itself up after reset or when the Simple
Connect Button was pressed or power saving mode enabled.
• Off - The device is not receiving electrical power.
2
Home Plug
• Solid - The device is connected to a PowerLine network.
• Blinking - The device is transmitting data.
• Off - The device has not found any other compatible PowerLine devices using the
same encryption key.
The color indicates the PowerLine link rate:
• Green - The PowerLine link rate is faster than 80 Mbps.
• Amber - The PowerLine link rate is between 50 Mbps and 80 Mbps.
• Red - The PowerLine link rate is less than 50 Mbps.
3
Ethernet LED
1
1
• Solid - The Ethernet port is linked but there is no data traffic.
• Blinking - The device is transmitting data.
• Off - There is no Ethernet connection.
1
D-Link DHP-347AV User Manual
2
3
5
Section 1 - Product Overview
DHP-306AV Hardware Overview
Connection
1
2
3
1
S i m p l e Co n n e c t
Press to secure your network. Refer to page 8 for more information.
Button
2
Reset Button
Press and hold the button for one second to reset to factory default.
3
Ethernet Port
Connect the CAT5 Ethernet cable to the DHP-306AV Ethernet port.
D-Link DHP-347AV User Manual
6
Section 1 - Product Overview
DHP-346AV Hardware Overview
LEDs
1
1
2
3
D-Link DHP-347AV User Manual
2
3
Power LED
• Solid - Indicates that the device is receiving electrical power.
• Blinking - Indicates that the device is setting itself up after reset or Simple Connect
Button was pressed or power saving mode enabled.
• Off - The device is not receiving electrical power.
PowerLine LED
• Solid - The device is connected to a PowerLine network.
• Blinking - The device is transmitting data.
• Off - The device has not found any other compatible PowerLine devices using the
same encryption key.
The color indicates the PowerLine link rate:
• Green - The PowerLine link rate is faster than 80 Mbps.
• Amber - The PowerLine link rate is between 50 Mbps and 80 Mbps.
• Red - The PowerLine link rate is less than 50 Mbps.
LAN LEDs (1-4)
• Solid - The Ethernet port is linked but there is no data traffic.
• Blinking - The device is transmitting data.
• Off - There is no Ethernet connection.
7
Section 1 - Product Overview
DHP-346AV Hardware Overview
Connection
2
1
1
2
Ethernet Ports (1-4)
3
4
Connect the CAT5 Ethernet cable to the selected Ethernet port in accordance to priority.
Simple Connect Button Press to secure your network. Refer to page 8 for more information.
3
Reset Button
4
Power Receptor
D-Link DHP-347AV User Manual
Press and hold the button for one second to reset to factory default.
Receptor for the supplied power cord.
8
Section 2 - Installation
DHP-346AV Ethernet Port Traffic Priority
When connecting devices to your ethernet ports, be aware of the Quality of Service (QoS) priorities assigned to each port.
4
3
2
1
Port
Color
1&2
Yellow
Both ports have medium priority and are best for networking data devices such as printers.
3
Purple
Has a high priority. You can connect devices such as game consoles to this port.
4
Light Green
D-Link DHP-347AV User Manual
Description
Has the highest priority and gives uninterrupted service to the connected devices such as media
players or Internet TV.
9
Section 2 - Installation
Hardware Installation
Step 1
Plug the PowerLine AV Network Adapter (DHP-306AV) into an AC Wall outlet. Connect the included Ethernet cable to the network cable connector
located on the PowerLine AV Network Adapter and attach the other end of the Ethernet cable to the network devices (e.g. Router).
Step 2
Connect the supplied power cord into the power receptor located on the back of the PowerLine AV 4-Port Switch.
Note: Power source is confirmed when the green LED Power Indicator on both the PowerLine AV 4-Port Switch and the PowerLine AV Network
Adapter are illuminated.
Step 3
Connect the included Ethernet cable to the network cable connector located on the PowerLine AV 4-Port Switch (DHP-346AV) and attach the other
end of the Ethernet cable to the game console, media player, Internet TV or Computer.
Note: Network Connectivity is confirmed when the PowerLine and Ethernet LED indicators on the PowerLine AV 4-Port Switch are illuminated.
Network Diagram
Game Console
Cable/ DSL
Modem
Wireless Router
TV
RESET
1
NAS Storage
Blu-ray DVD Player
2
LAN
3
4
INTERNET
USB
5V - - - 3A
INTERNET
DHP-306AV
DHP-346AV
D-Link DHP-347AV User Manual
10
Section 2 - Installation
Push Button Security
Understanding PowerLine AV Network Security
The PowerLine AV 4-Port Switch Starter Kit must use an identical encryption key for the network. The default encryption key for each PowerLine AV
4-Port Switch Starter Kit is HomePlugAV. All PowerLine AV 4-Port Switch Starter Kits with a default encryption key can communicate with each other.
It is recommended to create a private encryption key for network security purpose. The private encryption key allows you to protect your network
from unauthorized access via the PowerLine network. To create a private encryption key instead of the default encryption key, please follow below
steps:
1. PowerLine AV 4- Port Switch
Press the Simple Connect Button located on the back of the PowerLine AV 4-Port Switch for no more than
two seconds. The Power LED will start blinking after you release the button. The Switch will create a private,
randomly generated encryption key that the PowerLine AV 4-Port Switches in your network will use.
2. PowerLine AV Network Adapter
Within two minutes of pushing the Simple Connect Button of the PowerLine AV 4-Port Switch, press the Simple
Connect Button on the PowerLine AV Network Adapter for no more than two seconds. The Power LED will start
blinking after you release the button.
Note: Both Simple Connect Buttons must be pressed within two minutes.
3. PowerLine Network
After the above network security setup steps, your PowerLine network will be securely configured with the
same network encryption key. The PowerLine AV 4-Port Switch and the PowerLine AV Network Adapter will
memorize the security settings even if they are unplugged.
Note: To change the private encryption key, please reset the adapter back to its default value by pressing the
Reset button for two seconds and then follow the security setup procedure above.
D-Link DHP-347AV User Manual
11
Section 3 - Configuration
Using the Setup Wizard
Follow the simple steps below to run the Setup Wizard to guide you quickly through the installation process. Insert the D-Link DHP-347AV CD into
your CD-ROM drive. If the CD Autorun function does not automatically start on your computer, click Start > Run. In the Run command box type
“D:\autorun.exe”, where D: represents the drive letter of your CD-ROM. If it does start, proceed to the next screen.
Click on Install to begin.
D-Link DHP-347AV User Manual
12
Section 3 - Configuration
Configuration
After you have completed the D-Link PowerLine AV Utility installation wizard, double-click the D-Link PowerLine AV Utility icon on your desktop to
start the configuration of the DHP-347AV.
Double-click the D-Link PowerLine AV Utility icon
The D-Link PowerLine AV Utility provides you the option of setting your own PowerLine network and the network information for the connected
PowerLine devices.
D-Link DHP-347AV User Manual
13
Section 3 - Configuration
Device Name: Shows the name of the devices that have been discovered.
The device’s name is initially set by the utility itself.
Location: Shows if the device is local or remote.
Quality: Shows the network connection quality of the connected
device.
•Three squares - Suitable for HD video stream connection.
•Two squares - Suitable for SD video stream connection.
•One square - Suitable for data and Internet activity
connection.
Link Rate: Shows the link rate of the connected to the PowerLine device.
MAC Address: Shows the MAC address of the connected PowerLine device.
Firmware Shows the firmware version of the connected PowerLine
Version: device.
D-Link DHP-347AV User Manual
14
Section 3 - Configuration
Security
Understanding the Encryption Key setting:
The PowerLine devices on the same network must use an identical encryption key. The default encryption key for each PowerLine device is
HomePlugAV. All devices with a default encryption key can communicate with each other. It is recommended to create a private encryption key for
network security purpose. The private encryption key allows you to protect your network from unauthorized access via the PowerLine network.
Setting your private Encryption Key
1. Enter the device’s password before changing the encryption key:
• Local Device: You do not need to enter the device’s password before
changing the encryption key.
• Remote Device: You must enter the device’s password before changing
the encryption key.
Note: Each device has a unique device password on the device label.
2. Select the remote device and then enter the device’s password into the
Set Device Password window. Then click OK.
3. Select the PowerLine devices that you would like to apply the encryption
key setting. Then, type your private encryption key into the Encryption
Key Setting field and click Set Selected Devices. The utility will show a
message once the setting has been completed.
D-Link DHP-347AV User Manual
15
Section 3 - Configuration
Adding a Device to your PowerLine Network
If you use the default encryption key within the existing PowerLine Network and the new device retains the default encryption key, you can just
plug the new device into a power outlet. Then all the devices will be able to communicate with each other.
If the encryption key within the existing PowerLine network has been customized, you have two ways to add the new device to your PowerLine
Network.
1. You can use the PowerLine AV Utility to apply the customized encryption key in your record to the new device. Then all devices can communicate
with each other by using the customized encryption key.
2. You can use PowerLine AV Utility to set all devices within the existing PowerLine Network and the new device back to the first default encryption
key. Then follow the 1 to 4 steps of “Setting your private Encryption Key”. Your PowerLine network will be securely configured with a customized
encryption key and all devices will be able to communicate with each other after your setting.
D-Link DHP-347AV User Manual
16
Section 3 - Configuration
Troubleshooting
• PowerLine AV utility does not start correctly:
Reinstall the utility.
• PowerLine AV utility does not detect the PowerLine AV 4-Port Switch and PowerLine AV Network Adapter :
Please make sure your PowerLine AV 4-Port Switch and your PowerLine AV Network Adapter are correctly plugged and connected to the computer
or network device.
• I can’t configure any parameters on the PowerLine AV 4-Port Switch and the PowerLine Network Adapter. An error is shown when I try
to configure it:
Please make sure you have not unplugged the PowerLine AV 4-Port Switch and the PowerLine Network Adapter while configuring it.
• I changed the connection cable to another Network adapter and now the utility does not work correctly:
Please restart the utility each time you disconnect the connection cable.
• I’m having a lot of problems configuring my network:
If you are having problems configuring your network with two or more PowerLine devices, please reset all of the PowerLine devices and start
configuring the adapters again.
D-Link DHP-347AV User Manual
17
Appendix C - Technical Specifications
DHP-346AV Technical Specifications
Network Ports
• Four 10/100 Ethernet ports
Encryption
• 128 bit AES
EMC
• FCC Part 15 Class B
• CE Class B
• C-Tick
Operation Temperature
• 0°C ~ 40°C
AC Input
• 100 ~ 240VAC, 50/60Hz
Safety
• UL, CE LVD
Storage Temperature
• -10°C ~ 70°C
Humidity
• Operation: 10% ~ 90% RH
• Storage: 5% ~ 95% RH
Power Consumption Compliance
• EuP (Energy Using Product Directive)
• CoC (Code of Conduct on Energy Consumption of Broadband Equipment)
D-Link DHP-347AV User Manual
18
Appendix C - Technical Specifications
DHP-306AV Technical Specifications
Network Ports
• One 10/100 Ethernet port
Encryption
• 128 bit AES
EMC
• FCC Part 15 Class B
• CE Class B
• C-Tick
Operation Temperature
• 0°C ~ 40°C
AC Input
• 100 ~ 240VAC, 50/60Hz
Safety
• UL, CE LVD
Storage Temperature
• -10°C ~ 70°C
Humidity
• Operation: 10% ~ 90% RH
• Storage: 5% ~ 95% RH
Power Consumption Compliance
• EuP (Energy Using Product Directive)
• CoC (Code of Conduct on Energy Consumption of Broadband Equipment)
D-Link DHP-347AV User Manual
19