1
Dell Precision™ Workstation 530
Setup and Quick
Reference Guide
w w w. d e l l . c o m | s u p p o r t . d e l l . c o m
Notes, Notices, and Cautions
NOTE: A NOTE indicates important information that helps you make better
use of your computer.
NOTICE: A NOTICE indicates either potential damage to hardware or loss of
data and tells you how to avoid the problem.
CAUTION: A CAUTION indicates a potential for property damage,
personal injury, or death.
____________________
Information in this document is subject to change without notice.
© 2002 Dell Computer Corporation. All rights reserved.
Reproduction in any manner whatsoever without the written permission of Dell Computer
Corporation is strictly forbidden.
Trademarks used in this text: Dell, the DELL logo, and Dell Precision are trademarks of Dell
Computer Corporation; Microsoft and Windows are registered trademarks of Microsoft Corporation.
Other trademarks and trade names may be used in this document to refer to either the entities claiming
the marks and names or their products. Dell Computer Corporation disclaims any proprietary interest
in trademarks and trade names other than its own.
December 2002
P/N 10JEJ Rev. A03
Contents
Finding Information and Assistance . . . . . . . . . . . . . . . . . . . . . . . 5
Using the Dell Precision™ ResourceCD . . . . . . . . . . . . . . . . . . . . . 9
Setting Up Your Computer . . . . . . . . . . . . . . . . . . . . . . . . . . . . 10
Dual Monitors . . . . . . . . . . . . . . . . . . . . . . . . . . . . . . . . . . . . . . 17
Frequently Asked Questions . . . . . . . . . . . . . . . . . . . . . . . . . . . 18
Safety First—For You and Your Computer . . . . . . . . . . . . . . . . . . 20
Opening the Computer Cover . . . . . . . . . . . . . . . . . . . . . . . . . . 21
Opening the Cover . . . . . . . . . . . . . . . . . . . . . . . . . . . . . . . . . . . 21
Inside Your Computer . . . . . . . . . . . . . . . . . . . . . . . . . . . . . . . . 23
Removing and Installing Parts . . . . . . . . . . . . . . . . . . . . . . . . . . 24
Adding Memory . . . . . . . . . . . . . . . . . . . . . . . . . . . . . . . . . . . . . 24
Adding a Hard Drive or Externally Accessible Drive . . . . . . . . . . 24
Adding a PCI Expansion Card . . . . . . . . . . . . . . . . . . . . . . . . . . 24
Upgrading the Video Card . . . . . . . . . . . . . . . . . . . . . . . . . . . . . 25
Upgrading Your Processor(s) . . . . . . . . . . . . . . . . . . . . . . . . . . . 25
Solving Problems . . . . . . . . . . . . . . . . . . . . . . . . . . . . . . . . . . . 25
When to Use the Dell Diagnostics . . . . . . . . . . . . . . . . . . . . . . . . 26
Starting the Dell Diagnostics . . . . . . . . . . . . . . . . . . . . . . . . . . . 27
Messages and Codes . . . . . . . . . . . . . . . . . . . . . . . . . . . . . . . . . . 30
Contents
3
4
Contents
Finding Information and Assistance
The following table lists the resources that Dell provides as support tools.
Additional resources may be shipped with your computer.
What Are You Looking For?
Find it Here
•
•
•
•
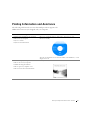
Drivers and Utilities CD (also known as the
ResourceCD)
A diagnostic program for my computer
Drivers for my computer
My User’s Guide
My device documentation
You can use this CD to access documentation, reinstall drivers, or run
diagnostics tools.
•
•
•
•
•
How to set up my computer
How to care for my computer
Troubleshooting information
How to open my computer cover
How to locate other documentation
Setup and Quick Reference Guide
Setup and Quick Reference Guide
5
w w w. d e l l . c o m | s u p p o r t . d e l l . c o m
What Are You Looking For?
Find it Here
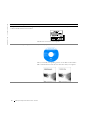
• Express Service Code and Service Tag
• Microsoft® Windows® License Label
Express Service Code and Product Key
The labels are located on your computer.
• How to reinstall my operating system
Operating System CD and Installation Guide
After you reinstall your operating system, use the Drivers and Utilities
CD to reinstall drivers for the devices that came with your computer.
6
Setup and Quick Reference Guid e
What Are You Looking For?
Find it Here
•
•
•
•
User’s Guide Icon (Microsoft Windows 2000)
How to remove and replace parts
Technical specifications
How to configure system settings
How to troubleshoot and solve problems
Double-click the User’s Guide icon on your desktop.
Windows XP Help and Support Center
1 Click the Start button and click Help and Support.
2 Click User’s Guide.
• Location of connectors on the system board S y s t e m I n f o r m a t i o n L a b e l
or
The label is located on the inside of your computer cover.
• Latest drivers for my computer
D e l l S u p p o r t W e b s i t e — support.dell.com
• Answers to technical service and support
The Dell Support website provides several online tools, including:
questions
• Knowledge Base — Hints, tips, and online courses
• Online discussions with other users and
• Customer Forum — Online discussion with other Dell customers
technical support
• Upgrades — Upgrade information for components, such as memory,
• Documentation for my computer including
the hard drive, and the operating system
the Service Manual
• Customer Care — Contact information, order status, warranty, and
repair information
• Downloads — Drivers, patches, and software updates
• Reference — Computer documentation, product specifications, and
white papers
Setup and Quick Reference Guide
7
w w w. d e l l . c o m | s u p p o r t . d e l l . c o m
What Are You Looking For?
Find it Here
•
•
•
•
•
•
Dell Premier Support Website —
premiersupport.dell.com
Service call status and support history
Top technical issues for my computer
Frequently asked questions
File downloads
Details on my computer’s configuration
Service contract for my computer
The Dell Premier Support website is customized for corporate,
government, and education customers. This website may not be
available in all regions.
• Warranty information
System Information Guide
• How to use Windows XP
• Documentation for my computer and
devices
Windows XP Help and Support Center
1 Click the Start button, and click Help and Support.
2 Type a word or phrase that describes your problem, and click the
arrow icon.
3 Click the topic that describes your problem.
4 Follow the instructions shown on the screen.
NOTE: For help using Windows 2000, click the Start button and click
Help.
8
Setup and Quick Reference Guid e
Using the Dell Precision™ ResourceCD
To use the Dell Precision ResourceCD from within the
Microsoft® Windows® operating system:
1
Insert the Dell Precision ResourceCD into the CD drive.
If you are using the Dell Precision ResourceCD for the first time on this
computer, the ResourceCD Installation window opens to inform you
that the ResourceCD is about to begin installation.
2
Click OK to continue.
To complete the installation, respond to the prompts offered by the
installation program.
3
Click Next at the Welcome Dell System Owner screen.
4
Select the appropriate System Model, Operating System,
Device Type, and Topic.
To access the Dell Precision ResourceCD Guide, click User’s Guides in the
Topic pull-down menu and click Dell Precision ResourceCD.
NOTE: To access device drivers and user documentation, you must use the
ResourceCD from within Windows. To use the Dell Diagnostics, you must insert
the ResourceCD in the CD drive and restart the computer. For information
about running the Dell Diagnostics, see "When to Use the Dell Diagnostics" on
page 26.
Setup and Quick Reference Guide
9
w w w. d e l l . c o m | s u p p o r t . d e l l . c o m
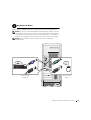
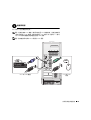
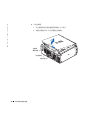
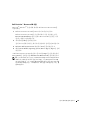
Setting Up Your Computer
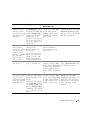
The numbers in the following figure correspond to the tasks described in
the setup steps.
NOTE: You must complete all steps to properly set up your computer.
C o m p u t e r Fe a t u r e s
6
diagnostic
lights
1
4
2
3
7
5
Back View
10
Setup and Quick Reference Guid e
Front View
(doors open)
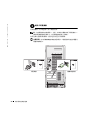
1
Keyboard and Mouse
Connect the keyboard and mouse as shown in the following illustration.
NOTE: If you have a Personal System/2 (PS/2) keyboard, connect it into the
PS/2 keyboard connector. If you have a Universal Serial Bus (USB) keyboard,
connect it to a USB connector as shown in the illustration. Do not connect a
USB mouse or keyboard to the USB connectors on the front of the computer.
NOTE: Do not attempt to operate a PS/2 mouse and a USB mouse
simultaneously.
PS/2 or USB
keyboard
PS/2 or USB
mouse
Setup and Quick Reference Guide
11
w w w. d e l l . c o m | s u p p o r t . d e l l . c o m
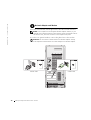
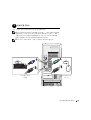
2
Network Adapter and Modem
Insert the network cable, not the phone line, into the network connector.
NOTE: Your computer has an integrated network adapter. However, if your
computer has a network expansion card installed, connect the network cable to
the network card, not to the connector on the computer back panel.
If you have an optional modem, connect the phone line to the modem.
NOTICE: Do not connect a modem cable to the network adapter. Voltage
from telephone communications can cause damage to the network adapter.
network cable
12
Setup and Quick Reference Guid e
modem cable
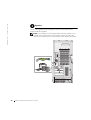
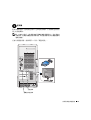
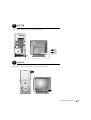
3
Monitor
Align and gently insert the monitor cable to avoid bending connector pins.
Then tighten the thumbscrews on the cable connector.
NOTE: If you are only using one monitor with an optional dual-monitor card,
you must use the primary port. To enable dual-monitor support, both monitors
must be attached when the computer starts.
For setting up dual monitors, see "Dual Monitors" on page 17.
primary port
optional secondary port
Setup and Quick Reference Guide
13
w w w. d e l l . c o m | s u p p o r t . d e l l . c o m
4
Speakers
Connect the speakers to the computer as shown on the instructions
supplied with the speakers.
NOTE: Your computer has an integrated audio controller. However, if your
computer has an audio expansion card installed, connect external audio
devices to the sound card, not to the connectors on the computer back panel.
14
Setup and Quick Reference Guid e
5
Power Connection
Plug in the computer and the monitor to their electrical outlets.
6
Power On
Press the power button on your computer and monitor to turn them on.
Setup and Quick Reference Guide
15
w w w. d e l l . c o m | s u p p o r t . d e l l . c o m
7
Setting Up the Operating System
When you start the computer for the first time, a few system start-up
messages may appear, including one that shows your Service Tag and
Express Service Code.
Your computer is preconfigured with the operating system already installed.
Before turning on your computer for the first time, you must complete all
the previous setup steps, connecting all devices for your computer.
The initial setup of the operating system is automatic and may take several
minutes. Additional setup time may be required, depending on your
system’s internal and external devices.
Follow the operating system prompts to complete setup. You may be
prompted to enter the Windows Product Key (also called the Product ID or
COA) to complete the registration. You can find this above the service tag
on your computer.
NOTE: For more information on setting up the operating system, see the
operating system installation guide.
For future reference, write the number below:
Product Key (ID or COA): ________________________________________
For more information, access your computer documentation from the
User’s Guides icon on the desktop or from the Dell Precision ResourceCD.
16
Setup and Quick Reference Guid e
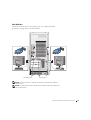
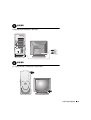
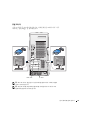
Dual Monitors
Attach the main monitor to the primary port. See "Frequently Asked
Questions" on page 18 for more information.
secondary port
primary port
NOTE: A second monitor is optional and requires a multimonitor graphics
adapter card.
NOTE: To enable dual-monitor support, both monitors must be attached when
the computer starts.
Setup and Quick Reference Guide
17
w w w. d e l l . c o m | s u p p o r t . d e l l . c o m
Frequently Asked Questions
Problem?
Try...
Or try the Dell Precision
ResourceCD
Or try the Dell Support Site
How do I use my Dell See "Using the Dell
Go to the main menu on the
Precision ResourceCD? Precision™ ResourceCD" on Dell Precision ResourceCD.
page 9 for more information. Click User’s Guides in the
Topic pull-down menu and
click Dell Precision
ResourceCD Guide.
Where can I find a
detailed User’s Guide
for my computer?
Depending on your
operating system, doubleclick the User’s Guides icon
on your desktop or click the
Start button and select Help
and Support.
Go to the main menu on the
Dell Precision ResourceCD.
Click User’s Guides in the
Topic pull-down menu and
click the user’s guide
appropriate for your computer.
Go to support.dell.com. At the
Welcome page, click
Dell Documents. Make selections
appropriate for your computer to
access your User’s Guide.
Go to the main menu on the
Dell Precision ResourceCD.
Click User’s Guides in the
Topic pull-down menu, click
the user’s guide appropriate
for your computer, and then
see "Limited Warranty and
Return Policy."
Go to support.dell.com. At the
Welcome page, click
Dell Documents. Make selections
appropriate for your computer to
access your User’s Guide. See
"Limited Warranty and Return
Policy" in the User’s Guide.
Documentation such as the
User’s Guide is available on
your hard drive.
Where can I find a
Depending on your
warranty statement for operating system, doublemy computer?
click the User’s Guides icon
on your desktop or click the
Start button and select Help
and Support. See the
"Limited Warranty and
Return Policy" section in
your User’s Guide.
Where can I find the
Product Key (also
called the Product ID
or Certificate of
Authenticity [COA])
for the operating
system registration?
See page 16 of this
document.
How do I find
technical
specifications for my
computer?
Depending on your
operating system, doubleclick the User’s Guides icon
on your desktop or click the
Start button and select Help
and Support. See the
"Technical Specifications"
section in your User’s Guide.
18
Setup and Quick Reference Guid e
Go to support.dell.com. At the
Welcome page, click Ask Dudley!
and search using the keywords
Product Key .
Go to the main menu on the
Dell Precision ResourceCD.
Click User’s Guides in the
Topic pull-down menu, click
the user’s guide appropriate
for your computer, and then
see "Technical Specifications."
Go to support.dell.com. At the
Welcome page, click
Dell Documents. Make selections
appropriate for your computer to
access your User’s Guide. See
"Technical Specifications" in the
User’s Guide.
Problem?
Try...
Or try the Dell Precision
ResourceCD
Or try the Dell Support Site
I have a computer with
a dual-monitorcapable graphics card.
How do I set up my
second monitor?
Depending on your
operating system, doubleclick the User’s Guides icon
on your desktop or click the
Start button, and then select
Help and Support and
search for dual monitor. A
step-by-step procedure for
setting up dual monitors is
located in the video
controller User’s Guide.
Go to the main menu on the
Dell Precision ResourceCD.
Click User’s Guides in the
Topic pull-down menu and
click the user’s guide
appropriate for your computer.
Go to http://support.dell.com.
At the Welcome page, click
Dell Knowledge Base and search
using the keywords dual
monitor.
If I need a driver for
my graphics card,
network adapter,
sound card, small
computer system
interface (SCSI)
software, or some
other device, where do
I locate it?
See "Using the Dell
See the Dell Precision
Precision™ ResourceCD" on WorkStations ResourceCD
page 9 for more information. Guide for more information.
How do I open the
computer?
See "Opening the Computer Go to the main menu on the
Cover" on page 21.
Dell Precision ResourceCD.
Click User’s Guides in the
Topic pull-down menu, click
the user’s guide appropriate
for your computer, and then
see "Removing and Installing
Parts."
Go to support.dell.com for help
with general usage, installation,
and troubleshooting instructions.
The monitor is blank
and the power light is
blinking green. How
do I resume operations
with my computer?
The computer is in a
reduced power, or "sleep,"
state. Use one of the
appropriate methods to
"wake up" the computer.
Go to support.dell.com. At the
Welcome page, click
Dell Documents. Make selections
appropriate for your computer to
access your User’s Guide. See
"Power Management" in the
User’s Guide.
You may also have a CD
specifically for the device. If
so, search the contents of the
CD for documentation and
appropriate driver(s).
Depending on your
operating system, doubleclick the User’s Guides icon
on your desktop or click the
Start button and select Help
and Support. See "Power
Management" in your
User’s Guide.
Go to the main menu on the
Dell Precision ResourceCD.
Click User’s Guides in the
Topic pull-down menu, click
the user’s guide appropriate
for your computer, and then
see "Power Management."
Setup and Quick Reference Guide
19
w w w. d e l l . c o m | s u p p o r t . d e l l . c o m
Problem?
Try...
Or try the Dell Precision
ResourceCD
Or try the Dell Support Site
How do I install
See the interior service label
additional hardware on described in "Inside Your
my computer?
Computer" on page 23. Also,
see "Removing and Installing
Parts" on page 24.
Go to the main menu on the
Dell Precision ResourceCD.
Click User’s Guides in the
Topic pull-down menu, click
the user’s guide appropriate
for your computer, and then
see "Removing and Installing
Parts."
Go to support.dell.com. At the
Welcome page, click
Dell Documents. Make selections
appropriate for your computer to
access your User’s Guide. See
"Removing and Installing Parts" in
the User’s Guide.
I installed 4 GB of
system memory. Why
does some of my
memory appear to be
missing?
Depending on your
operating system, doubleclick the User’s Guides icon
on your desktop or click the
Start button and select Help
and Support. See "System
Memory" under the
"Removing and Installing
Parts" section in your
User’s Guide.
Go to the main menu on the
Dell Precision ResourceCD.
Click User’s Guides in the
Topic pull-down menu, click
the user’s guide appropriate
for your computer, and then
see "System Memory."
Go to support.dell.com. At the
Welcome page, click
Dell Documents. Make selections
appropriate for your computer to
access your User’s Guide. See
"System Memory" in the User’s
Guide.
How do I reinstall my
operating system?
See the operating system
installation guide for
information on reinstalling
your operating system.
Safety First—For You and Your
Computer
While working inside your computer, do not attempt to service the
computer except as explained in this guide and elsewhere in
Dell documentation. Always follow the instructions closely.
Working inside your computer is safe—if you observe the following
precautions.
CAUTION: FOR YOUR PERSONAL SAFETY AND PROTECTION OF
THE EQUIPMENT
20
Setup and Quick Reference Guid e
Before you start to work on the computer, perform the following steps in the
sequence indicated:
1
Turn off the computer and all devices.
2
Touch an unpainted metal surface on the computer, such as the metal
around the card-slot openings at the back of your computer, before
touching anything inside your computer.
3
Disconnect the computer and devices from their electrical outlets.
Doing so reduces the potential for personal injury or shock. Also
disconnect any telephone or telecommunication lines from the
computer.
NOTE: Before disconnecting a device from the computer or removing a
component from the system board, verify that the standby power light on the
system board has turned off. See the interior service label located on the inside
of the cover to locate the standby power light.
While you work, periodically touch an unpainted metal surface on the
computer to dissipate any static electricity that might harm internal
components.
In addition, Dell recommends that you periodically review the safety
instructions in the documentation that came with your computer.
Opening the Computer Cover
You may need to open the computer cover if you are going to remove or
install a part, reset a forgotten password, or diagnose a computer problem.
CAUTION: Before you perform this procedure, see " Safety First—
For You and Your Computer" on page 20.
Opening the Cover
1
Turn off the computer and devices, disconnect them from their
electrical outlets, and wait 10 to 20 seconds.
2
If you have installed a padlock through the padlock ring on the back
panel, remove the padlock (see the following figure).
3
Lay the computer on its right side.
Setup and Quick Reference Guide
21
w w w. d e l l . c o m | s u p p o r t . d e l l . c o m
4
Open the computer cover:
a
Slide the cover release latch toward the top of the computer
(see the following figure).
b
Raise the back of the cover, and pivot it toward the front of the
computer.
cover
release latch
security cable slot
padlock ring
22
Setup and Quick Reference Guid e
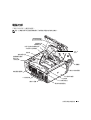
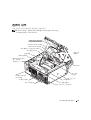
Inside Your Computer
The following figure shows the computer with the cover open.
NOTE: A service label affixed to the inside of your computer cover provides
information about working inside your computer.
interior service label
diskette-drive bracket
hard-drive bracket
externally accessible-drive bracket
chassis intrusion switch
AGP card
brace
front panel
cable retainer
memory riser board
retention bracket
(if needed)
speaker
expansion-card
cooling fan
microprocessor
airflow shroud
I/O panel connectors
expansion-card slots
power supply
system board
AC power receptacle
power supply airflow vents
Setup and Quick Reference Guide
23
w w w. d e l l . c o m | s u p p o r t . d e l l . c o m
Removing and Installing Parts
Instructions for removing and installing various parts are located in the
User’s Guide on your hard drive. To access this document:
1
Double-click the User’s Guides icon on your desktop.
NOTE: The User’s Guide is also available as a portable document format
(PDF) file at support.dell.com.
2
Click System Information.
3
Click System Documentation.
4
Click Dell Precision WorkStation 530 System User’s Guide.
5
Click Removing and Installing Parts.
6
Select Print from the File menu to print the procedure before you
begin working.
NOTE: To print the entire User’s Guide with the Internet Explorer browser,
select Print all linked documents in the Print window.
Adding Memory
Perform the preceding steps to access the User’s Guide, and then see
"System Memory."
Adding a Hard Drive or Externally Accessible Drive
Your computer has one or more enhanced integrated drive electronics
(EIDE) drives or SCSI drives. To determine which kind of drives you have,
see the order form that came with your computer.
Perform the preceding steps to access the User’s Guide, and then see
"Disk Drives and Media."
Adding a PCI Expansion Card
To add a Peripheral Component Interconnect (PCI) expansion card, such as
a modem, to your computer, perform the preceding steps to access the
User’s Guide, and then see "Expansion Cards."
24
Setup and Quick Reference Guid e
Upgrading the Video Card
To upgrade your accelerated graphics port (AGP) card, see the
documentation for the video card and any other special instructions. The
documentation for your video card is included with your video card upgrade
kit. You can also find online documentation about your video card at
support.dell.com. Go to the page for your computer and click
Dell Documents, then click Video Adapter. Pick your video card from the
list displayed.
For instructions on installing the card in your computer, perform the
preceding steps to access your User’s Guide, and see "Expansion Cards."
Upgrading Your Processor(s)
Perform the preceding steps to access the User’s Guide, and then see
"Microprocessor."
Solving Problems
NOTE: If computer problems occur that require help from Dell support, write
down your Express Service Code and Service Tag below, and then contact Dell
from the same location as your computer.
Express Service Code: ___________________________
Service Tag:
___________________________
Setup and Quick Reference Guide
25
w w w. d e l l . c o m | s u p p o r t . d e l l . c o m
Dell provides tools to help you solve problems. The tools listed in this
section can help you solve a problem when no other online tools are
available. Your computer includes the following tools:
D E L L D I A G N O S T I C S — The Dell Precision ResourceCD contains Dell
Diagnostics that tests various components on your computer and helps identify
the cause of computer problems. For more information, see "When to Use the
Dell Diagnostics" on page 26.
S Y S T E M L I G H T S — Located on the front of the computer, these lights can
indicate a computer problem. For more information, see "System Lights" on page
30.
D I A G N O S T I C L I G H T S — Located on the front of the computer, these lights can
indicate a computer problem. For more information, see "Diagnostic Lights" on
page 32.
S Y S T E M M E S S A G E S — The computer reports these messages to warn you of
current or possible failure. For more information, see "System Messages" on page
37.
B E E P C O D E S — A series of audible beep codes emitted by your computer can
help identify a problem. For more information, see "Beep Codes" on page 37.
When to Use the Dell Diagnostics
If you experience a problem with your computer, perform the checks in
"Finding Solutions" in your User’s Guide and run the Dell Diagnostics
before you contact Dell for technical assistance. Running the Dell
Diagnostics may help you resolve the problem without contacting Dell. If
you do contact Dell, the test results can provide important information for
Dell's service and support personnel.
The Dell Diagnostics allows you to:
26
•
Perform express, extended, or custom tests on one or all devices
•
Select tests based on a symptom of the problem you are having
•
Choose how many times a test is run
•
Display test results
Setup and Quick Reference Guid e
•
Suspend testing if an error is detected
•
Access online help information that describes the tests and devices
•
Receive status messages that tell you whether tests completed
successfully
•
Receive error messages if problems are detected
Starting the Dell Diagnostics
It is recommended that you print these procedures before you begin.
NOTICE: Only use the Dell Diagnostics to test your Dell™ computer. Using
this program with other computers can result in error messages.
Enter system setup, review your computer’s configuration information, and
ensure that the device you want to test displays in system setup and is
active.
Start the Dell Diagnostics from either your hard drive or from the Drivers
and Utilities CD (also known as the ResourceCD).
Starting the Dell Diagnostics From Your Hard Drive
1
Shut down and restart the computer.
2
When the DELL logo appears, press <F12> immediately.
If you wait too long and the Windows logo appears, continue to wait
until you see the Windows desktop. Then shut down your computer
through the Start menu and try again.
3
When the boot device list appears, highlight Boot to Utility Partition
and press <Enter>.
4
When the Dell Diagnostics Main Menu appears, select the test you
want to run.
NOTE: If you receive a
message stating that no
Diagnostics utility
partition has been found,
follow the instructions to
run the Dell Diagnostics
from your Drivers and
Utilities CD.
Starting the Dell Diagnostics From the Drivers and Utilities CD
1
Insert the Drivers and Utilities CD into the CD drive.
2
Shut down and restart the computer.
When the DELL logo appears, press <F12> immediately.
Setup and Quick Reference Guide
27
w w w. d e l l . c o m | s u p p o r t . d e l l . c o m
If you wait too long and the Windows logo appears, continue to wait
until you see the Windows desktop. Then shut down your computer
through the Start menu and try again.
NOTE: This feature
changes the boot sequence
for one time only. On the
next start-up, the
computer boots according
to the devices specified in
system setup.
3
When the boot device list appears, highlight IDE CD-ROM Device
and press <Enter>.
4
Select the IDE CD-ROM Device option from the CD boot menu.
5
Select the Boot from CD-ROM option from the menu that appears.
6
Type 1 to start the ResourceCD menu.
7
Type 2 to start the Dell Diagnostics.
8
Select Run the 32 Bit Dell Diagnostics from the numbered list. If
multiple versions are listed, select the version appropriate for your
platform.
9
When the Dell Diagnostics Main Menu appears, select the test you
want to run.
Dell Diagnostics Main Menu
1
NOTE: The Service Tag
for your computer is
located at the top of each
test screen.
28
After the Dell Diagnostics loads and the Main Menu screen appears,
click the button for the option you want.
Option
Function
Express
Test
Performs a quick test of devices. This test typically takes 10
to 20 minutes and requires no interaction on your part.
Run Express Test first to increase the possibility of tracing
the problem quickly.
Extended
Test
Performs a thorough check of devices. This test typically
takes an hour or more and requires you to answer questions
periodically.
Custom
Test
Tests a specific device. You can customize the tests you
want to run.
Symptom
Tree
Lists the most common symptoms encountered and allows
you to select a test based on the symptom of the problem
you are having.
Setup and Quick Reference Guid e
2
If a problem is encountered during a test, a message displaying the
error code and a description of the problem appear. Write down the
error code and problem description and follow the instructions on the
screen.
If you cannot resolve the error condition, contact Dell.
3
If you run a test from the Custom Test or Symptom Tree option, click
the applicable tab described in the following table for more
information.
Tab
Function
Results
Displays the results of the test and any error conditions
encountered.
Errors
Displays error conditions encountered, error codes, and
problem description.
Help
Describes the test and may indicate requirements for
running the test.
Configuration
Displays your hardware configuration for the selected
device.
The Dell Diagnostics obtains your configuration
information for all devices from system setup, memory,
and various internal tests and displays it in the device
list in the left pane of the screen. The device list may
not display the names of all the components installed on
your computer or all devices attached to your computer.
Parameters
Allows you to customize the test by changing the test
settings.
4
When the tests are completed, if you are running the Dell Diagnostics
from the Drivers and Utilities CD, remove the CD.
5
Close the test screen to return to the Main Menu screen. To exit the
Dell Diagnostics and restart the computer, close the Main Menu
screen.
Setup and Quick Reference Guide
29
w w w. d e l l . c o m | s u p p o r t . d e l l . c o m
Changing the Boot Sequence
NOTE: For more information, see your User’s Guide.
1
Turn on your computer (if your computer is already on, restart it).
2
When F2 = Setup appears in the upper-right corner of the screen,
press <F2>.
The System Setup menu appears.
NOTE: If you wait too long and your operating system begins to load into
memory, let the computer complete the load operation, then restart the
computer and try again.
3
Use the arrow keys to highlight the Boot Sequence menu option and
press <Enter> to access the pop-up menu.
NOTE: Write down your current boot sequence in case you want to
restore it after running the Dell Diagnostics.
4
Use the arrow keys to highlight CD Device in the Boot First Device:
menu option and press <+> to move it to the top of the list.
5
Press <Alt><b> to restart your computer.
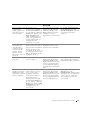
Messages and Codes
Your application programs, operating system, and computer can identify
problems and alert you to them. When a problem occurs, a message may
appear on your monitor screen, a beep code may sound, or a light code may
be generated. The following subsections present information about
messages, beep codes, and light codes.
System Lights
Your computer has a number of lights that can help you analyze and solve
problems. To locate these lights, see "Computer Features" on page 10.
The following table lists the codes for the system lights, gives probable
causes, and suggests corrective actions.
NOTE: For many system light codes, it is helpful to check the diagnostic lights
to see if the specific problem is identified. See "Diagnostic Lights" on page 32.
30
Setup and Quick Reference Guid e
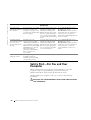
System Light Codes
Power Light
Hard Drive Light Cause
Corrective Action
Solid green
N/A
Power is on, and the computer is
operating normally.
No corrective action is required.
Blinking green
Blank
The computer is in the suspended
state (Windows 2000 and
Windows XP).
Use one of the appropriate methods
to "wake up" the computer. See
"Power Management" in the
User’s Guide.
Blinks green several N/A
times and then
turns off
A configuration error exists.
Check the diagnostic lights to see if
the specific problem is identified.
Solid yellow
The Dell Diagnostics is running a
If the Dell Diagnostics is running,
test, or a device on the system board allow the testing to complete.
may be faulty or incorrectly installed. Check the diagnostic lights to see if
the specific problem is identified.
Also, see "System Board Problems" in
the User’s Guide.
N/A
If the computer does not boot,
contact Dell for technical assistance.
Blinking yellow
Blank
A power supply or system board
failure exists.
Check the diagnostic lights to see if
the specific problem is identified.
Also, see "Power Problems" and
"System Board Problems" in the
User’s Guide.
Blinking yellow
Solid green
A system board failure exists.
Check the diagnostic lights to see if
the specific problem is identified.
Also, see "System Board Problems" in
the User’s Guide.
Solid green and a
beep code during
POST
N/A
A problem was detected while the
BIOS was executing.
See "Beep Codes" on page 37 for
instructions on diagnosing the beep
code. Also, check the diagnostic lights
to see if the specific problem is
identified.
Solid green power
light and no beep
code and no video
during POST
N/A
The monitor or the graphics card may Check the diagnostic lights to see if
be faulty or incorrectly installed.
the specific problem is identified.
Also, see "Video Problems" in the
User’s Guide.
Solid green power
light and no beep
code but the
computer locks up
during POST
N/A
An integrated system board device
may be faulty.
Check the diagnostic lights to see if
the specific problem is identified. If
the problem is not identified, contact
Dell for technical assistance.
Setup and Quick Reference Guide
31
w w w. d e l l . c o m | s u p p o r t . d e l l . c o m
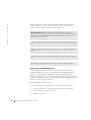
Diagnostic Lights
When you turn on your computer, it performs a series of self-diagnostic
tests. A successful power-on self test (POST) ends with a single beep that
signifies the start of normal operation. If the computer fails to complete the
POST, a series of lights located on the computer can help you understand
which test failed or why the computer stopped responding. These lights
communicate problems encountered before and during POST only, not
during normal operation. To locate the diagnostic lights, see "Computer
Features" on page 10.
The following table lists the codes for the diagnostic lights, gives probable
causes, and suggests corrective actions. The lights are labeled to help you
match the pattern on your computer with one shown in the tables.
32
Setup and Quick Reference Guid e
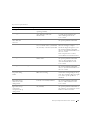
Diagnostic Light Codes Before POST
The following table lists the codes for the diagnostic lights that occur before
the computer begins the POST.
Diagnostic Light Codes Before POST
Light Pattern
A B C D
Cause
Action
No electrical power is supplied to the Connect the computer to its electrical outlet. Ensure that
computer.
the front-panel power light is on. If the power light is off,
ensure that the computer is connected to a working
electrical outlet, and then press the power button.
If the problem is still not resolved, contact Dell for
technical assistance.
Normal off condition. Computer is
connected to its electrical outlet.
A B C D
Ensure that the front-panel power light is on. If the power
light is off, ensure that the computer is connected to a
working electrical outlet, and then press the power button.
When the computer is operating normally, it can be
automatically or remotely started as long as it remains
connected to an electrical outlet. For more information, see
"Power Management" in the User’s Guide.
If the problem is still not resolved, contact Dell for
technical assistance.
Computer is in a reduced power or
"sleep" state.
Use one of the appropriate methods to "wake up" the
computer. See "Power Management" in the User’s Guide.
If the problem is still not resolved, contact Dell for
technical assistance.
A B C D
BIOS is not executing.
See "Reset Corrupted BIOS Settings" in the User’s Guide.
Possible power supply or power cord
failure.
See "Power Problems" in the User’s Guide.
Possible system board failure.
Contact Dell for technical assistance.
A B C D
A B C D
A B C D
= yellow
= green
= off
Setup and Quick Reference Guide
33
w w w. d e l l . c o m | s u p p o r t . d e l l . c o m
D i a g n o s t i c L i g h t C o d e s B e f o r e P O S T (continued)
Light Pattern
Cause
Action
Microprocessor and/or voltage
regulator module (VRM) mismatch.
See "Microprocessor Problems" in the User’s Guide.
Possible VRM 0 failure.
See "Microprocessor Problems" in the User’s Guide.
Possible VRM 1 failure.
See "Microprocessor Problems" in the User’s Guide.
Possible VRM 0 and VRM 1 failure.
See "Microprocessor Problems" in the User’s Guide.
A B C D
A B C D
A B C D
A B C D
Possible memory riser board A failure. See "System Memory Problems" in the User’s Guide.
A B C D
Possible memory riser board B failure. See "System Memory Problems" in the User’s Guide.
A B C D
Possible memory riser board A and
riser board B failure.
A B C D
= yellow
= green
= off
34
Setup and Quick Reference Guid e
See "System Memory Problems" in the User’s Guide.
Diagnostic Light Codes During POST
The following table lists the codes for the diagnostic lights that occur while
the computer is performing the POST.
NOTE: If the computer is turned on and all four diagnostic lights are not on,
see "Diagnostic Light Codes Before POST" on page 33.
Diagnostic Light Codes During POST
Light Pattern
Cause
Action
Possible BIOS failure, and the computer is in
the recovery mode.
Run the BIOS Recovery utility, and restart the
computer to retest. See "BIOS Recovery Utility"
in the User’s Guide.
A B C D
If the problem is still not resolved, see "Reset
Corrupted BIOS Settings" in the User’s Guide.
Possible microprocessor failure.
See "Microprocessor Problems" in the
User’s Guide.
Possible memory failure.
See "System Memory Problems" in the
User’s Guide.
Possible expansion card failure or conflict.
See "Expansion-Card Problems" and "Hardware
Conflicts" in the User’s Guide.
Possible video card failure.
Reseat the video card, and restart the computer
to retest. For instructions on removing and
installing an expansion card, see "Removing an
Expansion Card" in the User’s Guide.
A B C D
A B C D
A B C D
A B C D
If the problem is not resolved, see "ExpansionCard Problems" in the User’s Guide.
If the problem is still not resolved, contact Dell
for technical assistance.
Possible diskette drive or hard-drive failure.
See "Diskette Drive Problems" and "Hard Drive
Problems" in the User’s Guide.
A B C D
= yellow
= green
= off
Setup and Quick Reference Guide
35
w w w. d e l l . c o m | s u p p o r t . d e l l . c o m
D i a g n o s t i c L i g h t C o d e s D u r i n g P O S T (continued)
Light Pattern
Cause
Action
Possible USB failure.
Disconnect all USB devices and cables, and
restart the computer to retest. Then reconnect
all USB devices and cables, and restart the
computer to retest.
A B C D
If the problem is still not resolved, contact Dell
for technical assistance.
Possible system board resource and/or hardware See "System Board Problems" and "Hardware
failure.
Conflicts" in the User’s Guide.
A B C D
Possible system board resource and/or hardware See "System Board Problems" and "Hardware
failure.
Conflicts" in the User’s Guide.
A B C D
Possible expansion card failure or conflict.
See "System Board Problems" and "Hardware
Conflicts" in the User’s Guide.
A B C D
Possible system board resource and/or hardware See "System Board Problems" and "Hardware
failure.
Conflicts" in the User’s Guide.
A B C D
Normal operating condition after POST.
A B C D
= yellow
= green
= off
36
Setup and Quick Reference Guid e
No action is necessary.
System Messages
If an error occurs during start-up, a message may be reported on the
monitor identifying the problem. If a system message is displayed, look it up
under "System Messages" in the User’s Guide for suggestions on resolving
any problems. The system messages are listed alphabetically.
NOTE: If the system message you received is not listed in the User’s Guide,
check the documentation for the application program that you were running at
the time the message appeared and/or the operating system documentation for
an explanation of the message and a recommended action.
Beep Codes
If an error occurs during start-up that cannot be reported on the monitor,
your computer may emit a beep code that identifies the problem. The beep
code is a pattern of sounds: for example, one beep, followed by a second
beep, and then a burst of three beeps (code 1-1-3) means that the computer
was unable to read the data in nonvolatile random-access memory
(NVRAM).
If a beep code is emitted, write it down and look it up under
"System Beep Codes" in the User’s Guide.
Setup and Quick Reference Guide
37
38
Setup and Quick Reference Guid e
w w w. d e l l . c o m | s u p p o r t . d e l l . c o m
Dell Precision™ 工作站 530
安裝和快速參考指南
w w w. d e l l . c o m | s u p p o r t . a p . d e l l . c o m
註、注意事項和注意
註:註表示可以幫助您更有效地使用您的電腦的重要資訊。
注意事項:注意事項表示可能會損壞硬體或導致資料遺失,並告訴您如何
避免發生此類問題。
注意:注意表示可能會導致財產損壞、人身受傷或生命危險。
____________________
本文件中的資訊如有變更,恕不另行通知。
著作權所有 © 2002 年 Dell Computer Corporation。所有權利均予保留。
未經 Dell Computer Corporation 的書面許可,不得以任何形式進行複製。
本文件中使用的商標:Dell、DELL 標誌和 Dell Precision 是 Dell Computer Corporation 的
商標;Microsoft 和 Windows 是 Microsoft Corporation 的註冊商標。
本文件中述及的其他商標和商業名稱可能指擁有相應商標和名稱的公司實體或其產品。
Dell Computer Corporation 對本公司之外的商標和產品名稱不擁有任何專利權。
2002 年 12 月
P/N 10JEJ Rev. A03
目錄
尋找資訊和援助 . . . . . . . . . . . . . . . . . . . . . . . . . . . . . . . . . . . . 43
使用 Dell Precision™ ResourceCD . . . . . . . . . . . . . . . . . . . . . . . . 47
安裝您的電腦 . . . . . . . . . . . . . . . . . . . . . . . . . . . . . . . . . . . . . . 48
雙監視器 . . . . . . . . . . . . . . . . . . . . . . . . . . . . . . . . . . . . . . . . . . 55
常見問題 . . . . . . . . . . . . . . . . . . . . . . . . . . . . . . . . . . . . . . . . . 56
安全第一 . . . . . . . . . . . . . . . . . . . . . . . . . . . . . . . . . . . . . . . . . 58
打開主機蓋 . . . . . . . . . . . . . . . . . . . . . . . . . . . . . . . . . . . . . . . 59
打開主機蓋 . . . . . . . . . . . . . . . . . . . . . . . . . . . . . . . . . . . . . . . . 59
電腦內部 . . . . . . . . . . . . . . . . . . . . . . . . . . . . . . . . . . . . . . . . . 61
卸下和安裝零件 . . . . . . . . . . . . . . . . . . . . . . . . . . . . . . . . . . . . 62
新增記憶體 . . . . . . . . . . . . . . . . . . . . . . . . . . . . . . . . . . . . . . . . 62
新增硬碟機或外部可抽換式磁碟機 . . . . . . . . . . . . . . . . . . . . . . 62
新增 PCI 擴充卡 . . . . . . . . . . . . . . . . . . . . . . . . . . . . . . . . . . . . 62
升級視訊卡 . . . . . . . . . . . . . . . . . . . . . . . . . . . . . . . . . . . . . . . . 63
升級處理器 . . . . . . . . . . . . . . . . . . . . . . . . . . . . . . . . . . . . . . . . 63
解決問題 . . . . . . . . . . . . . . . . . . . . . . . . . . . . . . . . . . . . . . . . . 63
何時使用 Dell 診斷程式 . . . . . . . . . . . . . . . . . . . . . . . . . . . . . . . 64
啟動 Dell 診斷程式 . . . . . . . . . . . . . . . . . . . . . . . . . . . . . . . . . . 65
訊息和代碼 . . . . . . . . . . . . . . . . . . . . . . . . . . . . . . . . . . . . . . . . 68
目錄
41
42
目錄
尋找資訊和援助
下表列出了 Dell 作為支援工具而提供的資源。您的電腦可能隨附了附加
資源。
要尋找的項目是?
•
•
•
•
電腦的診斷程式
電腦的驅動程式
使用者指南
裝置說明文件
請在這裡尋找
驅動程式和公用程式 CD ( 亦稱為 ResourceCD)
您可以使用此 CD 存取說明文件、重新安裝驅動程式或執行診斷
工具。
•
•
•
•
•
如何安裝電腦
如何維護電腦
故障排除資訊
如何打開主機蓋
如何找到其他說明文件
安裝和快速參考指南
安裝和快速參考指南
43
w w w. d e l l . c o m | s u p p o r t . a p . d e l l . c o m
要尋找的項目是?
請在這裡尋找
• 快速服務代碼和服務標籤
• Microsoft® Windows® 授權標籤
快速服務代碼和產品識別碼
這些標籤均位於您的電腦上。
• 如何重新安裝作業系統
作業系統 CD 和安裝指南
重新安裝作業系統後,請使用驅動程式和公用程式 CD 以重新安裝用
於電腦隨附裝置的驅動程式。
44
安裝和快速參考指南
要尋找的項目是?
•
•
•
•
如何卸下和裝回零件
技術規格
如何組態系統設定值
如何排除故障和解決問題
請在這裡尋找
使用者指南圖示 (Microsoft Windows 2000)
連按兩下桌面上的 User's Guides ( 使用者指南 ) 圖示。
Windows XP 說明及支援中心
1 依次按一下開始按鈕和說明及支援。
2 按一下 User's Guide。
• 主機板上的接頭位置
系統資訊標籤
或
此標籤位於主機蓋的內側。
•
•
•
•
最新的電腦驅動程式
技術服務和支援問題的解答
與其他使用者和技術支援進行線上討論
包含 Service Manual ( 維修手冊 ) 的電腦說
明文件
Dell 支援網站 — support.dell.com
Dell 支援網站將提供幾種線上工具,其中包括:
• Knowledge Base ( 知識庫 ) — 提示和線上課程
• Customer Forum ( 客戶論壇 ) — 與其他 Dell 客戶進行線上討論
• Upgrades ( 升級 ) — 元件的升級資訊,例如記憶體、硬碟機和作業
系統
• Customer Care ( 客戶關懷中心 ) — 聯絡資訊、訂單狀態、保固和
維修資訊
• Downloads ( 下載軟體 ) — 驅動程式、修補程式和軟體更新
• Reference ( 參考 ) — 電腦說明文件、產品規格及白皮書
安裝和快速參考指南
45
w w w. d e l l . c o m | s u p p o r t . a p . d e l l . c o m
要尋找的項目是?
•
•
•
•
•
•
服務呼叫狀態和支援歷程記錄
有關電腦的首要技術問題
常見問題
檔案下載
電腦組態的詳細資料
電腦的服務合約
請在這裡尋找
Dell Premier Support (Dell 優先支援 ) 網站 —
premiersupport.dell.com
Dell Premier Support 網站是專為公司、政府和教育機構的客戶量身
定做的。此網站可能不適用於所有地區。
• 保固資訊
系統資訊指南
• 如何使用 Windows XP
• 電腦和裝置的說明文件
Windows XP 說明及支援中心
1 依次按一下開始按鈕和說明及支援。
2 輸入描述問題的字句或短語,然後按一下箭頭圖示。
3 按一下描述問題的主題。
4 按照螢幕上顯示的說明進行。
註:若要獲得有關使用 Windows 2000 的說明,請依次按一下開始
按鈕和說明。
46
安裝和快速參考指南
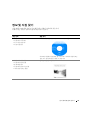
使用 Dell Precision™ ResourceCD
若要在 Microsoft® Windows® 作業系統中使用 Dell Precision
ResourceCD,請:
1
將 Dell Precision ResourceCD 插入光碟機。
如果您是第一次在此電腦上使用 Dell Precision ResourceCD,
ResourceCD Installation (ResourceCD 安裝 ) 視窗將會開啟,以通
知您 ResourceCD 即將開始安裝。
2
按一下 OK ( 確定 ) 以繼續進行操作。
若要完成安裝,請回應安裝程式所提供的提示。
3
在 Welcome Dell System Owner ( 歡迎 Dell 系統擁有者 ) 螢幕中,
按一下 Next ( 下一步 )。
4
選擇適當的 System Model ( 系統機型 )、Operating System ( 作業系統 )、
Device Type ( 裝置類型 ) 和 Topic ( 主題 )。
若 要 存 取 Dell Precision ResourceCD Guide (Dell Precision ResourceCD
指南 ),請在 Topic 下拉式功能表中按一下 User's Guides ,然後按一下
Dell Precision ResourceCD。
註:若要存取裝置驅動程式和使用者說明文件,您必須在 Windows 中使用
ResourceCD。若要使用 Dell 診斷程式,您必須將 ResourceCD 插入光碟機並
重新啟動電腦。若要獲得有關執行 Dell 診斷程式的資訊,請參閱第 64 頁的
「何時使用 Dell 診斷程式」。
安裝和快速參考指南
47
w w w. d e l l . c o m | s u p p o r t . a p . d e l l . c o m
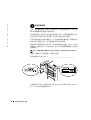
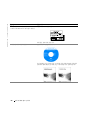
安裝您的電腦
下圖中的數字與安裝步驟中所述的工作相對應。
註:您必須完成以下所有步驟才能正確安裝電腦。
電腦配件
6
診斷指示燈
1
4
2
3
7
5
後視圖
48
安裝和快速參考指南
前視圖
( 蓋子已打開 )
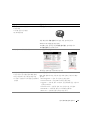
1
鍵盤和滑鼠
如下圖所示連接鍵盤和滑鼠。
註:如果您擁有 PS/2 鍵盤,請將其連接至 PS/2 鍵盤接頭。如果您擁有通
用序列匯流排 (USB) 鍵盤,請將其連接至 USB 接頭 ( 如下圖所示 )。請勿
將 USB 滑鼠或鍵盤連接至電腦正面的 USB 接頭。
註:請勿嘗試同時操作 PS/2 滑鼠和 USB 滑鼠。
PS/2 或 USB 鍵盤
PS/2 或 USB
滑鼠
安裝和快速參考指南
49
w w w. d e l l . c o m | s u p p o r t . a p . d e l l . c o m
2
網路卡和數據機
將網路纜線 ( 而非電話線 ) 插入網路接頭。
註:您的電腦配有內建網路卡。但是,如果您的電腦安裝了網路擴充卡,
請將網路纜線連接至網路卡,而不是電腦背面板上的接頭。
如果您擁有選購的數據機,請將電話線連接至數據機。
注意事項:切勿將數據機連接線連接至網路卡。電話通訊所產生的電壓可
能會損壞網路卡。
網路纜線
50
安裝和快速參考指南
數據機連接線
3
監視器
對齊並輕輕地插入監視器連接線以免弄彎接頭插腳,然後轉緊連接線接
頭上的指旋螺絲。
註:如果您只想將一台監視器連接至選購的雙監視器圖形卡,則必須使用
主連接埠。若要啟用雙監視器支援功能,兩台監視器均必須在電腦啟動時
連接至電腦。
若要安裝雙監視器,請參閱第 55 頁的 「雙監視器」。
主連接埠
選購的次連接埠
安裝和快速參考指南
51
w w w. d e l l . c o m | s u p p o r t . a p . d e l l . c o m
4
揚聲器
按照揚聲器隨附的指示將揚聲器連接至電腦。
註:您的電腦配有整合音效控制器。但是,如果您的電腦安裝了音效擴充
卡,請將外接式音效裝置連接至音效卡,而不是電腦背面板上的接頭。
52
安裝和快速參考指南
5
連接電源
將電腦和監視器的電源線插入電源插座。
6
開啟電源
按下電腦和監視器上的電源按鈕以開啟其電源。
安裝和快速參考指南
53
w w w. d e l l . c o m | s u p p o r t . a p . d e l l . c o m
7
安裝作業系統
您第一次啟動電腦時,螢幕上可能會出現一些系統啟動訊息,其中包括
顯示服務標籤和快速服務代碼的訊息。
您的電腦透過已安裝的作業系統預先組態。在第一次開啟電腦電源之前,
您必須完成之前的所有安裝步驟,並將所有裝置連接至電腦。
作業系統的起始安裝會自動進行,並可能需要幾分鐘時間。根據系統內
部和外接式裝置的不同,您可能需要更長的安裝時間。
請按照作業系統的提示完成安裝。系統可能會提示您輸入 Windows 產品
識別碼 ( 亦稱為 COA) 以完成註冊。您可以在電腦服務標籤的上部找到
此識別碼。
註:若要獲得更多有關安裝作業系統的資訊,請參閱作業系統安裝指南。
請在以下欄位寫下此識別碼,以備將來參考:
產品識別碼 (ID 或 COA):__________________________________
若要獲得更多資訊,請透過桌面上的 User's Guides 圖示或 Dell Precision
ResourceCD 存取電腦說明文件。
54
安裝和快速參考指南
雙監視器
將主監視器連接至主連接埠。請參閱第 56 頁的「常見問題」以獲得更多
資訊。
次連接埠
主連接埠
註:第二個監視器是選購的,並且需要多監視器圖形配接卡。
註:若要啟用雙監視器支援功能,兩台監視器均必須在電腦啟動時連接至
電腦。
安裝和快速參考指南
55
w w w. d e l l . c o m | s u p p o r t . a p . d e l l . c o m
常見問題
問題
請嘗試 ...
或嘗試使用 Dell Precision
ResourceCD
如何使用 Dell
Precision
ResourceCD?
請參閱第 47 頁的 「使用
Dell Precision™
ResourceCD」以獲得更多
資訊。
移至 Dell Precision
ResourceCD 中的主功能表。
在 Topic ( 主題 ) 下拉式功能
表中按一下 User's Guides,
然後按一下 Dell Precision
ResourceCD Guide。
或嘗試瀏覽 Dell 支援網站
可以從何處找到有關 根據作業系統的不同,連按 移至 Dell Precision
瀏覽 support.dell.com。
電腦的詳細使用者指 兩下桌面上的 User's Guides ResourceCD 中的主功能表。 在 Welcome ( 歡迎光臨 ) 網頁
南?
圖示,或按一下開始按鈕然 在 Topic 下拉式功能表中按 中,按一下 Dell Documents
一下 User's Guides,然後按 (Dell 文件 ),然後作出適合您
後選擇說明及支援。
您可以在硬碟機上找到說 一下適用於您電腦的使用者 電腦的選擇以存取使用者指南。
明文件,例如使用者指南。 指南。
可以從何處找到有關 根據作業系統的不同,連
電腦的保固聲明?
按兩下桌面上的 User's
Guides 圖示,或按一下開
始按鈕然後選擇說明及支
援。請參閱使用者指南中
的 「有限保固和退回規
定」章節。
可以從何處找到用於 請參閱本文件的第 54 頁。
作業系統註冊的產品
識別碼 ( 亦稱為真品
證書 [COA])?
瀏覽 support.dell.com。
移至 Dell Precision
ResourceCD 中的主功能表。 在 Welcome 網頁中,按一下
在 Topic 下拉式功能表中按 Dell Documents,然後作出適合
一下 User's Guides,接著按 您電腦的選擇以存取使用者指
一下適用於您電腦的使用者 南。請參閱使用者指南中的
指南,然後參閱 「有限保固 「有限保固和退回規定」。
和退回規定」。
瀏覽 support.dell.com。
在 Welcome ( 歡迎 ) 網頁中,按一
下 Ask Dudley! ( 詢問 Dudley!),
然後使用關鍵字產品識別碼進行
搜尋。
如何找到電腦的技術 根據作業系統的不同,連按 移至 Dell Precision
瀏覽 support.dell.com。
規格?
兩下桌面上的 User's Guides ResourceCD 中的主功能表。 在 Welcome 網頁中,按一下 Dell
圖示,或按一下開始按鈕然 在 Topic 下拉式功能表中按 Documents,然後作出適合您電
後選擇說明及支援。請參閱 一下 User's Guides,接著按一 腦的選擇以存取使用者指南。請
使用者指南中的 「技術規 下適用於您電腦的使用者指 參閱使用者指南中的 「技術規
格」章節。
南,然後參閱 「技術規格」。 格」。
56
安裝和快速參考指南
問題
請嘗試 ...
或嘗試使用 Dell Precision
ResourceCD
我的電腦配有可連接
雙監視器的圖形卡,
我如何安裝第二個監
視器?
取決於您的作業系統,連按
兩下桌面上的 User's Guides
圖示,或按一下開始按鈕,
選擇說明及支援,然後搜尋
雙監視器。安裝雙監視器的
逐步程序位於影像控制器的
使用者指南中。
移至 Dell Precision
瀏覽 http://support.dell.com。在
ResourceCD 中的主功能表。 Welcome 網頁中,按一下 Dell
在 Topic 下拉式功能表中按 Knowledge Base (Dell 知識庫 )
一下 User's Guides,然後按 然後使用關鍵字雙監視器進行搜
一下適用於您電腦的使用者 尋。
指南。
如果需要圖形卡、網
路卡、音效卡、小型
電腦系統介面 (SCSI)
軟體或其他裝置的驅
動程式,我可以在何
處找到它們?
請參閱第 47 頁的 「使用
Dell Precision™
ResourceCD」以獲得更多
資訊。
請參閱 Dell Precision
WorkStations ResourceCD
Guide (Dell Precision 工作站
ResourceCD 指南 ) 以獲得更
多資訊。
如何打開電腦?
您亦可能擁有裝置專用的
CD。如果是這樣,請搜尋
CD 的內容以找到說明文件
和適當的驅動程式。
或嘗試瀏覽 Dell 支援網站
瀏覽 support.dell.com 以獲得有
請參閱第 59 頁的 「打開主 移至 Dell Precision
機蓋」。
ResourceCD 中的主功能表。 關日常使用、安裝和故障排除指
在 Topic 下拉式功能表中按 示的說明。
一下 User's Guides,接著按
一下適用於您電腦的使用者
指南,然後參閱 「卸下和安
裝零件」。
監視器空白且電源指 電腦處於省電或「睡眠」狀 移至 Dell Precision
瀏覽 support.dell.com。
示燈呈綠色閃爍,我如 態。使用其中一種適當的方 ResourceCD 中的主功能表。 在 Welcome 網頁中,按一下 Dell
何使電腦恢復作業? 法 「喚醒」電腦。
在 Topic 下拉式功能表中按 Documents,然後作出適合您電
取決於您的作業系統,連按 一下 User's Guides,接著按一 腦的選擇以存取使用者指南。請
兩下桌面上的 User's Guides 下適用於您電腦的使用者指 參閱使用者指南中的 「電源管
圖示,或按一下開始按鈕然 南,然後參閱 「電源管理」。 理」。
後選擇說明及支援。請參閱
使用者指南中的 「電源管
理」。
如何在電腦上安裝附 請參閱第 61 頁的 「電腦內
加硬體?
部」中 所 述 的 內 部 服 務 標
籤。另請參閱第 62 頁的「卸
下和安裝零件」。
移至 Dell Precision
瀏覽 support.dell.com。
ResourceCD 中的主功能表。 在 Welcome 網頁中,按一下 Dell
在 Topic 下拉式功能表中按 Documents,然後作出適合您電
一下 User's Guides,接著按一 腦的選擇以存取使用者指南。請
下適用於您電腦的使用者指 參閱使用者指南中的 「卸下和安
南,然後參閱 「卸下和安裝 裝零件」。
零件」。
安裝和快速參考指南
57
w w w. d e l l . c o m | s u p p o r t . a p . d e l l . c o m
問題
請嘗試 ...
或嘗試使用 Dell Precision
ResourceCD
我安裝了 4 GB 系統記 取決於您的作業系統,連
憶體,為什麼某些記 按兩下桌面上的 User's
憶體似乎遺失了?
Guides 圖示,或按一下開
始按鈕然後選擇說明及支
援。請參閱使用者指南的
「卸下和安裝零件」章節中
的 「系統記憶體」。
或嘗試瀏覽 Dell 支援網站
移至 Dell Precision
瀏覽 support.dell.com。在
ResourceCD 中的主功能表。 Welcome 網頁中,按一下 Dell
在 Topic 下拉式功能表中按 Documents,然後作出適合您電
一下 User's Guides,接著按 腦的選擇以存取使用者指南。請
一下適用於您電腦的使用者 參閱使用者指南中的 「系統記
指南,然後參閱 「系統記憶 憶體」。
體」。
如何重新安裝作業系 請參閱作業系統安裝指南
統?
以獲得有關重新安裝作業
系統的資訊。
安全第一
進行電腦內部組裝時,切勿嘗試維修電腦,除非本指南和其他 Dell 說明
文件中另有說明。請務必嚴格遵循指示。
如果您遵循以下預防措施,進行電腦內部組裝將會很安全。
注意:為保證您的人身安全並保護設備
進行電腦內部組裝之前,請依序執行以下步驟:
1
關閉電腦和所有裝置的電源。
2
在觸摸電腦內部的任何元件之前,請先觸摸電腦上未上漆的金屬表
面 ( 例如電腦背面插槽開口周圍的金屬 )。
3
從電源插座上拔下電腦和裝置的電源線。這樣可減少人身受傷或觸
電的潛在危險。另外,請從電腦上拔下所有電話或電信通訊連線。
註:在中斷裝置與電腦的連接或從主機板上拆除元件之前,請確認主機板
上的備用電源指示燈已熄滅。請參閱位於主機蓋內側的內部服務標籤以瞭
解備用電源指示燈的位置。
當您工作時,應經常觸摸電腦上未上漆的金屬表面,以導去可能損
壞內部元件的靜電。
另外,Dell 建議您經常查閱電腦隨附的說明文件中的安全指示。
58
安裝和快速參考指南
打開主機蓋
如果要卸下或安裝零件、重設忘記的密碼或診斷電腦故障,您可能需要
打開主機蓋。
注意:在執行此程序之前,請參閱第 58 頁的「安全第一」。
打開主機蓋
1
關閉電腦和裝置的電源,然後從電源插座上拔下其電源線並等待 10
至 20 秒鐘。
2
如果您已在背面板的掛鎖扣環上安裝了掛鎖,請取下該鎖 (見下圖)。
3
將電腦向右側平放。
安裝和快速參考指南
59
w w w. d e l l . c o m | s u p p o r t . a p . d e l l . c o m
4
打開主機蓋:
a
將主機蓋釋放閂鎖向電腦頂部滑動 ( 見下圖 )。
b
提起主機蓋背面,將它朝電腦正面掀起。
主機蓋
釋放閂鎖
安全纜線孔
掛鎖扣環
60
安裝和快速參考指南
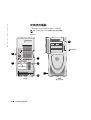
電腦內部
下圖所示為打開了主機蓋的電腦。
註:主機蓋內側所貼的服務標籤提供了有關進行電腦內部組裝的資訊。
內部服務標籤
磁碟機托架
硬碟機托架
外部可抽換式磁碟機托架
外殼侵入切換開關
AGP 卡
支架
前面板
連接線固定器
記憶體擴充豎板
固定托架
( 如有必要 )
揚聲器
擴充卡散熱風扇
微處理器通風罩
I/O 面板接頭
擴充卡插槽
電源供應器
主機板
交流電源插座
電源供應器通風口
安裝和快速參考指南
61
w w w. d e l l . c o m | s u p p o r t . a p . d e l l . c o m
卸下和安裝零件
有關卸下和安裝各種零件的說明位於硬碟機的使用者指南中。若要存取
此文件:
1
連按兩下桌面上的 User's Guides 圖示。
註:support.dell.com 上亦提供了使用者指南的可攜式文件格式 (PDF)
檔案。
2
按一下 System Information ( 系統資訊 )。
3
按一下 System Documentation ( 系統文件 )。
4
按一下 Dell Precision WorkStation 530 System User's Guide
(Dell Precision 工作站 530 系統使用者指南 )。
5
按一下卸下和安裝零件。
6
在您開始工作之前,請在檔案功能表中選擇列印以列印程序。
註:若要使用 Internet Explorer 瀏覽器列印整份使用者指南,請在列印視
窗中選擇列印所有連結的文件。
新增記憶體
請執行前面的步驟以存取使用者指南,然後參閱 「系統記憶體」。
新增硬碟機或外部可抽換式磁碟機
您的電腦配有一個或多個增強型整合套件 (EIDE) 磁碟機或 SCSI 磁碟
機。若要確定電腦配備的磁碟機類型,請參閱電腦隨附的訂購表格。
請執行前面的步驟以存取使用者指南,然後參閱 「磁碟機和媒體」。
新增 PCI 擴充卡
若要將週邊元件連接標準 (PCI) 擴充卡 ( 例如數據機 ) 新增至電腦,請執行
前面的步驟以存取使用者指南,然後參閱 「擴充卡」。
62
安裝和快速參考指南
升級視訊卡
若要升級圖形加速埠 (AGP) 卡,請參閱影像卡說明文件和任何其他特殊
說明。您的視訊卡升級套件隨附了視訊卡說明文件。您亦可在
support.dell.com 上找到有關視訊卡的線上說明文件。移至有關您電腦的網
頁並按一下 Dell Documents,然後按一下 Video Adapter (影像配接卡)。
在顯示的清單中選擇您的視訊卡。
若要獲得有關在電腦上安裝插卡的說明,請執行前面的步驟以存取使用者
指南,然後參閱 「擴充卡」。
升級處理器
請執行前面的步驟以存取使用者指南,然後參閱 「微處理器」。
解決問題
註:如果需要 Dell 支援的協助來解決電腦發生的問題,請在下面寫下您的
快速服務代碼和服務標籤,然後從您電腦的所在地與 Dell 公司聯絡。
快速服務代碼:___________________________
服務標籤:
__________________________
安裝和快速參考指南
63
w w w. d e l l . c o m | s u p p o r t . a p . d e l l . c o m
Dell 提供工具以協助您解決問題。本章節中列出的工具可以協助您在沒
有其他可用的線上工具時解決問題。您的電腦包含以下工具:
DELL 診斷程式 — Dell Precision ResourceCD 包含 Dell 診斷程式,該程式可
以測試電腦中的各種元件,並協助您識別電腦問題的原因。若要獲得更多資
訊,請參閱第 64 頁的 「何時使用 Dell 診斷程式」。
系統指示燈 — 這些指示燈位於電腦正面,可指示電腦問題。若要獲得更多資
訊,請參閱第 68 頁的 「系統指示燈」。
診斷指示燈 — 這些指示燈位於電腦正面,可指示電腦問題。若要獲得更多資
訊,請參閱第 69 頁的 「診斷指示燈」。
系統訊息 — 電腦將報告這些訊息以警告您目前或可能會發生的故障。若要獲
得更多資訊,請參閱第 74 頁的 「系統訊息」。
嗶聲代碼 — 電腦所發出的一系列嗶聲代碼可以協助您識別問題。若要獲得更
多資訊,請參閱第 74 頁的 「嗶聲代碼」。
何時使用 Dell 診斷程式
如果您在使用電腦時遇到問題,請與 Dell 聯絡尋求技術援助之前,先執行
使用者指南的 「尋找解決方案」中列出的檢查項目和 Dell 診斷程式。執行
Dell 診斷程式可協助您解決問題,而無需與 Dell 聯絡。如果您的確需要與
Dell 聯絡,測試結果可為 Dell 技術服務和支援人員提供重要的資訊。
Dell 診斷程式可讓您:
64
安裝和快速參考指南
•
對一個或所有裝置執行快速、全面或自訂測試
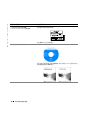
•
根據所遇問題的症狀選擇測試類型
•
選擇測試執行的次數
•
顯示測試結果
•
偵測到錯誤時暫停測試
•
存取有關測試與裝置的線上說明資訊
•
接收告訴您測試是否成功完成的狀態訊息
•
在偵測到問題時接收錯誤訊息
啟動 Dell 診斷程式
建議您在開始操作之前先列印這些程序。
注意事項:請只使用 Dell 診斷程式來測試您的 Dell™ 電腦。如果在其他電
腦上使用此程式,可能會導致出現錯誤訊息。
進入系統設定程式,查閱電腦的組態資訊,並確定要測試的裝置在系統
設定程式中顯示且處於現用狀態。
從硬碟機或驅動程式和公用程式 CD ( 亦稱為 ResourceCD) 啟動 Dell 診
斷程式。
從硬碟機啟動 Dell 診斷程式
1
關機並重新啟動電腦。
2
在螢幕上出現 DELL 標誌時立即按下 <F12>。
如果您等待太久且螢幕上出現 Windows 標誌,請繼續等待,直至您
看到 Windows 桌面,然後透過開始功能表關機並再試一次。
3
在啟動裝置清單出現時,反白顯示 Boot to Utility Partition (啟動至
公用程式分割區),然後按下 <Enter>。
4
在 Dell Diagnostics Main Menu (Dell 診斷程式主功能表 ) 出現時,選
擇要執行的測試。
註:如果收到一則說明未
找到診斷公用程式分割
區的訊息,請按照說明以
從驅動程式和公用程式
CD 執行 Dell 診斷程式。
從驅動程式和公用程式 CD 啟動 Dell 診斷程式
1
將驅動程式和公用程式 CD 插入光碟機。
2
關機並重新啟動電腦。
在螢幕上出現 DELL 標誌時立即按下 <F12>。
如果您等待太久且螢幕上出現 Windows 標誌,請繼續等待,直至您
看到 Windows 桌面,然後透過開始功能表關機並再試一次。
3
在啟動裝置清單出現時,反白顯示 IDE CD-ROM Device
(IDE CD-ROM 裝置 ),然後按下 <Enter>。
4
在 CD 啟動功能表中選擇 IDE CD-ROM Device 選項。
5
在出現的功能表中選擇 Boot from CD-ROM ( 從 CD-ROM 啟動 )
選項。
6
鍵入 1 可啟動 ResourceCD 功能表。
註:此功能僅會變更啟動
順 序 一 次。在 下 次 啟 動
時,電腦將根據系統設定
程式中指定的裝置啟動。
安裝和快速參考指南
65
w w w. d e l l . c o m | s u p p o r t . a p . d e l l . c o m
7
鍵入 2 可啟動 Dell 診斷程式。
8
從編號清單中選擇 Run the 32 Bit Dell Diagnostics ( 執行 32 位元 Dell
診斷程式 )。如果列出了多個版本,請選擇適合您平台的版本。
9
在 Dell Diagnostics Main Menu 出現時,選擇要執行的測試。
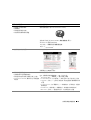
Dell 診斷程式主功能表
1
在 Dell 診斷程式載入且 Main Menu ( 主功能表 ) 螢幕出現後,按一
下代表所需選項的按鈕。
註:您電腦的服務標籤
將位於每個測試螢幕的頂
部。
2
選項
功能
Express
Test
( 快速測試 )
快速測試裝置。本測試通常需要 10 至 20 分鐘,且無需
使用者作出回應。請先執行 Express Test 以便能快速地找
到問題。
Extended
Test
( 全面測試 )
全面檢查裝置。本測試通常需要一小時或更長時間,且
需要您不時地回答問題。
Custom
Test
( 自訂測試 )
測試特定裝置。您可以自訂要執行的測試。
Symptom
Tree
( 症狀樹 )
列出所遇到的常見症狀,讓您根據自己的問題症狀選擇
測試類型。
如果在測試時遇到問題,則會出現顯示錯誤代碼和問題說明的訊息。
請記下錯誤代碼和問題說明,然後按照螢幕上的說明進行。
如果您無法更正錯誤,請與 Dell 公司聯絡。
3
66
安裝和快速參考指南
如果您是使用 Custom Test 或 Symptom Tree 選項執行測試,請按一
下下表所述的適當標籤以獲得更多資訊。
標籤
功能
Results (結果)
顯示測試結果和遇到的所有錯誤狀況。
Errors ( 錯誤 )
顯示遇到的錯誤狀況、錯誤代碼和問題說明。
Help ( 說明 )
對測試進行說明,同時還可能會指明測試執行要求。
標籤
功能
Configuration
( 組態 )
顯示所選裝置的硬體組態。
Parameters
( 參數 )
Dell 診斷程式會從系統設定程式、記憶體和各種內部
測試中獲取所有裝置的組態資訊,並將其顯示在螢幕
左窗格的裝置清單中。裝置清單可能不會顯示電腦中
安裝的所有元件或連接至電腦的所有裝置之名稱。
可讓您透過變更測試設定值來自訂測試。
4
測試完成後,如果您是透過 驅動程式和公用程式 CD 執行 Dell 診斷
程式,請取出 CD。
5
關閉測試螢幕以回到 Main Menu 螢幕。若要結束 Dell 診斷程式並
重新啟動電腦,請關閉 Main Menu 螢幕。
變更啟動順序
註:若要獲得更多資訊,請參閱使用者指南。
1
開啟電腦電源 ( 如果您的電腦已經開啟,請將其重新啟動 )。
2
在螢幕右上角出現 F2 = Setup 時按下 <F2>。
螢幕上將會出現系統設定程式功能表。
註:如果您等待太久且作業系統開始載入到記憶體中,請讓電腦完成
載入作業,然後重新啟動電腦並再試一次。
3
使用方向鍵反白顯示 Boot Sequence ( 啟動順序 ) 功能表選項,然後
按下 <Enter> 以存取快顯式功能表。
註:請記下您目前的啟動順序,以防在執行 Dell 診斷程式之後要恢復
此順序。
4
使用方向鍵反白顯示 Boot First Device ( 啟動第一個裝置 ) : 功能表
選項中的 CD Device (CD 裝置 ),然後按下 <+> 以將其移至清單
的頂部。
5
按下 <Alt><b> 以重新啟動電腦。
安裝和快速參考指南
67
w w w. d e l l . c o m | s u p p o r t . a p . d e l l . c o m
訊息和代碼
應用程式、作業系統和電腦均可識別問題並向您發出警報。在問題發生
時,監視器螢幕上可能會出現一則訊息,系統也可能會發出嗶聲代碼或
產生指示燈代碼。以下章節為您提供有關訊息、嗶聲代碼和指示燈代碼
的資訊。
系統指示燈
您的電腦配有多個指示燈,可協助您分析和解決問題。若要瞭解這些指
示燈的位置,請參閱第 48 頁的 「電腦配件」。
下表列出了系統指示燈的代碼、可能的原因和建議採取的更正措施。
註:對於許多系統指示燈代碼,檢查診斷指示燈有助於您識別特定的問題。
請參閱第 69 頁的 「診斷指示燈」。
系統指示燈代碼
電源指示燈
硬碟機指示燈
原因
更正措施
呈綠色持續亮起
呈綠色閃爍
不適用
電源已開啟且電腦正常操作。
無需採取任何更正措施。
空白
電腦 處於暫 停狀 態 (Windows 2000 使用其中一種適當的方法「喚醒」電
和 Windows XP)。
腦。請參閱使用者指南中的「電源管
理」。
呈綠色閃爍幾 次, 不適用
然後熄滅
存在組態錯誤。
呈黃色持續亮起
Dell 診斷程式正在執行測試,或者主 如果 Dell 診斷程式正在執行測試,請
機板上的裝置可能發生故障或未正 讓測試完成。
確安裝。
檢查診斷指示燈以確定是否能識別
特定的問題。另請參閱使用者指南中
的 「主機板問題」。
不適用
檢查診斷指示燈以確定是否能識別
特定的問題。
如果電腦無法啟動,請與 Dell 公司
聯絡以尋求技術援助。
呈黃色閃爍
空白
電源供應器或主機板發生故障。
檢查診斷指示燈以確定是否能識別
特定的問題。另請參閱使用者指南中
的 「電源問題」和 「主機板問題」。
呈黃色閃爍
呈綠色持續亮起
主機板發生故障。
檢查診斷指示燈以確定是否能識別
特定的問題。另請參閱使用者指南中
的 「主機板問題」。
68
安裝和快速參考指南
系統指示燈代碼 ( 續 )
原因
更正措施
在 POST 期間呈綠 不適用
色持續亮起且發出
嗶聲代碼
電源指示燈
硬碟機指示燈
電腦在 BIOS 執行時偵測到問題。
請參閱第 74 頁的 「嗶聲代碼」以獲
得有關對嗶聲代碼進行診斷的說明。
另外,請檢查診斷指示燈以確定是否
能識別特定的問題。
在 POST 期間,電源 不適用
指示燈呈綠色持續
亮起,未發出嗶聲代
碼且無影像顯示
監視器或圖形卡可能發生故障或未 檢查診斷指示燈以確定是否能識別
正確安裝。
特定的問題。另請參閱使用者指南中
的 「視訊問題」。
在 POST 期間,電 不適用
源指示燈呈綠色持
續亮起,未發出嗶
聲代碼但電腦鎖定
內建的主機板裝置可能發生故障。
檢查診斷指示燈以確定是否能識別
特定的問題。如果無法識別問題,請
與 Dell 公司聯絡以尋求技術援助。
診斷指示燈
開啟電腦電源時,電腦會執行一系列的自我診斷測試。開機自我測試
(POST) 成功結束時,系統會發出一聲嗶聲,表示開始正常作業。如果電
腦無法完成 POST,電腦上的一系列指示燈可協助您瞭解是哪個測試失敗
或電腦停止回應的原因。這些指示燈僅可指示在 POST 之前和 POST 期間
( 而非正常作業期間 ) 遇到的問題。若要瞭解診斷指示燈的位置,請參閱
第 48 頁的 「電腦配件」。
下表列出了診斷指示燈的代碼、可能的原因以及建議採取的更正措施。
這些指示燈均已作上標記,以協助您找到電腦上與下表所示樣式相符的
指示燈樣式。
安裝和快速參考指南
69
w w w. d e l l . c o m | s u p p o r t . a p . d e l l . c o m
POST 之前的診斷指示燈代碼
下表列出了在電腦開始 POST 之前出現的診斷指示燈代碼。
POST 之前的診斷指示燈代碼
指示燈樣式
原因
動作
電腦電源未接通。
將電腦連接至其電源插座。確定前面板電源指示燈已亮
起。如果電源指示燈熄滅,請確定電腦已連接至可用的電
源插座,然後按下電源按鈕。
A B C D
A B C D
如果問題仍未解決,請與 Dell 公司聯絡以尋求技術援助。
正常的關閉狀況。電腦已連接至其電 確定前面板電源指示燈已亮起。如果電源指示燈熄滅,請
源插座。
確定電腦已連接至工作正常的電源插座,然後按下電源按
鈕。
在電腦正常作業時,只要它仍保持與電源插座的連接,即
可自動或遠端啟動電腦。若要獲得更多資訊,請參閱使用
者指南中的 「電源管理」。
如果問題仍未解決,請與 Dell 公司聯絡以尋求技術援助。
電腦處於省電或 「睡眠」狀態。
使用其中一種適當的方法 「喚醒」電腦。請參閱使用者
指南中的 「電源管理」。
如果問題仍未解決,請與 Dell 公司聯絡以尋求技術援助。
A B C D
BIOS 無法執行。
請參閱使用者指南中的 「重設損壞的 BIOS 設定值」。
A B C D
電源供應器或電源線可能發生故障。 請參閱使用者指南中的 「電源問題」。
A B C D
主機板可能發生故障。
請與 Dell 公司聯絡以尋求技術援助。
微處理器和/或電壓調節器模組
(VRM) 不相符。
請參閱使用者指南中的 「微處理器問題」。
A B C D
A B C D
= 黃色
= 綠色
= 熄滅
70
安裝和快速參考指南
POST 之前的診斷指示燈代碼 ( 續 )
指示燈樣式
原因
動作
VRM 0 可能發生故障。
請參閱使用者指南中的 「微處理器問題」。
VRM 1 可能發生故障。
請參閱使用者指南中的 「微處理器問題」。
VRM 0 和 VRM 1 可能發生故障。
請參閱使用者指南中的 「微處理器問題」。
記憶體擴充豎板 A 可能發生故障。
請參閱使用者指南中的 「系統記憶體問題」。
記憶體擴充豎板 B 可能發生故障。
請參閱使用者指南中的 「系統記憶體問題」。
記憶體擴充豎板 A 和擴充豎板 B
可能發生故障。
請參閱使用者指南中的 「系統記憶體問題」。
A B C D
A B C D
A B C D
A B C D
A B C D
A B C D
= 黃色
= 綠色
= 熄滅
安裝和快速參考指南
71
w w w. d e l l . c o m | s u p p o r t . a p . d e l l . c o m
POST 期間的診斷指示燈代碼
下表列出了在電腦執行 POST 時出現的診斷指示燈代碼。
註:如果已開啟電腦電源,但四個診斷指示燈均未亮起,請參閱第 70 頁的
「POST 之前的診斷指示燈代碼」。
POST 期間的診斷指示燈代碼
指示燈樣式
A B C D
原因
動作
BIOS 可能發生故障,並且電腦處於恢復模式。 執行 BIOS 恢復公用程式,然後重新啟動電腦
以重新測試。請參閱使用者指南中的 「BIOS
恢復公用程式」。
如果問題仍未解決,請參閱使用者指南中的
「重設損壞的 BIOS 設定值」。
微處理器可能發生故障。
請參閱使用者指南中的 「微處理器問題」。
記憶體可能發生故障。
請參閱使用者指南中的 「系統記憶體問題」。
擴充卡可能發生故障或衝突。
請參閱使用者指南中的「擴充卡問題」和「硬
體衝突」。
視訊卡可能發生故障。
重新插接視訊卡,然後重新啟動電腦以重新測
試。若要獲得有關卸下和安裝擴充卡的說明,
請參閱使用者指南中的 「移除擴充卡」。
A B C D
A B C D
A B C D
A B C D
如果問題未解決,請參閱使用者指南中的「擴
充卡問題」。
如果問題仍未解決,請與 Dell 公司聯絡以尋
求技術援助。
磁碟機或硬碟機可能發生故障。
A B C D
= 黃色
= 綠色
= 熄滅
72
安裝和快速參考指南
請參閱使用者指南中的「磁碟機問題」和「硬
碟機問題」。
POST 期間的診斷指示燈代碼 ( 續 )
指示燈樣式
原因
動作
USB 可能發生故障。
中斷所有 USB 裝置的連接並拔下其連接線,
重新啟動電腦以重新測試,然後重新連接所有
USB 裝置及其連接線,並重新啟動電腦以重新
測試。
A B C D
如果問題仍未解決,請與 Dell 公司聯絡以尋
求技術援助。
主機板資源和 / 或硬體可能發生故障。
請參閱使用者指南中的 「主機板問題」和
「硬體衝突」。
主機板資源和 / 或硬體可能發生故障。
請參閱使用者指南中的 「主機板問題」和
「硬體衝突」。
擴充卡可能發生故障或衝突。
請參閱使用者指南中的 「主機板問題」和
「硬體衝突」。
主機板資源和 / 或硬體可能發生故障。
請參閱使用者指南中的 「主機板問題」和
「硬體衝突」。
完成 POST 後處於正常作業狀態。
無需採取任何措施。
A B C D
A B C D
A B C D
A B C D
A B C D
= 黃色
= 綠色
= 熄滅
安裝和快速參考指南
73
w w w. d e l l . c o m | s u p p o r t . a p . d e l l . c o m
系統訊息
如果在啟動期間發生錯誤,監視器上可能會顯示識別該問題的訊息。如
果螢幕上顯示系統訊息,請在使用者指南的「系統訊息」中找尋該訊息,
以獲得有關解決任何問題的建議。系統訊息按照字母順序排列。
註:如果您收到的系統訊息未在使用者指南中列出,請查閱出現該訊息時
正在執行的應用程式之說明文件和 / 或作業系統說明文件,以獲得有關該訊
息的說明和建議採取的措施。
嗶聲代碼
如果在啟動期間發生的錯誤無法顯示在監視器上,則電腦可能會發出一系
列識別問題的嗶聲。嗶聲代碼是指一種聲音的模式:例如,先發出一聲嗶
聲,接著發出第二聲嗶聲,然後發出急促的三聲嗶聲 ( 代碼為 1-1-3),這
表示電腦無法讀取非揮發性隨機存取記憶體 (NVRAM) 中的資料。
如果電腦發出嗶聲代碼,請記下該代碼,然後在使用者指南的 「系統嗶
聲代碼」中查找該代碼。
74
安裝和快速參考指南
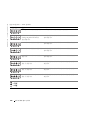
!"#$%&'()*+
,-.%/012324+567
!"#$%&'()
&'*
+
,-&'*
!"./0#'1234567897:&'2&;<#$=
>?@
)A#BCD(?EFGH
,-&'I&'!"J
CDKLMNOP
!"#$% :;< &' ()*
+,'-.&/!"#+,01 !"#234
=>?@ !"#5 678$% A<BCD E%F#@&GHIJDKE%FCD LMNCD OPQNRST% UVWRST% *'9: XYUSZ[@ XYUSZ[\ A[3]^ 89
89
!"
%
;<=>?@8A<BCD
#$%&'()&*+,-
./
!"
$%EFGH+5I
01./
234567
89"./
:;<"./
,_]`abcdeW
%
=>?@AB?@C
JKILMN;'6O
D@EF
EFGH+,-
IJK3
./
PQR'$%+5I
IJK3-LM-NBOP1Q
RST3UVHW"-LXLY
,_]`abcdeW
%
Z[\1B]K./
.$SIT=U !"
:^_
L@`6$a./
2345./
bcdeHfg)hFijXLY
!"#$CVWX#
kijM-N
)ijXLY
ijXLY
L@`7lmno
YMZ[=\
#
EFG89pqH+,-
rs
%%]=^ &&!%%'
:^?@BtuvNHwMxy
tuH"-N
G|}?@3U
,-
-z{R:^tu|}~
?@SVl k67|}
-z
|}~
1IJK3RG$a
67(E
672C7167
(
3[_
,_]`abcdeW
%
?@dCBtu %%_8`a]=^ &'&&!%%'
HwMr:^¡¢
1©tu"/}KUU:0B]ª0«
:0l$HW¬2)f3[)®¯+,-
"°t H*"±+,-
{3:£"¤2!"#$
¥¦-I
l$a§Z¨
l?@
767
YMZ$SI
%&./
!"#$CVWX#
B
kijM-N
)ijXLY
234"²2)³´M-Ndµ¶fg)
ijXLY
23"¨·)ijXLY
deH²;¸t¹)º»XLY
!"fg0hij+6kYbYClm
nCVW+lmo[Q
,_]`abcdeW
#$%&
'
()*+
',-./0123
'4()56
789:
;<='2>
?&)@2AB
CD*+
'EF123
<=GHIJKJL2MNO<='PQ123
(
R+'EF123
AS
T @UV
123
W
<XY'Z*+ [#L\
!"
#'UV?
$
'EF123
M_E%p],-WfqVr6k!
efWstXYUSZ+6k
E%Ffuvw[\stXYUSZ
(xfg0yV0ez%3{XYUSZ[@|
bco[Q
,_]`abcdeW
(
H]2^_`<=aC<X?>bAS"
}~,_6k<Yst
!"#cH
XY
[
k
,_]`abcdeW
k
#h >2$
H]cdeZ,f6g'hi123
%&"#%'&"$%&"f
o[Q(%)#(*%)$f
S%(%)fo[Q(%)r#
kf(%)f3o[Q
%&"r(%)r[f\[3o[Q
%&"#(%)
%&"#(%)
r
,_]`abcdeW
jklmnopRUq:jklmrs@hi123
feM D3
LMNDf,_ f% +
k¡¢ff3jnNfo[Q
tuvw56tu@pRUhi123
<£% + f3o[Q¤@
¥¦1f D!"§
% )
,_]`abcdeW
<£% noxyz{trs@|}g~/0123
HrsnoJ('|123
:;<N¨©%<>ª
st:;<3«6k[\¦¬<D
<¬f t
t<=
t'|123
ª
cª¨©
,_]`abcdeW
gn
^-gn'hi123
feMQPQ®/DS/¯f
QPQLMND,_ fGMQPQM_
k¡¢f3jn°Nfo[Q
,_]`abcdeW
t'pk0123
tpa'p@123
,_]`abcdeW
!
4'2>L2;JKJ;
L2gHg,;2
^#$%;<=4'
!p J¡<=aC-t¢£='hiA¤
"
#$%¥!<=¦0
§¨©ª«
2g¬<=^&T£=-<=2®¯°«±
²
#$%JKJ2-<ª@PQ123³e
³´µ¶7JK·56¸{cª@PQ123
_`gH2
°±²,_yV0e°±²,_deWbc
o[Q
J¹|º²{»¼_`'!µ123
³e´
Z½?&)¾¿R+
»@EFÀJ
<XÁ½gO|123
,_]`abcdeW
"#
!Ât'ÃÄkhi123½?&) Ã
!ÅÆ!"@|123
cª
ª
c<¨©³,_6k´µ<S¶·
ND t
:;<3«6k[\¦¬<D<¬
f t
,_]`abcdeW
*'
9:de
&
{§MG()¾tl
"¼¬ ¿&
*
4½²'
À)
XLY
l
"ÃH
²'
%%$ =.
%%=^=.
&
l
:ÁXLY
Â-IÁH
ij
ijXLY
IJK3Hºbcde
Hfg)
hFijIJk
ij
)
ÅÆXLY
&
l
:ÁXLY
Â-IÁH
ij4È
l
RG2" ijXLY
HÇ£
+,-
XLY
¾tH
ijXLY
4ÈH
ÅÆXLY
IJK3Hºbcde &
l XLY
l7
67"ÃH²' Hfg) :ÁXLY ¾tH
hFijIJk Â-IÁH
ijXLY4È
ij
) ij4Èl H
ÅÆXLY ijM-N ¿3 ÅÆXLYH
H ¿3M7BÉÊ M7BÉÊ6ËÀ) ¿3M7BÉÊ6ËÀ)
XLY
6ËÀ¨·)XLY XLY
IJK3ÌÍL
ÎM3[Ï"
ÃH²'
!3[+!"
,"-
"./0$
H12¾t
XLY
l:^
_67"ÃH
²'
IJK3Hºbcde
Hfg)
hFijIJk
ij
)
ÅÆXLY
H ¿:^_À¨·)
XLY
,_]`abcdeW
XLY
¾tH
ijProduct
KeyÐÏÑÒÓXLY
&
l
:ÁXLY
Â-IÁH
ij4È
l
ijM-N ¿:^_À)
XLY
XLY
¾tH
ijXLY4È
H
ÅÆXLY
H ¿:^_À)
XLY
*'
9:de
%%$ =.
%%=^=.
ÔÕ,:Ö
×ØÙ"
+,-7,
Úe¼¬
4½²'
IJK3Hºbcde
Hfg)
hFijIJk
ij
)
ÅÆÔÕ,
ÒÓXLY ?ÃY
ÛÜ
H"ÔÕ,
"
6ÝÞ
£+,-
&
l
:ÁXLY
Â-IÁH
ij4È
l
ijXLY
).2
XLY¾tH
!"#$ijM
-Ndual monitorÐÏÑ
ÒÓXLY
×ØÙH
{§MG()¾tl {§MG
&
43
ßWG
¿&
*
àÑáÙI À)
Ù33+!3
XLY
XLY
3/
HW"Þ#
+$ 3UVâã#+,-
!":;ÎM
RGâãH"
"ÃH
·ÍHR4È
$*²'
ÒÓ47XLY
¼¬
ä²'
15¾tl ¿89 &
l ¦åæ}/2345
ä:ÀXLY
:ÁXLY t¹G
H4È
Â-IÁH
#çè)XLY
ij4Èl
ijM-N ¿Z
[\1BÀX
LY
,Hféê#
²;²tëìu
¶LÌíÓ
îï³,-l
'ð)ñk¬Úe
¼¬4½²'
"òì!"6óô6
C³,-æòM./)
6 96
XLY
&
l
:ÁXLY
Â-IÁH
ij4Èl
ijM-N
¿ì
IJK3Hºbcde
u01ÀXLY
Hfg)
hFijIJk
ij
)
ÅÆXLY
H ¿ìu01À
XLY
XLY
¾tH
ijXLY4È
H
ÅÆXLY
H ¿ìu01À
XLY
,_]`abcdeW
(
*'
9:de
%%$ =.
%%=^=.
Hk
17¾tl ¿ZÀ &
l
" HMZ?@
:ÁXLY
./Géõ³,ö' EF)XLY
Â-IÁH
!M1(¾tl¿Z[\1 ij4È
BÀXLY l
ijM-N ¿Z[\1B
ÀXLY
XLY
¾tH
ijXLY4È
H
ÅÆXLY
H ¿Z[\1BÀ
XLY
&
l
:ÁXLY
Â-IÁH
ij4È
l
ijM-N ¿L@`
1ÀXLY
XLY
¾tH
ijXLY4È
H
ÅÆXLY
H ¿L@`1À
XLY
89lL@`1
÷+,-ìK
1ø¦Z"ù
¶L£të²'
IJK3Hºbcde
Hfg)
hFijIJk
ij
)
ÅÆXLY
H ¿Z[\1BÀ
¨·f×H" ¿L@`
1ÀXLY
IJK3
Úe¼¬4½
²'
IJK3 "
{§MGIJK3
pXLY
&>b2Â<XT<XÇ?È
ÈÉf123Ê,2<X&)Ë123
Ìp@Ͳ+&>b@Ìp²Îº²
3f+,g%hijkB*
,_]`abcdeW
&'>b!paC'ÏвÎ123
t¢£=p@Ñ123
&'Ò!pÓ+Ô,ÕÖµ
d
×zØD+@Ò123
(
£='pk©9123HÙ+ÚJ
Ûp(:;Ü@ÝÞ²´?pRUcßàU
©9123
fWM_¸B¹¯[rºfW»¼H½+¹@
f[rº«g@[%¾¿3LÀo[Q=>
eHfeHWOrT% fW«g@[)_bc
o[Q
>b¦Ì×zØD+@Ã!á0
Òâ&
³@Ú2㲪p!'À123
´? <XÌp@ª!á0äå
Èæ
!"
³@©9ÀJ<=º´çè`'é<ªÀJ
Æ'êaºëì'8¤º56;
=lmn0 ,io= p+,'-.&/!"
#+,01qrGH0sYt
$%&
£=p@Ñ:pk©9?Ó#$ #¥
ª!9123
Ó+íîïØ:9ðñ'<=?56ðñ'À
123H]|
(
'3ò0óô123
,_]`abcdeW
ëì'O123
ëì©9¼='õò0123H]|
ëìö'÷øù ò0úô123
=>
¸B¶_
% nÃÄ
yÁÂnB
)
,_]`abcdeW
#$
H]ëì;8*'JKû
WOrT% =>dÅfÆ .eH\R+
x$Ç0D
eHWOrT% PrÉE%FF¶Ê
E%FF¶Ê
GHIJDKE%FF¶Ê
Ö[׳r)_
,-N
ØÂ
k¡¢
% Ù×g
A<BE%Ð
nF¶Ê
#Ç0$
rÕ
%UVW
@ÑÒÓ
&+¡¢
LMNÃÄ
LMN
ÍÎÏ
«ÈM_
[rº
,«ËÌ
«ÈM_@Ô@»
,_]`abcdeW
$%&'
ü?³@©9:<=,,-.ý£^
W()<XY'|123<XÁ½g*+
¾¿R+
»@°sEF123
u.$SIv#0
fW.#/
.$ÚÛÜ
%@EF123
(
@EF123
$
&
'()
!"
#'EF123
$'EF123
)
>b@2>!pL\'UVOASþÿ'
å123
01FEÐݲÞ,-WßÀà
6kfwáfWxyz*Ir{|fwâão[Q
'()*
paC÷@²ÎOW()<XYÁ½g? 2g¬
Lt9'|123
+,-./012345*6,-.)*
ìÚ%%%&'(
'
)%
,-.´**,-.;<=,-.
'äå*+ ^ÃÆ'|123
paC÷@²ÎOW()<XYÁ½g? gm
,-.T%'|123
789)*
tucd
+&
',+
ä£
Ô,';*+W()<XYÁ½gO ä£Ô,'
|123
,_]`abcdeW
:;<9=>?-
-
'-
'+&
'bH,*+3Ô,<X
T!K&)@|1233Ô,<X3
Ô,bH,ekÄ**
3Ô,Ð?¡-å<X'@²AS
;
'EF?+
,'EF
1232^{3Ô,'UV123
Ô,'<=W()<XYÁ½gO
ä£Ô,'|123
@ABC=>?-
W()<XYÁ½gO fmG½'|123
()
3«%Ç01Däå0æ¶fçÈWOr
^]WOrèSvsé3ê31o[Q
g,
gH
,_]`abcdeW
ÆAi2
)?
'"¡-å
'()º
²56Â<X
'()O@0123
Âcd
;Ä
}~_&
H"
S£+,-
)l$a
Ò*úûM23ü}*+,-{§MG
:22¾tl ¿
L:ÀXLY
YMZY¶LÌGìeH23úû÷N)
ßÚý,-{§MG:28¾tl ¿L@`¶LÌÀXLY
}~Y¶LÌGìeH23úû÷N)
ßÚý,-{§MG:2;¾tl ¿¶LÌÀXLY
YMZYþIJúûÖa)â4"
Lt¶Lÿ,-{§MG:::¾tl ¿L@`LtÀ
XLY
kBN;H1"¦«lâNA"23ü}"
#ç,-{§MG:::¾tl ¿âNAÀXLY
DE@A>FG
Æ;56!@Æ!pW()
<XY w!(@²Î:êa
GHI@Î123êaGHI@Î+Æ
z»();àDÆ'Aiº²Æº
56²Î?(icgT¹?ªZ;
êaGHI0>b@²Îº²
,_]`abcdeW
.
ì´t¢£=ÐAËp%´()ª(²Î
.
ÆÚ-(UV
.
(βUV
.
(ic2
.
32(¹
.
(T£='<X¡-åqªZÁ½g
.
(;á0PQ*ÃÚL2²à
.
Æ;Û±563L2²à
DE@A>FGH
>b@2>!pÂ<=cª@åÈæ
XYUSZë¦o[Q
afW%USZ+kQìA[3D¯&íh
*/,*+GHI@ÎO
ªZ'é?
(º£=;*/,*+GHI2: R
äå123
,,-.´,-!T
"9#
-:
êaGHI@Î123
'Q:é2>123
:;JKJ+$20! 1'%Ë123
2®¥c:;JKJ+¾¿R+
2±&!9123H
L\'()O
'Q?22123
(
'£={2+-
!
$@UV:
0%
1'%Ë123
êaGHI!ÂL\;JKJ+κ('UV
123
2'îBµ
Úµ©+ï+ð
A[3D¯&¯k
E%p]'îBµ
fWXYUSZ
+(xÝ3[+
ño[Q
,-!T
"9#',-./0123
'Q:é2>123
:;JKJ+$20! 1'%Ë123
,_]`abcdeW
2®¥c:;JKJ+¾¿R+
2±&!9123H
L\'()O
'Q?22123
%@K+k
HòóWD0ôõ
.%
f
Hòk%'%
USZf3öM_
óWgHò÷
(
'£={2+
.
/
'UV:
0%
1'%Ë123
2'L\
.
/
vw@UV123
JKJL\-
%
/vw@UV123
)
1@µ¶O
L\'Î123
2'µ¶OêaGHI@Î123
_`;ª^{
0
(1
-
'UV
123{O!p56()()*+
!p@UV123
êaGHI!ÂL\;JKJ+κ('UV
123
WOr
èSÎë¤k
"Yf[÷
,_]`abcdeW
êaGHI,:
R+JKJ+
vwa'EF123
<=
>
»¬Òÿ,-Ò"¦åæ:2\
H?2\£{9³tëf#,-
23ÖMs¬kæÚe<=>
%&XLY
<=
>
ìKæÒÿ,-Ò"¦åæ
:L£{"6:æ¤2H
x4½ÿ,-
>
=6Òÿ,-%&*Ò{t6*
+,-
3/
>
¦åæúû")²ä23lH
ºÒÅÆ*+,-
(¹Æ;+3,Æ<X 2^
L2;JK,3,Æ<X@!{A-:R+
2(@Ë123
3Ú'Aiº²56Æ123
(
(´
vw('κ56
<Xá);Ü?.@EFO;ªZ'
0123
Ò5
BúVYC¶Lÿ,-
<
úVYCYAB23)¶Lÿ,-
@
ÒÒ%&HÎM$¨)
¶L*+,-
ÅÆMHwM$a)²;,-
G3/3
1
B
ZÒ4$a67
delqH"·ÍH¶Lÿ,-
·ÍH"HV°$a²
HV°¶L£t"ë+,-
&
Ò6)yâ{Òt6*
+,-
(;PQ+,-!T
"9#êaGHI@
Î:56'/&123
(R+@0:
R+012123êa
GHI@Q:'é2>*+
R+@
00123
,_]`abcdeW
(
yV0eÞ,-Wßbco[Q
'123;â0+é2>123
R+63Úa
4F2 = SetupJKJ+0! 1'
%Ë123
L\;JK,
[ø%ù °±²DA<Bk[rº%ú
§¦û3@üv[rº+w[\n[[ho[Q
(
R5e'()O-
2L\vw@UV?
0%
1'6bL\Á½g123
XYUSZ(x
HòóW«¶gý»f
gOÝþwHòóW@ÿs¬o[Q
R5e'()O#%
&L\&'ª?
031'{Þ407!123
01041''é2>123
'GIJ
M)GHI#$%T?Æ'ÛO*B
Æ;+L2;tR+JK,´5:,;
89ÀJ2¸,;9þL25:,
T2¸,Ð?&)@<X"
!"#
ÂÆ©4TAi2
)?2¸2¸
õ=56
|'|123
2g¬2¸,åTáþ?Ai|=;
gH¸[rº[^fgsWXY[+LÀk
ç1¦'3z%3 {XY[|+bc
o[Q
,_]`abcdeW
YMZYN;
,Y
íÓ
0;;<=
Y
AB"
íÓîÄ
éÓ
íÓîÄ1- AB"
AB"
Ó
f
9:H%
ìu6æ
'ðÿ,-
45*α+,-
¦LøtC³,!
?222
%&$
æòM./)
6 96XLYH
¿ìu01ÀXLY
$aY+,-
¶LÌ)¢Ò=ÞM
23"tü}XLY
HÒ%&
øIJL@`7lH
5SIJ3w£
të+,-
%&ø}
âãÒXLY
¶LÌ)¢Ò=ÞM
23"tü}XLY!M
H¿L@`7
23ÀXLY
Z£tëeH
2l:^tu)XLY
ÓîïÄ
éÓ
ìuU>!"L@`7
Yúû÷+,-
¶LÌ)¢Ò=ÞM
23"tü}XLY
H ¿ìu23À
B ¿L@`723À
XLY
ÓîïÄ
íÓ
L@`7Yúû÷+,-
¶LÌ)¢Ò=ÞM
23"tü}XLY!M
H¿L@`7
23ÀXLY
+,3%&#ø23ú
£+,-
:::¾tl ¿âNAÀH
âNAHwM)
XLY!M¶LÌ)
¢Ò=ÞM23"t
ü}XLY
&,3>#øíÓ AB"
tâNúû
&,3>#øíÓ
ìu¶LÌ
tâNG
úûtë
de7t
ëN
AB"
,!"×ØÙH5S ¶LÌ)¢Ò=ÞM
IJb»¬£të+,- 23"tü}XLY!M
l ¿?ÃY23À
XLY
,_]`abcdeW
YMZYN;#$
,Y
&,3>#øíÓ
ìu¶LÌ
tâNG
úûtët
L@` !
0;;<=
Y
AB"
f
9:H%
"L@`7H5S ¶LÌ)¢Ò=ÞM
"ê+,-
23"tü}XLY23
#Þ£tëeH2l
:^tu)XLY
"#
'+Þ:;êa(;Î*7PQ2
5:?_89+2g¬ªÚá02>;@"
*7'PQ<?56Þ:2¸@
ßAí?(´MNzå@=>º²
?2¸ÞÊ>¦¹JKJz0§*7
pJ*7¦ÌÒ?Æ'2ABêa2¸
õ=56
|'|123
êa2¸,åTÌAi|=;
2¸s2»¼J
?2¸í@@Ð|A
)"
)
,_]`abcdeW
}~YN;$*+,,
;*7'2>!pêa2¸
,'J8"
}~YN;$*+,,
Y
A B C D
f
H%
HìuU>£të+,- ìugDH5XLYìe$
¶LÌ"tü}XLYìu¶LÌ
e'ð£"ìugDH5
£"tü}ìuk%»XLY
ì&2345£tëGâãH2l
:^tu)XLY
A B C D
6æC³,-
ìugDH5£
+,-
ìe$¶LÌ"tü}XLYìu
¶LÌe'ð£"ìugDH
5£"tü}ìuk%»XLY
b»¬'ð"âãìugDH5
£e{ð!"u'L'*+,-
{§MGH ¿ìu01À
XLY
ì&2345£tëGâãH2l
:^tu)XLY
"òì!"6óô6
C³,-
æòM./)6 96XLY
H ¿ìu01ÀXLY
ì&2345£tëGâãH2l
:^tu)XLY
A B C D
+,3'ðtë+,-
H ¿(V+,36
XLY
6À)
ìuU>!"ìuAH
Y)+,-
H ¿ìu01ÀXLY
A B C D
A B C D
= = = ,_]`abcdeW
}~YN;$*+,,#$
Y
f
H%
L@`7Y¦+,-
H2l:^tu)XLY
)á§BB!"C !C
$
ʦÿ,-
H ¿)á§23À
XLY
A B C D
A B C D
C 2HY)+,- H ¿)á§23À
XLY
A B C D
C :HY)+,- H ¿)á§23À
XLY
A B C D
C 2BC :HY) H ¿)á§23À
+,-
XLY
A B C D
1Ç7"HY
)+,-
H ¿L@`123À
XLY
1Ç7HY
)+,-
H ¿L@`123À
XLY
A B C D
A B C D
1Ç7"BHY H ¿L@`123À
)+,-
XLY
A B C D
= = = ,_]`abcdeW
}~YN;$*+,+
;*7'²Î¦Ìêa2¸
,'J8"
D¿3 >XY[%<¬¾¿
4z%3 {XY[^+%5|bco[Q
}~YN;$*+,+
Y
A B C D
f
H%
+,3HYIJ*$H +,3 D//%&
+,-
L'-LÒXLY
H ¿+,3*$OP1QÀ
XLY
ì&2345£tëGâã
H ¿(V+,36 6À)
XLY
)á§Y¦+,-
H ¿)á§
23ÀXLY
1Y¦+,-
H ¿L@`1
23ÀXLY
A B C D
A B C D
üÙHYIJ+,úûMê H ¿üÙ23ÀB
¦+,-
¿+,À)XLY
A B C D
= = = ,_]`abcdeW
}~YN;$*+,+#$
Y
f
H%
?ÃYÙY¦+,-
?ÃYÙ-LM-N
L'-LÒXLYüÙ
\1-L"t¹G
H ¿üÙ\1ÀXLY
A B C D
2345£tëGâã
H ¿üÙ23ÀXLY
ì&2345£tëGâãH
2l:^tu)XLY
Ã@-!"H
Y)+,-
H ¿Ã@-
23ÀB ¿23À
XLY
3Y¦+,-
°3R.F)\1M-N
L'-LÒXLY
°3R.F)-L5M-N
L'-LÒXLY
A B C D
A B C D
ì&2345£tëGâãH
2l:^tu)XLY
L@`7{uBB!"Y¦ H ¿L@`723À
+,-
B ¿+,À)XLY
A B C D
L@`7{uBB!"Y¦ H ¿L@`723À
+,-
B ¿+,À)XLY
A B C D
üÙHYIJ+,úûMê H ¿L@`723À
¦+,-
B ¿+,À)XLY
A B C D
L@`7{uBY¦
+,-
A B C D
= = = ,_]`abcdeW
H ¿L@`723À
B ¿+,À)XLY
}~YN;$*+,+#$
Y
f
H%
&,3>/H6'ðC³,-
*α+,-
A B C D
= = = !$
'2¦¦Ì3;+tÆ'Bº²
L2;22g¬L2;JKJ+W()<XY
2g¬L2ÆAi
Ì@|1232g¬L2
=CÏ
¯&[rºA[3DÞ,-Wß8ÿfðkA[3D
¯&[f(xnUSZ,-W]&#°±²
,-WfWséA[3fg0,-c_+bco[Q
%&'
2¦2t2º²3;+5:
,'8*Æ'*B5:í@?'÷+
?_5:89:-_D5:8ùhD0½_
5:89+,2289:9:'',2
,
/AK'E@²È@"
5:+!{A-;W()<XY 2g¬5:
,0123
,_]`abcdeW
,_]`abcdeW